1
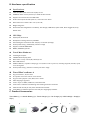
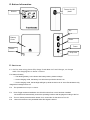
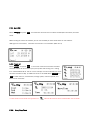
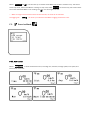
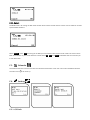
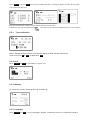
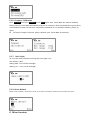
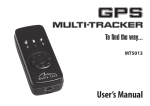
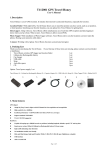
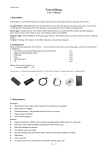
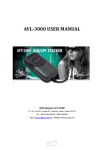
Travel Mate User Manual
Thank you for purchasing Bluetooth GPS Receiver and we wish you have the best
consumer product experience ever.
Product Introduction
Travel Mate is your ultimate travel buddy! This revolutionary powerful non-mapping navigator provides
you the ability to find, to record, to mark your favorite locations and your unforgettable travel memories!
With its new Sports mode function you’d be able to achieve your exercise targets, by viewing your current
speed, work-out distance and time.
If you are a very organized person with plans to achieve and places to go, put them in your to do list! With
alarm buzzer to remind you its time to go, you’d never be running out of time to finish your sight-seen trip!
A. Description of main function
1. Location Finder:
Build-in E-compass to guide you to reach the position you have saved
such as car position, or hotel position. Also you can save your POI into
Travel Mate via the software. Plus switch to local language through
software to make your traveling freely and easily。
2. Data Logger:
Just bring Travel Mate with you,it offer simultaneous use of real-time
GPS reception and data logging to know where you have been. Besides
data logging,it allow users to mark POI and show the while journey
track and information。
3. Photo Tagger:
Install the Travel Mate management software,showing you the tracks and locations that you
have taken. Sharing your memories with others! Also, you can keep memory on your business
trip and travel through track asset and editing your own photos and videos. Plus, you can also
share your point of interests with all internet users via this software.
4. Sport mode:
Travel Mate let you be able to set the time you want to exercise and the
distance for jogging、walking and biking. Travel Mate will also alarm you once
you reach your goal;This capability can become the dashboard of your
bike!
5. TM secretary:
Through our Travel Mate software to edit every important schedule
and stuffs as well as provide a friendly alarm to notice you. Plus it can
offer you no mapping navigation!
6. GPS Receiver:
Connect to your laptop,Travel Mate is going to become your best partner to navigate your way。
B. Hardware specification
z
Specifications:
z
TTFF Cold/Warm/Hot start time 29/25/<1 sec.
z
16M Bites flash memory stores up to 150K of data records
z
Support G-mouse function via USB cable
z
Power consumption: Stand by 25 hrs , continuous use 15hrs
z
Dimension: 80.0 x 44.5 x 23.5 mm (L x W x H)
z
Weight: 25 grams
z
Accessories: Re-chargeable Li-ion Battery, Car Charger, USB cable, Quick Guide, Photo Tagger CD, strap,
Rubber Pad
z
GPS Chip:
z
z
z
z
z
z
Skytraq V6, 65 Channel
Exceptional tracking sensitivity -160dBm
Outstanding fast connection TTFF -29/25/>1 seconds (average)
Smart power saving / 25 Standby, 15 hours usage
Support standard NMEA0183
WAAS / EGNOS supported
z
Travel Mate Hardware:
z
z
z
z
z
z
Including E-compass
128x64 Mono Display panel
Dimension: 70.0(L) X 40.0 (W) X 22.0 (H) mm
Mini USB Interface
16M bits Memory. Capable of keeping up to 150,000 records or positions, including longitude, latitude, speed,
UTC and tag data
Smart power saving / 25 hours stand by, 15 hours usage
z
Travel Mate’s software:
z
z
z
z
z
z
z
z
Support Windows, XP, and Vista.
Free update newest the software of travel mate.
Support Video playback (AVI, MP4) on the Tracks
Multi-languages supported
Able to export to KMZ, NMEA183, and GPX format
Travel mate’s software have Sharing and reaching the POI in the world.
Calendar will remind you the preset schedule with buzzer.
Travel Mate’s hardware show the local and your language by software.
C. Product Accessories
Travel Mate (1) + 1100mAh Battery (2) + Travel Charger (3) + Car Charger (4)+ USB Cable(5) + Strap(6) +
CD(7)
1.
2.
3.
4.
5
6.
7.
D. Button Information
Screen
Power On/Off
/back
Up
Battery
Cover
Enter
Down
Buzzer
Drop hole
E. Start to use
E-1. For first time using, please fully charge Travel Mate via Travel Charger, car charger, or USB
cable. The charging time is about 3.5 hours.
E-2. Status of battery
---- The flashing battery icon indicates low battery status, please recharge.
---- Under charging mode, the battery icon will show up while the device is on.
---- Under charging mode, the backlight will light up while the device is off. Once Travel Mate is fully
charged the backlight will be off.
E-3. The operation time is up to 17 hours.
E-4. Photo Tagger software installation: the CD will be Auto Run once it has been installed.
*the software will automatically choose the operating interface and language according to the PC.
E-5. Turn on: Please press the switch bottom for 3~5 seconds. Do the same to Turn off.
E-6.
Most of functions are only workable while GPS signal is locked.
F. Instruction
Introduction of Main Page
Icon
Indication
Location Finder
To indicate the directions
Data Logger
Track logging function
Exercise Mode
Set target to do exercise
Point of Interest of Location Finder
Preload or save the destinations
Calendar
Schedule reminder
Setting
Setting
Explanation of Icons
No GPS signal
F-1
Signal is locked
Location Finder
Battery status
Tracking now
Start to navigate
Schedule Reminder
F-1-1.
Mark Location
The GPS signal must be locked; otherwise this function is not workable. (Refer to F-6)
Select Mark Location and press Enter to save current position. Once it has been successfully save, the data, time
and coordinate will be shown up.
F-1-2.
Location Finder
Select Finder and press Enter , flag icon
will show up and Travel Mate will start to direct the last position you
have saved.
Press up or down to know the speed and date.
While you are within 15 meters to the destination, the
will show up. Meanwhile, the distance and speed will stop
showing.
F-1-3.
E-Compass
Select Compass
and press Enter , the E-Compass will show up to indicate you the North direction.
To keep E-Compass accurate, please calibrate your Travel Mate occasionally. (Refer to F-6-6
Compass Calibration)
F-2.
Data Logger
F-2-1. Mark POI
Select Mark POI and press Enter , the coordinate will be shown to indicate the POI (Point of Interest) has been
saved.
While reading the tracks via software, you can see the POIs you have saved before on the software.
GPS signal must be locked; Otherwise this function is not workable. (Refer to F-6)
F-2-2. Track List
Select Track list and press Enter to list all the tracks that have been recorded.
The track names will be shown as year/month/date and starting time - ending
time. Take 2008-09-02 07:06~07:11 for example, the name indicates this track
has been recorded on Sep. 2, 2008 from 07:07 to 07:11AM. Press up ,down and
Enter to check the time, total distance, average speed, maximum speed, and
total time of movement.
* Tracks under exercise mode: the sportsman icon
F-2-3.
Start/Stop Track
indicates the track has been recorded under exercise mode
Select Start track the
icon will show up to indicate Travel Mate has started to record the trip. The screen
shows stop track, while Travel Mate is tracking. To stop track, select Stop track On the contrary, the screen shows
start track while Travel Mate is not tracking. The
icon will be gone as well.
* While set target under exercise mode has been started, the track will be recorded.
The logging icon
F-3.
will show up to indicate Travel Mate is logging the exercise track.
Exercise Mode
F-3-1. View current
Select View current to know the exercise status, including time, distance, average speed, max speed, and
total time of movement.
F-3-2.
Set Target
Select Set Target to set the time you like to do exercise by pressing up or down bottom.
Select _Time and press up or down bottom to set the time you like to do exercise.
00:00, 24-hour clock
---- 0 0:00 --- -the number can be 1 or 2.(press enter to set next number)
---- 0 0 :00 --- the number can be 0~4, the unit is hour. (Press enter to set
next number)
---- 00: 0 0 --- the number can be 0 ~ 5. (Press enter to set next number)
---- 00:0 0 --- the number can be 0~9, the unit is minute. (Press enter to
set next digit)
Select _Distance and press up or down bottom to set the distance you like
to do exercise, walking ,jogging, or riding bicycle
---- 0 00‧0 --- the number can be 0 ~ 9. (Press enter to set next number)
---- 0 0 0‧0 --- the number can be 0 ~ 9. (Press enter to set next number)
---- 00 0‧0 --- the number can be 0 ~ 9. The unit is km. (Press enter to set
next number)
---- 000‧0 --- the number can be 0~9. The unit is 100 meters.
After completely setting, press enter to view current mode, and press enter again to record the track. And then,
the screen will show exercise status, including time, distance, average speed, max speed, and total time of
movement.
* While meeting your target; music will be playing.
F-3-3. Time Counter
Select _Time Counter
to start time counter function
Press Enter will start to count.
Press Enter again, it will stop.
Press up or down bottom, it will reset to zero.
F-4.
Point Of Interest
F-4-1. Default
The Default file is for saving the POI under location finder mode. The file and the content can be edited or created
by Travel Mate software.
Select default press Enter for listing all the POIs you have saved under location finder mode. The names of the
POIs will be shown as year-month-date-the number. Press up, down and Enter ,Travel Mate will start to direct you
to the destination.
F-5.
Calendar
The calendar function must be used with the software. Please refer to the user manual of Travel Mate software.
The alarm icon
F-6.
will show up.
Setting
F-6-1. GPS Info
Select GPS Info and press Enter to know current GPS information, including Longitude, Latitude, Altitude, Date,
Time, Course and CN value.
Each bar indicates each satellite and the number indicates the CN value.
At least four bars and the satellite icon
must show up; otherwise the LF&DL functions are not workable.
F-6-2. Time calibration
GPS: it indicates Greenwich Time. Once the GPS signal is locked, the time will show up.
Local Time: Press up or down to adjust time, Enter
F-6-3. Unit
Press up,down and Enter to select Metric or English unit.
F-6-4. Memory
To check the memory status of POI Log or Data Log,
F-6-5. Language
Press up, down and Enter to select languages, English, Traditional Chinese, or Simplified Chinese
F-6-6. Compass Calibration
Press up, down and select compass, press Enter again, then Travel Mate will start to calibrate.
Please put your Travel Mate horizontally and turn it clockwise. After completed those procedures,
Travel Mate will show if it has been successfully calibrated. If it is failed to calibrate, please try
again.
z
To keep E-Compass accurate, please calibrate your Travel Mate occasionally.
F-6-7. Back Light
(0~255) the value indicates how long the back light is on.
The default is 005.
Setting 000 - Turn off the backlight.
Setting 255 – Turn on the backlight.
F-6-8. Reset Default
Before reset to default, remember to back up the data in the device. Otherwise all the data will be lost.
G. Other function
G-1. GPS Receiver (G-mouse) function
Connected with laptop by USB cable, Travel Mate can be a GPS Receiver to make your laptop be a navigator.
Please install the navigation software in advance. (We don’t provide the mapping software)
H. Travel Mate Software
H-1. Install Travel Mate software and enter the series number
Insert the CD; the software will be automatically installed. After the software is completely installed,
enter the series number which is on one the pack of CD.
* The software supports Windows, XP, and Vista. The language of the software will be depended on the
computer system.
H-2. While pre-loaded the LF-POI which you want to navigator to, Travel Mate will
show ”updating*****”. Restart Travel Mate after updating is completed.
* The default file will be cancelled, once the LF-POI has been loaded.
H-2. For more detail please read the user manual of Travel Mate software which can be found in
<help> of user manual.
I. Q&A
I-1. Why the Location Finder or Data Logger function is not working?
A: Travel Mate can work outdoors only. And please make sure if the GPS signal is locked.
(Refer to the F-6-1for more detail about GPS signal)
I-2. Why couldn’t I record the POI?
A: Please make sure if the GPS signal is locked. While GPS signal is locked, the satellite icon
will be shown on the top of screen. (refer to G-2)
I-3. Can data logger function and the exercise mode work at the same time?
A: No. When set target under exercise mode has been started, the track will be started to
record again; even if the data logger function was recording. (Refer to F-2-2 Track
List-tracks under exercise mode)