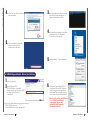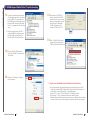
1
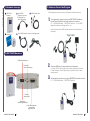
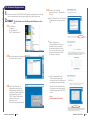
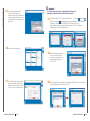
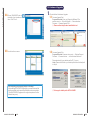
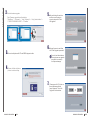
http://www.icm.com.tw
USER M A NUAL
Version:20121219
1.Hardware Coverage
1
2.OBD TRACE Hardware
1
3.Hardware Connection Diagram
2
4.PC Requirements
3
5.PC Settings
3
6.USB Hi-Speed Cable Driver Installation
5
7.USB Hi-Speed Cable Driver Troubleshooting
7
8.USB Hi-Speed Cable Driver Removal
9
9.Software Installation
9
10.Software Removal
10
11.Administration Program
12
12.Software Registration
15
13.Hardware Upgrade
20
14.Warranty Policy
24
w w w. i c m . c o m . t w
1 OBD TRACE
3 USB Hi-Speed Cable
2 16-pin OBDII
Diagnostic Connector
*Please find it from
WIN-STAR Package.
Hardware
w w w. i c m . c o m . t w
3. Hardware Connection Diagram
1.Hardware Coverage
Before diagnosis, please connect your Diagnostic Interface as below.
1.
To configure data, please connect your OBD TRACE interface as
below:The red light will be on when interface is connected.
PC → USB Hi Speed cable → OBD TRACE interface → 16-pin OBDII
diagnostic connector and trigger cable → car
Note: Must remove the USB Hi Speed cable after configuring data is
completed.
4 Software CD
5 16-pin OBDII diagnostic connector and trigger cable
2.OBD TRACE Hardware
USB Hi Speed cable port
Green light:
communication light
2.
3.
Check the OBD trace is connected when recording data
a. Turn the IG ON .The red light will be on when interface is connected.
b. Start the engine. The red light and green light will be both on when
recording data.
To Analyze data, please connect your OBD TRACE interface as below:
PC → USB Hi Speed cable → OBD TRACE interface
Red light:
wake up light
Black button:
firmware upgrade button
16-pin OBDII diagnostic
connector and
trigger cable Port
DIAGNOSIS REVOLUTION
1
DIAGNOSIS REVOLUTION
2
w w w. i c m . c o m . t w
Operation
system
WINDOWS 2000, XP, Vista (32 bit),
WINDOWS 7 (32 bit) is required.
CPU
CPU 1.6 Ghz or higher
RAM
WINDOWS 200 0 / XP: 512 MB; WINDOWS 7 / Vista: 2G
Hard
Disk Space
Free space more than 1GB (on C driver)
Display
Resolution 1024*768
2.
w w w. i c m . c o m . t w
4.PC Requir ements
Click on “Change User Account
Control settings”.
Please use USB Hi-Speed Cable to connect
your PC with WIN-STAR PLUS Multiplexer
(Ref. 2.Hardware Coverage 3 ) to connect your
PC with WIN-STAR PLUS Multiplexer
N otes
When you use Windows Vista or Windows 7, first you
need to close “User Account Control (UAC)”, please
refer to P.3 No.5.PC Settings.
5. PC Settings
3.
Move the slider to the “Never notify position”.
When you use Windows 7, please finish the setting below to run our
software successfully.
First, you need to disable “User Account Control (UAC)” before installing our
software.
1.
To use the control panel to disable UAC in Windows 7, there are several
methods to access the User Account Control settings page:
Do one of the following:
Go to Start Menu
→ Control Panel →
User Accounts and Family Safety → User Account.
Go to Start Menu
→ Control Panel →
In the search box, type UAC.
DIAGNOSIS REVOLUTION
3
DIAGNOSIS REVOLUTION
4
w w w. i c m . c o m . t w
Click “Yes” and “OK” to make the
change effective.
3.
It will automatically install the program.
After the DOS frame disappears, it
means the installation is done.
4.
5.
w w w. i c m . c o m . t w
4.
To confirm the installation is complete,
please right click “My computer”→
“Properties” on the desktop.
You are required to restart the
computer to turn off User
access control effectively.
5.
Click “Hardware”→“Device Manager”
6. USB Hi-Speed Ca ble Driver Installation
1.
2.
Start the computer
Insert Software CD in
to CD-ROM drive. Installation
window should pop up. Choose “USB
Hi-Speed Driver ” and click
“Installation”
※If you can't see the window pop up, please execute
“OBD_TRACE_setup.exe”
from CD-ROM drive to install the program.
DIAGNOSIS REVOLUTION
5
6.
Then click “Ports (COM & LPT)” to
unfold items. When USB Hi-Speed
Cable is plugged in and pulled out,
USB Serial Port will appear variably,
which means it can collocate with PC.
Note: In order to find out USB Serial
Port, USB Hi-Speed Cable is
requested to connect with
WIN-STAR PLUS Diagnostic
Interface and PC first.
DIAGNOSIS REVOLUTION
6
w w w. i c m . c o m . t w
7-1. If there is a bluetooth device within
your computer and it uses one of the
ports (COM&LPT), please check if
the COM number of bluetooth is less
than the COM number of USB Serial
Port. If so, please take the following
steps.
w w w. i c m . c o m . t w
7. USB Hi-Speed Ca ble Driver Tr oubleshooting
7-4. Use the menu of COM Port
Number and find out a COM
number which is not in use and
make sure the number must be
less than the COM number
(COM6) of bluetooth. For
example: COM4 Click “OK”
※ As seen on the picture, the COM
number(COM6) of bluetooth is less
than the COM number(COM7) of
Prolific USB-to-Serial Comm Port.
7-5. Then, “Prolific USB-to-Serial
Comm Port” is changed from
COM7 to COM4 as in the picture.
7-2. Choose “Prolific USB-to-Serial
Comm Port (COM7)”, and then click
“Properties”
7-3. Choose “Port Settings”, and then
click “Advanced”
※ Unable to use the USB Hi-Speed Cable Driver after installation
. If you have already followed the steps above to install the driver, it still
might not work with USB Hi-Speed Cable. Please click “My Computer” on
the desktop→choose“Properties”→“ Device Manager ”.
. Then click “+” sign of “Ports (COM & LPT)” to display all items.
. If it displays “ ! ” sign, it means the cable can’t work correctly.
. Please disconnect the cable and remove the driver (Please follow the steps
below to remove it), reboot the computer, and then install the driver again.
DIAGNOSIS REVOLUTION
7
DIAGNOSIS REVOLUTION
8
w w w. i c m . c o m . t w
※ Please enter Device Manager to
find its COM port, and choose
“uninstall” to remove the driver.
10. Software Removal
1.
w w w. i c m . c o m . t w
8. USB Hi-Speed Ca ble Driver Removal
Click “Start Menu” → “Programs”
→ “Control Panel”
9. Software Installation
1.
2.
2.
Click “Add or Remove Programs”
Start the computer
Insert Diagnostic Software CD to CD-ROM drive. Installation window
should pop up. Please follow the sequences to install the required
programs.
3.
When the list is shown, Look for
“OBDII_ TRACE_TLS” and click
”Change/Remove”
If you can’t see the window pop up, please execute
“OBD_TRACE_setup.exe” from CD-ROM drive to install
DIAGNOSIS REVOLUTION
9
DIAGNOSIS REVOLUTION
10
4.
When a window pops up and
says “Uninstalling
OBDII_TRACE_TLS”, please
click ”Next”
.
.
5.
Please connect your Diagnostic Interface with your PC and the car, and make
sure that the power supply light of the interface is on.
To start the software from ”Start
Menu”→
”All Programs”→
”Auto_Diagnosis”→
”Auto_Administration”
Waiting for few seconds.
Mark Explanation
6.
CFM (Confirm)
If the program has disappeared,
please check “Add or Remove
Programs” in the “Control
Panel” again. If the program
disappeared, it means the
software was removed.
DIAGNOSIS REVOLUTION
11
1.
Back
Language Change
Forward/Enter
Information: To list the
detail of your interface
Exit
Diagnosing
Diagnosis
1
Please follow the sequence on
this screenshot to click for
diagnosis access.
2
DIAGNOSIS REVOLUTION
12
w w w. i c m . c o m . t w
w w w. i c m . c o m . t w
11. Administration Program
w w w. i c m . c o m . t w
5.
Plug Position
Software Learning Class Shortcut
Other Programs – Shortcut (Firmware and Feedback included)
Firmware To make this shortcut valid, please confirm that you have finished its
installation from its diagnostic software CD.
Direct the plug position as in the
picture.
3.
w w w. i c m . c o m . t w
2.
6.
Software Registration
To reactivate your license of
diagnostic software, for example:
change a new PC or laptop.
4.
Document - Shortcut
For Example:
User Manual: Choose “User
Manual” and click
.
DIAGNOSIS REVOLUTION
13
7.
Form Title Setting
This function allows you to
customize your company info on
the printed report of short test.
DIAGNOSIS REVOLUTION
14
w w w. i c m . c o m . t w
1.
The first time to use the Diagnostic Software on this
2. Status I : PC.
Please connect your WIN-STAR PLUS Diagnostic Interface with your PC and
the car, and make sure that the power supply light of the interface is on.
w w w. i c m . c o m . t w
12. Softwar e Re gistr ation
2-4. Please visit our website
.
(www.icm.com.tw)→”Registration ”→
”English”
Step 1: Please fill in your Product Key
(16 alphanumeric codes) and click
”OK”.
2-1. ”Start Menu”→
”Programs”→
”Auto_Diagnosis”→
”AUTO_Administration”.
.
2-2.Choose the diagnostic software of
Step 2. Registration
It is required that you fill in your
information when you ask for
the activation code for the first
time. You only have to do it once
unless your interface serial No.
(10 codes) is changed.
the vehicle make you need.
.
2-3. The Product Key with 16
alphanumeric codes will be
displayed automatically (as in
the picture). Please write down
this Product Key and click
“NEXT” button. Please get its
activation code from
www.icm.com.tw.
Note: All letters must be capital.
DIAGNOSIS REVOLUTION
15
Step 3. Registration Finish
This screen will display your
Activation Code, the software you
purchased, and important notes.
Please fill in this activation code
(28 alphanumeric codes) back to
software window and click ”NEXT”
button.
Note:
All letters must be capital.
DIAGNOSIS REVOLUTION
16
w w w. i c m . c o m . t w
correct, it will display the
software version and valid date of
software update. Meanwhile, you
are allowed to use the diagnostic
functions.
3. Status II:
w w w. i c m . c o m . t w
2-5. When the activation code is
To reactivate your license of diagnostic software; for
example: annual software subscription renewal.
3-1. Please follow No.2-1 of “Software Registration” ->.Choose ”
” and click
When you execute
, the Renewal Key window will pop up-> To Select the
Software -> Please input “5577691” and new Product Key (16
alphanumeric codes) will appear. Please follow No. 2-3 of “ Software
Registration” to finish the registration.
2-6.You will see the car menu.
3-2. When the activation code is
correct, it will display the
software version and valid
date of software update.
Click ”EXIT”.
2-7. Click “Info” button on your upper
right side, and the detail of your
interface will also be listed. Click
”Close” to return to the car menu.
DIAGNOSIS REVOLUTION
17
3-3. It will display that the registration is completed. Meanwhile, you are allowed
to use the diagnostic functions. Click ”OK”.
DIAGNOSIS REVOLUTION
18
w w w. i c m . c o m . t w
3-4. Choose “DIAGNOSIS” and click
,
the detail of your interface will be
listed. Click ”Close”.
3-5. You will see the car menu.
1.
w w w. i c m . c o m . t w
13. Hardware Upgrade
Pre-installation for Hardware Upgrade
1-1. Firmware Upgrade ToolProgram Download: From your Diagnostic Software CD or
www.icm.com.tw → Technical Support → Choose interface →
Firmware → Firmware Upgrade Tool
※ Please confirm that you have installed this tool.
1-2.
Firmware Upgrade File Program Download: From www.icm.com.tw → Technical Support
Firmware → Firmware Version → to find the latest file format
Please download it to your desktop as like PD_Vx.x.exe.
Unzip: Please click this file on your desktop and follow its default path
to unzip it
After replacing your computer (Laptop or Desktop):
After installing WIN-STAR PLUS program, you need to connect the
interface and the car to request the activation code one more time.
(The WIN-STAR PLUS program in the original computer will not be
activated any more.)
DIAGNOSIS REVOLUTION
19
※ To change its default path is NOT ALLOWED.
DIAGNOSIS REVOLUTION
20
w w w. i c m . c o m . t w
To start hardware upgrade
5.
Start Firmware upgrade from the desktop
”Start Menu” → ”Programs” → ”Auto_Diagnosis” → “Auto_Administration” →
“OTHER PROGRAM IN NEED” → “Firmware”
6.
3.
w w w. i c m . c o m . t w
2.
After confirming the serial no.
and the current version is
correct, please click “Start
HW upgrade”.
Choose the version, and then
click ”Start Upgrade procedure”.
Connect multiplexer with PC and OBDII diagnosis cable.
Do not close the window or
interrupt power on upgrade
procedure to avoid any
multiplexer damage.
4.
Please click the multiplexer
picture to start next step.
7.
DIAGNOSIS REVOLUTION
21
Please press the “U” button on
the multiplexer and black
keep it pressed. Then click
“Upgrade” on the window.
DIAGNOSIS REVOLUTION
22
w w w. i c m . c o m . t w
14. War r anty Policy
When the Upgrade window pops
up, please release the black
button and wait for few minutes.
1.
Warranty Introduction
The term "Product" shall mean OBD TRACE.
I. C. M. Inc. warrants and tests the Product to be free from defects in material
and workmanship and to conform to published specifications. During the
warranty period, should the Product fail under normal use in the
recommended environment due to improper workmanship or materials,
I. C. M. Inc. will repair the Product or replace it with a comparable one.
I. C. M. Inc. will inspect the Product and make a decision regarding repair or
replacement.
9.
I. C. M. Inc. reserves the right to provide a functional equivalent or
refurbished replacement Product.
Click “OK” to complete
upgrade.
2.
Duration of Warranty
One-Year Warranty:
The Product is covered by this warranty for a period of one year from the date
of original purchase.
I. C. M. Inc. reserves the right to determine whether repair or replacement is
suitable upon inspection of the Product. The decision made by I. C. M. Inc.
whether to repair or replace the Product will be final.
3.
10.
Warranty Claim Requirements
When sending a defective Product to I. C. M. Inc., it is required that
customers provide prepaid freight and insurance. Shipped Products must be
properly packaged to prevent damage during transit. For Products
purchased from I. C. M. Inc. distributor or reseller, customers must contact
the seller for replacement or repair.
Then click “Exit” and leave the
program.
4.
Replacement and Repair
Beyond warranty period - I. C. M. Inc. will repair a defective Product beyond
warranty; however, the customer will be charged for the cost of labor and
replaced parts if the defective Product was returned beyond the applicable
warranty period.
DIAGNOSIS REVOLUTION
23
DIAGNOSIS REVOLUTION
24
w w w. i c m . c o m . t w
8.
w w w. i c m . c o m . t w
5.
Exceptions of Warranty
This warranty does not apply to Product failure due to accident, abuse,
mishandling, improper installation, and alteration, acts of nature, improper
usage, or problems with electrical power. In addition, opening or tampering
with the Product casing, or any physical damage, abuse or alteration to the
Product’s surface will also void the Product warranty.
This warranty only applies to the Product itself. I. C. M. Inc. will not be liable
for damages resulting from a third party device that causes the Product to
fail.
Please note that should the Product defect be caused by any of the following
factors, I. C. M. Inc. is not responsible:
a. Mishandling during shipment.
b. Misuse, repair or modification by users.
c. Not following the instructions in the user manual correctly.
“We never succeed until you succeed”
It’s the core of our Customer Satisfaction.
I. C. M. Inc. team thank you for choosing this
Product and for being our valued customer!
DIAGNOSIS REVOLUTION
25