1
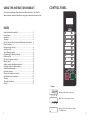
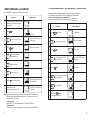
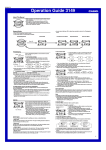
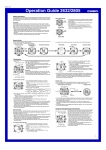
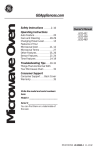
CM–1051T 1000 watts USING THIS INSTRUCTION BOOKLET CONTROL PANEL You have just purchased a Bonn Commercial Microwave Oven. Your Owner’s Manual contains valuable information on using your commercial microwave oven. INDEX Using this instruction booklet ..................................................... 1 Control Panel ............................................................................. 2 Installation ................................................................................. 4 Warnings ................................................................................... 4 How to use your Bonn Commercial Microwave Oven Safely .... 5 Hints for cooking ........................................................................ 7 Microwave oven cooking ........................................................... 8 Auto-Power-Off .......................................................................... 8 Timer (Manual) cooking ............................................................. 9 Programming for Memory cooking .......................................... 10 Power level list......................................................................... 12 One Touch Program cooking ................................................... 13 Memory recall .......................................................................... 14 Usable cooking utensils and materials .................................... 15 Checking counters & Mode settings ........................................ 16 Precaution while heating ......................................................... 17 Care and cleaning ................................................................... 18 What to do if repairs are needed ............................................. 19 Specifications and accessories ............................................... 20 Warranty .................................................................................. 21 Terms and conditions............................................................... 21 Contact .................................................................................... 22 1. Display Displays remaining cooking time. Indicates cooking power levels. Gives notice that it is time to replace the Magnetron. 1 2 INSTALLATION 2. Programmable No. Plus ten key For setting the program number from 10 to 19. e.g. When choosing the program number 10 or 15. Program 10..... . + Program 15..... + 3. Program Selection Keys The unit is ready to begin operation as soon as the heating time has been programmed, using these ten keys (numbered1 to 0). The time selected will be displayed, and “count down” after the process is begun. For determining power output and cooking time during programming. Please refer the page 11 to 16. 1. The oven surround and also the surround of the control panel is covered by a protective plastic film, this should be removed prior to putting the oven into use. 2. Install the oven on a flat, level surface strong enough to safely bear the weight of the oven. To avoid the possibility of causing vibration or noise the oven must be in a stable position. 3. Keep the oven away from heat and water. Exposure to heat and water can lower oven efficiency and lead to malfunctioning, be sure to install the oven away from external heat and water sources. 4. This oven conforms to EMC Directive 89/336/EEC, however some interference may occur if it is placed too close to a radio or TV, so keep them as far apart as possible. 5. Exhaust vents are located at the rear of the oven so maintain a minimum spacing of 5cm (2") between the oven and any adjacent surfaces at these points. In an enclosed housing, please maintain a minimum spacing of 20cm on the top. Covering the exhaust vent may lead to malfunctioning. Hot air flows from these vents, so be sure not to obstruct vents or let curtains come between the oven and the rear wall. 4. Clear Key For cancelling setting, interrupting the setting process when a mistake has been made, or stopping cooking before the completion of the cooking process. 5. Memory Key For entering the desired power output and cooking time for program cooking . 6. Power Key WARNING: This appliance must be earthed This appliance must be earthed. If there is an electrical short circuit, earthing reduces the risk of electric shock by providing an escape wire for the electric current. This appliance is equipped with a cord that has an earthing wire with an earthing plug. The plug must be plugged into an outlet that is properly installed and earthed. WARNING: A PLUG WITH BARED FLEXIBLE CORDS IS HAZARDOUS IF ENGAGED IN A LIVE SOCKET OUTLET. For entering the desired power output. 7. Timer Key For entering the desired cooking time. 8. Start Key For timer cooking. For restart at programmed cooking. 3 4 HOW TO USE YOUR BONN COMMERCIAL MICROWAVE OVEN SAFELY Although your oven is provided with safety features, it is important to observe the following: reduce the risk of burns, electric shock, fire, injury to persons or WARNING - To exposure to excessive microwave energy: a) It is important not to tamper with safety interlocks. b) Do not place any object between the oven front face and the door or allow residue to accumulate on sealing surfaces. Wipe the sealing area frequently with a mild detergent, rinse and wipe dry. Never use abrasive powders or pads. c) When opened, the door must not be subjected to weight. For example a child hanging on an opened door or any load that could cause the oven to fall forward to cause injury and also damage to the door. Do not operate the oven if it is damaged, until it has been repaired by a qualified service engineer. It is particularly important that the oven door closes properly and that there is no damage to the: i) Door (bent) ii) Hinges and Latches (broken or loosened) iii) Door seals and Sealing surfaces d) It is dangerous for anyone other than a properly qualified service engineer trained by BONN to carry out adjustments or repairs. NOTE It is quite normal for steam to be emitted around the door, or for misting to occur on the door, or even for water droplets to appear below the door during the cooking cycle. This is merely condensation from the heat of the food and does not affect the safety of your oven. The door is not intended to seal the oven cavity completely. Note: After cooking or when you stop cooking by opening the door the fan of the oven will turn for several minutes. 6. If smoke is observed, keep the oven door closed and switch off by disconnecting the oven from the power supply. 7. Do not do anything that may interfere with the operation of the upper or lower hinges and/or latches of the oven's door. 8. Do not use excessive force when pressing the unit’s keys, or press them with metal or sharp utensils or objects. 9. Do not place or store things on top of the unit, as it can become quite hot during operation and there is the danger of melting or damaging them. 10. Keep the power supply plug clean at all times to ensure proper operation. 11. Only allow children to use the oven without supervision when adequate instructions have been given so that the child is able to use the oven in safe way and understands the hazards of improper use. 12. Your BONN product is designed and manufactured with high quality materials and components which can be recycled and reused. This symbol means that electrical and electronic equipment, at their end-of-life, should be disposed of separately from your household waste. Please dispose of this equipment at your local community waste collection/recycling centre. In the European Union there are separate collection systems for used electrical and electronic products. Please help us to conserve the environment we live in! WARNING - ELECTROCUTION HAZARD HIGH VOLTAGE Do not remove the cover of your microwave oven. Have a professional repair your microwave oven. OTHER SAFEGUARDS: 1. Never remove the cabinet. High voltage electricity is used in this oven, so be sure not to remove the cabinet. 2. Be careful not to spill water over the oven, especially near the air vents. 3. Do not operate when there is no food in the oven. Operation of the oven when empty shortens the service life of the magnetron and causes overheating. Also, the internal components of the oven melt or burn. 4. When cooking, never allow aluminum foil, metal skewers or other metallic objects to touch the glass viewing window or oven cavity. This may cause sparking at the point of contact, may break the glass, or cause damage to the oven walls. 5. Do not leave the oven in unattended operation when food is heated or cooked in disposable containers of plastic, paper or other combustible materials. 5 6 HINTS FOR COOKING MICROWAVE OVEN COOKING 1. Microwave cooking time $VZKHQFRRNLQJZLWKRWKHUIRUPVRIKHDWPLFURZDYHVFDQFDXVHWKHPRLVWXUHLQ IRRGVWRHYDSRUDWHVRWKDWWKHIRRGZLOOEXUQLIRYHUKHDWHG 'RQRWVHWWKHWLPHUIRUDORQJHUWLPHWKDQQHFHVVDU\ 7KHILUVWWLPH\RXPDNHDGLVKZLWKWKLVRYHQVWRSFRRNLQJDELWHDUOLHUDQGFKHFNRQ WKHFRRNLQJSURJUHVV 'RQRWRYHUFRRN%DNHGIRRGVZLWKDKDUGGU\EURZQVSRWDIWHUPLFURZDYHKHDWLQJ LQGLFDWHVRYHUFRRNLQJ 'RQRWKHDWVPDOOTXDQWLWLHVRIIRRGRUGULHGIRRGVIRUORQJSHULRGVRIWLPH 6XFKIRRGVPD\EXUQRUFDWFKILUHDQGWKHRYHQZLOODOVREHDIIHFWHGLQPXFKWKHVDPH ZD\DVLILWZHUHRSHUDWLQJHPSW\3XWDFXSRIZDWHULQWKHRYHQZKHQKHDWLQJVXFKIRRGV $OZD\VPDNHVXUHWKDWFORVHGFRQWDLQHUVVXFKDVMDUVRIEDE\IRRGDUHRSHQHGDQG SODVWLFSRXFKHVRIYHJHWDEOHVDUHSLHUFHGEHIRUHFRRNLQJ 7LJKWO\FORVHGFRQWDLQHUVFRXOGH[SORGH $YRLGKHDWLQJEDE\ERWWOHVRUEDE\IRRGMDUV7UDQVIHUWKHIRRGLQWRDVXLWDEOHFRQWDLQHU IRUWKHPLFURZDYHRYHQ7KHIRRGWHPSHUDWXUHVKRXOGEHWHVWHGEHIRUHJLYLQJLWWRDEDE\. 'RQRWFRRNHJJVLQWKHLUVKHOOVEHFDXVHWKH\ZLOOH[SORGH 3ULFNWKHPHPEUDQHDURXQGWKH\RONEHIRUHIU\LQJHJJVWRDOORZVWHDPWRHVFDSH (JJVFDQQRWEHERLOHGLQWKLVPLFURZDYHRYHQ 'RQRWRYHUKHDW 'XULQJGHIURVWLQJVKRUWHQWKHWLPHWRDYRLGRYHUFRRNLQJ 1HYHUXVHWKHRYHQDVD&ORWKHV'U\LQJ&DELQHW :KHQERLOLQJZDWHURURWKHUOLTXLGVEHVXUHWRXVHZLGHPRXWKHGFRQWDLQHUV7KLV ZLOODOORZDLUEXEEOHVWRHVFDSHIUHHO\6KRXOGDQDUURZPRXWKHGFRQWDLQHUEHXVHGDLU EXEEOHVPD\FRPELQHWRIRUPDODUJHEXEEOHZKLFKPD\LQWXUQFDXVHWKHOLTXLGWRERLO RYHU7KLVPD\KDSSHQHYHQDIWHUWKHFRRNLQJWLPHKDVVWRSSHG 7RFRRNHYHQO\ 5RWDWHEXON\IRRGVKDOIZD\WKURXJKWKHKHDWLQJF\FOH :KHQFRRNLQJWZRRUPRUHLWHPVURWDWHWKHPKDOIZD\WKURXJKWKHKHDWLQJSURFHVV :KHQFRRNLQJIRRGVZLWKSDUWVRIGLIIHUHQWWKLFNQHVVHVSURWHFWWKHWKLQQHUIDVWHUFRRNLQJ SDUWZLWKDOXPLQXPIRLOKDOIZD\WKURXJKWKHKHDWLQJSURFHVVWRSURWHFWWKHPIURPRYHU cooking. :KHQKHDWLQJVRXSVRUVDXFHVVWLUWKHPRQFHRUWZLFHKDOIZD\WKURXJKWKHKHDWLQJ SURFHVV Note: %HIRUHXVHWKHXVHUVKRXOGDOZD\VFKHFNWKDWXWHQVLOVDUHVXLWDEOHIRUXVHLQPLFURZDYH RYHQV AUTO-POWER-OFF 7RVDYHHQHUJ\WKHSRZHUVXSSO\LVVKXWGRZQDXWRPDWLFDOO\ZKHQ\RXGRQRWXVH\RXU %211FRPPHUFLDOPLFURZDYHRYHQ :KHQ³´LVGLVSOD\HGRQWKHZLQGRZGLVSOD\ 7KHSRZHUVXSSO\ZLOOEHVKXWGRZQPLQXWHODWHU :KHQ³(QG´LVGLVSOD\HGRQWKHZLQGRZGLVSOD\ 7KHSRZHUZLOOEHVKXWGRZQPLQXWHVODWHU :KHQVRPHWKLQJRWKHUWKDQDERYHLVGLVSOD\HG 7KHSRZHUZLOOEHVKXWGRZQDERXWPLQXWHVODWHU 1RWH:KHQ³(´LVGLVSOD\HGRQWKHZLQGRZGLVSOD\ 7KH$87232:(52))IXQFWLRQLVQRWDYDLODEOH 7RWXUQRQSRZHU 2SHQWKHGRRURIWKHPLFURZDYHRYHQ 7 8 TIMER (MANUAL) COOKING PROGRAMMING FOR MEMORY COOKING Up to 3 stages on any power level can be cooked. 20 memory banks can be programmed for cooking the most popular dishes. Up to 3 stages on any power level can be programmed for each memory. When choosing the program number from 0 to 9: Power Level 5 (Example) To program the following on program No.4:( for 45 seconds. Operation Display window Put food in a suitable container on the 1 ceramic tray in the oven cavity and close the door. Operation Display window Colon 2 Touch key. 1 Touch key (twice). No change. Power level bar Touch 8 to select power level 8. 3 4 Touch key. 8 power Level Bar are displayed. 2 Touch 4 to program No.4. No change in display. 3 Touch Input the desired time using buttons 10 5 No change. 5 power level bars are displayed. Touch number “3”. 5 Touch key. No change. Touch another “0”. 7 6 8 Touch key to start cooking 9 Cooking time ends. Remove the food from oven. The time on window display will count down . The “beep” tone sounds, “0” shows. Note: When you require maximum power there is no need touch the POWER key. Maximum power operation will be automatic. So you can skip steps 2 and 3. Max input time is ten minutes. 2-stage cooking Follow steps 1 to 7, then repeat steps 2 to 7 and touch START key. 3-stage cooking Follow steps 1 to 7, then repeat step 2 to 7 two times and touch START key. 9 key. Input “power level 5” with button number “5”. 4 6 Program number. 7 8 Input the operating time with Touch number “4”. Touch number “5”. Then, touch key to complete memorizing. 10 POWER LEVEL LIST Note: When you operate Maximum Power, there is no need to touch the POWER key. Maximum power operation will be automatic so you can skip steps 4 and 5. 2-stage cooking Follow steps 1 to 8, then repeat steps 4 to 8 and touch MEMORY key. 3-stage cooking Follow steps 1 to 8, then repeat steps 4 to 8 two times and touch MEMORY key. When choosing the program number from 10 to 19: (Example) To program the cooking for 45 seconds at power level 6 for 1 serving in the memory 14. Operation Touch Display window key twice. 1 Touch key . 2 Touch 4 to program into “No: 14”. Repeat steps 4 to 9 above. NOTE: programming for memory cooking is completed by touching memory key. If memory key is not touched, the new setting will not be programmed. 11 POWER LEVEL LIST Maxpower POWER (W) Max. Input time 1000 10 minutes (Manual cooking) 6minutes (program cooking) 9 900 ” 8 800 ” 7 700 ” 6 600 ” 5 500 4 400 3 300 ” ” 2 200 ” 1 100 ” 0 0 ” 30 minutes. * You can set the power level at “0” to use the device as a timer (up to 30 minutes). The remaining time will slow every second after the start button is pressed. Note: 1. A “beep” tone sounds whenever any key is touched. 2. If the desired numeral is not displayed, touch CLEAR key and restart (procedures) from the beginning. 3. If an operating time over the Maximum Input time is selected, subsequent key operation is impossible. 4. To enter 1 minute (60 seconds) input ”100”. 5. The storing process is completed by touching MEMORY key. If MEMORY key is not touched, the new settings will not be stored and the previous memory contents will be retained. 12 ONE TOUCH PROGRAM COOKING 1. Ordinary Use (Example) When program No.3 is programmed as: 1st input: Maximum power 30 sec. 2nd input: Power Level 5, 1min. 3rd input: Power Level 2, 2min. Operation 1 2 3 Place food in the oven. Touch 3, then heating starts automatically. Cooking time ends. Remove the food from the oven. MEMORY RECALL (Example) When program No.3 is programmed as: 1st stage: Max power 30 sec. 2nd stage: Power Level 5, 1min. 3rd stage: Power Level 2, 2min. Operation Display window “0” appears in the display. “3” appears in the display. The total heating time shows and countdown. Shows. If the heating time is not programmed into a selected preset, “0” will appear on the display. To select the program number from 10 to 19, press +10 key between steps 1 and 2. Please see page 13 “when choosing the program number from 10 to 19” in detail. Display window Open the door. 1 Touch number “3”. Show 30 seconds on maximum power for 1st stage. 3 Touch number “3” again. Show 1minute on level bar “5” power for 2nd stage. 4 Touch number “3” again. Show 2 minutes on level bar “2” power for 3rd stage. 2 5 Touch key. Note: 1. Touch CLEAR key after recall. 2. If nothing is in the memory, the program Number indicator will flash. 3. You can change the program by operating the same procedure as programming for memory cooking on pages 12 to 13. 4. To select the program number from 10 to 19, press touch 10 key between steps 1 and 2. Please see the page 13 “when choosing the program number from 10 to 19” in detail. 13 14 USABLE COOKING UTENSILS AND MATERIALS CHECKING COUNTERS & MODE SETTINGS OVENPROOF GLASS Ovenware (treated for high intensity heat), such as mixing bowls, bread dishes, pie plates, cake plates, liquid measuring cups, casseroles, and bowls without metallic decoration. CHINA Bowls, cups, serving pieces, plates, and platters without metallic decoration. POTTERY Dishes, cups, mugs, and bowls. PLASTIC Plastic wrap (cling film) may be used as a cover. Lay the plastic wrap loosely over the dish and press it to the sides. The dish should be deep enough so that the plastic wrap will not touch the food, also the film should be pierced to allow steam to escape. As the food heats, it may cause the wrap to melt wherever it touches the food. Plastic dishes, cups, semi-rigid freezer containers, and plastic bags are usable for short cooking operations. Use with care as some softening of the plastic can occur with heat from the food. Not suitable for microwave cooking Display shows accumulative cooking time, fan motor working time and the number of operations of each preset memory. Buzzer sound and volume can also be adjusted along with other various functions. METAL UTENSILS Metal utensils are not recommended because the metal shields the food from microwave energy on the bottom and sides, causing uneven heating. Metal utensils will also cause arcing and damage to the appliance. METAL DECORATION Metal-trimmed or banded dinnerware, casseroles, etc.,should not be used. The metal trim interferes with normal cooking and damage may result. ALUMINUM FOIL Large sheets or pieces of aluminum foil should be avoided because they will disrupt cooking and may cause harmful arcing. However, smaller pieces may be used to cover areas such as poultry legs and wings. Any aluminum foil used should never be closer than 1 inch from the side walls of the oven. WOOD Wooden bowls and boards will become dried out when used in the microwave oven and may split or crack. OTHER Avoid using cracked, flawed, or defective utensils, including ovenproof glassware. CAUTION: DO NOT USE METAL TIES ON ANY PAPER OR PLASTIC BAGS; THE TIES BECOME HOT AND COULD CAUSE A FIRE 15 Operation 1 Touch key. 2 Touch key. Touch number “ 7” or “8” three times. 3 * E.g. The “8.88” appears in the display. Stages 1 to 3 are the same for all options. Input the 4th step as follows to check or change the modes. Input one of the following options (1-0) using the PROGRAM SELECTION key . 4 5 Display window Touch key. E .g. Input “1” (accumulative cooking time). All 4 digits will be flashing. The total cooking time will be shown. E.g.215hours. 6 Touch key again. 7 Touch key. In case where options other than “7772”,”8881”,”8882” were selected in step 4, “0” appears in the display confirming that the new setting has been accepted. Touch the CLEAR key to clear the display for the option “7772”,”8881”and “8882”. 16 The following options can be selected by inputing one of the numbers below at the operation step “3” and step “4”. INPUT OPTIONS 77.72...Accumulative operation time of fan motor.(units of 1 hour) 77.73...To enable the food get-out buzzer after cooking is done. 77.74...To disable the food get-out buzzer after cooking is done. 77.75...After the end of the processs hows "End" 77.76...After the end of the processs hows "0" 88.81...Accumulative cooking time. 88.82...The number of door operations.(100times) 88.83...Indication of remaining cooking time (when cooking is interrupted by door opening). 88.84...To cancel remaining cooking time (when cooking is interrupted by door opening). 88.85...Tone of the buzzer on cooking completion. (Pip,Pip,Pip) 88.86...Tone of the buzzer on cooking completion. (Peep) 88.87...The volume of the buzzer. (quiet) 88.88...The volume of the buzzer. (medium) 88.89...The volume of the buzzer. (Loud) 88.80...The volume of the buzzer. (None) CARE AND CLEANING ALWAYS KEEP THE OVEN CLEAN ALWAYS KEEP THE OVEN CLEAN 1. Clean the glass viewing window, the inner door panel and oven front face. For best performance and to maintain the high degree of safety the inner door panel and oven front face should be free of food or grease build-up. Wipe these parts with a mild detergent, rinse and wipe dry. Never use abrasive powders or pads. 2. Cleaning the control panel and plastic parts. Do not apply a detergent or an alkaline liquid spray to the control panel and plastic parts, this may cause damage to these parts. Use a dry cloth (not a soaked cloth) to clean these parts. 3. Cleaning the oven interior. After use be sure to clean up spilled liquids, spattered oil and food debris as quickly as possible. Clean the interior with a cloth soaked in luke-warm water with a mild detergent dissolved in it, then rinse the soap off with a damp cloth. In particular, the bottom of the oven interior tends to get stained from grease and food. Since this may cause odour and abnormal vibration, be sure to keep this area clean. CAUTION: Do not wipe plastic and painted sections of the oven with bleach, thinners or other cleaning agents, as this may cause these parts to dissolve or change shape. PRECAUTIONS WHILE HEATING 1. To check food during cooking Open the door halfway through the process, and cooking will stop. Remaining time will be displayed on the window display. 2. To resume cooking after checking food. Close the door and touch START key. 3. To stop cooking halfway through the process. Touch CLEAR key. 4. When a program not entered in the unit’s memory is selected “0” will appears and program number will flash on the window display. 17 18 WHAT TO DO IF REPAIRS ARE NEEDED 1. If any of the following appear, check for a problem. “U-50” flashes in the display window. When using program presets the preset must be touched within 1 minute of closing the door. To reset this safety feature open and close the door. To reset this safety feature open and close the door. *The purpose of this function is to prevent operation when there is no food in the oven. 2. Thi s is normal operation: The cooling fan operates for 5 minutes after heating has completed or heating has been stopped by opening the door or touching the STOP/CLEAR button during operating. Cooling fan operating continues for five minutes to keep the electronic components cool. When the door is left open the cooling fan continues to run for 2 minutes to cool the ovens components. 3. This oven features Self-Diagnostics that assists in the servicing of the oven. When the display shows an error code (ie. E-31) please contact Bonn Appliances to arrange service of the oven. 19 SPECIFICATIONS AND ACCESSORIES Specifications CM-1051T Microwave power output Microwave frequency 1000 W~100W 2450 MHz Outer dimensions 500(W) X 420(D) X 320(H) mm Cavity dimensions 330(W) X 320(D) X 230(H) mm Weight 19.5Kg (48lbs) 20 Warranty This Bonn Commercial Microwave Oven is supplied with a 12 month from the date of purchase. This warranty covers the cost of parts for 12 months from the date of purchase. It also covers the cost of labour for the first 12 months from date of purchase. The conditions of this warranty are subject to the terms and conditions set out below. Any service claimed under warranty must be done with full proof of purchase including serial number. Failure to do so will incur service costs to the purchaser. Terms and Conditions 1. PURCHASER’S STATUTORY RIGHT The warranty terms set out below do not exclude any conditions or warranties which may be mandatory implied by law, and your attention is drawn to the provisions of the Trade Practices Act 1974 and State Legislation which confers certain rights on consumers. 2. WARRANTY (A) 12 MONTH PARTS AND 12 MONTH LABOUR WARRANTY Bonn Appliances warrants to the original purchaser of this commercial mirowave oven that for a period of 12 months from date of purchase, any component found by Bonn Appliances to be defective will be replaced by Bonn Appliances without charge for parts. For a period of 12 months from the date of purchase, such componants will be replaced without charge for labour. This warranty is given on the condition that all service is to be performed by Bonn Appliances or by a service agent authorised by Bonn Appliances to service commercial microwave oven. If the oven is installed within a reasonable distance from an authorised service agent Bonn Appliances will, at it’s cost, effect warranty service on-site. Bonn Appliances shall have the exclusive right to determine what is a reasonable distance in each case. If the oven is installed out side of this area the customer shall bear the cost of sending the product to the agent or the agent’s travelling cost to the purchaser’s premises. 21 (B) EXCLUSIONS The warranty set forth in paragraph 2(A) should not apply: (i) To any defect or failure which, upon inspection by Bonn Appliances or it’s authorised service agent, is attributable to accident, misuse, abuse, negligence, alteration, non-observance of operating instructions or local regulations, improper installation, inadequate or faulty power supply, damage during transit and/or delivery, fire, flood, riot or any act of God, normal wear and tear, in particular to but not restricted to Stirrer Covers, Ceramic Bases, Lamps, Door Assemblies and Cavities. (ii) If the equipment has been serviced by a person not authorised by Bonn Appliances or with parts not approved by Bonn Appliances. (iii) If Serial Number plate is removed or defaced. (iv) To any costs related to operator instructions, correction of program errors, interior or exterior finishes attributable to a manufacturing fault, routine maintenance or cleaning. (v) To loose accessories. (vi) If the equipment is repossessed under any financing agreement. (vii) If the equipment is used outside Australia without the prior written approval of Bonn Appliances. 3. All claims under this warranty should be directed to Bonn Appliances on Ph. 07-3390 4185 Australia wide. 4. Subject to the purchaser’s statutory rights referred to in Clause 1, Bonn Appliances reserves the right to charge for any service not covered by the company warranty. Important Read the operating manual before operating your microwave oven. Familiarize your staff with oven operation before placing in service. Should you require service under warranty, please consult the instruction book before you call for service as service call for non-equipment failure or instruction on use may result in a service labour charge for your account. Contact For additional information and details of your nearest service agent authorized by Bonn Appliances contact: Bonn Appliances 4/40 Rivergate Place Murarrie 4172 Australia Ph. 07-3390 4185 Fax. 07-3393 9508 22