1
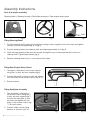
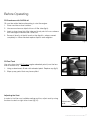
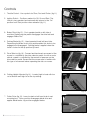
Auto-Drive Ride-On Mower
Owners Manual
Please read this instruction manual carefully
before operating your new Sanli Ride-On Mower.
Model number: ADR1130
Congratulations on choosing a Sanli mower.
12 Month Warranty (24 Month Engine Warranty)
Thank you for your purchase.
This product comes with a manufacturer’s warranty from Sanli Australia Development Pty Ltd that
your new product will be free from defects in materials and workmanship for the period stated above,
from the date of purchase, provided that the product is used in accordance with accompanying
recommendations or instructions where provided. This warranty is in addition to your rights under the
Australian Consumer Law.
You will be provided with a refund, repair or exchange by Sanli for this product if it becomes defective
within the warranty period. Sanli will bear the reasonable expense of claiming the warranty. This
warranty will no longer apply where the defect is a result of alteration, accident, misuse, abuse or
neglect.
Please retain your receipt as proof of purchase and contact Sanli’s Customer Service Centre on 1800
466 068 or alternatively, via email at [email protected] for any difficulties with your product.
Our goods come with guarantees that cannot be excluded under the Australian Consumer Law. You
are entitled to a replacement or refund for a major failure and compensation for any other reasonably
foreseeable loss or damage. You are also entitled to have the goods repaired or replaced if the goods
fail to be of acceptable quality and the failure does not amount to a major failure.
For New Zealand customers, this warranty is in addition to statutory rights observed under New Zealand
legislation.
This warranty does not cover;
• Commercial use
• Normal wear and tear
• Oiled air cleaner or starting difficulty caused by mower incorrectly tipped on its side
• Consumable items (including drive belts, oil, blades and spark plugs)
• Defects or faults caused by an act or omission after leaving manufacture
• Incorrect, contaminated or poor quality fuel (older than 3 months) or oil
• Incorrect maintenance or storage of the product
• Water damage or environmental conditions
• Failure to observe safety requirements
• Any loss or damage arising from faulty parts or workmanship
• Transport costs to and from Authorised Sanli Dealer
Sanli products are monitored and enhanced on an on-going basis to comply with changing technical
standards and requirements. As a result, Sanli reserves the right to alter design and specifications at any
time without prior notice.
2
Sanli Ride On Mower User Guide
Contents.
Safety tips.................................................................................................................................... 4
Ride-On features.......................................................................................................................... 5
Assembly instructions................................................................................................................... 6
Before operating........................................................................................................................... 7
Operating instructions................................................................................................................... 9
Maintenance .............................................................................................................................. 10
Technical specifications...................................................................................................... 10 & 11
Trouble shooting......................................................................................................................... 11
Contact Sanli Australia ............................................................................................................... 12
Sanli Ride On Mower User Guide
3
Safety Tips.
WARNING: The information contained within this safety section is extremely important. Personal
injury to the user and to others may result if this section is not read and acted upon at all times.
1.Never use your ride-on mower when tired or fatigued as lack of alertness may cause serious injury.
2.Before starting your ride-on mower inspect it carefully to ensure that there are no loose parts and that
it is in good working order.
3. C
lear the area to be mowed of any stones, sticks, wire and debris before beginning, and always
ensure that you mow a safe distance away (over 14 metres) from adults, children and animals.
4.Keep hands, feet and clothing away from the ride-on mower’s moving parts, and always wear
appropriate footwear (avoid sandals or open shoes).
5.Never put your hands or feet underneath the cutting deck of the ride-on mower while the engine is
running.
6.Be aware that the machine’s exhaust area and other parts of the ride-on mower get very hot during
and right after use.
7.Turn off the engine and disconnect the spark plug cap before cleaning, transporting, or making
adjustments, and never leave the ride-on mower unattended with the key in the ignition.
8.Mow up and down slopes and never across a slope. And always be extremely cautious when
changing direction on slopes.
9. We strongly recommend you avoid mowing when it is raining, or after nightfall.
10.Do not fill the tank, or start the ride-on mower indoors, or in a poorly ventilated area, as exhaust gases
contain poisonous substances and petrol fumes are flammable and dangerous.
11.Always use 95 octane unleaded petrol not more than 3 months old. Fill the tank using a funnel, but
never completely. Clean up any overflow or splashes before starting.
12.Never open the fuel filler cap, or fill the tank, if the engine is running or is still hot after use. And please
ensure that you securely tighten the petrol cap after filling.
13. Do not transport your ride-on mower in a vehicle if there is any petrol in the tank.
14.Store your ride-on mower along with any fuel and oil in a cool well-ventilated place, away from direct
sunlight and not near gas cylinders or hot water heater systems.
15.Do not smoke when filling the fuel tank, using your ride-on mower, or when petrol is in the immediate
area. And never use or store the ride-on mower near a naked flame.
16.Sanli recommends that you wear a safety helmet, ear protectors, safety goggles and safety boots
when using your ride-on mower.
17.All servicing and repair work under warranty must be carried out by an Authorised Dealer.
4
Sanli Ride On Mower User Guide
Ride-On Features
Rear mounted
engine
Rear engine safety
guard with light
towing bracket
Seat adjustment
lever
Comfort steering wheel
Adjustable
high-back seat
Throttle
control
Safety guard
mounting bolts
Fig 1
Cutting height adjuster
Grass deflector
chute
Foot operated drive selector (Auto-drive pedal)
Brake / Clutch
pedal
Ignition switch
Front nudge
bar
Fig 2
Parking brake knob
Cutter drive
lever
760mm (30”) Cutting Deck
Safety guard
mounting bolts
Sanli Ride On Mower User Guide
5
Assembly Instructions
Parts that require assembly
Steering wheel • Steering housing • Seat/plate assembly • Rear engine safety guard
holes
Fig 3
Fitting Steering Wheel
Fig 4
Fig 5
1. P
osition housing (fig 3) in place and using the housing screws supplied, insert into holes and tighten
securely (without over tightening) as in (fig 5).
2. Position steering wheel over steering shaft and align appropriately as in (fig 5).
3. Insert the long steering wheel bolt and washer through the top of steering wheel and screw into
steering shaft. Tighten appropriately (fig 4).
4.Replace steering wheel cap to cover exposed bolt head.
Fitting Rear Engine Safety Guard
1.The guard is attached to the mower chassis
using the 4 x bolts and nuts supplied (fig 6).
2.Position the guard so that the holes are aligned
with the holes on the mower chassis (fig 1& 2).
3. Secure in place.
Fig 6
Fitting Seat/plate Assembly
1.The seat/plate is attached to
the mower chassis using the 2
x bolts and nuts supplied (fig 7).
Position the seat/plate so that
the holes are aligned with the
holes on the mower chassis (fig
7). Secure in place.
Mounting bolts
2.Connect safety switch wiring
harness as shown in (fig 7a).
Fig 7
6
Sanli Ride On Mower User Guide
Fig 7a
Before Operating
Fill Crankcase with SAE 30 oil
Oil must be added before attempting to start the engine.
1. Place machine on level surface.
2. Unscrew and remove dipstick from oil filler tube (fig 8).
3. Insert a clean funnel into filler tube and slowly add oil in accordance
with the engine manufacturer’s direction.
4.Ensure oil level is at the full mark on the dipstick, when screwed
completely in. When finished replace dipstick and retighten.
Fig 8
Fill Fuel Tank
Use only clean, fresh 95 Octane regular unleaded petrol (must be less
than 3 months old).
1. Using a clean funnel, fill tank with unleaded petrol. Replace cap (fig 9).
2. Wipe up any petrol that may have spilled.
Fig 9
Adjusting the Seat
In order to find the most suitable seating position, adjust seat by using
the lever located on right side of seat (fig 10).
Adjustment
lever
Fig 10
Sanli Ride On Mower User Guide
7
Controls
1. Throttle Control - Has symbols for Slow, Fast and Choke. (fig 11).
2. Ignition Switch - Positions marked for Off, On and Start. The
switch is key operated and automatically returns to the ‘On’
position from Start position when released. (fig 11).
Fig 11
3. B
rake/Clutch (fig 12) - Foot operated pedal on left side of
machine. Depressing the pedal disengages the drive belt and
engages Brake Disc.
4. P
arking Brake (fig 12) - Hand operated knob left hand side.
Depressing the brake clutch foot pedal enables this knob to be
engaged and disengaged. Parking brake is applied when the
knob is locked in the up position by hand.
Fig 12
5. D
rive Selector (fig 13) - Forward and backward movement of the
mower is controlled by the drive selector pedal. As with a motor
vehicle, speed is controlled by the amount of pressure on the
drive selector pedal. Ensure that the mower user is familiar with
this type of movement before operating the ride-on mower.
Fig 13
6. C
utting Height Adjuster (fig 14) - Located right of seat with low
cut at bottom and high cut at the top setting.
Fig 14
7. C
utter Drive (fig 15) - Lever located on left hand side of seat
mounting box. Down position disengages blade drive and
applies blade brake. Up position engages blades.
Fig 15
8
Sanli Ride On Mower User Guide
Operating Instructions
Warning: All users must read and understand the following instructions before
operating the ride-on mower
Starting the Engine
Please note that the engine will not start unless the cutter drive is disengaged and the clutch/brake pedal
is depressed.
1. Depress clutch/brake pedal in order to apply the parking brake
2. Ensure drive selector is in the neutral position
3. Disengage the cutter drive
4. Move the throttle lever to the choke position
5. Turn the ignition key to the start position and release when the engine starts
6. Move the throttle lever to approx ¼ position
To Cut Grass or Drive
1. Depress clutch/brake pedal
2. Disengage the parking brake
3. Select cutting height
4. Move throttle to about ¾ position
5. Engage cutter drive
6. Select desired drive
7. Slowly release clutch/brake pedal to drive
To Stop Engine
1. Depress clutch/brake pedal
2. Shift the drive selector to neutral
3. Disengage the cutter drive
4. Apply the parking brake
5. Move throttle lever to the slow position
6. Turn the ignition key to OFF. Remove the keys
Safety Information
1. The parking brake should always be applied before leaving the machine
2. The parking brake must be released before attempting to drive
3. Depress the clutch/brake pedal when starting or when coming to rest
Engaging Clutches
When engaging the cutter drive lever or releasing the clutch/brake pedal, always operate slowly and avoid
any jerking motion. Moving these controls too fast could overload and stall the engine.
WARNING: To avoid loss of control always come to a complete stop before changing
drive direction and slow down before turning.
Sanli Ride On Mower User Guide
9
Maintenance
Warning: Regular service by a qualified Sanli Dealer is paramount to ensuring a safe, troublefree operation. The ride-on mower needs to be kept clean to assist inspection for loose, worn
or damaged parts before each use. Proper care and maintenance is the responsibility of the
owner.
Oil Change
Sanli recommends that you change your engine oil after the first 5 hours of use and then as per the
schedule outlined in the engine manufacturer’s manual supplied with this machine.
Spark Plug
The spark plug gap gradually increases during engine running and should be checked periodically and
whenever the engine malfunctions.
Spark plug should be inspected regularly and maintained as per the engine manufacturer’s manual
supplied.
Air Cleaner
Air cleaner should be inspected regularly and maintained as per the engine manufacturer’s manual
supplied.
Technical Specifications.
10
Model Number
ADR1130
Engine Type
Briggs & Stratton 4-Stroke 10.5 hp (344cc)
Fuel Capacity
4.0 Litres
Oil Capacity
1.42 Litres
Lubrication
Gear Impellor
Spark Plug
Champion RC12YC
Spark Plug Gap
0.7 to 0.8mm
Ignition Type
Magnetron
Engine Oil
SAE 30
Sanli Ride On Mower User Guide
Transmission
Auto-Drive system consists of a continuous belt being driven by an idler pulley over two drive pulleys
and around a return pulley. Friction plates are brought into contact with the drive pulleys to impart either
forward or reverse motion to rear drive wheels by means of a drive selector pedal on the right side of the
machine.
Ground speed at 3600 rpm is variable due to Auto-Drive system depending on pressure applied to drive
selector pedal.
Maximum Speed 8.6 km/h
Cutting Deck
Full floating pressed steel housing with right side discharge.
Cutting Width
760 mm (30”)
Tyres
Front Tyres: 4.1 x 6 tubeless (Pressure 16 Psi)
Rear Tyres: 16 x 6.5 x 8 tubeless (Pressure 20 Psi)
Controls
Throttle control with Fast, Slow and Choke positions
Key switch with Off, On and Start positions.
Steering Wheel
325mm diameter - 1 ¼ turns lock to lock.
Clutch / Brake Foot operated pedal on left side of machine.
Parking Brake Hand operated catch/knob on left hand side of machine used in conjunction with
clutch/brake pedal.
Drive SelectorFoot operated pedal located on right side of machine. Spring loaded so as to return to
neutral position.
Cutting Height
Lever right hand side. 6 cutting height positions from 15 to 65mm.
Cutter Drive
Lever located on left side of seat.
General
Wheel Base
135cm
Length164cm
Width
80cm
Height95cm
Turning Circle
5.8m Turning Radius
2.0m
Weight
195kg
Trouble Shooting
Please contact your Authorised Sanli Ride-On Dealer for further details.
Sanli Ride On Mower User Guide
11
Call the Sanli Customer Service Desk on 1800 466 068
Email: [email protected] Web: www.sanli.com.au
Head Office: 9 Gatwood Close, Padstow, NSW 2211