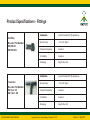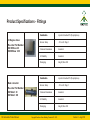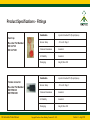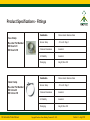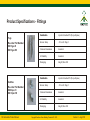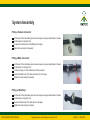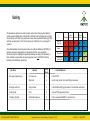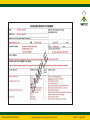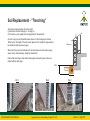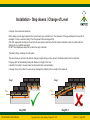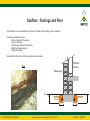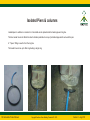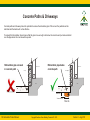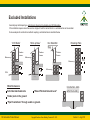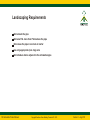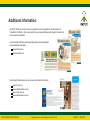
1
SX Reticulation System
Product Manual
(Incorporating Installers Guide)
June 2014
ABN 46 124 306 163
438 Tinderbox Rd Tinderbox
Sydney
5 Mayvic Rd
Greenacre
M: 0400 562 356
Melbourne
5 Gasoline Way
Craigieburn
T: 1300 929 626
Brisbane
35 River Rd
Redbank
F: 03 6229 6383
Tasmania
7050
Adelaide
2 Wilford Ave
Underdale
www.scbp.com.au
Perth
524 Abernethy Rd
Kewdale
E: [email protected]
Contents
P 3 - ...... Introduction
P35 - ...... Exclusions
P 4 - ...... Accreditation
P36 - ...... Limitations
P 5 - ...... Record keeping / traceability
P37 - ...... Landscaping
P 6 - ...... Terms of Use
P38 - ...... Equipment
P 7 - ...... System Overveiew
P39 - ...... Chemicals
P 9 - ...... Component Specifications
P41 - ...... Charging the System
P17 - ...... System Assemby
P43 - ...... Notices / Documentation
P18 - ...... Safety
P45 - ...... Property Owner Information
P20 - ...... Soils
P46 - ...... Warranty
P21 - ...... Installation
SX Reticulation Product Manual
Copyright Southern Cross Building P roducts P/L 2010
Version 2 - Aug 2013
Introduction
Reticulation systems have their origins in agriculture where it evolved from simply delivering water to plants to now carrying nutrient
solutions and insecticides in many different applications and environments.
For over 20 years delivering termiticides through a reticulation pipe has been used as a treatment method for protection of
buildings.
In the current Australian Standard AS 3660.1 - 2000 reticulation systems are acknowledged as a deemed to satisfy method principally under section 8 “Deemed to Satisfy Requirements - Chemical Soil Barriers”
The SX reticulation system has been independently tested and acknowledged as meeting the deemed to satisfy requirements of AS
3660.1 - 2000
This guide describes the components of SX reticulation system and the principles of installing the system correctly.
The components developed for this system are high quality and have been tested to ensure that they will work as designed.
Every job is different, some may have diffiult designs, others have difficult conditions such as soil type, this means the success
of the barrier will often depend on the skills and training of the installer.
Installers must be alert to situations where an installation will not be effective. This guide highlights many, but certainly not all
problem situations that may arise.
It is essential that installers are familiar and adhere to the limitations described in the specifications section of this guide.
Providing an effective barrier may mean combining or incorporating other products, or it may be necessary to refer the problem back
to the builder for rectification or re-design.
Thankyou for taking the time to find out about SX Reticulation Systems.
SX Reticulation Product Manual
Copyright Southern Cross Building P roducts P/L 2010
Version 2 - Aug 2013
Installer Accreditation
SCBP
Supplies
Accredited Installer Co.
Nominates
Supervisor.
Accredited Installer Company
Supervisor
A “Supervisor” is a person who is responsible for all aspects of the installation of the reticulation systems.
They are responsible for
Training of staff including being readily accessible to people working under their supervision.
Supervision of pipe laying,
Design of a system (length of ‘runs’ positioning of boxes etc)
Establish and monitor systems to ensure correct ‘pump ups’
Records including treatment certificates
Skills:
Holds Cert 3 in Pest control or above. National Competency PRMPM05; 06; 18; 8 and 10
Is familiar with the SX Reticulation Installers manual
Familiar with AS 3660.1 2000
Supervises
Chemical applicator
The chemical applicator is a person responsible for ‘pumping the system’. This work
must be consistent with competencies PRMPM05; PRMPM06; PRMPM18; PRMPM8 and PRMPM10
Holds Certificate 3 in Pest Management or above. National Competency 5; 6; 18; 8 and 10
Has been trained in pipe installation by the supervisor
Has been trained in chemical application (”pump ups”) by the supervisor.
Pipe Installer
The pipe installer prepares a site and lays pipe; installs pump up points prior to a ‘pump up’
Completed pipe installation training.
Works under supervisors supervision
The pipe installer must be either an employee or a contractor, where they work under the direct supervision
of the supervisor. The supervisor is available for advice and inspection of the final installation.
Where the installer is a contractor they must carry the same qualifications and equivalent PI & PL insurance
as the prime contracting company
SX Reticulation Product Manual
Copyright Southern Cross Building P roducts P/L 2010
Version 2 - Aug 2013
Record Keeping Traceability
.
We are required to be able to trace our products through to their end use.
This means we must be able to contact installers of our products in the event of a product recall or essential
technical update.
It is SCBP policy not to collect installation certificates, builder details or home owners details from you.
We acknowledge that customer lists and lists of work done is commercially valuable and sensitive information.
However, when you agree to the “Terms of Use” you are agreeing to maintain your records so that
you can trace where our products to where they have been used if the need ever arose.
SX Reticulation Product Manual
Copyright Southern Cross Building P roducts P/L 2010
Version 2 - Aug 2013
Terms of Use
Installers agree to the following terms of use for Southern Cross Buuilding Products components and systems.
Installers shall.....
follow SCBP Installation Guidelines for products
comply with the BCA; relevant Australian Standards and Chemical product labels
maintain documentation and a system which allows traceability
only allow properly trained, licensed and accredited people to install and maintain systems
use only components supplied by SCBP
SX Reticulation Product Manual
Copyright Southern Cross Building P roducts P/L 2010
Version 2 - Aug 2013
Reticulation system overview
SX Reticulation is a system designed to distribute pesticides around the base of buildings to form a termite barrier in accordance
with Australian Standard AS 3660.1 2000 (Section 8).
SX Reticulation is a “Deemed to Satisfy Product” this means that the system and its components have been assessed against the
performance criteria in AS 3660.1 - 2000
The pipe is placed at the base of the concrete slab, very close to the edge or even clipped on to the slab. The pipe is just under
the finished ground level (FGL) or just below concrete or pavers
SX Reticulation is chemical resistant pressure pipe with emitter holes at regular spacings. The system is assembled using
pressure fittings generally clamps are not necessary as the system should be pumped at relatively low pressure.
The pipe is flexible and strong and generally does not require “elbows” for bends, however “end stops”; “connector fittings”
and “valve boxes” are essential.
When a system is “charged” pesticide is pumped through the pipes at pressure, the pesticide is released from the pipe in a
controlled manner and the surrounding soil absorbs the pesticide forming a barrier.
People and companies wanting to use this system must ensure they have the appropriate training and state licences. These
requirements vary from state to state.
SX Reticulation Product Manual
Copyright Southern Cross Building P roducts P/L 2010
Version 2 - Aug 2013
Product Specifications - PIPE
Highly Chemical Resistant
SX reticulation pipe is a high quality chemical transfer pipe specifically engineered for use by industry and pest controllers for
transfer of diluted pesticides including solvent based solutions.
A PVC Nitrile blended compound ensures that the pipe has high levels of chemical resistance and a long service life.
Kink Resistant
SX Reticulation pipe has a wall thickness of 3.25mm (I/D 12.5mm O/D19.0mm).
The pipe is a composite construction combining a stong internal transfer tube, reinforcing fabric and durable outer coating.
This means the pipe has excellent resistance to kinking even at angles greater than 90 degrees.
Strong
SX Reticulation Pipe has a rated bust pressure of 8.4 MPA (1100 PSI) and a working pressure of 2.1 MPA (nearly 300PSI).
The working pressure of this pipe far exceeds any pressures exerted in its normal service period as a reticulation line.
Installers please note; this is not the pump up pressure for the system, refer to charging the system section for full details
UV Stable
The outer coating of the pipe is UV stabilised to protect the pipe if construction is delayed or the pipe is inadvertently exposed.
Impact Resistant
The pipe is strong yet flexible giving it excellent resistance to impact damage; crushing or cutting.
Emitting holes
The pipe is precision drilled with two opposing holes at 200mm centres providing a radial distribution
pattern.
SX Reticulation Product Manual
Copyright Southern Cross Building P roducts P/L 2010
Version 2 - Aug 2013
Product Specifications - Perforated Pipe
Reticulation Pipe
Re-order Part Number
SX Kit80
80m Drilled pipe
4 Boxes; 8 endstops;
8 Connectors / caps
8 Elbows
SX Retic 100
100m reel
Total weight 22 kg
stapped only
SX Retic 200
200m reel
Total weight 66kg
On timber reel
SX Reticulation Product Manual
Material
PVC / Nitrile Blend
Construction
Composite Layered
Hose classification
Premium
Dimensions
Pipe ID 12.50mm
Pipe OD 19.00mm
Pressure
Working Pressure 2.1 Mpa / 297 PSI
Burst Pressure 8.2 Mpa / 1190 PSI
Average Pump Pressure 0.7 Mpa / 100 PSI
Note this data is the pipe specification, for pump up
details refer to ''Charging the System' section
Chemical Resistance
Excellent
UV Stability
Good
Service Temperature
-10 to +80
Copyright Southern Cross Building P roducts P/L 2010
Version 2 - Aug 2013
Product Specifications - Feeder Pipe
Feeder Pipe
Re-order Part Number
SX Feeder 20
20 m Long
Total weight 12kg
stapped only
Material
PVC / Nitrile Blend
Construction
Composite Layered
Hose classification
Standard
Dimensions
Pipe ID 12.50mm
Pipe OD 18.00mm
Pressure
Working Pressure 2.1 Mpa / 297 PSI
Burst Pressure 8.2 Mpa / 1190 PSI
Average Pump Pressure 0.7 Mpa / 100 PSI
Note this data is the pipe specification, for pump up
details refer to 'Çharging the System' section
SX Reticulation Product Manual
Chemical Resistance
Good
UV Stability
Good
Service Temperature
-10 to +80
Copyright Southern Cross Building P roducts P/L 2010
Version 2 - Aug 2013
Product Specifications - Fittings
Construction
Injection Moulded PE (Polyethylene)
Service Temp
-10 to +80 Deg C
Chemical Resistance
Excellent
UV Stability
Excellent
Packaging
Bag 20; Box 200
Construction
Injection Moulded PE (Polyethylene)
Service Temp
-10 to +80 Deg C
Chemical Resistance
Excellent
UV Stability
Excellent
Packaging
Bag 20; Box 200
End Stop
Re-order Part Number
SX END 20
SX END 200
T Junction
Re-order Part Number
SX Tjunc 20
SX TJunc 200
SX Reticulation Product Manual
Copyright Southern Cross Building P roducts P/L 2010
Version 2 - Aug 2013
Product Specifications - Fittings
90 Degree elbow
Re-order Part Number
SX 90Elbow 20
SX90Elbow 200
Male connector
Re-order Part Number
SX MaleC 20
SX MaleC 200
SX Reticulation Product Manual
Construction
Injection Moulded PE (Polyethylene)
Service Temp
-10 to +80 Deg C
Chemical Resistance
Excellent
UV Stability
Excellent
Packaging
Bag 20; Box 200
Construction
Injection Moulded PE (Polyethylene)
Service Temp
-10 to +80 Deg C
Chemical Resistance
Excellent
UV Stability
Excellent
Packaging
Bag 20; Box 200
Copyright Southern Cross Building P roducts P/L 2010
Version 2 - Aug 2013
Product Specifications - Fittings
Construction
Injection Moulded PE (Polyethylene)
Service Temp
-10 to +80 Deg C
Chemical Resistance
Excellent
UV Stability
Excellent
Packaging
Bag 20; Box 200
Construction
Injection Moulded PE (Polyethylene)
Service Temp
-10 to +80 Deg C
Chemical Resistance
Excellent
UV Stability
Excellent
Packaging
Bag 20; Box 200
Dust Cap
Re-order Part Number
SX CAP 20
SX CAP 200
Female connector
Re-order Part Number
SX FEMC 20
SX FEMC 200
SX Reticulation Product Manual
Copyright Southern Cross Building P roducts P/L 2010
Version 2 - Aug 2013
Product Specifications - Fittings
Construction
Marine Grade Stainless Steel
Service Temp
-10 to +80 Deg C
Chemical Resistance
Excellent
UV Stability
Excellent
Packaging
Bag 20; Box 200
Construction
Marine Grade Stainless Steel
Service Temp
-10 to +80 Deg C
Chemical Resistance
Excellent
UV Stability
Excellent
Packaging
Bag 20; Box 200
Hose Clamp
Re-order Part Number
SX HoseC 20
SX HoseC 200
Cobra Clamp
Re-order Part Number
SX Cobra 20
SX Cobra 200
SX Reticulation Product Manual
Copyright Southern Cross Building P roducts P/L 2010
Version 2 - Aug 2013
Product Specifications - Fittings
Construction
Injection Moulded PE (Pol ethylene)
Service Temp
-10 to +80 Deg C
Chemical Resistance
Excellent
UV Stability
Excellent
Packaging
Sold separately
Valve Box
Re-order Part Number
SX Valve Box
6" square box
SX Reticulation Product Manual
Copyright Southern Cross Building P roducts P/L 2010
Version 2 - Aug 2013
Product Specifications - Fittings
Construction
Injection Moulded PE (Poly ethylene)
Service Temp
-10 to +80 Deg C
Chemical Resistance
Excellent
UV Stability
Excellent
Packaging
Bag 20; Box 200
Construction
Injection Moulded PE (Poly ethylene)
Service Temp
-10 to +80 Deg C
Chemical Resistance
Excellent
UV Stability
Excellent
Packaging
Bag 20; Box 200
Pegs
Re-order Part Number
SX Pegs 20
SX Pegs 200
Saddles
Re-order Part Number
SXClips 20
SX Clips 200
SX Reticulation Product Manual
Copyright Southern Cross Building P roducts P/L 2010
Version 2 - Aug 2013
System Assembly
Fitting a Female Connector
Cut the end of the reticulation pipe clean and square using a sharp blade or shears
Put the clamp on the pipe first
Put press the barbed end of the fitting into the pipe.
Tigten the hose clamp (if required)
Fitting a Male Connector
Cut the end of the reticulation pipe clean and square using a sharp blade or shears
Put the clamp on the pipe first
Put the dust cap on to the barbed end of the connector.
Press the barbed end of the male connector in to the pipe.
Tighten the hose clamp (if required)
Fitting an End Stop
Cut the end of the reticulation pipe clean and square using a sharp blade or shears
Put the clamp on the pipe first
Press the barbed end of the end stop in to the pipe.
Tighten the hose clamp (if required)
SX Reticulation Product Manual
Copyright Southern Cross Building P roducts P/L 2010
Version 2 - Aug 2013
Safety
SX reticulation systems are safe to handle and install. Charging the installed
system requires distribution of pesticide. Pesticides can be dangerous and their
use is strictly controlled. Only people who have done specialised training (PSTM
national competencies 5; 6 & 18 also known as Certificate 3) may charge the
systems.
Accredited installer should develop safe work method statements (SWMS) for
handling storage and application of pesticides for their own operations.
Some key risks are highlighted regarding handling and laying SX reticulation.
Each installer is responsible for developing their own Full SWMS including
handling and distributing pesticides.
Job Step
Hazard
Risk
Score
SubstVery
Disaster Serious Serious antial
Minor
Almost
Certain
1
1
1
2
2
Likely
1
1
2
2
2
Possible
1
2
2
2
3
Remotely
Possoble
2
2
2
3
3
Control Measure
Site prep & pipe laying
UV Exposure
Slips falls
2
2
Correct PPE
Avoid rough terrain & correct lifting procedures
Movings bulk rolls
Lifting strains
2
Correct Manual lifting procedures / mechanical assistance
Cutting Pipe
Cuts
3
Correct PPE especially Gloves
Charging System
Chemical Exposure
2
Follow separate SWMS for chemical use.
SX Reticulation Product Manual
Copyright Southern Cross Building P roducts P/L 2010
Version 2 - Aug 2013
E
L
P
M
A
S
SX Reticulation Product Manual
Copyright Southern Cross Building P roducts P/L 2010
Version 2 - Aug 2013
Soils
Soils are classified as either “sand” “silt” or “clay”.
Most soils are a combination of each type. The proportion of each type material
determins the soil type. Note that silt soils are sometimes referred to as “Loam”
soils.
The soil triangle shows the soil types according to their proportions- For example
50% clay / 50% silt is “Silty Clay”.
A simple soil test can be done by taking a handful of soil, wet it with water and
squeeze it. If the sample feels gritty it has a high sand content, if it
feels ‘soapy’ it has high silt and if it feels ‘sticky’ it has high clay content.
Now try the ‘rope test’ take the sample and and try to roll it into a
small cylindrical shape like a rope.
- Sandy soils will simply break up and not even form a ball.
- Silt (loam) soil will feel slick and and only a little gritty it will
form a ball but the ball will break apart easily and cannot be
rolled onto a rope
- Clay soils feel smooth and sticky, will readily form into a
strong ball and can be moulded into a rope shape.
Being able to identify a soil type is important because clay
soils are very poor at absorbing the pesticide.
A clay soil must be removed and replaced with a sandy
soil before application of a pesticide
SX Reticulation Product Manual
Copyright Southern Cross Building P roducts P/L 2010
Version 2 - Aug 2013
Perimeter Installations
Where a slab is constructed in accordance with AS 3600 and AS 2870 it is considered to be termite resistant. This means
only the perimeter and any penetrations (including joints) need to be protected.
This section of the guide shows the 3 steps to complete the work.....
1. Site Assessment & Site Preparation
Site Assessment means making sure the site is ready for work to begin.
Site Preparation means starting to plan the work and checking for design or installation issues.
2. Installation
Once the site is prepared and the layout determined the pipe can be installed.
The reticulation pipe is placed or clipped against the slab edge, then backfilled with appropriate soil up to FGL which
should be just above the pipe.
3. Builder Home owner Notification
AS3660.1 requires a" Certificate of Installation" to be given showing what work was done and what sort of
maintenance is required.
Unfortunately for the installer many sites will not have landscaping done and it may not be obvious to the installer what
FGL will be during construction. Therefore the home owner & builder must be given appropriate advice about adjustments
that may be necessary if landscaping is going to compromise the barrier.
See the advice for landscapring in this guide, review your hand over documentation and speak to your insurer to be sure
people are aware of maintence requirements for the reticulation system.
These are the issues that are specific to this property and are additional to the standard handover paperwork.
SX Reticulation Product Manual
Copyright Southern Cross Building P roducts P/L 2010
Version 2 - Aug 2013
1. Site Preparations
Complete any safety procedures before starting work
Remove all contaminants from the area to be treated.
This includes timber offcuts, building debris and formwork
Check site for termite activity including timber on the ground; old fences; and trees.
Check the soil on site - if inappropriate arrange for new soil.
Debris; building rubble
and heavy clay soil.
SX Reticulation Product Manual
Bricklayers mortar .
Building rubble
Copyright Southern Cross Building P roducts P/L 2010
Too Wet
Version 2 - Aug 2013
Site Assessment
Check out the building noting:
position of drains, downpipes & HWS overflows
the height of finished ground levels
where driveways & paths will be.
any change in levels
any slabs or footingscast separately to the main slab
Note drain adjacent to building
Work out the “layout” of the system
We recommend that installers use a checklist for site preparation and layouts. The checklist
is a useful reminder of all the issues to deal with as well as a record of how the system is
laid out. This will allow accurate drawing of “Treatment Certificates”.
The form can also serve as a record of defects/issues reported to the builder.
A Layout plan determines the following:
position of valve boxes
length of pipe runs
Height the pipe needs to be fixed at given the finished ground level.
Mark any issues that need to be rectified or marked as a limitation on the certificate.
SX Reticulation Product Manual
Copyright Southern Cross Building P roducts P/L 2010
Version 2 - Aug 2013
Site Checklist & Job Plan (example)
Comment
Safety Check
Cleared debris
Termite Check
Check drains
Check FGL
Run lengths
Box locations
Access
Defects notified
SX Reticulation Product Manual
Refer Company SWMS
Removed building debis incl
mortar timber and rubbish
Checked trees, fences, timber
on site, stumps.
Checked to make sure pesticide
won’t be pumped into drains
Checked to make sure pipe is
the correct height for the FGL
Run length no more than
10m
Boxes are 1m away from
doors and downpipes
Boxes can still be accessed
after fences etc are built
Identify any potential prblems
with the install here.
E.g. builder to ensure sand on
top of pipe at driveway to avoid
encasement.
Paving
Pipe clipped on low
below paving levels
Driveway
Pipe clipped on low
below concrete levels
Copyright Southern Cross Building P roducts P/L 2010
Elbow
End stop
Valve Box
Retic Pipe
Version 2 - Aug 2013
Key Dimensions
These are the key dimensions to adhere to....
Maximum distance of pipe from slab edge ......... 75mm
Maximum height from Finished Ground level ......... 75mm
Maximum distance below hard landscaping (Concrete path driveway or pavers ......... 75mm
Maximum “run” of pipe (length from connector to end stop) ......... 10m
Maximum bend of pipe without an elbow ......... 90 degrees
Pump up pressure - depending on equipment aprox 20 psi for sandy soils; max 60 psi for loams
Remember the best method is to do a trial pump at the job to be sure a good soaking delivery is achieved
Caution.
Pressures above 60psi are likely to tunnell through many soils and in some instances may completely
wash away the soil leaving an inneffective barrier.
SX Reticulation Product Manual
Copyright Southern Cross Building P roducts P/L 2010
Version 2 - Aug 2013
Pipe Installation Equipment
HAND TOOLS - For system assembly
Mattock
PPE Including gloves
Shovel
Hammer
Fitiings
Pipe Cutter
Screw Driver (for clamps)
Accessories
SX Reticulation Product Manual
Nail Gun
Copyright Southern Cross Building P roducts P/L 2010
Pipe
Version 2 - Aug 2013
Perimeter Installations - Correct Height
Pipe clipped high
on footing
Pipe clipped Low
on footing
Timber Frame
Timber Frame
Masonry
Finished
Ground Level
Slab
The diagram and picture to the left shows the
pipe clipped on “high” ready for garden soil
and turf.
Masonry
Masonry
The material below the pipe is heavy clay and
would not be appropriate soil to hold the
pesticide. Here the home owner is building up
the level with a sandy loam (turf underlay)
which will hold the pesticide.
Slab
80mm Min
80mm
150mm
The diagram and picture to the right shows the
pipe clipped on low in preparation for sand
base and concrete slab or paving.
Treated Zone
150mm Min
It is important that the pipe is protected from
being encased in either concrete or mortar
when paving, this will block the emitting holes
and a barrier will not be formed.
SX Reticulation Product Manual
Copyright Southern Cross Building P roducts P/L 2010
Version 2 - Aug 2013
Pic 1 Layout the pipe/boxes
Perimeter Pipe “Clipped On”
Pic 1 Set Out the pipe and valve boxes.
Pic 2 Nail gun pipe clip on. Using clips is recomended otherwise the pipe could be
displaced from the slab edge
Pic 3 Pipe in place readyfor soil and turf to be laid. Note the pipe has been
passed behind the down pipe to ensure chemical gets in behind the down pipe.
Pic 2
Nail on the clips/pipe
Pic 4 Overlap at the end of the “run”, make sure there is at least one set of emitter
holes operating here.
Pic 5 & 6 Elbows & valve box fitted and the valve box placement. Elbows
are recommended here as it often makes connecting for a charge up easier.
Elbows can be used at corners, however generally elbows are not needed as the pipe easily
conforms to most slabs without kinking.
Pic 3
Pipe behind downpipes
SX Reticulation Product Manual
Pic 4
Overlap ends
Pic 5
Fit elbows / connectors
Copyright Southern Cross Building P roducts P/L 2010
Pic 6
Fit Valve Box
Version 2 - Aug 2013
Soil Replacement - “Trenching”
Trenching is required where the soil is either
(i) Above the concrete footings (i.e. too high) or
(ii) The soil is a poor quality and not appropriate for the pesticide.
A trench is dug around the affected area close in to the footing and minimum
150mm wide. The depth of the trench will depend on the height the pipe needs to
be installed at (refer previous pages).
Masonry
When trenching care should be taken for buried services such as water supply,
sewer / storm water drainage, telephone & electricity.
Ensure that trenching is done behind down pipes to allow the pipe continuous
contact with the slab edge.
FGL
Trench
Pic 1
SX Reticulation Product Manual
Pic 2
Copyright Southern Cross Building P roducts P/L 2010
Pic 3
Version 2 - Aug 2013
Installation - Step downs / Change of Level
A change of level raises two problems:
Firstly making sure the pipe is placed in the correct area to give a treated zone. The placement of the pipe will depend on how FGL is
managed. If a step is used as in Diag 1 then the pipe will follow the stepped FGL.
If the FGL slopes past the change of level then the pipe needs to also follow the FGL however installers need to be careful with this
detail as this is a potential weak point.
DO NOT treat stepdowns where FGL is above the edge of the slab
The detail in Diag 1 is always the safer option.
The second issue to consider is the effect a change in height will have on the amount of pesticide solution which is delivered.
Pumping 'uphill' will dramatically reduce the effective run length of the hose.
A rise/fall of more than 2 courses should not be treated (refer excluded details).
A change of level of less than 2 courses can be managed by shortening the run length to 8m maximum.
Diag 1
Diag 2
FGL
FGL
Dwg RS 2
SX Reticulation Product Manual
Dwg RS 2
Copyright Southern Cross Building P roducts P/L 2010
Version 2 - Aug 2013
Subfloor - Footings and Piers
SX reticulation line can be installed in a subfloor of a building either during or after construction.
The same principles apply here.
- Work out a layout of the system
- Trench out the soil
- Place the pipe adjacent to the footing
- Backfill with appropriate soil.
- Charge the system
Remember that both sides of the footing will need to be treated.
Timber
Frame
Pic 4
Masonry
FGL
Trench
SX Reticulation Product Manual
Copyright Southern Cross Building P roducts P/L 2010
Version 2 - Aug 2013
Isolated Piers & columns
Isolated piers in subfloors or columns for a Verandah can be protected with a feeder pipe and ring line.
The blue feeder line is not drilled it is ideal to transfer pesticide to a loop of perforated pipe which surrounds the pier.
A “T piece” fitting is used to form the ring line.
The feeder line can be up to 20m long feeding a single ring.
SX Reticulation Product Manual
Copyright Southern Cross Building P roducts P/L 2010
Version 2 - Aug 2013
Construction Joints
Control joints or construction joints occur where the concrete slabs are formed (poured) separately.
The joint may have steel connecting the two slabs but for the purposes of protection from termites these are effectively two slabs with a
small gap in the middle which may allow termite entr y.
Joints which occur in the inside the perimeter of the building are excluded from treatment with SX reticulation. See Diag 1 & 2
AS 3660.1 2000 requires these joints to be treated as part of a full underslab treatment.
Only joints which can be incorporated in the perimeter shall be treated.
See Diag 3
Installers should take care with the placement of the pipe , remembering to carefully determine the correct height of the path or driveway .
The pipe needs to be below the concrete so it is not encased accidentally .
The usual guidelines about appropriate soil/sand also apply here.
Timber
Frame
Garage
Slab
(Separate Pour)
Driveway
Fill
Footing
“Brick up Base”
SX Reticulation Product Manual
Construction Joints
within the building
Copyright Southern Cross Building P roducts P/L 2010
Version 2 - Aug 2013
Concrete Paths & Driveways
Concrete paths and driveways have the potential to encase the reticulation pipe. If this occurs the pesticide will be
restricted and the barrier will not be effective.
To remedy this the installer should ensure that the pipe is low enough to be below the concrete and put some sand/soil
over the pipe where the concrete will be poured .
Reticulation pipe encased
in concrete path
Timber Frame
Reticulation pipe below
concrete path
Masonry
Timber Frame
Masonry
Masonry
Slab
Slab
80mm Min
Treated Zone
150mm Min
SX Reticulation Product Manual
Copyright Southern Cross Building P roducts P/L 2010
Version 2 - Aug 2013
Excluded Installations
Generally any detail requiring a vertical barrier should not be treated using SX Reticulation.
If the installation requires more than one line of pipe to form the barrier then it is a vertical barrier and is excluded.
Some examples of constructions methods requiring a vertical barrier are described below.
“Infill Slabs”
“Brick up Base”
Timber
Frame
Masonry
Non Monolithic
Step
Timber
Frame
Retaining Walls
Timber
Frame
Masonry
Masonry
Fill
Slab
(Separate Pour)
Fill
Fill
FGL
Masonry
Fill
Footing
Other Exclusions:
Full Underslab treatments
“Raised Finished Ground Level”
Construction Joints
within the building
Timber posts in the ground
“Pipe Penetrations” through a slab on ground.
SX Reticulation Product Manual
Copyright Southern Cross Building P roducts P/L 2010
Version 2 - Aug 2013
System Limitations
Not to be installed .....
near drains of any type.
on impervious surfaces such as concrete, timber, rock, stones or masonry.
into inappropriate soils types.
in wall cavities
differently from “key dimensions”
Where multiple runs of pipe would be required to form a vertical barrier, such as in deep footings.
In areas or ways which are listed as “exclusions” in this guide
Not to be Charged .....
With pesticide which are not approved for use in the SX reticulation system.
At high pressures which will cause tunnelling or wash away susceptible soils.
Pump up pressure - depending on equipment aprox 20 psi for sandy soils; max 60 psi for loams
Remember the best method is to do a trial pump at the job to be sure
a good soaking delivery is achieved
Using 'Foaming'. SX Reticulation has not been tested for use with foaming.
SX Reticulation Product Manual
Copyright Southern Cross Building P roducts P/L 2010
Version 2 - Aug 2013
Landscaping Requirements
Not relocate the pipe
Not raise FGL more than 75mm above the pipe
Not encase the pipe in concrete or mortar
Use only appropriate (non clay) soils
Not introduce drains adjacent to the reticulation pipe
SX Reticulation Product Manual
Copyright Southern Cross Building P roducts P/L 2010
Version 2 - Aug 2013
Pumping Equipment
Motor & Pump
Flow Metre
Delivery Hose
Spill Kit
Pressure Gauge
Connector Fitting
Flow Metre
Honda 4.5 Hp Motor
100m x 13mm Delivery hose
Pressure Gauge
200L Tank
This type of pump system will produce pressures in excess of 100psi
SX Retic only requires 20 psi for sandy soils; max 60 psi for loams
SX Reticulation Product Manual
Copyright Southern Cross Building P roducts P/L 2010
Version 2 - Aug 2013
Mixing Chemicals
Sx reticulation can be charged with any pesticide that has a label registration to do so .
There are 2 issues for the instller to consider (1) the dilution or mixing rate and (2) the volume of pesticide to pump.
Mixing Rate
The pesticide label is the best guide for dilution or mixing rates.
An example of an FMC Bifenthrin Label shows the various dilution rates.
SX Reticulation Product Manual
Copyright Southern Cross Building P roducts P/L 2010
Version 2 - Aug 2013
Mixing Chemicals
Sx reticulation can be charged with any pesticide that has a label registartion to do so .
There are 2 issues for the instller to condider (1) the dilution or mixing rate and (2) the volume of pesticide to pump.
Volume to Pump
Again the the pesticide label is the best guide for volumes to apply .
The FMC Bifenthrin abel
L provides 2 methods of calculating how many litres of emulsion to apply: 100l / 1 m3 or 5L / metre .
So for a maximum pipe length of 10m 50 Litres would be pumped .
Note that this assumes a barrier (trench) 300mm x 150mm
SX Reticulation Product Manual
Copyright Southern Cross Building P roducts P/L 2010
Version 2 - Aug 2013
Checking Your Equipment & Settings
Tunnelling caused by too
much pressure
As every installer will have slightly different equipment and settings we strongly reccomend that installers
do a trial charge up using water or a very weak solution. See Pic 2
Using excessive high pressure will cause “tunnelling" or wash away soils.
Tunnelling is where the solution comes out of the pipe at a high pressure and ‘blasts’ a hole in the soil (See
Pic 1) .When charging the system creating an even wetting pattern is ideal. See Pics 3 & 4
If the pressure is too low the solution may not reach the end of the run.
The pressure to the pipe can be controlled by
- altering the motor revs
- altering the recycle valve to the tank
- altering the ball cock at the flow meter
Pic 1
Trial Pump up to determine correct settings
An even spread of solution
Good pressure
Pic 1
Pic 2
SX Reticulation Product Manual
Pic 3
Copyright Southern Cross Building P roducts P/L 2010
Pic 4
Version 2 - Aug 2013
Charging the System
Once the installer has determined the correct settings for their equipmen the charge up can be done
Mix the chemicals according to the manufacturers label
Open the valve box and connect the pump to the reticulation connector
Make sure the correct amount of emulsion is pumped down each run, this can be done with the flow metre
or by noting the measurements on the tank.
Watch for any unusual things such as higher or lower than usual back pressure
Document the amount of chemical used.
SX Reticulation Product Manual
Copyright Southern Cross Building P roducts P/L 2010
Version 2 - Aug 2013
Builder and Home Owner Notices.
Durable Notice
AS 3660.1 2000 Appendix A sets out the “Durable Notice” requirements for termite management systems:
The notice must
(a) nominate the method of termite management
(B) Indidate the date of installation
(C) Where a chemical barrier is used - diclose the life expectancy of the chemicals (refer the chemical manufacturers label)
(D) Set out the scope and frequency of inspections
The notice must be durable and placed in a prominent location.
Note that some states will require more than one notice - check with the local authoriy for state variations
Sample Durable Notice
Courtesy of Rapid
Solutions P/L
SX Reticulation Product Manual
Copyright Southern Cross Building P roducts P/L 2010
Version 2 - Aug 2013
Builder and Home Owner Notices.
Certificate of installation
AS 3660.1 2000 Appendix A 2 requires installers of barriers to provide
a certificate of installation. Copies should be available to:
Homeowner
Builder
Certifier
Pest Controller
The certificate shall include:
Full details of the barrier including the name of the chemical the
Concentration used and the volume applied.
Date of installation.
Extent of the barrier and whether it was incorporated with other
treatment methods.
A diagram
Details for the need for future inspections
Limitations arising from design or installation issues.
Maintenance requirements for the system
Installers’ contact details
Sample Certificate of installation provided courtesy of Rapid Solutions
P/L.
Installers may develop their own documentation but it must comply
with all the requirements of AS 3660.1 App A. Installers should also
consult with their insurers before altering documentation.
SX Reticulation Product Manual
Copyright Southern Cross Building P roducts P/L 2010
Version 2 - Aug 2013
Additional Information:
AS 3660.1 2000 sets out the minimum requirements for documentation (”durable Notice” &
“Installation Certificate”). We recommend that you provide additional plain English information to
home owners and builders.
Commonwealth and State Government Agenciesprovide independent
and professional information.
www.timber.net.au
www.bsa.qld.gov.au
Peak Industry Bodies also provide consumer and builder information
www.hia.com.au
www.masterbuilders.asn.au
www.choice.com.au
www.rapidsolutions.com.au
SX Reticulation Product Manual
Copyright Southern Cross Building P roducts P/L 2010
Version 2 - Aug 2013
Warranties
Period of Warranty
In addition to any warranties or conditions implied by the Trade Practices Act, 1974 (as amended) or any other Statute or
Regulation, we warrant all of our components against defective workmanship and faulty materials under normal use for a period of
30 years.
To the extent permitted by law and for the purposes of the Warranty where the product is found to be defective during the
warranty period our sole obligation under this warranty is, at our option to repair or replace free of charge the defective
component(s).
Warranty Exclusions, Limitations and Rights
To the extent permitted by law and other than as required by the Trade Practices Act and other applicable legislation, we give
no further warranties and make no representations relating to the suitability os products or systems for specific applications or
sites.
SCBP offers no warranty in regard to the pesticide used or the installation.
The warranty excludes consequential loss damage or costs resulting from a failure of a system.
The warranty shall not apply where:
- The products are installed not in accordance with the appropriate SCBP Installation Guide
- The products or systems are installed contrary to the relevant Australian Standard or Building Code.
- Non genuine SCBP Components are substituted
- Annual inspection and servicing requirements are not maintained.
- The system is modified or altered so as to be inconsistent with the appropriate SCBP Installer Guide
Duties of the Installer
The Installation Guidelines set out Installer obligations relation to competency of installers and correct methods of installation
and care and maintenance of systems after hand over.
SX Reticulation Product Manual
Copyright Southern Cross Building P roducts P/L 2010
Version 2 - Aug 2013
End Installers Guide
SX Reticulation Product Manual
Copyright Southern Cross Building P roducts P/L 2010
Version 2 - Aug 2013