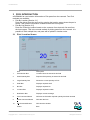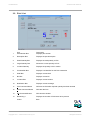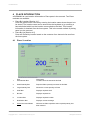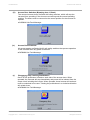
1
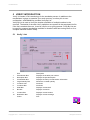
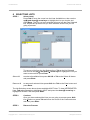
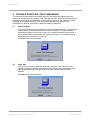
VERTICAL
CAROUSEL
wCARMAN
Lite
OPERATORS
MANUAL
First Issue: May 2001
Copyright 2001 – 2005 Kardex VCA Pty Ltd
All Rights Reserved
wCARMANLite
OPERATORS MANUAL
TABLE OF CONTENTS
1
LOADING INSTRUCTIONS .................................................................... 1
2
GETTING STARTED ............................................................................... 3
3
2.1
LOGGING IN TO WCARMAN LITE ............................................................... 3
2.2
SET CURRENT SHELF ................................................................................ 4
2.3
GETTING AROUND THE MAIN MENU ............................................................ 5
2.4
LOGOUT AND CLOSE WCARMAN LITE ................................................... 6
PICK INTRODUCTION............................................................................ 7
3.1
PICK \ LOCATION SCREEN .......................................................................... 7
Pick By Location.................................................................................... 8
STEP 1
STEP 2
STEP 3
STEP 4
STEP 5
3.2
PICK \ LIST .............................................................................................. 10
STEP 1
STEP 2
STEP 3
STEP 4
4
Enter Location Name .............................................................. 8
Enter Quantity ......................................................................... 8
Count and Pick Parts .............................................................. 9
Confirm Quantity ..................................................................... 9
Is Location Empty?.................................................................. 9
Select List(s) ......................................................................... 11
Count and Pick Parts ............................................................ 11
Confirm Quantity ................................................................... 11
Is Location Empty?................................................................ 12
PLACE INTRODUCTION ...................................................................... 13
4.1
PLACE \ LOCATION .................................................................................. 13
Place By Location ............................................................................... 14
STEP 1
STEP 2
STEP 3
STEP 4
4.2
PLACE \ LIST ........................................................................................... 16
STEP 1
STEP 2
STEP 3
4.3
Enter Location Name ............................................................ 14
Enter Quantity ....................................................................... 14
Count and Place Parts .......................................................... 15
Confirm Quantity ................................................................... 15
Select List(s) ......................................................................... 17
Count and Place Parts .......................................................... 17
Confirm Quantity ................................................................... 17
CHANGE PLACE QUANTITY ...................................................................... 18
STEP A
STEP B
No to Confirm Quantity ......................................................... 18
Enter New Quantity............................................................... 18
Doc ID: wCARMAN Lite OM.2.doc
Copyright 2001 – 2005 Kardex VCA Pty Ltd
i
All Rights Reserved
wCARMANLite
5
OPERATORS MANUAL
VERIFY INTRODUCTION ..................................................................... 19
5.1
VERIFY \ LIST .......................................................................................... 19
STEP 1
STEP 2
STEP 3
STEP 4
6
SELECTING LISTS ............................................................................... 21
STEP 1
STEP 2
STEP 3
7
Select List(s) ......................................................................... 20
Count Stock........................................................................... 20
Enter Quantity ....................................................................... 20
Confirm Quantity ................................................................... 20
Select List(s) ......................................................................... 21
Continue................................................................................ 21
Return to Process ................................................................. 21
MANUAL CAROUSEL OPERATIONS.................................................. 23
7.1
MOVE TO SHELF ..................................................................................... 23
7.2
SET SHELF .............................................................................................. 24
8
SHORTCUT KEYS ................................................................................ 25
9
TROUBLE SHOOTING / FAULT MESSAGES ..................................... 26
Valid for wCARMAN Lite Release 1.3.00.20040330
Doc ID: wCARMAN Lite OM.2.doc
Copyright 2001 – 2005 Kardex VCA Pty Ltd
ii
All Rights Reserved
wCARMANLite
OPERATORS MANUAL
IMPORTANT NOTICE
THE PC SUPPLIED WITH YOUR CAROUSEL IS AN INTEGRAL
PART OF THE CAROUSEL CONTROL SYSTEM
IF THE PC SOFTWARE IS CONFIGURED BY KARDEX VCA, ITS
OPERATION WILL BE CONFIRMED WITH THE CUSTOMER ON
COMPLETION OF THE COMMISSIONING PROCESS
THE WARRANTY WILL BE VOID IF THE CUSTOMER OR THEIR
REPRESENTATIVE CHANGES, MODIFIES OR MAKES ANY
ADDITIONS TO THE HARDWARE AND/OR SOFTWARE OF THE
CAROUSEL CONTROL SYSTEM WITHOUT THE WRITTEN
PERMISSION OF KARDEX VCA
THE CUSTOMER IS RESPONSIBLE FOR THE MAINTENANCE
OF ALL DATA FILES, INCLUDING BACKUP AND RESTORATION
PROCEDURES
Doc ID: wCARMAN Lite OM.2.doc
Copyright 2001 – 2005 Kardex VCA Pty Ltd
iii
All Rights Reserved
wCARMANLite
OPERATORS MANUAL
1 LOADING INSTRUCTIONS
Your vertical Carousel operates on the counter-balance principle. This means that both
front and back carriers should be reasonably in balance throughout the entire cycle.
When initially loading your carousel you should load opposite carriers and thus
maintain a reasonable balance. For example, in a 20 carrier carousel you should load
in the following order:
1, 11, 2, 12, 3, 13, 4, 14, 5, 15, 6, 16, 7, 17, 8, 18, 9, 19, 10, 20
IMPORTANT: The balanced allocation of locations within the carousel must be
facilitated by the host system. This principle of operation must be
implemented in the host system to ensure that carousel loading remains
reasonably balanced.
The maximum out-of-balance tolerance is 20%.
You will know if your carousel is out-of-balance by the following symptoms:
(i)
The out-of-balance indicator will show an overload condition.
The pointer will be in one of the red zones most of the time or is moving
dramatically from one side of the indicator to the other.
(ii)
(iii)
Motor noise indicates extra load at certain stages of the cycle.
The unit starts and runs roughly and trips the electronic drive.
If any of these symptoms are noted, it is recommended that you adjust the load to
ensure better balance.
CONSISTENTLY RUNNING YOUR CAROUSEL
OUT-OF-BALANCE WILL CAUSE DAMAGE!
WARNING:
THE CAPACITY OF EACH CARRIER IN YOUR CAROUSEL IS
100/250/500/750KG INCLUDING ANY INTERMEDIATE SHELVES.
ITEMS STORED IN THE CARRIER MUST LIE WITHIN THE BOUNDS OF
THE CARRIER. THEY MUST NOT PROTRUDE OVER THE FRONT LIP OR
EXCEED THE HEIGHT OF THE CARRIER SIDE.
FAILURE TO OBSERVE THESE CONDITIONS COULD DAMAGE YOUR
CAROUSEL AND IS NOT COVERED UNDER KARDEX VCA WARRANTY.
Doc ID: wCARMAN Lite OM.2.doc
Copyright 2001 – 2005 Kardex VCA Pty Ltd
Page 1 of 28
All Rights Reserved
wCARMANLite
Doc ID: wCARMAN Lite OM.2.doc
Copyright 2001 – 2005 Kardex VCA Pty Ltd
OPERATORS MANUAL
Page 2 of 28
All Rights Reserved
wCARMANLite
OPERATORS MANUAL
2 GETTING STARTED
The Carousel can be turned ON or OFF using the Isolator Switch located on the right
hand side of the machine and above the manual control panel. After the carousel has
been switched ON, the PC can then be started. wCARMAN Lite automatically runs
when Windows is started, however, it can be run from the following shortcuts:
C:\Windows\Desktop\
-
For Easy Desktop Access
C:\Windows\Start Menu\
-
For Easy Start Menu Access
The Welcome screen is the first window seen in wCARMAN Lite. It has two functions;
one is to LOGIN to wCARMAN Lite and the other is to CLOSE wCARMAN Lite.
2.1
Logging in to wCARMAN Lite
When wCARMAN Lite is first started, the Login button is highlighted, press Enter on
the keyboard to Login or alternatively press Alt & L.
Type your user name in the Name box then Tab to the Password box and type your
password then press Enter. The password and user names are not case sensitive so it
makes no difference if you use capital letters or not.
Doc ID: wCARMAN Lite OM.2.doc
Copyright 2001 – 2005 Kardex VCA Pty Ltd
Page 3 of 28
All Rights Reserved
wCARMANLite
OPERATORS MANUAL
If you type the incorrect user name or the incorrect password, the following error will
appear.
To clear this error, press Enter and you will return to the Login screen. As the error box
states, try to Login again and if you do not get it right after a few attempts then contact
your supervisor for assistance.
If the Carousel PC has not been able to communicate with the machine Programmable
Logic Controller (PLC), the following error will appear:
To clear this error, press Enter and the Main Menu will be displayed. You will need to
Logout of wCARMAN Lite and Login again. If this message is repeated, please contact
your supervisor for assistance.
NOTE:
IF WCARMAN LITE IS USED IN DEMO MODE, THE CAROUSEL WILL NOT
ROTATE.
2.2 Set Current Shelf
NOTE:
THIS FUNCTION IS NOT AVAILABLE IN DEMO MODE.
Each time you Login (or if you select this option from the Tools Menu) this screen will
appear. If the shelf number displayed on this screen is different to the one seen at the
carousel access level you should change it so that it displays the current shelf number
seen at the carousel access level. This function can be used at any time if the carousel
count is not correct.
Doc ID: wCARMAN Lite OM.2.doc
Copyright 2001 – 2005 Kardex VCA Pty Ltd
Page 4 of 28
All Rights Reserved
wCARMANLite
NOTE:
OPERATORS MANUAL
YOU CAN NOT ESCAPE FROM THIS SCREEN YOU MUST PRESS THE ENTER
KEY ON THE CORRECT SHELF NUMBER TO PROCEED.
You can change the current shelf by over-writing the incorrect shelf number with the
correct one or selecting the correct shelf number from the pull down menu. When the
correct shelf number is seen press Enter.
To access the pull down menu and see all the available shelves press F4. Use the
up(↑) and down(↓) arrow keys to highlight the correct shelf then press Enter.
WARNING: IF CURRENT SHELF IS DIFFERENT TO THE ACTUAL SHELF
AT THE CAROUSEL ACCESS LEVEL, THE CAROUSEL WILL
NOT ROTATE TO THE CORRECT LOCATION.
2.3
Getting around the Main Menu
The Main Menu is used to select the functions you wish to use in wCARMAN Lite. The
Status Bar at the bottom of the form provides information about how each function can
be initiated and also shows the current user name.
To navigate the Main Menu use the up(↑) and down(↓) arrow keys to highlight a
function then press the Enter key. To expand a menu, press the right(→) arrow key
and to collapse a menu press the left(←) arrow key.
The function keys (F1 – F6) can be used to move quickly from one main heading to
another. It is also possible to select a function by pressing the alpha key that is the first
letter of the word.
Doc ID: wCARMAN Lite OM.2.doc
Copyright 2001 – 2005 Kardex VCA Pty Ltd
Page 5 of 28
All Rights Reserved
wCARMANLite
2.4
OPERATORS MANUAL
LOGOUT and CLOSE wCARMAN Lite
Select Logout (F6) from the Main Menu and then press Enter.
At the confirm message press Enter.
At the Welcome screen, press Alt & C for Close, or Tab to Close button and press
Enter.
Press Alt & Y for Yes to confirm. Or Tab to the Yes button then press Enter to confirm.
NOTE:
IT IS IMPORTANT TO SHUT DOWN THE CAROUSEL PC IN AN ORDERLY
MANNER. THIS MUST BE DONE BEFORE THE CAROUSEL ISOLATOR IS TURNED
TO THE OFF POSITION. AN ORDERLY SHUT DOWN IS DONE BY FOLLOWING
THE WINDOWS SHUTDOWN PROCEDURE NOTED BELOW:
After you have shut down wCARMAN Lite:
Press Ctrl & Esc to open the Windows Start Menu, then press u.
Make sure Shut down is selected and then press Enter to shut down Windows and the
carousel PC.
Doc ID: wCARMAN Lite OM.2.doc
Copyright 2001 – 2005 Kardex VCA Pty Ltd
Page 6 of 28
All Rights Reserved
wCARMANLite
OPERATORS MANUAL
3 PICK INTRODUCTION
wCARMAN Lite uses location information to Pick parts from the carousel. Two Pick
methods are available:
• Pick By Location [Section 3.1]
Parts are picked from the carousel by entering the location name where the part is
stored. This location information is obtained from the host system.
• Pick By List [Section 3.2]
Parts are Picked by location based on the contents of an electronic list sent from
the host system. This is the normal method of picking parts from the carousel. It is
possible to Pick multiple lists, and parts will be picked in location order.
3.1
Pick \ Location Screen
1
Item
Part Number Box
Description
Location Name is entered in this field
2
Small Quantity Box
Required Pick quantity is entered in this field.
3
Large Quantity Box
Shows the current quantity to Pick
4
Shelf Box
Displays required shelf
5
Bin Box
Displays required bin
6
Location Box
Displays required location
7
Notification Box
Displays current message
8
Pick Command Button
Will execute Pick after required quantity has been entered
9
Reset Command Button
Will clear the form
10
Exit Command Button
Will close the window
Colour
Blue
Doc ID: wCARMAN Lite OM.2.doc
Copyright 2001 – 2005 Kardex VCA Pty Ltd
Page 7 of 28
All Rights Reserved
wCARMANLite
OPERATORS MANUAL
Pick By Location
STEP 1
Enter Location Name
Type in the location name to Pick from, then press Enter.
STEP 2
Enter Quantity
Type in the quantity that you want to Pick then press Enter.
The carousel will then rotate to the part location.
Doc ID: wCARMAN Lite OM.2.doc
Copyright 2001 – 2005 Kardex VCA Pty Ltd
Page 8 of 28
All Rights Reserved
wCARMANLite
STEP 3
OPERATORS MANUAL
Count and Pick Parts
As the carousel rotates to the required shelf, a lamp will come on,
indicating which bin to Pick from. The required location in the bin is
shown in large red text on the screen.
When the carousel has finished rotating, count the parts as you Pick
them from the bin.
STEP 4
Confirm Quantity
Confirm the Pick quantity by pressing Enter or press a remote
confirmation button on the carousel bench. The quantity to confirm is
shown in large blue text on the screen.
The Pick process is now complete.
If there is insufficient stock for you to Pick, you will need to find the next location where
stock is held. This information is available from your host system.
If the Pick empties a location proceed to STEP 5.
STEP 5
Is Location Empty?
Confirm the location is empty by pressing Enter or press a remote
confirmation button on the carousel bench.
If there is stock left Tab to the No button and press Enter.
wCARMAN Lite will remember if the location is free. This information is used in reports
and also to speed up the Place process.
Doc ID: wCARMAN Lite OM.2.doc
Copyright 2001 – 2005 Kardex VCA Pty Ltd
Page 9 of 28
All Rights Reserved
wCARMANLite
OPERATORS MANUAL
3.2
Pick \ List
1
Item
Part Number Box
Description
Displays part number
2
Description Box
Displays the part description
3
Small Quantity Box
Displays the total quantity to Pick
4
Large Quantity Box
Shows the current quantity to Pick
5
Location Quantity
Displays the quantity in the Location
6
List Identifier Box
Displays List Identifier for this Pick transaction
7
Shelf Box
Displays current shelf
8
Bin Box
Displays current bin
9
Location Box
Displays current location
10
Notification Box
Displays current message
11
Pick Command Button
Will execute Pick after required quantity has been entered
12
Reset Command Button
Will clear the form
13
Exit Command Button
Will close the window
14
Remaining x
Displays the number of Pick items left to process
Colour
Blue
Doc ID: wCARMAN Lite OM.2.doc
Copyright 2001 – 2005 Kardex VCA Pty Ltd
Page 10 of 28
All Rights Reserved
wCARMANLite
OPERATORS MANUAL
Pick By List
STEP 1
Select List(s)
Select the List or Lists you wish to use for the Pick operation. Refer to Section 6,
Selecting Lists.
The first location part number and required quantity will be presented on the Pick form.
The carousel will then rotate to the shown part location.
STEP 2
Count and Pick Parts
As the carousel rotates to the required shelf, a lamp will come on,
indicating which bin to Pick from. The required location in the bin is
shown in large red text on the screen.
When the carousel has finished rotating, count the parts as you Pick
them from the bin.
STEP 3
Confirm Quantity
Confirm the Pick quantity by pressing Enter or press a remote
confirmation button on the carousel bench. The quantity to confirm is
shown in large blue text on the screen.
The Pick process is now complete.
Doc ID: wCARMAN Lite OM.2.doc
Copyright 2001 – 2005 Kardex VCA Pty Ltd
Page 11 of 28
All Rights Reserved
wCARMANLite
OPERATORS MANUAL
If there is insufficient stock for you to Pick, you will need to find the next location where
stock is held. This information is available from your host system.
If the Pick empties a location, proceed to STEP 4.
STEP 4
Is Location Empty?
Confirm the location is empty by pressing Enter or press a remote
confirmation button on the Carousel bench.
If there is stock left Tab to the No button and press Enter.
wCARMAN Lite will remember if the location is free. This information is used in reports
and also to speed up the Place process.
Doc ID: wCARMAN Lite OM.2.doc
Copyright 2001 – 2005 Kardex VCA Pty Ltd
Page 12 of 28
All Rights Reserved
wCARMANLite
OPERATORS MANUAL
4 PLACE INTRODUCTION
wCARMAN Lite uses location information to Place parts in the carousel. Two Place
methods are available:
•
Place By Location [Section 4.1]
Parts are placed in the carousel by entering the location name where the part is to
be stored. The location name can be entered via the keyboard or by scanning a
barcoded label which has the location name coded on the label. This location
information is obtained from the host system. This is the normal method of placing
parts in to the carousel.
•
Place By List [Section 4.2]
Parts are Placed by location based on the contents of an electronic list sent from
the host system.
4.1
Place \ Location
1
Item
Part Number Box
Description
Location Name is entered in this field
2
Small Quantity Box
Required Place quantity is entered in this field.
3
Large Quantity Box
Shows the current quantity to Place
4
Shelf Box
Displays required shelf
5
Bin Box
Displays required bin
6
Location Box
Displays required location
7
Notification Box
Displays current message
8
Place Command Button
Will execute Place operation after required quantity has
been entered
Doc ID: wCARMAN Lite OM.2.doc
Copyright 2001 – 2005 Kardex VCA Pty Ltd
Page 13 of 28
All Rights Reserved
wCARMANLite
OPERATORS MANUAL
9
Item
Reset Command Button
Description
Will clear the form
10
Exit Command Button
Will close the window
Colour
Green
Place By Location
STEP 1
Enter Location Name
Type in the location name to Pick from, then press Enter.
STEP 2
Enter Quantity
Type in the quantity that you want to Place then press Enter.
Doc ID: wCARMAN Lite OM.2.doc
Copyright 2001 – 2005 Kardex VCA Pty Ltd
Page 14 of 28
All Rights Reserved
wCARMANLite
OPERATORS MANUAL
The carousel will then rotate to the part location.
STEP 3
Count and Place Parts
As the carousel rotates to the required shelf, a lamp will come on,
indicating which bin to Place to. The required location in the bin is shown
in large red text on the screen.
When the carousel has finished rotating, count the parts as you Place
them to the bin.
STEP 4
Confirm Quantity
Confirm the Place quantity by pressing Enter or press a remote
confirmation button on the carousel bench. The quantity to confirm is
shown in large blue text on the screen.
If the quantity you have to Place in the location does not match the quantity displayed
on the screen, you must change the Place quantity. Refer to Section 4.3.
The Place process is now complete.
If the location is too small for the quantity of stock you have to place, you will need to
allocate another location. This information is available from your host system.
Doc ID: wCARMAN Lite OM.2.doc
Copyright 2001 – 2005 Kardex VCA Pty Ltd
Page 15 of 28
All Rights Reserved
wCARMANLite
OPERATORS MANUAL
4.2
Place \ List
1
Item
Part Number Box
Description
Displays part number
2
Description Box
Displays the part description
3
Small Quantity Box
Displays the total quantity to Place
4
Large Quantity Box
Shows the current quantity to Place
5
Location Quantity
Displays List Identifier for the Place transaction
6
List Identifier Box
Displays the List this Place operation comes from
7
Shelf Box
Displays current shelf
8
Bin Box
Displays current bin
9
Location Box
Displays current location
10
Notification Box
Displays current message
11
Place Command Button
Will execute Place after required quantity has been
entered
12
Reset Command Button
Will clear the form
13
Exit Command Button
Will close the window
14
Remaining x
Displays the number of Place items left to process
Colour
Green
Doc ID: wCARMAN Lite OM.2.doc
Copyright 2001 – 2005 Kardex VCA Pty Ltd
Page 16 of 28
All Rights Reserved
wCARMANLite
OPERATORS MANUAL
Place By List
STEP 1
Select List(s)
Select the List or Lists you wish to use for the Place operation. Refer to
Section 6, Selecting Lists.
The first location part number and required quantity will be presented on
the Place form. The carousel will then rotate to the shown part location.
STEP 2
Count and Place Parts
As the carousel rotates to the required shelf, a lamp will come on,
indicating which bin to Place to. The required location in the bin is shown
in large red text on the screen. When the carousel has finished rotating,
count the parts as you Place them from the bin.
STEP 3
Confirm Quantity
Confirm the Place quantity by pressing Enter or press a remote
confirmation button on the carousel bench. The quantity to confirm is
shown in large blue text on the screen.
If the quantity you have to Place in the location does not match the quantity displayed
on the screen, you must change the Place quantity. Refer to Section 4.3.
The Place process is now complete.
If the location is too small for the quantity of stock you have to place, you will need to
allocate another location. This information is available from your host system.
Doc ID: wCARMAN Lite OM.2.doc
Copyright 2001 – 2005 Kardex VCA Pty Ltd
Page 17 of 28
All Rights Reserved
wCARMANLite
4.3
OPERATORS MANUAL
Change Place Quantity
STEP A
No to Confirm Quantity
To change the Place quantity, Tab to the No key then press Enter.
STEP B
Enter New Quantity
Type in the correct quantity and press Enter.
Return to the next step in your Place process.
Doc ID: wCARMAN Lite OM.2.doc
Copyright 2001 – 2005 Kardex VCA Pty Ltd
Page 18 of 28
All Rights Reserved
wCARMANLite
OPERATORS MANUAL
5 VERIFY INTRODUCTION
‘Verify’ is Kardex VCA’s terminology for the stocktake process. In addition to the
mechanisms in place to maxmise your stock accuracy, such as pick to zero
confirmation, wCARMAN Lite provides Verify By List.
Verify By List is used to Verify the location quantities of multiple locations in the
carousel. The details of the each Verify operation are reported in the populated List file.
If the list is retained after use, it can be used in an on-going manner. Verify By List can
be used for perpetual stocktaking activities for locations with fast moving items or for a
complete machine location Verify.
5.1
Verify \ List
1
2
3
3
4
6
7
8
9
10
Item
Part Number Box
Description Box
List Identifier Box
Large Quantity Box
Locations Left
Locations Box
Shelf Box
Bin Box
Location Box
Notification Box
Colour
Doc ID: wCARMAN Lite OM.2.doc
Copyright 2001 – 2005 Kardex VCA Pty Ltd
Description
Displays the location part number
Displays the part description
Displays the Verify List transaction information
Shows the counted quantity
Not Used
Not Used
Displays current shelf
Displays current bin
Displays current location
Displays current message
Pink
Page 19 of 28
All Rights Reserved
wCARMANLite
OPERATORS MANUAL
Verify By List
STEP 1
Select List(s)
Select the List or Lists you wish to use for the Verify operation. Refer to
Section 6, Selecting Lists.
The first location part number will be presented on the Verify form.
STEP 2
Count Stock
When the carousel has finished rotating, count the quantity in the
location and press Enter.
STEP 3
Enter Quantity
Type the quantity that you counted then press Enter.
STEP 4
Confirm Quantity
Press Enter to confirm the counted quantity.
The Verify Process is now complete.
If there are more locations to count, the carousel will rotate to the next location and
repeat the process from STEP 2.
Doc ID: wCARMAN Lite OM.2.doc
Copyright 2001 – 2005 Kardex VCA Pty Ltd
Page 20 of 28
All Rights Reserved
wCARMANLite
OPERATORS MANUAL
6 SELECTING LISTS
STEP 1
Select List(s)
Press Tab to move the cursor into the Lists Available box, then use the
up(↑) and down(↓) arrow keys to highlight the List you require and
press Enter. The List you have selected will move into the Lists Selected
box. Repeat this process until you have selected all the Lists you are
going to process.
To remove a List from the List Selected box, Tab to the List Selected
box and use the up(↑) and down(↓) arrow keys to highlight the List you
want to remove then press Enter.
Select All
to select all available Lists press Alt & S or Tab to the Select All button
and press Enter.
Remove All
to remove all selected Lists press Alt & L or Tab to the Clear button and
press Enter.
The List Selection screen above shows available HOST Lists. To view INTERRUPTED
Lists, Tab to the Source box highlighting HOST and press the down(↓) arrow key to
highlight INTERRUPTED then press Enter.
STEP 2
Continue
Once you have selected the Lists you are going to process press Alt &
C to Continue or press Tab and move the cursor to the Continue button
and then press Enter.
STEP 3
Return to Process
Doc ID: wCARMAN Lite OM.2.doc
Copyright 2001 – 2005 Kardex VCA Pty Ltd
Page 21 of 28
All Rights Reserved
wCARMANLite
OPERATORS MANUAL
For Pick, Place or Verify by List operations, return to STEP 2 in the relevant process
you are using, as listed below.
Process
Section
Pick by List
3.2
Place by List
4.2
Verify by List
5.1
When all lists have been completed, the following message will be displayed:
Press Enter to Clear the Message.
Doc ID: wCARMAN Lite OM.2.doc
Copyright 2001 – 2005 Kardex VCA Pty Ltd
Page 22 of 28
All Rights Reserved
wCARMANLite
7
MANUAL CAROUSEL OPERATIONS
7.1
Move To Shelf
OPERATORS MANUAL
The Move To Shelf function allows the operator to rotate the carousel to a specific shelf
number. This function has no input into the database and is primarily used to test the
carousel operation.
You can select a target shelf by simply over-writing the current shelf number using the
keyboard
Or, by selecting a target shelf number from the pull down menu, then press Enter to
begin carousel movement.
To access the pull down menu and see all the available shelves press F4. Use the
up(↑) and down(↓) arrow keys to highlight the target shelf then press Enter to accept
the highlighted shelf.
You can then watch the carousels progress on the Move Carousel screen, which
shows the current location and the target location.
Doc ID: wCARMAN Lite OM.2.doc
Copyright 2001 – 2005 Kardex VCA Pty Ltd
Page 23 of 28
All Rights Reserved
wCARMANLite
7.2
OPERATORS MANUAL
Set Shelf
The Set Shelf function is used to update the wCARMAN 32 shelf position with the
actual carousel shelf position. This function can be used at any time, and may be
required periodically if the carousel count gets out of sync with wCARMAN 32. The Set
Shelf function is presented on system start-up and must be acknowledged by the
operator.
For a full description of Set Shelf please refer to Section 2.2.
Doc ID: wCARMAN Lite OM.2.doc
Copyright 2001 – 2005 Kardex VCA Pty Ltd
Page 24 of 28
All Rights Reserved
wCARMANLite
OPERATORS MANUAL
8 SHORTCUT KEYS
F4
View pull down menu
Alt & C
Cancel
Alt & I
Info
Alt & F
Find
Enter
Confirm operation
Esc
Go back a step
Tab
Move forward to command
buttons
Shift & Tab
Move backward to command
buttons
Main Menu navigation:
up(↑) and down(↓) arrow keys
Navigate Main Menu
right(→) arrow key
Expand a menu
left(←) arrow key
Collapse a menu
Enter
Select item
Doc ID: wCARMAN Lite OM.2.doc
Copyright 2001 – 2005 Kardex VCA Pty Ltd
Page 25 of 28
All Rights Reserved
wCARMANLite
OPERATORS MANUAL
9 TROUBLE SHOOTING / FAULT MESSAGES
The Carousel is fitted with various safety devices, which operate regardless of the
mode in which the carousel is being used. The devices are in place to provide personal
protection to the users and protection for the inventory stored in the Carousel. A fault
message is generated whenever one of the safety devices is activated. Fault
messages can also be generated for different modes of operation.
(i)
Photocell Eyes
The access door area(s) are fitted with up to three photocell eyes. The photocell
beam must be uninterrupted for the Carousel to operate. The photocells are
positioned to detect if any trays or parts are outside the bounds of the carrier. If
the photocell beam is interrupted, the carousel will stop. The problem must be
fixed before the carousel can continue.
wCARMAN Lite Fault Message:
(ii)
Light Grid
The carousel access is fitted with a fail-safe light grid. This device is a selfchecking personnel safety device and will stop the carousel immediately if the
light grid is obstructed. The light grid will provide hand protection for the
operator.
wCARMAN Lite Fault Message:
Doc ID: wCARMAN Lite OM.2.doc
Copyright 2001 – 2005 Kardex VCA Pty Ltd
Page 26 of 28
All Rights Reserved
wCARMANLite
(iii)
OPERATORS MANUAL
Access Door Switches (Biparting door, if fitted)
The carousel access doors are fitted with safety switches, which will stop the
carousel from operating, if the doors are moved beyond the normal operating
position. The doors must be returned to the normal position for the carousel to
operate.
wCARMAN Lite Fault Message:
(iv)
Access Panel Switches
All access panels are fitted with fail safe safety switches that prevent operation
of the carousel when any panel is removed.
wCARMAN Lite Fault Message:
(v)
Emergency Stop Latching Pushbuttons
One E-STOP pushbutton is fitted on each side of the access doors. When
operated, the carousel will stop immediately and power will be isolated from the
output circuit including the inverter. When operated, these buttons will latch and
must be unlatched to be reset. Twisting the pushbuttons in a clockwise direction
will unlatch them.
wCARMAN Lite Fault Message:
Doc ID: wCARMAN Lite OM.2.doc
Copyright 2001 – 2005 Kardex VCA Pty Ltd
Page 27 of 28
All Rights Reserved
wCARMANLite
(vi)
OPERATORS MANUAL
User Stop
If any button on the keyboard is pressed while the carousel is moving the
movement will be stopped.
wCARMAN Lite Fault Message:
(vii)
Inverter Fault
If the inverter trips, the carousel will stop immediately. The RESET pushbutton
must be pressed to restart the inverter.
wCARMAN Lite Fault Message:
(viii)
Manual Mode Fault
If the carousel mode is selected to MANual while wCARMAN 32 is in use, the
following message will be displayed. The carousel mode must be selected to
AUTO for wCARMAN 32 to operate correctly.
wCARMAN Lite Fault Message:
Doc ID: wCARMAN Lite OM.2.doc
Copyright 2001 – 2005 Kardex VCA Pty Ltd
Page 28 of 28
All Rights Reserved
wCARMANLite
OPERATORS MANUAL
If you have a problem with your Carousel, or with wCARMAN Lite, that you cannot
solve, please contact your supervisor.
In most cases, problems can be easily addressed by your own IT people. However if
there is a problem that you cannot solve, please contact our Customer Service team:
Customer Service
Wodonga Office Australia
Phone: +61 (02) 6056 5173
Fax: +61 (02) 6056 2422
Email: [email protected]
Doc ID: wCARMAN Lite OM.2.doc
Copyright 2001 – 2005 Kardex VCA Pty Ltd
Page 29 of 28
All Rights Reserved