1
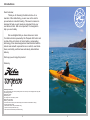
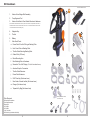
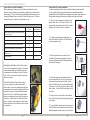
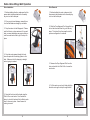
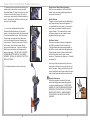
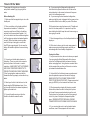
Owners Manual
Contents
1. Introductions.....................................................................4
2. Important Safety and Operating Instructions....................6
3. Kit Breakdown...................................................................8
4. Thru Hull Fitting Installation............................................10
5. Hobie eVolve Mirage Well Operation..............................14
6. Hobie Mirage eVolve Disassembly.................................16
7. Hobie eVolve Twist-N-Stow Rudder Conversion............17
8. Time to Hit the Water......................................................20
9. Operating Elements........................................................22
10. Troubleshooting and Care Instructions..........................28
11.Warranty..........................................................................30
12.Contact Information...........................................Back Page
This operating manual will help you use your Hobie eVolve safely
and efficiently. All information is given according to our latest
knowledge. Content is subject to technical changes.
• Indicates a danger or a procedure that may cause injury and
property damage.
• Indicates a danger or a procedure that may cause property
damage.
2
3
Introductions
Dear Customer,
Thank you for choosing the Hobie eVolve. As a
member of the Hobie family, you are now on the road to
pure adventure in electric boating. This owner’s manual is
designed to help you get maximum enjoyment from your
new Hobie eVolve. But more important, it is designed to
help you use it safely.
We are delighted that you have chosen our motor.
Your Hobie eVole is powered by the Torqeedo 402 motor and
is state-of-the-art in terms of motor, battery, and propeller
technology. It has been designed and manufactured with the
utmost care and with a special focus on comfort, user-friendliness, and safety, and has been extensively tested before
delivery.
We hope you will enjoy this product.
Sincerely,
Conformity declaration
We, Torqeedo GmbH, with sole responsibility, declare the conformity of the Ultralight product range with
the following provisions:
Small water vehicles
Electrical systems
Low-voltage direct current (DC) systems
DIN EN ISO 10133:2000
Starnberg, in March 2009
The aforementioned company holds the following technical documents available for viewing:
- Required operating manual
- Plans/software source code (EU authorities only)
- Inspection records (EU authorities only)
- Other technical documentation (EU authorities only)
4
5
Important Safety and Operating Instructions
Important safety instructions
Important operating instructions
Torqeedo motors are designed to operate safely and reliably as long
as they are used according to the operating manual. Please read this
manual carefully before you start the motor. Ignoring the instructions in
this operating manual can cause damage or personal injury. Hobie Cat
Company and Torqeedo accept no liability for any damage caused by actions that contradict this operating manual.
The following is a selection of the most important instructions for handling Torqeedo 402 motors. In addition to these instructions, please
observe the complete operating instructions to prevent damage to your
motor.
To ensure safe operation of the motor:
• Familiarize yourself with all the motor controls. For instance, you should
be able to stop the motor quickly if necessary.
• Only allow adults who have been instructed on how to operate the motor or have read the operating instructions to run it.
• Never operate the motor if someone is in the water close to the boat.
Stop the motor immediately if someone goes overboard.
• Always have a paddle and/or MirageDrive® on board.
• Check the status and function of the device before each tour.
• Note that the on-board computer does not include changes to currents
and wind conditions in the range calculation. If you are moving with the
wind or current the remaining range is calculated assuming you continue
going with the wind or current. If you change direction or if wind/current
change, your remaining range may be significantly lower. Therefore you
should note the effects that the wind and current have on your range.
• Never use the motor as a fixing point for your kayak; never use the motor as a handle for lifting or carrying.
• Do not open the battery casing; protect the battery pack from mechanical damage.
• Do not short circuit the battery pack.
• Avoid submerging the battery pack and remote throttle for long periods
of time.
• If the error code E46 is shown in the display or if you changed the fuse
of the battery, the battery charge status in the display is not accurate. After a complete charge of the battery, the battery charger status displayed
will be reliable again.
• The battery of your Ultralight motor has been declared a hazardous
item in UN Class 9. Private transportation is not critical, but if shipped by
a transport company the relevant statutory provisions must be observed.
• Keep the supplies magnetic key at least 50 cm / 20 inches away from
pacemakers.
• Keep the supplied magnetic key away from magnetic information media
(e.g. debit/credit cards, music cassettes, magnetic tapes etc.). The magnet integrated in the key has enough strength to render the saved data
unusable.
6
• Only run the motor when the propeller is under water. If it is run in the
air for longer periods, the shaft sealant rings that seal the motor to the
drive shaft may become damaged. If the motor is run in air for long periods, the motor itself can overheat.
• The Hobie eVolve product range, the associated remote throttle, battery
pack, and all electric plug-in connections are protected against dirt and
water in line with protection type IP68.
• The Torqeedo 402 has an integrated protective device that switches
the motor off when it reaches a particular slope of 90°. This prevents the
propeller from turning if the boat capsizes or tilts.
• After use, always take the motor out of the water.
• After operation in salty or brackish water, wash all components in fresh
water.
• Occasionally use contact spray to care for all cable connections. If you
use the motor in salt or brackish water, we recommend applying contact
spray once a month.
• You will extend the life of your battery if you do not expose it for longer
than necessary to a very hot environment. In order to guarantee that the
life of the battery is as long as possible, the battery should be stored for
longer period of time (e.g. over the winter) at around 50 % charge and
between 0 °C and +15 °C / +32 °F and +60 °F.
• Only charge the battery at environmental temperatures between 0 °C
and +45 °C / +32 °F and +113 °F.
• Store the motor, battery pack and remote throttle in the waterproof
travel bag only when dry. If storing the items for longer periods of time in
the travel bag, do not close it so it is airtight.
• Only use the travel bag for transportation, not for shipping the motor.
The motor stored in the travel bag must not be adversely affected by
heavy objects.
• If the motor malfunctions an error code is shown on the display. After
resolving the error the motor can be restarted out of the stop position
again. In rare cases it may be necessary to switch the motor off using the
“on/off” button. You will find descriptions and details in Section 9.3.
• Do not disconnect the cable connections when the propeller is turning.
• If you have a problem with your motor, please follow the instructions in
this operating manual for handling warranty claims.
7
Kit Breakdown
Items not illustrated to scale
2
1.
Hobie eVolve Mirage Well Assembly
2.
Prop Alignment Tool
3.
Hobie eVolveTwist-n-Stow Rudder Mount and Hardware
3
(The Hardware is assembled to the aluminum piece and include the cover plate slide, sister screw, 1032 Flat head screw to match the sister screw, three 10-32 x 1/4” Truss head screws and three 10-32x
7/8” Truss head screws with self locking nuts)
4.
Magnetic Key
5.
Throttle
6.
Battery
7.
Misc. Small Parts:
4
1
5
a. Power Cable Thru-Hull Fitting w/ Backing Plate
b. Hole Cover Plate w/ Backing Plate
c. Throttle Cable Mounting Backing Plate
d. Gasket Pack (3 Pieces)
6
e. Ram® Mounting Arm
f. Ram Backing Plate w/ Hardware
7a
g. Screws for Thru Hull Fittings (QTY 6 #10 Sheet Metal Screws)
7b
7c
h. Assorted Caps for Connectors
i.
Throttle Cable Extension
j.
Power Cable Extension
7d
k. 9/64” Allen Key (Not shown here)
l.
Small tube of thread Loctite® (Not shown here)
m. Charger (Not shown here)
n. Torqeedo Dry Bag (Not shown here)
7e
7g
7f
7i
Mounting hardware included,
but not shown here
Tools Required:
Phillips Head Screwdriver
Flat Head Screwdriver
Electric Drill
1/8” Drill Bit
3/4” Drill Bit
1-3/4” Hole Saw
6/64” Allen Key (included with this kit)
7h
8
9
7j
Thru Hull Fitting Installation
Components included with this kit give you the option of having a
majority of the wires in the kit be run inside your kayak. Using these
fittings will make the deck of your kayak less cluttered, but will require
that you do some drilling and part installation. Here are the instructions
for installing these parts. If you do not want to run the wires internally,
you can keep everything on the deck and organize the wires to your
liking.
Throttle Cable Thru Hull Installation
1. Choose a location for mounting your throttle.
The location of the thru-hull fitting will change
from boat to boat. The closer you can mount
the fitting to where you would like the throttle to
be, the less cable you will have to feed. When
choosing your location, also consider that you
will need to be able to reach inside to attach the
backing ring. Be sure to evaluate and test fit
a couple different locations prior to drilling any
holes.
2. After choosing your location, drill a 3/4” hole.
3. Place the small diamond shaped gasket
(provided with this kit) centered over the hole
you just drilled and use the two smaller holes in
the gasket as a guide to drill two 1/8” holes.
4. Place the small diamond shaped gasket over
the holes you just drilled. Now feed the throttle
cable through the gasket and hole in the kayak
until the throttle cable mounting plate butts up
against the gasket.
5. Thru bolt the mounting plate to the kayak
using the provided backing plate and sheet
metal screws.
Throttle Cable Gland Function
You will notice that there is a taller hex nutshaped part mounted to the throttle cable
mounting plate. This part is called a “cable
gland”. This allows you to easily change
your cable length that is available to attach
the throttle.
1. For more cable, turn the cable gland
counterclockwise enough so that it loosens
its grip on the cable and you can pull out
more length.
2. Once you have the desired length, turn
the cable gland clockwise to hold the cable
and to provide a seal around the cable to
prevent water leaks.
3. If you are not using the motor and don’t
want cable lying around the deck, you can
follow the same gland operation and feed
the cable into the hull all the way to the end
plug.
Ram Mount Installation
To mount your throttle to the hull, you will be
using the provided Ram mounting system.
This mount allows you to easily remove and
adjust the position of your throttle to the hull
with almost infinite adjustability.
1. Choose a location for the mount. Keep
in mind that you will need to be able to
reach inside to attach the backing plate.
We recommend that you install the deck
mounted ball somewhere near the throttle
cable.
2. Use the available ball mount as a guide
to pre-drill the two 1/8” mounting holes.
3. Use the provided bagged mounting
hardware to attach the ball to the hull. The
nuts will fit into the hex profile of the backing
plate to keep them from spinning as you
tighten everything.
10
11
Thru Hull Fitting Installation
Power Cable Thru Hull Installation
Before making any holes in your boat, first take a look at how your
kayak is set up and how you would like to configure your Hobie eVolve
drive system. This kit comes with two installation options for the motor:
through the MirageDrive well and off a Twist-N-Stow rudder. The chart
below will help you choose the best option for you.
Suggested Installation Guideline
Feature
Mirage Mounted
eVolve
Good for weedy areas for easy prop clearing
Ability to easily remove motor from kayak for storage
Kayak is NOT equipped with a Twist-N-Stow Rudder
Kayak is NOT equipped with T-handle up/down
rudder control
•
•
•
•
•
3. Using the power plug mounting plate, use
the hole locations to drill two 1/8” holes for the
screws to pass through.
•
Easier beaching
MirageDrive Well Option Power Plug Location:
If you use the Mirage well location for the motor,
we recommend that you install the power port
somewhere on the bulkhead in front of the foot
well. This is a convenient location to reach for
motor connection.
Twist-N-Stow Option Power Plug Location:
If you are going to use the stern mounted
motor option, you will be installing the plug port
somewhere near the back of the kayak. Be sure
to place the port on the right side of the kayak
and not the left. This will help keep the power
wire from entangling when putting the motor up
and down. Also be sure to make sure that the
port is located in a spot where the cable doesn’t
have to stretch too much when the motor moves
up and down.
12
2. When you have chosen the location of the
power cable, drill a 1-3/4” hole in the hull. We
recommend using a hole saw, but other cutting
methods can be used if care is exercised.
•
Hybrid Option (MirageDrive and motor operation
at the same time)
Easily reachable motor
Twist-N-Stow
Mounted eVolve
Power Cable Thru Hull Installation
1. Before creating the hole, be sure to test the location to make sure that
you can get the backing ring to the location that is needed and that the
power cable has room to fit without being bent too severely. Also make sure
that the cable coming from the motor will reach the location of the port.
4. Place the gasket on the outside of the
hull and put the assembly together using the
provided screws and with the backing plate on
the inside of the kayak.
5. Now take the power cable extension and
insert the end with the “flat” on one side of the
cable end through the thru-hull fitting. Make
sure that the flat is lined up and the cable end is
all the way in. Use the grip nut to lock the cable
end in place. You should feel a little pop as the
nut locks.
6. Now you can run the cable on the inside of
the hull to the location you are planning to place
your battery.
7. If you decide for some reason to remove the
thru hull fitting, the included cover plate and the
additional gasket can be used to cover the hole.
13
Hobie eVolve Mirage Well Operation
Drive Installation
Drive Removal
1. Before installing the drive, make sure that the
power cable is disconnected and/or the safety
key is not on the throttle pad.
1. Before handling the motor, make sure that
the power is disconnected and/or the safety key
is not on the throttle pad.
2. If the prop is turned sideways, manually turn
it so that the blades are straight up and down.
3. Drop the motor into the Mirage well. Please
note that there is a close variance in fit on each
boat, so some installations may require that you
rock the motor back a little to get it to drop into
place.
4. Once the motor passes through the boat,
lower the spine into the locking system in the
boat. Make sure that it is dropping in straight
and not going in crooked.
Correct
Incorrect
2. Slide the Prop Alignment Tool through the top
slot on the drive and allow it to go all the way
down. This tool will turn the propeller into the
up/down configuration for removal.
3. Remove the Prop Alignment Tool from the
drive and unclick the Click-N-Go or loosen the
cam knobs.
4. Pull the motor up and rock it back slightly to
allow the motor pylon to slip through the well.
5. Now lock the drive into the kayak using the
Click-N-Go or cam knobs. Once locked into
place, try to rock it back and forth a little to make
sure it is secure in place. A small amount of
rocking is normal.
14
15
Hobie Mirage eVolve Disassembly
Hobie eVolve Twist-N-Stow Rudder Conversion
To convert your Twist-n-Stow rudder to the Hobie eVolve motor, you will
have to disassemble the MirageDrive mount and assembly the Twist-NStow mount using the following instructions.
Hobie eVolve Twist-n-Stow Assembly
1. Insert the cable into the track on the rudder
attachment extrusion.
Mirage eVolve Disassembly
1. Unbolt the two cover plates at the top of the
spine using the provided 9/64” Allen hex key
wrench.
2. Slide the tongue and groove plate to cover
the track that you installed the cable into.
Please note that there is semi-circular cutaway
on one end of the cover plate which should be
pointing up when installed on the boat.
2. Loosen the two batten retainer straps at the
top of the spine.
3. Unscrew the wire retaining strap and remove
from the wire.
4. Pull the motor and batten assembly out
through the bottom of the spine and take off the
rubber fairing.
5. Unbolt all of the screws that are holding the
motor and batten clamp together.With all of
these steps completed, you should have just a
pylon assembly. Be sure to keep all of the nuts
and bolts in a safe place as you will need them
if you decide to put the Mirage eVolve back
together again.
16
3. Slide the pylon assembly into the aluminum
extrusion. The prop should be on the side of
the extrusion that has the sharper corner.
4. Once the pylon tube is inserted inside the
aluminum profile, you will notice that there is
a hole on both sides of the outer aluminum
piece in addition to the pylon tube. Slide a
screwdriver through the entire assembly to get
everything aligned and also to push the cable
out of the way.
Sister Screw
5. Place the end of the sister screw that has
the blind hole over the tip of the screwdriver
and push the screwdriver out using the sister
screw. This will keep the cable out of the way
while installing the sister screw. Look in the
hole and make sure it is all the way in.
5. With the sister screw pressed all the way
in, thread the small flat head screw into the
sister screw and tighten. Place a couple
drops of Blue Loctite (provided in this kit)
onto the screw that goes into the sister screw
to prevent it from backing out from motor
vibration. To tighten the assembly, you will
need to have a flat head screwdriver on one
side and a Phillips head screwdriver on the
other to hold the screws in place as you
tighten them up.
17
Hobie eVolve Twist-N-Stow Rudder Conversion
6. Remove all six screws that are attaching the
rudder blade to the rudder housing and take
the rudder blade off. Keep this rudder in a safe
location so you can find it again if you wish to
convert your rudder back to a blade instead of a
motor. Steering and Up/Down control lines will
not need to be changed.
7. Line up the assembled Hobie eVolve
Torqeedo Rudder Attachment to the rudder
mount on the kayak and install with the provided
Truss head machine screws. Note that the top
three screws are longer and are bolted with
a nut and the bottom three are threading into
the aluminum. Place a couple drops of Loctite
on the lower three shorter screws that are
going into the aluminum. It helps to install the
bottom three screws first as the alignment is
easier at this stage. DO NOT USE A POWER
SCREWDRIVER TO INSTALL THE LOWER
SCREWS. INSTALL BY HAND SO THAT THEY
ARE JUST SNUG.
8. Finished assembly is shown to the right.
Hobie eVolve Twist-N-Stow Operation
With the motor installed on the Twist-N-Stow
rudder, there are some operating instructions
you should be aware of.
Hybrid Feature
There is an unique feature that the MirageDrive
and Torqeedo motor can provide together. If
you pedal with the motor going, you can watch
your power consumption decrease and your
range increase. The combination of human
and electric power acts as a hydrid and can
significantly extend your range.
Up/Down Control
The motor mounted in the stern configuration
can ONLY be raised in boats that have the
T-Handle System which became standard on
all 2009 to current model Hobie Mirage kayaks.
Earlier kayaks have an up/down handle which
will hold the rudder down in light reverse
operation. Check with you dealer on a T-Handle
conversion kit.
One way to help control how softly the motor
sets down on the deck is by using both up and
down T-handles. Simply pull the motor up with
the up handle and control how quickly the motor
rests on the kayak deck with the down handle.
Propeller Awareness
Having the propeller mounted off the back
versus the Mirage setup leaves the propeller
in a more vulnerable position. PLEASE BE
AWARE OF YOUR SURROUNDINGS WHEN
OPERATING THE MOTOR IN THE STERN
MOUNTED POSITION. CARELESSNESS
COULD RESULT IN INJURY OR MOTOR
DAMAGE.
18
19
Time to Hit the Water
These steps will help guide you through the
setup that is needed to get you going on the
water.
Before Heading Out
1. Make sure that the magnetic key is not on the
throttle pad.
2. Place your battery in the kayak and attach
the power cord extension. To attach the
connector, mate the cord fitting to the battery
and twist lock the connections together. You
will not be able to twist the connections together
until the plugs are oriented and seated together
correctly. When the battery is resting, make
sure that the top is facing up to ensure that
the GPS gets a good signal. Do not cover the
battery with metallic objects or those containing
metal.
3. Connect your throttle cable extension to
the battery. There is a guide in the connector
which only allows it to connect in a certain
orientation. MAKE SURE THAT THE THREADS
ARE GOING TOGETHER CORRECTLY TO
PREVENT THEM FROM CROSS-THREADING.
If it isn’t going together, make sure that the
threads are lined up properly and are free of any
debris.
4. Attach your throttle to the ball mount on the
kayak using the RAM attachment arm. Once
you have the throttle at the desired adjustment,
tighten up the side knob.
5. Connect the cable coming out from the
throttle to the throttle extension cable.
6a. If you are using the Mirage well configuration of
the Hobie eVolve, place the motor unit into the well as
instructed earlier in the manual and connect the power
cord to the bulkhead power port.
6b. If you are using the stern mounted configuration,
make sure that the motor is plugged into the power port as
it would be difficult to do so after you push off the shore.
Pull the motor down using the down control T-handle and
cleat it in the down position. It is important to pull the
down holding line tight to keep the motor from coming up
when going in reverse.
7. Place the magnetic key on the throttle pad and turn the
display on.
8. While close to shore, give the motor some power to
make sure everying is working properly and that you
acknowledge the current battery charge status.
Coming into Shore
1. As you come into shore, be sure to reduce your speed.
If you are using the Hobie Mirage well eVolve be sure
to use the Prop Alignment Index and remove the drive
before running aground. Using the stern mounted Hobie
eVolve requires that you either pull the motor on deck or
just release the cleated down line.
2. Unhook all of the throttle and power connections and
place the protective caps over the ends of the plugs.
MAKE SURE THAT THE CONNECTIONS ARE DRY
PRIOR TO INSTALLING THE CAPS. Spray some contact
spray (ex WD-40®) on the terminals from time to time.
3. When transporting a kayak with the stern mounted
Hobie eVovle, make sure that it is firmly held in place
so it doesnt’ bounce around when driving on the road.
The shockcord on the kayak may not be strong enough
to hold it in place if the kayak is transported upside
down. REMOVE BATTERY FROM HULL DURING
TRANSPORTATION OR TURNING OVER THE KAYAK.
4. If you are using the motor in salt or brackish water
conditions, rinse all the equipment with fresh water.
20
21
Operating Elements
This section covers technical information about some of the componentry
of your electric motor kit. It is important that you read this information to
become familiar with and have a good general knowledge of all the parts
included in this kit.
BATTERY PACK
About your Battery
The battery pack is equipped with high performance lithium manganese batteries, also known as LIMA cells. The LIMA cells have a selfdischarge of under 1% per month at 20 °C / 70 °F, have stable cycles,
and no memory effect. The lithium battery can be used at environmental
temperatures from -20 °C to +60 °C / -4 °F to +140 °F.
A controller with several functions to protect and care for your battery
is integrated in the battery pack. The controller, among other functions,
protects the battery from fully discharging and overcharging by controlling the charging current.
The capacity of the battery pack changes over time. To adjust the capacity indicator we recommend completely emptying the fully charged battery once a year at average speeds.
The battery pack has a 20 A safety fuse. Open the marked cover in the
battery’s base to exchange the fuse. When closing the cover ensure that
the cover and seal sit properly (label to the outside).
Charging
The charging unit supplied is modified charges the eVolve battery pack
in approximately 8 hours (from 0% to full charge). When charging at high
environmental temperatures (> 35 °C / > 95 °F) longer charging times
may occur as the controller is equipped with a temperature-dependent
charging power “off” switch which ensures a proper and gentle charging
of the cells. To charge your battery:
1. Plug the cable end that plugs to the wall into the
charger junction box which has the cable end to
connect to the battery. There are two sets of wall
plug cords in this kit and should be usedaccording
to the plug shape that adapts to your wall socket.
2. Connect the charging unit to the battery and the power supply. To do
so remove the motor cable (if attached) on the battery pack and use the
same jack for charging.
22
3. You can charge the battery pack with the throttle still plugged in. If the
remote throttle is connected, you can turn on the display and view the
current charging status in percent with “charging“ being displayed in the
top most field on the display.
• The battery is protected from water penetration (IP68).
• Use the Torqeedo 402 battery exclusively with the eVolve
motor.
• Only use the power supply unit supplied or one authorized by
Torqeedo to charge the battery pack.
• Only charge the battery at environmental temperatures
between 0 °C and 45 °C / +32 °F and +115 °F.
• You will extend the lifespan of your battery if you do not expose
it to hot environments for long periods of time. If you store your
battery for long periods of time (ie., over the winter), it should be
charged to around 50% and stored between 0 °C and +15 °C /
32 °F and +60 °F. This will ensure the longest possible lifespan
for the battery.
• Protect the battery pack from mechanical damage. If the
housing of the battery is damaged, do not use the battery.
• Do not short circuit the battery pack.
• Avoid submerging the battery pack for long periods of time.
• The LIMA battery cells only catch fire if they are exposed
to temperatures over 300 °C / 570 °F. This is an important
advantage over other lithium based battery systems. If this
should occur try to put the battery in a location where it will
not cause damage. If this is not possible, keep a safe distance
or cover the battery with sand or other dry, non-flammable
materials.
Caring for the Battery
You will extend the lifespan of your battery if you do not expose it to
hot environments for longer than necessary. In order to guarantee the
longest possible lifespan of the battery, if you store it for a long period
of time (e.g. over the winter), it should be charged to around 50% and
stored between 0 °C and +15 °C / 32 °F and +60 °F.
23
Operating Elements
REMOTE THROTTLE
Controlling Speed and Direction
You can adjust the speed and propeller rotation direction by moving the
remote throttle. Forward movement of the remote throttle means the
kayak moves forward, backward movement of the remote throttle means
the kayak moves backwards. Please note that reverse movement does
not have the same thrust as going forward. The middle position (neutral)
corresponds to the stop position.
Magnetic Key
The remote throttle is equipped with a magnetic key that operates as an
on/off safety function. The motor only works if you place the magnetic
key on the proper location on the remote throttle control. If the magnetic
key is removed the motor stops. You can only start the motor again if you
first replace the magnetic key and then move the remote throttle to the
central (stop) position.
Remote Throttle Button Layout
The remote throttle is equipped with an on-board computer with an integrated display and three buttons below the screen.
Turning the Display On
Press the “on/off”
button for 1 second to switch the motor on. Pressing the button again for 3 seconds switches the motor off again. You
can switch the motor off in any operating mode. If there is no activity for
one hour the motor switches off automatically. Press the button again to
switch it back on.
Changing the Display Units
1. Press and hold the
button for 3 seconds.
2. You will first be able to select the units in which the remaining range is
displayed. By pushing the middle button in the center of the display you
select between kilometers, miles, nautical miles, and hours.
3. Choose your unit selection by pressing “setup” again.
4. You then enter the speed indicator setting. You can choose between
kilometers per hour, miles per hour, and knots. Again, select the units
with the center button and confirm your selection and leave the “setup“
menu again by pressing the “setup” button.
Calibrating the Throttle
The middle button is used for calibration. If the display shows a relevant
error message you can recalibrate the motor with the help of this button.
You will find details on the error codes and calibration instruction near the
error code table.
24
Display in Normal Operation
Battery charge status in percent remaining
Remaining range at current speed and battery status
GPS Calculated Ground speed
Power consumption in Watts
Other Indicators
Drive slowly: Is displayed when the battery
capacity is less than 20%.
Charging: Is displayed when charging.
The GPS module integrated into the
battery pack searches for satellite signals to
determine the position and speed. If no GPS signal
is received within 5 minutes the display switches in
the second field from “remaining range at current
speed” to “remaining time at current speed”. In
addition, a clock icon is displayed. If the remaining
duration is more than 10 hours it is indicated in
whole hours. If it is less it is shown in hours and
minutes.
This icon is displayed if the remote throttle
must be placed in the central (stop) position. This is
necessary before starting off.
Is displayed if the temperature of
the engine or battery is too high. The motor
automatically decreases the input power.
Error: If an error occurs the error icon and a twodigit code are displayed in the bottom field. The
code shows the component causing the error and
the error itself. You will find details about the error
codes later in this manual.
25
Operating Elements
PYLON
The pylon is the lower motor unit that contains
the motor and the electronic control system
which generate the propulsion. Several
protective functions are programmed into the
pylon.
Propeller Replacement
1. Disconnect the cable between the motor and battery.
2. Loosen and unscrew the central nut on the propeller.
3. Pull the propeller from the motor shaft.
4. Pull cylinder pin from the motor shaft and remove the disk spring from
the motor shaft.
5. Connect the cable between the motor and battery. Allow the motor
to run slowly and check whether the shaft is turning unevenly at the
shaft sealing ring. Contact Torqeedo Service if the shaft is damaged or
uneven.
6. Once again, disconnect the cable between the motor and battery.
Place a disk spring onto the motor shaft. Note the direction of the disk
spring: The inside rim of the disk spring must be in contact with the motor
housing. Insert the new cylinder pin centrally to the motor shaft.
7. Place the propeller onto the motor shaft and turn the propeller so that
the cylinder pin is aligned with the groove in the propeller.
8. Place a disk spring onto the motor shaft behind the propeller. Note the
direction of the disk spring: The outside rim of the disk spring needs to be
in contact with the propeller.
9. Tighten the central nut on the propeller using a 10mm socket wrench.
TIGHTEN THE NUT UNTIL IT IS SNUG!
Protective Functions
1. Temperature protection: If the motor
overheats, the motor control system reduces
the output of the drive until a temperature
equilibrium is established between generated
and disposed heat. Above a critical temperature
the motor stops and the display shows error
code E02 or E08.
2. Blocking protection: If the propeller is blocked
or stuck, the motor would normally consume
too much power. In this case, the motor is
switched off within a few hundredths of a second
to protect the electronics, motor winding, and
propeller. After removing the blockage you can
switch the motor on again. If there is a blockage
the display shows error code E05.
3. Cable break protection: If the connection
cable is damaged, i.e., if the connection to the
remote throttle, battery or motor is broken, the
motor will stop or not start. An error code starting
with E3 and containing another number is shown
on the display.
4. Location sensor: The Ultralight has an
integrated protective device that switches the
motor off when it is beyond a particular slope
(90°). This prevents the propeller from turning if
the boat capsizes or tilts further.
5. Throttle control: The propeller rev change
responds slowly to protect mechanical drive
components and avoid short-term power peaks.
6. Fin: The fin supports steering movements
and protects the propeller from hitting obstacles
underwater.
26
Pin
Motor Stops
Disk Spring
Self Locking
M8 Nut
Disk Spring
27
Troubleshooting and Care Instructions
Fault Codes
Fault Codes cont.
Display
Cause
What to do
Display
Cause
E02
Engine overheating
Motor can be used again after a short wait (about
10 minutes) Contact Torqeedo Service.
E46
Battery operating
temperature error
E03
Motor tilted during operation
Motor can be used again after tilting it down and
pressing on/off.
Battery cells outside operating temperature
between -20°C and +65°C/ -4°F and +150°F.
The motor can be used again when the
temperature has stabilized.
E04
Motor put into operation
while tilted
Motor can be restarted from the stop position after
being tilted down.
E48
Charging temperature error
Charging will continue when the cell temperature
is between 0°C and +45°C / +32°F and +115°F.
E05
Motor/propeller blocked
Loosen blockage and turn propeller one revolution
by hand.
Defects
Contact Torqeedo Services and notify them of
the error code.
E06
Voltage in motor too low
Low battery charging status. Motor can be used
again slowly from the stop position.
Other
Error
Codes
E07
Motor Overcurrent
Continue at low output. Contact Torqeedo
Service.
E08
Circuit board overheating
Motor can be used again after a short wait (about
10 minutes). Contact Torqeedo Service.
E21
Remote Throttle calibration
defective
Re-Calibrate Throttle by:
1. Press the middle button for 10 seconds. The
display will show “cal up”.
2. Press remote throttle control to full gas then
press the middle button.
3. The display shows “cal stp”. Return remote
throttle control to central position then press the
middle button.
4. The display shows “cal dn”. Press the remote
throttle control to full reverse position then press
middle button.
E22
Magnetic sensor defective
Re-calibrate (refer to E21)
E23
Value range false
Re-calibrate (refer to E21)
E30
Motor communication error
1. Check the motor cable’s plug-in connection.
2. Check the motor cable for damage.
3. Check the fuse on the underside of the battery.
If applicable replace the fuse. If the fuse is
replaced, the information display will not show
correct data until the battery is fully charged again.
E32
Remote throttle control
communication error
Check the remote throttle control cable’s plug-in
connection. Check the cable.
E33
General communication
error
Check the plug-in connections and cables. Switch
the motor off and on again.
E41,42
Incorrect charging voltage
Check whether the power supply unit used has
an output voltage between 10 V and 20V. If
necessary contact Torqeedo Service.
E43
Battery empty
Charge battery. Motor can be used again slowly
from the stop position if necessary.
E45
Battery overcurrent
Switch motor off and on again. The information
display will not show correct data after this error
occurred. The battery needs to be fully charged to
reset the information system.
28
Storage and care instructions
Corrosion protection
Materials were chosen with a high level of corrosion-resistance. All of the
materials used in the eVolve are, as with most leisure maritime products,
classed as “seawater resistant”, not “seawater-proof”.
• After use you should always remove the motor from the water. The
tilting mechanism can be used for this.
• After operation in salty or brackish water, wash all components in fresh
water.
• Store the motor, battery pack, and remote throttle in the waterproof
travel bag only when dry. If storing the items for longer periods of time in
the travel bag, do not close it so it is airtight.
• Treat all cable connectors with contact spray (WD-40®) once a month.
• Check the cable regularly for damage.
• Ensure that the motor’s individual parts are dry before stowing them in
the travel bag.
• Do not bend the cable and tackle line around sharp edges.
• Only use the travel bag for transportation, not for shipping the motor.
The motor stored in the travel bag may be affected by heavy objects.
Connector Caps
Included with this kit are caps that can cover all
of the wire connectors. Placing the caps over the
ends of the wires will prevent any water or debris
from collecting in the electrical contact area when
the ends are not connected together. MAKE SURE
THAT THE CAPS AND CONNECTORS ARE
CLEAN AND DRY PRIOR TO INSTALLING OVER
THE CONNECTORS. The lanyards on the caps
are for attaching them to features on your kayak or
around the cables themselves. The larger circular
cap is designed for the battery and exposed plug
that goes on the thru hull fitting. The lanyard loop
will fit over top of the plug.
29
Warranty
Warranty Registration
Your warranty registration card is completed online and should be
submitted to Hobie Cat Company within 30 days of the date of purchase. Please visit our website www.hobiecat.com and go to “Warranty
Registration” under “Company Support”.
If you have problems with your eVolve, contact your dealer first. If you
need further assistance, contact Hobie Cat Company. To help process
any warranty problems, it is important to complete your warranty card for
our records.
Warranty Process
Adhering to the following warranty process is a prerequisite to the satisfaction of any warranty claim. Before dispatching any apparently faulty
goods, it is imperative to coordinate the delivery with your Hobie dealer. If
necessary, you can find Hobie Cat Company contact details on the back
of this manual. We are unable to receive products which we have not
been notified of and will therefore refuse delivery.
To obtain warranty services, within 30 days of discovering the problem
take your Hobie eVolve, along with proof of purchase (sales receipt),
to the authorized Hobie dealer from whom you purchased your eVolve
unless you have moved or are traveling. In that case, take it to the nearest authorized Hobie dealer.
For returning the motor to Hobie Cat Company, we recommend keeping
the original Torqeedo packaging. If this is no longer available, packaging
will be provided, but is not included in the warranty. Please note that
Lithium Batteries are NOT TO BE SHIPPED without proper authorization and packaging provided by Hobie Cat Company or Torqeedo.
Extent of Warranty
The warranty ends two years after the date the product was delivered
to the final purchaser. Products that are used commercially or by public
authorities - even if only temporarily - are excluded from this two-year
warranty. In these cases, the statutory warranty applies.
Hobie Cat Company, Hobie Cat Australasia, Hobie Kayaks Europe and
Torqeedo guarantee the final purchaser of a Hobie eVolve powered
by Torqeedo that the product is free from material and manufacturing
defects during the period stated above. The manufacturer will indemnify
the final purchaser for any expense for the repair of a material or manufacturing defect.
30
Hobie Cat Company decides whether defective parts are repaired or
replaced. Distributors and dealers who repair Torqeedo motors have no
authority to make legally binding statements on behalf of Hobie Cat Company or Torqeedo.
Normal wear and tear and routine servicing are excluded from the warranty.
This Warranty Does Not Cover
• Normal wear and discoloration
• Damage caused by abuse or failure to perform normal maintenance
• Damage caused by alterations or modifications
• Damage caused by hitting submerged objects or beaching without
retracting the motor
• Transportation of parts to Hobie Cat Company or its dealers
• Any eVolve used as a rental or placed in commercial services of any kind
• Any other consequential damages, incidental damages, or incidental
expenses, including damage to property
• Damage caused by failure to follow procedures outlined in this manual
• Damage caused by storing the motor in the water (ex. on a mooring)
• Previous services or repairs were not carried out by firms authorized by
Torqeedo, or non-original parts were used
Some states do not allow the exculsion or limitation of incidental or consequential damges, so the above limitations may not apply to you.
Implied Warranty
Any implied warranties, including implied warranty of merchantable and
fitness for a particular purpose, shall be no longer than the duration of
this express warranty. Some states do not allow limitations on how long
an implied warranty lasts, so the above limitations may not apply to you.
Hobie Cat Company makes no express warranties in addition to this Limited Warranty. Hobie Cat dealers have no authority to make any warranties on behalf of Hobie Cat Company in addition to or inconsistent with
those stated herein.
To the extent any provision of this warranty is prohibited by Federal,
State or Municipal law and cannot be preempted, it shall not be applicable. This warranty gives you specific legal rights. You may have other
rights, which vary from state to state.
31
Hobie Cat Company
Oceanside, California, USA
1-800-HOBIE-49
hobiecat.com
Hobie Cat Australia
Huskisson, New South Wales Australia
1-800-4-HOBIE
hobiecat.com.au
Hobie Kayak Europe
Stellendam, The Netherlands
+31(0)187 499 440
hobie-kayak.com
Torqeedo Service Centers
North America
Torqeedo Inc.
171 Erick Street, Unit A-1
Crystal Lake, IL 60014
USA
[email protected]
T +1 – 815 – 444 88 06
F +1 – 847 – 444 88 07
Europe and International
Torqeedo GmbH
Petersbrunner Str. 3a
82319 Starnberg
Germany
[email protected]
T +49 - 8151 - 268 67 -26
F +49 - 8151 - 268 67 -29
PN 72024000
REV 9/09