1
EL/GL Series - Mach 3
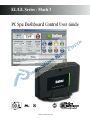
PC Spa Dashboard Control User Guide
900854
balboa-instruments.com
Page 1
Page 2
PC SPA DASHBOARD
The PC Spa Dashboard can be used with the EL8000,
EL2000, EL1000 and GL systems. System software
version 28 or higher is required for this panel.
This user guide lists all features that are available.
The icons shown on your panel will vary depending on
WKHFRQ¿JXUDWLRQRI\RXUVSD
&HUWDLQFRQGLWLRQVSULPLQJPRGH¿OWHUVRUIUHH]HFDQ
cause a function to operate longer, while faults can cause
a function to operate for a shorter length of time.
Table of Contents
Description and Requirements . . . . . . . . . 3
Minimum PC Requirements. . . . . . . . . . . . .3
Parts Needed for Installation . . . . . . . . . . . .3
Spa Panel/Temperature Lock and Reminders . . .6
Spa Messages & Create Fault Log . . . . . . . .6
Filter Cycles . . . . . . . . . . . . . . . . . . . .6
Software Installation . . . . . . . . . . . . . . 3
Hardware Installation . . . . . . . . . . . . . . 4
Run the Software . . . . . . . . . . . . . . . . 4
Link and Unlink Devices . . . . . . . . . . . . 6
Uninstalling Dashboard . . . . . . . . . . . . . 7
Trouble Shooting . . . . . . . . . . . . . . . . 7
Placing a shortcut on the Desktop . . . . . . . . .4
Spa Messages . . . . . . . . . . . . . . . . . . . .7
Troubleshooting Software Installation . . . . . . .7
Verifying the USB Connection . . . . . . . . . . .7
Establishing a Network Connection . . . . . . 5
The Dashboard Panel . . . . . . . . . . . . . . 5
The USB Icon . . . . . . . . . . . . .
Icons & Radio Buttons . . . . . . . .
Setting the Time . . . . . . . . . . .
Temperature Display . . . . . . . . .
Temperature and pH/ORP Displayed
Mode, Change Heat Mode . . . . . .
.
.
.
.
.
.
.
.
.
.
.
.
.
.
.
.
.
.
.
.
.
.
.
.
.
.
.
.
.
.
.
.
.
.
.
.
.5
.5
.6
.6
.6
.6
Poor Communication Due to Lack of Resources . .8
Error Message: Only COM 1-9 are Valid Ports . .8
Balboa’s Contact Information. . . . . . . . . . 8
Balboa’s Technical Support . . . . . . . . . . . .8
Balboa’s Website . . . . . . . . . . . . . . . . . .8
Description and Requirements
Parts Needed for Installation
The PC Spa Dashboard (referred to as “Dashboard”
KHUHDIWHULVDV\VWHPGHVLJQHGWRUHPRWHO\FRQWUROWKH
use of a spa through the use of your computer. A graphic
interface allows a user to easily see and control devices
that are installed onto the spa system. Through the use of
a transceiver, data is transmitted from your computer to
the system.
'DVKERDUG&'GLVNVXSSOLHG
86%6SD&RQWUROVXSSOLHG
86%$%FDEOHVXSSOLHG
Minimum PC Requirements
• Runs on Windows: 2000/NT or XP; SP 1 or SP 2
• &380+]RUEHWWHU
• 128MB of RAM
• CD-ROM/DVD drive
• Mouse; Compatible with any USB
• 20 MB of available hard disk space
6XSHU9*$éRUKLJKHUUHVROXWLRQYLGHR
adapter/monitor.
Do not connect the USB device to your PC until drivers
have been installed.
Software Installation
Insert the CD into your CD ROM to launch
the program. The “PC Installer” start-up
screen should appear. If the software does
not start automatically, start it manually.
From the START menu:
67$57!5XQ!%URZVH!&'GULYH!3&6HWXS
H[H$SSOLFDWLRQ!2SHQ7KHQSUHVV2.RQWKH581
GLDORJER[FRQW¶GQH[WSDJH
Page 3
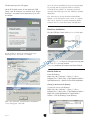
7KH¿UVWVWDUWXSVFUHHQZLOODSSHDU
On the PC Installer screen, be sure that both “USB
Driver” and “PC Software” are checked. Press “Begin
Installing”. Accept the license agreement if you wish
to continue.
Once the drivers installation has been acknowledged
by pressing OK, the program will then continue
to install the PC software. A “Preparing to Install”
message will briefly appear in the “Windows Installer”
dialog box.
The “Welcome to the Spa Dashboard Installation
Wizard” screen will appear. Press “Next” to continue,
then “Next” again to accept the Destination Folder.
Continue the on screen instructions until finished.
Hardware Installation
Plug the USB Spa Control cable into an available port.
If you should encounter the following Security
Warning screen, click “Run” to continue.
Once plugged in, a dialog box will appear showing that
the USB device is being installed.
$OORZWKHLQVWDOODWLRQWRFRQWLQXHXQWLOLWKDV¿QLVKHG
Run the Software
From the Desktop:
Right click “My Computer” > Open > C: drive >
3URJUDP)LOHV!6KRZ)LOHV!6SD'DVKERDUGIROGHU!
6SD'DVKERDUGH[H!GRXEOHFOLFNWR¿QLVKLQVWDOODWLRQ
Placing a shortcut on the Desktop
To place an icon on your Desktop:
Right click “My Computer” > Open > C: drive >
3URJUDP)LOHV!6KRZ)LOHV!6SD'DVKERDUGIROGHU!
5LJKWFOLFNRQ6SD'DVKERDUGH[H$SSOLFDWLRQ!
6HQGWR!&OLFNRQ'HVNWRSFUHDWHVKRUWFXW
After a few moments, the FTDI Driver Installation
screen will appear. Click OK.
Page 4
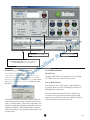
Link and Proceed buttons
Filter Cycle arrows
“Communication link error” will disappear
when a link has been established
Establishing a Network Connection
The Dashboard Panel
To establish a Network link, select the “Link”
radio button on the Dashboard, then press Proceed.
)ROORZWKHRQVFUHHQLQVWUXFWLRQV3RZHU2IIWKHQ
Power On your Spa. You will have a 30 second window
WRSXVKWKH³2.´EXWWRQWROLQNWKH86%GHYLFHWRWKH
RF network.
The USB Icon
7KHJUHHQ86%³/('´ZLOOQRUPDOO\EHOLW,WZLOOÀDVK
if a USB device is not connected to the system.
Icons & Radio Buttons
Turn on and off devices like Pumps, Light, and Blower
by pressing the device icons. The changes are shown on
the Dashboard control panel.
If the RF network has been set up correctly, within one
minute information will begin to display on the screen,
such as “Priming mode”, system time, temperature, and
diagnostic information. (Priming mode takes about four
PLQXWHVWRFRPSOHWH7KH3ULPLQJ0RGHLVFRPSOHWH
when the Displayed Temp. appears and the Pump 1 icon
becomes active.
The icons become animated when active. Pump icons
will rotate at the speed of the mechanical pumps: high,
medium, low, and off; the Light icon will light; the Heat
icon will become lit when the heater is on.
Page 5
Setting the Time
Filter Cycles
7KHWLPHVKRXOGEHVHW¿UVW$OOWLPHGGHYLFHVDUHUHJXlated by the clock being set. To set the clock, push the
appropriate arrows up or down in “Spa System Time”.
Or, under “Time Mode”, simply activate the radio button
“Sync to PC”. You have the option of using a 12 or 24
hour clock.
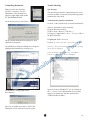
7KHWLPHRIWKH¿OWHUF\FOHVFDQEHVHWE\PRYLQJWKH
¿OWHUF\FOHVDUURZVWRWKHWLPHVUHTXHVWHG$GMXVWWKH
arrows on the ends of the blue slide bar to designate the
on/off times desired. The Filter Cycles Default radio
EXWWRQUHVHWVWKH¿OWHUF\FOHVWRWKHGHIDXOWVHWWLQJIURP
8:00 to 10:00 AM and PM.
Temperature Display
You have the option to view the temperature in
Fahrenheit or Celsius.
The Set Temperature is the target temperature that you
set. The Displayed Temp. window shows the current
temperature. As the spa is heating up, the Heat icon will
become brighter and animated.
7KHDUURZVRQHDFKHQGRIWKHVOLGHEDUFLUFOHG
designate the start and stop time of each cycle.
,QWKLVH[DPSOHWKHHYHQLQJ¿OWHUF\FOHLVVFKHGXOHGWR
start at 8:00 PM and end at 10:00PM
Temperature and pH/ORP Displayed
Link and Unlink Devices
If your spa is equipped with pH/ORP sensors, the
Displayed Temp. readout will alternate the temperature
DQGWKHS+253YDOXHVHYHU\¿YHVHFRQGV
7KH3URFHHGEXWWRQDQGWKHWKUHHDGMDFHQWUDGLREXWWRQV
allow you to link or unlink devices from your PC to the
spa transceiver. First select the radio button option, then
click on Proceed, which merely executes or performs
the action.
Mode, Change Heat Mode
The Dashboard accommodates three heating modes:
Standard, Economy, or Sleep mode.
Standard mode maintains the desired temperature.
Economy mode heats the spa to set temperature only
during filter cycles.
Sleep mode heats the spa to within 20°F (11°C) of the
set temperature only during filter cycles.
Spa Panel/Temperature Lock and Reminders
When the Spa Panel Lock and Spa Temp. Lock are
checked, the spa hard wired panel becomes inactive.
Checking the Reminders On box will provide reminders
RQFOHDQLQJ¿OWHUVDQGUHODWHGPDLQWHQDQFH
Spa Messages & Create Fault Log
Any faults in your Spa or Dashboard communication
links will appear in the Spa Messages dialogue box. In
addition, an alert will sound every 15 seconds until the
fault code is cleared. Once the fault is corrected, the Spa
Messages clears automatically.
The Create Fault Log button records a spa fault log and
VDYHVLWLQDWH[W¿OHORFDWLRQVSHFL¿HGE\WKHHQGXVHU
Spa Messages include scheduled maintenance reminders.
Page 6
D6HOHFWWKHLink button and press Proceed to link the
USB device to the Spa transceiver. You must manually
power Off and power On your spa when establishing the
main network link.
EUnlink all, then Proceed unlinks all devices that
are connected to the spa transceiver. Once devices are
unlinked, they will have to be relinked.
FLink other devices adds devices. It allows the spa
wireless menu panel to link with the spa transceiver.
Moreover, it simulates a Power Off/On of the
spa system.
Note: Once you have established the main link, you can
add new devices remotely from inside the house without
having to manually power down/power up the spa. (For
example, if you are adding a Balboa Spa Wireless Panel
IURPLQVLGHWKHKRXVH
Uninstalling Dashboard
Trouble Shooting
Either from the Start Up menu
(START > Programs > PC Spa
'DVKERDUGRUWKH'HVNWRSLFRQ
VKRZQDWULJKWright click on the
Spa Messages
PC Spa Dashboard Icon.
On the drop down box, press Delete.
The Spa Messages describe what problems may occur.
Once the problem is corrected, the Spa Messages panel
automatically clears itself.
Troubleshooting Software Installation
Problem: If the software does not install automatically.
Solution: Reload the software manually.
From the Windows Desktop:
67$57!5XQ!%URZVH!&'GULYH!
PCSetup.exe $SSOLFDWLRQ> Open.7KHQSUHVV2.RQ
the RUN dialog box.
2QWKH&RQ¿UP6KRUWFXW'HOHWHGLDORJER[SUHVV
Add/Remove Programs.
The Add/Remove Programs Dialog box will appear.
Highlight Spa Dashboard by clicking on it.
Verifying the USB Connection
Problem: If you have doubts if your USB is installed.
Solution: Check your hardware connection by opening
up the Device Manager.
From the Desktop: Right click “My Computer” >
Properties > Hardware > Device Manager.
Spa Dashboard will highlight in blue.
Press Remove.
2SHQWKH³3RUWV&20/37´WUHHE\FOLFNLQJRQ
the “+” next to it. The USB installed device should
appear as an additional COM port with the label
³86%6HULDO3RUW&20[´
3UHVV<HVWRFRQ¿UP\RXUFKRLFH7KH3&6SD
Dashboard will be removed from your system.
Page 7
Poor Communication Due to Lack of Resources
Balboa’s Contact Information
Problem: Having multiple USB devices installed on
your system may cause your USB not to work or the
FRPPXQLFDWLRQWREHVSRUDGLFLQWHUPLWWHQW. A possible
cause is that too many components are plugged into your
computer. This can often deplete the resources of your
computer. (One such example is if you have a Bluetooth
LQVWDOOHGLQWRD86%SRUWZKLFKFDQWDNHXSWR¿YH
&20UHVRXUFHV
Balboa’s Technical Support
Solution: With the Dashboard USB plugged in, pull
out your other USB devices one at a time and retry
communicating with your spa through the Dashboard.
(You may have to remove the hardware device through
WKH&RQWURO3DQHO5HPRYH+DUGZDUH'HYLFH
For further assistance, contact Balboa’s Technical
Support. Phone: 714 384-0384
Balboa’s Website
For more information on panel controls and related
products, please visit our website:
http://www.balboainstruments.com/
If the problem is solved, then an externally powered hub
is recommended. For more information on this topic,
visit http://support.microsoft.com/kb/885624.
Error Message: Only COM 1-9 are Valid Ports
Problem: Your system may not communicate due to an
invalid COM Port. The message will read:
Only COM 1-9 are valid port settings
Solution: Remap to a lower COM port using the Device
Manager. From the Desktop:
5LJKWFOLFNRQ³0\&RPSXWHU´
&OLFN3URSHUWLHV
&OLFNRQWKH+DUGZDUHWDE
&OLFNRQWKH'HYLFH0DQDJHU
&OLFNRQ³´WRRSHQWKH3RUWV&RP/37WUHH
5LJKWFOLFNRQ&RPPXQLFDWLRQV3RUW&20;
&OLFNRQ3URSHUWLHV
&OLFNRQWKH3RUWV6HWWLQJVWDE
&OLFNRQ$GYDQFHG
2SHQWKH&203RUW1XPEHUGURSGRZQPHQX
&KRRVHDQ\XQXVHG&20SRUWEHWZHHQ
&OLFN2.WRDFFHSW\RXUVHWWLQJVWKHQFORVHWKH
dialog box.
pn 40782-99_A
Page 8
April 26, 2007