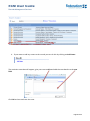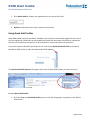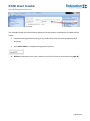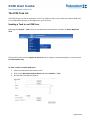
1
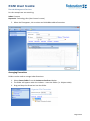
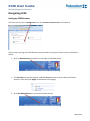
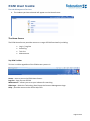
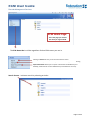
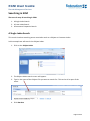
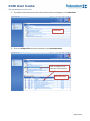
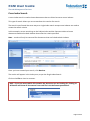
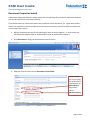
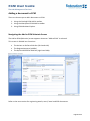
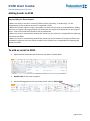
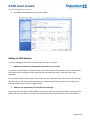
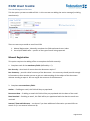
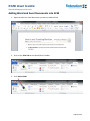
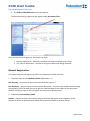
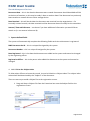
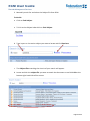
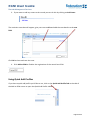
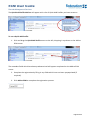
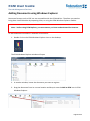
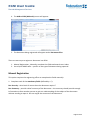
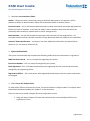
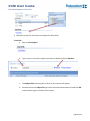
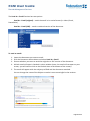
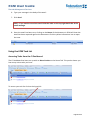
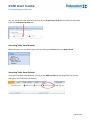
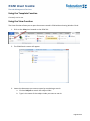
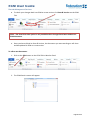
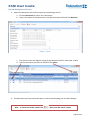
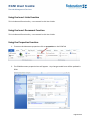
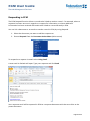
ECM User Guide Records Management Services Version 2 ECM User Guide Records Management Services LOGGING INTO ECM ............................................................................................... 4 NAVIGATING THE CI DASHBOARD .......................................................................... 5 HOME TAB........................................................................................................................................................ 5 ACTIVITIES I PERFORM ........................................................................................................................................ 6 ORGANISE ECM FAVOURITES............................................................................................................................... 6 ADD AN INDEX TO ECM FAVOURITES ..................................................................................................................... 7 ARRANGING FAVOURITES .................................................................................................................................... 8 NAVIGATING ECM .................................................................................................. 9 SETTING UP ECM BROWSER ................................................................................................................................ 9 THE HOME SCREEN .......................................................................................................................................... 10 SEARCHING IN ECM .............................................................................................. 12 A SINGLE INDEX SEARCH ................................................................................................................................... 12 CROSS INDEX SEARCH ....................................................................................................................................... 14 DOCUMENT PROPERTIES SEARCH........................................................................................................................ 15 DOCUMENT SEARCH RESULTS .............................................................................. 17 SEARCHING - ADVANCED FUNCTIONALITY ........................................................... 18 CHANGING THE SEARCH RESULTS VIEW................................................................................................................. 18 RETURNING TO THE PREVIOUS SEARCH CRITERIA SCREEN ......................................................................................... 19 ADDING A DOCUMENT TO ECM ........................................................................... 20 NAVIGATING THE ADD TO ECM MAINTAIN SCREEN ............................................................................................... 20 ADDING EMAILS TO ECM ..................................................................................... 21 ADDING TO ECM OPTIONS ................................................................................................................................ 22 MANUAL REGISTRATION ................................................................................................................................... 23 USING QUICK ADD PROFILES.............................................................................................................................. 26 ADDING WORD AND EXCEL DOCUMENTS INTO ECM ............................................ 30 MANUAL REGISTRATION ................................................................................................................................... 31 USING QUICK ADD PROFILES.............................................................................................................................. 34 ADDING DOCUMENTS USING WINDOWS EXPLORER ............................................ 36 MANUAL REGISTRATION ................................................................................................................................... 37 USING QUICK ADD PROFILES.............................................................................................................................. 41 THE ECM TASK LIST .............................................................................................. 43 Page 2 of 65 ECM User Guide Records Management Services SENDING A TASK TO AN ECM USER ...................................................................... 43 SENDING AN EMAIL TO AN EXTERNAL CUSTOMER ............................................... 44 USING THE ECM TASK LIST ................................................................................... 46 ACCESSING TASKS FROM THE CI DASHBOARD........................................................................................................ 46 ACCESSING TASKS FROM BROWSER ..................................................................................................................... 47 ACCESSING TASKS FROM OUTLOOK ..................................................................................................................... 47 NAVIGATING THE TASK LIST ............................................................................................................................... 48 ACTIONING TASKS................................................................................................ 49 WORKFLOW TASKS .............................................................................................. 52 USING MICROSOFT OUTLOOK & ECM – ADVANCED FUNCTIONALITY ................... 53 IDENTIFYING OUTLOOK EMAILS THAT HAVE BEEN ADDED TO ECM. ........................................................................... 53 USING MICROSOFT WORD / EXCEL & ECM – ADVANCED FUNCTIONALITY ........... 55 USING THE TEMPLATE FUNCTION ........................................................................................................................ 56 USING THE VIEW FUNCTION............................................................................................................................... 56 USING THE EDIT FUNCTION ................................................................................................................................ 58 USING THE INSERT LINKS FUNCTION .................................................................................................................... 62 USING THE INSERT DOCUMENT FUNCTION ........................................................................................................... 62 USING THE PROPERTIES FUNCTION...................................................................................................................... 62 RESPONDING IN ECM ........................................................................................... 63 Page 3 of 65 ECM User Guide Records Management Services Logging into ECM 1. To log into ECM, double click on the ECM SmartClient icon on your desktop. 2. Insert your Network User Name and Password and click OK 3. The Ci Dashboard will appear Page 4 of 65 ECM User Guide Records Management Services Navigating the Ci Dashboard Note – only the most important functions an ECM user needs to use have been listed. Home Tab Announcements – notifications when reports are ready for viewing and other system notifications. Reminders – set reminders for yourself or group in ECM, or in Outlook Alerts – displays how many tasks you have on your ECM Task List Page 5 of 65 ECM User Guide Records Management Services Activities I Perform This is the tab that you will work from the majority of the time in ECM. View Active Tasks – Click here to go to your ECM Task List Search ECM – Click here to go to the ECM Search Screen ECM Browser – Click here to go to ECM Browser Organise ECM Favourites The Organise ECM Favourites tab allows you to search for, save and arrange favourite documents, indexes and Quick Add Profiles. Favourites appear in the registration screen when registering documents from Email, Word, Excel or using ECM Windows Explorer. Page 6 of 65 ECM User Guide Records Management Services Add an index to ECM favourites 1. Select Index Entry from the ECM Favourite Type drop down box 2. Select Add ECM Favourite from the side bar under Actions to Perform 3. Select the Index from the Search Index drop down list 4. Type keywords in the Search field and click Retrieve Page 7 of 65 ECM User Guide Records Management Services For this example we are searching: Index: Contacts Keywords: Technology One (the Contact’s name) 5. When the file appears, tick to select and click OK to add to favourites. Arranging Favourites Folders can be used to arrange Index favourites. 1. Select Create Folder from the Actions to Perform side bar. 2. The folder will appear under the indexes – name the folder (i.e. Subject Index) 3. Drag and drop the favourites into the folder. Page 8 of 65 ECM User Guide Records Management Services Navigating ECM Setting up ECM Browser Access Browser by click on ECM Browser from the Activities I Perform Tab in Ci Dashboard. The first time you log into ECM Browser you will need to set up your home screen to be able to search. 1. Click on Maintenance located at the top right of the ECM screen. 2. The Set Views screen will appear - tick the show box next to each index you’d like to search or view and click Apply at the bottom of the page. 3. Click Exit Maintenance to return to the Home Screen Page 9 of 65 ECM User Guide Records Management Services 4. The indexes you have selected will appear on the Home Screen. The Home Screen The ECM Home Screen provides access to a range of ECM functionality including: Log in / Log Out Searching Task List Maintenance Top ECM Tool Bar This bar is visible regardless of the ECM screen you are in Home – returns you to the ECM Home Screen Log Out – logs you out of ECM. Maintenance – allows you to set your indexes for searching. Hide Logo – Hides the Technology One Enterprise Content Management Logo Help – provides access to the online Help Files. Page 10 of 65 ECM User Guide Records Management Services ECM Home Page This is the page you will first see when you log into ECM. The Side Home Bar is visible regardless of what ECM screen you are in. Clicking on Search returns you to the home search screen. The Task List is your electronic in-tray – where tasks will appear for actioning. Import Document allows you to import a document into ECM from your desktop, network drive or other USB device (not available to all users). Search Screen – initiate a search by selecting an Index Page 11 of 65 ECM User Guide Records Management Services Searching in ECM There are 3 ways of searching in ECM: 1. A Single Index Search 2. A Cross Index Search 3. A Document Properties Search. A Single Index Search This search involves searching across one Index such as a Subject or Customer Index. In this example we will search the Subject Index. 1. Click on the Subject Index 2. The Subject Index search screen will appear. 3. Type in the name of the Subject File you want to search for. This can be all or part of the name. 4. Click Retrieve Page 12 of 65 ECM User Guide Records Management Services 5. The Subject Files which meet the criteria of the search will appear in the Index Pane Index Pane 6. Click on a Subject File to view its contents in the Document Pane Click on Subject File to view the contents below Document Pane Page 13 of 65 ECM User Guide Records Management Services Cross Index Search A cross index search is used to locate documents that are linked to two or more indexes. This type of search allows you to narrow down the results of a search. The search is performed the same way as a single Index search except more Indexes are used to create the search criteria. In this example, we are searching on the Subject Index and the Contacts Index to locate documents attached to both indexes that meet the criteria specified. Note – results will only be returned for documents that are linked to both indexes. Once you have created your search, click Retrieve The results will appear in the Index pane, as per the Single Index Search. Click on the File to view its contents. HINT - If you are unsure which File contains the document you are looking for, clicking on All Results will show all documents from each file in the document pane below. Page 14 of 65 ECM User Guide Records Management Services Document Properties Search A Document Properties Search is useful when you are searching for a particular document and you are not sure which file is has been linked to. If you know some key information about the properties of the document, (i.e. registration officer, date it was registered, words included in the document summary) you will be able to use these to narrow down your search. 1. Always commence the search by selecting an Index to search against – in most cases you will select the Subject Index as all documents must be attached to a Subject. 2. Click Document to bring up the document search screen 3. Add your search criteria to the document search fields. In this example we are searching for all documents registered on the 05/07/2013 by Registration officer, Michelle Langley Page 15 of 65 ECM User Guide Records Management Services 4. Click Retrieve 5. Click OK to the following message 6. When the result screen appears click All Results to show all documents that meet the search criteria. Page 16 of 65 ECM User Guide Records Management Services Document Search Results The document pane displays the following information about a document: File Type Document Security Document Summary Index Status Document Action Menu No. of Pages Version Document Date Index Status I – attached to one or more indexes (i.e. Subject Index) T – Contains an active Task H – Contains History R - Contains related links C – Linked to a Contact (Customer) N – Contains Notes L – Is linked to a Location Clicking on the Document Action Menu brings up other actions Properties – shows the properties of the document. Here you can see what indexes the document is attached to, the history, active tasks, related documents etc. Notes – View notes associated with the document or add additional notes. Page 17 of 65 ECM User Guide Records Management Services Open – Open in the native application, or select to view a rendered PDF version. Copy to – copy the document to a clipboard. Advanced functionality, not available to all users. Send – Send the document as a task to an internal ECM user or email to external contact. Respond – allows a response to the document either using email, using an ECM template, or by attaching a document saved to a network drive. Edit – opens the document in edit mode to allow for changes to be made. Creates a new version. Document Links – provides access to: Related links – a document that has been related to the existing document using email, an ECM Template or by attaching an externally saved document. All Versions – access all versions of the document. Lock Document – only available to specific user groups. Locking a document secures it from future editing and is irreversible. Searching - Advanced Functionality Changing the search results view For a cross index search the default view is always the first index selected in the search. This can be changed by using the drop down and selecting an alternate index in the Search and Sort results by field. Page 18 of 65 ECM User Guide Records Management Services Returning to the previous search criteria screen Using the browser back arrow will return you to the previous search screen. Clicking on Search or Home within ECM browser will return you to the home page. ECM Home Page Page 19 of 65 ECM User Guide Records Management Services Adding a document to ECM There are three ways to add a document to ECM: 1. Using the Outlook ECM Add-in toolbar 2. Using the Word/Excel ECM Add-in toolbar 3. Using ECM Windows Explore Navigating the Add to ECM Maintain Screen The Add to ECM (Maintain) screen appears whenever “Add to ECM” is selected. This screen is divided into 3 sections: The Actions to Perform Side Bar (left hand side) The Registration pane (middle) The Quick Add Profiles Side Bar (right hand side). Refer to the next section for registering emails, word / excel and PDF documents. Page 20 of 65 ECM User Guide Records Management Services Adding Emails to ECM Responsibility for Email Capture • Where an email is sent by a University Officer (either internally, or externally), it is the responsibility of the sender to ensure it is captured in ECM. • Where the sender expects a reply, the sender can wait until the reply is received before adding the email, or register the original email into ECM, plus any replies as a related link to the original email – refer to the ECM User Guide for more information. • Where an email is received from outside the University, the receiver is responsible for capturing the record into ECM. • Where an email is received from outside the University and a number of University officers are included as recipients, the first officer named in the recipient list is responsible for capturing the record into ECM. To add an email in ECM 1. Open Outlook and locate the document you want to add to ECM 2. Double click on the email to open it. 3. On the Message pane at the top of the email, click on Add to ECM Page 21 of 65 ECM User Guide Records Management Services 4. The Add to ECM (Maintain) screen will appear: Adding to ECM Options If you are adding an email with an attachment you have 2 options: 1. Add the entire email, including the attachment as one record. This option should always be selected where the email contains information that provides context, and history to the message and any attachments (including who sent it, and the time it was received). If you need to edit the attachment in the email, you are required to add the entire email into ECM and then save a new copy of the attachment as a separate document to ensure you capture the full and complete history of the original email. 2. Add only the attachment, discard the email message. This option can be selected when adding an email that has been sent from a Multi-Function Device (MFD) and the email does not contain any information that provides context to the attachment. Page 22 of 65 ECM User Guide Records Management Services Tick the option you want to add to ECM – in this case we are adding the entire message (including attachments). There are two ways to add an email into ECM 1. Manual Registration - Manually complete the fields and attach to an index. 2. Use a Quick Add Profile – specific to the type of email being captured. Manual Registration This option requires the adding officer to complete the fields manually: 1. Complete each of the mandatory fields (defined by a *) : Doc Security – what level of access does the document require? Doc Summary – provide a brief summary of the document – the summary should provide enough information to allow another person to gain an understanding of the subject of the document without needing to open it. Do not retype the contents of the document. 2. Complete non-mandatory fields: Author – if adding an email, this field will be pre-populated. Document Date – if adding an email this field will be pre-populated with the date of the email. Date Received – if adding an email, this field will be pre-populated with the date the email was received. Internal / External Reference – use these if you have additional information you would like to search on (i.e. an external reference id). Page 23 of 65 ECM User Guide Records Management Services 3. System defined fields The system will automatically complete the following fields each time a document is registered: DWS Document Set ID – this is a unique ID assigned by the system. Document Number – this is a unique ID assigned by the system. Date Registered – this is the date the document was registered into the system and cannot be changed by the Registering officer. Registration Officer – this is the person who added the document to the system and cannot be changed. 4. Add a link to the Subject Index To allow other officers to locate the record, it must be linked to a Subject Index. The subject index selected will be determined by the “Subject” of the document. There are two ways to add a Subject file to the registration screen. 1. Drag and drop a Subject File from the Favourites or Recently Used bar onto the Subject field on the registration screen. 2. Manually search for and select the Subject file from ECM To do this: a. Click on Find Subject: Page 24 of 65 ECM User Guide Records Management Services b. Type in part or the entire subject you want to locate and click Retrieve: The Subject files matching the criteria of your search will appear. c. Locate and tick the subject file you want to attach the document to and click OK at the bottom right hand side of the screen: 5. If you want to add to any additional Indexes, you can do this by selecting Add Index Link from the left-hand side bar, or by clicking on the index links at the bottom of the maintain screen. 6. If you want to add any notes to the record you can do this by clicking on Add Notes. Page 25 of 65 ECM User Guide Records Management Services The maintain notes box will appear, give your note a title and add the note details to the text field. Click OK to close and save the note. 7. Click Add to ECM to finalise the registration of the record into ECM. Delete the email from Outlook (refer instructions on page 28) Using Quick Add Profiles Quick Add Profiles contains predefine metadata, which can be automatically applied to the record you are adding. Fields that can be predefined include the Document Classification, Document Summary, the index the document is to be attached to, Internal and External references. If you have a quick add profile you’d like to use, click on the Quick Add Profile Tab at the side of the Add to ECM screen to open the Quick Add Profile sidebar: Page 26 of 65 ECM User Guide Records Management Services The Quick Add Profile side bar will appear with a list of Quick Add Profiles you have access to: To use a Quick Add Profile – 1. Click and drag the Quick Add Profile across to the left, dropping it anywhere on the Add to ECM screen. The metadata fields which have been predetermined will appear completed on the Add to ECM screen. In this example the Doc Security, Doc Summary in the Document Details section has been completed and the Subject Link has been completed. Note – only part of the Summary has been filled out as each record would contain different information to be added to the summary at time of registration. Page 27 of 65 ECM User Guide Records Management Services 2. Complete the registration by filling in any fields which have not been prepopulated (if required). 3. Click Add to ECM to complete the registration process. 4. Delete the email from Outlook. To easily identify which emails have been added to ECM, you can add the ECM ID field to your Inbox and Sent Box. To do this – Right click on the heading bar and select Field Chooser From the drop down list select User-defined fields in Inbox (or Sent Items) Drag and drop the ECM ID field onto the heading bar Page 28 of 65 ECM User Guide Records Management Services Click on the X to exit Field Chooser. ECM Helpful Hints You can also register an email by highlighting the email in your Inbox or other Outlook folder by selecting “Add to ECM” from the Add-Ins Tab. Don’t forget to register emails from your Sent folder, as well as your Inbox. Customising your Add to ECM (Maintain) Screen Customise your Add to ECM (Maintain) Screen by saving frequently used Indexes as Favourites and renaming Favourites, to ensure they are meaningful to you. Adding a Recently Used Index to your Favourites While in the Add to ECM (Maintain) Screen, right click on the index you want to add to your favourites. Select Add to Favourites Renaming a Favourite Right click on the Index in Favourites Select Rename The Index name will appear with a box around it, amend the name and press enter to save the change. Page 29 of 65 ECM User Guide Records Management Services Adding Word and Excel Documents into ECM 1. Open the Word or Excel document you want to add to ECM. 2. Click on the ECM Tab on the Word/Excel Toolbar 3. Click Add to ECM Page 30 of 65 ECM User Guide Records Management Services 4. The Add to ECM (Maintain) screen will appear: The document being registered will appear under Document Files. There are two ways to register a document into ECM 1. Manual Registration - Manually complete the fields and attach to an index. 2. Use a Quick Add Profile – specific to the type of document being captured. Manual Registration This option requires the registering officer to complete the fields manually: 1. Complete each of the mandatory fields (defined by a *) : Doc Security – what level of access does the document require? Doc Summary – provide a brief summary of the document – the summary should provide enough information to allow another person to gain an understanding of the subject of the document without needing to open it. Do not retype the contents of the document. 2. Complete non-mandatory fields: Author – the person who is classed as having created the document or the signatory of the document where an administration officer has created on behalf of another person. Page 31 of 65 ECM User Guide Records Management Services Document Date – this is the date the document was created. Documents should be added to ECM at the time of creation, so this may be today’s date or another date if the document has previously been saved to a network drive or other storage device. Date Received – this will be the date the document was received into the organisation – for internally created records, the date received and the document date will usually be the same date. Internal / External Reference – use these if you have additional information you would like to search on (i.e. an external reference id). 3. System defined fields The system will automatically complete the following fields each time a document is registered: DWS Document Set ID – this is a unique ID assigned by the system. Document Number – this is a unique ID assigned by the system. Date Registered – this is the date the document was added to the system and cannot be changed by the registering officer. Registration Officer – this is the person who added the document to the system and cannot be changed. 4. Add a link to the Subject Index To allow other officers to locate the record, it must be linked to a Subject Index. The subject index selected will be determined by the “Subject” of the document. There are two ways to add a Subject file to the registration screen. 1. Drag and drop a Subject File from the Favourites bar onto the Subject field on the registration screen. Page 32 of 65 ECM User Guide Records Management Services 2. Manually search for and select the Subject file from ECM To do this: a. Click on Find Subject: a. To link to the Subject Index click on Find Subject: b. Type in part or the entire subject you want to locate and click Retrieve: c. The Subject files matching the criteria of your search will appear. d. Locate and tick the subject file you want to attach the document to and click OK at the bottom right hand side of the screen: Page 33 of 65 ECM User Guide Records Management Services 3. If you want to add any notes to the record you can do this by clicking on Add Notes. The maintain notes box will appear, give your note a title and add the note details to the text field. Click OK to close and save the note. 4. Click Add to ECM to finalise the registration of the record into ECM. Using Quick Add Profiles If you have a quick add profile you’d like to use, click on the Quick Add Profile Tab at the side of the Add to ECM screen to open the Quick Add Profile sidebar: Page 34 of 65 ECM User Guide Records Management Services The Quick Add Profile side bar will appear with a list of Quick Add Profiles you have access to: To use a Quick Add Profile 1. Click and drag the Quick Add Profile across to the left, dropping it anywhere on the Add to ECM screen. The metadata fields which have been predetermined will appear completed on the Add to ECM screen. 2. Complete the registration by filling in any fields which have not been prepopulated (if required). 3. Click Add to ECM to complete the registration process. Page 35 of 65 ECM User Guide Records Management Services Adding Documents using Windows Explorer Document formats such as PDF are not compatible with the ECM Add-Ins. Therefore you need to bring them into ECM either by importing them, or using the ECM Windows Explorer module. Note – before using ECM Explorer, you must ensure you have authenticated the Internet. To add a document stored on a network or local drive: 1. Double click on the ECM Windows Explorer icon on the desktop The ECM Windows Explorer window will open 2. In another window, locate the document you want to register. 3. Drag the document from its current location and drop it onto the Add to ECM icon in ECM Windows Explorer Page 36 of 65 ECM User Guide Records Management Services 4. The Add to ECM (Maintain) screen will appear: 5. The document being registered will appear under Document Files. There are two ways to register a document into ECM 1. Manual Registration - Manually complete the fields and attach to an index. 2. Use a Quick Add Profile – specific to the type of document being captured. Manual Registration This option requires the registering officer to complete the fields manually: 1. Complete each of the mandatory fields (defined by a *) : Doc Security – what level of access does the document require? Doc Summary – provide a brief summary of the document – the summary should provide enough information to allow another person to gain an understanding of the subject of the document without needing to open it. Do not retype the contents of the document. Page 37 of 65 ECM User Guide Records Management Services 2. Complete non-mandatory fields: Author – the person who is classed as having created the document or the signatory of the document where an administration officer has created on behalf of another person. Document Date – this is the date the document was created. Documents should be registered into ECM at the time of creation, so this may be today’s date or another date if the document has previously been saved to a network drive or other storage device. Date Received – this will be the date the document was received into the organisation – for internally created records, the date received and the document date will usually be the same date. Internal / External Reference – use these if you have additional information you would like to search on (i.e. an external reference id). 3. System defined fields The system will automatically complete the following fields each time a document is registered: DWS Document Set ID – this is a unique ID assigned by the system. Document Number – this is a unique ID assigned by the system. Date Registered – this is the date the document was registered into the system and cannot be changed by the registering officer. Registration Officer – this is the person who registered the document into the system and cannot be changed. 4. Add a link to the Subject Index To allow other officers to locate the record, it must be linked to a Subject Index. The subject index selected will be determined by the “Subject” of the document. There are two ways to add a Subject file to the registration screen. 1. Drag and drop a Subject File from the Favourites bar onto the Subject field on the registration screen. Page 38 of 65 ECM User Guide Records Management Services 2. Manually search for and select the Subject file from ECM To do this: a. Click on Find Subject: b. Type in part or the entire subject you want to locate and click Retrieve: c. The Subject files matching the criteria of your search will appear. d. Locate and tick the subject file you want to attach the document to and click OK at the bottom right hand side of the screen: Page 39 of 65 ECM User Guide Records Management Services 4. If you want to add any notes to the record you can do this by clicking on Add Notes. The maintain notes box will appear, give your note a title and add the note details to the text field. Click OK to close and save the note. Page 40 of 65 ECM User Guide Records Management Services 5. Click Add to ECM to finalise the registration of the record into ECM. 6. Delete the document from your network or local drive. Using Quick Add Profiles Quick Add Profiles contains predefine metadata, which can be automatically applied to the record you are registering. Fields that can be predefined include the Document Classification, Document Summary, the index the document is to be attached to, Internal and External references. If you have a quick add profile you’d like to use, click on the Quick Add Profile Tab at the side of the Add to ECM screen to open the Quick Add Profile sidebar: The Quick Add Profile side bar will appear with a list of Quick Add Profiles you have access to: To use a Quick Add Profile – 1. Click and drag the Quick Add Profile across to the left, dropping it anywhere on the Add to ECM screen. Page 41 of 65 ECM User Guide Records Management Services The metadata fields which have been predetermined will appear completed on the Add to ECM screen. 2. Complete the registration by filling in any fields which have not been prepopulated (if required). 3. Click Add to ECM to complete the registration process. 4. Delete the document from your network or local drive (refer to instructions on page 28). Page 42 of 65 ECM User Guide Records Management Services The ECM Task List The ECM Task List is like an electronic “to do” list. When a task is sent, either by another ECM user, or via a Workflow process, it will appear on your Task List. Sending a Task to an ECM User Selecting the Send As – Task action on the Document Action Menu initiates an Action Required Task. These tasks can be used to request an action (such as review or edit a document), or may be used for information only. To send a task to another ECM User: 1. Locate the document you want to task. 2. Click on the Document Action Menu and select Send As – Task 3. The Send As Task box will appear: Page 43 of 65 ECM User Guide Records Management Services 4. Complete the following mandatory fields: To: The ECM User the task is to be sent to. Subject: The subject of the message Clicking on the eclipse (box with the …) to the right of the Subject will provide access to Note Templates which can be used to add a note to the task. Refer to Section XXC - Note Templates for more information. 5. Complete the non-mandatory fields (if required) CC: Copy another ECM user into the task. The task will appear as a CC on their task list. Message: Provide details of what you require the person to do with the document you are sending. Deadline: allows the sender to set a due date for the task. Overdue Notification: allows the sender to ask for an overdue notification when the task is not completed by the deadline date. Completion Notification: allows the sender to ask for a completion notification when the task has been completed. 6. Click Send to send the task, or Cancel to cancel sending the task. Sending an Email to an External Customer An ECM document can be sent externally using email. The benefit of using the Send As – Email function rather than simply attaching the document to an email outside ECM is that the email is captured by the system automatically. You do not need to then register the email back into ECM as a record of what was sent. Page 44 of 65 ECM User Guide Records Management Services The Send As – Email function has two options: Send As – Email (original) – sends the email in its native format (i.e. Word, Excel, PowerPoint) Send As – Email (PDF) – sends a rendered version of the document. To send an email: 1. 2. 3. 4. Locate the document you want to email. Click the Document Action Menu and select Send As – Email Choose whether you want to send the original or a PDF version of the document. A blank email will open in Outlook in other window (note, the email will not open on your screen, you will need to click on the Outlook icon at the bottom of the screen). 5. The email will appear with the subject pre-filled and the document attached. You can change the name of the Subject to make it more meaningful to the receiver. Page 45 of 65 ECM User Guide Records Management Services 6. Type your message in the body of the email. 7. Click Send. HINT – if you need to cancel the email click the red X on the top right hand side of the email message. 8. Once the email has been sent, clicking on the Notes of the document in ECM will show the email has been captured against the document. Click the yellow information icon to open the note. Using the ECM Task List Accessing Tasks from the Ci Dashboard The Ci Dashboard has been set up with an Alerts Portlet on the Home Tab. This portlet shows you how many active tasks you have: To access your task list click on the hyperlink Page 46 of 65 ECM User Guide Records Management Services You can also access your task list by clicking on the View Active Tasks button which can be found under the Activities I Perform tab. Accessing Tasks from Browser Within Browser, you can access your tasks by clicking on Task List from the Home Panel Accessing Tasks from Outlook If you prefer to work from Outlook, clicking on the Add-Ins Tab and selecting ECM Task List will take you to the ECM Task List Browser. Page 47 of 65 ECM User Guide Records Management Services Navigating the Task List User / Group – if you have access to other user’s task lists, or are a member of a group, using the drop down list will allow you to change the task list view. This always defaults to your personal Task List. Limit Tasks To – defaults to Standard – shows all tasks. Selecting Registration, followed by Refresh will show registration tasks. Selecting Personal, followed by Refresh, will limit tasks only sent to you (not to a group) Refresh – refreshes the task list to display new tasks. Document Number – Allows you to search for tasks based on an ECM Document Number. Sorting Tasks: Clicking on the Task, From, Deadline, Received or Priority headings will sort the tasks by that field. Task – shows the task type. Expanding on the + will display the attached document. From – shows who sent the Task Page 48 of 65 ECM User Guide Records Management Services Deadline – if a deadline has been sent, this will show here – indicates when the task needs to be completed by. Received – the date the task was received on the task list. Priority – indicates the urgency of the task, where 1 is urgent, 2 is normal and 3 is low. Clicking will expand or collapse the second level of the task. This is the same as clicking the + or – to show or hide the attached document. Actioning Tasks The type of task will depend on how you action it. 1. To view the task click on the task hyperlink 2. Read the Task Instructions on the task – these may appear as a message for Action Required tasks, or as Task Instructions for workflow tasks. 3. The document will show in the Attachments at the bottom of the task. Page 49 of 65 ECM User Guide Records Management Services 4. If you are required to edit the document click on the Document Action Menu (white arrow) next to the document name and select Edit. For instructions how to edit an ECM document, refer to the section - Using Microsoft Word / Excel & ECM – Advanced Functionality – Using the Edit Function 5. To view the document without editing it, you can either click on the Document Summary hyperlink or select Open from the Document Action Menu. 6. If the task is an Action Required task, add comments to the message field within the task Clicking on the eclipse (box with the …) to the right of the Subject will provide access to Note Templates which can be used to add a note to the task. HINT – Notes are not mandatory. You should only add a note when you want to capture that an action was taken. Notes such as completed, done, actioned, noted, forwarded etc. should not be used. Example Subject: Message: Changes made to document Please refer to section 6 of the document for changes. Table added. Section 7 has been removed and section 8 renumbered. Page 50 of 65 ECM User Guide Records Management Services If the task is a workflow task, there will be a similar message or comment box depending on the workflow. 7. Complete the task by clicking Completed (for Action Required tasks) or by selecting the appropriate action for workflow tasks. 8. Once the task has been completed, the document will be updated with any notes that have been added. 9. Click Refresh to view the document Page 51 of 65 ECM User Guide Records Management Services Workflow Tasks The method of actioning a workflow task will depend on the type of workflow. All workflow tasks have task instructions regarding how to complete them. All workflow tasks will have an action button at the bottom of the task Actions may include: Approved Not Approved Confirm Action Continue Next Clicking on the action button will complete the task and progress the workflow. Page 52 of 65 ECM User Guide Records Management Services Using Microsoft Outlook & ECM – Advanced Functionality The ECM Add-Ins tab in Microsoft Outlook allows you to not only add emails to ECM, it also allows you to navigate directly to ECM without needing to change screens, or access the CI dashboard or browser. Clicking on Go to ECM will open the ECM Browser. Clicking on the ECM Task List, will open ECM Browser at the task screen. Clicking on Help will open the ECM User Assistance screen. Identifying Outlook emails that have been added to ECM. Once an email has been added to ECM, it is allocated an ECM ID. Using Outlook Functionality, you can add this field to your Inbox or Sent Items, which will allow you to easily identify which emails have been captured in ECM. To do this – Right click on the heading bar and select Field Chooser Page 53 of 65 ECM User Guide Records Management Services From the drop down list select User-defined fields in Inbox (or Sent Items) Drag and drop the ECM ID field onto the heading bar Click on the X to exit Field Chooser Hint – If an ECM ID appears next to an email in Outlook you can be assured is has been captured in ECM. Delete this email from Outlook to reduce your Outlook mailbox size and if required, you can refer back to the original email in ECM. Page 54 of 65 ECM User Guide Records Management Services Using Microsoft Word / Excel & ECM – Advanced Functionality The ECM Tab in Word and Excel allows you to access and edit documents in ECM. The Template function allows you to create new document using an ECM template. Currently not in use. The View function allows you to search for and open an ECM document. The Edit function allows you to edit search for, open and edit an ECM document, or if you have opened an ECM document in Read Only, it will allow you to edit the document you currently have opened. The Save function allows you to save the changes you have made to the document. The Save and Version function allows you to save the changes to the document you are working on and create a new version of the document in ECM. Effectively, selecting this option tells ECM to close the document and save the changes as a new version of the document. Not covered in this guide. Not covered in this guide. The Properties function allows you to update the document metadata. Clicking properties will bring up the ECM properties box. The Options function allows you to select the type of link to insert when using the Insert Links function. Page 55 of 65 ECM User Guide Records Management Services Using the Template Function Currently not in use. Using the View Function The View function allows you to open documents stored in ECM without leaving Word or Excel. 1. Click on the View icon located on the ECM Tab 2. The ECM Search screen will appear 3. Locate the document you want to open by completing a search. a. Click on Subject to search the subject Index b. Type in the name of the subject index you want to search Page 56 of 65 ECM User Guide Records Management Services c. Click Retrieve d. The results screen will appear listing all the subject files which meet your criteria e. Click on the Subject File to view the documents within that file Subject files meeting search criteria appear here Click on file to see documents within that file Page 57 of 65 ECM User Guide Records Management Services f. Tick the document you want to open and click Select 4. The document you have ticked will open in its native application. This function will allow you to open any type of document, not just word or excel documents. Using the Edit Function The Edit function allows you to: 1. Search for and select an ECM document to edit 2. Edit the ECM document you currently have opened in Read-Only. To edit a document you already have open: To verify the document is currently in Read Only – check the file name at the top of the document, it should show [Read Only] at the end of the file name. Page 58 of 65 ECM User Guide Records Management Services 1. Click on the Edit button on the ECM Tab in Word or Excel 2. A message will appear asking if you want to edit the current document. 3. Click Yes 4. When the user box appears, make sure your name is selected. Never check out to a group you are a member of. 5. A progress screen will appear, before the document is opened in edit-mode. HINT - To check the document is ready to edit - the [Read-Only] will be removed from the end of the file name at the top of the document. 6. Make changes to the document, ensuring you save your changes periodically throughout the day, especially if you are making a large number of changes. 7. To save changes click the Save button on the ECM Tab. Page 59 of 65 ECM User Guide Records Management Services 8. To check your changes back into ECM as a new version click Save & Version on the ECM Tab. Note – the Save & Version option is only available when changes have been made to an ECM document. 9. Once you have clicked on Save & Version, the document you were working on will close and be updated in ECM as a new version. To edit a new document: 1. Click on the Edit button on the ECM Tab in Word or Excel 2. The ECM Search screen will appear Page 60 of 65 ECM User Guide Records Management Services 3. Locate the document you want to open by completing a search. a. Click on Document to search for a document b. Type in the name of the document in the Doc Summary field and click Retrieve c. The results screen will appear listing all the documents which meet your criteria d. Tick the document you want to edit and click Select 4. The document you have ticked will open in edit-mode allowing you to make changes. Hint – to cancel out of the search click , then close the search screen Page 61 of 65 ECM User Guide Records Management Services Using the Insert Links Function This is Advanced Functionality – not covered in this User Guide. Using the Insert Document Function This is Advanced Functionality – not covered in this User Guide. Using the Properties Function 1. To access the document properties click on properties on the ECM Tab 2. The ECM document properties box will appear. Any changes made here will be updated in ECM. Page 62 of 65 ECM User Guide Records Management Services Responding in ECM The ECM Respond function allows a record to be linked to another record – for example, where a response has been sent out in regards to a request for information, or where additional information has been received and needs to be linked to a record already in ECM. You can link a document or an email to another record in ECM, by using Respond. 1. Select the document you want to add the response to. 2. Choose Respond from the Document Action Menu (white arrow) To respond to a request via email select Using Email. A new email in Outlook will open. Type your response and click Send Your response email will be captured in ECM as a response document with the same links as the parent document. Page 63 of 65 ECM User Guide Records Management Services To attach a response created in Word, or an email received in Outlook (i.e. an external party replying to an initial email already captured in ECM) - select Attach Document Note – To save an email into ECM using Respond, you will need to drag and drop the email to your desktop or network drive in order to import into ECM. The Respond with a Document screen will appear – 1. Browse and locate the document or email you want to attach using the Browse button. 2. Click OK once the document has been attached. The document properties screen will appear The document summary will appear as the title of the original document or email – prefixed with a RE: 3. Amend the summary to identify that the document is a response, and who the response is from – for example: Response from Public Record Office Victoria (PROV) – Retention Requirements for Survey Records. 4. The document will be linked to the parent indexes – you are at this stage able to add additional indexes if required. 5. Click OK to add the response to ECM Page 64 of 65 ECM User Guide Records Management Services 6. This page has been left blank. Page 65 of 65