1
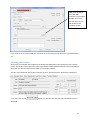
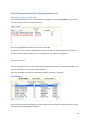
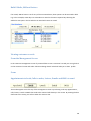
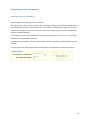
RETENTION.LINK USER MANUAL Prepared by Links Modular Solutions Pty Ltd | July 2008 2 Contents Overview ........................................................................................................................................... 5 General Overview .......................................................................................................................... 5 Prospect Programs ........................................................................................................................ 5 Retention Programs....................................................................................................................... 5 Setting up your prospect programs .................................................................................................... 6 Program Settings ........................................................................................................................... 6 Action Types .................................................................................................................................. 7 Date Control ................................................................................................................................ 10 Setting up your retention programs ................................................................................................. 12 Overview ..................................................................................................................................... 12 Adding a Retention Program ........................................................................................................ 13 Program Settings ......................................................................................................................... 13 Action Types ................................................................................................................................ 14 Date Control .................................................................................................................................... 17 System Settings ............................................................................................................................... 19 Non Attendance Reminders ......................................................................................................... 19 Setting the templates .................................................................................................................. 21 Adding Letter Templates.............................................................................................................. 23 Setting tasks to do reminders ...................................................................................................... 23 Finalisation of Settings ................................................................................................................. 24 Sales Managers & Sales Staff Members ........................................................................................... 25 Assigning a customer to a program .................................................................................................. 19 Overview ..................................................................................................................................... 26 Assigning Prospects to a Program ................................................................................................ 26 Assigning Members to a Program ................................................................................................ 27 Assigning Visit Pass Holders to a Program .................................................................................... 29 Assigning Students to a Program.................................................................................................. 30 Managing your programs ................................................................................................................ 31 Steps due today ........................................................................................................................... 31 Booking Appointments from the steps screen.............................................................................. 32 Not Completed Steps ................................................................................................................... 33 Pending Steps .............................................................................................................................. 34 3 Missed Appointment Steps .......................................................................................................... 35 Skipping steps.............................................................................................................................. 36 Deleting steps.............................................................................................................................. 36 Completing steps ......................................................................................................................... 37 Editing Steps ................................................................................................................................ 37 Adding a step............................................................................................................................... 38 Stopping a program ..................................................................................................................... 39 Completing a program ................................................................................................................. 39 Reactivating a program ................................................................................................................ 40 Viewing Programs on an Individual Basis ..................................................................................... 41 Viewing past actions .................................................................................................................... 42 Exporting & Printing History of Contacts ...................................................................................... 44 Viewing history of program changes ............................................................................................ 45 Customer Correspondence .......................................................................................................... 46 Daily Management from the Management Screen........................................................................... 47 Marking items as completed ........................................................................................................ 47 Bulk E-Mails, SMS and Letters ...................................................................................................... 47 Viewing customer records ........................................................................................................... 48 Reporting on your programs ............................................................................................................ 48 Average time as a member .......................................................................................................... 50 Average time of cancelled members ............................................................................................ 51 Glossary .......................................................................................................................................... 55 Appointments.............................................................................................................................. 55 Retention .................................................................................................................................... 55 Prospect ...................................................................................................................................... 55 Sales Appointments ..................................................................................................................... 55 Sales Managers............................................................................................................................ 55 Sales Staff Members .................................................................................................................... 55 4 Overview General Overview As the need to gain and retain customers with as little as much spend as possible becomes even more important, we must look to ensure that our processes allow us to actively follow a customers progression with our business and not let them get lost in the ‘system’. Retention.link is a unique module of Links Modular Solutions that allows users to setup step by step programs that are applied to a customer either at time of enquiry, or time of sale. That sale may be the purchase of a memberships, visit pass or even a booking into a class i.e. Swim Lesson. The unique setup will alleviate the need for external programs outside links to track and manage enquiries. It also ensures that regular contact can be maintained with customers and their contact tracked and managed throughout their time as a customer with the business. Prospect Programs Retention.link allows you to setup two types of programs that will be applied to prospects as they are entered into the database. Mandatory fields can be set for collection so that no prospect can be saved without the application of information such as Source of Enquiry and Type of Enquiry. Depending on the prospect program you design, the system could prompt users to follow up enquiries with a phone call, two days after their centre tour, or to send a letter if they still haven’t joined after three weeks for example. The automatic application of a prospect to the program you design will ensure that provided a prospect is entered into the database with at least their first name and surname, there is no way they can fall through the cracks. Retention Programs It is no secret that it is much cheaper to retain an existing customer than to gain a new one. However due to the manual work involved up until now, our retention strategies have often been limited by what we can offer based on our balance or staffing costs to retention financial gains. The retention programs within retention.link allow users to setup a specific order of steps that are followed by the customer throughout their time with your business. Whether follow up reminders are set for Fitness Consultations or Programs Shows, or it is simply a phone call to see how they are enjoying their time with you, the retention program allows you to have automatic control and not be reliant upon manual systems. 5 Setting up your prospect programs Prospect programs are designed to allow users to automatically set follow up reminders for prospective customers. It will also allow management to report on at what stage prospects are being converted to customers, and therefore to track which processes are effective. Program Settings 1. The screen will open with only the Program Code & Name fields available 2. Enter a code and description to activate the remainder of the screen For example a. CODE = NEWENQ b. DESCRIPTION = NEW ENQUIRY 3. Select that the program is a PROSPECT PROGRAM 4. You can now begin to enter the steps that relate to the program 5. Enter a step description 6. Enter the staff member or team that will complete the task. If sales staff is selected then when a customer is assigned to a program, it will ask the user which staff member the steps should be assigned to. 6 Action Types 7. Enter the action type for the step The options available for each action will vary depending on the action type selected. Below will show and explain each of the options available. Appointment Either the appointments scheduler in pos.link or facility.link can be used for retention step appointments. The benefits vary depending on the outcome required. The appointments scheduler is simple and basic to use, but has no billing options. The facility bookings module requires more setup but can have multiple facilities (or trainers) viewed at any one time and charges can be applied if required. At each step level, you can choose which ‘appointment’ is selected. This will enable the users when actioning a customer’s step access the correct appointment/facility type automatically. Please note - For the appointment type to show up the in the drop menu you must have selected Sales Reporting in the appointment type setup. Email An email template can be applied to the step, by the same manner that it is applied to a non attendance reminder. See the System Settings section of this manual for further information. 7 In Person An action type of In Person is available; however it is assumed that this action type will be used when manual follow up is required. Letter A letter template can be applied to the step provided it has been setup in the Letter Templates screen. See the System Settings section of this document for further information. Phone Call If the action type is phone call, then there is no templates or automation required Session You may wish to have a step that is a session for example; Trial a group exercise class Trial the Living Longer Living Stronger program As the user is not yet a member, then a guest pass it allocated to the prospect so that they can access the session. You can choose a number of days that this guest past stays valid for from the step date. For example the step is 7 days in the prospects program, and you want the pass to be valid for a further 7 days, in case it takes them another week to attend a session. 8 SMS You can assign an SMS template to the step. See the System Settings session of this document. Start Up Pack This action type may not be so relevant to Prospects however it can be used if required. The startup pack step will notify the user at Point of Sale when an attendance is recorded for the prospect/customer. Further information is discussed in the retention program setup section of this document. 9 Date Control 8. Enter the date control for this step 9. There are 5 date options available # days from start date This will make the step due at a number of days for example o o o Program is started on July 1st Date control for step is 7 days from start date The step becomes due on July 8th # days from a Step This will make the step due the set number of days after the selected step. Within # days from start date If this option is selected the step will show as due for all the days between the start of the program and the final day it is due. For example; o o o Program starts on July 1st Date control for step is within 7 days from start date The step shows as due on; o July 1st, 2nd, 3rd, 4th, 6th, 7th & 8th Within # to # days from start date This will allow the step to display similar to within # days from start however the first date is not from the start of the program. For example within 7 to 14 days of the program start date. 10 10. Enter a description for the step if required. You may to for example enter what should be said in a phone call for this step. The description will show in the customers tracking screen so that staff can see what is required from the step. 11. Once all of the details of the step have been entered, click on the 12. You are now ready to add the next step of your program 13. Continue until all steps are completed and the click on the button button 11 Setting up your retention programs Overview Retention programs may vary depending on the customer groups that you have attend your facility. For example you may have 8 different retention programs; o o o o o o o o New Full Access Members Existing Full Access Members New PT Members Existing PT Members New Swim School Students Existing Swim School Students New Aquatic Members Existing Aquatic Members Retention programs can be restricted by customer groups o o o Members Visit Pass Holders Students Within those groups membership/visit pass types and also class types can be limited. For example, the New Full Access Members retention program only applies to Full Access Membership Types and not Aquatic Only Membership types. 12 Adding a Retention Program Program Settings 14. The screen will open with only the Program Code & Name fields available 15. Enter a code and description to activate the remainder of the screen For example a. CODE = NEWFAMEM b. DESCRIPTION = NEW FULL ACCESS MEMBER 16. Select that the program is a RETENTION PROGRAM 17. Select which customer group/s it is relevant to 18. Click on the button to isolate certain membership types or leave to include all types 19. You can now begin to enter the steps that relate to the program 20. Enter a step description 21. Enter the staff member or team that will complete the task. If sales staff is selected then when a customer is assigned to a program, it will ask the user which staff member the steps should be assigned to. 13 Action Types 22. Enter the action type for the step The options available for each action will vary depending on the action type selected. Below will show and explain each of the options available Appointment Either the appointments scheduler in pos.link or facility.link can be used for retention step appointments. The benefits vary depending on the outcome required. The appointments scheduler is simple and basic to use, but has no billing options. The facility bookings module requires more setup but can have multiple facilities (or trainers) viewed at any one time and charges can be applied if required. At each step level, you can choose which ‘appointment’ is selected. This will enable the users when actioning a customer’s step access the correct appointment/facility type automatically. Email An email template can be applied to the step, by the same manner that it is applied to a non attendance reminder. See the System Settings section of this manual for further information. 14 In Person An action type of In Person is available; however it is assumed that this action type will be used when manual follow up is required. Letter A letter template can be applied to the step provided it has been setup in the Letter Templates screen. See the System Settings section of this document for further information. Phone Call If the action type is phone call, then there is no templates or automation required Session You may wish to have a step that is a session for example; Trial a group exercise class Trial the Living Longer Living Stronger program As the user is not necessarily a member that is valid to go that session, then a guest pass it allocated to the customer so that they can access the session. You can choose a number of days that this guest past stays valid for from the step date. For example the step is 7 days in the prospects program, and you want the pass to be valid for a further 7 days, in case it takes them another week to attend a session. 15 SMS You can assign an SMS template to the step. See the System Settings session of this document. Start Up Pack The start up pack step is designed so that if you wish to give a pack to a customer either when they first join or after sometime of being a customer then this step can be assigned with the relevant date. Quite often start up or joining packs are made up of physical items that can run out. If at the time of the start up pack being due to be handed out items is not available this step can be postponed until a later date. When the step is then due again this will show through card swipe, (customer attendance). 16 Date Control 23. Enter the date control for this step 24. There are 5 date options available # days from start date This will make the step due at a number of days. For example: o o o Program is started on July 1st Date control for step is 7 days from start date The step becomes due on July 8th # days from a Step This will make the step due the set number of days after the select step # days from a Completed Step This date control allows you to set a due date of a step by the completion date of a previous step on which it is dependent on. For example: If you would like to set a follow up call step after a centre tour has been completed you would use this date control. As soon as the booking is made the due date of any dependent steps are updated and in this case the followup call due date would be updated. If the appointment is missed and re booked the due date is update so that the due date of the dependent step, the follow up call is still dependent on the completion of the tour step. Within # days from start date If this option is selected the step will show as due for all the days between the start of the program and the final day it is due. For example; o o o Program starts on July 1st Date control for step is within 7 days from start date The step shows as due on; o July 1st, 2nd, 3rd, 4th, 6th, 7th & 8th 17 Within # to # days from start date This will allow the step to display similar to within # days from start however the first date is not from the start of the program. For example within 7 to 14 days of the program start date. 25. Enter a description for the step if required. You may to for example enter what should be said in a phone call for this step. The description will show in the customers tracking screen so that staff can see what is required from the step. 26. Once all of the details of the step have been entered, click on the 27. You are now ready to add the next step of your program 28. Continue until all steps are completed and the click on the button button 18 System Settings Administration>Retention Menu>Retention Program Setup There are some system settings that can be applied by location to the retention programs. These include non attendance reminders and general tasks to do. Salesperson is Mandatory on all contracts If this option is selected a membership contract cannot be sold unless a sales person id is assigned to the sale. The field will show as mandatory in the contract sales screen and the user will be prompted to complete this field before the membership can be processed. Non Attendance Reminders Administration>Retention> Retention Settings To avoid the need to ensure that staff members are running reports to follow up on non attendance of membership holders these reminder parameters can be used to display customers on the sales management screen. The criteria for the non attendance is that no attendance has been recorded against their membership contract are as many days as specified. The customer will continue to show until they have either attended or been marked as contacted. 19 For example; Settings are for 30 days, 60 days and 90 days A customer has not visited for 30 days They display in the 1st period of non attendance follow-ups The customer is then contacted but doesn’t attend They are removed from the 30 days contact list The customer then doesn’t attend for a further 30 days so now 60 days in total The customer again appears on the 60 day follow up list and will be contacted again by the action set 20 Setting the templates To assist automation of follow ups, users can set a template for a range of follow up methods including SMS, Emails & Letters. 1. Chose the follow up method 2. Click on the button to apply a template 3. The follow screen will appear depending on the action type selected Email 1. Enter an Email Template Description i.e. 30 day follow up email 2. Enter the text of the email template a. Merge fields can also be included by selecting the b. A range of fields are available button 3. Click on OK to save the template 4. The template will now show as set 21 SMS 5. Enter a SMS Template Description i.e. 60 day follow up SMS 6. Enter the text of the SMS template a. Merge fields can also be included by selecting the b. A range of fields are available button 7. Click on OK to save the template 8. The template will now show as set Letter When you select the letter option the letters that have been pre assigned to the retention data source will be viewable. You can select on of these letters for assignment to the non attendance reminder. See the Letter Templates section of this manual for further information. 22 Adding Letter Templates Before letter templates can be assigned to steps or non attendance reminders, they must first be setup in the letter templates screen. This screen is found in Administration>Letters>Templates. The data source for these is Retention. If you are unsure how to setup letter templates, please see the Administration Manual for further information. Setting tasks to do reminders To avoid the missing of standard tasks, follow up reminders can be set for staff to mark that they have completed them. These may include items such; Empty Lead Boxes Hand out 7 day passes in the gym Contact Expired Members You can also select to set reminders on reports so that they are not missed in either being printed or a mail merge sent from them. 1. 2. 3. 4. Choose either a report or enter a custom follow up reminder Select the frequency Enter the day (applicable for weekly and fortnightly) Enter an action i.e. Print, Email, Mail Merge, Call or N/A these are setup as contact methods and can be added to as required 5. If this is only a short term task then a Cease Date can be entered, this may be applicable to tasks that are only valid for certain promotions 23 Finalisation of Settings Once all settings have been entered you must click on the settings are saved into the system. button to ensure that all Example Settings Screen 24 Sales Managers & Sales Staff Members ADMINISTRATION>SECURITY>STAFF MEMBERS There are certain functions that can only be completed by sales managers, for example; Viewing the entire workload Removing steps from a customer’s program To mark a staff member as a sales manager, check the option as sales manager. 25 Assigning a customer to a program Overview Prospects, Members, Visit Pass Holders and Students can be assigned to a prospect or retention program as a part of their customer setup or sale. Any other customer group can also be assigned to a program manually. The drop down menus available for selection are automatically populated with the default program if a default is setup in the retention program setup screen. Assigning Prospects to a Program POS> CUSTOMERS>PROSPECTS When you enter a prospect the prospect programs drop down will only be populated with those programs that are set for Prospects. This drop down is viewable in the bottom left and corner of the Personal Details tab. The prospect screen is designed to work from left to right. The final tab is the tracking tab, whereby you can view the steps that are a part of the program you have selected. See managing customers for further information on the view of these steps. If the program you have selected has steps that are assigned to an individual sales staff member then the following screen will appear where you can select which staff member you wish the steps to be assigned to. 26 Assigning Members to a Program When you sell a membership contract the retention program drop down list is available in the bottom right hand corner of the screen. Again the default program will be listed here if one is setup as a default. If the program you have selected has steps that are assigned to an individual sales staff member then the following screen will appear where you can select which staff member you wish the steps to be assigned to. 27 In the case where a customer was already on a prospect program this program will be stopped by the purchase of a membership 28 Assigning Visit Pass Holders to a Program A separate screen is displayed when a customer is sold a visit pass that is allocated to a sales program. This screen will not be displayed unless the visit pass type is assigned to a particular sales program. This screen is displayed after the transaction is finalised Then this screen displays If the program you have selected has steps that are assigned to an individual sales staff member then the following screen will appear where you can select which staff member you wish the steps to be assigned to. 29 Assigning Students to a Program Students like members or visit pass holders can be assigned to a program. There may be a different program for students and this is depicted by the class types and settings that are assigned to the program in its initial setup. If you only have 1 program that is allocated to students then only this one program will be shown in the booking screen. The drop down is available from the bottom left hand side of the create student booking screen. 30 Managing your programs Steps due today When you setup a program any steps that are due on that day or due within a number of days from the start date, will pop up on the screen for you to action immediately. For example, a centre tour is the first item booked for a prospect. As soon as the prospect is entered and the record is saved the following screen appears: At anytime that you open the prospect or customer marketing screen, if a step is due today or from today onwards it will display as requiring action. You can either make a comment on this screen or click OK to complete it at another stage or action the step at the time. 31 Booking Appointments from the steps screen Clicking on the button will take you through to the appointments screen or the facility booking search screen depending on the appointment type setup. You will see below that this takes you through to the facility search screen where dates/times can be selected to narrow your search. 1. Enter available times to and from 2. Click on 3. The times available will be displayed in the results pane 4. Click on the booking time you wish to accept and click on 32 Not Completed Steps When a step has had no action made against it, and it is not yet overdue its status will be not completed. Example: 33 Pending Steps When an appointment is booked, but the appointment is in the future, the status is marked as pending. 34 Missed Appointment Steps If an appointment has been booked against a step but then the appointment is then not attended the status will be automatically changed to Missed Appointment. These steps will then show as Missed Appointments in the Management screen. Rebooking a missed appointment To rebook a missed appointment, go into appointments or facility bookings and cancel and rebook the appointment without leaving the screen. The missed appointment will disappear from the missed appointment list and the step the appointment is linked to will be updated. 35 Skipping steps In some cases steps will not be required, for example a customer does not want to complete a program show as they have been a regular trainer for a long time, but would still like a program written for them. To skip a step click on the button at the bottom of the step for a customer screen The status will now show as skipped Deleting steps There may be cases where a step is deleted. In this case you must be a sales manager to delete a step. A deleted step will be removed; however the action of the deletion will be trapped in the customer changes log for the program. See System Settings section for marking staff as sales managers. 36 Completing steps In some cases a step will be completed automatically, for example when a SMS or letter is sent the step is marked as completed, or when an appointment is attended. For In Person, Phone Call and Start up Pack type steps, the complete step button will need to be used to complete the step. Note: This is also done in bulk through the management screen Editing Steps Once a step has been completed it can be edited if required. Any changes to the step are trapped in the changes log. Editing the step removes any previous completion or skipping, and returns the status back to Not Completed. By clicking on the the status will be returned to 37 Adding a step You can manually add a step for an individual customer. This will affect only the customer it is set for. This is complete from either the prospect or customer marketing screen. 1. 2. 3. 4. 5. 6. Click on The steps screen will now be displayed Complete the fields as you would for setting up a step for the entire program You will need to select the position the step takes based on which step it follows A description cannot be entered for a step entered on the fly only comments An example of such a step may be an extra follow up call or extra free program show 38 Stopping a program Prospect programs will be stopped when that customer is sold a membership. You can also choose to manually stop a program, for example the prospect turns to a dead lead. To stop a program click on the button above the displayed steps. You will see that the first cell is now displaying the programs status Note: You must be a sales manager to stop a program manually Completing a program Whenever the last step in the program is actioned, either completed or skipped you will be asked if you wish to complete the program. The internal status for reporting is different between completed and stopped. Completed means that everything that was required to be done is considered done, whereas stopped shows that certain parts of the program where forgone. Upon actioning of the last step the following message will be displayed If you click YES the program will be marked as completed. Selecting NO will leave it as uncompleted and even though all steps may be completed, it will not be seen as completed from a reporting point of view. 39 Reactivating a program In some cases a program may have been accidently stopped or completed. If a staff member has the appropriate rights (sales manager), they can click on the white Program Completed Button and the following screen will appear. Click on the RE-ACTIVATE PROGRAM button to activate. 40 Viewing Programs on an Individual Basis Programs can be viewed in both the Customer Marketing and Prospect screens. The most active program will be displayed by default and then you can switch to other programs if required. For example a customer is now a member but was in the past a prospect. Their prospect program is still viewable by changing the drop down, however by default their membership retention program is displayed. Each of the steps can be viewed for further information or actioning by clicking on the button. For example, by clicking on Step 3 SMS the following screen will appear: 41 Hint: Click on SMS to send this SMS manually. If the mobile number is not here, you can add it and it will update to the customer profile. If you choose not to send an SMS you can select any of the buttons with the action you would like to do. Viewing past actions Once steps are actioned and completed, the details are displayed in the top section of the tracking screen. The show contacts and show sales steps buttons switch between manual actions created and those that are contacts based on the steps of a retention program. You can see in the below screen that a contact log entry for swim lessons discussions is displayed If you then click on the displayed button you will see now that the past completed steps are 42 43 Exporting & Printing History of Contacts You can export and print the contact logs and sales steps as required. 1. Click on the SHOW button 2. The following screen will display 3. Choose your filter options if required 4. Choose the Retention program if required 5. Choose one of the export or print options 44 Viewing history of program changes Anytime a step is actioned, deleted, skipped or steps are added this is recorded in the changes log. This log is viewable from the button left of the seen steps 45 Customer Correspondence If a customer does not want to receive emails or SMS’s then the steps assigned with those actions will be automatically skipped. To set this go into the customer’s marketing details, select which will take you the customer set up screen. There select tab ‘Others’ and then mark the correspondence the customer wishes to receive. 46 Daily Management from the Management Screen Marking items as completed On the bottom left hand corner of the Retention management screen is Tasks To Do. In this screen any tasks that have been set will show up here. If an item is highlighted in red that ‘Task To Do’ is overdue. To complete a task click the completed box next to the task and it will be deleted from the screen. The same task may pop up again if it is a reoccurring task. E.g. weekly, fortnightly etc Non Attendance The Non-Attendance screen is also in the Retention Management screen. It will show members who have not attended for the number of days specified. E.g. In this example, at 30 days non attendance a phone is the action required. Once a person has been contacted by the action required, by clicking the complete box next to their name their name will disappear off the list. 47 Bulk E-Mails, SMS and Letters If an email, SMS or letter is set for any of the non attendance, these options can be actioned in bulk. E.g. In this example, at 90 days non attendance an email is the action required. By selecting the whole list everyone in the list who has an email will receive an email. Viewing customer records From the Management Screen In the retention management screen if you would like to view a customer’s record you can right click on the customer’s name and select ‘Show marketing details’ which will take you to their profile. From Appointments to book, Calls to make, Letters, Emails and SMS’s to send These tabs appear across the top of the management screen. By selecting a tab any appointments, calls, letters, emails or SMS’s that need to be actioned will show up in the screen. By viewing the due date next to the name, you will see when the action is due. 48 Current & Missed Appointments By selecting either: It will either show missed appointments or that day’s appointments. To rebook a missed appointment, right click on the person’s name, view the customer’s appointment details, from there go into the appointment screen and drag the person’s appointment into an available timeslot. Missed appointments can only be moved within the week displayed. Doing this changes the appointment status to pending again. In the booking is a facility booking then you can change the details in the booking screen. 49 Reporting on your programs Average time as a member Reporting>Retention>average time as a member This report prints a list of current memberships, showing the length of time for each membership. If the membership has been renewed within the “Days between memberships” then those days are included in the length of time. This report also shows the average length of time for memberships shown by membership types. In the selection criteria enter the date that you would like the report to run up to, i.e. it will show members who started before this date. By selecting Show summary only the report will be refined to only show the membership type and numbers. You can choose how many days between memberships you would like to include in the report. 50 By selecting the Category and Type as shown below, you determine what memberships the report will include. Average time of cancelled members Reporting>Retention>average time of cancelled members This report prints a list of cancelled memberships, showing the length of time for each membership. Once again, if the membership has been renewed within the “Days between memberships” then those days are included in the length of time. The report shows the average length of time for memberships shown by membership types. For information on how to run this report please see Average time as a Member. No Sale Return Report Report.link>RetentionMenu>No Sale Return This report shows the number of customers who did not purchase a membership within the timeframe set by the business operator which is calculated from the end of a tour appointment or the first appointment in a prospect program but do return to purchase a membership. The report also shows the number of customers that purchased a membership within the set timeframe. 51 52 Program Usage Analysis Report.link>RetentionMenu>ProgramUsageAnalysis This report shows by numbers of attendances in a specified date range which is displayed either in a daily, weekly, fortnightly tally etc, members attending the centre who are on retention program and which program that is and attendances for those members who are not on a retention program. Note this is for memberships and visit passes only. 53 Sales Person Performance Report Report.link>RetentionMenu>SalesPersonPerformanceReport This report will show which steps were completed by each staff member as a tally for the date range entered. The steps are reported on by action type and therefore the tally is categorised by how many phone calls, appointments booked etc each staff member has completed. Therefore overall staff performance can be measured and individual staff members that are performing well can be given recognition. Retention Prospect Conversion Performance Report.link>Retention>RetentionProspectConversionPerformance The step as part of a prospect program at which a prospect is converted to a member, visit pass holder or booked into a class is shown in this report. Prospect programs can then be reviewed for effectiveness and sales staff performance can also be reviewed as you have the option to breakdown by sales staff. 54 Glossary Appointments Fitness Consultations An appointment where a member’s health and fitness is assessed and recorded by a Gym Instructor. Program Show An appointment where a member is shown through their personalised gym program. Retention Retention is simply the act of retaining something; using this retention program the aim is to retain as many members as possible. Prospect A prospect is a potential member. Sales Appointments A prospect attends an appointment at the centre at which they will be toured through the centre and explained member prices and details. Sales Managers & Sales Staff Members In staff set up if a person is checked under Sales Manager they have full access to the retention.link program. To have access to the Management Screen you must have Sales selected under Staff Members, Roles. In order a Sales Staff member to be assigned to steps of a member’s program they must have Sales selected also. 55