1
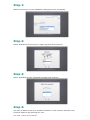
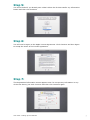
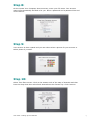
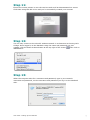
User Guide for…
Setting Up Your New MacBook
Step 1:
When you first turn on your MacBook a Welcome screen will appear.
Step 2:
Select Australia as the country or region and then click Continue.
Step 3:
Select Australian as your keyboard and then click Continue
Step 4:
You may be asked to set up a wireless connection. Click Continue and then click
Continue again to skip this step for now.
User Guide - Setting up Your Macbook
2
Step 5:
You will be asked if you already own a Mac? Select the Do Not transfer my information
button and then click Continue
Step 6:
You will need to agree to the Apple License Agreement. Click Continue and then Agree
to accept the terms of the license agreement.
Step 7:
The Registration Information screen appears next. Do not put any information in any
of the text boxes, just click Continue and then click Continue again.
User Guide - Setting up Your Macbook
3
Step 8:
On the Create Your Computer Account screen, enter your full name. Your account
name will automatically be filled in for you. Enter a password and a password hint and
click Continue.
Step 9:
Your account is then created and you can either select a picture for your account or
take a photo of yourself.
Step 10:
Select Time Zone screen. Click on the western side of the map of Australia and then
from the drop down box select Perth-Australia as the Closest City. Click Continue.
User Guide - Setting up Your Macbook
4
Step 11:
Ensure the mouse pointer is over the text box and scroll as demonstrated on screen.
Click Start using Mac OS X Lion and you’ve successfully created your account!
Step 12:
You can only connect to the school’s wireless network in a classroom at Canning Vale
College. Once logged in to the Macbook using the name and password you just
created, click the small wireless button at the top right of the screen.
Then click on
WIRELESS-5.
Step 13:
When the computer asks for a username and password, type in your network
username and password, not the username and password you log in to the Macbook
with.
User Guide - Setting up Your Macbook
5
Step 14:
The computer will ask you to accept the school’s wireless certificate, just click
Continue.
Step 15:
Type in the username and password that you log in to your Macbook with and click
Update Settings.
Step 16:
When connecting to the internet, you will see a box like the following. Simply use your
network username and password to access the internet. You may need to type green\
before your network username.
Backups:
It is recommended that you use Time Machine to back up your MacBook. Time Machine
is a program provided by Apple which allows you to use an external hard disk drive
(HDD) to backup all of your files saved on your MacBook.
Apple have a help article on how to use Time Machine at the below link.
http://support.apple.com/kb/HT1427
Important note:
You should back your work up every night to ensure you don’t lose any important files.
You can still copy files to a USB thumb drive but they will only store a limited number
of files. Time Machine takes a complete picture of your MacBook and if you need to reimage your MacBook in the Library you can easily restore all the software, settings and
files that were originally on the MacBook.
Enjoy your new MacBook and remember to look after it.
User Guide - Setting up Your Macbook
6