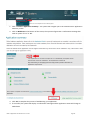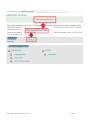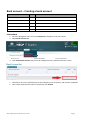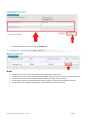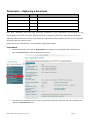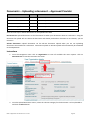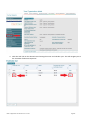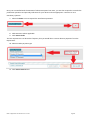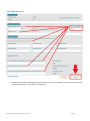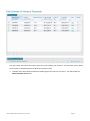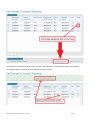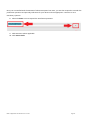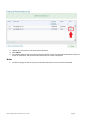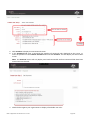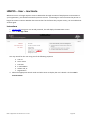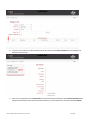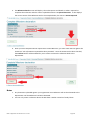
1
Student Support Branch (SSB) HELP IT Application - User Guide Version: V 4.0 Document Status: Current Document publishing date: Nov 2014 HELP IT Application User Guide V 4.0 – Current Page 1 Change Control Version Date Summary of Changes 1.1 17 May 2013 First version published 1.2 1.3 2.0 07 Jun 2013 11 Jun 2013 March 2014 IAM guides added & format standardised. Updated 36 – only CEO & SAO can lodge an RFI Addition of the new sections and screens shots for all sections. 3.0 July 2014 4.0 November 2014 The following sections relate to requirements that providers are no longer required to perform or should not use 26 – Fee Schedule – adding a fee schedule 31 – IAM – Accept/decline an invitation to join an organisation Updated the following sections IAMPCS Administrators responsibilities to include instructions for new applicants and when IAMPCS officers change. Added new sections IAMPCS – User - Create IAMPCS – User - Inactivate IAMPCS – User – Unlock Account IAMPCS – User – Update details IAMPCS – User Roles - Update Updated the following sections Person of Influence (POI) – Adding a POI to clarify who can add/update details. IAMPCS – User – Create. Update SAO User role as role can submit an application and an RFI Documents – Additional notes. To advise that HITS will permit all users to upload a document against any category/sub category however once uploaded, the user may not be able to view the document if the category relates to a module in which they do not have access. URL links to HITS and IAM. Browser advice. Contents Introduction ............................................................................................................................................ 6 Using this guide ....................................................................................................................................... 6 Application – Application Status ............................................................................................................. 7 Application – Organisation already exists in HITS................................................................................... 8 Application – Lodging an application .................................................................................................... 11 Application – New applicants ............................................................................................................... 13 Application – Return to draft ................................................................................................................ 15 Application – Summary screen ............................................................................................................. 16 Application – Withdrawing your application ........................................................................................ 18 Bank account – Creating a bank account .............................................................................................. 21 Context selector .................................................................................................................................... 23 Contacts – Adding a contact ................................................................................................................. 24 Contacts – Updating a contact .............................................................................................................. 28 Course – Activating a course ................................................................................................................. 30 Course – Inactivating a course .............................................................................................................. 34 Documents – Additional notes.............................................................................................................. 36 Documents – Archived .......................................................................................................................... 37 Document categories ............................................................................................................................ 39 Documents – Removing a document .................................................................................................... 40 Documents – Replacing a document .................................................................................................... 44 Documents – Uploading a document - applicant ................................................................................. 48 Documents – Uploading a document – Approved Provider ................................................................. 52 Documents – Viewing a document ....................................................................................................... 57 Estimate – Add and submit an estimate - HEP ..................................................................................... 59 Estimate – Add and submit an estimate - VET ...................................................................................... 68 Estimate – Add and submit a variation ................................................................................................. 82 Estimate – Checking estimate status .................................................................................................... 88 Fee Schedules ....................................................................................................................................... 89 Financial Performance – Create a financial performance .................................................................... 90 Financial Performance – Updating and submitting .............................................................................. 93 HITS – Logging in for First time users .................................................................................................... 95 HITS – Logging in ................................................................................................................................... 97 IAM – Accept/decline an invitation to join an organisation ............................................................... 101 HELP IT Application User Guide V 4.0 – Current Page 3 IAM – Forgotten your password ......................................................................................................... 101 IAM – HITS User roles ......................................................................................................................... 104 IAM – Logging into IAM....................................................................................................................... 105 IAM – Manage my forgotten password .............................................................................................. 106 IAM – Password expired ..................................................................................................................... 107 IAM – Reset your password ................................................................................................................ 110 IAMPCS – Administrators responsibilities........................................................................................... 113 IAMPCS – Update your user role ........................................................................................................ 114 IAMPCS – User – Create ...................................................................................................................... 118 IAMPCS – User – Inactivate................................................................................................................. 124 IAMPCS – User - Reset users password .............................................................................................. 127 IAMPCS – User – Unlock Account ....................................................................................................... 131 IAMPCS – User – Update details ......................................................................................................... 133 IAMPCS – User Roles – Update ........................................................................................................... 136 Milestone – View/submit.................................................................................................................... 139 Notifications ........................................................................................................................................ 142 Organisation details – Update details ................................................................................................. 148 Organisation details – View details ..................................................................................................... 150 Payments – Viewing payments ........................................................................................................... 152 Person of Influence (POI) – Adding a POI ........................................................................................... 155 Person of Influence – Updating a POI ................................................................................................. 162 Publications – Creating a publication request .................................................................................... 163 Publications – Withdrawing a publication request ............................................................................. 165 Reports – Viewing reports .................................................................................................................. 166 Request for further information (RFI) – Viewing an RFI ..................................................................... 170 Request for further information – Lodging an RFI .............................................................................. 172 Glossary ............................................................................................................................................... 175 Information ......................................................................................................................................... 176 Apple Mac Users ............................................................................................................................. 176 System for Higher Ed (HITS) URL ..................................................................................................... 176 Tertiary Education Quality & Standards Agency (TEQSA) ............................................................... 176 Training.Gov.Au (TGA) .................................................................................................................... 176 Web Browsers ................................................................................................................................. 176 Attachments........................................................................................................................................ 177 HELP IT Application User Guide V 4.0 – Current Page 4 Attachment A – System for Higher Ed (HITS) URL .......................................................................... 177 Attachment B – Application status Diagram ................................................................................... 180 Attachment C – User Security Declaration Form ............................................................................ 181 HELP IT Application User Guide V 4.0 – Current Page 5 Introduction The HELP Information Technology System (HITS) is the IT application that organisations must use to lodge applications to become approved HELP providers. HITS also manages ongoing compliance with the VET FEEHELP and FEE-HELP loan schemes. HITS is accessed via the System for Higher Ed which is the Department of Education’s portal for programs including the Higher Education Loan Program (HELP). HITS is currently the only application that is active within the System for Higher Ed. To gain access to HITS you must first have user credentials created in the Identify and Access Management system (IAM). IAM is the IT application which manages all security for HITS including users, user roles, passwords etc. Your logon ID and password will enable you to access both IAM and HITS. Using this guide This user guide and the revised information on the Education website are intended to assist both Higher Education (HE) and Vocational Education and Training (VET) providers with using HITS to manage their applications and ongoing compliance requirements under the Higher Education Support Act 2003 (HESA). Click on the above link or type the link below into your web browser to access the Departments website: http://education.gov.au/help-and-other-information The user guide is set out in alphabetical order of the main components within HITS and IAM to make it easier to find the information. Each section is structured so that the instructions are outlined first and then an example is displayed to provide a visual representation of the instructions. As an example: HELP IT Application User Guide V 4.0 – Current Page 6 Application – Application Status On the home screen of HITS – click the Application tab then click the Application summary for the sector you have applied for to see the current status of your application. The Application summary screen lists the mandatory components that must be completed before an application can be submitted. Mandatory components are as follows: Organisation Organisation details Contact details Person of Influence details Courses Course details For new applicants, the Requirements will initially default to incomplete by displaying an ‘X’ against each component however for previous applicants who re-apply; only the Course details will default to incomplete. This is because HITS does not delete any information previously added to an old application. Supporting documentation may also need to be uploaded in HITS. To upload supporting documentation, either select Navigate to Document list link illustrated or select the Document list from the left navigation bar. HELP IT Application User Guide V 4.0 – Current Page 7 Application – Organisation already exists in HITS Organisations who have previously applied but where not approved, or are approved in a sector and wish to make an application in the other sector must log into their HITS record to make an application. If you are unsure whether you have an existing HITS record you can contact the Department via [email protected]. HITS will only permit a new application in a sector where no application exists or the current application has one of following application status: Discarded; Withdrawn; or Revoked. You can check to see the current status of any application by selecting ‘Organisation – view Organisation Details’ on the navigation bar, then scrolling to the bottom of the screen and selecting the drop down arrow to display ‘Organisation Applications’. In the example below, the current application has a status of ‘Withdrawn’ so the organisation can make another application in the Higher Education sector. HELP IT Application User Guide V 4.0 – Current Page 8 Instructions 1. To make an application, select Application, then Create Application and you will be navigated to the ‘Create Application’ screen. 2. Select the sector then add your TGA and/or TEQSA ID and click Submit. A new application will be created with an application status of ‘Draft’. You will be able to confirm this by selecting the application via the Application – VET (or HE) Application summary screen. HELP IT Application User Guide V 4.0 – Current Page 9 Notes 1. HITS will automatically default to the sector of a new application where a current application exists in the other sector. In the example above, HITS has defaulted to the ‘Higher Education Sector’ as the organisation already has an application in the VET Sector. 2. If you are reapplying, any information you added to your previous application will be preserved. This includes contacts, persons of influence and all documents that you uploaded. You must check to confirm the information previously added is still current. 3. You will not be able to delete any documents submitted with a previous application however the Department can delete them on your behalf where they are out of date. You must contact the Department via [email protected] if you wish to have documents removed. HELP IT Application User Guide V 4.0 – Current Page 10 Application – Lodging an application USER ROLES ACCESS Provider Corporate Officer CEO Full access to lodge an application Provider Senior Officer SAO Full access to lodge an application Provider Finance Officer PFO No access to lodge an application Provider Editing Officer PEO No access to lodge an application Provider View Officer PVO No access to lodge an application You may only lodge an application that has all components showing as ‘Complete’ on the Application Summary screen. You must be a senior officer within your organisation and have a User role of SAO or CEO to be able to lodge an application. Instructions 1. From the Navigation menu click on Application. 2. Click <<sector>>Application summary; the system will navigate you to the selected sector Application Summary screen. If all the Categories and sub categories displayed on the Application summary are checked with a tick, your application is ready to be lodged. 3. Click on Lodge application for assessment at the bottom of the screen; the system will generate a confirmation message box with the option of ‘Yes’ or ‘No’. HELP IT Application User Guide V 4.0 – Current Page 11 4. Click Yes if you wish to submit your application. If you are not sure you have completed your application, click NO and you will be navigated back to the Application summary screen. 5. HITS will display a confirmation message on the top of the same screen and the application status will change from Draft to Initial Completeness Check. Notes 1. An application can only be lodged where the status of the application is in Draft. 2. You must ensure that you have uploaded all documents as requested in the FEE-HELP and VET FEE-HELP Provider Application Guide. 3. Each sector application will have its own Lodge application for assessment button. 4. A HITS notification message is generated – see Notifications section for details. 5. You will not be able to update your application once it has been submitted. This includes updating your Financial Performance or uploading any documents. 6. The CEO and SAO security roles are senior user roles which enable higher level tasks in HITS to be undertaken, such as submitting your organisations application, providing bank account details and declarations pertaining to provision of personal information. Only senior officers of the organisation, HELP IT Application User Guide V 4.0 – Current Page 12 such as the Chief Executive Officer, who have the requisite authority to bind the organisation, must be assigned to these two security roles. Application – New applicants New applicants are considered to be organisations that do not have an existing record in HITS. New applicants will apply through a separate process to those organisations that do have an existing record in HITS. The reason for the separate process is that the initial registration includes setting up a direct link with the organisation TGA or TEQSA record and populating these details into HITS. Instructions 1. To apply to become a HELP provider, the first step is to register your new application details in HITS. You can do this by clicking on Register and Apply or by typing the following URL into your web browser: https://extranet.education.gov.au/HESystemHits/Registration/Eligibility 2. Select the sector (or sectors) and Click Next. Sector options are ‘Dual Sector’, ‘Higher Education Sector’ or ‘VET Sector’. 3. Enter your organisation’s Training.gov.au (TGA) and/or Tertiary Education Quality and Standards Agency (TEQSA) code and click Next Note: If you do not know your Organisation’s TGA/TEQSA code, please contact the Department via [email protected]. 4. Check and confirm that the TGA/TEQSA Registered entity name is the correct entity name of your organisation and click Next. HELP IT Application User Guide V 4.0 – Current Page 13 Note: If your registered entity name is not the correct entity name, click Cancel and contact the Department via [email protected] 5. Complete all required fields and click Submit. 6. Your new user ID and a temporary password will be sent to the email address you provided. You will automatically be assigned a Provider Edit Officer (PEO) role. You will also be contacted by the Department shortly after you have registered with information on how to register additional users. Notes 1. It can take up to 15 minutes for the security application IAM to update the HITS system with your user credentials. HELP IT Application User Guide V 4.0 – Current Page 14 2. You will be contacted by the Department within a week of registering your new application in HITS to set up two IAM Provider Contract Security (IAMPCS) administrators for your organisation. Administrators will be responsible for managing all access to your HITS application including creating new users, assigning user roles, managing existing users, resetting passwords. You will not be able to complete your application if you do not have administrators assigned to your organisation. Please contact the Department via [email protected] if you have not been contacted within a week of your new application. 3. If you have an existing record, HITS will display the following error message. Application – Return to draft The Department reserves the right to return a submitted application to draft where it is incomplete. Where an application is returned to a Draft status, the Application summary screen may include comments on why the application was returned. You must address any issues raised in the comments before you resubmit your application. HELP IT Application User Guide V 4.0 – Current Page 15 Application – Summary screen USER ROLES ACCESS Provider Corporate Officer CEO Full access to view Application summary Provider Senior Officer SAO Full access to view Application summary Provider Finance Officer PFO Full access to view Application summary Provider Editing Officer PEO Full access to view Application summary Provider View Officer PVO Full access to view Application summary If your organisation is applying to be a HELP provider, has an existing application or is an approved provider in HITS, you will be able to view the Application summary screen. Instructions 1. From the Navigation menu click on Application. 2. Click ‘<<sector>>Application Summary’. The system will then navigate you to the selected sector ‘Application summary’ screen. The Application summary screen has two parts, the ‘Current status’ and the Requirements for <sector> in which you have applied. In the example below the current status of the application is Draft and the comments indicate that the application was returned to draft because the application was incomplete upon the initail submission. The requirements for VET application section indicates that all mandatory fields have been completed. It is important to note that where you re-apply HITS will reset all courses to ‘Details required’ however HITS will not remove any information that you previously uploaded or edited. The Requirements will therefore usually only require course Tuition assurance arrangements to be upload however you should check the other modules and update where appropriate. HELP IT Application User Guide V 4.0 – Current Page 16 Notes 1. All the categories and sub categories in the requirements section are hyperlinked to the screen that requires actioning. 2. The availability of the Lodge application for assessment button, for selection, is dependent on the all items listed in the Requirements for VET application being ticked and your User Role. HELP IT Application User Guide V 4.0 – Current Page 17 Application – Withdrawing your application USER ROLES ACCESS Provider Corporate Officer CEO Full access to withdraw an application Provider Senior Officer SAO Full access to withdraw an application Provider Finance Officer PFO No access to withdraw an application Provider Editing Officer PEO No access to withdraw an application Provider View Officer PVO No access to withdraw an application Withdrawing your application If your organisation has an application that is not approved, you will be able to withdraw it. You will only be able to withdraw your application in a sector where the application has one of the following application statuses: Draft Initial Completeness Check To be assessed Awaiting Further Information Recommended Decision You can check to see the current status of your application by selecting Organisation – view Organisation Details on the navigation bar, then scrolling to the bottom of the screen and selecting the drop down arrow to display Organisation Applications. Note: The Current status of the application must be set at ‘Yes’. Instructions 1. From the Navigation menu, click on Application to view all available sub menu options. HELP IT Application User Guide V 4.0 – Current Page 18 1. Click ‘<<sector>>Application summary’ - the system will navigate you to the selected sector Application Summary screen. 2. Click on Withdraw at the bottom of the screen; the system will generate a confirmation message box with an option of ‘Yes’ or ‘No’. 3. Click Yes to complete the process of withdrawing your application. 4. If successful, the system will display a confirmation message and the application status will change to Withdrawn. HELP IT Application User Guide V 4.0 – Current Page 19 HELP IT Application User Guide V 4.0 – Current Page 20 Bank account – Creating a bank account USER ROLES ACCESS Provider Corporate Officer CEO Can create, view and submit a Bank Account Provider Senior Officer SAO Can create, view and submit a Bank Account Provider Financial Officer PFO Can create, view and submit a Bank Account Provider Editing Officer PEO Cannot view bank account module Provider View Only PVO Cannot view bank account module Instructions 1. Go to the Navigation menu and select Payments to display the sub menu items. 2. Select Bank Account List. 3. Click Create Bank Account and you will be navigated to the Create Bank Account screen. 1. All fields on the screen which display the word ‘Required’ are mandatory and must be completed. 2. Once all the required information is completed, click Submit. HELP IT Application User Guide V 4.0 – Current Page 21 3. The Bank Account status will change to ‘Submitted’. Notes 1. 2. 3. 4. 5. A bank account can only be submitted once the application is approved. The Department must approve a bank account before payments can be processed into that account. A Provider can only have one approved bank account per sector at any one time. A new bank account must be approved in order to replace an existing approved bank account. A HITS notification message is generated – see Notifications section for details. HELP IT Application User Guide V 4.0 – Current Page 22 Context selector USER ROLES ACCESS Provider Corporate Officer CEO Can use the Context Selector Provider Senior Officer SAO Can use the Context Selector Provider Finance Officer PFO Can use the Context Selector Provider Editing Officer PEO Can use the Context Selector Provider View Only PVO Can use the Context Selector The ‘Context Selector’ appears on most screens in HITS and enables you to navigate between frequently used modules that you have access to. Instructions 1. Select a hyperlink from the Context Selector sub menu items. You will then be navigated to the selection screen in HITS. HELP IT Application User Guide V 4.0 – Current Page 23 Contacts – Adding a contact USER ROLES ACCESS Provider Finance Officer PFO Full access to add/view contacts Provider Corporate Officer CEO Full access to add/view contacts Provider Senior Officer SAO Full access to add/view contacts Provider Editing Officer PEO Full access to add/view contacts Provider View Only PVO Can only view contacts The contacts screen is where you provide information to the Department on all key contacts within your organisation for each sector you have an active application. For applicants, it is mandatory to have a minimum 5 contacts for a single sector application or 6 for a dual sector application. Instructions 1. From the Navigation menu click Organisation - Organisation details to view the Organisation Details screen. 2. Select the Contacts tab to navigate to the Contact list screen. 3. For new applicants, the Mandatory Contact summary details will display until such time as all the mandatory contacts have been created. Once they have been created, the Mandatory Contact summary details will disappear. Click the Add contact button. HELP IT Application User Guide V 4.0 – Current Page 24 4. Complete all required contact information fields and click the Save button. HELP IT Application User Guide V 4.0 – Current Page 25 5. When adding contacts for the first time, the Mandatory Contact Summary details will display above the contact list. The summary details will indicate which contact types have not been completed. Once all mandatory contacts have been completed, the Mandatory Contact summary details will stop displaying. HELP IT Application User Guide V 4.0 – Current Page 26 6. Once you select Save you will be navigated back to the Contact list screen. 7. Repeat above for all contacts. Notes 1. For applicants, HITS will temporarily display all mandatory contact types. Once all the mandatory contacts have been created, the display will disappear. 2. Where a mandatory contact changes, you must create a new contact for the contact type before you can delete the old contact details. 3. There is no limit on the number of contacts for the same contact type being created however notification emails will only be sent to the earliest created contact. 4. At least one contact phone/mobile number is required, either a telephone OR mobile phone number. 5. If your contact details are in another country, you must include the city in which you live. HELP IT Application User Guide V 4.0 – Current Page 27 Contacts – Updating a contact USER ROLES ACCESS Provider Corporate Officer CEO Full access to update contacts Provider Senior Officer SAO Full access to update contacts Provider Finance Officer PFO Full access to update contacts Provider Editing Officer PEO Full access to update contacts Provider View only PVO Can only view contacts You should update contact details where appropriate however it is important to consider the order in which contacts with the same contact type are listed. This is due to HITS notifications and email notifications as where there is more than one contact with the same contact type; notifications/emails will be sent to the first listed contact. Instructions 1. Click on Organisation then click on Organisation details to view the Organisation Details screen. 2. Select the Contacts tab to display the Contact list screen. 3. From the list of contacts, click on the Edit hyperlink for the record that you wish to update. HELP IT Application User Guide V 4.0 – Current Page 28 1. Update the relevant fields and click on the Save button. 2. You will be navigated back to the Contact list. Repeat this action if you need to update any further contacts. Notes 1. Required fields are indicated with the word ‘required’ in red next to the field name. 2. At least one phone number, either a telephone OR mobile phone number is required. HELP IT Application User Guide V 4.0 – Current Page 29 Course – Activating a course USER ROLES ACCESS Provider Corporate Officer CEO Can view/update a Course Provider Senior Officer SAO Can view/update a Course Provider Finance Officer PFO Can view/update a Course Provider Editing Officer PEO Can view/update a Course Provider View Only PVO Can view a course but not update. Activating a Course – VET The Department sources all course data for VET applicants and providers from training.gov.au (TGA). If you are a new applicant, all active courses against your TGA scope will be added to your course scope in HITS and will have an initial course status of ‘Details Required’. ‘Details Required’ refers to your Tuition Assurance arrangements and must be added for each course that you are offering VET FEE-HELP. After initial registration, whenever a new course is added to your scope in TGA, it will automatically be downloaded to your scope in HITS with a status of ‘Details Required’. You will receive a notification message to advise you that a new course has been added to your scope. It is the responsibility for organisations to manage all courses added to their course scope in HITS as the Department will use your course list to update Study Assist website. Updating a Course – HE The Department receives each month from TEQSA a data file containing all public information on approved higher education sector providers. All courses that are accredited by TEQSA will be uploaded to your course scope in HITS when you first apply. Thereafter, new courses will be added to your scope each month after TEQSA refreshes their data. All courses added to an application or approved provider record will have their course status default to ‘Details Required’. You will need to add your tuition assurance arrangements for every course that you intend to offer FEE-HELP unless you are exempt from tuition assurance arrangements. It is your responsibility to manage your course list in HITS. This includes updating course status to ‘Inactive’ when a course becomes superseded or expires and is no longer offered. HELP IT Application User Guide V 4.0 – Current Page 30 Instructions 1. From the Context selector select Course List to navigate to the Course list. The Course list will display courses for each sector in which you have an application. 2. Click on one or more courses that you wish to update from the displayed search results. HELP IT Application User Guide V 4.0 – Current Page 31 3. Click the ‘Add details’ button; the Add Course details screen will be displayed. 4. There are two options for you to select (three if you are an applicant): a. Tuition Assurance Scheme b. Other c. To be advised (for applicants only) 5. Select the appropriate Tuition Assurance Arrangement and complete all mandatory fields. Once complete click the Save button and confirmation button. 6. If you have selected more than one course, select Next to load the next course, otherwise navigate away from the screen. HELP IT Application User Guide V 4.0 – Current Page 32 Notes 1. You must upload evidence of your tuition assurance arrangements for each course that has a course status of ‘Active’. Please see Documents – Uploading a document (Applicant or Approved Provider) for details on how to upload documents. 2. Any new course added will have a course status of ‘Details required’. 3. For applicants, you will not be able to submit an application until all courses have been updated from Details required. 4. The Department uses the VET course list in HITS to update the Study Assist website. Approved VET providers must keep their HITS course list up to date to ensure their Study Assist course list is also kept up to date. 5. If your organisation is exempt from tuition assurance arrangements, please contact the Department via [email protected]. The Department will update the course status for you to Ministerial Exemption. 6. If you tuition assurance arrangement is by an agreement or guarantee, the course status will be updated to Ready. You must forward details of the agreement/guarantee to the Department via [email protected]. The Department will then determine whether to agree to the arrangements and where they do, they will update the course status to ‘Active’. 7. If you update a course status to ‘Inactive’, HITS will permit you to add tuition assurance arrangements where you wish to activate the course again. HELP IT Application User Guide V 4.0 – Current Page 33 Course – Inactivating a course USER ROLES ACCESS Provider Corporate Officer CEO Full access to inactivate courses Provider Senior Officer SAO Full access to inactivate courses Provider Finance Officer PFO Full access to inactivate courses Provider Editing Officer PEO Full access to inactivate courses Provider View Only PVO Cannot inactive a course Applicants and approved HELP providers can inactivate any course from their course scope in HITS where they no longer offer the course. Instructions 1. From the Context selector click on Course List to view the Course List. 2. Select one or more courses from the Course list by selecting the check box and then select the View details button. HELP IT Application User Guide V 4.0 – Current Page 34 3. Click the Inactivate button at the bottom of the screen; system will prompt the confirmation message box with option of ‘Yes’ or ‘No’. 4. Click Yes then select the next course to be inactivated and then continue to until you have actioned all the courses. Notes 1. You can reactivate an inactive course by following instructions in section 12 - Course - Activating a course. HELP IT Application User Guide V 4.0 – Current Page 35 Documents – Additional notes Ad Hoc document upload Use the Ad Hoc document upload when you are NOT uploading documents against a Milestone. Using this method automatically submits the document to the Department. Document List upload Use the Document List upload function when you are uploading documents that are related to a Milestone. Using this method allows you to remove any document or change any information. Locked documents A locked document is a document that has been submitted to the Department. Locked documents can only be removed by the Department. Unlocked documents An unlocked document is a document that has been uploaded into HITS but has yet to be submitted. It can be removed from HITS at any time. Documents uploaded using the Document List or via a milestone are unlocked until a milestone is submitted. A submitted milestone will lock all unlocked documents against the provider. Unlocked documents cannot be replaced by another document, they should be removed instead. New Applicants to HITS New applicants who have not registered in HITS previously will have no documents in their document list and whenever they upload a document, it will remain unlocked until such time as they submit their application. An unlocked document is a document which can be removed by the applicant. Applicants with a previous application who re-apply If your current application is inactive ie it is withdrawn and you reapply any documents that you uploaded previously will still appear in your document list. You should immediately review these documents and request the Department to remove any that are out of date. Contact the Department via [email protected] Document Size Maximum size for any document is 15 Megabytes (15 MB). If your document is close to this size, it is recommended that you split your document into two sections and upload separately. User roles HITS will permit all users to upload a document against any category/sub category however once uploaded, you may not be able to view the document if the category relates to a module in which you do not have access. For example, a PEO user may upload financial documents however as they do not have access to Financial information, they will not be able to view the document ie the URL link to the document will be disabled. HELP IT Application User Guide V 4.0 – Current Page 36 Documents – Archived The Department will archive documents that are no longer current, i.e. they have been replaced by a more up-to-date version or a newer version of the document has been uploaded. Archived documents will not appear in your documents list however if you wish to view any archived document follow the instructions below. Instructions 1. From the Navigation menu click on Organisation – View organisation details to navigate to the View Organisation details screen. Click on Document List to view the Document list screen. 2. Check the box against ‘Include Archived’ statement and select Filter. HELP IT Application User Guide V 4.0 – Current Page 37 3. Document list with Archived documents included. Archived documents have a code of ‘ARC’. HELP IT Application User Guide V 4.0 – Current Page 38 Document categories Each document uploaded into HITS must be attached to one of the following categories and their associated subcategories: 1. 2. 3. 4. 5. 6. Organisational Information (a) Establishing documentation (b) Other Persons of Influence Information (a) Details (b) Other Course Requirements (a) Tuition Assurance Requirements (b) Statement of VET Tuition Assurance (SVTA) (c) Fee Schedules (d) Other (e) Variation with Ministerial approval Procedural Requirements (a) Fair Treatment and Equal Opportunity Requirements (b) FEE Requirements (c) Grievance Requirements (d) Student Refund and Student Review Requirements (e) Personal Information / Privacy Requirements (f) Other Financial Requirements (a) Financial Statements (b) Business Plan (c) Project Budgets (d) Declaration, Certificates and other supplementary information (e) Risk Mitigation Strategies including Deeds of Guarantee (f) Deed of Undertaking (g) Estimate of Advance payments - First Year Survey and Estimate declaration (h) Strategic Plan (i) Other Administration (a) Applicant/provider correspondence (b) Statutory declaration (c) Other HELP IT Application User Guide V 4.0 – Current Page 39 Documents – Removing a document USER ROLES ACCESS Provider Corporate Officer CEO Full access to remove documents Provider Senior Officer SAO Full access to remove documents Provider Finance Officer PFO Full access to remove documents Provider Editing Officer PEO Full access to remove documents Provider View Only PVO Can only view documents Removing a document effectively deletes it from HITS and should only be used when the document was uploaded incorrectly. You can remove any document that has not been submitted ie there is no ‘Submitted Date’ (see example below). HELP IT Application User Guide V 4.0 – Current Page 40 To remove a document, follow the instructions below. Instructions 1. From the Navigation menu click on Organisation to navigate to the View Organisation details screen. Click on Document List to view the Document list screen. 2. From the list of available documents, select the check box beside the document you want to remove and click on the View details button. HELP IT Application User Guide V 4.0 – Current Page 41 3. The document details will be displayed for you to review. If you want to remove this document, click on the Remove button. 4. You will be navigated back to the Document list screen and a confirmation message will display confirming that the document was successfully removed. HELP IT Application User Guide V 4.0 – Current Page 42 Notes 1. A document can be removed if your application status is ‘Draft’ or you uploaded the document when your application was in a status of ‘Awaiting Further Information’. Once the Application or an RFI is submitted the document cannot be removed by you, you must request the Department to remove it for you where the document is not required for assessment purposes. 2. All documents uploaded but not submitted will be submitted with the milestone. 3. If you require a document to be removed and you do not have the functionality to remove it, please send a request to [email protected] providing all the necessary information. The Department will remove the document for you. HELP IT Application User Guide V 4.0 – Current Page 43 Documents – Replacing a document USER ROLES ACCESS Provider Corporate Officer CEO Access to replace documents Provider Senior Officer SAO Access to replace documents Provider Finance Officer PFO Access to replace documents Provider Editing Officer PEO Access to replace documents Provider View Only PVO Cannot replace documents Over time, documents that have been previously submitted by your organisation and assessed by the Department may become out of date. HITS will allow you to replace any document that has been submitted. Replacing a document does not remove (or delete) the replaced document instead it links one or more replaced documents with the current version. Please note that this functionality is only available to approved providers. Instructions 1. From the Navigation menu click on Organisation to navigate to the View Organisation details screen. Click on Document List to view the Document list screen. 2. From the list of available document, select the check box beside the document you wish to replace and click on the View details button. HELP IT Application User Guide V 4.0 – Current Page 44 3. The View Document details screen will be displayed for you to review. If you wish to replace a document, click on the Select button to upload your new document. HELP IT Application User Guide V 4.0 – Current Page 45 4. Choose the file to upload and click the Open button. 5. The filename will be displayed in the Replacement details section, click on the Replace button to confirm to save your replacement document in HITS. 6. Once you have replaced the document, you will receive a confirmation message. It is important to note that replacing a document does not change the Category or Sub category of the replaced document. HELP IT Application User Guide V 4.0 – Current Page 46 7. The replaced document name and link will be displayed under the Document details section. 8. If you need to replace another document, click on the Back to Document list link and repeat. HELP IT Application User Guide V 4.0 – Current Page 47 Notes 1. Maximum size for any document is 15 Megabytes (15 MB). If your document is close to this size, it is recommended that you split your document into two sections and upload separately. 2. A document can only be replaced when it has been submitted. 3. The new document is automatically submitted when uploaded. Documents – Uploading a document - applicant USER ROLES ACCESS Provider Corporate Officer CEO Access to upload documents Provider Senior Officer SAO Access to upload documents Provider Finance Officer PFO Access to upload documents Provider Editing Officer PEO Access to upload documents Provider View Only PVO Cannot upload documents Instructions 1. From the Navigation menu click on Organisation to view the Context Selector. Click on Document List to view the Document list screen. 2. From the Upload Document section, select the relevant category for the document to be stored under and click on Select button. HELP IT Application User Guide V 4.0 – Current Page 48 3. The Upload Documents screen will be displayed. All required fields must be completed. HELP IT Application User Guide V 4.0 – Current Page 49 4. Select an appropriate Sector and Sub category for your document. 5. Choose the file to be uploaded by clicking on the Select button. 6. Once you have located the file, click on the Open button of the File Download popup window, the name will be displayed below the Select button. 7. If you need to upload more documents for the same category and sub category, repeat the above steps. 8. Review the documents that you have uploaded. You can remove any document that is not appropriate by selecting the Remove button appropriate for the document. 9. Once you are satisfied you have uploaded all the documents for that category, click on the Submit button. You will receive a ‘Saved Successfully’ confirmation message if documents have been uploaded successfully. HELP IT Application User Guide V 4.0 – Current Page 50 10. If you need to upload more documents to a different category or sub category, from the HITS Upload Document screen click on the Back to Document list link and repeat above instructions. 11. Your documents have been uploaded and will now appear in your document list. Notes 1. Maximum size for any document is 15 Megabytes (15 MB). If your document is close to this size, it is recommended that you split your document into two sections and upload separately. 2. You must ensure document names are no more than 100 characters in length. If they are too long, you will get the following error message similar to “An application error occurred and has been logged. Please advise your administrator and provide them with this error code: ada3827c-fc25-446a-bc49c7a20”. 3. All documents uploaded during the preparation of your application will be submitted to the Department at the same time that you submit your application. HELP IT Application User Guide V 4.0 – Current Page 51 Documents – Uploading a document – Approved Provider USER ROLES ACCESS Provider Corporate Officer CEO Access to upload documents Provider Senior Officer SAO Access to upload documents Provider Finance Officer PFO Access to upload documents Provider Editing Officer PEO Access to upload documents Provider View Only PVO Cannot upload documents There are two ways in which documents can be uploaded into HITS Document List: Upload documents via the documents list when your documents relate to a milestone. Using the document list upload will not submit the document and should you decide a document is not relevant, you can remove it. Ad-Hoc documents: Upload documents via the Ad-Hoc document upload when you are not uploading documents associated with a milestone. Documents upload via Ad-Hoc upload will automatically be submitted to the Department. Instructions 1. From the Navigation menu click on Organisation to view all available sub menu options. Click on Document List to view the Document list screen. 2. From the Upload Document section, select the relevant category for the document is to be uploaded to and click on Select button. HELP IT Application User Guide V 4.0 – Current Page 52 From Document List From Ad-Hoc Documents 3. The Upload Documents screen will be displayed. All required fields must be completed before you can select the Submit button. HELP IT Application User Guide V 4.0 – Current Page 53 4. Select the Sector(s) and sub category. 5. Search for the file to be uploaded by clicking on the Select button. 6. Once you have located the file, click on the Open button of the File Download popup window, the name will be displayed below the Select button. 7. If you need to upload more files to a different category or sub category, from the HITS Upload Document screen click on the Back to Document list link and repeat. HELP IT Application User Guide V 4.0 – Current Page 54 8. Submitted documents will have the date the document was submitted in the ‘Submitted Date’ field. HELP IT Application User Guide V 4.0 – Current Page 55 Notes 4. The Ad-Hoc function is only enabled once an application has been approved. If your organisation has never registered in HITS previously and lodges a new application, you will only be able to upload documents via the Document List. 5. If you upload a document via the Document list and you are not subject to a milestone, you will need to remove the document and then upload it via the Ad-Hoc function. If you leave the document unsubmitted, it will only be submitted when you are next subject to a milestone. HELP IT Application User Guide V 4.0 – Current Page 56 Documents – Viewing a document USER ROLES ACCESS Provider Corporate Officer CEO Access to view documents Provider Senior Officer SAO Access to view documents Provider Finance Officer PFO Access to view documents Provider Editing Officer PEO Access to view documents Provider View Only PVO Access to view most documents Instructions 1. From the Navigation menu click on Organisation, this will navigate you to the screen which will display all the sub menu options available under the Organisation menu. In the context selector click on Document List to view the Document list screen. 2. From the list of available documents, select the check box beside the document you wish to view and click on the View details button. 3. The document details will be displayed for you to review, click on the filename link. You will be asked whether you wish to Open or Save the document. HELP IT Application User Guide V 4.0 – Current Page 57 4. Click the Open button on the File Download popup window. 5. If you need to access more documents, from the HITS View Document details screen, click on the Back to Document list link and repeat above steps. HELP IT Application User Guide V 4.0 – Current Page 58 Estimate – Add and submit an estimate - HEP USER ROLES ACCESS Provider Corporate Officer CEO Can create and submit an Estimate Provider Senior Officer SAO Can create an Estimate Provider Finance Officer PFO Can create an Estimate Provider Editing Officer PEO User role cannot view this module Provider View Only PVO User role cannot view this module Important note: Higher Education provider estimates are not to be completed in HITS at this time. Please do not add a Higher Education Provider estimate in HITS unless you have been advised formally by the Department of Education. HITS will display estimates at the time of approval for both the current calendar year and the following calendar year. Estimates will also be created for each sector in which there is an active application. The estimates will not contain any other information and where appropriate, you will have to edit the estimate before it can be submitted to the Department. For existing approved Providers, HITS will automatically create the following calendar years estimate at the start of the current calendar year. You must not submit the following calendar years estimate until October. Please note that you must have a user role of PFO, SAO or CEO to edit an Estimate and CEO to submit an Estimate. Instructions 1. Select Organisation – View Organisation details from the Navigation menu to display the Context Selector 2. Select Estimate list from the sub menu items. HELP IT Application User Guide V 4.0 – Current Page 59 3. Click the ‘Edit’ link on the desired record noting the sector and calendar year. This will navigate you to the ‘Estimate of Advance Payments’. HELP IT Application User Guide V 4.0 – Current Page 60 4. Complete all required fields and Save to navigate to ‘Estimate of Advance Payments’ screen. HELP IT Application User Guide V 4.0 – Current Page 61 5. Repeat above steps to add additional estimate line items to your estimate. You must check and confirm that all line items are correct before you continue. You can either edit or delete any line item on the Edit Estimate of Advance Payments screen. 6. To delete a line item check the Delete checkbox against the line item (or items). This will enable the Delete estimate item button. HELP IT Application User Guide V 4.0 – Current Page 62 A confirmation message will display and if you click on the Yes button a ‘Deleted Successfully’ confirmation message will display on Edit Estimate of Advance Payments screen. HELP IT Application User Guide V 4.0 – Current Page 63 Once you are satisfied with the Estimate of Advance Payment line items, you are then required to consider the justification questions and provide justification for your advance where appropriate. Note this is not a mandatory question. 7. Select the down arrow to expand the Justification questions. 8. Add comments where applicable. 9. Click Save as draft. The last requirement is to advise the frequency that you would like to receive advance payments from the Department. 10. Select Periodic payment type 11. Click Save as draft button. HELP IT Application User Guide V 4.0 – Current Page 64 Submitting an Estimate - Provider Corporate Officer (CEO) only 1. From the View Organisation details page, select Estimate List from the Context Selector List. 2. Click the Edit link on the desired record noting the sector and calendar year. This will navigate you to the Estimate of Advance Payments screen. 3. Select the Estimate items box to see a summary of all records in the Estimate items list. You should check all line items to ensure they are accurate before proceeding. HELP IT Application User Guide V 4.0 – Current Page 65 4. Where you are satisfied that the Estimate of Advance Payment is complete, check the Declaration tick box and click Submit. HELP IT Application User Guide V 4.0 – Current Page 66 5. The Estimate status will change to ‘Submitted’ and a notification will be sent to the Department notifying them that a new estimate has been submitted by your organisation. HELP IT Application User Guide V 4.0 – Current Page 67 Estimate – Add and submit an estimate - VET USER ROLES ACCESS Provider Corporate Officer CEO Can add and submit an Estimate Provider Senior Officer SAO Can add an Estimate Provider Finance Officer PFO Can add an Estimate Provider Editing Officer PEO Not applicable Provider View Only PVO Not applicable HITS will automatically create two ‘draft’ estimates at the time of approval for both the current calendar year and the next calendar year. The estimates will not have any other information and providers will have to edit the estimate before it can be submitted to the Department. For existing approved Providers, HITS will automatically create the next calendar years estimate at the start of the current calendar year ie 2015 estimate is created on 1/1/2014. Providers must not submit their next calendar years estimate until October. Please note that you must have a user role of PFO, SAO or CEO to edit an Estimate and CEO to submit an Estimate. Instructions 1. Select Organisation – View Organisation details from the Navigation menu to display the Context Selector 2. Select Estimate list from the sub menu items. HELP IT Application User Guide V 4.0 – Current Page 68 3. Click the ‘Edit’ link on the desired record noting the sector and calendar year. This will navigate you to the ‘Estimate of Advance Payments’. You have two choices on how to enter your estimate, either at course level or if you have more than 50 courses, you may choose to select to enter by field of study. It is important that you only select field of study if you are offering VET FEE-HELP to more than 50 courses otherwise the Department reserves the right to return your estimate to draft status. If an estimate is returned to draft status and you have to change from Field of Study to Course, HITS will delete all existing estimate line items and you will have to start your estimate again. HELP IT Application User Guide V 4.0 – Current Page 69 You must complete all the following steps before you Estimate can be submitted to the Department: Add one or more estimate items; Complete Justification questions; and Acknowledge the declaration. Entering Estimate details by Course 4. Click Add estimate item to navigate to the ‘Add Estimate item’ screen. HELP IT Application User Guide V 4.0 – Current Page 70 5. Complete all required fields and Save to navigate to ‘Estimate of Advance Payments’ screen. HELP IT Application User Guide V 4.0 – Current Page 71 6. Repeat above steps to add additional estimate line items to your estimate. You must check and confirm that all line items are correct before you continue. HELP IT Application User Guide V 4.0 – Current Page 72 You must check and confirm that all line items are correct before you continue. You can either edit or delete any line item on the Edit Estimate of Advance Payments screen. 7. To delete a line item check the Delete checkbox against the line item (or items). This will enable the Delete estimate item button. HELP IT Application User Guide V 4.0 – Current Page 73 A confirmation message will display and if you click on the Yes button a ‘Deleted Successfully’ confirmation message will display on Edit Estimate of Advance Payments screen. HELP IT Application User Guide V 4.0 – Current Page 74 Once you are satisfied with the Estimate of Advance Payment line items, you are then required to consider the justification questions and provide justification for your advance where appropriate. Note this is not a mandatory question. 8. Select the down arrow to expand the Justification questions. 9. Add comments where applicable. 10. Click Save as draft. HELP IT Application User Guide V 4.0 – Current Page 75 Entering Estimate details by Field of Study 1. Select the check box for ‘More than 50 active courses?’ A new check box will then display titled ‘Enter by Field of Study’. Check this box also and then select Add estimate item which will navigate you to the ‘Add Estimate item’ screen. 2. Fill in all required fields and click ‘Save’ this will navigate you to the ‘Estimate of Advance Payments’ screen. 3. Repeat until you have added all the line items to your estimate. You must check and confirm that the details entered are correct before you continue. HELP IT Application User Guide V 4.0 – Current Page 76 You must check and confirm that all line items are correct before you continue. You can either edit or delete any line item on the Edit Estimate of Advance Payments screen. 4. To delete a line item check the Delete checkbox against the line item (or items). This will enable the Delete estimate item button. HELP IT Application User Guide V 4.0 – Current Page 77 A confirmation message will display and if you click on the Yes button a ‘Deleted Successfully’ confirmation message will display on Edit Estimate of Advance Payments screen. HELP IT Application User Guide V 4.0 – Current Page 78 Once you are satisfied with the Estimate of Advance Payment line items, you are then required to consider the justification questions and provide justification for your advance where appropriate. Note this is not a mandatory question. 5. Select the down arrow to expand the Justification questions. 6. Add comments where applicable. 7. Click Save as draft. HELP IT Application User Guide V 4.0 – Current Page 79 Submitting an Estimate - Provider Corporate Officer (CEO) only 6. From the View Organisation details page, select Estimate List from the Context Selector List. 7. Click the Edit link on the desired record noting the sector and calendar year. This will navigate you to the Estimate of Advance Payments screen. 8. Select the Estimate items box to see a summary of all records in the Estimate items list. You should check all line items to ensure they are accurate before proceeding. HELP IT Application User Guide V 4.0 – Current Page 80 9. Where you are satisfied that the Estimate of Advance Payment is complete, check the Declaration tick box and click Submit. 10. The Estimate status will change to ‘Submitted’ and a notification will be sent to the Department notifying them that a new estimate has been submitted by your organisation. HELP IT Application User Guide V 4.0 – Current Page 81 Estimate – Add and submit a variation USER ROLES ACCESS Provider Corporate Officer CEO Can create and submit a variation. Provider Senior Officer SAO Can create a variation. Provider Finance Officer PFO Can create a variation. Provider Editing Officer PEO No access to this module Provider View Only PVO No access to this module You can only create a variation where your current estimate has been submitted and has a status of ‘Finalised’. Instructions 1. Select Organisation – View Organisation details from the Navigation menu to display the Context Selector. 2. Select Estimate list from the sub menu items. 3. Click the Edit link on the desired record noting the sector and calendar year. This will navigate you to the ‘Estimate of Advance Payments’. HELP IT Application User Guide V 4.0 – Current Page 82 4. Scroll to the bottom of the page and select Create Variation. You will receive a confirmation message that the variation has been created successfully. 5. The status of the Estimate will also be updated to ‘Draft Variation’. HELP IT Application User Guide V 4.0 – Current Page 83 6. To edit existing rows click on the ‘Edit’ link in the Estimate items list or select the ‘Add estimate item’ link if you wish to add a new line item. This will navigate you to the ‘Edit Estimate item’ or ‘Add Estimate item’ screen. Make the required updates then click Save. 7. To delete an estimate item, tick the Delete tick box and click Delete estimate item. HELP IT Application User Guide V 4.0 – Current Page 84 8. Repeat above steps until the Estimate items summary box displays the desired estimate amounts to submit for the whole calendar year. 9. Complete the ‘Justification questions’ where appropriate. 10. Click Save as draft to save the information on screen or Submit if you have finished. HELP IT Application User Guide V 4.0 – Current Page 85 Submitting a Variation - Provider Corporate Officer (CEO) only) 1. From the View Organisation details page, select Estimate List from the Context Selector List. 2. Click the ‘Edit’ link on the desired record noting the sector and calendar year. This will navigate you to the Estimate of Advance Payments screen. 3. View the ‘Estimate items’ box to see a summary of all records in the ‘Estimate items’ list. You should check all line items to ensure they are accurate before proceeding. 4. Where you wish to review the estimate, select Save as draft or where you are satisfied that the Estimate is complete, check the Declaration tick box and click on the Submit button. HELP IT Application User Guide V 4.0 – Current Page 86 5. The Estimate status will change to ‘Submitted’ and a notification will be sent to the Department notifying them that a new estimate has been submitted by your organisation. Notes 1. The attached payment schedule will continue to process payments associated with the old Estimate until such time as the Variation is submitted to and is approved ie ‘Finalised’, by the Department. HELP IT Application User Guide V 4.0 – Current Page 87 Estimate – Checking estimate status USER ROLES ACCESS Provider Corporate Officer CEO Can view an estimate Provider Senior Officer SAO Can view an estimate Provider Finance Officer PFO Can view an estimate Provider Editing Officer PEO Not able to access this module Provider View Only PVO Not able to access this module Estimates that have been submitted to the Department will have an initial status of submitted. The Department may approve the estimate or return the estimate to draft status where it requires changes. Instructions 1. Select Organisation – View Organisation details from the Navigation menu to display the Context Selector. 2. Select Estimate list from the sub menu items. 3. View the status on the desired record noting the sector and calendar year. If the status is ‘Finalised’, the Department has finalised the estimate. 4. To view the Decided estimate amounts: select the check box for the desired record and click View details. HELP IT Application User Guide V 4.0 – Current Page 88 5. View the ‘Estimate details’ box. Notes 1. Estimates can only be finalised by the Department. Fee Schedules This functionality has been removed for providers. HELP IT Application User Guide V 4.0 – Current Page 89 Financial Performance – Create a financial performance USER ROLES ACCESS Provider Corporate Officer CEO Can create a Financial Performance Provider Senior Officer SAO Can create a Financial Performance Provider Finance Officer PFO Can create a Financial Performance Provider Editing Officer PEO Not able to view this module Provider View Only PVO Not able to view this module Instructions From the Navigation menu select Organisation, View Organisation details from the Sub menu items to display the Organisation Details screen. Then click on the Financial Performance tab to display the Financial Performance list screen. 1. Click Create to navigate to the Create Financial Performance. 2. Input the information in the fields marked required. 3. You must enter a value or ‘0’ in all of the 75 fields of the Financial Performance. HELP IT Application User Guide V 4.0 – Current Page 90 4. It is recommended that you regularly click the Save button to ensure you are not timed out of HITS. When you are satisfied that you have uploaded all information, select Submit to lodge your Financial Performance. HELP IT Application User Guide V 4.0 – Current Page 91 5. You will be navigated back to the Financial Performance List and you Financial Performance will have a status of Submitted. Notes 1. Once a FP has been submitted, it is locked for editing purposes. You must contact the Department via [email protected] and request the FP be returned to draft, where the FP requires updating. 2. To edit a financial performance, you application must be in a status of Draft, Approved or RFI. 3. Where you are a Dual Sector organisation and one of your sector applications is approved, you will be able to edit all your financial performance. Should you wish to update a financial performance that is associated with your application, you must notify the Department first to gain their approval before updating your financial performance. HELP IT Application User Guide V 4.0 – Current Page 92 Financial Performance – Updating and submitting USER ROLES ACCESS Provider Corporate Officer CEO Can update and submit a Financial Performance Provider Senior Officer SAO Can update and submit a Financial Performance Provider Finance Officer PFO Can update and submit a Financial Performance Provider Editing Officer PEO Not able to access this module Provider View Only PVO Not able to access this module How to Update Financial Performance A Financial Performance record can only be updated if it has a status of Draft. You can view the status of your Financial Performance from the Financial Performance list. Instructions 1. From the Navigation menu select Organisation, Organisation Details from the Sub menu items to display the Organisation Details screen. Then select the Financial Performance tab to display the Financial Performance list screen. 2. Click the Edit button for the selected Financial Performance, the Edit Financial Performance screen will be displayed. HELP IT Application User Guide V 4.0 – Current Page 93 3. Update any information in the Financial Performance. 4. Click Submit. 5. The updates made to the Financial Performance will be saved, the Financial Performance will have a status of ‘Submitted’ and the Financial Performance list screen is displayed. Notes 1. You will no longer be able to edit your Financial Performance once it has been submitted. HELP IT Application User Guide V 4.0 – Current Page 94 HITS – Logging in for First time users The HITS URL has an embedded anti-phishing rule that times the URL out for 30 minutes after it is first used. The link must always be refreshed otherwise a user may experience an error or have to enter their password several times before they can log in. Please note: You must use one of the following web browsers to access both HITS and IAM Internet Explorer 11; or Firefox. To ensure that you do not experience an error when attempting to log into HITS please follow the steps below: 1. Open your web browser 2. Type or copy the URL link below into your web browser o https://extranet.deewr.gov.au/frontdoor/ 3. Enter your Username and Password then Sign In. You will be navigated to the System for Higher Ed welcome page. HELP IT Application User Guide V 4.0 – Current Page 95 4. You will be navigated to the System for Higher Ed welcome page. Save the address for this page as either a bookmark or favourite. Saving this web address as your favourite/bookmark will refresh the anti-phishing rule and will ensure that you don’t experience any errors when you log in. 5. Notes To check which version you are using in internet explorer, click on ‘Help’ in the tool bar, then ‘About Internet Explorer’. A window will then open advising you on which version you have installed. HELP IT Application User Guide V 4.0 – Current Page 96 6. Once you have saved the bulletin page as a favourite/bookmark, click on the HELP IT system logo to log into HITS. HITS – Logging in You should always log into HITS using your saved favourite or bookmark to avoid experiencing errors (see previous section to set up your favourite/bookmark). Instructions 1. Enter your Username and Password and select Sign In and you will be navigated to the System for Higher Ed welcome page. HELP IT Application User Guide V 4.0 – Current Page 97 2. The System for Higher Ed welcome page provides the following information. a. In the top right hand corner your Logon Id and Sign out button. b. The Bulletin section which provides information relating to the System for Higher Ed and HITS availability. c. System for Higher Ed Programs section which displays the HELP IT System logo which is used to sign into HITS. HELP IT Application User Guide V 4.0 – Current Page 98 3. To log into HITS, select the HELP IT System logo and you will be navigated to the HITS Home page where the following information or links are displayed. a. In the top right hand corner: i. Your Logon Id – zz0000 ii. HITS ID – this is your organisations HITS/HEP ID – 9999 iii. Roles(s) – Displays your IAM Organisation ID and your current role(s) – 700000, CEO; and iv. Notifications - displays the total number of notifications b. Under the HELP IT System banner, different options will be available based on your organisations status and by which user role you have. For example, the options below are: i. Organisation; ii. Application; iii. Payments; iv. Publications; and v. Reports. c. My To Do List – navigates you to the Notification Centre. d. System Information – links to User Guides and Quick Reference guides. e. Program Information – links to the Departments Education Provider information website. HELP IT Application User Guide V 4.0 – Current Page 99 Note: 1. The modules displayed in the banner are dependent upon the status of your application and the user role you have been assigned to. HELP IT Application User Guide V 4.0 – Current Page 100 IAM – Accept/decline an invitation to join an organisation Do not use this functionality If you have used this function, please contact the HITS Help Desk at [email protected] to remove any links. IAM – Forgotten your password If you have set up your ‘Forgotten my password’ account questions, you can reset your own password following the instructions below. Instructions 1. Log into IAM or type https://www.deewr.gov.au/IAM/pages/applicationlist.aspx into your browser. To navigate to the IAM log in screen 2. Click on Forgotten your password? 3. Enter your User Id and Email address and select Continue HELP IT Application User Guide V 4.0 – Current Page 101 4. Answer all 3 questions and click Continue If you answered all questions correctly, you will be directed to the ‘set your password’ screen. If you did not answer your questions correctly, you may attempt to answer them again or contact one of your IAMPCS officers to reset your password for you. 5. Enter a new password and confirm password then select Submit HELP IT Application User Guide V 4.0 – Current Page 102 You will receive a confirmation message that your password has been changed. HELP IT Application User Guide V 4.0 – Current Page 103 IAM – HITS User roles IAM is directly linked with HITS in that all user credentials and user roles are created in IAM and the role determines what a user can view and/or update in HITS. The following table includes all existing user roles that an IAMPCS administrator can allocate to each users credentials. It is important for IAMPCS administrators to consider the role of each user as HITS notifications are assigned to user roles – see Notifications for further details. USER ROLES ACCESS Provider View Only PVO Provider Editing Officer PEO Provider Finance Officer PFO Provider Senior Officer SAO Provider Corporate Office CEO HELP IT Application User Guide V 4.0 – Current Can view but not edit all modules in HITS except Persons Of Influence (POI), Estimates and Payments. As per PVO and can also edit modules. As per PEO with the addition of being able to view/edit bank account, Estimates and payments. As per PFO with the addition of being able to edit/view POI and submit application, request for further information and bank account to the Department. As per SAO with the addition of being able to submit an estimates to the Department. Page 104 IAM – Logging into IAM Log into IAM here or type the following into your address bar of your web browser https://www.deewr.gov.au/IAM/pages/applicationlist.aspx You will be directed to the IAM logon page. You must have an active User ID and Password before you can log into IAM. HELP IT Application User Guide V 4.0 – Current Page 105 IAM – Manage my forgotten password If you wish to self-manage forgotten passwords, you simply need to complete the 3 questions in I:AM under ‘Manage my account – Manage my forgotten password’. Once you have set up your Forgotten Password account, you will no longer need to contact the department regarding forgotten passwords. Instructions 1. Log into IAM or type https://www.deewr.gov.au/IAM/pages/applicationlist.aspx into your browser. To navigate to the IAM log in screen 2. Click on Manage My Account. 3. Select Manage My Forgotten Password 4. Complete all 3 questions. If you do not like any of the questions you can change them by clicking on the Change button. After you are satisfied with your answers, click on the Submit button. 5. You will receive a confirmation message that your questions have been completed. HELP IT Application User Guide V 4.0 – Current Page 106 IAM – Password expired Your password will expire after 42 days and you will be advised via the System for Higher Ed login page when you attempt to log in with an expired password. Please follow the instructions below to reset your expired password. Instructions 1. Select the Change Password link which is below the Sign In button. The Identity & Access Management Change Password screen will then be displayed. HELP IT Application User Guide V 4.0 – Current Page 107 2. Populate the following fields, you current ‘expired’ Password, New Password and Confirm New Password (the new password must comply with password rules listed on the change password screen). 3. Click Submit. a. A confirmation message will be displayed stating that your password has successfully been changed and you will be navigated back to the IAM login screen HELP IT Application User Guide V 4.0 – Current Page 108 Notes 1. If the new password that you enter does not meet the password rules the system will return an error. 2. If you have not done so already, you should log into IAM and set up your ‘Manage Your Forgotten Password’ questions so that you can reset your own password. HELP IT Application User Guide V 4.0 – Current Page 109 IAM – Reset your password Instructions 1. Select the Change Password link which is below the Sign In button. The Identity & Access Management Change Password screen will then be displayed. HELP IT Application User Guide V 4.0 – Current Page 110 2. Populate the following fields Current Password, New Password and Confirm New Password (the new password must comply with password rules listed on the change password screen). 3. Click Submit. a. A confirmation message will be displayed stating that your password has successfully been changed and you will be navigated back to the IAM login screen HELP IT Application User Guide V 4.0 – Current Page 111 Notes 1. If the new password that you enter does not meet the password rules the system will return an error. 2. You should log into IAM and set up your ‘Manage Your Forgotten Password’ questions so that you can reset your own password. HELP IT Application User Guide V 4.0 – Current Page 112 IAMPCS – Administrators responsibilities HITS has a devolved IT user security arrangement whereby each organisation will manage their own staff’s access to HITS through two nominated IAM Provider Contact Security Officer (IAMPCS) administrators. IAMPCS administrators will be responsible for managing all access to HITS including; Creating new users; Resetting passwords for existing users; Updating user roles; and Terminating access for users who no longer require access to HITS Organisations may have up to two IAMPCS administrators at any one time and for new applicants, these must be created as soon as possible after registering a new application in HITS as they will not be able to complete all the components without assigning appropriate user roles. Senior User Roles The CEO and SAO security roles are senior user roles which enable higher level tasks in HITS to be undertaken, such as providing bank account details and declarations pertaining to provision of personal information. Only senior officers of the organisation, such as the Chief Executive Officer, who have the requisite authority to bind the organisation, must be assigned to these two security roles. New Applicants If you are a new applicant, during the registration and apply process in HITS you will have nominated a primary contact officer. This officer will automatically be created as a user in HITS with a default user role of Provider Edit Officer (PEO) and will receive an email with their new User ID and temporary password. The Department will contact this officer via email shortly after you register you application in HITS to arrange the completion of the following forms that will enable IAMPCS officers to be created. System for Higher Ed IAM – Initial Access Request (IAR) form; and Skills User Security Declaration (USD) form. The IAR form and a USD form for each IAMPCS officer must be scanned and returned to the Department to enable the users to be created in the IAM system. The Department will send a confirmation email including their User ID, temporary password and additional information to assist them with their role as IAMPCS officers. Please note that whenever an organisation changes their IAMPCS officers, a new IAR form and USD form for a new user must be completed and forwarded to the Department via [email protected] Change in IAMPCS officers You may update your IAMPCS officers at any time by completing a new Initial Access Request (IAR) form including the details of the two officers you wish to have this administration role. Before you send in your new IAR, you must create user credentials for any IAMPCS officer who does not have existing user credentials in IAM. The Department will then allocate the IAMPCS role to the new user. If you are changing both IAMPCS users, you must send in a new IAR form and a scanned copy of both User Security Declaration forms to the Department via [email protected] . You can request an IAR form from the Department. HELP IT Application User Guide V 4.0 – Current Page 113 IAMPCS – Update your user role USER ROLES ACCESS Provider View Only PVO Provider Editing Officer PEO Provider Finance Officer PFO Provider Senior Officer SAO Provider Corporate Office CEO Can view all screens excluding POI, Financials, Estimates/Payments). Provider Edit Officer as per PVO and including edit on screens they can view. Provider Financial Officer as per PEO with the addition of being able to view/edit Estimates. Provider Senior Officer as per PFO with the addition of being able to edit/view POI, lodge an application or RFI and submit bank account. Provider Corporate Officer as per SAO with the addition of being able to submit an estimate to dept. Updating your role There are two roles allocated to IAM Provider Contract Security officers, an IAM system administration role which will enable you to manage all other users for your organisation and a HITS User role which determines what you can view and/or update in HITS. Your IAMPCS administration role is created by the Department and where you do not have an existing username or password, your initial access to HITS will also be created. As the Department does not know what your role within your organisation is, you will be assigned the lowest editing role of Provider Editing Officer (PEO). IAMPCS officers may update their HITS user role from PEO by following the steps below. Instructions 1. Log into IAM using your user ID and password, this will display the IAM Home screen. HELP IT Application User Guide V 4.0 – Current Page 114 2. From the home screen click Manage My Account to navigate to the Manage My Account screen. 3. From the My Account screen, select Manage My Roles. HELP IT Application User Guide V 4.0 – Current Page 115 4. The Manage My Roles screen displays your current Role and you may update the role by checking any other role. Before Update HELP IT Application User Guide V 4.0 – Current Page 116 After Update Notes 1. The HITS role above is NOT connected to the Contacts list in HITS. If you are a CEO and have added your contact details in HITS, you must also have CEO role assigned to you in IAM. HELP IT Application User Guide V 4.0 – Current Page 117 IAMPCS – User – Create USER ROLES ACCESS Provider Corporate Office CEO Provider Senior Officer SAO Provider Finance Officer PFO Provider Editing Officer PEO Provider View Only PVO Provider Corporate Officer as per SAO with the addition of being able to submit an estimate. Provider Senior Officer as per PFO with the addition of being able to edit/view POI, submit bank account, application and an RFI. Provider Financial Officer as per PEO with the addition of being able to view/edit Estimates. Provider Edit Officer as per PVO and including edit on screens they can view. Can view all screens excluding POI and Financials (including Estimates/Payments). You should consider what HITS notifications and/or emails that are available when assigning user roles. You can assign multiple user roles to a user’s account. Potential existing matches Before you create a new user in IAM you should always perform a search against your Organisation Id to see if the user you wish to create exists or not. If you perform a search and the user does not exist against your organisation, but a possible existing match is displayed when you create a new user, you must ignore the possible match and continue with creating the new user credentials against your organisation. There are two likely reasons for a potential existing match 1. IAM performs a match on like surname/first name and will return a match if they are similar; and 2. The user may have one or more accounts with different organisations As a rule of thumb, if a duplicate is identified and you know that the person does not have a user account attached to your organisation, you must create the user credentials and ignore the possible duplicate. Instructions 1. From the home screen click on Manage a User 2. Perform a search using Organisation as the ‘Search by’ field and your Organisation Id as your ‘Search Text’ and select Search HELP IT Application User Guide V 4.0 – Current Page 118 3. If the new user does not appear in your list, you may proceed with creating the user. Click on Home and then on Create a User. This will take you to the Enter User Details screen, from here you are required to enter the new user’s details. 4. You must enter details in all required fields; a. Given Name, b. Surname, c. Email; and d. DOB, You may enter details in the remaining optional fields. HELP IT Application User Guide V 4.0 – Current Page 119 5. Click Continue to display the Set Password screen. 6. In the Password field enter a password that matches all password rules displayed on the screen, reenter the password in the Confirm Password field and click Continue. This will display the Select Roles screen. Note: The Continue button will only display once both Password & Confirm Password fields have been entered and are identical. 7. Check the box against your organisations to display all available user roles. HELP IT Application User Guide V 4.0 – Current Page 120 8. Select the check box of the user security role(s) that you wish to allocate to the user then click Continue. HELP IT Application User Guide V 4.0 – Current Page 121 9. This will display the Verify Details screen. Once you have verified the details are correct, click on the Submit button to create the user. a. A ‘Successful’ confirmation message and details of the new users Logon Id and organisation the user has been created against will also display. HELP IT Application User Guide V 4.0 – Current Page 122 Notes 1. You must obtain a signed User Security Declaration Form before you create any user in IAM (see attachment C). 2. IAM does not send out an email confirmation when you create credentials for a new user. It is your responsibility to notify the person of their new Logon ID and Password and provide them with the URL links to IAM and HITS. You must also advise the new user that they must change their password before they attempt to log into HITS. 3. Do not create duplicate accounts for the same person. You should assign multiple user roles to the same record. Where a duplicate record is created, it should be immediately deleted. 4. It is the responsibility of the IAM Provider Contract Security (IAMPCS) administrator to manage all user access for their organisation. This also includes removing the access from staff who no longer require access to HITS. HELP IT Application User Guide V 4.0 – Current Page 123 IAMPCS – User – Inactivate Whenever a user no longer requires access to HITS either through cessation of employment or movement in your organisation, you should inactivate the persons account. Inactivating an account ensures the person no longer has access to HITS or IAM but also ensures that if in the future they require access, you can enable their account again. Instructions 1. Log into IAM using your user ID and password, this will display the IAM Home screen. 2. Click on Manage a User You may search for the user using one of the following 6 options a. User id b. Given name c. Surname d. E-mail address e. Admin role; or f. Organisation 3. Select the appropriate search mode and select enter to display the user’s details. Click on User’s Account Status HELP IT Application User Guide V 4.0 – Current Page 124 4. Check the Disable Account checkbox to enable the ‘Reason for Disable’ selection. Select one of the three available reasons below the select Submit. a. Security Intervention b. Temporary Absence c. No Longer Employed 5. You will receive a confirmation message if the update was successful. HELP IT Application User Guide V 4.0 – Current Page 125 HELP IT Application User Guide V 4.0 – Current Page 126 IAMPCS – User - Reset users password Instructions 1. Log into IAM using your User ID and password, this will display the IAM Home screen. 2. Click the Manage a User link to display the Manage a User screen. 3. Search by User ID and enter the User ID of the user whose password you wish to reset in the Search Text. 4. Click Search to return a list of all users that match your search criteria. 5. Click the radio button of the User ID whose password you wish to reset; this will display the User Details screen for the selected user. HELP IT Application User Guide V 4.0 – Current Page 127 6. From the Your Tasks list on the left hand side of the screen select Reset Password; this will display the Reset Password screen. 7. Enter the new password in the Password field, confirm the new password in the Confirm Password field (the password entered must meet the password security rules stated on the screen) and select Submit. HELP IT Application User Guide V 4.0 – Current Page 128 8. The system will notify you that the change has been successful. 9. Email the user their temporary password and advise them that they must change their password via the ‘Change password’ link on the System for Higher Ed sign in page. HELP IT Application User Guide V 4.0 – Current Page 129 Notes 1. You can also search for a user by selecting any of the following: a. User ID b. Given name c. Surname d. E-mail address e. Admin role f. Organisation 2. If the new password entered does not meet the password security requirements an error message will be returned. 3. I.AM access is linked to HITS, you should be able to Log into HITS Using the same username and password. 4. Sharing your password is a breach of ICT systems policy as you are responsible for maintaining the integrity of HITS by not sharing your user ID and password with any other person. HELP IT Application User Guide V 4.0 – Current Page 130 IAMPCS – User – Unlock Account A user’s account will automatically be locked by IAM whenever they attempt to log in using an incorrect password more than 3 times. Instructions 1. Log into IAM using your user ID and password, this will display the IAM Home screen. 2. Click on Manage a User 3. Search for the user using one of the following 6 options and click on the Select button. a. User id b. Given name c. Surname d. E-mail address e. Admin role; or f. Organisation If the users account is locked, you will see confirmation under Account Status HELP IT Application User Guide V 4.0 – Current Page 131 4. Click on Unlock User’s Account and check the Unlock Account (which will enable the Submit button), then click on the Submit button to unlock the users account. Note: IAM will not notify a user that their account has been unlocked. You must advise the user via email. HELP IT Application User Guide V 4.0 – Current Page 132 IAMPCS – User – Update details You may update the following details about a user; Given Name Surname Codeword Telephone Fax Mobile Alternative Names; and E-Mail Instructions 1. Log into IAM using your user ID and password, this will display the IAM Home screen. 2. Click on Manage a User 3. Search for the user using one of the following 6 options and click on the Select button. a. User id b. Given name c. Surname d. E-mail address e. Admin role; or f. Organisation 4. When the User Details screen is displayed, click on Manage User’s Details to navigate to Manage User Details Screen HELP IT Application User Guide V 4.0 – Current Page 133 5. You can update any details on this screen. See IAMPCS – User – Create for details on acceptable field formats. When you have finished updating, click on the Submit button. You will receive a confirmation message and details of what field(s) were changed. HELP IT Application User Guide V 4.0 – Current Page 134 HELP IT Application User Guide V 4.0 – Current Page 135 IAMPCS – User Roles – Update A user’s role is assigned when the user’s credentials were initially created however you may update their user role at any time. Instructions 1. Log into IAM using your user ID and password, this will display the IAM Home screen. 2. Click on Manage a User You may search for the user using one of the following 6 options a. User id b. Given name c. Surname d. E-mail address e. Admin role; or f. Organisation 3. Select the appropriate search mode and select enter to display the user’s details. Click on Manage User’s Roles HELP IT Application User Guide V 4.0 – Current Page 136 4. Check one or more boxes against the roles you would like to add to the users profile and then click on the Submit button. 5. You will receive a confirmation message to advise that the roles have been successfully added. HELP IT Application User Guide V 4.0 – Current Page 137 HELP IT Application User Guide V 4.0 – Current Page 138 Milestone – View/submit USER ROLES ACCESS Provider Corporate Officer CEO Can View/update and submit a milestone Provider Senior Officer SAO Can View/update and submit a milestone Provider Finance Officer PFO Can View/update and submit a milestone Provider Editing Officer PEO Can View/update and submit a milestone Provider View Only PVO Can view a milestone only There are two types of milestones that are generated by the Department: Recurring Milestone; and A one off Milestone. An example of a recurring milestone would be submission of audited financial statements either ending 30 June or 31 December of each year. A one off milestone example would be the completion of the Requirements Pack for newly approved providers. Applicants/Providers can action any milestones up to 3 months prior to the due date. Instructions 1. Click on Organisation – View Organisation details to view the Organisation Details screen. 2. Click on the Upcoming Milestones tab to view the Upcoming Milestones screen. 3. The Upcoming Milestones page has two sections, Upcoming Milestones and Milestones. The Upcoming Milestones section will display any milestone that requires action. The following fields are on this page: a. Due Date i. Is the date that the milestone must be actioned by ii. You can action this milestone up to 3 months before the due date b. Milestone Status i. Action Required – Action is outstanding on this milestone HELP IT Application User Guide V 4.0 – Current Page 139 ii. Once you have actioned a milestone by submitting the milestone, the milestone will be removed from the Upcoming Milestones page. Please note that if the milestone is a recurring milestone, a new milestone will be added with a future date which is on the anniversary of the latest submitted milestone c. Milestone Type i. Administration ii. Course iii. Financial iv. Organisational v. Personnel vi. Procedural d. Milestone description i. A description of the milestone 4. To action a milestone click on the check box against the milestone you wish to action and select View details to view the Milestone details screen. HELP IT Application User Guide V 4.0 – Current Page 140 5. The Milestone details screen will display a short description and details on what is required to complete the milestone and also a link to upload documents via Upload document. It also displays the current status of the Milestone and in the example below, the status is Action Required. 6. Once you have completed all the requirements of the Milestone, you must check the box against the statement “The information requested has been provided”. Once the statement has been checked, the Confirm button will be enabled for you to select to submit the milestone back to the Department. Notes 1. Any documents uploaded against your organisation via a Milestone will not be submitted to the Department until the Milestone has been submitted. 2. You can only action a milestone where the Due date is within 3 months of today’s date. HELP IT Application User Guide V 4.0 – Current Page 141 Notifications Notifications are used in HITS to notify certain user roles whenever an action is required or where an action has occurred. Notifications can either be in the form of a systems notification, email or can be a combination of the two. There are three types of notifications Program Notifications; Action notifications; and Information notifications. 1. Program Notifications Program Notifications are generated by the Department and are used to advise users of any issues that may impact on the HELP program, the System for Higher Ed, IAM or HITS. 2. Action Notifications Action notifications are notifications that require the organisation to undertake an action in HITS. notification will specify what action is required. The 3. Information Notifications Information notifications are used to confirm an action has occurred. The following table contains all notification messages that are issued in HITS and the User role that is able to view the notification. If you wish to view notifications assigned to more than one user role, you will need to have each role assigned to you in IAM. What action causes this notification to be sent Notification text 1 Type Sent2 to Email When the application status is changed to ‘To be FRLI registered’ for 'VET' sector You have been approved as a VET FEE-HELP provider. Approval documentation will be sent to your designated contact person soon. Approved VET FEE-HELP provider responsibilities are detailed in the VET Administrative Information for Providers. You have been approved as a FEE-HELP provider. Approval documentation will be sent to your designated contact person soon. Approved FEEHELP provider responsibilities are detailed in the HE Administrative Information for Providers. Info CEO, SAO, PFO No Info CEO, SAO, PFO No When the application status is changed to ‘To be FRLI registered’ for 'HE' sector HELP IT Application User Guide V 4.0 – Current Page 142 When a payment schedule is approved with an associated payment type of either 'Reconciliation' or 'Miscellaneous' being approved as part of the schedule HITS Notification A reconciliation/miscellaneous payment has been approved for your organisation. Please see your Payment Schedule for more information. Email Notification Trigger: When a payment schedule is approved with reconciliation or recovery To: CEO/VC and SAO contact CC: None From: HITS system email Subject: <sector> approval of Payment Schedule for <calendar year> with Reconciliation or Recovery (Miscellaneous) Body text: This email is to inform you that payment schedule <payment schedule number> for [insert legal entity name of Provider] has been approved for <$$$> for <calendar year> advance payments. Info CEO, SAO Yes CEO/VC, SAO Please log on to HITS for further information. Note: This email was automatically generated. If you have any questions, please contact the Payments team should the funds not be received within this timeframe. When a payment changes to the status of 'Bank Rejected' When a bank account is 'Submitted' Initial submission of a new application by legal entity A payment to the nominated Bank Account for your Info organisation [Provider legal name] ([Provider HITS ID]) has not been processed because the Bank Account details are incorrect. Please update your BSB details for the payment to be processed. The Department has received changes in bank Info details for [Provider legal name] ([Provider HITS ID]). CEO, SAO, PFO No CEO, SAO, PFO No This message is to inform you that on [DD MM YYYY], a formal application by [legal entity name of Applicant] to become a [VET provider/Higher Education Provider] under the Higher Education Support Act 2003 was received and is being considered by Department. CEO, SAO No HELP IT Application User Guide V 4.0 – Current Info Page 143 Three days before Request for Further Information (RFI) deadline. System Notification Message This message is to inform you that on [deadline date] [legal entity name of Applicant] will be subject to withdrawal unless it has responded to the Notice dated [DD MM YYYY]. Email Notification Message Trigger: Three (3) days prior to Applicant Deadline date. Action CEO, SAO, PFO, PEO Yes CEO/VC, SAO, Primary Contact Officer From: HITS System Message Subject: HITS Request for Information (RFI) Body Text: A Notice requiring the provision of further information (RFI) in relation to your organisation’s application to become a <sector> provider was issued on [RFI issue date DD MM YYYY]. The information is to be provided to the Department by uploading the required documents in the HELP IT System (HITS) and lodging the RFI by 5 pm on [deadline date]. An RFI may only be lodged by persons within your organisation designated a SAO or CEO role. If the RFI is not lodged by the deadline date your organisation’s application will be subject to withdrawal. Please log on to HITS to view the Notice and respond. Note: This email was automatically generated. If you have any questions, please contact the tsenquiries inbox TGA Register Entity name on View Organisation details screen is updated by TGA TGA has updated the legal name of the Organisation [Legal entity name] Info CEO, SAO, PEO No Any user updates the Legal Entity name on View Organisation details screen The Legal entity name of [Registered entity name] has been modified. Info CEO, SAO, PEO No When a Persons of Influence is added/updated, Personnel information for [POI first/last name] of [Organisation legal entity type] has been [{modified/added}] Info CEO, SAO No HELP IT Application User Guide V 4.0 – Current Page 144 Milestone due date reminder Milestone overdue <provider name> has a milestone requiring action. All the requirements of this milestone must be met by <due date of milestone>. Please contact the Department as soon as possible if you have any questions about this milestone event. <line break> (new line) <short description of milestone> System Notification Message Milestone OVERDUE <provider name> has not confirmed that the requirements of an outstanding milestone have been met by the due date. The due date for this milestone was <due date>. The requirements of this milestone must be met immediately. Please contact the Department immediately to explain why this milestone has not been met by the due date if you have not already done so. <line break> (new line:) <short description of milestone> Email notification message From: HITS System Message Subject: Overdue <sector> provider milestone Body Text: This email is to inform you that a milestone for [insert legal entity name of Applicant] was due on [date of milestone due date] and it requires your urgent attention. Info CEO, SAO, PFO, PEO No Info CEO, SAO, PFO, PEO Yes CEO/VC, SAO, Primary Contact Officer To action this milestone, please login to HITS from the link provided below and select ‘Organisation View’ then ‘Upcoming Milestone’ to read and complete this milestone. If you do not have access to HITS, please request the appropriate person from your organisation with HITS access to action this milestone, or contact your organisation’s IAMPCS Officer to arrange access. It is important to note that only certain user roles (CEO, SAO and PFO) are able to action and declare that a milestone has been completed. Please log on to HITS for further information. Note: This email was automatically generated. If you have any questions, please contact the HELP team enquiries inbox HELP IT Application User Guide V 4.0 – Current Page 145 Approval of Payment Schedule System Notification Message Info CEO, SAO, PFO Info CEO/VC, SAO Yes The payment schedule for [Calendar year of the schedule] for [Provider legal name] ([Provider HITS ID]) has been approved. Please see the payment schedule for more information. Email notification message From: HITS system email Subject: <sector> approval of Payment Schedule for <calendar year> Body text: This email is to inform you that payment schedule <payment schedule number> for [insert legal entity name of Provider] has been approved for <$$$> for <calendar year> advance payments. Please log on to HITS for further information. Note: This email was automatically generated. If you have any questions, please contact the Payments team should the funds not be received within this timeframe. When an Applicant status is changed to "Approved". System notification message Info CEO This message is to inform you that [legal entity name of Applicant] has been [registered] on FRLI with a date of effect of [DD MM YYYY]. Email notification message From: HITS System Message Subject: <sector> provider approval FRLI registration Body Text: This email is to inform you that [insert legal entity name of Applicant] has been registered on the Federal Register of Legislative Instruments (FRLI) with a date of effect of <Approved date>. CEO/VC, SAO, Primary Contact Officer Please note these approvals are subject to a 15 day disallowance period in both houses of Parliament. Depending on the Parliamentary cycle it can be a while before the disallowance period ends. Please log on to HITS for further information. Note: This email was automatically generated. If you have any questions, please contact the tsenquiries HELP IT Application User Guide V 4.0 – Current Page 146 Yes inbox When the RFI status is 'Issued' From: HITS System Message Subject: HITS Request for Information (RFI) Body Text: A Notice requiring the provision of further information, pursuant to the Higher Education Support Act 2003, in relation to your organisation’s application to become an approved <sector> provider has been issued in the HELP IT System (HITS). Action CEO, SAO, Primary Contact Officer Yes Your publication request has been approved Info PEO No Your publication request has been rejected Info PEO No A response is to be provided to the Department by uploading the required documents in HITS and lodging the RFI by 5 pm on the deadline date stipulated in the RFI Notice. Failure to respond by the deadline may result in withdrawal of the application. It is important to note that only certain user roles (CEO and SAO) are able to lodge an RFI. Please log on to HITS to view the Notice and respond. Note: This email was automatically generated. If you have any questions, please contact the HELP team enquiries inbox Publication request ‘Approved’ Publication request ‘Rejected’ 1. Where there are brackets in a notification such as [Registered entity name] – the brackets will display the current information in the field. 2. Email notifications are sent to recipient drawn from the contacts list. If there are more than one of any email contact ie CEO/VC, then only the first listed CEO/VC will receive the email. HELP IT Application User Guide V 4.0 – Current Page 147 Organisation details – Update details USER ROLES ACCESS Provider Corporate Officer CEO Full access to update organisation details Provider Senior Officer SAO Full access to update organisation details Provider Finance Officer PFO Full access to update organisation details Provider Editing Officer PEO Full access to update organisation details Provider View Only PVO Cannot update organisation details Instructions 1. From the Navigation menu click on Organisation – View Organisation details, this will navigate you to the View Organisation details screen. 2. Scroll to the bottom of the screen and click on Edit button 3. You can update any field that is not ‘greyed’ out. HELP IT Application User Guide V 4.0 – Current Page 148 4. When validating your Head Office address, HITS will return the closest match. If this match is not your correct address, you can check the ‘Confirm this address is correct’ box to update your details with the details that you input. 5. After all details have been added/updated select the Save button. HELP IT Application User Guide V 4.0 – Current Page 149 Organisation details – View details USER ROLES ACCESS Provider Corporate Officer CEO Full access to view organisation details Provider Senior Officer SAO Full access to view organisation details Provider Finance Officer PFO Full access to view organisation details Provider Editing Officer PEO Full access to view organisation details Provider View Only PVO Full access to view organisation details View of Organisational Details Once your organisation is registered and available in HITS you will be able to view your organisation’s details. Instructions 1. From the Navigation menu click on Organisation, this will navigate you to the screen which will display all the sub menu options available under the Organisation menu. 2. Click on Organisation details to view the Organisation Details screen. Notes 1. The main part of the screen displays your organisation information, TGA and/or TEQSA details and information about the type of organisation that you have provided. HELP IT Application User Guide V 4.0 – Current Page 150 2. The panels towards the bottom of the screen display Federal Register of Legislated Instruments (FRLI) details and a list of applications that has been submitted by your organisation and their current status. VET Federal Register of Legislative Instrument HE Federal Register of Legislative Instruments Organisation Application History 3. Panels within the organisation details screen can be opened and closed by clicking on the arrow symbol. HELP IT Application User Guide V 4.0 – Current Page 151 Payments – Viewing payments USER ROLES ACCESS Provider Corporate Officer CEO Can view a Payment Schedule Provider Senior Officer SAO Can view a Payment Schedule Provider Finance Officer PFO Can view a Payment Schedule Provider Editing Officer PEO Cannot view a Payment Schedule Provider View Only PVO Cannot view a Payment Schedule Viewing VET Sector Payments You can check the status of a payment at any time: 1. Select Payment Schedule List from the Context Selector to view the Payment Schedule List. 2. Tick the row of the Payment Schedule you wish to check and click View Details. HELP IT Application User Guide V 4.0 – Current Page 152 3. View the ‘Payment list’ box, if the status of the payment is ‘Paid’ then the payment has been cleared by the Reserve Bank of Australia. HELP IT Application User Guide V 4.0 – Current Page 153 4. Notes 1. If the status is Bank Rejected then you will need to update your bank account details. 2. A Payment record status will change in HITS when the finance system processes the payment and sends HITS an update for that payment record. 3. You will also receive a notification message after each monthly payment is processed. HELP IT Application User Guide V 4.0 – Current Page 154 Person of Influence (POI) – Adding a POI USER ROLES ACCESS Provider Corporate Officer CEO Full access to add persons of influence information Provider Senior Officer SAO Full access to add persons of influence information Provider Finance Officer PFO No access to this module Provider Editing Officer PEO No access to this module Provider View Only PVO No access to this module Information that is required to be input into this component is considered sensitive. To add/update or view the information you must have a senior user role of SAO or CEO. You must also be a senior officer within your organisation such as a Chief Executive Officer or Company Secretary as you have legal obligations under the Privacy and Criminal acts that you cannot delegate to another person. Instructions 1. From the Navigation menu, click on Organisation, this will navigate you to the screen which will display all the sub menu options available under the Organisation menu. Click on Organisation details to view the Organisation Details screen. 2. Go to the Persons of Influence tab and click; the Person of Influence list screen will be displayed. 3. Click the Add persons of influence button. 4. There are 4 parts to the POI that you must complete before you can save the update. HELP IT Application User Guide V 4.0 – Current Page 155 a. Part 1 – Personnel Information b. Part 2 – Residential address HELP IT Application User Guide V 4.0 – Current Page 156 c. Part 3 – Postal address d. Part 4 – Declaration. This section can only be completed by a senior person within your organisation who has been assigned SAO or CEO user role. It MUST NOT be completed by a junior officer who has been assigned SAO role. Once you have completed all fields, select the SAVE button. 5. You will be navigated back to the Persons of Influence list screen where a notification message will be displayed to confirm the person was created successfully. HELP IT Application User Guide V 4.0 – Current Page 157 6. A check will also appear against POI requirement to acknowledge that the minimum requirement of one POI has been added successfully. If you need to add more POIs repeat above steps. HELP IT Application User Guide V 4.0 – Current Page 158 7. After you have added all persons of influence, you must complete the statement, upload all relevant documents, enter comments if required and click Save. HELP IT Application User Guide V 4.0 – Current Page 159 8. Enter details regarding Contingency Funding and then select Save HELP IT Application User Guide V 4.0 – Current Page 160 9. Once you have completed all the fields, the Mandatory Persons of Influence Summary screen will no longer display. Notes 1. If you are an applicant and you create a CEO or SAO contact, HITS will automatically create a POI record using some of the information from the Contacts screen. You must update these POI records further information is required. 2. Required fields are indicated with the word required in red text next to the field name. 3. Completing the field “Date no longer a person of influence” will inactivate that record. 4. The Statement and Contingency Funding panels on the Persons of Influence list screen must reviewed and updated where appropriate after adding new POI record(s). HELP IT Application User Guide V 4.0 – Current Page 161 Person of Influence – Updating a POI USER ROLES ACCESS Provider Corporate Officer CEO Full access to update persons of influence information Provider Senior Officer SAO Full access to update persons of influence information Updating a Person of Influence From time to time you may be required to update existing persons of influence (POI) information for your Organisation. To update existing information please follow the steps outlined below. Instructions 1. Log into HITS with your assigned User ID and personal password. From the Navigation menu, click on Organisation, this will navigate you to the screen which will display all the sub menu options available under the Organisation menu. Click on Organisation details to view the Organisation Details screen. 2. Go to the Persons of Influence tab and click; the Persons of Influence list screen will be displayed. 3. From the list of Persons of Influence, find the one you would like to update and click the Edit hyperlink. 4. Update the relevant fields and click Save. 5. You will be navigated back to the Persons of Influence list. If there is more than one existing Persons of Influence whose details need to be updated repeat above steps. Notes 1. Required fields are indicated with the word required in red next to the field name. 2. Completing the field “Date no longer a person of influence” will inactivate that record. 3. The Statement and Contingency Funding panels on the Persons of Influence list screen may need to be reviewed or updated after editing a POI record. 4. Panels within the Persons of Influence list screen can be opened and closed by clicking the arrow symbol. HELP IT Application User Guide V 4.0 – Current Page 162 Publications – Creating a publication request USER ROLES ACCESS Provider Corporate Officer CEO Can create Provider Publication requests Provider Senior Officer SAO Can create Provider Publication requests Provider Finance Officer PFO Can create Provider Publication requests Provider Editing Officer PEO Can create Provider Publication requests Provider View Only PVO Cannot create Provider Publication requests Creating a Publication Request To create a HELP Publication Request for your Organisation log into HITS with your assigned User ID and personal password. Instructions From the Navigation menu go to Publications and select Publication Request from the sub menu items; 1. Input the information in the fields marked required. 2. Go to Select Publication and choose the HELP Publication from the drop down list. HELP IT Application User Guide V 4.0 – Current Page 163 3. Enter the Amount Requested and select Add/Update. Your requested publication will appear in the Publications Request list. 4. If you are requesting multiple HELP Publications, complete actions ii and iii above and add to your list. 5. When all the publications for the Provider Request appear in the Publication Requests list click the Submit. The Publication Request is now complete. Notes 1. Only one active publication request can be submitted to the Department and must be approved/rejected by the Department before another publication request can be submitted. 2. If you wish to split a publication request over two campuses, please make sure you provide details in the delivery details section. 3. If your organisation has multiple campuses and you wish to make multiple publications requests at the same time, you must contact the Department via [email protected] providing all the details as per the online publication request. The Department will then create individual publication requests on your behalf. 4. Your organisation name and ID will be prepopulated on entry to the screen. 5. A Notification message appears when an application is submitted to the Department: HELP IT Application User Guide V 4.0 – Current Page 164 Publications – Withdrawing a publication request USER ROLES ACCESS Provider Corporate Officer CEO Can withdraw a Provider Publication requests Provider Senior Officer SAO Can withdraw a Provider Publication requests Provider Finance Officer PFO Can withdraw a Provider Publication requests Provider Editing Officer PEO Can withdraw a Provider Publication requests Provider View Only PVO Cannot withdraw a Provider Publication requests Withdrawing a Publication Request If a HELP Publication Request has been submitted to the Department but has not been approved or rejected, you may withdraw the publication. From the Navigation menu go to Publications and select Request Publications from the sub menu items; this will display the Publications Request screen. Instructions 1. The publication request you previously submitted is displayed. 2. Click Withdraw. 3. A confirmation message will be displayed. HELP IT Application User Guide V 4.0 – Current Page 165 Reports – Viewing reports USER ROLES ACCESS Can view following reports Provider Corporate Officer CEO Provider Cash flow Payment Reconciliation; and Provider Payment Schedule Can view following reports Provider Senior Officer SAO Provider Cash flow Payment Reconciliation; and Provider Payment Schedule Can view following reports Provider Finance Officer PFO Provider Editing Officer PEO Cannot view Reports Provider View Only PVO Cannot view Reports Provider Cash flow Payment Reconciliation; and Provider Payment Schedule Available Reports There are currently three reports available in HITS for approved providers. Provider Cash flow Displays all finalised payments and recoveries by date. Payment Reconciliation Report This report compares data from the Higher Education Internet Management System (HEIMS) and HITS Advance payments in order to reconcile advance payments with actual student load liability reported by you. Provider Payment Schedule Report This report displays financial information regarding the current payment schedule for calendar year that payments have been made to your organisation. Viewing Reports From the Navigation menu go to Reports, you will be navigated to the Reports screen which will display a list of Report Categories. HELP IT Application User Guide V 4.0 – Current Page 166 The reports you can view in HITS are based on your user role and can be selected by clicking on the Hyperlink under each Category. Instructions 1. Select the required report from the list of available reports. 2. For the Payment Reconciliation report, you will be able to select the Sector and Calendar Year to view all payments including offsets, adjustments and overpayment recoveries processed in that year. You can also export the report to the following: a. XML file with report data b. CSV (comma delimited) c. Acrobat (PDF) file d. MHTML (web archive) e. Excel f. TIFF file g. Word. HELP IT Application User Guide V 4.0 – Current Page 167 3. For the Provider Payment Report you will be able to select the final payment schedule for each calendar year in which you received a payment. 4. The report will display all payments processed and any advance payments left in the Calendar year that are yet to be paid. HELP IT Application User Guide V 4.0 – Current Page 168 5. You can also export the report to the following: a. XML file with report data b. CSV (comma delimited) c. Acrobat (PDF) file d. MHTML (web archive) e. Excel f. TIFF file g. Word. Notes 1. Only reports viewable by your access level will be visible to you. HELP IT Application User Guide V 4.0 – Current Page 169 Request for further information (RFI) – Viewing an RFI USER ROLES ACCESS Provider Corporate Officer CEO Can View an RFI Provider Senior Officer SAO Can View an RFI Provider Finance Officer PFO Can View an RFI Provider Editing Officer PEO Can View an RFI Provider View Only PVO Can View an RFI Viewing a Request for Further Information If your organisation has an RFI in the status of ‘Issued’ or ‘Lodged’ in HITS, you will be able to view an RFI for your organisation. Instructions 1. From the Navigation menu click on Application, this will navigate you to the screen which will display all the sub menu options available under the Application menu. Click on RFI List to view the RFI list screen. 2. On the RFI list screen, you will see a table, which will list all the current or past RFIs against the current sector application for your organisation. You are now ready to view an RFI. HELP IT Application User Guide V 4.0 – Current Page 170 3. Go to the <sector> RFI list. 4. Select the RFI record from the list by selecting the check box against the record and the View details button will be enabled. 5. Click on View details and the system will navigate you to the View RFI details screen. HELP IT Application User Guide V 4.0 – Current Page 171 Request for further information – Lodging an RFI USER ROLES ACCESS Provider Corporate Officer CEO Can Lodge an RFI Provider Senior Officer SAO Can Lodge an RFI Provider Finance Officer PFO Cannot lodge an RFI Provider Editing Officer PEO Cannot lodge an RFI Provider View Only PVO Cannot lodge an RFI If your organisation has an application in the status of ‘Awaiting Further Information’ and an RFI in the status of ‘Issued’, in HITS you will be able to lodge an RFI for your organisation. Instructions 1. From the Navigation menu click on Application, this will navigate you to the screen which will display all the sub menu options available under the Application menu. Click on RFI List to view the RFI list screen. 2. On the RFI list screen, you will see a table, which will list all the current or past RFIs created, raised or lodged against the current sector application for your Organisation. You are now ready to lodge an RFI. 3. Go to the <sector> RFI list. 4. Select the RFI with the status of ‘Issued’ by selecting the check box against the record and the View details button will be enabled. HELP IT Application User Guide V 4.0 – Current Page 172 5. Click View details to navigate to the View RFI details screen. 6. Scroll to the bottom of the screen; System displays the Upload Document button. 7. Click Upload Document to upload the requested documentation as part of an RFI. HELP IT Application User Guide V 4.0 – Current Page 173 8. Once the documents have been uploaded successfully, navigate back to View RFI details screen by following the steps 1 to 3. 9. Scroll to the bottom of the screen; System displays the confirmation check box ‘I confirm that the requested information for the RFI has been provided’. 10. Select the check box; system will enable the Lodge button at the bottom right of the screen. 11. Click Lodge. The system will then generate a confirmation message box with an option of ‘Yes’ or ‘No’. 12. Click Yes to lodge the RFI. 13. If successful, the system will navigate you to the RFI list screen and display a confirmation message that the RFI has been successfully lodged. Notes 1. 2. 3. 4. The confirmation check box needs to be ticked before the RFI can be lodged. On successful lodgement, status of the application will change to ‘To be assessed’. On successful lodgement, status of the RFI will change to ‘Lodged’. A Notification message will display 3 days prior to the date your RFI is due: Message Title This message is to inform you that on [deadline date] [legal entity name or organisation] will be subject to withdrawal unless it has responded to the Notice dated [DD MM YYYY]. HELP IT Application User Guide V 4.0 – Current Sent to CEO SAO PFO PEO Action Refer to the RFI Submission immediately. Page 174 Glossary CEO – Provider Corporate Officer HITS – HELP Information Technology System IAMPCS – IAM Provider Contact Security PEO – Provider Edit Officer PFO – Provider Financial Officer PVO – Provider View Only RFI – Request for Further Information SAO – Provider Senior Officer SSB – Student Support Branch TGA – Training.gov.au TEQSA – Tertiary Education Quality and Standards Agency HELP IT Application User Guide V 4.0 – Current Page 175 Information Apple Mac Users The Department does not support Apple Mac. All applicants/providers must use Microsoft Windows. System for Higher Ed (HITS) URL The System for Higher Ed URL contains an embedded anti-phishing rule that prevents hackers from ‘following’ your login to HITS that times out the URL once it has been used to log into the System for Higher Ed. The antiphishing rule times the URL link out for 30 minutes which means that if used within that time, you will either receive an error message or you will be required to enter your password a number of times before you can log in. Please follow the directions in Attachment A to set up the URL link as a favourite. Tertiary Education Quality & Standards Agency (TEQSA) The Department sources organisation details and course information from TEQSA similar to what is sourced from TGA. TEQSA data is updated in HITS once per month. Training.Gov.Au (TGA) HITS has a web services interface with TGA and sources all organisation and course information for VET applicants. Web Browsers We recommend using Internet Explorer 11 or Firefox as your web browser. Please do not use Internet Explorer 10, or Google Chrome to access HITS or IAM as you will experience errors including not being able to change your password or HITS not recognising date formats. HELP IT Application User Guide V 4.0 – Current Page 176 Attachments Attachment A – System for Higher Ed (HITS) URL THE HITS URL as an embedded anti-phishing rule that times the URL out after it is first used. If you have already used the URL to log into HITS, you cannot use the URL again otherwise you will receive the following error. If you do use the URL without it being refreshed, you may receive one of the following errors. The page cannot be displayed Explanation: There is a problem with the page you are trying to reach and it cannot be displayed. Try the following: Refresh page: Search for the page again by clicking the Refresh button. The timeout may have occurred due to Internet congestion. Check spelling: Check that you typed the Web page address correctly. The address may have been mistyped. Access from a link: If there is a link to the page you are looking for, try accessing the page from that link. Technical Information (for support personnel) Error Code: 403 Forbidden. The server denied the specified Uniform Resource Locator (URL). Contact the server administrator. (12202) HELP IT Application User Guide V 4.0 – Current Page 177 To avoid receiving any of the above errors, please follow the steps below: Step 1: Open your web browser – please note that you must use only Internet Explorer 11 or Firefox as your web browser to access HITS or IAM as other browsers are not compatible. Step 2: Copy the URL link below and paste it into your web browser – do not double click on the URL link to open it https://extranet.education.gov.au/frontdoor/ Step 3: Once the System for Higher Ed log in page is displayed, enter your Username and Password and then select the ‘Sign In’ button. You will be navigated to the ‘Welcome to the System for Higher Ed’ page and https://extranet.education.gov.au/FrontDoor/Bulletin will display in your address bar. HELP IT Application User Guide V 4.0 – Current Page 178 Step 4: Save this URL address as your bookmark/favourite and whenever you wish to log into HITS, open a new web browser and use your bookmark/favourite to log in. Note: If you still experience an error, you should clear your browsing history, close your web browser then commence the above steps again. HELP IT Application User Guide V 4.0 – Current Page 179 Attachment B – Application status Diagram The following diagram details how an application progresses through each application status from ‘Draft’ through to ‘Approved’/not approved. HELP IT Application User Guide V 4.0 – Current Page 180 Attachment C – User Security Declaration Form [Dept use only] User Security Declaration Form I, …….…….…….…….…….…….…….…….…….…….………..………. [insert full first name/s and surname] of .…….…….…….…….…….…….…….…….…….…….………………….….…… [insert full home address] born on .…….…….…….…….…….…….…….…….…….…….…….…………………….. [insert DOB] acknowledge that I have been provided access to the Department of Education (the Department) Information, Communications and Technology (ICT) Systems for the purpose of administering Australian Government programs and have the following obligations: I will only access the Department’s ICT Systems for which I have authorisation and for purposes which are relevant to my work. I am solely responsible for all action taken on the Department’s ICT Systems under my User ID. I will maintain the integrity of access to these Systems including, but not limited to: (a) not sharing my User ID, nor using another person’s User ID; and (b) ensuring the safekeeping and confidentiality of my personal identification number/s (PIN) / passwords. I will not illegally access the Department’s ICT Systems, download or distribute inappropriate, undesirable or offensive material. I will not use the Department’s ICT systems to violate copyright or infringe the intellectual property of software and the integrity of systems configurations and software. I will identify and avoid conflicts of interest. Where there is a perceived or actual conflict of interest I will notify my supervisor or manager and follow appropriate advice before accessing the Department’s ICT Systems. I understand that: The Department will use my personal information to monitor my use of the Department’s ICT Systems as part of managing and administering the ICT systems, protecting against unauthorised access, verifying security problems and ensuring compliance with policies. I may be required to consent to a criminal history check conducted by the Australian Federal Police. I must report all suspected breaches of the Department’s ICT Systems to the Department’s IT Security at [email protected] My access may be suspended immediately without notice where it is suspected or alleged that there has been inappropriate usage of data, records and information and/or where the obligations outlined above have not been met. The Department reserves the right to deny future requests for access to the Department’s ICT systems. It is a criminal offence to provide false or misleading information, or to access or modify HELP IT Application User Guide V 4.0 – Current Page 181 1 restricted data . This includes unauthorised access to, or modification of, restricted data by a person, which is an offence under section 478.1 of the Criminal Code Act 1995 and punishable by 2 years imprisonment. Unauthorised access to the Department’s ICT systems or providing false or misleading information may result in criminal and/or civil action being taken against me. It is a criminal offence for a Commonwealth officer to publish or communicate information obtained from the Department’s ICT systems. Disclosure of information by Commonwealth officers is an offence under section 70 of the Crimes Act 1914 and is punishable by 2 years imprisonment. Disclosure of information obtained from the Department’s ICT systems may result in a criminal or civil action being taken against me. Conflict of Interest The onus is on you to be alert and identify any actual or potential conflict of interest, financial or otherwise. A conflict of interest is defined as a situation where a staff member has, or could be perceived as having, a personal interest in a matter that is the subject of a decision or duty of the staff member. A personal interest includes, but is not limited to, a direct or indirect, past, current or planned future financial, management, organisational membership or any other interest by the staff member or by a business associate, family member or friend of the staff member. Your employer should refer you to an internal policy in relation to responding to conflict of interest situations. Privacy Notice The Department is collecting this information for the purposes of verifying your identity to determine whether access is provided to the Department’s ICT systems. The Department may use this information for the purposes of managing and administering ICT systems, protecting against unauthorised access, verifying security problems and ensuring compliance with policy. The Department will not disclose this information unless it is required or authorised by or under law. Alternatively the Department may seek your consent to disclose this information. I have read and understood my obligations outlined in this Declaration. I am not currently before the Court charged nor have I been found guilty with any fraud related or unauthorised access offences. Signature Date Witness Signature & Date Workplace [insert place of employment] 1 This includes all data on the Department’s systems that you are not authorised to access or modify. HELP IT Application User Guide V 4.0 – Current Page 182