1
ACDC MOTORISED SOLUTIONS PTY LTD EuroGlide Sectional and Tilting Door
Opener Installation Instructions and User
Guide
WARNING Please read the manual carefully before installation and use. The installation of your
new EuroGlide door opener must be carried out by a technically qualified or licensed person.
Attempting to install or repair the door opener without suitable technical qualification may result in
severe personal injury, death and / or property damage.
INSTALLER’S PLEASE ENSURE CUSTOMER RECIVES THIS COPY OF INSTALLATION
MANUAL
ACDC MOTORISED SOLUTIONS PTY LTD CONTENTS
Important Safety Recommendations...…………………………….……………………………...1
Product Description...........……………………………………………………………………….....2
Accessory Description..........………….……………………..……………………………………..3
Installation Recommendations………………………………………….………………………….4
Installation................................……………………………………………………………………...5
Programming the EuroGlide Opener...........................…………………………………............6
Programming Accessory Modes........................…………………………………………...…….7
PCB Layout………………..…………………………………………………………..………............8
Parts List.............................................................…………………..…………………….……......9
Using the Manual Disengagement…………………………………………………….................10
Routine Maintenance………………………………………………………………………………...11
Technical specifications………………………………………………………………………….....12
Information for the User..........................................................................................................13
Warranty Conditions............................................................................................................... 14
ACDC MOTORISED SOLUTIONS PTY LTD Important safety recommendations
FAILURE TO COMPLY WITH THE FOLLOWING SAFETY RECOMMENDATIONS MAY RESULT IN
SERIOUS PERSONAL INJURY, DEATH AND / OR PROPERTY DAMAGE.
1. PLEASE READ CAREFULLY AND ADHERE TO ALL SAFETY AND INSTALLATION
RECOMMENDATIONS.
2. The opener is designed and manufactured to meet local regulations. The installer must be familiar
with local regulations required in respect of the installation of the opener.
3. Unqualified personnel or those persons who do not know the occupational health and safety
standards being applicable to automatic doors and other gates, must in no circumstances carry out
installations or implement systems.
4. Persons who install or service the equipment without observing all the applicable safety standards
will be responsible for any damage, injury, cost, expense or claim whatsoever any person suffered as a result
of failure to install the system correctly and in accordance with the relevant safety standards and installation
manual whether directly or indirectly.
5. For additional protection we strongly recommend the inclusion of a Safety Photo Beam. Although
the opener incorporates a Safety Obstruction Force system the addition of Photo Beam will greatly enhance
the operating safety of an automatic garage door and provide additional peace of mind.
6. Make sure that the garage door is fully open & stationary before driving in or out of the garage.
7. Make sure the garage door is fully closed & stationary before leaving.
8. Keep hands and loose clothing away from the opener and garage door all the time.
9. The Safety Obstruction System is designed to work on stationery objects only. Serious personal
injury, death and / or property damage may occur if the garage door comes into contact with a moving object.
10. Children should be supervised to ensure that they do not play with the Remote Controls, the Door
Opener itself or the Wall Switch (if fitted).
11. If the supply cord is damaged, it must be replaced by the manufacturer, its service agent or
similarly qualified persons in order to avoid a hazard.
12. Watch the moving door and keep people, animals and objects away until the door is completely
opened or closed.
13. Take care when operating the manual release since an open door may fall rapidly if the door is out
of balance or not tensioned correctly.
14. Frequently examine the installation, in particular check cables, springs and mountings for signs of
wear, damage or imbalance. Do not use if repair or adjustment is needed since a fault in the installation or an
incorrectly balanced door may cause injury. Each month check that the door reverses when the door contacts
a 50 mm high object placed on the floor. Adjust if necessary and recheck, as incorrect adjustment may
present a hazard. Disconnect the supply when cleaning or carrying out maintenance.
ACDC MOTORISED SOLUTIONS PTY LTD Product Description
1. Soft start, soft stop to minimise start-up load on the garage door opener and garage door.
2. Opening & Closing Obstruction Force self-adjustment.
3. ISS (Intelligent Safety System) When the door is closing it will automatically reverse should it come in
contact with an obstruction or is restricted in some manner.
4. Auto Close facility available.
5. Wall Switch facility available.
6. Safety Photo Beam facility available.
7. Secure Rolling Code Transmitter/Receiver combination.
9. Battery Backup facility available, in case of power failure.
10.Remote Digital Entrance Keypad option.
11. Convenient Open/Stop/Close pushbutton (O/S/C) on operator cover.
12. Hand transmitter lock out facility
13. Sturdy metal chassis construction.
Pre-installation recommendations
1. The garage door must be able to be lifted and closed easily by hand and without much effort. A well
balanced & sprung door is critical for proper installation.
2. The garage door opener cannot compensate for a badly installed garage door and should not be used as a
solution for a 'hard to open' door.
3. If the unit is being installed on an existing door, make sure any existing locking devices are removed or
warranty will be void.
4. An approved 240v mains outlet must be installed near where the opener is being installed.
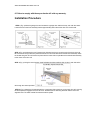
5. There should be a minimum gap of 30mm between the bottom of the chain drive rail and the top of the
garage door at it's closest point. (refer to Fig. 1.)
ACDC MOTORISED SOLUTIONS PTY LTD 6. Failure to comply with these pre-checks will void any warranty.
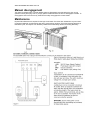
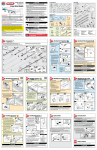
Installation Procedure
STEP 1 (Fig. 2)Close the garage door and measure the garage door width at the top, and mark the centre.
Locate and mount the front assembly bracket approximately 65mm above the door on the inside wall.
STEP 2 (Fig. 3a & b)Insert the Arm Transport Unit (Shuttle) into the cut-out at the end of the chain drive rail.
Be sure it faces the right direction (the disconnection arm on the shuttle faces towards the Powerhead). Slide
the shuttle along the rail until it locks into place with the brass chain coupler.Move the whole shuttle assembly
to the centre of the drive rail.
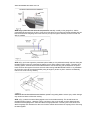
STEP 3 (Fig. 4) Using the 6mm hexagon head Rail Mounting bolts supplied, slide 2 bolts in each side of the
rail through the cutouts provided.
STEP 4 (Fig. 4) Attach the Powerhead (with the control panel facing the door) to the chain drive rail, ensuring
the drive spindle is engaged into the chain drive. Assemble the two mounting brackets with the 6mm nuts
supplied. Note: The wider bracket fits nearest the drive spindle.
ACDC MOTORISED SOLUTIONS PTY LTD STEP 5 (fig. 5) Place the chain drive rail and powerhead assembly centrally on the garage floor, with the
powerhead furthest away from the door. Lift the front of the drive rail up to the front bracket assembly that has
been mounted above the garage door.Insert the main pivot pin through the assembly and secure it with the
split pin supplied.
STEP 6 (Fig. 6) Lift and support the powerhead (with a ladder) so it is positioned centrally and level. Using the
brackets supplied, mount the powerhead by attaching to the ceiling rafters or rafter noggins. There are many
mounting options, however the recommended method is to use the mounting rails on the side of the powerhead, as well as the support of the chain drive rail side mounting bolts.IMPORTANT NOTE: In any installation
the chain drive rail must be supported halfway along its length to prevent any flex in the drive rail assembly.
Failure to do so will void any warranty.
WARNING: Do not allow children around the door, opener or supporting ladder. Serious injury and/or damage
may result from failure to follow this warning.
STEP 7 (Fig. 7) Attach the manual disengagement cord to the shuttle assembly. This should be set at a
reachable height of approx. 1.8metres. Pull the cord down to free up the shuttle, and then slide the shuttle
towards the closed garage door. Select and attach the appropriate door connecting arm to the shuttle, then
attach the garage door bracket to the other end. Position and bolt the bracket to the top edge of the door using
the bolts supplied.
ACDC MOTORISED SOLUTIONS PTY LTD (Fig. 8) Lift the garage door until the shuttle locks back into the drive chain. Attach the travel limit bracket to
the chain drive rail towards the powerhead, and tighten the bolts on the assembly. IMPORTANT NOTE: The
travel limit bracket prevents over travelling of the door when in manual operation. Failure to fit this bracket will
void any warranty should the door come in con-tact with the powerhead.
(Fig. 9)Lift the garage door until the shuttle locks back into the drive chain. Attach the travel limit bracket to the
chain drive rail towards the powerhead, and tighten the bolts on the assembly.IMPORTANT NOTE: The travel
limit bracket prevents over travelling of the door when in manual operation. Failure to fit this bracket will void
any warranty should the door come in contact with the powerhead.
Installation is now complete, and you are now ready to program the unit.
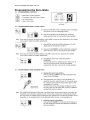
ACDC MOTORISED SOLUTIONS PTY LTD Programming the Euro Glide
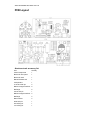
ACDC MOTORISED SOLUTIONS PTY LTD ACDC MOTORISED SOLUTIONS PTY LTD PCB Layout
Aluminum track accessory list
Item
Quantity
Clutch Components
1
Bracket for door panel
1
Bracket for track
1
Manual Release cord
1
Cord pendant
1
ø 1.8×38 Cotter pin
2
M6X14 hexagon head bolt
6
M6 flange
6
ø 8×25 axis pin
1
M8X16 hexagon head bolt
4
M8 flange
4
Motor bracket
2
ø8*90 axis pin
1
28×18 fixing kit
1
10×15 fixing kit
1
ACDC MOTORISED SOLUTIONS PTY LTD Manual disengagement
The opener is equipped with a manual release system to disengage the track shuttle so the door can be
opened or shut by hand (Fig 12 & 13). Simply pull the handle and move the door to disengage the shuttle. To
re-engage the door move the door by hand until the trolley re-engages in the chain shuttle.
Maintenance
No particular maintenance is required for the logic circuit board. Check the door at least twice a year to see if
it is properly balanced, and all working parts are in good working condition. Check the reversing sensitivity at
least twice a year, and adjust if it is necessary. Make sure that the safety devices are working effectively.
ACDC MOTORISED SOLUTIONS PTY LTD Technical specifications
Power Input: 240v ac 50hz
Protection Fuse: 3amps
Motor Power: 100w
Courtesy Light time:3 minutes
Working temperature: -20° to 60°C
Relative Humidity: <90%
Max force: 600N
Rated load: 300N
Radio frequency: 433.92 MHz
Sensitivity: >1 uV for correct receiver signal
Decoding: Rolling code
Hand Transmitter Battery: Type 23A 12V
Important information for the user
In some situations and if there is no other entrance other than the garage door, it is recommended that an
external disengagement device should be fitted. Once the opener has been installed, the user must acquaint
himself/herself about how it works and all the risks that can arise if it is used improperly. The user must avoid
placing himself/herself in dangerous situations such as standing within the door’s operating range when it is
moving. Do not let children play near the door, and keep the remote controls out of their reach. All service
repairs or checks must be carried out by professionally qualified persons. Please keep the Instruction Manual
in a safe place.
Warranty Conditions
1. This warranty is in addition to any non-excludable conditions or warranties that are implied into this contract
by relevant statute, including the
Trade Practices Act 1974 (Cth).
2. Subject to all of the terms set out below, ACDC Motorized Solutions Pty Ltd ("ACDC") warrants
(a) the
PowerGlide overhead door opener drive units for twenty four (24) months; and
(b) all components and
accessories for twelve (12) months, from the date of purchase (specified in the tax invoice receipt) as free of
any defects in material and workmanship.
3. This warranty applies only where the purchaser:
(a) immediately notifies ACDC or the retailer of the alleged defect;
(b) returns the product to the retailer; and
(c) presents the relevant sales invoice and this warranty document to the retailer to confirm the date of
purchase.
4. To the extent permissible by statute, ACDC disclaims any liability of whatsoever nature in respect of any
claim or demand for loss or damage which arises out of:
(a) accidental damage to or normal wear and tear to the product or to the product's components;
(b) any cost relating to damage resulting from wear and tear;
(c) blown fuses, loss or damage caused by electrical surges, power surges or power spikes;
(d) loss or damage due to theft, fire, flood, rain, water, lightning, storms or any other acts of Nature;
(
(e) door not in safe and correct working order and condition;
(f) evidence of unauthorised repairs;
(g) any cost relating to damage caused by misuse, negligence or failure to maintain the equipment in a
Proper working order as per clauses (d) through (f);
(h) installation, adjustment or use which is not in accordance with the instructions set out in installation
Instruction manual;
(i) damage caused by insects;
(j) loss or damage to any property whatsoever or any loss or expense whatsoever resulting or arising
there from or any consequential loss;
(k) any cost or expense arising due to manufacturer recall of any product;
(l) any cost or expense due to negligence of the approved service provider;
(m) installation of a residential garage door in a commercial or industrial situation or a non-single
ACDC MOTORISED SOLUTIONS PTY LTD residential dwelling.
5. ACDC's liability under this warranty is limited, at ACDC's absolute discretion, to replacing or repairing the
product which ACDC, in its unfettered opinion, considers to be defective either in material and/or workmanship
or to credit the dealer with the price at which the product was
purchased by the dealer.
6. This warranty does not extend to cover labour for installation.
7. This warranty is limited to Back-to-Base repair and does not cover labour for on-site attendance.
8. This warranty is void if the Product is not returned to the manufacturer in its original or suitably secure
packaging.
9. This warranty does not cover consumable items including globes, batteries and fuses.
10. Except for this warranty, ACDC gives no warranties of any kind whatsoever (whether express or implied),
in relation to the product, and all warranties of whatsoever kind relating to the product are, to the extent
permissible by statute, hereby excluded.
11. Where the Product is retailed by any person other than ACDC, except for the warranty set out above, such
person has no authority from ACDC to give any warranty or guarantee on ACDC's behalf in addition to the
warranty set out above.
ACDC MOTORISED SOLUTIONS PTY LTD Postal Address
Po Box 102 Helensburgh NSW 2508
Head office & showroom
120 Walker St Helensburgh NSW 2508
P.H: (02) 4294 9722
Fax: (02) 4294 9733
Queensland Office
Unit 6 / 22 Eastern Service Rd
Stapylton Qld 4207
P.H: (07) 3287 5422
Fax: (07) 3287 5722