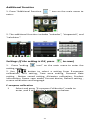
1
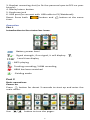
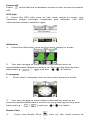
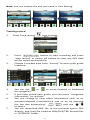
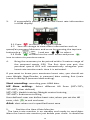
Introduction Thank you for purchasing this personal sports GPS from us! Track your outdoor activities with this advanced personal sports GPS. About GPS GPS (Global Positioning System) is a satellite-based navigation system operated by the U.S. Department of Defense which is responsible for its performance. The GPS Navigation System is made up of 24 GPS satellites orbiting above the surface of the Earth. It needs 4 satellites to gain current latitude, longitude and elevation information. GPS satellite signal will be blocked by metal or thick material, GPS signal is not available under roof, inside buildings, tunnels, deep water and underground. When satellites searched are fewer than 4pcs, the speed and ODO information may be inaccurate. About This Manual Congratulation! And thank you for purchasing this personal sports GPS as your Navigator. The personal sports GPS is a simple and nice personal outdoor GPS device. With its compact design and light weight, it fits perfectly in every bag. Before you start using this product, we recommend reading this manual step by step to obtain the best results with this new personal sports GPS. We wish you a lot of fun. The theme of each segment guides you to learn the easiest operation in outdoor GPS world. By learning the features and functions of the personal sports GPS, you can optimize the usage and performance of the personal sports GPS while you are cycling or mountaineering. All rights reserved, no part of this manual may be reproduced, copied, transmitted or stored in any storage without the written consent of original supplier. Information in this manual is subject to change without notice. All brand and product names are registered trademarks of their respective companies. Safety Notice ! Charge the personal sports GPS for at least 8 hours before using it for the first time. ! Do not operate it while cycling, or it may cause accident. ! Obey all traffic rules when you are cycling with this personal sports GPS. ! Pay attention to the road condition, do not stare at it while 1 cycling. ! For your own safety, do not use it during thunderstorms or lightning. ! Only use accessories recommended from the manufacturer. ! Keep it out of the reach from children. ! Handle it with care. Avoid contact with sharp objects. Keep it off from metallic objects. ! While you are taking a rest during the trip, always check up the trip information displayed on the screen with all environmental resources such as maps, road signs and landmarks. Resolve any ambiguity before next step. ! Set the personal sports GPS to track back mode if you are lost. It will guide you back to the point you are familiar with. ! The personal sports GPS is designed to serve as a navigational AID device, do not use it for any purpose requiring precise measurement of direction, distance or topography. ! The personal sports GPS has no user self-repairable parts, always consult your dealer or service center for help. ! Please calibrate E-compass when environment is changed. If this product is going to be end of life, please recycle it properly. It cannot be treated as municipal waste. It must be disposed of separately via the appropriate return and collection systems available. Usage Notice: Do: ✔ Turn off and unplug the power before cleaning the product ✔ Use a soft dry cloth with mild detergent to clean the display housing ✔ Unplug the power if the product is not used for a long period of time ✔ Ensure that the operating temperature is within -10℃~ +45℃ ✔ It’s normal that the personal sports GPS will feel warm with continuous use due to its high performance Do not: ✘ Use abrasive cleaners, waxes or solvents to clean the unit. ✘ Use under the following conditions: → In extremely hot, cold or humid environments. → Near any appliance generating a strong magnetic field → In direct sunlight 2 Function features 1. Non-stop track recording for at least 100 km. 2. GPS Accuracy: within 10 meters in normal GPS mode. 3. Guided by preloaded route plan 4. Support Google Map and Google Earth 5. File format: KML, GPX, TRK, RTE, WPT 6. 3D E-compass 7. Trip information including Odometer, Target Dist, Speed, GPS Info, E-compass, Elapsed Time, HRM, Altimeter, Calorimeter, Avg Speed, Max Speed, air-pressure, weather forecast and so on. 8. MP3 and MP4 playback supported. 9. Fishing evaluation function. 10. Multi-languages for selection. 11. Multi-point, Multi-path Navigation 12. ANT+™ 2.4GHz Rx +wireless communication protocol Note: Three kinds of cases for GPS positioning: In general cases: it takes 1 minute to get started if it is your first time to use the GPS positioning; Often used in a fixed area: it takes 1 to 10 seconds to get started if you often use it in a fixed area. In special cases: if you haven’t used the MG350 for over 3 months or if your position now is 800 kilometers away from the position where you used the GPS positioning last time, it takes about 5 minutes to get started. Getting Started Follow the instructions in this section to setup and begin using the product. Charge the Battery The personal sports GPS is powered by a built-in Li-Polymer battery that you can charge by the provided USB cable connected to a running PC/Notebook. Charge battery safely 1. Connect the PC USB port and the personal sports GPS USB port with the provided USB cable. 2. The power sign is shown dynamic when charging, once fully charged, the power sign will stop moving. 3. Please unplug the USB cable from PC/Notebook when charging is finished. Note 3 1. Before use it for the first time, please recharge it for at least 8 hours. 2. Your PC/Notebook must be turned on when charging for the battery. 3. Do not overcharge it, or it may shorten the battery’s life. 4. Around 300 cycles for charge/discharge. 5. When not using for long time, you’d better charge the machine at least once for 3-6 months. Caution! 1. Danger of explosion if battery is incorrectly replaced. 2. Do not disassemble, crush, short-circuit or incinerate the battery as it may cause fire, injury, burns, or other hazards. 3. The Li-Polymer battery is a consumptive material, so recharge it periodically. The personal sports GPS may be charged by adaptor which is an optional in package, the rated voltage and current of the adaptor is 5V 1A. Package Contents Please check that the package contains the following items: 1. Personal sports GPS 2. USB cable 3. Earphone 4. Quick start guide 5. Bicycle handle retainer 6. Personal sports GPS bracket 7. ANT+™ compatible heart rate monitor Product Overview The personal sports GPS provides several connections for operation: 1. LCD display 2. Power ON/OFF 4 3. Bracket mounting slot (to fix the personal sports GPS on your bicycle) 4. Menu/return button 5. Earphone jack 6. USB port (to connect with USB cable to PC/Notebook) Reset: Press both button and button at the same time. Operation Part 1 Introduction to the status bar icons: : Battery power level : Signal strength, if no signal, it will display: : Local time display : MP3 playing :Tracking recording / HRM recording :HRM has been matched : Guiding mode Part 2 Basic operations Power on Press button for about 3 seconds to start up and enter the main menu. Use / button to turn the pages. 5 Power off Press and slide the shutdown arrow on the screen to power off. GPS Info 1. Press the GPS Info icon on the main menu to enter, the interface shows latitude, longitude and altitude. The GPS information shows satellite signs. Altimeter 1. Press the Altimeter icon on the main menu to enter: 2. You can change to view other information such as speed/odometer/distance and so on by pressing the top two buttons(e.g.: / ) and use / to select. E-compass 1. Press the E-compass icon on the main menu to enter: 2. You can change to view other information such as air pressure/altitude/distance and so on by pressing the top two buttons(e.g.: / ) and use / to select. Route Plan 1. Press the Route Plan icon on the main menu to 6 enter: 2. Press button to enter and choose a planned route to enter path guide interface: 3. You can select or to move forward or backward for navigation. If you have exited Path guide, you can press “navigation information” to re-enter. You can change to view other information such as air pressure/altitude/distance and so on by pressing the top two buttons as / and use / to select. 4. 5. Note: 1. Maximum 50 RTE routes can be planned with each route maximum 50 waypoints. No limitations for KML/GPX files. 2. Default file names are PLN0000.RTE /KML0000.KML/ GPX0000.GPX respectively. 3. Forward navigation: Select mode, the destination will be the red waypoint,and icon will be displayed at the status bar. Backward navigation: Select mode, the destination will be the green waypoint, and icon will be displayed at the status bar. 4. If current position is within 50 meters from destination, it will switch to the next waypoint automatically. 5. Supported file format: RTE, KML, GPX. 6. You can download KML files to the personal sports GPS directly, and it will be saved as KML/GPX format files to the 7 “GPSDATA” folder. 7. If navigation is inaccurate, re-start navigation mode. Measurement of Area 1. Press the Measurement of Area icon menu to enter: 2. Press the area of your route: on the main to enter and begin to measure 3. After you finish your route, save the data. And then you can see your route path in . 4. Choose one of the data and click it to open and you can see the length, perimeter and area of your path show on the interface: 8 Note: You can choose the unit you need in Unit Setting: Tracking record 1. 2. 3. 4. 5. 6. 7. Press Track record icon to enter: Press button to start recording and press “stop record” or power off button to stop, the GPS data will be saved automatically. Choose a tracked path from “history” to enter path guide interface: You can use or to move forward or backward for navigation. If you have exited path guide, you can press “navigation information” to re-enter. You can change to view other information such as air pressure/elapsed time/distance and so on by pressing the top two buttons(e.g.: / ) and use / to select. You can download KML file to the personal sports GPS directly, and it will be saved as KML/GPX/TRK format files in “GPSDATA” folder. 9 8. You can open the files in history, choose a tracked path to enter path guide interface: Note: 1. GPX, KML, TRK format tracking records can be created. Default file names are TRK0000.TRK, KML0000.KML, and GPX0000.GPX respectively. Each record maximum 25000 track waypoints. 2. If current position is within 50 meters away from the destination, it will switch to next waypoint(more than 100m)automatically. 3. If navigation is inaccurate, re-start navigation mode. 4. Tracking records (in KML format) can be opened via Google Earth. 5. Support GPX, KML, and TRK format navigation file. POI 1. Once orientating, press “POI” menu to enter: 2. Press button to enter, choose the appropriate icon, and press “save” button to record current position as a POI: 10 icon on the main 3. Choose a record saved from “history” to enter path guide interface: 4. You can use or to move forward or backward for navigation. If you have exited Path guide, press “navigation information” to re-enter. You can change to view other information such as air pressure/altitude/distance and so on by pressing the top two buttons (e.g.: / ) and use / to select. 5. 6. Note: If navigation is inaccurate, re-start navigation mode. Default file name is “POI0000.WPT”. HRM (Heart Rate Monitor) This product is ANT+™ certified to support compatible heart rate monitor. 1. Press HRM icon on the main menu to enter: 2. Press “Pairing” to pair heart rate monitor: 11 3. If successfully paired, you can see heart rate information in HRM display: 3.1 Press to switch to diagram mode. 3.2 You can change to view other information such as speed/air pressure/distance and so on by pressing the top two buttons(e.g.: / ) and use / to select. 3.3 Press to return to the main menu and press icon to return to previous menu. 4. Bring the accessory to be paired within 3 meters range of the personal sports GPS. The first time you pair, the personal sports GPS will automatically recognize your heart rate monitor each time it is activated. If you want to know your maximum heart rate, you should set your Weight /Age/Gender in personal data setting first (main menu→ setting→ personal data setting). Start recording: recording your HRM date. HR Zone setting : Select different HR Zone (50%-70%, 70%-85%, User defined) 50%-70%: Health training /Weight control training 70%-85%: Endurance training User defined: user can define heart rate, when you set the HR zone, click to exit and save. Alert: alert when not in specified heart zone 5. Position the Heart Rate Monitor The heart rate monitor is on standby and ready to send data. Wear the heart rate monitor just below your chest. It should be 12 snug enough to stay in place during your run. 5.1 Push one tab of the belt through one slot of the heart rate monitor. Press the tab down. 5.2 Wet both sensors on the back of the heart rate monitor to create a strong connection with you. 5.3 Wrap the belt around your chest and attach it to the other slot of the heart rate monitor. 5.4 Adjust the belt of the heart rate monitor to a proper size which can comfortably fit your body. Turn on the sports GPS and bring it within 3 meters range of the heart rate monitor. If heart rate data does not appear or is erratic, you may have to tighten the belt around your chest or warm up for 5-10 minutes. If the problem still exists, try to pair the sensors again. The sensors of heart rate monitor are ANT+™ compatible HRM Battery Information The heart rate monitor contains a user-replaceable CR2302 battery. Note: Contact your local waste disposal department for a proper disposal of batteries. 1. Locate the circular battery cover on the back of the heart rate monitor. 2. Use a coin to twist the cover counter-clock wisely till arrow pointing to open. 3. Remove the cover and replace the battery with the positive side facing up. 4. Then twist the cover clock wisely till arrow pointing to close. 5. Be careful not to damage or lose the O-ring gasket on the cover. HRM Technical Specifications Waterproof: IPX4 Transmission range: 10m 13 Battery: 3 volts (CR2032) Battery life: approximately 8 months (1 hour per day) Operating temperature: (-10℃~ + 45℃) NOTE: In cold conditions, make sure the temperature of the heart rate monitor is similar to your body temperature. Radio frequency/protocol: 2.4GHz ANT+™ Sport wireless communications protocol Accuracy may be degraded by poor sensor contact, electric interference, or a weak receiving distance from the transmitter. Geocaching 1. Press games: 2. Press icon on the main menu to enter geocaching to input GPS data: E/W/S/N: east/west/south/north : cancel :confirm : return to the main menu : return to previous menu 3. Press 4. If you press icon ,the GPS will enter the navigation interface: to view geocoaching location: 14 You can select to navigate. : return to the main menu : return to previous menu You can change to view other information such as air pressure/calories/distance and so on by pressing the top two buttons(e.g.: / ) and use / to select. Music 1. Press icon on the main menu to enter music mode. Repeat Mode Use icon to select the desired repeat mode, definition of repeat icons as below: Repeat one Once All repeat All once Random Play Mode Use below: icon to select the play mode. Icon definition as 15 In Order Shuffle EQ Use icon to select the EQ Mode: NORMAL, ROCK, POP, CLASSIC, SOFT, JAZZ, DBB, WOW, WOWHD. NOTE: EQ mode is invalid while playing WMA files. Directory list Use icon to select the directory list: Main directory, All Music, and ID3 List. Photos 1. 2. Press mode. Use【 open. icon on the main menu to enter photo 】to select a desired photo, and click it to 16 3. Press to return to the main menu. 4. Press to return to previous menu. 5. Press to delete the selected file. 6. Press to return to previous folder. : Select the interval time for auto playing. : Previous photo. : Next photo. : Return to the previous folder. NOTE: Supported photo format: BMP/JPG/GIF/PNG/TIF. Videos 1. 2. Press “Video” icon on the main menu to enter video mode. Use 【 】to select a desired video file, and click it to start playing. 17 Ebooks 1. Select “Ebooks” menu and enter E-book mode by pressing the E-book icon. 2. Use【 】to select a desired txt file, and click it to open. 3. Press to return to the main menu. 4. Press to return to previous menu. 5. Press to delete the selected file. 6. Press to return to previous folder. : Select the interval time for auto browsing. : Previous page. : Next page. : Return to previous folder. Note: Only TXT files are supported. Explorer 1. 2. Press “Explorer” icon on the main menu to enter explorer mode. Use【 】to select a desired folder and click it to open. 18 Navigation information 1 Press “navigation information” menu to enter: icon on the main 2 If you press icon, it will display information about Speed and Odometer: 3 You are also free to switch to the following information by pressing either window and using / to select, then directly pressing the selected option to enter: Dist: Distance between current position and destination Speed: Current speed Avg Speed: The average speed for current sport Max Speed: The maximal speed for current sport Odometer: Distance of current sport Air-pressure: The current pressure value Target Dist: The distance between current position and destination place Time Elapsed: Time elapsed for current sport Calories: Show calories consumed by current sport Altitude: Show Altitude Heart Rate: Show Heart Rate 19 : return to previous menu : switch between six viewing windows and two viewing windows : return to the main menu Fishing evaluation function 1. Press Fishing icon on the main menu to enter: Icons definition as below: : very good fishing : good fishing : weak fishing : Unstable Low Pressure System : Unstable High Pressure System : Unknown : Rain : Cloudy : Sunny : return to previous menu / : zoom in/zoom out the diagram : return to the main menu Note: For reference only. Information on weather forecast will not appear until the personal sports GPS has been turned on for 1 hour. 20 Additional Function 1. Press “Additional Function enter: ” icon on the main menu to 2. The additional function includes “calendar”, “stopwatch”, and “calculator”. Settings (If the setting is OK, press 1. Press “setting setting mode. to save) icon” on the main menu to enter the 2. Use button to select a setting from E-compass calibration, Unit setting, Time zone setting, Personal data setting , Button sound setting, Altimeter calibration, Product information, Power save mode, Format device, Default setting , screen calibration and language. E-compass calibration 1 Select and press “E-compass Calibration” mode to enter ,and it will display a compass as below: 21 2 3 Rotate the personal sports GPS, the E-compass will circumrotate to calibrate according to current environment. It will return to previous menu after calibration. Note: Please calibrate E-compass for the first time use or when using environment is changed. Unit setting 1. Select and press “Unit setting” to enter, and you can select Metric or Imperial. Press to confirm and return to previous menu. Timezone setting 1. Select and press “Timezone setting” to enter. 2. Short press button to select the time zone from UTC +12 to UTC -12, and then press the selected option to confirm and exit. Note: Please setup the time zone corresponding to your current region. Personal data setting 1 Select and press “Personal information setting” to enter. 2 Please input your actual “Weight /Age/Gender” using 3 Press button to adjust. to confirm and return to previous menu. Button sound setting Select and press “Button sound setting” to enter and you can select ON or OFF. Press to confirm and return to previous menu. Altimeter calibration 1. Select and press “Altimeter calibration” to enter, you can calibrate the altimeter through adjusting the following three modes, as shown below: :If you know current position height, you can use the 22 mode to calibrate. : If you know current position air pressure, you can use the mode to calibrate. : If you don’t know current position height or air pressure, you can use the mode to calibrate. 2. Use confirm and exit. button to adjust, then press “Save” to : return to previous menu : return to the main menu Note: If you restart sports GPS device, air pressure will restore the default value. Product information Select and press “Product information” to view firmware version, total memory and free memory: : return to previous menu : return to the main menu Power Save Mode Select and press “Power save mode” to enter: 23 1 Power off 1.1 Select and press “Power off” 1.2 Use button to select from “OFF/60s/120s/ 180s/ 240s/ 300s” to set auto power off time. 1.3 Press to confirm and return to previous menu. Display setting (Auto lock) a) Select and press “Display setting” b) c) Use button to select from “0s/5s/10s/15s /30s/1min/5min/15min/30min” to set auto lock time Press to confirm and return to previous menu. Format device Select and press “Format device” to enter and press “format main disk” to proceed. Default setting Select and press “default setting” to enter, if you choose “YES”, the sports GPS device will restore factory settings. If you choose “NO”, it will return to previous menu. Screen calibration Select and press “Screen calibration” to enter, please follow and press “✚” icon to calibrate. Language Select and press “Language” to enter, there are 4 languages for your choice. Use button to select and press the selected option to confirm and exit. Personal Sports GPS AP 1. Connection: Link the personal sports GPS to your PC/Notebook. 2. Data: Path/Altitude, Path/Speed, HRM(optional) diagram 3. Plan: Route Plan 4. POI: Points of interest 5. Track: Tracking log Install Guider AP driver on your PC/Notebook Copy Guider AP driver in the personal sports GPS to your PC/Notebook first. 1. Connect your personal sports GPS to your PC/Notebook with the provided USB cable. 24 2. 3. PC/Notebook will auto identify the device and icon will display at the right corner of the desktop. Open my computer, click “removable disk (F)” Copy the file named “Guider2.0.6.exe” and paste it to the desktop of your PC/Notebook System Requirements Your PC/Notebook should have at least the following specifications to make the unit working smoothly: Operating System: Windows XP, Vista, Win7 CPU: Pentium 4-2.0GHz or higher RAM: 1GB RAM or higher Hard Disk: 500M free space Interface: USB port Internet: Microsoft Internet Explorer 7.0 or above Speed: Internet connection and bandwidth 1MB Download Display screen resolution: above 1024*700 Connection and Guider AP Parameter setting 1. Connect your personal sports GPS to the PC/Notebook USB interface with the provided USB cable, click Guider AP to open, the Guider AP will automatically detect the device. If your PC does not identify the personal sports GPS, it will show: 2. Download files from the personal sports GPS by clicking 3. icon in “Device Operations”. Select Data/Plan/POI/Track by clicking the corresponding icon on the top left corner of Guider AP. Data 1. Import track file into APP, and the data interface will display altitude, HRM, speed and other data: 25 2. Select a language you want to use. 3. There are two options for “Unit Setting”: Metric, Imperial. Select one for your use. Plan 1. First, you need to plan your route on Google earth. 2. When your plan is over, you need to export your route for KML format from Google earth. You can move it to the GPSDATA file of the GPS product! You can also operate as following steps: 1. Open “Guider APP”. 2. Clicking “open” in “plan” interface, to choose the KML files you want to open, the planned routes will be listed in the left column and its waypoints will be listed in the right column. 3. Select a plan and right click it, and then you can choose to carry out the following operations: Add: add a new plan; Modify: modify the title of the selected plan: 26 Delete: delete the selected plan Clear all: delete all listed plans 4. Select a waypoint and right click it, and then you can choose to carry out the following operations: Modify: modify the title of the waypoint; Clear All: delete all waypoints from the route plan Icon definition: Download Data from the personal sports GPS Upload Data to the personal sports GPS Save the plan. Open a plan. 5.When you connect the Sports GPS to your PC, The Guider APP icon on its upper right screen will change from to , Click “Upload Data to Guider”, the plan route will be uploaded to your the Sports GPS. 27 POI POI is for managing the marked POIs in the route. POIs can be downloaded from the personal sports GPS and saved into files for backup. Select a POI and right click it, you can choose to delete the selected POI or clear all POIs. When you save POIs for the KML format, you can see by Google earth. Download POIs from the personal sports GPS Upload POIs to the personal sports GPS Save the POI. Open POI. Track Download tracks from personal sports GPS, select one and right click it, you can select to modify the color/name of the track. Delete the track or delete all tracks. Click one route of the track and it will show date, start time, end time, duration, total distance, and total waypoints of the route. For a logged track, you can save it into a file as a record, or transform it into different file formats [e.g.: TRK, KML (for Google) format]. When you save for the KML format, you can see by Google earth. 28 Icon definition: Download Data from the personal sports GPS. Save the track data Open a track Note: 1. As Google map does not match the real longitude/latitude of some areas in China, please use Google Earth for tracking demonstration. 2. Internet must be linked when to open Google Earth through Guider AP. 3. Guider AP will be upgraded without notice. Steps to install/uninstall the personal sports GPS to your bike Please follow the steps as below to install/uninstall the personal sports GPS to your bike. Install steps ➡ 29 ➡ ➡ Uninstall steps: ➡ 30 Technical Specifications CPU LCD display Flash Memory Power supply Battery capacity Li-Polymer life 2 buttons Interface Waterproof grade Operating Temp Dimension(mm) Weight ATJ2257D 2.2" 320*320 RGB with TP Built-in 4 GB Nand Flash Memory Li-Polymer 1600 MAH 8 hours(All function open) 1xpower/light 1xmenu Mini 5Pin USB IPX7 -10℃ to 45℃ 95*58*23 114.8g V3.0 31