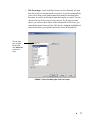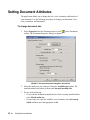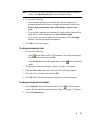
1
© 2004 Brady Worldwide, Inc. All Rights Reserved. MarkWareTM (hereafter “MarkWare ”) User’s Guide This manual is proprietary to Brady Worldwide, Inc. (hereafter “Brady”), and may be revised from time to time without notice. Brady disclaims any understanding to provide you with such revisions, if any. All brand or product names referenced in this manual are trademarks (TM) or registered trademarks (®) of their respective companies or organizations. Protected by US Patent 5,823,689. Written and designed by Varitronics, a business unit of Brady Worldwide, Inc., 6835 Winnetka Circle, Brooklyn Park, Minnesota 55428, USA. ¡ iii iv ¡ BRADY WORLDWIDE, INC. ® YOU SHOULD CAREFULLY READ THE FOLLOWING TERMS AND CONDITIONS OF THIS LICENSE AGREEMENT BEFORE OPENING THIS PACKAGE. IF YOU DO NOT AGREE WITH THESE TERMS AND CONDITIONS, PLEASE PROMPTLY RETURN THIS PACKAGE FOR A FULL REFUND. LICENSE AGREEMENT Brady Worldwide, Inc. (hereafter "Brady") hereby grants you a non-exclusive, nontransferable license to use this software and the accompanying documentation according to the following terms: 1. LICENSE GRANT: You may 1) install the software on only one computer at a time, and 2) make one (1) copy of the software in machine readable form solely for backup purposes. 2. LICENSE RESTRICTIONS: You may not: 1) transmit the software over a network without an additional license; 2) modify, adapt, translate, reverse engineer, decompile, disassemble, create derivative works based on, or copy (except for the backup copy) this software or the accompanying documentation; 3) rent, transfer or grant any rights in the software or accompanying documentation without the prior, express written consent of Brady; or 4) remove any proprietary notices, labels, or marks on the software and accompanying documentation. 3. NATURE OF THIS AGREEMENT: This license is not a sale. License fees paid by you, if any, are in consideration of the licenses granted under this Agreement. Title and copyrights to the software, accompanying documentation, and any copy made by you, remain the property of Brady or its suppliers. Unauthorized copying of the software or the accompanying documentation, or failure to comply with the above restrictions, shall automatically terminate this license, without further notice, and terminate your rights to use the software, and Brady shall, in addition to its other legal remedies, be entitled to its reasonable attorney fees. 4. LIMITED WARRANTY: Brady warrants that, for a period of ninety (90) days from the date of delivery to you as evidenced by a copy of your receipt, the software, as furnished, under normal use, will perform without significant errors that make it unusable. Brady's entire liability and your exclusive remedy under this warranty (which is subject to you returning the software to Brady) will be, at the option of Brady, to attempt to correct or help you around errors, to replace the software with functionally equivalent software or diskettes, or to refund the license fee of the software and terminate this Agreement. EXCEPT FOR THE ABOVE EXPRESS LIMITED WARRANTY, BRADY MAKES AND YOU RECEIVE NO WARRANTIES, EXPRESS, IMPLIED, STATUTORY OR IN ANY COMMUNICATION WITH YOU, AND BRADY SPECIFICALLY DISCLAIMS ANY IMPLIED WARRANTY OF MERCHANTABILITY OR FITNESS FOR A PARTICULAR PURPOSE. BRADY DOES NOT WARRANT THAT THE OPERATION OF THE PROGRAM WILL BE UNINTERRUPTED OR ERROR FREE. Some states do not allow the exclusion of implied warranties so the above exclusions may not apply to you. This warranty gives you specific legal rights. You may also have other rights which vary from state to state. 5. LIMITATION OF LIABILITY: IN NO EVENT WILL BRADY BE LIABLE FOR ANY DAMAGES, INCLUDING LOSS OF DATA, WHEN LOADING THIS SOFTWARE OR OTHERWISE, OR LOST PROFITS, COST OF COVER OR OTHER SPECIAL, INCIDENTAL, CONSEQUENTIAL OR INDIRECT DAMAGES ARISING FROM THE USE OF THE PROGRAM OR ACCOMPANYING DOCUMENTATION, HOWEVER CAUSED AND ON ANY THEORY 6555 West Good Hope Road, P.O. Box 571, Milwaukee, Wisconsin 53201-0571, USA, tlf. +1 (414) 358-6600¡ v OF LIABILITY. THIS LIMITATION WILL APPLY EVEN IF BRADY HAS BEEN ADVISED OF THE POSSIBILITY OF SUCH DAMAGE. Some states do not allow the limitation or exclusion of liability for incidental, or consequential damages, so the above limitation may not apply to you. 6. GENERAL: This Agreement shall be governed by, and interpreted under, the laws of the State of Wisconsin, USA. You acknowledge that U.S. law and regulations may restrict the export/re-export of the software. You agree not to export/reexport the software or portions thereof in any form without the appropriate U.S. and foreign government licenses. This obligation shall survive and continue after this Agreement terminates. This Agreement is the entire agreement between the parties and supersedes any other communications or advertising with respect to the software and accompanying documentation. If any provision of this Agreement is held invalid, the remainder of this Agreement shall continue in full force and effect. vi ¡ 6555 West Good Hope Road, P.O. Box 571, Milwaukee, Wisconsin 53201-0571, USA, tlf. +1 (414) 358-6600 Table of Contents Table of Contents vii Introduction 1 About the MarkWare Application- - - - - - - - - - - - - - - - - - - - - - - - - - - - - - - - - - - 2 Contacting Technical Support- - - - - - - - - - - - - - - - - - - - - - - - - - - - - - - - - - - - - - 2 Installing Application Components 3 Installation Requirements - - - - - - - - - - - - - - - - - - - - - - - - - - - - - - - - - - - - - - - Installing the Application- - - - - - - - - - - - - - - - - - - - - - - - - - - - - - - - - - - - - - - - Installing the Print Driver - - - - - - - - - - - - - - - - - - - - - - - - - - - - - - - - - - - - - - - Changing the Display Language - - - - - - - - - - - - - - - - - - - - - - - - - - - - - - - - - - - - 4 5 8 9 Creating Documents 11 Introduction to Templates - - - - - - - - - - - - - - - - - - - - - - - - - - - - - - - - - - - - - - - - 12 Creating Documents With Templates- - - - - - - - - - - - - - - - - - - - - - - - - - - - - - - - - 14 Setting Document Attributes - - - - - - - - - - - - - - - - - - - - - - - - - - - - - - - - - - - - - - 20 Index 1 ¡ vii viii ¡ Introduction Thank you for choosing Brady Worldwide’s MarkWareTM application software. The MarkWare application is a Windows-based application used to create a variety of labels, signs, tags, pipe markers, and other industrial identification. This guide provides a brief overview of the MarkWare system, describes installation procedures, and provides basic instruction on how to start the application and create documents. Topics in this chapter include: About the MarkWare Application Contacting Technical Support ¡ 1 About the MarkWare Application The following features make the MarkWare application easy-to-use, flexible, and powerful: The label creation wizard guides you through the process of creating the desired output. The extensive on-line help system is easily accessible and provides detailed information and instructions. The online help system is available in English only. A complete stock of pre-designed templates and ready-to-use artwork make it easy to create commonly used signs, labels, and other industrial identification. A full range of editing and drawing tools allow you to customize your designs. A connection to Brady roll-fed printers allow you to use Brady high performance ribbons and tapes. A library of international standard graphics containing over 800 industrial graphics and safety graphics is easily accessible to you. Contacting Technical Support Please contact Brady Worldwide, Inc. with any questions or concerns. The contact support numbers for each region are listed below. 2 Region Phone Number Fax Number United States and other C/S countries 800-368-3362 414-228-5799 Singapore, Malaysia, Philippines, Indonesia, Taiwan, Thailand 65-6775-2077 65-6775-7929 Hong Kong 852-2359-3149 852-2359-3164 China 86-21-5255-0008 86-21-5240-1472 Korea 82-31-704-8410 82-16-452-9795 Japan 81-45-461-3600 81-45-450-2380 ¡ About the MarkWare Application Installing Application Components The MarkWare application installation CD provides all the files necessary for installing the application and the print drivers for Brady printers. Topics in this chapter include: Installation Requirements Installing the Application Installing the Print Driver Changing the Display Language ¡ 3 Installation Requirements Be sure that your computer meets the following minimum requirements for running the MarkWare software before you attempt installation: 486 DX/33 MHz or greater PC running Microsoft® Windows 98 2nd Edition, NT 4.0, 2000, or XP (Pentium® recommended) 32 MB RAM (128 MB or greater recommended) CD-ROM drive 120 MB or greater available hard disk space (for a complete installation) Display size of 640 x 480 at 256 colors (800 x 600 or greater recommended) Available parallel, serial, or USB port, plus data cable for all desired printers Print drivers for all desired printers (For more information on installing print drivers, see Installing the Print Driver on page 2-8.) Note: In addition to the hard disk space listed above, you need additional free space to run the application. The amount of space needed depends on the size of the files you create. If the MarkWare application closes down unexpectedly, check that your PC meets the above memory and hard disk space requirements. If it does comply, try clearing some additional hard disk space on the system. If you are using a Brady printer, make sure that the version of the operating system on your printer is compatible for use with MarkWare . PowerMarkTM Sign and Label Maker 1.0 or higher Labelizer PLUS 3.02 or higher VersaPrinter HandiMark TM Sign and Label Maker 1.05 or higher 1.05 or higher GlobalMark Industrial Label Maker Monocolor 1.0 or higher GlobalMark Industrial Label Maker Multicolor 1.0 or higher GlobalMark Industrial Label Maker Color & Cut 1.0 or higher TM TM TM ¡ Industrial Labeling System Portable Label Maker TM 4 TM Installation Requirements Installing the Application The MarkWare application software and Brady print drivers are shipped on a single CD-ROM. A standard Windows setup wizard guides you through the installation procedure. The installation allows you to install both the application and Brady print drivers at the same time. For more information on installing Brady print drivers, see the Print Driver Installation Sheet that was shipped with the application or the documentation that accompanied your printer. Hint! You need to uninstall and then reinstall all Brady print drivers from your PC for the application to function properly. For more information on uninstalling Brady print drivers, see the documentation that accompanied your printer. Use the following procedures to install and uninstall the application components. Hint! Before you begin the installation procedure, close all open applications and disable all anti-virus software on your PC. To install the application 1. Insert the installation CD into your CD-ROM drive. If your PC does not automatically launch the installation wizard, click Start on the Windows taskbar and select Run. Type D:\Setup.exe and click OK, or click the Browse button and select the desired path. (Substitute the letter corresponding to your CD-ROM drive if it is not labeled D.) The Choose Setup Language dialog box appears. 2. Select an appropriate language and click OK. The MarkWare Main Setup Menu dialog box appears. 3. Select Install MarkWare. 4. Click Start Installation. The MarkWare Setup dialog box appears. 5. Click Next to continue. The Choose Destination Location dialog box appears. 6. Select a location and click Next to continue. Hint! The Choose Location for the install defaults to C:\Program Files\Brady\Markware 2.0. If you want to change the destination ¡ 5 directory, click the Browse button and select the desired path. Click OK to accept. The Choose Location for Documents dialog box appears. 7. Select a document location and click Next to continue. Hint! The install defaults to C:\ProgramFiles\Brady\Markware 2.0\Documents. If you want to change the destination directory, click Browse and select the desired path. Click OK to accept. You can also share files across a network connection by pointing the Document Location folder to a folder on your system’s server. The Setup Type dialog box appears. 8. Select one of the following install options: • Custom: Program installs requested components. This option is recommended for advanced users. Use this option to install template creation capabilities or the print only version. Select Custom and click Next. The Select Components dialog box appears. Proceed to step 9. • Typical: Program installs with the most common components. This option is recommended for most users. Select Typical and click Next. The Select Country-Specific Templates dialog box appears. Proceed to step 10. 9. Select the components you want to install and click Next. The following are brief descriptions of each of the components: • MarkWare: Installs the application program files, templates, help files, sample databases, and sample graphics. This is a default setting. • Template Design Capability: Installs the Template Design module which allows you to create and save your own templates. • Print-Only Version: Installs a version of the program that only allows the printing function to be enabled. Users are not allowed to modify templates or create new documents. • Right-to-Know Chemical Database: Installs a database of chemicals for use with the Right-to-Know application. This is a default setting. The Select Country-Specific Templates dialog box appears. 10. Select the country-specific templates you want to install and click Next to continue. The Select Program Folder dialog box appears. 6 ¡ Installing the Application 11. Select a name for the program folder in Windows and click Next to continue. The system begins installing the application. Hint! The default folder is MarkWare 2.0. To select a new name, type the desired name in the Program Folders text box. 12. Select one of the following options: • Click Yes to add the application icon to your desktop. • Click No to leave the application accessible only from the Start menu. 13. Click Finish to complete the installation. 14. Insert the Brady Print Driver CD to install your Brady print drivers To uninstall the application Hint! This procedure uninstalls MarkWare version 2.0 only. To uninstall earlier versions of MarkWare , refer to the documentation that accompanied that software version. 1. Click Start on the Windows taskbar, then select Settings|Control Panel. The Control Panel dialog box appears. 2. Double-click the Add/Remove Programs icon, as shown on left. 3. Select MarkWare 2.0 and click the Change/Remove button in Windows NT/ 2000 or the Add/Remove button in Windows 95/98. The Install Shield wizard launches the MarkWare Uninstall program. 4. Select an appropriate language and click OK. The MarkWare Main Setup Menu dialog box appears. 5. Select Uninstall MarkWare and click Start. The Confirm File Deletion dialog box appears. 6. Verify that you want to remove all MarkWare file components from your system by clicking OK. If you do not want to remove MarkWare file components, click Cancel. The Uninstalling (Template files) dialog appears. 7. Do one of the following: ¡ 7 • Click Yes to remove all template files (including user created templates). • Click No to leave these templates in the system. If you choose to leave the templates in the system, the system verifies that the templates were not deleted and prompts you to click OK. The system prompts you to remove shared files. 8. Indicate whether you want to remove the shared files by: • Clicking Yes to delete the shared file. • Clicking No to retain the shared file in the system. • Clicking Cancel to exit. The program closes when it finishes removing all the components. Note: This procedure does not remove print drivers. For more information on removing print drivers, see the documentation that accompanied your printer. Installing the Print Driver Hint! You need to delete all existing Brady printers and reboot your PC before you reinstall any new Brady print drivers. This will allow for proper functionality with MarkWare application. Brady print drivers are shipped on a seperate CD-ROM than MarkWare. A standard Windows setup wizard guides you through the print driver installation procedure. You can only print documents you create with MarkWare only to Brady printers. 1. Insert the Brady Print Driver CD or download the drivers from the Brady web site at http://www.bradysignmark.com and click on the downloads link. 2. Double-click the Printer_Install.exe file on the inserted CD. 3. Select the install language you would like to use and click OK. 4. Select the print driver you would like to install and click OK. NOTE: To install multiple drivers, select the first printer and then press and hold the CTRL key. Holding the CTRL key, select the additional drivers you would like to install. Click OK when all desired drivers are selected. 5. 8 ¡ Select a printer port for each driver and click OK. Installing the Print Driver 6. Click Finish when the install is complete. 7. Click Yes to reboot your computer. NOTE: You must reboot your computer in order for the print drivers to function properly. Changing the Display Language Once you have started using MarkWare, you can change the language of the screens. For instance, you can switch from Korean to English. To change display languages 1. Select Preferences from the Options menu. 2. Select the Program tab. 3. Select the appropriate language. 4. Click Apply and then click OK. 5. Make sure your documents are saved, and then exit the MarkWare application. 6. Relaunch the MarkWare application. The dialogs appear in the selected language. ¡ 9 Creating Documents The signs, labels, and tags you create in the application are referred to as documents. Documents can be saved in the application as files for reuse. You use pre-designed layouts, called templates, to create a variety of commonly used industrial sign, tag, and label applications. The application allows you to group and save templates that you use frequently in one easy to find location using the My Templates feature. If you installed the template design capabilities for the application, you can modify and save templates meet your own needs. Contact technical support for more information on using the template design feature. Topics in this chapter include: Introduction to Templates Creating Documents With Templates Setting Document Attributes ¡ 11 Introduction to Templates Templates are like wizards that help guide you through creating your document. They prompt you for the necessary text and graphic information. These objects are then automatically positioned and sized in the document. The application's templates enable you to create the following types of documents. Note: Some documents are only available for certain countries and Brady printers. Text Labels Allows you to create simple, text-only documents. Safety & Facility Allows you to create safety signs, warning labels, and general facility signage. Asset & Equipment Allows you to create property and equipment identification and maintenance inspection labels. Tags Allows you to create hazard prevention, maintenance, production, and quality and control tags. Pipe Markers Allows you to create standard or roll-form pipe markers and symbol and arrow tape pipe markers. These templates are only available for Brady printers. Warehouse Allows you to create warehouse facility labels such as shelf, rack, bin, and production and quality control labels. Hazardous Materials Allows you to create hazardous material shipping labels for land, sea, and air. Installed for European markets only. Right-to-Know Allows you to create OSHA (Occupational Safety and Health Administration) compliant chemical warning labels for use in the United States. Right-to-know uses a built-in chemical database and specific hazard and target organ pick lists. Database information is available in English only, but you can type label information in any language. 12 ¡ Introduction to Templates HSID (Hazardous Substances Identification) Allows you to create HSID compliant chemical warning labels for use in Europe. These templates are only installed for European regions. Text Labels Allows you to create simple, text-only documents. Safety & Facility Allows you to create safety signs, warning labels, and general facility signage. Asset & Equipment Allows you to create property and equipment identification and maintenance inspection labels. Tags Allows you to create hazard prevention, maintenance, production, and quality and control tags. Pipe Markers Allows you to create standard or roll-form pipe markers and symbol and arrow tape pipe markers. These templates are only available for Brady printers. ¡ 13 Creating Documents With Templates This section describes how to create a document using a pre-made template. You can create the document of your choice in just three easy steps. First, select the template you want to use, enter the prompted information, and then print your document. To create a document using a template 1. From the Document Type dialog box, select Create New Document. Hint! 2. Select a printer. 3. Select a template category in the Select your document type option. Note: 4. If you select a Custom template, a blank document automatically appears in the editing window. Click OK to continue. The Create New Document dialog box appears. Hint! 14 ¡ If you currently have a document open and want to select a document from the current template category, select New from the File menu or click on the Standard toolbar. If you want to select a different template category, select Change Document Type from the File menu or click on the Standard toolbar. Use the Back button to return to the previous screen, or the Cancel button to exit without creating a document. Creating Documents With Templates FIGURE 1. Create New Document dialog box 5. Select category and subcategory where available. 6. Select a template. A preview of the selected template appears to the right of the selected template. 7. Verify the document size. To change the document size, click Change Sizes and select new settings. Note: You can save frequently-used templates in the My Templates by clicking Add to My Templates. The template becomes available in the document type My Templates for easy access. 8. Click OK to continue. 9. Prompt screens appear for data that is required to populate the document. The following prompts may appear depending on how the template was created: ¡ 15 • Note: Text prompt: The text prompt screen allows you to type single text objects, create new text list objects, or use existing text list objects. Creating a text list allows you to enter a list of text items that will be applied to the same text object in multiple documents. The text items you enter create a mini-database that prints a new document for each item in the list. If you want to create multiple documents from a previously saved text list, you can select the Use text list option in any Text prompt. For example, if you had three text list items, one document would print for each item in the text list. You must press ENTER after each item in the list or the items will be treated as one text item. When creating a text list, be sure to press ENTER between items. FIGURE 2. Enter Data dialog box: Text prompt with text list items 16 ¡ Creating Documents With Templates • Pick list prompt: A pick list differs from a text list in that only one item from the pick list is inserted into the text object. A pick list prompt allows you to select from several predetermined text items for insertion in the document. A pick list is developed when the template is created. You can choose from a pick list or type in your own text. If you type your own entries, you can save those entries to the current pick list. However, you cannot delete items from a pick list. Pick lists are arranged in alphabetical order which allows you to quickly and easily locate the desired text. You can type your own pick list item and click Add to list to save the entry. FIGURE 3. Enter Data Dialog Box: Pick List Prompt ¡ 17 • Graphic prompt: The graphic prompt allows you to select graphics from the resident library or import graphics from outside of the application. Click the Browse button to access graphics outside of the graphic library. Graphic preview FIGURE 4. Enter Data Dialog Box: Graphic Prompt Note: Only print graphics can be accessed from this prompt. Once the document is displayed in the editing window, you can access print and cut graphics and cut only graphics using the Insert graphic option. 10. Click Finish on the last prompt screen to accept the changes. Your document appears in the editing window. Hint! You can change information that you enter in template prompts after the fact by clicking on the Draw toolbar. If you don’t want to enter text for the current prompt, just click Next or Finish without entering any information. You can also click Cancel to stop the prompting process for the template. You can then enter information directly into the editing window. 11. To modify the documents attributes, see the section Setting Document Attributes on page 3-20. 18 ¡ Creating Documents With Templates 12. To save the document for the first time, select Save As from the File menu to name your document. The Save Document dialog box appears. Note: If you have previously saved the document, select Save from the File menu to add the additional changes. 13. Type a name for your document in the Document name field. 14. Select an existing file group or type a name to create a new group in the File group option. Note: The default file destination was set up during installation. The current document path is specified in Full path. If you want to save the file to a directory other than the default directory, click Browse and select the appropriate path. 15. Click OK to save the document. ¡ 19 Setting Document Attributes The application allows you to change the size, color, orientation, and borders of your document. Use the following procedures to change your document’s size, color, orientation, and boundaries. To change document size 1. Select Properties from the Document menu or click toolbar. The Document Properties dialog box appears. on the Document FIGURE 5. Document Properties Dialog Box: General Tab 20 ¡ 2. Select the media size you want to use from the Available sizes option. The installed media in the printer is shown in Currently installed sizes. 3. Do one of the following: • If you want the document to match the size of the currently installed media, select Match media size. • If you want to set a specific width for your document, select Set custom width, and then select the appropriate width. Setting Document Attributes Hint! If you want to override a document size setting and match the installed media, select Match media size from the Document menu. 4. Do one of the following: • If you want the application to automatically scale the length of your document proportionally when you change the document’s width, select Resize length proportionally when width changes (objects do not scale). • If you want the application to determine the length of the document based on the objects on the document, select Auto calculate length. • If you want to set a custom length for your document, select Set length, and then select the appropriate measurement. 5. Click OK to accept the changes. To change document color 1. Do one of the following: • Click on the Object toolbar. The Document Color dialog box appears. Select the desired color and click OK. • Select Properties from the Document menu or click on the Document toolbar. The Document Properties dialog box (Figure 5 on page 3-20) appears. 2. Click the Select color button. The Document Color dialog box appears. 3. Select the color you want to use and click OK. 4. Click OK on the Document Properties dialog box to accept the changes. To change document orientation 1. Select Properties from the Document menu or click on the Document toolbar. The Document Properties dialog box (Figure 5 on page 3-20) appears. 2. Click the Orientation tab. ¡ 21 3. Do one of the following: • If you want the document to be taller than it is wide, select Portrait. • If you want the document to be wider than it is tall, select Landscape. 4. Click OK to accept the changes. To apply a border to the document 1. Select Properties from the Document menu or click on the Document toolbar. The Document Properties dialog box (Figure 5 on page 3-20) appears. 2. Click the Frame tab. FIGURE 6. Document Properties Dialog Box: Frame Tab 22 ¡ 3. Select the a shape for the frame from the Shape option. If you don’t want a frame around your document, select None. 4. If you want to change the color of the frame, click the Select color button and select the appropriate color. Click OK to accept the changes. 5. If you want to change the weight of the document frame, select a width from the Line width option. 6. If you want to print the frame around the document, select Print frame. 7. If you are using a printer with a plotter cutter and you want to cut out the frame around the document, select Cut out frame. Setting Document Attributes 8. Click OK to accept the changes. ¡ 23 24 ¡ Setting Document Attributes Index A Application Features 2 F Framing Documents 22 C Color Documents 21 I Installation MarkWare 5 Print-only 6 Requirements 4 Right-to-Know 7 Template design 6 D Documents Matching media size 20 Properties Color 21 Framing 22 Orientation 21 Sizing 20 Types 12 Asset & Equipment 12, 13 Hazardous Materials 12 HSID 13 Pipe Markers 12, 13 Right-to-Know 13 Safety & Facility 12, 13 Tags 12, 13 Text Labels 12, 13 O Orientation Documents 21 Outputs Creating using templates 14 P Print drivers 8 Printers 4 R Resources Technical support 2 Right-to-Know 7 ¡Index-1 S Sizing Documents 20 T Technical support 2 Template design capability 6 Templates Creating outputs 14 Graphic prompt 18 Pick list prompt 17 Text list prompt 16 Text prompt 16 U Uninstall MarkWare 7 Index-2¡ www.bradycorp.com ©2002 Brady Worldwide, Inc. All Rights Reserved MS3324 Y192958 MW-EN