1
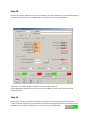
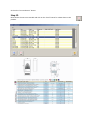
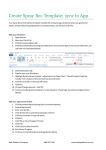
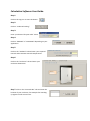
Calculation Software User Guide.
Step 1.
Click on the cog icon to start calculation.
Step 2.
Click on “Industrial Cooling”
Step 3.
Enter your desired “Project code” name.
Step 4.
Click on “INDOOR” or” OUTDOOR” depending on your
application.
Step 5.
Click on the “Ambient” tab and enter your required
internal and maximum external temperatures.
Step 6.
Click on the “Enclosure” tab and enter your
enclosure dimensions.
Step 7. Click on the “Covered side” tab and enter the
location of your enclosure, for example free standing
up against a wall as seen here.
Step 8.
Click on the “Layer” tab then choose “NON INSULATED”. Select enclosure material from the
“Thermal trans. Coefficient” drop down box.
Step 9.
Click on the “Components” tab and enter pre programmed devices from drop down box (select the
“New” button for each component). To manually enter components that are not pre programmed
click on “Other” from the drop down box and manually enter components. Alternatively, if the
power dissipation is known, enter the value directly into the “Power dissipated” space (if using this
method, click on the “Refresh” button).
Step 10.
Click on the “Result” tab then click on the “Calculate” tab. Your ventilation or air conditioning option
boxes will turn green if this is a suitable type of cooling solution for your application.
Tolerances can also be altered to show the closest suitable sized unit.
If your application requires more than one unit for installation reasons you can also alter the
quantity amount.
Step 11.
At this point click the “Save” button and all your details for this project will be stored. Click the
“Print” button for a paper copy of calculations. Select the most appropriate form of cooling for your
application - for example in the above case if you choose air conditioning,
click on the “Air Conditioner” button.
Step 12.
Now choose the unit most suitable and click on the “Card” button for a data sheet on the
product.