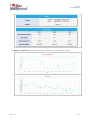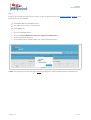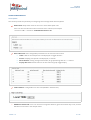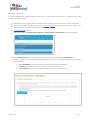
1
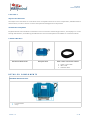
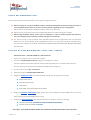
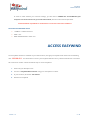
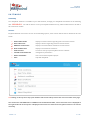
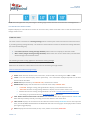
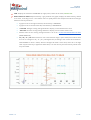
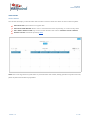
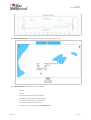
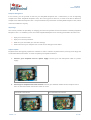
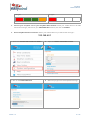
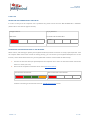
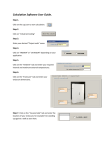
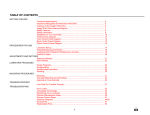
EasyWind Software Manual Software Manual Version 1.3 1 / 28 EasyWind Software Manual INDEX CONTEXT Object of this document Introduction to EasyWind COMPONENTS DETAILED COMPONENTS EASYWIND RECEPTION UNIT EASYWIND SENSOR DATA / POWER CABLE CONNECTORS INSTALLATION SENSOR CONNECTION SENSOR PLACEMENT RECEPTION UNIT CONNECTION USAGE RECOMMENDATIONS SETTING UP EASYWIND BEFORE YOUR FIRST SAMPLE Conventions and default values EASY WIND AUTO - CALIBRATION COMPASS CALIBRATION RESET FACTORY DEFAULT DAMPING USE COG TO CALIBRATE ACCESS EASYWIND SOFTWARE Availability Sections WIND CONDITIONS REAL-TIME STATS Time Selector True Wind Direction Relative to Mean True Wind Speed AMBIENT CONDITIONS BOAT CONDITIONS VIEW HISTORY Session Calendar Session Details Export Import SYSTEM CONFIGURATION Screen Options Wind Sensor Calibration Version 1.3 2 / 28 EasyWind Software Manual Identifiers Management Wifi Settings Software Update CHECKS RECEPTION UNIT POWER SUPPLY INDICATOR CONNECTING THE RECEPTION UNIT TO THE INTERNET HELP ABOUT EASYWIND RELEASE NOTES Version 1.3 3 / 28 EasyWind Software Manual CONTEXT Object of this document The object of this document is to introduce users to EasyWind and how to use its components, available features and functions, in order to ensure a correct and optimised management of the product. Introduction to EasyWind EasyWind obtains wind conditions information from an ultrasonic meteorological sensor, and displays it in a user friendly web interface, accessible by portable devices such as mobile phones and tablets via a wireless network. COMPONENTS Ultrasonic Wind sensor Reception Unit Data / Power Connection Cables ✓ ✓ ✓ Power / data cable. Micro USB. Ethernet cable. DETAILED COMPONENTS EASYWIND RECEPTION UNIT 1. 2. Lock fasteners Clasp Version 1.3 4 / 28 EasyWind Software Manual EASYWIND SENSOR 1. 2. 3. Ultrasonic sensor. Sensor nut. Base. DATA / POWER CABLE CONNECTORS 1. 2. 3. Power/data connector to sensor. Data connector from reception unit to sensor. Power connector from reception unit to support boat. Version 1.3 5 / 28 EasyWind Software Manual INSTALLATION SENSOR CONNECTION 1. Unscrew sensor base from sensor. 2. Pass power connector to sensor through the sensor base. 3. Connect power connector to sensor. 4. Screw sensor base to sensor. 1. 2. 3. 3. SENSOR PLACEMENT 1. Fix the sensor base upon a wind mast in the support boat. 2. Make sure the sensor dent exactly matches the bow of the support boat. 3. In order to ensure this, once EasyWind is connected and working, GOTO the BOAT CONDITIONS MENU, and, check that the boat’s heading (not COG) matches a manual compass reading or known bearing. 2. Version 1.3 3. 6 / 28 EasyWind Software Manual RECEPTION UNIT CONNECTION 1. Connect data cable to reception unit. 2. Connect power cable to reception unit. 3. Connect power cable to support boat (12 Volts). 1. 1. 2. 2. 3. EasyWind compass within the wind sensor should be calibrated and ready to use when acquired, however, if it the sensor has undergone non usage periods and/or heavy transport conditions, it may require a calibration procedure . Version 1.3 7 / 28 EasyWind Software Manual USAGE RECOMMENDATIONS Please follow the below recommendations for an optimal usage and results:. ✓ Before starting to use your EasyWind product, read the full EasyWind manual carefully and refer to your EasyWind support team in case you have any doubt regarding how to use EasyWind. ✓ Misuse will not be covered by EasyWind’s Support Team or any warranty. ✓ Always ensure you perfectly close your EasyWind Reception Unit while carrying out samples. ✓ When using EasyWind, please ensure you are stopped, or under a constant speed and direction; else, the sampling may be affected, and the average values altered! ✓ For security reasons, and to prevent other EasyWind interferences, change WIFI name and password before first use. Please beware sharing EasyWind passwords, as it may cause a network overload and/or confusion with samples. NOTE WELL YOUR NEW EASYWIND NAME AND PASSWORD BEFORE MODIFYING THE SETTINGS. SETTING UP EASYWIND BEFORE YOUR FIRST SAMPLE RECEPTION UNIT + PORTABLE MOBILE / TABLET DEVICE 1. Ensure your reception unit is connected to power. 2. Connect to EasyWind WIFI network using your smartphone or tablet. Once the reception unit has been powered, the wifi network may take from 15 to 60 seconds to show up . This time may vary according to the smartphone or tablet which is being used. 3. In your browser, GOTO URL 192.168.42.1 4. GOTO menu option SYSTEM CONFIGURATION . 5. Within the SCREEN OPTIONS , revise the following settings are according to your needs: 6. ✓ WIND SPEED UNITS. ✓ MAGNETIC DEVIATION. ✓ TIME ZONE. ✓ REAL-TIME STATS VISUALIZATION SETTINGS. Within the MANAGE IDENTIFIERS toggle, please give your EasyWInd an ALIAS NAME (write on the text field, and click on the UPDATE BUTTON to save). 7. Change your WIFI NETWORK name and password (Do not forget to save your settings!). ✓ DEFAULT WIFI NAME: PROVIDED IN YOUR EASYWIND DELIVERY NOTE . ✓ DEFAULT WIFI PASSWORD: easywind . NOTE WELL YOUR NEW EASYWIND NAME AND PASSWORD BEFORE MODIFYING THESE SETTINGS! Version 1.3 8 / 28 EasyWind Software Manual In order to make effective your new wifi settings, you will need to POWER OFF and POWER ON your reception unit and reconnect to your new wifi network , with the new name and password. YOUR EASYWIND EQUIPMENT IS NOW READY TO PROVIDE YOUR FIRST SAMPLES! Conventions and default values ✓ 1 SAMPLE = N Measurements. ✓ TIME = UTC. ✓ WIND SPEED DEFAULT UNITS: m/s. ACCESS EASYWIND Your EasyWind software is available via your web browser, through your EasyWind wifi network at the following URL: 192.168.42.1 . You will be able to access your EasyWind website via any tablet mobile device or PC with a wifi connection module. Follow the below steps to access EasyWind: 1. Power ON your Reception Unit. 2. Connect to EasyWind WIFI network using your smartphone or tablet. 3. In your browser, GOTO URL 192.168.42.1. 4. Welcome to EasyWind! Version 1.3 9 / 28 EasyWind Software Manual SOFTWARE Availability Your EasyWind software is available via your web browser, through your EasyWind wifi network at the following URL: 192.168.42.1 . You will be able to access your EasyWind website via any tablet mobile device or PC with a wifi connection module. Sections EasyWind Website main menu consists of the following options; each of them will be further detailed in this user Guide: ✓ WIND CONDITIONS Displays numerical values regarding real-time measurements. ✓ REAL TIME STATS Displays statistics regarding real-time measurements. ✓ AMBIENT CONDITIONS Displays real-time ambient conditions measurements. ✓ BOAT CONDITIONS Displays real-time boat conditions. ✓ VIEW HISTORY In order to view your past EasyWind session calendar. ✓ SYSTEM CONFIGURATION Configuration parameters.. ✓ ABOUT EASYWIND Learn more about EasyWind project. ✓ HELP Help with EasyWind. TIP! Clicking on the top bar at any of the windows and sections always returns the user to the index menu page . The wind sensor AUTOMATICALLY CONNECTS to the RECEPTION UNIT, and a connection icon is displayed at the right hand-side of the top bar. If displayed connection icon is disconnected, please click on it to connect manually. Version 1.3 10 / 28 EasyWind Software Manual WIND CONDITIONS This window has been designed to display real-time wind conditions: ✓ WIND DIRECTION ANGLE : In degrees. ✓ WIND CARDINAL DIRECTION : Cardinal direction. ✓ WIND SPEED : Units can be configured from the SYSTEM CONFIGURATION SECTION . REAL-TIME STATS This window has been designed to display real-time wind statistics via a graphical display. Time Selector Exclusive toggle buttons which enable the user to choose 5 measurements time-windows. Default times are 1’ / 5’ / 10’ / 15’ / 30’, these can be modified according to the users needs via the SYSTEM CONFIGURATION SECTION : ✓ 1’ : Displays wind measurements for the last minute. ✓ 5’ : Displays wind measurements for the last 5 minutes. DEFAULT VALUE . ✓ 10’ : Displays wind measurements for the last 10 minutes. ✓ 15’ : Displays wind measurements for the last 15 minutes. ✓ 30’ : Displays wind measurements for the last 30 minutes. Version 1.3 11 / 28 EasyWind Software Manual NOTE : The web application may take longer in loading larger time-frames due to the amount of managed data. True Wind Direction Relative to Mean Graphical display for wind direction relative to the mean value, which will enable users to view the wind direction change trends in time. SCIENTIFIC NOTE The mean value is calculated as a moving average, which is based upon a fixed set of the last values the sensor is providing (moving average window). The number of values which are taken to calculate the average will affect the mean the following way: ✓ Less values (shorter moving average window) : Mean reacts more rapidly to the latest trends. ✓ More values (longer moving average window) : Mean takes into account older values, and therefore will show longer and smoother trends. The following formula is being applied to calculate the moving average : value = (value + ((mean of N samples)*N )) / (N+1) Where N is the number of values taken into account for the moving average window. Further information about moving average. ✓ X AXIS : Wind direction relative to the mean value, centered at 0º , and running from -180º to +180º . ✓ Y AXIS : Time axis which displays values dynamically. The overall data displayed depends on the time selector above described. ✓ MEAN LINE : Represented by an ORANGE LINE , centered line a the 0º . ✓ MEAN VALUE : Displays the wind direction numerical mean value; ORANGE TEXT . ✓ ✓ + BUTTON : Enlarges moving average window to display a smoothened mean curve. ✓ - BUTTON : Shortens moving average window to display a more reactive mean curve. ✓ Default value for the moving average window is set at the SYSTEM CONFIGURATION SECTION . ✓ This setting is synchronised with the TRUE WIND SPEED graph below. TRUE WIND DIRECTION RELATIVE TO MEAN : True wind direction values. Represented as a BLUE LINE which will be printed dynamically according to time and relative to the mean value. ✓ LAST VALUE : Displays the numerical last wind direction measurement; BLUE TEXT . If user clicks upon the value, the TRUE DIRECTION RELATIVE TO MEAN LINE will hide from the graph. Re-displayed when clicked upon again (toggle display). ✓ PORT : Displays the minimum PORT (or left) value, relative to the mean; RED TEXT . Version 1.3 12 / 28 EasyWind Software Manual ✓ STBR : Displays the maximum STARBOARD (or right) value, relative to the mean; GREEN TEXT . ✓ WIND INTENSITY GRAPH : Represented by a grey shadow area graph; displays the wind intensity, related to its mean, according to time. This enables users to rapidly detect and compare wind direction changes related to intensity variations. ✓ If graph curves to the right-hand side, wind intensity is GROWING. ✓ If graph curves to the left-hand side, wind intensity is DECREASING. ✓ + BUTTON : Enlarges moving average window to display a smoothened mean curve. ✓ - BUTTON : Shortens moving average window to display a more reactive mean curve. ✓ Default value for the moving average window is set at the SYSTEM CONFIGURATION SECTION (MEAN WINDOW). ✓ 30 | 45 | 90 | 180 : Default view for user is 360º direction angle. Upon clicked, these values allow the user to configure a 30 | 45 | 90 | 180 degree view, according to the current wind conditions. FOR EXAMPLE: If wind is stable, direction changes will need a closer look, and a 30 or 45 angle view may be necessary to appreciate wind shifts;. If on the contrary the wind is shifty a wider view may be needed. Version 1.3 13 / 28 EasyWind Software Manual True Wind Speed Graphical display for wind speed, represented together with the mean value; which will enable the user to view the wind speed change trends in time. ✓ X AXIS : Time axis displays values dynamically. The overall data displayed depends on the time selector above described. ✓ Y AXIS : Wind speed values. Units can be configured at the SYSTEM ONFIGURATION SECTION . ✓ MEAN LINE : Mean wind speed reference, represented as an ORANGE LINE . ✓ MEAN VALUE : Displays the wind speed numerical mean value; ORANGE TEXT . ✓ + BUTTON : Enlarges moving average window to display a smoothened mean curve. ✓ - BUTTON : Shortens moving average window to display a more reactive mean curve. ✓ Default value for the moving average window is set at the SYSTEM CONFIGURATION SECTION (MEAN WINDOW). ✓ ✓ This setting is synchronised with the TRUE WIND DIRECTION graph above. TRUE WIND SPEED : True wind speed values. Represented as a BLUE LINE which is printed dynamically according to time. ✓ LAST VALUE : Displays the numerical last wind speed measurement; BLUE TEXT . If user clicks upon the value, the TRUE WIND SPEED LINE will hide from the graph. Re-displayed when clicked upon again (toggle display). Version 1.3 14 / 28 EasyWind Software Manual AMBIENT CONDITIONS This window has been designed to display real-time ambient conditions; these values may vary according to the brand and type of sensor : ✓ AIR TEMPERATURE : In Celsius Degrees. ✓ PRESSURE : In Bars. ✓ DATE: Date / UTC Time. ✓ POSITION : Latitude / Longitude. BOAT CONDITIONS This window has been designed to display real-time boat conditions; displayed variables may vary according to the brand and type of sensor : ✓ HDG : Boat Heading. Degrees. ✓ SOG : Boat Speed Over Ground. ✓ COG: Boat Course Over Ground. Degrees. ✓ PITCH / ROLL / YAW : Boat Pitch, Roll (useful and Yaw (if available). Degrees. These values are useful for the initial calibration of the sensor. Version 1.3 15 / 28 EasyWind Software Manual VIEW HISTORY Session Calendar This window will display a calendar which will include the sessions which have been carried out with EasyWind. ✓ DATE SELECTOR : Quick selection of a given date. ✓ DATE SELECTION ARROWS : Allows users to move between dates sequentially, or to select today’s date. ✓ DAY / WEEK / MONTH VIEW : Day / week / month calendar view selector. DEFAULT VALUE = MONTH . ✓ IMPORT OPTION : Described separately HERE . NOTE: Due to the large amount of data which is processed within this window; loading operation may take some time; please be patient until window is fully loaded. Version 1.3 16 / 28 EasyWind Software Manual Session Details This window provides full information about a given sample: ✓ EXPORT : Described separately HERE . ✓ REMOVE PERIOD : Delete measurements of the day. Remember to backup the information prior the deleting action. ✓ SAMPLE FREQUENCY: Time selector which enables user to view the session’s details according to a higher or lower sampling per time-period;. Window performance is affected when selecting higher sample frequencies; please be patient and wait for the window to load completely. ✓ ✓ 1 ‘ : One sample per minute in order to calculate the mean values. DEFAULT VALUE . ✓ 30’ ‘ : One sample per every 30 seconds in order to calculate the mean values. ✓ 20’ ‘ : One sample per every 20 seconds in order to calculate the mean values. ✓ 5’ ‘ : One sample per every 5 seconds in order to calculate the mean values. ✓ 1’ ‘ : One sample per every second in order to calculate the mean values. WIND CONDITIONS : Session’s wind conditions graphical display, same as the REAL-TIME STATS section. Version 1.3 17 / 28 EasyWind Software Manual ✓ MEASUREMENT MAP : Session’s positional route represented upon a map. ✓ SAMPLE DETAILS : Full details about the session: Version 1.3 ✓ Period. ✓ Station. ✓ Wind Speed Min, Mean and Max Values. ✓ Wind Direction Min, Mean and Max Values. ✓ Temperature Min, Mean and Max Values. ✓ Pressure Min, Mean and Max Values. ✓ Comments: Not yet implemented; Coming Soon! 18 / 28 EasyWind Software Manual ✓ AMBIENT CONDITIONS : Session’s temperature and pressure conditions graphical display. Version 1.3 19 / 28 EasyWind Software Manual Export Sessions can be externally exported, for backup or analysis purposes within the SESSION DETAILS SECTION . The following formats are available: ✓ EASYWIND: .ew / Own EasyWind format. ✓ CSV: .csv / CSV summary + CSV sample list. ✓ JSON: .json / Json. ✓ Click on the EXPORT button. ✓ Choose the FILE FORMAT you want your sample to be exported in. ✓ Click on the EXPORT button. * ✓ Your samples will be available within your device’s downloads folder. * NOTE : The exporting process may take a few minutes according to the amount of data within the exported session. Version 1.3 20 / 28 EasyWind Software Manual Import EasyWind from your backups sessions or from other EasyWind Reception Units (previously exported) can be imported using EasyWind’s format .ew . In order to import new sessions: 1. Click on the IMPORT button. 2. Choose the .ew file from your local device, by using the browsing window. 3. Click on the UPLOAD button. * 4. Your samples will be available within your VIEW HISTORY calendar. * NOTE : The importing process may take a few minutes according to the amount of data within the imported session. Version 1.3 21 / 28 EasyWind Software Manual SYSTEM CONFIGURATION Screen Options This section provides the possibility of configuring some settings which affect EasyWind: ✓ WIND UNITS : Drop-down menu for the user to select wind speed units. Users can also introduce their own conversion factor if desired; for example: 1 m/second * 60 = 1 m/minute. CONVERSION FACTOR = 60 . ✓ REAL TIME STATS : User configurable parameters for the real time stats section: ✓ Label : Label for the time periods to be displayed as toggle selectors. ✓ Period : Sampling time-period to be displayed, in seconds. ✓ Mean Window : moving average time window, for graph filtering with the + / - buttons. ✓ Display Blue Line : Default value for the last value line graph toggle display. ✓ TIME CONTROL : Configurable user time-zone (DEFAULT VALUE IS UTC). ✓ MAGNETIC DEVIATION : Users can introduce a magnetic deviation, given the location they are in, and this will taken into account in the sample results. Version 1.3 22 / 28 EasyWind Software Manual Wind Sensor Calibration In order to calibrate the compass within the wind sensor, an auto-calibration procedure is provided; please read carefully before proceeding: ✓ Navigate to a calm sea area, away from other boats or ferrous objects (structures or aids to navigation). ✓ Check that the weather station instrument is correctly installed on the vessel and the unit under test is powered up and connected to the reception unit. ✓ Access EasyWind Software. ✓ GOTO menu option SYSTEM CONFIGURATION / WIND SENSOR CALIBRATION / Compass Calibration. ✓ PRESS START BUTTON , the calibration screen will start flashing and will display: IN PROGRESS ... ✓ Within 2-3 minutes, slowly rotate the vessel (4-6 knots) in a circular turn, until the message changes to one of the following: Version 1.3 ○ OK / CALIBRATED : The calibration process has been successfully completed. ○ TIME-OUT : The rotation motion is too slow and has been timed out. ○ FAIL / ERROR : An error has occured; repeating the process is recommended. 23 / 28 EasyWind Software Manual RESET FACTORY DEFAULT Upon clicked, each of the buttons will reset the compass calibration, damping configurations or both to the default values. DAMPING Pitch / Roll and the compass rate gyro can use damping procedures for greater accuracy. The number of seconds taken into account in order to display the measured value can be configured within this window. USE COG TO CALIBRATE If the local magnetic inclination (dip) is severe, this can produce errors in the compass heading when the vessel is not leveled. Since the compass heading is used in the calculations for true wind, this can also result in errors in the reported true wind speed and direction (apparent wind is not affected). The WeatherStation can be instructed to use Course Over Ground (COG) provided by the internal GPS in place of the internal compass heading in the calculations for true wind. If this feature is enabled, then the COG will be used instead of internal compass heading for calculation of true wind only if the GPS has achieved a fix, and if the Speed Over Ground (SOG) is greater than 3 knots. If there is no GPS fix or if the SOG is 3 knots or less, then the internal compass heading will be used. Do be aware when using this feature that Heading and COG are not the same. Heading refers to the direction the bow of the vessel is pointing to. COG refers to the direction the vessel is travelling. While in an automobile these values are likely to be nearly identical, in a boat they can differ because of the effects of wind and current on the vessel. The rationale for using COG instead of heading in the calculations for true wind is that the difference between COG and actual heading might be less than the error in the reported compass heading due to dip. Version 1.3 24 / 28 EasyWind Software Manual Identifiers Management In this section, you can provide an alias for your EasyWind Reception Unit. Furthermore, in case of importing samples from other EasyWind Reception Units, alias can be given to them too, in order to be able to difference samples from different Reception Units. Unique identifiers are provided for each EasyWind Reception Units, which cannot be modified in any way. Wifi Settings This section provides the possibility of changing the name and password of the wifi network created by EasyWind Reception Unit. It is mandatory in the case other EasyWind Reception Units are being used within the same area. ✓ Input your new wi-fi name. ✓ Input your new wi-fi password. ✓ Make sure you remember your new wi-fi settings. ✓ Power off and on your reception unit in order for the changes to take effect. Software Update EasyWind team will regularly update the software in order to enhance its performance, solve any minor bugs and to add extended functionalities. In order to update your EasyWind software: 1. Connect your reception unit to a power supply : Connect your mini USB power cable to a power supply. 2. Connect your reception unit to the internet : Connect your ethernet cable from the reception unit to the to an internet network connection station or router. Connected to the Internet Version 1.3 Not connected to the Internet 25 / 28 EasyWind Software Manual Led lights 3. Led lights Connect your reception unit to your EasyWind WIFI Network : GOTO your mobile device or PC WIFI connection manager, and look for your EASYWIND WIFI network, and click on CONNECT . 4. Access EasyWind Software Interface : GOTO your mobile device or pc web browser and type : 192.168.42.1 5. Access the SYSTEM CONFIGURATION MENU . 6. Open the UPDATE SOFTWARE TOGGLE . 7. Click on the UPDATE BUTTON . 8. Wait until you get a successful update message. Version 1.3 26 / 28 EasyWind Software Manual CHECKS RECEPTION UNIT POWER SUPPLY INDICATOR In order to verify that the reception unit is powered ON, please ensure that the RED POWER LED is LIGHTED. (Power LED is most interior light to the left). Enough batteries Empty batteries RED LIGHT NO LIGHT OR TILTING LIGHT Power Power CONNECTING THE RECEPTION UNIT TO THE INTERNET When ashore, and wanting to update your EasyWind software (internet connection is strictly required) and/or view the samples which have been carried out during the day, you can connect your EasyWind Reception Unit to the Internet, which will enable Internet via your EasyWind wifi network. Please follow the below steps: 1. Connect an ethernet cable (not provided) from the reception unit to the to an internet network connection station or router (not a PC). 2. Check out the reception unit’sLEDS colour code ( view LED location ): Connected to the Internet Power NOT Connected to the Internet Power Troubles connecting to the Internet? Visit our TROUBLESHOOTING section. Version 1.3 27 / 28 EasyWind Software Manual HELP This user manual and other useful tips will be available for download within this section. ABOUT EASYWIND Information about EasyWind project and partners involved. RELEASE NOTES 01/09/2014 Version 1.3 Version 1.1 ✓ P 3 : Note on connection icon, and possibility of manually connecting to sensor. ✓ P 10 : Remove sample option. ✓ P 15: Enhanced update software section. Version 1.2 ✓ ✓ ✓ ✓ ✓ ✓ ✓ ✓ ✓ ✓ ✓ ✓ New CONTEXT section. New COMPONENTS section. New CHECKS section. New USAGE RECOMMENDATIONS section. New SETTING UP BEFORE FIRST USE section. New AUTO-CALIBRATION section. New ACCESS section. New screenshot for Real Time Stats - Wind Direction. Explanation for new Degree view. New screenshot for Real Time Stats - Wind Speed. New screenshot for configuration options. Explanation for Calibration options. Version 1.3 ✓ ✓ ✓ ✓ ✓ ✓ New detailed components section. New installation section. Check section moved to the end of the document. New screenshot for Session Details / Wind conditions. Calibration section moved to System Configuration options. Extended wi-fi settings explanation. 28 / 28