1
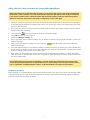
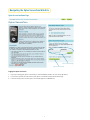
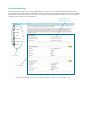
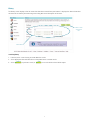
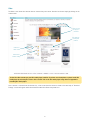
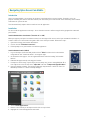
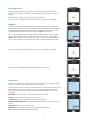
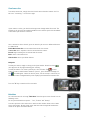
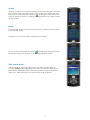
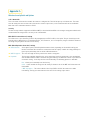
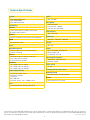
Optus SecureCam
User Guide.
Make note of your Optus SecureCam details here
Username
Password
Username
Password
Username
Password
SecureCam Technical support
1300 653 964
Billing enquiries
Small and Medium Business Customers
133 343
Consumer Customers
133 697
Website
mobile.optuszoo.com.au
SMALL & MEDIUM BUSINESS
Table of Contents
Table of Contents ....................................................................................................................................................................................................2
Package Contents . .......................................................................................................................................................................................... 3
Getting Started . ........................................................................................................................................................................................................4
Connection through Ethernet ................................................................................................................................................................. 4
Connect to Power Outlet ............................................................................................................................................................................ 4
Register your SecureCam Account . ................................................................................................................................................... 4
Adding a Wireless Connection between the Camera and Broadband Router ................................................... 5
Positioning of Camera . ................................................................................................................................................................................ 6
Navigating the Optus SecureCam Website ........................................................................................................................................6
Optus SecureCam Home Page ............................................................................................................................................................... 6
Logging into Optus SecureCam . .................................................................................................................................................. 6
Your Account Home Page ........................................................................................................................................................................... 7
Subscribers .......................................................................................................................................................................................................... 8
Adding Subscribers ............................................................................................................................................................................... 8
History ...................................................................................................................................................................................................................... 9
Searching History ................................................................................................................................................................................... 9
Video ........................................................................................................................................................................................................................ 10
Viewing Live Video . .............................................................................................................................................................................. 11
Recorded Video Events ..................................................................................................................................................................... 11
Viewing Recorded Video Events ................................................................................................................................................. 11
Archiving/Deleting Recorded Video Events ...................................................................................................................... 11
Viewing Archived Video Events . ................................................................................................................................................. 10
Schedules ............................................................................................................................................................................................................ 12
Adding Schedules ................................................................................................................................................................................. 12
Edit Schedules ........................................................................................................................................................................................ 12
Video Alerts with Optus SecureCam ............................................................................................................................................... 13
Live View ...................................................................................................................................................................................................... 13
Notification ................................................................................................................................................................................................ 13
Navigating Optus SecureCam Mobile .................................................................................................................................................. 14
Introduction . ...................................................................................................................................................................................................... 14
Installation ......................................................................................................................................................................................................... 14
Install to Handset direct from Internet (“Over-the-air” or OTA) . ................................................................... 14
Install to Handset from PC (Offline) . .................................................................................................................................... 14
Launch application ....................................................................................................................................................................................... 15
Logging in ............................................................................................................................................................................................................ 15
Camera List ........................................................................................................................................................................................................ 15
View Camera Live . ......................................................................................................................................................................................... 16
Navigation . ................................................................................................................................................................................................. 16
Main Menu ........................................................................................................................................................................................................... 16
Archive . .................................................................................................................................................................................................................. 17
History .................................................................................................................................................................................................................... 17
Other general options ................................................................................................................................................................................ 17
Appendix A: Troubleshooting your Camera . .................................................................................................................................. 18
Appendix B: Troubleshooting your Network ................................................................................................................................. 19
Appendix C: Wireless Security Guide and Options . ................................................................................................................20
SSID - Network ID ........................................................................................................................................................................................ 20
Security . ............................................................................................................................................................................................................... 20
WPA (Wi-Fi Protected Access) Settings . .................................................................................................................................... 20
WEP (Wired Equivalent Protection) Settings .......................................................................................................................... 20
Appendix D: Installing VLC media player ........................................................................................................................................ 21
Installing on PC .............................................................................................................................................................................................. 21
Technical Specifications ................................................................................................................................................................................22
2
Package Contents
3
Getting Started
To begin with, check that your product package contains all the items listed in the Package
Contents. During setup, an Ethernet connection must first be used to configure the camera
before it can be used wirelessly.
Connection through Ethernet
Use Ethernet cable to connect the Camera to your broadband router or network device. *Use
Category 5 Cross Cable when the Camera is directly connected to PC.
Keep the Ethernet cable connected until the camera setup is complete. This is when the unit
is ready to mount.
Connect to Power Outlet
Connect the power adapter to your Camera before plugging it in to the power socket. This will reduce the risk of
accidental electric shock.
Once you have connected the power adaptor to the power socket, the Camera will turn on. The front red light will light first
and the device will commence start-up. During start-up the red, blue and green lights will be on. After the Camera has
started-up it will standby for receiving an IP address. Once the IP Address has been allocated, the green light will blink
every second.
The Camera will first detect the Ethernet. If it does not connect to Ethernet, the Camera will try WLAN. During the
searching and connecting process to the wireless access point or station, the red light on the Camera will flash every
second. Until the Camera connects to the other wireless device, the red light will remain on. Operating in either Ethernet
or WLAN, the green light will flash every second to indicate that the camera is functioning properly. If the red light is
blinking, please check the network connections.
Register your Optus SecureCam Account
Note: If you have purchased multiple cameras, you will only need to complete the registration process once. In
this case, you will only need the MAC address of the camera you have connected in the ‘Getting Started’ section.
1. Open up web browser and go to http://mobile.optuszoo.com.au.
2. Click
Create New Login
icon, refer to “SecureCam Landing Page”.
3. Enter your Optus mobile number and the MAC address for your camera and click
found on the sticker on the bottom of the camera.
Next
. The MAC address can be
4. If successful, a snapshot from the camera will appear with a green “Connection Successful” box and you can continue
to the next step. If unsuccessful, a red “Unsuccessful” notice will appear. In this case, please check that your
camera is connected properly (refer to ‘Getting Started’ section) and click the ‘Test’ button. If the connection is still
unsuccessful, please contact Technical Support.
5. Fill in your account details and click
6. Fill in your subscriber deatils and click
Next
.
Next
.
7. You will be directed to a Terms and Conditions page. If you agree to our Terms and Conditions select
8. You will now be directed to your Optus SecureCam Home Page. Your purchased cameras have now been added to your
account and can be found in the Video tab.
4
Adding a Wireless Connection between the Camera and Broadband Router
Note: If the Ethernet is not available while the power is on, the Camera will search for any wireless network with
the identifier (SSID) of “default”. Once a wireless network is found, the light will turn blue, ready for installation.
If the camera is unable to detect a wireless network with the default settings, install the Camera using a wired
(Ethernet) connection, and proceed to the wireless configuration section of this guide.
1. Ensure you can have a connection to the camera via an Ethernet cable and your camera appears in the list of cameras
on the Video page of the Optus SecureCam portal. Refer to the “Connect your Camera” and “Registering your Account”
sections in this User Guide.
2. Ensure that your camera is still connected via an Ethernet cable and obtain your wireless settings from your network
administrator before proceeding.
3.
4.
5.
6.
Select Video icon
in the menu column of the Optus SecureCam web page.
Select Edit icon next to desired camera.
Expand the “Wireless Settings” tab.
Enter in your home wireless network settings, refer to “Appendix C: Wireless Security Guide and Options” of this User
Guide for assistance.
7. Please ensure your Wireless settings are correct, then click Save . Wait 30 seconds and then disconnect your
camera Ethernet cable.
8. Your camera will now restart. If your wireless network is found by the camera, the camera green status LED will flash,
and the red status LED will be solid. Please refer to Appendix A for the status LED procedure. If unsuccessful, you will
be able to view your camera wirelessly in the Video page.
9. If the camera red status LED flashes and the camera has not found your wireless network, re-connect the Ethernet
cable and restart the camera power. Please refer to “Appendix A: Troubleshooting Your Camera” of this User Guide for
the status LED procedure.
Some invalid settings may cause the system failing to respond. Change the configuration only if necessary and
consult with your network supervisor or experienced users for correct settings. Once the system has lost contact,
refer to “Appendix A: Troubleshooting Your Camera” of this User Guide for reset and restore procedures.
Positioning of Camera
Before mounting, it is recommended that you test the preferred position of the camera. This ensures that the field of view
is suitable and the camera is able to function properly. If the camera has been added successfully, remove the Ethernet
connection and position the camera as desired.
5
Navigating the Optus SecureCam Web Site
Optus SecureCam Home Page
Optus SecureCam login
Register new Accounts
Logging into Optus SecureCam
1. Log in by entering your Optus SecureCam pre-activated Mobile number as User ID and password.
2. If successful, you will be redirected to your Optus SecureCam Portal Account Home Page.
3. If unsuccessful, please contact Optus SecureCam Support on 1300 653 964.
6
Your Account Home Page
The Account Status section on this screen displays whether your account is currently enabled. When your account is
disabled, your camera will continue to communicate with the monitoring centre and the events will still be sent. However,
your subscribers will not be notified of any events. This setting is not recommended and should only be used in specific
situations, such as when you are moving house.
General information and
Optus SecureCam notices
Menu Column
Account Status
7
Subscribers
The Subscribers page shows a list of your nominated subscribers. These are the people that have access to the account
through the SecureCam portal and Mobile Application. The subscribers can also receive notifications when an event occurs
(by SMS or Email). Notification settings are also configured on this screen, simply click on the corresponding icon to
enable or disable the notification method for each subscriber.
Subscribers have full access to all Optus SecureCam functionality in both the web portal and mobile application, including
the ability to add/edit/delete other subscribers and delete video archives.
When a subscriber is added to your account, Optus SecureCam will automatically send an SMS to their Optus mobile
containing instructions on how to install the Optus SecureCam mobile application. Refer to the section “Navigating the
Optus SecureCam Mobile Application” for more details.
Nominated
Subscribers
Adding Subscribers
1. Select the Subscribers icon
2. Select
Add Subscriber
in menu column
, located at the bottom of the main body
3. Enter in the required fields and select
without saving the changes.
Save
to update the information, or
Cancel
To be set up as a subscriber, charges will apply, please see the Optus SecureCam brochure for further details.
8
to return to previous screen
History
The History screen displays all of the events that have been received from your Camera. It displays the date and time that
the event was received by the monitoring centre along with a brief description of the event.
Submit or Clear
search fields
here
Search fields
Searching History
1. If desired, enter a search string to narrow down the results.
2. Select appropriate date and time values in drop down boxes to narrow results.
3. Select
Submit
to perform a search, or
Clear
to reset the fields to their default inputs.
9
Video
The Video screen shows the cameras that are connected to your account. View the Live Stream simply by clicking on the
camera name.
Click to install
VLC player, to
view video
Drop down box
to view public
Cameras
Camera List
Select to view
Edit & Delete
Camera Settings
To view live video streams you need VLC media player installed. If you have not already done so please install VLC
media player by selecting the “Please click to install” link or the VLC media player image. Refer to Appendix D:
Installing VLC media player.
Once a camera is selected from the Cameras list, a live stream from the camera is shown in the main body. A “Recorded
Footage” section will appear with Archived and Recorded Video Events drop down lists.
10
Once a camera is selected from the Cameras list, a live stream
from the camera is shown in the main body. A “Recorded
Footage” section will appear with Archived and Recorded Video
Events drop down lists.
Viewing Live Video
Live video streams can be viewed using the portal. Select the
desired camera from the Cameras list. The live video stream will
be shown main window.
Recorded Video Events
When the camera detects motion it sends the footage to the
Optus SecureCam servers. The recorded footage can be viewed
any time through the Optus SecureCam portal or via your mobile.
Additionally, if the footage was received within the notification
schedule, it is flagged as an alarm and a notification text or
email is sent out accordingly. (Refer to section Video Alerts with
Optus SecureCam).
Your Optus SecureCam account has storage available for 30
Video Events. Once this limit is reached the oldest video event
is automatically deleted. You may “archive” 5 video events which
you don’t want to be deleted. Alternatively you may save the
video event to your mobile or PC by selecting “export”. These are
explained below.
Viewing Recorded Video Events
When the camera detects motion it sends the footage to the
Optus SecureCam servers. The recorded footage can be viewed
any time through the Optus SecureCam portal or via your mobile.
To view recorded video events:
1.
2.
3.
4.
Select the desired camera from the Cameras list.
A “Recorded Footage” section will appear within the Archived and Recorded Events drop down list.
Select the desired recorded video event from Recorded Events drop down list.
The video event will be displayed in the media player.
Archiving/Deleting Recorded Video Events
Video events maybe permanently archived. Each account is allowed a maximum of 5 archived video events (which will not
be deleted unless explicitly overwritten or deleted by a subscriber). To archive or delete video events you will need to.
1. Select the desired recorded video event from Recorded Events drop down list.
2. Select “Archive” or “Delete” according to desired outcome.
Viewing Archived Video Events
1. Select the desired archived video event from Archived Recorded Events drop down list.
2. The video event will be displayed in the media player.
11
Schedules
Schedules are used to control motion detection and notification for your Optus SecureCam account. Once you setup a
schedule (e.g. Outside Business Hours), you can then associate it with your camera(s). Optus SecureCam will then use the
schedules to automatically turn motion detection and notification on and off for any cameras they have been linked to.
Delete and Edit
existing Time
Schedules
View existing
Time Schedules
Add new Time Schedules
Note: All times are Australian Eastern Standard Time.
Adding Schedules
1. Enter Time Schedule Name.
Add
2. Select the
icon.
3. Modify time periods with the drop down boxes in the “Add Time Period” section. Select
Cancel to return to the previous screen.
Add
to save or click
Add
to save or click
Edit Schedules
1. Select
Edit
icon in the desired Time Schedule.
2. Modify time periods with the drop down boxes in the “Add Time Period” section. Select
Cancel to return to the previous screen.
How do I setup my camera to start recording events?
• Upon successfully completing the camera’s registration determine whether you want the camera to be always detecting
motion or not.
• If you only want detection set to certain timeframes you need to create a schedule for the camera to use.
• Go to the Scheduling screen and create a weekly schedule that reflects the timeframes you want the camera to be
detecting motion.
• Once you have created the schedule go to the Video screen and select the Edit icon for the camera you wish to set your
motion detection for.
• In the Update camera panel select the ‘Be Notified upon Motion Detection’ dropdown menu.
12
• If you have setup a schedule for the camera it will appear here in the dropdown for you to select it to activate motion
detection within those timeframes.
• If you wish the motion detection to be always active there is an option for this selection in the dropdown.
• Also, you should select the ‘Daily Online Check’ checkbox to ensure the camera remains active.
• Finally, in the Motion Detection window select the detection sensitivity level for the camera (Note: Medium is the
preferred setting).
How do I connect my camera via Wi-Fi to my router?
• Using the Wi-Fi settings you’ve created in the router go to the Video screen and select the Edit icon for the camera you
wish to set your Wi-Fi connection for.
• Enter the encryption security settings for the router in the Wireless Configuration panel. This will report the encryption
settings to the camera.
• Click the ‘?’ icon to the right of the Wireless Configuration heading and follow the wireless configuration setup screens
for the router you have selected.
Video Alerts with Optus SecureCam
This section describes how to configure and use the Optus SecureCam account for video alerts and events.
The Optus SecureCam service can be managed from the Optus SecureCam portal and allows the user to:
• View your Optus SecureCam camera via the web or your Optus mobile
• Set up notifications
• View recorded video events
• Archive video events
Note: It is assumed that you have correctly registered and setup your account, added your subscribers, and
configured your schedules. To correctly setup your account and camera please refer to “Getting Started” and
“Navigating your Optus SecureCam portal”.
Live View
The Optus SecureCam service allows the subscribers to view live camera streams from their camera via the web browser
or their Optus mobile. To view via web refer to “Video” section of “Navigating the Optus SecureCam portal”.
Once you have installed the Optus SecureCam mobile application on your handset you may view your camera(s) live. Once
you have logged into the application, select the camera you would like to view from the camera list. Refer to section
“Navigating Optus SecureCam Mobile”.
Notification
Email and SMS (text) notification messages can be sent whenever a video event is triggered within the notification
schedules. Each account is allowed a limit of 10 SMS notifications and unlimited Email notifications. To set up notification,
please refer to the “Subscribers” and “Schedules” sections of “Navigating the Optus Securecam portal”.
13
Navigating Optus SecureCam Mobile
Introduction
Optus SecureCam Mobile is an extension of the Optus SecureCam web site on your handset. Primarily it is for the
purpose of viewing live cameras and video archives, but also allows you to view account status and history and to disable
notification for a period of time.
This document briefly explains how to install and use the application.
Installation
You can install the application in two ways – direct from the internet or offline using the utility program that came with
your handset.
Install to Handset direct from Internet (“Over-the-air” or OTA)
When you register your Optus SecureCam account a text message will be sent to each of your nominated subscribers. It
contains a brief set of instructions along with a URL to visit from your mobile. Follow these steps.
1. Open the link using your handset web browser.
2. Click on the link “Download SecureCam”.
3. Follow prompts to on your handset to install the application.
Install to Handset from PC (Offline)
1. Log into the Optus SecureCam web portal and click “Video” and then click on the handset
image with the link “View from mobile”. See image on right.
2. At the bottom of the page is a list of supported handsets under the heading “All Certified
Models”.
3. Download the application by selecting your handset.
4. Uncompress the file using a zip file utility such as winzip or if you are running Windows XP or
later right click on the file and select “Open with” and then “Compressed (zipped) Folders”.
5. Open your handset software. The utility for Nokia and Sony handsets is called PC Suite. For
Blackberry handsets it is called “Desktop Manager”.
6. Select “Install Applications”.
7. Browse to the location you uncompressed the files in step 4 above.
8. Highlight the SecureCam application and install.
14
Launch application
Different model handsets install applications in different locations. Nokia phones
typically install it under “Installations” or “Applications”. Other phones use “Apps” or
“Games”.
The application is called “SecureCam” and will have this icon.
Click on the icon. The application will start up with the splash screen on the right.
Logging in
The first time you use the application you will be required to enter a username and
password. The username is the mobile number you used to register with. The password
is the same password you selected for the Optus SecureCam website. Once you have
entered your mobile number and password select “Login” from the menu.
Your handset will then display a message similar to “Allow network access?” telling
you the application wants to make a data connection to the internet. Select “Yes” or
“Allow”. Your handset may also prompt you to select a data connection known as an
“APN”. Select the default. A “confirming login details” window will appear like right.
If your username and/or password were incorrect this message will be displayed.
Otherwise, you will be logged in and presented with a list of cameras.
Cameras List
When you first login to the application you are presented with a list of all your cameras
as well as public webcams you have added to your favourites.
From here you can select a camera to view the camera live. Alternatively, you can select
from the menu to access all the other features. These include Main Menu, History,
Archives, and others. The menu options are shown below and explained later in the
user guide:
Main Menu: Access the Optus SecureCam main menu (see below).
History: View your Optus SecureCam account history.
Settings: Change your settings (auto login and video quality).
Enable/Disable Notification: turn SMS and Email notification on or off for a period
of time.
Video Archive: Access your video archives.
Multi View: Select multiple cameras and view them simultaneously.
Exit: Shutdown the Optus SecureCam application.
15
View Camera Live
To view the camera live, simply select the desired camera from the Cameras list. You
will see a “connecting…” screen like at right.
If your camera is online, you should see footage come through within 10 seconds. This
depends on the speed of your mobile broadband service and the speed of the broadband
service where you camera is connected.
Once a camera has been selected, press the menu key for access to additional features
as shown below:
Enable Motion Detection: turn on motion detection for this camera.
Screen Shot: take a snapshot of the live stream from the camera.
Record: begin recording the live stream from the camera.
Back: return to the Cameras list.
Video Archive: Access your Video Archives.
Navigation
To move your camera, simply use the joy stick of your handset. You will see these
icons appear in the top right confirming your selection.
icon will
To move the camera to its “home” position press the “1” button. The
appear. To move to saved locations known as “presets”, press the button 2 through to 9.
icon will appear. 2 moves to the first preset, 3 to the second, 4 to the third, etc.
The
Your camera comes configured with 8 presets equally spaced around the horizontal axis.
Press the “0” key to switch to full screen mode.
Main Menu
Go to the main menu be selecting “Main Menu” from the options menu. You will see the
following screen.
You are presented with three options – “Live”, “Archive” and “History”.
Live takes you back to the camera list to view live video. Archive shows a list of video
events and archives. History shows events that have come through and notifications –
similar to the Optus SecureCam website.
16
Archive
Selecting the archives screen presents you with a screen similar to below. It is ordered
by your camera. Under each camera there is a list of video events listed by date. If the
video event was received within a schedule an
icon will appear along side the date.
Select the archive you wish to see simply by navigating down the list of dates and press
the select button.
History
The history page shows the 10 most recent video events – listed by a short description
of the event and the date.
Expand the list to see further details including who was notified.
icon will appear. Selecting this item
If there is video associated with the event an
will take you directly to the archives screen and begin playing this archive.
Other general options
User can change the setting for options such as auto logon and video quality by
selecting “Setting” option in Main Menu and System. The check box allows user to
define whether automatically login or manually login when opening the application
(Figure 3.7.1). Video quality also can be justified from low (0) to high (10).
17
Appendix A:
Troubleshooting your Camera
The following table lists camera conditions and their corresponding LED states.
Condition
LED color
Loading system after power on
Steady red
During booting procedure
Steady green, blue and red
Detecting and setting network
Steady green and blue. Blink red till IP address is confirmed
After network is setup (system up)
Blink green every second and steady red
During the upgrade firmware process
Blink green every second and fast blink red
Enable audio
Steady blue. Disable audio will turn off blue LED.
Reset and restore
There is a button in the back side of the Network camera. It is used to reset the system or restore the factory default
settings.
RESET:
Click on the button.
RESTORE:
1. Press on the button continuously.
2. Wait for all LEDs to blink fast.
3. Free the button.
Q: Why does my camera spin when I power it on?
A: Your camera is calibrating itself, it is normal for you camera to spin and emit sounds for the first 3 minutes after
powering on.
18
Appendix B:
Troubleshooting your Network
You can find our support pages and FAQ on http://mobile.optus.com.au.
Q1: My camera is powered on and the Ethernet cable is plugged in. How do I know if my camera has an IP address?
A: Refer to Appendix A: Troubleshooting your Camera, if the network is up (system up) then Green will blink every second
and steady red, please check the following items:
1. Enable DHCP in your network.
2. Ensure the Ethernet cable is not faulty. The hub/switch port light should be on.
Q2: I have internet connectivity, but I still can’t add or view my camera. Why?
A: Please check the following items:
1. Ensure your camera has an IP address, refer to Q1.
2. Ensure UDP port 1194 outgoing is not blocked in your LAN/Wireless environment.
Q3: The camera is working fine via an Ethernet cable, but wireless won’t work. Why?
A: Please check the following items:
1. Check the setting for WLAN as the camera is 802.11g compliant only.
2. If you use an Access Point (AP), you have to choose ‘Infrastructure Mode’.
3. Please check that the settings are the same for both AP and camera. You have to check that the SSID/Preamble/
Security Options/Data Encryption/Key length/Key format/Network key are the same for both AP and camera.
4. Unplug the power card and Ethernet cable then plug in the power card again into WLAN mode.
5. Refer to Appendix C: Wireless Security Guide and Options for assistance.
19
Appendix C:
Wireless Security Guide and Options
SSID - Network ID
This is the name of the wireless network the camera is configured for. The field accepts up to 32 characters. The name
must be exactly the same as that used in the wireless section of your router, or the connection will not be established.
Note that SSID is sometimes written as ESSID.
Security
The two security methods supported are WPA and WEP, as described below. WPA is the strongest encryption method and is
recommended. Not using wireless security is not recommended.
WPA (Wi-Fi Protected Access) Settings
The camera uses a pre-shared key (PSK) for key management, and TKIP or AES as the cipher. The pre-shared key can be
entered either as Manual hex, as 64 hexadecimal (0-9, A-F) characters, or as a Passphrase, using 8 to 63 ASCII characters.
The longer the passphrase the more secure the key.
WEP (Wired Equivalent Protection) Settings
n
Authentication Select Open System, Shared Key Authentication or both, depending on the method used by your wireless connection. Not all wireless connections have this option, in which case they probably use Open System, which may also be called SSID Authentication.
n
WEP Encryption This sets the length of the key used for the wireless encryption.
n
Key Mode The key types available depend on the access point being used. Key generation is not standardized and can differ between brands. Check that the generated keys are identical to those in your wireless connection setting - if not they must be entered manually. The following options are available:
Hex – allows you to manually enter the hex key.
ASCII – In this method the string must be exactly 5 characters for 64-bit WEP and 13 characters for 128-bit WEP.
4 WEP key options – This selects which of the 4 keys (HEX or ASSCII) the camera uses when transmitting. The key you entered must be the same as the setting in your router.
20
Appendix D:
Installing VLC media player
Installing on PC
VLC media player is required to view camera streams from the web. To install
VLC media player.
1.
Click the VLC media player link in the Video section of the Optus
SecureCam platform.
2. Select to save file (please note where the file is saved to).
3. Open/run the file downloaded.
4. Select the desired language then “OK”.
5. Select “Next”.
6. You will be directed to a VLC media player terms and conditions page.
If you agree to the conditions select “I Agree”.
7. Select “Next”.
8. Select “Install”.
9. Congratulations you have successfully installed VLC media player,
select “Finish” to complete installation process.
21
Technical Specifications
Audio
System
n
n
n
CPU: Vivotek VVTK-1000
RAM: 32MB SDRAM
ROM: 4MB FLASH ROM
n
Microphone
Networking
n
n
n
Protocol
n
TCP/IP, HTTP, SMTP, FTP, DDNS, UPnP, Telnet,
NTP, DNS, DHCP and RTSP
n
Three color LEDs
Dimension
10 baseT or 100 baseT Fast Ethernet auto negotiation
WLAN
n
Omni-directional
Frequency: 50 – 16000Hz
S/N ratio: more than 60dB
LED indicator
Physical
n
AAC, GSM-AMR
n
100mm(D) * 110mm(W) * 120mm(H)
Weight
802.11g wireless LAN
Video
n
Algorithm supported
Power
n
n
MPEG4 (simple profile) for streaming video
JPEG for still image
n
n
n
Features
n
n
n
Adjustable image size, quality and bit rate
Time stamp and text overlay
3 motion detection windows
n
n
Temperature: 0-50°C/32-122°F
Humidity: 95%RH
EMI & Safety
Up to 30/25 frames at 160x120
Up to 30/25 frames at 320x240
Up to 30/25 frames at 640x480
n
CE, FCC
Viewing system requirement
Camera Specification
n
n
n
n
n
Input: 100-240VAC, 50/60Hz, 0.5A
Output: 12VDC, 1.5A
Consumption: Max 7 W
Operating Environment
Resolution
n
n
n
NET. 271g
Operating system
1/4 inch color CMOS sensor
Resolution: 640x480
1.5Lux/F2.0
AGC, AWB, AES
Electronic shutter: 1/60 ~ 1/15000 second
n
Microsoft Windows 98SE/ME/2000/XP
Browser
n
Internet Explorer 5.x or above
Lens
n
Fixed focal with fine tuning, 4.0mm, F2.0
SingTel Optus Pty Limited ABN 90 052 833 208 trading as Optus Communications, 1 Lyonpark Road, Macquarie Park NSW 2113 Australia. Optus, the Optus logo
and ‘yes’ are trademarks of SingTel Optus Pty Limited. Optus Communications’ services are provided by Optus Networks Pty Limited ABN 92 008 570 330 and
Optus Mobile Pty Limited ABN 65 054 365 696.
SecureCam_User_Guide_05/08
22