1
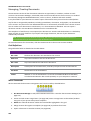
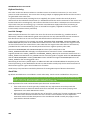
MYOB EXO BUSINESS
User Guide
EXO
BUSINESS
MYOB ENTERPRISE SOLUTIONS
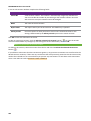
Important Notices
This material is copyright. It is intended only for MYOB Enterprise Solutions Business Partners and their customers. No
part of it may be reproduced in any way without the prior permission of MYOB.
MYOB has carefully prepared this material but excludes (to the extent allowed by legislation) any direct or indirect
liability arising from errors or omissions or from its use. Any case studies (including the application of particular accounting
standards or legislation) are representative examples only, and will not directly apply to the user’s own circumstances. They
are not a substitute for professional advice. Users must check that third party materials, for example from the IRD and the
ATO, are current at the time they are used.
Trademark Rights
MYOB is an internationally registered trademark of MYOB Technology Pty Ltd. The use of this trademark and MYOB’s other
trademarks is prohibited without prior consent. Other products mentioned may be service marks, trademarks or registered
trademarks of their respective owners.
Table of Contents
Getting Started _________________________________________________________ 1
MYOB EXO Business Overview ...................................................................................................... 1
Features of the System ................................................................................................................. 1
MYOB EXO Business Utilities ......................................................................................................... 2
Basic Keyboard Navigation ............................................................................................................ 4
Advanced Keyboard Navigation .................................................................................................... 5
Searching ....................................................................................................................................... 8
Grids ............................................................................................................................................ 10
Business Flow Menus .................................................................................................................. 12
Archiving Data ............................................................................................................................. 13
Help Functions ............................................................................................................................ 16
Reading Menu Paths in Topics .................................................................................................... 18
Setting Up ____________________________________________________________ 19
System Setup ............................................................................................................................... 19
Staff and Logging In ..................................................................................................................... 21
Migrating Data to EXO Business .................................................................................................. 23
Extra Fields .................................................................................................................................. 24
Custom Buttons........................................................................................................................... 28
Event Log ..................................................................................................................................... 29
Business Alerts ............................................................................................................................ 33
EXO URL Protocol ........................................................................................................................ 41
Grid Settings ................................................................................................................................ 44
Geolocation Settings ................................................................................................................... 45
Sending Emails ............................................................................................................................ 47
EXO Email Service ........................................................................................................................ 51
Configuration .............................................................................................................................. 55
Head Office and Branch Accounts............................................................................................... 86
Working with Accounts __________________________________________________ 90
Debtors ........................................................................................................................................ 90
Creditors ....................................................................................................................................105
Non Accounts ............................................................................................................................116
Contacts ....................................................................................................................................120
Common Account Functions .....................................................................................................129
Working with Stock ____________________________________________________ 156
Stock Overview..........................................................................................................................156
Stock Master .............................................................................................................................157
Stock Search ..............................................................................................................................158
Setting up Stock Groups ............................................................................................................159
Setting up Stock Item Details ....................................................................................................162
Alternate Supplier Codes and Costs ..........................................................................................179
Performing Stock Take ..............................................................................................................181
Dealing with Stock Movements ................................................................................................197
iii
MYOB EXO Business User Guide
One-Off Stock Items ..................................................................................................................199
Stock Serial Numbers ................................................................................................................202
Style, Size, Colour ......................................................................................................................212
The General Ledger ____________________________________________________ 225
General Ledger Overview ..........................................................................................................225
Setting up GL Accounts .............................................................................................................227
Setting up GL Control Accounts ................................................................................................240
Creating GL Batches ..................................................................................................................243
Reconciling GL ...........................................................................................................................247
Generating GL Reports ..............................................................................................................247
Maintaining GL Budgets ............................................................................................................268
General Ledger Transactions ....................................................................................................278
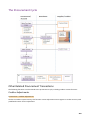
The Procurement Cycle _________________________________________________ 304
Other Related Procurement Transactions ................................................................................304
Working with Purchase Orders .................................................................................................306
Generating Creditor Invoices ....................................................................................................326
Inwards Goods ..........................................................................................................................345
Dealing with Creditor Payments ...............................................................................................349
Handling Reconciliation ............................................................................................................352
The Sales Cycle________________________________________________________ 353
Sales Cycle Overview .................................................................................................................353
Generating Sales Orders ...........................................................................................................357
Generating Debtor Invoices ......................................................................................................386
Receiving Debtor Payments ......................................................................................................400
Debtors Banking Batches ..........................................................................................................407
Credit Notes ..............................................................................................................................414
Debtor Adjustments ..................................................................................................................414
Sales Territories and Budgets....................................................................................................416
Sales Analysis ............................................................................................................................422
Pricing and Discounting _________________________________________________ 428
Overview ...................................................................................................................................428
Price Policies..............................................................................................................................435
Debtor Price Policy Groups .......................................................................................................436
Prompt Payment Discounts ......................................................................................................439
Sell Prices ..................................................................................................................................442
Scheduling Price Changes..........................................................................................................444
Price Rules .................................................................................................................................449
MYOB EXO Finance ____________________________________________________ 451
MYOB EXO Finance Overview ...................................................................................................451
Bank Reconciliation ...................................................................................................................451
Creditors Payment Processor ....................................................................................................476
Direct Debits..............................................................................................................................493
iv
Table of Contents
Taxation _____________________________________________________________ 499
Automatic Tax Rate Hierarchy ..................................................................................................499
Tax Setup ...................................................................................................................................500
Tax Rate Hierarchy Setup ..........................................................................................................503
Tax Reports ...............................................................................................................................505
Manufacturing ________________________________________________________ 506
About Manufacturing ................................................................................................................506
Setting up Bills of Materials ......................................................................................................507
Processing Builds .......................................................................................................................514
Works Orders ............................................................................................................................517
Time Billing ................................................................................................................................523
Document Manager____________________________________________________ 527
Accessing the Document Manager ...........................................................................................527
Importing and Exporting Documents ........................................................................................528
Document Manager Window ....................................................................................................529
Bulk Sending Documents ..........................................................................................................531
Creating Merge Letters .............................................................................................................533
Merging Account Data with an Existing Template ....................................................................535
Reporting ____________________________________________________________ 536
Running a Report ......................................................................................................................537
Clarity Report Browser ..............................................................................................................539
Clarity Report Designer .............................................................................................................540
Dashboards ...............................................................................................................................541
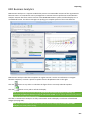
EXO Business Analytics ..............................................................................................................551
Index _______________________________________________________________ 563
v
Getting Started
MYOB EXO Business Overview
MYOB EXO Business is more than just an accounting solution. It is a complete business system allowing a
company to centralize virtually all business information into one completely integrated solution. It
eliminates the need for separate marketing databases through advanced contact management features
and integrates a powerful document manager with Microsoft Office applications including email.
The software is designed for small to medium sized companies and is a completely integrated solution with
all core modules in one package. Since it is an open system it is possible to integrate third party software
applications to extend MYOB EXO Business’s functionality.
Technical Overview
MYOB EXO Business is a seamlessly integrated suite of business management, relationships management
and accounting software applications developed for the needs of growing and ever changing small and
medium businesses. It features a 32-bit, multi-tiered, SQL Windows system written using Borland Delphi.
Data is stored in a readily accessible industry standard format making it available to the majority of popular
SQL-based business intelligence tools and productivity tools such as Microsoft Office products. The data is
protected by comprehensive database and application security protocols.
Features of the System
Some of the important features of MYOB EXO Business are listed here.
Built on Industry Standard Platform
MYOB EXO Business is built on the advanced and popular industry standard network operating system,
Microsoft Windows.
Offers Reliability and Data Integrity
The client/server SQL technology that MYOB EXO Business uses avoids the common causes of data
corruption. This results in data security, data integrity, scalability, reliability and performance.
Provides High Scalability
The system can work well with up to 400 concurrent users. Its scalability is only dependent on the
hardware that it runs on.
Allows Customisation
The software is highly adaptable and can fit into many different situations. Tools such as Menu Designer,
Report Writer and User Defined Forms allow customisation to suit your business needs.
Contains Easy-to-Use Interface
The MYOB EXO Business design is clear and simple. This makes the system easy to learn and operate.
Integrates with Other MYOB Products
MYOB EXO Business integrates with the MYOB EXO Payroll product so that payroll data can be posted to
the EXO Business General Ledger, and pay information sourced from the EXO Job Costing timesheet data
can be posted to EXO Payroll.
Note: Information on setting up EXO Business to integrate with EXO Payroll is available in the Help
for the EXO Job Costing module.
1
MYOB EXO Business User Guide
Integrates with Third Party Tools
MYOB EXO Business supports Microsoft SQL Server, which is an industry standard system. It also has the
facility to store documents against Debtor or Creditor accounts. Thus documents such as quotes and
account follow-up letters can be safely stored.
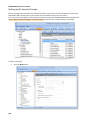
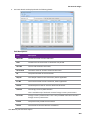
MYOB EXO Business Utilities
MYOB EXO Business offers many utilities to facilitate processing of transactions. The following summarises
their function and how to locate them for further evaluation.
Debtors
Invoice Number Search
Utilities > Debtors Utilities > Invoice number search
Searches for either Debtor or Creditor invoices, and allows viewing and reprinting
Prompt Payment Discount Calculation
Utilities > Debtors Utilities > Prompt Pay Discount Calculation
Manages the discount mechanism for debtor prompt payments
Price Policies and Price Rules
Utilities > Debtors Utilities > Setup Price Policies
Sets up pricing policies for stock items or stock groups, and applies then to accounts or account groups
Invoice Batch Printing
Reports > Debtors Reports > Debtor Invoice Batch Printing
Allows batch printing of invoices, for example after warehouse order supply
Statement Batch Printing
Reports > Debtors Reports > Debtor Statements
Performs debtor statement printing
Creditors
Remittance Batch Printing
Reports > Creditor Reports > Creditor Remittances
Allows batch printing of remittance advices
2
Getting Started
Sales Orders/Purchase Orders
Archive Sales Orders / Purchase Orders
Utilities > Sales Order Utilities > Archive Sales Orders
Used to archive old sales order and purchase order transactions (see page 13) to help maintain an efficient
system. Normally these records are no longer required once invoices have been created.
Stock
Price Change Scheduler
Utilities > Stock Utilities > Price Change Scheduler
Allows new prices to be preloaded, ready to be instigated at a later date. This function should be compared
with Price Policies which can also support time-bound pricing.
Price Update Utility
Utilities > Stock Utilities > Price Update Utility
Allows pricing structures to be updated by formula, including rounding
Setup Stock Serial
Utilities > Stock Utilities > Setup Stock Serial Numbers
Used to initially set up serial numbers and check and edit if needed. Serial number tracking is an optional
feature that can be enabled.
Serial Stock Batch Codes
Utilities > Stock Utilities > Setup Stock Batch Codes
Used to initially set up batch numbers, and check and edit if needed. Batch number tracking is an optional
feature that can be enabled.
Serial Number Tracking
Utilities > Stock Utilities > Serial Number Tracking
Serial numbers can be tracked directly on the stock item master, (Account> Stock> [search for item]> Serial
Nos), or accessed from its own Serial Number Tracking menu. This gives the ability to show how and when
the stock item came into the system (e.g. creditor/ purchase order/ inwards goods reference), and how and
when it left the system (e.g. Debtor/ Sales order), and internally (e.g. works order), depending on the level
of tracking detail selected for the stock item.
General Ledger
GL Batch Review
Utilities > General Ledger > GL Batch Review
Allows GL batches to be reviewed (see page 287) by account range, period, dates or staff, and printed as
necessary.
3
MYOB EXO Business User Guide
Reconcile GL Account
Utilities > General Ledger > Reconcile Account
Allows transactions in a GL account to be reviewed and marked as reconciled.
System
Data Verification
Utilities > Data Verification
Performs various tests on transactions (see page 57) to highlight issues.
Email Sender
Utilities > Send E-mail
Manages the user setup for the built in email sender (see page 47), which works with in-house mail servers.
Menu Designer
Setup > Setup Menus
Used to manage user menus (see page 77). Normally reserved for the system administration or
implementer
Document Manager
Utilities > Document Manager
Manages the storing and attaching of documents (see page 527) to Debtors and other accounts.
Basic Keyboard Navigation
MYOB EXO Business can be navigated by keyboard or mouse, however it’s normal to use a combination of
both options. Both standard Windows and MYOB EXO Business-specific keyboard conventions are used.
Standard Windows keyboard conventions:
4
Key
Use
TAB
Moves from field to field, column to column
SHIFT+TAB
Moves backwards from field to field, column to column
ENTER
On open windows, automatically selects the OK button.
ARROW KEYS
Moves around a grid (see page 10), or up and down a list
PgUp, PgDn
Moves between the ‘sections’ of some windows, such as moving from the
invoice header, to the body, to the end
Getting Started
MYOB EXO Business-specific keyboard conventions
Key
Use
F1
Help
F3
Debtor Search
F4
Sales order search window
F6
Debtors invoice entry
F7
Debtors Invoice reprint window
F5/F10
Window specific functions
Advanced Keyboard Navigation
MYOB EXO Business can be navigated by keyboard or mouse, commonly both options are used. Both
advanced Windows and MYOB EXO Business-specific keyboard conventions are used.
Advanced Windows keyboard shortcuts
Key
Use
CTRL+TAB
Moves though Tabs from left to right.
SHIFT+ CTRL+TAB
Moves through Tabs from right to left.
ALT+F4
Closes current MYOB EXO Business window.
ARROW KEYS
Moves around a grid, or up and down a list.
PgUp, PgDn
Moves between the ‘sections’ of some windows, such as moving from
the invoice header, to the body, to the end.
MYOB EXO Business main screen keyboard shortcuts
Key
Use
ALT+(underlined
letter)
Executes assigned function of that control. Normally field labels with underlined
letters indicate that letter + ALT key will activate that control box’s or button’s
function. For example, pressing ALT+C will result in the same action as clicking
the
button.
F3
Opens the Debtor Search window.
F4
Opens the Sales order search window.
F6
Opens the Debtors Invoice Entry window.
F7
Opens the Debtors Invoice reprint window.
5
MYOB EXO Business User Guide
Debtors Invoicing window keyboard shortcuts
Key
Use
F5
Opens the Debtor Account Details window.
F6
Opens a second Debtors Invoice Entry window.
F7
Opens the Debtors Invoice reprint window.
F9
Opens the Sales Messages window.
F10
Opens the Extra Delivery Addresses window.
F11
Opens the default Delivery Address window.
Insert
Inserts a blank line.
CTRL+O
When a line item is selected, creates a One Off Stock Item.
CTRL+L
When a line item is selected, opens the Stock Level Enquiry window.
CTRL+N
When a line item is selected, creates a new Narrative.
CTRL+’
When in a Narrative window, opens the list of Common Phrases.
Creditors Invoicing window keyboard shortcuts
Key
Use
F5
Opens the Creditor Account Details window.
F10
Opens the Goods Receipt Search window.
F11
Toggles between GL and STOCK mode.
CTRL+F2
When a line item is selected, opens the Invoice Line Periscope.
Sales Order Entry window keyboard shortcuts
Key
Use
F4
Opens the Sales Order Search window.
F5
When account details are is selected, opens the Debtor Account Details window.
When a line item is selected, opens the Stock Account Details window.
6
F10
Opens the Extra Delivery Addresses window.
Insert
Inserts a blank line.
CTRL+F2
When a line item is selected, opens the Sales Order Line Periscope.
Getting Started
CTRL+O
When a line item is selected, creates a One Off Stock Item.
CTRL+L
When a line item is selected, opens the Stock Level Enquiry window.
CTRL+N
When a line item is selected, creates a new Narrative.
CTRL+’
When in a Narrative window, opens the list of Common Phrases.
Purchase Order Entry window keyboard shortcuts
Key
Use
F5
When account details are is selected, opens the Creditor Account Details window.
When a line item is selected, opens the Stock Account Details window.
F10
Opens the Extra Delivery Addresses window.
Insert
Inserts a blank line.
CTRL+F2
When a line item is selected, opens the Purchase Order Line Periscope.
CTRL+O
When a line item is selected, creates a One Off Stock Item.
CTRL+L
When a line item is selected, opens the Stock Level Enquiry window.
CTRL+N
When a line item is selected, creates a new Narrative.
CTRL+’
When in a Narrative window, opens the list of Common Phrases.
7
MYOB EXO Business User Guide
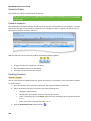
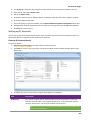
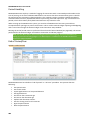
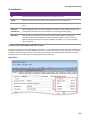
Searching
Search windows follow a common style, regardless of what is being located. This includes search windows
for debtors, creditors, general ledger and stock accounts, as well as sales orders, purchase orders, bills of
materials, contacts, works orders, and inwards goods processes.
1. To narrow the search, enter part of the name in the Search Key. Alternatively other related details
may be entered into the Search Key field, (such as the account number or the Alphacode in an
account search). You can search on:
•
Account number, Code and Name
•
Any part of the debtor address
•
Phone number
•
Contact name
•
Balance
Note: you cannot search by Primary Group in this search.
2. Check any options relevant to the search. For example, Extended search searches more fields (such
as address, or extra search fields (see page 10)), however it is slower. If Extended search is not
checked, only basic fields are searched such as the account name and number. Check the Include
inactive accounts checkbox to include both active and inactive accounts in your search.
3. Click Search. This provides a list of items that match the search criteria.
4. To select an item and view more detail, use the Up and Down arrow keys and press Enter, or
Double-Click on the item using the mouse.
When inside a transaction entry grid, and an item such as an account or stock item needs to be found,
enter a question mark ‘?’ and press TAB to return all the items in a search list. A partial search is also
possible in place of the question mark, e.g. enter ‘FISH’ and press TAB to return all items starting with FISH.
Note: Stock Item Search supports three methods: Exact Phrase, All Words and At Least One.
8
Getting Started
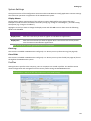
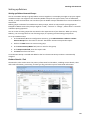
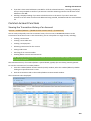
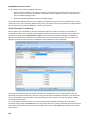
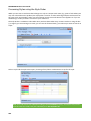
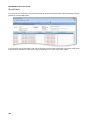
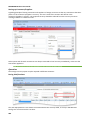
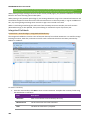
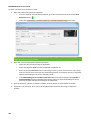
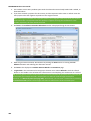
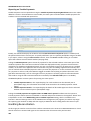
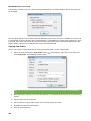
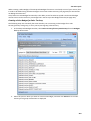
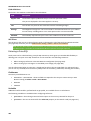
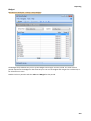
Advanced Search
The advanced search feature is available on several windows; in some cases it is immediately available, and
in others it can be accessed by selecting Advanced Search from the Search Mode control or from the File
menu to replace the standard search functions with the advanced functions.
Note: As its name implies, this is an advanced search function - it will take some experimentation
before you are familiar with the complex options available. If you have a large customer base, we
recommend you familiarise yourself with this tool; used correctly, it can significantly refine search
results.
1. To begin configuring the search parameters, click on the Filter button to add a condition or a group,
or click press the button to add a new condition. The Filter button also provides a means to clear
all the search parameters from its popup menu.
2. The red items are boolean functions. Using the “AND” operator between terms retrieves
documents containing both terms. “OR” retrieves documents containing either term. “NOT”
excludes the retrieval of terms from your search. Click on this to choose the function from the
popup menu.
3. The ellipsis button is used to add a condition, add a group or remove a row.
4. The green, maroon and blue text items define the search parameter. The green and maroon items
are interactive and will open a popup menu when clicked. The green item is the actual field
definition, the maroon is a conditional argument and the blue text is a user-defined variable. The
blue text can be compared to the Search Key field in the standard search window.
Note: When using the “like” argument, the percent character (%) is used as a wildcard. For
example, to search for all Debtors whose names begin with “A”, enter “Name like A%”.
5. Add additional filter criteria by clicking the button at the bottom of list.
6. The search result is displayed below - note how this has isolated the result to only one item in this
example, as the search was well defined.
Tip: The best way to get familiar with this advanced search is to experiment with a few search
parameters. Searching will not have any impact on EXO Business, and if you can find the time to
become initially proficient with this search method, it could save you valuable time when a fast result
is required.
9
MYOB EXO Business User Guide
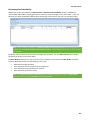
Adding Search Fields
Profile settings can be used to add fields to search windows. A variety of Extra ... search fields profile
settings are available in the EXO Business Configurator, e.g. Extra creditor account search fields, Extra
stock items search fields, Extra debtor account transactions search fields, etc. To add extra search fields,
enter text into these settings in the format Field=Caption=SearchBehaviour, where:
•
•
•
Field is the name of the database field you want to add
Caption is the name to appear for the field on the search window
SearchBehaviour is a string of characters that determines how to search on the field. Available
characters are:
• G = show this field as an optional visible column in the search grid.
• S = add this field as part of the select statement.
• W = make this field value a condition in the WHERE clause.
• U = force a character to uppercase for comparison. (String Fields)
• E= use Exact match (=) in the where clause rather than LIKE. (String Fields)
Multiple search fields can be specified, separated by commas. The =Caption and =SearchBehaviour values
are optional; if no =SearchBehaviour option is specified, the default behaviour is GSWU.
For example, entering “FAX=Fax Number, EMAIL=Email Address” into the Extra debtor account
transactions search fields setting will add fields for fax number and email address to the Debtor search
window.
Note: Extra search fields added to search windows in this way are searched on when Extended
search is ticked. They are also available for selection when building a query on the advanced search
interface.
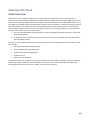
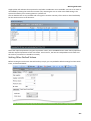
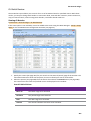
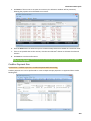
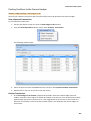
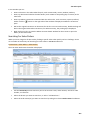
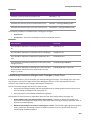
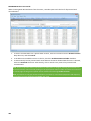
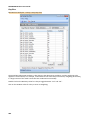
Grids
Exogrids are used in many parts of MYOB EXO Business. They simplify and standardise the way information
is displayed, and control the columns that are visible and how they are sorted. The depth of functionality
may vary by grid.
10
Getting Started
Clicking on a column header name will sort the grid by that column (Code in the example above). Dragging
and dropping a column name header will re-order the grid (e.g. you can move Name to be the first column
in the grid).
Right-clicking anywhere on the column headers opens a popup menu containing the following options:
•
Save column settings – retains the current settings for this grid on the workstation.
•
Hide this column - as the function implies, the hides the selected column. This is useful for hiding
information that is not relevant to this list. Individual columns can be reactivated by using the
Select visible columns command.
•
Restore default column settings – resets all changes back to the ‘factory default’.
•
Select visible columns – determines the columns to display in the grid. Some optional columns are
not enabled by default, as they may not suit all users.
•
Find – prompts for search text, and searches the grid for a matching entry.
•
Grid ordering – provides two options, to ‘Lock Grid Ordering’ or to ‘Revert to Natural Order’. This
prevents automatic reordering when keying-in transactions.
•
Copy to clipboard – copies the contents of the grid to the Windows clipboard, to be pasted into a
spreadsheet or similar application (using the Edit > Paste menu in most applications).
•
Custom filter – advanced option to apply custom SQL statements to the grid.
To set column widths, place the cursor directly over a column boundary and the cursor will change to the
icon. You can drag the column boundary to the appropriate width then release the mouse button to set
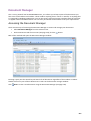
it. To set this width as default, you will need to save your settings.
Double-clicking an item on the grid body will usually open the item.
Notes
•
Clicking on a column name will sort the grid by that column (in ascending order). Clicking on the
column a second time will reverse sort (descending order).
•
Holding down the SHIFT key while clicking on a second column allows multiple sorts (e.g. sort by
Primary Group, then by Name)
•
Custom filters are saved in the computer’s registry so are unique to a workstation login.
•
Not all windows use Exogrids, but most search grids an some transaction entry windows do.
•
Grid settings, e.g. column widths and ordering, are specific to each computer. However, they can
be saved to the EXO Business database (see page 44), then restored or replicated on other
computers.
11
MYOB EXO Business User Guide
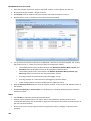
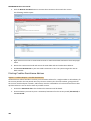
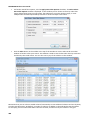
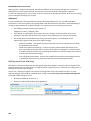
Business Flow Menus
On opening MYOB EXO Business, you are presented with this business flow menu. This menu has buttons,
menus and links to user defined functions, as well as graphical elements providing a custom look and feel of
the interface. Business Flow Menus are optional - if no Business Flow Menu is specified, the EXO Business
interface will contain only the main dropdown menu.
Default Business Flow Menus
Business flow menus can be created and customised using EXO Business Config (see page 80). A range of
default menus are supplied with EXO Business - these menus are designed to suit the needs of staff
members at various levels in your organisation. Menus are assigned to user in the Configuration Assistant
at Staff > Users.
The default menus contain a various options and sub-menus, which are divided across the following tabs:
12
•
Task Scheduler - contains the Task Scheduler function that allows you assign activities to EXO
Business users.
•
Sales - contains options and reports relating to Debtors and the Sales Cycle.
•
Purchases - contains options and reports relating to Creditors and the Sales Cycle.
•
Stock - contains options and reports relating to Stock items, including stocktaking and Bills of
Materials.
•
General Ledger - contains options and reports relating to the General Ledger.
•
End of Month - contains a series of functions that should be performed to carry out the End of
Month process.
•
Reports - contains links to EXO Business reports and Dashboards.
Getting Started
•
Utilities - contains helpful utilities and setup functions for each major area of the EXO Business
system.
•
Education Centre - displays the Education Centre website, which provides a central point of access
to all EXO Business documentation.
The exact combination of available tabs and options depends on the role of the staff member that each
default menu is designed for.
Archiving Data
Archiving functions are used to remove all unwanted records and help maintain an efficient organisation of
data. Archived records are taken away from the primary database tables and stored in separate archived
database tables. Archiving functions provide the following benefits:
•
Maintains a fast and efficient data structure, making data retrieval easy.
•
Provides a more sophisticated search selection, ensuring correct extraction of records to be
archived.
•
Marks records as deleted, thereby eliminating unwanted records.
Sales Orders, Purchase Orders and Stock Transfer Requests (Distribution Advantage) have archiving
functions designed in a similar fashion.
The General Ledger has its own archive functionality, which works differently.
Tip: As the archived records are stored in separate archive tables, they can be retrieved by creating a
simple Clarity report using the fields from archive tables and view the archived records from Clarity.
Archiving Sales Orders
Utilities > Sales Order Utilities > Archive Sales Orders
Select options to search by, then click Load Orders to display all Sales Orders that match the search criteria.
Click Archive Orders to archive all Sales Orders listed. You are asked to confirm the operation. Click Yes.
Note: Archived records are stored in the separate database tables that were set up for storing the
archive records. Archived Sales Orders are stored in SALESORD_HDR_ARCHIVE and
SALESORD_LINES_ARCHIVE.
13
MYOB EXO Business User Guide
Ticking the Mark as Deleted only option means that the listed Sales Orders will not be archived to a
separate table; instead they are stored in the primary database table (SALESORD_HDR) and are identified
by the value 1 coded for the Process Finalisation field. This signifies that the record is marked as deleted
and will not appear in any EXO Business grids.
Archiving Purchase Orders
Utilities > Purchase Order Utilities > Archive Purchase Orders
Select options to search by, then click Load Orders to display all Purchase Orders that match the search
criteria.
Click Archive Orders to archive all Purchase Orders listed. You are asked to confirm the operation. Click Yes.
Note: Archived records are stored in the separate database tables that were set up for storing the
archive records. Archived Purchase Orders are stored in PURCHORD_HDR_ARCHIVE and
PURCHORD_LINES_ARCHIVE.
Ticking the Mark as Deleted only option means that the listed Purchase Orders will not be archived to a
separate table; instead they are stored in the primary database table (PURCHORD_HDR) and are identified
by the value 1 coded for the Process Finalisation field. This signifies that the record is marked as deleted
and will not appear in any EXO Business grids.
14
Getting Started
General Ledger Archives
EXO Business Configurator > Utilities > General Ledger > Utilities > Consolidate GL tab
Select the period to consolidate up to, then click the Consolidate button. You are asked to confirm the
operation. Click Yes.
The consolidated GL Transactions are stored in table GL_TRANS_ARCHIVE.
Note: The Delete tab on this screen contains another function to delete the GL consolidates. This
function differs from the Consolidate function by completely deleting the records from the system,
making them non-retrievable, whereas the Consolidate function stores the consolidated records in a
different GL archive table.
15
MYOB EXO Business User Guide
Archiving Stock Transfer Requests (DA)
EXO Business Distribution Advantage > Utilities > Archive Stock Transfer Requests
Stock Transfer Requests are a feature of the MYOB EXO Business Distribution Advantage module. They can
be archived in the same way as Sales Orders and Purchase Orders.
Select options to search by, then click Load Requests to display all Stock Transfer Requests that match the
search criteria.
Click Archive Requests to archive all Stock Transfer Requests listed. You are asked to confirm the operation.
Click Yes.
Note: Archived records are stored in the separate database tables setup for storing the archive
records. Archived Stock Transfer Requests are stored in STOCK_REQUESTS_ARCHIVE and
STOCK_REQUESTLINES_ARCHIVE.
Ticking the Mark as Deleted only option means that the listed Stock Transfer Requests will not be archived
to a separate table; instead they are stored in the primary database table (STOCK_REQUESTS) and are
marked as deleted, so they will not appear in any EXO Business grids.
Help Functions
MYOB EXO Business provides several online help functions, in addition the written white papers and user
manuals:
16
•
On-line help. This can be accessed by selecting the Help > On-line Manual menu option or by
pressing F1.
•
Tool Tips are shown when hovering over an icon, a section, an option or a setting.
•
Window help at the bottom of most windows can be accessed by clicking the
right of the window.
button on the top
Getting Started
Additional Reading
For more in-depth understanding of key areas, detailed white papers and manuals are available, including:
•
Bank Reconciliation
•
BOMs and Stock code Enhancements
•
Debtors Banking Batches
•
GL Movements and Period Handling
•
GL Report Batches
•
GL Report Writer
•
Inwards Goods Receipting/Costing
•
Key window Controls
•
One-off Stock Items
•
Payment Processor
•
Payment Types and EFTPOS Integration
•
Period Handling and Transaction Aging
•
Pricing and Discount Policies
•
Shortcut Keys in MYOB EXO Business
•
Stock Integration
•
Stock Serial Numbers
•
Stock Take
•
Stock Valuation
•
Taxation Features
Users Manuals are also available for MYOB EXO Business add-on modules, including Fixed Assets,
Distribution Advantage, Clarity, Job Costing and POS.
17
MYOB EXO Business User Guide
Reading Menu Paths in Topics
When a topic refers to a window it will begin with a Menu Path navigation ribbon. Some windows require a
number of mouse clicks, and / or actions before they can be accessed, hence the need to include to ribbon
to easily locate the window details in this topic. This also eliminates the need to write up a lengthy
procedure in each topic, therefore please take the time to understand the terminology here.
Reading this ribbon is detailed below:
Example:
Account > General Ledger > [Search] > {double click on the Account} > (Details Tab) >
Command
Action
Description
Account > Stock
Menu
Commands
The > is a separator between menu commands. In this
case, click Account then choose Stock from the list.
> [Search]
Click button
After following the menu commands a window should
open, there are any number of commands that can be
executed from this window, square brackets [ ] indicates
that a button with this name needs to be clicked.
> {double click on the
Account}
Procedure
Sometime there are no buttons but actions that need to
take place to get further into this menu path. These
actions are designated by the curly brackets { }. This
action designates double clicking an account name.
> (Details Tab)
Click a TAB
Many windows in MYOB EXO Business have two or more
tabs, the brackets ( ) indicate the tab name to select.
>
Click an icon
Icon, this simply designates an Icon to click.
Note: These actions aren’t necessarily listed in the same order as illustrated in this example.
18
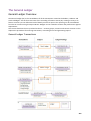
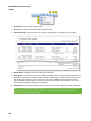
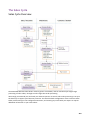
Setting Up
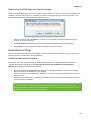
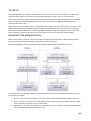
System Setup
This chapter presents an overview of the MYOB EXO Business setup and may be useful to help the
understanding of a ‘super user’, but would not normally be relevant to most users.
Note: Setup is normally performed by a certified EXO Business implementation partner. The
following information is provided as optional reading to gain an understanding of MYOB EXO
Business’s key building blocks.
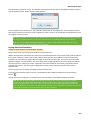
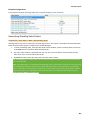
The following diagram presents an overview of the EXO Business setup:
19
MYOB EXO Business User Guide
Configuring MYOB EXO Business
Once you have installed EXO Business for the first time on your computer and/or network, it needs to be
configured based on the requirements of your business. The EXO Business configuration is carried out by
your partner who will ascertain your business needs and accordingly set up the system.
Once the system is configured you need to start the EXO Business program and log in as the administrator,
using the name and password given to you by your partner. Logins to EXO Business are related to Staff
Setup. The login to the database is defined and stored in the database connection setup which is
established by your partner.
For more information related to the configuration of your system contact your EXO Business partner.
Setting up Options
You can set additional menus in EXO Business using the Menu Designer. The Extra Fields option allows you
to set and customize some fields.
Refer: Setup Menus (see page 77) for details on setting up menus.
For more information related to the setting up of menus and extra fields, contact your EXO Business
partner.
Setting up Account Groups
You need to set up account groups for each of the main functions in EXO Business – General Ledger,
Creditors, Stock and Debtors.
Refer: General Ledger (see page 278), Creditors, Stock and Debtors (see page 90) topics in this help for
more information on the setup of each account group.
Functions Across Groups
Some setup functions are common to all groups. These can be set up through the setup menu in EXO
Business or through the EXO Business Configuration Assistant.
Refer: Setting up Menus and Options in the following section for more information on setting up these
groups.
20
Setting Up
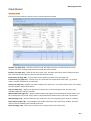
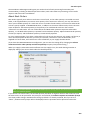
Staff and Logging In
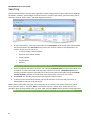
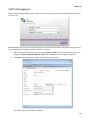
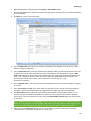
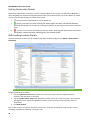
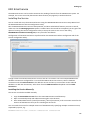
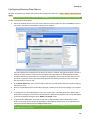
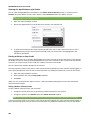
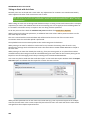
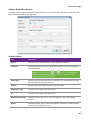
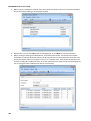
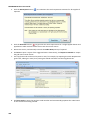
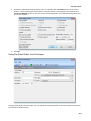
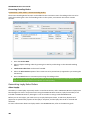
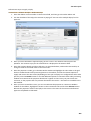
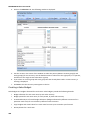
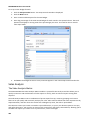
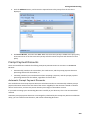
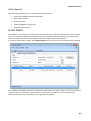
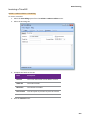
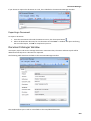
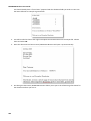
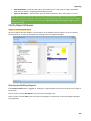
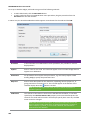
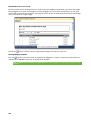
When starting an MYOB EXO Business module, users must first log on and select an EXO Business database
to connect to:
MYOB EXO Business manages the staff login process, with each staff member having their own log in name,
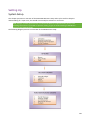
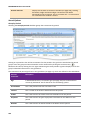
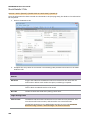
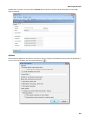
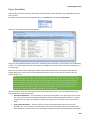
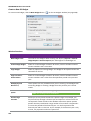
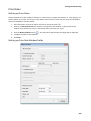
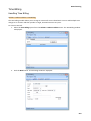
menu assignment and their user profile. To set up a new user:
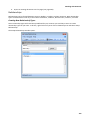
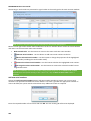
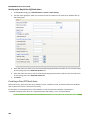
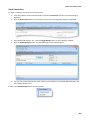
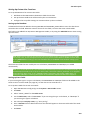
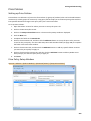
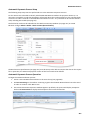
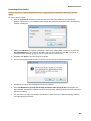
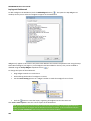
1. Open the Setup Staff window, either by selecting Setup > Staff from the EXO Business menu, or by
going to the Staff > Profile Assignment > Staff section of EXO Business Config (see page 55).
2. Click New on the Setup Staff window. The Setup Staff Form opens:
The staff number is automatically assigned.
21
MYOB EXO Business User Guide
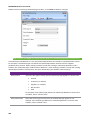
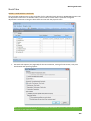
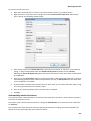
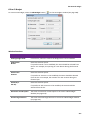
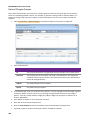
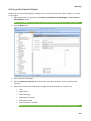
3. Check the Active box to ensure that this staff member is on the active staff list.
Note: Once entered on the MYOB EXO Business system, a staff member cannot be deleted.
Uncheck the box to cancel a staff member from the list.
4. Fill out the staff information, such as the staff member’s name and contact details.
5. Enter any staff-specific authorisation limits in the authority tab.
6. Manage the account security, and assign the staff member specific profiles and a menu.
Note: The Login ID can differ to the actual staff name.
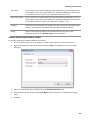
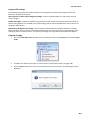
7. To change the password of the staff member:
a. Click the Change Password button. The Change Password window appears.
b. Type a new password and click OK.
8. In the Setup Staff Form, click Save.
A new staff member is created and added to the list.
Default Users
Default user profiles are installed with EXO Business. The first time you log on to an EXO Business database,
you will need to supply these details to log in.
For a new blank database:
•
Default admin user = ExoAdmin
•
Default admin password = ExoAdmin
For the demonstration database (Motorpartz):
•
Default admin user = ExoAdmin
•
Default admin password = ExoAdmin
•
Default demo user = demo
•
Default demo password = DEMO
Note: User names and passwords are case-sensitive.
22
Setting Up
Migrating Data to EXO Business
The MYOB EXO Business Migration Wizard allows you to migrate data from an existing MYOB Premier or
MYOB Aurora One system into a new EXO Business system. The following data sources are supported:
•
MYOB Premier 10 (New Zealand & Australian versions)
•
MYOB Premier 11 (New Zealand & Australian versions)
•
MYOB Premier 12 (New Zealand & Australian versions)
•
MYOB Aurora One 16
The Migration Wizard, EXOMigrationWizard.exe, is available on the EXO Business CD in the Supporting
Files\Migration Wizard folder. Copy the Migration Wizard executable to the PC running the EXO Business
database and double-click on it to start it.
Note: ODBC drivers for the system that you are importing data from must be present before running
the Migration Wizard. Installers for these drivers are also available on the EXO Business CD in the
Supporting Files\Migration Wizard folder.
The wizard gathers all relevant information, migrates data from the source company file into EXO Business
and reports the results of the migration.
See the MYOB EXO Business Implementation Guide for information on how to perform a migration of data
to the EXO Business system. These details include important pre- and post-migration steps, as well as the
operation of the Migration Wizard itself.
23
MYOB EXO Business User Guide
Extra Fields
To allow the capture of customised information, MYOB EXO Business supports Extra Fields. These are
flexible points of data entry that can be defined at implementation time. They are used to collect
information at time of data entry, to appear on forms or to be analysed and reported.
Examples of use of Extra Fields are many and varied, but could include:
•
Capturing demographic information at the point of sale.
•
Custom personal information about customers, such as birth dates or anniversaries.
•
Recording specific information on stock items, such as warranty terms or links to images.
Extra fields can be created in various areas of MYOB EXO Business, including:
•
Sales Orders
•
Purchase Orders
•
Debtor, Creditor and GL accounts
•
Contacts
•
Stock items
•
Activities
•
Invoices
Extra fields can be displayed on the Details 1 tab or Extra Fields tab of an account window. On transaction
windows, they appear on the header or line periscope windows.
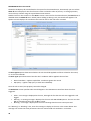
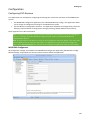
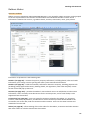
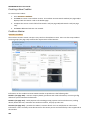
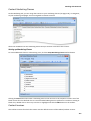
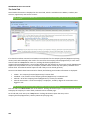
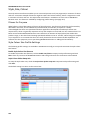
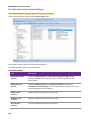
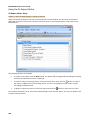
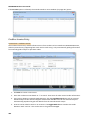
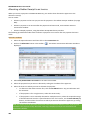
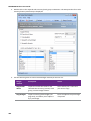
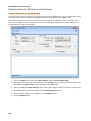
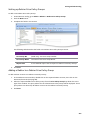
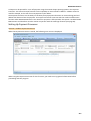
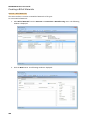
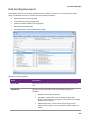
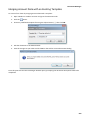
Creating Extra Fields
EXO Business Config > [System] > Extra Fields
MYOB EXO Business allows users to create Extra Fields on various tables to hold vital information needed
on the system.
24
Setting Up
1. Open EXO Business Config and go to the System > Extra Fields section.
2. All currently defined Extra Fields are listed on the right panel. Double-click on a record to drill down
and check details.
3. Click New to create a new Extra Field.
4. For the Table name field, specify the table in the EXO Business database that you want to add a
field to or display a field from.
5. For the Field name field, select the field from the database table you selected above that you want
to display as an Extra Field. If the field you want to display does not already exist, click the Add
Field toolbar button to add a field to the selected table. The system will automatically add a prefix
of X_ if not entered by the user. Enter the correct data type and default value if necessary. No
spaces are permitted in this name; use an underscore to insert spaces (_), e.g.
International_Number.
6. Enter a Display name - this is the label that will be displayed next to the Extra Field when it appears
on screens.
7. Enter the Position and Size of the Extra Field. The position must be unique across Extra Fields on
this table - used and unused positions are displayed on the right side panel of the window.
8. The Grid Column option applies to Extra Fields on Sales Orders, Jobs and Opportunities. If it is
enabled, the Extra Field will be available as a column on the main grid of the relevant window.
(Once set up, you must enable the column using the Select visible columns right-click menu option
on the grid.)
Note: For header tables, the Grid Column option is always unticked and for line tables it is always
ticked. The only exception is the SALESORD_LINES table, where the option can be changed—if it is
ticked, Extra Fields will appear in the grid; if it is not, they will appear in the line periscope.
9. Select the correct Dialog Type based on the chosen field, e.g. choose “Date Picker” for dates,
“Standard Edit” for varchars, “Check Box” for char(1), etc.
25
MYOB EXO Business User Guide
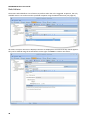
10. If the OPPORTUNITY or OPPORTUNITY_QUOTE table was specified for the Table name field, a Copy
field option becomes available. This field determines what will happen to the Extra Field when an
Opportunity is copied. Choose from:
•
Always - the Extra Field will not appear on the Copy Opportunity window; it will always be
copied when an Opportunity is copied.
•
Never - the Extra Field will not appear on the Copy Opportunity window; it will never be
copied when an Opportunity is copied.
•
Prompt for value (OPPORTUNITY table only) - the Extra Field will appear in the Extra Fields
section of the Copy Opportunity window, where the user can choose to keep the original
value or enter a new one.
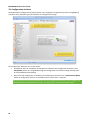
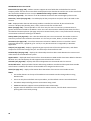
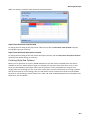
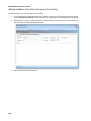
Dialog Types
Selection Controls
If you set the Dialog Type to “Drop-Down Edit”, “Drop-Down Selection” or “Drop-Down SQL Selection”, the
combo boxes for Lookup SQL, Key field and Display field are activated.
The Lookup SQL can contain:
•
•
A table name, in which case the Key field and Display field combo boxes contain all fields for the
specified table.
A SQL select statement that specifies which fields the Extra Field will use, in which case the Key
field and Display field combo boxes contain only the fields specified by the SQL statement.
If you are using a Drop-Down Edit or Drop-Down Selection control, the Key field and Display field are
concatenated together into a single string, e.g. “1. ACCOUNTNAME”. This means that the Data type for the
Extra Field must be CHARACTER, so that it can record the concatenated string.
If you are using a Drop-Down SQL Selection control, only the Key field is recorded, which means that the
Data type should match the data type of the selected key field.
URL Controls
There are two available dialog types for displaying URLs: “URL or Shortcut” and “URL Lablel”.
The URL or Shortcut type displays a raw URL as clickable text, e.g. http://myob.com.
The URL Label type can display a user-friendly HTML label that links to a URL, e.g. a field that was populated
with:
<a href=“http://myob.com”>MYOB website</a>
would appear as MYOB website, and link to http://myob.com when clicked on.
26
Setting Up
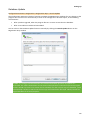
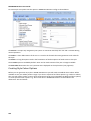
Extra Field Events
Some Extra Fields can be configured to update their values whenever the relevant field on the record type
is changed, e.g. Extra Fields on a Sales Order can update when the Debtor account is changed.
When one of the following are selected for the Table name field, an Events tab becomes available:
•
•
•
•
•
•
•
JOB_TRANSACTIONS
JOBCOST_HDR
JOBCOST_LINES
OPPORTUNITY
OPPORTUNITY_QUOTE
SALESORD_HDR
SALESORD_LINES
The Event Field Name field displays the field that will trigger the Extra Field update. For Extra Fields on
header records, this is ACCNO; for Extra Fields on lines, it is STOCKCODE.
The Event SQL field contains the SQL statement that will be used to update the Extra Field when the
relevant Sales Order field is changed. Parameters can be used to pass in information:
Record Type
Supported Parameters
Job header
:Accno
:Current_User
Job quote line
:Stockcode
:Current_User
Job transaction line
:Stockcode
:Jobno
:MasterJobno
:Accno
:Current_User
27
MYOB EXO Business User Guide
Opportunity header
:Accno
:Company_Type_Int
:Company _Type_Char
:Company _Id
Opportunity quote line
:Stockcode
:Opportunity_Seqno
Sales Order header
:Accno
Sales Order line
:Stockcode
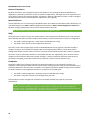
In the example above, an Extra Field on SALESORD_LINES has been set up to display the WEIGHT value for
the selected Stock item. This value will be updated whenever the STOCKCODE on a Sales Order line is
changed.
Note: Extra Field events override default values - if a default value is specified for an Extra Field that
is populated by events, it will be ignored.
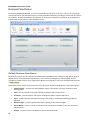
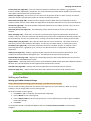
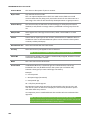
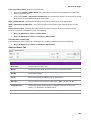
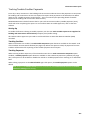
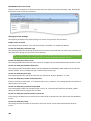
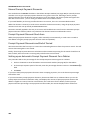
Custom Buttons
MYOB EXO Business allows you to add user-defined buttons to the toolbars of certain windows:
These buttons can be used to add functionality to the relevant windows, for example, to launch an external
application or run a Clarity report. It is possible to pass parameters from the current window to the
application or report launched by the custom button.
The following EXO Business windows support custom buttons:
•
Contacts
•
Creditor Account Details
•
Debtor Account Details
•
Opportunities
•
Purchase Orders
•
Sales Orders
•
Stock Item Details
•
Works Orders
Note: The EXO Business Job Costing and POS modules also support custom buttons, as does the
Stock Requests feature of the Distribution Advantage module.
28
Setting Up
Setting up Custom Buttons
Custom buttons are controlled by User-level profile settings (see page 73), which are set up in EXO Business
Config.
Each button has two profile settings: one that specifies the caption for the button and one that specifies
the command that should be run when the button is clicked. For example, to add a custom button to the
Debtors window, configure the settings:
•
Debtor custom button 1 caption
•
Debtor custom button 1 command line
Both settings must be configured; if either setting is blank, the custom button will not appear on the
window’s toolbar.
Caption Setting
The text entered for the “caption” profile setting of a custom button appears when the mouse pointer is
hovered over the custom button:
Command Line Setting
The text entered for the “command line” profile setting of a custom button specifies the command that will
run when the button is clicked.
To run an external program, enter:
“MyProg.EXE <LOGIN> <CURRENT>“
Where <LOGIN> passes the database connection details and <CURRENT> passes out the key field identifier
(most commonly the SEQNO) of the current record that you have loaded on the screen at the time that you
press the button.
Any parameter entered with the extension .CLR will assume that you want to run a clarity report and will
call Clarity directly. It is not necessary that Clarity.EXE exist to do this, for example:
“MYREPORT.CLR /S=SEQNO=<CURRENT>“
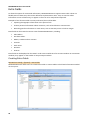
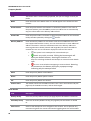
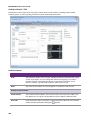
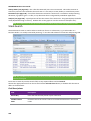
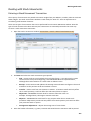
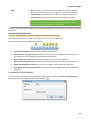
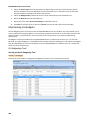
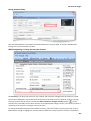
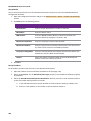
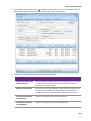
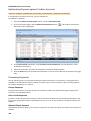
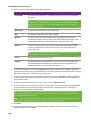
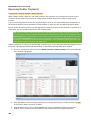
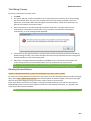
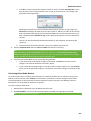
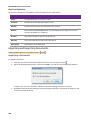
Event Log
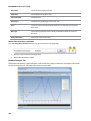
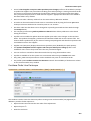
MYOB EXO Business includes the ability to maintain an audit log of key events that you may want to track.
For certain events in EXO Business, you can identify the event, and record the reason and time of the event,
as well as who performed it. Audit events can occur in multiple places throughout the software. The event
types are referred to as Event Reason Classes and are hooks in the system provided by EXO Business.
Tracking of each class is optional. You can set up a list of valid reasons within each class to be chosen at run
time. An additional comment may be entered by the user for each event instance should a “covering note”
be required.
29
MYOB EXO Business User Guide
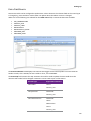
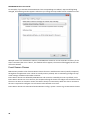
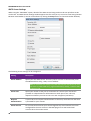
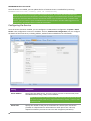
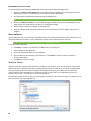
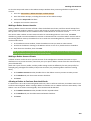
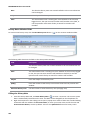
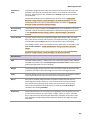
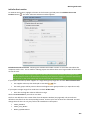
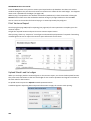
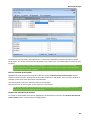
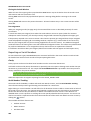
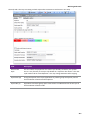
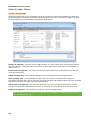
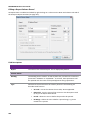
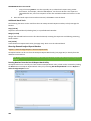
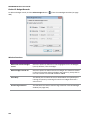
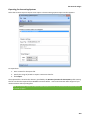
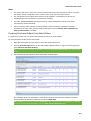
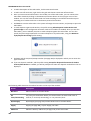
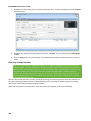
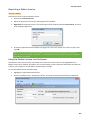
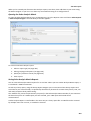
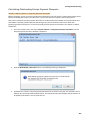
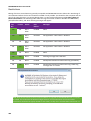
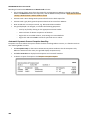
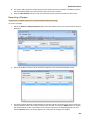
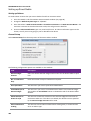
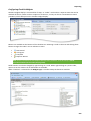
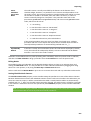
For example, if you activate the Event Reason Class corresponding to a Debtor’s Stop Credit flag being
changed, the following window appears whenever you change the Stop Credit field on a Debtor account:
Multiple reasons are available for selection, and additional comments can be entered if necessary. If the
event is activated, but set to “Silent”, this window will not appear; the event will be logged, but the user
will not be alerted.
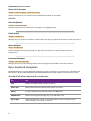
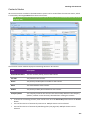
Event Reason Classes
EXO Business provides a list of Event Reason Classes that tie in with business events (usually exceptions)
throughout the application suite. These are usually security-related, such as monitoring changes to stop
credit settings of Debtor and Creditor accounts.
Event Reason Classes are defined by EXO Business and cannot be created by the user. By default, most
Event Reason Classes are set to inactive, the exceptions being the classes for Ledger Lock and Record Lock.
The users can elect to activate a reason class either silently or interactively. When the class is interactive
the user is required to configure a list of reasons to be selected at run time.
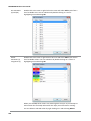
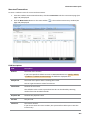
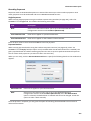
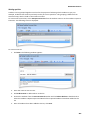
Event Reason Classes are maintained at EXO Business Config > System > Event Log > Event Reason Classes.
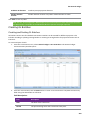
30
Setting Up
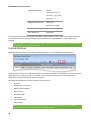
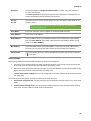
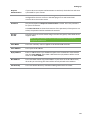
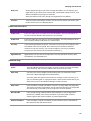
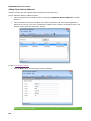
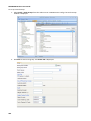
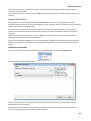
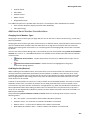
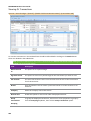
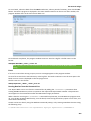
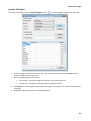
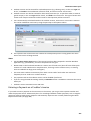
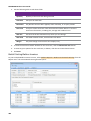
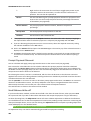
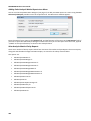
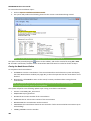
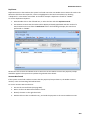
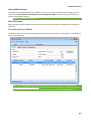
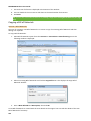
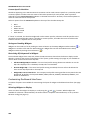
Double click a class to edit it:
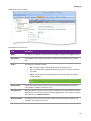
The fields on this screen are:
Field
Description
Name
This will be the caption of the window requesting a reason for the logged activity.
Description
This displays a more explicit description to indicate circumstances of use to the
user
Active
This field has 3 possible settings:
•
No - An audit log will not be maintained for this Reason Class.
•
Yes - A window will be displayed requesting the user choose a reason for
this event.
•
Silent - No window will be displayed; instead an event log entry will be
created silently.
Note: You must set up Event Reasons for any class that is set to “Yes” or
“Silent”.
History Notes
Ticking this option will also create an entry in the History Notes of the primary
entity (Debtor, Creditor, Stock item, Job).
Has Reference
When this option is ticked, an extra field is available on the Event Reason window,
allowing users to record a reference with the logged Event. If this option is ticked,
you must also set a Reference Name.
Reference Name
This specifies the label for the reference field on the Event Reason window, e.g.
“Voucher” for a discount override.
31
MYOB EXO Business User Guide
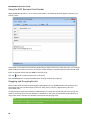
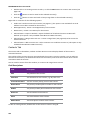
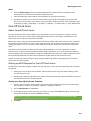
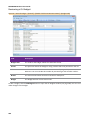
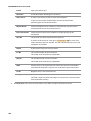
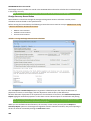
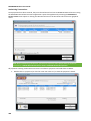
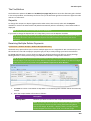
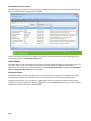
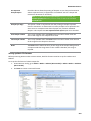
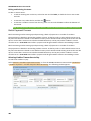
Event Reasons
Event Reasons within an Event Reason Class form a list of reasons that can be chosen at run time when an
event is logged. With the exception of the ledger and record lock reason classes, which cannot be
deactivated, EXO Business does not automatically set up any reasons. You must establish at least one
reason for each class you want to activate.
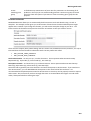
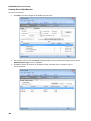
Event Reasons are maintained at EXO Business Config > System > Event log > Event Reasons.
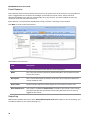
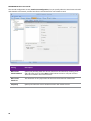
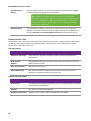
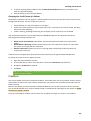
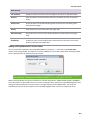
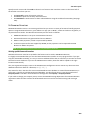
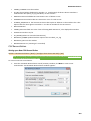
Click New to create a new Event Reason:
The fields on this screen are:
Field
Description
Class
This is the Event Reason Class that the reason belongs to.
Name
This is the name of the reason that will be selectable in the list when an event
for the class occurs.
Description
This is a short description to indicate to the user the circumstances when this
reason should be used.
Report Code
Determines the sequence reasons appear in the list within a reason class.
Must Fill Reference
This option is available if Has Reference is ticked for the reason’s class. Ticking
this option will prevent the reference from being left blank when an event is
logged for this reason.
Reporting
EXO Business provides the Clarity report ReasonReportbyClass.CLR (Audit Report) to list the audit log. You
can add this report to your menu (see page 77).
32
Setting Up
Customisation
All logged events are recorded in the database table REASON_EVENTS. As this table has no dependencies, it
is a good candidate for your implementer to add custom triggers if your business process requires this.
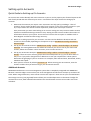
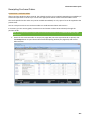
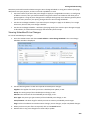
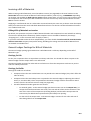
Business Alerts
You can set up custom business rules and notifications for various events in the EXO Business system. Rules
using custom conditions can be attached to a defined list of system events; when a rule’s conditions are
met, a message can be displayed to the user and a notification email can optionally be sent to one or more
addresses. Custom rules are triggered when one of the following events occur:
•
A Sales Order is saved
•
A Debtor Invoice is saved
•
A Sales Order is supplied
•
A Creditor Invoice is saved
•
A Purchase Order is saved
•
A Job Quote is saved
•
An Opportunity Quote is saved
•
A Job Transaction is saved
Note: Alerts on Debtor and Creditor Invoices are only triggered from Invoice Entry screens, e.g. the
Creditor Invoice Entry screen or the Invoice Entry screen in EXO Job Costing. They are not triggered
when creating the invoice from another screen, e.g. when creating a Debtor Invoice from a Sales
Order. Similarly, creating an Opportunity by copying an existing one will not trigger alerts on
Opportunities.
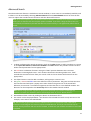
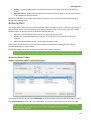
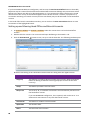
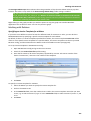
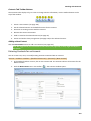
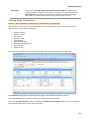
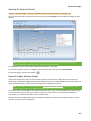
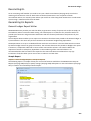
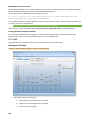
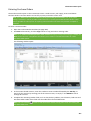
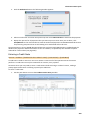
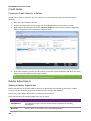
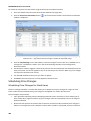
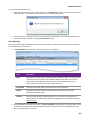
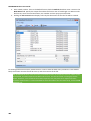
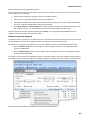
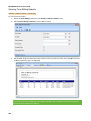
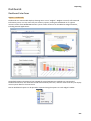
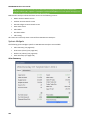
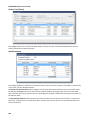
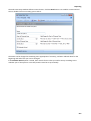
Business Alerts are set up in the EXO Business Configurator at System > Event Log > Business Alerts:
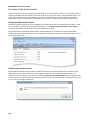
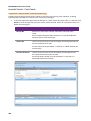
33
MYOB EXO Business User Guide
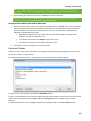
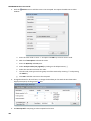
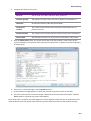
The Rules tab displays all rules defined in the system for the selected event; alternatively you can tick the
Show all box to display all rules for all events. Rules are listed in order of priority—to change priorities,
move rules up or down using the up and down arrow buttons.
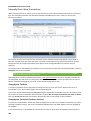
Double-click on a rule to edit it or click New to create a new rule for the selected event (the New button is
disabled when the Show All box is ticked). When adding or editing a rule, the Details tab appears. The
Options sub-tab displays the conditions that must be met for the rule to be activated.
The Run Against option determine whether the rule should be applied to all lines related to the record,
or to the record header.
The Rule Type option determines how the rule’s conditions will be applied. Choose from:
•
•
Record Condition – applies simple filter conditions against the record.
SQL Query – applies a SQL query to each line individually.
Once the rule is saved, this property cannot be changed.
The Behaviour section specifies what should happen in the EXO Business interface when the rule is
triggered:
•
•
•
Silent – no message is displayed to the user, although the fact that the rule was triggered is still
logged.
Warning – a warning message is displayed to the user with Yes and No options. The user can click
Yes to proceed with the action or No to cancel.
Blocking – a message is displayed to the user indicating that the action cannot proceed.
For “Warning” or “Blocking” rules, enter the message to display to the user in the section below. This
message can contain the same parameters that are used to build rule conditions—see below.
34
Setting Up
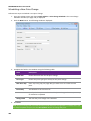
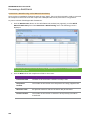
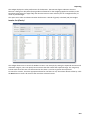
Rule Conditions
The bottom section of the Details tab is where you enter the conditions that must be met to trigger the
rule.
Rules with the type “Record Condition” are entered in the form of a filter that can include the parameters
detailed below.
Rules with the type “SQL Query” are entered in the form of a SQL statement to run against the EXO
Business database. The parameters below can also be used in SQL statements.
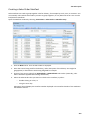
Parameter
Meaning
General (available for all rules)
@CURRENT_USER
The ID number of the logged on user.
@STAFFNAME
The name of the logged on user.
@NOW
The current date and time.
@TODAY
The current date.
@EXOLINK
A formatted exo:// protocol hyperlink (see page 41) to the transaction, e.g.
exo://saleorder(10001). Can be used in notification emails.
Sales Orders (saving or supplying)
@ACCNO
The ID number of the Debtor account on the Sales Order.
@ACCOUNTNAME
The name of the Debtor account on the Sales Order.
@ORDERNO
The ID number of the Sales Order.
@SALESNO
The ID number of the salesperson on the Sales Order.
@SUBTOTAL
The Sub Total amount on the Sales Order.
@TAXTOTAL
The GST Total amount on the Sales Order.
@TOTALDISC
The total discount on the Sales Order.
@UNDISCOUNTED
The undiscounted total of the Sales Order.
@H
A specified field from the SALESORD_HDR table, e.g. @H.DUEDATE.
@L
A specified field from the SALESORD_LINES table, e.g. @L.STOCKCODE.
35
MYOB EXO Business User Guide
Purchase Orders
@PURCHORDNO
The ID number of the Purchase Order.
@ACCNO
The ID number of the Creditor account on the Sales Order.
@ACCOUNTNAME
The name of the Creditor account on the Sales Order.
@SALESPERSON
The ID number of the staff member in the Purchase Order’s Ordered by field.
@H
A specified field from the PURCHORD_HDR table, e.g. @H.ORDERDATE.
@L
A specified field from the PURCHORD_LINES table, e.g. @L.UNITPRICE.
Debtor Invoices
@SEQNO
The ID number of the invoice.
@ACCNO
The ID number of the Debtor account on the invoice.
@ACCOUNTNAME
The name of the Debtor account on the invoice.
@H
A specified field from the DR_TRANS table, e.g. @H.SUBTOTAL.
@L
A specified field from the DR_INVLINES table, e.g. @L.DISCOUNT.
Creditor Invoices
@SEQNO
The ID number of the invoice.
@ACCNO
The ID number of the Creditor account on the invoice.
@ACCOUNTNAME
The name of the Creditor account on the invoice.
@H
A specified field from the CR_TRANS table, e.g. @H.TRANSDATE.
@L
A specified field from the CR_INVLINES table, e.g. @L.TAXRATE.
Jobs
@ACCNO
The ID number of the Debtor account on the job.
@ACCOUNTNAME
The name of the Debtor account on the job.
36
Setting Up
@JOBNO
The job number.
@H
A specified field from the JOBCOST_HDR table, e.g. @H.STATUS.
@F
A specified field from the JOBCOST_FLAGS table, e.g. @F.ISACTIVE.
@Q
A specified field from the JOBCOST_LINES table, e.g. @Q.STOCKCODE.
@T
A specified field from the JOB_TRANSACTIONS table, e.g. @T.QUANTITY.
Opportunities
@ACCNO
The ID number of the company account on the opportunity.
@ACCOUNTNAME
The name of the company account on the opportunity.
@OPPORTUNITYID
The ID number of the opportunity, or “New” if it has not been saved yet.
@CONTACTID
The ID number of the contact associated with the opportunity.
@CONTACTNAME
The name of the contact associated with the opportunity.
@H
A specified field from the OPPORTUNITY table, e.g. @H.PROBABILITY.
@L
A specified field from the OPPORTUNITY_QUOTE table, e.g. @L.QUANTITY.
The alias parameters that give access to the fields of a table (@H, L@, etc) can be used to access Extra
Fields; however, computed fields are not supported in Business Alerts.
Note: While these parameters are not case-sensitive, the values of table fields are, e.g. @F.ISACTIVE
would need to look for the value “Y”, not “y”.
37
MYOB EXO Business User Guide
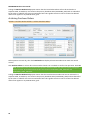
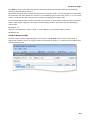
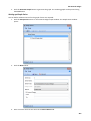
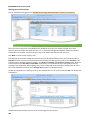
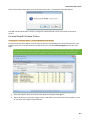
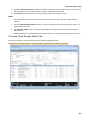
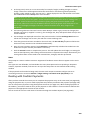
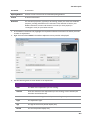
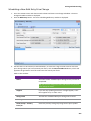
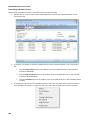
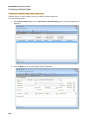
Rule Actions
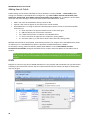
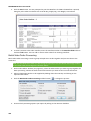
The Actions sub-tab defines a list of actions to perform when the rule is triggered. At present, the only
available action is to send an email to specified recipients using the EXO Email Service (see page 51).
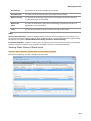
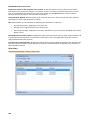
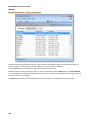
All actions set up for the rule are displayed. Actions are displayed in the order that they will be applied they can be ordered using the arrow buttons on the right. Click New to create a new action.
38
Setting Up
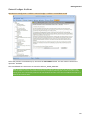
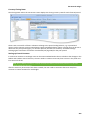
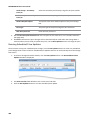
On the Details sub-tab, enter a descriptive name for the action, then specify who to send the email to. One
or more EXO Business staff members can be selected as recipients from the Internal Recipients dropdown,
and other email addresses can be entered manually into the Other Recipients field.
Note: The Other Recipients field can also contain parameters (see page 39) that allow the email to
be sent to an email address associated with the record that generated the alert.
Enter a subject line and the message text to send/display. The message body can include any of the
parameters that are available for the rule (see page 35).
Once all information has been entered, click Save Action to add the action to the rule.
Note: Clicking Save Action adds the action to the rule, but does not save the rule itself—click the
Save button on the main toolbar to save the rule and all of its actions to the EXO Business database.
Rules that have been added but not yet saved are listed on the Actions sub-tab with the ID “New”.
Email Parameters
Business Alerts can be sent to an email address associated with the record that generated the alert. Email
address parameters can be entered into the Other Recipients field; when the alert is triggered, the
parameter will be replaced with the relevant email address for the record. The following email parameters
are available:
Parameter
Meaning
General
@COMPANYEMAIL
The email address for the company (Debtor or Creditor) associated with
the record.
@DEFAULTCONTACTEMAIL
The email address for the default Contact of the company associated
with the record.
@CONTACTEMAIL
The email address for the Contact associated with the record (not
available for Purchase Orders or Creditor Invoices).
Sales Orders
@SALESEMAIL
The email address for the Salesperson associated with the Sales Order.
@STATEMENTCONTACTEMAIL
The email address for the Statement Contact of the Debtor associated
with the Sales Order.
Purchase Orders
@SALESEMAIL
The email address for the staff member associated with the Purchase
Order.
@STATEMENTCONTACTEMAIL
The email address for the Remittance Contact of the Creditor
associated with the Purchase Order.
39
MYOB EXO Business User Guide
Debtor Invoices
@SALESEMAIL
The email address for the Salesperson associated with the invoice.
@STATEMENTCONTACTEMAIL
The email address for the Statement Contact of the Debtor associated
with the invoice.
Creditor Invoices
@STATEMENTCONTACTEMAIL
The email address for the Remittance Contact of the Creditor
associated with the invoice.
Jobs
@SOLDBYEMAIL
The email address for the staff member who entered the job
(JOBCOST_HDR.STAFFNO).
@ACTIONBYEMAIL
The email address for the staff member who is set as the job’s manager
(JOBCOST_HDR.ACTIONBY).
Opportunities
@ASSIGNEDBYEMAIL
The email address for the staff member in the Opportunity’s Assigned
By field.
@ASSIGNEDTOEMAIL
The email address for the staff member in the Opportunity’s Assigned
To field.
@CREATEDBYEMAIL
The email address for the staff member who created the Opportunity.
40
Setting Up
Applying Rules to Users
The Apply To sub-tab lets you specify which EXO Business staff members the rule applies to:
Tick the boxes for the users that this rule applies to, or tick Apply To All Users.
Event Rule Auditing
Every time a Business Alert is triggered, an entry is recorded in the REASON_EVENTS table used by the
Event Log (see page 29). New Reason Classes are created automatically for each type of event that alerts
can be created for.
For alerts that send a message, an entry is also stored in the new EVENTS_SCHEDULE table. Entries include
the values of all parameters relating to the rule.
EXO URL Protocol
EXO Business records can be opened from a URL/hyperlink using the exo:// protocol. The link can be on a
webpage, in an email, in a third-party application, or in the EXO Business interface itself.
Note: EXO Business grid displays support clickable URLs for the TEXT and NTEXT data types. This
feature can be used in Grid widgets, to allow drilling to a URL directly from the data. In combination
with EXO Business URLs, it allows drilldown to any of the EXO Business records that support URLs.
Setting up the EXO URL Protocol
A separate application, exoprotocolhandler.exe, processes all EXO Business URLs. This application is
installed with EXO Business, and must be present on all PCs where you want to use EXO Business URLs.
To set up support for EXO Business URLs, double-click on this application to run it once (every time it runs,
it checks if it is registered as the exo:// handler in local registry, and registers itself if it is not).
41
MYOB EXO Business User Guide
URL Format
EXO Business URLs are formatted as follows:
exo://[connection/]command[(#)][/][?param=value¶m=value...]
Each URL has the following components:
•
•
•
•
connection - specifies the EXO Business database connection to use.
command - specifies the EXO Business procedure/window to launch.
(#) - some commands allow you to open a specific record by entering the record’s ID number
(SEQNO or ACCNO) in brackets. If an ID number is not supplied, the search screen for that kind of
record is displayed.
?param=value - some commands support additional parameters, such as a search string.
Multiple parameters are separated with an ampersand (&).
A command must be specified; all other components are optional.
Supported Commands
Supported commands are listed in the table below. All commands open in the core EXO Business module,
unless stated otherwise.
Note: Commands must be available as a menu item in the relevant module; users will be prevented
from opening any screen that they would not normally have access to when using an EXO Business
module. This ensures that the security of the EXO Business system is preserved.
42
Command
Description
activity
Opens the Activities window in the EXO Business Core module.
campaign(x)/?search=xyz
Opens the Campaign record with the ID number x in the EXO
Business CRM module, or searches for the text specified by the
?search parameter.
company/?search=xyz
Opens the Company search window in the EXO Business Core
module, searching for the text specified by the ?search
parameter.
contact(x)/?search=xyz
Opens the Contact record with ID number x in the core EXO
Business module, or searches for the text specified by the
?search parameter.
core_campaign(x)/?search=xyz
Opens the Campaign record with the ID number x in the core
EXO Business module, or searches for the text specified by the
?search parameter.
core_opportunity(x)
Opens the Opportunity record with ID number x in the core EXO
Business module.
core_serviceunit(x)/?search=xyz
Opens the Serviceable Unit record with the ID number x in the
EXO Job Costing module, or searches for the text specified by
the ?search parameter.
Setting Up
craccount(x)/?search=xyz
Opens the Creditor account with the Account ID number x, or
searches for the text specified by the ?search parameter.
crinvoice
Opens the Creditors Invoices window.
crm_contact(x)/?search=xyz
Opens the Contact record with ID number x in the EXO Business
CRM module, or searches for the text specified by the ?search
parameter.
document(x)
Opens the document stored in the Document Manager with the
document ID x.
draccount(x)/?search=xyz
Opens the Debtor account with the Account ID number x, or
searches for the text specified by the ?search parameter.
invoice(x)
Opens the Debtor invoice with ID number x.
job(x)/?search=xyz
Opens the Job record with the ID number x in the EXO Job
Costing module, or searches for the text specified by the
?search parameter.
opportunity(x)/?search=xyz
Opens the Opportunity record with ID number x in the EXO
Business CRM module, or searches for the text specified by the
?search parameter.
purchaseorder(x)/?search=xyz
Opens the Purchase Order with ID number x, or searches for the
text specified by the ?search parameter.
prospect(x)/?search=xyz
Opens the Non Account x with the Account ID number x, or
searches for the text specified by the ?search parameter.
report/?paramaters
Opens a Clarity report. All report parameters are supported, e.g.
exo://report/?DR_Control.CLR&d=Printer&a=N
saleorder(x)/?search=xyz
Opens the Sales Order with ID number x, or searches for the
text specified by the ?search parameter.
serial/?stockcode=xyz&search=xyz
Opens the Serial Number Tracking window.
serviceunit(x)/?search=xyz
Opens the Serviceable Unit record with the ID number x in the
core EXO Business module, or searches for the text specified by
the ?search parameter.
stockitem/?stockcode=xyz
Opens the Stock item with the stock code specified by the
?stockcode parameter.
statement
Opens the Debtors statements window.
43
MYOB EXO Business User Guide
Examples
exo://draccount(2) – opens the Debtor account with the ID number (SEQNO) 2.
exo://crm_contact(3) – opens the Contact with the ID number (SEQNO) 3 in the EXO CRM module.
exo://contact/?search=smith – opens the Contact search window, showing results for a search on “smith”.
exo://stockitem/?stockcode=AIRFIL01 – opens the Stock item with the code AIRFIL01.
Grid Settings
ExoGrid column settings, form sizes and positions can be saved, restored and replicated using the EXO
Business Configurator (see page 55). These settings can be copied to the EXO Business database, then
restored on another computer. Saving grid settings to the database means you can:
•
Restore a user’s settings when they move to a new computer.
•
Have a user’s settings “follow” them from computer to computer.
•
Maintain consistent settings in a terminal server/cluster server environment.
•
Easily replicate the same settings across multiple computers.
•
Easily set up grid settings on a new computer for first time use.
Saving and Manually Retrieving Grid Settings
Grid settings are saved and restored in the Profiles section of EXO Business Config (see page 73). Three new
options are available when right-clicking on a User Profile:
•
Save Grid Settings – Saves the grid settings currently present on this computer to the EXO Business
database for this profile.
•
Retrieve Grid Settings – Retrieves grid settings saved for this profile from the database and applies
them. All existing grid settings are deleted before the new settings are applied.
•
Merge Grid Settings – Retrieves saved grid settings for this profile from the database and applies
them. Existing grid settings are not deleted.
Portable Grid Settings
Grid settings can be made portable, so that they will “follow” a user from one computer to another. If the
Computer-level profile setting Allow portable grid settings has been enabled, then when a user logs on to a
computer, the grid settings saved for the user’s profile are automatically restored.
Note: The automatic restore operation only occurs when the user logging on belongs to a different
profile set than the previous logged on user.
Enabling portable grid settings means that users can operate on multiple different computers (e.g. in a “hot
desking” environment) and retain their grid settings. It also means that users’ settings can remain
consistent in a terminal server or cluster server environment, where the hosting server may change without
notice.
44
Setting Up
Replicating Grid Settings on a New Computer
The first time EXO Business is run on a computer, a record for the computer is created in the EXO Business
database. As part of this process, it is possible to replicate saved grid settings to the new computer. The
following window appears the first time EXO Business is run:
•
Select a computer and click Inherit to create the new computer record and replicate the grid
settings to the new computer.
•
Click Don’t Inherit to create the computer record and leave grid settings at their defaults.
•
Click Cancel to exit the application without creating a computer record.
Geolocation Settings
Geolocation information (latitude and longitude) can be saved for Debtors, Creditors, Non Accounts and
Contacts, based on each record’s Delivery Address
Enabling Geolocation Features
The system can automatically retrieve geolocation details whenever a Delivery Address is entered or
changed, depending on the profile setting Prompt for unset map coordinates on saving delivery
addresses. This setting has the following options:
•
•
•
Always prompt for un-mapped delivery addresses - a dialog box appears, asking the user if they
want to retrieve new details (this is the default).
Never prompt for un-mapped delivery addresses - new details are automatically retrieved without
asking the user.
Disable map locating features - geolocation details are never retrieved - the new button does not
appear on account windows.
Note: By enabling this feature you consent to send information to MYOB and for us to relay part of
this information to Microsoft in accordance with the Microsoft Online Privacy Statement (see
http://go.microsoft.com/fwlink/p/?LinkId=253457) in order to retrieve mapping coordinates and
confirmation of the existence of a physical address.
45
MYOB EXO Business User Guide
Setting Geolocation Details
Geolocation information is based on a record’s Delivery Address. The system uses Microsoft’s Bing API to
query Bing Maps for latitude and longitude details when the Location button next to the address is clicked.
An icon on the button displays the status of the match:
•
•
- the system hasn’t attempted to retrieve details yet.
- details successfully retrieved. Clicking the button again will open your default browser,
showing the location on a map. SHIFT+clicking the button will attempt to retrieve location details
again.
•
- an error occurred when attempting to retrieve details. Hovering the mouse over the button
will display a popup message indicating why the attempt failed.
Bulk Loading Location Details
Location details for accounts can be loaded in bulk from the EXO Configurator at Admin > Bulk Update >
Geocoding:
Note: This screen is also available from the main toolbar of the EXO OnTheGo Configurator.
To bulk update location details:
1. Use the Update locations for: dropdown to select the kind of account to update (Debtors,
Creditors, Non Accounts or Contacts).
2. Use the Update where status is in: dropdown to filter the list of accounts by status. Only accounts
that appear on the list will be updated. By default, accounts whose status is already “OK” are
filtered out.
3. Click Bulk Update.
The system attempts to retrieve details for each account in the list, and updates each account’s status
according to whether the attempt succeeds or fails.
46
Setting Up
Sending Emails
Email functions are available on many windows in the MYOB EXO Business system. For example:
•
Emails can be sent to Contacts by clicking the
button on the Contacts window.
•
Invoices and Statements can be emailed to Debtors by clicking the
Transactions tab of the Debtor Account Details window.
•
Sales Orders can be emailed to Debtors and Purchase Orders can be emailed to Creditors by clicking
the
button on the Sales Orders or Purchases Orders windows.
•
A Mailshot function (see page 530) is available on several windows for bulk sending emails to
Debtors or Creditors.
•
Emails can be scheduled and sent automatically using the EXO Email Service (see page 51).
button on the
A Send E-Mail menu item can also be added using EXO Business Config, allowing emails to be sent from the
main menu of certain EXO Business modules.
Emails can be sent in several ways, depending on how the EXO Business system is set up.
Note: When emails are sent from EXO Business (via SMTP or the user’s local email client), they are
automatically saved to the Documents tab of the relevant account (see page 144).
Email Setup
The method used to send emails from within EXO Business is determined by the Email client User-level
profile setting. This setting has the following options:
•
Disabled - Emails will not be sent.
•
EXO SMTP - Emails will be sent via SMTP using the EXO Business Email Sender (better for sending
large batches of emails). An external SMTP server is required.
Note: When using Microsoft Exchange Server, the SMTP service must be active. The EXO Business
Email Sender uses the SMTP protocol, not the IMAP protocol used by Microsoft Outlook.
•
Default Email Client - Emails will be sent using the user’s default email software (suitable for
smaller batches of emails).
47
MYOB EXO Business User Guide
SMTP Server Settings
When using the “EXO SMTP” option, details of the SMTP server being used must be set up before emails
can be sent. The SMTP Server Settings window appears the first time you try to send an email using the EXO
Business Email Sender (it can be accessed later by clicking the Setup button on the Email Sender window).
The following server settings can be configured:
Setting
Description
Server Address
Specify the host SMTP server. The entry can be a server or service name (Local
Area Network host only), a URL, or an IP address.
Note: IP addresses are usually only used with internal mail servers or ones
that have no public DNS entry (registered domain). Ideally, a name or URL
should be used.
48
Server Port
Specify the number of the port to send emails on. Consult your mail service
provider or IT department for information on which port to use. This may
depend on whether you want to use TLS or SSL encryption (see below).
Requires
Authentication
If your mail server requires authentication to send mail, check this box and enter
a password for your account.
Server User ID
For an internal mail server (such as Exchange Server) this will be the User ID as
configured for the user account in the Mail program. For ISP-hosted mail
account this is the account name.
Setting Up
Password
Only active/required if Requires Authentication is ticked. This is the password
for your mail account.
Tick Show character to show the characters of the password; if this option is not
ticked, the password will be masked with asterisks.
Use TLS
Use SSL
Tick these boxes to secure emails using TLS or SSL encryption, if the SMTP server
supports them.
Note: SSL takes precedence over TLS; if both boxes are checked, SSL
encryption will be used.
From Name
This is the “friendly” name to appear in the Sender field of emails.
From Address
This is your email address.
Reply Address
Enter an address here if you would like replies sent to a different email address
than the From Address. If this field is left blank the reply address will be set the
same as the From Address.
BCC Address
This is the blind carbon copy email address. If you enter an email address here,
all emails you send using this client will be secretly echoed to this address.
File Directory
This is the default directory used in the Open dialog when the Attach File button
( ) is clicked.
Other Settings
The following additional email-related settings may need to be configured:
•
The Clarity Form profile settings (see page 74) specify whether or not various Clarity forms should
be sent via email, and how these forms should be attached to emails.
•
Options to email remittance advice to Creditors or to use the Mailshot function are available on the
Payment Processor General Setup window (see page 477).
•
A Show email before sending option can be configured on the Direct Debits General Setup window
(see page 493).
The following User-level profile settings also affect how emails are sent:
•
Send emails using plain text -tick this setting to restrict the body of emails to plain text, rather than
HTML.
•
Confirm before sending email - tick this setting to display a confirmation message before sending
each email, or leave it blank to send emails automatically.
49
MYOB EXO Business User Guide
Using the EXO Business Email Sender
When MYOB EXO Business is set to use the Email Sender, the following window appears whenever you
send an email:
Some fields may be filled in automatically, depending on where the email is being sent from. For example,
when sending an email to a Contact, the Contact’s email address is automatically entered in the To: field.
Enter all required details and click Send to send the email.
Click the
button to add an attachment to the email.
Click the Setup button to open the SMTP Server Settings window (see page 47).
Dragging and Dropping Emails
Emails in Microsoft Outlook can be dragged and dropped onto any MYOB EXO Business window with a
Documents tab; this includes Company accounts, Stock items, Contacts, Opportunities, Jobs and
Serviceable Units.
To drag and drop emails from Outlook to EXO Business, first open the record that you want to copy the
email to, then drag the email from Outlook to anywhere on the open record window in EXO Business. A
copy of the email is saved to the window’s Documents tab (see page 144).
Note: The Outlook client must be running on the same PC (real or virtual) or Terminal Server session
as EXO Business. Dragging emails from a local Outlook client to EXO Business running on a Terminal
Server session, for example, is not supported.
50
Setting Up
EXO Email Service
The EXO Email Service can be used to automate the sending of emails from the EXO Business system. For
example, this service is used by the Business Alerts feature (see page 33) to send email alerts.
Installing the Service
You can install and set up the EXO Email Service using the MYOB EXO Business Services Setup Wizard and
the MYOB EXO Business Service Configuration utility.
Run the MYOB EXO Business Services Setup Wizard, and when asked which features you want to install,
make sure that the Messaging Service option is enabled. Once the wizard has completed, you are given the
option of running the service configuration utility to set up the service. You can run the utility,
MYOB.ED.EXO.Cloud.ServiceConfig.exe, at any time after installation.
Configuration of the EXO Email Service is performed on the EXO Business Alerts Configuration tab of the
service configuration utility:
A single instance of the EXO Email Service runs on each PC. An instance can have multiple EXO Business
database connections configured for it. To install the EXO Email Service instance, select a database
connection and click Add Connection. This adds the service and sets up a connection to the selected
database. To add new connections, select them from the EXO Connection dropdown and click Add
Connection.
Installing the Service Manually
The service can also be installed manually:
1. Copy the ExoEmailService.exe file to the main EXO Business install directory.
2. Open a command prompt with administrative rights at this location.
3. Enter ExoEmailService.exe /install [connection], where [connection] is the connection name for the
instance of EXO Business that you are installing the service for.
You can install the service for multiple instances of EXO Business by specifying multiple connection names,
separated by spaces, e.g.
ExoEmailService.exe /install Connection1 Connection2
51
MYOB EXO Business User Guide
Once the service is installed, you can update the list of instances that it is installed for by entering:
ExoEmailService.exe /config [list of connections]
The EXO email service runs using the Local System account. This means that the EXO Business
database connection must have been created while logged in as an administrator account; otherwise
the service will not be able to find the connection details. If you receive the error ”Failed to start
service”, you may need to open the EXO Business Connection Editor window while logged in as an
administrator, then delete and re-create the connection.
Configuring the Service
Once the service has been installed, you can configure it in EXO Business Configurator at System > Email
Service. Two configuration screens are available. The first, Email Service Configuration, lets you configure
the details of the email server, including address, authentication and default user information:
Setting
Description
Server Address
Specify the host SMTP server. The entry can be a server or service name (Local
Area Network host only), a URL, or an IP address.
Note: IP addresses are usually only used with internal mail servers or ones
that have no public DNS entry (registered domain). Ideally, a name or URL
should be used.
Server Port
52
Specify the number of the port to send emails on. Consult your mail service
provider or IT department for information on which port to use. This may
depend on whether you want to use TLS or SSL encryption (see below).
Setting Up
Requires
Authentication
If your mail server requires authentication to send mail, check this box and enter
a password for your account.
Server User ID
For an internal mail server (such as Exchange Server) this will be the User ID as
configured for the user account in the Mail program. For ISP-hosted mail
account this is the account name.
Password
Only active/required if Requires Authentication is ticked. This is the password
for your mail account.
Tick Show character to show the characters of the password; if this option is not
ticked, the password will be masked with asterisks.
Use TLS
Use SSL
Tick these boxes to secure emails using TLS or SSL encryption, if the SMTP server
supports them.
Note: SSL takes precedence over TLS; if both boxes are checked, SSL
encryption will be used.
From Name
This is the “friendly” name to appear in the Sender field of emails.
From Address
This is your email address.
Reply Address
Enter an address here if you would like replies sent to a different email address
than the From Address. If this field is left blank the reply address will be set the
same as the From Address.
BCC Address
This is the blind carbon copy email address. If you enter an email address here,
all emails you send using this client will be secretly echoed to this address.
File Directory
This is the default directory used when adding attachments to emails.
53
MYOB EXO Business User Guide
The second configuration screen, Email Time Configuration, lets you specify when the email service should
and shouldn’t send emails, and the how often it should check for new emails to send:
54
Setting
Description
Don’t send
emails between
Specify the period(s) when the service should not send emails by entering start
and end times here. Click the New toolbar button to enter a new pair of times.
Times are entered in the 24 hour format.
Don’t send
emails on
Tick the boxes for any days when the email service should not send emails.
Frequency
Specify how often the service should check for new emails to send.
Setting Up
Configuration
Configuring EXO Business
Two applications are available for configuring the settings that control the operation of the EXO Business
system:
•
The MYOB EXO Configurator application (also called EXO Business Config) - this application allows
you to change all configuration settings in the EXO Business system.
•
The EXO Business Configuration Assistant - this application simplifies the configuration process by
offering a reduced subset of configuration settings (selecting sensible defaults for all others).
These applications are discussed below.
Note: Changing configuration settings can have catastrophic consequences if incorrect settings are
chosen. It is strongly recommended that changes only be made by a qualified EXO Business
implementation partner.
Note: Changes made in EXO Business Config or the Configuration Assistant appear in the other EXO
Business applications the next time they open. If an application is open at the time changes are
made, select Refresh Settings from the File menu to update the application with the new changes.
MYOB EXO Configurator
All configuration settings are available in the MYOB EXO Configurator application (EXO Business Config).
Related settings are grouped into sections and sub-sections within the application.
55
MYOB EXO Business User Guide
The Configuration Assistant
The EXO Business Configuration Assistant guides users through the configuration process by highlighting
essentials areas and offering a reduced subset of configuration settings.
The Configuration Assistant runs in two modes:
•
Immediately after the installation of EXO Business software, the Configuration Assistant runs in
Setup Mode, where you are guided through the configuration of essential settings. Settings must
be confirmed before proceeding.
•
Once the initial configuration is complete, the Configuration Assistant runs in Maintenance Mode,
where all configuration options are available and no confirmation is required.
Tip: Information on configuring EXO Business with the Configuration Assistant is also available in the
“MYOB EXO Business Implementation Guide”. This document is installed with EXO Business.
56
Setting Up
Database Update
Configuration Assistant > Registration > Registration Keys > Launch Update
The Configuration Assistant includes a function to update the EXO Business database for any changes to the
program. This function runs automatically as soon as the Configuration Assistant opens, in the following
circumstances:
•
After a product upgrade, when the program files are a newer version than the database.
•
After a new add-on module has been added.
You can also run the Database Update function manually by clicking the Launch Update button on the
Registration Keys window.
Caution: It is strongly recommended that the database be backed up before any updates are
performed. This means the database can be restored and operation continued on previous program
versions should any issues occur. Never restore a backup over the only live copy of a database, just in
case a backup is invalid, in which case the live copy will could also be destroyed. Ideally rename the
original database for archival purposes.
57
MYOB EXO Business User Guide
Data Verification
MYOB EXO Business includes a utility that performs various tests on the transactions in the EXO Business
database to highlight any errors and suggest what may be causing them. After running a Database Update
operation (see page 56), a prompt appears asking if you want to verify the data:
At other times, the data verification utility can be accessed from the EXO Business Configurator at Utilities
> Others > EXO Config Verification.
58
Setting Up
The following options are available:
Field
Description
Verify Debtors
Verify Creditors
Verify General
Ledger
Verify Current
Invoices
Verify Allocations
Verify Misc
Functions
Stock
These options determine which aspects of the EXO Business system will be
checked by the data verification process.
Fix Current Aged
Balances
If this option is ticked, any imbalances in the current aged balances that are
detected by the data verification process will be automatically corrected.
Only List Errors
If this option is ticked, then the output results will only show the results of
tests that return errors - any tests that pass will not be listed.
Source Ledgers
Period Range
Select the range of periods whose data you want to verify.
Click OK to run the data verification process. The results of the process are displayed in the lower section;
click Save to save the results to a text file or Print to print them out.
Data Verification Menu Item
The Data Verification utility can be added to drop down menus (see page 77), so that it can be accessed
from other modules. It is possible to specify which of the above options will be checked by default, by
editing the item’s parameters. The following parameters can be entered:
•
•
•
•
•
•
•
•
•
D = Verify Debtors
C = Verify Creditors
G = Verify General Ledger
I = Verify Current Invoices
A = Verify Allocations
M = Verify Misc Functions
S = Stock
L = Only List Errors
Y = Fix Current Aged Balances
For example, entering DCSL means that only the Verify Debtors, Verify Creditors , Stock and Only List
Errors options will be ticked when the utility opens.
Company Settings
Customer details and software registration information is configured at:
•
•
The Company section of EXO Business Config
The Registration section of the Configuration Assistant
59
MYOB EXO Business User Guide
Configuring Registration Information
The Registration Keys section controls the registration code entry for MYOB EXO Business modules. The
registration codes are specific to the company name, the individual EXO Business product, number of users
and the expiry date of the registration code.
Tip: Note the colour of the highlight bar and module. If the line is red, then the module, number of
users, security code, expiry date and/or company name do not match the code given. Check that all
the items match the code requested.
Modules are divided into two sections: Core and Add-on. A single registration code applies to all Core
modules. Add-on modules are all separately licensed - a registration code must be supplied for each one.
Registration codes can be downloaded and applied automatically, or they can be obtained from MYOB and
entered manually. Both operations are performed from the Registration Keys section.
Before applying registration keys, however, it is vital to ensure that the company name is set up correctly:
1. Click Change Name to set the company name of the system.
2. Enter the company name on the window that appears, then click OK.
Note: The spelling of the company name is critical for the registration code to be accepted. Ensure
the name given when obtaining the registration codes from MYOB is exactly the same as entered
above. Take special care with abbreviations (Limited vs. Ltd), and punctuation (Pty. vs. Pty).
Incorrect spelling of the company name will cause the security code entry to be marked as
3. If the company is the subsidiary of a larger company, click Change Parent Name to set the name of
the parent company.
To enter registration information:
1. Double-click the “EXO Business” module name.
2. Enter the following fields:
Max Users The registered number of users, as per the number of concurrent licences purchased
from MYOB.
Registration Key The registration code received from MYOB for the selected module.
Expiry Date The expiry date for the EXO Business module. For more information of how this will be
applied to the end user, refer to the Terms and Conditions of the End User Licence Agreement.
3. Click Save to save these settings.
Note: The EXO Business module is the only module associated with an expiry date, however
generally operation of the add-on modules will not be practical without a correctly registered EXO
Business product.
Tip: Specific registration codes are not required for the core modules included with MYOB EXO
Business, with the exception of EXO Business Config.
60
Setting Up
Configuring Company Details
The Company Details section holds details such as the name and address of the company using MYOB EXO
Business. This information is primarily used in reports for displaying the company’s contact details, but
some fields also have a specific purpose in the system such as the Country and Bank Account fields.
Field
Description
Company name
Displays the company’s name. Read-only in this section - the company name can
be changed in the Registration section.
Postal address
Enter the company’s postal address. Four lines are available.
Street address
Enter the company’s street address, or tick Street address is the same as postal
address to copy the postal address details.
Country
Select the country that the company operates in.
Note: It is very important that you choose the right Country setting. This
influences the tax rates to be used on the system.
Phone number
Enter a contact phone number for the company.
Fax number
Enter a contact fax number for the company.
Email address
Enter a contact email address for the company.
Web Site
Enter the company’s web site
Tax Number
The name of the property depends on the country that the company operates in.
Enter company’s the tax number (e.g. GST number, VAT number).
Bank account
Enter the company’s bank account number.
Account name
Enter the name on the company’s bank account.
Essential Settings
The Business Essentials section of the Configuration Assistant and the EXO Business Config application
defines key operations and must be carefully set up before operation begins. This includes the General
Ledger setup and control accounts, period management and tax rates. These settings are not normally
changed once transacting has begun.
Essential settings are configured at:
•
•
The Essential section of EXO Business Config
The Business Essentials section of the Configuration Assistant
61
MYOB EXO Business User Guide
Settings are grouped into the following subsections:
•
•
•
•
•
•
•
•
•
•
Implementation Notes
General Settings
General Ledger
GL Control Accounts
Financial Year
Analysis Codes
Current Period
Tax Rates
Company
EXO Job Costing
Implementation Notes
The Implementation Notes section is a free-form notes area where implementers are encouraged to enter
important notes about the installation. For example, this might include key configuration settings, database
customisations, or any unusual implementation of extra fields.
There are also fields to enter details of the Implementation Partner and System Administrator. These
details are displayed on the About Box of the core MYOB EXO Business application (select About from the
Help menu, then click Registration Details).
Click Register to send an email to MYOB containing the System Administrator Details and information from
the Company Details section, so that MYOB’s records of your contact information can be updated.
General Settings
The General Settings section holds information relating to decimal places, tax settings and stock costing
methods.
Decimal Places in Numeric Values
Set the number of decimal places used in transactions for the following amounts:
•
•
•
•
•
•
62
Cost prices
Sell prices
Bill costs
Quantities
Bill quantities
Discounts
Setting Up
Tax
The name of this section (GST, VAT, etc) depends on the country that the company is based in. The
following settings are available:
Field
Description
Invoice basis/
Payments basis
MYOB EXO Business is primarily designed to record tax on an Invoice basis,
i.e. each invoice line has a tax amount that is accrued as soon as the
invoice is produced.
However, EXO Business does have additional mechanisms that will assist
in the production of Tax returns based on when payments are made or
received.
The differences are:
•
When a payment is made you will receive additional prompts to
record the tax portion of a payment transaction.
•
The Tax return (or BAS) will gather payment transactions rather
than invoice transactions and will mark these as having been
included on the tax return.
Note: See the “Taxation Features” white paper for more
information.
TAX inclusive pricing
for debtors
Enable this option if prices are entered inclusive of tax. Leaving the box
clear indicates tax-exclusive pricing.
Base Debtor TAX rate
Base Creditor TAX rate
Select the default tax rates applied to Debtor and Creditor transactions for
analysis.
Withholding Tax on
Creditors Payments
To apply withholding tax to Creditors Payments (see page 349), tick this
option and specify a tax rate. If this option is ticked, an option to apply
withholding tax becomes available on the Creditor Payment Entry window
(see page 331).
Other
This area contains other key settings:
Field
Description
Stock cost method
Select the costing method to use for stock items: AVERAGE, LATEST or
STANDARD.
If “AVERAGE” is selected, two more options relating to “special” transactions
become available:
•
Include transactions with zero cost in average cost calculations
•
Include credit transactions in average cost calculations
Enable or disable these options as necessary.
BOM cost method
Select the costing method to use for Bills of Materials (see page 506):
AVERAGE, LATEST or STANDARD.
63
MYOB EXO Business User Guide
Operate in multiple
currencies
Tick this option to enable support for multiple currencies (see page 293).
General Ledger
In this section, you can configure the General Ledger as per the customer’s requirements. This information
entered into this will seldom change after the initial setup and in some cases may actually have systemwide implications if it is changed.
GL Account Code Structure
The structure of the General Ledger coding method is set up here. GL account codes can be divided into up
to three sections:
branch-account-subaccount
Both the branch prefix and sub-account suffix are optional. Select whether branches and/or sub-account
sections are needed, and the number of digits for each section. An example of the structure you have
entered is displayed below in red. This example updates as changes are made.
Summarise Postings From
Tick the boxes in this section to summarise Debtor/Creditor postings to the General Ledger.
GL Stock Integration
Selects the method of stock system integration to the General Ledger:
•
Periodic stock - This option is more suited to stock valuation where processes such as Job Costing
or Manufacturing (including the allocation of overhead or labour costs to the finished product) are
used. This feature requires the user to have the “GL Closing Stock” procedure on their menu.
Periodic Stock allows the user to determine the level of stock-on-hand to be reflected in the
accounts at the end of the period.
•
Perpetual stock - This option is the more complex of the two inventory integration methods. This
method allows the posting of physical stock transactions to the General Ledger on a one-to-one
basis. Disabling this feature will require the user to manually post stock valuations in a periodic
manner (Periodic Stock system). Perpetual Stock is more suited to warehousing and retail type
situations with standard stock in/ stock out movements, and only supports Average stock costing
methods. To use Perpetual Stock two additional accounts are required to be setup in the GL Control
Accounts (Stock Clearing Account and a Stock Adjustment Account). The Post Stock to GL menu
procedure must be added to the users menu. The Stock Purchases GL Code for physical stock
should point to the Stock Clearing Account; the “Stock GL Coding” function included in the GL
Utilities can be used to achieve this.
Select a Cost of Sales method - this controls the posting of cost of sales to the General Ledger. Choose
from:
•
Post to Cost of Sales from GL Control A/c - This option posts all cost of sales to a single control
account: the Cost of Sales account specified in the GL Control Accounts section (see page 65).
•
Post to Cost of Sales A/c from Stock Item - This option allows the user to select multiple trading
accounts based on the Stock item. Cost of sales is posted to the account specified by the C.O.S. GL
code setting on the Stock Details 2 tab (see page 167) for the relevant Stock item.
Other
Branch no. for balance sheet Specify the default branch number for transactions on the Balance Sheet.
Note: This field should only be set when first setting up a site. Any attempt to change its value once
transactions have been entered will have unknown consequences, and may potentially corrupt the
Balance Sheet branch reporting and/or data.
64
Setting Up
Chart of Accounts
While an organisation’s Chart of Accounts can be set up manually from the main MYOB EXO Business
application (see page 227), the configuration applications allow you to select a pre-made Chart of Accounts
from a list. Select an Industry classification and Business type, and the pre-made Chart of Accounts
appears in the section below.
Alternatively, you can import a chart of accounts from a CSV file, e.g. one provided by a company
accountant. Click the Import button to select the CSV file containing the chart of accounts definition. See
the “MYOB EXO Business Implementation Guide” for details of the expected file format.
Once the Chart of Accounts has been selected or imported, it appears in the area at the bottom of the
General Ledger section, where it can be altered manually if necessary:
•
•
•
To edit an item, right-click on it and select Edit. Make any changes then click OK.
To delete an item, right-click on it and select Delete, then click Yes to confirm.
To create a new group, account or sub-account, right-click on the node you want to create the item
under and select New GL Group, New Account or New Sub-Account as appropriate. Enter details
for the new item and click OK.
GL Control Accounts
Once the Chart of Accounts has been set up (by importing the information or manual entry), the key
accounts can be brought through to the GL Control Accounts (see page 240).
The GL Control Accounts section is divided into General and Custom tabs. The General tab contains the
standard control accounts, while the Custom tab contains the control accounts for more specialised areas,
such as foreign exchange and advanced stock. If a pre-made Chart of Accounts was selected on the General
Ledger screen, a set of default GL Control Accounts will be displayed here.
To set a GL Control Account:
1. Right-click on an account and select Search. A search window appears.
2. Browse through the chart of accounts to find the account you want.
3. Select the account, then click Select & Close.
Financial Year
The Financial Year section is used to set up the periods that compose the financial year.
To set up the financial year:
1. Select a period and click the Edit button, or double-click to edit.
2. Enter a name for the period, as well as a short code and report code (which is useful to set the
sequence in a report).
3. Select the financial Quarter that the period belongs to.
4. Under Transaction Entry Validation, select if the month is a standard calendar month or if specific
dates are used.
5. If a period is not a standard calendar month, the Dates Between ... and ... of the period must be
specified. These dates also contain the year, so these dates must be set up at the beginning of
every financial year to reflect the change in dates.
6. Click Save to save the settings.
Note: Ensure the first name in the sequence is the first period of the financial year. This may be
different to a standard calendar year.
The Load button allows you to specify and create a standard twelve month financial year.
65
MYOB EXO Business User Guide
You must also specify the first period of doing business, and the period that represents January.
Caution: Incorrect setting of the Accounting period representing January will result in incorrect
population of the Period History table, as well as causing issues with the current calendar year.
Ensure this is set correctly.
Note: See the “Period Handling and Transaction Ageing” white paper for more detail on period
management.
Current Period
The Current Period settings track the current period of operation, and help to enforce period transaction
dates. As the Financial Year can be defined purely in calendar months rather than explicit dates, the Current
Period settings are used to align the calendar months and calendar year to the financial periods. These are
then used for period/date enforcement.
Field
Description
First month of the
calendar year
This is required to ascertain which financial period will roll over the
Current calendar year when an end of month is performed. The system
cannot determine this automatically because the financial year may start
in any calendar month, and the actual financial period name is
customisable (e.g. “Jan”, “January”, “01”), so it must be explicitly set.
Note: Incorrectly setting the first month of the calendar year will
result in incorrect population of the Period History table, as well as
causing issues with the current calendar year. Ensure this is set
correctly.
Current financial period
Current calendar year
These values confirm the current period of operation for each ledger.
These automatically increment at the correct time during end of period
rolls.
Transaction ages in EXO Business are numbered from current (0)
backwards. EXO Business knows which period in the period table is the
current one, and uses this as a point of reference to display the name of
the period on reports and within data entry screens.
Tip: See the “Period Handling and Transaction Ageing” white paper
for more detail on period management.
Default posting age
Enter the default age for transactions when they are posted to the
posted to the Debtors, Creditors, Stock or General ledgers.
Year Names
You can customise the display names for the last, current and next year
periods if necessary.
Analysis Codes
This section is where you set up Analysis Codes (see page 84). Analysis Codes are arbitrary codes used in
software applications that can be assigned to transactions. They do not perform any function themselves
and are independent of the normal grouping of account codes; they are simply a customisable way of
grouping related transactions together for sorting and reporting.
66
Setting Up
Tax Rates
The Tax Rates section sets the tax rates used by the company, which are then used to create the tax return
form entries. Tax rates have the ability to use separate GL Control Accounts, and link to a Tax Return Key
Point for tax reporting.
To set up tax rates:
1. Select a tax rate and click the Edit button, or double-click the tax rate to edit.
2. Enter the Tax Rate details, including Name and Tax rate, and select the relevant Tax Return Key
Point reference to be used on the tax return.
Tip: See the “Taxation Features” white paper for more detail on taxation and tax rate setup, including
suggested default settings for different countries.
Company
This section is only available in EXO Business Config, and only when the InterCompany module is in use.
Enter the Company number for this company, as specified on Setup Source Companies window in the
InterCompany module.
See the InterCompany User Guide for more information on these Company numbers.
EXO Job Costing
This section is only available in EXO Business Config, and only when the EXO Job Costing module is in use.
See the EXO Job Costing User Guide for information on these settings.
Admin Settings
The Business Essentials section of the Configuration Assistant and the EXO Business Config application
contains sections that business department managers may own to control their area of responsibility, e.g.
stock group names, account group names.
Settings are grouped into the following subsections:
•
•
•
•
•
•
•
•
•
•
•
•
•
•
•
•
Courier
Period
Banks
General Ledger
Finance
Creditors
Stock
Debtors
Inwards Goods
ClientConnect
Dashboards
EXO Fixed Assets (EXO Business Config only)
EXO Intercompany Consolidations (EXO Business Config only)
Serviceable Units (EXO Business Config only)
Analytics
Social Media
Note: Quick Insert functions are available for many of these sections to allow fast data entry of
multiple records at once. See the “Quick Insert” white paper for details.
67
MYOB EXO Business User Guide
Courier
This section lets you set up the couriers used for stock transfers. The following items can be set up:
Dispatch Methods
Couriers
Stock Request Types
•
•
•
Note: In EXO Business Config, the Dispatch Methods section is available at Business Admin > Setup.
Period
This section is available in EXO Business Config only.
Current Period
This section is the same as the Current Period section in the Essential Settings (see page 66).
Financial Year
This section is the same as the Financial Year section in the Essential Settings (see page 65).
Period Statuses
This section displays the statuses of all accounting periods, showing whether they are currently locked or
unlocked. Double-clicking on a period toggles between the locked and unlocked state.
You can enter default posting ages for each ledger - these are the same settings that are available on the
Current Period section (see page 66).
Period History
This section displays the history of all recorded accounting periods. Select a period and click Edit to change
its details.
Banks
Debtors (Direct Debit)
Set up the file formats for generating direct debit transfer files for Debtors. Formats for major local banks
are set up by default. Click New to set up a new format manually, or Load Bank File to import a text file
containing bank format information.
Click Edit to change an existing format. When editing the details of a format, click the File Format button to
set up the fields that should appear in the output file:
Click New to add a new field to the format, then specify:
•
Which part of the file it appears in (Header, Body or Footer).
•
An Order number, which specifies the field’s place in the file.
•
A description.
•
The type of data that the field contains.
Once these details are supplied, you can enter specific information about the contents of the field in the
Details section.
Creditors (Direct Credit)
Set up the file formats for generating direct credit transfer files for Creditors. Formats for major local banks
are set up by default. These are set up in the same way as the direct debit file formats for Debtors.
68
Setting Up
Bank Formats (Reconciliation)
This section lets you set up bank file formats for use with the Bank Reconciliation function (see page 471).
These settings are also available in the EXO Finance module.
General Ledger
This section contains settings that affect the operation of the General Ledger.
Account Groups
The General Ledger is grouped into accounts with different functions such as Sales, Asset and Liability
accounts and Overheads. When setting your GL you need to name and define the groups you require. This
section lets you set up GL Account Groups (see page 227).
GL Control Accounts
This section is only available in EXO Business Config, and is the same as the GL Control Accounts section in
the Essential Settings (see page 65).
GL Report Batches
The GL Report Batches utility enables multiple General Ledger Reports to be batched together and
scheduled to run at a convenient time. This section lets you set up GL Report Batches (see page 261).
Finance
Branches
Set up branches and branch names if analysis by branch is required. A branch is usually a separate profit
centre within the business. Branches often equate to locations which designate a stock holding area
however multiple stock locations could also exist within a branch. Virtual locations could also exist (and
possibly cross branch boundaries) to separate stock for other reasons, e.g. seconds stock or work in
progress.
Note: Branches are numbered starting at 0, whereas Stock Locations are numbered starting at 1. Be
careful of this difference if you have a one-to-one relationship between branches and locations.
Tax Rates
This section is only available in EXO Business Config. It allows you to set up the tax rates used by the tax
system (see page 501).
Currencies
If multiple currencies (see page 293) are used, the currencies in use are set up in this section.
Multiple currency operation is enabled on the General Settings section of Business Essentials (see page 62).
Payment Groups
This section lets you set up the Payment Groups used in the EXO Business system. Payment Groups cluster
Payment Types together, and determine properties such as the GL Bank account associated with the
payment media.
Note: See the “Payment Types and EFTPOS Integration” white paper for more detail.
Payment Types
This section lets you set up the Payment Types used in the EXO Business system, e.g. cash, cheque, EFTPOS.
Payment Types define the properties of payment media, including whether the payment option is available,
rounding, and how it integrates with the EXO Business POS add-on module.
Note: See the “Payment Types and EFTPOS Integration” white paper for more detail.
69
MYOB EXO Business User Guide
Payment Denominations
This section lets you set up the denominations used in the EXO Business system. Payment denominations
determine the denominations that are available for each payment type. Denominations for the CASH
payment type and the local currency are set up by default, but denominations can be added for other
types. Click New to add a new denomination.
Tax Return Key Points
Tax Return Key Points are internally defined rates that are used in the Tax Return functions (see page 502),
which are set up automatically during installation. Each key point relates to a point on the Tax Return form;
key points are therefore specific to each country. Tax Return Key Points are automatically set up based on
the country selected during installation. They should be associated with Tax Rates.
Credit Terms
Credit Terms are set up by default on install, but it is possible to add new terms, specifying positive credit
factors for “net day” terms, and negative credit factors for “month following” terms (0 = Cash Only), and
whether they are active for Debtors or Creditors. Click New to create new credit terms.
For credit factors -29 to -31, it is assumed due dates are for the end of the month following, so the day of
the month is decreased, if need be, until a valid date is achieved, e.g. -31 could equate to 28.02.03 or
30.04.04.
Creditors
Creditor Account Groups/Alternate Creditor Account Groups
These sections let you set up Creditor Account Groups and Alternate Creditor Account Groups (see page
107). Creditor Account Groups are useful in reporting scenarios to group different creditor types together.
Tip: The names used to reference creditor account groups in MYOB EXO Business can be customised
at System > Display Name.
Stock
Stock Groups/Alternate Stock Groups
These sections let you set up Stock Groups and Alternate Stock Groups (see page 159).
Enter Stock Group names for reporting or sorting purposes. Group names can also be shown on stock
search screens and filters. Select a name and click the Edit button, or double-click on it. This is where you
enter autocode prefixes and auto suffixes for one-off stock items. Enter the expected profit margin and
variances and the GL code for Sales, Purchases and COS per stock group.
Note: For Stock Groups, the Parent group property references an Alternate Stock Group.
Tip: The names used to reference stock groups in MYOB EXO Business can be customised at System >
Display Name.
Stock Locations
Select a location and click the Edit button, or double-click on it. Enter names for the stock locations, using
both short-form codes and long names. There are also options useful for reporting and forms, such as the
location Address, and flags to allow exclusion from reports.
Click New to add new locations beyond the default ten locations.
Note: Stock Locations are numbered starting at 1, whereas Branches are numbered starting at 0. Be
careful of this difference if you have a one-to-one relationship between branches and locations.
70
Setting Up
Stock Price Groups
Enter the names of the Price Groups to be applied to stock items, and utilities in the pricing policies and
updates.
Stock Price Groups allow similar products to be grouped together so that they may share common pricing
policies. Using Stock Price Groups means only the price policies relating to the group need to be changed,
and not every stock item. The stock item is added to a Stock Price Group in the MYOB EXO Business core
module at Account > Stock > Details 1 tab.
Note: See the “Pricing and Discount Policies” whitepaper for more detail.
Stock Unit Definitions
Set up the names of the stock units that will be available, e.g. “EACH” or “PACK”.
Price Names
Set up Price Names that set the base prices used for Debtor accounts. Select a name and click the Edit
button, or double-click the item to edit.
Price SQL (see page 432) is used with the Account > Stock Item > Sell Price Formulation function.
Currency is used when a price is set based a foreign currency, when used in the Pricing Calculator. It does
not restrict the price to foreign currency accounts.
Note: MYOB EXO Business supports a maximum of 100 price names.
Warranty
Set up the warranties available on stock items. Click Add to create a new warranty. Enter a description and
a Charge Stock Code (you can enter part of a stock code and press ENTER to open a Search window). You
must also select the Stock Group and Alternate Stock Group that this warranty applies to.
Debtors
Debtor Account Groups/Alternate Debtor Account Groups
These sections let you set up Debtor Account Groups and Alternate Debtor Account Groups (see page 93).
Set up the Debtor Account Groups and Alternate Debtor Account Groups as required to help group debtors
together, e.g. by region or client type. These can be added to search grids as extra fields, and used for
reporting purposes.
Tip: The names used to reference debtor account groups in MYOB EXO Business can be customised
at System > Display Name.
Debtor Price Policy Groups
Create names to be used for grouping debtors into Price Policy groups. Individual debtors can then join a
Price Policy Group by selecting the Price Policy Group name on the Account > Debtors > Discounts/Prices
tab. The Debtor Price Policy Group is then associated with a Price Policy. All debtor accounts that belong to
that Policy Group will then receive that Price Policy’s prices and discounts.
Note: See the “Pricing and Discount Policies” white paper for more detail.
Sales
This section is only available in EXO Business Config. It allows you to set up marketing classes (see page
126), which can be applied to Contacts.
71
MYOB EXO Business User Guide
Inwards Goods
Cost Codes
Set up cost codes that relate to the shipment of goods, e.g. customs or duty.
Shipment Status
Shipment statuses define the stages of the flow of goods from the supplier to your warehouse. These
should be generic stages that apply to all methods of shipping.
Shipment Method
Shipment Methods define the type of transport being used to transport (or ship) the goods. This can also be
used for report filtering.
Note: See the “Inwards Goods” white paper for more detail.
ClientConnect
This section contains settings that relate to integrating EXO Business with the MYOB EXO ClientConnect
customer relationship management system.
Dashboards
This section contains settings that relate to the Dashboards function (see page 541).
Setup Widgets
Create and edit the widgets that are available on Dashboard interfaces.
Note: For widgets to be available for selection on a Dashboard interface, they must be assigned to
users by adding them to their “EXO Business Analytics” drop down menu definitions using the Drop
Down Menu Designer (see page 77).
EXO Fixed Assets
This section is only available in EXO Business Config, and only when the Fixed Assets module is in use. It
contains settings that affect the operation of the Fixed Assets module.
See the Fixed Assets User Guide for more information on these Company numbers.
EXO Intercompany Consolidations
This section is only available in EXO Business Config, and only when the InterCompany module is in use. It
contains settings that affect the operation of the InterCompany module.
See the InterCompany User Guide for more information on these Company numbers.
Serviceable Units
This section is only available in EXO Business Config, and only when the EXO Job Costing module is in use. It
contains settings that affect the operation of the EXO Job Costing module.
See the EXO Job Costing User Guide for information on these settings.
Analytics
This section provides access to the configuration settings for the EXO Business Analytics module (see page
555).
Social Media
This section lets you set up the EXO Business system to communicate with various social media networks
(see page 151).
72
Setting Up
System Settings
The System section of the Configuration Assistant and the EXO Business Config application contains settings
that affect the operation or appearance of the EXO Business system.
Display Names
Display Names allows customisation of the reference names displayed for some generic functions.
Examples include the names for Debtor Secondary Group (e.g. change to “Sales Region”), and Job Costing
Description (e.g. change to “Problem”).
Highlight a record you want to change the display name and click Edit. You can then enter the following
details and click Save.
Field
Description
Display Name
Enter the name that you want to appear on EXO Business applications.
Display Hint
Enter the hint text that you want to appear when a user hovers the mouse pointer
over the name on EXO Business applications.
Note: Group IDs are system-generated and not customisable.
Event Log
This section is available in EXO Business Config only. It is where you set up the Event Log (see page 29).
Extra Fields
This section is available in EXO Business Config only. It is where you set up extra fields (see page 24) for use
throughout the EXO Business system.
Profiles
Settings that are specific to the company, users or computers are stored in profiles. The Profiles section
allows configuration and management of the various profile settings in MYOB EXO Business.
Note: The EXO Business Config application allows access to all profile settings. The Configuration
Assistant offers a sub-set of the most important or most used settings.
73
MYOB EXO Business User Guide
Default Company, User, Computer profiles are provided, but customised profiles can also be created.
Profiles are created in a hierarchy, with the default settings forming the default profiles. Child profiles
“descend” from the parent profiles, and inherit the parent’s settings. However child profiles can override
individual settings as required.
For example, a Sales user profile could be set up with options relevant to the Sales team. A descendant
profile could then be created for the Sales Manager which has the same settings as the rest of the sales
team, but has also has the rights to issue credit documents.
Profiles are then assigned to individual users or computers, or to groups of users or computers as
appropriate. This allows groups of users to have the same profile assigned to them, allowing quick
configuration without having to create an individual profile for each user.
Tip: The PROFILE_FIELDS table contains all of the EXO Business profiles. Users can also use the Profile
Listing report to list all profiles by module.
Profile Types
The three profile types are all accessed from the Profiles section.
Company Profile
The Company profile stores company-wide settings. Because MYOB EXO Business only supports one
company per database, only one company profile can exist. As such, this profile is given the name of the
registered company.
User Profiles
User profiles relate to options that are applicable to specific users, e.g. granting the user the rights to edit
account information.
User profiles are then attached to staff at Staff > Profile Assignment > Staff (EXO Business Config) or Staff >
Users (Configuration Assistant).
Computer Profiles
Computer Profiles store settings related to the computer hardware, or the computer’s network location in
a workplace. These settings include printer settings for forms and reports (because most printout
destinations are associated with where the computer is located), hardware related issues (such as EFTPOS
terminal hardware), and mapped file directories.
Computer profiles are assigned to physical computers at Staff > Profile Assignment > Computer (EXO
Business Config) or Staff > Computers (Configuration Assistant).
Clarity Form Profiles
The Forms section gives various profiles access to different MYOB EXO Business forms. The Company profile
specifies the Clarity files for a selection of forms.
Note: Clarity forms and reports must be stored at the directory specified in the Computer-level
profile settings Directory for Custom Clarity Forms (.CLR, .CLF and .FMT) or Directory for Standard
Clarity Forms.
MYOB EXO Business looks into the Custom Clarity Directory first before going into the Standard Clarity
Directory.
User profiles configure a variety of user prompts relating to forms.
74
Setting Up
Computer profiles contain the following settings for each form:
Field
Description
Destination
A form’s primary destination can be set to None, Printer, File, Viewer, Email or Grid.
Email Option
Tick this box to send a copy of this document via email, in addition to sending a
copy to the specified destination. All email options are conditional upon the “Email
client” profile setting being enabled for the user.
Output Device
This is the file format that is used if the Destination is set to “File”. If the Email
Option is ticked, it is the file format of the attachment.
Commonly viewable graphics file formats are PDF and BMP. Text and spreadsheet
options are also available. If the email option is disabled and the primary
destination is printer or screen this option can be only printer or screen.
Printer Name
This is the Windows UNC name for the printer. This printer must be one that is
already available to you in the Windows printer settings list.
Security Profiles
The Security Profiles section controls options relating to login/password security. Security options include
areas such as password complexity and how often the password must be changed. While more than one
security profile can exist, most sites generally will just alter the default profile.
Security profiles are available at:
•
Profiles > Security Profiles and Staff > Profile Assignment > Security Profiles in EXO Business
Config
•
Staff > Security Profiles in the Configuration Assistant
Security profiles are attached to staff through the Staff > Users section.
Note: Security profiles do not control the user’s access to parts of MYOB EXO Business; user access is
controlled by User profile settings (see page 74), combined with menu access (see page 75).
Staff Settings
The Staff section of the Configuration Assistant and the EXO Business Config application is where you set up
customised menus, as well as records for staff members (users ), computers and security profiles.
Menus
The Menu Designer lets you set up customised user menus for all MYOB EXO Business modules. These
menus, once defined, are then assigned to one or more staff members, possibly organised by the company
staff structure. By setting up different menu structure for different users, you can restrict certain functions
to those users with the authority to access them, and customize the appearance of the EXO Business
interface to suit the needs of the organization.
Dropdown Menus
Dropdown menus are the standard menus available at the top of applications. The Menus > Dropdown
Menu section is used to configure the dropdown menus for all EXO Business applications (see page 77).
75
MYOB EXO Business User Guide
Business Flow Menus
Business flow menus are the graphical menus that appear on the opening windows of EXO Business
applications. A business flow menu can be created for all applications, although only some applications are
set up with a business flow menu by default. The Menus > Business Flow Menu section is used to configure
the business flow menus for all EXO Business applications (see page 80).
Menu Definitions
A menu definition is a set consisting of a Dropdown Menu and a Business Flow Menu. Menu definitions are
associated with users at Staff > Users (Configuration Assistant) or Staff > Profile Assignment > Staff (EXO
Business Config), and determine which menus will be used for that user.
Tip: The definition assigned to the current user is highlighted in green.
Staff
The Staff section is used to set up new staff members. This includes personal details (such as Job Title and
Phone details) and authority values (creditor invoice limits, purchase order limits). Users are configured at:
•
•
The Staff > Profile Assignment > Staff section of EXO Business Config
The Staff > Users section of the Configuration Assistant
The Users section also manages login access to MYOB EXO Business (see page 20). The staff member is
assigned a Login ID, and a password managed with the Change Password button. The Account Status
setting shows and/or sets the status of the user’s account and password (Account OK, Locked, or Expired).
The Users section is also where Profiles are associated with the user. Specifically, this is where the user is
assigned a User Profile (to define user-specific settings), a Security Profile (to determine how the user’s
password is managed), and a Menu Definition (to associate a menu structure with the user).
Computers
Computer profiles store settings related to the computer hardware, or the computer’s location in a
workplace. These settings include form and report printer settings (because most printout destinations are
associated with where the computer is located in a workplace), hardware related settings (such as EFTPOS
terminal hardware), and mapped file directories. Computers are configured at:
•
•
The Staff > Profile Assignment > Computer section of EXO Business Config
The Staff > Computers section of the Configuration Assistant
The Computers section manages the association of computer profiles (see page 74) to physical
workstations.
Note: User interface preferences such as customised ExoGrids and screen selection check boxes are
stored in the user’s Window’s registry, to ensure they are unique per user. These settings will
therefore ‘follow’ the Windows login. Computer (and user) profiles can be shared by more than one
computer or user, and are therefore not suitable for this purpose.
76
Setting Up
To assign a computer profile to a computer:
1. Alter the computer profile selection method by clicking the
toolbar button (note that changing
this setting mid-operation may result in having to delete and remap computer profiles). Options
available are:
o
GUID – the historical method where a unique identifier is stored within the computer’s
registry. This works fine if the Windows Login user is consistent, however this may not be
appropriate as network operating systems tighten security and workstations have multiple
users. This option will not work in a Terminal Services environment.
o
ComputerName, ClientName – two separate options which are relevant for some
operating systems, but not others. For instance, ComputerName is suitable for Windows as
uniquely identifying the workstation, but in some Terminal Services environments the
ComputerName is the main server and ClientName is the unique username.
o
ComputerName + ClientName – a compound setting that is unique in most mixed
operating system environments, and is the normal suggested setting.
2. Double-click on the appropriate computer name to assign a profile.
3. Select the required Computer Profile from the drop-down selection.
The computer running MYOB EXO Business needs to be associated with a computer profile. However, a
computer cannot be assigned a profile until that computer runs an EXO Business application, which then
“registers” the computer with EXO Business, giving the configuration applications a reference with which to
associate a profile.
To assist, EXO Business has a Company-level profile setting Use Default Profiles, which if enabled, will
assign any new computer the default computer profile. If this setting is disabled, the user will be prompted
to select a computer profile the first time an EXO Business application is run on the computer.
If a user regularly moves their notebook computer between offices (or maybe home and office), then the
computing environment could change radically. For instance, different printers could be available or the
preferred location to obtain reports from could change.
Security Profiles
The Security Profiles section controls profile settings relating to login/password security (see page 75).
Configuring Dropdown Menus
Setup > Setup Menu
Access to functions inside MYOB EXO Business is controlled through menus. Staff members are assigned
menus, which can be shared with multiple users. The Drop Down Menu Designer is also available in the
Staff section of the Configuration Assistant and EXO Business Config (see page 55).
77
MYOB EXO Business User Guide
From the Configuration Assistant, it is also possible to set up Business Flow menus (see page 80), which
define the layout of the main window for each module, including links and buttons.
Note: As the menu setup forms a key part of the user access security, access to the Setup Menu
option should only be given to staff entrusted with full administration privileges.
1. Select the program for which the menu is to be used (e.g. MYOB EXO Business, EXO Job Costing).
2. Select the menu name to edit.
Note: The name of the menu being used by the current user is coloured green.
3. Click the Edit button, or double-click the item. The following window appears:
4. Edit the menu name if desired.
5. Type in part of the menu item name in the Filter box, to refine the list of menu Procedure items.
6. Select the required menu procedure.
78
Setting Up
7. Drag the required menu procedure from the right hand side (from point 3) onto the desired place
in the menu structure on the left hand side. A popup box will appear to allow the menu name to be
edited:
8. Enter any optional parameters. For example, when adding a Clarity report, the name of the report
to run must be specified in the parameters.
9. A shortcut key combination and icon can be assigned. Any menu function that is assigned a
shortcut will also appear in the shortcut menu (see page 79) for the module whose menu is being
edited.
Note: EXO Business does not enforce uniqueness on shortcut key combinations - you must ensure
that you do not assign the same key combination to multiple functions in the same menu.
10. Move the selected menu item up and down the list as required by using the Move Up and Move
Down buttons or by pressing CTRL+UP ARROW and CTRL+DOWN ARROW. You can also right-click on
menu items to reposition, delete or edit them.
Notes
•
If menu items are changed on the current user’s menu, after saving and closing the menu editor,
select File > Refresh Settings from the main EXO Business menu to refresh the user’s menu.
(Refresh Settings also refreshes other setup options, such as user profile settings).
•
Whole menus can be exported and imported between databases using the relevant toolbar
buttons.
•
The menu procedure “External Program” allows other applications to be launched from the MYOB
EXO Business menu.
•
Separator bars can be added to give separators on the menu, and the separator bars can be
renamed to form sub-menu headings.
•
The menu procedure “Run Clarity Report” is used to run a report designed in the Clarity report
writer. The report name is entered in the parameter box, e.g. SPECIALREPORT.CLR.
79
MYOB EXO Business User Guide
Configuring Shortcut Menus
The main window of each module includes a shortcut menu in the title bar:
This menu can be configured to give quick access to commonly used functions. Either click on the icon for
the function you want, or use the shortcut key combination that has been assigned to that function.
Note: Hovering the mouse pointer over an icon in the shortcut menu shows you the name of the
function and the shortcut key combination assigned to it.
Shortcut menus for each module are set up when configuring dropdown menus (see page 77).
To add a function to a shortcut menu:
1. Open the Dropdown Menu Designer (see page 77).
2. If the function you want to add to the shortcut bar has already been added to the window, double
click on it. If it has not yet been added, add it by dragging the function onto the menu from the
Procedures list on the right. In either case, the Menu Item window opens:
3. Select a ShortCut key combination and an Icon.
Note: EXO Business does not enforce uniqueness on shortcut key combinations - you must ensure
that you do not assign the same key combination to multiple functions in the same menu.
4. Click OK, then save changes to the menu.
The function now appears in the shortcut bar, using the icon you specified.
Note: If the module whose shortcut bar you are configuring is already open, you will need to select
Refresh Settings from the File menu to update the shortcut bar.
80
Setting Up
Configuring Business Flow Menus
Business Flow Menus are added and edited in the Configuration Assistant at Staff > Menus > Business Flow
Menu.
Tip: Default menus can be copied with the Copy Menu button and used as the basis of a new menu.
To add a new Business Flow Menu:
1. Select the module whose menu you want to edit from the Program box, then click New to create a
new menu. The Business Flow Menu editing screen appears:
The left-hand pane is the designer area where the menu is created. The right-hand pane contains a
toolbox of menu elements and a list of all available menu procedures. A floating Menu Designer
Component Browser window lets you configure the properties of the currently selected item and
its “child” component items. The Component Browser also displays the name of the menu item
that the mouse is current over.
2. In the Menu Name field, enter a new name for the menu, which will be referred to when assigning
the menu to users.
3. Click on the WorkSpace item on the Menu Designer Toolbox, then click on the design area on place
it.
4. To change the size of the WorkSpace, hover the mouse over it and hold down CTRL. While CTRL is
held down, moving the mouse resizes the WorkSpace. Alternatively, double-click on the WorkSpace
to view its Properties dialog and enter Width and Height values.
5. To position the WorkSpace, hover the mouse over it and hold down SHIFT. While SHIFT is held
down, moving the mouse resizes the WorkSpace. Alternatively, double-click on the WorkSpace to
view its Properties dialog and enter Top and Left values.
Tip: To make the WorkSpace resizable, double-click on it and set the Custom property to “R” and
the Align property to “Client”.
81
MYOB EXO Business User Guide
The WorkSpace forms the base of the Business Flow menu, defining its size and shape. All other menu
items are placed on it.
Tip: You can place Panel items on the WorkSpace, then place other items on the panel. This allows
you to position multiple items at once.
To add a text link to a Business Flow Menu:
1. Enter text into in the Filter field to filter the list of available procedures.
2. Drag a procedure from the list to the WorkSpace. A window displaying the link’s parameters
appears:
3. Enter any parameters that may be required, then click OK.
Tip: You can add links to an external file or executable by dragging the “External Program” procedure
onto the WorkSpace, then changing its Name and entering the filename of the file/executable into its
Parameters field. Similarly, you can add a link to a Clarity report by dragging the “Run Clarity Report”
procedure onto the WorkSpace, then specifying the report.
To add a button to a Business Flow Menu:
1. Click on the Buttons item on the Menu Designer Toolbox.
2. Select the style of button (Standard, Focus or Transparent), then click anywhere on the WorkSpace
to place it.
Note: Transparent buttons allow more than one image to be specified. These images correspond to
the various states of the button, e.g. inactive, active, hover.
3. Enter any parameters that may be required, then click OK.
4. Size and position the button using the CTRL and SHIFT keys.
5. Enter some text into in the Filter field to filter the list of available procedures.
6. Drag a procedure from the list onto the button. This is the procedure that will be activated when
the button is clicked.
7. Enter any parameters that may be required, then click OK.
Tip: You can set a button to link to an external file or executable by dragging the “External Program”
procedure onto the button, then changing its Name and entering the filename of the file/executable
into its Parameters field.
To add a drop-down menu to a Business Flow Menu:
1. Click on the Drop Buttons item on the Menu Designer Toolbox.
2. Select the style of button (Standard, Focus or Transparent), then click anywhere on the WorkSpace
to place it.
Note: Transparent buttons allow more than one image to be specified. These images correspond to
the various states of the button, e.g. inactive, active, hover.
3. Enter any parameters that may be required, then click OK.
4. Size and position the button using the CTRL and SHIFT keys.
5. Enter some text into in the Filter field to filter the list of available procedures.
6. Drag a procedure from the list onto the button. (To add a sub-menu, drag .)
7. Enter any parameters that may be required, then click OK.
8. Repeat steps 5 – 7 for all other procedures you want to be available from the drop-down menu.
82
Setting Up
Note: You can add sub-menus by dragging the “SubMenu” item onto the dropdown button. To add
items to the submenu, select it so that its components appear on the Component Browser, then drag
items onto its name at the top of the Component Browser.
The drop-down menu works in real time on the Menu designer: click on the menu to view the items that
will appear under it.
To add graphical elements to a Business Flow Menu:
1. Click on the Label, Image or Line item on the Menu Designer Toolbox, then click anywhere on the
WorkSpace to place the item.
2. Enter any parameters that may be required:
o
For labels, this includes the label text.
o
For images, this includes the image file to display.
o
For lines, this includes the line style and orientation.
3. Click OK.
4. Size and position the item using the CTRL and SHIFT keys.
To add a tabbed layout to a Business Flow Menu:
Two varieties of tabbed layouts are available: Standard and Enhanced. Enhanced layouts allow
transparency and mouseover effects; Standard layouts do not allow these effects, but are more flexible
with how tab buttons can be arranged.
1. Click on the MultiPage > Standard > MultiPage or MultiPage > Enhanced > MultiPage item on the
Menu Designer Toolbox, then click anywhere on the WorkSpace to place it.
Tip: Standard MultiPages have a TabPos property that lets you specify which side of the MultiPage
tabs will appear on. Enhanced MultiPages can only have tabs at the top.
2. Size and position the MultiPage using the CTRL and SHIFT keys.
3. Click on the MultiPage > Standard > Tabsheet or MultiPage > Enhanced > Tabsheet item on the
Designer Toolbox, then click on the MultiPage. Enter a name an optionally an image then click OK.
This adds a tab to the top of the MultiPage.
Note: Enhanced Tabsheets allow more than one image to be specified. These images correspond to
the various states of the tab button, e.g. inactive, active, hover.
4. Repeat step 3 to add more tabs to the Multipage.
5. Click on a tab, then drag other items such as links and buttons onto the MultiPage. These items will
only appear when that tab is clicked.
6. Click on another tab. The items you added to the previous tab will disappear. Drag more items to
the MultiPage for this tab.
7. Repeat steps 5 and 6 for all tabs.
The tabbed layout works in real time on the Menu designer: click on a tab to view the items that will appear
on that tab.
To add a Dashboard interface to a Business Flow Menu:
A procedure called “Dashboard” is available in the list of procedures; dragging this procedure onto a
Business Flow Menu means that a Dashboard interface (see page 541) will be available when running the
module. The Dashboard can be customised and widgets can be added to it at run time. Enter “D” into the
Custom field for the procedure to indicate that it can be “docked” in the WorkSpace, so that it appears as
part of the core EXO Business interface, rather than appearing in a new window. Enter “DR” to indicate that
it is dockable and resizable. The Align property should be set to “Client”.
83
MYOB EXO Business User Guide
It is also possible to add a working Dashboard interface that can be edited at design time:
1. Click on the Panels > Dock Panel item on the Menu Designer Toolbox, then click anywhere on the
WorkSpace to place it. A Dashboard interface appears on the WorkSpace.
2. Size and position the Dashboard using the CTRL and SHIFT keys.
Tip: To have the Dashboard take up all of the available area, set its Align property to “Client”.
3. Click on the Panels > Panel item on the Menu Designer Toolbox, then click on the Dashboard. This
adds a panel and automatically converts it to a Dashboard widget.
4. Repeat step 3 to add more widgets to the Dashboard.
5. Click on a widget, then drag other items such as links and buttons onto the widget. Repeat for all
widgets.
Menu Definition
A menu definition is a set consisting of a Dropdown Menu and a Business Flow Menu. Menu definitions are
associated with users at Staff > Users, and determine which menus will be used for that user.
Tip: The definition assigned to the current user is highlighted in green.
To set up a menu definition:
1. Click New to create a new definition, or Edit to alter an existing one.
2. Enter a Name for the definition.
3. Select the Drop Down Menu for this definition.
4. Select a Business Flow Menu for this definition, or click Clear if you do not want to display a
Business Flow Menu.
5. Click Save to save the settings.
Analysis Codes
Analysis Codes are arbitrary codes that can be assigned to transactions. They do not perform any function
themselves and are independent of the normal grouping of account codes; they are simply a customisable
way of grouping related transactions together for sorting and reporting. This allows you to collect and
monitor income and expenditure for a particular function or event that is not captured by the use of a
project code or class, i.e. allows for much finer segmentation.
Once Analysis Codes are set up, they can be assigned to line items in all transaction types. A transaction can
have more than one code assigned to it.
84
Setting Up
Setting up Analysis Codes
Analysis Codes are set up in the MYOB EXO Business Configuration Assistant (see page 55). Codes are
grouped into CodeSets; before you can create Analysis Codes, you must set up at least one CodeSet.
Note: A maximum of five CodeSets may be created.
To set up a CodeSet:
1. Open the Configuration Assistant and go to Essential > Analysis Codes section.
2. Click the New CodeSet button.
3. Enter a name and description for the set.
4. If you want the codes in the set to follow a specific pattern, enter a code template in the Analysis
Code Validation field. A code template is a string consisting of the letters A and N, where A
represents an alphabetical character and N represents a numeric character. For example, entering
the template “AANNN” means that all codes in the set must consist of two alphabetical characters
followed by three numbers. If you do not enter a template, codes can contain any characters.
5. Click Save to save the CodeSet.
Analysis CodeSets must be active in order for users to be able to assign the codes they contain to
transactions. Activate a CodeSet by ticking its Active box. A CodeSet must have at least one code in it
before it can be activated.
Analysis codes can be created directly under a CodeSet, or under another code.
Adding Analysis Codes
To add an Analysis Code:
1. Select the Code or CodeSet you want to create the code under and click New Code.
2. Enter the code. If a template has been defined for the code’s CodeSet, the code entered must
match the format of the template. The code is highlighted red if it does not match the template.
3. Enter a name and description for the code.
4. Click Save to save the code.
Default Analysis Codes can be assigned to users at Configuration Assistant > Staff > Users. These codes will
be assigned by default to any transaction entered by the user.
Analysis Code Profile Settings
The following Company-level profile settings may need to be configured:
•
Default analysis codes required - specifies whether or not default Analysis Codes must be specified
for each user at Staff > Users.
•
Analysis codes mandatory for every transaction - specify whether or not one or more Analysis
Codes must be selected for every transaction entered.
•
Maximum number of analysis codes per transactions - enter the maximum number of Analysis
Codes that can be applied to a single transaction.
•
Hide Analysis Codes Column - if you do not intend to use Analysis Codes, this setting can be used to
hide the Analysis Codes column on the Sales Order, Purchase Order, Creditors Invoice, Debtors
Invoice, Cashbook and Journal entry windows.
The following User-level profile setting may need to be configured:
•
Permit editing of Analysis Codes assigned to a transaction - specify whether or not users can alter
the Analysis Codes assigned to a transaction. The user’s default Analysis Codes are always applied,
even if they are not permitted to edit them.
85
MYOB EXO Business User Guide
Head Office and Branch Accounts
About Head Office and Branch Accounts
MYOB EXO Business supports head office and branch accounts. This is useful for dealing with franchise or
multi-branch Debtors or Creditors.
A guiding principle to use with this function is that purchase/sale analysis and stock-related functions are
performed using branch accounts; accounts payable /receivable functions are performed using head office
accounts.
•
Head Office Account - Transactions for the branch accounts are assigned to it. Statements
produced for the Head Office Account will also list transactions.
•
Branch Account - When a transaction is entered on to a Branch account, it will automatically
update the Head Office account that this account is connected to. Transactions can be viewed from
either the Branch account or the Head Office account.
Head Office and Branch accounts are clearly labelled on the Debtors/Creditors account window:
In the toolbar are two toolbar buttons specific to the head office/branch functionality: Show Branch
and
Show Head Office . If you are viewing a Branch account, you can click the Show Head Office button to
view the Head Office account; if you are in the Head Office account, you can click the Show Branch button
to view branches of the head account.
Rules for Assigning Branches to a Head Office
•
A branch may not be assigned to another head office.
•
A branch may not be a head office itself (i.e. only two levels are allowed).
•
A branch must be an active account.
•
All members of a group (head office and branches) must have the same currency, e.g. a foreign
currency account cannot be connected to a non-foreign currency amount.
If a head office is put on stop credit, then all the branches will also be placed on stop credit.
Reports
Reports will give individual sales and purchasing analysis on branch and head office accounts. Statements
however, give a consolidated view of transactions for a period via the head office account. Statements for
the individual accounts may be printed but will only show transactions that have not been transferred to
the head office account, i.e. those transactions that existed prior to the branch being assigned to a head
office and were explicitly transferred to the head office account.
Advanced Head Office/Branch Features
If you have the MYOB EXO Business Configurator, the following advanced profile settings are available.
86
Profile Setting
Description
Hide ‘send to head office’
button on debtor account
screen – User Profile
Enabling this option will hide the Send to Head Office button on the
debtor account window. This setting would be used in conjunction
with the “keep transactions” setting above.
Setting Up
Hide ‘keep trans’ checkbox
in debtor account screen –
User Profile
Enabling this option will hide the Keep trans checkbox in the Debtor
Account window. This setting would also be used in conjunction with
the “keep transactions” setting above.
Keeping transactions with the branch account or head office option
This is an advanced feature only available to MYOB EXO Business Configurator users.
This is a profile setting which provides a different method of handling debtors Head Office / Branch
relationships. It is not available for creditor accounts.
Using this method you have the option of allowing branch accounts to retain their transactions and to
receive payments but to have a consolidated view of the purpose of reporting total balances at head office
level, and for producing a consolidated statement. A summarise option is included on head office account
details 1 tab, which will toggle the head office account balance to be the sum of its own posted
transactions, or to be that of itself and all its independent children.
Once the profile setting has turned on, the user is able to select whether or not this profile takes effect via
the keep track trans check box in the debtors account window. The profile setting Hide ‘keep trans’
checkbox in debtor account screen could be used to control whether users have the option.
Transactions
Transactions are shown only in the branch accounts to which they belong. You can only receipt payments
for branch invoices in the head office account, as all transactions are automatically transferred to the head
office account.
If you have MYOB EXO Business Configurator, you can explicitly transfer transactions to the head office
account by clicking the button in the branch account window and then they are visible in both accounts.
This action transfers all existing transactions from the branch to the head office account and sets the
branch account aged balance to 0. The profile setting Hide ‘send to head office’ button on debtor account
screen could be used to control whether users are able to perform this action.
Transferring Branch Transactions to Head Office
If you have MYOB EXO Business Configurator, you can manually transfer branch transactions to the head
office account:
1. In Account > Debtors select the required branch from the list of debtors.
2. Click the Send to Head Office button to transfer all transactions from the branch account to its
head office account. The aged balance for the branch account will be set to 0 and the head office
aged balance will be adjusted to reflect the added transactions.
As the system stands at present, in order to allocate a transaction within this function, the
transaction must be transferred to head office.
3. Click the Show Head Office button (within the branch account) to view the head office account.
Payments
Because transactions are automatically posted to the head office account, payments are also receipted
from the head office account. When a branch account is selected for this purpose, the account that appears
is the branch’s head office account and therefore a consolidated list of unallocated transactions from all
branches is displayed for the purpose of allocation.
87
MYOB EXO Business User Guide
If you have MYOB EXO Business Configurator, and have set the Send to Head Office button to be visible,
payments may be received from both branch and head office accounts although only transactions which
belong to the branch are able to be allocated against i.e. if a transaction has been transferred to a head
office account then it may not be allocated against via the branch account. Likewise, a payment for a
transaction remaining in a branch account (and not transferred) may not be allocated via the head office
account.
In the head office branch consolidation window, you can click on the View Transactions button to view
transactions of the highlighted branch.
Setting up and Viewing Head Office and Branch Accounts
1. In Account > Debtors or Account > Creditors select the account that is to be the head office
account.
2. Double-click this account. The account should open defaulting to the Details 1 tab.
3. Click the Show Branch
button to view, set up or link the branches. The following window opens:
Branches that belong to this Head Office will be listed here along with their aged balances.
Column
Description
Accgroup
The Debtors or Creditors Account Group of the account. Branch and Head
Office can belong to different account groups (but must be of the same
currency).
Group
The Debtor’s/Creditor’s Account name.
Keep Trans
This is set to ‘N’, as all branch transactions are automatically transferred to
the head office account.
If you use MYOB EXO Configurator, this is optional, and can be set to ‘Y’ to
allow branch transactions to stay with the branch account.
88
Account No
The Debtor or Creditor account number.
Alphacode
The Account code.
Name
The full name of the account.
Setting Up
Balance
The total balance of the account, with a total line of all branch accounts at
the bottom of the grid.
Current
Current balance
30 Days
30 day outstanding balance.
60 Days
60 day outstanding balance.
90 Days
90 day outstanding balance.
This Month TO
The Total for this month
Last Month TO
The Total for last month
This Year TO
The Total for this year
Last Year TO
The Total for last year
4. To view account details for an existing branch, double-click on the preferred branch. The debtor
account window for the selected branch will then be displayed.
5. To add branches, click on the Add button. The Account Search window opens. Select an existing
account, or Click New to create a new one. If a particular account is not displayed, it will be because
it’s not eligible to be selected, in accordance with the rules for assigning branches to a head office
(see page 86).
Once you have added a Branch account to a Head Office, all future transactions are automatically
transferred to the Head Office account. If you have EXO Business Config, you can also transfer existing
transactions to Head Office.
89
Working with Accounts
Debtors
This section details the functions related to debtors. It describes how you set up debtor account groups and
debtor accounts as well as the major customer and sales-related tasks you perform such as Credit Control
and Sales Order Invoicing.
Based on the options you have selected in MYOB EXO Business (Local, General and Staff security setup
sections), you are able to perform certain functions. You can decide whether your invoices should include
or exclude GST by selecting from the options in MYOB EXO Business Configurator > Essential > General
Settings. You can also check options to allow you to accept deposits against sales orders. When creating
sales orders, you can set the system to provide you with additional functions as Standing Orders, Quotes
and Laybys.
From the initial Debtors window you can search for a Debtor (see page 7) or create a new Debtor.
Creating a New Debtor
To create a new Debtor:
1. Go to Accounts > Debtors or press F3.
2. From the Debtor Account Details window, click the New button. The window now refreshes,
displaying the Details 1, Details 2 and Extra Fields tabs, with the Details 1 tab selected.
3. Complete the fields in the Details 1 tab (see page 93) and Details 2 tab (see page 96).
4. Click Save. Additional tabs are now created.
90
Working with Accounts
Debtors Master
Accounts > Debtors
Debtor account management within MYOB EXO Business is very powerful. Debtor accounts can be grouped
to suit the requirements of the business and the Debtors Account Details window contains all the
information related to the account, e.g. Debtor details, contacts, transactions, notes, price policies.
Information is spread across the following tabs:
Details 1 (see page 93) – contains the primary company information, including details, sales and credit
information, price setup, account type flag and other system maintained information.
Details 2 (see page 96) – holds the secondary information about the company, including payment info
(including prompt payment discounts), banking details, tax registration, auto order template, invoice
format control and pop up alert text.
Contacts (see page 122) – provides the Debtor’s contact details. Users can add, delete or edit contact
information. Users can easily create documents for the contact person, and an email facility is also
supported from this window.
Transactions (see page 129) – users can view all transactions related to the Debtor, e.g. payments,
invoices, credit notes, adjustments, and allocations. Each transaction provides details related to the
transaction such as the date, kind of transaction and the amount. Users can also email invoices and
statements from this tab.
Orders (see page 98) – allows viewing of the sales orders for this Debtor, its statuses and order amount.
New sales orders can also be created from this window.
91
MYOB EXO Business User Guide
Extra Fields (see page 139) – Debtor accounts support 24 extra fields that can be defined to suit the
company needs. The first three extra fields are displayed on the details1 tab and the rest on the extra fields
tab. The fields available here are set up at EXO Business Config > System > Extra Fields.
Serials (see page 139) – this shows a list of all serialised stock items that were bought by this account.
Discounts / Prices (see page 99) – this tab displays all the price policies and price rules to be used on this
account.
Jobs – displayed when the EXO Job Costing module is installed, this tab lists all jobs related to the
account. It displays the jobcode, jobno, status, order no and start and due date.
Notes (see page 141) – this tab provides a ‘free-form’ way for users to record any communication or
general information related to the Debtor. Users can insert the username and date/time when the info is
recorded and common phrases (see page 143) can be entered easily. This is a very useful tool for entering
conversations and events relating to the Debtor.
History Notes (see page 141) – this is like the Notes tab, but is more structured. This makes it easier to
search for previous notes related to the Debtor. It’s also easy to create, delete, or email history notes.
Documents (see page 144) – lists all the documents related to a Debtor account. It could be a word
processing document, a graphical .gif or .avi file, or any document that is recognized by a Windows
application.
Analysis (see page 100) – displays a graph that gives a quick view of the sales performance, and allows
comparison of the sales through the year. This will help to forecast future sales.
Relationships (see page 145) – displays the relationships that have been made between this account and
other entities in the EXO Business system.
Opportunities – displayed when functions from the EXO Business CRM module have been added to the EXO
Business core, this tab displays all sales opportunities related to the account.
Activities (see page 148) – displays and tasks and appointments associated with this account.
Serviceable Units – displayed when the EXO Job Costing module is installed and the optional Serviceable
Units feature is enabled, this tab lists all Serviceable Units assigned to the account.
Social (see page 151) – displays information about the Debtor from various social media services.
Notes
92
•
The toolbar buttons at the top of the Debtor Account Details window change when moving
between tabs.
•
There can only be one default contact per Debtor, and the default contact cannot be deleted.
•
The Debtor Stop Credit flag prevents transactions being saved.
•
MYOB EXO Business supports a Parent/Child account relationship.
•
Support exists for different invoice formats for Debtor Invoices, used for both normal invoice
printing and invoice batch printing.
Working with Accounts
Setting up Debtors
Setting up Debtor Account Groups
You can use Debtor Groups to group Debtor accounts together. For example you might set up your regions
as Debtor Groups. You might use the Secondary Debtor Group for the type of client, such as wholesaler,
retailer, or state and interstate. You can then report on Debtor Groups and add them to search windows as
extra fields.
Debtor groups are distinct from Debtor Price Policy Groups, which are only used for pricing purposes.
Examples of Debtor Price Policy Groups might be “trade”, “internet” or “foreign”, where there is a need for
a different pricing approach.
You can create account groups that are suited to the requirements of your business. When you set up
Debtors, you can assign them to one of these groups, for reporting and associating price policies.
To set up a Debtor Group:
1. In the MYOB EXO Business Configuration Assistant, go to Administration > Debtors > Debtor
Account Groups from the menu on the left. The Debtor Account Group window opens.
2. Click on the New button to create a new group.
3. In the Account Group Name field, enter a name for this group.
4. In the Report Code field, enter the report code.
5. Click Save icon from the menu.
A new Account Group is created and added to the list. The Account Group number is automatically
assigned.
Debtors Details 1 Tab
The Details 1 tab is used to store the primary information for the Debtor, including contact details, sales
and credit information, price setup, account type flag, and other system-maintained information.
93
MYOB EXO Business User Guide
Company Details
Field
Description
Code
The Debtor code is automatically populated, but you can change it now if you
prefer.
Name
Enter the name of the Debtor here as it should appear in the statements and
invoices.
Postal Address
Enter the postal address of the Debtor. If the delivery address is the same as
the postal address, press the Tab key on the last address line to automatically
copy this information to the delivery address field.
Postal Code
Enter the postal code if it is known or select the postal code from the Postcode
Lookup window opened by clicking the
Delivery Address
button.
Enter the Delivery address for the Debtor. Note that an additional Line 5 and
Line 6 appear beneath the country. You can use these lines to enter additional
address information. Click the small button next to the delivery address to
retrieve geolocation details (latitude and longitude) that match the address
entered here. An icon on the button displays the status of the match:
•
- the system hasn’t attempted to retrieve details yet.
•
- details successfully retrieved. Clicking the button again will
open your default browser, showing the location on a
map. SHIFT+clicking the button will attempt to retrieve location details
again.
•
- an error occurred when attempting to retrieve details. Hovering
the mouse over the button will display a popup message
indicating why the attempt failed.
Email
Enter the primary Debtor email address.
Phone
Enter the primary Debtor phone number.
Fax
Enter the primary Debtor fax number.
Contact name
The default contact for the Debtor account. This is set in the Contacts tab (see
page 122) of the Debtor account, and can be changed.
Sales Details
94
Field
Description
Primary Group
Select the primary Debtors Group (see page 93) that this Debtor is related to.
Secondary Group
Select the secondary Debtors Group (see page 93) that this Debtor is related
to.
Sales Person
Select a staff salesperson to be assigned to this account. This is optional. Any
transactions against this account will then be logged against this staff member.
Working with Accounts
Base Price
Choose which base price you want to assign this Debtor to. For example, you
might have set up a base price called ‘trade’, and another called ‘internet’, and
determined different pricing rules for these.
Select the Debtor Price Policy Group (see page 436) for this Debtor.
Turnover
Turnover totals of the Debtor account, for the current month, last month, year
to date and last year, are displayed here.
Credit Limit Information
Field
Description
Credit terms
Enter the credit terms you want to use for this Debtor. This may already be set
to your company default credit terms for a new account.
Credit Limit
Enter the credit limit you want to use for this Debtor. This may already be set to
your company default credit limit for a new account.
Currency
If you are using multiple currencies, choose the currency you are trading in with
this Debtor in the Currency field. Once selected, all transactions with this
customer are in this currency. You cannot change the currency of a Debtor
account once the account has transactions posted to it.
Aged Balances
Aged balances for the current and previous one, two and three months, and a
total balance, are displayed here.
Additional Flags
Field
Description
Active
This flag indicates whether the Debtor account is active or inactive (see page
103). If inactive, the account is hidden from the main Search view.
Open item
A check if you want to display all outstanding items on statements rather
than only a Balance Brought Forward statement.
You must check this option if the account is a foreign currency account, or if
you are calculating GST on a payments basis. Leave the box unchecked, if you
want this account to be a Balance Brought Forward account.
Stop credit
If this checkbox is ticked, the Debtor account is on stop credit (see page 102).
This means no further transactions can be processed. Accounts on stop credit
are indicated by a red band across the top of the account window.
Need Ord No
If the profile setting Validate Debtor Order Numbers in the Configuration
Assistant is enabled, then tick this checkbox if you want order numbers
checked against past order numbers to prevent duplication.
Account Template
If this checkbox is ticked, this Debtor account will be used as a template for
Non Accounts and new POS accounts.
95
MYOB EXO Business User Guide
Allow Restricted
Goods
If this checkbox is ticked, you can sell any stock items that have been flagged
as restricted goods (see page 103) to this Debtor.
Note: You can enable the Use customised customer stock restrictions
logic Company-level profile setting to customise and extend the
Restricted Goods function. When this setting is enabled, EXO Business
uses the FN_RESTRICTED_ITEM function to determine if a Stock item
can be sold to a Debtor - this function can be customised to suit the
needs of your organisation.
Private Account
If this checkbox is ticked, this account is classed as private (see page 103).
Whether or not this account can be accessed by this level of user depends on
how the Allow Access to Private Debtor Accounts user profile setting is set.
Debtors Details 2 Tab
The Details 2 tab is used to store secondary information about the Debtor, including payment information
(including prompt payment discounts), banking details, tax registration, auto order template, invoice
format control and pop-up alert text.
Payment Details
Field
Description
Default Payment Type
Select from the drop down list What payment method the debtor will
generally use.
Bank Account
Number
The BSB (Bank State Branch) number for the bank and branch at which the
debtors account is held.
Bank Account Name
The name of the account.
Advice Notification
The method of advice notification preferred by the debtor. Tick each
checkbox to enable the advice notification type.
Prompt Payment Details
96
Field
Description
Discount (%)
The discount percentage being offered. Enter an integer between 0 and 100
and exclude the % designator.
Amount
The discount amount being offered.
Do Not Accept Cheque
Whether or not cheques will be accepted from this debtor.
Working with Accounts
Social Media Details
Field
Description
Facebook
The Debtor’s Facebook account ID. This can be a numerical ID, or a Facebook username,
if they have one.
LinkedIn
The Debtor’s LinkedIn account ID. This must be the numerical ID.
Twitter
The Debtor’s Twitter account username.
Note: If you do not know these details, you can search for them on the Social tab (see page 153).
GST Details
Field
Description
ABN
The Australian Business Number (ABN) of the debtor. (Aus)
GST
The GST number of the debtor. (NZ)
Override GST rate
The default GST rate for the country will default in here. You can override the
default GST rate for this debtor here.
Miscellaneous Details
Field
Description
Auto Order Template
A Bill of Materials (see page 507) order template. Manufacturing use only.
Invoice File
You can use multiple invoice layouts in MYOB EXO Business (see page 101).
Invoice formats need to be saved with the invoice# filename.
Enter the number that is used in the invoice template name that will be
used for this Debtor, i.e. to select invoice2.clf, enter ‘2’; to select
invoice5.clf, enter ‘5’, and so on. Leave the value as ‘0’ to use the default
invoice.clf template.
Statement Delivery
Statement Contact
Select how statements should be delivered to this Debtor. Choose from:
•
None - No statement will be sent to the Debtor.
•
Email - Statements will be sent to the Debtor via email.
•
Print - Printed statements will be mailed/faxed to the Debtor.
•
Both - The Debtor will be emailed statements and also sent printed
copies.
When sending statements via email, the email will be sent to the address of
the contact selected here.
97
MYOB EXO Business User Guide
Invoice Type
Select the type of invoice to send to this Debtor. Choose from:
•
DEFAULT - Use the default invoice type, as determined by profile
settings.
•
STANDARD - Use standard MYOB EXO Business invoices for this
Debtor.
•
M-POWERED - Use the MYOB M-Powered Invoices service (see
page 395) for this Debtor. M-Powered Services need to be available
on your system to use this feature. M-Powered Services are
available in Australia only.
Pop-up Alert
Field
Description
Pop-up Alert
A note you would like to appear when dealing with this debtor. This could be a
reminder about certain preferences they may have.
Debtors Orders Tab
This tab is used to view Sales Orders for the Debtor. You can also create new Sales Orders, quotes, standing
orders and laybys. For a specific Sales Order, you can print an order, print a backorder, print a proforma
invoice, and view the sales order history.
There are several filters available to enable you to quickly find the sales order you require; several of these
allow you to filter by Order Status (see page 307).
Sales Order Details
The grid header fields are detailed in the table below:
98
Column
Description
Order No
The Sales Order number.
Status
The status of the sales order.
Order Date
The date the Sales Order is created,
Due Date
The expected time of arrival to the customer of the sales order.
Cust Order No
A record of the customer’s order number.
Reference
The code that you use as a batching system if you are entering standing orders
(see page 381).
Total Value
As the name implies, this is the total value of the order.
Working with Accounts
Additional Sales Order tasks are available the right-click menu:
Option
Description
Print Order
Prints a packing slip of the order, itemizing each item in this order.
Print Backorder
Print a backorder
Print Proforma
Print the proforma invoice for the selected sales order.
View Sales Order
History
View the history of the sales order. See View the history of a sales order (see
page 365).
Debtor Discounts/Prices Tab
Account > Debtors > {Select a Debtor} > (Discounts/Prices)
The grid header fields are detailed in the table below:
Field
Description
Price Policy Group
This is the Debtor Price Policy Group (see page 436) to which this
Debtor account belongs.
(Price Policy grid)
Policy #
The price policy number.
Policy Reference
The name of the price policy.
Customer Reference
The customer’s own price agreement reference number, if they keep a
record of supplier prices and discounts for price checking.
Start Date
The activation date of the price policy.
End Date
The end date of the price policy. Note that the start and end dates of a
price policy will override the start and end dates of any included price
rules; if the end date of a price policy extends beyond the end date of
an included price rule, a prompt is displayed.
Fixed
If checked, this means that although lower prices may be available (or
may become available in time) that the price rules contained in this
policy are absolute and are always applied regardless of normal price
logic. These prices may be considered as agreed.
(Price rule grid)
Stock Code
Used to search for a specific stock item’s price rule.
Description
The description of the stock item.
Stock Group
The stock group code to which the stock item belongs.
Group Name
The stock group description.
99
MYOB EXO Business User Guide
Start Date
The start date of the price rule.
Stop Date
The end date of the price rule.
Sell Price Band
The base price
Discount %
The discount percentage of the price rule.
Price
The new price of the discounted stock item, or blank if a stock group
price rule.
Min. Qty
The minimum quantity that is to be purchased in order to receive a
discount.
Policy Reference
The name of the price policy.
Menu Items and other commands
Click the Setup Price Policies button to set up Price Policies (see page 435).
1. Creates a new Price Rule (see page 449)
2. Delete the selected Price Rule
Debtors Analysis Tab
The Analysis tab displays a graph that gives a quick view of the sales performance, and allows comparison
of sales through the year. This will help to forecast future sales.
100
Working with Accounts
The Average Debtor Days value indicates the average number of days that the debtor takes to pay their
invoices. This value is only visible if the Show average debtor days profile setting is enabled.
Tip: The main logic for this calculation is in a stored procedure called
DR_CR_ALLOCATION_AVE_DAYS_SP. The Number of months of debtor transactions to be used for
Average Debtor Days calculation profile setting specifies how many months of debtor transactions
to use when calculating the average (the default is 99).
Right-clicking on the graph provides you with the option to copy the graph into another Windows
application such as Word or Excel. You can also print the graph.
Working with Debtors
Specifying an Invoice Template for a Debtor
If you want to use different invoice formats for different kinds of customers or sales, you can do this in
MYOB EXO Business by specifying a specific invoice template for each Debtor.
By default, if there is no invoice template specified for a Debtor, the invoice template Invoice.CLF will be
used. To use a specific invoice template for a specific Debtor, the invoice template must be set up in EXO
Business Config, and then selected on the Details 2 tab of the Debtor account (see page 96).
To set up invoice templates in EXO Business Config:
1. Open EXO Business Config and go to the Forms section.
2. Search for the Invoice form files profile setting.
3. Enter the file names of all invoice templates, separated by commas. File names must be of the
format “InvoiceX.CLF”, where X is the number of the template.
4. Click Save.
To specify an invoice template for a Debtor:
1. Select the Debtor you want to specify the invoice template for.
2. Click on the Details 2 tab.
3. In the Invoice file field, enter the number that is used in the invoice template name that you want
to use, e.g. to select invoice2.clf, type ‘2’ in the Invoice file field; to select invoice5.clf, enter ‘5’, and
so on.
4. Click Save.
101
MYOB EXO Business User Guide
Viewing the Aged Balances of a Debtor
You can view the Aged Balances of a Debtor in the Debtor Account Details window, in summary in the
Details1 tab of the debtor account, and in detail in the Transactions tab of the debtor account.
Note: If you have the MYOB EXO Business Configurator, there is profile setting to be able to change
the Aged Balances of a debtor account.
1. Open the required debtor account.
2. Review the aged balances in the Credit Terms frame in the Details1 tab.
3. To view the transactions that make up each period total, click on the Transactions tab. For each
highlighted period in the Transactions by Period frame, the transactions are highlighted in the
transaction grid below.
Putting a Debtor on Stop Credit
The Stop Credit status on an account will highlight the account as being on Stop Credit for any user opening
the Debtor account. A warning will be displayed if any user tries to process a sale or invoice for this Debtor
account. You cannot process a sales order for a debtor account on Stop Credit.
You can still process a Debtor Receipt for the account.
A reason log event exists for this action. If the event has been enabled, this action may be silently logged, or
you may be prompted to select an event reason and enter any additional explanatory notes for this action.
1. Open the required Debtor account.
2. On the Details1 tab, tick the Stop Credit checkbox.
3. Click Save.
When any user next opens this debtor account, a red Stop Credit band appears at the top of the Debtor
Account Details window.
Taking a Debtor off Stop Credit
To take a Debtor off Stop Credit, you can either:
•
Change the status when you are processing a Debtor Receipt for this account.
•
Change the status in the Details1 tab of the Debtor Accounts window.
Note: You cannot clear the Stop Credit status unless you process a Debtor Receipt in this window.
A reason log event exists for this action. If the event has been enabled, this action may be silently logged, or
you may be prompted to select an event reason and enter any additional explanatory notes for this action.
102
Working with Accounts
To clear the Stop Credit status in the Debtor Receipts window when processing a debtor receipt for the
account:
1. Go to the Transactions > Debtor Receipts > Debtor Receipt.
2. Enter the Debtor Receipts, including the amount of the Debtor Receipt.
3. Uncheck the Stop Credit checkbox.
4. Complete and save the transaction.
Making a Debtor Account Inactive
Making a Debtor account inactive will hide it from the default search view, and from search lookups from
other transaction windows. However, you can still choose to include inactive accounts in your search, and
then process a transaction such as a Debtor Invoice or Sales Order for an inactive account.
You cannot make a Debtor account inactive that has an outstanding balance. In this case, the Active
checkbox is greyed out and unavailable for selection in the Details1 tab. To make a Debtor account with an
outstanding balance inactive, the Debtor first has to settle the outstanding balance, and then the account
can be made inactive.
1. In the Debtor Accounts window, locate the Debtor account you want to make inactive.
2. Check that the balance showing in the Balance column is zero. If so, double-click on the Debtor.
3. Clear the Active checkbox, then click Save.
Note: New Debtor accounts can be automatically set to Active or Inactive by configuring the Set new
debtor accounts as active Company-level profile setting.
Making a Debtor Account Private
A debtor account can be set to be a private account. If the Configuration Assistant has been set up to
disallow access to private accounts, then when you try to open a debtor account from the search window,
you will be blocked.
(Each user is part of a user profile, and this profile setting can be set differently for each user profile, for
example giving management visibility of all private accounts, but preventing admin staff from viewing
them.)
1. In the Debtor Accounts window, double-click on the debtor account you want to make private.
2. In the Details1 tab, tick the Private Account checkbox.
3. Click Save.
Allowing a Debtor to Purchase Restricted Goods
If a stock item is set to be a restricted goods stock item, then to sell that stock item, the Debtor must be set
to allow restricted goods. When creating a debtor transaction such as a Debtor Invoice or Sales Order, if the
Debtor is not set to allow restricted goods, the transaction will be blocked.
1. In the Debtor Accounts window, double-click the required Debtor.
2. In the Details1 tab, tick the Allow Restricted Goods checkbox.
3. Click Save.
103
MYOB EXO Business User Guide
Adding Extra Delivery Addresses
A Debtor account can have multiple delivery addresses associated with it.
You can add extra delivery addresses either:
•
from the Debtor Account Details window, by clicking the Additional Delivery Addresses... toolbar
button, or
•
from the Debtor Invoice Entry window, in the Payments/Delivery tab, when specifying delivery
details for an invoice. If you enter a new delivery address when creating a new Debtor Invoice, the
address will be saved with the Debtor account.
To add a new delivery address:
1. Click the New button. The following window is displayed:
Note: You can change the labels on each line of your delivery addresses using the MYOB EXO
Business Configuration Assistant.
104
Working with Accounts
2. To edit an existing delivery address, click the Edit the Selected Item button in the toolbar, and
make any required changes.
3. Save the edited, or new, delivery address.
Changing the Credit Terms of a Debtor
The default credit terms you can apply to a specific Debtor account are set up in the Finance section of the
Configuration Assistant. For each credit term, you can:
•
•
•
specify whether it is active for Debtors or Creditors
choose one of four credit term option types: No credit - cash only; End of invoice month; Net days;
Days from month following
create a warning, including the warning text to display, when credit terms are exceeded
How credit terms behave in your implementation of MYOB EXO Business also depends on how the
following profile settings have been set:
•
•
•
Debtor Credit Terms Default: New debtor accounts will inherit the credit term of this profile
setting.
Debtor Balance Warning: Displays the warning set up in the credit term if invoice or sales order
entry does not comply with the credit term.
Enforce Credit Terms: Enforces (not just a warning) when invoice/sales order entry does not
comply with credit term.
Credit terms are managed quite separately from how transactions are aged in MYOB EXO Business.
To change the credit terms of a Debtor account:
1. Open the required Debtor account.
2. In the Credit section, select the required term from the Credit terms drop-down list.
3. Change the Credit limit if required.
4. Click Save.
Note: If this is a child account, which does not have its own balance, the credit limit test will apply to
the parent account instead.
Creditors
This section details the functions related to Creditors. It describes how you set up Creditor Account Groups
and Creditors as well as the major creditor-related tasks you perform such as Credit Control and Purchase
Order Invoicing.
Based on the options you have selected in MYOB EXO Business you are able to perform certain functions.
You can decide whether your invoices should include or exclude GST by selecting from the options in MYOB
EXO Business Config > Profiles.
From the initial Debtors window you can search for a Creditor (see page 7) or create a new Creditor.
105
MYOB EXO Business User Guide
Creating a New Creditor
To create a new Creditor:
1. Go to Accounts > Creditors.
2. Click New to create a new Creditor account. The Creditor Account Details window (see page 108) is
displayed with the Details 1 tab as the default page.
3. Complete the entries in each field of the Details 1 tab (see page 108) and Details 2 tab (see page
110).
4. Click Save. Additional tabs are now created.
Creditors Master
Accounts > Creditors
The Creditors account master concept is very similar to the Debtors master. Users can also setup Creditor
account groups (see page 107) suited to the requirements of the business.
Information on the Creditors Account Details window is spread across the following tabs:
Details 1 (see page 108) – contains company details, purchases and credit information, account type flag
and other system maintained information.
Details 2 (see page 110) – holds payment info including prompt payment and vendor discount, banking
details, default GST rate, maximum auto authorise amount, and pop-up alert text.
Contacts (see page 122) – provides the creditor’s contact details. User can add, delete or edit contact
information. Users can easily create document for the contact person and email facility is also supported on
this window.
106
Working with Accounts
Transactions (see page 129) – users can view all transactions related to the creditor, e.g. payments,
invoices, refunds, adjustments, allocations, etc. Each transaction provides details related to the transaction
as the date, kind of transaction and the amount.
Orders (see page 112) – this is where you can view a list of purchase orders on their account, its statuses
and order amount. New purchase orders can also be created from this tab.
Extra Fields (see page 139) – debtor accounts supports 24 extra fields that can be defined to suit the
company needs. The first 3 extra fields are displayed on the details1 tab and the rest on the extra fields tab.
Serials (see page 139) – lists serial number information pertinent to the creditor account. Users can even
view serial number history.
Discounts/Prices (see page 112) – this tab displays all the discounts and price rules to be used on this
account.
Notes (see page 141) – allow users to record any communication or general information related to the
creditor. Users can insert the username and date/time when the info is recorded and common phrases can
be entered easily. This is a very useful tool for entering conversations and events relating to the creditor.
History Notes (see page 141) – this is like the Notes tab, but is more structured. This makes it easier to
search for previous notes related to the debtor. It’s also easy to create, delete, or email history notes.
Documents (see page 144) – lists all the documents related to a Creditor account. It could be a word
processing document, a graphical .gif or .avi file, or any document that is recognized by a Windows
application.
Analysis (see page 113) – displays a graph that gives a quick view of the purchases performance, and
comparison of the purchases through the year. This will help to forecast future purchases.
Relationships (see page 145) – displays the relationships that have been made between this account and
other entities in the EXO Business system.
Opportunities – displayed when functions from the EXO Business CRM module have been added to the EXO
Business core, this tab displays all sales opportunities related to the account.
Activities (see page 148) – displays and tasks and appointments associated with this account.
Social (see page 151) – displays information about the Creditor from various social media services.
Note: The toolbar icons at the top of the Creditor Account Details window change when moving
between tabs.
Setting up Creditors
Setting up Creditor Account Groups
Setup > Business Admin Settings (General Setup) > [Creditor Account Groups]
You can create account groups that are suited to the requirements of your business. When you set up
Creditors, you can assign them to one of these groups.
To set up a Creditor account group:
1. Click New to add a new group. The Details tab is displayed.
2. Enter a Name for the account group.
3. Enter a Report Code for the account group. This is a user-defined report code to report on Debtor
Price Policy Groups.
4. Click Save.
A new Account Group is created and added to the list. The Account Group number is automatically
assigned.
Note: Right click on the column heading for grid-related tasks.
107
MYOB EXO Business User Guide
Creditors Details 1 Tab
The Details 1 tab is used to store the primary information for the Creditor, including contact details,
Creditor groups, account type flag, and other system-maintained information.
Field Descriptions
Field
Description
Code
The code that relates to the account. MYOB EXO Business automatically assigns
a code. If you prefer, you can change the code by overtyping it. This code is
primarily used for controlling the sorting of reports but also allows you to
search a creditor. E.g. SMIT1 (Mr Smith) or JON1 (Jones Co Ltd).
Name
The name of the creditor as it should appear in statements and invoices.
Company Contact Details
Postal Address
The creditor’s postal address. If the street name is the same, press TAB on the
last address line to copy the Postal Address into the Delivery Address fields.
Post code
Enter the postal code if it is known or select the postal code from the Postcode
Lookup window opened by clicking the
108
button.
Working with Accounts
Delivery Address
The delivery address. If it differs from the postal address, overtype it here. Click
the small button next to the delivery address to retrieve geolocation details
(latitude and longitude) that match the address entered here. An icon on the
button displays the status of the match:
•
•
- the system hasn’t attempted to retrieve details yet.
- details successfully retrieved. Clicking the button again will
open your default browser, showing the location on a
map. SHIFT+clicking the button will attempt to retrieve location details
again.
•
- an error occurred when attempting to retrieve details. Hovering
the mouse over the button will display a popup message
indicating why the attempt failed.
Contact
The name of the main person to be contacted.
Email
The main e-mail address of the creditor.
Phone
The main phone number of the creditor.
Fax
The main fax number of the creditor.
Extra Fields
Default Code
This is an example of a user-defined extra field (see page 24).
Miscellaneous
Primary
The name of a primary account group, from the list.
Secondary
The name of a secondary account group, from the list
Staff
The name of the staff member who normally deals with this creditor.
Credit Terms
Select from the list to specify Cash Only or the method for due payment to the
creditor.
Currency
The currency for transactions with this customer. You cannot change the
currency of a Creditor account once the account has transactions posted to it.
Flags
Active
A check in this box to view the creditor’s account details.
The box is checked by default. If the box is not checked, the account becomes
inactive, and is hidden from the main search window.
109
MYOB EXO Business User Guide
Open Item
A check if you want to display all outstanding items on statements rather than
only a Balance Brought Forward statement.
This is a default setting if you selected the New Accounts Defaults to Open
Item in MYOB EXO Business Config > Profiles. You must check this option if the
account is a foreign currency account, or if you are calculating GST on a
payments basis. Leave the box unchecked, if you want this account to be a
Balance Brought Forward account.
Stop Credit
If checked this will prevent further invoices being posted to this account.
Private Account
If checked, this account will become a private account.
Toolbar Buttons
Note: These are only available once the initial values have been entered and saved in this tab.
Send the transactions to the head office account.
Edit aged balances.
On a head office account, this button displays all branches; on a branch
account, this button opens the head office account.
Creditors Details 2 Tab
The Details 2 tab is used to enter and store payment info including prompt payment and vendor discount,
banking details, default GST rate, maximum auto authorise amount, and pop-up alert text.
Field Descriptions
Field
Description
Payment
Default Payment
Type
Select the default payment method to this creditor.
Bank Account
Number
The bank account number of the creditor.
Bank Account Name
The name of the bank account.
Miscellaneous
Default Invoice
Mode
Select default invoice mode.
Primary Lead Time
The number of days between placing an order and its arrival.
Secondary Lead Time
The alternate lead delivery time in days.
Prompt Payment
Discount (%)
The percentage of discount being offered for prompt payment.
110
Working with Accounts
Remittance Contact
Remittance advice will be emailed to the address of the contact selected
here.
Pop Up Alert
Use this field to enter a user defined popup alert.
Note: Use the ^ character to insert a carriage return.
GST
GST #
Enter the company GST number here (New Zealand only).
ABN
Enter the company’s Australian Business Number here (Australia only).
Override GST Rate
The override GST rate.
Track Taxable
Payments
Applies to Australian companies only. If you make payments to this Creditor
for construction or building services, you will need to track these payments
for reporting on the “Taxable payments annual report”. Tick this option to
track all payments for this Creditor.
Remittance
Send M-Powered
Payments
Remittances
This option is only available if “M-POWERED” is selected for the Default
Payment Type. Ticking this box means that remittance advice will be sent
to this Creditor whenever payments are made to them via the MYOB MPowered Payments system (see page 335).
M-Powered Services need to be available on your system to use this
feature. M-Powered Services are available in Australia only.
Remittance Method
If the Send M-Powered Payments Remittances option is selected, specify
how remittance advice should be delivered to this Creditor. Choose from:
•
None - No remittance advice will be sent to the Creditor.
•
Email - Remittance advice will be sent to the Creditor via email.
•
Print - Printed remittance advice will be mailed/faxed to the
Creditor.
•
Both - The Creditor will be emailed remittance advice and also sent
printed copies.
E-Mail
If remittance advice is to be sent by E-Mail, enter the address to send to.
This defaults to the address on the Details 1 tab (see page 108).
Fax
If remittance advice is to be sent by Fax, enter the fax number to send to.
This defaults to the number on the Details 1 tab (see page 108).
111
MYOB EXO Business User Guide
Social Media
Facebook
The Creditor’s Facebook account ID. This can be a numerical ID, or a
Facebook username, if they have one.
LinkedIn
The Creditor’s LinkedIn account ID. This must be the numerical ID.
Twitter
The Creditor’s Twitter account username.
Note: If you do not know a Creditor’s social media details, you can search for them on the Social tab
(see page 153).
Viewing Creditor Purchase Orders
The Orders tab on the Creditor Details window contains a list of all Purchase Orders on the Creditor
account.
To filter the list of orders, check the options related to the type of orders you want to include.
Note: If you have ticked the Enable extended sales order statuses Company-level profile setting in
MYOB EXO Business Config there will be more check boxes here.
The following toolbar-specific functions are available:
112
•
A new Purchase Order can be manually created (see page 310) from this window by clicking New
Order > Manual Order.
•
A new Forecast Based Purchase Order (see page 317) can be created from this window by clicking
New Order > Forecast Order.
Working with Accounts
Creditor Discounts/Prices Tab
Account > Creditors > {Select a Creditor} > (Discounts/Prices)
Creditor discounts per stock code or stock price group are listed in a grid. These price rules are defined by
clicking the New Price Rule button (see page 115).
Field Definitions
The grid header fields are detailed in the table below:
Field
Description
Stock Code
The code you use to call up an item. A stock code can normally contain up to
15 characters.
Stock Price Group
Stock items can be categorised and grouped on this category, this is the
number assigned to this stock group.
Group Name
This is the name given to the stock group, detailed above.
Price
The price that applies to the stock item.
Discount
This is the discount in a percentage received for purchasing stock items in
bulk quantities. This quantity is displayed in the Min. Qty field.
Min. Qty
This, as detailed above, is the minimum quantity that needs to be purchased
from a creditor to receive the allotted discount.
Start / Stop Date
If this discount or pricing is over a predetermined period, this is defined by
the start and end date displayed here.
113
MYOB EXO Business User Guide
Creditors Analysis Tab
The graph on the Analysis tab allows you to compare purchasing through the year.
Tip: Right-clicking on the graph provides you with the option to copy the graph into another
Windows application as Word or Excel. You can also print the graph.
114
Working with Accounts
Working with Creditors
Creating a New Price Rule for a Creditor
The Setup Cost Price window allows you to setup purchase prices from a creditor for a single stock item, a
group of stock items with a discount applied. Similarly this is applied to stock price groups, where the group
is any variety of similar stock items assigned to a group.
Click the New Price Rule button on the Discounts/Prices tab of the Creditor Details window (see page 112)
to open the Setup Cost Price window.
To set up cost prices:
1. For a single stock item, enter a Stock Code (if this is unknown, enter “?” and press TAB to open the
Stock Search window). If the cost pricing is to be determined by a group, choose this group from
the Stock Price Group dropdown.
2. Enter the Price Type details in the fields provided. If stock price grouping is enabled, the supplier
price option is no longer available. If an item is not available from the supplier, a substitute may be
required. If substitutes are available, enter the cost price for the substitution item here.
3. If discounts are attainable from the supplier, there may be Conditions to receive these, such a
minimum order quantity. Alternatively these stock items may be sold only in batches, requiring the
minimum quantity field to be completed. If discounts or prices are only for a predetermined period,
enter the start and stop dates that define the discount period.
115
MYOB EXO Business User Guide
Non Accounts
Accounts > Non Accounts
Non Accounts let you add companies that aren’t yet Creditors or Debtors, e.g. sales prospects. A Non
Account can be converted to a full Creditor or a Debtor account at a later date if necessary.
Creating a Non Account
To create a Non Account:
1. Go to Accounts > Non Accounts.
2. From the Non Account Details window, click the New button.
3. Enter the following details on the Details tab:
Field
Description
Name
Enter the name of the account as it should appear throughout the MYOB
EXO Business system.
Phone
Enter a contact phone number for the account.
Fax
Enter a fax number for the account.
E-mail
Enter an e-mail address for the account.
Website
Enter the account’s website address.
Postal Address
Enter the postal address of the account.
Type
This is a user-definable classification of the Non Account. Select the type
of account that the Non Account is, or select “Edit List...” to create a new
type.
Base Price
Choose which base price you want to assign this Non Account to. For
example, you might have set up a base price called “Trade”, and another
called “Internet”, and determined different pricing rules (see page 449)
for these.
Select the appropriate price band for this account.
116
Sales Person
Select a staff salesperson to be assigned to this Non Account. This is
optional. Any transactions against this account will then be logged against
this staff member.
Postal Code
Enter the postal code if it is known or select the postal code from the
lookup window attained from the ellipsis [...] key.
Contact Person
The default contact for the Non Account. Contacts are set up on the
Contacts tab for the account. Initially, this field will be empty - after you
have created the Non Account and added Contacts for it, you can specify
one of them as the default here.
Working with Accounts
Notes
The area at the bottom of the Details tab is a free-form notes area where
you can enter any extra information about the account.
4. Click Save. Additional tabs now become available, allowing you to edit all Non Account properties
(see page 117).
Converting Non Accounts to Full Accounts
Non Accounts can be converted to full Creditor or Debtor accounts if necessary.
To convert a Non Account to a full account:
1. Click the Convert to Debtor or Convert to Debtor toolbar button, depending on the type of account
you want to convert the Non Account to.
2. Click Yes when prompted to confirm the conversion.
Non Account Details
The available tabs on the Non Account Details window are detailed below.
117
MYOB EXO Business User Guide
Details
This tab contains contact and sales information for the Non Account.
Field
Description
Name
Enter the name of the account as it should appear throughout the MYOB EXO
Business system.
Phone
Enter a contact phone number for the account.
Fax
Enter a fax number for the account.
E-mail
Enter an e-mail address for the account.
Website
Enter the account’s website address.
Postal Address
Enter the postal address of the account.
Postal Code
Enter the postal code if it is known, or select the postal code from a lookup
window by clicking the [...] button.
Delivery Address
Enter the delivery address of the account. Click the small button next to the
delivery address to retrieve geolocation details (latitude and longitude) that
match the address entered here. An icon on the button displays the status of
the match:
•
•
- the system hasn’t attempted to retrieve details yet.
- details successfully retrieved. Clicking the button again will
open your default browser, showing the location on a map.
SHIFT+clicking the button will attempt to retrieve location details again.
•
- an error occurred when attempting to retrieve details. Hovering
the mouse over the button will display a popup message
indicating why the attempt failed.
Type
This is a descriptive classification of the account. Select the type of account
that the Non Account is, or select “Edit List...” to create a new type.
Account Template
Select the Debtor account that will be used as a template for the Non Account.
Any pricing rules (see page 449) used by the template account will be applied
when generating quotes for the Non Account, e.g. for an Opportunity when
using EXO Business CRM.
Note: Debtor accounts can be marked as templates by ticking the
Account Template flag on the Details 1 tab of the Debtor Account
Details window (see page 93).
Base Price
118
The base price to assigned to this Non Account - this is determined by the
Account Template. For example, you might have set up a base price called
“Trade”, and another called “Internet”, and determined
Working with Accounts
Sales Person
Select a staff salesperson to be assigned to this Non Account. This is optional.
Any transactions against this account will then be logged against this staff
member.
Contact Person
The default contact for the Non Account. Contacts are set up on the Contacts
tab for the account. Initially, this field will be empty - after you have created
the Non Account and added Contacts for it, you can specify one of them as the
default here.
Campaign Wave
This field is available if the EXO Business CRM module is installed. If the Non
Account is associated with a campaign wave, e.g. if it came about as a result of
a campaign, the wave can be specified here.
Facebook
LinkedIn
Twitter
To view social media account information for the Non Account (see page 151),
enter their usernames or logon IDs here.
Extra Fields
If any Extra Fields (see page 24) have been defined for Non Accounts, fields in
positions 1 - 3 will appear in this area, while any others will appear on the
Extra Fields tab.
Notes
This area is a free-form notes area where you can enter any extra information
about the account.
Note: The LinkedIn ID must be the numerical ID, not a username. The
Facebook ID can be a numerical ID or a Facebook username, if one has
been set up.
Extra Fields
If any Extra Fields (see page 24) have been defined for Non Accounts, fields in positions 4 and later will
appear on this tab.
Contacts
This tab lists all Contacts associated with the Non Account (see page 120). Use the toolbar to add and edit
Contacts:
1. New Contact: Create a new Contact and associate it with the Non Account.
2. Associate a New Contact: Select an existing Contact to associate with the Non Account.
3. Set as Default Contact: Set the selected Contact as the default Contact for the Non Account. This
Contact will appear as the Contact Person on the Details tab.
4. Remove Contact Association: Remove the selected Contact from the Contacts tab for the Non
Account. (This does not delete the Contact from the system.)
History Notes
This tab works in the same way as the History Notes tab for Debtors (see page 141).
Opportunities
This tab is only displayed when functions from the EXO Business CRM module have been added to the EXO
Business core. It lists all Opportunities associated with the Non Account.
119
MYOB EXO Business User Guide
Activities
This tab lets you associate activities (see page 148) with the Non Account in the same way as you do for
Creditors and Debtors.
Relationships
This tab lets you specify relationships for the Non Account in the same way as you do for Creditors and
Debtors.
Documents
This tab lets you attach documents (see page 144) relating to the Non Account.
Social
This tab lets you view information about the Non Account from various social media services (see page
151).
Contacts
Debtors, Creditors and Non Accounts all include a Contacts tab, where Contacts can be created and
assigned to accounts. The Contact tab is a useful marketing tool; it contains a list of business Contacts
associated with the main company. You can easily create marketing campaigns or documents that get sent
to the right person (Contact) within the right company.
Contacts can also be set up independently of accounts from the Contacts window, which is available under
the Accounts menu.
You may on a regular basis liaise with the accounts manager. However, the right person for the details
about a new product being launched by your company may be the debtor’s Managing Director. So, you can
mark the information directly to the director since you have the address and e-mail details on the Contacts
tab.
You can also maintain a record of how each Contact first heard about your business: newspaper, television,
yellow pages or any other and determine the effectiveness of an advertising medium for your future
campaigns.
The two tabs, Details and Marketing, contain information about your Contact. The Notes field on the
Details tab allows you to make brief notes about the debtor or Contact listed here. Any data stored on the
Contacts tab can serve as a common pool of information for the Sales and Marketing team.
Relationships can be formed between contacts and Debtors, Creditors, Non Accounts and staff.
You can also add an Extra Fields tab with related information such as the Contact’s credit card number,
birthday and hobbies.
120
Working with Accounts
Contacts Master
All account Contacts recorded in the EXO Business system can be viewed from the Contacts master, which
is accessed by selecting Contacts from the Account menu.
Note: To view the Contacts associated with a specific account, view the Contacts tab on that account
(see page 122).
The Contacts master window displays the following details for all Contacts:
Field
Description
First and Last Name
The first and last (family) name of the Contact.
Job Title
The job title of the Contact.
Phone
The primary landline phone number for the Contact.
Email
The email address of the Contact.
Mobile
The primary mobile phone number for the Contact.
Company Name
The company name for the Contact. This will normally default to the company
(Debtor, Creditor or Non Account) selected when creating this Contact.
•
To search for an existing Contact, enter search terms in to the Search Key field and click the Search
button.
•
You can filter the list of Contacts by Contact List. Multiple classes can be selected.
•
You can filter the list of Contacts by Marketing Class (see page 126). Multiple classes can be
selected.
121
MYOB EXO Business User Guide
•
Double-click on an existing Contact to edit it, or click the New button to create a new Contact (see
page 123).
•
Click the
button to send an email to the selected Contact(s).
•
Click the
button to create and send a Clarity merge letter to the selected Contact(s).
Right-click on a Contact for the following options:
•
Send Email - Send an email to the Contact (see page 47). (This option is not available if an email
address has not been entered for the Contact.)
•
New Opportunity - Create a new Opportunity for the Contact.
•
New Activity - Create a new Activity for the Contact.
•
Selected Items > Export to Outlook - Export the details of all selected Contacts to Microsoft
Outlook. (This option is only available if EXO Business CRM is licensed.)
•
Selected Items > Merge Letter with List - Create a merge letter (see page 533) to be sent to the
selected Contacts.
•
Selected Items > Add to Contact List - Select a Contact List to add the Contact to. (This option is only
available if EXO Business CRM is licensed.)
Contacts Tab
The Contact tab on the Debtor, Creditor and Non Account screens displays details of the account’s
associated Contacts.
This tab lists all the Contacts that are associated with the account. From this window, you can add new
Contacts to the account, set the default Contact for the account, and create and remove other Contact
associations with the account.
You can email a Contact from this window, or create a mail merge letter to them.
Field Descriptions
Field
Description
Title
The job title of the Contact.
Salutation
The salutation for the Contact, e.g. Mr, Mrs or Dr.
First and Last Name
The first and last (family) name of the Contact.
Direct Phone
The primary landline phone number for the Contact.
Mobile
The primary mobile phone number for the Contact.
Direct Fax
The fax number of the Contact.
Email
The email address of the Contact.
Home Phone
The home phone number of the Contact.
To edit an existing Contact, double-click on the Contact’s name in the grid.
122
Working with Accounts
Contacts Tab Toolbar Buttons
The Contacts tab is display-only; to create or change Contact information, use the toolbar buttons at the
top of the window.
1. Create a new Contact (see page 123).
2. Set the selected Contact as the default Contact for this account.
3. Associate an existing Contact with this account.
4. Remove the Contact association.
5. Send an email to the selected Contact (see page 47).
6. Create and send a Clarity merge letter (see page 533) to the selected Contact.
Adding a New Contact
Click the New Contact button to add a new Contact (see page 123).
Note: We suggest that you first search for the Contact (see page 120), as they might already be in
the system.
Entering Contacts for an Account
You can create new, view, or modify existing Contacts associated with an account.
Account > Creditors or Debtor > {Double Click Account} > (Contacts) > [New Contact]
1. In the Debtor/Creditor account, click on the Contacts tab. The Contacts tab lists all Contacts for the
debtor account.
2. Click the New Contact icon in the toolbar (
). The Contacts window opens:
123
MYOB EXO Business User Guide
3. Complete the fields in this table.
•
Click on the ellipsis button [...] beside the Name field to enter the salutation, first name and
surname.
•
Click on the ellipsis button [...] beside the Postal code field to select the post code from a
list.
•
Use the Copy Company Address icon in the toolbar if you want to copy either the postal
address or delivery address from the current debtor account.
•
Check the Active checkbox to maintain the account of this debtor.
These actions are detailed in the Field Descriptions below:
Field
Description
Name
The Contact name can be manually entered here, however it’s recommended
that you use the name Check Full Name window to enter the details. Click on
the ellipsis [...] button and select the Salutation, enter the First name and the
Last name. Click OK to enter this full name into the name field.
Company
The company name for the Contact. This will normally default to the company
(Debtor, Creditor or Non Account) selected when creating this Contact.
Job Title
The job title of the Contact.
Contact Details
Postal and
Delivery Address
Use the Copy icon in the toolbar to copy details from the selected account.
Selecting Copy company main details copies the following information to the
Contact:
•
Postal Address
•
Phone
•
Fax
•
Email
•
Sales person
Click the small button next to the Delivery Address to retrieve geolocation
details (latitude and longitude) that match the address entered here. An icon on
the button displays the status of the match:
•
•
124
- the system hasn’t attempted to retrieve details yet.
- details successfully retrieved. Clicking the button again will open
your default browser, showing the location on a map. SHIFT+clicking
the button will attempt to retrieve location details again.
Working with Accounts
•
- an error occurred when attempting to retrieve details. Hovering
the mouse over the button will display a popup message
indicating why the attempt failed.
Postal Code
Enter the postal code if it is known; if not, click on the ellipsis [...] button to
search and select a postal code.
Phone Numbers
Email
Phone
Fax
Mobile
Home Phone
Complete these fields with as much information at hand.
Flags
Active
This flag is enabled by default. If this Contact is to be inactive for any reason,
disable this checkbox.
Sync with
Outlook
If this flag is enabled, the Contact will be synchronised with Outlook whenever a
sync is performed. If this flag is not enabled, the Contact will not be included in
synchronisation operations.
Opt-Out
eMarketing
If the contact has opted out of electronic marketing communications, enable
this flag. Contacts with this flag enabled can be excluded from Contact Lists.
Miscellaneous
Sales Person
If there is a designated salesperson associated to this debtor/creditor, enter
his/her name here.
Advert/ Source
The name of the advertising source through which you received this Contact.
Select the advert or source if applicable. If one is not available in the list, click
the Setup button to create one. This opens the Setup Advert Types window;
click New to create a new Referral item, then save and exit.
MSDN
Yahoo
Skype ID
If this Contact has account details for these online networks, enter them here.
Facebook
LinkedIn
Twitter
To view social media account information for the Contact (see page 151), enter
their usernames or logon IDs here.
Note: The LinkedIn ID must be the numerical ID, not a username. The Facebook
ID can be a numerical ID or a Facebook username, if one has been set up.
4. Click Save. A number of additional tabs now appear in the window. Enter Contact information in
these tabs.
•
Marketing tab (see page 126). Assign the Contact to your marketing classes (see page 126),
or categories, so your marketing campaigns are more targeted to relevant Contacts.
Additional Marketing Classes can be setup, when this tab is active a Setup Marketing
Classes button activates. Click this to configure additional or edit existing marketing classes.
125
MYOB EXO Business User Guide
•
Invoices tab (see page 127). Lists invoices for which the Contact was the default Contact of
the Debtor account.
•
Orders tab (see page 128). List any Sales/Purchase Orders associated with the Contact.
•
Notes tab (see page 141). Enter any notes for the Contact. Use the New Note icon on the
toolbar to enter a note - this will automatically assign a header to this note.
•
History Notes tab (see page 141). Enter any history notes for the Contact. History notes are
notes for which the date and subject are also recorded. As with notes, click the New
History Note icon to create a new history note.
•
Docs tab (see page 144). Link any documents to the Contact.
•
Accounts tab (see page 128). Edit the Debtor/Creditor accounts that the Contact is
associated with. For example, a Contact may be the manager of one company, the partner
of a manager of another company, the father of a son who works at another company, and
so on.
•
Relationships tab (see page 145). Lists any other relevant Contacts the Contact has.
•
Activities tab (see page 148). Lists any tasks and appointments associated with the
Contact.
•
Opportunities tab. This tab is only displayed when functions from the EXO Business CRM
module have been added to the EXO Business core. It lists all Opportunities associated with
the Contact.
•
Social tab. This tab displays information about the Contact from various social media
services (see page 151).
5. Click Save.
6. To make this new Contact the default Contact for this debtor account, click on the Set to Default
Contact icon in the toolbar.
Once you have set up the debtor Contact, you can also:
•
Create a relationship between Contacts.
•
Create activities for the Contact (see page 148).
•
Synchronise Contacts with Microsoft Outlook.
Note: If the Contact’s address details are the same as those on the debtors account, click the Copy
from Account button and the details are copied here.
126
Working with Accounts
Contact Marketing Classes
On the Marketing tab, you can assign the Contact to your marketing classes (see page 126), or categories,
so your marketing campaigns are more targeted to relevant contacts.
Check the checkboxes for the marketing classes that you need to associate to this contact.
Setting up Marketing Classes
To create additional classes or edit existing ones, click the Setup Marketing Classes toolbar button.
Clicking the New button will create a marketing class for the next one in the sequence. If there are a few
blank classes after last defined class it is recommended editing these as preference. To edit an existing or
blank class, double click on the entry in the list or highlight and click the Edit button on the toolbar.
Contact Invoices
This tab lists invoices for which the contact was the default contact of the Debtor/Creditor account.
127
MYOB EXO Business User Guide
Contacts Orders
This tab lists the orders associated with the Contact.
Note: For this feature to work, the Add debtor contact details to transactions Company-level profile
setting has to be enabled in EXO Business Config. A salesperson can be associated with Sales Orders
(see page 358).
Contact Accounts
This tab displays the Debtor/Creditor accounts that the Contact is associated with. For example, a Contact
may be the manager of one company, the partner of a manager of another company, the father of a son
who works at another company, and so on.
With this tab active in the Contacts window, the following toolbar appears:
1. Assign the Contact to a Debtor or a Creditor.
2. Set as the default Contact for this debtor.
3. Un-assign the Contact from this account.
Emailing Contacts
Account > Contacts
You can send emails to individual Contacts, groups of Contacts, or all Contacts, from the Contacts window.
To email Contacts:
1. Go to the Account menu and choose Contacts. The Contacts window is displayed.
2. Select the Contacts you want to email in one of the following ways:
•
Highlight a single Contact
•
Holding the CTRL key down, click on a selection of Contacts
•
Select a marketing class, click Search, select all in that marketing class using the keystroke
CTRL + A
•
Select all Contacts using the keystroke CTRL + A
3. Click the Send Email to List toolbar button (
128
).
Working with Accounts
4. If you don’t have email addresses recorded for all of the selected Contacts, a warning is displayed,
and you are prompted to confirm if you want to email the remaining Contacts that do have email
addresses. Click Yes.
5. A dialog is displayed asking if you want to hide the CC list in the email. If you don’t want each
Contact to see the other Contact email addresses being emailed, click Yes to hide the email address
list.
Common Account Functions
Viewing the Transaction History of an Account
Account > Creditors/Debtors > {double Click the account name} > (Transactions)
You can easily and quickly view the transaction history of an account in MYOB EXO Business on the
Transactions tab of the account. From this window, you can also perform a range of tasks, including:
•
creating a new invoice
•
creating a new credit note
•
creating a new payment
•
allocating transactions for the account
•
issuing credit notes
•
searching for an invoice number
•
emailing Debtor invoices and statements
Note: Although the Transactions tabs for Debtor and Creditor accounts differ slightly, the majority of
the content is common.
The transaction history of a Creditor/Debtor is period-based, typically (but not always) monthly periods.
To view the transactions of a Creditor/Debtor:
1. From the Creditor/Debtor Account Details (search) window, select the creditor/debtor by doubleclicking the required account’s name.
2. Click the Transactions tab on the Creditor/Debtor Account Details window.
The Transactions tab is displayed:
129
MYOB EXO Business User Guide
Field Descriptions
The grid header fields are detailed in the table below:
Field
Description
Trans #
The unique transaction ID.
Date
The date the transaction was created.
Pd stat seq
The unique period number for the period, also identifying the period as
Creditors, Debtors, GL or Stock.
Age
The period number of the transaction (where for example if 0 is the current
month of July, ‘1’ is June, ‘2’ is May, and so on).
Transaction
The transaction type, such as Invoice or Payment.
InvNo
The invoice number.
Ref 1
An internally set reference text/number that varies according to the kind of
transaction. For example, if a sales order, the sales order number is displayed; if
a payment, the payment type is displayed.
Ref 2
An internally set reference text/number that varies according to the kind of
transaction. For example customer reference number if invoice, or cheque
number if Ref 1 is Cheque.
Ref 3
An internally set reference text/number that varies according to the kind of
transaction. For example, if cheque payment type, then the bank name is
displayed; if invoice, then ‘invoice’ is displayed.
Branch Code
The branch code of the transaction, such as SYD or AKL.
Due Date
The due date of the invoice, based on the credit terms of the creditor account.
Amount
The total amount of the invoice.
Outstanding
The outstanding amount of the invoice.
Status
The allocation status of the invoice, for example, Unallocated, Partly Allocated,
Allocated.
Branch Account
If this is a branch account, this is the branch account number. If not, this column
will display ‘-1’.
GLBatchNo
The GL batch number if this was posted to GL as part of a GL batch.
Exchrate
If multiple currencies are being used, the exchange rate used for this transaction.
The local currency is ‘1’; otherwise the actual exchange rate used displays as a
decimal, e.g. ‘0.83’.
130
Working with Accounts
Debtor transactions only
Gateway TrxID
Each transaction processed by the gateway service provider is issued a reference
known as a TrxID. This is typically a long alphanumeric code. See the whitepaper
on payment gateways.
Batch No
This is the batch number of the banking batch.
Gateway No
The is the number of the defined gateway for this transaction.
?
Right-click on the transaction line and choose Toggle Query Status to put a
question mark on the transaction, to reflect that the transaction is in question.
This can then be reported on.
Creditor transactions only
Auth
The authorisation status of the invoice
Paystatus
The payment status of this invoice, for example, Released, paid.
Menu Commands
Debtor and Creditor
Debtor Specific
1. New Invoice: Create a new Creditor invoice (see page 326) or Debtor invoice (see page 386).
2. New Payment: Enter a Payment on a Creditor invoice (see page 331) or receive a Debtor payment
(see page 400).
3. Allocate transactions for this account: Enter a payment on a Creditor invoice (see page 331) or
allocate a Debtor receipt to an invoice (see page 391).
4. Issue a Credit Note: Enter a credit note for a Creditor (see page 339) or create a credit note for a
Debtor (see page 414).
5. Invoice Number search: Search for an invoice (see page 135).
6. Refresh: Provides an updated transaction list.
7. Automatically allocate payments to the oldest invoice: (Debtors only). This will also allocate
credits (negative value invoices) and refunds (negative payments) and zero value transactions.
8. Email Invoice: Click this button to email the selected invoice to the Debtor as a PDF attachment.
9. Email Statement: Click this button to email a statement to the Debtor as a PDF attachment.
131
MYOB EXO Business User Guide
Shortcut Menu
Right clicking on any invoice summary line opens the following shortcut window. The table below this
diagram details the actions of the shortcut commands.
Creditor shortcut menu
Debtor shortcut menu
Shortcut Command
Description
View Invoice
View the invoice in a report format.
Print Invoice
Reprints the Debtor invoice (see page 393).
Print Receipt
Prints a payment receipt. Only available for a payment transaction.
Edit Invoice
Opens the invoice to edit its details. This option is only available if the
Permitted level of access to debtor transaction editing or Permitted
level of access to creditor transaction editing User-level profile
setting is set to “Full invoice editing allowed”.
Edit Ref Fields
Edit the transaction reference fields for the invoice (see page 391).
This option is only available if the Permitted level of access to debtor
transaction editing or Permitted level of access to creditor
transaction editing User-level profile setting is set to “Full invoice
editing allowed” or “Invoice header fields editing allowed”.
132
Working with Accounts
Duplicate Invoice
Select to create a duplicate of a Debtor invoice (see page 390).
Generate Credit
Provides a copy of the negative invoice.
Reverse Payment
Reverses a Debtor payment (see page 406).
Journal
Opens the Debtors Adjustment Entry window to make a Debtors
journal adjustment entry transaction (see page 414).
Margin Pie Chart
Displays a graph for the invoice showing margins.
View Allocation Info
Displays a list with the allocation information in a separate window.
Reverse Allocation
Reverse all allocations associated with this transaction (payment or
invoice). This option is only available if the Allow reversal of
debtor/creditor allocations User-level profile setting is enabled. This
option is not available for transactions with deposits or foreign
currencies.
Refresh
Updates the entire transaction list.
Authorise this Transaction
Where M-Powered Payments are used (see page 335), this option
authorises the selected transaction.
View Reconciliation Info
Provides a list with the reconciliation information.
View Purchase Order
Invoice History
Displays the Purchase Order History window.
Allocate To Oldest
Allocates a payment transaction to the oldest outstanding invoice.
Toggle Query Status (?)
Puts a question mark on the transaction, to reflect that the
transaction is in question. This can then be reported on. You may
need to add the ? column by right-clicking on the column header and
selecting Select visible columns.
View Banking Batch
Opens the Debtors Banking Batches window (see page 411).
View GL Batch
Transactions
Opens the GL Batch Transactions window (see page 282), showing all
GL transactions associated with this transaction. This option is only
available for transactions that have been posted to the GL, and
requires the Allow Sub ledgers drill through to GL Transactions Userlevel profile setting to be enabled.
View Job
Where the Job Costing add-on module is used, displays the job
associated with the transaction.
View Sales Order History
Displays the Sales Order History window (see page 365).
View Analysis Codes
Displays the Analysis Codes (see page 84) associated with the
transaction.
133
MYOB EXO Business User Guide
Preview Journals
Displays the GL Batch Transactions window (see page 282), showing
the Debtor Ledger and Stock Ledger transactions that will be
generated for the transaction. This is a preview only - no transactions
are saved when the window is closed.
Search Options
Group by Period
Checking the Group by Period checkbox groups the transactions by period:
Clicking on a period line lists all the transactions for that period in the grid in the area below the period
groups. Once the group has been selected it can be minimised by clicking the minimise icon (
).
Maximise this view by clicking the icon again. Minimising this view provides a greater display area for the
group’s individual transactions in the grid below.
The transactions by Period grid has its own grid fields (see page 10), which are defined in the table below:
Shortcut
Command
Description
Age
In MYOB EXO Business, transaction ages (see page 135) are numbered from
current (0) backwards. See for details on this numbering system.
Period Name
This is the period name that correlates to the
Invoices
This is a total for all invoices submitted over this period.
Credits
This is the total for the credits issued to this debtor over this period.
Payments
This is the total for all types of payments received from the debtor for this
period.
Refunds
This is the total for all refunds issued to the debtor for this period.
134
Working with Accounts
Dr Adjustments
This is the total for all debtor adjustment transactions (see page 414) for the
selected period.
Cr adjustments
This is the total for all creditor adjustment transactions for the selected period.
Creditor adjustments are similar to Creditors Payment Entry, this function
creates adjustment entries against a creditor account, with predefined reasons
for the adjustment.
Balance
The current debtor account balance for the selected period.
Show Only Unallocated
Checking the Show only unallocated checkbox filters the transaction list to display only the transactions
that are not allocated to an account. This is useful when it is necessary to allocate transactions that have
not been previously allocated.
Transaction Page Numbering
While MYOB EXO Business stores transaction dates, it is not a purely date-based system. It does not rely on
dates for critical procedures such as transaction ageing and posting between ledgers, nor are dates used by
any of the standard reports within EXO Business to calculate control totals.
MYOB EXO Business employs a method of tagging all transactions with a nominated period number at the
time of posting. As an extra validation, EXO Business can ensure that the transaction date given is valid for
the period that the transaction is being posted to. This method is used to avoid the traditional problems
associated with incorrectly entered dates and extra processing overhead required to ‘age’ transactions into
periods which often makes purely date based solutions very limited in scale.
In MYOB EXO Business, transaction ages are numbered from current (0) backwards. This may be different
from the system you are familiar with, however it does give you some useful logic consistency.
Example:
0 = current period
1 = One period ago (last month)
2 = Two periods ago
54 = Fifty-four periods ago etc.
MYOB EXO Business knows which period in the period table is the current one, and uses this as a point of
reference to display the name of the period on reports and within data entry screens.
135
MYOB EXO Business User Guide
Invoice Number Search
Creditor/Debtor account > Transactions tab >
Clicking the Invoice Search button on the Transactions tab (
window.
) or pressing F7 opens the Invoice Search
The Invoice Search window has a right click menu to giving access to many other windows. This includes
‘drilling’ to the Account (Debtors or Creditors) where further transactions, reversals or updating of header
reference fields may be performed from the transactions tab (if you have sufficient access rights within
those windows).
From here you can reprint invoices, credits and receipts. Set search criteria and click Search. The Print
buttons are not enabled until you have selected a search item.
The filters to search by Shift and Terminal ID are disabled when the window is set to Creditors mode as they
are not applicable.
Field Definitions
The grid (see page 10) header fields are detailed in the table below:
Field
Description
Seqno
A unique identifier for records in tables.
Entry Time
The time of the invoice entry.
Inv Date
The date of the invoice entry.
A/c
The account number.
InvNo
The invoice number.
Trans type
The transaction type, i.e. Invoice or credit note etc.
136
Working with Accounts
Name
The company name of the debtor or creditor.
OutStanding
Any outstanding amounts for this invoice are listed here.
Tot inc GST
The total amount that was invoiced, including GST.
Tot exc GST
The total amount that was invoiced, excluding GST.
Taxtotal
The total amount that was taxed to this invoice.
Alpha Code
This is the debtor/creditor code which is normally automatically assigned by
the system. Generally this is the first 6 characters of the account name
followed by two sequential numerals, starting at 01.
Session_id
A session id is an integer value (number) which tags all transactions at the
time of saving. It’s transaction scoped, so when you create an invoice which
has invoice line and optional payments, all those transactions get grouped
together with the same session id.
It’s a grouping type of field, i.e. this field gets moved / copied when the
source transaction moves through the system. The invoice lines will receive a
session_id when saved. The invoice lines required the stock to be
decremented, resulting in the creation of a stock transaction, this copies the
invoice line session id and then the stock and invoices are posted to the GL.
This creates a GL transaction and once again the invoice line session id gets
copied. It’s primarily used to ensure that once a source transaction is posted
to the GL all its source transactions can be easily identified.
Gatewayno
This configures EFTPOS / Credit card payment gateway numbers. In MYOB
EXO Business you can set up Credit card payment gateways . Like a direct
payment service, a web service for the management and handling of
payments. As EXO Business can handle multiple payments, it tags the
payment debtors lines with the seqno identifying the gateway used.
Eftauth
This usually contains EFTPOS / Credit Card authorisation / approval codes
related to payment gateways.
Eftcaid
This usually contains a unique EFTPOS computer / terminal id . See POS /
EFTPOS whitepaper.
Eftstan
This usually contains a unique EFTPOS / Credit Card transactional id. See POS
/ EFTPOS whitepaper
Job#
Usually a jobcost jobno / jobcode if an invoice came as a result of an EXO Job
Costing job.
137
MYOB EXO Business User Guide
Toolbar
Print Invoice
Print Docket
View Invoice
138
Working with Accounts
Recording Additional Information through Extra Fields
If you have any specific information on an account or stock item that cannot be displayed elsewhere, you
can set up extra fields (see page 24) to display on the account’s Extra Fields tab.
Note: This tab is available only if you have set up extra fields and displays the fields that you have
established.
Debtor and Creditor accounts support 24 extra fields; the first three extra fields are displayed in the
Details1 tab of the Debtor/Creditor account, and the remainder on the Extra Fields tab. For Stock items, all
extra fields are displayed on the Extra Fields tab.
To record extra field details:
1. Click the Extra Fields tab.
2. Complete any necessary fields on this tab.
Debtor/Creditor Account Serial Numbers
Account > Debtors/Creditors > {Double Click the Account name} > (Serials)
The Serials tab on Debtor and Creditor accounts is used to record all serialised stock items (see page 202)
sold to the Debtor/Creditor. This enables you to quickly handle Debtor enquiries about stock items they
have purchased, for warranty, and return policy purposes.
Note: Before serial numbers can be used, they must be activated for the database by setting the
profile Serial Numbers Tracking Enabled. Serial numbers may only be used with stocked items.
Lookup items cannot be serialised.
Serial Number Types (Modes)
Occurrence of serial number processing depends on both the serial type (mode) of the stock item, and the
class of the trading partner in the particular MYOB EXO Business function.
There are three classes of trading partners:
•
Creditor (Supplier) – e.g. functions like purchase orders and creditor invoices.
•
Internal (no Creditor or Debtor) – e.g. adjustments, transfers and works orders.
•
Debtors (Customer) – e.g. sales orders and debtor invoices.
You can search for a serial number across all branches:
1. Click on the Serials tab of the debtor/creditor account.
2. Enter the serial number you are searching for, or leave blank to view all serialised stock items sold
to this debtor.
3. Check the Exclude not in stock checkbox to exclude.
4. Check the Exclude pre-assigned checkbox.
139
MYOB EXO Business User Guide
Search Filters
Option
Description
Serial Number
Serial numbers are maintained as part of the workflow whenever stock
transactions are created for a serialised stock item. This is usually associated
with a business document (e.g. Debtor invoice). When the document is saved
using the Save & Exit or Save buttons, the stock items that should be
serialised are determined based on the combination of the document class
and the serial type of the stock items. The quantity of serials for each of these
is computed.
Location
Choose the location from the list to filter this search.
Exclude not in stock
Tick this to filter out serial number results in the search that are not in stock.
Exclude preassigned
Tick this to filter out serial number results in the search that have been preassigned.
Serialised Item Details
The grid (see page 10) header fields are detailed in the table below:
Column
Description
Stock Code
The Stock item code.
Description
The description of the stock item.
Serial No
The serial number of the stock item.
Location
The location from which the serialized stock item was purchased.
Assigned Document
If no documents are assigned the default will be none. If there are there will
be a link to this document.
CR Accno
The creditor account number
Reference
If applicable a reference number will be listed here.
BOM Code
Bill of materials code
Worksorder No
The works order number. This number is allocated by the system.
RequestSeqno
Joins stock requests
Job No
The job number.
InStock
Provide indication if this serial number available for sale.
Last Updated
The date that the details on this stock item where last updated.
140
Working with Accounts
Recording Notes
Notes are a freeform way of recording any communication or general information related to a selected
account master. Notes can be added to Debtor, Creditor, Stock and General Ledger accounts. The
username and current date are automatically entered at the start of a new note. Notes are displayed in a
list you can scroll through.
To record notes for an account:
1. Go to the Notes tab on the Account Details window:
2. Click the New Note button (
inserted with the note.
) to enter a new note. The current system date is automatically
3. Right click anywhere in the editing area to open a popup menu. Most of these are standard editing
commands with the addition of Insert Username, to insert your name at the end of the note and
Insert Common Phrase, see the tip below.
4. After entering the contents of the note, click the Save button to save the note entry.
Tip: Use the Common Phrases utility (see page 143) when entering repetitive information, or to save
typing and assist with retaining a generic format to notes.
History Notes
History notes are more structured and formal than Notes (see page 141). You can search for history notes,
delete them, and email them. Generally use history notes for more formal communications with the
debtor/creditor, that you want to keep a record of.
A History Notes tab is available on the Debtors, Creditors, Non Accounts, Stock and General Ledger
accounts windows. The following table describes the available buttons and fields on this tab:
Field/Button
Description
New History Item button
Used to create a new history item. This opens the New or Edit window.
Delete History Item button
Used to delete an existing history item.
Source
What sort of account the history note was created from.
141
MYOB EXO Business User Guide
Date
The date this history item was created. Defaults to the current date but
can be changed.
Subject
The subject of the history note.
Staff
The staff member who is creating this note. Defaults to the currently
logged in user, but you can enter another staff member in this field, or
use the question mark search facility to search for another staff
member.
History Notes Window Fields
To create a new history note, click the New History Item button (
) on the account window toolbar.
The following table describes the fields in the History Notes window:
Field
Description
Date
The date this history note was created. Defaults to the current date but can
be changed.
Staff
The staff member who is creating this note. Defaults to the currently logged
in user, but you can enter another staff member in this field, or use the
question mark search facility to search for another staff member.
Subject
Enter the subject of the history note.
(Body)
Enter the content of the history note into the main text entry field on this
window.
Email this History Item
Use this button to email this history note (see page 143).
Editing the History Note
1. From the History Notes tab, click New History Note (
) to enter a new note. The current system
date is automatically inserted into the note. This date can be changed from the drop-down list.
2. Right-click anywhere in the editing area to open a popup menu. Most of these are standard editing
commands with the addition of Insert Username, to insert your name at the end of the note and
Insert Common Phrase, see the tip below. There is also Spell Check feature for history notes.
142
Working with Accounts
Note: If the Spell Check option is not available, you may need to install the spellchecker DLL files
and register them manually. Contact Support for the required files and instructions on how to
install them.
3. After entering the contents of the note, click Save to save the note entry.
TIP: For entering to repetitive information and to save typing and assist with retaining a generic
format to notes, use the Common Phrases utility (see page 143).
Saving and/or Emailing this History Note Item
1. Review the history note, make any changes if required, and then click Save. This is then recorded in
the History Notes tab. Only after saving the note will the Print and Email this history item buttons
become available. If you choose to Email this note, an email is automatically created with the
following pre-populated information:
•
By default the addressee of the email is the current Debtor/Creditor, using the email
address recorded on the Details 1 tab.
•
The subject of the email is the Subject of the history note.
•
The content of the email is the body of the history note.
2. If necessary, make any changes to the email and send.
Common Phrases
A library of common phrases can be built to save typing and assist with retaining a generic format to notes.
To select or create a common phrase:
In a supported field, press CTRL + ‘ (single quote). The Common Phrases window appears:
To add a phrase, type the phrase and click the Add Phrase button.
To select a common phrase to the text box, begin typing the phrase and the cursor will focus on the nearest
match in the search grid. Either click OK to select the highlighted phrase, or double-click the phrase
required.
To delete a phrase from the list, highlight the phrase to be deleted and click the Del. Phrase button.
143
MYOB EXO Business User Guide
Managing / Creating Documents
The Documents tab lists all the documents related to an Opportunity or a Debtor, Creditor or Stock
account. The Document Manager, which adds, edits and removes documents from accounts, its standard
functionality throughout MYOB EXO Business, such as in the GL, Creditors and Stock modules.
It may be useful for your business to maintain copies of documents that you send each Creditor/Debtor.
Any file that is recognized by Windows, including spreadsheets, documents, and graphics, can be attached
to the account. Any email sent from MYOB EXO Business is automatically attached to the relevant account.
You can either store documents as attachments, or in the EXO Business database. You can export a
document stored in the EXO Business database back to a standalone file.
The template is a fixed format, once imported, the document is stored inside the database. It is backed up
when you back up your database. If you import many large documents, the size of your database is
substantially increased.
Note: If you transport the database frequently, the use of this feature should be minimal. It is
recommended that you do not store large documents here.
To create documents for the Creditor, click the Documents tab in the account masters window.
Field Definitions
The grid header fields are detailed in the table below:
Field
Description
Doc. Date
The date the document was attached to the account.
Reference
Any internal reference text for the document.
Doc. Code
Any internal document code for the document.
Description
A description of the attachment, entered by the person who attached the file.
File Name
The filename of the attached file.
Linked
Whether or not the attached file is stored in the MYOB EXO Business database,
or linked to EXO Business but stored separately on your computer or network.
Menu Commands
All the commands for document management are from the toolbar, detailed below:
1. Run Document Manager to add, edit and delete documents. Launches the Document Manager (see
page 527).
2. Create and edit an RTF merge letter. (see page 533) Create a merge letter to this Debtor/Creditor
using one of your preset Clarity letter templates.
3. Delete the selected document. Delete the attached file highlighted in the grid.
4. Merge account data against a template (see page 534) to produce form letter.
5. Export a document to another location (see page 528).
144
Working with Accounts
6. Import an existing document into this page (see page 528).
Relationships
Relationships can be formed between Contacts, Debtors, Creditors and Non Accounts. New relationship
types can be defined to link any of the entities of Debtors, Creditors, Non Accounts, Contacts, and staff.
Creating New Relationship Types
Some relationship types will have been predefined for you; however you are likely to want to create
relationship types of your own. To do this, right click on any area of the relationship tree and select Setup
Relationships.
The Setup Relationships window opens:
145
MYOB EXO Business User Guide
Double-click on an existing relationship type to edit it, or click New to define a new type.
Note: Except for the Image, you cannot edit the details for a relationship type that is already in use.
A relationship in EXO Business is a two-way relationship between two entities in the EXO Business system.
For example, a relationship type may define the relationship between Contacts and the suppliers
(Creditors) they work for. When viewing a Contact record and creating a relationship between it and a
Creditor, this relationship type could be called “Works for”; when viewing a Creditor’s record and creating
relationships between it and Contacts, the same relationship type could be called “Employs”.
Field
Description
Entity Source
Select the first type of entity that the relationship type applies to. Choose from:
•
Contact
•
Customer (i.e. Debtor)
•
Supplier (i.e. Creditor)
•
Non Account
•
Staff
For example, if the relation type defines the relationship between a Contact and
a Creditor, select “Contact” here.
Entity Destination
146
Select the second type of entity that the relationship type applies to. For
example, if the relation type defines the relationship between a Contact and a
Creditor, select “Creditor” here.
Working with Accounts
Rel. Name
Enter a name for this relationship type when viewed from Source to Destination.
For example, if the relation type defines the relationship between a Contact and
the Creditor that they work for, you could enter “Works for” here.
Inverse Rel. Name
Enter a name for this relationship type when viewed from Destination to Source.
For example, if the relation type defines the relationship between a Contact and
the Creditor that they work for, you could enter “Employs” here.
Category
Read-only field that displays the category that the relationship is grouped under.
Displays “User Defined” for relationship types that are added manually.
Image
Select an icon image to appear next to relationships of this type on the
Relationships tab, or click Default Image to use the default.
Creating Relationships between Entities
To create a relationship between EXO Business entities:
1. Go to the Relationships tab of the Debtors, Creditors, Non Accounts or Contacts window.
2. Right-click anywhere in the main window and choose New. The Relationship : New window is
displayed:
3. Select the relationship type (see page 145) in the Relationship Name field.
4. Click the ellipsis button of the second Entity Name field, and search for and select the “target”
entity.
5. Click OK.
147
MYOB EXO Business User Guide
Removing Relationships
To remove a relationship, right click on the relationship icon and select Remove.
Activities
Activities can be set up in EXO Business to provide reminders and progress indicators for important
events. An activity can be a Task or an Appointment:
•
A Task is a to-do item that must be completed in a specified time frame.
•
An Appointment is an event scheduled for a specific time.
Activities can be accessed in multiple ways:
•
Via the Activities tabs in the maintenance screens for Contacts, Debtors, Creditors and Non
Accounts.
•
Via the Activity Search widget, which can be added to the EXO Business business flow menu.
•
Via the EXO Business CRM module.
When using the EXO Business CRM module, activities can be synchronised with Microsoft Outlook. Tasks
are converted to Outlook Tasks and Appointments are converted to Outlook Appointments.
Creating an Activity
Click the New Activity ( ) toolbar button to create a new activity. Alternatively, right-click on the Activity
Search widget’s calendar in the time slot that you want to create the activity in.
The Activity Window
Note: If Extra Fields (see page 24) have been set up for Activities, an Extra Fields tab will also be
available on this window.
148
Working with Accounts
This is the window for entering new activities; use the table below as a reference for completing the fields
in this window.
Field
Description
Activity Type
Select whether the activity is a Task or an Appointment.
Type
This is a user-definable classification for the activity. Select a type from the list,
or select “Edit List...” to create a new type.
Sync with
Outlook
If this box is ticked, the activity will be synchronised with Outlook whenever a
sync is performed. If this box is not ticked, the activity will not be included in
synchronisation operations.
Subject
Type a brief description of the activity and its purpose.
Company
Contact
Assignment of an activity to a Company and/or Contact is optional. Where
assigned, the activity will appear on the Activities tab of that company (Debtor,
Creditor, Non Account) and/or the Contact screen.
Note: When entering the Company name, use the search option by typing
? and pressing TAB.
Opportunity
This field is only available when the EXO Business CRM module is licensed. If the
activity was created from an Opportunity, that Opportunity will be displayed
here; otherwise, you can optionally specify an Opportunity to associate the
activity with.
Job Code
This field is only available when the EXO Job Costing module is licensed. If the
activity was created from a job, that job will be displayed here; otherwise, you
can optionally specify a job to associate the activity with.
Campaign Wave
If the EXO Business CRM module is installed, activities can be associated with a
campaign wave.
Note: When creating an activity from the Details tab of the Campaigns
window, the activity is associated with the first wave of that campaign.
When creating an activity from the Waves tab, the activity is associated
with the selected campaign wave.
Label
A label can be specified for the activity - this affects how it will appear on
calendar displays.
Priority
A priority (Low, Normal or High) can be specified for the activity. Low and High
priority tasks are indicated with an icon on calendar displays.
Status
The Status setting has predefined list entries, but these may be edited or added
to using the “Edit List...” option.
For Tasks, clicking the Mark Complete toolbar button automatically updates this
property to “Completed”.
Assigned To
Assigned By
The EXO Business Staff members that the activity was assigned to and by.
149
MYOB EXO Business User Guide
% Complete
This property applies to Tasks only. Specify the percentage completion by
entering a number or using the arrow controls.
Clicking the Mark Complete toolbar button automatically updates this property
to 100%.
Start Time
End Time
The start and end time for the activity.
All day event
If this is selected, the selections for the time of day will disappear as they are no
longer valid.
Reminder
If you tick this checkbox, the system will pop up a reminder from the system tray
after adding a reminder icon. Reminders can be enabled or disabled using the
Enable Reminders option on the Tools menu of the Activity Search
window/Dashboard widget.
Show time as
This property applies to Appointments only. Select how to display the time for
this activity on the Task Scheduler. Choose from:
•
Free
•
Tentative
•
Busy
•
Out of Office
Note: The relationship between the Status and % Complete properties is automatically maintained.
For example, setting Status to “Completed” automatically updates the % Complete value to “100”
and vice versa.
Once all properties are configured, click Save & Exit on the toolbar to save your changes and close the
Activity window, or Save & New to save changes to this Activity and reset all fields so that a new Activity
can be added.
Activity Recurrence
Click the Recurrence button to set an activity as recurring and establish the frequency.
150
Working with Accounts
Configure the recurrence options and click OK to assign this to the new or edited task. If you are editing an
existing task and no longer need this recurrence to continue, click Remove recurrence to remove this from
the calendar.
Social Media
MYOB EXO Business can display social media information about companies (Debtors, Creditors and Non
Accounts), Contacts and Opportunities. The following social media services are currently supported:
•
•
•
Twitter
Facebook
LinkedIn
Users have the option of viewing social media information using their own login details, or using details for
the company. For example, while users may use the company details by default, a salesperson may want to
view an Opportunity’s LinkedIn details while logged in to their own account, so that they can see any
connections between themselves and the Opportunity. It is possible to switch between company and
personal accounts at any time.
Setting up Social Media
Company-wide social media details are set up in EXO Business Config at Admin > Social Media > Setup
Social Media. From this screen you can:
•
Authorise social media applications using a company account
•
Enter IDs for the company’s social media accounts
Note: The Social Media section in EXO Business Config also includes an Application Key/Secret
section. This section contains details used by the EXO Business application to connect to social media
networks. Do not alter these details unless instructed to do so by MYOB; altering these details
could cause the social media functions to stop working.
151
MYOB EXO Business User Guide
Authorising Social Media Applications
To use the social media functionality, the EXO Business application must be authorised to log in to the
various social networks. Users have the option of logging in and viewing social media information using
their own accounts, or using a company account. To log in and authorise social media applications using a
company account, click the toolbar buttons for each social media network:
Doing so retrieves an “access token”, which is stored and used to log users in using the company’s details.
Note: To change the company account in use, go to the Twitter, Facebook or LinkedIn website and
log out, then come back to this screen in EXO Business Config. You will be prompted to log in again.
Setting up Company Social Media Accounts
The Company Social IDs sub-tab in the Social Media > Setup Social Media section contains social media
account IDs or usernames for the company. The accounts entered here will be displayed by the social
media widgets (see page 155) and used when posting to social media from a campaign wave (EXO Business
CRM).
Facebook and LinkedIn distinguish between user accounts and accounts for pages or companies, which
exist independently of an individual user. Extra settings are available to determine how to manage these.
The following table describes all available settings:
Field
Description
Facebook
User
ID/Name
This read-only field is populated automatically when clicking the Facebook toolbar
button.
Page
ID/Name
If your company has its own Facebook page, enter its ID number or name here.
Campaigns
to be sent
from
When posting to social media from a campaign wave, you can post to the Facebook
wall for the User ID or for the Page ID; use these options to select which wall to post
to.
My
Company
widget uses
This setting determines what appears on the “My Company’s Facebook Wall”
widget. Select whether to display the Facebook wall for the User ID or for the Page
ID.
LinkedIn
User ID
This read-only field is populated automatically when clicking the LinkedIn toolbar
button.
Company ID
If your company has its own account on LinkedIn, enter its ID number here.
152
Working with Accounts
Campaigns
to be sent
from
These options are disabled; at present, LinkedIn does not allow third party
applications such as EXO Business to post activity to a company account, so the User
option must always be selected.
My
Company
widget uses
This setting determines what appears on the “My Company’s LinkedIn Activity”
widget. Select whether to show LinkedIn activity for the User ID or the Company ID.
Twitter
Company
ID/Screen
Name
This field is populated automatically when clicking the Twitter toolbar button; it can
also be entered and edited manually.
This is the Twitter account ID that will be displayed on the “My Company’s Twitter
Mentions” widget. When posting to social media from a campaign wave, the post
will be sent to this account’s Twitter feed.
Note: Twitter does not distinguish between users and companies, so all other
Twitter properties are disabled. The User ID/Screen Name is read-only, and is
automatically populated with whatever is entered for the Company
ID/Screen Name.
Once you have set up these options, you can go to the Company Social Preview sub-tab see how the
selected accounts will appear on the social media widgets.
Setting up Personal Social Media Logons
Users can log on to social media networks using their personal account details on the Social tab (see page
153). If the user has not specified a personal account, they will be prompted to log in and authorise the
social media applications the first time they go to a sub-tab on the Social tab. The details they enter are
saved against their Staff record in the EXO Business database.
Setting up Social Media IDs
Social media usernames or account IDs can be set up for companies and Contacts in the following places:
•
•
•
•
On the Details 2 tab of the Debtor Account Details window (see page 96).
On the Details 2 tab of the Creditor Account Details window (see page 110).
On the Details tab of the Non Account Details window (see page 117).
On the Details tab of the Contacts window (see page 123).
Opportunities use the social media details set up for the company that they are associated with.
If you do not know social media details for a company or Contact, they can be searched for and filled in
automatically from the Social tab (see page 153).
Note: The LinkedIn ID must be the numerical ID, not a username. The Facebook ID can be a
numerical ID or a Facebook username, if one has been set up.
153
MYOB EXO Business User Guide
The Social Tab
Social media information is displayed on the Social tab, which is available on the Debtor, Creditor, Non
Account, Opportunity and Contact screens.
Note: The Disable Social Media Tabs profile setting can be used to hide this tab on some or all of
these screens.
If no details have been entered social media account details for the company/Contact/Opportunity being
viewed, each sub-tab displays the results of a search for the company/Contact/Opportunity’s name. Each
search result has a keep button next to it; clicking this button populates the
company/Contact/Opportunity’s social media details with the details from that search result. (EXO Business
captures as many details as it can; for example, LinkedIn search results may also specify a website and a
Twitter feed - these details will be copied as well if they are not already present.)
Once account details have been entered or found, the following social media information is displayed:
•
•
•
•
Twitter - The company/Contact/Opportunity’s Twitter feed.
Facebook - The contents of the company/Contact/Opportunity’s Facebook wall.
LinkedIn - All of the company/Contact/Opportunity’s activity on LinkedIn.
LinkedIn Connections - All of the company’s employees, sorted by degree of connection to the
logged in user.
Note: The LinkedIn Connections tab is available for Opportunities only.
Each sub-tab has a More Results link at the bottom. Clicking this button opens a separate browser window
to display the company’s Twitter feed, Facebook wall or LinkedIn page.
On all sub-tabs, each entry has a keep button. Clicking this button copies the entry to the
company/Contact/Opportunity’s History Notes tab (see page 141).
154
Working with Accounts
Company vs. Personal Account
On the Facebook and LinkedIn sub-tabs, buttons are available to switch between the user’s personal
account and the company account:
•
•
•
Your Account - when using the company account, this button switches to using the personal
account.
Company Account - when using the personal account, this button switches to using the company
account.
Log Off - when using the personal account, this button logs off the personal account.
If the user has not specified a personal account, they will be prompted to log on the first time they go to a
sub-tab on the Social tab. The details they enter will be saved against their Staff record in the EXO Business
database.
Social Media Widgets
The following widgets are available to display social information about your own company on dashboard
displays (see page 541):
•
•
•
My Company’s Facebook Wall
My Company’s LinkedIn Activity
My Company’s Twitter Mentions
These widgets use the account IDs entered in EXO Business Config; if no details have been entered, these
widgets perform a search for the Company Name as set up in EXO Business Config > Company > Company
Details.
155
Working with Stock
Stock Overview
The Stock function in MYOB EXO Business is indispensable to the operation of the system because it
represents the only available link between the Sales (Debtors) Ledger and the General Ledger. All products
and services commonly supplied as part of the day-to-day business must have an appropriate code set up in
this ledger. This applies to physical stock items as well as services provided. It is therefore common practice
to have a number of miscellaneous stock codes (probably one for each product group) to accommodate
any infrequent sales transactions such as the sale of an asset or the renting of property. This principle has
proven to work well in practice for two reasons:
1. You can take advantage of a large number of reports and graphical representations for all revenuegenerating activities.
2. It shields the non-accounting sales data entry operator from more complex decisions required for
General Ledger posting.
The topics in this section detail options for maintaining records of the goods and services you offer for sale.
This includes:
•
descriptive information (see page 164)
•
cost and selling prices (see page 163)
•
physical stock levels (see page 181)
•
supplier sources
•
pictures of your products.
It explains how you can categorise or group your products for your product catalogue, customer price lists
and for sales analysis purposes. Also included in this section are the various methods of recording and
reporting the movement of stock into, within, and out of your company.
156
Working with Stock
Stock Master
Accounts > Stock
The stock master holds the inventory items, and their pertinent details.
Details 1 (see page 164) – contains stock item code, description, groups, cost and sell prices, unit of
measure, serial no. tracking method and stock levels per stock location.
Details 2 (see page 167) – holds the min/max stock, sales, purchase and COS GL codes, weight and cubic
info, sales and purchase GST and the barcode and alternate codes.
Extra Fields (see page 139) – only available if extra fields have been set up (see page 24).
Transactions (see page 171) – contains a list of transactions for the particular stock item, e.g. invoices,
orders, receipts, adjustments, and transfers.
Orders (see page 173) – displays the orders related to the stock item. It contains three panels: sales orders,
transfer requests and purchase orders.
Jobs (see page 176) – displays any jobs that the stock item is currently being used in. This tab is only
available if EXO Job Costing is installed.
Works Orders (see page 177) – displays Works Orders (see page 517) associated with the stock item. This
tab is divided into two panels: works orders to be produced and works orders to be used in production.
Web (see page 177) – contains fields that you need to use if you are displaying your stock on a website.
Batch Qty (see page 178) – only available if the enable stock batch codes have been enabled. This tab is
used to assist in handling batch-tracked stock items
Notes (see page 141) – allows entry of ‘free-form’ notes pertinent to the stock item.
157
MYOB EXO Business User Guide
History Notes (see page 141) – this is like the Notes tab, but is more structured. This makes it easier to
search for previous notes related to the stock item. It’s also easy to create, delete, or email history notes.
Documents (see page 144) – lists all the documents related to a stock item. It could be a word processing
document, a graphical .gif or .avi file, or any document that is recognized by a Windows application.
Analysis (see page 178) – a quick preview of the sales status of the stock item. The graph displays the dollar
value (depicted through a red line). Double-click on the graph to view the total units sold (blue line).
Note: The toolbar icons at the top of the stock item window change when moving between tabs.
Stock Search
The Stock Search screen is used to select a Stock item for use in a document, e.g. a Sales Order or a
Purchase Order. It is usually accessed by entering “?” into the code column of a new line and pressing TAB.
Note: Any variables entered into the search key field will only search the Code and Description
columns of the grid.
Enter text to search by into the Search field, set any required filters and click Search.
Choose the appropriate item from the list and click the Select & Close button, or double-click the item to
add it to the document.
Field Descriptions
Field
Description
Search Key
Enter the search name phrase or part name here.
Include inactive
items
Check this box is the search result is to include inactive items in the search
result.
158
Working with Stock
Method
Choose one of these options to refine the search.
•
exact phrase: The search result must contain the words exactly as
they are entered in the search key field.
•
all words: The search result will contain all of the words or part
words entered in the search key field.
•
at least one: The search result will contain at least one of the words
or part words entered in the search key field.
Stock grouping
Filter by stock group
Check this checkbox to enable the stock group options.
Stock group fine
Choose this radio button if you want to restrict the search results to the fine
stock group relative to the variable entered into the Stock Group field.
Stock group course
Choose this radio button if you want to restrict the search results to the
course stock group relative to the variable entered into the Stock Group
field.
Search results grid
Code
The stock code
Description
The stock description for the stock item.
Qty
The physical stock level at the current location.
Stock Group (Fine)
Formerly designated Primary this is a stock group from those established in
Business Admin > Stock Groups.
Stock Group (Course)
Formerly designated Secondary this is a stock group from those established
in Business Admin > Stock Groups.
Popup Menu
Right clicking anywhere in the search results grid opens a popup menu with
a Stock Level option. Clicking this opens the Stock level Enquiry window
which lists the physical, free, not for sale, committed and back order stock
levels for the defined regions.
Setting up Stock Groups
Setting up Stock Groups
MYOB EXO Business has a single product classification – you may add any number of additional categories
through Extra Fields options, but reporting needs to be customized to incorporate these additional
groupings. This topic details the procedure for setting up Stock Groups. Products and services can be
organised into stock groups.
Each Stock Group has an option to set up expected margin, together with an allowable variance from this
expected margin. The variance below indicates that a Margin of 40% Plus or Minus 5% is acceptable, that is
35% through 45% inclusive. These can be preset via Stock Groups as illustrated below.
159
MYOB EXO Business User Guide
To set up a Stock Group:
1. Select Stock > Stock Groups from the Admin menu in EXO Business Config. The Stock Groups
window is displayed:
2. Click New to add a new group. The Details tab is displayed:
160
Working with Stock
Field Definitions
The fields on this tab are detailed in the table below:
Field
Description
Stock group
number
The number assigned to this group.
Stock group name
Enter a name for this group
Parent group
Select a parent group from the drop-down list.
Report Code
Enter the report code here.
Display on website
A check in the box if you want to display the stock on your web site, under
this group.
Website picture
The path and file name of a .gif or .jpg file of a picture, if you want it to be
displayed on your web site as a heading for products in this group.
Autocode prefix
Enter an Autocode Prefix, and a numeric Autocode Suffix that will increment
on stock code generation. Autocode generator values against each product
group.
Autocode suffix
Expected margin
Margin variance +/Sales GL code
Cost of sale GL code
Purch clearing GL
code
Used to set up an expected margin, together with an allowable variance from
this expected margin. I.e. a margin of 40% with an acceptable 5% variance is
35% through 45% inclusive.
Select the Sales and Cost GL codes using the General Ledger Account search
window.
The General Ledger Account code that purchase transactions for this stock
are posted to.
About Stock Price Groups
Stock Price Groups allow you to collect similar products together that may share common pricing but are
distinct products. Example whiteboard markers are stocked and sold in different colours but are all the
same price, any discount policies that refer to them refer to every colour in the range. Using Stock price
Groups you need only change the policies relating to the group and not every individual colour.
Stock Price Groups are set up in MYOB EXO Business Config at Admin > Stock > Stock Price Groups.
161
MYOB EXO Business User Guide
Setting up Stock Item Details
Account > Stock
You can set up the stock items through the Stock Item Details window. The window contains a set of tabs
that allow you to easily record and access stock details when you require it.
To set up stock, select Stock from the Account menu. The Stock Item Details (search) window is displayed:
This is the initial stock interface. Stock items can be found through the search options at the top of the
window, or a new stock item can be added by clicking the New icon. However, it’s best to search for the
item first to avoid double entry. A basic method for searching is detailed below, however, we recommend
reviewing the advanced search options (see page 158).
1. Enter the search name, phrase or part name here.
2. Search Options:
•
Check Include inactive items to enable inactive Stock items (i.e. items whose Active flag is
unticked) to appear in search results.
•
Check Extensive Search to enable powerful searching when barcodes used as stock items.
This is aimed at businesses that use the barcode as the stock item number, and makes
searching faster and more effective. This is enabled by default.
3. Select the Method. Choose one of these options to refine the search:
162
•
exact phrase: The search result must contain the words exactly as they are entered in the
search key field.
•
all words: The search result will contain all of the words or part words entered in the
search key field.
•
at least one: The search result will contain at least one of the words or part words entered
in the search key field.
Working with Stock
4. Check the checkbox to enable the radio button within. Choose the fine radio button if you want to
restrict the search results to the fine stock group relative to the variable entered into the Stock
Group field. Choosing the course button works in the same manner, restricting the results to course
group.
The grid header fields are detailed in the table below:
Field
Description
Code
The code you use to call up an item. A stock code can normally contain up to
15 characters.
Description
The name or description of the stock item as it should appear on invoices or
reports. The description can contain up to 40 characters which can be
overtyped in the Invoice Entry, Sales Orders and Purchase Orders windows.
Qty
The physical stock level at the current location.
Stock Group (Fine)
This is more of a specific stock group.
Stock Group
(Coarse)
This is more of a generalised stock group.
Right-clicking on a Stock item opens a popup menu with a single item: View Image. If there is an image
associated with this Stock item (see page 177), it can be viewed by selecting this option.
Once the search fields have been defined and the stock searched with no result, begin creating the new
Stock Item by clicking New. The Stock Item Details window (see page 156) appears - to begin with only the
following tabs are available:
•
•
•
Details 1 (see page 164)
Details 2 (see page 167)
Extra Fields (see page 139)
Once you have entered details on these tabs, click Save. All other tabs then become available.
163
MYOB EXO Business User Guide
Setting Cost Methods and Sell Prices
Prices set for stock items vary depending on the outlet – retail, wholesale or trade. If the item is being sold
through a website there may be a different price for it. You may also choose to set special prices for some
customers and discounts for certain stock items. Each customer can have a default base price on which
discounts operate. These prices can be represented in any currency.
Cost Prices
Field definitions
The fields in this window are detailed in the table below:
Field
Description
Supplier Cost
The default supplier published cost price used for purchase orders.
This price is displayed in the main supplier’s currency.
Last
The current cost price for the stock item inclusive of landing charges.
Average
The weighted average cost. The cost includes or excludes GST based on your creditor
account setup. Including GST is not a usual option and is not recommended.
Standard
The manually adjusted cost price. This is the standard cost of this stock item.
Sell Prices
The sell prices that you see in the Sell Prices panel on the Details 1 tab of the Stock Item Details window
(see page 164) are those you set in EXO Business Config > Admin > Stock > Price Names.
Note: See the White Paper “Discount Policies” for more information on Discounts and Special Prices.
This White Paper is available on the MYOB EXO Business partner site (login required).
164
Working with Stock
Entering Stock Details
Account > Stock > [Search] > {double click on a Stock item}
The main details – input and display – are set on two tabs on the Stock Item Details screen (Details 1 and
Details 2). This allows the Stock Lookup to maintain a small floating window and not obscure other relevant
information that you are entering. Together, the two tabs allow you to store reference information such as
the stock code with its description, stock locations, codes, stock quantities and the various selling prices.
The note after this procedure provides more information on these features.
To enter stock details:
1. Click the Details 1 tab in the Stock Item Details window. This is the default tab that is displayed
when you double-click a stock item from the Stock Item Details (search) screen. The following
window is displayed.
2. Complete the entry fields on the screen. The following table provides information on the fields
under this tab:
Field
Description
Stock Code
The code you use to call up an item. A stock code can normally contain up to
15 characters.
Description
The name or description of the stock item as it should appear on invoices or
reports. The description can contain up to 40 characters which can be
overtyped in the Invoice Entry, Sales Orders and Purchase Orders screens.
165
MYOB EXO Business User Guide
Groups - The group options are all selected from predefined drop down menus.
Stock Group (Fine)
Formerly designated Primary this is a stock group from those established in
Business Admin > Stock Groups.
Stock Group
(Course)
Formerly designated Secondary this is a stock group from those established in
Business Admin > Stock Groups.
Classification
A selection from the list of stock classifications. These are predefined. They
can be used for selective reporting in Clarity.
Price group
The name of the price group.
Cost Prices - these are detailed in Setting Cost Methods and Sell Prices (see page 163)
Supplier Cost
(NZD)
The default supplier published cost price used for purchase orders.
Last
The current cost price for the stock item inclusive of landing charges.
Average
The weighted average cost. The cost includes or excludes GST based on your
creditor account setup. Including GST is not a usual option and is not
recommended.
Standard
The standard cost of this stock item.
This price is displayed in the main supplier’s currency.
Sell Prices
Internet
Retail
Trade
Pack Of
The Price Names that you set up in MYOB EXO Business Config at Admin >
Stock > Price Names.
Note: MYOB EXO Business supports a maximum of 100 sell prices.
The stock code entered in the Pack of field on the Details 2 page.
Other
Main Supplier
The name of the main supplier (see page 179) as defined in the Creditors
Account.
Unit / Pack
Select the unit of sale for pricing, for example Per Pack, Per Box or Per Dozen.
Unit options are set up in EXO Business Config at Admin > Stock Stock Unit
Definitions.
Link stockcode
If this stock item is linked to another, e.g. if this item represents a pack of
other items, the linked item’s stock code is displayed here. This field is readonly - its value is set using the Link stockcode field on the Details 2 tab (see
page 167).
166
Working with Stock
Serial no. tracked
Select Yes if you want to track serial numbers for this stock item (see page
202).
This check box is available if you have selected Track Serial Numbers in MYOB
EXO Business Config > Profiles.
Note: If checked, you are asked to enter the serial number for each unit
of this item before you process a transaction such as Sales Order,
Invoice or Purchase Order.
Flags
Active
Select this flag if you want to see the stock item in the main search screen.
This flag is checked by default.
Lookup
Select this option for a non-stock item (such as labour charges) or a physical
stock item that does not require tracking of the in-stock quantities.
Note: This flag is disabled and cannot be changed once transactions
have been recorded against the stock item.
Recoverable
This flag is only available if EXO Job Costing is installed, and is disabled unless
the item is a lookup item. If ticked, it designates the stock item as a
recoverable expense for EXO Job Costing.
Discountable
You can clear this flag to exclude stock item from discounting price rules even
though the rule encompasses the product group or price group that the stock
item is in. This only applies on price rules with discounts and not on substitute
price.
Restricted Goods
Customers can be prevented from buying restricted stock through the
restricted stock feature. You can also change the caption for restricted item
using the Display Name.
Note: You can enable the Use customised customer stock restrictions
logic Company-level profile setting to customise and extend the
Restricted Goods function. When this setting is enabled, EXO Business
uses the FN_RESTRICTED_ITEM function to determine if a Stock item
can be sold to a Debtor - this function can be customised to suit the
needs of your organisation.
Batch Tracked
To batch-track a stock item, you need to set the item to batch tracked in the
Stock Item Details window. The Enable stock batch codes profile setting must
be enabled for this flag to be available.
Item Expires
This flag is only available if the Use expiry dates for batched and serialised
items profile setting is enabled. It adds support for expiry dates on batch or
serial number records.
An Expiry Days field is displayed on the Details 2 tab of the Stock Item Details
window (see page 167). Enter the number of days before expiry of the stock
item here.
167
MYOB EXO Business User Guide
Stock Details 2 Tab
Account > Stock > [Search] > {double click on a Stock item} > (Details 2)
Once the information has been entered into the Details 1 tab (see page 164), the details in this tab need to
be completed:
1. Click on the Details 2 tab.
2. Complete the entry fields on the window. The following table provides information on the fields
under this tab:
Field
Description
Defaults
Min Stock
A figure that indicates the default minimum stock level for the stock item for
each location. When stock reaches this point, reordering is required.
Max Stock
A figure that indicates the maximum stock level for the stock item. This is the
level to which reordered stock is to be raised.
Bin Code
The Bin or Shelf code used when picking a stock item.
Ledger Posting Profile
Sales GL code
The default code that sales transactions for this stock item are posted to. This
must be a Profit & Loss account, and cannot be a GL Control Account.
The default setting here is the Default Sales Account as set in the MYOB EXO
Business Config > Admin > General Ledger > GL Control Accounts.
168
Working with Stock
Purchase GL
code
The General Ledger Account code that purchase transactions for this stock are
posted to. This must be a Profit & Loss account, and cannot be a GL Control
Account. This property is only available if the Lookup property on the Details 1
tab is selected.
The default setting here is the Default Purch Account as set in MYOB EXO
Business Config > Admin > General Ledger > GL Control Accounts. The post
method depends on the Cost of Sales Method that you select in MYOB EXO
Business Config > Essential > General Ledger.
Purch Clearing
GL Code
This property is only available if the Lookup property on the Details 1 tab is not
selected. It cannot be edited, and defaults to the Stock Clearing Account as set
in the MYOB EXO Business Config > Admin > General Ledger > GL Control
Account.
C.O.S. GL code
The Cost of Sales account in the General Ledger when stock is sold. This must
be a Profit & Loss account, and cannot be a GL Control Account. This property is
only available if the Lookup property on the Details 1 tab is not selected.
This setting is used if “Post Cost of Sales A/c from Stock Item” is selected for the
Cost of sales method at MYOB EXO Business Config > Essential > General
Ledger.
The default setting here is the Cost of Sales Account as set in the MYOB EXO
Business Config > Admin > General Ledger > GL Control Accounts.
Miscellaneous
EOQ
Economic Order Quantity - allows you to set a minimum quantity to be ordered.
The EOQ is enforced as per the EOQ prompt on purchase orders Company-level
profile setting (Prompt, Force or No EOQ).
Weight
The physical weight of the stock item. This information need not be entered but
is useful if you need to know the weight of items that are being couriered.
Cubic
The cubic weight of the item. This information need not be entered but is useful
if you need to know the volume of items that are being couriered.
Duty %
Duty can be entered using automatic calculation of duty based on pre-set
percentage held on the Stock Item. This can be used in the Inwards Goods –
Cost Goods screen (see page 347), where you can choose to use the Duty
Percent in the calculation of Landed Cost, by checking the Use stk duty %
checkbox, then clicking Calculate.
Dimensions
Choose the dimension for this stock item if applicable. You can specify one, two
or three measurements for a stock item – length, square, or cubic – and then
buy or sell the item by these physical dimensions. Examples of how this could
be used might include selling timber/material/carpet etc. by length or length
and width.
169
MYOB EXO Business User Guide
Variable Cost
Tick this option to signify that the Stock item is a Variable Cost Item. This is an
item where the cost price varies for each instance, to the point that the average
cost is misrepresentative, e.g. freight by weight. If this option is ticked, the
invoice line cost for the item is recorded as a percentage of the selling price on
the invoice line. The percentage used is the expected GP% on the product
group for this item.
Sales GST
The sale GST rates on stock items.
Purch GST
The purchase GST rates on stock items.
Barcodes or Alternate Codes
Pack of
The stock code related to this pack.
This can only be used on a Lookup item. It points at a stocked (non-lookup) item
which will maintain the actual stock. The quantity of the stock item units
contained in this pack is also specified.
Alternate
Suppliers/ Stock
Codes
Click this button to specify alternate suppliers for the stock item (see page 180).
Link stockcode
Lets you link this stock item to another - any transactions posted for this item
are automatically posted to the stockcode you enter in this field. To specify a
linked stockcode, this stock item must be set as a lookup item on the Details 1
tab (see page 164).
For example, if you sell bottles in crates of six, you may have a “Bottle” stock
item and a “Crate of Six Bottles” item - in this case, enter the Bottle item’s stock
code into the Link stockcode field for the Crate of Six Bottles item. This means
that whenever a crate is sold, the transaction is recorded against the Bottle
stock item as well.
Description
The description for the linked stock item is displayed here.
Qty
The quantity of the linked stock item that this items represents. For example, if
the stock item is for a crate of six bottles, enter the Bottle item’s stock code
into the Link stockcode field and enter “6” into this field.
Warranty No.
Default warranty for the stock item.
Pop-Up alert
A note that you would like to appear when you sell or receive this item.
For example: 2 ‘AA Batteries’ required.
Note: Use the ^ character to insert a carriage return.
Auto Narrative
170
A stock note can represent a long description and can be customised for a
particular line. Note copying can be automated for individual products by
setting this field to “Yes”.
Working with Stock
Expiry Days
If the profile Use expiry dates for batched & serial numbers is enabled, the
system will offer and expect expiry dates to be entered on serial records if the
Item Expires flag is checked on the Details 1 tab of the Stock Item (see page
164). Enter the number of days before expiry of the stock item here.
Viewing Stock Transactions
Account > Stock > [Search] > {double click on a Stock item} > (Transactions)
The transactions tab contains a list of transactions for a particular stock item. Transactions can be of
different types and include the following:
•
•
•
•
•
•
•
•
•
Creditors Invoice
Debtors Invoice
Sales Order
Purchase Order
Stock Receipt
Manual Adjustment
Stocktake Var Adjustment
Stock Transfer
Edited Invoice
To view the list of transactions, click the Transactions tab. The following window is displayed:
The Location field provides the default location. Select the required location from the list.
Click the Load button to refresh the transaction list for the selected location.
Check the Group by Period checkbox to enable the Transactions by Period window view. This setting will
be remembered the next time this tab is accessed.
171
MYOB EXO Business User Guide
Field definitions
The grid header fields are detailed in the table below:
Default Window
Field
Description
Date
The date of the transaction
Alpha
This is the debtor/creditor code which is normally automatically assigned by the
system. Generally this is the first 6 characters of the account name followed by two
sequential numerals, starting at 01
Ref1
Details referring to the transaction such as transaction description.
Ref2
Batch Code
Detailed in Keying stock batch codes (see page 192)
Qty
The number of stock items.
Unit Price
The price of a single stock item.
Unit Cost
The cost price of a single stock item.
Loc
The code of the location where the transaction took place.
To loc
The code of the location where the stock is being transferred.
Receipt no
The receipt no
Kit code
A kit (BOM) code if this has been added to non sales orders.
Plu
These are Stockcodes or Barcodes for lookup items that link to a stocked item.
Transactions by Period Window
Field
Description
Age
In MYOB EXO Business, transaction ages are numbered from current (0)
backwards. See Transaction age numbering (see page 135) for details.
Period Name
The period name that represents the current period for each ledger associated
to the age number.
Sales Qty
Stock items sold for the period.
Sales Value
The total value of the stock items sold in that period, including any markups to
the stock items.
Note: A sale is a credit value, therefore the Sales Value is displayed as a
negative amount. The corresponding Unit Price is displayed as a positive
amount.
172
Working with Stock
Purchase Qty
The number of stock items bought for the period.
Purchase Value
The total cost to purchase all these stock items for that period.
Other Trans Qty
The quantity of all the other types that do not belong to purchases and sales,
i.e. adjustments etc for the period.
Other Trans
Value
The value of all the other types that do not belong to purchases and sales, i.e.
adjustments etc for the period.
Level
The remaining number of items in stock at the end of that period.
Notes
Stock on Hand Quantities - Stock on Hand quantities can be forced into a negative by overselling. This is
ignored from the stock valuation reports. Stock quantities can be to several decimal places as governed by
the options you specify in MYOB EXO Business Config > Essential > General Settings.
Transaction Quantities - Negative transactions (-ve) represent removal of stock from Stock on Hand (Sales
Invoice). Positive transactions (+ve) represent an addition to Stock on Hand (Stock Receipt).
Viewing Order Status of Stock Items
Account > Stock > [Search] > {double click on a Stock item} > (Orders)
The Orders tab displays all orders related to the Stock item.
173
MYOB EXO Business User Guide
The tab is divided into three panes:
•
The top pane contains details related to outbound Sales Orders (see page 353).
•
The middle pane contains details related to transfer requests. The Stock Transfer Requests feature
of the Distribution Advantage module provides enhanced stock movement transactions when:
•
o
stock transfers need a ‘request then send’ process.
o
transferred stock is in-transit for a period of time.
The bottom pane contains details related to inbound undelivered Purchase Orders (see page 306).
Field Definitions
The grid (see page 10) header fields are detailed in the table below: This is divided into three sections Sales
Orders (see page 174), Transfer Requests (see page 175) and Purchase Orders (see page 175).
Field
Description
Sales Orders
Order Number
The order number of the Sales Order.
Order Date
The date the order has been placed.
Due Date
The date the order is due.
A/c No
The account number of the debtor.
Status
0-Not Processed, 1-Partly Processed, 2-Fully Processed, 3-Quote, 4-Standing
Order, 5-Layby
Has Backorders
Provide an indication if there are any backorders on this order.
Name
The name of the debtor.
Ordered
The quantity of stock items that have been ordered.
Supplied
The quantity of stock items that have been supplied.
Invoiced
The quantity of items that have been invoiced.
Customer O/N
The customer’s order number, if applicable.
Location
The stock location.
BackOrder Qty
If there are backorders, the quantity of these is displayed here.
BOM Code
Bill Of Material Code, the BOM code becomes a shortcut to the product list,
to save keying each product into the order.
BOM Seqno
A unique serial sequence number for this bill of materials.
Plu
These are Stockcodes or Barcodes for lookup items that link to a stocked
item.
174
Working with Stock
Corrected Qty
Shows the true or current order quantity (which may be different to quantity
initially ordered. Example: you ordered 10, receipted 9 then set the line to
fulfilled, Corrected Qty = 9.
Transfer Requests
RequestNo
The unique request number for the stock transfer.
From Loc
This displays the source location.
To Loc
This displays the destination location.
Request Qty
The requested quantity of this stock item.
In Transit Qty
The actual quantity that is in transit.
Status
The status of the transfer:
•
New Request – a new request entered, waiting processing and
sending by the From location.
•
Picking – The request has been saved, and locked ready to pick.
However it has not been processed or dispatched yet.
•
In Transit – a request that has been processed by the From location,
and is transferred to the in-transit stock location
•
Complete – a request that have been received and processed by the
To location, and is now complete.
Request Date
The date the stock transfer was requested.
Require Date
A date to notify the other party of the date required.
Comment
Any user comments are displayed here.
Batchcode
The batch code of the Stock Item. MYOB EXO Business offers the facility to
track batches of stock, although this is not set by default. If Stock batch codes
enabled is ticked in MYOB EXO Business Config, there is a Batch tracked field
in every Stock Item Details > Details 1 tab. If the Batch tracked option is
enabled for this stock item, the batch code listed here will allow the stock
item to be tracked by batch number.
Plu
These are Stockcodes or Barcodes for lookup items that link to a stocked
item.
Purchase Orders
Order No
The order number of the Purchase Order.
Order date
The date the order has been placed.
PO Date
The date the order has been placed.
175
MYOB EXO Business User Guide
Line Due
The due date for this order
A/c No
The account number of the creditor.
Supplier Name
The name of the creditor.
Ordered
The quantity of items that have been ordered as per the PO.
Received
The quantity of items that have been received.
Invoiced
The quantity of items that have been invoiced.
Location
The stock location.
C
Indicates if this purchase order has been confirmed Y (Yes) - N (No).
Status
The status of any outstanding orders.
Plu
These are Stockcodes or Barcodes for lookup items that link to a stocked
item.
Corrected Qty
Shows the true or current order quantity (which may be different to quantity
initially ordered. Example: you ordered 10, receipted 9 then set the line to
fulfilled, Corrected Qty = 9
Costed Qty
This is used in the costing procedure (see page 347).
BackOrder Qty
The quantity of these orders on backorder.
Stock Jobs Tab
The Jobs tab on the Stock Item Details window displays any jobs that are using the stock item.
176
Working with Stock
The tab consists of a dashboard interface (see page 541), which displays the WIP Stock (Grid) widget by
default. A WIP Stock (Report) widget, which displays the same information as a Clarity report, is also
available. You can add this widget to the dashboard using the Add Widget button (
).
Viewing Stock Item Works Orders
The Works Orders tab for a Stock item displays all Works Orders (see page 517) that the Stock item is
associated with, either as a component or an end result.
The To be Produced section lists any Works Orders where the Stock item is the item produced.
The To be Used in Production section lists any Works Orders where the Stock Item is used as a component.
Both sections are read-only.
Displaying Stock Items on a Website
The Web tab on the Stock Item Details window contains fields that you need to use if you are displaying
your stock on a website.
To display stock items on the web, click the Web tab.
177
MYOB EXO Business User Guide
The following options require configuration on this tab:
Field
Description
Show on Web Site
Tick this checkbox if you want to indicate that this stock item should be made
available for sale on the web site.
Picture URL
The name of the image file that is associated with this stock item. The image
file should be placed in the Stock Image Files directory as specified in the
Installation Details form that your MYOB EXO Business partner has given you.
Sales text [HTML]
The sales text you want to appear on the web site with the details of the
stock item. The sales text field (plain text or enhanced with HTML) can be
used to enter HTML formatted text. This means that it is possible to include
formatting features such as bold and italic text. It is also possible to place
hyperlinks to other web sites in this field.
Viewing Batch Quantities
The Batch Qty tab details the batch quantities for this stock item along with its batchcode, location,
reference and expiry. To change the location, select a new location from the drop-down list and click Load.
To include batches with a zero quantity, enable the checkbox.
Note: This tab is only available if the Enable stock batch codes profile setting has been enabled in
EXO Business Config.
Overview
MYOB EXO Business offers the facility to track batches of stock, although this is not set by default. If the
Enable stock batch codes profile setting is ticked in MYOB EXO Business Config, there is a Batch tracked
field for every Stock Item on the Details 1 tab (see page 164). If the Batch tracked option is enabled for this
stock item, the batch code listed here will allow the stock item to be tracked by batch number.
178
Working with Stock
Viewing Stock Sales Performance
Account > Stock > [Search] > {double click on a Stock item} > (Analysis)
To view the sales performance of a Stock item, click the Analysis tab:
The graph provides a quick view of the sales status of the stock item. The graph displays the dollar value
(depicted through a red line). Double-click on the graph to view the total units sold (blue line).
Right-clicking on the graph provides you with the option to copy the graph into another Windows
application as Word or Excel. You can also print the graph.
Note: Sales turnover figures represent deliveries of stock and this may not reconcile exactly with
stock analysis by invoice line because of uninvoiced deliveries.
Alternate Supplier Codes and Costs
This is a special feature that allows you to maintain separate supplier stock codes that you use on purchase
orders and in the stock receipt windows.
Note: By default, the feature is disabled and needs to be switched on. The existing Alternate
Suppliers option remains unaffected if you do not enable the new feature.
To enable the use of the new supplier data and to validate stock items on purchase orders, enable the
following profiles in MYOB EXO Business Config > Profiles:
•
Use Supplier Codes on Purchase Orders
•
Restrict purchases to approved suppliers for stock item
The topics Defining Supplier Stock Codes (see page 180) and Maintaining the Alternate Supplier Prices (see
page 314) contain more information on setting up this feature.
179
MYOB EXO Business User Guide
Defining Supplier Stock Codes
Account > Stock > [Search] > {double click on a Stock item} > (Details 2) > [Alternate Suppliers / Stock
Codes]
To define supplier stock codes:
Click the Alternate Suppliers / Stock Codes button on the Details 2 page (see page 167).
The following window is displayed.
Notes:
•
•
•
Currency is automatically assigned based on the creditor’s details.
Enter a new line by clicking on the last record and pressing the down arrow.
Search for an account by typing ? in the Acc No field and pressing TAB. This displays the Account
(search) window.
Enter the name of each supplier, code, description, cost and currency.
Click Save to save this new entry.
Note: If the supplier’s code for a stock item is different from your own but you only have one main
supplier, you should type it here. The supplier’s cost will be maintained on both windows by the
creditor’s invoice lines, as they are posted.
Note: You can have more than one alternate code for the same supplier. In this case, you are asked
to choose on the Purchase Order.
Note: If you want to be able to type the supplier’s code directly into the invoice from stock window
(assuming that it was not generated via the normal purchase order – Packing Slip scenario), include
the stock code in the alternate code fields as usual.
180
Working with Stock
Using Different Codes and Costs
Transactions > Purchase Orders > Purchase Orders > [New]
To use different codes and costs:
1. Select Purchase Orders from the Transactions menu. The Purchase Orders (search) window is
displayed.
2. Click the New button. Enter the details of the first supplier.
3. Repeat Steps 1 and 2 to create a purchase order for the second supplier (and any subsequent
suppliers) – using a different description, price and supplier code.
For example, you could create the same stock item TEST on 3 purchase orders with 3 supplier codes, 3
supplier costs (in different currencies), and 3 descriptions to 3 suppliers.
Note: The supplier cost is updated as part of the process of accepting creditor invoice lines. These
invoices are generated from the Purchase Orders – Receipt window, Stock Receipt or Creditors
Invoice from Stock procedures. The supplier cost is not updated by manual stock transactions or
stock transfers.
Note: There is an additional utility that allows you to look up a stock item, using the supplier
reference.
Performing Stock Take
The Stock Take function in MYOB EXO Business uses a comparative stock take method and reports
discrepancies between counted and computer stock levels. Adjustment transactions are applied via a stock
take upload sub-function giving the user complete control over the timing.
Stock takes are separated by stock location. Multiple locations may have stock takes concurrently active.
Within a location, partial or rolling stock takes are also accommodated using selection criteria applied to
the stock take initialisation process (e.g. supplier, stock group, bin number range etc). Additional filters may
be specified by custom SQL if required and these may be set differently for each location Full stock take is
also supported.
Stock take data may be imported from CSV file (Comma Separated Value) rather than keyed. This provides
for use of hand held scanning devices or for importing data during implementation of a new database (or
new location for existing database). The CSV import file may optionally also specify the average cost of the
stock being imported.
Full support for stock batch codes and limited support for serial numbers is also available.
The stock take window allows you to stock take all or individual locations. MYOB EXO Business uses an
adjustment method rather than an overwrite method. Thus the result of a stock take is a positive or
negative adjustment transaction to bring the levels back into line with a physical count.
Workflow Summary
Performing a stock take involves the following steps:
1. Select a location in the locations grid (see page 182).
2. Click the Initialise button and set selection criteria if required. This initialises the stock location (see
page 186), creating a snapshot of the present stock levels and sets the corresponding counted
quantities to zero ready for keying. See
3. Print count sheets for each location (see page 188) and perform physical count.
4. Key in the counted quantities (see page 188) or import a CSV format file containing the count.
181
MYOB EXO Business User Guide
5. Print variance reports (see page 190). Check any “suspicious” count figures and amend keyed
quantities if required. If amending counted figures be sure to reprint the variance report.
6. When happy with the counted figures, run the stock take upload function (see page 190). This
creates stock transactions for any items that have a variance. This is the first point in the workflow
that any amendment to the “true” stock ledger occurs. Up to this point the stock take may be
discarded and recounted by rerunning the initialisation at step 2.
Start a New Stock Take
To start a new stock take:
Utilities > Stock Utilities > Stock Take
The Stock Take window is displayed showing a stock locations grid.
The columns Initialised, Count sheets, Keyed, and Uploaded show date-time stamps of those steps in the
process. Custom filter is an additional filter as a partial SQL statement that may be applied to each location.
Select the location where you want to carry out the stock take.
182
Working with Stock
Double click a location row (or click the Details tab) to show the location detail and edit its custom SQL
filter if required.
Options
Several options global to all locations may be set. This is usually performed once only when the database is
set up. From the toolbar, click the Options button (
).
183
MYOB EXO Business User Guide
Selection
Exclude Batch Tracked Stock Items – Condition 1. Check this item to exclude batch tracked stock items
from stock take.
Note: This option will only appear if profile Enable stock batch codes is set to true. It is disabled if
excluding batch-tracked items.
Summarise stock holding for batch tracked items: Condition 1 & 2. If unchecked the system will create a
separate stock take row for each batch number within the item (i.e. the count of batch tracked items will
be at a stock batch code level). Check this item to create a single row per stock item for batch-tracked
items. This allows consolidated counting of the item ignoring the batch breakdown. If a discrepancy is
found then a single batch code is then keyed to receive the variance posting.
Exclude Serialised Stock Items – Condition 3. Check this item to exclude any serialised stock items from the
stock take.
Note: This option will only appear if profile Enable serial numbers tracking is set to true.
Custom Filter – A custom SQL statement may be entered here. It applies to all stock locations. There is also
an additional Custom filter per each stock location. The entry here should form an extension to the WHERE
clause used by stock take initialisation. (e.g. STOCKGROUP2 <> 37 would always omit items for group 37)
Sorting for Countsheets and Keying by
This option controls the native sequence that rows are added to the stock take count grid. The selected
option becomes the default for the key entry grid and the stock take reports. The options here are:
•
•
•
•
BinCode, Stock group, Stock code
Stock group, Stock code
Description, Stock group, Stock code
Stock code, Description
Other Options
Initialise cost prices (initial stock upload or import) – This is normally only used when importing stock such
as when first creating the database or when creating a new location. Check this box to make an additional
column for unit cost available to the count sheet keying or CSV import processes. When this option is
checked then the stock transactions written for variances during the upload process take this keyed cost
rather than defaulting to the average cost already on the stock item master.
Reporting Options
Show system quantities on count sheets – Check this option if you want to show the computer system
quantities on the count sheets. When uncheck the system quantities do not print (blind stock take).
Exclude lines with zero stock from variance report – Check this item to exclude items with no stock
variance from the variance report.
184
Working with Stock
Stock Take
Utilities > Stock Utilities > Stock take
The stock take window assists in the stock take of all or individual stock locations. MYOB EXO Business uses
an adjustment rather than an absolute value, so the result of a stock take is a positive or negative
adjustment transaction to bring the levels back into line with the physical count.
1. Set Stock Take options (see page 183) for the item selection, sorting of count sheets, cost price
initialisation and reporting options.
Note: MYOB recommends that you tick the Initialise Cost Prices option for initial stock upload or
import for a new implementation.
185
MYOB EXO Business User Guide
2. Select a location from the list, and click Initialise to initialise a new stock take on the currently
selected location. This takes a ‘snapshot’ in time, to allow stock take variances to be calculated.
3. Print count sheets for each location.
4. Key in the count quantities or import count.
5. Print variance reports for each location, to allow rechecking of any ‘suspicious’ count figures.
Note: Potential reasons for variance could include incorrect counting or errors during keying
(rather than actual stock issues). It is often valuable to recheck the Count Qty against the physical
count sheets.
6. Upload the stock variation for each location to the ledger, specifying a time and period that the
transactions should be entered at.
7. An optional stock take import text file can be used to import stock take figures from another
source, such as a stock taking device.
Initialise a Stock Location
When you initialise a stock location the current system quantities for stock levels are copied into the
temporary stock take table created when you clicked on the New button. This gives MYOB EXO Business
the system quantities for comparison against the actual physical stock count.
If you continue to perform stock transactions (for example, receive stock or invoice stock), it is important
that you still count your stock at the levels when the initialisation was performed. That is, if you invoice
stock and physically move it from the stock location, you must still count it in your stock take.
Therefore, to avoid any confusion and errors, it is best to restrict transactions and physical stock
movements until you are ready to upload your stock take results.
MYOB EXO Business gives you the option to initialise all the stock locations at the time of starting the stock
take or you can initialise stock locations individually. This gives you the ability to stock take different stock
locations separately.
For example, you could stock take the main warehouse one weekend and a store/showroom stock location
on the following weekend.
186
Working with Stock
Initialise One Location
To initialise one location, highlight a location in the locations grid and press the Initialise the current
location button ( ). The Stock Take Item Selection window appears:
Exclude items with zero stock - Checking this checkbox will inhibit creation of stock take rows where the
computer stock is zero. This is useful in reducing report sizes where there are a large number of items that
are out of stock.
Note: The danger with using this option is that there may be items that have zero computer stock
but have physical stock in the warehouse. Omitting items with zero computer stock also means they
will not print on the count sheets and may be missed by the counting staff.
If you require selection by either supplier or a single stock group range then uncheck Show all Stock items.
•
The supplier code may then be keyed or searched (? > Tab) for.
•
The stock groups will be preset to lowest and highest stock group numbers (i.e. equivalent to All)
If you require a single range of bin codes then uncheck All bin codes.
•
Enter low and high bin codes to define the range.
Check the Custom Filers if you wish to use these.
The first row defaults to the custom filter from the Options window (see page 183). The second rows
defaults to the filter from the corresponding location. These may be over written here if desired. This will
change them for this run only, they will not be saved back to the options.
•
STOCK_ITEMS=S
•
STOCK_LOC_INFO=L
•
BATCH_QUANTITIES=B
187
MYOB EXO Business User Guide
Click OK to initialise this stock take.
The initialisation process may be repeated for other locations if required. Concurrent stock takes of
different locations are supported.
Note: Only one stock take per location can be active at any given time therefore the initialisation
process cannot be repeated for the same location but using different parameters. Doing this will
firstly erase the previous stock take for that location. Stock take initialisations can therefore not be
cumulatively used for a location with differing selection criteria. Use the custom filters to achieve
this.
Print Count Sheets for Each Location
Count sheets are used for the warehouse staff to record counted quantities.
Select the required location in the grid before launching the report then press the print count sheets button
(
). The report prints with no further intervention.
Use the count sheets to perform the physical count (see page 188).
188
Working with Stock
Key in Quantities
After the physical count has been performed, the hand written count quantities (see page 188) are keyed
to the system.
To import a stock take, use the drop down next to the Entry button and choose Key Count.
The Key in Stock Take Count window appears:
The grid is pre-populated with the stock items complying with the selection criteria used in the initialisation
process. The system quantities are the computer stock figures as at time of the stock take initialisation (i.e.
a cloned copy).
Some columns and buttons, especially for batch codes and serial numbers, only appear if the relevant
profile settings are active. There are also additional read-only columns that may be selected from the
Visible Columns list.
Note: If there have been additional stock transactions since the stock take initialisation then the
current stock figures as visible in the stock levels grid may differ from the system quantities in the
stock take window. Only the stock take variance between system quantities (snapshot) and the
counted quantities will be posted (adjustment transaction) there for once the physical count has
been completed, other processing (e.g. sales and receipts) may continue even though the count
quantities are not yet entered. This is therefore a comparative stock take where the count is
matched to a snapshot of computer stock taken at a specific time.
Key the quantities from the count sheet into the Count Qty column. There are two toolbar buttons that
may optionally be used the assist this.
•
Zero Count Quantities – Use this button to set all counts quantities in the grid to zero. This returns
the count grid to the point following initialisation without reinitialising the stock take (i.e. system
quantities are not reset). This option is useful if the keying process is suspect and needs to be redone.
•
Copy System Quantities – Use this button to set all counted quantities equal to the system
quantities (i.e. no variances). If a visual check of the count sheets indicates that only a few items
have variations it may be faster to use this button and then amend counted quantities which differ.
189
MYOB EXO Business User Guide
Press the Save button at any time to commit your keyed work to the database. This does not exit the
window. Saving does not post the stock variance transactions or affect the live stock ledger - this happens
when stock is uploaded to the ledger (see page 190).
When keying is competed use the window close button (windows X) to close the window. Clicking the
Cancel button will also close the window but without saving any changes made since the last Save.
You can return to the window for further keying or to amend previously keyed figures.
Print Variance Report
Once keying (see page 188) and/or importing (see page 191) of count quantities is complete, print the
variance reports.
Hi-light the required location and press the Print Variance Report button.
After printing, check any “suspicious” count figures and amend keyed quantities if required. If amending
counted figures be sure to reprint the variance report afterwards and re-check.
Upload Stock Load to Ledger
When you are happy with the counted figures on the variance report, run the stock take upload function.
This posts stock transactions to the live stock ledger for the variance quantities and signals conclusion of
the stock take for that location.
To upload variances press the Upload Counted Quantities button.
A window appears requesting date and period information to apply the variance stock posting.
190
Working with Stock
Posting to past periods is supported as a stock take can commonly be aligned with and end of period
process already performed.
Once these fields are set correctly, click the OK button to proceed. The system will confirm completion of
the post.
Import Stock Take
If the stock take has been prepared outside the MYOB EXO Business (e.g. via spreadsheet or from a
portable scanning device) then the counted figures may be imported. This is a substitute for keying and the
usual initialisation must be performed.
Any rows in the import file for stock items that were not initialised will be rejected. If using selection
criteria in the stock take initialisation then please be sure the criteria will initialise all items that will be
imported.
When importing the quantity in the CSV file is added to any quantity for the item that may have been
previously imported or entered to the stock take.
The file to be imported should be a CSV (comma separated variable) file containing fields Stockcode and
Quantity (in that order). Stockcode can be replaced by Barcode and is resolved to Stockcode during the
import.
Importing a stock take
To import a stock take, use the drop down next to the Entry button and choose Import Count.
The Stocktake File Import dialog appears:
The name of the CSV file to be imported should be keyed in the field Input File. Alternatively use the
ellipses button to locate the file.
The dialogue allows selection of the location that will be imported into therefore the location does not
have to be hi-lighted before launching the import process.
191
MYOB EXO Business User Guide
A number of checkbox options also appear.
Filter characters – Set this option to filter out from the import file any characters that are not permitted
within a stock code (such as the \ character).
Expect Barcodes – Set this option to signal that the first field of an imported row may be a Barcode that
must be resolved to a stock code.
Expect PLU’s – Set this option to indicate that some rows may contain PLU codes. These are Stockcodes or
Barcodes for lookup items that link to a stocked item.
Expect Unit Cost – Set this option if unit costs will also be submitted. This requires a column in the input file
containing the unit cost.
Expect Batch Codes –Set this option to indicate that separate rows will exist in the import file for stock
batch codes. The file will be expected to have a third column for the batch codes. For non-batched items
this column should be blank.
Expect Expiry Dates – Set this option if expiry dates will also be submitted for batch-tracked items. This
requires a column in the input file containing the expiry date.
The batch codes and expiry date check boxes only appear if those profiles are active. There is no facility to
import serialised stock.
Note: If the Expect Batch Codes or Expect Expiry Dates options are checked then the file format
caption above the input file name changes to indicate the appropriate
format.
To import the file, click the Upload button.
Progress messages will be displayed in the notepad area at the bottom of the window.
After import proceed with printing a variance report and performing an upload as would occur for a keyed
stock take. Prior to uploading, The Key quantities function may be used to correct any imported quantities
if required.
Stock Take - Advanced Features
Stock Take - Advanced Features
The chapters listed here cover advanced features available in the Stock module of MYOB EXO Business.
Keying stock batch codes (see page 192) | Keying stock serial numbers (see page 193) | Taking on stock
with unit costs (see page 195)
Keying Stock Batch Codes
If the Enable stock batch codes Company-level profile setting set then batch codes may optionally be
processed in the stock take.
If batch codes are active then the Key Counted Quantities grid has an additional Batch Code column.
When summarising batch-tracked items, only a single row per stock item is initially present. The row will
initially have a blank batch code. A total for the item /location may therefore be keyed without performing
a batch breakdown. If the System quantity does not match the counted quantity then a batch code must be
entered to which the variance will be posted. This batch code may be an existing batch code for the item or
a new batch code may be created. Existing batch codes may be searched for using the usual ‘?’ character.
If not summarising batch tracked items then a row will be present for each batch code of the item/location.
The system will expect that a count by individual batch code has been performed and keyed (or imported).
Variations will be created per individual batch code where quantities do not match.
When on a row for a batch tracked item the Split Line button becomes active.
192
Working with Stock
Use this button to perform a split. The focused row will split into two rows so that different batch numbers
may be applied to each. When clicked a dialog appears:
Enter the quantity for the new line. The remainder will be left on the original line. The maximum quantity
that may be entered is 1 less than on the original line. Enter a new or an existing batch code (different from
the original) on the new row.
Tip: A batch number can be “corrected” by splitting a line and entering a new batch code to the new
row. Key the required quantity to the new row and zero the counted quantity on the old row.
Note: If the profile Blank batch code warning is set, batch codes will be verified both on saving
within the keying window and again when uploading.
Keying Stock Serial Numbers
Utilities > Stock Utilities > Serial Number Tracking
Partial facility exists for keying serial numbers at stock take time.
Within stock take the system does not enforce the relationship between the location total quantity and the
list of serial numbers. In other areas of the software this constraint only applies to serials that are Fully
Tracked. The stock take also applies identical logic for all serial number types. This means that stock take
applies to Debtor only and Creditor only serial types even though logically stock take could be considered
an internal process. Taking this “loose” approach overcomes otherwise unnecessary complications and
simplifies the process. The serial type is displayed in the Key count quantities grid for informational
purposes only.
There is no provision to import serialised stock take information.
In the Key count quantities grid a row for a serialised item will enable the Setup stock serial numbers
button
.
Clicking this button navigates to a window where serial numbers can be added, deleted or edited.
Note: Because of the timing differences below the controls are “loose” and under user control.
Changes to serial numbers are immediate. They occur when each of the 3 functions available for
serials are processed. For each the location, total stock will not be altered (by variation) until the
stock take update is performed. The intermediate situation, prior to upload, can be that the serial list
mismatches the location total yet reflects the true stock situation.
193
MYOB EXO Business User Guide
The existing in-stock serials are presented in a grid similar to the serials grid in the stock account window:
Note: These are only the in-stock serials and only for the location being keyed.
Buttons at the right of the toolbar allow modification of this list. Another button closes the serials window
and returns to the usual stock take count window.
•
Back to Stock Take - Use this button to return to the main stock take count window.
•
Add new serial numbers - Use this button to add more serial numbers to the list.
•
•
•
Edit the selected serial number - Use this button to change the properties of the highlighted
serial number (including the serial number itself).
Remove the selected serial number - Use this button to delete the highlighted serial number.
De-assign the select serial number - Use this button to remove the selected number from its
assigned document.
Note: The availability of the serial number editing buttons depends on the Allow serial number
override User-level profile setting. If this is set to “N”, only the Back to Stock Take button is
available.
Add new serial numbers
Clicking the Add new serial numbers button will open another window to permit one or more serial
numbers to be specified and added to the list. Before it can offer a grid with the appropriate number of
rows to be filled, the system needs to know how many additional serials are required.
Enter the required number of new serials and click OK. The new serials grid will then be displayed.
194
Working with Stock
Complete the serial numbers (and expiry dates or references if applicable) and then click Save to create
these serials. The system will ensure that duplicate serial numbers are not created within a stock item (any
location).
Note: See the White Paper “Stock Serial Numbers” for more information on the usual assisted
processes (buttons) for sequential serial numbers. This White Paper is available on the MYOB EXO
Business partner site (login required).
Edit the selected serial number
Highlight the serial number row you wish to edit then click the Edit the selected serial number button.
Another window will open showing the serial number properties in edit mode. This is the same window as
available via the menu item Setup Stock serial Numbers.
The serial number, reference and expiry date may be changed.
The location may not be changed, as this requires a stock transfer.
Note: Expiry dates require the profile Use expiry dates for Batch and Serial numbers to be active.
The item must also be enabled for expiry dates.
Remove the selected serial number
To remove a serial number from the list, highlight the unwanted serial and press the Remove the selected
serial number button. A confirmation message appears.
195
MYOB EXO Business User Guide
Taking on Stock with Unit Costs
Normally costs are not keyed with a stock take. Any adjustments for variations are costed automatically
and as applies with other stock transactions such as sales.
Note: Adjustments to stock value (rather than stock quantities) are accommodated separately from
stock take under the menu item Transactions > Stock > Manual Stock Movements > New > Average
Cost Adjustment.
When taking on stock such as during initial database setup or creating a new stock location after a company
acquisition (or similar) the database will not have an existing unit cost to apply to the stock being taken on.
It is therefore convenient to key or import a unit cost along with the quantities.
To do this you must first check the Initialise cost prices checkbox from Stock take > Options.
When keying stock take count quantities, an additional Unit Cost column will be present and the cost for
each item may be entered.
This cost is stored with the stock take data and will be used as the unit cost of the variance stock
transaction when the stock take upload is performed.
The uploaded variance transaction performs the usual average stock calculation.
When posting to an item for which no stock exists for any location the existing value of stock is zero,
therefore the average stock calculation will return the same value to STOCK-ITEMS.AVECOST as keyed in
the stock take.
When posting to an item that already has stock (e.g. from pre-existing stock or an upload from another
counted location) the average cost will be calculated taking the stock value for the variance posting at the
keyed unit cost and averaging it with the pre-existing stock at STOCK-ITEMS.AVECOST.
Unit costs may also be used with the stock take import. In the stock take import window check the Expect
Unit Cost option to indicate that the import file contains this extra column.
When previous quantities for an item exist in the stock take (e.g. from a previous import file or multiple
rows for the same item in the current import file) then the unit cost in the stock take for the item will be
averaged from the multiple imported entries.
196
Working with Stock
Dealing with Stock Movements
Entering a Stock Movement Transaction
The majority of transactions are posted to the Stock Ledger from your Debtors, Creditors, Sales or Purchase
Order Ledgers. The Stock Transactions window is used mainly for write off – write on adjustments or
transferring stock between locations.
There are six types of transactions that can be performed from the Stock Movement window. Once the
type of stock movement has been selected, the transactions are essentially entered in the same way.
To enter a stock movement transaction:
1. Open the Stock Transactions window (Transactions > Stock > Manual Stock Movements).
2. Click New and select the stock movement type required.
•
Sale – moves stock OUT and updates the stock sales figures. It is mainly used to create
stock turnover history when beginning a new MYOB EXO Business implementation,
although the usual method is via a sales order or debtor invoice.
•
Receipt – moves stock IN and updates the Average Cost and Latest Cost figures. The usual
method is via the purchase order and creditor’s invoice.
•
Transfer – moves stock from one location to another. A location transfer will only affect
the ‘in stock’ quantity; it will not affect the sales units/values or reports.
•
Adjust Out – DECREASES the stock level for reasons other than sales. For
example: damaged stock, shrinkage or manual stock take.
•
Adjust In – INCREASES the stock levels for any purpose other than a normal stock
procedure. Adjustment journals will only affect the In Stock quantity and it will not affect
your purchase totals or reports.
•
Average Cost Adjustment – adjusts the average cost of a stock item.
3. Enter the header information, e.g. Date, Location and Period that the transaction will be posted.
197
MYOB EXO Business User Guide
4. Enter the transaction details, e.g. Stock code, Quantity, Location, Batch Code and GL code.
5. RIGHT-CLICK on the line details window to create a one-off stock item or view stock levels.
6. Add narrative to the transaction by clicking on the Narrative icon.
7. Click Save to process stock transaction. The system will prompt to print a stock transaction
document.
Field Definitions
The grid header fields are detailed in the table below:
Field
Description
Date
The date for the transaction. The default date is the current system date. To
change the date, select from the attached calendar.
Reference
A reference code for internal use. This field is optional and can be left blank.
Initials
The initials of the staff member entering the transaction.
Location
The name of the location to which the transaction is to be updated. Select
the option from the list box. If you are entering a Transfer, this is the
originating stock location.
Adjustment Type
A click against the appropriate transaction type.
Grid column definitions
Stock Code
The stock code that pertains to the item for which the transaction is being
carried out.
Description
The description of the stock code. The default description is automatically
completed here but you can overtype it if you want to change or add details.
Qty
The stock quantity for this transaction.
To Loc
The location number that stock is to be transferred to. This field is only
accessible if you are entering a Transfer. For all other entries this field will
display N/A.
Unit Price
The unit price of the item. This defaults to the Latest Cost price for the stock
item. You can override this price if necessary.
GL Code
The general ledger code related to this stock item.
Analysis Code
Analysis Codes are intended for use during transaction entry. They are not
available on any master files (e.g. GL Control accounts, Stock Item records).
The basic principle is that if a GL account can be entered or edited on a
transaction, the user should also be able to enter analysis codes.
198
Working with Stock
Notes
•
Click the Batch Lookup button to display the Batch No Lookup window to view batch code
information on all locations for a batch tracked stock item.
•
Serial tracked items will prompt for serial numbers on saving the movement.
•
The ability to create any or all of these transaction types can be controlled by the setup of the
user’s menu. On the Stock Transactions Entry procedure, disable particular stock movement types
by entering -S (Sale), -R (Receipt), -T (Transfer), -I (Adjust In), -O (Adjust Out), -C (Cost Adjustment).
One-Off Stock Items
About One-Off Stock Items
The One-Off Stock Items feature enables you to very quickly create a stock item for a unique, one-off
purchase or sale of stock. It offers many advantages over the practice of having a miscellaneous “nonstock” item with or without tracked serial numbers.
Most entry screens (such as Sales and Purchase Order entry, Debtor and Creditor Invoice entry, and Stock
transactions) have the ability to create a stock item on-the-fly. This new item can inherit the values of an
existing “template” item, or it can be an exact duplicate of another stock item in all but the actual stock
code.
This feature may be used by companies who source specialized parts, or act as a portal for an entire
industry niche. In these cases the potential product range is enormous, and it is not practical to hold the
entire catalogue the inventory database. Using this method the items are only created as required and can
be automatically disposed of to allow the transactions to take place on that transaction only.
Another scenario where this function may be useful is where the product range being sold is one-off in
nature such as trade-in goods.
Setting up EXO Business for One-Off Stock Items
For businesses that require regular trade of one-off stock items, there are two setup tasks that accelerate
the process:
•
Setting up a one-off stock item template, which will be used to copy from when creating a new
one-off stock item, and
•
Setting up for rapid one-off stock items, which will automatically add a prefix and suffix to any new
one-off stock item codes to identify them.
Setting up a One-Off Stock Item Template
1. Create a new stock item, with a generic name to cover the attributes of new one-off stock items
you are likely to require, for example ‘TradeIn’ for trading in used cars.
2. Set the Classification to “TEMPLATE”.
3. In the Flags section, set the stock item to inactive (i.e. untick the Active checkbox), and make the
stock item a lookup item (tick the Lookup checkbox).
Note: When searching for a one-off stock item, make sure you tick the Include inactive items
checkbox in the Stock Item Details search window.
4. Click Save.
199
MYOB EXO Business User Guide
Setting up for Rapid One-Off Stock Items
1. In MYOB EXO Config, go to Administration > Stock > Stock Groups.
2. For each stock group for which you need to be able to create one-off stock items, double-click on
the stock group.
3. Enter the prefix you want to use for all automatically generated stock codes for one-off stock items
in this stock group in the Autocode prefix field.
4. Enter the suffix you want to use for all automatically generated stock codes for one-off stock items
in this stock group in the Autocode suffix field.
5. Click Save.
Creating a One-Off Stock Item
Sales order entry, purchase order entry, debtors invoice, creditors invoice, and stock transaction windows
have a shortcut to create a stock item on-the-fly.
For example, if a second hand TV is to be traded in, a one-off stock item could be created from a
“TVTRADE” template stock item on a negative quantity Sales Order, or on a Purchase Order.
Note: Before creating a one-off stock item, you should complete the setup tasks (see page 199).
200
Working with Stock
To create a one-off stock item:
1. Open the transaction that is to have a one-off stock item created, e.g. a Debtor invoice.
2. Right-click on the transaction line in the grid and select Create one-off stock item. Alternatively,
press CTRL+O. The following window opens:
3. Enter a stock item into the Stock code field in the Copy From section, or search for a stock item by
typing ‘?’ and pressing ENTER. Check the Include inactive items checkbox and click Search.
Selecting the Search template only option will restrict the search to stock items with a classification
of “TEMPLATE”.
4. If the Copy From Stock code belongs to a stock group with an Autocode prefix/suffix set up, then an
automatically generated stock code will be entered in the Copy To Stock code field. This Stock code
can be accepted or overridden.
5. A serial number could also be scanned as the new Stock code, or part of the new Stock code as long
as it can be guaranteed that this will be unique.
6. Enter in any remaining details of the new stock item as required.
7. Click OK.
Automatically Inactive Stock Items
A one-off stock item is automatically set to inactive status when there has been a stock movement and the
total stock on hand falls to zero.
To keep the stock item for future transactions, change the Classification of the stock item from “ONE-OFF”
to “NORMAL”
One-off items will remain active for historical reporting and warranty tracking, but will be excluded from
regular stock line reporting if they are marked as inactive.
201
MYOB EXO Business User Guide
Stock Serial Numbers
About Serial Numbers
This section gives a technical overview of key serial number processes.
Serial numbers can only be used with stocked items; lookup items cannot be serialised.
Before serial numbers can be used, they must be activated for the database by ticking the Company-level
profile setting Enable serial number tracking. There are other profile settings that also govern their
behaviour.
Note: See the “Stock Serial Numbers” white paper for technical information on all available profile
settings.
Serial Numbers versus Batch Numbers
Serial numbered items differ from batch numbered items in the following fundamental ways:
•
Each serial number has an implicit quantity of one. They cannot be used with decimalised or zero
quantities. Batch numbers have a quantity and these can be decimalised.
•
Multiple serial numbers can apply to a single document line and stock transaction. The batch
number for a document line must be constant for the entire line quantity. If multiple batches are
required per stock item on the document then multiple document lines must be entered.
•
Serial numbers are entered in a separate grid or form usually appearing during the document Save
process. Batch numbers are entered directly on the document line prior to saving.
•
Serial numbers are maintained against the database by application program code. Batch numbers
are maintained from triggers in the database when a stock transaction containing a batch number
is committed.
Serial Number Types
Occurrence of serial number processing depends on both the serial type (mode) of the stock item, and the
class of the trading partner in the particular EXO Business function. There are three classes of trading
partners:
•
Creditor (Supplier), e.g. purchase orders and Creditor invoices
•
Internal (no Creditor or Debtor), e.g. adjustments, transfers and works orders
•
Debtors (Customer), e.g. sales orders and Debtor invoices
The user defines the serial type of each stock item. Types are offered for each combination of the three
trading partner classes. The Stock Item Details screen (see page 164) offers this as a drop down combo
control on the Details 1 tab:
202
Working with Stock
The types offered are:
•
Not Serialised – the item is not serialised. Serial number dialogs and tabs will not appear for this
item.
•
Fully Tracked (Creditor, Internal, Debtor) – the item is serial tracked for all stock transaction types.
This setting ensures that a serial number list by location will match the total in stock quantity for
that location. It requires that serial numbers be identified for all stock movements and is therefore
maintenance intensive.
•
Creditor and Internal – the item is serial tracked only for the inwards supply chain, i.e. a transaction
associated with supplier/Creditor processing and internal stock movements but not transactions
associated with Debtors. Use this setting if you need to trace the source of a serial number
(including internal transfers) but do not require information on the customer it was sold to.
•
Debtor Only – the item is only tracked for transactions associated with a Debtor. Use this option if
you only require tracing customer sales by serial number (e.g. for customer warranty purposes) and
do not require serial detail for purchases or stock on hand.
•
Creditor & Debtor – the item is tracked for all movements except internal movements (e.g.
transfers). Use this option if you need to know both trading partners associated with this item (e.g.
for both Supplier and Customer warranty), but do not need to keep stock levels by serial. This
option can reduce the required serial processing compared to “Fully Tracked” when lots of
adjustments, transfers, or works orders are involved.
•
Creditor Only - the item is only tracked for transactions associated with a Creditor. User this option
if you only require tracing supplier purchases by serial number (e.g. for supplier warranty purposes)
and do not require serial detail for stock on hand or sales.
•
Internal & Debtor – the item is serial tracked only for the outwards demand chain, i.e. a transaction
associated with customer/Debtor processing and internal stock movements but not transactions
associated with Creditors. Use this setting if you need to trace the destination of a serial number
(including internal transfers) but do not require information on the supplier it was obtained from.
•
Internal Only – the item is tracked only for internal movements that do not involve either a Creditor
or Debtor. Use this setting if you do not require the tracking of the purchase of this item but do
need to trace it through internal transfers or consumption (e.g. raw materials used in production).
Stock Levels and Serial Numbers
It is possible for the stock level of a stock item and the quantity of serial numbers for the stock item to not
be equal.
Items set to anything other than “Fully Tracked” can be considered loose bindings as they can process some
stock movements without entry of serial numbers. This does not imply that serial numbers are chosen
automatically by the system where not requested, but rather that serial numbers are not maintained in
those cases. The serial number list for an item is therefore not necessarily an accurate representation of
stock on hand.
Serial number records are maintained indefinitely once created. In EXO Business, all serial number
processes check for and maintain the uniqueness of a serial number within a stock item (regardless of stock
location). Serial numbers may be duplicated across differing stock items.
Each serial record has a property, INSTOCK, which will have a value of “Y” or “N” to indicate the last known
state of that serial. Also, the property LOCNO indicates the last known location of that serial number. In
cases where the item is not fully tracked, LOCNO will be amended where necessary by the last participating
stock transaction.
203
MYOB EXO Business User Guide
As an example, for a Creditor & Debtor only item:
•
After purchase and before sale LOCNO will reflect the location of the inwards goods receipt. This is
still true even if an internal transfer has moved the stock to a different location or consumed it as
part of a manufacturing process.
•
After sale LOCNO is updated to match the supply location.
Also in the above example, if there are no single entry internal only type movements (adjustments, works
orders etc), then even if transfers (double entry) occur, the total stock across all locations is represented by
the serial list but the location breakdown is likely to be incorrect.
Serial Number Processing
Serial numbers are maintained as part of the workflow whenever stock transactions are created for a
serialised stock item. This is usually associated with a business document (e.g. Debtor invoice). When the
document is saved using the Save & Exit or Save buttons, the stock items that should be serialised are
determined based on the combination of the document class and the serial type of the stock items. The
quantity of serials for each of these is computed. A serial numbers screen is displayed:
The top grid is populated with the required number of serialised rows. This is calculated from the line
quantities of the parent document, and only items that should be considered serialised for this document
class are displayed. If no items require serial processing, then the serials screen will not appear and the
transaction will continue.
It is not possible to delete or insert rows, as this would require altering the quantities on the parent
document. At any stage the Cancel button can be used to discard any serial information entered and return
to the parent document that can then be amended as necessary. Clicking Save again will return to a fresh
serials screen.
204
Working with Stock
As the top grid is navigated:
•
The lower grey bar will show the stock item code and name, and the upper grey bar will show the
serial number type and available actions.
•
The lower grid will show any applicable serial number list for the item in focus.
•
The status bar beneath shows the filters that were applied in presenting this list and stock the stock
status, location selection, and account selection.
Usually the lower grid shows a list of available serials. When the item is for a contra (negative) quantity
such as a credit note, the row in the upper grid will be coloured red and the lower grid typically shows a list
of serials previously traded with this partner. The column header wording of the first column (e.g. Existing
Serial Numbers in the above example) also changes to reflect this.
Navigation and Data Entry
For some serial number types and document classes the serial numbers must already exist in the list shown
in the lower grid. In others they may be created.
The following points should be noted when navigating the serial number screen:
•
When the cursor focus is in a Serial No cell of the upper grid, the left and right arrows move along
this upper grid row, while the up and down arrows move the selected line in the lower grid. If the
cursor focus is in another upper grid column (e.g. Expiry or Reference) then the up and down
arrows navigate the top grid.
•
Entering, scanning or selecting a serial number will move the focus line of the top grid down one
row. This accommodates rapid entry.
•
If an entered serial number matches an entry in the lower list, it is selected. Selection can also be
done using a mouse or navigating the bottom grid and pressing ENTER. A selected serial will copy all
its static attributes such as Expiry and Reference.
•
Selected serials disappear from the bottom grid so that they may not be selected multiple times. If
a serial is selected in error, simply select another. The newly selected serial will replace the
previous selection, and the replaced serial will be returned as the last row on the bottom list (i.e.
the lower grid is not automatically resorted).
Sequential Entry
After entering a serial number, sequential numbers can be automatically entered or selected for
consecutive rows that have the same stock code. This is done using the Sequential or (n) Sequential
buttons.
The Sequential button will recurse until a change of stock code is detected. The (n) Sequential button will
request a quantity and recurse this many times or until a change of stock code (whichever comes
first). These functions are also available on the right mouse click menu, or by pressing F12 or CTRL-F12
respectively
When using these functions to create new serials the right-most portion of the serial number in focus is
used as the incrementing integer. For example if started with a serial in the form ABC-123-1001-Z, then
1001 will be the portion incremented. The next serial will be ABC-123-1002-Z. This function will also clone
the Expiry and Reference fields from the starting row.
When selecting existing serials the system will select from the lower list in sequence. Expiry and Reference
will be obtained from the selected serial.
205
MYOB EXO Business User Guide
Closing the Serials Window
When all rows of the upper grid are populated the Save button may be clicked to close the serials screen
and continue with the transaction save.
Clicking Save without all rows populated will present a warning dialog before returning to the serials
screen.
Clicking Cancel will return to the parent document. All serial number entry in the current session will be
discarded.
Pre-assignment
When pre-assigning serials (see page 210), the same workflow occurs as described previously for stock
transactions.
If serials have been pre-assigned, then when the serial selection screen re-opens (either for review or
subsequent stock transitions), the serials previously assigned will automatically populate the upper grid.
If the quantity required in the current session is less than the quantity pre-assigned then the pre-assigned
serial will populate the upper grid in ascending Serial No. sequence (e.g. a Sales Order for ten items may
have ten pre-assigned, but only four are being supplied for the current session). The additional assigned
serials will show in the lower grid as rows with a different background colour. This allows easy identification
for preferred substitution. A non-assigned serial may also be chosen as replacement if desired.
If insufficient serials have been pre-assigned, blank serial number cells will appear and will require entry.
Reporting on Serial Numbers
For most document types, MYOB EXO Business maintains link fields in the serial number records to both
the header-level and line-level records of the participating document.
Clarity
Clarity reports can be used to detail serial numbers used on transaction documents.
Link fields can be used by Clarity documents to optionally print sub-reports showing serial number lists per
document or per document-line. The sample file InvoiceWithSerials.CLF is provided in the Clarity Variants
Library available on the partner website.
Note: See the “Stock Serial Numbers” white paper for technical detail on the joins expected when
linking sub-reports to document headers or lines.
Older FMT reports do not support reporting from the STOCK_SERIALS table.
Serial Number Tracking
The Serials tab of the Debtor, Creditor and Stock Item Details screens, and the Serial Number Tracking
menu function both provide a grid showing serial numbers for a stock item.
Right-clicking on a serial number row will offer a list of document classes to drill to. Classes with no link will
be greyed out on this menu. The separate Serial Number Tracking screen also has buttons on the button
bar for each document class plus buttons for Debtor and Creditor account screens. These buttons are
disabled when no link is present so scrolling this screen quickly identifies the links present. This screen can
also be accessed as a separate window from the Serial Nos tab of the Stock Item Details account screen by
clicking the
button.
The available drill-down features are:
206
•
Creditor Account
•
Debtor Account
•
Purchase Order
Working with Stock
•
Inwards Goods
•
Sales Order
•
Creditor Invoice
•
Debtor Invoice
•
Assigned Document
Two additional options are possible when this form is accessed from other EXO Business modules:
•
Stock Transfer Requests (Supply and Sales Order Workflow)
•
Jobs (Job Costing)
Additional Serial Number Considerations
Changing Serial Number Types
Changing the serial number type (see page 202) for an item that has no stock transaction (e.g. a new item)
poses no problems.
Changing the serial number type when tractions exist is a different matter, especially when stock on hand is
non-zero. EXO Business provides tools that allow the user to align the list of serials with the stock level
without also creating stock transactions (i.e. not altering basic stock keeping field). These tools are locked
by default.
Access to the serial number editing tools is controlled by the User-level profile setting Allow serial number
override. If it is set to “Y”, two additional buttons are available on the Serials tab of the Stock Item Details
account screen:
•
Add new serial numbers - request the quantity of serials to be added and then input a list of
serials.
•
Remove the selected serial number - delete the serial row highlighted in the grid (a
confirmation dialog appears).
Crediting Serials (Returns)
When crediting serial numbered stock, the system offers a list of serial numbers for selection from serial
numbers previously traded with that business partner (Debtor or Creditor). Items that are set to “Fully
Tracked” will not permit entry of serials that do not exist in the selection list. Other serialised stock items
that are appropriate for the trading partner may either be selected from the offered serial list or a new
serial number can be created.
Creation of serial numbers on return for a “Fully Tracked” item is blocked by default. The intent is to block
fraudulent returns from a customer or prevent an item being returned to the incorrect supplier. Some
circumstances may mean that this restriction is not appropriate, e.g. when the EXO Business software has
been implemented after some trading of these items has commenced. It may be necessary to process a
return for an item legitimately traded on a previous occasion whose transaction was never recorded in an
EXO Business database.
The profile setting Serials numbers creation on return allows for loosening these controls. It has the
following values:
•
No – the system is constrained for both Creditors & Debtors (default)
•
Creditors return – no constraint on Creditors but Debtors constrained
•
Debtors return – no constraint on Debtors but Creditors constrained
•
Both Debtors & Creditors return – neither Creditors nor Debtors are constrained
207
MYOB EXO Business User Guide
Deferred Invoicing
This refers to the case where a Debtors or Creditors invoice is created at a later time (i.e. not in same
process as stock transaction). This occurs when costing receipts or supplying Sales Orders and the invoice is
not generated at the same time.
In a partial invoice situation (invoicing less than supplied), the system matches the serials by invoice
reference from the linked stock transaction (i.e. EXO Business finds the stock transaction for the invoice and
locates serials with a matching link). This assumes that there has not been a subsequent stock transaction
of the same class prior to invoicing (e.g. a customer return between supply and invoice). Processing of
different classes is accommodated (e.g. item is received from supplier, supplied to customer, customer
invoice raised, creditor invoice processed).
Last-link Storage
When multiple transactions of a similar class occur for the same serial number (e.g. a Debtors Invoice
followed by a Debtors Credit Note for goods return) the links are only maintained for the last movement.
Each document class has its own set of links and therefore do not interfere with each other.
In the case of a credit note, for example, the STOCK_SERAILNOS fields INVSEQNO, STOCKOUTSEQNO and
DRINVLINESEQNO will point at the Credit Note and the links from the serial number to the original invoice
are lost. If the invoice was created from a sales order then the original sales order links are still retained,
provided that the credit note was manually entered and not a negative quantity sales order.
Note that STOCKINSEQNO and STOCKOUTSEQNO are direct (non-visible) links to the
STOCK_TRANSACTIONS table and apply to multiple business transaction classes. A STOCKINSEQNO
originally linked to the STOCK_TRANS for an INWARDS_GOODS_LINE may be overwritten with the link to a
STOCK_TRANS associated with a CR_INVLINE used to return the goods to supplier. Both the IGRLINESEQNO
and the CRINVLINESEQNO in STOCK_SERAILNOS remain valid but the original STOCKINSEQNO link to the
STOCK_TRANS for the incoming goods is lost.
Maintaining all this history would require an additional table and would add additional complexity to the
internal processing. It was decided that this was not warranted as usually only the last stock movement of
that business type for a given serial number was of interest.
Serial history may have been recorded by document if creating PDF output of business documents.
Stock Take
By default serialised items are included in a stock take setup. Serials can be excluded from this process.
Note: To exclude serial numbered items from stock take, enable the Company-level profile setting
Exclude stock items with serial numbers from stock take, or tick the Exclude Serialised Stock Items
option on the on the Stock Take Options window (see page 183).
Stock adjustments for serial numbered items pose their own considerations:
208
•
If the stock item is of serial type Fully Tracked, then any adjustments must also provide the
additional serials or determine which serials to be removed. This can be done by keying stock
adjustments in the Stock Movements screen.
•
Other serial types do not insist that the sum of serials for a stock item / location combination match
the stock level. It therefore becomes the user’s choice if serial numbers are to be adjusted in
association with stock take discrepancies. This consideration would normally only apply to serial
types with the Internal attribute.
Working with Stock
Reference Field
Serial numbers also offer an alphanumeric reference field for each serial item. This field has no special
significance and can be used to store any additional information. Up to 30 characters is accommodated per
serialised item.
This field is always present but can be hidden, if not required, by using the visible column attribute of the
Exogrids. Blank or null entries are permitted so use is optional.
Tip: Adding the menu item Setup Stock Serial Numbers accommodates correcting serial reference
numbers and even changing an existing mis-keyed serial number. This item is not installed to the
default menus for security reasons.
Although serial numbers are identified during processing by their recorded serial number the system
assigns each serial number a unique identifier to each item (SEQNO). EXO Business does not use the actual
value of the serial number field for linking purposes therefore this tool can safely change it. This is useful if
say some goods were accidentally receipted (created) with the wrong serial number. Uniqueness of serial
numbers within a stock item is still an imposed constraint.
Note: Extra Fields functionality (see page 24) is not supported on the STOCK_SERIALNOS table.
Serial Number History
MYOB EXO Business provides several screens to view the history of serial numbers. The main serial number
record stores only the last document number for each document class. Access to these documents is
provided via a right-click menu from the Serials tab in the Debtors, Creditors and Stock account screens.
On the Serials tab of the Debtors, Creditor and Stock account screen, the right click menu includes a View
History item. This opens a window of stock transactions associated with the serial number:
Transactions in this window can be drilled into in the same way as on the main Transactions tab in the stock
account screen.
The View History menu item may also be accessed from the available serials window in the lower grid
when processing serial numbers.
Note: The Serial Number History screen shows stock transactions associated with stock movements.
If invoicing (Debtors or Creditors) is done subsequent to the supply or receipt, the stock transaction
does not contain the invoice number and hence cannot directly drill to the invoice.
For Sales Orders the stock transaction provides right-click menu access to Sales Order history from which
the invoice(s) may be drilled.
To facilitate reprint of invoices with serial numbers, the system also maintains separate audit by serial
number linked to invoice number. This may optionally be used in Clarity instead of the links to the primary
serial number record. For compatibility with earlier versions, the default Clarity files provided still use the
single level of history provided by the main serial number record.
209
MYOB EXO Business User Guide
Note: See the “Stock Serial Numbers” white paper for technical information on the table structures
and links that may be used in Clarity.
Advanced Serial Number Features
This section covers optional advanced features that capture additional data or extend the workflow. By
default they are inactive.
Expiry Dates
If the Company-level profile setting Use expiry dates for batched & serialised items is active, the system
will offer and expect expiry dates to be entered on serial records if the Item Expires option is also checked
on the Details 1 tab of the Stock item (see page 164). Expiry dates are entered in the form dd.mm.yy.
Pre-Assignment
Pre-assignment is the process of linking or associating a serial number with a document prior to the
workflow that generates a resulting stock transaction. This is normally a reversible process in that
alternative serial numbers may be exchanged for pre-assigned ones at any time prior to creating the stock
transitions.
Pre-assignment is optional and requires that the Company-level profile setting Allow serial number
assignment be activated.
Three processes may pre-assign serial numbers. These are:
•
Inwards Goods – serial numbers can be entered in Inwards Goods Receipts and then recalled for
processing during Inwards Goods Costing.
•
Sales Orders – serial numbers can be entered at time of Sales Order Entry and then recalled for
processing during supply.
•
Stock Transfer Requests – when stock is moved to the In Transit location using the Send button
(creates stock transactions) then if the pre-assignment profile is set, the selected serial numbers
are tagged as assigned to the Request document until received into the destination location. This
ensures that only the sent serials are processed on during the Receive process. This is especially
useful where serials for a stock item may exist in the in-transit location for multiple transfer
requests at any given time. On using the Receive button, the tagged list of in-transit serials is
recalled for easy processing.
Pre-assignment has no effect on free stock levels or other stock calculations. By associating a serial with a
document, the user can:
•
Create a serial number record prior to actual stock transaction processing.
•
Tag a serial to a particular document so that it is unavailable for selection on any other document.
•
Allow rapid recall of the pre-assigned list at time of generating the stock transaction.
Note: The true document class link fields are not updated until a stock transaction is processed. In
this way, if a serial participates more than once for a given document class (e.g. returned item sold
on a subsequent Sales Order), the original link is not lost until overridden by the new stock
transaction. De-assigning a serial number thus restores the history condition that existed previous to
assignment.
Pre-assignment is determined from the serial number property ISASSIGNED, which can be one of the
following values:
210
•
N - not assigned
•
i - Inwards Goods (Supplier)
•
o - Sales Order (Customer)
Working with Stock
•
q - Stock Transfer Requests (Internal)
•
r - (Reserved for future use)
Note: These values are case-sensitive.
An assigned serial number will also have header and line level links in a pair of fields designated for this
purpose. These are separate from the links associated with the particular document class. The assigned
links have indeterminate values when ISASSIGNED = ‘N’ (i.e. they are not cleared after use). If using
assignment links in Clarity then the query must explicitly test the ISASSIGNED field for the correct letter
associated with the document class.
Bills of Materials
EXO Business provides some additional support for serial numbers when processing Bills of Materials.
The BILLCODE is stored in the field STOCK_SERIALNOS.KITCODE for participating serial numbers.
There is no logic to correlate or link output serial numbers to component serial numbers. In other words,
the individual component numbers for an individual serial number of an output stock item is not
determinable where the output quantity is greater than one. Serial numbers, both component and output,
can be determined for a document.
When a bill of material is embedded within another document (e.g. Sales Order or Debtors Invoice) then
the BOM type is relevant to the serialised actions taken:
•
A BOM of type “Kit” sells the component directly and does not manufacture an output item. A
serial number will therefore not be requested for the OUTPUTCODE. The component lines are true
sales lines and therefore serial numbers will be requested only if the stock item’s serial type
contains the debtor attribute.
•
A BOM of type “Build” (manufactured) involves two simultaneous processing functions:
manufacture (internal attribute) and sale (Debtor attribute). Serial numbers will be requested for
items (both components and output) that have either internal and/or Debtor attributes.
If EXO Business were to apply exact rules of definition, then a BOM of type “Build” should theoretically not
request serial numbers for components which do not contain the internal attribute (e.g. such as those
marked Debtor only). This was deemed contrary to popular expectation where serial numbers for
components of a manufactured item are often listed on the debtor invoice for documentation purposes
only, even though the output item is the only stock code that is participating in the sale process.
The parent supply or invoice processes do not check for discrete multiples of a BOM across all components.
For example, manufacturing five units where each require a component quantity of three does not enforce
the supply or invoice quantities of that component to be a multiple of three. The row count for serials
requested will simply derive from the supply or invoice quantities entered (as per a non-BOM line). Preassignment also works in the usual way.
211
MYOB EXO Business User Guide
Style, Size, Colour
The Style Colour Size feature enables you to create and process stock (see page 156) in variations of colour
and size. A common example of how this might be used is the fashion industry, where a single item is sold
in variations of colour and size. The Style Colour Size feature is available at no extra cost to MYOB EXO
Business users. The feature is enabled by configuring profile settings (see page 212).
Fitness for Purpose
What follows is a brief description of the use of these functions. The feature is limited to the functionality
described in this book, and no additional (undocumented) functionality is implied. It is widely
acknowledged that there are specialised software applications developed to handle Style Colour Size
requirements, these are generally expensive to buy and complex to install and use. Our intention here is to
better accommodate MYOB EXO Business users who have an element of Style/Colour/Size within their
product range, or who have found existing specialised software to be an ‘overkill’, either being too complex
or too expensive. It is essential that the users satisfy themselves that the demonstrable capabilities are
sufficient for their purposes prior to purchasing MYOB EXO Business or adding this functionality.
Style Colour Size Profile Settings
The following profile settings are available in EXO Business Config to set up and customise the Style Colour
Size feature.
Enable Style Colour Size features
To enable Style Colour Size features, tick the Enable size/colour Company-level profile setting and click
Save. Close any instances of MYOB EXO Business and Config and restart for the feature to be enabled.
Style Colour Picker Swap Axis
To swap the Style Picker axis, check the Style colour picker swap axis Computer-level profile setting and
click Save.
The default setting has colour as the vertical axis:
212
Working with Stock
When this setting is enabled, colour becomes the horizontal axis:
Style Colour Size Stock Code Formula
To change the formatting of the Style colour code formula, edit the Size colour code formula Companylevel profile setting as necessary.
Style Colour Size Stock Description Formula
To change the formatting of the Style colour description formula, edit the Size/colour description formula
Company-level profile setting as necessary.
Creating Style Size Options
Before you can generate any styles in MYOB EXO Business you will need to establish what sizes will be
available across your whole product range. For example you may have some styles which come in only
three sizes Small Medium and Large, other styles may come in a more comprehensive range of sizes
ranging from sizes 6 through size 14. If you have a style that has an extra dimension to its sizing e.g. Black Size 10 shoes (wide or narrow fitting), then you will need to create a separate sub style to accommodate
the wide or narrow fitting or create specific sizes ‘10N’ and ‘10W’. MYOB EXO Business accommodates two
dimensions: Size and Colour.
213
MYOB EXO Business User Guide
To create style size options use the option in MYOB EXO Business Config as shown below:
The Size ID is a unique key assigned by the system. It cannot be altered by the user and is invisible during
normal operation.
The Code is a short abbreviation of the size. It is used in the formula that auto-generates stock codes for
the style.
The Name is a long description used in the formulation of the descriptions of Stock items in this style.
The Is active option is enabled by default. Sizes can be made inactive if they are no longer available.
The Sort Order determines the size’s position when displayed on the Style Picker (see page 219).
Creating Style Colour Options
Before you can generate any styles in MYOB EXO Business you will need to establish what colours will be
available across your whole product range. If you have a style that has fabric options e.g. Leather or Plastic,
then you will need to either create a whole separate sub style to accommodate the different fabric options,
or create specific Colour options e.g. ‘Red L’ and ‘Red P’. MYOB EXO Business accommodates two
dimensions: Size and Colour.
214
Working with Stock
To create style colour options, use the option in MYOB EXO Business Config as shown below:
The Colour ID is a unique key assigned by the system. It cannot be altered by the user and is invisible during
normal operation.
The Code is a short abbreviation of the colour. It is used in the formula that auto-generates stock codes for
the style.
The Name is a long description used in the formulation of the descriptions of Stock items in this style.
The Swatch lets you pick a colour to act as a visual cue when picking this style on an order. Clicking the edit
button opens a standard colour select window:
The Is active option is enabled by default. Colours can be made inactive if they are no longer available.
The Sort Order determines the colour’s position when displayed on the Style Picker (see page 219).
215
MYOB EXO Business User Guide
Creating a New Style
A style is a collection of Stock codes that are common but with minor variations. These variations are
typically Size and Colour. The Size and Colour variations are two common problems for businesses that deal
in styles. These are creation of a new style (maybe involving a hundred-or-so stock codes), and
representation of the style in a visually compact fashion using a matrix where size is represented by the XAxis and Colour on the Y-Axis.
In MYOB EXO Business, a Style is analogous with a Stock Group, you can set the name of product group as
‘Style’ using the display names option in EXO Business Config. Stock Groups can be grouped under parent
grouping Stock Group 2. For example sales of various styles of socks might be reported under the collective
stock group 2 ‘Socks’.
Also the Price Groups function can be used as a useful method of controlling discounts of promotional
pricing across a whole style at once.
Not all product groups are required to have style attributes:
•
A sports equipment shop may sell all sorts of sports equipment, but only sports apparel and sports
shoes have Style/Colour/Size requirements.
•
A furniture store may sell furniture and bedding, but only Bed sheet product lines have a size colour
attributes.
For this reason there is a flag on each product group indicating that this product group has Style attributes.
Click New on the screen above to create a new stock group, then proceed to set up the stock group in the
normal manner. Tick the Style box and three more tabs appear:
216
Working with Stock
The Style tab is the key to creating a whole style and its constituent stock items in one step.
Field
Description
Inherit from
Style
You can inherit the properties of a similar style already created in your system.
This is a very fast way to set up a style based on a style from last season. The new
style need not be an exact duplicate. You may change attributes after copying.
Style Name (N)
A long description of this style (equivalent to product group description) used in
the formulation of Stock Item descriptions.
Style Code (S)
Equivalent to Product group report code used as an abbreviated for of the style in
the formulation of Stock codes.
217
MYOB EXO Business User Guide
Size Variations
(X) and (M)
Double-click in this area or right click on this area and select Add to pick from a
list of available sizes. You can add these by double-clicking on a size or
highlighting one and clicking OK.
Colour
Variations (Y)
Long Name (L)
Double-click in this area or right-click on this area and select Add to pick from a
list of available colours. You can add these by double-clicking on a colour or
highlighting one and clicking OK.
When you click OK, these colours are shown against the style. If you attempt to
add a colour that is already selected for this style you will receive a warning.
You can delete a selected colour by right-clicking on it and selecting Delete.
218
Working with Stock
Create
matching price
group
To facilitate easy maintenance of price rules for promotions or discounting of all
products in the style you can automatically generate a stock Price group to match
the style. Check this option if you want to create a matching price group for this
purpose.
Formulas and masks
MYOB EXO Business allows you to automatically build consistent stock code details using a ‘mask’ or
template. The example section gives you an illustration of how the stock codes and descriptions might
appear when created. If you change the formula, you will see the examples change as you do so. The
letters used in the formulae correspond to the letters in brackets on the style creation screen.
There are two company level profile settings that are used to set the default formulae; however, if a style is
inherited then the formula will be inherited as well. The two profiles are called:
•
SIZE_COLOUR_CODE_FORMULA
•
SIZE_COLOUR_DESC_FORMULA
Stock code Formula - can only use P, S, Y and X characters. These represent Alternate Stock Group
ReportCode (P), Style Code (S), Colour Code (Y), Size Code (X)
Description Formula – are limited to Q, N, L and M characters. These represent Alternate Stock Group
Name (Q), Style Name (N), Colour Name (L), Size Name (M).
The Stock code is generally set to 23 characters and stock descriptions to 40 characters. If you need more
than 40 characters, you can add additional descriptions in the notes field of the stock item. It is
recommended to keep descriptions limited to 40 characters so that they can be properly viewed on reports
and Invoices. Also, ensure that you have enough characters to accommodate the longest size and colour
codes / descriptions before creating the style.
219
MYOB EXO Business User Guide
Processing Styles using the Style Picker
While you can treat a stock item that belongs to a style as a unique stock item, (e.g. point of sale where you
may scan a barcode on the product) the style picker is used as an aid to selecting multiple stock items from
the same style. An example is when you are ordering various sizes and colours from suppliers or if you are
distributing a variety of colours and sizes to your customers.
The Style Picker is available in Sales Order Entry and Purchase Order Entry screens. Similar to using the dot
(.) to signify you are entering a KIT code, you can use the forward slash (/) to indicate you want to search on
styles:
Select a style and the Style Picker opens, showing all size/colour combinations set up for the style:
Note: Sizes and colours are ordered according to their Sort Order property. If multiple sizes/colours
have the same sort order, they are ordered by their Size ID/Colour ID.
220
Working with Stock
A light yellow cell indicates that a particular size/colour combination is not available. You can set an item as
unavailable by making the stock item inactive or by removing the size or colour extra field settings. The
system also blocks you in entering data on a yellow cell.
You can double-click on any available cell in the grid to view the summary of the stock on hand availability
for that stock item across all locations.
Select the required quantities using the Style Picker matrix, then click Save and the order will be populated
with the required quantities of each stock item. From here on, the lines are independent stock codes and
the order is processed as it would be normally.
Setting Other Default Values
Before creating the stock items that will make up a style, you can predefine default settings for these stock
items, as illustrated below.
Note: The secondary stock group for each of these stock items is set at the stock group level.
221
MYOB EXO Business User Guide
You can also preview the style before you create it using the view/size colour matrix option on the toolbar (
).
You can save the description of this style without generating associated stock items.
You can verify the style description by clicking the Verify style toolbar button (
Verify tab and clicking the Verify button.
222
), or by going to the
Working with Stock
The verification checks the style description you have made, and checks any existing stock items that are
attached to this style (created manually) that do not have size or colour specified. The full list of possible
errors is as follows:
No style code specified
No style name specified
No size variations specified
No colour variations specified
No matching price group found
Matching price group found but ‘Create matching price group’ unselected
No stock code formula specified
The stock code formula contains no style mask (S)
The stock code formula contains no colour mask (Y)
The stock code formula contains no size mask (X)
No description formula specified
The description formula contains no style mask (N)
The description formula contains no colour mask (L)
The description formula contains no size mask (M)
No style stock items exist - select ‘Generate’ button
No style stock items with size/colour exist - select ‘Generate’ button
These style stock items don’t have size or colour specified:
These style stock items have inactive flags:
These style stock items don’t follow the code/desc formula specified:
These style stock items don’t have the matching price group:
These style stock items have the matching price group when shouldn’t:
There is not ONE ONLY style stock item for these size/colour combos:
Generation of the stock items is a separate task performed when you click the
button on the toolbar.
When you click this icon you will see a progress box appear as the stock items are created. Once the style is
created, a confirmation message will appear.
223
MYOB EXO Business User Guide
Stock Items
If you search your stock items list you should now see all the constituent stock codes created by the style
generator as illustrated below:
If you examine one of these items you will see that there are two extra fields that contain the stock items
size and colour attributes. These are the key to building the on screen style picker matrix.
224
The General Ledger
General Ledger Overview
The General Ledger (GL) is the consolidation of all the movements created in the debtors, creditors and
stock sub ledgers. The GL forms the basis of the recording of business activity. By creating as many or as
few GL accounts you can define the level of detail you wish to report. The reporting can be consolidated
from the GL accounts using the Report Writer. Budgets can be created to monitor the performance against
expectations.
This section describes the set up related to the GL – account groups, accounts and control accounts. It also
explains the procedures for entering transactions, reconciling the GL and generating reports.
General Ledger Transactions
225
MYOB EXO Business User Guide
General Ledger Master
Account > General Ledger
The General Ledger (GL) is the consolidation of all the movements created in the Debtors, Creditors and
Stock sub-ledgers. GL accounts are used to identify and access accounts in the General Ledger to prepare
financial reports at the end of each period and each financial year.
Details (see page 229) – contains General Ledger account no, name, report code, account group, default
GST rate and flags. It also identifies the type of GL account, the currency used and if it’s a usual debit or
credit account.
Transactions (see page 233) – lists all the records that matched the search criteria based on period, sub
accounts and branches.
Budget (see page 235) – allows multiple budgets to be set up and used for reporting purposes.
Notes (see page 141) – this tab provides a way for users to record any communication or general
information related to the account. Users can insert the username and date/time when the info is recorded
and common phrases (see page 143) can be entered easily.
History Notes (see page 141) – this is like the Notes tab, but is more structured. This makes it easier to
search for previous notes related to the account. It’s also easy to create, delete, or email history notes.
Analysis (see page 237) – show trends of a particular account in graphical form.
Note: The buttons in the toolbar at the top of the General Ledger Account Details window change
when moving between tabs.
226
The General Ledger
Setting up GL Accounts
Quick Guide to Setting up GL Accounts
GL accounts are used to identify and access accounts in your GL and to prepare your financial reports at the
end of each period and each financial year. Here is a checklist of the steps involved in setting up GL
accounts:
1. Determine the accounts you require. Your accountant can help you by providing a “chart of
accounts” that is used to produce your end of year accounts. If you set up similar accounts in your
GL, it helps reduce the amount of work required to produce your end of year accounts.
Every transaction you enter must belong to an account. Having too many accounts makes account
selection more difficult during transaction entry. Having too few accounts reduces the amount of
information shown in your reports. The GL chart of accounts has an impact on modules such as
Asset Register and features like Foreign Currency.
2. Decide on a coding system for your accounts. You also need to decide the branches and subaccounts to be included, depending on the options set up in EXO Business Config > Essential >
General Ledger.
3. Set up your GL Control Account in EXO Business Config > Admin > General Ledger > GL Control
Accounts. This setting determines the default GL accounts you want to use as your main bank
account, debtor and creditor control accounts, errors account and so on.
4. Set up your GL Account Groups in EXO Business Config > Admin > General Ledger > Account
Groups. If there are some account groups that have already been set up, you can leave them as
they are or if you prefer change them or add others to suit your requirements. These options
determine the grouping of your GL accounts. For example, Sales and Purchases, Overheads, Assets,
Liabilities and Capital.
5. Enter your GL accounts by selecting Account > GL. When entering your GL accounts, note the
account numbers that you will be using in your GL Control Account.
Additional Accounts
MYOB EXO Fixed Assets is an asset management system that is completely integrated with MYOB EXO
Business’s General Ledger to ensure that your asset management and financials are kept up-to-date at all
times. When using Fixed Assets, more control accounts are required - these are set up in the Fixed Assets.
The Foreign Currency (see page 293) feature allows you to make adjustments in the General Ledger for
movements in Forex, both realised and unrealised. You should create accounts to be used in the Forex
calculator.
227
MYOB EXO Business User Guide
Setting up GL Account Groups
The GL is grouped into accounts with different functions such as Sales, Asset and Liability accounts and
Overheads. When setting your GL you need to name and define the groups you require.
To set up a GL account group, select Setup GL Account Groups from the MYOB EXO Business Setup menu:
Setup > Business Admin Settings > Account Groups. The GL Account Groups window is displayed.
To add a new group:
1. Click the New button.
228
The General Ledger
2. The Group no is automatically assigned and this will be the next sequential number in the list.
3. Enter a brief, descriptive Group name.
4. Select the Report code.
5. Choose the Section type. If “Balance Sheet” is selected, select the type: Asset, Liability or Equity.
6. Choose the Debit/Credit type.
7. If the new group is to be reconcilable, tick the Reconcilable during bank reconciliation check box.
8. Configure the range of expected account numbers by entering them into the From and To fields.
9. Click Save to save this entry.
Setting up GL Accounts
You can set up your GL accounts based on your chart of accounts (a structured plan of how accounts are
numbered), which is created to fit the needs of your business.
Entering GL Account Details
To enter GL details:
1. Account > General Ledger, this opens the GL (search) window.
2. Click New to create a new GL account. The General Ledger Account Details window opens at the
Details tab:
3. Complete the entries in each field, using the table below as a guideline.
Item
Description
Account no
The account code for the GL Account from the chart of accounts. If you have
branches and sub codes, these will be entered later, so just enter the main GL
Account number here. The account number cannot be zero.
Note: Once you have saved your account details, you cannot go back and
edit the account number.
229
MYOB EXO Business User Guide
Account Name
The name or description of your GL account.
Report Code
Any alternate account codes.
This is an optional alphanumeric field. You could use this field to store old
account codes that may help you if you need to search for the old account at a
later stage. This code can also be used by the Report Writer to group accounts.
Account Group
The Account Group to which the account belongs, for example (in the demo
database) Trade, Retail or Foreign. Select a predefined account group from the
list.
Debit/Credit
Select against the usual sign of the account, either a Usual Debit or a Usual
Credit.
Section
Choose the GL report type for this account, Profit and loss or a Balance sheet. If
the Balance sheet is selected additional options can be selected. These options
are Asset, Liability and equity.
Override GST rate
Select the override GST rate from the list.
Currency
Select the currency that applies to this GL Account.
Note: The option is available only when multi currency is enabled.
SubAccNo
A sub account number. This number is automatically assigned; however it can be
overwritten with another number.
Name
This is the name of the sub account.
Period Totals
In MYOB EXO Business, transaction ages are numbered from current (0)
backwards. This may be different from the system you are familiar with,
however it does give you some useful logic consistency.
Example:
0 = current period
1 = One period ago (last month)
2 = Two periods ago
54 = Fifty-four periods ago etc.
EXO Business knows which period in the period table is the current one, and
uses this as a point of reference to display the name of the period on reports
and within data entry screens.
It is important you are comfortable with this and that all users understand the
approach.
Note: For a Profit and Loss account, the period totals will display the
account movement for the period; for a Balance Sheet account, the period
totals are the accumulated balance for the period.
230
The General Ledger
Flags
•
Active - Check this option to indicate whether the account is active or
inactive. If inactive, the account is hidden from the main Search view.
•
Allow journals - Check this option to allow journals on this account.
•
Private Account - Check this option to make this account private.
Note: Some GL accounts should have the Allow journals checkbox
unticked, so accounts will be system-maintained, e.g. Debtors control
account, Creditors Control Account, Stock on Hand.
The other tabs on the General Ledger Account Details window become visible after a GL account is created
and saved.
Viewing GL Account Details
Account > General Ledger > [Search] > {double click the GL Account name}
The field descriptions are the same as for creating a new account (see page 229).
The only changes are to the toolbar menu buttons:
1. Transaction navigation. Previous, next, forward and last record.
2. Show amounts in foreign currency. If more than one currency is enabled for this account, this is
only possible if it was enabled in the EXO Business Configurator.
3. Enter a new sub account. Use this option to create a Sub Account (see page 231).
4. Edit the selected sub account. Use this option to delete a sub account’s details (see page 231).
5. Delete the selected sub account. Use this option to delete a sub account (see page 232).
6. View delete and calculate movements. This opens the General Ledger Movements window (see
page 232).
Creating GL Sub Accounts
To create a new sub account, open the relevant master account and click the Enter a new sub account
button on the General Ledger Account Details window (
).
231
MYOB EXO Business User Guide
In the GL Sub Account window complete the following fields:
Field
Detail
SubAccNo
A sub account number. This number is automatically assigned by EXO Business.
You can override this number by overwriting it with another number. Once the
sub account is saved, this number cannot be changed.
Name
The name of the sub account.
Report Code
The report code as per the GL accounts. This field entry is optional.
Allow journals
Check this option to allow journals on this account. The default value for this
setting is determined by the Allow journals option on the master account.
Click OK to save this sub account in the list.
To edit an existing sub account, click the Edit the selected sub account button (
) to open the GL Sub
Account window. Make any changes by overwriting the current information, then click OK.
Note: You cannot edit the account number.
To delete a sub account, select the account from the list and click the Delete the selected sub account
button (
).
If you delete a sub account that has transactions against it, any previous transactions are transferred to the
00 Sub Account. However, if there are any stock items that were previously posted to this sub account they
need to be re-linked to a GL account before you process any transactions. To link these stock transactions
enter a new Sales GL Code in Account > Stock > Details 2.
232
The General Ledger
General Ledger Movements
The General Ledger Movements utility is used to display, delete and recalculate the GL movements. It is
also used to initially populate the GL Movement table, although GL Movement records will be inserted and
maintained automatically as transactions are processed.
Note: Populating the GL Movements table for all existing transactions could take a considerable
period of time, depending on the volume of GL transactions.
Open the General Ledger Movements utility by clicking the
Details window toolbar.
button on the General Ledger Account
1. Click the Calculate button on the toolbar to calculate the initial GL movements for the accounts/
branches/ periods/ companies specified in the selection options.
2. Select either a range of accounts or a specific account, and other required filter information, and
click Search to display a list of the GL movements. A result similar to the illustration above will be
displayed.
3. Clicking the Calculate button on the toolbar recalculates the GL Movements for the accounts/
branches/ periods/ companies specified in the header. Alternatively, highlighting appropriate rows
on the grid selecting Calculate from the right-click menu will recalculate only the selected rows.
Note: Deletion of records is based on the selected criteria (or selected rows if right-click > Delete is
used). If all records are deleted through this utility, the identity seed (MSSQL) is reset to zero so new
records will start at 1.
233
MYOB EXO Business User Guide
Viewing GL Transactions
Account > General Ledger > [Search] > {double click the GL Account name} > (Transactions Tab)
To view the transactions in the window filters should be defined before clicking on the Search button.
These are detailed in the table below.
Note: The search behaviour on this screen is affected by the Hide GL transactions when viewing an
account User-level profile setting.
Field
Description
Date from and
to
The option to set a period range.
Age from and to
The option to select set a period range for the transactions you want to view.
Sub account
The list of sub accounts. Select a sub account from the list to view transactions
for all sub accounts.
Branch
A list of branches. You can select a particular branch or to view accounts in all
branches.
Company
Select the company name from this list.
Reverse Sort
Enable this option to reverse the order of displayed accounts.
Group
Transactions
To group the displayed transactions, select one or more properties to group by
from the Grouping dropdown, then tick the Group Transactions option.
Grouping
234
The General Ledger
Account details column headers
Date
The date the transaction took place.
Pd
The period number to which the transaction has been posted. (For example, 0
refers to the current period, 1 is the last period.)
Batch
The batch number to which the transaction was entered.
Br
The branch for the transactions.
Sub
The sub account number to which the transaction applies.
ChqNo
A cheque number appears here, if one applies to the transaction.
InvNo
The invoice number that applies to the transaction, if appropriate.
Details
The analysis column for the transaction (generally details about the
transaction).
Debit
Positive entry in the transaction list.
Credit
Negative entry in the transaction list.
In the transaction list, you can right-click on a transaction open a popup menu. The options are:
Menu Item
Description
Debit
Credit
View GL Batch
This opens the GL Batch Transactions window for the
batch number associated with this transaction.
●
View Source
Account
This opens the creditors master (see page 106) source
account details window.
●
View Source
Transactions
This opens a preview of an invoice for this transaction.
●
Edit Transaction
references
This feature is available for receipts and adjustments. It
opens a window with options to change the
Transaction Date, Invoice Number, Cheque Number
and the Narrative.
●
●
View Analysis
Codes
This opens the Analysis Codes (see page 84) window
for this transaction.
●
●
●
235
MYOB EXO Business User Guide
Reviewing a GL Budget
Account > General Ledger > [Search] > {double click the GL Account name} > (Budget Tab)
Field
Description
Budget code
The code for the budget. Select the code from the list.
Period
The period for which the budget is being viewed. Select the period from the list.
Sub Account
A sub account number. This number is automatically assigned by MYOB EXO
Business. You can override this number by overwriting it with another number.
Branch
The name of the branch where the transaction took place.
Budget
The budget amount set for this account.
To edit a budget, click the GL Budgets button to open the GL Budgets window (see page 268). You can now
make changes to the budget.
236
The General Ledger
Viewing GL Account Trends
Account > General Ledger > [Search] > {double click the GL Account name} > (Analysis Tab)
You can view the trends of a particular account by clicking the Analysis tab on the General Ledger Account
window.
Note: Right-clicking on the graph provides you with the option to copy the graph into another
Windows application as Word or Excel. You can also print the graph.
To display the monetary value labels, double click anywhere in the graph.
To view other legends, such as the budget, tick the appropriate check box under Period Totals.
To print the graph, click the print button (
).
General Ledger Analysis Codes
Under normal operation, there are three levels of analysis in the General Ledger: Branch, Account and
Subaccount. The General Ledger Analysis Codes feature allows you to define additional levels of analysis for
more detailed reporting, e.g. Branch-Account-Subaccount-Analysis1-Analysis2
Note: This feature is not to be confused with Analysis Codes (see page 84), which provide a more
powerful and comprehensive method of adding analysis data to transactions.
GL analysis codes are intended for use during transaction entry. They are not available on any master files,
e.g. GL Control accounts, Stock Item records. In general, if a GL account can be entered or edited on a
transaction, you should also be able to enter analysis codes.
The built-in General Ledger Report Writer (see page 247) does not report on GL Analysis Codes; to report
on them, you must use Clarity Reports.
237
MYOB EXO Business User Guide
Setting up GL Analysis Codes
Select Setup > Setup Analysis Codes to define the codes. If this menu option is not available, it must be
added to the menu using the Menu Designer - Setup > Setup Menu or use EXO Business Config (see page
55).
The current number of analysis codes in use is displayed. Specify the number of codes required in the
Proposed number of codes field. If this number is changed, the database must be updated to recreate the
GL Movements metadata - EXO Business will close automatically so that an update can be run from EXO
Business Config (see page 56).
If the Accept valid analysis codes only check box is not ticked, then any number can be entered as a GL
analysis code.
If the box is checked, you must set up valid codes on the Validation tab:
238
The General Ledger
Click New to create a new code, then specify a descriptive name for the code. Codes are automatically
numbered sequentially starting at 1.
The Validation tab contains a numbered column for each analysis code, i.e. if you selected to use two codes
on the General tab, there will be two columns on the Validation tab. For each code, enter “Y” or “N” in each
column to indicate whether the code can be used for the appropriate analysis code.
In the example above, codes 1 and 2 (“Internal” and “External”) can be used for Analysis Code 1 or Analysis
Code 2, while code 3 (“Special”) can only be used for Analysis Code 2. This means that the following GL
code is valid:
00-0100-01-1-2
However, the following GL code is invalid, as code 3 appears in the Analysis Code 1 position:
00-0100-01-3-2
Using GL Analysis Codes
Enter GL analysis codes by appending them to GL codes in the GL Code fields on entry screens such as
Debtor and Creditor invoices. GL analysis codes are separated by hyphens, i.e. Branch-Account-SubaccountAnalysis1-Analysis2 etc.
239
MYOB EXO Business User Guide
Setting up GL Control Accounts
Setup> Business Admin Settings > [GL Control Accounts] (General)
The GL Control Account Setup window (General tab) opens.
Enter the GL Account type that each posting should go to.
The following table provides more information:
Item
Description
Default sales account
The default account for Sales (Debtors) transactions.
When you enter a new stock item, this is the sales code that the stock item
defaults to.
Cost of sales account
The cost value of debtor invoices.
Default purchase
account
The default account for Purchases (Creditors) transactions. When you enter
a new stock item, this is the purchases code that the stock items default to.
Bank account
The General Ledger account that represents your main (default) bank
account.
Debtors account
The control account that represents the total amount outstanding by your
debtors.
When all debtor transactions have been posted to the GL and any Forex
movements processed, this account should balance to the Debtors Aged
Balance report.
240
The General Ledger
Creditors account
The control account that represents the total amount owing to your
creditors. When all creditor transactions have been posted to the GL and
any Forex movements processed, this account should balance to the
Creditors Aged Balance report.
Profit account
An account number for the Running of the End of Financial Year process.
This account is where the end of year profit (or loss) is posted during the
end of year process. The account is also known as the Retained Earnings or
Revenue Reserves Account.
Debtors GST account
The GL Account that the GST component from your Debtor ledger invoices
get posted to – GST Output Tax account.
Creditors GST
account
The GL Account that the GST component from your creditor ledger invoices
get posted to.
It is also known as the GST Input Tax account.
Adjustments
accounts
The account that comes up as the default GL account when you enter
debtor and creditors adjustment transactions.
You may often need to re-journal these transactions to other GL accounts.
The GL account for each adjustment can be set at the time of making the
adjustment in the sub ledger.
Errors account
The account that stores any postings that have been incorrectly set up.
For example, the stock item to GL linkages have not been set correctly.
Note: Do not leave this blank. It is recommended that you nominate
an errors account so that if there is a problem posting to a GL
Account, the transactions are posted to this account so that they are
not lost and you just need to enter a journal out of this account and
into the correct GL Account.
Rounding account
An account that receives the result of any value rounding. Typically, any
debits or credits tend to cancel out and the account has a small balance.
Stock on hand
account
The account you want to post the cost of your purchases of stock items
before posting to the Cost of Sales Account.
Stock adjustment
account
The account where adjustments are made to stock accounts.
Stock clearing
account
The account where invoices have not been processed for stock received.
This account is available if you have selected Live Stock to GL Integration in
MYOB EXO Business Config > Essential > General Ledger.
This account is available if you have selected Live Stock to GL Integration in
MYOB EXO Business Config > Essential > General Ledger.
Note: The Stock GL Coding button on the window allows you to update the default purchases
account on the Details 2 page of the Stock Item Details window to the default stock clearing account.
You can elect to perform this on all stock items with a stock classification or no stock items.
241
MYOB EXO Business User Guide
GL Control Account Custom Settings
Setup> Business Admin Settings > [GL Control Accounts] (Custom)
The GL Control Account Setup window (Custom Page) opens.
Enter the GL Account type that each posting should go to.
The following table provides more information:
Field Descriptions
Item
Description
Deposits Received
Account
Enable the Allow deposits in sales orders and general ledger profile
setting in EXO Business Config if you want to store deposits on sales
orders/laybys.
Withholding Tax
account
Enable the Withholding Tax on Creditors Payments setting in the
Essentials > General Settings section of EXO Business Config if you want to
store withholding tax from creditors.
Debtors forex
variance
Debtors Foreign Exchange variance account.
Creditors forex
variance
Creditors Foreign Exchange variance account.
Current forex
variance
Current Foreign Exchange variance account.
242
The General Ledger
Creditors PP discount
Creditors prompt payment discount.
Vendor discount
account
Vendor discount account only used if vendor discount is active.
Click Save to save any edits.
Note: See the “Stock Integration” White Paper for more information on Stock and Control Accounts.
This White Paper is available on the MYOB EXO Business partner site (login required).
Creating GL Batches
Creating and Posting GL Batches
GL batches contain sets of individual transactions. Batches can be created for different purposes. This
includes recording or splitting existing batches or creating recurring batches for prepaid accounts such as
insurance.
To create and post a batch:
1. From the Transactions menu, select General Ledger > GL Transactions. The General Ledger
Transaction Entry window opens:
2. From the main window, click the New button to enter a new transaction. Complete the necessary
fields using the table below as reference.
Field Descriptions
Item
Description
Date
The date of the transaction.
Period
The period during which the transaction takes place.
243
MYOB EXO Business User Guide
Initials
Enter your initials here.
Reference
A brief description detailing the transaction.
Auto reverse
A check if you wish to create an auto-reversing batch.
In this case the system automatically reverses the batch while
performing the end of period rollover.
Repeat Branch
Check the Repeat branch checkbox to automatically copy the branch
used previously to the next transaction line.
Print Transactions
Check the print transactions checkbox to enable printing of this
transaction.
GL Code
The GL code you want to post the transaction to.
If you do not know the GL code, press ? followed by TAB for a list of GL
codes and select the ones needed. This will automatically enter the code
and details in the fields.
Details
A descriptive reason for the transaction.
Inv No
The invoice number of the transaction.
This needs to be entered only if applicable.
Chq No
The cheque number of the transaction.
This needs to be entered only if applicable.
Debit
Positive entry in the transaction list. Ensure that the sum of the debits
and credits in the batch is equal to zero to be able to post transactions.
Credit
Negative entry in the transaction list.
Foreign
The transaction amount.
This field is used only when selecting a GL account with a currency other
than the default currency.
3. Click Post to GL. This saves the transactions in the batch and posts the batch to the GL.
244
The General Ledger
Error Messages
If you enter a GL code for an account where you have not selected the option Allow journals on the Details
tab of the General Ledger Account Details window, the following warning message is displayed:
The sum of the debits and credits of the transactions in the batch should be equal to zero. If not, you
cannot post the batch to the GL. The following error message is displayed:
Note: There may be batches that cannot be immediately posted to the GL. You need to save these
batches until a later time (see page 245) when they can be posted.
Holding GL Batches for Later Posting
Transactions > General Ledger > GL Transactions
Some batches are saved as Recurring Batches or Suspended Batches until they are ready for posting. The
Utilities menu in the General Ledger Transaction Entry window provides you with options related to later
posting:
245
MYOB EXO Business User Guide
Recurring Batch
A Recurring Batch is a batch that is used on a repeated basis. For example, an insurance account which has
been prepaid and coded to a prepayment (Current Asset) account will be spread back to expenses evenly
over the period of the insurance cover. Saving a batch as a recurring batch is a quicker way to handling a
batch that you have to enter every month.
Saving Recurring Batches
To save a recurring batch:
1. After entering the batch transactions, click the File menu in the General Ledger Transaction Entry
window and select Save As > Recurring Batch. The batch is given temporary file name.
2. Click OK.
The batch is stored for future recall and posting.
Posting Recurring Batches
To post a recurring batch:
1. Click the Utilities menu in the General Ledger Transaction Entry window and select Open Recurring
Batch(es).
Note: You can open one or more recurring batches. Recurring batches can be appended to make a
super batch.
The Open Recurring Batch(es) window opens.
2. Complete the fields on the window.
3. Click the Open button. The saved recurring batch is added to the list on the General Ledger
Transaction Entry window.
4. Click the Post to GL button on the transactions window. This posts the recurring batch to the GL.
Note: Repeat the steps listed above, each time you need to post a recurring batch to the GL.
Suspended Batch
A Suspended Batch is a batch created for a ‘one-time’ use only. For example, a batch has been created but
cannot be immediately posted because transactions in the batch have to be checked and approved by
another staff member. The batch is saved as a Suspended Batch.
Saving Suspended Batches
To save a suspended batch:
1. After entering the batch transactions, click the Utilities menu in the General Ledger Transaction
Entry window and select Save As Suspended Batch. The Save As Suspended Batch window opens.
2. Complete the fields in the window and click OK. The batch is stored for future recall and posting.
Posting Suspended Batches
To post a suspended batch:
1. Click the Utilities menu in the General Ledger Transaction Entry window and select Open
Suspended Batch. The Open Suspended Batch window opens.
2. Complete the fields within the window.
3. Click the Open button. The saved suspended batch is added to the list on the General Ledger
Transaction Entry window.
4. Click the Post to GL button on the transactions window. This posts the suspended batch to the GL.
246
The General Ledger
Reconciling GL
As an accounting staff member you need to carry out a bank reconciliation (see page 451) to aid in the
matching of transactions in the GL bank codes to the bank statements. You can perform a bank
reconciliation either as a manual system where you work from a hard copy bank statement or an electronic
system using a .CSN format file from the bank.
Generating GL Reports
General Ledger Report Writer
MYOB EXO Business provides you with the ability to generate a variety of reports such as the GL Graph, GL
Trial Balance and GL Transaction Batch Listing. You need reports as a reference for yourself as well as to
provide your financiers and government authorities with the financial performance and position of your
organization.
The GL Report Writer enables you to report on transactions that have been posted to the General Ledger. It
is period-driven in the same way as the transactions in the General Ledger being reported on.
The Report Writer is set up in a tabulated format with rows and columns. The rows determine the content
by General Ledger account or group of accounts. The columns determine the periods or budget. The report
is written in a sequential order both in terms of the rows and the columns. You need to define the
sequence of actions to take place, dependent on the numbering of the rows and columns. It is
recommended that the first draft of the report has the rows and columns numbered in a way (say
increments of 10) that allow you to insert rows or columns at a later date.
Sample Report
Reports > General Ledger Reports > Setup GL Reports
The following report is a sample of how you can use the features available in the EXO Business Setup GL
Reports (see page 248) utility to specify settings (see page 248) and options in rows and columns (see page
251) to create a clear and well-presented report.
247
MYOB EXO Business User Guide
Using the GL Report Writer
GL Report Writer Setup
Reports > General Ledger Reports > Setup GL Reports
When using Setup GL Reports the user is presented with a search window. The first time the window is
displayed, no reports are listed as none have yet been set up. In the example below, a few reports have
been defined.
The following options are available:
•
To create a new report, click the New button. The Details tab (see page 248) containing the Settings
and Rows And Columns sub-tabs is displayed.
•
To create a copy of an existing report, select the report name, then click the
button. A copy of
the report is added to the list of existing reports. The user can change the name of the copy by
overtyping the default name.
•
To delete a report from the list, select the report and click the
button or press the DELETE key.
Once reports have been set up, the search window displays a list of these reports. The user can double-click
a report name for details.
248
The General Ledger
GL Report Writer Settings
Reports > General Ledger Reports > Setup GL Reports > [New]
The Settings sub-tab on the Details tab allows the user to specify the settings for the report. Initially, the
page contains default settings which provide the basic settings that the report requires. If the defaults are
being used, the user can move to the Rows and Columns sub-tab.
Click the Test Layout button for a preview of the layout.
Field Descriptions
Item
Description
Report No
The system generated number assigned to the report.
Report Name
Enter a descriptive name of the report here.
Secondary Heading
Provides a detailed heading and is in addition to the report name.
249
MYOB EXO Business User Guide
Period End Descriptor
Affects the text of the period label at the top of the report. Select either
“for the period ended” (for Statements of Financial Performance) or “as
at” (for Statements of Financial Position). There are a number of display
options for each (lower case, sentence case, upper case); select the
preferred option from the list.
Report Units
This is used as a divisor to change the units which the report will use. For
example, selecting 1000 means the report is printed in thousands (000’s).
Decimal Places
Determines the number of decimal places shown on the report.
Show Commas
Determines if a comma separates the units of the report at each 000
break.
Short Periods in Header
Uses a shorter form of the period name (for example, Jan instead of
January).
Show Variance as %
Shows the budget variance between actual and budget instead of a $
value.
Period Year in Header
Puts the period year in the header where period has been selected as a
column.
Suppress Zeros
A default setting which can be overwritten when actually running the
report to determine if the report shows a row when all columns in that
row equal 0.
Period No in Header
Puts the period number in the header where period has been selected as
a column.
List Sub Accounts
A default setting which can be overwritten when actually running the
report to determine if the report shows sub accounts, where they exist.
Repeat Header
Determines if the report header should be repeated where the report
continues over more than 1 page.
Use Clarity Formatting
Tick this option if a Clarity formatting template (CLF) is to be used.
Deliver to Excel
Tick this option if the generated report is to be exported to an Excel
compliant format.
Period in same Financial
Year
This option only applies to the “P&L Report - All Branches” Report Type. If
this option is ticked, then at run time fields set to rolling 12 months are
limited to reporting the financial year only. Fields not set to rolling 12
months are not affected by this option.
Page No Location
Determines the position on the page for the page number to appear.
There is also an option not to display a page number.
Page Orientation
Selects the page as either portrait or landscape. The selection here will
be determined by the number of columns the user would like to display,
the font, font size and report units.
250
The General Ledger
Page Break
Varies depending on page orientation, font and font size selections. This
could require trial and error to find what best suits the user’s report.
Font Name
The font to be used when printing the report.
Size
The size of the font to be used when printing the report.
Report Table Name
Enter a name for the report table in this field. This is essentially the file
name storing the report settings.
Report Code
Enter a short, descriptive code for the report. Reports are ordered by
their Report Code on the Run GL Reports window (see page 258).
Validate at Runtime
If this option is ticked, EXO Business checks the Chart of Accounts when
the report is run or previewed. If the Chart of Accounts has changed since
the report was last edited, warnings to check the report setup appear at
the end of the report and in the Warning(s) pane on the right of this tab.
GL Report Writer Rows and Columns
Reports > General Ledger Reports > Setup GL Reports > [New] > (Rows and Columns)
The report is made up of rows and columns. As a general rule, the rows are used for a subject while the
columns refer to the period to be reported on.
You can re-order report rows by clicking on them and dragging or by using the
and
buttons.
Alternatively, you can edit the rows’ sequence numbers on the Report Row Record window (see page 252).
251
MYOB EXO Business User Guide
A preview of the report is displayed in a pane on the right of the window. Click the Preview button (
) to
refresh the preview (the preview is also refreshed when the Save button is clicked). By default, the preview
displays no data, allowing it to display and refresh faster. To display real data on the preview, click the
Preview with Data button (
).
Report Row Record
Right-clicking on a Report Rows field grid displays the following shortcut menu:
•
New Row: Displays a blank Report Row Record window.
•
Edit Row: Displays the Report Row Record window populated with the information related to the
selected row.
•
Delete Row: Deletes the selected row from the report.
When either the new or edit row option is selected the Report Row Record window (see page 252) opens.
Report Column Setup
Right-clicking on a Report Columns field in the grid displays the following shortcut menu:
•
New Column: Displays a blank Report Column Record window.
•
Edit Column: Displays the Report Column Record window populated with the information related
to the selected row.
•
Delete Column: Deletes the selected column from the report.
When either the new or edit row option is selected the Report Column Setup window (see page 255)
opens.
252
The General Ledger
Editing a Report Row Record
GL Report Rows are added and edited by right-clicking on a row on the Rows and Columns sub-tab of the
Setup GL Reports window (see page 251):
Field Descriptions
Item
Description
Report
The name of the selected report. This is displayed by default.
Sequence
Enter a number here to set or change the sequence that the row performs
its defined action.
Note: You can also use the
and
buttons on the Setup GL
Reports window (see page 251) to re-order report rows, which
changes their sequence numbers.
Action type
Determines the function that the row performs. The table below (see page
254) lists and describes each function.
Caption
The description that appears in the row of the report.
GL Account range
The GL Account range to be reported on.
To
The GL Account range to be reported on.
Normally debit/credit
Determines what sign (+ve or –ve) to be applied to the number being
printed.
Branch
Determines if the row is to be branch specific. If branches are being used in
columns this should be set to Acc.
253
MYOB EXO Business User Guide
SQL filter
Used as the where clause in a SQL statement.
Note: By default, this filter does not apply to the Budget column (if
one exists). To make the SQL filter apply to the Budget column, enter
/B= followed by the SQL statement to be run against the GLBUDGETS
table, e.g. GLTRANS.BRANCHNO = 1 /B= GLBUDGETS.BRANCHNO = 1
Reset after print
Used with Sub Total, Total and Grand Total lines to reset the accumulator
after printing.
Action types
The following types are available from the Action type dropdown:
Item
Description
01
Main Heading
The heading text for the report, which is displayed in bold.
02
Sub Heading
Subheading text is displayed in bold and underlined.
03
Narrative
Narrative lines are plain text with no emphasis.
04
Page Break
This will force a page break at this row. This overrules any page length
setting made on the Settings page.
05
Single Account
Group
Allows the user to specify a GL account to be printed in the report.
06
Single Account
Group
Conditional on
Value
Same as single account group but it allows user to specify Normally
Debit/credit (Normally Debit/credit combo box on the screen is enabled)
as an extra criteria
07
Sequential
Range of
Account Groups
If selected this shows information of GL accounts that falls in between the
specified GL account group range.
08
Single General
Ledger Account
If selected this shows information of a single GL account
09
Single General
Ledger Account
Conditional on
Value
If selected this shows information of a GL single account but it allows user
to specify Normally Debit/credit (Normally Debit/credit drop-down list on
the screen is enabled) as an extra criteria.
10
Sequential
Range of
Accounts
If selected this shows information for a range of GL account.
11
Profit and Loss
Account Range
Total function
Allows the user to print a total similar to a P&L Range Value but which gets
added as a P&L Total.
254
The General Ledger
12
P&L Subtotal
Prints the total of the list above it. If the previous subtotal has not been
reset then the subtotal also includes any prior subtotals.
13
P&L Total
Prints the subtotals above the total. If the previous total has not been reset
then the total also includes any prior totals.
14
P&L Grand
Total
Prints the totals above the grand total. If the previous grand total has not
been reset then the grand total also includes any prior grand totals.
15
Bal Sheet Range
Tot
The same as the P&L Range Total except that it is used for a Statement of
Financial Position.
16
Bal Sheet
SubTotal
The same as the P&L Subtotal except that it is used for a Statement of
Financial Position.
17
Bal Sheet Total
The same as the P&L Total except that it is used for a Statement of
Financial Position.
18
Bal Sheet Grand
Total
The same as the P&L Grand Total except that it is used for a Statement of
Financial Position.
19
P&L Ledger
Total
Used in the Statement of Financial Position to provide the user with the
sum of the current year’s Statement of Financial Performance. In a
technical sense it is the total of the GLTRANS where the GLACCS section = 0
for the current financial year.
20
P&L Range
Value
Allows the user to combine GL accounts based on a SQL Filter.
21
Bal Sheet Range
Val
The same as the P&L Range Value except that it is used for a Statement of
Financial Position.
22
Opening Stock
Used in conjunction with periodic closing stock.
23
Closing Stock
Used in conjunction with periodic closing stock.
255
MYOB EXO Business User Guide
Editing a Report Column Record
GL Report Rows are added and edited by right-clicking on a column on the Rows and Columns sub-tab of
the Setup GL Reports window (see page 251):
Field Descriptions
Item
Description
Report
The name of the selected report. This is displayed by default.
Column Details
Heading
The heading for the column. As well as plain text, this field can contain the
parameters <PERIOD> or <QUARTER> - at runtime, these parameters will
be replaced with the name of the period/quarter being reported on.
Type
Determines the function that the column performs. The following list
describes each function.
256
•
GL Code - Lists in the column the GL Code, where applicable.
•
Data Field - Lists the name of the account or the description used
(if any) in the Report Row Record.
•
Period - Allows the user to define the period to be printed.
•
PD Range - Allows the user to define a period range, e.g. three
months for a quarter.
The General Ledger
•
Moving frame of periods - Allows the user to define a period
range, represented by the Frame Length value. This period range is
relative to the Frame Starts period specified at runtime (see page
258).
•
This Year - Displays the Year to Date value for the current financial
year.
•
Last Year - Displays the Year to Date value for the last financial
year.
•
Last Year End - Displays the year end value for the last financial
year.
•
Budget - Displays the budget value for the current financial year.
•
YTD Budget - Displays the budget value for the current financial
year to date.
•
Percentage - Allows the user to select a column to report on the
percentage of a row.
•
Quarter - Displays individual periods with totals for the quarter to
their right.
•
Quarter Total - Displays only the totals for the quarter.
•
Quarter Budget - Displays budget values for individual periods
with totals for the quarter to their right.
•
Quarter Budget Total - Displays only the budget totals for the
quarter.
Field Name
This becomes active if the “Data Field” option is selected in the Type field.
Allows the user to select directly from the GLACCS table.
Period No
Determines the period to be reported on.
Current Period = 0.
Frame Length
This becomes active if the “Moving frame of periods” option is selected in
the Type field. It specifies the number of periods to report on.
From Period
Used in conjunction with PD RANGE. Period No becomes the start period
and From Period is the end Period No.
Quarter Offset
This becomes active if the one of the “Quarter” options is selected in the
Type field. Specify the quarter to report on. The current quarter is 0;
numbers greater than 0 signify past quarters, e.g. 1 is the previous quarter,
4 is the current quarter in the previous year.
Include rolling 12
months
The system accommodates reporting on either a financial year or rolling
year (rolling 12 months) and the choice can be made at run time. This is
achieved without having to modify the report after each period roll.
For each column in the report you wish to optionally report on a rolling 12
month basis, tick this option so that this field will be either rolling 12
months or financial year only dependant on run time selection. If not
ticked, then the field will always report financial year only.
257
MYOB EXO Business User Guide
Order periods from
oldest to newest
This option applies to columns where the Type is set to “Moving frame of
periods”, or where the Type is set to “Period” and the Include rolling 12
months option is ticked. It affects the ordering of columns: when ticked,
columns are ordered from oldest to newest, e.g. July 2011, August 2011 ...
June 2012; when unticked, columns are ordered from newest to oldest,
e.g. June 2012, May 2012 ... July 2011.
Formatting Options
Branch
Used to set a specific branch in a column. If using branches in the column
the user should have branches in rows set to All.
Sequence
Enter a number here to set or change the sequence that the row performs
its defined action.
Alignment
Sets the option for printing alignment to the right or the left of the column.
Width
Determines the column width.
% Row Seq
When using percentage, the Row Seq and Col Seq provide the coordinates
for the figure to be used as 100%
% Col Seq
When using percentage, the Row Seq and Col Seq provide the coordinates
for the figure to be used as 100%
Include Rolling
Quarters in the
financial year of the
specified quarter
offset
Tick this option to report on quarters in a financial year going back from
the quarter entered in the Quarter Offset field.
258
The General Ledger
Running GL Reports
To run a predefined report (see page 248), select General Ledger Reports > Run GL Reports from the
Reports menu.
Item
Description
Report
Select the report to run. Reports are listed with their Report Code and
Report Name, as set up on the Settings tab of the Setup GL Reports
window (see page 248).
Period
The period selection box determines where the report starts with respect
to a period = 0 selection. For example, if the period selected in the period
list is period 2, the report adds 2 periods to each column where it has a
period determined (0 will become 2, 1 will become 3, and so on).
Frame Starts
This field is only available if the report contains columns with the type
“Moving frame of periods”. It specifies the starting period for the frame of
periods. The length of the frame, i.e. the number of periods to be reported
on, is specified by the Frame Length column property (see page 255).
Budget 1 and 2
If the GL report being run has budgeting columns, the Budget list turns
active and allows the user to select the budget to be reported against.
Branch no(s)
Use the branches either as defined or manually check the branch numbers
from the window opened through the ellipsis [...] button.
259
MYOB EXO Business User Guide
Include periods in
same financial year
only
This checkbox is only available if the “P&L Report - All Branches” Report
Type is selected. If this option is ticked, then at run time fields set to rolling
12 months are limited to reporting the financial year only. Fields not set to
rolling 12 months are not affected by this option.
Suppress accounts
with zero values
This setting determines if the report shows a row when all columns in that
row equal 0. The default value is determined by the Suppress Zeros check
box on the Setup GL Reports window (see page 248).
List sub accounts
This setting determines if the report shows sub accounts, where they exist.
The default value is determined by the List Sub Accounts check box on the
Setup GL Reports window (see page 248).
Use Clarity
formatting template
Tick this option if a Clarity formatting template (CLF) is to be used.
Deliver to Excel
Tick this option if the generated report is to be exported to an Excel
compliant format.
Analysis codes
If GL Analysis Codes have been set up (see page 237), codes can be
specified here.
Once all settings are configured, click the
button to generate the report.
Saving GL Report Writer Settings
The settings on the Run GL Report window can be saved to a file, so that they can be re-used at a later
time. Click the Save or Save As buttons ( or ) to save the settings as a file with the extension .GLR.
To load settings from a .GLR file, click the
button and browse to select the file.
A .GLR file can also be specified as a parameter when adding the Run GL Reports menu item (see page 77):
Specifying a .GLR file means that when the menu item is selected, a GL report will be automatically
generated using the settings in the .GLR file (the Run GL Report window does not appear). It is possible to
set up multiple GL Report menu items, each with different settings, so that a variety of GL Reports can be
generated quickly.
Note: By default, .GLR files are saved in the directory specified by the Directory location for standard
Clarity forms profile setting (several example .GLR files are installed in this directory). When running
a GL Report from a menu item as illustrated above, the .GLR file is assumed to be in this directory.
260
The General Ledger
Setting the Default Report
When adding the Run GL Reports menu item (see page 77), it is possible to specify which report should be
selected by default when the Run GL Reports window opens. Enter the parameter REPORTID=x into the
Parameters field, where x is the Report No of the default report.
GL Report Batches
Reports > General Ledger Reports > Setup GL Report Batches
The GL Report Batches utility enables multiple GL Reports (see page 247) to be batched together and
scheduled to run at a convenient time. A GL report batch could be a collection of different reports such as
P&L and balance sheet, but may also include repetitions of the same report with different parameters. An
example of this repetition could be multiple occurrences of P&L by branch report where there is one for
each branch.
Batches can be run (see page 264) via the user interface or run from a command line prompt. The latter
allows scheduling of a batch using an external scheduler such as the “AT” command provided with
Microsoft Windows. The batch can therefore be run with no user interaction.
GL reports may also be directed to file rather than printer. For example, they may be written directly to PDF
files for publication to Adobe Acrobat reader. The system automatically takes care of any output dialogues
to achieve this, and so can be run without user interaction.
Setting up GL Report Batches
The Setup GL Reports Batch utility allows establishment of GL report batches. This is available from both
the main MYOB EXO Business menu, and the Configuration Assistant.
Note: There are three profile settings that should be set before creating GL report batches, as well as
additional profiles that also apply to all batches:
•
Directory location for GL Report Batch runs (Computer-level General profile)
•
Save GL report batch files as CSV (Computer-level General profile)
•
GL Report Batch output device (Clarity Form profile)
To create a GL reports batch:
1. Start the utility from Reports > General Ledger > Setup GL Report Batches.
Note: GL Report Batches can also be set up in EXO Business Config at Admin > General Ledger > GL
Report Batches.
261
MYOB EXO Business User Guide
2. When a batch is selected or created, the system shows the Search tab. From here existing batches
can be selected for editing or new batches created.
3. Double-click a row or click Edit to edit an existing batch, or click New to create a new batch.
4. When creating or editing a GL Report Batch, the Details tab is shown. This shows some header
information to identify the batch and lists the GL reports that are contained within the batch. The
grid on the Details tab lists the reports to be run, in a specific order, with specific parameters. The
contents of the grid are edited directly, to set the options for each report to be run. Moving off the
line or saving the batch validates each line for correct entry.
262
The General Ledger
Item
Description
Batch number
On insert, this field is automatically set to the next available number but can
be changed before saving.
Description
Use this field to describe the purpose of the batch, or to distinguish it from
other batches.
List seq
Enter a number here to set or change the sequence that the reports (with
specific parameters) are run. On insert, this is automatically set to the next
available number.
Report
Select the GL Report to run from the drop-down list, which is accessed using
the spacebar. This is a required field.
Period
Select the period for which the report is to be run from the drop-down list,
which is accessed using the spacebar. This is a required field.
Budget code
Select the budget for which the report is to be run from the drop-down list,
which is accessed using the spacebar. This is not a required field, but should
be set for reports that use budget columns. To clear the field use the
backspace key.
Branches
If the report is to be run using the branch numbers defined in the report
then leave this field blank. Otherwise, to override the branches set up in the
report, either enter a comma-separated list of branch numbers, or rightclick on the grid to Select Branch(es) or press CTRL+B.
No Zero
Set this to “Y” to suppress reporting of lines that have only zero values.
Sub A/C
Set this to “Y” to report sub-accounts on separate lines. This defaults to “Y”
for systems using sub-accounts.
Clarity
Set this to “Y” to view the report using Clarity instead of the usual report
viewer.
Save to File
Set this to “Y” to save the report to file instead of printing it.
Printer Name
This field is used to determine what printer the report is sent to. This field is
not relevant if saving to file. Leave this field blank, to use the default printer.
Right-click on the grid or press CTRL+P to select a printer.
Copies
If the report is not saved to file, this field is used to determine the number
of copies to be printed, and defaults to 1. This field is not relevant if saving
to file.
5. The following operations are available:
•
Insert a line using the down arrow key.
•
Cancel an insert/edit using the ESC key.
•
Delete a line using CTRL+DELETE.
263
MYOB EXO Business User Guide
•
Copy a line using CTRL+L. Use this to quickly set up a batch with reports using similar
parameters, for example, a batch of P&L Reports, one for each branch. This copies the
selected batch line, sets its list sequence to the next available number and selects it in the
grid.
6. Once the batch report lines have been entered, click Save to save the batch.
Additional Batch Tools
The following functions can be used from the main Setup GL Batch Reports window, to help manage the
batches.
Copy (Ctrl+O)
Copies the selected batch (including lines) to a specified Batch Number.
Merge (Ctrl+M)
Merges the selected batches into the first batch selected, resetting list sequences and deleting remaining
batch headers.
Run (Ctrl+R)
Loads the Run GL Report Batch utility (see page 264), which runs the selected batch.
Running General Ledger Report Batches
Reports > General Ledger Reports > Run GL Report Batch
GL Report batches can be run from the Setup GL Reports Batch utility (see page 261) or directly from the
Windows command line.
Note: The Run command is not available when setting up GL Report batches using the Configuration
Assistant.
Running Batches from the Run GL Report Batch Utility
GL Report Batches are normally run from the Run GL Report Batch utility, which can be accessed by clicking
the Run button on Setup GL Reports Batch utility or by selecting Run GL Report Batch from the Reports >
General Ledger Reports menu.
264
The General Ledger
To run a batch, select the batch from the Batch combo box, select a period if necessary, then click the Run
button. The batch’s progress is displayed in the main window. Batches can be run one after another; the
progress window clears at the start of each batch run.
On each batch completion, the progress window content is saved to a log file. The file name is in the
format:
GLRepBat<BatchNo>_<Date>_<Time>.txt
Note: Log file(s) are saved to the directory specified in the Directory for GL Report Batch runs
setting.
Errors
If an error occurs while running a report, an error message appears in the progress window.
An error file is saved in the same directory as the log files. The batch continues to run the next report. The
batch run error count is displayed on the last progress line.
The file name is in the format:
GLRep<ReportNo>_<Date>_<Time>_Error.txt
Running Batches from the Command Line
A GL Report Batch can be run from the command line by adding the /GLREPBAT=n parameter when
starting MYOB EXO Business, where n represents the required GL Report Batch number. This parameter
must appear on the command line after the EXO Business login parameters.
When a batch is run using the /GLREPBAT=n command line parameter, the EXO Business program starts
up, runs the Run GL Report Batch utility, runs the batch, saves the log file and any report or error files, and
closes itself automatically.
A batch can be run directly using the Windows Command prompt, or by creating a Windows shortcut using
the following entry:
C:\MYOB EXO Business.exe MyDatabase MyLogin MyPassword /GLREPBAT=2
265
MYOB EXO Business User Guide
The Windows Scheduler can be used to regularly run the batch at a specified time. The Windows Scheduler
options available will depend on the version of Windows being used.
For example, from the Windows Command prompt, enter:
at 17:11 /interactive /every:M,T,W,Th,F,S,Su C:\MYOB EXO Business.exe
MyDatabase MyLogin MyPassword /GLREPBAT=2
This example would run GL Report Batch 2 every day of the week at 5.11pm. Adjust the time or the day list
in ‘/every’ to suit your requirements.
Tip: To view all scheduled jobs, enter AT by itself and press ENTER.
Alternatively, use the Scheduled Tasks tool (Control Panel > Scheduled Tasks) to schedule batches.
Running Multiple GL Report Batches
To run multiple GL Report Batches together, create a batch file of GL Report Batch commands using
Notepad, then run this file from Windows Explorer, or as a scheduled task.
GL Graph
The graph allows you to view the status of a series based on the selected criteria.
Viewing the GL Graph
Utilities > General Ledger Utilities > General Ledger Graphs
1. Specify the criteria for the graph:
a. Select which series to display on the graph.
b. Specify start and end periods for the graph.
c. Enter a title for the graph.
266
The General Ledger
2. Click the Generate Graph button to generate the graph. The resulting graph can be printed using
the Print button.
Setting up Graph Series
You can define additional series for the graph if more are required:
1. Click the Setup Series button on the General Ledger Graph window. The Graph Series window
opens:
2. Click the New button.
3. Enter a concise name for the series in the Series Name field.
267
MYOB EXO Business User Guide
4. Select the Series Type from the drop down list. Depending on the type selected, other options
become available. These are defined in the next few steps, bear in mind that some of these will
only be available according to the Series Type chosen.
5. Select the Budget Code to which the series is to be restricted from the drop down list.
6. Select the Branch from the drop down list.
7. Specify the from and to GL Account Range as specified in the GL.
8. Click Save to add this series to the list or Cancel to lose your edits and close this window.
Maintaining GL Budgets
The GL Budgeting tool is a function within the MYOB EXO Business core product. This tool enables you to
store a projection and report against it. The reporting is against transactions that have been posted to the
General Ledger. It is period-driven in the same way as the transactions in the General Ledger being
reported on.
GL Budgets can be entered directly into MYOB EXO Business or imported in the form of a .csv file. EXO
Business can export budgets to a spreadsheet (for example, Excel) for modification and import the budgets
back into EXO Business. You have the ability to store multiple budgets, for different years or a reforecast
within the same financial year.
GL Budgeting Tool
Setting up the GL Budgeting Tool
Utilities > GL Budgets
The first time the window is displayed no budgets are listed, as none have been set up yet.
268
The General Ledger
Field
Description
Budget code
If there is no code in the list, then one needs to be set up (see page 270).
Branch
A/c no
Sub
Account name
Period
Lower $
Upper $
Once a Budget Code has been selected, enter data into these fields to refine the list
in the grid.
Search
If Auto Refine is unchecked, click this button the display the results of the search in
the grid below.
Auto Refine
With this selected, the results in the grid will automatically refresh when
information is entered into the search parameters
Menu Options
From this window the following options are available to the user.
Icon
Name
Description
New Record
Creates a new budget record for a budget.
Save
Save the new budget record.
Cancel
Cancel the creation of a record for a budget.
Delete (see page 271)
Deletes budget records from a budget.
Print (see page 276)
Prints the budget with the data entered or imported.
Nav keys
The arrow icons are used to navigate between
transaction records.
New Budget (see page 270)
Creates a new budget in MYOB EXO Business.
Edit Budget (see page 271)
Allows the user to edit a budget. It is not used to
change the numbers within a budget, but it is used
when a GL code is added. This creates the records for
the new GL code that did not exist at the time the
budget was created.
Spread Budget (see page 272)
Spreads budget per period based on the spread
method used.
Import Budget (see page 274)
Imports a CSV file and modifies it before importing it
into the budget table.
Export Budget (see page 275)
Exports the budget to the Excel spreadsheet, in a CSV
file format.
269
MYOB EXO Business User Guide
Create a New GL Budget
To create a new budget, click the New Budget button (
) on the GL Budgets window (see page 268).
Window Functions
Item
Description
New Budget Code
The code for this budget. When running a GL Report, (Reports > General
Ledger Reports > Run GL Reports) this code appears in the Budget list.
Create Empty Budget
Select to create a budget record for all branch, account numbers and sub
account numbers with a zero value.
Copy Budget
Select to replicate an existing budget. The budget to be copied needs to be
selected from the list.
Copy Last Year’s
Actual Values
Select to create a budget record for all branch, account numbers and sub
account numbers with a value from the equivalent period in the previous
year.
Multiply by and
Round to $
These options are only available when you are creating a new budget from
an existing budget or creating a budget from the previous year’s actual
results.
Overwrite records
option
This allows you to replace an existing budget with new records.
Period range
selection
Allows you to only create records for a specific range. For example, you
may be half way through a financial year and require a re-forecast for the
last 6 periods. Fewer records in the database mean that reports operate
quicker than they would with a large number of zero values. The periods 1
to 12 are the periods of the financial year. 1 is the first period of the
financial year and 12 is the last. So, for example, if the financial year is July
to June, July is period 1 and June is period 12.
270
Note: The existing records are deleted.
The General Ledger
Edit a GL Budget
To create a new budget, select the Edit Budget button (
) on the GL Budgets window (see page 268).
Window Functions
Item
Description
Existing Budget Code
From the list, select the code of the budget that is to be modified.
All Branches
Branch
Select the relevant option.
All Accounts
Account
Select the relevant option.
All Sub A/cs
Sub A/c
Select the relevant option.
If a specific branch is to be modified, the name should be selected from
the list. For example, the opening of a new branch during the financial
year.
If a specific GL account is to be modified, the name should be selected
from the list. For example, the creation of a new account during the
financial year.
If a specific GL sub account is to be modified, the name should be
selected from the list.
Overwrite records option
The same as Overwrite records option in the Create a New Budget
window (see page 270).
Period range selection
The same as Period range selection in the Create a New Budget window
(see page 270).
271
MYOB EXO Business User Guide
Delete GL Budget Records
To delete a budget record, click the Delete Budget button (
268).
) from the GL Budgets window (see page
Window Functions
Item
Description
Delete the selected budget
record
Select the option to delete the record highlighted in the GL Budgets
(search) window, from the budget.
Delete budget records for
Select the option to delete records in a budget. The method is similar
to the one used when editing a budget (see page 271), except that in
this case records are removed instead of added
Zeros Only
This allows you to reduce the size of the database and speed up the
running of reports by removing all records in a budget that have a
value of zero.
Period range selection
This functions the same as Period range selection in the New Budget
window (see page 270).
272
The General Ledger
Spread a GL Budget
To spread a GL budget, select the Spread Budget button (
) on the GL Budgets window (see page 268).
1. Choose a budget to be spread over the year using the Search Criteria. Click the Search button to
load this budget into the spread tool.
2. Select a Spread Method. Choose from:
•
Use Formula - spread the budget according to a pre-defined formula.
•
Straight Line - distribute the spread evenly throughout the year.
3. Click Spread. The resulting spread will display in the grid. These figures can still be manually edited
if need be.
4. Click OK to apply this spread to the GL budgeting tool.
273
MYOB EXO Business User Guide
Formula Method
If the Formula method is to be used, click the Formula button to load, edit or create a formula to apply to
this spread:
1. The Setup Formula window opens. If no previous formulas have been defined, click the New button
to create one. Alternatively, select an existing formula from the grid.
2. Give the new formula a name and a brief description for future reference.
3. In the grid, define the spread for the financial year by entering them adjacent to the month. These
figures are in a percentage for the annual budget. Click Save to save this new spread.
Straight Line Method
Use the Straight Line Spread Method to distribute the spread evenly throughout the year:
1. Enter the total combined budget amount for the year into the Straight Line field.
2. Click the Spread button to spread this amount to selected account.
274
The General Ledger
Import a GL Budget
To import a budget, select the Import Budget button (
) from the GL Budgets window (see page 268).
Window Functions
Item
Description
New Budget Code
The code for this budget. When running a GL Report, (Reports > General
Ledger Reports > Run GL Reports) this code appears in the Budget list.
Import Budget File
The location and name of the CSV file to be imported into the budget table.
Import Columns
Defines the format of the CSV file to be imported. The specifications are
based on the format of the existing file.
Period Range
Selection
The same as Period range selection in the Create a New Budget window
(see page 270).
Sub No option
This option needs to be selected if sub accounts are required in the budget.
Select Button
Allows the user to search for the CSV file that needs to be imported.
Overwrite records
option
Is the same as Overwrite records option in the Create a New Budget
window (see page 270).
Load Button
Loads the CSV file into the grid (see page 10). This is an intermediate stage
prior to importing the records into the budget table. You can edit the data
prior to clicking the OK button.
OK Button
Loads the data from the grid into the budget table. The program performs
an error check at this time to ensure that each record has a unique
combination of Branch, Account and Sub Account.
Cancel Button
Ends the session without putting data into the budget table and takes you
directly back to the main budget window.
275
MYOB EXO Business User Guide
Export a GL Budget
To export a budget, select the Export Budget button (
) from the GL Budgets window (see page 268).
Window Functions
Item
Description
Budget Code
The code of the budget to be modified/exported. Select the relevant code
from the list.
Branches, Accounts
and Sub Accounts
Allows you to reduce the number of records to be exported.
Totals option
Totals on the report, both down and across
Exclude Zeroes
Allows you to reduce the size of the database and speed up the running of
reports by excluding all records in a budget that have a value of zero when
exporting the budget.
Period Range
Selection
The same as Period range selection (see page 270) in the create a new
budget window.
OK Button
Exports the budget to a CSV file, launches Excel and populates the
spreadsheet with the budget data.
Cancel Button
Ends the session without putting data into the budget table and takes you
back to the main budget window.
276
The General Ledger
Print a GL Budget Report
To print a budget report, select the Print Budget button (
) from the GL Budgets window (see page 268).
Window Functions
Item
Description
Budget Code
The code of the budget to be printed. Select the relevant code from the
list.
Branches, Accounts
and Sub Accounts
Allows you to reduce the number of records to be printed.
Totals option
Totals on the report, both down and across to appear in the printout.
Exclude Zeroes
Allows you to reduce the size of the printout by excluding all records in a
budget that have a value of zero when printing the budget.
Period Range
Selection
Is the same as Period range selection in the Create a New Budget window
(see page 270).
OK Button
Print the budget report according the defined options above.
Cancel Button
Ends the session without printing and takes you back to the main budget
window.
277
MYOB EXO Business User Guide
General Ledger Transactions
General Ledger Transaction Entry
Transactions > General Ledger > GL Transactions
Transactions are generally posted to the GL from the sub ledgers. However, if there is an error or special
posting to made, or if there provisions which have not yet been entered in the sub ledger, manual GL
Transaction Entry can be used.
1. Click New to create new GL transaction batch.
2. Complete fields in the screen like GL Code, Details, Invoice No, Amount and Reference. Ensure that
the sum of the debits and credits in the batch is equal to zero to be able to post transactions.
3. Some batches can be saved as a Recurring or Suspended batches until they are ready for posting.
The Utilities menu provides options related to later posting.
4. Click the Post to GL button to save the transactions in the batch and post the batch to the General
Ledger.
Notes
278
•
Accounts can be blocked from allowing manual journal postings. A warning message will be given if
an entry is made to a GL account that does not allow manual journal postings, e.g. debtors control
account.
•
One or more recurring batches can be opened and appended to make a ‘super batch’.
•
Posted GL Batches can be viewed through the GL Batch Transactions screen. A single batch number
(e.g. 50), a batch range (e.g. 50-55), or selected batch numbers (e.g. 50, 51, 55) can be specified.
•
Select the Repeat branch checkbox to automatically copy the branch used previously to the next
transaction line.
•
Transactions can be viewed all for periods but posting is limited to a maximum of 24 periods.
•
Recurring transactions are created when rolling the period, and are posted on the current period.
The General Ledger
Posting Ledgers to GL
Utilities > Ledger Posting > Post Ledgers to GL
All three source ledgers (Debtors, Creditors and Stock) can be posted to the General Ledger at the same
time. One batch is created for each ledger. Batches are created on combination of Period and ledger, i.e.
one for each period and ledger combination. The Description field for the batch indicates the ledger for
which the batch has been created.
Toolbar buttons are available to access the setup screens for GL Control Accounts (see page 65), Currencies
(see page 69) and Period Statuses (see page 68), as well as the Data Verification utility (see page 57). These
options are also available in the Utilities menu.
279
MYOB EXO Business User Guide
You can view transactions that have not yet been posted by selecting an option from the View Unposted Tx
button menu.
To post ledgers to the GL:
1. Select what information to post. Choose from:
•
Debtors Invoices and Adjustments
•
Debtors Receipts
•
Debtors Cost of Sales
•
Debtors Realise FX Gains/Losses
•
Creditors Invoices and Adjustments
•
Creditors Receipts
•
Creditors Stock Cost Variances
•
Creditors Realise FX Gains/Losses
•
Stock (if EXO Job Costing is installed, this option becomes “Stock and Work in Progress”)
Note: The availability and default settings for these options are determined by the profile settings
Allowed ledgers to post and Default status of the ledgers in Post ledgers to GL screen.
2. Specify the period or dated range you want to extract data from. Choose from:
280
•
All Unposted - All unposted transactions.
•
Prior to Current Period - Everything except the current financial period.
•
Selected Period Range - Selecting this option lets you specify a From and To period to
determine the source range.
•
Selected Date Range - Selecting this option lets you specify From and To dates to
determine the date range.
The General Ledger
3. Select the destination GL period. Choose from:
•
Source Ledger Period - With this mode each source ledger period will create a distinct
General Ledger batch in the matching GL period. Where multiple periods exist in the
selected set of source data, multiple GL batches will be produced.
•
Custom GL Period - Selecting this option lets you specify a specific GL period to receive all
selected transactions. In this mode only one GL batch will be created even if multiple
periods are included in the source ledger data selected.
4. Enter post run details:
•
The Date Stamp you want to use to date the GL transactions being posted
•
The Initials of the person performing the post run
•
A Description of the post run.
5. Click the New GL Post Run button. This creates suspended batches and marks the source ledger
transactions as posted. You are given the option of printing a report on the post run. If the
Generate and Process GL Post Run option is ticked, the post run will be processed automatically.
Note: Instead of clicking New GL Post Run, you can click New Preview GL Post Run to extracts and
views GL data without marking the source transactions as posted. This is useful for first GL post
runs, particularly during implementation. This gives you the opportunity to correct data in the
source ledgers and/or ensure system setup (such as GL accounts on stock items etc.) is correct.
6. The batch(es) appear on the Post Ledgers to GL window. Review the transactions listed and ensure
the total debit and total credit values balance. From here you can edit the batch if necessary by
right-clicking on it (some options are not available if the batch was processed automatically):
•
Right-click and select Print Batch to print a report on a batch.
•
Right-click and select Edit Batch > Description to edit the batch’s description.
•
Right-click and select Edit Batch > General Ledger Period to change the General Ledger
period that the batch will post to.
•
Right-click and select Edit Batch > Fix Imbalance to create a rounding line in the batch for
the amount of the imbalance, subject to the threshold you specified by the profile setting
Post Ledgers to GL Maximum. For amounts less than the threshold, the rounding line is
automatically created; for amounts greater than the threshold, you are prompted for your
password if you are supervisor, or if you are not a supervisor, a list of supervisors is
displayed, for a supervisor to enter their password.
•
Right-click and select Validate Batch to check the batch for imbalances.
•
Right-click and select Reverse Batch to reverse the batch transactions. For pending
batches, this reverts all of the source transactions from the batch to their original state. For
posted batches, this takes all the source transactions from the batch and reverses the
Debits and Credits.
Note: To enable the Edit Batch > Transactions option, use the Drop Down Menu Designer (see
page 77) to add the parameter “+EGL” to the Post Ledgers to GL menu function.
You can also view additional information about the transactions in the batch by right-clicking on the
transactions in the bottom section of the Post Ledgers to GL window:
•
Right-click and select View GL Account to open the General Ledger Account Details window
(see page 229) for the relevant account.
•
Right-click and select View Pre Posted Transactions > Selected Account to display the
showing the pre-journals that will be posted for the account that was right-clicked on.
281
MYOB EXO Business User Guide
•
Right-click and select View Pre Posted Transactions > All Accounts to display the showing a
consolidated view the pre-journals for all accounts in the grid.
7. If the Generate and Process GL Post Run option is not ticked, click Process GL Post Run to post all
batches to the General Ledger.
If you close the Post Ledgers to GL window without processing the GL post run, the next time you open it
you can click Reload GL Post Run to re-open any pending post runs. If there are any pending post runs, a
warning message will appear at the top of the window:
GL Batch Transactions
Utilities > General Ledger Utilities > GL Batch Transactions
You can view transactions related to a specific GL Batch if you are looking for the location of a posted
transaction.
To view a GL Batch:
1. Open the GL Batch Transaction window using the path above.
2. Select the batches to display:
•
Enter one or more numbers into the Batch No and click the Load button. You can specify a
single batch number (for example, 50 that lists all batch transactions with the batch
number 50) a batch range (for example, 50 – 55 listing all batch transactions with batch
numbers from 50 to 55) or selected batch numbers (for example, 50, 52, 54 which lists all
batch transactions with batch numbers 50, 52,and 54).
•
Enter “?” into the Batch No field and press TAB or ENTER to open a search window, or click
the
button next to the Batch No field. Select one or more batches (you can select
multiple batches by holding down CTRL) and click Select & Close.
3. To group the displayed transactions, select one or more properties to group by from the Grouping
dropdown, then tick the Group Transactions option.
282
The General Ledger
4. The batch details are displayed with the following details:
Field Descriptions
Item
Description
Batch No
The batch number of the listed batch.
Date
The date the last transaction in the batch was posted.
GL Code
The GL code related to this batch.
GL Account
The name of the GL account related to this batch.
Pd
The period number of the transaction.
Chq No
The cheque number of the transaction, where applicable.
Inv No
The invoice number of the transaction, where applicable.
Details
The description of the GL account related to this batch.
Amount
The Foreign Currency debit amount.
This is available only if the batch contains foreign currency transactions.
FC Credit
Foreign currency credit amount. This is only available if the batch contains
foreign currency transactions.
Initials
The person who posted the transaction.
Source
The GL Sources that this batch is recorded in.
Click Print to print the batch report.
283
MYOB EXO Business User Guide
Period Handling
MYOB EXO Business employs a method of tagging all transactions with a nominated period number at the
time of posting. As an extra validation EXO Business can ensure that the transaction date given is valid for
the period that the transaction is being posted to. This method is used to avoid the traditional problems
associated with incorrectly keyed dates and extra processing overhead required to ‘age’ transactions into
periods, which often makes purely date based solutions very limited in scale.
When starting up the EXO Business system, you need to tell EXO Business how many periods have
transpired before you begin to process transactions. This is used in General Ledger reporting and budgeting
and is carried out through the General Ledger Control Accounts Setup window.
Running the end of period routine is performed from the End of Period window (see page 284). The actions
performed for the General Ledger are listed on the window to indicate progress.
Note: See the White Paper “Period Handling and Transaction Ageing” for more information on
setting up periods and rolling ledgers. This White Paper is available on the MYOB EXO Business
partner site (login required).
End of Period/Year
Utilities > End of Period
MYOB EXO Business has a definite “end of period” or “roll-over” procedure. This process does the
following:
•
•
•
•
•
•
•
•
•
•
284
Sets period totals
Sets month totals
Copies aged balances to last period balances
Sets aged balances
Increments the transaction age
Increments the allocation age
Updates the allocation statuses
Sets the closing rates for all currencies
Ages the period status
Rolls the period status
The General Ledger
Each ledger (Debtors, Creditors, Stock and General Ledger) can be rolled separately or all ledgers can be
rolled simultaneously (recommended). Tick the required boxes, then click OK to roll the selected ledgers.
Ticking the End of financial year box means that the End of Year procedure will be run as well as the End of
Period procedure. The additional steps taken in an End of Year procedure are discussed below.
Ticking the Take Business Analytics Snapshot means that a snapshot is taken for the EXO Business Analytics
module (see page 551) as part of the end of period process. This ensures that the final day’s trading is
always completely captured.
Rolling the Debtors Ledger
Normal sequence of events:
1. Back up your database (you might want to keep this backup long term).
2. Finish entering all transactions for the period and the financial year.
3. Print and save all required Debtor reports (especially any involving year to date totals etc).
4. Print Debtors statements.
5. Post all Debtor transactions to the General Ledger (Utilities > Ledger Postings > Post Ledgers to
GL).
6. Run the End of Period utility.
Extra steps performed in an End of Year procedure:
•
•
Copies the This Year total to the Last Year total on all Debtor accounts.
Zeros the This Year totals on all Debtor accounts.
Rolling the Creditors Ledger
Normal sequence of events:
1. Finish entering all transactions for the period and financial year.
2. Print and save all required Creditor reports (especially any involving year to date totals etc).
3. Print remittance advices, etc.
4. Post all Creditor transactions to the General Ledger (Utilities > Ledger Postings > Post Ledgers to
GL).
5. Run the End of Period utility.
Extra steps performed in an End of Year procedure:
•
•
Copies the This Year total to the Last Year total on all Creditor accounts.
Zeros the This Year totals on all Creditor accounts.
Rolling the Stock Ledger
Normal sequence of events:
1. Finish entering all Debtor invoicing and Stock receipts for the period and financial year.
2. It is normal to run a stock take just prior to the End of Year, to ensure your closing stock valuation
figures are as accurate as possible.
3. Print and save any required Stock reports such as Stock Valuation and Stock Sales reports.
4. Run the End of Period utility.
285
MYOB EXO Business User Guide
Extra steps performed in an End of Year procedure:
•
•
Copies the This Year totals to the Last Year total on all Stock items.
Zeros the This Year totals on all Stock items.
Rolling the General Ledger
Normal sequence of events:
1. Finish entering as many transactions for the period and financial year as you can. Even after the roll
over you can post to prior years’ periods.
2. Extract and Post all transactions for the period and year from the Debtors and Creditors ledgers
(Utilities > Ledger Postings > Post Ledgers to GL).
3. Print and save all required General Ledger reports (Balance Sheet, Profit & Loss etc)
4. Run the End of Period utility.
Extra steps performed in an End of Year procedure:
•
•
Zeros off the Profit & Loss accounts and posts the resulting Profit or Loss to the retained earnings
account as defined in the GL Control account screen.
The Profit & Loss current year movements are cleared.
Note: The General Ledger has the capability of multiple open periods – even periods in past financial
years. The system will detect whenever a GL Batch is entered into a period of a past financial year
and prompt you as to whether it should update the previous year’s P/L figure. (You should normally
agree to update this, to prevent the Balance Sheet from going out of balance.) You can continue to
enter transactions for the past year after you have rolled the End of Year, and revised Profit & Loss
and Balance sheets can be printed.
Points to Note
•
An End of Period must be performed before any transactions can be entered into the new period.
•
It is not necessary that all transactions be posted to General Ledger before a ledger is rolled over.
•
Complete specialised procedures like Exchange Rate Variance calculations before doing an End of
Period.
•
There is no loss of transaction detail as a result of the End of Period or End of Year
procedures. Transaction details are retained as history and are never automatically deleted by EXO
Business.
•
Processes and controls exist to allow transactions to be posted back into prior periods. Period lock
controls help manage this process, and periods would normally be locked once period reporting has
been completed.
•
The Post to Past Period User-level profile setting must be enabled to allow users to post
transactions on previous or past periods.
•
The Allow end of period rollover User-level profile setting must be enabled to allow a user to roll
the end of period.
•
A Company-level profile setting called Enable warning for transactions not posted to GL before
end of period processing can be enabled to prompt users if Post Debtors/Creditors/Stock to GL has
not been processed yet an attempting to do an end of period.
Note: See the “Period Handling and Transaction Ageing” white paper for more detail.
286
The General Ledger
GL Batch Review
The GL Batches report allows you to search for a set of GL Batches based on specified criteria. With these
results, you can print listings with header or transaction detail, view and edit narratives, view transactions,
copy or reverse a batch, insert missing batch headers, recalculate header totals etc.
Viewing GL Batches
Transactions > General Ledger > GL Batch Review
If this menu option is not available, it must be added to the menu using the Menu Designer - Setup > Setup
Menu or use the EXO Business Configuration Assistant (see page 55).
1. Specify the criteria (see page 287) for your search on the General (search) page of the window. The
more detail entered in these search options, the more refined your search result will be.
2. Select the options (see page 289) from the Search list and click this Search button (see page 289).
The transactions that meet the specified criteria are displayed on the window.
Search Field Definitions
Item
Description
Batch To
The batch range to be searched.
Period To
The period range to be searched.
Date
The date range to be searched.
Amount
The amount related to the batch to be searched.
287
MYOB EXO Business User Guide
Source
The GL sources (see page 289) that this batch is recorded in. Clicking the ellipsis
[...] opens a popup window with options to select the sources for inclusion in the
search.
Printed
The print status of this batch. <All> | Y - Yes | N - No
Branch
The branch number to be searched.
Rec No
The branch reconciliation number to be searched
Initials
The initials of the person entering the search criteria.
Staff
The staff member number to be used in the search
Search
A click v if you want to display the Search list and select options (see page 289).
Tip: As you enter details in each field, the scope of the search is narrowed. If all the
search fields are left blank, the search results bring up a list of all batches. You
receive the same result (list of all batches) if fields are set to the default option
<All>.
Field Headings
Batch No
The batch number of the listed batch.
Date
The date the last transaction in the batch was posted.
Pd
The period of the transaction
Br
The branch number where the transaction has been posted.
Src
The GL source that this batch is recorded in
Initials
The person who posted the transaction
Staff
The staff member who posted the transaction.
Reference
The reference for the batch of transactions.
Auto Rev
The transaction reversal status for the next rollover. Y - Yes | N - No
Printed
The print status of this batch. Y - Yes | N - No
Debit
The sum of the debit transactions in the batch.
Credit
The sum of the credit transactions in the batch.
FC Credit
The Foreign Currency Credit amount.
This is available only if the batch contains foreign currency transactions.
FC Debit
The Foreign Currency debit amount.
This is available only if the batch contains foreign currency transactions.
288
The General Ledger
Reversed in
The batch number where the reversal of a transaction has taken place
Reversed of
The batch number where a transaction has been reversed.
Copied from
The number of the original batch, if this is a copy.
3. If you have further details for the transaction you wish to locate, you can refine the list of
transactions that are displayed on the General page. Click the Advanced tab on the window.
4. Type the information you have in the relevant field.
5. Select the options from the Search list and click the Search button. The transactions displayed now
are related to your advanced search criteria.
6. Click Print to print the list of batches. The Print GL Batch Listing (see page 290) box is displayed.
Search List and Button
The Search button on the GL Batches window has a dual function. When you click it, it displays a list with
search criteria and is also a search button. After you have selected the option on the list, the system begins
the search. Once the search is complete, the batches that match the search criteria are displayed on the
window.
Searching by Header asks the system to locate a batch from the Batch Header Record in the GL Batch table.
The system takes the search criteria that you have specified and matches them with data available in the GL
Batch table. Criteria as Narrative (Advanced tab) can only be located in the GL Batch table while others as
Batch, Period or Source(s) are available in both Header and Transactions.
When searching by Transactions, the system looks for a batch from the GL Trans table. The search criteria
that you have specified are matched against the data in the GL Trans table. Criteria as Details can only be
located in the GL Trans table, while others as Date, Period or Source(s) can be located in both GL Batch and
GL Trans table.
If you click Both, the system gives you a list of all batches that meet the search criteria from either the GL
Batch table or the GL Trans table. This can include batches outside your specified search range. For
example, your period range may be limited from June to November 2000, but the system locates batches
that relate to both Header and Transactions criteria and may display batches out of the specified date
range.
The options on the search list appear in the order of their search times. Of the three options, Header
displays a list of batches in the shortest time frame while Transactions takes a longer period. Both involves
a larger search and thus requires the longest time frame.
Note: The Search button also acts as a refresh button that you can click to reset your search options,
after you have made any changes such as copying a batch, after changing the criteria in your search
list (searching batches based on criteria in the Advanced page) or returning to the General page to
search again for the previously displayed list.
Select GL Sources
One of the factors involved in the selection criteria for the GL Batches is the transaction source. If you know
the feature, function or ledger that this transaction has been created by, you can click the ‘ellipsis’ [...]
button next to the Source(s) field. This displays the Select GL Source(s) window.
You can select one or more options in the displayed list, or if the name does not appear on the list the
name can be typed in the Other field. Clicking the Clear All button allows you to deselect options while
Select All quickly selects all available options on the list.
289
MYOB EXO Business User Guide
Utilities Menu / Toolbar
The Utilities menu on the GL Batches window contains functions related to the batches. You can also rightclick a batch line to bring up a popup (see page 290) version of this menu.
•
GL Trans Entry - Provides a shortcut to the GL Transaction Entry window.
•
Insert Missing - Looks for any missing GL Batch Header and inserts the missing header.
•
Copy - Copies the selected batch. You can edit the batch details in the GL Transaction Entry
window.
•
Recalculate - Recalculates the debits and credits (Debit, Credit, FC Debit, FC Credit) transactions in
the batch, based on the GL transaction records for that batch.
•
Reverse - Takes all the transactions from the batch and reverses the Debits and Credits.
•
Reference - Opens a window with an option to edit the reference text for the selected grid item.
•
View - Displays the transactions for the selected batch.
•
SQL - Brings up the SQL form that allows you to view or copy the SQL statement.
Popup Menu
The popup menu can be accessed by right clicking anywhere in the grid (see page 10). The commands
available on this popup replicate those on the Utilities menu (see page 290).
Print Options
When printing the GL Batch Listing, you have a range of options to choose from.
Transactions > General Ledger> GL Batch Review > File > Print
Print > GL Batch List - Prints the Batch List based on the specified search criteria.
290
•
If you choose Show > Header Detail, the printed copy contains the GL Batches displayed on the
window with fields from the GL Batch table.
•
If you choose Show > Transactions and Narrative, the printed copy provides the name of the batch
and all the transactions it contains with fields from the GL Trans table.
The General Ledger
Print > Selected GL Batch - Prints the selected batch.
•
If you choose Show > Header Detail, the printed copy contains the selected batch line with fields
from the GL Batch table.
•
If you choose Show > Transactions and Narrative, the printed copy contains all transactions related
to the batch line with fields from the GL Trans table.
Show > Header Details - Prints the batch header detail with the fields form the GL Batch table.
Show > Transactions and Narrative - Prints the transactions and narrative with fields from the GL Trans
table.
Display Search Criteria - Checking this option prints the search criteria that you have entered on the
window. This option is available only with the following:
•
Print > GL Batch List and Show > Header Detail
•
Print > GL Batch List and Show > Transactions and Narrative
Print Next Batch on New Page
Prints each batch of transactions on a new page. This option is available only with the following:
•
Print > GL Batch List and Show > Transactions and Narrative
Advanced Search Tab
Item
Description
Reference
The description of the batch.
Details
The details of the batch, as listed in the GL Transactions window.
Chq No
The cheque number
Inv No
The invoice number included in the GL Transactions.
Auto Rev
The transaction reversal status of the batch. <All> | Y - Yes | N - No
Include Related
The batches where another batch is related to the batch found in the
search, e.g. Reversed in and Reversed of
Search
Click to display the Search list and select options
291
MYOB EXO Business User Guide
GL Trial Balance Tree
The Trial Balance Tree is a complete list of all GL accounts split between Profit & Loss and Balance Sheet
accounts. It allows you to scroll down the list of accounts and select the one you require.
It is useful for creating a dynamic trial balance report; additionally it’s used to review transactions, primarily
by account and period range.
To view a GL Trial Balance, select Reports > General Ledger Reports > GL Trial Balance Tree. The Trial
Balance Tree window opens:
Select the options on the window. The following table provides more information.
Item
Description
Load
Clicking this button loads the Trial Balance tree relative to the options
selected in the View and Range configuration area.
Expand All
The transactions in the grid are listed by account name. Adjacent to this is
a group total. To view the details and subtotals of this account it needs to
be expanded, as illustrated for current assets above. This button expands
all the accounts, this action can be undone by clicking the Collapse All
button.
Collapse All
View Transactions
Clicking this will open the transaction details window for a selected
account from the tree.
Note: This has to be an individual account from an expanded
account group.
292
The General Ledger
View:
Range:
Trial Balance
With this option selected clicking the load button loads the trial balance
details into the tree view.
Profit and loss
A/cs
With this option selected clicking the load button loads the profit and loss
accounts details into the tree view.
Balance Sheet
A/cs
With this option selected clicking the load button loads the Balance Sheets
accounts details into the tree view.
Use account
Balances
YTD at:
A check if you want the tree to display the values for the entire year.
Age from:
The period range for which you require the list of GL accounts. This option
is available only if you have not selected the YTD Values option.
Use account group
report codes
Enable this option to display the Rep code total column. (You must click
Load again to refresh the display after enabling this option.)
Use sub accounts
This is only available if the Range is set to a date Range and not sorted by
balances. Enabling this option adds the Sub acc dr and Sub acc cr columns.
(You must click Load again to refresh the display after enabling this
option.)
Branch
Only available when sub accounts is ticked. Choose the branch from the list
to filter by branch. Click Load to view the sub account totals.
Company
Only available when sub accounts is ticked. If available, choose the
company from the list to filter by company. Click Load to view the sub
account totals.
Foreign Currency
The purpose of multi-currency is to allow users to store Debtors, Creditors and Balance Sheet accounts in a
currency other than the default currency. MYOB EXO Business has a utility to convert these transactions
into the default currency for the General Ledger.
Note: Enabling multi-currency within the system adds options to many transaction entry screens and
reports and may complicate the system unnecessarily if the user’s business does not require
frequent foreign exchange transactions. If the transactions in foreign currency are infrequent, it is
recommended that this function is not enabled.
Setup
Enabling Foreign Currency Features
To enable EXO Business to accommodate foreign currency transactions the option Operate in multiple
currencies must be ticked at EXO Business Configuration Assistant > Business Essentials > General
Settings.
Once this option is ticked, the Currency property becomes available when creating new accounts.
293
MYOB EXO Business User Guide
Setting up Local Currencies
You can maintain exchange rates at EXO Business Config > Administration > Finance > Currencies.
Note: You can also edit currencies from within the main EXO Business application by adding the
Setup Currencies menu item.
The local currency (0) exists in all EXO Business databases when they are initially created. If the local
currency does not reflect the region the user is in, it should be changed immediately, before any further
transactions are entered. The local currency rate must always have buy and sell rates of 1.
Click New to create a new currency rate.
Exchange for all currencies except the local currency can be edited directly on the Current Rates tab. The
Buy Rate for each currency is the exchange rate used when purchasing from Creditors; the Sell Rate is the
exchange rate used when selling to Debtors. The Local Curr Val Buy and Local Curr Val Sell values show the
inverse values of the Buy Rate and Sell Rate respectively. It is expected that users will update currency
exchange rates frequently. When editing rates, users are warned if they attempt to change rates by more
than a pre-defined limit (set by the % Change Alert property on the Details tab).
To edit all properties of an existing currency rate, double-click on it or select it and click Edit. The Details tab
is displayed:
The Details tab also contains a history of all rate changes for the currency.
294
The General Ledger
Currency Closing Rates
The Closing Rates tab on the Currencies screen displays the closing currency rates for each financial period:
These rates are used for all future valuations relating to the period ending balance, e.g. in period end
reports such as Control account reconciliation reports and Aged balance reports. Closing rates can be set or
altered for the prior period (age 1); for all other periods, the rates are read-only. Unrealised foreign
exchange gains and losses can also be re-evaluated (see page 299) for the prior period.
Setting up Control Accounts
In order that variances in exchange rates can be accommodated within the GL to balance the changes in the
Debtor and Creditor control accounts, the user needs to create a Forex Gain/Loss account in the profit and
loss section of the GL.
Note: Once a Debtor/Creditor or GL bank account has had any transactions posted to it, the user
cannot change the currency.
After the necessary GL accounts have been created, the user needs to nominate the Forex Gain/Loss
accounts as control accounts for each ledger.
295
MYOB EXO Business User Guide
Setting up Customers/Suppliers
A guiding principle of having customers and suppliers in foreign currencies is that any transaction that takes
place is in the customer’s/supplier’s currency. The user’s view of the account will also be in the
customer’s/supplier’s currency. The required currency should be selected from the Currency list when
creating a Debtor or Creditor account:
Sales reports and all Stock movements are always converted to local currency immediately, at the rate the
transaction applied to.
Note: The currency cannot be changed once the account has been saved.
Operation
The Foreign Currency option may be required in different situations.
During Sale/Purchase
The rate displayed here is the default rate selected from the currency table, as set up in EXO Business
Config. You can overwrite the rate here.
296
The General Ledger
During Payment Entry
The rate displayed here is the default rate selected from the currency table, as set up in EXO Business
Config. You can overwrite the rate here.
While Designating a Foreign Currency GL Account
The Currency is set when the account is first created, and cannot be changed once the account is saved.
The amounts displayed in the Period Totals section are in the local currency. However, if this is a foreign
currency account and the user has clicked the Show amounts in foreign currency button (
), these
amounts are converted from the local currency to the appropriate foreign currency. The currency button is
active only if the account is a foreign currency account.
To change the default setting from the default currency, select the foreign currency previously set up in
EXO Business Config. Changing this currency does not affect the currency that the account is reported in.
297
MYOB EXO Business User Guide
The foreign currency numbers are stored in the GLTRANS table and used to calculate the unrealised change
in the foreign currency.
Note: Once a transaction is entered in the account, the currency cannot be changed.
Foreign Currency Reconciliation
Reconciliation is carried out through the Foreign Exchange Rate Variance Calculator window, which
calculates variances based on the specified rates.
Before running the reconciliation, the following GL Control Accounts must be set up at EXO Business Config
> Business Essentials> GL Control Accounts:
•
•
•
Debtors Forex Variance
Creditors Forex Variance
Current Forex Variance
Utilities > Foreign Exchange Rate Variance Calculator
Click the Reports > Detailed Report option to generate a detailed report that shows the allocation of
payments to invoices in each ledger, with the adjustment made to take up the difference.
Because allocation of payments is all-important in the calculation of variances, the Unallocated Payments
Report highlights unallocated payments so that these can be redressed prior to recalculation and posting.
Note: The Exchange Rate Change History, Exchange Rate Debtor Gains and Exchange Rate Creditor
Gains reports are available as standard Clarity reports.
When you are satisfied with the allocations, the summary screen can be printed (click the Reports >
Summary Report option on the Foreign Exchange Rate Variance Calculator window). The journal posting in
the GL can then be activated by clicking the Post to GL button.
298
The General Ledger
Field
Description
Source Ledgers Period /
Date Range
Specify the period or dated range you want to extract data from. Choose
from:
•
All Unposted - All unposted transactions.
•
Prior to Current Period - Everything except the current financial
period.
•
Selected Period Range - Selecting this option lets you specify a
From and To period to determine the source range.
•
Selected Date Range - Selecting this option lets you specify From
and To dates to determine the date range.
This control applies to realised variances only; the entire sub-ledger
is re-valued for current and unrealised variances at the end of the
specified period.
Take up allocated
Debtor transactions
Take up allocated
Creditor transactions
Adjust foreign currency
General Ledger a/c
balances
Adjust General Ledger
Debtor control a/c with
reversing journal
Adjust General Ledger
Creditor control a/c
with reversing journal
Provides realised transactions as per the details report. Transactions can
be posted to the source ledger period, or a custom period can be
selected. A Destination GL Period can be selected for realised foreign
exchange variances.
Gives the difference in the exchange rates on the actual transactions and
the rates in the Setup Currencies screen. A Destination GL Period can be
selected for unrealised foreign exchange variances and for current
foreign foreign exchange variances.
Unrealised foreign exchange variances can only be posted into the
current period or prior periods (i.e. periods 0 or 1). If EXO
Intercompany is installed, they can only be posted to the current
period.
Note: The Integrated Cashbook (Transactions > General Ledger > Integrated Cashbook Entry), when
being used on a foreign currency designated bank account, can be used to enter payments into
Debtor and Creditor accounts, as long as the Debtor or Creditor is the same currency as the bank
account, or using the local currency. EXO Business converts the transaction using the exchange rate
provided.
Note: Realised gains or losses will only be posted to the GL after the invoice(s) and corresponding
payment(s) have been allocated.
Foreign Exchange Re-evaluations
Unrealised foreign exchange gains and losses can be re-evaluated from the following places:
•
•
•
The Setup Currencies window. A Re-evaluate button is now available on toolbar. On the Current
Rates tab, clicking this button performs a re-evaluation on the current period (age 0). On the
Closing Rates tab, the button is only available when the prior period (age 1) is selected.
During the End of Period process (see page 284). For example, when ending June and rolling into
July, the End of Period utility now re-values the unrealised gains/losses for June and sets the closing
rates for June. This also applies to the End of Year process.
The Foreign Exchange Variance Calculator (see page 298).
299
MYOB EXO Business User Guide
The Re-evaluate button on the Setup Currencies window is disabled when EXO Intercompany is
installed, as EXO Intercompany already has its own foreign exchange revaluation functions.
When posting foreign exchange variances to the current period (age 0), the previous revaluation is reversed
before a new auto-reversing journal takes place.
When posting to the previous period (age 1), the existing valuations in age 1 are reversed and new ones are
entered for the period. These then auto-reverse themselves out in the next period, i.e. age 0. In addition to
this, any existing foreign exchange auto-reversals in age 0 are reversed out as well.
When re-evaluating unrealised gains and losses from the Setup Currencies window, the Profit account
(Retained Earnings) is also updated, if the period being re-evaluated is a part of previous year.
Integrated Cashbook
Transactions > General Ledger > Integrated Cashbook Entry
The Integrated Cashbook is used to enter information directly from a bank statement. It is used for Foreign
Exchange accounts, bank fees, and interest and for cash transactions that have not been processed by
Debtors or Creditors.
To make a new entry:
1. From the main window, click New to enter a new transaction. Complete the necessary fields using
the table below as reference.
300
Item
Description
Reference
Enter some reference test to identify this entry.
Bank Account
The GL account for the bank statement
Date
The date the statement is prepared.
The General Ledger
GL Period
The period the GL transactions are to be posted to.
Entered by
The initials of the staff member preparing the statement.
PreAllocation
Mode
Check this option to enable the Pre-allocation mode.
Print
Transactions
Check this option to enable the printing of transactions.
Consolidate GL
Postings
Check this option if all Debtor entries are to be consolidated as one.
Grid column headings
Lr
The name of the ledger.
To select the type, click the cursor in the field and press:
•
G (General Ledger)
•
D (Debtors Ledger)
•
C (Creditors Ledger)
•
X (Expense)
•
I (Income)
A/c
The account number or part of the account name. Double-click on the
account name to drill down to the relevant GL, Debtor or Creditor
account.
Name/Details
The account name or the transaction details.
Type
The type of transaction.
To select the type, click the cursor in the field and press:
•
C (Cash)
•
Q (Cheque)
•
V (Visa)
•
M (Mastercard)
•
A (Amex)
•
D (Diners)
•
E (Eftpos)
•
I (Direct Credit)
•
T (Direct Debit)
Chq/Ref
The cheque number or reference number.
Date
The date of the transaction.
Enter the date in the format dd.mm.yy
301
MYOB EXO Business User Guide
$ Expense
The amount of the transaction if it is an expense.
$ Income
The amount of the transaction if it is an income.
GST
The GST rate number.
2. Click Post to GL to process the cashbook transaction. Alternatively, click Save to save as a recurring
or suspended transaction.
Notes
•
The Integrated Cashbook is also accessible from the Bank Reconciliation module.
•
Pre-allocation mode is supported.
•
System settings are also available to consolidate posting.
•
Only D, C, X and I transactions (Debtors, Creditors, eXpense and Income) have a tax component.
General Ledger Export for Accounting Systems
Account > Accounts Systems Export
General Ledger accounts and transactions can be exported in a format that can be imported into the MYOB
Accountants Office system using the Accounting System Export window.
Setting up Accounting System Export
Before the Accounting System Export function can be used, the following setup tasks must be performed:
1. Open the EXO Business Configurator and go to the Profiles section.
a. Set the External accounting system Company-level profile setting to “MYOB Accountants
Office Link”.
b. Edit the Directory location for documents Computer-level profile setting to specify the
directory that export files should be saved to.
2. Go to the Staff section.
3. Use the Menu Designer at Staff > Menus > Dropdown Menu to add the Accounts Systems Export
menu option to the Account menu, if it is not already available.
302
The General Ledger
Exporting for Accounting Systems
Select the Accounts Systems Export menu option. The Accounting System Export window appears:
To export data:
1. Enter a name for the export file.
2. Specify the range of periods to export transaction data for.
3. Click Export.
The exported file is saved to the directory specified by the Directory location for documents profile setting.
This file can then be imported from MYOB Accountants Office - contact Accountants Office Support if you
need assistance with importing files.
Note: This function updates GLTRANS.EXPORTSEQNO from 0 to 1 so that these transactions will not
be picked up again.
303
The Procurement Cycle
Other Related Procurement Transactions
The following functions are also related to the procurement cycle, including creditor invoice functions.
Creditor Adjustments
Transactions > Creditor Adjustments
Similar to Creditors Payment Entry, this function creates adjustment entries against a creditor account, with
predefined reasons for the adjustment.
304
The Procurement Cycle
Editing Creditors Invoice
Account > Creditors > Transactions > Right-click > Edit Invoice
The editing of Creditor Invoices is controlled. If enabled, an existing creditor invoice may be opened for
editing, (subject to restrictions such as the transaction already being posted). The process is then very
similar to creating a new creditors invoice.
An alternative setting restricts editing of creditor invoices to reference fields only (e.g. narratives and order
numbers).
Credit Note/Refund
Account > Creditors > Transactions > Right-click > Generate Credit
The issuing of credit transactions is controlled. If enabled, an existing creditor invoice can be reversed by
RIGHT-CLICKING on an existing transaction, and selecting Generate Credit. The Creditors Invoice Entry
window will be displayed with the original invoice available for editing, but with negative invoice quantities
resulting in a negative price.
Alternatively, a credit note can also be generated using the main Creditors Invoice Entry window, using a
negative quantity value. The invoice is then processed in the normal way.
Allocating/Reallocating Payments against Invoices
Account > Creditors > Transactions > Allocate
Payments and invoices can be fully, partially or automatically allocated using the allocation tools.
Authorising Creditor Invoice Payment
Account > Creditors > Transactions > Right-click > Authorise
Approving creditor transactions for payments can also be done by right-clicking on a transaction on the
creditor account. This then links with the Creditors Payment Processor for payment.
305
MYOB EXO Business User Guide
Working with Purchase Orders
Viewing Purchase Orders
Transactions > Purchase Orders > Purchase Orders
Purchase Orders may be used to instigate the purchasing cycle. This functionality allows the entry,
searching, editing, and receipting of Purchase Orders, which can later be “converted” into Creditor Invoices
(see page 326) to assist in keeping the purchases cycle accurate.
To view existing orders:
1. Enter text in the Search Key field.
2. Select a Branch from the drop-down box
3. Filter by the Order status
4. Click Search.
Double-click on the appropriate row to drill-down and open the order. Or right-click and select Edit the
Selected Order.
The table below details all the fields and functions within this window.
Field
Description
Search Key
This restricts the Purchase Order grid to display orders whose creditor names
have part of the search string in their name. E.g. MAR for will list Purchase Orders
with the word Mart and Market in its name. Alternatively if you have details
related to the Purchase Order as the Order No, Account No or the Name, enter
this information in the Search Key field and click the Search button. This provides
you with a list of Purchase Orders that match the search criteria.
306
The Procurement Cycle
Branch
This filters the grid to display orders that originated at a certain branch only. If
<All Branches> is selected this effectively nullifies this filter.
Order Status
Each of these checkboxes will allow the inclusion of the described order in the
grid.
•
Unprocessed Orders - Orders that have been entered but have not been
processed.
•
Partly Processed Orders - Orders that have been entered but not
supplied, partly supplied (dispatched) or fully supplied (dispatched), but
not invoiced.
•
Fully Processed Orders - Orders that have been fully supplied
(dispatched) and fully invoiced.
If the Enable extended Purchase Order statuses Company-level profile setting is
enabled, two additional statuses are available:
•
Quotations - Orders that have been created as quotations, which have
not yet been converted to a full Purchase order
•
Awaiting Authorisation - Orders whose total exceeds the staff member’s
authorisation limit (see page 316). These orders must be authorised by a
staff member whose authorisation limit is greater that the order total.
This toggles the display of the Purchase Order history window. By default the
history grid is not displayed. However when toggled, the window will retain the
last setting, i.e. if it was set to display in the last session, it will continue to do so
until it is turned off again.
Grid
The grid is the area that displays a list of the service orders as defined by the
search and filter criteria. Right clicking on the Grid header will open a generic
popup menu. Right-clicking inside the grid opens a specific popup menu (see page
308).
The order items in the grid are colour coded to provide easy identification or the
order progress:
•
Current Order: Navy
•
Overdue Order: Maroon
•
Partially Supplied Order: Green
•
Supplied Order Black
Order No
The order number.
Order Date
The date that the order was processed.
Due date
The expected date to receive the order.
Accno
The creditor account number.
Name
The name of the creditor. This relates to the account number.
Status
This is the order status: 0 - Not Processed (This has 2 sub categories, current and
overdue), 1 - Partly Processed, 2 - Fully Processed.
307
MYOB EXO Business User Guide
Value Ex GST
This is the combined total of the order, excluding GST.
Confirmed
This checkbox indicates that the supplier/creditor has acknowledged the order.
Local value
This is the combined total of the order, converted to the local currency.
Main Grid Right-click Menu
Edit the
selected order
Takes you to the Order (Entry) window for the selected order. However, you
cannot edit a Fully Processed order. This can also be accomplished by double
clicking on the order.
Set Status to
Fully Processed
Forces the selected order into the “Fully Processed” status, even if it has not been
dispatched or invoiced.
Authorise the
Selected Order
Authorises an order with status “Awaiting Authorisation”. This status is only
available if the Enable extended Purchase Order statuses Company-level profile
setting is enabled. Staff members can only authorise an order if the order total
does not exceed their authorisation limit (see page 316).
Convert Quote
to Order
Changes a Purchase Order Quote (order with the status “Quote”) to “Not
Processed” to accept a quote.
Note: Quotes are only available if the Enable extended Purchase Order
statuses Company-level profile setting is enabled.
Delete
Deletes the order in any status.
Copy Order
Copies the selected order.
View Purchase
Order History
This opens the Purchase Order history (usually displayed at the bottom of the
main Purchase Order window) in a separate window:
308
The Procurement Cycle
History
Whether the Purchase Order history is docked in the main Purchase Order interface or opened as a
separate window, the function and behaviour is still the same. The only difference with the docked
version is that the menu functions are available from the right-click menu and not on the main
toolbar.
Note: To aid performance on large databases when scrolling the search grid you may care to
minimise (hide) the History panel, as in this mode the history is not queried from the database.
Doc#
A system-generated number
Activity
For example New Order, Order Qty.
Date-Time
The date and time of the activity.
Order No
Purchase Order Number as selected from top grid.
Receipt No
The receipt number of the Purchase Order.
Invoice No
The invoice number of the Purchase Order.
Sales Person
The salesperson for the Purchase Order line activity.
Staff#
The Staff # of the salesperson for the Purchase Order line activity.
Branch
The branch where this sales order was created.
State
The state of the Purchase Order.
Related Rec
Any related records to this Purchase Order.
Link
Displays any documents that have been linked to the Purchase Order, such as PDF
invoices or statements.
History Window Right-click Menu
Account
This opens the creditor account details window for the selected history
transaction.
Purchase Order
This opens the Purchase Order for the selected history transaction.
Inwards Goods
This opens the inward goods window to enter any details for inward goods.
View Document
This opens a print preview copy of the Purchase Order receipt.
View History
Allows the user to swap the filter on the window to a different class for the
highlighted line. For instance you may wish to drill in from a creditors invoice,
locate the Purchase Order(s) that it came from and then see what other events
may exist for that Purchase Order (e.g. other receipts or invoices where partial
shipment has occurred).
Print History
This opens a print ready print preview of the Purchase Order History report for
the selected history transaction.
309
MYOB EXO Business User Guide
Toolbar
1. Print Order: This prints the selected order.
2. Print List: This prints the list defined by the search result.
3. Print List (Clarity): This prints the list to a clarity preview window, click here to see a sample.
4. Delete Order: Clicking this icon marks the order as deleted.
5. Copy Order: This opens the copy order window, providing options to copy selected components of
this order. In the Copy To: fields, the order number is automatically assigned to the next one in the
list. Choose the account to copy to, note you can use the ? > Tab shortcut to open the account
search window. Choose whether to copy the contents of the Header narratives and / or the Line
narratives by checking the appropriate checkboxes.
6. Email Order: This emails the selected order directly to the associated Creditor as a PDF attachment.
Note: If the Confirm before sending email profile setting is enabled, the email will appear before
sending, giving you the opportunity to edit it. If the setting is disabled, the email will be sent
automatically without being displayed.
310
The Procurement Cycle
Entering Purchase Orders
The Purchase Order option in the Transactions menu is used to enter, edit supply, invoice and delete
Purchase Orders. Purchase Orders can be fully or partly invoiced at a later time.
Note: If the Allow new lines to be added to partly processed purchase order User-level profile
setting is enabled, it will be possible to add new lines to a partly processed Purchase Order. It will
also be possible to edit any lines on a partly processed order that have not yet been receipted or
invoiced.
To enter a Purchase Order:
1. Open the Purchase Orders window (see page 306).
2. Click New. Alternatively, click the Copy button to copy and edit an existing order.
Note: If the Enable extended purchase order statuses Company-level profile setting is enabled, the
New button becomes a dropdown that allows you to create a new Purchase Order or a new
Purchase Order Quote.
The following window opens:
3. In the account header section, enter the Creditor account number followed by the TAB key, or
search for the account by entering part of the account name, or simply ‘?’ and ENTER to search
through all accounts.
4. Complete the remaining header fields, such as date, delivery address, stock location, lead time and
Purchase Order header extra fields. See the table below for field definitions.
Note: You can click the
Purchase Order lines.
button to hide the header details, leaving more room for viewing the
311
MYOB EXO Business User Guide
5. On the Order Details tab enter the stock item code (or use ‘?’ to search), the quantity, and enter or
override the price if necessary. You can key in percentage discount per Purchase Order line. You
can right click on the PO line to add line narrative or create one off stock item or view stock levels.
Note: Purchase Orders are limited to a maximum of 2000 lines; however, 400 is suggested as a
sensible maximum. More than this may result in performance degradation.
6. Add a Purchase Order header narrative by clicking on the Narrative icon (
).
7. For foreign creditors, you can click the Exchange Rate button to refresh exchange rate and use the
buy rate from currencies table.
8. Click Show Tax Summary to review tax rates used on Purchase Order
9. Click Save to save the Purchase Order. The system will assign the next Purchase Order number, and
prompt to print the order.
Field Definitions
Field
Description
Account
The name of the account. If you have specified a default account in MYOB EXO
Business Config > Admin > Creditors > Creditor Account Groups, the default is
displayed here.
Ordered by
The name of the person placing the order.
Confirmed
Check this box to confirm all lines in the Purchase Order, i.e. the supplier /
creditor has acknowledged the order. This will also change the order status in the
Purchase Orders (see page 306) listing window.
Delivery Address
The address for delivery. The default address is taken from the stock location.
Press F10 or right-click for a list of alternate addresses.
Note: Stock location addresses are configured in MYOB EXO Business
Config at Admin > Stock > Stock Locations.
Order Date
The date. This defaults to the current system date. You can change it by selecting
the preferred date from the calendar.
Due Date
The date that the goods are due to arrive.
Location
The name of the stock location that the goods will be dispatched from.
Lead Time
Choose between primary (the number of days between placing an order and its
arrival) or secondary (the alternate lead delivery time in days) lead times. These
times are defined in the Creditors Details 2 Tab (see page 110).
Exch rate
The currency and exchange rate for the creditor.
Job Code
Sales Order
The job code, if using the EXO Job Costing module.
312
If the Purchase Order was created from a Sales Order (see page 319), this field
instead displays the ID of the Sales Order that the Purchase Order was created
from.
The Procurement Cycle
Branch
The branch name and number. The default here is based on the one that you set
in MYOB EXO Business Config > Admin > EXO Finance > Branches.
Campaign Wave
If the EXO Business CRM module is installed, Purchase Orders can be associated
with a campaign wave to track purchases against a marketing campaign.
Order details
Stock Code
The code for this purchase item. This code can be either the Stock code or the GL
code.
Description
The description of the stock items. This is automatically entered when you press
the TAB key after entering the stock code.
Qty
The quantity of the stock item. The default is set to 1.
Price
The price that applies to the stock item. This is the price that is set up in the stock
window and is based on the price level assigned to this customer.
Total
The total price for this invoice line.
Supplier Code
The supplier’s code for this stock item.
Options
Click on the ellipsis [...] to open the Purchase Order Line Periscope (see page 315)
window for this stock item.
Due Date
The date the order line is due.
C
Indicates whether the Purchase Order has been confirmed - Y (Yes) or N (No).
This is set by ticking the Confirmed checkbox in the Purchase Order Line
Periscope (see page 315).
Job Code
The job code. It defaults to the code from the Job code field in the header, but it
can be changed per line. This is only relevant for the EXO Job Costing module.
Sell Price
The sell price as detailed in the stock details 1 tab (see page 164) and Setting Cost
Methods and Sell Prices (see page 163)
Cost Type
The job type established in EXO Job Costing. This is only relevant for the EXO Job
Costing module.
Cost Group
The cost group established in EXO Job Costing. This is only relevant for the EXO
Job Costing module.
313
MYOB EXO Business User Guide
Menu commands
1. Print: There are three print options: Order, List and List (Clarity).
2. Account: View creditor Details. This opens the creditor in the Creditor Account Details window (see
page 106).
3. Show Tax Summary: This opens the Tax Rate Summary window, listing the Tax rate #, name, %
Calculated Tax and Actual Tax. This is a static window, no information can be entered or edited
here.
4. Refresh Exchange Rates: This loads the latest exchange rate from the currencies table.
5. Receipt using Inward Goods: This opens the Inwards Goods – Receipt Goods window (see page
345).
Note: Once a Purchase Order has been fully receipted (no outstanding quantities), this button is
disabled.
6. Receipt this Order: This opens the Purchase Order Receipt window (see page 320).
7. History: This opens the History window (see page 309) for the Purchase Order.
8. Addresses: If alternate delivery addresses need to be specified for the delivery of this order they
can be selected from this Extra Delivery Address window.
9. Narrative: To add any comments or notes to the order. This is a very basic text editor and the
contents of the comments are saved by clicking the OK button.
File Menu Commands
All the file menu commands are replicated on the toolbar (detailed above).
Notes
•
Right-click on a stock item to view stock levels in all stock locations (or press CTRL+L), or to create a
one-off stock item (or press CTRL+O), or add a line narrative.
•
The purchase price of a stock item on a Purchase Order is automatically suggested by the system,
based on the following hierarchy:
•
314
o
Use the Stock item > Details 1 > Cost prices > Supplier price if the Purchase Order is being
raised for the Stock item > Details 1 > Main Supplier. (If the supplier cost price or the
supplier account number is set to 0, then this setting will be ignored).
o
Otherwise, use the Supplier Cost from the Stock item Details 2 tab (see page 167) if there is
a supplier cost price set for the stock item. The use of Pack Sizes will also impact on the
price selected.
o
Otherwise, use the Price from the most recent Purchase Order raised against that supplier,
for that stock item.
o
Otherwise, default the Purchase Order Price to $0.00, ready to be manually entered.
Maintaining the Alternate Supplier Prices on stock items can assist in automatic entry of the
purchase price on a Purchase Order. Having a Stock item > Details 1 tab > Cost prices > Supplier of
$0 or a Stock item > Details 1 tab > Main Supplier of account number 0 on the stock item would
mean only the Alternative Suppliers price table needs to be maintained.
The Procurement Cycle
•
A user’s Check supplier cost prices when purchase prices change profile can be enabled to prompt
to update the supplier cost price when overriding prices when placing or creating a Purchase Order.
This assists in interactively maintaining the alternative supplier price lists during Purchase Order
entry and purchase pack price for each alternate supplier. Appropriate columns are also added to
Purchase Orders entry window.
•
Press F10 to select a delivery address from the Extra Delivery Addresses window.
•
GL codes can be used instead of stock items on a Purchase Order by using the format @GLCODE.
Lookup stock items could also be created to point to a GL account.
•
Purchase order lines due dates can be changed on a partially processed Purchase Order through
the Receipt button.
•
The company profile setting Delivery Addresses Shared allows delivery addresses to be shared
among all accounts.
•
A profile can be enabled to update alternate supplier price when costs changes on the Purchase
Order. This updates the Supplier_Stockitems.PurchPackPrice field and not the LastCost field. The
LastCost field is updated only by the action of costing receipted goods and therefore represents the
true landed cost from this supplier.
•
Supplier Cost (SKU price) displays the Packcost (purchase price) divided by the pack quantity.
•
The Update LastUpdate field for supplier code cost price when prices change profile is also
available if users want to keep track when the cost price had changed.
•
You can confirm or unconfirm all Purchase Order lines by using the PO Orders menu.
•
A profile is available to let the system save a transaction when using an inactive stock item.
•
GET_COST_PRICE stored procedure is used to establish cost prices on a Purchase Order.
•
The profile option Creditors Invoice Line Discounts controls the availability of the discount column
on the Purchase Order entry window.
Purchase Order Line Periscope
Transactions > Purchase Orders > Purchase Orders > [New] > (Order Details) > [...]
This window is used to assist the data entry when creating a new Purchase Order (see page 310). In
addition it provides further options to:
•
Adjust the GST rate and view the GST value of this adjustment.
•
Adjust the price %.
•
View the stock item.
315
MYOB EXO Business User Guide
Purchase Order Authorisation
Authorisation limits can be enabled for Purchase Orders. If a staff member creates a Purchase Order with a
total that exceeds their authorisation limit, that order will be given the status “Awaiting Authorisation”. An
order in this status cannot be processed further until it is authorised by a staff member with a higher
authorisation limit (or if the order is reduced so that its total is no longer over the staff member’s limit).
Setting up Authorisation Limits
By default, authorisation limits are not applied to Purchase Orders and the “Awaiting Authorisation” status
is not available. To enable Purchase Order authorisation, the Enable extended purchase order statuses
Company-level profile setting must be ticked in EXO Business Config.
Once authorisation is enabled, staff members’ authorisation limits must be set up on the Setup Staff
window (see page 20) or the Staff section of EXO Business Config (see page 75). Authorisation limits are set
up on the Authority tab:
Authorising Purchase Orders
Purchase Orders whose total exceeds the authorisation limit of the staff member that created them are
displayed on the Purchase Order screen (see page 306) with the status “Awaiting Authorisation”. To
authorise a Purchase Order, right click on it and select Authorise the Selected Order from the popup menu.
A staff member can only authorise an order if its total is less that the staff member’s authorisation limit; if it
is not, an error message is displayed:
316
The Procurement Cycle
If the staff member’s limit allows them to authorise the order, a confirmation message appears:
Click Yes. The Purchase Order’s status is changed to “Not Processed” and it can now be processed as
normal.
Forecast Based Purchase Orders
Transactions > Purchase Orders > Forecast Based Purchase Orders
Forecast-based Purchase Orders compare stock on hand and outstanding sales and purchase orders, and
suggests the items to reorder based on reorder levels. This uses the Primary Supplier field on the stock
item.
Note: See also the On Demand Purchase Orders functionality in the Distribution Advantage module.
On-Demand Purchase Orders provides an assisted form of creating purchase orders directly from
sales order information This function is available in the optional Distribution Advantage module.
1. Enter the Supplier name that the Purchase Order will be generated against.
2. Select the Primary stock group range, Location and define if the system will list all suppliers’ stock
or only stock that requires replenishment.
317
MYOB EXO Business User Guide
3. Click the Recompute button (
required.
) to recalculate the stock requirement statistics for all suppliers if
4. Click the Generate button (
) to generate the stock requirement for a single supplier button and
populate the table with stock items that match the search criteria
5. Review the results, and manually override the Order Now quantity if required.
6. Click Print to print a report of the suggested items. Alternatively, click Export to CSV File to output
the grid rows in Excel format.
7. The Copy/Paste tab can be used to paste in rows, for example, by exporting the Stock Requirement
grid to CSV, editing it in Excel, then pasting the edited rows back into the Copy/Paste tab.
8. Click Post Order to open the purchase order window and automatically populate the order based
on the reorder item listing created.
318
The Procurement Cycle
Notes
•
The system will warn if there are more than 400 records that match the search criteria, to ensure
the results remain manageable Users can then use a more restrictive filter options.
•
The “Recalculate stock requirement statistics for all suppliers” recalculation can be set as a
scheduled task if the calculations are excessively complex.
•
The CALC_STKREQUIREMENT stored procedure is used to establish the manner how stock
requirements will be calculated.
•
Use of economic order quantity in forecast based purchase ordering is possible if an EOQ is
specified on the stock item, and the setup profile option Use of Economic Order Quantities on
Auto Purchase Orders is enabled.
Creating Purchase Orders from Sales Orders
It is possible to create one or more Purchase Orders directly from a Sales Order.
To create Purchase Orders from a Sales Order:
1. Open the Sales Order that you want to create Purchase Orders from.
2. Click the Generate PO(s) button on the Sales Order window toolbar, or right-click on the grid and
select Generate Purchase Order(s).
Tip: This button/menu option can be hidden using the Hide sales order controls User-level profile
setting.
3. The Generate Purchase Order(s) from Sales Order window opens:
The following details are displayed for each line on the Generate Purchase Order(s) from Sales
Order window. All details are read-only, except for Order Now.
Note: By default, only lines where the Order Now value is greater than 1 are displayed. To display
all lines from the source Sales Order, tick the Show All Sales Order Lines box.
319
MYOB EXO Business User Guide
Field
Description
Supplier
Supplier for the stock item. If no supplier is defined for a stock item, it will
appear under MISC PURCHASES.
Stock Code
The unique code for the stock item.
Description
Description of the stock item.
SO Qty
Quantity from the Sales Order.
Supplied
Quantity that has already been supplied.
Prev PO
Quantity that already appears on previous Purchase Orders.
EOQ
Economic Order Quantity, which sets a minimum amount for orders.
Recommended
This value is equal to:
SO Qty - Supplied - Prev PO
The value is adjusted up to the EOQ, where this applies.
Order Now
The quantity that will appear on the Purchase Order. The default value is
the same as Recommended. (If a line is not ticked, its default Order Now
quantity is 0.)
4. Select/de-select the lines to create orders for. Lines are grouped by supplier; selecting or
deselecting a supplier selects/deselects all lines under that supplier.
5. Edit the Order Now quantities for selected lines as necessary.
Note: When editing the Order Now quantity, the EOQ is enforced as per the EOQ prompt on
purchase orders Company-level profile setting (Prompt, Force or No EOQ).
6. Click Generate PO(s).
Purchase Orders are created, one for each supplier. Purchase Orders are created one at a time - once one is
saved and closed, the next one opens. All lines that are ticked and have an Order Now value greater than
zero are included in Purchase Orders. The Sales Order field is populated with the ID of the parent Sales
Order. (This field replaces the Job Code field on Purchase Orders that were created by other means.)
Notes
Bills of Materials are not supported in Purchase Orders. This means that BOMs lose their structure when
they reach the Purchase Order, and appear as a collection of individual stock items.
Any changes forced by customer or supplier changes after Purchase Orders have been created will not
automatically change the status or quantities of those Purchase Orders. This process must be handled
manually.
When the Purchase Order is receipted, costed and invoiced, this has no effect on the original Sales Order in
terms of supply, generation of invoice etc. This process must be handled manually.
320
The Procurement Cycle
Receipting Purchase Orders
Transactions > Purchase Orders
After a Purchase Order has been entered, the ordered stock has to be supplied. Depending on availability of
stock and requirement of invoice you can click the appropriate button on the Purchase Orders screen.
The stock specified on the order may not be available immediately or only a part of it can be supplied at the
present time.
You can receipt more than one Purchase Order to a Goods Received Note and invoice it.
In summary you can receive goods, associate costs and create creditors invoice directly through the
purchase order.
Note: This method does not support the more advanced features of the Inwards Goods (see page
345) system.
1. Search for the Purchase Order to receipt (see page 306). Once the required order is opened, click
the Receipt button to open the Purchase Order Receipting window (see page 323) and receive
ordered items.
321
MYOB EXO Business User Guide
2. Click the
window:
Add Line icon to add line items to be receipted. This opens the Add Line To Order
a. Enter the stock code or enter “?” and press the TAB key to search for the code.
b. Add a brief Description to detail the order.
c. Enter the Quantity and Unit price.
d. Select Analysis Codes (see page 84) by clicking on the ellipsis button [...]
e. Select the GST Rate and enter the value.
f.
The Job Code, Cost type and Cost group can all be searched by entering “?” and pressing
the TAB key.
g. Click OK to add the new item to be receipted.
3. Change due dates for all stock lines, or change the due date per line with the Purchase Order
Supply Periscope by clicking on the (+) link.
4. Click Receipt All if everything is to be receipted at this time.
322
The Procurement Cycle
5. Check the Generate Invoice checkbox if a creditor’s invoice is to be created at this time. The system
will prompt for the entry of the creditor’s invoice number when processed.
6. Click Process to receipt stock items and optionally create the creditors invoice.
Notes
•
Stock transactions can only be posted to the current period using the Purchase Order Receipt
method.
•
Use the Inwards Goods Receipt function to assist in receiving more than one purchase order on a
single creditor’s invoice.
•
The Receipt or IWG buttons can optionally be hidden by using the user profile ‘Purchase Order
Hide Controls’.
•
MYOB EXO Business recommends Inwards Goods Receipt as a preferred method in receiving stock.
Purchase Order Receipt Details Tab
This topic provides an overview of the Purchase Order Receipt Details tab.
Transactions > Purchase Orders > Purchase Orders> {Double Click an order} > [Receipt]
323
MYOB EXO Business User Guide
Field Descriptions
Field
Description
Account through to
Branch
See Entering a Purchase order - Field Definitions (see page 312).
Checkbox options
Invoice as Supplied
Enable this option if you want the Receipt Now quantity to be copied to
the Invoice Now field. If it is not checked, you will need to manually enter
the figures in the Invoice Now field. Entering the quantity is essential if you
wish to generate an invoice.
Print Receipt
Document
Enable this option if you want a receipt record printed for this order.
Generate Creditor
Invoice
Enable this option if you want to generate an invoice for this Purchase
Order.
Show All
Enable this option to view all items in the Purchase Order. To view only
items that have not been supplied, leave the box unchecked.
Force to Fully
Processed Status
Enable this option if you want to force the order to the fully processed
status, even though the order may not be fully receipted or invoiced.
Other options
Receipt date
This automatically defaults to the current system date but you can select
the preferred date from the calendar.
Packing slip
The packing slip number.
Grid options
Stock code
The stock code of the item being receipted.
Description
The description of the stock item as defined in the Stock window.
Ordered
The quantity of the stock item that you ordered.
Receipted
The quantity of the stock item previously receipted.
Outstand
The outstanding quantity.
Invoice
The quantity you have previously generated an invoice for.
UnInvoiced
The quantity that is yet to be invoiced.
Receipt Now
The quantity that you are receiving.
If you have checked the Invoice as Supplied box, press TAB for the system
to automatically copy the Invoice as Supplied quantity to the Invoice Now
field.
324
The Procurement Cycle
Invoice Now
The quantity you wish to invoice here.
You will be unable to process the invoice if the field is left at 0.
Unit Price
The price that applies to the selected stock item.
Confirm
Enable this option to confirm the purchase order, i.e. the supplier /
creditor has acknowledged the order.
Location
The stock location that the goods are receipted to.
Toolbar commands
1. Account: This opens the creditor in the Creditor Account Details window (see page 106).
2. Tax Summary: This opens the Tax Rate Summary window, listing the Tax rate #, name, % Calculated
Tax and Actual Tax. This is a static window; no information can be entered or edited here.
3. Refresh Exchange Rates: This loads the latest exchange rate from the currencies table.
4. Add a line: This button adds a new line (order item to be receipted) to the order (see page 321).
5. Find Line: Opens the Stock Search window (see page 158) to search for a line in the order.
6. Receipt all: Click this button to receipt everything for this order.
7. Process: Click this button to receipt stock items and optionally create the creditors invoice.
8. Narrative: Click this button to open a text editor, so you can enter notes in this editor relating to
the selected line.
Reversing Purchase Orders
There are two methods for reversing a Purchase Order in MYOB EXO Finance. You can reverse it through
the original Purchase Order or you can reverse it through a new Purchase Order.
To reverse an order through the original Purchase Order:
1. Open the original Purchase Order and click the Receipt button. The Purchase Order (Supply)
window is displayed.
2. Note the stock quantity in the Receipted field and type this quantity as a negative in the Receipt
Now and Invoice Now fields.
Note: If you have checked Invoice as Supplied, the quantity from the Receipt Now field is
automatically copied into the Invoice Now fields.
3. Click Process to reverse the order. The Payment/Entry window is displayed.
4. Click OK to save this refund.
5. If the creditor’s account is an Open Item account, the Allocation window is displayed and you can
allocate the refund against the credit note. Once you have finished the process, the Purchase
Orders (search) window is displayed.
Note: If you have checked Include Partly Processed Orders, the order that you have just reversed is
marked as a backorder. You can now select this order and remove it from the purchase order system.
325
MYOB EXO Business User Guide
The creditor’s account in the Transactions tab now contains a credit. If you look at the transaction list for
the stock item you reversed, you will see a credit here as well.
You can also reverse a Purchase Order without going back to the original Purchase Order:
1. Create a new order and type the same details but with negative stock quantities.
2. Once you have entered the details in the Purchase Order (Entry) window click the Receipt button
and ensure that the Invoice as Supplied and Generate Creditor Invoice boxes are checked.
3. Check the Enter Payment box if a payment has been entered.
4. Type the same quantity that was supplied into the Supply Now box but as a negative quantity. If
the Invoice as Supplied box has been checked, MYOB EXO Business automatically updates the
Invoice Now column.
5. Click the Process button to process the transaction. If you selected Generate Creditor Invoices, the
Generate Creditor Invoice window is displayed.
6. Click OK to save any changes that you make.
Generating Creditor Invoices
The Creditor Invoice Entry window is used for entering invoices from suppliers where a Purchase Order was
not used to initiate the purchase and/or the invoice does not involve the purchase of stock items. The
invoice window links directly to the General Ledger Account Codes for coding the purchases, but the
transactions are not posted to the General Ledger itself until the Post Creditors to GL option has been run.
Entering a Creditor Invoice
Account > Creditors > {double Click the creditor’s name} > (Transactions) > [New Invoice]
You can create an invoice for an existing creditor through the Invoice Entry window. Invoices can be for
stock and non-stock transactions.
Creditors Invoice Entry allows invoices from creditors to be entered into MYOB EXO Business, either by
manual entry (supporting both stock and GL code entry), or by automatically pulling information from
inwards goods receipts or purchase orders.
326
The Procurement Cycle
Non-stock Transactions
To enter a creditor invoice for a non-stock transaction:
1. From the Creditor Account Details window, click the Transactions tab. The Transactions page (see
page 129) is displayed.
2. Click the New Invoice button on the main toolbar (
page 330) is displayed.
). The Creditor Invoice Entry window (see
Field Descriptions
Field
Description
Account
The name of the account.
If you have specified a default account in MYOB EXO Business at Config > Admin
> Creditors > Creditor Account Groups, the default is displayed here.
Salesperson
The name of the person who is entering the invoice.
You can type the name or select from the list.
Invoice date
The date of the invoice.
This defaults to the current system date but this can be altered by selecting
another from the attached calendar.
Payment due
The date the payment is due.
Job code
The job code.
Invoice no
The invoice number.
If you do not enter an invoice number, the system will not allow you to save the
invoice entry.
327
MYOB EXO Business User Guide
Customer order
no
The customer order number.
Location
The location where the invoice is being generated.
Age
The relevant financial period from the list.
(currency)
If you operate in multiple currencies, this is the currency specified for the debtor
account, e.g. ‘AUD’, ‘NZD’. If you don’t operate in multiple currencies, this field
displays as ‘N/A’ and cannot be edited.
Branch
The name of the branch where the transaction took place.
Type
The code for the type of transaction.
This is changed by clicking the toggle mode button. It will be GL for direct coding
to General Ledger or Stock for stock item purchases.
Code
Either the GL or Stock code for the item being invoiced.
If you do not know the GL or Stock code, press ? + TAB for a list of GL codes and
select the one you require. This will automatically enter the description,
quantity, price and total fields.
Description
The description of the item.
Once you enter the code, the default description is displayed. If you wish to
change this, you can overtype the displayed description.
Qty
The required quantity.
The default is 1 but you can change to the required quantity.
Price
The unit price of this line item.
Whether the price you enter is inclusive or exclusive of GST depends on whether
you have selected Creditors GST Inclusive Pricing in MYOB EXO Business at
Config > Essential > General Setup.
Total
The invoice line total.
Note: You can copy an invoice line by pressing ALT + INSERT on your keyboard. This will copy the line
that the cursor is in.
Click Save if you want to save the invoice to the creditor’s account, or click the Payment tab to enter the
payment on the invoice.
Tip: You can also open the Invoice Entry window from the Transactions menu in the MYOB EXO
Business main window. Click the Creditors Invoice option. The Invoice Entry window is displayed.
328
The Procurement Cycle
Stock Transactions
To enter a creditor’s invoice for a stock transaction:
1. From the Creditor Account Details window, click the Transactions tab. The Transactions page is
displayed.
2. Click the New Invoice button. The Creditor Invoice Entry (see page 330) window is displayed.
3. If the Mode field displays “GL”, click the Toggle Mode button so that is displays “STOCK”.
4. Click the Goods Receipt button. The Goods Receipt Search window opens:
5. You can now receipt multiple purchase orders for one supplier to one Goods Received Note, and
then add the landed costs.
In step 4, the Goods Receipt button has two options:
329
MYOB EXO Business User Guide
If the On Costs option is selected, the Inwards Goods On Costs window (see page 347) opens:
Creditor Invoice Entry
Transactions > Creditors Invoice
The Creditor Invoice Entry window allows invoices from creditors to be entered into MYOB EXO Business,
either by manual entry (supporting both stock and GL code entry), or by automatically pulling information
from inwards goods receipts or purchase orders.
1. Click New to create a new invoice.
2. Enter the creditor account details or ‘?’ to search. Then enter all other invoice header information.
3. For invoices relating to Inwards Goods Receipts, click the Goods Receipt button. All un-invoiced
Goods Receipts for the selected supplier will be listed. DOUBLE-CLICK on the desired receipt to
automatically populate the grid with details from the Inwards Goods receipt.
4. Invoices can be coded to stock or GL accounts. The Toggle Mode button switches the mode
between ‘Stock’ and ‘GL’. This can be seen in the grid column Type.
330
The Procurement Cycle
5. Creditor invoices can be entered for overhead expenses (e.g. cleaning costs). In this case Type will
be ‘GL’, and Code is the combination of branch code, GL account and GL sub-account.
6. Creditor invoices can also be entered for direct stock purchases (i.e. no purchase order or inwards
goods receipt). In this case Type will be ‘Stock’, and Code is the stock item. This type of invoice will
create stock receipt transactions and the stock-on-hand quantity will be increased.
7. Tax is automatically calculated based on the creditor account, stock item or GL account. However
this can be modified on each line by using the periscope in the Option column.
8. The Payments tab can be used if the creditor has already been paid or is being paid at the same
time as the invoice is being entered.
Notes
•
Use the Paste Invoice Lines button if the invoice lines have been prepared in another Windows
application (e.g. spreadsheet), and are to be pasted into the grid.
•
RIGHT CLICK on the line details window to create a one-off stock item. (One-off items allow quick
creation of a stock code based on template items, for things such as trade-in items, or creating
items as needed from large parts catalogues.)
•
The menu item Creditors Invoice Entry from Stock can be used if stock codes are used more
frequently than GL codes on a creditors invoice.
•
The payments tab on the creditors invoice can be disabled if preferred.
•
If you are using the EXO Job Costing module, a Job Code column is available to associate the invoice
with a job.
•
Creditors Invoice maximum limit is 400 rows.
Entering a Payment on a Creditor’s Invoice
If you need to enter a payment at the same time as the invoice, you can go to the Payment window and
make the payment entries. Alternatively this is for recording individual creditor payments, such as singular
payments made by hand-written cheque or electronically. Payments are normally made using the Batch
Payment Processor (see page 482).
331
MYOB EXO Business User Guide
To enter a payment on a Creditor’s invoice:
1. Open the Creditor Payment Entry Window:
•
From the Creditor Account Details window, go to the Transactions tab and click the New
Payment button (
•
).
Select the Transactions > Creditor Payments > Creditor Payment Entry menu item.
Note: Opening the Creditor Payment Entry window from a Creditor account will automatically
assign the payment to that Creditor.
2. Enter the account and payment details information.
•
Select the date, period and age (if applicable).
•
Select the payment Type from the predefined drop-down list.
•
Enter the payment Amount and if it’s in foreign currency, enter the conversion rate. (If you
enter an amount that is less than the outstanding amount, the balance amount is displayed
against Outstanding in the Invoice Summary panel.)
•
If the Withholding Tax on Creditors Payments option has been enabled in the Essential >
General Settings section of EXO Business Config, options to apply withholding tax to the
payment become available at the bottom of the window.
3. Click the ellipses […] button to view the creditor account details, to check details if needed.
4. If payment is by a cheque, press F12 in the Chq/Ref field to automatically assign a sequential
number.
332
The Procurement Cycle
5. Click Save. If the account is an Open Item account, the allocation window will be presented,
allowing the payment to be allocated to an invoice.
6. Click the Auto button to allow the system to automatically balance out based on transaction value.
7. If this is not possible due to the amount, click the Part Allocate % button to allocate the selected
amount.
8. Click Save to save these allocations.
Note: You can also enter a payment before you allocate the payment to the invoice, or as a Batch
Payment (see page 482).
Creditor Payment Run
Transactions > Creditor Payments > Creditor Payment Batch Processing
Creditor payment runs can be performed to create multiple cheque payments or supported direct credit
banking files.
333
MYOB EXO Business User Guide
1. Enter the selection criteria for invoices to be paid; creditor, account group, due date etc.
2. Also choose the pay method – cheque or direct.
3. Click Search to list all creditors that have invoices that meet the selection criteria.
4. Double-click on a row to view the invoices that have been selected.
5. For an invoice to be paid, it must be set to ‘Released’. Then for an account to be paid, the ‘To Pay’
flag must be set to ‘Y’. There are a variety of ways of setting these statues.
•
The toolbar buttons on the Creditor Account tab (Release All, Release None, Pay All, and
Pay None) affect all payable invoices on all displayed Creditor accounts.
•
The toolbar buttons on the Transactions tab (Release All, Release None, Hold All, Pay,
Don’t Pay) affect all invoices on the selected Creditor account.
•
Pressing SPACEBAR on the selected account will toggle ‘To Pay’.
•
Pressing SPACEBAR on a selected invoice will toggle the ‘Release Status’.
•
Status change options are also available from the right-click menu.
6. Click the Save Pay Status button to save the creditor account ‘To Pay’ status and ‘Release Status’ of
the invoices.
7. Click Process Cheques or Process D/Cs to start the pay-run. Cheques will be printed or the Direct
Credit file created.
Notes
334
•
Use Calc Disc to calculate prompt-payment discounts.
•
Creditor payment authorisation is an option that is also supported, requiring invoices to be
‘authorised’ before they can be released for payment if the value of the invoice exceeds the limit of
the user that entered them.
•
Account Lists can be set up to group accounts by payment priority, category or special account
grouping.
The Procurement Cycle
•
When expected accounts or invoices do not show up on window, review account payment type,
invoices due dates and other filter options used.
•
Most payment processor reports are now supported in Clarity.
M-Powered Payments
The MYOB M-Powered Payments service lets you pay your suppliers electronically and send them
remittance advices in one easy process, directly from the MYOB EXO Business software.
The M-Powered Payments process works as follows:
1. MYOB EXO Business is set up to use M-Powered services.
2. Purchases are made, and invoices are received from Creditors.
3. Payments are entered and authorised in EXO Business, then sent the M-Powered Payments system,
which processes the payments.
4. EXO Business is updated with the details of the payment, and remittance advice is sent to Creditors
(optional).
Note: The M-Powered Payments service is only available in Australia.
Setting up M-Powered Payments
M-Powered Payments must be set up before the feature can be used in MYOB EXO Business.
It is highly recommended that you use the latest EXO Business Installer to set up program files. If you just
copy the executables manually, it is easy to miss out additional files that are necessary to connect to the MPowered services database. If you run the EXO Business Installer, these files will be copied to the right
location automatically.
Also, the registered company name in the EXO Business Configurator cannot contain any characters that
Windows would not allow for a filename, i.e. \ / : * ? ,” |
The reason for this is that the first time an M-Powered Services database is created from EXO Business, it
will create a .box file to hold the M-Powered database. This box file will have a name that matches the
Company Name recorded in the EXO Business Configurator at Company > Company Details.
If you need to change you company name, contact the MYOB licensing department for new EXO Business
registration codes and also contact the M-Powered Services team for the new licensing and user login
codes.
Set up Shared Directory (optional)
If the same M-Powered database is to be accessed by multiple users, you will need to specify the location
of the database on all PCs that will be used to access it. Specify this location by configuring the Directory
location for M-Powered Database Computer-level profile setting using the EXO Business Configurator.
Activating M-Powered Payments
To activate the M-Powered Payments service, open the M-Powered Service Centre application by selecting
the M-Powered Service Centre menu option or clicking the M-Powered icon on the Purchases tab of the
main graphical menu:
Click the Send/Receive button on the Service Centre to contact MYOB M-Powered Services and activate MPowered Payments.
335
MYOB EXO Business User Guide
Set up Banks
One or more bank accounts to use for M-Powered Payments must be set up in the MYOB EXO Business
Configuration Assistant:
1. Open the Configuration Assistant and go to the Administration > Banks > Creditors (M-Powered)
section.
2. Click New. Enter the following details:
Field
Description
Bank Number
Enter a unique identification number for the bank.
Bank Name
Enter the bank’s name.
BSB Number
Enter the BSB (Bank State Branch) number for the bank and
branch at which the company’s account is held.
Bank Account Number
Enter the company’s bank account number.
Bank Account Name
Enter the name on the company’s bank account. This must match
the name of the account as recorded by the bank.
Company Trading Name
Enter the name by which the company does business (which may
be different from the Bank Account Name).
Default
Select this option to make this bank account (M-Powered) the
default account for Creditor payments.
3. Slick Save.
Set up Creditors
For all Creditor accounts that you want to use M-Powered Payments:
1. Open the Creditor account and select the Details 2 tab (see page 110).
2. Select “M-POWERED” for the Default Payment Type property. This enables the Remittance group
of properties.
3. Select the Send M-Powered Payments Remittances option if you want to send remittance advice
to this the Creditor when payments are made.
a. If you selected this option, specify whether to send remittance advice by E-Mail or Fax.
b. Enter an e-mail address or fax number to send remittance advice to.
336
The Procurement Cycle
Recording Payments
Payments made via M-Powered Payments are entered the same way as other Creditor payments. Once
made, payments must be authorised and sent to MYOB M-Powered Services.
Single Payments
When entering single payments using the Creditor Payment Entry window (see page 331), select “MPOWERED” for the Type field. This enables the following extra fields:
Field
Description
Bank
Select one of the bank accounts you set up in the MYOB EXO Business
Configuration Assistant under Creditors (M-Powered).
Your Statement Text
Enter text to appear on your bank statement.
Their Statement Text
Enter text to appear on the Creditor’s bank statement.
Enter all other values as normal and click Save to enter the payment.
Payment Batches
When entering payment batches using the Creditors Payment Processor (see page 476), select “MPOWERED” for the Pay by field (this option is only available when the M-Powered Service is enabled). The
grid is populated with all Creditors awaiting payment who are set up to be paid via M-Powered Payments.
You can select which payments you want to make in the usual way.
When you are ready, click the Process M-Powered button. Specify the following details on the window that
appears:
Field
Description
Statement Text
Enter text to appear on your bank statement.
Bank
Select one of the bank accounts you set up in the MYOB EXO Business
Configuration Assistant under Creditors (M-Powered). If the Use Default Bank
option is selected, the default bank is selected and cannot be changed. Untick this
option to select a bank manually.
Once the process is complete, you are given the option of launching the M-Powered Service Centre to
authorise transactions.
337
MYOB EXO Business User Guide
Authorising Transactions
Once payments have been entered, they must be authorised and sent to MYOB M-Powered Services using
the MYOB M-Powered Service Centre application. Open this application by selecting the M-Powered
Service Centre menu option or clicking the M-Powered icon on the Purchases tab of the main graphical
menu:
Note: Before authorising transactions, you must set up one or more people who can authorise
transactions at MYOB M-Powered Service Setup > MYOB M-Powered Payments.
All payments awaiting authorisation are listed. To authorise payments and send them to MYOB:
1. Double-click on a payment (or click the arrow icon next to it) to view the payment’s details.
338
The Procurement Cycle
2. Click the Authorise button. The following window appears:
3. Select an authoriser and enter their password, then click Authorise Now to authorise the payment.
4. Repeat this process for all payments that you want to process now. Once you are done, click
Send/Receive on the main window to send the authorised payments to MYOB M-Powered Services
for processing. Payments that are still waiting to be authorised will not be sent.
Once payments are sent to MYOB M-Powered Services and processed, EXO Business is updated with the
details of the payments. Remittance advice is sent to Creditors, as specified by the remittance options
selected for each Creditor (see page 335).
Entering a Credit Note
Account > Creditors > {double Click the creditor’s name} > (Transactions) > [Credit Note]
A credit note is used to reverse or correct an invoice. It reverses all of the operations that the invoice
performs. A credit note can only be initiated for an invoice, not a payment.
Occasions when you may need to enter a credit note include reversing a creditor’s invoice, making a
prompt payment discount or offering a special price reduction.
To enter a credit note:
1. Use the path above to access the Creditor Invoice Entry window.
339
MYOB EXO Business User Guide
2. The Creditor Invoice Entry window opens with the selected invoice already loaded and credited, as
illustrated above.
3. If you have entered a payment for this invoice, click the Payments tab to enter a refund. Enter the
same payment but the negative equivalent of the original invoice.
Note: Entering a Credit Note with a positive quantity and a negative value may cause your reports
to be inaccurate. It is important that the quantity is negative to bring the stock back in. If the
quantity is positive, the stock will be removed.
4. Click Save. The Creditor Transaction Allocation window is displayed listing all transactions.
5. With the transaction selected, allocated this by clicking the Auto button or clicking the Part
Allocate % button and selecting the allocation amount.
6. Click Save. This displays the Creditor Account Details > Transactions page.
7. A right-click in the transactions list brings up a shortcut menu. Select Refresh or click the refresh
button on the toolbar. This refreshes the transactions list and displays your credit note as a refund.
Tip: You may prefer to enter credit notes on your invoices and leave all payments for a particular day
of the month (for example the 20th). All payments can then be made through the Payment
Processor, as a Batch Payment (see page 482). Alternatively, you can enter a credit note by selecting
the Generate Credit option from the right-click shortcut menu on the invoice summary line.
340
The Procurement Cycle
Posting Creditors to the General Ledger
Utilities > Ledger Postings > Post Ledgers to GL
Once all your creditor invoices have been processed they need to be posted to the General Ledger.
View Unposted Transactions
To view unposted transactions:
1. Use the path above to open the open the Post Ledgers to GL window.
2. From the View Unposted Trx button menu, select Creditors Transactions.
The following window opens:
3. Select the period and click the Scan button the search for the Unposted Creditor Transactions.
4. Double-click on any item in the list to view the invoice.
Posting Transactions
1. In the Post Ledger to GL window, complete all the fields. Select the creditor ledger period or
creditor transaction date range from which the creditor’s transactions are to be extracted, and the
general ledger period to be posted into. It is also suggested that the user key in their initials as a
reference. For Creditors, ensure that only Creditor options are checked in the Source Ledgers to
Post section.
341
MYOB EXO Business User Guide
2. Click the New GL Post Run button to retrieve the transactions that match the criteria.
The following window opens:
3. Right-click on an account to view the GL Account or View Pre Posted transactions from the popup
menu.
4. Review the transactions listed and ensure the total debit and total credit values balance.
5. Click Process GL Post Run to post extracted transactions to GL. The system assigns the next GL
batch number.
Printing Creditor Remittance Advices
Reports > Creditors Reports > Creditor Remittances
The Remittance Advices window is used to print remittance advices for a single Creditor or all Creditors, for
the current period or the last period. Not only is there a summary line for each Creditor, giving totals for
the current month and past 3 months, and balance, but also a detailed list of each transaction that makes
up those balances. You can drill to view any Creditor Invoice.
1. Choose the Statement date. This the date the statements will be dated.
2. Choose whether you want to print a statement/statements for the current period (This Period) or
the Last Period.
342
The Procurement Cycle
3. If you require more criteria to filter the Creditors for whom you want to print statements, click the
Show advance search options icon
in the top right corner of the window.
4. Complete the Advanced Search fields using the following table:
Field
Description
Account Selection: From
and To Accounts
The From and To accounts of the account range you want to filter
on. Use the same account number in both fields to select the
statement of a single Creditor.
Balances: From and To
The From and To account balances of the balance range you want
to filter on. For example, you might decide it’s not worth the
postage to send out statements with a balance of less than $5.
Include Accounts with:
Zero Balances
Choose to include accounts with zero balances.
Include Accounts with:
Credit Balances
Choose to include accounts with credit balances.
343
MYOB EXO Business User Guide
Include Accounts with:
Inactive Status
Choose to include accounts whose Active flag is unticked.
Include Accounts with:
Current Activity
regardless of account
balance
Choose to include accounts with any activity in the current
period, regardless of their account balance.
Age Balance
You can generate statements for those Debtor accounts with an
outstanding balance of a particular age, e.g. print statements for
accounts with outstanding balances for 2 months.
Account Group
Choose to include accounts of a specific Account Group.
Custom Filter SQL
Advanced feature: You can use a SQL query statement to filter
the accounts, using any of the fields in the DR_ACCS table. Select
whether to Append the SQL query to the default filter using an
AND operation or Replace the default filter.
Note: When selecting the Replace option, your custom filter must
be preceded with an AND or OR operation.
5. Click the Search button at any stage to refresh the list with your search criteria. If you are printing
statements for multiple Creditors, filter the required Creditor accounts so that the Print All button
will print only the statements you want to print.
6. Double-click a Creditor account line in the top grid of the window to list the transactions of that
Creditor that make up their account balance for the selected search criteria.
7. Double-click a Creditor Invoice line in the bottom grid to view the printed invoice.
8. If you have selected multiple Debtors, click the Print All button; if you are printing a single
statement, click the Print One button. To bulk send remittances by print and/or email (see page
530), click Mailshot.
344
The Procurement Cycle
Inwards Goods
Inwards Goods – Receipt Goods
Transactions > Inwards Goods > Inwards Goods Receipt
Note: When a purchase order has been fully receipted (no outstanding quantities) then this function
will not be available.
Inwards Goods is the more sophisticated goods receipt mechanism, including support for on-costs, and
receipting stock across multiple purchase orders in one delivery.
Receipting is the process used to record goods physically received into the warehouse as they arrive,
irrespective of price or additional charges. Inwards Goods Receipting is designed to enhance workflow by
allowing warehouse staff to check and record Receipt quantities against the Purchase Orders in EXO
Business. Receipted quantities are recorded against the Purchase Order at the time of Receipting.
The Inwards Goods Receipting function records a list of stock items and corresponding quantities received,
but does not action stock transactions to place them into available stock. Thus there is no effect on Stock
Item > Cost Prices (e.g. Average and Last Cost) or the General Ledger. It is designed to allow the warehouse
staff to record items received as an independent step from Costing those items into stock. A Receipt can be
recalled and amended up until an Inwards Goods Costing is done. It therefore allows data entry to be
suspended and saved for later completion.
Receipting is usually actioned from a list of outstanding Purchase Orders but additional lines (not originally
ordered) may also be added to the Receipt. An Inwards Goods Receipt may therefore also be used for nonorder Receipts (i.e. no Purchase Order). Receipts may span multiple Purchase Orders but only from the
same Creditor. Partial Receipts from Purchase Orders are accommodated.
1. To view existing receipts, enter the Receipt no, Stock code or Purchase order no, and then click
Search. DOUBLE CLICK on the selected record to drill down on the receipt.
2. To create a new receipt, click the New Receipt button.
345
MYOB EXO Business User Guide
3. In Receipt Details, enter details to identify the Supplier that the receipt relates to and tick the Show
all Locations check box if you want to display PO’s from all locations. The purchase orders list is
automatically populated as soon as you tab out of the supplier field.
4. Click Refresh to reflect recent changes that might have occurred since you first loaded the form.
5. Review the list and choose the purchase orders that are to be receipted in.
6. Click the Receive Selected button to load purchase order details into the bottom grid, or doubleclick an individual line. Repeat the process if multiple purchase orders are to be included in the one
receipt. Alternatively, select multiple orders at once by holding the CTRL key while clicking on the
required purchase orders, and then press Receive Selected.
7. If there are many lines to be receipted, minimise the now completed purchase orders part of the
window by clicking on the Minimise button in the panel’s top right corner. This will give maximum
window space for the receipt lines.
8. Enter the receipted quantity Rec Qty, or click Receipt All if all lines are to be fully receipted.
9. If additional items are to be receipted that are not on a purchase order, these can be added by
clicking on the Add Line button. Select the stock item and enter the quantity received.
10. The purchase order line can be split into several lines by clicking on the Split Line button. This may
also be useful when recording batch codes for a stock item.
11. To clear un-receipted lines, click on the Clear button. This will remove all PO lines where the
receipted quantity RecQty is equal to zero.
12. Press Line Fulfilled button to complete an under receipt or over receipted line. This satisfies the
purchase order by adjusting the corrected quantity on the purchase order line to resolve the line as
fulfilled thereby completing the order automatically.
13. Click Save to save the receipt; the system will assign the next Receipt number. This process will
save your work and update the outstanding quantities on the purchase order.
14. Click the Auto Cost button to by-pass the Inwards Goods Costing function by updating stock at the
values displayed on the Inwards Goods Receipt window (that have come from the PO). This is
available for local suppliers only and enabled through a user profile setting.
15. Alternatively, use the Cost Now button to go directly into the Inwards Goods Costing function. This
button is hidden when user does not have the Inwards Goods Costing menu option.
Note: The options in steps 14 and 15 are selected from the button drop down if applicable.
Field definitions
The grid header fields are detailed in the table below:
Field
Description
Supplier
The Creditor from whom the goods are being received
Packing Slip/Ref
The Supplier’s packing slip or reference number.
Location
The Location (Warehouse) into which the stock will be posted.
Date
Date the goods were received. Defaults to today’s date.
No cartons
Number of packages received containing the goods.
Shipping ref
The shipping carriers reference - usually a consignment number
346
The Procurement Cycle
Receipt notes
Any notes pertinent to the Receipt
IWG Receipt Lines
PO No
Purchase Order Number as selected from top grid.
Stock Code
The Stock Code that pertains to the item for which the transaction is being
carried out
Description
The description of the Stock Code.
Ordered
The quantity ordered as per the PO.
O/S Qty
The outstanding quantity for this Stock Code in this Purchase Order. Takes
the ordered quantity of the Stock Item, less Receipts already saved. This is a
reference for user to check quantity received is acceptable.
Sup Price
The cost that applies to the stock item unit, as entered in the Purchase Order
line. The supply prices (Sup Price) can be amended here if necessary. This
will not alter the original Purchase Order price.
Discount
Allows any discount you may have received to be applied. This will not alter
the original Purchase Order price.
Rec Qty
The Quantity physically received. This always defaults to zero and requires
changing to reflect actual quantity of stock received.
Notes
•
Uncosted receipts may be reviewed and edited. The stock ledger is not updated until the costing
process is performed.
•
Expiry Date, Batch number and Serial numbers can be entered if these options are being used.
•
If a purchase order is partially receipted, the remainder can form one or more further receipts.
•
Shipments can be enabled through a Company setup profile option. Receipts can be part of a
shipment (e.g. a container). One shipment, containing many receipts from different suppliers can
then be costed together.
•
Inwards goods receipts now show a count of receipted lines in the bottom panel of window.
•
A new user profile “Prompt to print receipt labels” allow users to specify when to be prompted to
print Stock labels in Inwards goods. Options are Never, After Receipting and After Costing. Default
is Never.
347
MYOB EXO Business User Guide
Inwards Goods – Cost Goods
Transactions > Inwards Goods > Inwards Goods Costing
Inwards Goods Costing provides various options to add costs the incoming stock valuation, including
estimating apportionment by methods such as quantity and weight.
1. To find the required receipt, enter the Receipt no., Stock code or Purchase order no., and then click
Search. A list of receipts that meet the criteria will be returned. Select the receipt from the list to
display the costing grid.
Search by
Searches for / Requires
Receipt No
Searches for the Receipt number allocated to a Receipt when
saved.
Enter a specific Receipt number if known, or leave this field blank
and click Search to list all Receipts.
Stock Code
Use this search function to find all Receipts containing a Receipt line
for the requested stock code.
A stock code must be specified (i.e. searches on a blank field will be
unsuccessful)
Purchase Order No
Use this search function to find all Receipts containing lines from
the requested Purchase Order number.
A Purchase Order number must be specified (i.e. searches on a
blank field will be unsuccessful)
348
The Procurement Cycle
2. In the top panel, enter an on-cost Cost Code, for example; freight, handling charges or custom
charge. These costs will be apportioned to the stock items in the bottom grid and spread by
quantity, value, weight or cubic. You can use ? + TAB to display the cost code window. Cost codes
are established from the Setup menu of this window.
Note: The term “on-cost” refers to the additional costs of a given Shipment, over and above the
agreed purchase price of the goods. (Some companies may know these costs as “landing costs”.)
“On-cost” relates to the extra costs involved in getting the goods from the supplier to the
warehouse, where this cost is not included in the unit cost of the goods. Some examples of “oncosts” are: sea freight, airfreight, insurance, customs clearance costs, duty, freight to the
warehouse.
3. The bottom grid shows the items from the Stock Receipt. Values in grey cannot be changed, but
Supplier Unit Price (in supplier’s currency), the exchange rate, duty and specific fixed costs per unit
can be modified.
4. The exchange rate displayed comes from the purchase order. Click the Exchange Rate button to
refresh the exchange rate on every line with the current exchange rate.
5. If the duty percent has been recorded on the stock item, the Use stk duty % option will allow the
stock item’s Duty amount to be calculated automatically.
6. Once all costs have been entered, click Calculate to automatically calculate the Landed Cost. The
landed cost may be manually overridden if necessary.
7. Click the Process button to complete the process. This will update the stock ledger, increasing the
stock-on-hand quantity, and creating stock transactions to represent the receipt. Alternatively, the
costing information can be saved to be retrieved later, changed, and then processed.
Notes
The prompt to create a Creditors Invoice is suppressed if Creditors invoice does not appear on the user’s
menu.
Cost types are user definable, and standardise the name, description and cost spread type. Shipment
statuses, shipment methods, and costs are set up in the Setup menu on the Inwards Goods Costing
window.
If the perpetual stock method is being used, the new stock receipt transactions will give rise to GL
accounting entries the next time Utilities > Ledger Posting > Post Stock to GL (Perpetual) is run.
Dealing with Creditor Payments
After you have entered the invoice you can complete the payment entry at the same time (see page 326),
using the payment tab, or you can make a payment entry before you allocate the payment (see page 331).
You can also process payments using the Payment Processor (see page 477). When making a payment to
the Creditor, you need to make an entry of the payment on the Creditor’s account and then allocate that
payment to the appropriate invoices on that account.
You can check the current credit status of accounts through the Creditor Reports (see page 536).
349
MYOB EXO Business User Guide
Reallocating Payment against Creditor Accounts
Account > Creditors > {Double click an account} > (Transactions) > [Allocate Transactions]
If you allocate a payment incorrectly, you can reallocate it.
To reallocate a payment:
1. From the Creditor Account Details screen, click the Transactions tab.
2. In the Transactions page, click the Allocate Transactions button (
Allocation screen is displayed.
). The Creditor Transaction
3. In the View Criteria drop-down, select Include Current Transactions. (For old payments, select
Include All Transactions.)
4. Select the transaction you want to reallocate by checking the Sel checkbox.
5. Click the Auto button to automatically unallocate it. You can now reallocate the payment (see page
331).
Processing Payments
You can quickly process your payments using the Payment Processor. This Processor is a program that is
available in the EXO Finance add-on module. It enables you to process cheques or direct credit payments
for creditors singularly, or in a batch.
Cheque Payments
The Payment Processor prints the cheque, the remittance advice and allocates the payment against the
account in one complete process.
Direct Credit Payments
For direct credits, the Payment Processor creates a file that is loaded into your desk-banking program. The
file for your specific bank needs to be loaded in the set up. You can also email the remittance advice to the
supplier.
Manual Cheque Payment
The Payment Processor allows you to create a cheque for an invoice that does not require the creation of a
Creditor.
350
The Procurement Cycle
Tracking Taxable Creditor Payments
From July 1 2012, businesses in the building and construction industries that make payments to contractors
for building and construction services are required to report these payments to the Australian Tax Office
(ATO) on the “Taxable payments annual report” - this is an annual report providing details of taxable
payments for building and construction related activity.
MYOB EXO Business includes features that let you track construction industry taxable payments (CITP),
which will aid in completing this report. For more information on taxable payments, refer to the ATO
website.
Setting Up
To enable the features relating to taxable payments, tick the new Track Taxable Payments to suppliers for
building and construction related activity Company-level profile setting.
All Creditors whose payments you need to track should have an Australian Business Number (ABN)
recorded.
Tracking Creditors
When CITP features are enabled, a Track Taxable Payments option becomes available on the Details 2 tab
of the Creditor Account Details window (see page 110). When this option is ticked, all payments from the
Creditor will be tracked for reporting on the Taxable payments annual report.
Tracking Payments
When entering Creditor Payments, if the selected account has its Track Construction Payments option
enabled, a Taxable payment option becomes available on the Creditor Payment Entry window (see page
331). This option can be enabled or disabled to include or exclude payments from tracking on an individual
basis.
When editing a payment via the Edit Ref Fields right-click option, the Taxable payment option can be
edited.
Note: Access to the Edit Ref Fields option is controlled by the Permitted level of access to creditor
transaction editing profile setting.
351
MYOB EXO Business User Guide
Reporting on Taxable Payments
Taxable Payments can be reported on using the Taxable Payments Reporting Worksheet menu item. When
added to a menu in the EXO Business core module, this item opens a window where taxable payments for
Creditors can be reviewed and reported on:
Initially, the worksheet displays all Creditors whose Track Construction Payments option is enabled, and
the period selected is the current year. To specify a different year or a specific period/date range to include
in you report, select it using the Filter Criteria controls, then click Search. Double-clicking on a Creditor
opens the Creditor Account Details window (see page 106).
Ticking the Show Payments options shows all payments for the selected Creditor in the lower part of the
window. Payments that have been marked as taxable are displayed normally; payments that have been
marked as non-taxable are highlighted purple. You are not required to report on all payments to a tracked
creditor; for instance if the payments are for materials only (such as building supplies and materials) then
you can exclude these individual payments when you enter the payment or on this worksheet. Double-click
on a payment or select it and press SPACE to toggle its taxable status (doing so updates the totals in the
grid above automatically). You can also right-click on a payment to view the payment’s allocation details
and to edit it using the Edit Transaction Reference window (if the Edit Ref Fields option is available).
The Print dropdown contains options for printing two CITP reports:
•
•
Taxable Payments Return - this report displays, for each Creditor over the selected year or
period/date range, the information that needs to be entered on the Taxable payments annual
report.
Taxable Payments Details - this report display the details of all taxable payments for the selected
Creditor over the selected year or period/date range.
Ticking the Include payments to suppliers where an ABN wasn’t quoted checkbox sets the reports to
include payments where taxes were withheld or retained and paid to the ATO on the suppliers’ behalf. This
is dependent on the use of Withholding Tax on Creditor Payments setting, which is available in the
Essential > General Settings section of the EXO Business Configurator (see page 62). A Creditor may begin
the reporting year without an ABN, and then supply an ABN later when trading within the same tax year.
Handling Reconciliation
At this stage you need to reconcile all the creditor statements to the invoices in MYOB EXO Business. Check
that all invoices are entered and agree to the statement that all invoices to be paid are valid.
352
The Sales Cycle
Sales Cycle Overview
The MYOB EXO Business Sales Order model is generic and flexible, and can handle simple single-stage
processing of sales orders, through to multi-stage sales order processing.
We strongly recommend you work with your business partner to ensure sales order processing is set up in
the best way to support your business processes. This would include configuration of the numerous Sales
Order profile settings in the Configuration Assistant, and creating any extra fields you require to capture
additional information in your sales orders.
353
MYOB EXO Business User Guide
Quick Supply your Sales Orders
At its simplest, you can raise a sales order and then supply and invoice it in one step. When in the Sales
Order window, you can just click the Quick Supply icon, and choose the next step in the process, or just
click OK to process the order according to the default options already set up. You can accept deposits or
payments at the time of supply, and print the invoice for the customer there and then.
You can choose to process your sales orders primarily at the sales order level, but for any given sales order
line, you have considerable control over all release and supply of that line, price and discounting.
Control your Sales Order Release and Supply Process
As your business processing requirements scale up, typically more granular control is required in each
phase of the process, particularly when warehousing of inventory is involved, which usually means separate
picking and packing of orders in batches. There are a number of defined phases in EXO Business’s sales
order model, giving you the control of the batch through each phase of the sales order supply and release
process.
The basic steps in the Sales Order supply process are Process Order, Process Release for Picking, Process
supply/stock movements, and Process invoice.
Process
Description
Process Order
Commits the stock for the sales order.
Process Release for
Picking
Creates the picking list.
Process supply/stock
movements
Creates the packing slip, stock transactions are generated, and stock
moved out of stock on hand.
Process invoice
Creates the invoice. Becomes fully invoiced if all quantities supplied, or
remains partly processed. Debtor invoice lines created for all supplied
quantities.
When stock is short-supplied to you, or you have far more orders than you can fulfil, you can choose to
release some portion of the sales order quantity, and back order the rest, to ensure all your customers at
least receive some of the stock item.
For greater granularity in sales order processing, you can use the Tasks menu. Tasks are used to set the
selection criteria and processing actions, and include the processing of release, pick, supply and invoice
quantities. Tasks work at the sales order level. (Use the Distribution Advantage module to use customised
tasks at a sales order line level.) Generally speaking, only businesses with large or complex inventory
setups are likely to use the Tasks menu.
Serialised/Batch-tracked Stock Item Support, and Laybys
Sales Orders supports serialised and batch-tracked stock items (see page 202).
Layby sales (see page 383) are also supported, although the functionality was designed to work in
conjunction with the POS module.
Batch Processing
Batch sales order processing is used to group sales order together for processing; batch sales order line
processing is a separate module of EXO, and is used to group together individual sales order lines into a
batch for processing.
354
The Sales Cycle
The Distribution Advantage module gives you another level of batch processing functionality and
customisability, including on-demand purchase orders, batch sales order line processing, stock transfer
requests and sales order consolidation.
About Back Orders
Back Orders typically occur when a stock item is out of stock, so the order quantity is recorded as a Back
Order, to be supplied when you receive more quantity of the stock item. However, you may also want to
ration your available quantity of a stock item across a number of Sales Orders, to ensure each Sales Order
at least is partly supplied. In MYOB EXO Business, in addition to the status of Back Order, there is also the
status of Release. The Release quantity is the quantity of an undelivered stock item that remains
“allocated” to a Sales Order. The sum of the Release and Back Order quantities equal the Sales Order
quantity, i.e. the Back Order quantity is separate from the Release quantity. Adjust the Back Order quantity
to what you require, and the Release quantity is automatically adjusted.
To use a simple example, if you have a Sales Order of 10 of an item, but want to only supply 5 of the 10, to
ration out the shipment of the item you have just received, 5 will have a status of Back order, to be
supplied at a future date, and 5 will have a status of Release, to part-supply the Sales Order.
(If you have the MYOB EXO Business Configurator, you can turn this setting off by changing the Enforce
constraint of sales order quantity and release quantity Company-level profile setting.)
When you supply a Sales Order with insufficient stock to supply a line, the Stock Shortage window is
displayed, asking if you want to back order the shortfall quantity:
Note: The Check available stock for sales orders profile setting affects the checks that determine
when this window appears.
If you choose not to back order, the shortfall quantity will show as negative stock for the stock item, and
the Sales Order can be processed. This prompt is controlled by the Default response to backorder prompt
User-level profile setting in EXO Business Config. By default it is already activated, but if you set it to
“Never”, the Back Order prompt will not be displayed and no quantities will be placed on back order.
355
MYOB EXO Business User Guide
Consignment Sales Orders
The only difference with a consignment sales order is the use of the consignment location. Make sure you
invoice out of the same consignment location, so the stock will come out of that location.
Consignment orders require the following to be set up:
•
A consignment stock location. Make sure you only use one consignment location, as you can easily
end up with multiple consignment locations.
•
The profile setting Allow Consignment stock orders through sales orders profile to be enabled in
the MYOB EXO Business Configuration Assistant.
Other Related Sales Transactions
The following are other functions that are related to the Sales Cycle.
Discounts and Special Prices
Utilities > Debtor Utilities > Setup Pricing Policies
MYOB EXO Business supports extensive discount and special pricing structures, through the use of
advanced Pricing Policies that can impact individual items or entire stock or pricing groups. Quantity breaks
and specific “contract” or “fixed” pricing is also supported.
Note: See the “Pricing and Discount Policies” white paper for more detail on discounting, prompt
payment discounts, and pricing policies.
Credit Notes
Account > Debtors > Transactions > Right-click > Generate Credit
The issuing of credit transactions can be a controlled function. If enabled, an existing debtor invoice can be
reversed by right-clicking on an existing transaction and selecting Generate Credit. The Debtors Invoice
Entry window will be displayed with the original invoice available for editing, but with negative invoice
quantities and therefore a negative price.
Alternatively, a credit note can be generated directly from the main Debtors Invoice Entry window using a
negative quantity value. The invoice is then processed in the normal way.
Depositing Allocated Payments
Transactions > Debtors Receipts > Debtors Banking Batches
Debtors banking batches are used to batch payments that have already been entered for deposit into a
bank account.
Direct Debit
Direct Debits are supported as an add-on module to MYOB EXO Business, for business that are authorises
to perform regular deductions directly from debtor bank accounts
356
The Sales Cycle
Generating Sales Orders
Viewing Sales Orders
The Sales Order window has powerful functionality to support searching for sales orders, including
extensive filtering and use of sales order statuses. Sales Order history is displayed for the highlighted sales
order. You can also perform a number of additional functions relating to the sales order, including creating
or viewing the manifest for the order, processing the order using the Batch Sales order processing function,
copying a sales order, and drilling to the original sales order transaction. A number of printing options are
available.
Transactions > Sales Orders
1. Select the branch whose sales orders you want to search in the Branch field.
Note: The ability to create and view sales orders for other branches is controlled by the profile
setting Allow Sales Order Search view, creation for other branches in the Configuration Assistant.
2. Choose which order statuses you want to include or exclude from the search in the Order Status
list.
3. To use additional search filters in your search, tick the Apply extra filter options checkbox. The
search results are displayed in the grid below. The following table describes all the visible columns
in this grid. Click the Set Defaults button to save the default statuses of all search filters.
Field
Description
Order No
The Sales Order number.
Cust O/NO
The customer’s order number.
Order Date
The date the Sales Order was created.
Due Date
The date the Sales Order was due to the customer.
357
MYOB EXO Business User Guide
A/c
The account number of the customer.
Name
The account name.
Reference
Any additional reference number entered for the Sales Order.
Status
The status of the Sales Order. 0-Not Processed, 1-Partly Processed, 2Fully Processed, 3-Quote, 4-Standing Order, 5-Layby
Value ex GST
Value of the Sales Order, excluding GST.
Local value
This is the value of the Sales Order, converted to the local currency.
Has Unreleased
This field is ticked if there are any quantities on the Sales Order that
have not yet been released.
Has Back Orders
This field is ticked if there are any backorders in the Sales Order.
Has Unpicked
This field is ticked if there are any quantities on this Sales Order that
have not yet been picked.
Has Unsupplied
This field is ticked if there are any quantities on this Sales Order that
have not yet been supplied.
Has Uninvoiced
This field is ticked if there are any quantities on this Sales Order that
have not yet been invoiced.
Hold
This field is ticked if the Sales Order has been put on hold.
Phase
The phase of the sales order, for example ‘Invoiced’ or ‘Order’.
Finalised
‘Normal’ or ‘Forced’, meaning was the sales order finalised in the
normal way, or forced to fully processed.
4. Click the
button to review the history of the highlighted Sales Order line (see page 365). You
can also view a list of Debtor Transactions for the highlighted sales order line by clicking on the
button on the right side of the window above the Sales Order History grid.
358
The Sales Cycle
Creating Sales Orders
Transactions > Sales Orders
Create customer Sales Orders from the Transactions menu or directly from the Debtor Account > Orders
tab.
1. Click the New button to create a new Sales Order, or click the arrow to the right of the button to
create a new quote, layby or standing order. The type of Sales Order is indicated in the title bar
near the top of the window.
•
A Quotation is a Sales Order that doesn’t commit any stock until it is converted to an
invoice or standard Sales Order. No GL transaction is created until it is converted.
•
A Standing Order is a Sales Order which is not actioned until you process it in the Process
Standing Orders window, at which point each standing order is converted to an invoice. It is
used when the debtor wants exactly the same Sales Order to be supplied, often at regular
intervals. No GL transaction is created until it is converted.
•
A Layby Sales Order does commit the stock item quantity. Normally deposits are made on
laybys, and you can specify a default deposit percentage, and enforce it.
2. The Sales Order window opens:
359
MYOB EXO Business User Guide
Enter the Sales Order details using the following table.
Field
Description
Account
The account for which you are creating the Sales Order. You cannot
process a Sales Order for an account on stop credit; a warning will be
displayed.
Contact
If the Add debtor contact details to transactions profile setting is enabled,
a Contact can be selected for the Sales Order. Correspondence related to
the order will be sent to this Contact’s email address, rather than the
account’s email address.
Salesperson
Enter the salesperson you want to record as having made the sale. To
search for a salesperson, type ‘?’ in the field and tab.
Campaign
Wave
If the EXO Business CRM module is installed, Sales Orders can be
associated with a campaign wave to track sales against a marketing
campaign.
Opportunity
This field is available if the EXO Business CRM module is installed. If the
Sales Order was generated from an Opportunity, the Opportunity will be
entered here automatically; otherwise, one can be manually entered
(enter ? and press TAB to search for an Opportunity).
Delivery
Address
The default address of the debtor account. Click the Home icon in the
toolbar to select or create another delivery address for the account.
Order Date
The date the Sales Order is created.
Due Date
The expected time of arrival to the customer of the Sales Order.
Default Loc#
Choose the stock location from which you are supplying the stock. You can
specify location at the Sales Order line level by clicking on the Sales Order
Line Periscope button and selecting the required location in the Location
field.
On Hold
Putting a Sales Order On Hold changes the Sales Order status to Not
Processed. The quantity of the ordered stock item is still committed. The
status bar at the top of the Sales Order has a red background.
In the Sales Order search window, you can filter on Sales Orders which are
On Hold.
360
AUD/NZD
The currency of the transaction.
Reference
Any reference annotation you require on the Sales Order.
GST
Select whether the prices shown on the Sales Order are GST-inclusive or exclusive. Changing this setting affects the Sub Total, GST Total and Order
Total values at the bottom of the window.
The Sales Cycle
Consign loc
This field is displayed if the Allow Consignment stock orders through Sales
Orders profile setting has been enabled in EXO Business Config. To create a
consignment order (see page 355), make sure you select the Consignment
location here. This is the location from which the stock is supplied.
Branch
The branch of the Sales Order. If the profile setting Allow Sales Order
search, view & creation for other branches is enabled, you can specify any
branch in this field.
Extra Fields
Any Extra Fields (see page 24) created for the Sales Order header are
displayed in this section.
Cust o/n
Note: Extra Fields on the Sales Order header can be configured to update
their values (see page 27) whenever the Debtor account number on the
Sales Order is changed; similarly, Extra Fields on Sales Order lines can be
configure to update whenever the Stock code on the line changes.
If you have an Extra Field for the Customer Order Number set up, the
profile setting Validate debtor order numbers in is set to “On Entry” or
“On Save”, and the Debtor for which you are creating the Sales Order has
the Need Ord No checkbox ticked in the Debtor Account Details window,
then entering an order number for the Sales Order is compulsory. A check
is also made to ensure the order number hasn’t already been used.
3. Enter the stock item details for the Sales Order in the grid below, using the following table.
Field
Description
...
Click in this column to open the Sales Order Line Periscope (see page 373)
for the current line.
Stock Code
Enter the stock item code, or type ‘?’ and tab to select from a list. To add a
Bill of Material in Sales Order entry window, enter a full stop (.) then the Bill
code on the Sales Order line stock code column.
Description
The description of the stock item.
Qty
Enter the quantity of the stock item being ordered.
@Price
The price of the stock item.
Note: You can click the
button to check the prices of all lines against the
latest cost and selling prices from the Stock ledger.
Discount (%)
Enter any discount for the line. This column will not appear if you disabled
the profile setting Allow manual entry/override of discounts on debtor
invoice and sales order lines in EXO Business Config; this also applies to the
Discount field in the Sales Order Line Periscope (see page 373).
Total
The total for the line.
Analysis
Codes
Enter the analysis code you want to use for this Sales Order line.
Note: Sales Orders are limited to a maximum of 1000 lines.
361
MYOB EXO Business User Guide
4. To add a description of the Sales Order, click the Narrative button.
5. To add a one-off stock item, right-click in the grid and choose Create One-Off Stock Item.
6. Once you have entered information in the header part of the Sales Order, you can minimise the
Sales Order header by clicking on the Minimise/maximise button in the top right corner of the
window. You can also view the Sales Order line total excluding tax and the discounted unit price
excluding tax of a Sales Order line in the bottom panel of the window.
7. Click Save to save the Sales Order. The system will assign the next number, and prompt to print the
Sales Order.
8. To make deposits against Sales Orders, the profile setting Allow deposits in Sales Orders and
general ledger in the Configuration Assistant needs to be enabled. If enabled, when you save the
Sales Order, you are asked if you want to make a deposit against the Sales Order. You can also
specify the percentage required for a minimum deposit on any Sales Order, using the Minimum
Layby Deposit Percentage profile setting.
9. Click Yes, and the Payment/Receipt window (see page 400) is displayed in which you can enter the
payment details.
10. If you use dispatch methods, and the profile setting Prompt for dispatch information for debtor
invoices/Sales Orders is enabled, you will be prompted to select the dispatch method from the list
displayed.
The following table describes the toolbar functions at the top of the window:
Button
Description
Narrative
Add a narrative to the Sales Order.
All
Lines/Outstanding
For partly processed Sales Orders, this button filters the Sales Order lines to
view all, or view only outstanding, i.e. not processed, lines.
Quick Supply
Quick Supply (see page 372) all Sales Order lines in the Sales Order.
Supply
Supply (see page 369), or part-supply, the order.
Addresses
Add extra delivery addresses (see page 103) to the Sales Order.
362
The Sales Cycle
More Actions
Tax Summary
Display a summary of all tax rates that apply to the items on the Sales Order.
Account
View the Debtor Account Details window for the debtor account of the Sales
Order.
Check Prices
Check the prices on the Sales Order against the latest cost and selling prices
from the Stock ledger.
History
View the history of the Sales Order (see page 365).
Generate PO(s)
Generate one or more Purchase Orders based on the Sales Order (see page
319).
Review Stock
Availability
This options is available for unprocessed Sales Orders when back orders are
enabled. It opens a new window where stock levels for the items on the Sales
Order are displayed (see page 365).
Adding a Bill of Materials to a Sales Order
You can select Bills of Materials (see page 506) (BOMs) by entering a “.” (full stop) in the Stock Code
column and pressing ENTER. This opens a list of active BOMs for you to select from. After selecting a BOM,
you are prompted for the quantity that you require:
Note: Decimal quantities can be entered if the Quantities value at EXO Business Config > Essential >
General Settings > Decimal Places in Numeric Values is set to a value greater than zero.
When inserting a BOM, the system will draw in its default components. A BOM header displays in bold. Its
cost and sell price is calculated from the sum of its component lines, which have a shaded background. Any
change to these component lines will result in a change rolling up to the BOM header. The totals are
calculated on the sum of the component lines of BOMs together with normal non-component lines.
363
MYOB EXO Business User Guide
If the BOM is priced by total, then after inserting the BOM lines you will be asked to confirm the total price
for the BOM:
The top option obtains its price from the Bill of Materials setup screen. This price is editable at run time and
is apportioned across the kit lines (price rollup/rolldown). If the BOM has an output code pointing at a stock
item code, the system will test for the best price on that stock code and the result will be offered with the
bottom option. This price is not editable but may be selected if desired.
Copying Sales Orders
You can also create a new Sales Order by copying an existing order. To copy a Sales Order:
1. Select the order and click the Copy Order button (
select Copy Order. The following window opens:
). Alternatively, right-click on the order and
Note: You can specify a different order to copy by entering a different number into the Order no
field.
2. Enter the Debtor account to raise the new order for. This defaults to the account of the order being
copied.
3. Select a Status for the new order.
4. Select whether to copy header and/or line narratives to the new order.
5. Click OK. The new Sales Order opens.
6. Save the order and close.
364
The Sales Cycle
Reviewing Stock Availability
Where back orders are enabled, the More Actions > Review Stock Availability option is available for
unprocessed Sales Orders. Selecting this option checks for stock shortages on the Sales Order - if any are
detected, the Stock Availability window opens, displaying stock levels for the items on the Sales Order:
Note: For this window to appear, the Check available stock for sales orders profile setting must be
enabled, and the Default response to backorder prompt profile setting must be set to “Yes” or “No”
(not “Never”).
By default, only line items that have stock shortages are displayed - tick the Show all lines box to display
the details of all lines on the Sales Order.
The Back Order quantities for each stock item can be edited on this window. The Back Order dropdown
contains additional options for backordering stock items:
•
•
•
•
Backorder shortage quantities
Force backorder entire quantities for shortage lines
Force backorder entire quantities for all lines
Reset backorder quantities to zero
Note: If the Default response to backorder prompt profile setting is set to “Yes”, the Back Order
quantities will be set to the Shortage quantities by default.
365
MYOB EXO Business User Guide
Viewing the History of a Sales Order
The Sales Order History window can be viewed in two ways:
•
in a separate window, by clicking the History toolbar button on a partly processed Sales Order
•
in the bottom panel of the main Sales Orders search window (see page 367), by clicking the
button.
The following fields are available in the History pane:
Field
Description
Doc #
A system-generated ID number.
Activity
For example New Order, Order Qty.
Date-Time
The date and time of the activity.
Sales Person
The salesperson for the sales order line activity.
Staff #
The Staff # of the salesperson for the sales order line activity.
Branch
The branch where this sales order was created.
BSOLP Batch
If this sales order was processed as part of a batch, the batch number.
Link
Displays any documents that have been linked to the sales order, such as
PDF invoices or statements.
366
The Sales Cycle
In this window you can:
•
View each event in the Sales Order lifecycle, such as New Order, Invoice, Release, Delivery.
•
View any documents linked to the Sales Order (such as PDFs of the packing slip or invoice) in the
Links field.
•
View any Debtor transactions associated with the sales order, such as Invoice, Payment, Refund,
Credit. Click the
button on the right side of the window to display the Debtors Transactions
pane.
•
Drill to the original transaction or document for the line. For new order activity, double-clicking will
drill to the original Sales Order transaction; for Release activity, the packing slip is displayed.
•
Right-click on any line to view the Debtor account details window for the account or print the
history of this Sales Order.
Searching for Sales Orders
When you have a large list of sales orders, finding a specific sales order quickly can be a challenge. There
are a number of useful ways of searching for sales orders in MYOB EXO Business.
Transactions > Sales Orders > Sales Orders
The main Sales Order Search window is displayed:
•
Use the Search Key field to search on part of the account name, order number, customer order
number, or reference.
•
Select the branch you want to search on, or select “<All Branches>“.
•
Select the order status(es) you want to search on by ticking the relevant Order status checkboxes.
367
MYOB EXO Business User Guide
•
For further Search filter options, tick the Apply Extra Filter Options checkbox. The Sales Orders Extra Filter Options window is displayed. In this window you can choose to filter by order date
range, delivery date range, account group, the salesperson, an order number range, or enter
multiple order numbers separated by commas to retrieve multiple sales orders.
•
Click the Filter button in the toolbar at the top of the window to use the Sales Order Line Filter
window to further refine your search. This window is used to search sales order lines by stock item
and then by sales order status. You can also sort by any of the columns in this window.
Remember that you can also use visible columns functionality to view additional columns and sort by them,
to make searching easier. By default, a number of columns are hidden in the Sales Order Search window.
For example, you can make visible orders that are On Hold, and then sort by this column in the grid.
368
The Sales Cycle
Advanced
In addition to these search methods, you can also use the Custom Filter functionality, which you can use to
create custom SQL queries. The Custom Filter is accessible in several windows throughout MYOB EXO
Business. In the Sales Order Search window, right-click on the column headings of the grid and choose
Custom Filter > Set Filter. Note that this requires knowledge of SQL and familiarity with the table names
and field names in the MYOB EXO Business SQL database.
Supplying Sales Orders
Transactions > Sales Orders > [Select Order] > Supply
The Sales Order Supply window allows the supply on an order-by-order basis, with the maximum control.
The Sales Order Supply window is used to supply one sales order at a time, or part of a sales order. Using
the Supply window, the processing can be divided into three stages:
1. Release items for picking
2. Supply or create stock movements
3. Generate invoice
To process multiple sales order at once, use the Batch Sales Order Processing window (see page 376).
To process a complete sales order quickly, use the Sales Order Quick Supply window (see page 372).
1. To supply a Sales Order through the Supply window, open the Sales Order and click on the Supply
button. The Supply Details tab is displayed:
369
MYOB EXO Business User Guide
2. Refer to the following table to complete the fields in the header part of the Supply Details tab.
Field
Description
Invoice as Supplied
Will copy the Supply Quantity for each sales order line to the Invoice
Now quantity. If you want to supply now but invoice later, leave this
checkbox unticked, or simply override the invoice quantity for each
sales order line.
Check Stock Levels
To display a warning when insufficient stock to supply the sales order
line. Checks current stock level in the selected location.
Print Packing Slip
Prints a packing slip.
Print Label
Prints a packing slip label.
Generate Invoice
Generates the invoice for the selected sales order lines.
Print Invoice
Prints the invoice.
Enter Payment
To be prompted to enter a payment.
Force to Fully
Processed
Checking this option will mark the order as fully processed even
though not all lines have been supplied or invoiced.
Show All
Show all sales order lines including those that have already been
supplied.
Invoice Date
The date of the invoice. Must be in the current period.
Set Default
Save the current settings as your default settings.
3. Refer to the following table to complete the fields in the Sales Order Line part of the window.
370
Field
Description
Stock
Code/Description
Stock code and description of the stock item.
Ordered
The quantity of the stock item on the sales order line. Click on the Plus
symbol to view the Sales Order Supply window, where you can change
the Ordered quantity of the stock item.
Supplied
Any quantity of the stock item on the current sales order line that has
already been supplied.
Outstanding
Any quantity of the stock item on the current sales order line that has
yet to be supplied.
Released
Click on the Plus symbol to view the Sales Order Supply window, where
you can change the Released quantity of the stock item. Releasing less
than the supply quantity will put the difference on BackOrder.
The Sales Cycle
Back Order
Quantity of the stock item on this sales order line on back order.
Released quantity + Bk Order quantity = Outstanding quantity.
Invoiced
Any quantity of the stock item that has already been invoiced.
Uninvoiced
Any quantity of the stock item that has been supplied but not invoiced.
Pick Now
Quantity of the stock item you are picking now.
Supply Now
Quantity of the stock item you are supplying now.
Invoice Now
The quantity of the stock item you are invoicing now. Keep blank to
allow deliver now invoice later scenario.
SO Unit Price
The unit price.
Note: You can allow a price override here by disabling the Prevent
override of price in sales orders and debtor invoices profile setting in
the EXO Business Configurator.
Discount %
Any discount you want to give on the sales order line. Checks
maximum discount staff member can give.
Location
Location sales order line to be supplied from. Can supply single sales
order from multiple locations. Default stock location in Default stock
location for new invoice, sales order or purchase order profile setting
displayed here.
Batch Code
This field is only available if the Enable stock batch codes profile
setting is ticked.
4. Click Supply All if everything can be supplied.
5. Click the Invoice All button to generate an invoice for the supplied item.
6. Users then tick or un-tick check boxes based on their operation requirements.
7. Click on Set As Default to save the settings and to be used as the parameters for future supply.
8. Click on the Add icon to add additional line items to be supplied directly from the supply window,
such as shipping costs.
9. Click Process button to process the sales order and generates the required stock movements,
transactions and forms.
The following table describes the toolbar functions at the top of the window:
Button
Description
Release All
Releases all backorder quantities for the sales order.
Pick All
Sets the Pick Now quantities of all lines to the Outstanding amount. Only
available if the Enable sales order pick quantity profile setting is enabled.
Supply All
Sets the Supply Now quantities on all lines to equal the release quantity.
371
MYOB EXO Business User Guide
Invoice All
Invoices all un-invoiced quantities up to the maximum of the supplied quantity.
Sales Order
Narrative
Enter any descriptive narrative about the Sales Order.
Process
Gives you the option of breaking down the ‘process’ into distinct processes that
can be run individually, or collectively (by clicking the Process button). Clicking
the Process button also performs the tasks that are indicated by ticked boxes in
the workflow settings, such as Generate Invoice, Print Packing Slip.
Sales Order Quick Supply
Transactions > Sales Orders > [Choose order] > Quick Supply
Sales Order Quick Supply is used to supply a single, complete sales order, as opposed to the Supply
function, which you also can use to part-supply a sales order.
•
To process multiple complete sales orders, use the Batch Sales Order Processing function (see page
376).
•
To process multiple sales order lines, from multiple sales orders, use the Batch Sales Order Line
Processing function in the Distribution Advantage module.
Note: If you place goods on backorder, Quick Supply will supply and invoice only what is released. It
will not force any backorder quantities on sales order lines to become released.
To supply Sales Order through the Quick Supply window:
1. Open the Sales Order you want to supply.
2. Click the Quick Supply button. This will display the Quick Supply Order window.
372
The Sales Cycle
3. Choose the required processing options here, as required. Click the Details button to view more
options, such as entering the invoice date or payment details, if those options are enabled. Click
the Save as Default button to save the current processing options as the default settings for future
uses of this window.
4. Click OK.
Using the Sales Order Line Periscope
Using the Sales Order Line Periscope, you can change the following details on the sales order line on which
you clicked the ellipsis button.
373
MYOB EXO Business User Guide
Field
Description
Quantity
The quantity of the stock item being ordered on this sales order line.
Release
The quantity of the stock item allocated to the order but not yet supplied. Use
the Release quantity with the Backorder quantity to part-supply a sales order,
for example if you want to ration a limited supply of a stock item across
multiple sales orders.
Back order
The quantity of the stock item you want on backorder. Note that the Backorder
quantity plus the Release quantity should equal the Quantity. You may need to
exit and re-enter the window to refresh the window.
Correction
This is the correction quantity that represents an adjustment from the original
order quantity placed. Corrections could occur as keyed adjustments or can be
computer generated to account for oversupply, or for short supply determined
by forcing the order to fully processed when there is unsupplied quantity.
Due Date
The due date of the sales order.
Unit Price
You can override this price if the profile setting Allow override of price in sales
orders & debtor invoices in the Configuration Assistant is enabled.
GST Rate
GST percentage rate.
GST value
GST amount.
Location
The default stock location.
Discount %
Any discount given on the sales order line. This field will not be displayed if you
disabled the profile setting Allow manual entry/override of discounts on
debtor invoice and sales order lines in the EXO Business Config. This also
applies to the Discount column in the Sales Order window.
Click the Show Stock Item button to view the Stock Item Details window for the selected stock item.
Click the Price Formulation button to view any price rules for the stock item.
374
The Sales Cycle
Creating a Sales Order Manifest
Sales manifests are used to group together sales for delivery, for example by truck, train, or container. You
can manually select which Sales Orders you want to group together, for any date and carrier. You can also
load previous manifests.
Open the Manifest window by selecting Transactions > Sales Orders > Manifest Entry.
1. Click the New button. A list of Sales Orders is displayed.
2. Enter the Carrier being used for the delivery, and a description of the delivery. This might be
geographical, or describe the stock being freighted for example.
3. Choose if you want to select from UnSupplied or UnManifested sales orders. (Normally, sales
orders would be supplied before being manifested.)
4. Select the Sales Orders that you want to include in this manifest, by either:
o
double-clicking on a line, or
o
using the ENTER key.
Selecting a line will display the manifest number displayed in the manifest header of the window in
the Manifest column.
375
MYOB EXO Business User Guide
5. Click the Save button. You are prompted to print the Manifest. Click Yes. The Manifest is printed,
listing key sales order line details such as Order Qty, Supply Qty, Unit Weight, Unit Volume.
6. To view a previous sales order manifest, enter the manifest number in the Manifest field and then
click the Load button. You can add or remove sales orders from existing manifests.
Batch Sales Order Processing
Batch Sales Order Processing is used to group multiple entire orders together and process them at the
same time.
Note: See the Batch Sales Order Line Processing functionality of the Distribution Advantage module
for line-level order processing across all Sales Orders.
1. On the Sales Orders window (see page 357), select the Sales Orders you want to group together for
batch processing. Choose the branch and order statuses you want to filter on and click Search.
2. Select multiple Sales Orders to be supplied by holding down the CTRL key and clicking on the
required sales orders.
3. Click the Batch Sales Order Processing toolbar button (
) to begin the process.
4. Choose which processing options you require by ticking on the relevant checkbox.
376
The Sales Cycle
5. Click the Details button to reveal more options to control the supply.
6. Refer to the following table when choosing the Batch Sales Order Processing options.
Field
Description
Release all for
picking
Prints the picking slip for all released quantities in selected sales orders.
Confirm all picked
quantities
You can also choose to Process the batch to Released, and print the
picking slip.
Manually make any adjustments if actual picked quantity differs from the
picking slip quantity, then confirm the batch.
You can also choose to process the batch to Pick, and print the
Confirmation slip.
Supply all picked
Supplies all picked quantities on the sales order. Stock on hand levels are
now adjusted.
You can also choose to post the stock movement, and print the packing
slip.
Invoice all
supplied
Creates the debtor invoice line transactions.
You can also choose to post the invoices, and print the tax invoices.
7. Click Save as Default to retain the settings for the next time the batch process is used.
8. Click OK to process.
Notes
•
The Sales Order Line Filter function from the main sales order search window can be used to
determine which sales orders are to be supplied.
•
A Manifest utility can be used to create a Sales Order manifest (see page 374) or a bulk loading list
to consolidate orders for a particular shipment method or van route.
377
MYOB EXO Business User Guide
Custom Line Fields
A Custom Line Field (CLF) is an extra column in the grid (body) of Sales Orders and Debtor Invoices. Unlike
Extra Fields (see page 24), the Custom Line Field can perform calculations to manipulate the unit price of
the Sales Order/Debtor Invoice line automatically as the line is entered, ensuring that the line total is
always quantity * unit price - discount. (While it is possible to have a calculated Extra Field, the calculation
is only applied once the Sales Order is saved.)
Three types of Custom Line Field function are available:
•
Type 0 - No calculation is performed; instead, the Custom Line Field is populated with data from a
specified lookup field in the STOCK_ITEMS table.
•
Type 1 - Automatically recalculates unit price using the formula:
Unit price = CLF value * Unit price per kg / Quantity
Where the Unit price per kg is specified by the PRICEPERKG field of the STOCK_ITEMS table.
•
Type 2 - Automatically recalculates unit price using the formula:
Unit price = CLF value / Sell price per quantity
Where the Sell price per quantity is specified by the PRICEQTY field of the STOCK_ITEMS table.
Example
A business sells whole fish, where the price is determined by weight - fish are $2 per kg, i.e. the
PRICEPERKG field for the FISH stock item is set to $2.00. The Custom Line Field is set up to contain the
weight of the fish. The unit price is calculated using the type 1 calculation, by multiplying the weight by the
price per kg to determine the unit price.
A single fish weighing 2.5kg is sold - this will cost $5 (2.5kg @ $2 per kg). A value of 2.5 is entered into the
CLF column (which has been given the name “Weight”), and the Sales Order line is updated with a unit
price of $5 (2.5 * 2), ensuring that the line total is $5.00:
A single fish weighing 3kg is sold - this will cost $6 (3kg @ $2 per kg). A value of 3 is entered into the Weight
CLF column, and the Sales Order line is updated with a unit price of $6 (3 * 2), ensuring that the line total is
$6.00:
Four fish weighing a total of 6.5kg are sold - this will cost $13 (6.5kg @ $2 per kg). A value of 6.5 is entered
into the Weight CLF column, and the Sales Order line is updated with a unit price of $3.25 (6.5 * 2 / 4),
ensuring that the line total is $13.00:
378
The Sales Cycle
Setting Up Custom Line Functions
To set up EXO Business for Custom Line Fields:
1. Add fields to the EXO Business database to hold the CLF data.
2. Set up the Extra Fields that will be used by the CLF calculations.
3. Configure the CLF profile settings to activate and set up the CLF column.
Setting up the Database
A database field must be added to the DR_INVLINES and SALESORD_LINES tables to store the data that is
entered in the CLF field. Whatever name is chosen for this field, it must be the same in both tables.
This field can be added from SQL Server Management Studio, or by using the Add Field button when setting
up Extra Fields:
Note: While you can add the new field from the Extra Fields screen, it cannot be set up as a visible
Extra Field; if it is, errors will appear when you try to process a Sales Order or Debtor Invoice. After
clicking Add Field and setting up the new database field, click Cancel to exit without setting up an
Extra Field.
The Stock item fields that are used by the CLF calculations, PRICEPERKG and PRICEQTY, are added
automatically.
Note: Prior to EXO Business 8.4, the PRICEPERKG and PRICEQTY fields had to be added manually. As
the PRICEQTY field had to be set up as an Extra Field, it would be called X_PRICEQTY. In an upgrade
to EXO Business 8.4 or later, if an X_PRICEQTY field is detected in the STOCK_ITEMS table, it is
renamed to PRICEQTY. A warning will appear on the Database Update window if this happens.
Setting up Extra Fields
If you are using the type 1 or type 2 calculations, the PRICEPERKG or PRICEQTY field must be added to the
Stock screen as an Extra Field (see page 24), so that data can be entered into it.
To set up Extra Fields for Custom Line Fields:
1. Open EXO Business Config and go to the System > Extra Fields section.
2. Click New.
3. Select “STOCK_ITEMS” for the Table name.
4. For the Field name, select “PRICEPERKG” if you are using the type 1 calculation, or “PRICEQTY” if
you are using the type 2 calculation.
5. Set a descriptive Display name, e.g. “Price per kg”.
6. Enter a Position value to determine where the field will appear on the Extra Fields tab of the Stock
item window.
7. Click Save.
379
MYOB EXO Business User Guide
The Extra Field now appears on the Extra Fields tab of the Stock item window (see page 139), allowing this
information to be set for any stock item:
Setting up Profile Settings
The following Company-level profile settings are used to set up Custom Line Functions:
Enable custom line field
This setting controls whether or not CLF functionality is available. It is disabled by default.
Custom line field (CLF) calculation type
This setting specifies the calculation function that the Custom Line Fields will use. Enter 0 (no calculation), 1
(CLF field * Price per kg) or 2 (CLF field / Price quantity).
Note: In previous versions, a calculation type 3 was available. This calculation type is now redundant,
but the system still accepts a value of 3 here, to remain compatible with older versions.
Custom line field (CLF) column name
This setting specifies the name of the CLF column as it appears on the Sales Orders/Debtor Invoices screen.
Custom line field (CLF) database field name
This setting specifies the database field in the DR_INVLINES and SALESORD_LINES tables that the CLF data
will be stored in. This is the field that you created in the previous step.
Custom line field (CLF) data type
This setting specifies the type of data that the CLF will contain. Choose “Number” or “Text”.
Custom line field (CLF) number of decimal places
If the CLF contains numeric data, i.e. if the data type is set to “Number”, this setting specifies the number of
decimal places to be used.
Custom line field (CLF) stock item lookup field
This setting applies when the calculation type is set to “0”. It specifies the field from the STOCK_ITEMS
table that will be used to populate the CLF field.
Custom line field (CLF) passed to debtor invoice line
If this setting is enabled, the CLF value from the Sales Order is passed to the CLF field on the related Debtor
Invoice.
Custom line field (CLF) width
The setting specifies the width (in characters) of the CLF column on the Sales Orders/Debtor Invoices
screen.
380
The Sales Cycle
Example Configuration
In the previous example (see page 378), the CLF profile settings are set as follows:
Generating Standing Sales Orders
Transactions > Sales Orders > New > New Standing Order
Standing orders may also be referred to as Recurring Invoices. This option is available if the Extended Sales
Order Statuses profile option is enabled in the Profile Manager.
1. To enter a Standing order, from the sales order search window, click on the drop down arrow next
to the New button and choose New Standing Order.
2. The sales order window is displayed and user can now enter the debtor account details and the
order lines as per a conventional sales order.
3. Click Save and the system will assign the next sales order number.
Tip: Add Reference as an extra field to the sales order header to help identify which standing orders
are to be processed.
Note: A Standing Order is considered an outstanding order, and therefore commits stock. Processing
a standing order creates an invoice for the order which processes stock movements. The standing
order is retained as a commitment to represent the next repeat of the order and therefore still also
reserves the stock. For a repeatable list of stock items to use as needed on sales order entry, use
Order Template BOMs (see page 507).
381
MYOB EXO Business User Guide
Processing Standing Orders
Transactions > Sales orders > Process Standing Orders
The Process Standing Order function can be added to the Transaction menu if standing orders are to be
used. The window gives a list of all standing orders in the system, and controls the invoice creation
function.
1. Enter the Invoice Date.
2. Select multiple standing orders by pressing the CTRL key and clicking on the selected standing
orders.
3. A Reference Code Filter can be used if needed.
4. Select the Print Invoices option if the invoices are to be printed out (as opposed to just creating the
transaction).
5. Press the Start button to commence processing of standing orders.
Note: The invoice printing will follow the order of records in the Exogrid, i.e. top to bottom, so it is
suggested that the Exogrid be sorted before you start printing.
Generating Layby Sales Orders
About Laybys
The ability to create laybys is primarily used in a retail environment, and in MYOB EXO Business laybys have
been designed to work in conjunction with using the MYOB EXO POS. However, layby functionality is still
included in MYOB EXO Finance, although it is not as seamless as using it with MYOB EXO POS.
Before you can use laybys, you need to set up a Layby lookup stock item, to which any deposits and
payments are posted until payment of the layby is complete, and the layby sales order is invoiced and
allocated.
For more information about how laybys work in the MYOB EXO POS, refer to the POS user guide.
382
The Sales Cycle
Layby Profile Settings
The following Company-level profile settings in the Configuration Assistant (see page 55) affect the
behaviour of deposits for laybys:
Allow deposits in sales orders and general ledger - Select to enable Deposits in sales orders and the
General Ledger.
Enable POS laybys - Enables or disables Layby features in POS. Layby’s utilises Sales Order functionality.
Requires that Deposits are enabled (core profile setting) and also that Extended Sales order statuses are
enabled in Sales Orders.
Minimum Layby Deposit Percentage - Set this profile to the default percentage of deposit for a layby.
When initially creating a layby this will automatically prime the To Pay total to be this percentage of the
total layby value. To enforce this as a minimum percentage also set profile Enforce Minimum Deposit.
Creating a Layby
1. Go to the Sales Order Entry window, click on the down arrow on the New button and select New
Layby.
2. Complete the details of the layby as you would for a regular Sales Order (see page 358).
3. Click the Save button when you have entered the sales order line items. The following prompt is
displayed.
383
MYOB EXO Business User Guide
4. Click Yes. The Sales Order grid of the Payment/Receipt Entry window is displayed, with the Deposit
checkbox ticked.
5. Complete the details of the layby deposit and then click Save. You are returned to the Sales Order
window.
6. Click the Print button to print the layby. The printed layby includes the deposit that has just been
made.
Receiving a Layby Payment
Note: The Layby features in MYOB EXO Business were originally designed to work with the MYOB
EXO POS module; using the layby feature without POS does not give the full layby functionality. For
example, when receiving layby payments, in the POS module, when a final payment is made you are
prompted to supply and process the sales order. Without the POS module, the final payment is
treated in the same way as any other payment on account, and therefore requires manual supply,
invoicing and allocation. If you are a frequent user of laybys, we strongly recommend you consider
implementing MYOB EXO POS.
After the initial layby has been created, you will be receiving incremental payments from the customer on
the layby. Receiving a layby payment is essentially the same as receiving any Debtor payment (see page
400), and is made using the Debtor Receipts window.
When the final payment is being made, the order needs to be supplied, invoiced and allocated.
384
The Sales Cycle
Follow these steps to supply a layby.
Transactions > Debtors Receipts > Debtor Receipt
1. Enter the debtor account number in the Account field, and then go to the Sales Orders tab.
2. Tick the checkbox of the layby the customer is paying off. You can select multiple laybys for this
payment.
3. Once you have selected the required layby, put the cursor in the Amount field and press the
Spacebar. The amount to pay for the selected lines is displayed in the Amount field.
4. Enter the payment details and then click Save. As mentioned above, without the POS module, no
change is made to the LAYBY status of the sales order.
5. Once the payment is made, go to the Sales Order window and highlight the sales order in the grid.
Click on the Batch Sales order processing button in the toolbar, and tick the relevant options to
supply and invoice the sales order (depending on how your company has configured the sales order
process). Click the Details button to view the additional options in the Batch Sales order processing
window here. Note that the payment details won’t appear on the invoice you print out for the
customer, as the payment has not yet been allocated to the invoice - this feature is available in the
POS module.
6. Once you have created the invoice, you can now allocate the payment to it. Return to Debtors
window for the debtor, highlight the invoice in the Transactions tab and click the Allocate button.
Allocate the payments made on the layby to the invoice. The status of the invoice and allocated
payments is updated to ‘Allocated’.
385
MYOB EXO Business User Guide
Generating Debtor Invoices
Transactions > Debtors Invoice
You can create a Debtor Invoice either directly from the Invoice Entry window or as part of the Sales Order
supply process (see page 369). The Debtor Invoice Entry window allows stock to be sold and invoice to be
created directly, without the need for a sales order.
1. Click New to create a new Debtor Invoice.
2. Enter the debtor account number in the Account field, or type ‘?’ and tab to search for the required
account.
3. Enter the basic details of the invoice:
Field
Description
Salesperson
Select the staff member you want to record as having made the sale.
GST Included
Tick to make the invoice GST inclusive. You can override this at an invoice
line level by clicking on the options ellipsis icon for the invoice line and
changing the tax rate.
If you have EXO Business Config, you can disable this option, both at invoice
and invoice line level, so that all debtor invoices follow the GST inclusive rule
that has been set for your company.
Invoice Date
386
The invoice date. Must be within the period specified by the Age field.
The Sales Cycle
Payment Due
The date payment of this invoice will be due, calculated using the credit
terms entered for the debtor.
Note: You can change this field’s label by configuring the Debtor invoice due
date field caption Company-level profile setting in EXO Business Config, if
you require specific wording more appropriate for your customers.
Reference
An additional reference number you can record for the invoice, such as the
name of the customer’s project or cost centre.
Note: You can change this field’s label by configuring the Debtor invoice
reference caption Company-level profile setting in EXO Business Config, if
you require specific wording more appropriate for your customers.
Customer
order no.
The customer order number.
Invoice no.
The invoice number will be automatically generated when you save the
invoice. Note that a profile setting in the Configuration Assistant can be set
to allow you to enter your own invoice number.
Location
Select from list of active locations in this field.
Age
If the Post to Past Periods User-level profile setting is enabled, you can select
the period that the invoice will be generated in; if it is disabled, this field is
read-only and always shows the current period.
(currency)
If you operate in multiple currencies, this is the currency specified for the
Debtor account, e.g. AUD, NZD. If you don’t operate in multiple currencies,
this field displays as “N/A” and cannot be edited.
For Debtor accounts that are in a foreign currency, you can enter “?” into this
field and press TAB to open a search window showing the exchange rates that
were used in the first transaction on or before the Invoice Date entered for
this invoice. This can be useful when entering invoices for prior periods, as it
shows what the historical exchange rates were in the prior period.
Branch
Select the branch of the transaction. Branches are cost centres in MYOB EXO
Business.
Campaign
Wave
If the EXO Business CRM module is installed, invoices can be associated with
a campaign wave to track sales against a marketing campaign.
Opportunity
This field is available if the EXO Business CRM module is installed. If the
invoice was generated from an Opportunity, the Opportunity will be entered
here automatically; otherwise, one can be manually entered (enter ? and
press TAB to search for an Opportunity).
387
MYOB EXO Business User Guide
4. Enter the details of stock items being sold in the invoice:
Field
Description
Stock Code
The Stock item code. Type ‘?’ in this field and press tab to select stock item
from a list.
Note: If the Enable GL code entry into the stock code field on a debtors
invoice profile setting is enabled, you can enter a GL Code into this field by
entering “@” and then the code (or enter “@” and press the ENTER key to
search for a GL code).
Description
The Description of the stock item, display only.
Qty
The quantity of the stock item you are selling.
@Price
The price of the stock item. Double-click on this field to view the Price
Formulation window, which lists any price policies which apply to this stock
item or debtor which have affected the price displayed in this field.
Disc (%)
The discount percentage on this line (see page 429). Enter the percentage
number of the discount. The discount amount is now removed from the
invoice line total
Note: If you have EXO Business Config, you can specify whether or not you
want to allow line discounts in a Debtor invoice.
Total
The total amount for the invoice line.
Options
The ellipsis button here displays the Invoice Line Periscope (see page 393),
which summarises transaction information for the line, and allows you to
override tax and discount information for the line.
5. To check the quantity in stock of the highlighted stock item, in each of your locations, right-click
anywhere in the window and choose Stock Level. For each location this lists physical stock on hand,
free stock, not for sale, committed, and on back order.
6. To check how the tax has been calculated on an invoice line, press Tax Rates to display a summary
of the tax rates used, which will also show the difference between automatically calculated rates
and overridden rates.
7. To add more descriptive comments to the invoice, click the Narrative button.
8. At any time when you’re creating an invoice, you can create a one-off stock item (see page 199). A
one-off stock item is used for one-off sales, where you don’t intend to keep the stock item in
inventory, or even sell that stock item again.
Tip: The invoice window can also be used to create invoices at a Point of Sale. The EXO Business
POS module provides an Enhanced Point of sale system with features and functions tailored for a
more advanced retail environment.
Note: If there are restrictions attached to a debtor or alerts defined, the system displays warning
messages, e.g. “Do not accept cheque”, or “This account on STOP CREDIT”
9. Click Save.
10. If your company ships goods, the Dispatch Method window is displayed. Select the method for
shipping the goods and click OK.
388
The Sales Cycle
This is controlled by the User-level profile setting Prompt for dispatch information for debtor
invoices & sales orders, which must be enabled to display this window.
11. You are prompted to print the invoice. Choose the required invoice template (see page 101) you
want to use for this debtor and click Yes.
Note: You can batch print multiple invoices from the Invoice Batch Printing window (see page 394).
Receive a Payment on a New Invoice
You can receive debtor payments in various ways:
•
in the Payments/Delivery tab of the Debtor Invoice Entry window,
•
in the Debtor Receipts window, and
•
in the Debtor Batch Receipt window.
The Payments/Delivery tab is the easiest and quickest method of receiving payment at the point of sale.
However, if you want to enter comprehensive payment information, or give discounts on the sale, we
recommend you receive payments using the Debtor Receipts window.
Note: If the Payments/Delivery tab does not appear in the Debtor Invoice window for a new invoice,
then if the profile ‘Allow Debtor Payments Entry’ in the Configuration Assistant needs to be enabled.
1. Select the Payments/Delivery tab.
389
MYOB EXO Business User Guide
2. Enter the payment type in the Payment Type field either by typing the name of the payment type,
or by typing ‘?’ in the field and selecting from the list that is displayed. You can use multiple lines to
pay with multiple payment types.
3. Press the spacebar in the Amount field to display the total invoice amount.
4. Enter the remaining payment details.
5. Click Save to save and print the invoice.
Enter Delivery Details for an Invoice
Note: If the Payments/Delivery tab does not appear in the Debtor Invoice window for a new invoice,
then if the profile ‘Allow Debtor Payments Entry’ in the Configuration Assistant needs to be enabled.
1. The delivery address for an account is displayed in the Delivery details of the frame. If the account
has multiple delivery addresses, click on the Select Address button. The Extra Delivery Addresses
window is displayed, where you can add extra delivery addresses (see page 103).
2. Select the required delivery address and Save.
Duplicating a Debtor Invoice
Account > Debtors > {choose one} > (Transactions)
Sometimes it may be quicker to duplicate an existing debtor invoice than to create it again from scratch. To
do this:
1. Open the required Debtor account.
2. Click on the Transactions tab (see page 129).
3. Highlight the invoice you want to duplicate. Either:
•
highlight the required period and then scroll to the required invoice, or
•
click on the Invoice Search button (
) and locate the required invoice.
4. Right-click on the invoice and select Duplicate Invoice. A duplicate of the original invoice is
displayed in the Invoice Entry window, but with updated information such as salesperson and
dates.
5. Edit the duplicated invoice as required and save.
Editing a Debtor Invoice
You can only edit an existing invoice if the invoice was generated in the current period, and the invoice is
unallocated. Any changes are posted to the relevant General Ledgers.
Note: The ability to edit a debtor invoice is enabled by a User-level profile setting called Permitted
level of access to debtor transaction editing. If this is not enabled, you will not be able to edit a
debtor invoice.
If the invoice was generated in a non-current period, that has been locked, or the invoice is allocated, or
partially allocated, you can only edit the reference fields of the invoice (see page 391), such as the order
number, or add a narrative.
Accounts > Debtors
1. Click on the Transactions tab for the required debtor account.
2. Right-click on the required debtor invoice and select Edit Invoice. The Edit Invoice [inv number]
window is displayed.
3. Edit the invoice as required.
390
The Sales Cycle
4. Click Save.
5. A confirmation dialog is displayed. Click Yes. You are then prompted to print the invoice.
Editing the Reference Fields of a Debtor Invoice
If a Debtor invoice has already been allocated, or is dated in a prior period, you can no longer edit the
invoice, but you can edit the reference fields of the invoice.
Note: The Permitted level of access to debtor transaction editing User-level profile setting must be
set to “Full invoice editing allowed” or “Invoice header fields editing allowed” for user to be able to
edit Debtor invoice reference fields.
1. Click on the Transactions tab for the required Debtor account.
2. Right-click on the required Debtor invoice and select Edit Ref Fields. The Edit Transaction Reference
window is displayed.
3. Edit the fields using the following table:
Field
Description
Trans Date
The transaction date of the original invoice. Cannot be changed to a
locked period.
Payment Date
Payment due date.
Reference
Any reference number or text.
Cust Order no
Customer Order Number.
Amount
Amount of the invoice - display only, this cannot be changed.
Narrative
Any further narrative you want to add about the invoice or the changes
to it.
4. Click Save.
391
MYOB EXO Business User Guide
Allocating a Debtor Receipt to an Invoice
When you receive a payment in MYOB EXO Business, you need to then allocate the payment to the
relevant invoice(s).
You can either:
•
allocate a payment at the time you process the payment in the Debtor Receipts window (see page
400).
•
allocate a payment to an invoice after the payment has been made, via the Debtor Account
Transactions window.
•
allocate multiple payments, using the Debtor Receipt Batch Entry window.
The following procedure describes how to allocate a payment to an invoice after the payment has been
made.
Accounts > Debtors
1. Select the required account and then click on the Transactions tab.
2. Click on the Allocation button in the toolbar (
displayed.
). The Debtor Transactions Allocation window is
3. Select Only Unallocated Transactions in the View Criteria field.
4. Select the payment line you want to allocate by ticking the checkbox of the payment.
5. Select the invoice to which you want to allocate the payment:
•
To allocate to the oldest invoices first, click the To Oldest button. Any part-allocation will
be automatic.
•
If the payment is for a single invoice, select that invoice only.
•
If the payment is to be manually allocated to multiple invoices, select the required invoices.
If the allocation will result in a part-allocation of the ‘last’ invoice, use the Part Allocate (%)
button, and then select the invoices to which you want to allocate the payment, by ticking
the relevant checkboxes.
Note: You cannot save the allocation transaction until the allocation balance is zero; if you try and
save before the payment is fully allocated, a warning is displayed, and you are returned to the
Transactions window.
392
The Sales Cycle
Reprinting a Debtor Invoice
Account > Debtor
Follow these steps to reprint a debtor invoice:
1. Click on the Transactions tab.
2. Select the period of the invoice in the top grid of the window.
3. Right-click the required invoice in the bottom grid of the window and select Print Invoice. The Print
Invoice dialog is displayed:
4. Choose the required invoice template (see page 101), how many copies you want to reprint, then
click OK.
Note: The Print Invoice window only appears if more than one invoice template is in use in the
system. If only one template is available, it is selected automatically, and the invoice prints without
requesting any user input.
Using the Debtor Invoice Line Periscope
The Debtor Invoice Line Periscope summarises transaction line information for the highlighted line in
Debtor Invoice Entry window, and allows you to make changes to the transaction information and see how
it affects your margin on the sale before committing to a change.
To view the Debtor Invoice Line Periscope:
1. Highlight the required transaction line.
2. Click on the ellipsis icon in the Options column. The Invoice Line Periscope window is displayed.
393
MYOB EXO Business User Guide
3. Use the following table to edit these fields:
Field
Description
Quantity
Quantity of the stock item being invoiced.
Unit Price
Unit price of stock item.
Discount%
Any discount that has been applied, either manually, or via price policies.
Cost Price
Cost price of the stock item. Click the Stock Item Details button to view the
stock item information, including last, average and standard costs.
GST rate
The GST rate of the transaction line, which you can change.
GST value
The dollar amount of GST, from the GST rate above.
Margin
The profit margin on the invoice line. Display only.
4. To view the Stock Item Details window for the stock item, click the Show Stock Item button.
5. To view any price policies for the stock item, or debtor, click the Price Formulation button.
6. Click Save.
Batch Printing Debtor Invoices
To print multiple Debtor Invoices at once, select Debtors Reports > Debtor Invoice Batch Printing from the
Report menu. The Invoice Batch Printing window opens:
394
The Sales Cycle
Specify search criteria and click Load to show a list of invoices that match the criteria in the lower half of
the window. From here you can:
•
•
•
Click Print All to print all invoices in the list.
Click Print to print the currently selected invoice.
Click Mailshot to send invoices to their related Debtors using the mailshot functionality (see page
530).
M-Powered Invoices
MYOB M-Powered Invoices is an invoicing tool that lets you access a variety of customer-friendly payment
options. Using M-Powered Invoices, your debtors can pay you via BPAY®, credit card online or by phone, or
any Australia Post outlet. The M-Powered Invoices process works as follows:
1. MYOB EXO Business is set up to use M-Powered services.
2. M-Powered Invoices are generated and sent to Debtors.
3. Debtors make payments, which are processed by MYOB.
4. Customer Payments files are supplied by MYOB, so that payments can be imported into EXO
Business as Debtor Payments.
Note: The M-Powered Invoices service is only available in Australia.
Setting up M-Powered Invoices
M-Powered Invoices must be set up before the feature can be used in MYOB EXO Business.
It is highly recommended that you use the latest EXO Business Installer to set up program files. If you just
copy the executables manually, it is easy to miss out additional files that are necessary to connect to the MPowered services database. If you run the EXO Business Installer, these files will be copied to the right
location automatically.
Also, the registered company name in the EXO Business Configurator cannot contain any characters that
Windows would not allow for a filename, i.e. \ / : * ? ,” |
The reason for this is that the first time an M-Powered Services database is created from EXO Business, it
will create a .box file to hold the M-Powered database. This box file will have a name that matches the
Company Name recorded in the EXO Business Configurator at Company > Company Details.
If you need to change you company name, contact the MYOB licensing department for new EXO Business
registration codes and also contact the M-Powered Services team for the new licensing and user login
codes.
395
MYOB EXO Business User Guide
Activating M-Powered Options
Select Setup > M-Powered Details.
Note: If this menu option is not available, you may need to add it using the EXO Business
Configuration Assistant at Staff > Menus.
The MYOB M-Powered Services window appears:
If you do not have an M-Powered Payee Number, click the Sign Up button to open a web browser to the
MYOB M-Powered Services signup page.
If you have a Payee Number, click the Edit button to make the fields on this window editable.
Field
Description
Payee
Number
Enter the Payee Number you obtained when you signed up for MYOB M-Powered
Services.
Biller
Name/Code
Select the Biller Name or Biller Code to be used on M-Powered Invoices. This
appears in the “How to Pay” section of the invoice.
Maximum
Payment
This optional value applies to credit card transactions only, and is the maximum
payment amount per invoice.
Set up Debtors
For all Debtor accounts that you want to use M-Powered Invoices:
1. Open the Debtor account and select the Details 2 tab (see page 96).
2. Select “M-POWERED” for the Invoice Type property.
Alternatively, all Debtor accounts can be set to “M-POWERED” by enabling a profile setting (see below).
Set up Profiles
The following profile settings can be configured in the EXO Business Configuration Assistant (see page 55)
to customise M-Powered Invoices:
396
•
Enable MYOB M-Powered invoice as the default invoice type for all accounts (Company profile) If this option is ticked, all Debtor accounts have their Invoice Type set to “M-POWERED”.
•
Default payment type for import of M-Powered Invoice data (User profile) - Select the default
Payment Type for payments that are imported as Customer Payments (see page 397).
The Sales Cycle
Generating M-Powered Invoices
M-Powered Invoices are generated in the same way as standard Debtors Invoices (see page 386).
The invoices contain an extra “How To Pay” section, which gives the Debtor instructions for how to pay the
invoice.
Importing Customer Payments
You will receive two Customer Payments files by email, detailing all payments made by your Debtors, and
the total amount credited to your nominated bank account:
•
•
An M-Powered Payment File, with an extension of .MYC.
A Payment Advice file in PDF format. This file lists each payment received and the invoice it relates
to.
To import the payments into EXO Business as Debtor Payments:
1. Save the two Customer Payments files to a convenient location.
2. Open the Debtors Payment/Receipt Batch Entry window (see page 403).
3. Click the M-Powered button at the top of the window.
4. Browse to the location of the .MYC file that you want to import. Select it and click OK.
5. All valid transactions are automatically imported and appear on the Debtors Payment/Receipt
Batch Entry window.
Note: If any invoice numbers in the .MYC file are not found by the import function, a window
detailing the unsuccessful imports appears. Click the Print button to produce a hard copy for your
records, and then click the Close button to continue with the accepted transactions. If you want to
reject the entire import, then click the Cancel button on the main window’s toolbar.
6. Change the General Ledger code of the Bank Account if you need to. This will have defaulted to the
GL code specified in the Payment Group that the “M-POWERED” Payment Type belongs to.
Note: Payment Groups and Payment Types are set up in the EXO Business Configuration Assistant.
7. Check the Post to GL box if you want to post the transactions to the General Ledger when you save
this batch, or leave it clear to post the transactions to the Debtors Ledger only now, and defer the
posting to GL.
8. Check the Auto Allocate box to automatically allocate payments which match by value. Payments
which do not match by value will invoke the Allocation window.
9. Click the Save button to save the batch.
397
MYOB EXO Business User Guide
Note: As an alternative to importing payments from the .MYC file, you can enter them manually by
clicking the New button and entering the information from the Payment Advice file. This method is
intended for backup or troubleshooting purposes.
Printing Debtor Statements
Reports > Debtors Reports > Debtor Statements
The Statements window is used to print statements for a single Debtor or all Debtors, for the current period
or the last period. Not only is there a summary line for each Debtor, giving totals for the current month and
past 3 months, and balance, but also a detailed list of each transaction that makes up those balances. You
can drill to view any Debtor Invoice.
1. Choose the Statement date. This the date the statements will be dated.
2. Choose whether you want to print a statement/statements for the current period (This Period) or
the Last Period.
3. If you require more criteria to filter the Debtors for whom you want to print statements, click the
Show advance search options icon
in the top right corner of the window.
398
The Sales Cycle
4. Complete the Advanced Search fields using the following table:
Field
Description
Account Selection: From
and To Accounts
The From and To accounts of the account range you want to filter
on. Use the same account number in both fields to select the
statement of a single Debtor.
Balances: From and To
The From and To account balances of the balance range you want
to filter on. For example, you might decide it’s not worth the
postage to send out statements with a balance of less than $5.
Include Accounts with:
Zero Balances
Choose to include accounts with zero balances.
Include Accounts with:
Credit Balances
Choose to include accounts with credit balances.
Include Accounts with:
Inactive Status
Choose to include accounts whose Active flag is unticked.
Include Accounts with:
Current Activity
regardless of account
balance
Choose to include accounts with any activity in the current
period, regardless of their account balance.
Age Balance
You can generate statements for those Debtor accounts with an
outstanding balance of a particular age, e.g. print statements for
accounts with outstanding balances for 2 months.
Account Group
Choose to include accounts of a specific Account Group.
Custom Filter SQL
Advanced feature: You can use a SQL query statement to filter
the accounts, using any of the fields in the DR_ACCS table. Select
whether to Append the SQL query to the default filter using an
AND operation or Replace the default filter.
Note: When selecting the Replace option, your custom filter must
be preceded with an AND or OR operation.
5. Click the Search button at any stage to refresh the list with your search criteria. If you are printing
statements for multiple Debtors, filter the required Debtor accounts so that the Print All button will
print only the statements you want to print.
6. Double-click a Debtor account line in the top grid of the window to list the transactions of that
Debtor that make up their account balance for the selected search criteria.
7. Double-click a Debtor Invoice line in the bottom grid to view the printed invoice.
8. If you have selected multiple Debtors, click the Print All button; if you are printing a single
statement, click the Print One button. To bulk send statements by print and/or email (see page
530), click Mailshot.
399
MYOB EXO Business User Guide
Receiving Debtor Payments
Transactions > Debtors Receipts > Debtor Receipt
When a debtor makes a payment, you need to allocate that payment to the appropriate invoices on the
account. You also need to ensure that the credit control matches the payment made to the group of
invoices.
If you are receiving payment at the time of generating the invoice, you will probably enter the payment in
the Payments/Delivery tab of the Debtor Invoice window, in which you can record basic payment details.
You can either allocate the payment to the appropriate invoice(s) at the time the payment is received, or at
a later date. You can unallocate payments, and reallocate them.
Note: If this is a branch account (and you don’t have EXO Business Config), the invoice transaction
you are receiving a payment against will be displayed in the branch account transaction grid, but the
New Payment button will be inactive; you can only receive a payment from the head office account.
Click the Show Head Office button to receive the payment. If you do have EXO Business Config, you
can choose to manually send transactions to Head Office, and so are able to receipt payments in the
branch account before transferring to Head Office.
Debtor’s payments or receipts can be recorded in various ways: via the Payments tab of the Debtors Invoice
Entry (see page 386), the Debtors Receipt window, or the Debtors Receipt Batch Entry window.
1. Go to the Transactions menu and choose Debtors Receipts > Debtor Receipt. The Payment/Receipt
Entry window is displayed:
2. Enter the debtor account making the payment by entering the name (or number) directly or ?+Tab
in the account field to search for a debtor.
3. Click the ellipsis button […] on the Aged Balances area to view Debtors Account Transaction
window. This is a useful to check the debtor’s transactions before entering the payment.
400
The Sales Cycle
4. Select the payment type in the Payment field.
5. Enter the payment amount:
•
If you enter the payment amount directly in this field, and don’t select any invoices in the
grid below against which to allocate the payment, the payment will remain unallocated.
You can allocate it later via the Debtor Account > Transactions window.
•
If you select the invoices you want to pay by ticking the checkbox of the required invoices,
and then press the SPACEBAR in the Amount field, the total amount of the selected
invoices is displayed in the Amount field, and the invoices and payment will be immediately
allocated on saving the receipt transaction.
•
If you enter an amount which only part-pays an invoice, then click the Part Allocate button
to allocate the payment to that invoice and leave an unallocated balance.
6. Enter the remaining payment details as necessary.
7. Choose the View Criteria for the grid below, for example ‘Only Unallocated Transactions’.
The grid header fields are detailed in the table below:
Column
Description
Sel
Tick the checkboxes of all lines you want to receipt the payment against.
Trans #
The unique transaction id.
SO #
The Sales Order number.
Date
The date of the transaction.
Transaction
The transaction type, e.g. invoice, payment.
Branch
The branch of the transaction line. If this is the head office account, all
branch transactions are listed; if you have MYOB EXO Configurator, and
this is a branch account, you can only receipt a payment against your
branch.
Inv No
The invoice number.
Ref 1
Internally generated explanatory reference text.
Ref 2
Internally generated explanatory reference text.
Due Date
The due date of the transaction, based on the credit terms of the debtor.
Amount
The transaction amount.
NZD / AUD
New Zealand or Australian Dollar - this shows the defined exchange rate.
To Allocate
When you tick the Sel checkbox for the transaction line, this becomes
zero. If this is a part-payment of the line, the amount still to be allocated
is displayed in this field.
Al
‘1’ indicates the transaction line has been allocated, ‘0’ that it has not yet
been allocated.
401
MYOB EXO Business User Guide
?
Right-click on the transaction line and choose Toggle Query Status to put
a question mark on the transaction, to reflect that the transaction is in
question. This can then be reported on.
PP Disc
Tick this checkbox to give a prompt payment discount for payment of this
invoice. This uses the Prompt Payment Discount percentage information
of the Debtor (see page 439).
PP Disc Amount
The prompt payment discount amount, based on the previous
percentage.
Receipt Amt
The total payment receipt amount for the line.
TaxTotal
The tax total on the transaction line.
8. If the payment is a deposit, tick the Deposit checkbox. The Sales Order tab is displayed. Highlight
the required sales order for which the payment is a deposit (see page 403) and click Save.
9. If you are allocating the payment to one or more invoices, select the required invoices by ticking
the relevant checkboxes in the Sel column.
10. Click in the Amount field and press the SPACEBAR again. The total to pay of the selected invoices is
displayed in the Amount field.
11. Click Save. The Allocations Grid is docked into this window; saving both the receipt and allocation
to invoice info simultaneously. This feature helps with the detection of errors before anything is
saved.
Prompt Payment Discount
You can calculate and apply prompt payment discounts at the invoice level (see page 404).
Each invoice has a checkbox that can be ticked to indicate that prompt payment should be calculated.
When ticked, the PP Disc Amnt column will automatically be calculated at the discount rate established on
the Debtor account (see page 440). The line is also automatically flagged as allocated when this is done. The
receipt amount column shows net of discount.
De-selecting the invoice, so that it is unallocated, will also clear the discount as the discount cannot be
applied if the invoice is not being allocated. Clicking the discount checkbox by itself will cancel the discount
calculation but leave the row allocated.
Use the spacebar on an invoice to select or de-select prompt payment discount. Use Enter on an invoice to
allocate or unallocated an invoice, use the up and down arrow keys to navigate between these invoices.
Alternatively the mouse can be used, but is less effective than the keyboard method.
The total discount is shown at the bottom of the window.
Small Balance Write-off
If you have allocations marked, and the Amount field is less than the total of these, when you press Save
the system will ask if you wish to discard the allocations and receipt the payment only (no allocations).
As when allocating later, the Adjustment button will create a debtor adjustment to balance the allocation
set. The difference here is that the computation is based on the pending receipt transaction. Continuing the
short paid example above, we can see that clicking the Adjustment button computes a pending adjustment
value and displays it in the window footer.
Note: The adjustment entry cannot exceed $5.00.
An adjustment entry can also be automatically generated from payment rounding.
402
The Sales Cycle
The Find Button
The find button replaces the Auto and To Oldest (see page 391) buttons when the allocation grid is docked
in the receipt window. It will attempt to find an entry in the allocation grid that matches the payment value
and set it to ‘allocated’.
Deposits
To change the receipt to a deposit (against Sales Order rather than invoice) either tick the Deposit
checkbox or click on the Sales Orders tab (which automatically ticks the checkbox). A list of Sales Orders is
displayed.
Note: You can only select one Sales Order for the deposit.
If you need to change the deposit back to receipt then just un-tick the Deposit checkbox.
Note: Clicking the Sales Orders tab when you have pending allocations in the Transactions tab does
not permit this action. You must click the Deposits checkbox instead. This will also clear those
allocations.
Receiving Multiple Debtor Payments
Transactions > Debtors Receipts > Debtors Receipt Batch Entry
The batch entry option allows you to receive multiple payments as a single batch. We recommend you use
this window to record all receipts per payment type per day to easily manage your bank reconciliation.
For MYOB EXO POS users, you can choose to align your banking batches with shifts by setting the Align
Banking Batches to Shifts profile setting in the MYOB EXO Business Configuration Assistant.
Note: By default, you can post both individual debtor receipts and debtor receipt batches to the
General Ledger. If you only want to allow debtor receipt batches to be posted to the General Ledger,
enable the Company-level profile setting Post Debtors Payments to GL as Batches.
1. Click New to create a new debtor receipt batch. A new banking batch number will be automatically
created.
2. Enter the receipt header information as follows:
Field
Description
Receipt Date
The date you want to record as the receipt date of this batch.
Note: You can filter the list of debtor receipts that is displayed using
the Configuration Assistant profile setting Default Banking Batch
Search Date Range. By default, it displays today’s receipts, but this
can be changed to the last 7 days, to All, or to custom range.
403
MYOB EXO Business User Guide
Payment Group
Payment group defines the GL account to use, whether it’s bankable
or not, and the corresponding bank fees to use.
Bank account
The GL account of your current bank account.
Batch no
The batch number of this Debtor Receipt batch. Automatically
generated.
Bank fee
Tick this checkbox to be able to enter bank fees for the batch in the
Post Bank Batch to GL window that is displayed when you save the
batch.
Branch
Branch number and description.
Age
The current period.
Initials
The initials of the user creating this debtor receipt batch.
Narrative
Any further text you want to add to annotate this batch.
(AUD/NZD)
The currency of the GL account.
Post to GL
Tick to post the batch to GL. When you save, this will display the Post
Bank Batch to GL window, which summarises the batch details
before posting.
Auto allocate
Ticking this checkbox will display the Allocation window, where you
can allocate the debtor payment to the relevant invoice(s).
Post Realised Foreign
Exchange Variances
This checkbox is available if multiple currencies are enabled. Ticking
this checkbox means that any realised foreign exchange gains or
losses that are a part of the batched receipts will be posted to the
General Ledger.
Note: The availability of this option and the Post to GL option is
controlled by the Allow posting to GL from debtor receipt screens
User-level profile setting.
3. Enter the debtor payment details. Right-click on a line to select the payment type for the line.
When you enter a debtor account number in the Debtor Account field, the aged balances of that
debtor are displayed at the bottom of the window.
4. To change the Stop Credit status of a debtor account in this window, right-click on the payment line
for the debtor account and choose Stop Credit Status to toggle the tick beside the menu option.
When the tick is cleared, the background colour of the line is returned to white.
5. Click Save to save the batch payment transactions. If you have ticked the Post to GL checkbox, the
Post Bank Batch to GL window is displayed, which summarises the batch details for review before
final posting, and is also used to enter any bank fees.
6. You are also prompted to print the payment batch report, which lists all debtor payments in the
batch.
404
The Sales Cycle
Giving a Prompt Payment Discount
You can give a prompt payment discount when receiving a Debtor payment in the Debtor Receipts window.
Note: that you can only apply a prompt payment discount to an invoice line.
A prompt payment discount may have a GST component.
1. Go to the Debtor Payments window, either via:
•
Clicking on the New Payment icon in the Transactions tab of the Debtor window, or
•
Going to Transactions > Debtor Receipts > Debtor Receipt. Select the required debtor
account.
2. Tick the PP DISC checkbox for the required invoice line or with the line highlighted, press the
SPACEBAR.
The calculated discount amount, based on the prompt payment discount percentage recorded for
the debtor, is displayed in the PP Disc column, and the adjusted invoice line total displayed in the
Receipt Amt column.
3. Return the cursor to the Amount field and press the SPACEBAR to display a revised payment total for
this debtor receipt, including the prompt payment discount you have just given.
4. Save the transaction.
You can review the debtor payment receipt transaction, including the prompt payment discount credit
transaction:
1. In the debtor account, click on the Transactions tab.
2. Highlight the current period in the top frame (period ‘0’).
3. Scroll through the transactions in this period until you see the payment transaction. The prompt
payment discount credit transaction has a Ref 1 field of ‘Prompt Payment’ and a Ref 2 field of
‘Discount’.
Allocating a Debtor Receipt to an Invoice
When you receive a payment in MYOB EXO Business, you need to then allocate the payment to the
relevant invoice(s).
You can either:
•
allocate a payment at the time you process the payment in the Debtor Receipts window (see page
400).
•
allocate a payment to an invoice after the payment has been made, via the Debtor Account
Transactions window.
•
allocate multiple payments, using the Debtor Receipt Batch Entry window.
The following procedure describes how to allocate a payment to an invoice after the payment has been
made.
405
MYOB EXO Business User Guide
Accounts > Debtors
1. Select the required account and then click on the Transactions tab.
2. Click on the Allocation button in the toolbar (
displayed.
). The Debtor Transactions Allocation window is
3. Select Only Unallocated Transactions in the View Criteria field.
4. Select the payment line you want to allocate by ticking the checkbox of the payment.
5. Select the invoice to which you want to allocate the payment:
•
To allocate to the oldest invoices first, click the To Oldest button. Any part-allocation will
be automatic.
•
If the payment is for a single invoice, select that invoice only.
•
If the payment is to be manually allocated to multiple invoices, select the required invoices.
If the allocation will result in a part-allocation of the ‘last’ invoice, use the Part Allocate (%)
button, and then select the invoices to which you want to allocate the payment, by ticking
the relevant checkboxes.
Note: You cannot save the allocation transaction until the allocation balance is zero; if you try and
save before the payment is fully allocated, a warning is displayed, and you are returned to the
Transactions window.
Reversing a Debtor Payment
To reverse a Debtor payment:
1. Open the required Debtor account.
2. Click on the Transactions tab and highlight the invoice you want to credit.
3. Right-click on the payment you want to reverse and select Reverse Payment.
4. You are asked to confirm the reversal. Click Yes.
The payment is reversed. A confirmation message appears.
406
The Sales Cycle
Debtors Banking Batches
About Debtors Banking Batches
Debtors banking batches are used to tag Debtor payments as belonging to a specific banking batch. Banking
batches provide the following benefits:
•
Production of banking documents
•
Consolidated postings to General Ledger.
•
Support of multiple bank accounts in General Ledger.
•
Automatic calculation of Banking fees.
•
Optional integration with Point of Sale shifts and EFTPOS settlements.
If you want to post Debtor receipt batches to the General Ledger at the same time as you receipt them, you
should use the Debtor Receipt Batch Entry window (see page 403), which also includes bank batch creation
and posting functionality.
Banking batches are created for a single payment group, and use the GL bank account number and bank fee
settings of the payment group.
Banking batches are also automatically created from other functions in MYOB EXO Business:
•
POS post shifts to banking
•
EFTPOS Settlement cutover
•
Integrated Cashbook Entry (when keying rows to the Debtors ledger)
•
Processing Automatic Payments (in Finance)
•
Processing Direct Debits (in Finance)
When performing an EFTPOS settlement cutover, separate banking batches are created within a Payment
Group so that EFTPOS transactions are banked separately from non-EFTPOS transactions. As settlement
automatically banks the takings it is logical to separate these from manually banked debtor payments. This
also aids bank reconciliation of consolidated General Ledger postings.
Note: Debtors transactions are also created in Integrated Cashbook (see page 300), when cashbook
entries are keyed for type ‘D’ (Debtors). The Debtor transactions are automatically allocated to a
banking batch when the batch is “saved” via the Process button. Direct Debits also create debtors
payment transactions which are allocated to banking batches. Automatic payments (Finance module)
also create debtors payments transactions which are allocated to banking batches.
407
MYOB EXO Business User Guide
Create a New Debtors Banking Batch
Transactions > Debtors Receipts > Debtors Banking Batches
In the Debtors Banking Batches window, click the New button. The following window is displayed:
Complete the following fields:
Field
Description
Payment Group
The payment group of the batch. You can create a batch for one payment
group only. If you only use the one ‘Default’ group, than all transactions are
included. If you use multiple payment groups, then create a batch for each
payment group as required.
Payment Type
Specify the payment type, or ‘Entire Group’ for all.
Bank account
The bank account of the payment group selected.
Branch
The branch for which you are creating the batch.
Age
The current period.
Bank Fee
Tick to include a bank fee for this banking batch. By default, this picks up the
bank fee setting of the payment group, but you can override the setting
here. The bank fee does not create a transaction until the batch is posted to
General Ledger and may be over written at that time.
Initials
The initials of the person creating the bank batch.
Narrative
Any further annotation for the banking batch as required.
AUD/NZD
The currency of the GL account.
408
The Sales Cycle
Locked
If a new banking batch, this should be unlocked; batches aren’t locked until
they are posted.
Ready To Post
Tick this box if the batch is ready to be posted to the GL.
Post Realised
Foreign Exchange
Variances
This checkbox is available if multiple currencies are enabled. Ticking this
checkbox means that any realised foreign exchange gains or losses that are
a part of the batched receipts will be posted to the General Ledger.
Note: The availability of this option is controlled by the Allow posting
to GL from debtor receipt screens User-level profile setting.
There are two frames in this window:
•
Available Debtors Transactions, which lists transactions that have not yet been assigned to a batch,
and
•
Batched Debtors Transactions, which have already been batched, for example if they have been
receipted via the Debtor Receipts Batch Entry window.
To include a transaction in the batch, double-click on an available transaction to move it to the Batched
Debtors Transactions frame.
To remove a transaction from the batch, double-click on the transaction in the Batched Debtors
Transactions frame, or click the Remove Payment button.
Posting Batches to the General Ledger
To post a batch, click the Post to GL button.
To post multiple batches, edit each batch as required, and use the Back button to return to the main
Debtors Banking Batch window each time, which saves any changes you have made to the batch.
1. Select the rows to post using the CTRL or SHIFT key, then click the Multi Post button to post the
selected batches.
2. The Post Bank Batch to GL window is displayed (if multiple batches being posted, for each batch in
turn).
409
MYOB EXO Business User Guide
Tick the Bank fee checkbox to enter bank fees for this banking batch:
3. Review and complete the fields in this window using the following table:
410
Field
Description
Batch Number
Displays the batch number being posted. When using Multi Post, a
separate dialogue is displayed for each batch.
Transaction Date
(Default = today). This is the date that will appear for the posted GL
transactions.
Age
(Default = current). Specifies the General Ledger period to which the
batch will be posted.
Initials
(Copied from main window). Key the initials of the person performing
the banking.
Post to bank
account
(Defaults to the bank account specified on the main window). This was
initialised from the payment group when the batch was created. It
cannot be changed in this dialog.
The Sales Cycle
Bank Fee
Check this if you require the system to generate GL postings for bank
fees. This will cause the Fee details panel to appear. The default for
this checkbox may be set in the payment group setup.
Post fee to account
The bank fee amount will be posted to this GL account. This field
defaults to the account established in the payment group. It may be
overwritten if required.
Fee calculation
This displays the method of fee calculation established in the payment
group.
Fee maximum
This is only displayed if a maximum value is set in the payment group.
Fee amount
This displays the calculated fee amount. If the calculation method in
None then initially this field will be zero. The fee amount may be over
written for all calculation methods.
GST Rate
(Default = zero rated). This is the GST rate applicable to the fee. The
list offers Creditor GST rates, as we are being charged the fee (i.e. do
not confuse with Debtors, as payments are from Debtors).
Note: If profile Post to GL from External database is active then banking batches may be posted to
a General Ledger in another database. In this case an additional Destination field appears in the top
panel. This defaults to the current database but may be used to select an alternative database to
receive the GL transactions.
4. Click OK. If you are posting multiple batches, this window is displayed for each batch in turn.
Review the transaction details and enter bank fees for each batch.
5. A confirmation dialog is displayed, and then a summary dialog. Click OK. The posting of the Banking
batch(es) is completed.
Multiple batches still post separate GL postings per batch (i.e. does not consolidate GL postings
across banking batches). This is especially useful for users running shifts. As each payment group
creates a separate banking batch as part of the end of day procedures, it is common to want to
filter banking batches by Terminal ID and post all outstanding in one go.
When the batch has been posted to the General Ledger, if you return to the Debtors Banking
Batches window and tick the Include Posted Batches checkbox, the posted batch is listed, with a ‘Y’
in the GL column indicating it has been posted, and a tick in the Locked column, indicating the
batch is now locked.
6. If you require a printed schedule of the batch to take to the bank, go to the File menu and choose
Save as Report and then Bank Batch (or POS Bank Batch). Selecting Bank Batch will print the
BankBatch.clf clarity report (usually A4); selecting POS Bank Batch will print the POSBankBatch.clf
clarity report (usually 4” slip).
o
To save the batch as a CSV file, go to the File menu and choose Save as CSV. This will create
a CSV file with the filename <batchno>.csv, for displaying in MS Excel.
o
To save the batch as a text file, go to the File menu and choose Save as Text. This will
create a text file with the filename <batchno>.txt, for displaying in Notepad.
411
MYOB EXO Business User Guide
View an Existing Debtors Banking Batch
Transactions > Debtors Receipts > Debtors Banking Batches
Search for the required Debtors Banking Batch in the Debtors Banking Batch window using the following
table:
Field
Description
Quick Ranges
Defaults to the range set in the Configuration Assistant, as below. Choose the
date range you require, or to specify a From and To date, choose Custom.
From date/To
date
The From and To Dates defaults to All from the profile setting in the
Configuration Assistant, and can be changed there to the same options as
available in the Quick Ranges field above.
Branch
The branch for which you are creating the banking batch.
Bank account
Use ? > Tab to search for the bank account number to use for this banking
batch.
Shift
For POS users, the shift number of the banking batch.
Terminal ID
For POS uses, the terminal ID of the batch.
Include Posted
Batches
Tick to include posted batches in your search.
Include Locked
Batches
Tick to include locked batches in your search.
Click the Search button. The list in the grid is refreshed, filtered by the search filters you have just entered.
Double-click on the debtors banking batch you require.
412
The Sales Cycle
Alternatively, if you know the batch number you require, click the Load button, enter the batch number
and click OK.
The details of the selected banking batch are displayed.
There are two frames in this window:
•
Available Debtors Transactions, which lists transactions that have not yet been assigned to a batch,
and
•
Batched Debtors Transactions, which have already been batched, for example if they have been
receipted via the Debtor Receipts Batch Entry window.
Note: You cannot edit the contents of a batch that has already been posted.
Click the Back button to return to the previous Debtors Banking Batches window. When you click the Back
button, the contents of the batch are saved.
If you require a printed schedule of the batch to take to the bank, go to the File menu and choose Save as
Report and then Bank Batch (or POS Bank Batch). Selecting Bank Batch will print the BankBatch.clf clarity
report (usually A4); selecting POS Bank Batch will print the POSBankBatch.clf clarity report (usually 4” slip).
To save the batch as a CSV file, go to the File menu and choose Save as CSV. This will create a CSV file with
the filename <batchno>.csv, for displaying in MS Excel.
To save the batch as a text file, go to the File menu and choose Save as Text. This will create a text file with
the filename <batchno>.txt, for displaying in Notepad.
413
MYOB EXO Business User Guide
Credit Notes
Creating a Credit Note for a Debtor
A credit note is used to reverse or correct an invoice. It reverses all of the operations that the invoice
performs.
1. Open the required Debtor account.
2. Click on the Transactions tab (see page 129) and highlight the invoice you want to credit.
3. Right-click on the transaction and select Generate Credit. The Invoice Entry window is displayed,
with the original quantities displayed as negative values.
4. If you have entered a payment for this invoice, click on the Payments/Delivery tab. Enter the same
payment, but the negative of the original invoice.
Note: The cost of physical stock is returned into stock at the value it was when it was sold. This cost
can be changed using the periscope on the Invoice Entry tab.
Debtor Adjustments
Making a Debtor Adjustment
Debtor Adjustments are typically used to write off or adjustment the outstanding balance on a debtor
account. They do not affect the source transactions that constitute that balance.
You can only make debtor adjustments on unallocated transactions.
There are several types of debtor adjustment you can make:
Adjustment Type
Description
Small Balance
This adjustment type is used for automatically created minor rounding
adjustments.
Write Off
Used to write off an amount of the outstanding balance.
414
The Sales Cycle
Correction
A correction.
Opening Balance
Used for a new account with an inherited opening balance.
Journal
A Journal transaction.
Retention
For retention payments, typically in Job Costing, where your client has withheld
payment, pending achievement of a milestone. This retention is held in your
Debtors Retention account and shown as an asset (or more properly a
‘contingent’ asset) on your balance sheet.
1. In the Debtor Transactions tab, highlight the required unallocated transaction for which you want
to make an adjustment.
2. Right-click and select Journal. The Debtors Adjustment Entry window is displayed.
3. Use the following table to enter details of the adjustment:
Fields
Description
Date
The Date of the adjustment you are creating.
Amount
Enter the amount of the adjustment you are creating, not the amount you
want the revised total to be.
Invoice No
The invoice number against which you are making this adjustment.
Type
The adjustment type.
Age
The age of the current period. Display only.
Period
The current period. Display only.
415
MYOB EXO Business User Guide
GST
The GST code to be used on this adjustment.
Details
A description of the adjustment you are creating.
GL Code
The GL adjustments account.
Analysis
Codes
Enter any Analysis Codes (see page 84).
4. Click OK.
You can review any adjustments made by viewing the Debtors Adjustment Listing report: Reports >
Debtors Reports > Debtors Adjustment Report.
Sales Territories and Budgets
About Sales Territories and Budgets
Sales budgets allow sales target levels to be established as a combination/intersection of:
•
Sales Staff
•
Primary Debtors Account Groups
•
Primary Stock Groups
A sales territory is created by the intersection of multiple stock and debtor groups, with only a single sales
staff member at the top level, for reporting. A territory is created for each relevant sales staff member.
You can create a sales budget by:
•
primary stock group and then by sales territory,
•
sales territory and then by primary stock group.
Separate budgets are set within each territory each spanning a financial year. You can also create and save
budgets for multiple future years.
You can create a budget by:
•
Apportioning a yearly total across months, or manually keying monthly figures
•
Setting budgets based on actual figures
•
Copying previous budgets
Creating a Sales Territory
A sales territory in MYOB EXO Business can be set up for each sales person on your staff. A sales territory is
created by a combination of Debtors account groups and stock groups. Within each sales territory, you can
only have a single sales person selling a stock group, i.e. you don’t have two sales reps selling the same
stock items to the same debtors.
Sales Territories are used to create sales budgets, so make sure the sales territories you create mirror how
you want to create your budgets.
When creating a Sales Territory, if the Setup Sales Territories function and the related function Setup Sales
Budgets are not already in one of your menus, then they need to be added using Menu Designer (see page
77).
416
The Sales Cycle
To Create a Sales Territory
1. Go to the Setup menu and choose Setup Sales Territories. The Setup Sales Territory window is
displayed.
2. Click New. Detail and Selection tabs now appear in the Setup Sales Territory window.
3. Enter a Report Code and territory Description, select the Staff member, and enter any Notes about
the territory. It might be useful to include the staff member’s name in the territory description for
easier reporting and identification.
417
MYOB EXO Business User Guide
4. Click on the Selection tab. The following window is displayed.
5. Use the arrows in the centre of the window to select the primary debtors account group(s) and
stock group(s) for this territory. Use the double arrows to select all to the right pane, if it’s quicker,
and then use the single arrow to de-select a group.
6. If you select an account group and stock group that has already been used in a sales territory, a
warning is displayed.
7. Click Save. The sales territory now appears in the list.
Creating a Sales Budget
Sales budgets are budgets allocated for stock items. Sales budgets provide the following benefits.
418
•
Budget allocation for each stock item by each sales territory.
•
Budget spread for each stock item, for each period, by each sales territory.
•
A combined analysis of overall budget allocation (budgets allocated by different territories for a
particular stock item) for a stock item by different sales territories.
•
Copy budgets and actual values for a stock item from one year to another year forward.
•
Activity details for a stock item.
The Sales Cycle
When creating a Sales Budget, if the Setup Sales Budgets function is not already in one of your menus, then
it needs to be added using the Menu Designer. See Create a Sales Territory (see page 416) for instructions
on adding the menu item.
A key feature in Sales Budget functionality is the ability to use formulas to spread a total annual budget
amount across each month on a percentage basis. See Set up a sales budget formula (see page 421).
Creating a Sales Budget for Sales Territory
The following steps are essentially the same whether you are creating a sales budget for a sales
territory/primary stock group, or for a primary stock group/ sales territory.
1. In the Setup Sales Budgets window, select Sales Territory/Primary Stock Group from the Budgets
for drop-down menu.
2. Select the year for which you want to create a new budget, and then click Search. A list of sales
territory/stock group combinations is displayed.
419
MYOB EXO Business User Guide
3. Double-click on the required sales territory/stock group combination. The Setup window for a Sales
Territory/Primary Stock Group is displayed.
4. Use the following table to choose which budget method you want to use.
420
Budget
method
Description
Action
Copy Actual
Values
Copies the actual sales total for the
selected sales territory/ primary stock
group, into the budget column.
Select which year’s sales total
you want to copy.
Copy Budgets
Copies an existing Sales Budget (see
page 421), and allows you to adjust it
by a percentage.
Enter the adjustment percentage
if required.
The Sales Cycle
Spread by
Actual Budget
The total budget amount for the year
for the sales territory/ primary stock
group, which you then want to split by
percentages you enter in each month
in this window.
Enter the budget total to which
you want to apply monthly
percentages.
Spread by
Formula
The total budget amount for the year
for the sales territory/ primary stock
group, which you want to spread by
your setup formula spread
percentages.
Enter the budget total to which
you want to apply your budget
formula.
5. Click Update, whenever you make any selection changes in the window, to update the window
with your selection.
6. Click Save.
Copying an Existing Sales Budget
Using this method you can copy (forward or backward) budgets into another year. For example, if you have
a budget spread of 100,000 in 2004, the user can copy this into the same stock group in 2005.
1. Double-click on any record from the budget type that you want to copy from.
2. Enter Actual budget and select formula (Spread by formula).
3. Click Spread and then Update. The budget is spread and updated in the two columns.
4. Click Save, which will take you back to the main window again.
5. Double-click on the record again and edit the details.
6. Now select Copy Budgets, and if you want to adjust the budget you are copying, enter the
adjustment percentage.
7. Click Update. Now you will see that all values are copied.
8. Go back to the Sales Budgets window and select records for year 2005 and check the budget for
the record for which you have copied the values. You must find the budget updated in the budget
field.
Setting up a Sales Budget Formula
The Setup formula is one of the key features of sales Budgets. Setup formula enables you to setup the
spread of sales by % for each period, totalling 100%, over the whole year.
You can set up formulas from the following windows:
•
The main “Sales Budget” window
•
Sales Budget window of:
o
The Primary Stock Group Records.
o
The Sales Territory/Primary Stock Group Records.
o
The Primary Stock Group/Sales Territory Records.
421
MYOB EXO Business User Guide
To set up a sales budget formula:
1. Click the Setup Formula button. The Setup Formula window is displayed.
2. Click the New button.
3. Enter a name and description for the new budget.
4. Enter the percentage of the total annual budget for each month in the Spread column. The Total
Spread % field keeps a running total of the percentages you enter. The total for the 12 months
must equal 100%.
5. Click Save. The budget formula is saved, and now appears in the main Setup formula window list.
Sales Analysis
The Sales Analysis Matrix
The MYOB EXO Business Sales Analysis Matrix module is a powerful sales analysis tool that allows you to
quickly create over 700 combinations of sales reports on the fly, with no technical report-writing skills
required.
The Sales Analysis Matrix uses a combination of preset report formats, common groupings and custom
filters to let you quickly and accurately analyse your sales. Sales staff can define their own requirements by
experimentation, and then share the results with colleagues by email, the web or spreadsheet.
The selection criteria you create are saved as report definitions, so you or your business partner can copy
and refine them later. You can also run these search criteria from the Clarity command line, allowing you to
schedule the reports you create to run at preset times, such as overnight.
422
The Sales Cycle
When you’ve created your favourite sales analysis reports, save them, then add them to your menu using
the Menu Designer so you can re-run them any time without having to re-configure them.
Opening the Sales Analysis Matrix
To open the Sales Analysis Matrix, log in to EXO Business, go to the Reports menu and choose Sales Reports
> Sales Analysis Designer. The Sales Analysis window appears:
To create a new Sales Analysis report:
1. Select a report type (see page 424).
2. Select groupings and options (see page 425).
3. Specify any selection criteria (see page 426).
4. Save or print.
Saving Sales Analysis Matrix Reports
You can save Sales Analysis Matrix reports for re-use later. When you save a Sales Analysis Matrix report, it
is saved with a .SAM file extension.
As with any Clarity report, using the Clarity Report Designer you can customise these Clarity reports and
save them to your Custom folder, as specified by the Directory location for custom Clarity forms (.CLR, .CLF
and .FMT) Computer-level profile setting.
The .SAM file only stores the parameters you specify in the Sales Analysis Matrix window; if you customise
the base Clarity form of a .SAM report you have created, your .SAM report will include those
customisations.
A Sales Analysis Report is transferable in the same way as a clarity report file. A .SAM file can be accessed
by multiple users from a server, or emailed to a branch.
423
MYOB EXO Business User Guide
Adding Sales Analysis Matrix Reports to a Menu
You can use the Drop Down Menu Designer (see page 77) to add your SAM reports to a menu. Drag the Run
Sales Analysis Report procedure onto the required menu. The Menu Item window appears:
Enter the name of your report in the Caption field, and the filename of the report in the Parameters field. If
you want to open the Sales Analysis Designer window each time you run the report from the menu, append
“/OPEN” to the report filename, as shown in the example above.
Sales Analysis Matrix Clarity Reports
There are a number of Clarity reports which form the basis of the Sales Analysis Reports. These CLR reports,
along with JPG thumbnail images and PDF samples, are stored in the Clarity masters folder.
The reports are:
424
•
SalesAnalysis5Weeks.clr
•
SalesAnalysisDateRange.clr
•
SalesAnalysisDateRangeCustom1.clr
•
SalesAnalysisDateRangeCustom2.clr
•
SalesAnalysisDateRangeNoGP.clr
•
SalesAnalysisDateRangeNoGPCustom1.clr
•
SalesAnalysisDateRangeNoGPCustom2.clr
•
SalesAnalysisDiscount.clr
•
SalesAnalysisGP.clr
•
SalesAnalysisGroupPercentages.clr
•
SalesAnalysisMonthly.clr
•
SalesAnalysisMonthlyPortrait.clr
•
SalesAnalysisNoGP.clr
The Sales Cycle
Sales Analysis Report Types
The following report types can be selected.
Period
The periods here are your GL periods, as set up in EXO Business Config at Business Essentials > Financial
Year.
Date Range
In addition to being able to specify your own date range, you can also choose one of the preset date
ranges.
Group Percent
The Group Percent reports give This Year, Last Year, Year to date, last year to date and variance
percentages for the selected groupings and criteria.
Discounts
The Discounts reports give discount percentage, dollar value and average dollar value, for the selected
report grouping and selection criteria.
12 Month Quantity
The 12 month Quantity reports give monthly quantity sold totals for the 12 months before the selected
Period date. Due to the number of columns in this report, you also have the option of printing the report in
landscape or portrait format.
12 Month Sales
The 12 month Sales reports give monthly sales totals for the 12 months before the selected Period date.
Due to the number of columns in this report, you also have the option of printing the report in landscape or
portrait format.
5 Weeks Quantity
The 5 Weeks Qty reports give weekly quantity sold totals for the 5 weeks before the selected Period date.
You can specify a start date for the report, or select one of the preset range dates as your starting date. For
example, choosing ‘Last Month’ as the Preset Range will report on the 5 weeks immediately following the
1st of the last month.
5 Weeks Sales
The 5 Weeks Sales reports give weekly sales totals for the 5 weeks before the selected Period date. You can
specify a start date for the report, or select one of the preset range dates as your starting date. For
example, choosing ‘Last Month’ as the Preset Range will report on the 5 weeks immediately following the
1st of the last month.
Sales Analysis Report Options
Groupings
Once you have chosen the type of report you want to run, you can filter the report by Main Group and
then Secondary Group. For example, reporting on Location and then Sales Rep will group sales by location
and for each location by sales rep. Reporting on Primary Group and then Location will give sales of the
given stock group for each location, and so on.
425
MYOB EXO Business User Guide
A lookup window is used for selecting groupings. Clicking the edit button at the end of each grouping field
opens a window where all groupings are available:
Note: The information on each group that is displayed on this window is stored in the
FACT_GLOSSARY table.
You can also choose to report on the Main Group and not use the Secondary Group by selecting the “No
Groupings” option for the Secondary Group field.
Other Options
The Other Options that are available for the report are determined by the Report Type you have chosen for
the report. Also, as you select options here, other options may become available or unavailable as
appropriate. For example, for a date range report, selecting Show Cost & Profit logically makes Show Sales
Only and Show Quantity Only options unavailable.
Selection Criteria
The Report Selection Criteria Filter gives you an even greater level of analysis in your SAM reports. These
criteria mimic common SQL statements, but let you build your filter from simple drop-down menus.
Using Selection Criteria, you can report on a single Debtor account, Stock Group, Debtor Account Group,
sales person, location or branch. Clicking the
button next to the Value property opens a search window
offering all relevant values for the selected field.
426
The Sales Cycle
You can use the following conditions to indicate the relationship between the field and the value:
Selection
Criteria
Description
=
Returns all records where the value of the selected field is equal to the value you
specify.
<>
Returns all records where the value of the selected field is not equal to the value
you specify.
<
Returns all records where the value of the selected field is less than the value you
specify.
<=
Returns all records where the value of the selected field is less than or equal to the
value you specify.
>
Returns all records where the value of the selected field is greater than the value
you specify.
=
Returns all records where the value of the selected field is greater than or equal to
the value you specify.
Like
Not Like
Returns all records where the value of the selected field is “like” the value you
enter. For example, Debtor Acc Like Jo would return a list including account names
like Johnson, Jones, and so on.
Between
Not Between
Returns all records where the value of the selected field is inside (Between) or
outside (Not Between) the specified To and From values.
In List
Not In List
Returns multiple records that match (In List) or don’t match (Not In List) a commaseparated list of values. For example, Debtor Account In list 1,2,3 returns Debtor
account numbers 1, 2 and 3.
Blank
Not Blank
Returns all records where the value of the selected field is either blank or not blank.
Note: The conditions are generic conditions and may not apply to all reports in the Sales Analysis
Designer.
427
Pricing and Discounting
Overview
There are comprehensive mechanisms in MYOB EXO Business for automatically determining appropriate
prices to be offered to customers for goods dependent on a number of preset pricing rules that make up
your pricing policies.
To
For Example
Use
Define a price value for a single
stock item
A single whiteboard marker.
One of the ten configured Sell
Prices (see page 442)
Define a price value for
multiple stock items
Whiteboard markers stocked
and sold in different colours
but the same price.
Stock Price Groups (see page
429)
Apply a discount percentage to
a product or list of products
Price Rules (see page 428)
Apply a discount percentage to
a product or list of products,
and share that with a customer
or multiple customers
Price Policy (see page 429)
Define a group of customers
for common pricing or
discounting
To apply pricing policies to all
branches of a company, or
apply price policies for
internet, trade, retail
customers.
Debtor Price Policy Groups (see
page 436)
Price Rules
A price rule (see page 449) is used to apply a discount or substitute price to an inventory item (see page
156) or group of inventory items. You can specify a minimum quantity of the inventory item(s) the
customer must purchase to qualify for the discount, and also a date range the discount is valid for.
Price rules must be maintained individually in the Discounts/Prices tab (see page 99) of the Debtor account
for which they were created. Price rules cannot be easily attached to a pricing policy at a later date. Price
rules are not shared across parent/child account relationships if they are created on the parent account.
A price rule can be made up by either:
•
A percentage above or below the list price, or
•
An absolute net price, i.e. a new price.
Note: Discounts have the advantage in that if the list price fluctuates, the selling price also fluctuates
proportionally. Net prices are often used to avoid inconveniently rounded net unit prices that can
result from discounting.
428
Pricing and Discounting
Price Policies
Price Policies (see page 435) are collections of price rules for Products (or groups of products) that can be
shared between customers (or whole groups of customers). Using price policies helps you to maintain
pricing rules with the least possible elemental changes. Each price policy has a name and notes.
Tip: A single customer can be attached to many price policies, but a well-rationalised discounting
model would avoid this. It might be useful to have one price policy called policy to which every
debtor price policy group (see below) belongs. This can be used to apply promotional items or to be
applied to or removed from to your entire customer base with a single entry rather than simply
changing the list price.
Invoice Line Discounts
Offering a discount on an invoice line item at the time of invoicing or order entry is the most common way
of offering a discount on a purchase. You can discount on the invoice line either as a result of a price rule,
or by manually applying a discount. The discount percentage shows as a separate column on the invoice
entry window, and the invoice line total is shown with the discount removed.
Discounting has its advantages over adjusting the unit price directly because:
•
It clearly distinguishes an amount that a customer pays from the perceived price
•
Discounting requires less maintenance as it adjusts proportionally when the base selling price is
changed
Note: MYOB EXO Business does not support discounts on the invoice total. This is because of the
difficulty in analysing profitability by invoice line. If you want to offer such a discount, we
recommend applying the discount to a line on the invoice.
Stock Price Groups
Stock Price Groups (see page 161) allow you to collect similar products together that may share common
pricing but are distinct products. Example whiteboard markers are stocked and sold in different colours but
are all the same price, any discount policies that refer to them refer to every colour in the range. Using
Stock price Groups you need only change the policies relating to the group and not every individual colour.
Stock Price Groups are set up in MYOB EXO Business Config at Admin > Stock > Stock Price Groups.
429
MYOB EXO Business User Guide
Changing Prices for All Items in a Stock Group
Utilities > Stock Utilities > Price Update Utility
You can change the price of all items in a stock group in the Price Update utility, which changes the price by
a multiplier of the price of another stock group, or latest cost, standard cost or supplier cost.
The following example sets the Internet price for the stock group “1. ENGINE” to be 1.2 times the trade
price. You can apply the price change for all items in this stock group supplied by a specific supplier. You
can also specify a range of stock groups.
1. Go to the Utilities menu and choose Stock Utilities and then Price Update Utility.
2. Specify the price name you want to update in the Set field, the price name you want to use for the
multiplier in the Equals field, and the multiplier in the Times field.
3. Select the From and To Stock Groups of the stock group range for which you want to change prices.
4. Specify how prices should be rounded in the Rounding Options section.
5. Select a specific supplier, or all suppliers, in the Supplier section.
6. Click the Update button.
430
Pricing and Discounting
Field Definitions
Field
Description
Set
The price name for which you want to set a new price, or ALL.
Equals
The price name you want to use in the calculation of the Set new price.
Times
The multiplier you want to apply to the ‘Equals’ price to determine the new ‘Set’
price.
From/To
Stock Group
The stock group range you want to apply the new price to. For example, if you want
to change the Internet price for all stock items in the Engine stock group.
Rounding
Specify how you want to prices of the stock items in the selection range to be
rounded: Round Up, Round Down or Round to Nearest. Enter a value in the edit
field to specify the amount that prices should be rounded to, e.g. 0.01 to round to
the nearest cent.
Setting Cost Methods and Sell Prices
Prices set for stock items vary depending on the outlet – retail, wholesale or trade. If the item is being sold
through a website there may be a different price for it. You may also choose to set special prices for some
customers and discounts for certain stock items. Each customer can have a default base price on which
discounts operate. These prices can be represented in any currency.
Cost Prices
431
MYOB EXO Business User Guide
Field definitions
The fields in this window are detailed in the table below:
Field
Description
Supplier Cost
The default supplier published cost price used for purchase orders.
This price is displayed in the main supplier’s currency.
Last
The current cost price for the stock item inclusive of landing charges.
Average
The weighted average cost. The cost includes or excludes GST based on your creditor
account setup. Including GST is not a usual option and is not recommended.
Standard
The manually adjusted cost price. This is the standard cost of this stock item.
Sell Prices
The sell prices that you see in the Sell Prices panel on the Details 1 tab of the Stock Item Details window
(see page 164) are those you set in EXO Business Config > Admin > Stock > Price Names.
Note: See the White Paper “Discount Policies” for more information on Discounts and Special Prices.
This White Paper is available on the MYOB EXO Business partner site (login required).
Entering a Price SQL
Stock prices can be calculated using a simple SQL statement, which gives you considerable flexibility in
defining your new price. Price SQL statements can be entered in the following situations:
•
•
When setting up Sell Prices in the EXO Business Configurator (see page 442).
When creating a price change or a scheduled price change (see page 446).
Use the information below to construct a simple SQL formula in the Price SQL field. (For advanced users,
you can use any valid SQL formula with any field present in the STOCK_ITEM table, including Extra Fields.)
Fieldnames
Commonly used fieldnames are:
•
SELLPRICE1 ... SELLPRICE10 - these ten fields correspond to the ten price names set up in EXO
Business Config at Admin > Stock > Price Names.
•
AVECOST
•
STDCOST
Variables
Additional useful variables, prefixed with an @ symbol, are available for use in calculations.
The following variables are available when configuring Sell Prices:
432
•
@EXCHRATE - the exchange rate used with respect to the currency selected for the price.
•
@TAXRATE - the tax rate entered for the Sales GST property on the Details 2 tab (see page 167).
Pricing and Discounting
Examples
Price Scenario
Price SQL
Calculate a price by factoring another price
SELPRICE2 * 1.3
Calculate foreign price from local cost
SELLPRICE2 * @EXCHRATE
Calculate GST inclusive price from GST exclusive cost
STDCOST * ((100+@TAXRATE)/100)
Calculate GST exclusive price from GST inclusive price
SELLPRICE2 * ((100-@TAXRATE)/100)
The following variables are available when creating price changes:
•
@NEWPRICE
•
@CURRENCY - the current exchange rate for the nominated currency
Examples
Price Scenario
Price SQL
Price should be equivalent to Average Cost Plus 30% Markup
AVECOST/0.70
Price should be equivalent to standard cost Plus 30 Margin
STDCOST*1.30
Price should be equivalent to Retail price (Sellprice2) less
10%
SELLPRICE2*0.9
Price Should be equivalent to Sellprice1 in this price name’s
Foreign Currency
SELLPRICE1/@CURRENCY
Price should be equivalent to Average cost + 33% rounded
down and then rounded back up to just under the next
dollar, e.g. $5.99.
FLOOR (AVECOST*1.33)+0.99
Maintaining Consistent Margins with Changes in Cost Price
In MYOB EXO Business, you can maintain your existing selling price margins, even though your cost prices
may fluctuate. Fixing your margins means your selling price will vary, so this presupposes that your
customers will accept the price changes without prior notification.
You can review the margins and prices of a stock item by:
•
using the Price Change window, which is displayed when an inwards goods receipt varies by more
than the margin specified for the stock group, or
•
using the Sell Price Formulation window (see page 443).
The operation of these features is dependent upon two User-level profile settings (see page 73):
•
Check supplier cost prices when purchase prices change - prompts to update the supplier cost
price when overriding prices when placing a purchase order (creating or editing a purchase order as
opposed to receipting stock).
•
Minimum percentage cost variance requiring price review - controls the triggering of the popup by
setting a minimum percentage variance in landed cost (local currency), above which the price
review popup window will appear.
433
MYOB EXO Business User Guide
When goods are receipted and costed, and the cost differs from the previous average cost, a window is
displayed for each stock item affected. You can then review and reset the selling price if required.
To reset the selling price for a price name, enter the new price in the New Val column. Enter the new selling
price to maintain the margin you require.
Advanced
If you have different staff responsible for costing and setting selling prices, you can add profitability
information on the costing sheet. The costing sheet could then be used by someone in Sales/Marketing to
review pricing and advise on required changes, as a separate process to inwards good costing.
•
The %Margin column presents gross margin, i.e.
(Sellprice-Cost Price / Sellprice)*100.
•
The %margin is a false figure Price Names that are in foreign currency because the currency
exchange is not taken into account here, however the proportional cost variation still applies
•
The costing sheet is controlled by the Clarity form IGCosting.CLF. The availability of this
functionality is governed by three User profile settings;
o
Stock Costs Hidden - User profile attempts to prevent users from seeing cost prices while
browsing the stock records.
o
Check Prices when Costs Change – Custom level User profile enables the display of the
price review pop up window if the cost price of the item has changed on a purchase order
or creditor invoices (using stock), prompting the operator to reset the sell prices in order to
maintain the same percent margin.
o
Cost change check threshold - Custom user profile sets the minimum percentage variance
in landed cost (local currency) required to activate price review popup window.
Setting up a Price Warning
Sometimes at the time of invoicing, the selling price might be changed in a way that takes it outside of the
expected margins for the stock item. This might be due to a data entry error, confusion over selling price, or
because the cost price has changed.
You can set a warning to appear at the time of invoicing either if the sale is below cost price, or if the
expected margins are exceeded. In EXO Business Config, set the Sales entry price exception warning level
User-level profile setting to one of:
434
•
Attempt to sell Below Cost Price, or
•
Attempt to sell Outside product group guidelines.
Pricing and Discounting
Price Policies
Setting up Price Policies
Price Policies are collections of price rules for Products (or groups of products) that can be shared between
customers (or whole groups of customers). Using price policies helps you to maintain pricing rules with the
least possible elemental changes. Each price policy has a name and notes.
To set up Price Policies:
1. Open the Debtor account for whom you want to set up the price rule.
2. Click on the Discounts/Prices tab.
3. Click on the Setup Price Policies button. The Price Policy Setup window is displayed.
4. Click the New icon.
5. Complete the fields on the Details tab.
6. Click on the Price Rules tab, and then click the Add Item button to set up the price rules you want
to use for this price policy. Use this table Setup Price Rule window fields (see page 449) to complete
the fields in the Price Rules window.
7. Click on the Accounts tab, and then click the Add Item button to add any specific debtor accounts
you want this price policy to apply to.
8. Click on the Price Policy Groups tab, and then click the Add item button to add any Debtor Price
Policy Groups you want this price policy to apply to.
9. Click Save.
Price Policy Setup Window
Account > Debtors > {Select a Debtor} > (Discounts/Prices) > [Setup Price Policies]
435
MYOB EXO Business User Guide
Field Descriptions
The grid header fields are detailed in the table below:
Field
Description
Policy No
This is a sequential policy number used for reference.
Policy Ref
The name of this price policy.
Customer Ref
The customer’s own price agreement reference number, if they keep a record of
supplier prices and discounts for price checking.
Start Date
The activation date of the price policy.
End Date
The end date of the price policy. Note that the start and end dates of a price policy
will override the start and end dates of any included price rules; if the end date of a
price policy extends beyond the end date of an included price rule, a prompt is
displayed.
Fixed Policy
If checked, this means that although lower prices may be available (or may become
available in time) that the price rules contained in this policy are absolute and are
always applied regardless of normal price logic. These prices may be considered
agreed.
Active
Indicates whether or not this price policy is active, decommissioned, suspended.
Notes
Any detailed notes or description of the price policy. Typically a plain English
summary of the price policy, scope, terms, date to be renegotiated, name of person
created, etc.
Debtor Price Policy Groups
About Debtor Price Policy Groups
Debtor Price Policy Groups are named groups that allow you to gather multiple price policies (see page 435)
into a single group, and then attach multiple debtor accounts to that group.
Examples of Debtor Price Policy Groups might be used include:
•
Setting up Retail, Trade, Internet and Trade as Debtor Price Policy Groups.
•
Setting up Debtor Price Policy Groups for a list of debtors with a branch/head-office relationship to
allow policy changes to take place for the entire group rather than making individual changes.
A debtor account can only be assigned to a single debtor price policy group. All the price policies of a
debtor price policy group will apply to the debtor account.
It would be unwise to design debtor policy groups that contain debtors in a variety of currencies unless
they were to be used only on policies that contained discount based price rules and not substitute prices.
Debtor Price Policy Groups are set up in the Configuration Assistant.
Debtors can be added individually to a Debtor Price Policy Group (see page 437) from the Debtor account.
Price Policies can be assigned to Debtor Price Policy Groups, or vice versa, as the price policy is created and
then the Debtor Price Policy Group added to it (see page 437).
436
Pricing and Discounting
Setting up Debtor Price Policy Groups
To add a new Debtor Price Policy Group:
1. In EXO Business Config, go to Admin > Debtors > Debtor Price Policy Groups.
2. Click the New button.
3. Complete the fields in this section.
The following table describes the fields in the Debtor Price Policy Groups section.
Field
Description
Price Group No.
(Read-only). The Price Group number.
Price Group Name
The name of the Price Group Name.
Report Code
A user-defined report code to report on Debtor Price Policy Groups.
4. Click Save.
Adding a Debtor to a Debtor Price Policy Group
To add a Debtor account to a Debtor Price Policy Group:
1. In the Debtor Account window, double-click on the required Debtor account, then click on the
Discounts/Prices tab (see page 99).
2. Select the required Debtor Price Policy Group from the Price Policy Group drop-down list to the
right of the window. The price policies for the selected Price Policy Group will be displayed. These
price policies are shared by all debtor accounts in this Debtor Price Policy Group.
3. Click Save.
437
MYOB EXO Business User Guide
Adding a Debtor Price Policy Group to a Price Policy
To add a Debtor Price Policy Group to a Price Policy:
1. In the Debtor Account Details window for a Debtor account, go to the Discounts/Prices tab and
click the Setup Price Policies button. The Price Policy Setup window (see page 435) is displayed.
2. Double-click on the Price Policy you want to add the Debtor Price Policy Group. The Price Policy
Setup window now displays additional tabs.
3. Select the Price Policy Groups tab.
438
Pricing and Discounting
4. Click the Add Item button, and choose the required Price Policy Group from the list that is
displayed.
5. Click Select & Close, and then click Save. When the Price Policy Group is added to the price policy,
all accounts that are in that Price Policy Group will also receive the prices and discounts of that
policy.
Prompt Payment Discounts
There are two different methods for offering Prompt Payment Discounts to customers in MYOB EXO
Business:
•
automatically, based on the invoice date, the credit terms, and the prompt payment discount
percentage entered for the Debtor, or
•
manually, based on your own discretion when receipting a payment, and the prompt payment
percentage entered for the Debtor, regardless of invoice date.
Automatic Prompt Payment Discounts
This method uses the Prompt Payment Discount Calculation window to automatically calculate prompt
payment discounts based on the due date of the invoice. Eligibility for the discount is based on the due
date of each invoice, and uses the preset discount percentage on the Debtor account.
If you need to manage your outstanding discounts carefully in your business, this is the recommended
method.
Automatic prompt payment discounts are managed by calculated by the Prompt Pay Discount Calculation
utility; you can calculate new discounts, and review outstanding discounts.
439
MYOB EXO Business User Guide
Manual Prompt Payment Discounts
This method uses the PP Disc checkbox in the Debtor Receipts window (see page 400) to manually choose
whether or not to give a prompt payment discount on a given invoice line. Selecting a line for prompt
payment discount uses the discount percentage set up for the Debtor. No check is performed against the
due date of the invoice - you can even give the discount to an overdue invoice.
If you need flexibility in the way you offer discounts on invoices, this is the recommended method.
When the discount is claimed, a credit note is issued for the discount amount, using the prompt payment
discount stock item set up already in MYOB EXO Business.
Discounts manually applied in this way to an invoice will exclude that invoice from the automatic prompt
payment discount method, which only calculates the discount based on unallocated invoices.
Prompt Payment Discount Stock Item
When prompt payment discounts are given, either manually or automatically, a credit note is issued to
each Debtor using the prompt payment discount stock item (PPDISC).
Prompt Payment Discounts and End of Period
We recommend that the first step is to review the outstanding discounts from the previous month. This will
ensure that existing data is not erased.
Ideally, the Prompt Payment Discount Calculation and the Statement printing for the month should be run
back-to-back, after the month’s invoicing and just before the End of Period.
Setting up an Automatic Prompt Payment Discount for a Debtor
This procedure will set the percentage for the Prompt Payment Discount given to a Debtor:
1. Click on the Details 2 tab of the Debtor Account Details window (see page 96) for the Debtor.
2. In the Prompt Payment panel of this tab, enter the percentage discount amount in the Discount (%)
field.
3. Click Save.
If you use manual prompt payment discounts when receipting payments, this is the discount percentage
that will be used.
If you use automatic prompt payment discounts, the Amount field here is calculated when you run the
Prompt Payment Discount Calculation utility, and displays the amount of prompt payment discount the
debtor is eligible to receive, based on invoice dates, the credit terms for the debtor, and the prompt
payment discount percentage. Once payment has been made, the amount displayed here will be zero.
440
Pricing and Discounting
Calculating Outstanding Prompt Payment Discounts
Utilities > Debtor Utilities > Prompt Pay Discount Calculation
Before you begin, ensure you have reviewed and reported on your last month’s prompt payment discounts
before calculating this month’s new discounts. Last month’s discounts will be reset by this process.
This process calculates prompt payment discounts on unallocated invoices based on the invoice date and
each debtor’s prompt payment discount percentage. The process should be run back to back with
generating monthly statements, so that the prompt payment discount information can appear on debtor
statements.
1. Go to the Utilities menu and choose Debtor Utilities > Prompt Pay Discount Calculation. The Set
Prompt Payment Discounts window is displayed.
2. Click the New Month’s Discounts button. The following warning is displayed.
3. Click Yes. This month’s new prompt payment discounts are listed in the grid. This includes a list of
Debtors who have been offered the discount, the related discount percentage, and the amount to
be paid by each Debtor. You can print this list.
441
MYOB EXO Business User Guide
Reviewing Outstanding Prompt Payment Discounts
1. Go to the Utilities menu and choose Debtor Utilities > Prompt Pay Discount Calculation. The Set
Prompt Payment Discount Calculation window is displayed.
2. Click the Discounts Outstanding button. A prompt is displayed, asking if you are sure you want to
Review Outstanding Discounts. Click Yes.
3. The outstanding discounts are listed in the grid. You can print this list.
Sell Prices
About Sell Prices
Sell Prices appear on the Details2 tab of the Stock Item Details window (see page 167), and give you the
option of specifying ten different price values for each stock item. Each price is set up for a specific
currency, and can have its own price formula.
Each customer is assigned a base price (in the Debtor Account Details window Details1 tab), which is one of
these ten sell prices.
For example, if you were to have a Trade sell price and a Retail trade price, your Trade price might be 0.8 of
your retail price, and you would assign all your Trade customers to the Trade base price in the Debtor
Accounts window.
Any further discounts you may offer, via price rules, price policies, or discounts offered at the time of sale,
are applied against the base price on the debtor account.
442
Pricing and Discounting
Changing a Base Price
To add or edit base prices:
1. In EXO Business Config, go to Admin > Stock > Price Names.
2. Click New to create a new price, or select an existing one and click Edit.
3. Complete the fields on this window:
Field
Description
Price No
Read-only, the price number is automatically set, and cannot be changed.
Name
The name of the Sell Price.
Price SQL
The SQL formulation for the Sell Price (see page 432).
Currency
The currency of the Sell Price.
4. Click Save.
Changing the Base Price of a Debtor
1. In the Debtor Account search window, double-click on the required Debtor.
2. On the Details1 tab (see page 93), select the required base price from the Base Price drop-down
list.
3. Click Save.
Reviewing the Sell Prices of a Stock Item
An advanced feature is the ability to review and update the sell prices of a stock item using the Sell Price
Formulation window. While you can update the sell price of a stock item directly in the Stock Item Details
window, the Sell Price Formulation window gives you more detailed information on margins and exchange
rates, so you can ensure any pricing change will protect the margins you want on the stock item.
Advanced note: The margins are based on the cost basis selected for your company in the General Settings
window of the Configuration Assistant, and the expected margins set for the stock group to which the stock
item belongs.
To use this feature, the following Configuration Assistant settings are required:
•
Show Price Formulations must be enabled
•
Hide Stock Costs must be disabled
443
MYOB EXO Business User Guide
To review the sell prices of a Stock item using the Sell Price Formulation window:
1. Go to the Details tab of the Stock Items Details window (see page 164).
2. Click the Sell Price Formulation button (
window is displayed.
) on the Stock Item toolbar. The Sell Price Formulation
Green or Red arrows show margins outside the expected GP variation range for this stock group,
whereas the ‘-’ sign shows that the margin is within the expected range.
3. Click the Last/Std/Avg icons in the toolbar to view the margins from the last cost, standard cost or
average cost. The default is what is set in the General Settings window of the Configuration
Assistant window.
4. The New Price column suggests a theoretical price for this item based upon the defined formula for
each price name. This can be applied to any or all of these prices if chosen. Make any price changes
you require in the New Price column.
5. Tick the Use checkbox of the prices you want to update.
6. Click Save. The new sell prices are now applied to the Stock item.
Scheduling Price Changes
Scheduling Price Changes for Stock Items
The Price Change Scheduler is a utility that allows you to prepare base price changes for ranges of stock
items in advance and schedule these price changes to be applied at a certain date and time.
Some examples of use include:
444
•
24/7 operations operating Internet Shopping businesses where customers may be ordering at all
times of the day or night and where any price changes must be instantaneous across the range of
products affected.
•
Businesses that operate on the basis that customers must be formally notified of price changes in
advance. Once again the price scheduler can be useful to produce a proposed price list in advance.
Pricing and Discounting
Note that you should consider whether using the Price Change Scheduler or using Price Policies (see page
435) better suits your purpose, as there are similar capabilities in each.
•
Use Price Policies if you want the price changes to apply to a single debtor account, or small group
of debtor accounts, then you should consider using Price Policies. Price Policies also allow you to
group together a range of price changes across multiple stock groups. Price Policies generally allow
you to be more precise in your pricing changes than the Price Change Scheduler.
•
Use the Price Change Scheduler if you want the price changes to apply to all debtors, for a single
stock item, then use the price change scheduler.
•
Use the Price Change Scheduler – Bulk Entry (see page 447) if you want the price changes to apply
to all Debtors, for selected Stock Group(s) and Secondary Stock Groups.
Viewing Scheduled Price Changes
To view all scheduled price changes:
1. Go to the Utilities menu and choose Stock Utilities > Price Change Scheduler. The Price Change
Scheduler window is displayed:
2. Use the following filters to view the required scheduled price changes:
Supplier: The supplier for which you have a scheduled price update, or ALL.
Group: The stock group of the scheduled price change, or ALL.
Stk Item: The stock item of the scheduled price change, or ALL.
Price Type: The price type (price name) of the scheduled price change, or ALL.
From/To Dates: The date range for which you want to view any scheduled price changes.
Flags: Tick the checkboxes to include inactive changes, active changes, and/or completed changes.
3. When you have set your filters as required, click on the Search button.
4. Double-click on any price change line to view and/or update.
445
MYOB EXO Business User Guide
Scheduling a New Price Change
Follow these steps to schedule a new price change.
1. Go to the Utilities menu and choose Stock Utilities > Price Change Scheduler. The Price Change
Scheduler window (see page 445) is displayed.
2. Click the New button. The following window is displayed:
3. Complete the fields in this window using the following table:
Field
Description
Stock item
Choose the stock item for the price change.
Price Type
Choose the price type (price name) for the price change.
New Price SQL
Enter any Price_SQL (see page 432) you want to use to create the new
price.
Entered by
This defaults to the current user.
Status
Specify whether you want this scheduled price change to be active, inactive,
or marked as completed
Change Date
The date the price change was scheduled.
4. Click Save.
Note: The price change will not automatically be made when the Change Date is reached; when you
are ready to update the price, use the Run Updates button to change the price.
446
Pricing and Discounting
Scheduling a New Bulk Entry Price Change
1. Go to the Utilities menu and choose Stock Utilities and then Price Change Scheduler. The Price
Change Scheduler window is displayed.
2. Click the Bulk Entry button. The Price Scheduling Bulk Entry window is displayed.
3. Use the filters in this window, as described here, to select the range of stock items for the bulk
price change. When you have selected your filters, click the Generate Edit List button, which will
populate the grid with a list of all stock items that match your filters.
Fields in this window:
Field
Description
Status
The status of this scheduled price change: Active, Inactive or
Completed.
Tip: you can also change the status and details of a previous
price change to active.
Supplier
If you are only updating items from a single supplier, enter
that supplier here, or select <ALL>.
Change Date
The date the scheduled bulk price change was created.
Price Type
Filter by the price name in this field.
Stock Groups – Primary
From/To
Select the primary stock group range for the price update
447
MYOB EXO Business User Guide
Stock Groups – Secondary
From/To
Select the Secondary Stock Group range for the price update.
Stock Groups – Price Group
From/To
Select the Stock Group range for the price update.
Stock Code/Description
The specific stock item and description of this price change
line.
Price type
The price type of the price change for this stock item.
New Price/Formula
Enter the new price here.
4. Edit the New Price/Formula field with the new price for the stock item, or a Price SQL statement
(see page 432).
5. Click Save. Note that the price changes will not automatically be made when the Change Date is
reached; when you are ready to update the price, use the Run Updates button to change the price.
Running Scheduled Price Updates
Once you have set up your scheduled price changes, use the Run Updates button to action any scheduled
price changes with a status of Active. Scheduled Price Updates will not run automatically when the Change
Date occurs.
1. In the Price Change Scheduler window, click the Run Updates button. The Run Scheduled Price
Updates window is displayed:
2. The Date to Action field defaults to the current time and date.
3. Click the Run Updates button to run the scheduled price update.
448
Pricing and Discounting
Price Rules
Setting up Price Rules
Stock Price Rules are used to apply a discount on a stock item or range of stock items, i.e. stock groups, to a
specific debtor. Price rules are set up on a per debtor account basis; a price rule you set up for one debtor
will not be available to another debtor.
1. Enter the Debtor account for whom you want to set up the price rule.
2. Click on the Discounts/Prices tab. There are two panes in this window: in the top half of the
window price policies are set up, in the bottom half, price rules are set up.
3. Click the New Price Rule button (
). The Setup Price Rule window (see page 449) is displayed.
4. Complete all fields on this window.
5. Click Save.
Setting up Price Rule Window Fields
449
MYOB EXO Business User Guide
The following table describes the fields in the Setup Price Rules window:
Field
Description
Stock Code or
Stock Group
Choose either stock code or stock group:
To choose a stock code, click on the Stock Code radio button and enter the code,
or type a question mark in the field and press Tab, to browse through the stock list
to select the required stock item.
To choose a stock group, click on the down arrow to select the required stock
group.
Expected
Margin
The margin, or markup, you expect to make from sales of stock items in the
selected stock group. A read-only field.
Margin
variance +/-
The percentage above and below the expected margin percentage that is allowed
for sales of stock items in this stock group. A read-only field.
Discount
Enter the discount percentage that the selected debtors are to receive once they
purchase the required quantity. The discount will work off the price level that is
assigned to the selected debtor(s).
Base Price
Select the base price you want to use as the basis for calculating the new price.
Use the up and down arrows to review the effect of the price rule on the ten
default price names.
This box is disabled when the Substitute Price option is selected.
New Price
When the price rule is for a stock item, this is the new price after the discount has
been deducted from the selected base price.
Substitute
Price
Actual dollar price value to be used in place of the base price if the price rule
conditions are met.
Switch to
Base Price
Actual dollar price value to be used in place of the base price if the price rule
conditions are met.
Calculated
Margin
Each Stock Group has an option to set up expected margin, together with an
allowable variance from this expected margin. The variance below indicates that a
Margin of 40% Plus or Minus 5% is acceptable, that is 35% through to 45%
inclusive.
Calculated
Variance
Minimum
Quantity
The minimum quantity that is to be purchased in order to receive a discount.
Start Date
The start date of the date range this price rule applies to.
Stop Date
The end date of the date range this price rule applies to.
450
MYOB EXO Finance
MYOB EXO Finance Overview
MYOB EXO Finance is an external module that interfaces with the core MYOB EXO Business system. There
are three components to the Finance module:
•
Bank Reconciliation (see page 451), used for reconciliation of bank accounts in the General Ledger
to bank statements.
•
Creditors Payment Processor (see page 476), used for paying Creditors via cheque or direct credit.
•
Direct Debits (see page 493), used where the organisation has authority to direct debit Debtor
accounts.
Bank Reconciliation
The Bank Reconciliation function (Utilities > Bank Reconciliation) has been designed for accounting staff
that need to manage their bank accounts. This facility is used to match transactions in the General Ledger
Bank account to transactions that appear on the company’s bank statement.
Bank Reconciliation can be run in one of two ways:
•
A manual system for when working from a hard copy bank statement (see page 458). In manual
mode the system displays unreconciled GL transactions from the selected GL bank account, and
you manually flag which of these are ‘reconciled’ – these will be the items that appear on the paper
bank statement. The ones that are not flagged are the unreconciled GL transactions and the total of
these should represent the difference between the balance of the GL bank account and the closing
balance that appears on the bank statement.
•
An electronic system using a CSV format file supplied by the bank (see page 463). In CSV mode - the
system displays the unreconciled GL transactions from the selected GL bank account, but the bank
statement transactions are imported into MYOB EXO Business from a CSV format text file provided
by the bank. The process is then to match unreconciled GL transactions to the imported bank
items. A GL transaction that is matched is flagged by the system as being reconciled. The objective
is to match all the imported bank items to a GL transaction. The GL transactions that remain
(unreconciled GL transactions) should represent the difference between the balance of the GL bank
account and the closing balance that as per the Bank.
Note: Before bank statement files can be imported into the Bank Reconciliation program, the bank
format needs to be set up (see page 471). This setup is performed in Setup > Bank Formats, and
defines how MYOB EXO Business should interpret CSV bank statement files that are to be imported
into Bank Rec. This only needs to be set up if the CSV method of Bank Reconciliation is to be used.
451
MYOB EXO Business User Guide
When choosing Bank Reconciliation from the menu, a window opens with the list of all previous bank
reconciliations:
1. To list the reconciliations for a specific bank account, select the account from the GL bank account
drop down list, and click Search.
2. To Include unreconcilable accounts in the list, check the Include Not Reconcilable checkbox.
3. To automatically list the previous bank reconciliations whenever the Bank Rec function is selected,
select the Autoload check box. Alternatively, click on Search every time to list previous bank
reconciliations.
Note: The list of previous bank reconciliations is displayed in an Exogrid, meaning that columns can
be moved around, rows sorted by clicking on the appropriate column header and select the columns
to view by right-clicking on the yellow column header and selecting Visible Columns.
Note: The details on the grid (statement balance, GL balance, unreconciled payments and deposits)
are all taken from the database table BANK_REC_LOG.
452
MYOB EXO Finance
Bank Reconciliation Details Window
The main details window is laid out as follows:
Definitions
Name
Description
Mode
For a new reconciliation the mode is NEW. Other modes are VIEW and EDIT.
GL balance as at
dd.mm.yyyy
The GL balance as at the date specified – not necessarily the current GL balance.
MYOB EXO Business will add up all GL transactions for the specified bank
account, up to and including the date specified
Reconciliation
Type
[Manual] Set to Manual from the set-up window and cannot be changed.
[CSV] Set to CSV from the set-up screen and cannot be changed.
•
Click on
to see the path and file name of the import file.
•
Click on
to view the contents of this file.
Locked
While it is unlocked, the user can still edit the reconciliation (see page 455). The
user can lock a bank reconciliation when it is complete.
Bank Statement
Opening Balance
The bank statement opening balance is set to the closing balance from the
previous reconciliation.
453
MYOB EXO Business User Guide
Bank Statement
Closing Balance
The bank statement closing balance is bank statement opening balance, plus all
transactions that appear on the bank statement (i.e. total shown at the bottom
right of the window).
Note that the opening and closing bank statement balance are not
immediately available for edit. However, the opening balance is available
for editing on the first reconciliation of a GL account. For subsequent
reconciliations, it is still possible to change the opening/closing bank
statement balances by selecting Setup > Edit Statement Balances. This
option is only available if the user profile ‘Allow Bank Reconciliation
Opening/Closing Statement Balance Edits’ is enabled.
Unreconciled GL
Transactions as at
dd.mm.yyyy
The GL transactions that appear on the left-hand-side are the unreconciled
transactions with a transaction date less than or equal to the reconciliation
date. The sum of unreconciled GL transactions appears at the bottom of this
section.
Note: Unreconciled GLTRANS are where gltrans.reconciled = 0 and
gltrans.transdate =< the reconciliation date specified on the panel
above).
Transactions
appearing on the
Bank Statement
Use the arrow buttons (
The items on the right-hand-side in Manual Mode are the reconciled GL
transactions – those that appear on the Bank Statement. The sum of items
appearing on the bank statement appears at the bottom of this section. Doubleclicking an item on left-hand-side transfers it to the right-hand-side.
) to move the lines for view on the bank statement up or down.
From the search/summary screen it is possible to see the details of any existing reconciliation.
Details Screen
To see the details of a reconciliation, from the search/summary screen, double-click on any existing
reconciliation. This will display the Details screen, which is similar to the Details screen when adding a new
reconciliation:
The Mode is set to VIEW, so the reconciliation cannot be changed.
454
MYOB EXO Finance
The left-hand-side represents the unreconciled transactions at that point in time. This will be the same list
that would have been seen when the reconciliation was first entered.
Note: For reconciliations entered after upgrading to MYOB EXO Business 7.0, this screen will provide
an accurate list of unreconciled GL transactions at that point in time. However it is not possible to
build an accurate list of unreconciled transactions for reconciliations that were entered before an
upgrade to MYOB EXO Business 7.0, as the required data links were not recorded for these
reconciliations.
The logic used to select GL transaction for display on the left-hand-side of the screen is:
GL_TRANS where
gltrans.transdate <= bank_rec_log.transdate and
gltrans.seqno <= bank_rec_log.gltrans_seqno and
((gl_trans.reconcile_no = ‘0’ or
bank_rec_log.seqno)) [**]
gl_trans.reconcile_seqno >
[**] The GL transactions are either not yet reconciled at all (reconcileno = 0), OR they have been reconciled
but after this reconciliation.
The selection of transactions on the right-hand-side depends on whether the reconciliation was created in
manual mode or CSV mode. In manual mode, the details are from GL transactions that were stamped with
this reconciliation number.
In CSV Mode, the list on the right-hand-side is of all unreconciled bank statement items.
It is possible to see all the GL transactions that were available for reconciliation when the reconciliation was
first entered by selecting >Setup>Show Reconciled Items. Unreconciled transactions will appear in black.
Reconciled transactions appear in blue.
To print the Bank Reconciliation details that appear on the screen, select Reports > Bank Reconciliation
Details. The output can be saved to Excel by selecting File > Save As and selecting the CSV format.
The following functions are also available in View Mode:
•
Check Reconciliation (Tools > Check Reconciliation)
•
Search
•
Calculate Selected
It may be necessary to change an existing Bank Reconciliation. Double-clicking on the appropriate row on
the search/summary screen will display the Details screen in View mode.
While in View mode the reconciliation cannot be changed. To make changes the reconciliation has to be
put into Edit Mode; however, there are some restrictions on placing a reconciliation into Edit Mode.
455
MYOB EXO Business User Guide
Restrictions
Editing of the last reconciliation is generally acceptable and MYOB EXO Business allows this. But editing of
reconciliations before the last one should be avoided if at all possible. This should be the exception and not
part of the normal process. To control editing there is a User-level profile setting called Allow editing of
bank reconciliations. The following table shows the logic that either enables or disables the Edit button,
(allow/disallow edits), and which warning messages will appear.
Last
Rec
Locked
Profile
Edit
Button
Messages
Yes
No
Don’t
allow
Enabled
None
Yes
Yes
Don’t
allow
Disabled
Not applicable – Edit button is disabled
No
No
Don’t
allow
Disabled
Not applicable – Edit button is disabled
No
Yes
Don’t
allow
Disabled
Not applicable – Edit button is disabled
Yes
No
Allow
Enabled
None
Yes
Yes
Allow
Enabled
Warning message that is blocked
No
No
Allow
Enabled
Subsequent Bank Reconciliation warning (see below).
No
Yes
Allow
Enabled
Subsequent Bank Reconciliation warning. # Warning
message that it is locked
Note: Bank Reconciliations that were entered before an upgrade to MYOB EXO Business 7.0 cannot
be edited. This is because the General Ledger balance, reconciliation date and unreconciled
transactions would not be tightly related to each other, as they are in reconciliations entered in 7.0.
456
MYOB EXO Finance
The Editing Process
To put the reconciliation into Edit mode:
1. Click Edit.
2. The system will then revise the GL Balance by re-selecting all GL transactions up to and including
the reconciliation date. Any new GL transactions that are unreconciled, and with a date on or
before the reconciliation date will now appear in the left-hand list. These new transactions can
then be reconciled in the normal manner.
3. Other transactions on the left-hand-side can also be reconciled – as long as they were not
reconciled on a subsequent reconciliation. If they have been reconciled on a subsequent
reconciliation, an error message will be displayed:
4. Transactions on the right-hand-side in manual mode (already reconciled) can be unreconciled (by
double-clicking on them). The system will adjust the total unreconciled value and the closing bank
statement balance as this activity takes place.
5. When all the changes have been completed, click Save. If this is not the last reconciliation, the
system will go to the next reconciliation where you can continue to edit, or just save it.
Note: It is important to save, otherwise the GL bank balance and opening/closing bank statement
balances on subsequent bank reconciliations will not be revised and the data will be incorrect.
Deleting Reconciliations
Utilities > Bank Reconciliation > {select the conciliation in the list} > Tools > Delete
To remove an existing Bank Reconciliation from the system, from the Bank Reconciliation window (see page
451), select Tools > Delete Reconciliation. This will also update the General Ledger transactions (see page
233) that have been flagged as being reconciled; it will set these to unreconciled.
If the reconciliation was a CSV reconciliation, all imported bank statement items will be removed from
MYOB EXO Business’s internal record (deletes records from the database table bank_rec_uploads). The
actual import file will not be deleted.
Note: Only the last Bank Reconciliation for a given GL Bank account can be deleted.
457
MYOB EXO Business User Guide
Manual Reconciliations
Setting up a New Manual Reconciliation
Manual Reconciliations are bank reconciliations performed manually off a printed statement from the
bank. This contrasts with a CSV Reconciliation (see page 463), where the reconciliation is performed against
an electronic banking file provided by the bank.
To begin a manual bank reconciliation, the Manual reconciliation type must be selected.
To begin a new reconciliation, from the main Bank Reconciliation search/summary window, click New. The
following window will be displayed:
Enter the relevant settings as follows:
•
GL Bank Account will default to the Bank Account on GL Controls. The drop-down list will start from
this account.
•
Enter new reconciliation number. The reconciliation number will increment from the last number
used, but can be changed, for example to match a bank statement number. It cannot be set to a
reconciliation number that has been used previously for this GL bank account.
•
Select unreconciled GL transactions up to and including is the reconciliation date. MYOB EXO
Business will work out the GL balance as at this date and will only show unreconciled GL
transactions (see page 233) up to this date. For example, if on the 10th of July a reconciliation form
the month of June is begun, enter a reconciliation date of 30 June, and the system will obtain the
GL balance as at 30 June, and display unreconciled transactions with a transaction date less than or
equal to 30 June on the left-hand-side of the window.
•
Date of closing bank statement is held for information purposes only, to easily identify which
statement file was being reconciled.
•
Reconciliation type. Choose Manual for a manual reconciliation.
Once the set-up information has been entered, click OK to display the details window.
458
MYOB EXO Finance
Reconciling a Manual Bank Reconciliation
In manual mode, the left-hand-side of the window will show all unreconciled GL transactions, and the righthand-side represents reconciled transactions (those that appear on the bank statement).
To show that a GL Transaction is reconciled:
1. DOUBLE-CLICK on a single item from the left-hand-side.
2. Alternatively select items by left-clicking the mouse while on the appropriate row, and if more than
one item is to be selected, then hold down the CTRL key while LEFT-CLICKING. Click the Reconcile
button from the toolbar.
Either method will move the item from the left-hand-side to the right-hand-side, and adjust the Bank
Statement Closing Balance.
To undo a reconciled item DOUBLE-CLICK on a single item from the right-hand-side-hand-side.
This will transfer the item from the right-hand-side to the left and adjust the Bank Statement Closing
Balance in the process.
Calculate Selected
The Calculate Selected function is to help the operator to work out which set of transactions on the lefthand-side agrees with which set of transactions on the right-hand-side.
To calculate selected item totals:
1. Select items on either side by left-click on the appropriate row. If more than one item is to be
selected, hold down the CTRL key while clicking the appropriate row.
2. Click the Calculate Selected button on the toolbar. The system will sum the selected items and
display these totals at the bottom of the window.
Searching for Transactions
The Search function is used to find certain transactions from either side of the bank reconciliation details
window.
To search for items:
1. Click the Search button on the toolbar. The Search panel is displayed.
2. Enter the search criteria and click Find:
•
Cheque No is an exact match.
•
Amount is an absolute value, so 100.00 will find both +100.00 and -100.00.
•
+/- is a variance amount. So 10.00 +/- 0.05, would return values between 9.95 and 10.05,
and those with values between -9.95 and -10.05.
•
Details. Enter details text here. Any entries that contain this text will be returned.
459
MYOB EXO Business User Guide
3. The system will search both sides of the reconciliation for transactions that match the criteria
entered. The system is looking for transactions where Cheque No equals that specified and
transaction Amount equals that specified +/- the variance and where the transaction’s detail
contains the Details text entered.
4. Matching transactions are displayed red, and the total number found is shown at the top of each
column.
5. Click Hide to remove the Search panel.
Adding and Removing Entries in the Bank Reconciliation
Cashbook Entries
The Integrated Cashbook (see page 300) is available directly from the Bank Reconciliation.
To make a cashbook entry:
1. Select Tools > Make Cashbook Entry.
2. If the transaction is dated on or before the reconciliation date, the transaction will be added to the
list of unreconciled transactions on the Bank Reconciliation and the GL Balance that is being
reconciling to will be adjusted for this Cashbook transaction.
Remove Items from General Ledger
If there are two or more GL transactions in the bank account that net to zero, they can be removed from
the list of unreconciled GL transactions.
1. Select the transactions by holding down CTRL, while clicking on the appropriate rows.
2. Select Tools > Remove from General Ledger. These transactions will be removed from the list on
the left-hand side. They will be flagged as “reconciled”.
460
MYOB EXO Finance
If the user attempts to remove transactions that do not net to zero, an error message is displayed:
Removing Bank Statement items
If there are two or more items from the bank statement import file that net to zero, they can be removed
from on the right-hand-side of the screen.
To remove bank statement items that net to zero:
1. Select the transactions by holding down CTRL, then right-click on the appropriate rows. Selected
transactions will be highlighted, with the select box ticked
2. Select Tools > Remove from Bank Statement. These transactions will be removed from the list on
the right-hand-side. They will be flagged as ‘reconciled’.
Checking a Reconciliation
A Check Reconciliation function will perform a quick check that the current reconciliation balances, and a
more detailed reconciliation report can be run
To run the Check Reconciliation function:
1. Select Check Reconciliation from the Tools menu. The following window appears:
2. Click OK to continue.
A reconciliation summary report is available for printing.
Note: In CSV mode (see page 463) the reconciliation will not be reconciled while there are still items
on the right-hand-side
461
MYOB EXO Business User Guide
To create a bank reconciliation report:
1. Click on Reports > Bank Reconciliation Details.
2. The system will produce the following, based on the current reconciliation being viewed.
Note: The report performs two integrity checks at the bottom of the form.
The report can be printed (using the
button on the toolbar), and can be saved to file using File > Save
As. If saved in CSV format, the data can be retrieved into Microsoft Excel or similar for further analysis.
Closing the Bank Reconciliation
To complete a bank reconciliation:
1. Click Save to save the reconciliation. If the reconciliation does not balance the system will display
the Check Reconciliation window (see page 461), to alert the operator that the reconciliation is not
finished.
2. Alternatively, click Cancel to return to the search/ summary window without saving the new
reconciliation.
Note: Any Cashbook entries and AP Processing transactions that were created during the
reconciliation cannot be undone by clicking Cancel.
The system will perform the following updates upon saving a new bank reconciliation:
462
•
Creates a new BANK_REC_LOG record
•
SEQNO New seq no generated
•
ACCNO The GL account number of the reconciliation
•
SUBACCNO The GL sub-account number of the reconciliation
•
RECONCILENO The reconciliation number entered
•
TRANSDATE The reconciliation date that was entered in “Select unreconciled GL transactions up to
and including”.
•
STMNT_OPENBAL From the window
MYOB EXO Finance
•
STMNT_CLOSEBAL From the window
•
GL_BAL The GL balance displayed on window, i.e. sum(amount) all Gltrans where transdate <=
reconciliation date (bank_rec_log.transdate) for this account.
•
DEPOSITS Unreconciled debit GL Transactions. Sum of debits on LHS
•
PAYMENTS Unreconciled credit GL Transactions. Sum of credit on LHS
•
GLTRANS_SEQNO Set to the last GLTrans that makes up the GL balance on the window. This is last
seqno of Gltrans where gltrans.transdate <= rec date on window for this GL account
•
RECTYPE Manual
•
STMNT_DATE New field. Set to the “Date of Closing Bank Statement”, also displayed on window.
•
LOCKED Per window. Yes/no
•
GL_TRANS (updates to reconciled transactions)
•
RECONCILE_SEQNO Updated with the seqno of the new bank_rec_log
•
RECONCILE_NO From the window
•
RECONCILED Set to 1 (meaning it’s reconciled)
CSV Reconciliation
Setting up a New CSV Reconciliation
Utilities > Bank Reconciliation > [New] > {Configure then choose CSV File} > [Ok]
Note: The following procedure assumes that the CSV file format has already been set up according to
the correct Bank Format (see page 471).
To create a new CSV reconciliation:
1. From the main Bank Reconciliation search/summary window, click New to create a new
reconciliation. The New Bank Reconciliation window appears:
463
MYOB EXO Business User Guide
2. Enter the following information:
•
GL Bank Account will default to the Bank Account on GL Controls. The drop-down list will
start from this account.
•
Enter new reconciliation number. The reconciliation number will increment from the last
number used, but can be changed. It cannot be set to a reconciliation number that has
been used previously for this GL bank account. To edit an existing bank reconciliation, see
Editing (see page 455).
•
Select unreconciled GL transactions up to and including is the reconciliation date. EXO
Business will work out the GL balance as at this date and will only show unreconciled GL
transactions up to this date. For example, if on the 10th of July a reconciliation for the
month of June is begun, enter a reconciliation date of 30 June and the system will obtain
the GL balance as at 30 June, and display unreconciled transactions with a transaction date
less than or equal to 30 June on the left-hand-side of the screen
•
Date of closing bank statement is held for information purposes only, to easily identify
which statement file was being reconciled.
•
Reconciliation type. Select CSV for a CSV reconciliation.
3. Click the ellipsis button
to browse to the import file that contains the bank transactions. The
system will open the window to search for the import file. Select the file and click Open.
4. Having entered the setup information, click OK.
Performing a Bank Reconciliation
In CSV mode, the left-hand-side of the screen will show all unreconciled GL transactions, and the righthand-side represents unmatched bank transactions from the import file. There are three ways to identify
which item(s) on the left-hand-side matches to item(s) on the right-hand-side.
Note: Before manually trying to find the matches, MYOB recommends using the auto match feature
(see page 465).
1. Double-click on a single item from the left-hand-side. The system will search for matching item(s)
from the right-hand-side. These will be selected and shown in red.
Note: It is possible that more than one match is found on the right-hand-side. If more than one
match is found, you will have to determine which is the correct match, and deselect the incorrectly
selected items on the right-hand-side.
2. Select an item from the left-hand-side, then click Find Match on the toolbar. The system will search
for matching item(s) from the right-hand-side, and show these in red – as described above. (This
serves the same purpose as double clicking on an item).
3. Manually select matching items by left-click on the appropriate rows. If more than one item is to be
selected, then hold down the CTRL key.
464
MYOB EXO Finance
To reconciled the selected items:
1. Having selected GL transactions and bank items, click Reconcile. This will remove all selected items
from both sides. If the values do not match, an error message will appear:
2. If only one item is selected from each side of the bank reconciliation, the SPACEBAR can be used to
reconcile the items instead of clicking the Reconcile button.
Auto-Matching
The auto match function automatically finds matching records and allows the operator to reconcile these.
To automatically match records:
1. Click Auto Match on the toolbar. The following screen is displayed:
Item
Description
Date
Check this box if the match is to be based on transaction date. The date format
of the items from the import file should be defined. The data on the file is in
text format, so EXO Business needs to know how to interpret the date, i.e.
which characters represent the day, month and year.
Cheque No
Check this box if the match is to be based on Cheque Number
Details
Check this box if the match is to be based on the details field of the GL
transaction and bank items
Amount
The match will always be based on Amount. This cannot be unchecked; it is
displayed here for information purposes to highlight the fact that the amounts
have to match.
2. Having defined the basis for the match, click Do Auto Match. The program will now attempt to find
GL transactions that match with imported bank items using all of the criteria defined by the user.
The results will appear in the grid.
465
MYOB EXO Business User Guide
The details from the GL transactions are displayed in white columns. Details of items from the
imported bank statement file are displayed in grey columns.
Note: That if a duplicate match is found (e.g. $100 found on left-hand side potentially matching 2
rows of -100 on the right-hand side) the match will not be returned.
3. Review the list to ensure the matches are correct. If a match is incorrect, select the row and click
Remove Match. The row is removed from the grid and the items stay unreconciled.
4. To refresh the grid with new selection criteria, make the changes to the criteria, and click Do Auto
Match again.
5. Once the list of matches has been reviewed and considered to be correct, click Reconcile. The
system will display a confirmation message as follows: “Reconcile the listed auto matches? [Yes]
[No]”. Click Yes to continue the process. This will remove all listed items from both sides of the
reconciliation.
6. Click the window’s close button to close the window without reconciling the matched items.
To undo a previously reconciled item:
1. In CSV mode, reconciled transactions will disappear from the screen. To display reconciled
transactions, select Setup > Show Reconciled Items. The system will then display reconciled items
in blue.
2. To undo previously reconciled items, select the items and click Reconcile to restore the
transactions to an unreconciled state.
Automatic Payments Process
The Automatic Payments Process is an optional feature of the Bank Reconciliation function when run in CSV
mode (see page 464). This is an advantage when the company’s Debtors pay their accounts directly to the
company’s bank account, and a unique Debtor code is provided. Automatic Payments from Debtors will
appear on the bank statement file, and the Bank Statement transactions can be imported into a new CSV
reconciliation.
The AP Process can then be run to pick up these Debtor payments, identify which EXO Business Debtor
account the payment transaction relates to, and then create a payment/receipt transaction against that
Debtor account. As it creates these payment/receipt transactions it will also produce the GL entry: DR Bank
CR Debtors Control. The entry to the GL Bank account is ‘reconciled’ to the payment transaction from the
import file.
466
MYOB EXO Finance
Automatic Payments Process Setup
The following setup steps must be performed to use the Automatic Payments Process.
For the AP Process to be able to identify which MYOB EXO Business Debtor the payment relates to, it is
necessary to establish a code that the Debtor will provide when they make payments to the company bank
account. This code is entered on the EXO Business Debtors account - any text field can be used to hold this
code, including Extra Fields (see page 24).
The field to be used must be identified on the Bank Format Setup window (see page 471) or in EXO
Business Config at Admin > Banks > Bank Formats (Reconciliation):
The Bank Format specifications (see page 471) must be set up to be able to interpret the data on the import
file. In particular, the Automatic payment section of this form needs to be defined.
Automatic Payments Process Operation
To begin the CSV Reconciliation process:
1. Create a new CSV Bank Reconciliation in the normal way (see page 463).
2. Click AP Processing on the toolbar. A warning is given that the Bank Reconciliation has to be saved
in order to continue. Click Yes to save.
3. The Process Automatic Payments window appears. By default, the system will display exceptions.
Click on All Transactions to display both exceptions and successful matches.
467
MYOB EXO Business User Guide
Matching is based on the Reference and Match Field columns:
•
The matching of bank items from the import file and EXO Business Debtors is based on the value
held in the Reference field of the import file, and the DRACCS field specified in Bank Reconciliation
> Setup > Bank Formats > Debtor Field to match.
•
Columns with a white background represent data from the bank import file.
•
Columns with a grey back-ground represent data that has come from Debtors.
•
Rows in Red text are receipt reversals, e.g. dishonoured Direct Debits.
•
The grid displayed is an Exogrid, so includes the following properties:
o
Sort by any field by clicking on the appropriate column header.
o
Move columns for better comparison of the data.
o
Right-click to set visible columns, save settings or restore defaults.
o
Right-click and select Find to search for particular text or values.
Automatic Payments Process Exception Handling
Exceptions are items where the system couldn’t find the matching Debtor account, or it found more than
one matching Debtor account.
468
•
Click Exceptions Only on the Process Automatic Payments window to list the exceptions only.
When the AP Process first starts, the grid will display exceptions only.
•
Click All Transactions to display both exceptions and successful matches.
•
To obtain a report of exceptions click Report > Exception Report.
MYOB EXO Finance
Duplicates
Duplicate items are those where the system has found more than one Debtor that matches the code in the
Reference field from the import file. These are highlighted in the bank reconciliation by showing
**Duplicate** in the Debtor name field. In the above example a duplicate is found for “TRENT”.
To correct duplicate exceptions:
1. Either double-click on the affected line, or select the line and click Duplicate Search.
2. The Debtors Account Search window will be displayed already populated with the results of a
search based on the text from the Reference field. In the following example, the search was
performed on “TRENT”.
Review the search results and double-click to select the correct Debtor to which the payment/receipt
should be applied. The system then updates the grid with these details.
Account Not Found
If the system cannot find a Debtor account that the payment/receipt relates to, the Debtor account
number, name and matching field will be blank.
To correct Account Not Found issues:
1. Process the successful APs (see page 469).
2. Return to the main Bank Reconciliation screen.
3. Identify the item on the right-hand side.
4. Double-click to make a Cashbook entry, and code the payment to the correct Debtor account.
469
MYOB EXO Business User Guide
Automatic Payments Process Performing the Update
Once the list of APs with matching debtor accounts has been reviewed, the operator can process the work.
1. To manually allocate reversed payments, check the Prompt for allocations box on the Process
Automatic Payments window.
Note: This only applies to payment reversals (e.g. dishonoured Direct Debits). It does not apply to
normal APs (payment/ receipt transactions).
2. To start the processing, click Process. The system will display the following confirmation:
Automatic payments processed successfully (GL Batch No 1322)
3. Click OK.
4. If the Prompt for allocations option is ticked, the system will display the Debtor Transaction
Allocation screen for each payment reversal. Manually allocate the new transaction.
The Effect of Processing Automatic Payments
This section describes what happens behind the scenes once the Automatic Payments process occurs.
Automatic Payment value matches an outstanding invoice.
If the value of the Automatic Payment matches the value of an outstanding invoice in the matching debtor
account, EXO Business will automatically allocate the Automatic Payment to that invoice.
Automatic Payment value doesn’t match any outstanding invoice
If the value of the Automatic Payment doesn’t match any of the outstanding invoices in the matching
debtor account, EXO Business will create an unallocated payment/receipt transaction for the Debtor.
Payment/Receipt Reversals
Payment/receipt reversals (e.g. dishonoured Direct Debits) will appear on the Transactions tab for the
Debtor account (see page 129).
Note: The Allow Part Allocation in the Bank Rec AP and Auto Allocate Bank Rec AP to Latest Invoice
profiles can be enabled if required.
General Ledger Journal
For each Automatic Payment the system generates a General Ledger journal DR Bank CR Debtors Control.
For payment reversals, this is CR Bank DR Debtors Control. This entry is posted automatically; there is no
need to run the Debtors to GL posting utility.
Effects on the Bank Reconciliation
Returning to the main Bank Reconciliation screen, having completed an Automatic Payment Process, there
will be some differences.
470
•
The Automatic Payment items from the right-hand-side of the Bank Rec will be cleared off. These
are now ‘reconciled’ to the newly created GL transactions.
•
The GL Balance as at dd/mm/yy will be updated with the value of the newly created GL entries.
•
The newly created GL transactions representing the Automatic Payments will be ‘reconciled’
therefore they do not appear on the left-hand-side of the reconciliation.
MYOB EXO Finance
Bank File Format Setup
Bank File Format
If Bank Reconciliation is to be run in CSV mode (i.e. the bank’s data will be imported into the reconciliation
then matched to GL transactions), it is necessary to set up a Bank Format record. This is a definition of how
to interpret the data on the import file; which position holds the date, the amount and so on.
There is one Bank Format for each GL Bank account. When running the bank reconciliation in CSV mode,
the system will pick up the appropriate Bank Format based on the GL Account entered in the set-up
window for a new CSV reconciliation.
Bank File Format Setup
Bank formats are set up on the Bank Formats window (Setup menu > Bank Formats), or in EXO Business
Config at Admin > Banks > Bank Formats (Reconciliation).
471
MYOB EXO Business User Guide
To create a new Bank Format record:
1. Click New. The Bank Format Details tab is displayed:
2. Enter the format number (this will automatically select a sequential number) and GL Account
number for the bank account.
3. Complete the remaining details according to section Bank Format - Details Screen.
To delete an existing Bank Format record, click the
confirmation of the delete request.
button on the toolbar. The system will prompt for
To edit an existing format, click Edit, or double-click to edit an existing record. The Bank Format Details tab
is be displayed.
472
MYOB EXO Finance
Creating a New Bank Format
To create a new bank format, click New, a sequential format number will be automatically assigned. This
can be manually overwritten though. Complete the remaining fields using the table below as reference.
Field
Description
Format no:
Unique identifier of this record. Can be defined on entry of a new Bank
Format. This number is automatically assigned, but can be manually
overridden.
GL Bank A/c
The General Ledger account and sub-account that represents the bank that
is to be reconciled. Choose the GL bank account for this format by entering it
here. You can search for this by clicking in this field and pressing the TAB key
(illustrated above), double click the selection or highlight and click the Select
and Close button.
Column Positions (These are the column numbers in the Unreconciled Items from the Bank
statement table)
Note: Each column position must be unique
Transaction Date
The field number on the import file that holds the transaction date.
MTS
The field number on the import file that holds the MTS code
Cheque Number
The field number on the import file that holds the Cheque Number
Reference
The field number on the import file that holds the transaction’s reference
Details
The field number on the import file that holds the transaction details
Particulars
The field number on the import file that holds the transaction’s particulars
Amount (Only one of these two options can be selected by enabling the radio button)
Total
Select this if the amount (positive and negative) is held in one field position.
Having selected this, enter the field number on the import file that holds the
amount
Credit Debit
Select this if the positive and negative amounts are held in different
positions on the import file. The next 2 field are the field number on the
import file that hold the Credit and Debit amounts respectively.
Number of rows to skip when loading a file
Header rows
This is the number of rows at the top of the import file that should be
ignored. These rows will not contain bank transactions
Footer rows
This is the number of rows at the bottom of the import file that should be
ignored. These rows will not contain bank transactions
473
MYOB EXO Business User Guide
Automatic payment
MTS receipt
This field will contain all the MTS codes for bank receipts that the system
should look for when determining whether a bank transaction is to be
included in the Automatic Payments Process. Up to 10 values can be entered
here, separated by commas.
Debtor field to
match
Select a field from the DRACCTS table that this system will use to identify the
matching Debtor account for Automatic Payments (see page 466). During
the AP Process, the system will read the Reference field from the import file
and attempt to look up the Debtor account based on the field identified
here.
MTS reversals
This field will contain all the MTS codes for reversals of bank receipt that the
system should look for when determining whether a bank transaction is to
be included in the AP Process. Up to 10 values can be entered here,
separated by commas.
Example
The following is a sample file that could be read by the above Bank Format specifications:
474
MYOB EXO Finance
Foreign Currency Bank Accounts
Bank Reconciliation can be run for foreign currency bank accounts. This is where the Currency on the GL
account is set to something other than the local currency.
This section only describes the differences in Bank Reconciliation that occur when running it for between
foreign currency bank accounts. The Foreign Currency section (see page 293) should be read to understand
all functionality provided.
To perform a Bank Reconciliation with a foreign currency:
1. When creating a new reconciliation, having specified the GL Bank account, the system recognises
that the account is in foreign currency and makes appropriate changes, e.g. Foreign columns
become available.
475
MYOB EXO Business User Guide
2. The following fields are now displayed in foreign currency:
•
GL Balance
•
Bank Statement Opening Balance
•
Bank Statement Closing Balance
•
Total unreconciled items (bottom of left hand section)
•
Total items on bank statement (bottom of right-hand section)
3. For individual items listed in the grid, the system also displays the local currency value of each
transaction. Items ‘reconcile’ or match, if the foreign currency amounts agree.
Cash Book Entries with Foreign Currencies
Cash book entries must also recognise the foreign currency exchange rate.
To create a cash book entry with a foreign currency:
Utilities > Bank Reconciliation > [New] > Tools > Make Cashbook entry
Enter the transaction as normal, except now the Exchange Rate will be entered:
If the date of the Cashbook entry is on or before the reconciliation date, the transaction will now appear in
the left-hand list (as unreconciled). The GL Balance will also be updated to reflect the new transaction.
Creditors Payment Processor
The Creditors Payment Processor function enables you to process cheque or direct credit payments for
creditors either singularly or in a batch. The Payment Processor prints the cheque, the remittance advice
and allocates the payment against the account in one complete process. In the case of direct credits, the
Payment Processor does not process a cheque. Instead it creates a file to be loaded into your desk banking
program. The file for your specific bank should be loaded in the set up. The remittance advice can be emailed to a supplier when you have this set up.
A cheque can be printed for a one-off payment using the manual cheque printing option in the Payment
Processor. The manual cheque function has the capability to issue refunds to debtors. A debtor refund is
used for example, in the case of an overpayment by the debtor.
The Payment Processor has the ability to calculate prompt payment discounts on invoices being paid and
deduct that discount from the payment. The Payment Processor interacts with the creditor authorisation
function within MYOB EXO Business. The release for payment is affected when this option is enabled within
EXO Business and therefore must be used in conjunction with the staff login features (see page 20).
The Creditors Payment Processor function enables you to process cheque or direct credit payments for
creditors either singularly or in a batch. The Payment Processor prints the cheque, the remittance advice
and allocates the payment against the account in one complete process. In the case of direct credits, the
Payment Processor does not process a cheque. Instead it creates a file to be loaded into your desk banking
program. The file for your specific bank should be loaded in the set up. The remittance advice can be emailed to a supplier when you have this set up.
476
MYOB EXO Finance
A cheque can be printed for a one-off payment using the manual cheque printing option in the Payment
Processor. The manual cheque function has the capability to issue refunds to debtors. A debtor refund is
used for example, in the case of an overpayment by the debtor.
The Payment Processor has the ability to calculate prompt payment discounts on invoices being paid and
deduct that discount from the payment. The Payment Processor interacts with the creditor authorisation
function within MYOB EXO Business. The release for payment is affected when this option is enabled within
EXO Business and therefore must be used in conjunction with the staff login features (see page 20).
Setting Up Payment Processor
Account > Creditor Payment Processor
When the Payment Processor is started, the following main screen is displayed:
When using the Payment Processor for the first time, you need to set up general information before
proceeding with the program.
477
MYOB EXO Business User Guide
Select Utilities > General Setup. The following window is displayed:
The following configuration options are available on this window:
Field
Description
Print Remittance
when paying by D/C
Check this box to enable the printing of remittance advice notes for surface
mail to the creditors.
Email Remittance
advice to Creditors
Check this box to enable e-mailing of remittance advice notes to
creditors. E-mailing remittance advice requires an external e-mail account
set up on the machine that runs the Payment Processor. The user also
needs the e-mail address set up in the Creditors Account Details (see page
108) window.
Show email before
sending
Check this to display the email on the screen before sending this to the
creditor.
Show foreign
currency warning
Highlights any foreign currency creditor payments in red and displays a
warning that the current selection contains foreign currency creditors.
Consolidate D/C to
General Ledger
If you intend a batch processing of direct credits to creditors, check this
checkbox to allow the Payment Processor to make one entry into the
General Ledger, for that list of payments. The General Ledger account is the
bank account that is updated with the consolidated entry. This
consolidation is posted to the current period in the General Ledger.
Allow selection of
GL Acc
Tick to specify the Direct Credits GL account.
Use Mailshot for
printing and
emailing remittance
when paying by D/C
Check this box to launch the Mailshot window (see page 530) after
processing Direct Credits (see page 488).
General ledger
account for D/Cs
Specify the account you use for Direct Credits. Only active if the Allow
selection of GL Acc checkbox is ticked.
478
MYOB EXO Finance
Use Separate
Cheque Report
Check this box to allow the printing of cheques on one sheet and remittance
advices separate forms (as opposed to a combined “tear-off” cheque and
remittance document on one form).
Note: If the Use Separate Cheque Report option is selected, the
FinPPSeqChqRep.CLF Clarity form is used, as well as the standard
FinChqWr.CLF.
Cheques per Page
This option is used in conjunction with the printing of cheques separate
from the remittance. It determines how many cheques can be printed at the
same time. For example an A4 sheet of paper may contain 3 individual
cheques. This requires the Use separate check report option to be checked.
First cheque number
This is only available when the Reset button has been clicked. Enter the
start of the range for the cheques to be used.
Last cheque number
This is only available when the Reset button has been clicked. Enter the end
of the range for the cheques to be used.
Reset
The Reset button allows the entry of the range of the cheques being used. If
a cheque inside that range exists in the creditor’s database, the range is
rejected.
Setting up Bank File Formats
Before processing Direct Credits or Direct Debits, bank file formats must be set up for Creditors and
Debtors.
To set up the file format of a bank output file:
1. In EXO Business Config, go to Admin > Banks > Debtors (Direct Debit) or Admin > Banks > Creditors
(Direct Credit).
2. Click New to create a new bank format.
479
MYOB EXO Business User Guide
3. Enter a bank number. If this is the default format check the Default checkbox. Enter a name in the
Bank Name field. Specify the output file and the file format: CSV or fixed length. For Direct Credit
file formats, enter the user bank name, user number and user payer per bank fields.
4. Clicking the File Format button displays a line-by-line illustration of how the file will be created:
For existing bank format entries, double-click on a row to show the bank name, whether it is the default
bank, the location that the file will be sent to, and the structure of the file.
Tip: MYOB EXO Business holds commonly used Bank Formats on the partner web site. These can be
downloaded, and then imported into Bank File Formats. This will save time in setting-up the file
details. However, once the details have been imported, they may have to be adjusted to meet
particular requirements. To load a standard file from the website into the bank setup, click the Load
Bank File icon.
480
MYOB EXO Finance
Setting up Lists
Creditors can be grouped together into lists for the purpose of selecting which Creditors to pay. For
example, Creditors that must be paid early can be put into a special list. This grouping is different from
Account Group, which is held on the Creditor account.
To create new account lists, select Setup Account Lists from the Utilities menu in on the Creditors Payment
Processor. The following screen is displayed:
To create a new list:
1. Click New. The following window appears:
2. Enter the name for the new list.
3. Click Add Account to add Creditors to the list.
4. Choose the Creditor from the Account Search window and click Select & Close or double click to
select this Creditor. Repeat steps 3 and 4 until all the required Creditors have been added to the
list.
5. Once all Creditors have been added to the list, click Save.
481
MYOB EXO Business User Guide
Editing and Deleting List Items
To edit or remove items:
•
To edit an existing item on the list, select the item and click Edit, or double-click on a row to view
and edit.
•
To remove a list, select the list and click the
•
To remove a Creditor account from the list, press CTRL+DEL and click OK to confirm the deletion of
this record.
button.
Note: This only deletes the Creditor from this list - it does not delete the Creditor record completely.
Batch Payment Process
Batch Processing involves setting up and processing a batch of payments to a number of creditors.
The payments are based on outstanding creditor invoices. So the key task is to select which invoices are to
be paid. This selection is based on user-defined criteria, which would include selecting invoices that are due
up to a certain date. Invoices must also be released before they can be paid, and the creditor’s account
must be set to a To Be Paid status before a payment will be generated to settle the outstanding invoices.
Selecting Creditor Transactions to Pay
To select the creditors to pay:
Select Account > Creditors Payment Processor, or from the MYOB EXO Business menu select Transactions
> Creditor Payments > Creditor Payment Batch Processing. The following window appears:
482
MYOB EXO Finance
Enter the criteria for selecting invoices to pay:
Enter the Creditor account name and press ENTER if only one Creditor is to be paid, (or use ‘?’ and ENTER) if
all the Creditors are to be paid.
•
Credit status and Account Group are from the Creditor Account
•
User A/c list is a previously defined user list (see page 479).
•
Due By date will determine which invoices will be selected. Only invoices with a payment due date
less than or equal to Due By will be selected for payment.
•
The Pay By Cheque or Direct Credit options select Creditors based on the Default Payment type on
the Creditor Account, e.g. the following account has a cheque default payment type.
Once the selection criteria have been entered, click Search. The main grid will be populated with the
creditor accounts that meet the selection criteria.
Release Invoices for Payment
A ‘payable’ invoice is one that is not held and is due. The release of invoices can be done at an account level
on the Creditors Accounts tab, or against specific transactions on the Transactions tab.
To release or not release ALL payable invoices on ALL displayed account, on the Creditor Accounts tab:
•
Click the Release All button on the toolbar to set ALL payable invoices on all displayed Creditor
accounts to RELEASED.
•
Click the Release None button on the toolbar to set ALL payable invoices on all displayed Creditor
accounts to NOT RELEASED.
To release or not release all the payable invoices on a specific Creditor, select the Creditor from the grid on
the Creditor Accounts tab, then right-click to display options to release or hold all invoices for that account:
The options listed will affect all payable invoices for the selected account.
483
MYOB EXO Business User Guide
Controlling Individual Invoices
Alternatively, individual invoices for a specific account can be controlled.
1. Double-click on a row and the system will display the invoices for the selected Creditor on the
Transactions tab.
2. To release, not release or hold ALL payable invoices on the selected Creditor, on the transaction
tab:
•
Click the Release All button on the toolbar to set ALL payable invoices on the selected
Creditor to RELEASED.
•
Click the Release None button on the toolbar to set ALL payable invoices on the selected
Creditor to NOT RELEASED.
•
Click the Hold All button on the toolbar to set ALL payable invoices on the selected Creditor
to HELD
3. To change the release status of individual invoices, select the row, then either use the SPACEBAR to
move through the statuses, or right-click and select the required status from the pop-up menu.
484
MYOB EXO Finance
Paying Part of an Invoice
To part pay an invoice:
1. Select the invoice that is to be part-paid.
2. Right-click on the selected line, and chose the Part Allocate option, or choose $Amount or
Percentage radio button, and click the Part Allocate button.
3. A prompt to enter the part allocation amount will be presented. Enter the dollar amount or the
percentage that is to be paid, depending on the option selected.
4. Click OK. The transaction grid will be updated to reflect the allocation entered, e.g.
Change Authorisation
Invoices may be ‘un-authorised’ if the value exceeded the entry clerk’s authorisation limit. An invoice
cannot be released until it has been authorised.
To change the authorisation:
Having selected the invoice, use F8 or right-click>Change Authorisation to toggle between authorised and
un-authorised. The authorisation value on the grid will reflect the change.
Note: To use the Authorisation function in MYOB EXO Business, set the profile Enable authorisation
on Creditors payments. The limits for each staff member must be set. In EXO Business Config, select
Staff > Profile Assignment > Staff, and set the Cred. Invoice Auth Limit field on the Authority tab.
485
MYOB EXO Business User Guide
Other Functions on the Transaction Tab
The following functions are also available from the Transaction tab:
•
Double-click on a selected invoice to see the invoice details.
•
To edit the Creditor account details, click the Creditor Account button on the toolbar.
•
To set the Creditor To Pay to Yes, click the Pay button on the toolbar.
•
To set the Creditor To Pay to No, click the Don’t Pay button on the toolbar.
Once the status of individual invoices is complete, click on the Creditor Accounts tab to deal with the next
Creditor account and/or complete the pay process.
Set Accounts to be Paid
This step involves specifying which creditors to pay. A Creditor may have its invoices in a released state, but
will not be paid until the Creditor To Pay status is set to Yes.
•
To set all displayed accounts to be paid, click the Pay All button on the toolbar on the Creditors
Accounts tab.
•
To set all displayed accounts to not be paid, click the Pay None button on the Creditors Accounts
tab
The To Pay status on individual accounts can be set using any one of these methods:
•
Select the account line on the grid, then use SPACEBAR to toggle To Pay between Yes and No.
•
Right-click on the account line on the grid, then use the Pay this account or Don’t pay this account
options.
•
Double-click on the account line to get to the Transaction tab, then click the Pay or Don’t Pay
button on the toolbar.
The To Pay column of the main grid shows which accounts will be paid (“Y) and which will not be paid (“N”).
486
MYOB EXO Finance
Prompt Payment Discount
To take up a supplier’s prompt payment discount, the Creditor’s account must be set up with a percentage
discount. To do this:
1. In EXO Business, go to the Details 2 tab of the Creditor Account screen and enter a value in the
Prompt payment discount field:
2. In Payment Processor, click the Calc Disc button (
).
Discount will be calculated on invoices where:
•
Creditors accounts where To Pay is set to “Yes”.
•
The prompt payment discount has been set-up for the creditor
•
The creditor’s invoices have been released.
•
The Due Date of the creditor’s invoice is less than or equal to the Payment Date on the main
Payment Processor screen.
A new transaction is generated to represent the discount taken.
487
MYOB EXO Business User Guide
Processing Cheques
Finance > Account > Creditors Payment Processor > [Process Cheques]
To process cheques:
1. Click the Process Cheques button to initiate the printing of cheques and accounting updates. This
button is only available when dealing with Cheque payments. The following message will be
displayed.
2. Click Yes to confirm that the cheque number is correct.
3. A Cheque Remittance report is generated; review this report, then print.
4. Once complete, a summary of the cheque run is displayed:
5. Select a line a press the SPACEBAR to toggle the Print OK? flag. If set to “No” the system will leave
the account unpaid.
6. Click OK to initiate the accounting updates. Accounting update will not be performed for accounts
where Print OK? is set to “No”.
A Creditor transaction is created for the payment. This is allocated to the invoices that made up the
payment, i.e. the released invoices.
The system also updates the General Ledger:
488
•
DR Creditors Control
•
CR Bank
MYOB EXO Finance
Processing Direct Credits
Finance > Account > Creditors Payment Processor > {Pay By Direct Credit option selected} > [Process
D/C’s]
To process Direct Credits:
1. Click the Process D/C button to initiate the creation of the Direct Credit file and accounting
updates. This button is only available when dealing with payments by Direct Credit. The following
window is displayed:
2. Modify the File Name if required. If a different bank to the default bank is required, uncheck the
Use Default Bank box, then select a new Bank from the drop-down-list. Click OK to continue. A
message window appears, giving the user an opportunity to view the file.
3. Click Yes, then Open to see the contents of the file.
4. The next message prompts the user to confirm that the process should be completed:
5. Click Yes to continue; this will perform accounting updates.
6. If the Use Mailshot for printing and emailing remittance when paying by D/C setup option has
been enabled, the Mailshot window will open (see page 530), allowing you to bulk send remittance
advice to Creditors.
7. The final step is to import the newly created Direct Credits file into the desktop banking software
and subsequently processed.
489
MYOB EXO Business User Guide
Manual Cheque Process
The manual cheque facility is used to raise a cheque payment when the payment does not necessarily
relate to outstanding creditor invoices. For example, a payment is being made to refund a debtor, or a
payment is being made where the creditors invoice either doesn’t exist or has not been entered into
creditors.
1. Select Transactions > Manual Cheque. The Manual Cheque entry window is displayed:
2. Enter cheque details:
Field
Description
To
The name of the person or organisation that this cheque is to be made out to.
Amount$
The total amount of the cheque. This field is calculated from the integrated
cashbook amounts (in the panel on the lower half of the screen) and therefore
cannot be changed directly.
Address
The address details of the recipient.
Details
Any details that you require.
3. In the bottom grid, enter the analysis of the payment. It can be charged to General Ledger expense
account(s), debtor accounts and so on, by entering the appropriate character in the Ledger Lr
column. Press D,C,X. D for Debtors Ledger, C Creditors Ledger (for payments in advance of an
invoice), eX Expense.
4. Enter Details to appear on the transaction narrative.
5. Enter the amount and tax code/amount.
6. Click the Print Cheque button on the toolbar to print the Remittance/ Cheque form.
7. A prompt is given to confirm the cheque number. Click Yes to continue.
490
MYOB EXO Finance
8. The system will prompt for confirmation that the cheque printed successfully. Click Yes to perform
the accounting updates. The system will provide the GL batch number.
9. Click the Clear Cheque button to clear any information that you have entered into this screen.
Reversing a Cheque
Transactions > Creditor Payments > Creditor Payment Batch Processing
To reverse a cheque:
1. Select the Reverse a Cheque Payment option from the Utilities menu. The Account Search screen is
displayed:
2. Select the Creditor account line for which the cheque is to be reversed and double-click it.
3. The Select Cheque Number list box displays the cheque numbers that have been processed for the
selected Creditor. Select the cheque number to be reversed, and click the Details button to display
the cheque details. If this is the cheque to be reversed, select the corresponding details line and
click the Reverse button. A prompt appears to confirm the reversing of this cheque.
491
MYOB EXO Business User Guide
Cheques Paid Report
Direct Credit Report
492
MYOB EXO Finance
Other Reports
The remaining reports open in a standard Print Preview window:
•
View All Outstanding Payments (Released)
•
View Cheque Details
•
View D/C Details
•
Invoices Flagged as “Do Not Pay”
•
Proposed Payment Run
Direct Debits
Direct Debits are used where the organisation has authority from Debtors to deduct funds from their bank
account to settle their debt with the organisation. The organisation will also need to have a direct debit
facility available on their desk bank software with their respective banking institution.
To open the Direct Debit window, select Direct Debits from the Account menu of the EXO Finance module.
Direct Debits are handled in batches. A new batch can be saved as an “Open” batch, which can be edited at
any point until it is “Confirmed”. When a batch is saved, there is an option to print an audit report.
Confirmed batches can be consolidated to a single batch if required.
493
MYOB EXO Business User Guide
Setting up Direct Debits
Setting up Debtors
For each Debtor account that you want to deduct funds from via Direct Debit:
1. Go to the Details 2 tab of the Debtor Account Details window (see page 96).
2. Change the Default Payment Type to “D/DEBIT”.
3. Enter the Debtor’s Bank Account Number and Bank Account Name. The Bank Account Name is the
name the customer has that bank account under; this will go into the bank file.
4. Choose an Advice Notification type: Fax, Email and/or Print. An advice notification type must be
chosen, even if you are not going to print or distribute the advice.
General Setup
Select General Setup from the Setup menu of the Direct Debits window.
The following configuration options are available on this window:
Field
Description
General Ledger
Account
Select the default General Ledger bank account for the Direct Debits to post
into.
No. of notification
days
Enter the number of days of notification required.
Print D/D advice
Tick this box if you want to print Direct Debit advice.
Consolidate D/D to
General Ledger
Tick this box if you want to consolidate Direct Debits to the General Ledger.
This enables the Consolidate button on the Batches tab of the Direct Debits
window.
Allow selection of
GL Acc for D/D
Tick this box to allow the selection of the General Ledger bank account for
each Direct Debit run. If this box is not ticked, the default account specified
by the General Ledger Account will be used.
Show email before
sending
Tick this box to show advice emails before sending them, if email has been
set as an advice type.
494
MYOB EXO Finance
Direct Debit Password
A password is required to process Direct Debits. To set this password, use EXO Business Config to enter a
value for the Password for consolidating and processing direct debits Company-level profile setting. By
default, the password is blank.
Note: The password is case-sensitive.
Bank File Format
Before processing Direct Debits, bank file formats must be set up for Debtors in EXO Business Config (see
page 479).
Processing Direct Debits
The Batches tab on the Direct Debit window shows all Direct Debit batches. Several options are available to
filter the list of batches.
Note: If the Consolidate D/D to General Ledger option has been enabled on the Direct Debits
General Setup window (see page 493), you can consolidate multiple batches into a single batch by
selecting multiple Confirmed batches with the CTRL key and clicking the Consolidate button.
495
MYOB EXO Business User Guide
Creating Direct Debit Batches
To create a new batch:
1. Click New. The view changes to the Debtor Accounts tab:
2. Set any filter options and click Search to display Debtor accounts with outstanding invoices whose
Default Payment Type is set to “D/DEBIT”.
3. Click All to release all invoices for all Debtors listed or double-click on a Debtor to go to
Transactions tab:
496
MYOB EXO Finance
a. Click All to release invoices for receipt or select an invoice and click Part Allocate to set a
part payment for the selected invoice. You can pay by an amount or a percentage. This
opens the following window:
Depending on whether the user selected to part pay by an amount or percentage, the
Amount field displays the total amount of the invoice or 100.00 (i.e. 100% of the invoice).
Enter the amount/percentage to be paid and click OK. The invoice now shows that it has
been released and the Amount to Pay column displays the payment amount selected by
the user.
Invoices can also be selected/unselected manually by selecting them and pressing the
space bar.
b. Once all invoices have been selected, return to the Debtor Accounts tab.
4. Specify a Payment Date and enter Ref1 and Ref2 information if necessary.
Note: You can also specify the General Ledger bank account for the Direct Debits to post into, if the
Allow selection of GL Acc for D/D option has been ticked on the Direct Debits General Setup
window (see page 493); otherwise this field is read-only, and displays the default General Ledger
account entered on the Direct Debits General Setup window.
5.
Save the Direct Debit Batch by one of the following methods:
•
If you will want to make further changes to the batch, click Save to save the current
changes. The status of the batch will remain “Open”.
•
If you are finished making changes to the batch and are ready to process it, click Confirm.
The status of the batch will change to “Confirmed” and it will no longer be possible to edit
it.
Processing Direct Debit Batches
To confirm that a batch is ready to be converted into a bank file, double-click on the batch to go to the
Debtor Accounts tab, then click Confirm. Once a batch is confirmed, no further changes can be made.
A confirmed batch can be converted to a Direct Debit file ready for transfer to the Banking software.
Remittances can be printed for the batch if required.
To process a Direct Debit batch:
1. Double-click on the batch to go the Debtor Accounts tab.
2. Click Direct Debit. You must enter the Direct Debit password (see page 495) to proceed.
Note: The password is case-sensitive.
497
MYOB EXO Business User Guide
The following window is displayed:
3. Modify the File Name if required. If a different bank to the default bank is required, uncheck the
Use Default Bank box, then select a new Bank from the drop-down-list. Click OK to continue. A
message window appears, giving the user an opportunity to view the file.
4. Click Yes, then Open to see the contents of the file.
The next message prompts the user to confirm that the process should be completed:
5. Click Yes to continue; this will perform accounting updates.
6. The final step is to import the newly created Direct Debits file into the desktop banking software to
be subsequently processed.
Sending Remittance Advice
Once a batch is confirmed, you can send remittance advice to the affected Debtors. Open the confirmed
batch and use one of the following methods from the Debtor Accounts tab:
498
•
Click the Remittance toolbar button to print the Direct Debit Remittance Advice report. This report
can then be sent to Debtors.
•
Click the Mailshot toolbar button to open the Mailshot window (see page 530), which allows you to
bulk send remittance advice to Debtors.
Taxation
The MYOB EXO Business taxation features centres around the ability to have multiple tax rate definitions
(optionally with separate tax control accounts) and being able to assign a tax rate to a transaction.
The default tax rate on a transaction can be configured in the system through a hierarchical rate selection
process. If the user has been granted permission, they can override the suggested default rate with a
manually selected tax rate.
Generic Tax by tax rate reports can be run regardless of the country of origin. Alternatively, tax rates can be
used in conjunction with tax return key points to generate specialised tax reports such as the Australian
BAS, the New Zealand Tax Return, and the Singapore Tax Return. Using the integrated reports also marks
source transactions with the tax return they were reported on to assist with prior period postings.
Automatic Tax Rate Hierarchy
When a transaction is entered, the tax rate used is automatically determined by a hierarchical structure.
The user can then accept this setting, or optionally manually override it.
The following diagram depicts the hierarchy for automatically selecting a transaction’s tax rate:
For example, when performing a Debtor’s Invoice function, the tax rate is automatically selected by using
the hierarchy as follows:
1. Account - the tax rate of the Debtor account is used if explicitly specified on the Debtor account.
2. Stock - if no tax rate has been set at the Debtor account level, then the rate applicable to the stock
item is selected, if explicitly set on the stock item.
3. Default Rate - if no tax rate has been set on the account or the stock item, then the default Debtors
rate from the MYOB EXO Configurator is used.
499
MYOB EXO Business User Guide
In the case of a Creditor’s Invoice that uses General Ledger (GL) codes instead of stock items, if the
Creditor’s account default rate is not set, the rate from the GL account is used, and if a rate is not set on the
GL account, the default creditor tax rate in the Configurator is used.
Once the tax rate is chosen, the user can also manually override this rate and specifically set the tax rate
number and tax rate, using the periscope function.
Overriding Function
The following options are available on many transaction entry windows (if enabled for the user), to allow
manual overriding of the automatically selected transaction tax rate and amounts:
•
Line periscope – to view line detail, and also to explicitly set the tax rate and amount.
•
Tax Toggle – to change amount to inclusive or exclusive of tax.
•
Tax Rates button – to compare calculated tax against default hierarchical tax rate.
Tax Setup
During the implementation phase, relevant tax rates are selected and assigned to their matching tax return
key point. The base Debtor and Creditor tax rates are also assigned, which form the default.
During operation, “automatic overrides” on the accounts and stock items are then configured as new
accounts or stock items are set up.
Company Defaults
The tax system in MYOB EXO Business is customised based on the country selected in the main Company
setup screen of EXO Business Config.
This setting determines settings such as the available Tax Return Key Points, as well as cosmetic display
information such as the local tax system name (e.g. GST, VAT).
To select the country for the system:
1. Go to EXO Business Config > Company > Company Details.
2. Select the appropriate country in the Country field.
Note: If the country of operation is changed, the default tax rates, and the tax rate settings must also
be reviewed and set to the appropriate country settings. Changing the country also alters the
available tax return key points, used to configure the integrated tax returns - see the following
sections for more detail.
Essential Defaults
Tax Basis
Invoice- or payments-based tax determines how taxation reports are run, and also if extra tax rate
functions must be enabled (e.g. whether an overriding tax rate is required on a payment with paymentsbased tax systems).
The tax basis is set at EXO Business Config > Essential > General Settings.
Note: MYOB EXO Business recommends and supports Invoice-based tax only.
MYOB EXO Business allows for a variety of tax rates to be recorded on each line of an invoice. When a
payment is made it is only possible to record a single tax rate. Many functions that are controlled by profile
settings (such as tax rate overrides at invoice line level) are suited only for invoice line based taxes.
500
Taxation
While it is possible to operate EXO Business and report tax on a payment basis, there are certain logical
paradoxes that can occur related to the fact that, by default, EXO Business allows tax to be recorded at a
finer level of detail than on a payment basis. For example, care should be taken to disable functionality that
promotes individual invoice line level control over tax rates. If multiple tax rates do occur on the same
invoice (or in fact to the same customer or supplier), then the only logical method of reconciling tax on a
payment basis is to ensure that payments received or made are consistently allocated against invoices, and
to produce estimates of tax by reports that calculate the tax content of invoices that are paid during the
period.
Note: Some features, such as the Australian BAS Return, cannot support payment-based tax, because
fundamental linking is done at an invoice line level.
Debtor Pricing
A setting is available to determine whether the sell pricing of stock is entered as tax inclusive or tax
exclusive.
To set the tax inclusive/exclusive setting for Debtor pricing:
1. Go to EXO Business Config > Essential > General Settings.
2. Tick the Tax inclusive pricing for debtors box to state that the sell prices of stock items are entered
as tax inclusive; leave the box unticked to state that stock prices are entered as tax exclusive.
Tax Rates
The tax rates are used to ‘group’ the purpose of the tax on an invoice or payment. It is these tax rates that
can be reported on for tax returns, and when linked with tax return key points form the basis of the Tax
Return systems.
To set up tax rates:
1. Open the tax rates table from EXO Business Config > Essential > Tax Rates.
2. Create a new tax rate by clicking New, or double-click on an existing rate to view and edit.
3. Enter the following information, and press Save to save the tax rate.
Field
Description
Tax rate name
Tax rate short name
User-friendly names used to reference the tax rate.
Tax rate %
The percentage rate of tax to be recorded.
Tax return key point
Used to identify the corresponding field on the Tax Return, using this
tax rate as part of the calculation. See Tax Return Key Points below.
GL control account
Leave the Use Default box ticked to use the GL control account
specified in Configuration Assistant > Business Essentials > GL
Control Accounts for the debtors and/or creditors tax account;
otherwise, untick the box and select a specific GL account for the rate.
To verify that the tax rates have valid key points, and to also check that only valid tax rates exist on debtor,
creditor, stock and GL accounts, click the Check Rates
button on the toolbar. This will perform a check,
and report errors and warnings.
501
MYOB EXO Business User Guide
In a new implementation, the suggested default rates for the selected country can be loaded by clicking the
Load Rates toolbar button. This button will only be available if the tax rate table is empty, and therefore
can only be used if no transactions containing tax rates have been entered in the system.
Troubleshooting
The most common reason for the Check Rates function reporting “null key point values” is because there is
no Tax return key point setting for a tax rate. A blank tax rate description will also make a tax rate invalid –
if the rate number is shown in the table, it is expected to have a matching tax key point. It is suggested that
blank description tax rates be avoided (or deleted), and that all tax rates point to a key point to confirm
they have not been ‘mis-configured’. The tax return point “NA – Not recorded on return” could be used if
the rate is not to be entered on a tax return.
Other common causes of invalid tax rates include incorrect initial setting of default tax rates, or data
imported directly to the database that has not set the tax rate fields. The following fields must be set when
importing data:
•
dr_accs.taxstatus
•
cr_accs.taxstatus
•
stock_items.salestaxrate
•
stock_items.purchtaxrate
•
glaccs.taxstatus
Default Tax Rates
Default tax rates are the lowest level in the hierarchy of tax rate defaults (see page 499), and will be used
on transactions unless specifically set by rates on the account or the stock item, or manually overridden.
These default rates could be thought of as the “fall-back” rate if there are no other overrides on the
transaction.
To set the default tax rates:
1. Go to EXO Business Config > Essential > General Settings.
2. Select one of the pre-defined Tax Rates for the Base debtor tax rate and Base creditor tax rate.
It is critical that the default tax rates be set correctly. Invalid tax rates may also prevent transaction from
being entered.
Tax Return Key Points
Tax Return Key Points are the references to the key points on the country’s tax return system. Tax return
key points are pre-defined, relevant to each country, and are viewable but not user-editable. It is the
assigning of the key point to a tax rate that controls what will appear on the tax return. More than one tax
rate may be added to the same tax return key point.
To view the pre-defined Tax Return Key Points, go to EXO Business Config > Administration > Finance > Tax
Return Key Points.
You can double-click on a key point to show more information on the item, such as the full description.
Tax Return Key Points are listed as Creditor and/or Debtor. These properties carry through when assigned
to tax rates, and therefore help prevent incorrect tax rates being entered on the wrong transaction types.
“DIS” and “N/A” are special key points that can be used to “disable” a tax rate to prevent data entry, or not
display the rate on a tax return.
502
Taxation
Tax Rate Hierarchy Setup
Once the tax rates have been linked to the tax return key points, and the default rates setup, optional tax
rate overrides by debtor/ creditor account and stock item can be set up. These settings will override the
default tax rates (see page 502) specified at Configuration Assistant > Business Essentials > General
Settings.
Existing Transactions
Databases with existing transactions will need to be checked before using the automatic tax return features
if they have not been configured previously. For new transactions entered going forward, this should not be
an issue as long as the settings are correct.
Historical information should be marked so that this information will not be picked up when the Include
previous option is selected on a new tax return, (i.e. when the intention is to include transactions added to
a prior period that has already had a Tax Return created, in whatever format was used previously). This
historical information could be captured by creating a “dummy” tax return to mark all the transactions in
the historic data’s date range.
Tax Rate on Debtors/ Creditors
The automatic tax rate used on a transaction can be determined by a rate set on a Debtor or Creditor
account. This is useful, for example, if the tax rate charged to a foreign Debtor is different to local accounts,
or if the tax rate paid to a foreign creditor is different. Setting the tax rate on an account will set the tax
rate on a transaction line to this account’s default rate.
The Debtor/Creditor default rate is the “highest” overriding level in the automatic hierarchy (see page 499)
(with the exception of manually overriding the rate during transaction entry).
To override the tax rate on an account:
1. Select the Debtor or Creditor from the Account > Debtor or Account > Creditor screen.
2. Select a rate for the Override Tax Rate field on the Details 2 tab. Leaving this field set to “-1. AUTO
SELECT RATE” will disable any overriding of the tax rate by the account, so the next level down the
hierarchy will be used (which is the tax rate on the stock item).
Tax Rate on Stock Items
The automatic tax rate used on a transaction can also be determined at a stock item level, e.g. to
accommodate various tax rates are applied specifically by stock item. A tax rate set on a stock item will be
not be used if a tax rate is also set on the Debtor/Creditor account, or if one is manually set during
transaction entry, as they have higher priority.
To set the tax rate on a specific stock item:
1. Select the stock item from the Stock > Account screen.
2. Select rates for the Sales Tax and Purch Tax fields on the Details 2 tab. Leaving these fields set to “1. AUTO SELECT RATE” will disable any automatic overriding of the tax rate by the stock item, so
the next level down the tax rate hierarchy will be used (which is the default tax rate of the system).
503
MYOB EXO Business User Guide
Manually Overriding Transactions
When entering lines on an invoice, the tax rate hierarchy is used to automatically select the tax rate on the
line. This automatic selection may then be optionally overridden by the user, if they are set up with
permission to do so.
On invoices where a rate other than the automatic rate is needed, the periscope button can be used on
that line manually enter the rates and value. (Use with caution when using a payment-based tax system).
The button next to the periscope allows price options to be changed between tax inclusive and tax
exclusive.
To compare the tax calculated by the default tax rate hierarchy with the rate manually overridden, click the
Tax Rates button on the toolbar.
Note: The ability to override the rates on invoices is controlled by the user profile setting Allow
override of tax amount for invoice lines.
Overriding the tax value on Debtors transactions is not recommended. If the client manually overrides the
Tax value field, this will result in a discrepancy between the Gross on the invoice and the Gross on the Tax
Return. Instead of changing the tax value, clients should change the tax rate.
Changing the Tax Rate
In some circumstances clients may want to change the tax, e.g. from 15% to 0%, because the tax on a
transaction is for a “Zero Rated” supply such as exported goods.
In this case, clients should change the Tax rate using the drop down of available rates to a rate that is set to
0%, and let the system recalculate the tax amount to $0.00. Do not simply override the Tax value to $0.00.
This way MYOB EXO Business will correctly calculate the Gross to be shown on the Tax Return.
Changing the Tax Value (Creditors Invoices)
In some rare circumstances, clients may want to change the Tax value on a Creditors transaction, e.g. when
entering a Creditors Invoice, the tax as calculated by EXO Business may differ slightly to that as charged by
the Supplier.
In this circumstance it is acceptable to override the Tax value to agree with the supplier’s documentation.
504
Taxation
Tax Reports
The main Tax Return functions under Tax Reports on the Reports menu are used to generate the tax return
(specific to the country), and are complimented with Tax By Rate Type and Tax Rate Exceptions reports. You
can also use the Tax Rate Exception Report menu item to highlight invoices where the tax rate is not
relevant to the transaction type.
Tax Returns
The following Tax Return reports are available:
•
•
•
•
New Zealand GST Return
BAS Tax Return
Singapore GST Return
VAT Return
Each report is accompanied by an Edit Return option, which lets you select and edit previous returns.
Tax by Rate Type Report
Reports > Tax Reports > Tax Report by Rate Type
The Tax by Rate Type report can be used to create “manual” tax returns, or to allow auditing of data. Two
reports exist: a tax rate report for payment transactions and a tax rate report for invoice transactions.
Note: The Clarity report for payment transactions is TAXByRateType_Payment.CLR, and invoice
transactions is TAXByRateType.CLR.
Tax Rate Exceptions
A Tax Rate Exceptions report can be run to help identify incorrect coding, or invalid codes. This report is
available from the Tax Return reports by selecting Utilities > Tax Rate Exceptions. (You can also add the
report to the main EXO Business menu for direct access.)
This report can help identify tax rates set up or used on the incorrect ledger if changes are made to the tax
rate settings.
505
Manufacturing
About Manufacturing
This section describes the Bill of Materials and Time Billing modules. It explains how a Bill of Materials
(BOM) is set up and processed. It also details the processing of a Works Order and explains the handling of
Time Billing.
Bills of Materials can be classified into three different types:
•
Kit – individual components are sold, and the code is a shortcut code to the collection of
components
•
Build – all components are consumed in a transformation to make an output stock item.
•
Order Template – a simple product list for use with Sales Orders only. The BOM code becomes a
shortcut to the product list, to save keying each product into the order.
Note: See the MYOB EXO Business White Paper “BOMs and Stock Code Enhancements” for technical
details on Bills of Materials, including information on the database tables and fields they use.
506
Manufacturing
Setting up Bills of Materials
Types of Bills of Materials
There are three main ways of using the Bill of Materials module: kits, manufactured items and order
templates.
Kits
A kit item is an item that is made up of a list of other stock items that are assembled at the time of sale. It is
a quick and easy way to sell something that consists of a number of different stock items. The kit may also
be priced separately allowing the selling price to be different from the sum of the selling prices of the
components.
In a kit Bill of Materials, the components are sold and the header is a shortcut code to a collection of
components.
Kits can be used with Sales Orders and the EXO Job Costing module, but not with Works Orders.
Manufactured Items
Manufactured Items, or “builds”, are produced from other stock items. When you manufacture an output
item you deduct the component items from stock and build the new manufactured output item, which is
then placed in stock. This item is then sold in the usual method with pricing specified on the output stock
items.
In a build Bill of Materials, the output item is sold.
Note: A bill without an output item cannot be a manufactured item. A bill with an output item is
usually a manufactured item but can also be a kit. When manufactured items are sold as kits, the
rules applicable to kits should be used.
Builds can be used with Sales Orders and Works Orders, but not with the EXO Job Costing module.
Order Templates
An order template is not a true Bill of Materials but a simple “shopping list” for use with Sales Orders only.
The Bill of Materials code becomes a shortcut to the product list, to save entering each product into the
order. No header line is included.
Note: The Auto Order Template on the Details2 tab of Debtor accounts (see page 97) only displays
order template Bills of Materials.
507
MYOB EXO Business User Guide
Creating a Bill of Materials
Account > Bill of Materials
The same interface is used to create Bills of Materials of all types.
To create a Bill of Materials:
1. Select Bill of Materials from the Accounts or Transactions > Manufacturing menu. The following
window is displayed:
2. Click the New button. The following window is displayed:
508
Manufacturing
3. Complete the fields on the Details tab:
Field
Description
Bill code
Enter the bill code for this Bill of Materials. This is the code that
you need to type to bring up your kit during invoicing. This code
will also be displayed in the Bill of Materials (search) window.
Note: The bill code can be changed by clicking on the Change Bill
Codes button. This changes all references to the bill code.
Description
Enter the description for this kit as you would like it to appear on
the invoice. This description is also displayed on the Bill of
Materials (search) window.
Type
Select the type of Bill of Materials:
•
Kit
•
Build
•
Order Template
Active
Select this option if the Bill of Materials is no longer active, i.e. no
longer available for use.
Hide lines on reports
Select this option if you want to hide components that make up
this Bill of Materials on the invoice/sales order. If this tick box is
not checked, the components are displayed on the invoice/sales
order lines (at zero price).
Output item/
Template item
For builds and kits, enter the stock code of the finished product
(the final output item). This field is optional for kits.
For order templates, if you wish to price the template as a single
item, enter the stock code for the template item.
Batch quantity
Specify the quantity (number of output items) that is produced
from the selected components. This defaults to 1 when you create
a new kit.
509
MYOB EXO Business User Guide
AutoBuild
This option is only available for Bills of Materials with the Type
“Build”. Normally, if a Sales Order is raised for the output item
and there are none in stock, you are given the option of putting
the item on back order. If this option is selected, you are also
given the option of building the item on the spot:
Note: Stock Shortage warnings only appear if the Stock out
warnings Company-level profile setting is enabled.
Overhead allocation (%)
The overhead involved when producing this item. The percentage
overhead is then taken from the final output. This field is optional
for kits.
Notes
Enter any notes that relate to the kit.
Pricing By
Select the pricing mode you want to use:
Sell prices
510
•
Components/Products - Select this option if you would
like to price this Bill of Materials by component (kits and
builds) or product (order templates). This uses the sell
prices set up in the stock window for each component
stock item you select for this kit, and works by adding
them together to give you a final price for your kit.
•
Total/Template - Select this option if you would like to
specify the sell price for this Bill of Materials. If you select
this option you will also need to enter sell prices.
When pricing by Total, enter the prices that this item will be sold
for.
Manufacturing
3. Click the Components tab (kits and builds) or Products tab (order templates).
4. Select the cost type for the components/products:
•
Latest - The current cost price for the stock item.
•
Average - The weighted average cost price of the stock item.
•
Standard - The standard cost of this stock item.
Note: The Cost Type option is not available for order templates.
5. Click the
or
buttons to add or remove items to the Bill of Materials.
Note: The maximum number of component/product lines allowed in a Bill of Materials is 200.
6. Complete the following fields for each item.
Field
Description
Stock Code
The stock code of the item.
Description
The description for the item.
Quantity
The quantity of the item that is used in the Bill of Materials. For order
templates, this value can be set to 0, so that the user will be prompted to
enter a quantity.
Unit Cost
The cost price of the item, according to the selected Cost Type. Read only.
Total Cost
The total cost for the item, i.e. the unit cost multiplied by the quantity. Read
only.
Default
Enter “Y” if the item is included in the Bill of Materials by default.
Report Code
The report code associated with the item’s Stock Group.
511
MYOB EXO Business User Guide
7. The total cost of all items is displayed at the bottom of the window.
8. You can double-click on an item to drill down to the Stock window for that item.
9. Click Save.
Tip: You can also create a Bill of Materials by making a copy of an existing Bill of Materials (see page
512).
Copying a Bill of Materials
Account > Bill of Materials
One way of creating a new Bill of Materials is to create a copy of an existing Bill of Materials and then
editing it as required.
To copy a Bill of Materials:
1. Select Bill of Materials option from the Accounts or Transactions > Manufacturing menu. The
following window is displayed:
2. Select an existing Bill of Materials and click the Copy Bill button. This displays the Copy Bill of
Materials window:
3. Enter a New Bill Code and Description, then click OK.
A new Bill of Materials is created with the same details as the original. You can edit the details of the new
Bill of Materials if necessary.
512
Manufacturing
Invoicing a Bill of Materials
When invoicing a Bill of Materials, enter the Debtors Invoice (see page 386) in the usual method. In the
Stock Code field enter the Bill of Material’s Bill Code preceded by a full stop. e.g. .CARCARE03. Depending
on whether you enabled the Hide lines on reports option during setup, you may or may not be able to view
the components that make up this Bill of Materials. Continue to enter any other required details and click
Save to save the invoice.
Supplying a manufactured item in a Sales Order is entered exactly the same way as above. Enter the Output
Code you created into the stock code field. Manufactured items can also be transferred between locations
as a standard stock item.
Editing Bills of Materials on Invoices
By default, the quantities and prices of Bill of Material header and component lines are locked from editing
to ensure the header/lines relationship. (Order templates are not true Bills of Materials, but simply
“shopping lists”, so this constraint does not apply to them.)
If you want to be able to edit the lines independently, you must disable the Enforce bill of materials header
and line constraints Company-level profile setting. Disabling this setting means that Bill of Material lines
are treated as individual lines.
General Ledger Postings for Bills of Materials
The General Ledger postings generated when a Bill of Materials is sold vary depending on the Bill of
Material’s type.
Postings for Kits
For kits, the component lines are equivalent to ordinary sales lines. The header line does not post to the
General Ledger and the output code is not referenced.
The General Ledger accounts for Sales and Cost of Sales arise from the component stock item as per the
rules for ordinary sales lines.
Postings for Builds
Postings for builds are as follows:
•
Component lines that are stocked items are not posted to the General Ledger (they don’t affect the
value of stock).
•
Component lines that are lookup items are posted to the General Ledger as adjusting the value of
stock (i.e. are value-add). These are posted with the General Ledger code for the Stock On Hand
account from the GL Control Account setup (see page 240).
•
The Bill of Materials header generates two entries:
o
For inwards goods - to the General Ledger purchases account set on the Output item, (i.e.
receipt the manufactured item into stock). The cost and sell of the stock transaction is the
sum of the costs of the components (including lookups) and therefore incorporates the
contra-entry for added value represented by the lookup item posting.
o
For the sale of the output item - with General Ledger accounts for the sales and cost of
sales being taken from the Output item.
513
MYOB EXO Business User Guide
Postings for Order Templates
For General Ledger posting, the system treats lines of an order template identically to ordinary lines - the
fact that they were derived from a Bill of Materials does not make a difference.
Processing Builds
Build type Bills of Materials must be processed to consume the component items and create the output
item. You can either process a bill of materials (manufactured item) individually or in a batch from inside
the Bill of Materials screen. This process for a Bill of Materials is a one-step process, immediately
consuming components and producing an output item, as opposed to a production process that moves
through many production stages. If you wish to process a bill through a production process, you can use the
Works Orders (see page 517) module.
Notes
•
Batch processing is designed to quickly create simple manufactured items. It does not handle batch
numbers or serialised stock items. To manufacture items for batch-numbered components or
output items, use the more sophisticated Works Order functionality (see page 517).
•
Processing a Bill of Materials produces the following stock transactions:
o
Adjust Out transactions for the components
o
Adjust In transaction for the Bill of Materials output item
Processing a Single Build
Account > Bill of Materials
Once you have created a Bill of Materials with the type “build”, it must be processed in order to consume
the component items and create the output item.
To process a single build-type Bill of Materials:
1. Select Bill of Materials from the Accounts or Transactions > Manufacturing menu.
2. Select a Bill of Materials with a Type of “Build”. Double-click to open the Bill of Materials.
3. Click the Process button. The following screen is displayed:
514
Manufacturing
4. Complete the fields on the screen.
Field
Description
Bill code
The bill code of the Bill of Materials being produced.
Produce quantity
The quantity of output items you want to produce. The default is 1.
Reference
An optional reference code. May be left blank.
Component
location
The number of the location that components will be taken from to
produce this item.
Product Location
The number of the location that you want the output item receipted to.
Process date
The date that this item is to be processed. The default is today’s date.
5. Click the Check Stock button. The system checks the stock and provides a status report on the
current availability of component stock compared to requirement, to produce the desired quantity
of output items.
6. If there are no stock shortages, click the Process button.
7. A confirmation message appears to verify that you want to process the stock. Click Yes.
8. The bill is processed and a success message is displayed at the end of the status report. Click the
Print button for a printed copy of the Status Report.
Once the process is complete, the stock ledger will contain negative movements for the components that
made up this bill code. The output item will show a positive stock movement for the produce quantity.
515
MYOB EXO Business User Guide
Processing a Build Batch
Transactions > Manufacturing > Bill of Materials Batch Entry
Once you have created Bills of Materials with the type “build”, they must be processed in order to consume
the component items and create the output item. Multiple builds can be processed in a single batch.
To process a batch of build-type Bills of Materials:
1. Click the Batch Process button on the Bill of Materials window (see page 507), or select Bill of
Materials Batch Entry from the Transactions > Manufacturing menu. The following screen is
displayed:
Tip: You can also access this screen by clicking the Batch Process button on the Bill of Materials
screen (see page 507).
2. Click the New button and complete the fields on the screen.
516
Field
Description
Transaction Date
The date of the transaction. Defaults to today’s date.
Component
Location
The number of the location that components are being supplied from.
Reference Code
An optional reference code for the batch. May be left blank.
Product Location
The number of the location to which the final product(s) should be
transferred.
Manufacturing
3. Enter the details of all Bills of Materials that you want to include in the batch.
Field
Description
Bill Code
The bill code of the item being processed.
Description
The description related to the bill code.
Quantity
The quantity to be produced.
Analysis
Codes
Any Analysis Codes (see page 84) you want to associate with the Bill of
Materials.
4. Once all details are entered, click the Process button.
5. A confirmation message appears to verify that you want to process the stock. Click Yes.
6. When the processing is complete, a success message is displayed:
Works Orders
Using Works Orders
A Work Order is essentially a more complex processing version of a build-type Bill of Materials, allowing
you to move through the production status for each stage of component assembly until the final product is
produced.
You still need to set up your build-type Bills of Materials (see page 507) before you can use Works Orders.
The Works Order processing function supports batch codes and serialised stock items.
Note: Works Orders are only available if the Use works orders Company-level profile setting is
enabled.
517
MYOB EXO Business User Guide
Creating a Works Order
Transactions > Manufacturing > Works Order Entry
A Works Order is a more complex version of a build-type Bill of Materials.
To create a Works Order:
1. Select Works Order Entry from the Transactions > Manufacturing menu. The following window is
displayed:
2. Click the New button. The following window is displayed:
518
Manufacturing
3. Complete the fields on the Details tab.
Field
Description
Works order no
The number of the selected works order. This number is assigned when
the Works Order is first saved.
Entered by
The name of the staff member entering the works order. Click the
button to select the staff member’s name.
Billomat code
The Bill of Materials code. Click the
button to select a Bill of
Materials. Only build-type Bills of Materials are available, as these are
the only BOMs that undergo a manufacturing transformation.
Product code
The code of the Bill of Materials’ output item.
Qty. required
The quantity to be produced.
Batch code
The production batch code. You can add this Works Order to an existing
batch.
Status
The production status:
•
Uncommitted
•
Committed
•
In Production
•
Completed
Reference
An optional reference code. May be left blank.
Entry date
The start date for the Works Order.
Production date
The production date for the Works Order.
Due date
The date the Works Order is to be completed.
Expiry date
The date the Works Order expires.
Product Loc
The location to which the final product should be transferred.
Component Loc
The location that components are being supplied from.
Linked sales order
The number of the Sales Order (see page 353) that the works order is
linked to. Click the
optional.
Production notes
button to select a Sales Order. This field is
Any notes that you may need to make in relation to this works order.
519
MYOB EXO Business User Guide
3. Click the Components tab.
4. Complete the fields at the top of the Components tab.
Field
Description
Qty Required
The total quantity to be produced.
Qty produced
The quantity to be produced in this operation.
Date produced
The date the works order is completed.
Product Loc
The location to which the final product should be transferred.
Batch code
The production batch code.
Expiry date
The date the Works Order expires.
Component Loc
The location that components are being supplied from.
5. Use the buttons on the toolbar to add or remove components:
Button
Function
Load all components from the Bill of Materials.
Add a component.
Remove a component.
Replace a component.
520
Manufacturing
6. The following fields are displayed for each component:
Field
Description
Stock Code
The stock code of the item.
Description
The description for the item. Read only.
Qty Reqd
The quantity of the component required to fulfil the entire Works Order.
Read only.
Qty Used
The quantity of the component to be consumed in this operation.
BatchCode
The production batch code.
Req. Cost
The total cost of the required number of the component. Read only.
Used Cost
The cost of the components consumed in this operation. Read only.
Analysis Codes
Any Analysis Codes (see page 84) you want to associate with the Works
Order.
7. Clicking the
button sets the Qty Used value for all components to the Qty Reqd value.
8. You can double-click on an item to drill down to the Stock screen for that item.
9. Click Save. You are given the opportunity to print the Works Order.
Note: The Works Order will appear on the Works Order tab (see page 177) of any Stock item that is
involved in it, either as a component or as an output item.
Processing a Works Order
Transactions > Manufacturing > Works Order Entry
Once a Works Order is created, it must be processed to consume the component items and create the
output item.
Unlike Bills of Materials, that are either processed or not processed, Works Orders allow you to specify the
production status of the order.
To set the production status of a Works Order:
1. Select Works Order Entry from the Transactions > Manufacturing menu.
2. Double-click on the Works Order whose status you want to change.
3. On the Details tab, set a value for the Status property. Choose from:
•
Uncommitted
•
Committed
•
In Production
•
Completed
Works Orders do not generate stock movement transactions until they are fully processed, i.e. Completed.
521
MYOB EXO Business User Guide
To process a Works Order:
1. Select Works Order Entry from the Transactions > Manufacturing menu.
2. Double-click on the Works Order whose status you want to change.
3. Select the Components tab.
4. Click the Process button on the Components tab toolbar. Click Yes to confirm.
This posts the Works Order to the Stock Ledger. The posting consists of negative stock movements to
component items and a positive stock movement to the output item.
The production status of the Works Order is automatically set to “Completed”.
Printing Works Orders
Works Orders can be printed out individually or in batches. To print the currently selected Works Order,
select Print Works Order from the Print drop-down menu on the Works Order window’s toolbar.
A preview of the Works Order is displayed. Click Print on the preview window to print the Works Order.
To print a batch of Works Orders, select Print batch of works orders from the Print drop-down menu on
the Works Order window’s toolbar. The following window appears:
Enter options to specify the Works Orders that you want to include in the printing operation, then click OK.
Click Yes to confirm.
Each Works Order is previewed one at a time. Click Print on each preview window to print each Works
Order.
522
Manufacturing
Time Billing
Handling Time Billing
Utilities > Debtor Utilities > Time Billing
The time billing module allows you to charge an account for time-related work. You can add multiple time
charges to an account and then produce a single, itemised invoice at any time.
To create a time bill:
1. Select the Time Billing option from the Utilities > Debtors Utilities menu. The Time Billing window
is displayed:
2. Click the New button. The following window is displayed:
523
MYOB EXO Business User Guide
3. Complete the fields on the Details tab.
Field
Description
Account
The name and number of the debtor account.
Staff
The name of the staff member. You can type the name or select from the list.
Date
The date the job was done.
Start Time
The start time of the job.
Stop Time
The end time of the job.
Hours
The total number of hours being billed. This is automatically calculated based
on the start and stop times you have entered.
Code
The code of the stock lookup item related to this job.
Details
The description of the selected code. This is automatically entered based on
the code.
Hourly Rate
The hourly rate for this code. This is the rate specified in the Stock Item
Details Sell Prices and is automatically entered here.
Total Charge
The total charge for the job. This is automatically calculated based on the
hours and the rate.
4. Click Save. A time bill for the specified account is created.
524
Manufacturing
Invoicing a Time Bill
Utilities > Debtor Utilities > Time Billing
To invoice a time bill:
1. Select the Time Billing option from the Utilities > Debtors Utilities menu.
2. Select the Invoicing tab.
3. Complete the fields on this tab.
Field
Description
Account
The name and number of the debtor account.
Order No
The order number.
Reference
The reference number.
Print Invoice
Tick this option if you want to print the invoice.
Invoice Date
The date the invoice is created.
4. Click the Invoice button.
525
MYOB EXO Business User Guide
Viewing Time Billing Reports
Utilities > Debtor Utilities > Time Billing
To view a time bill report:
1. Select the Time Billing option from the Utilities > Debtors Utilities menu.
2. Select Time to bill by Customer from the Report menu.
3. Set the date range and select the status of the invoices you want to view, then click OK. The Time
To Bill by Customer report is displayed.
Note: If you need to change any details such as the number of hours being billed or the code, select
the account from the Time Billing search page and double-click it. Make the necessary changes on
the Details tab and save these changes.
526
Document Manager
This is a very powerful tool in MYOB EXO Business, as it allows you to keep copies of the documents you
have sent to each Debtor and Creditor. These could be anything from a .GIF to an .AVI file, or anything that
is recognised by Windows applications. You can also easily create mail merge templates with the customer
or supplier name and address details. You can even personalise the document to suit your requirements.
Accessing the Document Manager
There are two ways of accessing the Document Manager to create and manage your documents:
•
Select Document Manager from the Utilities menu.
•
On the Documents tab of an account (see page 144), click the
button.
Both of the methods will open the Document Manager window:
Entering a query into the search key will search for all documents regardless of the Creditor or Debtor.
Double Click on any one of these documents to edit it in the document manager window.
Click
New to create a new document using the Document Manager (see page 529).
527
MYOB EXO Business User Guide
Grid Field definitions
The grid has a header for each column, these are detailed in the table below:
Field
Description
Seqno
A unique identifier for records in tables.
Savedate
The date of the last edit that require a save.
Docdate
The date the document was attached to the account.
Module
The module of MYOB EXO Business. This will default to the ledger that you are
currently in (Debtors or Creditors).
Refcode
Any internal reference text for the document.
Doccode
Any internal document code for the document.
Description
A description of the document.
Importing and Exporting Documents
Debtor/Creditor Account > Documents Tab >
and
Importing a Document
To import a document:
1. From the Documents tab inside the Master Account, click the Import button .
2. Select the appropriate document / file and click Open, you will now see the following window:
To reduce the size of the database, MYOB recommends keeping this file as a link only.
3. Click OK and the Document Manager window (see page 529) opens, prompting for details on the
recently imported document.
528
Document Manager
If you choose to import this document as a link, this is labelled in the Document Manager window:
Exporting a Document
To export a document:
1. From the Documents tab inside the Master Account, click the Export button .
2. Select the destination directory for this document and click Save. A window will open confirming
the successful export, click OK to complete the process.
Document Manager Window
Use Import, Export and View to manage documents. Document date, File name and Source path will be
added automatically when a document is imported.
The following table describes the fields in the Document Manager window.
This window allows you to edit or create fields to the new/edited document.
529
MYOB EXO Business User Guide
Field definitions
Field
Description
Module
The module of MYOB EXO Business that the document applies to. This will
default to the ledger that you are currently in (Debtors or Creditors).
Account
The Debtor or Creditor account that the document is attached to.
Reference
Any internal reference text for the document.
Document Code
Any internal document code for the document.
Description
A description of the document.
Document date
The date the document was attached to the account. This field will be greyed
out and you will not be able to edit it. Once you have selected the document
that you wish to import, MYOB EXO Business will insert the current system
date and time that this document was imported.
File Name
The filename of the attached document. This field is also greyed out and will
display the original name of the document that you selected to import. Once
again you cannot edit this field.
Source Path
This will display the source path from which this document was selected. This
is also greyed out and you will not be able to edit this field. Once you have
added these in, click “Save” to save the document.
This will help you to identify
the document when you go
back to view it at a later
date.
Buttons
Change Document
Import a new document, replacing the original document, i.e. the existing
document will no longer be attached. This function can also be accessed by
clicking the toolbar button.
Export
Export a document stored in the MYOB EXO Business database to a separate
standalone file. This function can also be accessed by clicking the toolbar
button.
Open
Opens the document in the default viewer. This function can also be accessed
by clicking the
toolbar button.
530
Document Manager
Bulk Sending Documents
The Mailshot function lets you bulk send documents to Debtors, Creditors or Contacts by print and/or
email. The Mailshot function is available from the following windows:
•
Debtor Statements (see page 398)
•
Invoice Batch Printing (see page 394)
•
Creditor Remittance Advices (see page 342)
•
Direct Debits (see page 495)
•
Campaign Waves (requires EXO Business CRM)
Specify the following details:
Detail
Description
Printer URL
Select the printer to use for those documents that are to be printed
out.
Email Mode
Specify how emails should be sent. The following options are
available:
•
Disabled - Emails will not be sent.
•
EXO SMTP - Emails will be sent via SMTP using the EXO
Business Email Sender (see page 47). This is better for sending
large batches of emails.
•
Default Email Client - Emails will be sent using the user’s
default email software. This is suitable for smaller batches of
emails.
531
MYOB EXO Business User Guide
Email Body as plain text
Tick this option to restrict the body of emails to plain text, rather than
HTML.
Confirm each email on
screen
Tick this option to display a confirmation message before sending
each email, or leave it blank to send emails automatically.
Save copy of sent email to
documents
This option only appears when sending a mailshot from a campaign
wave in EXO Business CRM. Tick this option to save a copy of the sent
email to the Docs tab of each Contact that the mailshot is sent to.
Note: A History Note is always created for each Contact when a
mailshot is sent. If this option is ticked, the email is saved in
addition to the History Note.
CLE File
Specify the Clarity email template to use for email communications.
CLM File
Specify the Clarity mail merge template to use for printed documents.
Attachments
Specify any attachments to be sent with emails.
The bottom section displays all Debtors, Creditors or Contacts who will be sent communications by the
mailshot. Double-click on a Debtor, Creditor or Contact to drill to that record.
Tick or clear the Email and Print boxes for each Debtor to specify how statements will be sent to them (or
use the toolbar buttons to check all Email and/or Print boxes). The default settings for these options are
determined by the following properties:
•
For Debtor Statements, the Statement Delivery setting on the Debtors Details 2 tab (see page 96).
•
For Direct Credit remittance advice, the Remittance Method setting on the Creditors Details 2 tab
(see page 110).
•
For Direct Debit remittance advice, the Advice notification settings on the Debtors Details 2 tab
(see page 96). (These settings are only available when the Default payment type is set to
“D/DEBIT”.)
The default value for the Primary Email is determined from the following properties:
•
If a Statement Contact (Debtors) or Remittance Contact (Creditors) is specified for the
Debtor/Creditor, this Contact’s email address is used; otherwise
•
if a default Contact has been set on the Contacts tab for the Debtor/Creditor, this Contact’s email
address is used; otherwise
•
the company email address on the Details 1 tab of the Debtor/Creditor is used.
Email addresses can be manually edited if necessary.
Note: When sending a mailshot to Contacts, if any lines are highlighted in grey, this means that the
highlighted Contacts have the Opt-Out eMarketing flag ticked. These Contacts will not be processed
in the mailshot, regardless of whether or not the Email and Print boxes are ticked.
When all options are set, click the Go button to start the mailshot.
When running a mailshot from the Invoice Batch Printing window, you are given the option of collating
invoices for Debtor account - in this case, a single email is sent to each Debtor, with all invoices for that
Debtor attached; otherwise each invoice will be emailed separately. The # Invoices column displays how
many invoices there are for each Debtor (this column is only available when running a mailshot from the
Invoice Batch Printing window).
532
Document Manager
Note: If the attachments to a collated email exceed a size limit (set by the Batch Invoice Mailshot
Attachment Size Limit profile setting), the invoices will be split over multiple emails.
As statements are sent, the Done box for each account is ticked. The Pause and Stop buttons allow the
mailshot to be suspended or cancelled before it is complete.
Creating Merge Letters
By creating a template document in Rich Text Format you can merge customer details into another .RTF file
for distribution. Template files are expected to have TP_*.RTF
To create a merge letter:
1. Open a Debtor or Creditor account and go to the Documents tab.
2. Open the Select Clarity Merge Letter window by clicking the
template from the list.
button. Choose the appropriate
533
MYOB EXO Business User Guide
You should already have a “form letter” prepared with the database fields you wish to insert into
the letter defined. An example is given below.
3. You will be asked to choose the original Template file and destination for the output file. Choose
these and select OK.
4. Once the document has been created, MYOB EXO Business will open it up automatically.
5. On closing this document, MYOB EXO Business allows you to put in the referencing information for
the document before you save it.
534
Document Manager
Merging Account Data with an Existing Template
To create a form letter by merging account data with a template:
1. Open a Debtor or Creditor account and go to the Documents tab.
2. Click the
button.
3. Choose a predefined template file using the ellipsis button [...] then click OK.
4. Edit the document in the default editor.
5. Save the changes to your edits and click Yes on the Add to account documents dialog.
From this point the Document Manager window opens, prompting the document descriptive fields to be
completed.
535
Reporting
MYOB EXO Business contains various methods of obtaining reports, including tools that allow the user to
create their own GL reports, customise forms and create other general purpose reports.
Reports and reporting options are all accessed from the Reports menu. This menu contains the following
options:
Option
Meaning
Dashboard
Opens the Dashboard (see page 541), which displays a configurable view
of multiple summary reports.
Clarity Report Browser
Opens the Clarity Report Browser (see page 539), from where you can
select and run reports from various categories.
Clarity Report Designer
Open the Clarity Report Designer (see page 540), which is a utility that lets
you customise reports and forms, or create entirely new ones.
Analytics
Opens the EXO Business Analytics module (see page 551), which takes
“snapshots” of business activity, allowing viewing of historic key
performance indicators such as stock and sales activity.
Debtors Reports
Sub-menu containing a selection of Debtors reports.
Creditors Reports
Sub-menu containing a selection of Creditors reports.
Sales Reports
Sub-menu containing a selection of Sales reports, as well as the Sale
Analysis Designer
Stock Reports
Sub-menu containing a selection of Stock reports.
Purchases Reports
Sub-menu containing a selection of Purchases reports.
General Ledger Reports
Sub-menu containing:
•
A selection of General Ledger reports, including the Chart of
Accounts.
•
Options to set up special GL Reports using the GL Report Writer
(see page 247), and then run them.
•
Options to set up and run GL Report Batches (see page 261).
Tax Reports
Sub-menu containing various Tax and Tax Return reports (see page 505),
as well as options to edit previous Tax Returns.
Currency Reports
Sub-menu containing a selection of Currency Exchange Rate reports.
Other Reports
Sub-menu containing reports on the MYOB EXO Business system.
Shift Report
Opens a window for running and printing Shift Reports to be used with the
POS system.
536
Reporting
Note: This is the default layout for the Reports menu. This menu can be customised using the Menu
Designer (see page 77); in this case, the available menu options may not match the options listed
here.
Running a Report
Select a report to run from the Report menu or from the Clarity Report Browser (see page 539). After
running the report, you must enter any report parameters required. You can then output the report to the
required destination in the required format.
Specifying Report Parameters
If no parameters are required, the report is generated immediately. A report preview (see page 537) is
displayed, which can then be printed.
Many reports use a standard Clarity Report Parameters window for gathering parameters (some or all of
which may be optional):
The exact parameters available differ from report to report, but the layout of the Clarity Report Parameters
window and the available options are common to all reports that use the window.
Note: Some reports use a more complex custom window for gathering parameters. These windows
are specific to their report.
Viewing, Printing and Exporting Reports
Once the required parameters have been entered, the report can be generated and then output to a
variety of destinations. The Clarity Report Parameters window offers the following options are available
from its File menu or toolbar:
•
Print - generates the report and prints it to the selected printer.
•
Preview - Generates the report and displays it in an onscreen viewer. The report can be printed
directly from the preview, or you can close the preview to return to the Clarity Report Parameters
window.
537
MYOB EXO Business User Guide
538
•
Export to File - Generates the report, then displays a Print to File window, allowing you to select
the file format to export the report to.
•
View Grid - Displays a grid containing the data that the report is generated from. This view is also
available on the Grid tab of the Preview window.
Reporting
•
Email Attachment - Generates the report, then attaches it to a new email as a PDF. The default
email client is used for composing and sending the email.
•
Export to XLS Report - Generates the report as a Microsoft Excel report, then opens it in Excel.
Note: When using Excel 2010, the report will open in Protected View mode. To prevent this from
happening, open the Trust Center in Excel and add the EXO Business temporary directory as a Trusted
Location. The temporary directory is specified by the Directory location for temporary files Computerlevel profile setting.
Clarity Report Browser
Reports > Clarity Report Browser
The Clarity Report Browser displays a structured list of all available reports. Reports can be run directly
from the browser, or they can be opened for editing in the Clarity Report Designer.
Running and Editing Reports
If the Show Preview button is toggled on, clicking on a report displays a review of the report on the right of
the window.
Select a report and click Run Report to run the report (see page 537).
Select a report and click Edit to open the report for editing or customisation in the Clarity Report Designer
(see page 540).
539
MYOB EXO Business User Guide
Sorting Reports
EXO Business looks for Clarity reports and forms in the directories specified by the Computer Profile
settings Directory for Custom Clarity Forms(.CLR,.CLF and .FMT) and Directory for Standard Clarity
Forms(.CLR,.CLF and .FMT). All Reports detected by MYOB EXO Business are displayed in the browser,
sorted into categories.
Information on the report’s category is stored in the file properties of each report file. If this information is
not present for a report file, the report will be classified into the “No Category” category. Right-click on a
report and select Properties to view that report’s file properties.
Note: EXO Business keeps a record of all standard reports that are available by default. Selecting File
> Reclassify All Reports sorts all known reports that are missing their classification data into the
appropriate categories.
Clarity Report Designer
Reports > Clarity Report Designer
The Clarity Report Designer is a utility for creating and editing reports and forms in MYOB EXO Business. It
features a wide range of options for drawing in data from EXO Business database tables, then sorting and
presenting the information on a report whose appearance can be completely customised.
Note: See the MYOB EXO Business Clarity User Guide for full details on the use of the Clarity Report
Designer.
Existing reports can be opened in the Clarity Report Designer by selecting them on the Clarity Report
Browser (see page 539) and clicking Edit. Alternatively, you can select File > Open in the Clarity Report
Designer and browse to find the .CLR or .CLF file for the report or form you want to edit.
Note: The directories that MYOB EXO Business looks in for Clarity reports are specified by the
Computer Profile settings Directory location for custom Clarity forms (.CLR,.CLF and .FMT) and
Directory location for standard Clarity forms.
540
Reporting
Dashboards
Dashboard Interfaces
Reports > Dashboards
Dashboards are customisable displays showing one or more “widgets”. Widgets are small, self-contained
information panes; in many cases they are summary reports, making the Dashboard an at-a-glance
overview of the entire MYOB EXO Business system. Other functions can be added as widgets however,
including external applications.
The default Business Flow Menus (see page 80) of several EXO Business modules are composed of
Dashboard interfaces; this allows them to be customised by each user, and also means that they can display
current system data on the main menu.
Data on Dashboard reports can be printed or exported using the options on each widget’s toolbar.
541
MYOB EXO Business User Guide
Laying out Dashboards
To add a widget to the Dashboard, click the Add Widgets button (
). This opens the My Widgets List
window, where you can select the widgets to appear on the Dashboard:
Widgets only appear in this menu if they have been added to the relevant drop down menu using the Drop
Down Menu Designer (see page 77). Once widgets have been added on this list, they can be enabled or
disabled using the Setup Widgets dropdown menu (
).
To change the layout of the Dashboard:
•
Drag widgets around to re-order them.
•
Click and drag the border of a widget to re-size it.
•
Use the Zoom Setting options on a widget’s toolbar to make that widget fit to its frame:
•
Click the
button to reset the layout, organising all widgets into tiles the same size.
Click Tools > Save Layout to save the current layout of the Dashboard.
Note: Dashboard layouts can be locked for each EXO Business module, so that widgets cannot be
added, removed or re-arranged and the Dashboard toolbar is hidden. To lock a Dashboard layout,
enable the Lock dashboards User-level profile for the relevant module.
542
Reporting
Setting up Dashboard Widgets
Dashboards are customisable displays showing one or more information panes called “widgets”. To create
a new widget:
1. Open EXO Business Config and go to the Admin > Dashboards > Setup Widgets or Staff > Menus >
Setup Widgets section.
Note: A Setup Widgets menu item is also available to be added to the menus for other modules.
2. Click the New button.
3. Enter a name for the widget.
4. Select the Refresh Frequency, which determines how often the data in report is automatically
refreshed.
5. Select which EXO Business module(s) this widget should be available for. Choose from:
•
<All>
•
EXO Business
•
EXO Job Costing
•
EXO Business Analytics
•
EXO Business CRM
•
EXO Accountant’s Assistant
Note: Checklist widgets can only be made available for the EXO Accountant’s Assistant.
543
MYOB EXO Business User Guide
6. Widgets are not available to users until they have been added to their dropdown menus. You can
add the widget to users’ menus automatically by selecting one or more from the Menu
Assignments dropdown. Widgets can be manually added to menus later using the Drop Down
Menu Designer (see page 77).
7. Select a Widget Type:
•
Select “Clarity Report” to create a widget that displays a Clarity report.
•
Select “URL” to create a widget that displays the target of a URL, e.g. a web page or a local
file.
•
Select “Pivot Table” to create a widget that displays data in a pivot table.
•
Select “Grid” to create a widget that displays data in a standard ExoGrid (see page 10).
•
Select “Checklist” to create a widget that displays a structured list of steps that must be
performed and checked off.
•
Select “Form Widget” to create one of the pre-defined widgets installed with the EXO
Business system.
•
Note: Once a widget is saved, its Widget Type cannot be changed.
8. Specify what information the widget should display:
•
If you are creating a Clarity widget, click the
button to select a report file. Once a
report is selected, this button opens a window to set any necessary report parameters.
•
If you are creating a URL widget, enter the URL to display into the URL field.
•
If you are creating a Pivot widget or Grid widget, enter a SQL statement to select the data
to display into the SQL field.
•
If you are creating a Checklist widget, the items on the list must be set up on the Checklist
Setup tab (see page 545).
•
If you are creating a Form widget, select the Form Type, then set details on the Customize
Widget tab.
9. For Clarity widgets, select Default Zoom Settings, which determine how large the report appears
inside its frame.
10. Click Save.
Once a widget has been created, it is not available on dashboard interfaces until it has been added to one
or more drop down menus using the Drop Down Menu Designer (see page 77). Add the widget to the
Widgets section of all menus for all users who should be able to use it.
544
Reporting
Configuring Checklist Widgets
Checklist widgets display a structured list of steps, or “nodes”. Each node is a separate item that can be
checked off the list; nodes can be a simple note to the user, or they can link to an EXO Business menu
procedure, which will open on the checklist widget display:
Buttons are available at the bottom of the checklist tree. Selecting a node on the tree and clicking these
buttons changes the node’s icon to indicate its status:
•
•
•
•
- Not Started
- In Progress
- Complete
- Requires Review
Note: There is no button for the Requires Review status; however, it can be set by a stored
procedure attached to the node (see page 547).
Node statuses can also be changed by right-clicking on a node. When right-clicking on a parent node,
options to set the statuses of all child nodes are available.
When “Checklist” is selected for the Widget Type, a Checklist Setup tab becomes available:
545
MYOB EXO Business User Guide
To set up a checklist widget, add nodes using one of the following methods:
•
•
To add a blank node, click the New Node button.
To add a node that links to an EXO Business menu procedure, drag the procedure from the
Procedures list onto the checklist.
In either case, the Checklist Node Edit window appears. Enter details for the node and click OK.
Field
Description
Procedure
If the node links to an EXO Business menu procedure, the procedure’s name is
displayed here.
Caption
Enter a name for the node. This name will appear on the checklist widget when it
appears on a dashboard.
Parameters
For procedures that require extra parameters, e.g. Run Clarity Report or Add
Existing Widget, specify the parameters here.
Help Text
Enter a short description for the node here, explaining what its purpose is, or
giving instructions on how to use it. This text will appear at the bottom of the
checklist display when the button is clicked.
Note: Any text that starts with www. or http:// will be displayed as a
clickable hyperlink.
Field Name
The statuses of all nodes are stored in the EXO Business database, in the table
specified by the Checklist Status Table property on the Checklist Setup tab. The
status for this node will be stored in the field you specify here. Once set, the field
name cannot be changed.
Note: Field names must be unique - if you enter a field name that is the
same as another node’s field name, it will be prefixed with a number to
make it unique, e.g. FIELD_1. If this node is deleted, the field will be
removed from the database.
546
Reporting
Status
Validation
Stored Proc
Name
The node’s status is usually controlled by the buttons at the bottom of the
checklist widget; however, it is possible to use a custom stored procedure to set
the node’s status. This property specifies a stored procedure that will be run when
the checklist is loaded or refreshed, when the node is clicked on, or when its
status is manually changed to “Complete”. This procedure must take in the
parameters @CONTEXTID and @NODESTATUS, and return a new @NODESTATUS
value, which must be one of:
•
-1 = Do nothing
•
0 = Set the node’s status to “Not Started”
•
1 = Set the node’s status to “In Progress”
•
2 = Set the node’s status to “Complete”
•
3 = Set the node’s status to “Requires Review”
•
4 = Hide the node and any sub-nodes below it
If the stored procedure name you enter here does not already exist, a default
procedure with the correct inputs and outputs will be created when the table is
saved (checklist procedures are automatically prefixed with “CL_”).
Expanded By
Default
If this box is ticked, then all subnodes under this node will be displayed by default;
if not, the node will be collapsed by default, so that its subnodes will be hidden
until the + icon next to the node is clicked.
Subnodes can be added under any node (including other subnodes). Select the parent node or subnode,
and then click New Subnode or drag a procedure from the Procedures list onto the parent node.
Editing Nodes
Once added, nodes and subnodes can be edited by double-clicking on them or by selecting them and
clicking the Edit Node button. It is also possible to re-order nodes and subnodes by dragging them drag
them into a new position, or by using the Move Up and Move Down buttons.
Select a node and click Delete Node or press DELETE to remove that node and any sub-nodes underneath it.
Storing Checklist Node Statuses
The Checklist Status Table property on the Checklist Setup tab specifies the name of the table in the EXO
Business database that will store the individual statuses of each node in the checklist. The table name you
enter here must be unique; it will be created when the table is saved (checklist tables are automatically
prefixed with “CL_”). Once set, the table name cannot be changed. The table contains a field for each node
in the checklist - field names for each are specified by the Field Name property on the Checklist Node Edit
window.
Note: If a checklist widget is deleted, a message appears asking the user if they also want to delete
the associated table as well as any associated stored procedures.
547
MYOB EXO Business User Guide
Context-Specific Checklists
Checklists appearing in the EXO Accountant’s Assistant can be made context-specific to a particular period.
A context-specific checklist saves the status of all nodes separately for each period; when a period is
selected from the Financial Period dropdown on the EXO Accountant’s Assistant, the checklist updates to
show the node statuses for that period.
Select an option from the Context dropdown at the top of the Checklist Setup tab:
•
•
•
•
•
None
GL Period
Debtor Period
Creditor Period
Stock Period
If “None” is selected, the checklist widget will not be context-specific; otherwise it will be specific to the
period for the selected ledger. When a checklist is context-specific, the table that stores checklist node
statuses contains a separate line for each period.
Saving and Loading Widgets
Widgets can be saved to a file by clicking the Save As button on the Setup Widgets window toolbar (
Widgets are saved as a file with the .WDG extension. Widget files can then be loaded into the Setup
Widgets window by clicking the Load button (
).
).
Restricting SQL Keywords in Widgets
Pivot and Grid widgets have a SQL tab, where the SQL statement that selects the data to display can be
edited. To preserve the security and integrity of the system, profile settings (see page 73) are available to
restrict what can be entered on the SQL tab:
•
Edit Pivot Widget SQL at runtime - this User-level profile setting determines whether or not the
SQL tab is displayed. If it is disabled, the SQL tab is not available.
•
Restrict Widget SQL - if this User-level profile setting is enabled, the user will not be allowed to
enter certain SQL keywords on the SQL tab.
•
Widget SQL reserved words List - this Company-level profile setting specifies the keywords that are
disallowed. By default, the keywords DROP, INSERT, DELETE, UPDATE, TRUNCATE, MODIFY, and
ALTER are disallowed.
Customising Dashboard Interfaces
A number of options are available for customising the layout of widgets on dashboard interfaces (see page
541).
Selecting Widgets to Display
Users can select the widgets to display on a tab using the
and
buttons. Which widgets are
available for selection is determined by the staff member’s dropdown menu definition, as set up in EXO
Business Config (see page 77).
548
Reporting
To add a widget to the menu (and therefore make it available for selection in the interface), drag the Add
Widget item to menu. When adding this item to a menu, the Menu Item window that appears lets you
choose the specific widget to add:
Once added, the widget does not actually appear in the dropdown menu; instead, it becomes available for
selection when clicking the
button.
Note: Having the availability of widgets controlled by menu definitions allows for an additional level
of security; users have access to only those Dashboard widgets that have been added to their menu.
Arranging Widgets
Dashboards widgets can be arranged by dragging and docking. When dragging one widget onto another, a
cross-shaped docking control appears:
549
MYOB EXO Business User Guide
The five sections of the docking control are used to place the widget being docked, e.g. to dock the widget
being dragged to the right of the widget it is being dragged onto, move the mouse pointer over the right
section and release the mouse button. Selecting the centre section of the docking control docks the widget
onto a sub-tab of the target widget:
Clicking the
button resets the layout, organising all widgets into tiles the same size.
Saving Widget Layouts
Click the button to save the current arrangement of widgets as a “layout”. Previously saved layouts are
available in the Layouts combo box at the left of the window.
Note: In EXO Business Analytics (see page 551), the layout of widgets on the tabs is saved for each
snapshot.
550
Reporting
EXO Business Analytics
EXO Business Analytics is a separate module that presents a customisable overview of the organization’s
business status. It is intended for use by management to monitor business performance. EXO Business
Analytics extracts data from various sources in the MYOB EXO Business system and then displays it in a
consolidated format. This allows managers to quickly get a complete picture of the entire business.
EXO Business Analytics takes data snapshots at regular intervals. Use the arrow buttons to navigate
between snapshots, or select a specific snapshot from the dropdown menu on the right.
Click the
Click the
button on any tab to re-calculate the figures for the currently selected snapshot.
button on any tab to refresh the display.
Note: The Computer-level profile settings Recalculate and Refresh Analytics on Startup and
Recalculate and Refresh Analytics every 15 mins when loaded can be used to automate the process
of taking and refreshing data snapshots.
The tabs on EXO Business Analytics are fully customisable. Each tab displays a collection of Dashboard
widgets (see page 541).
Note: Tabs can be hidden from view on a per-user basis by configuring the Hide tabs in EXO
Analytics User-level profile setting.
551
MYOB EXO Business User Guide
Note: Two optional custom tabs can be defined by specifying values for the one or both of the
Analytics custom tab 1 caption and Analytics custom tab 2 caption User-level profile settings (if no
captions are specified, the custom tabs do not appear).
EXO Business Analytics allows drill down access to the following screens:
•
Debtor Account Details screen
•
Creditor Account Details screen
•
General Ledger Account Details screen
•
Stock Item screen
•
Sales Order
•
Purchase Orders
•
Job Costing
All screens are read-only when accessed from EXO Business Analytics.
System Widgets
The following system widgets specific to EXO Business Analytics are available:
•
Sales Summary (see page 552)
•
Invoice List (Classic) (see page 553)
•
Orders List (Classic) (see page 554)
•
Stock Summary (see page 554)
Sales Summary
552
Reporting
This widget displays the sales performance of the business. The Run Rate figures indicates what the
business is doing on a daily basis (having made an allowance for the weighting applied to each day in the
Period Day Plan Setup (see page 559)) and what the business must achieve (also on a weighted basis) to
reach its period budget.
The report uses colour to indicate whether the business is ahead of (green) or behind (red) the budget.
Invoice List (Classic)
This widget allows users to search for Debtors Invoices. For example, by setting the expected minimum and
maximum margins, users can quickly locate invoices that fall outside the expected range. This range may
include stock items that are over-discounted or that have a cost that is greater than expected.
To search for invoices, check the appropriate boxes for the filters to use, then select details to filter by. Click
the Run button to return all invoices that match the selected criteria.
553
MYOB EXO Business User Guide
Orders List (Classic)
This widget allows users to search for Sales Orders. The list of orders can be filtered by Period, Account
Group, Sales Person and Branch Name.
Stock Summary
This widget displays the valuation of stock by location. Users can select a location, and obtain a stock list by
a stock item, for the selected location.
The Show only Inactive Stock option displays a list of stock items that have been set to the Inactive status
(by clearing the Active tick box on the Stock Item Details window (see page 156)). Stock items are listed
only if the item quantity is greater than zero. Drilling down provides a detailed list showing the locations of
the inactive stock.
The Annualised Stock Turn KPI calculates the stock turn based on the current cost of sales on a period-todate basis, using the current closing stock level. The KPI then converts this into an annualised estimate of
current stock turn.
554
Reporting
Setting up EXO Business Analytics
The EXO Business Analytics module’s Setup menu contains options that define the Financial Period. A
Financial Period is made up of a financial year, which in turn is made up of periods/months (usually 12).
Months are made up of days. Days can be workdays or non-workdays and can have a weighting applied to
them. This weighting affects the run rates (a run rate is the amount of daily sales achieved to date or
required to reach the monthly sales target).
The following setup windows are available from the Setup menu:
•
Preferences (see page 555)
•
Sales Years (see page 556)
•
Months (see page 557)
•
Budget (see page 558)
•
Day Plan (see page 559)
These setup options are also available in EXO Business Config (see page 55) at Admin > Analytics.
Preferences
EXO Business Analytics > Setup > Setup Info
The options on this window are read-only in EXO Business Analytics and are displayed for informational
purposes. To set the values of these options, use EXO Business Config.
555
MYOB EXO Business User Guide
Recalculate report on this computer every 15 mins Enable this option to receive the most up-to-date
information every 15 minutes. Ideally, in a network situation, this option should be selected by only one
user, to avoid load on the network. Any other users should click the Refresh button on the main EXO
Business Analytics window to view the latest information.
Stock Valuation Method Determines the stock values for the stock in the Stock tab. Select the valuation
method that is most useful for decision-making.
KPI Select whether or not to display the following Key Performance Indicators:
•
Annualised Stockturn, displayed on the Stock tab.
•
Average Invoice Age, displayed on the Finance tab.
•
Sales GP percentages, displayed on the Sales and Orders tab. (If this option is disabled, these values
display “N/A”.)
Exclude Quotes from Sales Orders Enabling this option removes quotes from the Sales Today numbers and
includes them when the quote is converted to a sales order. This is only applicable where the system is
using extended sales order statuses.
Use PostTime to Calculate Sales Enabling this option means that EXO Business Analytics will calculate sales
from the transaction table based on when the transaction has been posted as opposed to the transaction
date entered by the user.
Sales Years
EXO Business Analytics > Setup > Setup Years
556
Reporting
The Sales Year Setup window defines Financial Years. Click the New button is to establish a new Financial
Year or double-click on an existing year to edit it.
The Name can be changed to something more appropriate if necessary, and Start and End dates for the
beginning and end of the year can be changed.
If the Calendar Period option is ticked, then months for this sales year will be set up according to the
calendar year. If the option is not ticked, months must be set up manually.
557
MYOB EXO Business User Guide
Months
EXO Business Analytics > Setup > Setup Months
The Sales Period Setup window defines the period Start and End dates within the selected financial year.
These periods are completely user-defined, but they cannot overlap one another.
Click the New button to establish the periods within the financial year.
Double-click on an existing period to edit it (or select a period and click the Edit button). The Period Name
can be changed to something more appropriate if necessary, and Start and End dates for the beginning and
end of the year can be changed.
The Delete button deletes the selected period, but only if there is no existing data for that period.
558
Reporting
Budget
EXO Business Analytics > Setup > Setup Budgets
The Budget Setup window lets you set up the budgets and margins for each period. The total of these
periods represents the budget for that financial year. You can set budgets and margins for each branch, or
for all branches at once.
Double-click on a period to edit the Value and Margin for that period.
559
MYOB EXO Business User Guide
Day Plan
EXO Business Analytics > Setup > Setup Day Plan
The Period Day Plan Setup window is a day planner that determines workdays, and the weighting to be
applied to each workday. For example, a retail business will most likely have a heavy weighting to Saturday,
if a large amount of the week’s total sales are conducted on a Saturday.
Double-click on the WorkDay value for a day to toggle between “Yes” and “No”.
Click on the RunRate value for a day to enter its weighting.
560
Reporting
Running EXO Business Analytics from the Command Line
The EXO Business Analytics module, Analytics.exe, can be run from the command line in unattended
“snapshot” mode, launching and exiting at predetermined times, as specified by a scheduled task in
Windows.
Command Line Parameters
Parameter
Meaning
ConnectionName
A valid MYOB EXO Business database connection name. Required.
LoginID
A valid staff Login ID. If the ID contains spaces it must be enclosed in quote marks
(“ “). Required.
Password
The password for the supplied Login ID. Required.
/?
Displays a window listing all of these command line parameters. Optional.
/NOSAVE
Prevents the saving of the current connection to the connection history list.
Optional.
/M
Mode. /M=SNAPSHOT runs EXO Business Analytic in snapshot mode, meaning
that it closes as soon as it has run. Exceptions are logged in snapshot mode only.
Optional.
/TRANSDATE
Specifies a transaction date. Optional.
/L
Specify the name of the file to log to. Optional.
Example
Analytics Testdata ExoAdmin ExoAdmin /M=SNAPSHOT
/L=d:\EXOBusiness\Analytics\Analytics.LOG
Runs EXO Business Analytics in snapshot mode, logging on to the connection “Testdata” using the logon ID
“ExoAdmin” and password “ExoAdmin”. Log information is written to the file
d:\EXOBusiness\Analytics\Analytics.LOG.
561
Index
A
Account Hierarchy Setup ............................... 503
Accountants Office ........................................ 302
Activities ....................................................... 148
Aged Balances ............................................... 102
Alternate Supplier Codes and Costs ............... 179
Analysis Codes ................................................84
GL Analysis Codes ......................................... 237
Analysis tab
Creditors ....................................................... 114
Debtors ......................................................... 100
Stock.............................................................. 179
Analytics ....................................................... 551
command line options ..................................561
customising ................................................... 548
setting up ...................................................... 555
archiving .........................................................13
GL accounts ..................................................... 15
Purchase Orders.............................................. 14
Sales Orders .................................................... 13
authorising Purchase Orders ......................... 316
Automatic Payments Process ........................ 466
effect of processing Automatic Payments ....470
exception handling ....................................... 468
operation ...................................................... 467
performing updates ......................................470
setup ............................................................. 467
B
Back Orders .................................................. 355
Bank File Formats .......................................... 471
setup ............................................................. 471
Bank Reconciliation ....................................... 451
adding and removing entries ........................460
checking ........................................................ 461
closing ........................................................... 462
deleting reconciliations.................................457
Details tab ..................................................... 453
editing reconciliations...................................455
enquiries ....................................................... 454
manual reconciliations ..................................459
performing .................................................... 464
setting up reconciliations...................... 458, 463
Batch Payment Process ................................. 482
Bills of Materials (BOMs)............................... 506
adding to a Sales Order ................................ 363
copying ......................................................... 512
creating ........................................................ 508
invoicing ....................................................... 513
processing (builds) ....................................... 514
setting up ..................................................... 507
Branch Accounts ............................................. 86
builds (Bill of Materials) ................................ 506
processing .................................................... 514
processing in batches ................................... 516
Business Flow menus ...................................... 81
C
Calculate Outstanding Prompt Payment
Discounts................................................... 441
checklists ...................................................... 545
cheques ........................................................ 488
reversing ...................................................... 491
CITP .............................................................. 351
Clarity Reports .............................................. 536
Browser ........................................................ 539
Designer ....................................................... 540
General Ledger ............................................. 247
running ......................................................... 537
Common Phrases .......................................... 143
Configuration .................................................. 55
Admin Settings ............................................... 67
Company Settings .......................................... 59
Essential Settings ........................................... 61
Menu functions .............................................. 77
Profiles ........................................................... 73
Staff and Logging in ........................................ 21
System Settings .............................................. 73
Consignment Sales Orders............................. 356
Contacts ........................................................ 120
Accounts tab ................................................ 128
e-mailing ...................................................... 128
entering for an account ............................... 123
Relationship Tab........................................... 145
searching ...................................................... 121
Credit Notes
creating ........................................................ 414
Creditor Account Groups ............................... 107
563
MYOB EXO Business User Guide
Creditor Lists ................................................. 481
Creditors ....................................................... 105
Analysis tab ................................................... 114
Contacts tab .................................................. 122
creating new Price Rules ...............................115
Creditors Master ........................................... 106
Details 1 tab .................................................. 108
Details 2 tab .................................................. 110
Discounts/Prices tab .....................................113
entering a credit note ...................................339
Notes ............................................................. 141
orders ............................................................ 112
posting to General Ledger ............................279
remittance advice ......................................... 342
transactions .................................................. 129
Creditors Invoices ......................................... 330
entering......................................................... 326
entering a payment ......................................331
paying via M-Powered Payments .................335
releasing for payment ...................................483
Creditors Payment Processor ........................ 476
Creditor Payment Run ..................................333
M-Powered Payments ..................................337
processing cheques ....................................... 488
processing direct credits ...............................489
reports .......................................................... 492
selecting Creditors ........................................ 482
setup ............................................................. 477
custom buttons ...............................................28
Custom Line Fields ........................................ 378
D
Dashboards ................................................... 541
customising ................................................... 548
Database Update ............................................57
Debtor Account Groups ................................... 93
Debtor Adjustments ...................................... 414
Debtor Price Policy Groups ............................ 436
adding a Debtor ............................................ 437
adding to a Price Policy .................................438
setting up ...................................................... 437
Debtors ...........................................................90
adding extra delivery addresses ...................104
adding to a Debtor Price Policy Group .........437
changing credit terms ...................................105
creating ........................................................... 90
Debtors Master ............................................... 91
Details 1 tab .................................................... 93
Details 2 tab .................................................... 96
Discounts/Prices tab ....................................... 99
564
History Notes ............................................... 141
making inactive ............................................ 103
making private ............................................. 103
Orders tab ...................................................... 98
posting to General Ledger............................ 279
putting on Stop Credit.................................. 102
Serials tab ..................................................... 139
statements ................................................... 398
transactions.................................................. 129
viewing Aged Balances ................................. 102
Debtors Banking Batches .............................. 407
creating ........................................................ 408
viewing ......................................................... 412
Debtors Invoices ........................................... 386
batch printing ............................................... 394
duplicating.................................................... 390
editing .......................................................... 390
M-Powered Invoices .................................... 395
reprinting ..................................................... 393
Debtors Receipts
multiple payments ....................................... 403
Direct Credits ................................................ 489
Direct Debits ................................................. 493
processing .................................................... 495
setting up ..................................................... 494
Document Manager ...................................... 527
accessing ...................................................... 527
window fields ............................................... 529
Documents ................................................... 144
importing and exporting .............................. 528
dropdown menus ............................................ 77
E
Email Sender ................................................... 47
emails ............................................................. 47
bulk sending (mailshot) ................................ 531
drag and drop from Outlook .......................... 50
End of Period ................................................ 284
End of Year ................................................... 284
Event Log ........................................................ 29
exo
// protocol ...................................................... 41
EXO Business Analytics.................................. 551
command line options ................................. 561
setting up ..................................................... 555
Exogrids .......................................................... 10
saving and restoring grid settings .................. 44
exporting
documents ................................................... 528
Index
GL budgets .................................................... 276
GL export for accounting systems ................302
reports .......................................................... 537
extra delivery addresses................................ 104
Extra Fields .....................................................24
using with Debtors and Creditors .................139
F
Facebook ...................................................... 151
Finance ......................................................... 451
Forecast Based Purchase Order ..................... 317
Foreign Currency ........................................... 293
bank accounts ............................................... 475
operation ...................................................... 296
setting up ...................................................... 293
General Ledger Transactions ......................... 278
geolocation features ....................................... 45
GL Analysis Codes ......................................... 237
GL Report Writer ........................................... 247
running ......................................................... 259
setting up ..................................................... 248
rows and columns .................................... 251
settings ..................................................... 249
GL Trial Balance Tree ..................................... 292
Grids ............................................................... 10
saving and restoring grid settings .................. 44
H
Head Office ..................................................... 86
setting up ....................................................... 88
G
History Notes tab .......................................... 141
General Ledger ...................................... 225, 226
account trends .............................................. 237
analysis codes ............................................... 237
archiving.......................................................... 15
creating sub accounts ...................................231
exporting for accounting systems.................302
setting up ...................................................... 229
transactions .................................................. 234
hyperlinks ....................................................... 41
General Ledger Batches ................................. 287
creating ......................................................... 243
GL Batch Review ........................................... 287
holding .......................................................... 245
posting .......................................................... 243
suspending .................................................... 245
transactions .................................................. 282
General Ledger Budgets
creating ......................................................... 270
deleting ......................................................... 272
editing ........................................................... 271
exporting ....................................................... 276
importing ...................................................... 275
printing reports ............................................. 277
reviewing ...................................................... 236
setting up ...................................................... 268
spreading ...................................................... 273
I
importing
documents ................................................... 528
GL budgets ................................................... 275
stock take data ............................................. 191
Integrated Cashbook ..................................... 300
Invoice Line Discounts ................................... 429
Invoice Line Periscope ................................... 393
invoices
Creditors Invoices......................................... 330
Debtors Invoices .......................................... 386
M-Powered Invoices .................................... 395
searching ...................................................... 136
Inwards Goods ...................................... 345, 348
costing .......................................................... 348
receipt .......................................................... 345
K
keyboard navigation .........................................4
advanced .......................................................... 5
General Ledger Graph ................................... 266
kits ................................................................ 506
adding to a Sales Order ................................ 363
copying ......................................................... 512
creating ........................................................ 508
invoicing ....................................................... 513
setting up ..................................................... 507
General Ledger Movements .......................... 233
L
General Ledger Control Accounts .................. 240
Custom accounts........................................... 242
General Ledger Reports ................................. 247
batches.......................................................... 261
running batches ............................................ 264
settings .......................................................... 249
latitude ........................................................... 45
Laybys ........................................................... 382
creating ........................................................ 383
565
MYOB EXO Business User Guide
receiving payments ....................................... 384
LinkedIn ........................................................ 151
Local Currency Bank Accounts ....................... 247
longitude ........................................................45
M
mailshot ........................................................ 531
Manual Cheque Process ................................ 490
Manufacturing .............................................. 506
margins ......................................................... 433
Marketing Classes ......................................... 127
menus
Business Flow Menus ...................................... 12
configuring .................................................. 81
Dropdown Menus ........................................... 77
Shortcut Menus .............................................. 80
Price SQL
entering ........................................................ 432
Price Update Utility ....................................... 430
Price Warnings .............................................. 434
Pricing and Discounting Overview ................. 428
Procurement Cycle ........................................ 304
Profiles ........................................................... 73
Prompt Payment Discounts ................... 439, 487
giving when receiving a debtor payment .... 405
reviewing ...................................................... 442
setting up ..................................................... 440
prospects ...................................................... 116
Purchase Order Line Periscope ...................... 315
M-Powered Payments ................................... 335
Purchase Orders............................................ 306
archiving ......................................................... 14
authorisation ................................................ 316
creating from Sales Orders .......................... 319
entering ........................................................ 311
forecast-based ............................................. 317
receipts................................................. 321, 323
reversing ...................................................... 325
N
R
Non Accounts ................................................ 116
details............................................................ 117
receiving payments ....................................... 400
laybys ........................................................... 384
O
reconciliations
deleting ........................................................ 457
editing .......................................................... 455
setting up ............................................. 458, 463
Merge Letters ............................................... 533
migrating data ................................................23
M-Powered Invoices ..................................... 395
One-Off Stock Items ...................................... 199
creating ......................................................... 200
setting up ...................................................... 199
order templates ............................................ 506
copying .......................................................... 512
creating ......................................................... 508
invoicing ........................................................ 513
setting up ...................................................... 507
P
posting ledgers to General Ledger ................. 279
price changes
bulk entry ...................................................... 447
running .......................................................... 448
scheduling ..................................................... 446
viewing .......................................................... 445
Price Names .................................................. 442
Price Policies ................................................. 429
Details tab ..................................................... 435
setting up ...................................................... 435
Price Rules .................................................... 428
setting up ...................................................... 449
566
Relationships
relationship types ........................................ 145
Remittance Advices....................................... 342
Reports ......................................................... 536
Browser ........................................................ 539
Designer ....................................................... 540
General Ledger ............................................. 247
running ......................................................... 537
Restricted Goods........................................... 103
reversing payments....................................... 406
S
Sales Analysis Matrix .................................... 422
options ......................................................... 425
report types ................................................. 425
Sales Budgets ................................................ 416
copying ......................................................... 421
creating ........................................................ 418
setup formula ............................................... 421
Index
Sales Cycle .................................................... 353
Sales Order Line Periscope ............................ 373
Sales Order Manifests ................................... 375
Stock Movements
entering ........................................................ 197
Stock Price Groups ........................................ 161
Sales Orders .................................................. 353
archiving.......................................................... 13
batch processing ........................................... 376
copying .......................................................... 364
creating ......................................................... 359
Extra Field events ............................................ 27
history ........................................................... 366
Quick Supply ................................................. 372
searching ....................................................... 367
Supply ........................................................... 369
viewing .......................................................... 357
Stock Take .................................................... 185
importing...................................................... 191
initialising ..................................................... 186
keying in quantities ...................................... 189
keying in stock batch codes ......................... 192
keying in stock serial numbers ..................... 193
performing ................................................... 181
starting ......................................................... 182
uploading to ledger ...................................... 190
Variance Report ........................................... 190
Sales Territories ............................................ 416
creating ......................................................... 416
Style Colour Size ........................................... 212
creating Style Colour options ....................... 214
creating Style Size options ........................... 213
creating Styles .............................................. 216
default values ............................................... 221
enabling........................................................ 212
Sell Prices ...................................................... 442
sending emails ................................................47
serial numbers .............................................. 202
history ........................................................... 209
pre-assigning ................................................. 210
processing ..................................................... 204
reporting ....................................................... 206
tracking ......................................................... 206
shortcut menus ...............................................80
SMTP ..............................................................47
social media .................................................. 151
staff ................................................................21
Standing Orders
creating ......................................................... 381
processing ..................................................... 382
Statements ................................................... 398
bulk sending (mailshot).................................531
Stock
Batch Qty tab ................................................ 178
Details 1 tab .................................................. 165
Details 2 tab .................................................. 168
displaying on a website.................................177
order status ................................................... 173
posting to General Ledger ............................279
reviewing Sell Prices .....................................443
sales performance ........................................ 179
searching ....................................................... 158
setting up ...................................................... 162
Stock Master ................................................. 157
transactions .................................................. 171
unit costs ....................................................... 196
Works Orders ................................................ 177
Stock Groups ................................................. 159
Stop Credit .................................................... 102
Supplier Stock Codes ..................................... 180
T
taxable payments ......................................... 351
taxation ........................................................ 499
automatic tax rate hierarchy ....................... 499
setup ............................................................ 500
Tax Return reports ....................................... 505
Time bills ...................................................... 523
creating ........................................................ 523
invoicing ....................................................... 525
reports.......................................................... 526
Twitter .......................................................... 151
U
unit costs ...................................................... 196
URLs................................................................ 41
users ............................................................... 21
default ............................................................ 22
Utilities .............................................................2
W
website (Stock) ............................................. 177
widgets ......................................................... 543
Works Orders ................................................ 517
creating ........................................................ 518
printing ......................................................... 522
processing .................................................... 521
Stock items ................................................... 177
567
568