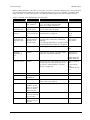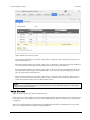
1
User Guide
for
Creation and Administration
of
Web sites and Shops
- Version 6 -
Table of Contents
Table of Contents
1.
Introduction ..........................................................11
Prerequisites ...................................................................... 11
About this handbook .......................................................... 11
2.
3.
Quick start / First steps .........................................13
Basic principles.....................................................17
General page layout............................................................ 17
Administration Navigation ......................................................... 17
Working area ............................................................................. 18
Sidebar ..................................................................................... 18
Tray ................................................................................... 18
History ............................................................................... 19
Favourites .......................................................................... 19
Sections............................................................................. 20
Help................................................................................... 20
Active button "Save" ........................................................... 20
Web site views ................................................................... 20
Tables ................................................................................ 21
Adding records ......................................................................21
Editing records ......................................................................21
Deleting records ....................................................................21
Selecting in tables.................................................................22
Batch processing in tables .....................................................22
Sorting using sorting keys......................................................22
Search ............................................................................... 22
Language-dependency ........................................................ 22
Default settings .................................................................. 23
Visibility............................................................................. 23
Attribute types.................................................................... 23
Using text with value selection ...............................................25
Using options ........................................................................26
Working with text fields ...................................................... 27
WYSIWYG Editor.................................................................. 27
Insert and edit images/videos................................................27
Insert and edit multimedia elements ......................................28
Flash page content .................................................................... 28
Gadgets .................................................................................... 28
RSS page content ...................................................................... 28
Insert link / Remove link ........................................................28
Insert anchor ............................................................................. 28
Uploading images............................................................... 29
Colour selector ................................................................... 29
File management ................................................................ 30
Import and export ............................................................... 31
Export ...................................................................................31
Import file .............................................................................32
Editing CSV files with Microsoft Excel .....................................32
Short URL ........................................................................... 33
Creating a short URL for all pages ............................................... 33
User Guide for Web site Administrators
Page 3
Table of Contents
4.
Administrator data ................................................35
Security query for deletion actions ...................................... 35
5.
Settings ................................................................37
General settings ................................................................. 37
General .................................................................................37
Presentation.............................................................................. 37
Status ....................................................................................... 37
Advanced settings ..................................................................... 37
Page cache............................................................................37
Utilisation .............................................................................38
Address ................................................................................38
Business hours .....................................................................39
User administration ............................................................ 39
Users ....................................................................................39
User details – Sign-in data ......................................................... 39
User details – Posts................................................................... 39
User details - Newsletters .......................................................... 40
User groups...........................................................................40
Registration ..........................................................................40
Signing in..............................................................................40
Administrators ......................................................................41
Administrator details – Sign-in data ........................................... 41
Administrator details – Posts ..................................................... 41
Tax calculation ................................................................... 41
Tax matrix .............................................................................41
Tax areas ..............................................................................42
Assignment to countries ............................................................ 42
Tax classes ...........................................................................42
Tax model .............................................................................43
Delivery and payment ......................................................... 43
Delivery methods...................................................................43
General properties for delivery methods .................................44
Delivery methods with an exemption limit ..............................44
Delivery method Shopping basket total ..................................44
Delivery method Weight of the products in the
shopping basket ....................................................................45
Delivery method Number of products in the
shopping basket ....................................................................45
Shipping method DHL ............................................................45
Payment methods..................................................................46
General properties for payment methods ................................47
Payment method with credit card, manual ..............................48
Dependencies .......................................................................48
Delivery options ....................................................................49
Delivery options: Details - general .............................................. 49
Delivery options: Details - Selection ........................................... 49
Deferred payment ..................................................................49
Logistics ...............................................................................50
Country settings ................................................................. 52
Languages ............................................................................52
Currencies.............................................................................53
Special case Swiss Franks.......................................................... 53
Countries ..............................................................................53
Page 4
User Guide for Web site Administrators
Table of Contents
Regions.................................................................................53
Regions - Details - General ......................................................... 54
E-mail settings ................................................................... 54
E-mail settings - Events..........................................................55
Event e-mail – Details ................................................................ 55
Exception: E-mail messages for the merchant .................................. 56
Shopping basket settings ................................................... 57
Shopping basket ...................................................................57
Texts.....................................................................................57
Registration ..........................................................................58
Product settings ................................................................. 58
General .................................................................................58
Availability ............................................................................59
Auto cross-selling..................................................................59
Texts.....................................................................................59
Product comparison...............................................................60
Shopping lists .......................................................................60
Search ............................................................................... 60
Search statistics....................................................................60
eBay settings ..................................................................... 60
General settings ....................................................................61
eBay accounts .......................................................................61
eBay accounts - Details.............................................................. 61
Templates .............................................................................62
Settings for order documents .............................................. 62
Texts ......................................................................................... 63
Invoices in e-mails..................................................................... 63
6.
Products ...............................................................65
Creating a new product ....................................................... 65
Creating a new single product ................................................65
Creating a new product with variations ...................................66
Creating a product bundle......................................................66
Bundle products ........................................................................ 67
Import and export of product bundles......................................... 67
Notes about bundles .................................................................68
Creating a downloadable product ...........................................68
Downloads ................................................................................68
Creating a customizable product ............................................69
Product details – General.................................................... 69
Comparison price ..................................................................69
Reference unit .......................................................................70
Description ...........................................................................70
Stock and delivery period ......................................................70
Delivery details .....................................................................70
Attributes..............................................................................71
Product details – Images .................................................... 71
Product details – Categories ............................................... 72
Product details – Variations ................................................ 72
Variation assistant ................................................................73
Extending a variation using the product variation assistant ......... 74
Product details - Customization........................................... 74
Product details – Prices ...................................................... 75
User Guide for Web site Administrators
Page 5
Table of Contents
Bulk discount ........................................................................76
Value discount ......................................................................77
Discount calculation for product prices ..................................78
Product details – Cross-selling ............................................ 78
Variation products and cross-selling .......................................... 79
Product details - Portals...................................................... 79
Product portals.......................................................................... 79
eBay ......................................................................................... 79
Product types ..................................................................... 79
Import and export ......................................................................80
Product type details...............................................................80
Attributes ..................................................................................80
Layout....................................................................................... 81
Price lists ........................................................................... 81
Price lists – Advanced settings...............................................81
Price list details ....................................................................82
Shopping basket discount ......................................................... 82
Search statistics................................................................. 82
Product reviews .................................................................. 82
Import and export ............................................................... 83
Product search in the administration area............................ 84
7.
Customers.............................................................85
Customer details - General .................................................. 85
Customer details - User data ............................................... 86
Data synchronisation .......................................................... 87
Customer details - Orders ................................................... 87
Customer details - Newsletter.............................................. 87
Customer groups ................................................................ 87
Customer attributes ............................................................ 88
Import and export ............................................................... 88
8.
Content / Categories..............................................91
Preview .............................................................................. 91
Multifunction bar and content ............................................. 92
Page mode ............................................................................92
Commands function group ......................................................... 92
Layout function group ................................................................ 92
Language function group ........................................................... 93
Editing mode .........................................................................93
Datasheet view ................................................................... 93
General .................................................................................93
Pages....................................................................................94
Products ...............................................................................94
Images ..................................................................................95
Layout...................................................................................95
Creating new pages ............................................................ 95
Page types ......................................................................... 96
Home page............................................................................96
Page / Category .....................................................................97
Content page.........................................................................97
Link ......................................................................................97
Promotional products ............................................................98
Page 6
User Guide for Web site Administrators
Table of Contents
Contact information ...............................................................98
Terms and Conditions ............................................................98
Right of withdrawal................................................................99
Privacy policy ........................................................................99
Business hours .....................................................................99
Site map ...............................................................................99
Forum ...................................................................................99
Topics – Details....................................................................... 100
Blog .................................................................................... 100
Posts – Details ........................................................................ 100
Guestbook .......................................................................... 101
Image gallery....................................................................... 101
Images .....................................................................................101
Image search....................................................................... 102
Import and export ............................................................. 102
9.
Booking system ...................................................105
Services ........................................................................... 105
Service details .................................................................... 106
Service details - Customer options ........................................... 106
Bookings............................................................................. 106
Bookings.......................................................................... 109
Booking details ................................................................ 109
10.
Design ................................................................111
Design basics ................................................................... 111
Editing the design............................................................. 114
Multifunction bar and content ........................................... 115
Page view in browser ........................................................... 115
Area function group .................................................................. 115
Width and padding function group ............................................ 115
Page areas function group ........................................................ 115
Icon set function group .............................................................116
Horizontal areas .................................................................. 116
Area function group ..................................................................116
Font function group ..................................................................116
Page elements function group ...................................................116
(Active) button / (Active) button - Right Image ................................ 116
Box ............................................................................................... 117
Vertical areas ...................................................................... 117
Area function group .................................................................. 117
Font function group ..................................................................118
Page elements function group ...................................................118
Content area ....................................................................... 118
Area function group ..................................................................118
Font function group ..................................................................118
View function group..................................................................118
Page elements and navigation........................................... 119
User-defined page elements ................................................ 120
Own styles ....................................................................... 121
Templates ........................................................................ 122
Quick design .................................................................... 123
11.
Orders ................................................................125
Orders – Details ............................................................... 125
Editing mode ....................................................................... 126
User Guide for Web site Administrators
Page 7
Table of Contents
Documents.......................................................................... 127
Document details ................................................................ 127
UPS packing slip ................................................................. 128
Preparation ............................................................................. 128
Creating the UPS control number.............................................. 128
Activate order tracking ............................................................. 128
Order tracking in the shop........................................................ 129
WorldPay transactions ...................................................... 129
12.
Marketing ...........................................................131
Newsletter campaigns....................................................... 131
Creating a newsletter campaign ........................................... 131
Newsletter campaigns – Details – General ............................ 132
Newsletter campaigns – Details – Addressees ...................... 132
Subscription from the Web site ................................................ 132
Newsletter........................................................................ 133
Newsletter details – General ................................................ 133
Mailing data .............................................................................133
Design .................................................................................... 134
Contents ................................................................................. 134
Creating the newsletter content................................................ 134
Sending the newsletter .............................................................135
Newsletter details – Recipients ............................................ 135
Coupons .......................................................................... 135
Coupons - General ....................................................................135
Coupons - Validity ....................................................................135
Coupons - Coupon codes ......................................................... 136
Notes ...................................................................................... 136
Creating coupons ................................................................ 136
Using coupons in newsletters .............................................. 137
Product recommendations ................................................ 137
Product inquiries .............................................................. 138
etracker statistics ............................................................. 138
General ............................................................................... 138
Create etracker account ........................................................... 138
Registration data ..................................................................... 139
Search engine reporting........................................................... 139
Pages.................................................................................. 139
Google Analytics............................................................... 140
Product portals................................................................. 140
General settings .................................................................. 140
Product list and export......................................................... 141
etracker reporting ................................................................ 141
Amazon............................................................................... 142
Offer details ............................................................................ 143
PriceMinister ....................................................................... 143
Offer details ............................................................................ 143
Own portals......................................................................... 144
Social Web ....................................................................... 144
How to connect your website to Facebook................................. 144
How to connect your website with Twitter ..................................145
How you use other social bookmarks for your website ................145
Google AdWords ............................................................... 145
Trusted Shops Certification ............................................... 146
Page 8
User Guide for Web site Administrators
Table of Contents
eBay ................................................................................ 146
Items .................................................................................. 147
Item settings/eBay assistant................................................ 148
Title ........................................................................................ 148
Category ................................................................................. 149
Details .................................................................................... 149
Layout..................................................................................... 149
Delivery................................................................................... 150
Payment.................................................................................. 150
Verification ............................................................................. 150
Default values ..................................................................... 150
Orders................................................................................. 151
13.
14.
Glossary..............................................................153
Index ..................................................................157
User Guide for Web site Administrators
Page 9
Prerequisites
Introduction
1. Introduction
Prerequisites
The program is browser-based. The administration will function using the following browsers:
-
Internet Explorer 9 and higher (The Google Chrome Frame Plugin must be installed for the website administration. A message is displayed when the site is accessed.)
Mozilla Firefox after 4 and higher
Safari 5
Chrome 5
For administrative tasks, the requires a screen resolution of 1,024 x 786 pixels and a colour depth of at
least 65,000 colours. For certain languages (Spanish, French, Catalan, Russian, Portuguese), the pages of
the administration only will display correctly with a resolution of 1280 x 1024.
In order to use all the functions of the application, you must enable the following in your browser:
-
JavaScript
Session cookies
Pop-up windows
Flash content
About this handbook
This handbook explains basics and shows functions and methodologies.
All basics are explained that that are required to use the application effectively.
The handbook does not provide a full explanation of all functions. It is a supplement to the information
available on the administration pages and should be read in conjunction with these. Functions which are
self-explanatory or where all important information is already shown on the page are not explained here.
Only functions and processes that are complex and that do not contain all information on the user interface have extra information and notes in the help.
The following multi-step concept should help you to get to know individual functions:
1. First look for the intuitive usage and meaning of fields and information.
2. Read the information in the blue box on the side of the page. (For example, about how to set up a
payment method)
3. Read the short information about the fields that are not self-explanatory. This short information is
shown by a symbol behind the respective field.
4. Read tips and tricks that are shown for certain functions.
5. Look at related topics that discuss connections.
6. Open the online Help.
Additional information is available on the user blog and in the video tutorials that you can access in the
MBO. Links to these are shown in the Help area of each page.
User Guide for Web site Administrators
Page 11
Quick start / First steps
2. Quick start / First steps
Once these steps have been performed, the Web site is basically ready for use. However, there are many
other options for optimising the Web site in respect of your own needs.
After completing the following steps, your Web site is ready for use:
1.
2.
3.
4.
5.
6.
7.
8.
Sign in
Run through the Setup assistant
Check the site/pages
Check/place the main page elements
Modify the design
Create products
Check important system settings
Test the site
1. Sign in
Details on how to access the Administration section of your web site are provided by your provider. Sign in
to the Administration section using the username and password. This information has either been sent to
you or you have already defined it yourself in the course of setting up the web site.
Caution: After running the Setup assistant, the first thing you should do is edit your password so that
no unauthorised person can use the system. See Administrator data, on page 35.
2. Run through the Setup assistant
The first time you sign in, the Setup assistant will automatically take you through the initial steps. The assistant will help you configure the main settings for your site.
3. Check the site/pages
The site topic selected in the Setup assistant determines the basic structure of your Web site. To view this
structure, select Content / Categories >> Preview.
This preview allows you to verify that the main pages with which you want to launch your site are in place.
You can add, delete or move pages at this stage. Check the content on each page, and update it as required. You will find more detailed information on this in the section Content, on page 91, et seq.
The most important aspect of this stage of the setup process is that you check the existing sample content
for its appropriateness for your requirements, and make any modifications you need.
4. Check/place the main page elements
Page elements represent the functionality of the Web pages – they are the means by which your customers
can operate the various functions and browse your site. These page elements include, for example:
-
Link to Terms and Conditions and Privacy Policy
The categories tree, or a list of categories that provides access to individual product categories and
products
The Search function
The sign-in function for registered users
Functions to switch language and currency
Shopping basket
User Guide for Web site Administrators
Page 13
Quick start / First steps
Depending on the topic you have selected, the most important associated page elements will be displayed
on each Web page. Check whether the necessary elements are correctly placed.
You can find information on the basic principles of design and working with page elements in Design, on
page 111 and Page elements and navigation, on page 119.
5. Modify the design
Your selection of a topic for the site determined the matching site design. If required, you now have many
options for modifying the design. The section Design, on page 111 contains a detailed description of how
to customise the layout and design.
6. Create Products/Services
If you want to operate an online shop, and sell products or services, you must now create some products
and assign them to categories. You can create new products in the Products menu. Services can be created under Booking system.
The most important data you need to enter is a product number, product name, list price, and selecting a
tax class. Set the status for Visible to Yes. If required, fill in additional fields.
Save your entries by clicking Save.
Assign the products to categories. To do this, click the Categories tab and select the correct categories.
For a complete description on how to best implement and use all the functions for products, see Products,
on page 65.
The booking system and services can be created using the assistant in the Booking system menu item.
You can find all relevant information under Booking system, on page 105.
7. Check important system settings
All system parameters have a default setting and can be used immediately. Check the most important ones
at this stage to optimise the settings. To do this, click Settings in the menu bar.
We recommend checking the following settings at this stage:
-
Languages, currencies, countries; see Country settings, on page 52
Delivery and payment methods; see Delivery and payment, on page 43
E-mail settings for various notices and confirmation messages; see E-mail settings, on page 54
This completes the basic settings needed to operate your shop. An overview of all settings is available under Settings, on page 37.
8. Testing
Before publishing the Internet address of your web site, you should test it as a visitor. Doing this lets you
check whether your settings and changes (for your logo, design, products, and so on) have been correctly
applied and are displayed as planned.
It is also important to check whether e-mails such as registration confirmations or order confirmations are
being sent. Sign in as a customer to provide a valid e-mail address for messages to be sent to.
Note: If e-mails are not being sent properly although you entered all the addresses correctly, have your
provider check the system settings.
Page 14
User Guide for Web site Administrators
Quick start / First steps
If the tests run to your satisfaction, delete all the test data (products, customers, etc.) and make the Internet address of your Web site available to your clientèle.
We wish you the best of success!
User Guide for Web site Administrators
Page 15
General page layout
Basic principles
3. Basic principles
This chapter explains the basic structures, functions and procedures that are used throughout the entire
application. This knowledge will be required to use the application effectively.
General page layout
All pages of the administration are based on the following structure:
Figure 1: Structure of Administration pages
The areas are:
-
Administration navigation (1); see Administration Navigation, below
Menu bar (2)
Working area (3); see Working area, on page 18
Sidebar (4); see Sidebar, on page 18
Administration Navigation
The Administration Navigation menu is available on every page. The following links are available:
User Guide for Web site Administrators
Page 17
Basic principles
Tray
Web site link
The See your site: Website link displays the current page in the browser as seen by the visitor. See Web
site views, on page 20. If your website is closed for visitors, a symbol for this is also shown in addition to
the link.
Page cache link
In some cases a link is shown in front of the link to the site Page cache: update now in a red arrow. This
link displays the status of the page cache. Use this link to activate the page cache with the current settings
or open the settings for the page cache. For more information on the page cache, see Page cache, on page
37.
Administrator link
Click your administrator name to open the page containing the user settings for the administrator. See
Administrator data, on page 35.
Sign out link
Click Sign Out to leave the Administration area. Signing out ensures that your connection to the system is
closed correctly and securely, and that no unauthorised user can gain access to the Administration area of
your site. After you sign out, the sign-in page will appear again.
Working area
The working area may contain forms, tables, or other functional controls, depending on its current purpose.
Each area is organised into tabs. Every tab has a title which is displayed in the form of a link. See Figure 2,
on page 20. You can click this link to activate the tab, if more than one tab is visible at a time.
On the tabs you can enter and edit information, check settings, display search results, and so on.
Sidebar
The sidebar consists of the following sections described below:
-
Help; see Help, on page 20
Tray; see Tray, below
Favourites; see Favourites, on page 19
History; see History, on page 19
By default, the first time a particular page is called up, the Help section is displayed. This happens irrespective of which section of the sidebar was active before. If the page that has been called up has been
viewed before, then the sidebar content does not change. If you are happy using the application, and do
not need the help to be shown for new pages, you can edit this default setting; see Administrator data, on
page 35.
Tray
The tray is an area for temporarily storing objects or object groups. These objects may be products, customers, or even delivery methods. You can add an object to the tray at one place in the application and
use it at another place.
An example is sending newsletters containing product information. You select the products from the product list and add these to the tray. When you create the newsletter, you can take the products from the tray
and insert them into the newsletter.
Page 18
User Guide for Web site Administrators
History
Basic principles
The objects are saved in groups according to type. The number of elements which are contained in the
group is displayed in round brackets.
Note: There is one group for each object type (for example, customers or categories) and one group for
each product type.
The following methods are available to add objects to the tray:
-
add a single object from its detail view.
When you are in the detail view of an object which can be added to the tray, its name will appear as
the second-to-last entry in the tray.
This object has not yet been added to the tray. Do do this, click the entry with the object name. This
adds the object to the correct group in the tray. The object link will be displayed as long as you are in
the detail view for the object. If the entry is not a link, the object has already been saved in the tray.
-
add a number of objects from a table using batch processing commands
If you want to add several objects to the tray at the same time, you must switch to the table view for
the objects in question. In addition, the Add to tray batch processing command must be available for
this table. Instructions for executing batch processing commands can be found in Batch processing in
tables, on page 22.
On certain pages it is possible to add objects from the tray. There is a button for this Add products from
tray. Only objects applicable to the current task will be added from the tray.
To remove an entry from the tray, click the icon behind the relevant entry.
To remove all entries from the tray, click
Empty tray.
When you sign out, the tray will also be emptied.
History
The History list contains links to the most-recently visited pages that you have called up in the Administration area.
To copy a link from the history into your favourites, click the icon. For more information, see Favourites
below.
Favourites
This area contains links to your favourite pages in the administration area. This allows you to open these
pages directly.
The following options are available for saving pages to your favourites:
-
Pages can be added from the History area. See History, above.
In Favourites click the link Add current page to favourites. This link is only visible if the page has not
yet been added to the list of favourites.
Favourites continue to be stored after signing out. The number of favourites you can have is unlimited.
User Guide for Web site Administrators
Page 19
Basic principles
Sections
Sections
Sections are subareas on tabs and serve to group data. Sections are used if the amount of relevant information is too large for one tab, but these belong together.
The individual sections can be selected by clicking the section title; see Figure 2.
Figure 2: tabs and sections
The arrow shows the selected section.
Help
The application includes a multi-level Help system.
The most important information are available in the form of notes right on the web page.
The current page may contain links to related topics on the bottom part of the page and to functions or settings which are related to the current page.
Active button "Save"
In the application, Save is an active button. This means that the button can only be used when a value has
been changed on the current page and saving is necessary.
As well as this, a * appears in the title bar of the browser so that you can quickly recognise from the Windows taskbar that the content of the browser has not been saved.
Web site views
If you create or edit information which is visible on the Web site, you should also make sure that the information has been transmitted and is displayed correctly.
You can open the latest version of the pages of your Web site in a new window by clicking the link in the
Administration Navigation bar; see Administration Navigation, on page 17. The page is displayed using the
active style.
If you edit a different style, the Web site is displayed using the design stipulated by that style. See also
Own styles, on on page 121.
Page 20
User Guide for Web site Administrators
Tables
Basic principles
Tables
A table is a list of objects. Information can be added to a table, modified, or deleted. To increase the clarity to fit your requirements, you can sort the records according to various methods. In some tables, you can
define the contents using a search filter.
The table functions are explained individually in the following section.
-
Adding records,
Editing records,
Deleting records,
Selecting in tables,
Batch processing in tables,
Sorting using sorting keys,
Adding records
The following methods are available for creating new records:
-
Manual record entry
Add information from the tray
New entry in submenu
Editing records
You can modify entries in the following ways:
-
manual modification in the table
open the detail view and modify the entries in the detail view
Click the link to open the detail view. Modify the information in the detail view. Save your entries by
clicking Save.
-
modifying entries in groups by batch processing
If multiple entries are to be processed in one action, use the respective batch processing command.
See also Batch processing in tables, on page 22.
Deleting records
Entries can be deleted in the following ways:
-
Button Delete
In some tables there is a button marked Delete below the table. Select the relevant entries and click
Delete.
-
The batch processing command Delete
In some tables Delete can be selected from the batch processing commands. Select the relevant entries and start the Delete process.
For more on selecting, see Selecting in tables, on page 22.
For more on batch processing, see Batch processing in tables, on page 22.
User Guide for Web site Administrators
Page 21
Basic principles
Search
Selecting in tables
If a table contains records which can be selected, the first column is the selection column.
To select all records on the page, click the check box in the column header.
Note: The Select all function works on all the records displayed on the current page. To select any other
records, you first have to open the correct page and execute the command for this page.
Batch processing in tables
A batch processing command is a command which is executed for all selected records in a table. The batch
commands available for a table are shown above the table in question. The icons for batch commands are
greyed out until you have selected one or more entries.
Perform these steps to use a batch processing command:
1. Select the records to be processed.
2. Select the action.
Sorting using sorting keys
The sorting key is a number much like a row number, which is used to determine the order of records in a
table. Every record is assigned a position in the table according to the sorting key. If the table supports
sorting records using sorting keys, the column Sort order is displayed. In this column, the current sort key
for every record is displayed in an entry field.
Changing the value of the sort key lets you sort the table records any way you like. Save your entries by
clicking Save.
In order to be able to more effectively sort new entries, after saving a new sort order, the key fields are
again displayed in increments of 10.
Note: This sorting command effects both the Web site display and the administration area.
Search
You can switch between quick search and advanced search.
The quick search is a full text search and offers one entry field. The entered search term is applied to all
fields of the objects that can contain text.
The advanced search contains additional fields. The entry fields adjust to the type of objects to be filtered.
For products there are product specific fields, for customers there are customer specific fields, and so on.
You can use the placeholder * in the text fields to complete the search text. Capitalisation is not considered. If you only enter "*” or leave the field blank, all objects of that type will be shown.
The search fields are connected using logical AND. In other words, a record must meet all the criteria defined by the entries in the search fields and not just one of them.
Language-dependency
The application supports various languages, both in the Web site and also on the administration page.
Page 22
User Guide for Web site Administrators
Default settings
Basic principles
The administration language is set in the administrator settings; see Administrator data, on page 35.
You can set up language selection for your visitors on the Web page so that every visitor can select his preferred language. Activate these languages in the Country settings; see Country settings, on page 50.
Note that you have to enter and maintain your specific content for the various languages yourself. This is
information such as product descriptions or names, language-specific files, and other attachments.
At all places where language-dependent content must be maintained, the corresponding entry fields for
different languages are displayed. The drop-down menu contains the languages you selected in
Languages, on page 52.
Always enter date and time information in the administration language. The display on the web site will always be in the selected language automatically.
Default settings
Your customers must select between various values in the shop in various places. This is, for example, the
selection of the payment or delivery method or the selection of product variations. You define a standard
value for each selection. This value is shown to the customer upon opening the page as selected and is
valid as long as the customer does not select any other.
The setting of the standard value is termed the default. In all tables in which you can set a default value,
there is a Default column. The column contains an option field for each entry.
Click the option button of the value that is to be the default setting. Save your entries by clicking Save.
On the detail page of the corresponding objects, you can set the default as well.
Select the values your customers use the most.
Visibility
The visibility setting defines whether an object is displayed in the Web site. If you activate Visible, the customer can see and order these elements in the shop. If you deactivate Visible, the element can only be
seen by you in the preview.
You can manage the visibility using option buttons in the detail views or using the check boxes in the corresponding tables.
If an object is set to not visible, it can still be accessed and displayed directly via the URL or the relevant
page.
Note: Newly created elements such as products, categories, and so on, are set by default to Not Visible
so that you can first collect all the necessary data before the element appears in the Web site.
Attribute types
Attributes are used to describe properties of objects. For example, customers have attributes such as salutation, username or e-mail address. For products these are product number or description, for example.
Attributes can be divided into different attribute types. You can set the usage and allowed values of an attribute over the attribute types.
User Guide for Web site Administrators
Page 23
Basic principles
Attribute types
When creating attributes for products or customers, you need to define the attribute type. This means that
you define whether this attribute should be displayed and processed as, for example, a character string
(text), a number, or a date in the system. The individual attribute types have the following meanings:
Table 1: Overview of the attribute types for entry fields
Type
Description
Usage
Example
Text
Character string,
word, sentence
Entry fields for names, addresses, text and Text field
so on. You can use any character.
There are no length restrictions.
Languagedependent text
Languagedependent text
Can be used as Text; one value can be entered for each active language
red
Red
Text with value
selection
Text for building a
set of possible values
For more information, see Using text with
value selection, on page 25.
red
yellow
green
Languagedependent text
with value selection
Languagedependent text for
building a set of
possible values
Can be used as Text with value selection; Rot / Red
one value can be entered for each active
Gelb / Yellow
language
Grün /Green
See Language-dependency, on page 22 and
Using text with value selection, on page 25.
Options
Selection
See Using options, on page 26.
CD
DVD
Languagedependent options
Selection
Can be used as options; one value can be
entered for each active language
Optical mouse
Optical mouse
English keyboard
English keyboard
Customer options Selection
This allows you to offer options for services
that the customer can select for the booking. See also Service details - Customer
options, on page 106.
Table reservation
with:
Flower arrangement,
Christmas decorations
Integer
Integer
255
Decimal number
Floating-point decimal numbers
15.23
Yes/No
Decision
Option button Visi-
Option buttons. At this point, the user
makes a Yes or No decision.
ble
Entry field for prices
€21.95
Money
A fixed-point number with a specific
number of decimal
places for saving
money amounts.
Date
Date fields for days
from 01.01.0001 up
to 31.12.9999.
12.06.2010
Time
Time field for the
range 00:00:00 to
23:59:59
11:11
Page 24
User Guide for Web site Administrators
Attribute types
Basic principles
Type
Description
Usage
Example
Date and time
Combination of date Entry fields for exact times. The entry format 6/12/2010 11:11
and time
is defined by the current country setting. For
Germany the format is DD.MM.YYYY
hh:mm:ss
File
File name
You can use this field to assign a file to a
product, for example.
Productinfo.pdf
Languagedependent file
File name
Can be used as File; one file can be assigned for each active language
Productinfo_de.pdf
Productinfo_en.pdf
Using text with value selection
The Text with value selection and the Language-dependent text with value selection attribute types form
the basis for creating drop-down menus or product variations. For these attributes, you define various values for the user to select from.
In the details for these attributes, next to the General tab there is an additional Value selection tab. Here
you can define a value pool which will be used for this attribute. This allows you to make sure that only the
values you suggest can be applied to an attribute.
The following example demonstrates this:
You would like your visitors to enter how they heard about your site on the registration form. You want to
set a fixed number of answers which the customer can select from.
Create a ContactInfo customer attribute of the type Language-dependent text with value selection. For more
on customer attributes, see Attributes, on page 86. Create the preset values in the attribute details on the
Value selection tab as shown in Figure 3.
User Guide for Web site Administrators
Page 25
Basic principles
Attribute types
Figure 3: Value pool for the attribute type Language-dependent text with value selection
Save your entries by clicking Save.
The customer can then use the following drop-down menu in the registration form.
Figure 4: using an attribute with value selection
Using options
These attribute types provide the user with a value pool from which to select multiple values. Each value
can be selected by clicking the check box next to it. This technique is useful for creating different product
configurations.
Just as in Text with value selection, you define a value pool which can be used for this attribute. This allows
you to make sure that only the values you suggest can be applied to an attribute.
The following example demonstrates this:
A basic product is to be offered with various additional components. In a Configuration attribute you provide possible configuration characteristics; see Figure 5.
Page 26
User Guide for Web site Administrators
Working with text fields
Basic principles
Figure 5: attribute type options
When creating a product of this type the configuration of this product is displayed in the check boxes.
Working with text fields
Text fields are entry fields where longer texts can be entered. They are used to contain, for example, product descriptions or the text of a newsletter. You can format these texts to make the layout more attractive.
This can be done in the following ways:
-
Usage of the integrated WYSIWYG editor, see WYSIWYG Editor, below
Usage of HTML formatting instructions directly in the text
When working in the page preview, there is also the option of using the inline editing mode. This allows
you to edit text directly in the page preview. For formatting purposes, use the WYSIWYG formatting tools in
the multi-function toolbar. See also Preview, on page 91 and Multifunction bar and content, on page 92.
You cannot use HTML code directly during inline editing. To enter HTML code at this position, click the Edit
HTML icon in the multifunction bar.
WYSIWYG Editor
The program offers a comfortable solution for designing text fields - a WYSIWYG editor. WYSIWYG (What
You See Is What You Get) means that the text is shown during editing exactly as it will be displayed later.
This has the advantage for you that you can simply and professionally design texts without knowing formatting commands. You can insert images, links and tables easily.
The WYSIWYG Editor can be started in the following different ways:
-
If, the Edit text button is displayed for a text field, click on it. This opens the Editor in a new window
and the text is copied from the field.
When you click in the text field, the Editor automatically opens in a new window.
When you click in the text field, the toolbar of the Editor is displayed above the field.
Click Apply to store the edited text in the text field.
Read about the colour selection in Colour selector, on page 29,
Insert and edit images/videos
You can add images and videos using the file manager. For more about this, see File management, on page
30.
This is how to add an image:
1. Click the icon. for image insert/edit.
2. Select an image from the file manager.
3. Click Apply in the file manager to add the image into the WYSIWYG Editor.
Edit the image settings as follows:
1. Click the image.
2. Click the icon. Insert/edit image.
3. Modify the properties.
4. Click Apply to save the changes for the image.
To add videos of Flash files, do the same thing.
Note the following:
User Guide for Web site Administrators
Page 27
Basic principles
-
-
WYSIWYG Editor
The address of the image file is entered in the Image URL field. If you want to display an image using an
absolute URL, enter the address in the format http://.... If the image is supposed to be shown on a
page that is loaded using https://, the image URL must also contain https://. Otherwise, a warning is
shown in the browser about unsafe content. In the shop, all pages after the shopping basket are https
pages.
Include a description and a title. The description is important for search engines.
Insert and edit multimedia elements
Multimedia elements are active elements which you can include in your web site in order to make it more
attractive or in order to include external content. This includes Flash files, RSS feeds and “Gadgets”.
This is how to add a multimedia element:
1.
2.
3.
4.
5.
Click on the button of the relevant type.
Select the element from the list.
Enter the required parameters on the detail page.
Click on Update to display a preview.
Click Add to add the element into the text field.
Flash page content
Flash page content contains animated images/graphics. The user must have installed a Flash player for his
browser in order to be able to view the Flash files. Flash files are used, for example, for banner advertising
or to realise complex content in an animated format.
Gadgets
Gadgets are various functions that can be integrated into your Web pages. These allow you to provide your
Web site's visitors with additional information, services or entertainment. Typical gadgets include, for example, railway timetables, traffic information or Google Maps.
RSS page content
RSS page content (RSS feeds) are lists of short messages that can be integrated into your Web site. They
are comparable to a news ticker. In an RSS feed, the news is summarized briefly in headlines. A link allows
the visitor to jump to the entire message. RSS feeds are available from many different providers on many
different topics.
The user can load new Feeds using the update button on the web site.
Insert link / Remove link
This is how to add a link:
1. Select the text for the link.
2. Click on the button to add a link.
3. Enter an internet address or select a page.
4. Select the corresponding checkbox if the linked page should open in its own window.
5. Click Apply to add the element into the text field.
The list also contains any anchors you have added to the text in the lower section.
To remove an assigned link, move the cursor to the link and click the icon. The link is deleted and the text
loses the link function.
Insert anchor
Using anchors, you can set target marks in the text which can be jumped to using special links.
Page 28
User Guide for Web site Administrators
Uploading images
Basic principles
Click the icon to place an anchor. Enter the name of the anchor in the Anchor name field and click Insert.
If you want to insert a link to an anchor, follow the instructions for Insert link / Remove link, on page 28.
Select the corresponding anchor in the page selection list.
Uploading images
Images are uploaded through the Open file dialogue. In addition, an Upload file button or symbol is available in the corresponding places.
Use the following process to upload images:
-
Using the upload file dialogue
Here you upload the file directly using the upload dialogue in the browser. In some places in the application, a size alteration can be made with the image during upload. A check box is shown for this, if it
is possible.
-
Using the file manager
The file management is opened. You select the desired file from the file list. For more about this, see
File management, on page 30. You can open the kinds of files that are allowed for the current operation.
Note: You can use the Open file dialogue to upload external images. In the field for the file name, enter
the external URL of the file (http://...). If the image is supposed to be shown on a page that is loaded using https://, the image URL must also contain https://. Otherwise, a warning is shown in the browser
about unsafe content. In the shop, all pages after the shopping basket are https pages.
For background images, there are a number of special points that must be noted. Read Notes on back-
ground images, on page 113.
Colour selector
The colour selector is a tool used to help select colours. The colour selector is used in all instances where
colours can be defined for text, background colour, etc.
All elements for which a colour can be set are identified by a corresponding icon that shows the current
colour. Click this icon to open the colour selector in a new window.
On the right-hand side in the upper half of the paint box you see the current colour and below it a range of
colours that match it. Below the colour field you see your user-defined colours. The current colour is circled
in the colour field. By clicking on the lower half of the paint box on the right-hand side you can discard the
changes you made and restore the original colour.
Colour selector
You can set a colour in the following ways:
-
Direct entry (Colour code)
You can enter the colour code in the form RRGGBB (RR- red component, GG – green component, BB –
blue component) with leading hash mark (#). If you do not enter the hash mark it will automatically be
added to valid colour codes after saving. The coding of colours in HTML will not be covered here. For information on this, please see the relevant specialist literature.
User Guide for Web site Administrators
Page 29
Basic principles
-
File management
Selection via the colour field
Select the colour with the mouse. Using the vertical slider you can change the colour to be displayed in
the colour field. Set the relevant hue in the colour field.
To use the current colour, click Apply.
Matching colours
A series of colours is displayed under Matching colours. These are complementary colours which ideally
match the current main colour of your style. The series is calculated according to basic design rules. To set
a colour from this series as current colour, click on the appropriate check box.
User-defined colours
In the fields for user-defined colours you can store colours that you want to use repeatedly. To store a colour here, first click on the user-defined colour you wish to replace. Next, select a colour as described above
in order to store it.
Some of the user-defined colours are initially entered using your selected design template.
To set a user-defined colour as the current colour, simply click the corresponding colour box. This causes
the colour to be displayed in the box for the current colour where it can be applied.
File management
You can use the file management function to upload and manage various types of file. You can access these file from the WYSIWYG Editor. Logos and background images can also be loaded from the file manager.
File management is separated into two main folders Own files and Image database.
Under the main folder Own files you can create a folder structure into which you can sort your own files.
You can import the desired file into the text from this structure.
This contains a selection of images that you can copy directly to your text or your own site structure.
The left side of the file management control displays the folder structure. The files are listed in the right
side.
If you select a folder, the corresponding commands that are available for this folder are displayed in the
command bar. The following functions can be performed:
-
Create new folder
Rename folder
Delete folders
To upload files, click the Upload files button. See also Uploading images, on page 29. Here you upload the
file directly using the upload dialogue in the browser.
The following functions are also available for files:
-
Delete
Delete selected files
Download
Rename files
Copy files
Page 30
User Guide for Web site Administrators
Import and export
Basic principles
To copy files, proceed as follows:
1.
2.
3.
4.
Select the target folder.
Select a folder in the image database.
Highlight the relevant images.
Click Copy files.
Import and export
Use the import and export functions to share information with other systems. This can be used if you have
prepared your information using another system or program and you want to use this in the Web site; see
Import file, on page 32. Conversely, you may want to use the information on the Web site in another system; see Export, below.
CSV files are used for import and export. A CSV file is a simple text file containing a list of individual values
separated by a specific delimiter. Each object takes up one line in the file. For more on CSV files, see also
Editing CSV files with Microsoft Excel, on page 32. Use of an export file as a template for the import file ensures that you correctly spell field names and field and column names.
The details for import and export for specific object types is explained in the respective chapters.
Note: Before importing a file with a large number of records, we recommend that you test the import
process with a file of just one or a few records.
Export
The export can be done in the following ways:
-
Export selected objects using batch processes.
In this case, the Export command can be used on tables for specific objects such as products or customers. This allows you to export the selected objects in the tables. For more on batch processing, see
Batch processing in tables, on page 22.
-
Export all objects of a specific type using the Import and Export menu item.
The various fields have the following meaning for the export:
Table 2: parameters for exporting product data
Field name
Description
Object Type
Formatting
Regional setting for the data format in the export file, for example, for currency or
date information.
The selection also determines the corresponding separator symbol.
Coding
Selection of the character set to be used.
The Default is the default character set for the administration language. If you are
using additional characters, set this to Unicode. Otherwise this character will be
displayed as a question mark.
Delimiter
Delimiter used to divide data fields in the export file
This setting overwrites the delimiter setting entered in Formatting.
Languages
Setting that defines which fields relevant for a language will be exported
Once you have entered all the settings, click Export to start the export process.
User Guide for Web site Administrators
Page 31
Basic principles
Import and export
Note: Some functions in the application will open in new browser windows. For this reason, your
browser must allow pop-up windows to open. Otherwise, certain functions cannot be used.
Import file
Before importing, you first need to create a correctly formatted CSV file. It is especially important to use the
correct field names in the header.
The field names in the header have two parts, the name and the ID. The name corresponds to the name of
the fields in the product detail view. You can modify this name if necessary. The internal names (IDs) are
enclosed in square brackets and must never be changed. You can also interchange columns, as long as
each column keeps its own heading.
Note: Use the export file as an example in order to have a template for the headings.
The following rules are applied to the values in the import file:
-
If a column in the import file is not available, the values in the database will not be changed.
If a column of the import file is available and does not contain values for one or more records, the respective entries are deleted from the database.
If a column in the import file exists and contains entries, the corresponding data is replaced in the database by the data from the file.
The various fields have the following meaning for the import:
Table 3: Parameters for importing product data
Field name
Description
Object Type
Field type
Example
Drop-down menu
Formatting
Defines how numbers, currency, and
Drop-down menu
date formats are interpreted during the
import
The selection also determines the corresponding separator symbol.
Delimiter
Setting for the delimiter used to divide Drop-down menu
data fields in the import file
This setting overwrites the delimiter
setting entered in Formatting.
Languages
Irrelevant for the import.
CSV import file
Enter the name of the import file in this Entry field, alphafield. Click Browse to search for the
numeric
file.
The size of the import file is limited.
The current maximum value is displayed under the entry field.
Drop-down menu
C:\temp\import.csv
When all the parameters have been set correctly, start the import by clicking Import. If problems occur during import, you will receive a relevant message. In the case of large files, the total number of errors is limited to 100 error messages.
Editing CSV files with Microsoft Excel
CSV files can be edited with Microsoft Excel, for example. The automatic cell formatting in Microsoft Excel
can cause some data to be incorrectly interpreted and displayed. This occurs in the following examples,
among other cases:
Page 32
User Guide for Web site Administrators
Short URL
-
Basic principles
Long numbers may be displayed as exponentials (e.g. telephone numbers, where 123456789123654
becomes 1.234567 E+14).
Dates and times may be displayed in numerical format (e.g. 02.05.2008 becomes 39570).
Leading zeroes in numbers may be deleted (e.g. in postal codes, 07743 may become 7743).
In such cases, you must check the corresponding cells or columns and correct the formatting so that the
data matches the requirements of the export file. Set for example for formatting for the specified cells to
Text. Alternatively, use a different program to edit your import data.
Short URL
Short URLs are short, meaningful internet addresses for a website. They are handier and easier to use than
long cryptic URLs that are generated by the system. Here are URLs for two of the same pages as an example:
Long URL
-
http://www.shopdomain.de/epages/shopname.sf/de_DE/?ObjectPath=/Shops/shopname/Products/
lt_0401107001
Short URL
-
http://www.shopdomain.de/Leatherman
The comparison shows the advantages of a short URL:
-
The customer can read the short URL easier and faster.
The customer can understand the URL on the page with the Google search results faster and easier.
The customer can remember the URL.
The customer can see the contents of the web site from the name.
You can assign short URLs for products, category, and informational pages. The prerequisite for assigning a
short URL is your own domain.
You can create short URLs for all relevant pages with one comment from the start page of the administration. You can also manually change or create the short URL in the general details of the relevant page later.
Creating a short URL for all pages
Make sure that the provider of your web site has entered a domain name.
This is how to create a short URL for all pages:
1. Click this link to open the Administration home page.
2. Click Generate short URLs.
3. Read the ensuing message carefully and click Generate short URLs.
This is how to edit a short URL for individual pages:
1. Open the general details of a specific page, such as a product or a category.
2. Enter a descriptive name in the Short URL field, for example, the product name.
3. Save your entries by clicking Save.
If you would like to utilize the URL in other channels, click Use link externally. The URL is then shown in
the normal form and in HTML. Copy and paste the URL into other media.
User Guide for Web site Administrators
Page 33
Security query for deletion actions
Administrator data
4. Administrator data
This is where you configure the personal settings that control the way you work in the administration area.
These include, for example, data for accessing the administration area, and the e-mail address used to
send you system notifications.
By and large this administrator data corresponds to the general sign-in data for users. See Administrator
details – Sign-in data, on page 41.
The Allow sign in field is not shown, since you cannot lock the administrator account out of the Web site.
An additional setting is the option Always display Help for previously unseen pages. This allows you to
manage the display of the Help pages. If you set this to Yes, Help topics will be shown for every page that is
being visited the first time. See also Sidebar, on page 18.
Save your entries by clicking Save.
Note: In some situations, more languages may be available for the Web site than for the Administration
area.
Security query for deletion actions
For security reasons, you will be asked for additional confirmation with every delete command. The delete
command will be performed after your confirmation. You can switch off deletion confirmation using the Deletion confirmation check box.
Caution: If you clear the Deletion Confirmation check box, every deletion is executed immediately and
without the need for confirmation. You will not be able to cancel the action later. It is recommended
that only experienced users deactivate this.
User Guide for Web site Administrators
Page 35
General settings
Settings
5. Settings
General settings
Use the General settings to set the address of your Web site and enter the business hours. In addition, you
can control customers' access to your Web site and the speed at which individual pages are rendered (displayed).
General
Page: Settings >> General settings >> General
The following tabs are available here:
Presentation
Here you can edit the name and slogan of your web site. Place these data using the page element Name of
the Web site with slogan. They are usually shown in the Header. See Design basics, on page 111.
Here you can upload an image for your web site logo in optimal size. See also Uploading images, on page
29. Place the logo using the Logo page element. It is usually shown in the Header area.
A favicon is a small image that appears in the browser's address bar to the left of the Web site address
(URL). The file should contain an image in the size 16x16 pixels or 32x32 pixels. You can do the following
to create the Favicon:
-
Directly from the logo: To do this, click the link. Create own favicon from logo.
Create from another image: Upload the image directly, see Uploading images, on page 29. You can only
use *.ico or *.cur images for this.
Status
You can close your web site. Instead of your web site, a message is shown. You can edit the content of the
message. If you do not use your own text, a standard message is shown.
Advanced settings
You can add your own code to every page in the header HTML code. These can be your own style information, for example.
You can enter instructions, for example which remove the availability display for products. Enter the code
in the text field and save your entries by clicking Save.
Caution: Only use this function if you are an experienced user. Code errors can interfere with the function of the entire web site.
Page cache
Page: Settings >> General settings >> Page cache
This function controls the speed at your pages are displayed.
Dynamic content is data and information that is read from the database and inserted into the page just before the Web page is displayed. This ensures that the values are up-to-date. This includes data about prices, amounts, and so on.
Pages where the content changes rarely can be cached and displayed more quickly.
User Guide for Web site Administrators
Page 37
Settings
General settings
Your customers expect up-to-date pages with fast loading times. For this reason, it is a good idea to find
the optimum setting between displaying current content and quicker availability of the page.
The page cache allows you to configure how often certain pages are updated. When deciding this, bear in
mind how often you change and update the data on these pages.
For example, if you change the prices of your products weekly, it is good to update product and category
pages as well as statistics every week after the price change. During the rest of the week, these pages can
be loaded and displayed from the cache.
The same applies for stock data. When inventory levels of products are evaluated for display in the shop,
the page cache must be set so that when the stock level changes during the order process, the corresponding pages are updated. For more about this, see Availability, on page 59.
The status of the page cache is displayed in the Administrator menu; see Administration Navigation, on
page 17.
Use the check box Activate page cache... to switch the page cache function on or off.
Once you have switched the page cache on, select your preferred update intervals for the pages listed on
the screen. Save your entries by clicking Save.
If you have made extensive changes to data and information, you can update all the pages with one click.
To do this, click Update immediately.
If you click the menu bar option See your site, all pages will also be updated at once.
Note: If you make changes while in the administration area and these changes are not immediately visible on the Web site, check the setting for the period of validity. If necessary, click Update immediately.
Remember the following:
-
The page cache only applies to users who are not signed in.
Customers will not see the changes until after the administrator has started the update or it has been
performed automatically.
We recommend that while setting up the Web site you disable the page cache option in order to apply frequent changes immediately. When your shop goes into Live operation, click the check box and set the
longest possible periods of validity.
Utilisation
Page: Settings >> General settings >> Utilisation
Your Web site supports a range of functionality with defined limits. The Utilisation tab shows you which
functions are available in which scope and to what extent the maximum values are being used.
If you have reached the limit or want to use new functions, contact your provider.
Address
Page: Settings >> General settings >> Address
This data is used when the address information for the Web site is made public. For example, it is the
sender address on invoices and packing slips. This information is also used when address information
needs to be submitted to third party systems, for example, when registering for product portals such as
Pangora or Kelkoo.
Page 38
User Guide for Web site Administrators
User administration
Settings
Business hours
Page: Settings >> General settings >> Business hours
On this page, you can manage your usual hours of business. These are the times or hours during which you
usually offer your services or during which your customers can book. The times on this page are the centrally maintained default times. These apply for example, to the booking system as the default and can be
overwritten for individual bookings.
You can configure the same hours for all weeks, or set different hours for odd weeks and for even weeks.
When entering hours, you should remember:
-
You can split a day into two, setting opening times for the morning and afternoon.
For round-the-clock operation, enter the hours from 00 to 00 (not 00 to 24)
The end time must always be greater than the start time. Therefore, to specify business hours from
22.00 until 04.00, enter 22 - 0 for the evening and 0 - 4 for the next day.
To display the business hours on the Web site, you must create a page using the Business hours type and
set it as visible. See also Business hours, on page 99. In addition, you can place the page element Business hours as box on your pages. For more information, see Page elements and navigation, on page 119.
User administration
Users
Page: Settings >> User management >> Users
Users are visitors to your Web site who register and have a user name/e-mail address and password.
This allows you to make certain pages or even your whole Web site only accessible to registered users. You
can also assign user-specific prices. Alternatively, restrict the use of forums and blogs to registered users.
User details – Sign-in data
Page: Settings >> User management >> Users >> Sign-on data
A checkbox in the Registration process completed field means that the user has completed registration using the double opt-in process. Whether this special registration process must be performed is determined
by you on the Signing in tab in the option Use safe registration (double opt-in process). See also Signing
in, on page 40.
If a user has forgotten his password, you can provide him with the possibility to set a new one. Click Send
e-mail. This e-mail contains a link that the customer can use to enter a new password.
If you manually assign a new password, you must send the new password yourself.
Note: When a new user is created manually in the MBO, the password is not generated automatically.
You must enter a password so that the user can sign in to the Web site.
User details – Posts
Page: Settings >> User management >> Users >> Posts
This displays a list of all the posts or messages that the user has written in all forums, blogs and guest
books on your Web site.
User Guide for Web site Administrators
Page 39
Settings
User administration
User details - Newsletters
Page: Settings >> User management >> Users >> Newsletters
In the table, all newsletter campaigns are listed. You can see immediately which are subscribed to by the
current user.
If you subscribe or unsubscribe for this user here, he is informed about this via e-mail.
User groups
Page: Settings >> User management >> User groups
You need user groups if you want to allocate permission to your users to carry out certain commands. These types of permission are always allocated using user groups. For example, if you want to restrict a page
to specific users, you must first link the corresponding page to the corresponding user group. You must also assign the corresponding users to this user group.
To create a new user group, the following options are available:
-
Enter the new user group into the table. For more information, see Adding records, on page 21.
When you create a customer group und Customers >> Customer groups, a user group with the same
name is created automatically. For more information about customer groups, see Customer groups, on
page 87.
To display the list of assigned users, click the ID of the user group. To add users to the list, the following
options are available.
-
Proceed as described in Adding records, on page 21.
Add a registered customer to a customer group.
This customer will automatically be added as a user in the user group that has the same name as the
customer group.
Registration
Page: Settings >> User management >> Registration
This section defines the content of the registration form. Your visitors must complete this form when registering. By the act of registering, your visitors become users.
The registration settings are described in Registration, on page 58.
Signing in
Page: Settings >> User management >> Sign in
This section allows you to define the options for accessing your Web site.
Using the Require sign in option you can make it compulsory for your users to sign in. This means that only
visitors who have a user account are allowed to navigate on your Web site. New visitors can only access the
Web site once you have created user profiles for them in the administration area.
Enter a relevant text in the Text if signing in is required field to inform non-registered visitors of the configuration and explain the steps required to register.
The Double opt-in process provides a secure registration for you and your customers. The customer receives an e-mail after registration. Only after the customer clicks on a special link will the registration process be completed. The customer has to confirm that he has performed the registration himself.
Page 40
User Guide for Web site Administrators
Tax calculation
Settings
Once you start to use customer information for purposes not simply restricted to the ordering process, you
must inform your customers of the reasons of your using their data and the customers must agree to this
usage. You can enable the Activate privacy policy... option to require customers to agree to you saving their
personal information. This step ensures that your customers have agreed to this usage before they register.
If the option is active, an agreement is queried in the following places:
-
during registration
for unregistered customers, when they enter their address in the order process
in the contact form
For information about the privacy policy, see Privacy policy, on page 99.
Administrators
Page: Settings >> User management >> Administrators
Administrators are all users that are registered in your web site and can work there.
Note: The administrator created by your provider cannot be deleted from the administration.
Administrator details – Sign-in data
Page: Settings >> User management >> Administrators >> Sign-in data
To find out about the security question for deletion, see Security query for deletion actions, on page 35.
Note: For newly created administrators, the system assigns the default password admin. You must enter this as the old password when you change the password for the first time.
Administrator details – Posts
Page: Settings >> User management >> Administrators >> Posts
This displays a list of all the posts or messages that the administrator has written in all forums, blogs and
guest books on your Web site.
Tax calculation
Tax matrix
Page: Settings >> Tax calculation >> Tax matrix
Your provider will supply you with a table with the most widely used tax classes in the main tax areas. This
is called the tax matrix.
The default tax class and the default tax area are marked with a * in the table.
The default setting of the tax matrix is read only. It is managed by your provider. If necessary, you can also
edit the entries yourself. To do this, click Customise. After confirming this, you can edit the values in the
matrix. The same applies for tax areas and tax classes.
User Guide for Web site Administrators
Page 41
Settings
Tax calculation
Caution: After doing this, you can no longer return to the default tax matrix. Once you have made the
decision to customise the tax matrix for your shop, you will need to manage the tax settings yourself.
Tax areas
Page: Orders >> Tax calculation >> Tax areas
Note: You cannot modify the tax areas until you click Customise on the Tax matrix page. See Tax matrix, on page 41.
To set a tax area to default, click the option button in the corresponding row. The default setting of the tax
area applies to the following places:
-
During tax calculation for product prices in the MBO.
If you save gross prices, net prices will be saved. And the tax level of the default tax area will be used.
-
During selection of the tax area in the shopping basket
If the customer is allowed to select his tax area in the shopping basket, available areas are displayed
in a drop-down box. The default tax area is pre-selected in this field. See also Shopping basket, on
page 57.
The tax area is the basis for the tax calculation for the specified customer. Therefore, each customer must
be assigned a tax area. The assignment can occur manually or automatically. See also Shopping basket, on
page 57. During automatic assignment, the country of the customer address is analysed and determines
the tax area.
Assignment to countries
In the Assignment to countries section, you can see a list of the countries which are assigned to various
tax areas. Which countries are contained in the list can be managed in the country settings. See Countries,
on page 53.
Note: If you would like to edit the country assignment, you must go to the Tax matrix page and click
Customise to activate entry mode. See Tax matrix, on page 41.
In the entry mode, each country entry has a drop-down menu that lists the tax areas created under Tax areas. You can use these to change the assignment of tax areas.
In addition, you can create "Special tax areas" for every country. Those are areas in a country where different tax rates apply. To assign such an area its own tax rates, do the following:
1.
2.
3.
4.
5.
6.
7.
8.
Create a tax area in the Tax areas section.
Go to Assignment to countries.
For the corresponding country, click Add exception.
Enter the name and the postcode for the special area and select the newly-created tax area in the dropdown menu.
Click Save.
Change to the Tax matrix tab.
Enter the corresponding tax data in the row for the new tax area.
Click Save.
Tax classes
Page: Orders >> Tax calculation >> Tax classes
Page 42
User Guide for Web site Administrators
Delivery and payment
Settings
Note: You cannot modify the tax classes until you click Customise on the Tax matrix page. See Tax
matrix, on page 41.
To set a tax class as default, click the option button in the corresponding row. The preset tax class will be
set as the default when new products are added.
Tax model
Page: Orders >> Tax calculation >> Tax model
Here you configure whether prices are entered net or inclusive of tax how they are displayed in the shop.
Displaying and calculating prices in the shop
The way prices are displayed and calculated in the shopping basket depends on the tax model that is set.
According to the tax model that has been configured, a suitable price text is displayed alongside the price.
See Texts, on page 59.
You can specify a different tax model for each customer. See Customer details - General, on page 85.
When selecting the tax model Gross you can set whether the VAT is shown in the shopping basket and in
all e-mails and documents associated with the order. In some cases, merchants are not required to show
tax. Note that these settings must also match the text that is displayed in addition to the product prices.
For more information, see Texts, on page 59.
Entering prices
The option Entry of prices in administration on basis of stipulates whether the prices you enter are net or
inclusive of VAT. This applies to product prices that are linked to a tax class.
The tax model does not differentiate between prices for which no tax class has been assigned. Such prices
include, for example, coupon values.
Delivery and payment
Here you can manage and configure the payment and delivery methods you offer in your shop. The system
provides relevant types which form the basis for the individual methods.
Delivery methods
Page: Settings >> Delivery and payment >> Delivery methods
The system provides the following internal types as the basis for the delivery methods:
Free delivery
Basis for delivery methods where no further costs are incurred.
Fixed price
Basis for delivery methods at a fixed price.
Exemption limit
Basis for delivery methods with price limits.
Using this you can offer your customers Free delivery for goods above a
certain total value. See Delivery methods with an exemption limit, on page
44.
User Guide for Web site Administrators
Page 43
Settings
Shopping basket total
Delivery and payment
Basis for delivery methods where the price depends upon the order value.
In addition to product prices, coupons and discounts can be taken into
account when calculating the order value, see Delivery method Shopping
basket total, below.
Weight of the products in Basis for delivery methods where the price depends upon the weight of the
the shopping basket
order.
Delivery costs are dependent upon the weight of the products in the shopping basket, see Delivery method Weight of the products in the shopping
basket, on page 45.
Number of products in the Basis for delivery methods where the price depends upon the number of
shopping basket
products ordered.
Delivery costs are based upon the number of products in the basket; see
Delivery method Number of products in the shopping basket, on page 45.
You can set the sequence of all delivery methods using the sorting key in the last column of the table. For
more details, see Sorting using sorting keys, on page 22.
General properties for delivery methods
Page: Settings >> Delivery and payment >> Delivery methods >> [delivery method] >> General
The properties and parameters for the individual delivery methods have different underlying types. The
general properties are the same for all delivery methods.
Using a delivery method can be limited by geographic region. Select the region from the field Permit usage
for following delivery addresses. These regions must be defined beforehand. For more information, see
Regions, on page 53.
Under Note, you can provide additional information about the delivery method. The language-dependent
text is displayed to the customer during the order process, directly below the method and the packing slip
is printed.
The Visible and Default fields are not active for the method marked as Default. If you want to edit the settings for this method, you must first set another method to default.
For all chargeable delivery methods there is an additional tab Settings that contains specific settings for
the method. This tab is used to set the tax class, prices, maximum values and calculation basis. The current tax model is displayed for the prices; see Tax model, on page 43.
Delivery methods with an exemption limit
The base price will be used on the invoice for the customer, as long as the order value is smaller as the set
limit.
In the field Free above order value of you can set the shopping basket value above which delivery is free for
the customer.
You can also set how the limit is determined.
Delivery method Shopping basket total
Set from which partial prices the total price is calculated. Depending upon this total price, you can stagger
delivery costs.
Page 44
User Guide for Web site Administrators
Delivery and payment
Settings
For each price area you set a base price and a calculation multiplier. The multiplier determines the variable
part of the delivery price, the base price the constant part. Delivery costs are calculated according to the
formula that is beneath the table.
This is how to create staggered prices:
1. Enter for the area from 0 to unlimited for every currency the multiplier and the base price for the first
limit value (for example, 50 Euro).
2. Save your entries by clicking Save.
3. Enter the first limit into the field in the Price of the shopping basket from column, such as $50.
4. Enter the multiplier and base price. These values apply from the limit to unlimited.
5. Save your entries by clicking Save.
Delivery method Weight of the products in the shopping basket
Set in which weight unit the weight of the products of the shopping basket are calculated. Use this weight
unit to define price scales for your delivery costs.
For each weight level you set a base price and a calculation multiplier. The multiplier determines the variable part of the delivery price, the base price the constant part. Delivery costs are calculated according to
the formula that is beneath the table.
This is how to create staggered prices:
1. Enter into the area from 0 to unlimited a factor and a base price for every currency for the first limit value (500g for example).
2. Save all your entries with Save.
3. In the new entry field in the Weight from column, enter the first limit value (500g for example).
4. Enter the multiplier and base price. These values apply from the limit to unlimited.
5. Save your entries by clicking Save.
Negative values can be used for the base price as well. This allows you to use models such as: up to 20 Kg,
delivery costs 5 Euro, over 20 Kg, every additional Kg costs 0.50 cents.
Delivery method Number of products in the shopping basket
For each amount, you set a base price and a calculation multiplier. The multiplier determines the variable
part of the delivery price, the base price the constant part. Delivery costs are calculated according to the
formula that is beneath the table.
This is how to create staggered prices.
1. Enter into the area from 0 to unlimited a factor and a base price for every currency for the first limit value (50 for example).
2. Save all your entries with Save.
3. In the new entry field in the Quantity from column, enter the first limit value (50 for example).
4. Enter the multiplier and base price. These values apply from the limit to unlimited.
5. Save your entries by clicking Save.
Shipping method DHL
DHL offers the possibility of online postage. This allows you to pay, create, and print postage stamps for
your shipment simply and quickly. For more information on this, go to www.dhl.de/onlinefrankierung.
To be able to use these functions in your shop, you have to create a Delivery using DHL delivery method.
For orders with this delivery method, create a DHL packing slip. You can generate and pay the shipping
postage using this packing slip.
User Guide for Web site Administrators
Page 45
Settings
Delivery and payment
Under Orders >> Shipments >> DHL shipment you can find all orders that were assigned a DHL shipping
number.
Under Orders >> Transactions >> DHL online postage, you can find all transactions that you have paid delivery postage online.
To create and pay for DHL postage stamps orders online proceed as follows:
Create a Delivery using DHL delivery method.
Open the details in the Settings tab.
Select the payment method that you would like to use to pay delivery costs with DHL.
Select the respective check boxes for this. The checkbox to confirm the Terms and conditions is a required field.
5. Enter the values to calculate delivery costs.
6. Save your entries by clicking Save.
7. Open the Text tab. Enter a text if desired that the customer sees in the order confirmation e-mail.
8. Set the delivery method on the General tab to Visible.
9. After an order has been performed with the delivery method Delivery using DHL, you are alerted via email. (If you have the corresponding option activated in Settings.) Otherwise, you have to regularly
search through orders for DHL orders.
10. Open the Documents tab in the details for DHL orders.
11. Create a DHL shipping label.
12. Open the details of the DHL shipping label and enter all necessary data.
13. Save all entries.
14. Click Continue to DHL online postage.
15. Pay the fee with the payment method which you have set in the settings. You receive a confirmation email. During payment, a shopping basket is created for you by DHL that you can use to print the shipping postage.
16. You are returned to the MBO and the DHL shopping basket is shown.
17. From this shopping basket, you can print and save the shipping postage.
18. After a successful test print, begin the postage printing.
19. The shipping number is shown in the DHL shopping basket and in the list of DHL shipments.
20. After the shipment is received and registered with DHL, you and your customer are informed by DHL
that shipment tracking is possible using the shipping number.
You can use batch actions to create postage stamps for several orders at once. To do so, select the DHL orders in the orders table and activate the respective batch processing command.
1.
2.
3.
4.
Then the DHL shipping labels will be created and shown one after the other. Enter the delivery data for every DHL shipping label. At the end, pay the total amount and print the delivery postage.
Payment methods
Page: Settings >> Delivery and payment >> Payment methods
Various payment methods are available that you can offer your customers. There are internal methods
available as well as offerings of external vendors.
The types are provided by the system for the internal methods. All processes must be manually confirmed
by you. The internal types are:
Page 46
Free
No other costs are charged to the customer when this method is used.
Fixed price
You define the additional amount that the customer should pay when using
this payment method.
User Guide for Web site Administrators
Delivery and payment
Settings
Exemption limit
You define the additional amount that the customer should pay when using
this payment method. In addition, you define a limit value (Limit) above
which the customer must pay an order.
Direct debit
No other costs are charged to the customer when this method is used.
This type makes sure that the customer's bank details are requested during
the ordering process in the shop. The information entered is tested for
completeness but not accuracy. No test is carried out for the existence of
the account entered or the presence of sufficient funds.
Direct debit via fax
No other costs are charged to the customer when this method is used.
The customer downloads a fax form during the order process that he uses
to send his bank details.
Credit card
Use this method if you would like to offer your customers credit card payment and to edit the data manually.
For the external payment methods, the transactions will be performed on the platforms of the external providers. These are providers such as PayPal or Moneybookers. The customer will be sent to vendor’s system
for the payment process where all necessary data will be gathered, checked, and processed. Afterwards,
the customer is returned to the shop. The corresponding orders can be organized by transaction numbers.
There is a transaction list for every provider that you can see under Orders.
Set the payment method as the default that is used most often by your customers.
Each payment method can be assigned to customer groups. This means that only those customers that belong to an assigned customer group can use this payment method. It is then only displayed for these customers. The assignment is managed on the Customer groups tab on the details of each payment method.
General properties for payment methods
Page: Settings >> Delivery and payment >> Payment methods >> [payment method] >> General
The general properties are mostly the same for all payment methods. If one of these settings for a method
is not available, it is not displayed or displayed in grey.
Deferred payment available
This allows your customers to use your financing offering. To do this, deferred payment must be set up. See
Deferred payment, on page 49.
Availability restriction
Here you can specify a minimum order value and a maximum order value for the payment method. The
payment method is not displayed in the order process if the order value does not lie within the specified
range. If you do not want to specify a minimum or maximum order value, leave these fields blank.
You specify the minimum order value for all orders, independently of the payment method, under Settings
>> Basket settings. For more information, see Shopping basket, on page 57.
Discounts
Create a discount for the payment methods that you want your customers to use more often. In contrast,
you can pass the costs for a payment method on to customers by entering negative values.
User Guide for Web site Administrators
Page 47
Settings
Delivery and payment
Creating the order occurs
This setting is useful for payment methods of external vendors. This helps you manage whether the order is
saved by the system before or after the payment process. If you save the order beforehand, you always
have order data, even if the payment process has errors in the external system. You can then discuss the
order with the customer and solve the problem.
Permit usage for the following billing addresses
This allows you to limit payment methods to specific regions. For more information, see Regions, on page
53.
Comment
This text is displayed to the customer during the order process, directly below the method and order documents are printed.
Save your entries by clicking Save.
Caution: A payment method must be visible in order for it to be available for selection in the shop.
The Visible and Default fields are not active for the method marked as Default. If you want to edit the settings for this method, you must first set another method to default.
For the payment methods with special settings, there is an additional Settings tab. This tab is used to set
the values such as tax rate, prices, maximum values and calculation basis and other parameters. The current tax model is displayed for the prices; see Tax model, on page 43.
Payment method with credit card, manual
Page: Settings >> Delivery and payment >> Payment methods >> [credit card, manual] >> Settings
The table shows all credit cards with manual processing. Using the drop-down menus, you can set which
additional information the customer has to enter for which credit card and whether the corresponding entry
fields are required or optional.
Entry fields for Card number, Card holder, and Expiry date are displayed by default. This cannot be modified.
Use a page element to display credit cards in the shop that you accept. In the Credit card logos section,
select the correct logos. Save your entries by clicking Save. For more information, see the section Page elements and navigation, in the Page elements and navigation chapter, on page 119.
The credit card data is deleted after you have set the status to Paid or Rejected. The only information that
remains is a note that the order was paid by credit card. For data protection purposes, make sure that you
set the order to Paid or Rejected as soon as possible.
Dependencies
Page: Settings >> Delivery and payment >> Dependencies
Here you can set the which payment methods can be used for specific delivery methods and can be selected by customers.
A special assignment is set using the No delivery column. You can sell goods or services for which delivery
is not required or useful, but that must be paid. Use the Without delivery column to assign the products or
services that are not shipped to the corresponding payment methods. After creating a payment method the
checkbox is selected by default.
Page 48
User Guide for Web site Administrators
Delivery and payment
Settings
Note: After it has been created, a payment method is assigned to all delivery methods by default. In the
same way, new delivery methods are assigned to all payment methods. Remove the check marks for
the combinations that you do not offer.
Make sure that at least one combination is activated. Otherwise, no orders can be made in the shop.
Delivery options
Page: Settings >> Delivery and payment >> Delivery options
Using delivery options, you can offer your customers a service in connection with the order. This is where
you can prepare services such as gift wrapping or similar. The customer can access this service by clicking
a link in the shopping basket.
You can set the name for the link in the Display name in shopping basket field.
Delivery options: Details - general
The description is shown to the customer during selection of the options. Use these to provide the customers with all necessary information about the specific delivery option.
If you activate the option Display entry field, the customer can provide a text about the delivery option. This
is useful for delivery options such as greeting cards.
Delivery options: Details - Selection
In Selection you can create all variations of a delivery method from which your customer can select. This
can be, for example, various images on the greeting card or the type of packaging.
You can describe each variation with a name or a short description. The names are displayed in entry
fields. Enter changes directly in the respective field.
You can optionally add an image. For more on using images, see Uploading images, on page 29. Click the
image in order to show it in original size.
Note: The selected variation applies to the entire shopping basket and not for individual products.
Deferred payment
Page: Settings >> Delivery and payment >> Deferred payment
You can offer your customers deferred payment for various payment methods. You can activate these in the
general settings of the corresponding payment method in the Deferred payment possible option button;
see General properties for payment methods, on page 47.
The individual fields for deferred payment have the following meanings:
Table 4: fields for deferred payment
Field name
Description
Field type
Example
Text for "Financing"
stage of ordering
This text is displayed on the web site
using the table of financing options.
Provide your customers with all the
information and notes relating to your
deferred payment options.
Text field
We can offer deferred
payment options for
your order. Select ...
User Guide for Web site Administrators
Page 49
Settings
Delivery and payment
Field name
Description
Field type
Example
Currency
Currency for which you set the monthly Drop-down menu
rate;
One table per currency
Minimum amount
Order amount, above which you offer
deferred payment
Interest rates for the
number of monthly
payments
Annual interest rate for term;
Entry field, numeric 5
The possible durations are shown in
months in the column headings.
Enter values for the durations you offer.
Entry field, numeric 1000
Note: For interest rates, simply enter the annual interest rate; the system calculates the monthly
amounts.
The customers will be offered a selection of the available financing models in the order process. In the order summary, the financing selected is displayed.
In the Payment Method line, in addition to the deferred payment parameters, the additional amount that
the customer must pay for using this payment method is indicated.
The instalments are calculated according to the following formula:
Here, Z is the duration in months and P the order value in the currency indicated.
In the ordering process, the APR is also specified along with the interest rate and monthly instalment. This
is the compounded calculation. The procedure is defined for Germany in the German Price Indication Ordinance (Preisangabenverordnung – Pangv).
Logistics
Page: Settings >> Delivery and Payment >> Logistics
On this page you can add logistics vendors and define dependencies between delivery methods and
logistics vendors.
Whereas delivery methods are different types of shipping (e.g. standard or express delivery), logistics
vendors are companies that handle delivery for you (e.g. FedEx or UPS). Logistics vendors are linked by you
to delivery methods. When a customer selects one of these delivery methods for his order, the delivery is
made by the logistics vendor to which the delivery method is linked.
Advantages of logistics vendors
If you instruct one of the logistics vendors supported by the software to handle the delivery, this offers the
following advantages over conventional delivery:
-
Easy creation of packing slips directly from the administration area of your shop
Clearer organisation of orders
Delivery costs are invoiced together
Both you and the customer can view the delivery status of orders
More favourable delivery conditions, in some cases
Page 50
User Guide for Web site Administrators
Delivery and payment
Settings
Setting up a logistics vendor
To set up a new logistics vendor, follow these steps:
1. Create the logistics vendor
Page: Settings >> Delivery and Payment >> Logistics
Create the new logistics vendor in the table, entering the name of the vendor and, under Type, selecting the
vendor that you wish to set up.
2. Complete the data for the logistics vendor
Page: Settings >> Delivery and Payment >> Logistics >> [Logistics Vendor]
Follow the steps listed in the administration area to integrate the logistics vendor into your shop.
3. Create a new shipping method
Page: Settings >> Delivery and Payment >> Delivery Methods
Create a new delivery method that you will later link to the logistics vendor. See Delivery methods, on page
43. Some logistics vendors offer their own delivery methods that you can select here.
4. Specify the settings for the delivery method
Page: Settings >> Delivery and Payment >> Delivery Methods >> [Delivery Method]
Here you can specify the settings for the new delivery method. Remember to switch them to visible.
5. Specifying dependencies
Page: Settings >> Delivery and Payment >> Logistics >> Dependencies
Link here the new delivery method with the logistics provider. A delivery method can only be linked with a
maximum of one logistics vendor.
When you have followed these steps, customers can select the new delivery method in your shop.
Process in the administration area
If, for their order, customers select a delivery method that is linked with a logistics vendor, you must
complete the following steps:
1. Add Packing slip
Page: Orders >> [Order] >> Documents
First you access the order and create a packing slip. To do so, on the Documents tab click Add followed by
Packing slip.
2. Supplement the information in the packing slip
Page: Orders >> [Order] >> Documents >> [Packing slip]
Add the missing information (indicated by a red asterisk) for the packing slip.
User Guide for Web site Administrators
Page 51
Settings
Country settings
3. Trigger shipping order
Page: Orders >> Deliveries >> [Logistics Vendor]
Click Trigger shipping order to transfer the order to the logistics vendor. You can combine multiple orders
and then trigger them as a batch command. All triggered shipping orders will then be displayed on the
Transactions tab.
4. Print packing slip
Page: Orders >> Deliveries >> [Logistics Vendor]
You can now print the shipping label.
Country settings
In the country settings, you can define the languages, currencies, countries and regions that are used on
your Web site. You are responsible for the language-dependent contents such as product descriptions, the
content of newsletters, or the correct price in the selected currencies.
Languages
Page: Settings >> Country Settings >> Languages
On this page, you can prepare the languages for the Web site and administration areas. For an introduction
to this, see Language-dependency, on page 22.
The table lists all the languages you have activated for the Web site. The appropriate countries are automatically displayed with the language.
For each country, clicking the icon will display the specific formats which must be observed while entering
information.
Use the option button in the Default column to set the default language for the Web site. An entry must be
set to visible before it can be made to the default.
Using the sorting in the Sorting language column, you can set in which sequence the languages in the selection field for the are shown. See Language-dependency, on page 22.
Using the sorting in the Sorting country column, you can set in which sequence the countries are shown on
the web site.
To activate a new language, select it from the drop-down menu at the end of the table and confirm with
Save.
Note: The languages listed in the drop-down menu are part of the installation. If you need additional
languages, contact your provider.
Before you can deactivate a language, you must make sure that none of the associated countries are set to
Default and that all associated countries are set to Not visible. Once these requirements are fulfilled, you
can deactivate the language as described in Deleting records, on page 21. The language will still be available in the drop-down menu.
Page 52
User Guide for Web site Administrators
Country settings
Settings
Caution: As soon as you have activated an additional language, check all the objects (products, categories, and so on) for language-dependent fields and enter the translation. If the text data does not exist
in the corresponding languages, it cannot be displayed.
If you have set up more than one language for your Web site, you should offer your visitors the option of selecting a preferred language. A corresponding page element is available for this. For more on working with
page elements, see Page elements and navigation, on page 119.
Currencies
Page: Settings >> Country Settings >> Currencies
On this page, you can prepare the shop currencies for your customers to select from. The currency the customer selected remains active until a different currency is explicitly selected or the session ends.
Use the option button in the Default column to set the default currency for the shop. An entry must be set
to visible before it can be made to the default.
To activate a new currency, select it from the drop-down menu at the end of the table and confirm with
Save.
To delete a currency, follow the steps described in Deleting records, on page 21. The currency will still be
available in the drop-down menu.
Caution: Products which are not priced in a particular currency cannot be put in the shopping basket or
ordered in that currency.
In you want to offer products at no charge, such as pamphlets or brochures, enter the price as 0.00.
Special case Swiss Franks
Due to the fact that in Switzerland, the smallest unit of currency is 5 Rappen, all the prices must be rounded to increments of 5 Rappen, that is, every price must end with 5 or 0.
As soon as you enter prices in the currency Swiss Francs, the system checks the entry and rounds the price
whenever necessary.
Countries
Page: Settings >> Country Settings >> Countries
This is where you specify the countries available for users when registering on your Web site, or when entering their address.
To add a new country to the list, select it in the drop-down menu below the table and click Save.
To delete a country from the table, proceed as described in Deleting records, on page 21. This will delete
the entry from the table. The country will however still be available in the drop-down menu below the table
and can added again at any time.
Note: Note that if you select a country from the list, you must be able to guarantee order processing
and delivery in this country. Only include those countries in your list for which you can deliver under the
given conditions.
Regions
Page: Settings >> Country Settings >> Regions
User Guide for Web site Administrators
Page 53
Settings
E-mail settings
Regions are the foundation for area-specific delivery and payment methods. Use regions to define which
delivery and payment methods are available to your customers in various countries.
The regions are based on countries that you set under Settings >> Country Settings >> Countries. For more
on this, see Countries, on page 53. During the order process, the country from the delivery and billing address is checked for assignment to a region.
To create a new region, enter the name of the region in the entry field in the last row. Save your entries by
clicking Save. Assign the respective countries to the region details. For more information about this, see
Regions - Details - General, below.
To assign a delivery or payment method to a specific region, do the following:
1. Add the country to the country list for the region in Settings >> Country settings >> Countries. For more
on this, see Countries, on page 53.
2. Create a new region.
3. Select the corresponding countries in the region details. For more information, see Regions - Details General, below.
4. Open the delivery or payment method and select the desired region from the Allow usage for following
addresses drop-down menu. Save your entries by clicking Save.
Note the following when using regions:
-
-
-
A new delivery or payment method is available in all countries of the shop by default.
If no countries are assigned to a region, they cannot be entered for a delivery or payment method.
If all countries for a region are deleted, the associated delivery and payment methods apply to all countries of the shop.
The customer is notified if he changes the country of the delivery or invoice address and the delivery or
payment method that was previously selected is no longer available.
PayPal Express and Google Checkout cannot be limited to a region because the billing address is not
known. These payment methods therefore do not require the settings described in the administration.
The delivery methods that are assigned to these payment methods must support the countries that can
be selected as delivery countries in the payment system.
Using regions, you can define various prices for various delivery areas:
For example, you can have a different price for delivery via UPS in Germany than delivery via UPS shipping to other EU countries. For this purpose, create two regions, Germany and EU. Then create two delivery methods: UPS Germany and UPS Non-EU (except Germany). Assign the delivery methods to the
corresponding regions.
The regions should be named so that the customer can immediately see which regions a method applies to.
Regions - Details - General
The name of the region can be edited in the ID field.
The table lists all the countries that you have assigned in Settings >> Country settings >> Countries.
E-mail settings
The system provides various e-mails for notification, confirmation, and information. You can configure
which of these e-mails are sent to the customers. To do this, you must configure certain default settings
and activate sending for the relevant e-mail.
In the general e-mail settings, you can include values that are valid for all e-mail events.
You can enter an extended e-mail address in the form of Name <e-mail address> for all e-mail addresses.
Multiple addresses can be entered. The delimiter is a semicolon.
Page 54
User Guide for Web site Administrators
E-mail settings
Settings
The coding determines how your characters are processed in the e-mail. Unicode is a setting which allows
all known characters to be processed, such as umlauts.
Caution: If the default sender e-mail address is not entered, no event e-mails will be sent.
Note: The sender address is the default sender for all e-mail messages. It is used when no other address has been entered for the individual e-mail messages.
E-mail settings - Events
Page: Settings >> E-mail settings >> Events
The table shows all e-mails that are sent from the system to customers and exceptionally also to the administrator.
Activate delivery by clicking the check-box for the event. Save your entries by clicking Save.
You can configure each e-mail message separately. To do this, click the name of the event to go to the associated e-mail details.
Event e-mail – Details
For the individual events, you can add various recipients and additional texts. The fields are mainly used in
e-mails as follows:
User Guide for Web site Administrators
Page 55
Settings
E-mail settings
Figure 6: Use of specific fields in the e-mail
Exception: E-mail messages for the merchant
Certain event e-mails are only sent by the system to the merchant:
-
Warning when a minimal stock level has been reached
Product sold out
Change of user address
ClickandBuy – error e-mail
Product inquiries
Product feedback
E-mail from the contact form
If a post to a blog, forum, or guestbook was created
Page 56
User Guide for Web site Administrators
Shopping basket settings
Settings
For these e-mail messages, there is an additional entry field Recipient address in the general properties. In
this field, enter the address of someone you have chosen to handle this topic.
Note the following about the customer contact e-mail:
-
To enable customers to be able to use the customer contact form, you must place a contact form as a
page element on your Web site; see Page elements and navigation, on page 119.
The contact form is only shown on the Web site if a recipient address is inserted for the e-mail event.
Shopping basket settings
Here you can configure the behaviour of the shopping basket by certain events and define basic settings
for the order process.
Shopping basket
Page: Settings >> Shopping basket settings >> Shopping basket
The following are some of the actions and settings you specify:
Use the Command "Add to basket" setting to determine what happens after a customer puts a product in
the shopping basket.
Use the Adding a duplicate product setting to determine what happens after a customer puts a product in
the shopping basket which is already there.
Use the Display of the "Add to basket" function to determine how the button looks that customers use to
add products to the shopping basket.
Via the setting Order process you specify whether the order process should be classic or in individual steps
(with two steps more).
If you set a minimum order value, you can set which parts of the shopping basket are used to calculate the
order value. Select a possibility from the selection field Price of minimum order value relates to total of ....
The order value calculated in this way is compared to the minimum order value. This setting is independent
of the tax model that is used, so applies equally to gross and net prices. Therefore, you cannot have different minimum order settings for different tax models.
The standard is that the tax area is assigned automatically based upon the customer’s address. Using the
setting Enable selection of the tax area in shopping basket you can allow your customers to set the tax area themselves. Remember that you as a merchant must verify that the billing address of the customer corresponds with the selected tax area or that the customer is entitled to make purchases in the selected tax
area.
You can specify whether the order process is available only for registered customers. This setting applies
analogously to bookings.
Texts
Page: Settings >> Shopping basket settings >> Texts
Frequently, it is necessary to display order information and additional information to the customer in the
shop. The following places are available for this:
-
above the shopping basket
below the shopping basket
on the order confirmation page
User Guide for Web site Administrators
Page 57
Settings
Product settings
You can require your customers to accept your Terms and Conditions during the order process. There is a
check box with a text for this. You can modify this text here if necessary.
Text for confirmation page / affiliate tracking code
If your shop is part of an affiliate partner programme, you can integrate the required tracking code here.
This code cannot be seen by the customers in your shop.
The tracking code provides your affiliate partner with information about the order, enabling him to register
the purchase transactions in your shop.
The tracking code is provided by the affiliate partner. You may need to incorporate placeholders into the
code; in the event of an order, these will then be automatically replaced by the appropriate data. For
example, the placeholder #OrderTotalAmountNet will be automatically replaced by the net total amount of
the order. For an overview of the available placeholders, in the administration area click on the symbol
next to Text for confirmation page / affiliate tracking code.
Registration
Page: Settings >> Shopping basket settings >> Registration
This option allows you to define the contents of the forms that visitors must complete in the Web site. These are:
-
Sign in form for registration (new customers)
Entry of the billing address on registration, ordering or in My account
Entry of the delivery address on ordering or in My account
Click the check box for the desired field in the Visible column to display the corresponding field in the
form.
Click the check box for the desired field in the Required column to include the field as required in the form.
The address fields are included in the form country-specific. The basis for this is the language which the
customer has selected currently for the shop.
At the top of the table you can see the system attributes. These are created by default. You may use these
fields but not modify them.
In the lower part of the table you can activate the attributes you have created yourself in Customers >> Customer attributes. See also Customer attributes, on page 88. Click the name to edit the details.
Note: To send your customers e-mails for order confirmation and other events you must set the E-mail
field to required.
Product settings
General
Page: Settings >> Product Settings >> General
Here you set whether the product numbers in the shop are shown in product lists and on the product details pages as order numbers.
If prices for variations of a specific product are different, you can enter the corresponding price information. If you show the cheapest variation as the default, you should write for the prices: “from xx €”.
Page 58
User Guide for Web site Administrators
Product settings
Settings
Availability
Page: Settings >> Product Settings >> Availability
On this page, you can define how the order process in the shop should continue if an ordered product is no
longer available, that is, the stock level is the same or less than 0.
The function requires that you fill out the Stock level field for the products. If this field is not filled, the selected option will be ignored.
If a product reaches the stock level of 0 during an order, the available amount will be added to the shopping basket in the case of options with order stop. Example: For example, two items are on stock but four
items have been ordered. Only the existing two items will be added to the shopping basket.
If you increase the stock level of a previously sold-out product, the product will not automatically be made
Visible again, since there could be other reasons for it to be Not visible. You must set the product to Visible
either in the details or using batch processing; see Products, on page 65.
You can configure the system to notify you as soon as a product has reached the stock level 0 or has
reached or fallen below the minimum stock level. To do this, configure the corresponding e-mail messages
in the e-mail settings. For more details, see E-mail settings - Events, on page 55.
You can decide yourself what information is displayed on availability and delivery depending on stock
levels. To do so you can use placeholders and conditional displays. Further information here can be found
directly in the administration area.
Auto cross-selling
Page: Settings >> Product Settings >> Auto cross-selling
As opposed to manual cross-selling (see Product details – Cross-selling, on page 78), automatic crossselling is based on analysis of customer buying patterns (according to the principle Customers that have
purchased this product have also purchased the following other products). In this process, data is collected about how often a product is bought in relation to another product.
Set how many products are shown as auto cross-selling products for one product.
In the Minimal match field, set how often a product needs to be sold along with another in order to be displayed as a cross selling product.
Note: The function can slow down the display of products because multiple products have to be read
from the database and statistical information is managed and evaluated. Immediate and constant statistical evaluation is also not available for the same reason. The statistics are calculated at times when
few users are signed in to the system (usually at night).
Texts
Page: Settings >> Product Settings >> Texts
Depending on the tax model, the prices in your shop will be displayed with or without VAT included. A text
indicating the current tax model is displayed for the prices. Select the section that matches your tax model
for displaying prices on the Web site.
The texts should also be used to inform your customers of any VAT that is or is not included and any additional delivery costs. For example, in Germany the text Price inc. VAT ex delivery is common.
You can configure the text as you wish, including for singular and plural prices. The texts can be formatted.
For more on formatting, see Working with text fields, on page 27.
User Guide for Web site Administrators
Page 59
Settings
Search
In addition, you can display a comparison price for the current list price. An explanatory text can be prefixed to the comparison price. You can enter this in the field Text before comparison price. You can also select to format the price with a strikethrough effect. Do this by selecting the check box Strike through comparison price. The preview shows you immediately how the comparison price is displayed in the shop. For
more information on the comparison price and how it is used, see Comparison price, on page 69.
Product comparison
Page: Settings >> Product Settings >> Product comparison
This option allows you to enable your customers to compare products in the shop.
If you activate this option, the customer can select and compare any products in the shop. The products
are displayed in a table, with all visible attributes. The customer can take products from this table and put
them in his shopping basket or save them as a shopping list.
Shopping lists
Registered customers can save shopping lists under My account. In these shopping lists, products, shopping baskets, and orders can be saved. To do so, there are links on the corresponding pages.
Use this option to manage the visibility of the shopping lists function.
Search
Here you can make the settings for the search results page.
Under Display of search results select how the products found are listed.
Under Tips if search returns no result you can specify a text that the user sees if his search was
unsuccessful. Here you can for example incorporate a link to the contact form of your shop.
Search statistics
Page: Settings >> Search >> Search statistics
The search statistics provide an overview of the search terms used in your shop by your customers and
how often they are used. The table lists all the search terms your customers have used. They are all written
in lower-case letters because capitalisation is not considered in the search.
For every search term you can see how often it was used and how many hits it yielded.
The following considerations or actions are recommended:
-
Use search terms that have no hits in descriptions or product names.
Use the search terms as keywords for products that you offer in these areas; see the Keywords for
search field in Description.
Fill any existing gaps in your assortment by adding often searched for products.
Display products which are searched for often on the start page or in main categories so that your customers find them immediately.
eBay settings
The eBay interface enables you to offer your products on eBay. The basics about this and how you set up
and manage offers is available under eBay, on page 146.
Page 60
User Guide for Web site Administrators
eBay settings
Settings
Preparation
In order to integrate eBay with ePages, you must understand the functions and rules of the eBay platform.
eBay offers this information on the eBay site.
Register with eBay as a seller. You will need valid seller registration data to send items to eBay from the
shop, offer them there and receive ordering information. All relevant information to sellers can be found on
the eBay page under Sell.
Configuration of notification e-mail
After an offer is completed, the customer receives an e-mail from the system with a note about conducting
the payment. This e-mail is an automatic system e-mail with pre-configured standard content. You may
however add your own hints, information, or advertisements. Open the e-mail referring to eBay under Settings >> E-mail settings >> Events. For more information, see E-mail settings, on page 54.
General settings
Page: Settings >> eBay Settings >> General
Set when the stock level for the corresponding product is updated, when you place an offer with eBay.
Define a default feedback text which will be used for completed items. You can overwrite this feedback for
every offer if necessary. Because of eBay rules, as a seller you can only provide positive ratings.
eBay accounts
Page: Settings >> eBay Settings >> eBay accounts
eBay runs different auction platforms for each country. You need to set up your own eBay account in the
shop administration for each country in which you wish to set up eBay offers. This determines certain settings such as category lists or available delivery and payment methods.
Before creating an account, you must configure the necessary language and currency. See also Country settings, on page 50.
To delete an account, proceed as described in Deleting records, on page 21. The following accounts cannot
be deleted:
-
If items still exist for this account,
If the account is set as the default account in the configuration, see Default values, on page 150.
Note: If you want to create an account for a country which is not included in the drop-down menu, contact your provider.
eBay accounts - Details
Page: Settings >> eBay Settings >> eBay accounts >> [account] >> General
Enter the location of your shop. The content of the selection fields is provided by the assigned auction platform.
You must authenticate the current eBay account through the eBay platform. The prerequisite for this is a
seller account at eBay.
To improve security, eBay has introduced a new authentication mechanism.
User Guide for Web site Administrators
Page 61
Settings
Settings for order documents
You cannot exchange any data with eBay without authentication. The authentication has a time limit and
must be renewed periodically. The system checks your authentication details on a regular basis. If they are
no longer valid, for whatever reason, you will receive an automatic e-mail with a corresponding error report.
In order to receive this e-mail you must set the default sender e-mail address in the e-mail settings. For
more information, see E-mail settings, on page 54.
The following methods exist to authenticate an account:
-
Click the Request authentication button.
After this you must sign in to eBay. eBay verifies the information and generates a corresponding token.
To transfer this to your shop, you must agree on the eBay page. You will be returned to the shop. You
will see confirmation in the authentication field in the eBay account details.
-
Using a valid token of another account.
If you already have an account with valid authentication, you can instead use the token from the other
account. The corresponding function is shown in the details of the new account.
Note: The authentication can only be used from live systems.
Templates
Page: Settings >> eBay Settings >> Templates
eBay offers the possibility of presenting items using your own design and layout. You can use this option in
your shop administration area by using the existing templates or designing your own.
In the Selection of template patterns section, prepared templates exist that you can use in the table and
edit if necessary.
The following options are available for adding a new template to the list:
-
Proceed as described in Adding records, on page 21.
Go to the Select sample templates section. Select a template on this page and click Apply.
You can edit the name and text of the template in the details; see Working with text fields, on page 27. You
can insert placeholders for product attributes in the text. When creating the item, the actual values for the
product are then used. The placeholders are located to the right of the text field. To insert a placeholder,
simply click its name. The placeholder is inserted at the current cursor position.
Save your entries by clicking Save.
Instructions about using these templates with your eBay offers are available in the description of the eBay
assistant in Title, on page 148.
Note: Due to security reasons, eBay restricts the use of active page contents such as JavaScript, Flash,
and so on. If you use such elements in your templates, it is possible that your pages will not be displayed properly on eBay. For this reason, check how your items on eBay are displayed and make any
necessary changes to your templates.
Settings for order documents
Order documents can be created as PDF documents and sent via e-mail. You can define basic settings for
texts and sending invoices.
Page 62
User Guide for Web site Administrators
Settings for order documents
Settings
Texts
You can create one print template for every document type. This is also used to create the specific PDF
document.
This template is filled with example data and entry areas for text. Click in a text field in order to edit the corresponding template.
Printing the header and footer is done using the Display header and footer option. If you use corporate letterhead which already has a header and a footer, activate, Only for PDF documents. In this case, headers
and footers are only shown in the print template for PDF files. For printing on paper, they are not overwritten.
Invoices in e-mails
You can make it so that whenever you set a specific order status, an e-mail with the invoice as a PDF document is sent automatically.
The invoice must be generated previously. If multiple invoices exist, the last created will be sent.
The corresponding checkbox can be selected only after the e-mail event which belongs to it was previously
activated. To do this, click the link to the checkbox of the connected e-mail event. Set the option for the
event in the details under Activated to Yes.
User Guide for Web site Administrators
Page 63
Creating a new product
Products
6. Products
Page: Products
The table lists all the individual, main products, and product bundles. To display the variations to the main
products in the table, you must perform a search.
To open the details of a product, click its name. Clicking the icon to the left next to the product number
opens a new browser window containing the product details.
Batch processing commands are available to manage the table entries. For an introduction to this, see
Batch processing in tables, on page 22. The following specialised actions can be performed:
Table 5: Specialised batch processing commands for products
Command
Comment
Duplicate
The system creates a copy as a new product with its own unique product
number, since every product number may only exist once.
The duplicate is created as Not visible.
Export
Export the selected products. See Export, on page 31.
Assign to category
The category is selected using a drop-down menu in the second stage after
starting the command. As soon as a certain total number of categories for
the shop is exceeded, you can select a target category using a special category browser.
Assign product portals…
Assigning selected products to active product portals can be performed in
two steps:
1. Select the desired products and start the command.
2. Select the portals to whose export lists the products should be added,
and complete the process by clicking Assign.
If the Export all products option is activated for a portal, it cannot be selected here. See also Product portals, on page 140.
Set New marker
Highlighted products are all flagged immediately as New.
Remove New marker
Marked products are no longer displayed as new products.
To create a new product, refer to Creating a new single product, below.
The function to delete all products is available in the Product settings on the General tab.
Creating a new product
The submenu offers the following possibilities for creating a new product:
-
Creating a single product; see Creating a new single product, below
Creating a product with variations; see Creating a new product with variations, on page 66
Creating a product bundle; see Creating a product bundle, on page 66
Creating a downloadable product; see Creating a downloadable product, on page 68
Creating a customizable product; see Creating a customizable product, on page 69
Creating a new single product
The following methods exist for creating a new single product:
-
Click on Add
Direct entry in the table
User Guide for Web site Administrators
Page 65
Products
-
The
Creating a new product
New >> Product
function in the sub menu
The entry fields in the last row of the table are available for direct entry. Proceed as described in Adding records, on page 21, and save your entries by clicking Save.
The following specifications apply to products created in the table directly:
-
the product number is a required field
the name entered is assigned to the language of the administration
the price entered is valid for the currency displayed in the table
The new product is set to Not visible .
the new product is not assigned to a category.
the default product type is assigned to the new product.
You can edit all remaining parameters in the product details; see Product details – General, on page 69.
If you create a product using the New submenu, you will be forwarded to a page where you can enter the
general product details. First, enter a unique value in the Product number field. Having done this, enter
additional general information; see Product details – General, on page 69.
After the general product details have been saved, additional tabs will be activated. Enter the remaining information as described in Product details – Images, on page 71 and following.
Note: Visibility is set to Not visible by default. When all information has been entered, set the product
to Visible in order to display it in the shop.
Creating a new product with variations
To create a product with variations directly, click on Add on the Products page and then select Product
with variations, or click on the Product with variations link in the New submenu.
This forwards you to the page where you can enter the general product details. First, enter a unique value in
the Product number field. Having done this, enter additional general information; see Product details –
General, on page 69.
Save your entries by clicking Save.
Having done this, you will be forwarded to the product variation assistant directly. For more information,
see Variation assistant, on page 73.
For the basics about variations, refer to Product details – Variations, on page 72.
After creating the variations, all other tabs are activated. Enter the remaining information as described in
Product details – Images, on page 71 and following.
Creating a product bundle
A product bundle is a packet or set made up of products that belong together and that are then offered together for a combined price.
To create a product bundle directly, click on Add on the Products page and then select Product bundle, or
click on the Product bundle link in the New submenu.
This forwards you to the page where you can enter the general product details. First, enter a unique value in
the Product number field. Having done this, enter additional general information; see Product details –
General, on page 69. Note the following exceptions:
Page 66
User Guide for Web site Administrators
Creating a new product
-
Products
You cannot enter any values in the Stock level and Minimum stock level fields. These values result from
the smallest values of each of the individual products.
The Reference unit field and the corresponding Amount in product field are inactive. This is because the
packages cannot be compared to other products as they are compiled individually.
Save your entries by clicking Save.
After saving, additional tabs will be activated. You are forwarded directly to the Bundle products tab. This
tab is displayed for product bundles in place of the Variations tab. Enter the associated products here; see
Bundle products, below. After this, enter the remaining information as described in Product details – Images, on page 71 and following.
Bundle products
For product bundles, you must select and compile the products that make up the packet. These are the
bundle products.
The table lists all the products which belong to the current product bundle. To open the details of a product, click its name. Clicking the icon to the left next to the product number opens a new browser window
containing the product details.
To remove a product from the product bundle, select it and click Remove assignment. The product is removed from the table without any confirmation. The product itself is not deleted.
The total price of the individual items is compared with the bundle price below the product list. The price
difference is also displayed. The contribution of a product to the total amount is calculated using the quantity and the list price per item. These values are updated whenever you save.
Import and export of product bundles
The import or export of bundles is a combination of the import/export of the products and their assignments.
The products used must exist. Create the products used manually or import them before importing the
bundle assignments. During import of bundle assignments, missing products are not shown.
The bundle assignments are included in the import and export files for cross selling. Therefore, after the
product import, you must also perform a cross selling import.
To import a product bundle, proceed as follows:
1. Create a file for the product import which contains the data for all products that belong to the bundle.
Use the export file as a template for this.
2. Enter for the product which is the bundle itself (base product) in the Product bundle [IsBundleProduct]
column a 1.
3. Import the product data for the object type Products with the import.
4. Create a file for importing bundle assignments. Use the export file of the type Cross-selling as a template for this.
5. Enter for every row with a bundle product the value BundleProductMap in the Type [Class] column.
6. Enter for every row with a bundle product the product number of the base product in the Base product
[Product] row.
7. Fill out the other columns according to the template.
8. Import the bundle assignments with the import for the object type Cross-selling.
9. Check in the product table whether the bundle product was correctly created.
Required fields for importing the bundle assignments based on the cross-selling import are:
-
[Class]
[Product]
[TargetProduct]
User Guide for Web site Administrators
Page 67
Products
-
Creating a new product
[Job title]
If the Quantity [BundledQuantity] column is not present in the import file or is empty, the value of “1” will
always be assumed.
You can read a general description about importing and exporting in the chapter Import and export, on
page 31.
Notes about bundles
You should note the following information about working with product bundles:
-
The stock level and minimum stock level of the bundle are determined by the smallest respective value
for the individual products.
After the order has been placed, the inventory for all the associated components is updated at the
same time.
Only products of the same VAT class can be assigned to a bundle.
The status Not for sale is taken into account for bundle products. If one of the bundle products is set to
Not for sale, the entire bundle cannot be bought.
The unit price is calculated by adding the respective list prices of the individual products together. Any
price discounts defined in the price lists are not considered at this point.
As soon as products have been added, the total of the list prices of the individual products is displayed
next to the bundle price. The price difference, possible the saving, is displayed.
Creating a downloadable product
Using downloadable products, you can offer digital products such as images, documents, and other files.
To create a downloadable product directly, click on Add on the Products page and then select Downloadable product, or click on the Downloadable product link in the New submenu.
This forwards you to the page where you can enter the general product details. First, enter a unique value in
the Product number field. Having done this, enter additional general information; see Product details –
General, on page 69.
Save your entries by clicking Save.
After saving, additional tabs will be activated. You are immediately led to the Downloads tab. This tab only
exists for downloadable products. Upload the files which belong to this. See Downloads, below. After this,
enter the remaining information as described in Product details – Images, on page 71 and following.
In the Product settings under Downloadable product, you can set when the files are available to be
downloaded. You can set whether the customer can download the files immediately after completing the
order or only after payment.
In the detail view of the order, you can send the links for downloading manually. In the editing mode, you
can change the limits for downloading for this order.
Downloads
In the table, you can see all the files that you have uploaded for the current downloadable product.
If you want to upload files directly, click Upload file.
If you have saved the files to an external server and the customer should download them from there directly, click Link file and enter the URL of the file.
Click the file name to open the file.
Page 68
User Guide for Web site Administrators
Product details – General
Products
The order in which the products are displayed is defined by the numbers in the Sort order column; see
Sorting using sorting keys, on page 22.
In addition, you can limit downloading of the current downloadable product by the customer as follows:
-
By time: Limit the time during which the customer can download the files.
Quantity: Limit how many times the customer can download the files.
It can be useful for the sale of downloadable products to not put any files here. This applies to software or
documents that you need to customize for the customer. In this case, you are responsible for sending the
files yourself.
Creating a customizable product
Customers can create a customizable product using their own texts or images, allowing you to sell
customized T-shirts or mugs for example. Basic information on the customization of products can be found
under Product details - Customization, on page 74.
A customizable product is created in two steps:
1. Create the product and enter the general product details.
2. Decide on the options for customization.
You have the following options when creating a customizable product:
a) Click Add followed by Customizable Product.
b) On the menu bar, click Products followed by New and Customizable Product.
c) Use the direct entry in the table as described in the chapter Creating a new single product, on page 65
and afterwards specify the customizing options for the product details. For more information, see
Product details - Customization, on page 74.
If you chose option a) or b), you are automatically taken to the page on which you enter the general product
details.
First, enter a unique value in the Product number field. Afterwards, enter the additional general data, for
more information, see Product details – General, below.
Save all your entries with Save.
A page now appears on which you enter the options for customization. More information on customization
options can be found in Product details - Customization, on page 74.
Product details – General
Page: Products >> [product] >> General
On this page the product attributes are displayed in different blocks. For a better overview you can open
and close these blocks. Use the Drag & Drop function to change the order of blocks.
Comparison price
The comparison price is a price that you can contrast with the current sale price of a product. This allows
you to show price reductions or special prices in an eye-catching way. You can configure one comparison
price per currency for each product.
User Guide for Web site Administrators
Page 69
Products
Product details – General
Once a comparison price is entered for a currency, it is displayed in the shop for the corresponding product
along with the current list price. To describe the price comparison, you can add text and define the way the
comparison price is to be displayed. For more details, see Texts, on page 59.
Note: The comparison price is only used for display purposes. It is not a sale price and is not used to
calculate discounts or bulk prices.
Reference unit
In order to compare the prices of similar products with differing quantities, there needs to be a common
starting point. Therefore, (according to PangV in Germany), a comparable unit of quantity is to be indicated
as the reference unit. This means that, for example, for a 375g package of breakfast cereal, the 1kg price is
entered.
The system calculates the reference price using the values in the List price, Reference unit, and Amount in
product fields.
Description
The product descriptions are important for the presentation of products in your shop. In addition, they are
evaluated during the product search in the shop. In addition, they are also important by enabling your
products to be found in search engines. The more you invest in the description, the better are the chances
that your product pages will be listed at the beginning of Google results. Use the WYSIWYG editor for entry
and design.
The field Keywords for search is mainly used by the search that the customers perform in your shop. Enter
alternative descriptions or spellings under which the product should be able to be found.
Note: Trusted Shops warns against using company brand names and labels as keywords for a search
engine. It is recommended that questionable search terms are not used. Questionable terms are those
which are capable of being mistaken for trademarked names or those which are identical with trademarked terms.
Stock and delivery period
Manage the stock level of your products in order to show your customers availability. You receive an e-mail
when the stock level reaches “0”, see Exception: E-mail messages for the merchant, on page 56. In addition, you can define the shop’s handling of products that reach a stock level of “0”. See Availability, on
page 59.
For variations, create a stock level for the main product which is always used when creating a variation.
The minimum stock level is the value below which you should order more of the product. The minimum
stock level should not be smaller than the minimum order quantity. You can configure the system to send
you an e-mail if the stock level falls to the minimum stock level; see Exception: E-mail messages for the
merchant, on page 56.
Note: If you cancel an order (order status Rejected ), the stock level for the product in question is corrected automatically.
Delivery details
If you want, you can also set delivery data for each product. These include the delivery weight and dimensions of the product.
You can also restrict the product to specific delivery methods. This allows you to restrict specific delivery
methods for specific products.
Page 70
User Guide for Web site Administrators
Product details – Images
Products
Attributes
You can use the Product type drop-down menu to assign a product type to the current product. This sets
additional product attributes; see Product types, on page 79.
The relevant attributes will be displayed according to product type. These can be edited to suit the current
product. Save your entries by clicking Save.
Note: Once a product has variations, the product type assignment can no longer be changed.
Product details – Images
Page: Products >> [product] >> Images
Product images are displayed at various places: in promotional products, as part of product lists and obviously also in the product details. You can provide images in various sizes, as well as group them together
to form image galleries and slideshows.
There are two areas in which a product's images are managed: Views and Gallery/slideshow.
Views
The images are made available here for display in product lists and product details. Since the images can
be displayed in different sizes on different pages, the images are generated in various sizes:
Table 6: Product image formats
Format
Description
List view
This image will be used in product lists. A product list can be the representation of the
products in a category, or the results of a search.
Details page This image will be displayed on the product details page and on the home page. It can be
used in an image list or slideshow with other images in the Gallery/slideshow section.
Enlarged
view
This image is shown in a new window to a maximum size of 800*600px, when the visitor
clicks the product image in the product details.
View for
This image is displayed using the page element Promotional in box format.
promotional
products
You can upload images usually using the Upload file button. For more details, see Uploading images, on
page 29. The individual formats can be prepared as follows:
-
Create all formats automatically when master image is uploaded
When uploading the image using the large image upload button, all formats are created automatically.
An image in the specified size is created for each format. Any existing images are overwritten.
-
Create formats individually
You can upload a separate image for each format. Use the button which applies to the correct format.
This allows you to set whether the image size should be modified during uploading.
Each image that is uploaded to the Views section is stored in the image list in the Gallery/slideshow section.
User Guide for Web site Administrators
Page 71
Products
Product details – Categories
Gallery/slideshow
On this page, you can upload and manage images that you want to show additionally on the product details page in the image list or in a slideshow. The following options are available to adding images to the
list:
-
Upload the image as a master image or individual format in the Views section.
Upload the image via the image upload button in the bottom row of the table. See also Uploading images, on page 29.
In the table, you can see all the images that you have uploaded. If you want to display an image in the
product details, check the corresponding check box in the Visible column. The display sequence of the images on the Web site is defined in the Sorting column. See also Sorting using sorting keys, on page 22.
To the right of the table you can see the preview area. If you move the mouse into the display area of the
slideshow, the control elements are displayed.
The display of images and the slideshow in the shop on the product detail page are set using the display
option for the product type. See Layout, on page 81.
Caution: If you delete the image to which the views in the Views section belong, the views will be deleted too. No further images will be displayed in product lists, etc., for this product.
Note: Slideshows can only be viewed in the shop if JavaScript is enabled in the customer's browser.
Product details – Categories
Page: Products >> [product] >> Categories
The table lists all the categories to which you have assigned the current product. To assign a product to a
category, select a category from the drop-down menu under the table.
In addition, you can set whether a product is shown in the product list of this category on the first or the
last place. Select the corresponding option for this Display in this category before you save the selection.
This option only applies for the category that you are currently assigning.
As soon as a certain total number of categories for the shop is exceeded, selection of a target category is
performed using a special category browser. Mark the required category.
Note: A product should always be assigned to at least one category.
To remove the assignment to categories, select the corresponding categories in the table and click Remove assignment.
Note: You are not required to confirm this command as no data is being deleted, only the assignment.
Product details – Variations
Page: Products >> [product] >> Variations
Variations are products of the same type that only differ in terms of the values of one or more properties. A
good example of this is items of clothing such as t-shirts or one type of jacket. Typical differentiating criteria include the properties size or colour.
Page 72
User Guide for Web site Administrators
Product details – Variations
Products
The variations are generated from the original product. This is the master product or main product. The variations are called variation products or sub-products.
The simplest way to create variations is to use the variation assistant. This can be used to create variations
and to add new variations. See Variation assistant, below.
Note the following: when working with variation products:
-
-
Variation products are completely separate self-contained products. You can modify any individual
property if necessary.
If you delete the master product, all the derived variation products will be deleted as well.
You cannot derive any further variations from a variation product.
When it is created, the variation product inherits the price of the master product. Using the Own price
option field in the general product details you can configure whether a different price should be set for
this variation product. As soon as this option is activated, you can also access the Prices tab and set
the discounts for this variation.
Category assignments made via the master product cannot be removed from the variation product.
However, additional assignments to other categories can be made.
The images of master products and variation products are managed together. If you want to delete the
images of a variation product, first check that there are no other products that use these images.
The order in which the products are displayed is defined by the numbers in the Sort order column; see
Sorting using sorting keys, on page 22.
The variation product marked as default is displayed in the shop as the default variation product.
Variation assistant
The product variation assistant helps you to create variations for a product quickly and simply. The assistant can be started in the following ways:
-
Use the New >> Product with variations function from the product context menu.
Open it directly from the Variations tab in the product details. There you can click the Start product
variation assistant link.
Perform the following steps in the assistant:
1. Attributes and values
On this page, select the product type and variation attributes.
All available product types are listed in the Product type drop-down menu. Select the appropriate entry. If
you need a new product type, select the New product type entry in the drop-down menu and enter the
name in the Name entry field. Two attribute edit areas are displayed. Edit these attributed as described in
the following.
If the selected product type has no variation attributes yet, create new attributes with values as described
later.
After selection, the available variation attributes are displayed. Each attribute is displayed in its own edit
area. Using the check boxes, you can specify whether the corresponding attribute should be used to create
variations. Existing values are displayed.
If you need an additional value for an attribute, enter it in the entry field below the corresponding value list.
If you need additional values, click Show more fields and enter the values in the new fields.
If you need a new attribute, click New attribute. Enter the name and edit the values as with existing attributes. For new attributes, you can determine whether the attribute values should be language-dependent.
The values for the other languages are entered later in the details for the corresponding attribute of the
product type.
User Guide for Web site Administrators
Page 73
Products
Product details - Customization
Note: In the wizard a maximum number 10 values can be entered per attribute. A message is displayed
to indicate when you have entered the maximum number of attribute values. If you need additional values, you must enter these directly for the corresponding product type.
Click Next to go on to the next step.
When doing this, please note the following:
-
-
Existing attributes are displayed in grey. The available values cannot be changed. You may still add
values.
Existing attributes can only be deleted in the details of the relevant product type.
If variation products have already been created, the product type assignment cannot be changed. The
drop-down menu is displayed in grey. You must first delete all relevant variation products before
changing the product type assignment.
If you would like to create additional attributes for the new product type, open the details of the product type.
Read about prototypes in Product types, on page 79.
2. Variation products
On this page, you can see the variations which can be made by combining the attribute values.
The name consists of the product number of the master product and a sequential integer.
The variation products are generated for the selected variations. If you do not want a variation product for a
variation to be generated, remove the selection.
If a variation product has already been created for a combination, the entry is displayed with a grey check
box. These entries cannot be changed as long as the relevant variation product exist.
3. Finish
On this page, set how the variation products are displayed in the shop. Select this desired option by clicking the corresponding option field. See also Layout, on page 81.
Click Finish to end the assistant, save all settings and generate the variation products.
Extending a variation using the product variation assistant
Start the product variation assistant in the Variations tab. There you can click the Restart product variation assistant link.
1. Create a new variation attribute with values as described in step 1 of Variation assistant, on page 73.
2. The existing variation products must also be assigned a value for the new attribute. In the next step,
select the value that should be used for the existing variations. After selection, click Next to display
the possible product variations.
3. When the product list is displayed, continue as described in step 2 of Variation assistant, on page 73.
Product details - Customization
Page: Products >> [Product] >> Customization
Here you specify whether or not a product can be customized and the corresponding options in this regard.
By activating customization you enable your customers to customize this product with their own text or
pictures. Customers can then sell personalised T-shirts or mugs.
Product bundles and download products cannot be customized.
Page 74
User Guide for Web site Administrators
Product details – Prices
Products
For products with variations, customization applies only for the main product. For more information,
seeProduct details – Variations, on page 72.
Basic settings for customization (e.g. for supported file formats and font types) can be made under Products >> Product Types >> [Product Type] >> Customization. The settings made there apply for all customizable
products of this product type.
The sales process for customizable products
The sales process in your shop runs as follows for the customer:
1. On the product detail page of a customizable product, the customer will see the button Customize now
as standard, instead of the button Add to basket.
2. If the customer clicks on this button, a dialog window opens in which he can customize the product.
3. Once customization is complete, the customer can place the product in the basket and place his order
in the usual way.
Together with the order information you then receive a complete overview of the customizations carried out
by the customer. For more information, see Orders – Details, on page 125.
Enabling customization of a product
To activate customization of a product and to make the necessary settings in this regard, complete the
following steps:
1. First, activate the customization of the product by selecting the relevant option.
2. In the Instructions field you can specify an instruction text that helps the customer to customize the
product.
3. Under Display preview image you can select whether you and, subsequently, the customer, will see a
preview of the product and the areas that can be customized by the customer. If you select the option
No here, the customer will not be able to position the texts and images desired by him on the product.
This makes sense for products by which the customer already knows the areas to be customized, as is
the case with ballpoint pens, for example. If you select the option Yes you can specify under Customizable areas which areas of the product can be customized by the customer.
4. These steps apply only if, under Display preview image, you selected the option Yes:
a) Adding an image: If you have not yet uploaded an image for this product, click on the button Upload
file. Otherwise at this point the image is displayed that you find on the Images tab under Magnified
view. Ensure that the image is a suitable customization template.
b) Specify customizable areas: Customizable areas are those areas of the product that the customer can
customize. To add a new customizable area, drag & drop one of the grey squares onto the preview image. You can now move this area using drag & drop or make it larger or smaller by dragging the edges
using the mouse. You can define up to five customizable areas.
c) Customization options: Under Possible operations for text fields and image selection you specify
whether the customer can position, scale and rotate the texts and images.
5. Now add text fields and/or image selections. For a product to be customizable, there must be at least
one text field or one image selection. There can be a maximum of five text fields and image selections.
Under Name specify the description of the text field or image selection. For text fields you can specify
whether these are on one or two lines. Under Length limit you specify the number of characters the
customer may enter in this text field. For image selections you can determine the minimum size of the
image. Please note that small images are often not suitable as a print template. For text fields, click on
Define fonts or, for image selections, on Define file formats, to modify the relevant options for the entire product type.
6. Click Save.
Product details – Prices
Page: Products >> [product] >> Prices
User Guide for Web site Administrators
Page 75
Products
Product details – Prices
For every product, you can create bulk prices and discounts as well as a list price.
You can configure the following price reductions:
-
Bulk discount/prices; see Bulk discount, below
Value discount; see Value discount, on page 77
Shopping basket discount, see Shopping basket discount, on page 82
As soon as you have configured price reductions for a product, a Price reductions link will be shown in the
product detail view in the shop. The customer can click this link to see the price reductions. You can show
special product prices to registered customers immediately as well. See Price lists – Advanced settings, on
page 81.
Bulk discount
Page: Products >> [product] >> Prices >> Bulk discount
In this section, you can configure discounts based on unit numbers. You can define bulk prices and/or percent discounts. The prices and reductions are connected to a price list in which you can set the validity period and the customer or customer group; see Price lists, on page 81.
In the table you can display and edit two price lists at the same time. This lets you compare, for example,
lists for different currencies or periods of validity.
The icon to the left of the drop-down menu shows whether the price list is currently active. You can click
this icon to call up details for the price list being displayed.
Note: The price lists in which the current product is already included are marked with an asterisk *. This
gives you a quicker overview of which price lists are associated with the product.
Note the following:
-
-
You can set both a bulk price and a discount for a quantity. If you offer both bulk pricing and a discount, the bulk price will be charged first and then the discount is subtracted; see Discount calculation
for product prices, on page 78.
The discount entered last effects all subsequent list entries if no other discounts are entered. To remove the discount on subsequent entries, enter a 0 in the next discount field or the affected discount
field. The following example in Figure 7 should explain this:
Page 76
User Guide for Web site Administrators
Product details – Prices
Products
Figure 7: Bulk discount for products
If the customer purchases 10 products, each product costs $21.95. The total price for these 10 products would be $219.50.
If the customer purchases 20 products, each product costs $21.95. For the total product sum ($439), a
10% discount is provided ($43.90). The total price for 20 products is then $395.10.
If the customer purchases 30 products, each product costs 19.95. The discount from the previous entry is still valid. For the total product sum ($598.50), a 10% discount is provided ($59.85). The total
price for 30 products is then $538.65.
If the customer purchases 40 products, each product costs $16.95. The total sum for the products is
$678. 0% discount is entered. Therefore, the 10% are no longer valid. No additional discount is provided. The total price for these 40 products would be $678.
Note: Remember that you can create customer-specific and customer group-specific price lists. You can
define prices for individual customers by entering the price or discount for the amount of 1 and assign
only the one customer to the list.
Value discount
Page: Products >> [product] >> Prices >> Value discount
In this section, you can configure a price reduction which depends upon the total price. The value discount
is joined to a price list in which you can also set the validity period and the customer area; see Price lists,
on page 81.
The icon to the left of the drop-down menu shows whether the price list is currently active. You can click
this icon to call up details for the price list being displayed.
User Guide for Web site Administrators
Page 77
Products
Product details – Cross-selling
Note: The price lists in which the current product is already included are marked with an asterisk *. This
gives you a quicker overview of which price lists are associated with the product.
If you have configured bulk discounts as well as value discounts, the price is calculated as described in
Discount calculation for product prices, below.
Discount calculation for product prices
Since you can assign more than one discount for each product, the sequence for calculating the discount
needs to be defined. The individual discounts are calculated sequentially as follows:
1. Calculation of the bulk price based on the product price; this results in a reduced unit price per product for the corresponding number of items.
2. Calculation of the bulk discount based on the bulk price
3. Calculation of the value discount; The total from bulk pricing minus the quantity discount is compared
with the limit for the value discount. If the limit is exceeded, the value discount is applied.
Product details – Cross-selling
Page: Products >> [product] >> Cross-selling
When using cross-selling, additional products are offered in relation to a particular product. These are accessories or related products. The purpose of this offer based on related products is to motivate the customer to buy additional products as well as the current product.
Accessories
Accessories are products that extend or improve the functionality of the basic product or are necessary
to use the product (fuel, batteries, and so on).
Related products
Products that lend themselves well to being related products are products that enhance the functionality of the base product, that are necessary to use the product, or that make using the product more
comfortable, for example, torches for tents, and so on.
Alternative items
The alternative items function is not so much about offering the customer product enhancements. You
present alternatives to the selected product in the form of a product comparison. You can use this
function to show the customer similar products you are offering and draw his attention products for
sale that he otherwise may not have viewed.
References
The table shows an overview of the products the current product is linked with and the type of link. In
addition to the various cross-selling types, assignment to a product bundle is also displayed.
Accessories and related products are shown in the shop on the product detail page. The Alternative items
link provides information about alternative items on the product detail page.
You can set the display sequence of cross-selling products in the shop using the sorting key in the corresponding table. See also Sorting using sorting keys, on page 22.
The Create reciprocal assignments check box allows you to configure whether the assignment of a new
cross-selling product should be made reciprocally. The following example demonstrates the procedure in
Page 78
User Guide for Web site Administrators
Product details - Portals
Products
more detail: Product A is the first product. Product B is to be assigned to Product A as a cross-selling product. If reciprocal assignment is activated, product A will also be assigned to product B as a cross-selling
product of the same type at the same time.
Note: Clicking Remove Assignment only removes the assignment of products to each other. No products are deleted. For this reason, deletion confirmation is not requested.
Variation products and cross-selling
The following methods exist for assigning cross-selling products to variation products:
-
Manual assignment using the Cross-selling tab of the variation.
assignment using the master product (variation products inherit the cross-selling products of the master product).
The cross-selling products inherited from the master product are displayed in the table above the manually
assigned cross-selling products. You can not edit the Comment and Sort order fields directly for the inherited cross-selling products.
To edit the entries in these fields, proceed as follows:
-
Create a second cross-selling product for the cross-selling product for which you want to change the
values; see Adding records, on page 21.
Enter the desired values in the Comment and Sort order fields. Save your entries by clicking Save.
Product details - Portals
On this page, you can see the available portals for product export and the existing eBay items and orders
for this product.
Product portals
Page: Products >> [product] >> Portals >> Product portals
The table shows an overview of the available product portals and the portals to which the current product
is currently being exported. To assign the current product to a list for a portal, click the relevant check box.
eBay
Page: Products >> [product] >> Portals >> eBay
All eBay items based on the current product are displayed in this table. The table is comparable in composition and function to the table for all eBay items. See also Items, on page 147 in the eBay chapter.
On the product eBay page, you can immediately create a new item for this product. To do this, click Create
new item. The item will be generated with the default values. See also Default values, on page 150. To edit
item details, see Item settings/eBay assistant, on page 148.
In the case of master products, the variation products are displayed in the table.
Product types
Page: Products >> Product types >> General
Product types include additional attributes for products.
User Guide for Web site Administrators
Page 79
Products
Product types
All products have the same standard attributes such as product number, name, and description. In addition, additional attributes can be assigned such as colour or size. Such additional attributes are defined in
the product type. Through assigning a product type to a product, additional attributes for the product can
be used. Product types thus allow grouping of products with similar qualities.
If you change the product type assignment, you change the set of additional attributes for the product. The
current additional attributes of the product are displayed in the general product details in the Attributes
section. See Attributes, on page 71.
A special type is the Source product type. For one thing, this new product type will be automatically assigned to new products. For another, this is the source product type for all other product types. All attributes of this product type are passed to the other product types when they are created. In this way, you can
specify additional attributes that apply to all products. The shared additional attributes can only be deleted via the source product type.
The source product type itself cannot be deleted.
Note: If you do not want any shared additional attributes, delete all attributes from the source product
type.
Caution: A product type can only be deleted as long as no products are assigned to it.
Import and export
You can import and export product types.
Required for import is the [Alias] field.
If the [Alias] is empty, the system uses the standard product type and changes its values.
If a columns in the import file do not contain any values, the values in the database will not be changed.
You can read a general description about importing and exporting in the chapter Import and export, on
page 31.
Product type details
Attributes
Page: Products >> Product types >> [product type] >> Attributes
The attributes which are available from the source product type are shown first in the attribute list. Visibility and sorting can only be changed on the source product type. Deletion is also only possible at the source
product type.
You can set your own sequence for the attributes that are especially defined for the specific product type.
For more details, read Sorting using sorting keys, on page 22.
Caution: When you delete an attribute, all the product data contained in this attribute is lost.
In the case of attributes with value selection and options, you must also create and edit the value pool in
the Value selection tab. For more information see Using text with value selection, on page 25 and Using
options, on page 26.
An overview of all attribute types is available here: Attribute types on page 23.
Page 80
User Guide for Web site Administrators
Price lists
Products
Layout
Page: Products >> Product types >> [product type] >> Layout
Using the layout options for a product type you can configure how the product information is displayed
displayed in the product detail page of the shop.
You can use the following layouts:
Table 7: layout variations for product display
Layout
Comment
Product details
Alignment of product image and descriptive text to each other in the product view in
the shop
Variations
Shows the variations for a product;
If a large number of variations for a product exist, select the layout using a drop-down
menu. This allows the page to be displayed more quickly and increases clarity.
If only a few variations have been created, we recommend the table layout is used.
Image lists are best used if a small number of variations with different images are to
be displayed.
Bundle products
Shows individual products for a product bundle;
The compact layout displays the products with an image and the price. Table layout is
best suited for displaying a large number of products.
List view corresponds to the product list in a category.
Price lists
Page: Products >> Price lists >> Overview
Price lists form the basis for customer-specific pricing and discounts. A price list defines the validity period
of the price reduction and the affected customers or customer groups. The prices themselves are set in the
product assigned to the price list; see Product details – Prices, on page 74. In addition, shopping basket
discounts are configured using price lists.
Caution: Only one price list can be active for a customer and customer group at one time.
Price lists – Advanced settings
Page: Products >> Price lists >> Advanced settings
Here you can set which prices are displayed for the customer in product lists and product details.
If the option Take account of bulk and value discounts based on price lists is active, then the customer
sees the prices that apply to him in the product lists and product detail view.
The prerequisites for this are:
-
A special price must be entered for one ordering unit in the price list, such as one piece.
The price list is currently valid.
The customer belongs to a customer group that has been assigned to the price list.
Other price reductions such as bulk prices for larger purchase quantities are displayed on the product detail page using the Price reductions link.
Note: Usage of this option reduces the display speed of the corresponding page because the prices
must first be calculated.
User Guide for Web site Administrators
Page 81
Products
Search statistics
Price list details
Page: Products >> Price lists >> [price list]
You can limit the applicability of the price list to customer groups and individual customers.
The available customer groups are listed in the drop-down menu beneath the table on the Customer
groups tab. You must first create customer groups under Customers >> Customer groups to be able to use
them for price lists. See also Customer groups, on page 87.
To be able to assign customers directly, enter the customer number on the Customers tab or paste customers from the tray.
Note: Direct customer assignment has a higher priority than customer group assignment. If one price
list is valid for a customer directly, and a second price list is valid over a customer group assignment,
the customer-specific price list only applies for the customer. This applies to bulk pricing and discounts
as well as for the shopping basket discount.
Shopping basket discount
Page: Products >> Price lists >> [pricelist] >> Shopping basket discount
Use this function to give your customers discounts on their shopping baskets. You can scale the price reduction according to the shopping basket value. You can assign absolute values or percentage discounts.
The shopping basket discount is displayed on the product detail page using the Price reductions link.
Note: The shopping basket discount you allocate applies to the total of the products. Any charges for
delivery and payment are not included in the calculation.
In the shopping basket, the customer is shown the difference to the next discount level.
Search statistics
Page: Products >> Search statistics
The search statistics provide an overview of the search terms used in your shop by your customers and
how often they are used. The table lists all the search terms your customers have used. They are all written
in lower-case letters because capitalisation is not considered in the search.
For every search term you can see how often it was used and how many hits it yielded.
The following considerations or actions are recommended:
-
Use search terms that have no hits in descriptions or product names.
Use the search terms as keywords for products that you offer in these areas; see the Keywords for
search field in Description.
Fill any existing gaps in your assortment by adding often searched for products.
Display products which are searched for often on the start page or in main categories so that your customers find them immediately.
Product reviews
Product feedback gives your customers the opportunity to give their opinions on the products and discuss
their own experiences. Customers are able to award points from 1 to 5, and can also enter some feedback
text.
Page 82
User Guide for Web site Administrators
Import and export
Products
The ratings provided most recently will be listed in the table at the top.
You should receive an e-mail notification when product ratings are submitted for your shop. Create an corresponding e-mail event by providing a recipient e-mail address. For more information, see E-mail settings,
on page 54.
Settings
Page: Products >> Product ratings >> Settings
This option specifies who is permitted to submit ratings, and when the ratings will be visible in the shop. If,
for example, you want to moderate the ratings before they are published, set the option Display new product ratings immediately to No.
Remind your customers to rate the products they purchased. To do so, you can set up the automatic sending of a corresponding e-mail. This asks the customer to provide a product rating. Set how many days after
the order arrives that the e-mail will be sent to customers.
Import and export
Page: Products >> Import and export
You can import and export products as well as the complete product catalogue.
You can read a general description about importing and exporting in the chapter Import and export, on
page 31.
Products
During product import/export, all data that directly belong to the product are transferred.
To create new products, the ID [Alias] is required for the import file.
In the import file, you can enter the file name (such as camera_s.png) or a links to the image file (for example, http://imageserver/ProductImage/camers_s.png). The references are used if the image is already
available anywhere in the Internet. If only a file name is provided, the image must be uploaded to the
product details previously and the corresponding views must have been generated.
A simplified process exists to importing many products with their corresponding images. This is described
on the page for product import in the Tips and tricks area under Import images to products and categories during product import.
Product catalogues
Importing a product catalogue occurs through multiple steps, since not all data can be provided in one file.
When importing this data, a sequence must be observed. This is described on the page for product import
in the Tips and tricks area under Import product catalogues from other systems.
Product discounts
Import and export the amounts and values for value and bulk discounts with this. The corresponding price
lists and products must already exist. They are not created during import.
User Guide for Web site Administrators
Page 83
Products
Product search in the administration area
Import and export
You can import and export cross-selling assignments. Note that you only transfer the assignments this way.
The products used must exist. During import of cross-selling assignments, missing products are not
shown. Create the products used manually or import them before importing the cross-selling assignments.
Required fields for import are:
-
[Class]
[Product]
[TargetProduct]
[Position]
Note: Some functions in the application will open in new browser windows. For this reason, your
browser must allow pop-up windows to open. Otherwise, certain functions cannot be used.
Product search in the administration area
The search allows you access to individual products or product groups simply and conveniently. The easyto-use search offers numerous filtering possibilities. For basic information on using the search function,
see Search, on page 22.
Note: The product search also applies to attributes and products set to Not Visible.
Both master products as well as variation products are covered by the search too; see Product details –
Variations, on page 72.
Searching by product number is faster than searching using the Text search field.
The following attributes will be searched for the term entered into the Text search field: Product number,
Product name, Manufacturer name, Manufacturer product number, Product code, Short description, Long
description, Keywords for search, as well as all the attributes based on the Text variable type. For more information about attribute types, see Attribute types, on page 23.
In addition, the fields in which file names are saved are also searched. With this, you can also search for
the names of product images used or attached files such as pdf files, video files, and so on.
Use the Language drop-down menu to determine which Translation field will be searched for languagedependent fields.
Inventory or minimum stock level searches find and list variation products and individual products. Master
products are not included in the search.
Page 84
User Guide for Web site Administrators
Customer details - General
Customers
7. Customers
Page: Customers
Customers are visitors to the Web site who place orders in the online shop. Customers have order-related
data such as the invoice address and delivery address, tax model and tax region, invoice data, etc. There
can be registered and unregistered customers. Unregistered customers must provide their customer data
for each order. Registered customers have undergone the registration process, and have entered all the required customer data during that stage. They also receive passwords. This makes registered customers users. See Users, on page 39
To open the detail view for a customer, click the customer number. Clicking the icon to the left next to the
customer number opens a new browser window containing the customer details.
The following methods exist to add new customers to the system:
-
The customer registers in the shop. You can determine the contents of the registration form. See
Registration, on page 40. This creates him as a user simultaneously.
A customer does not register, and orders without signing in. He is created as an unregistered customer.
Click on Add on the Customers page.
Use the Create new customer command in the customer context menu in the administration area. Enter information as described in Customer details - General, below and following.
Customer import; see Import and export, on page 88
Caution: If you delete a customer, her orders will also be deleted.
Customer details - General
Here you enter and manage the merchant-side customer data of a customer. The user does not have access
to this information.
Address
Page: Customers >> [customer] >> General >> Address
Here you can edit the address information of the merchant-side customer data.
If the customer is not a registered customer, all system-generated e-mail messages related to this customer are sent to the address in the E-mail field.
If the merchant-side user data differs from the billing address, you will be informed by e-mail. In addition,
the Synchronise data function will be displayed, which you can execute if necessary. See also Data synchronisation, on page 87. For more information about user data, see Customer details - User data, on page
86.
Customer account
Page: Customers >> [customer] >> General >> Customer account
The customer number is recommended by the system. You can accept the number generated by the system
or use your own. The number must be unique.
When a new customer is created, the customer group you set in the Customer groups is set as the default.
See Customer groups, on page 87.
User Guide for Web site Administrators
Page 85
Customers
Customer details - User data
Use the tax model to decide which prices the customer is shown in the shop and how the shopping basket
is calculated. See also Tax model, on page 43. The tax model can only be applied after the customer has
registered in the shop.
The tax area can be assigned manually or automatically. If automatic assignment is activated, the tax area
is assigned according to the country of the customer address.
Attributes
Page: Customers >> [customer] >> General >> Attributes
In the Attributes section you can manage and edit the attribute information you entered in Customer attributes, on page 88. Click the link marked with the corresponding attribute name to jump directly to the detail
page for the attribute.
Customer details - User data
Page: Customers >> [customer] >> User data
Users are registered customers. They can manage their user data in the shop by clicking My Account. This
information can be viewed in the User data tab. You can configure which information the customer can
manage in My Account in the registration form. See Registration, on page 40.
Note: You can convert an unregistered customer into a user by allocating sign-in data for this customer.
After saving, the address data is copied from the order to the billing address and the default delivery
address.
Signing in
Page: Customers >> [customer] >> User data >> Sign in
Here you manage the user access data.
A checkbox in the Registration process completed field means that the user has completed registration.
All system-generated e-mail messages related to this customer are sent to the address in the E-mail field.
Note: The e-mail address in the E-mail field is used for registered customers. For non-registered customers, the e-mail address in the E-mail field of the Address section is used; see Address, on page 85.
Billing address
Page: Customers >> [customer] >> User data >> Billing address
This option shows the billing address the customer entered in My Account in the shop. Changes you make
here can be seen by the customer in My Account. If there are differences to the merchant-side customer
data, the Synchronise data function is displayed. See also Data synchronisation, on page 87.
Default delivery address
Page: Customers >> [customer] >> User data >> Default delivery address
This option shows the delivery address the customer entered in My Account and set as Default. Changes
you make here can be seen by the customer in My Account.
Page 86
User Guide for Web site Administrators
Data synchronisation
Customers
Data synchronisation
Merchant-side customer data are customer data which you manage under Customers >> [customer] >>
General, seeCustomer details - General, on page 85. The customers themselves can manage their information on the web site at My Account >> Manage personal data.
The merchant-side customer data and the user data may contain differences. In this case, the Synchronise
data function will be displayed and the system will inform you via e-mail. To enable this, the corresponding
e-mail event must be activated; see E-mail settings - Events, on page 55.
Click Synchronise data to display the differences and select the changes to be adopted.
On the right side you can see the fields of the billing address the customer has entered in My Account in
the shop. On the left side you can see the relevant fields in the merchant-side customer data.
Fields which contain differing information are marked blue. Click to import the merchant-side customer
data into the billing address. Click to import the invoice address information into the merchant-side customer data.
Save your entries by clicking Save.
Customer details - Orders
Page: Customers >> [customer] >> Orders
On this page, you can see the orders for the current customer. To open the page with the order details, click
the order number. A general description about orders can be found in Orders, on page 125.
The following methods of creating orders for a customer exist:
-
Click Create and edit new order in the bottom row of the table.
The Create new order function is now active in the Orders menu.
An order will be created for the customer and you will now be in edit mode; see Editing mode, on page
126.
Customer details - Newsletter
In the table, all newsletter campaigns are listed. You can see immediately which are subscribed to by the
current customer.
If you subscribe or unsubscribe this customer here, he is informed about this via e-mail.
Customer groups
Page: Customers >> Customer groups
You can use customer groups to offer selected customers various advantages. These are, for example, customers or customer groups, specific prices or payment methods.
Here you can define and manage customer groups. The table lists all the customer groups you have created. The names are displayed in entry fields. Enter changes directly in the respective field.
Save your entries by clicking Save.
User Guide for Web site Administrators
Page 87
Customers
Customer attributes
In the options fields of the Default for new registration and the Default for ordering without registration columns, you can set which customer group a new customer will be assigned to in each case.
Before deleting the customer group, the system checks whether any customers are still assigned to the
group. If this is the case, you will receive a note stating the options available to dealing with the customer
assignments.
To edit the group membership for a customer, open his customer account; see Customer account, on page
85.
Customer attributes
Page: Customers >> Customer attributes
The standard attributes are provided by the system. You can define additional attributes to save more information about your customers.
You create and manage these additional attributes in the table. For more information about using these attributes and the standard attributes, see Registration, on page 58.
For more information about attribute types and their usage, see Attribute types, on page 23.
Caution: When you delete an attribute, all the customer data saved in this attribute is also deleted.
Import and export
Page: Customers >> Import and export
You can read a general description about importing and exporting in the chapter Import and export, on
page 31.
In the import file, the following columns are mandatory for creating new customers:
-
"ID [Alias]"
If no further data is specified, the customers are created using the corresponding alias. The default settings
are used for all other required data. If other columns are filled in the import file, the values are entered for
the corresponding attributes.
If the customer number does not yet exist, a new customer is created. Note the following when creating a
new customer:
-
If no user data is entered in the import file, an unregistered customer is created.
If user data is entered in the import file, the customer is created as a user and can sign in to the Web
site. For more information about user data, see Customer details - User data, on page 86.
Note: When a user is created, the sign-in name and the automatically generated password are sent to
the customer by e-mail. The corresponding e-mail events must be activated for this to occur, however;
see E-mail settings - Events, on page 55.
In the import file, you can set the default language and currency for the user in the columns Language /
country [User.LocaleID] and Currency [User.CurrencyID]. These settings are effective when the new user
signs in to the Web site for the first time.
Page 88
User Guide for Web site Administrators
Import and export
Customers
In the [BillingAddress.Country] and [ShippingAddress.Country] columns, the country is not provided, instead a country code is used. The corresponding assignment is available on this web site:
http://www.iso.org/iso/country_codes/iso_3166_code_lists/english_country_names_and_code_elements.htm.
Use these codes during import in order to assign the customer to the correct country. The following codes
apply to Great Britain, Spain, France, and Germany:
-
GB – Great Britain
ES – Spain
FR – France
DE – Germany
User Guide for Web site Administrators
Page 89
Preview
Content / Categories
8. Content / Categories
In this area you generate the structure of your Web site, and edit the content of individual pages. This is
where you build the page hierarchy or the category tree of your web site.
The elements used to build the structure are the pages. There are various page types that all offer various
functions. See Page types, on page 96 and subsequent.
In the Preview you can manage the structure and edit basic content directly within the page view. See
Preview, below.
In the Datasheet view, you can edit the rest of the data about the page. See Datasheet view, on page 93.
Use the Change view function to switch between the edit modes.
Read about how to create a new page in Creating new pages, on page 95.
You can import and export existing structures. See Import and export, on page 102.
Preview
Page: Content / categories >> Preview
This area allows you to generate and edit the structure of your Web site, and to edit the text directly in the
page view.
The page is divided into the following three areas:
-
Multifunction bar in the upper area; see Multifunction bar and content, on page 92
Page browser on left
Page preview on right
Page browser
The left part of the page shows the page browser. It shows the structure of your Web site. You can use it to
create, move, and delete the various pages. You can use these elements to construct your site structure as
you wish. The icon next to the ID indicates the status. A coloured icon means visible, while a grey icon
means not visible.
The functions to edit the structure are in the commands function group of the multifunction bar. See
Commands function group, on page 92.
Page preview
The right side of the page shows a page preview.
Some areas of the page shown are marked by a dotted border. These are text fields or areas to upload images. These can be edited directly. Click on an these areas to edit them. There are two types of these text
fields.
-
HTML text fieldsWhen the field is activated, the multifunction bar changes and provides functions for
text editing. See Editing mode, on page 93. Such fields are product descriptions, or other long texts.
Text-only fields: In these fields, you can only enter plain text, with no option for formatting. These comprise product names or category names, for example. The multifunction bar never changes.
User Guide for Web site Administrators
Page 91
Content / Categories
Multifunction bar and content
Multifunction bar and content
The multifunction bar is contained in the top area of the page with the preview area. It provides all functions that are necessary to edit the page structure and the text fields. Functions are grouped together in
function groups.
The File function group is always available.
File function group
In this group, you can find the functions to save, undo, and repeat changes.
If you edit the page structure, the multifunction bar is shown in the page mode and offers the corresponding functions. See Page mode, below.
If you edit text fields in the preview, the multifunction bar is shown in edit mode and offers text editing
functions. See Editing mode, on page 93.
Page mode
You are in the page mode if you are in the preview mode and have not activated any text. In this mode, the
function groups Commands, Layout and Language are shown in the multifunction bar.
In this mode, you can edit the structure of your web site, create new pages, and set the visibility of the content of individual pages.
Commands function group
The New function corresponds to the function New in the submenu of Content / Categories. The new
page is created as a subpage of the current page.
The visibility status of the page is indicated by the icon in front of the page name. If you do not make the
home page visible, it means that you close the web site.
After deleting, the page is deleted from the view immediately. No confirmation is shown. If you have not yet
saved, you can restore the page. Click on Undo to do so or open the complete page again.
Use the Move page function to move the current page within the structure. This allows you to define the
sequence of the pages and to put a page into various hierarchical levels. Only functions are active that are
possible on the current place on the page.
Caution: The result of commands (for example, visible or delete) is shown in the page browser but is
not yet save. Click the save symbol in order to save the current status.
Layout function group
This group contains functions allowing you to arrange and display the content on the individual pages. Various layout options are available depending on the current page type.
The function group is only shown if the display can be changed for the current page.
The icons indicate the currently configured options. Click the arrow to view all options. If you move the
mouse over an image, a small notice is shown. This describes what is shown in which order.
This function group corresponds to the Layout tab in the details of a page. See Layout, on page 95.
Page 92
User Guide for Web site Administrators
Datasheet view
Content / Categories
Language function group
Here you can configure the language of the content that you want to edit for the individual pages. When
you select a language, the current page is displayed in the corresponding language and you can edit the
texts in this language.
Editing mode
You are in the editing mode if you have clicked a text field in the preview. In this mode, the function groups
for editing text are shown on the multifunction bar.
These functions correspond to the functions of the WYSIWYG editor, see WYSIWYG Editor, on page 27.
You can enter HTML code for the text fields as a special function. To do so, click Edit HTML in the multifunction bar. A new window opens containing the text. Insert your HTML code here. Save your entries by
clicking Apply. The page preview shows the text with the formatting from the HTML code applied.
Caution: Your changes are visible immediately upon leaving the field, but are not automatically saved.
Click the save symbol in order to save the current status.
Datasheet view
Page: Content / Categories >> Datasheet view
In a datasheet view, you can edit all the available data for the current page. Select this view to enter and
edit data that cannot be edited in the preview.
The parameters are grouped into tabs, which are described below. The specific descriptions of each page
type refer to any exceptions.
The following tabs are always available:
-
General; see General , below
Pages; see Pages, en page 94
Products; see Products, on page 94
Images; see Images, on page 95
Layout; see Layout, on page 95
General
Page: Content / Categories >> Datasheet view >> Pages >> [page] >> General
There are general settings for each page type. These are settings such as page title, descriptive texts, visibility, or also access control.
The option Visible in page element is a special form of the general visibility. This page is set as visible or
not visible only in the corresponding page element. It remains visible generally, however. This means, for
example, that if you have a large catalogue structure, you can elect to just display the most important categories for navigation purposes. All the categories are displayed in the category list in the display area, and
the user can access them from here. If the page is not visible in general, the option cannot be used.
You can assign access permissions for some pages. Use the Allow display for drop-down menu to show
who can view this page. The corresponding page can only be called up by the configured user group.
This setting is valid for pages on which visitors can edit entries (forum, blog, etc.) and allows you to limit
creation of such entries. To do so, use the Adding allowed for drop-down menu.
User Guide for Web site Administrators
Page 93
Content / Categories
Datasheet view
The content of the Title field is shown as a page heading, in the title line of your browser, and in the page
browser in the preview display.
The content of the Caption for page element field is shown as a link in the page element in which the categories are shown for navigational purposes. For example, Tree view of the pages as a box or List of the
pages of the top level. If you leave the field empty, the text from the Title field will also be used as the caption for the page element. If the title is very long, enter a shorter more poignant term so that the name of
the link is not too long. This text is shown in the navigation history (breadcrumb).
The field Keywords for search is mainly used by the search that the customers perform in your shop that
you place as a page element on your web site. Enter alternative descriptions or spellings under which the
product should be able to be found which are not in the page texts, but under which the specific page
should be able to be found.
The individual page types contain up to four fields for the extended description in addition to the description. The description is shown in the category lists.
The texts from the extended descriptions are displayed on the page itself or in the details of the corresponding category. You can set which texts are displayed using the layout options for the page. See
Layout, on page 95 for more details.
For some page types there are additional, special settings. These are explained in the descriptions of the
specific page types.
Pages
Page: Content / Categories >> Datasheet view >> Pages >> [page] >> Pages
All structural elements which are located hierarchically beneath the current page are referred to as subpages of this page. The term Subcategory is also used.
The table lists all the sub pages that have been created for the current page. The icon next to the ID displays type and status.
To create a new page, follow the steps described in Adding records, on page 21.
Use the batch command Move to... to move pages to another place in the structure tree. When you move
categories, all associated and subordinate elements such as subcategories and products are moved as
well. These assignments remain in place.
Caution: If you delete a page, all subpages and their contents are deleted as well. The products assigned are not deleted, just the page assignments.
Note: If you open the Web page view when in a page, you will see the page even if it has been set to
Not visible. If you switch to the next higher page level, this page will no longer be displayed as a sub
page as long as the status is set to Not visible. Take account of the page cache settings; see Page
cache, on page 37.
Products
Page: Content / Categories >> Datasheet view >> Pages >> [page] >> Products
The table lists all the products which are assigned to the current page. The function and meaning of the
icons is the same as in the general product list.
The following methods exist to assign products to the current category:
Page 94
User Guide for Web site Administrators
Creating new pages
-
Content / Categories
Adding new entries, as described in Adding records, on page 21. Save your entries by clicking Save.
Create a new product directly via the Product's sub menu. Click the New link and proceed as described
in Creating a new product, on page 65. The product is assigned to the category on completion.
You can set the sequence using the sorting key in the last column of the table. For more details, see Sorting
using sorting keys, on page 22.
Use the batch commands to sort the product list according to various criteria, for example, according to ascending prices. This sorting is not dynamic. That means that if you change prices for the products after
sorting, the list is not sorted again automatically. The sequence stays the same as before the price change
was made. If you would like to sort the list again with ascending prices, you must perform the corresponding batch command again.
Images
Page: Content / Categories >> Datasheet view >> Pages >> [page] >> Images
You can manage up to four images for each page. The List view image is used for page lists. A small image
is displayed for each page here, alongside the title and description. The other images are displayed on the
page itself in the category details along with any existing long description fields. You can specify which image is displayed using the layout options. See Layout, below.
You must upload each image individually using the Upload file button. See also Uploading images, on
page 29.
Layout
Page: Content / Categories >> Datasheet view >> Pages >> [page] >> Layout
The table lists all the options for displaying the content of the corresponding page in the Web site. If you
move the mouse over an image, a small notice is shown. This describes what is shown in which order.
The selected option has two functions. The first is to set which content should be shown on the page, such
as only text or subpages together with products. In addition, the sequence of content is set, for example,
first products and then subpages or the other way around.
Depending upon the page type, you have up to four text fields available and can upload up to four images.
See General , on page 93. With the Text option, you set which of the texts and images are shown in which
combination. If the icons display indicate more text fields or image than are currently available on the
page, these are created and can then be edited by you.
Use Subpages to set whether all subpages should be shown on the subpage or only the content pages.
Use Products to see how the product list on the page should look.
Note: If you arrange the products or category pages in more than one column, these pages are displayed first from left to right and so on down the page.
Creating new pages
There are various ways to create a new page, depending upon the context in which you find yourself. In the
following process, we assume that a structure is already existing. This is also the situation after running
through the setup assistant.
Proceed as follows:
1. Open the Preview in the Content / Categories menu.
User Guide for Web site Administrators
Page 95
Content / Categories
Page types
2.
3.
4.
5.
6.
Select a page in the page browser under which the new page should be created.
Click New on the multifunction bar.
Enter a name and select the corresponding page type. Leave the Visible option on No.
Click Insert.
Check whether the page was inserted in the correct place in the structure. If not, use the functions under Move page in the multifunction bar to move the page to the correct place.
7. Click on the text fields on the preview and enter the corresponding content.
8. Select the correct layout options for the page. Test multiple variation until you have found the optimal
page display.
9. Click the link to the web page preview in the administrator navigation. Look at the page again on the
web site.
10. Click Visibility on the multifunction bar.
11. Select the Visibility option to yes and click Apply.
Now the new page is shown on your web site.
If you also want to offer the page in additional languages, switch the language using the selection box. This
way you can see what language-dependent data you still have to enter.
If necessary, enter additional data in the datasheet view. Click Datasheet view on the multifunction bar
and enter all required data in the tabs provided.
For more about the basics of working with the various views, see Preview, on page 91, Datasheet view, on
page 93 and Multifunction bar and content, on page 92.
Page types
Page types are the foundation for the various types of pages from which you can build your web site.
The page type determined the type of content and the functionality that is shown in the content area of the
respective page. See Web site structure, on page 112.
For the page type Category, for example, these are descriptive texts, heading, and images for the category
as well as the product list and the list of subcategories. The page type Right of withdrawal contains text
with corresponding information for the visitors of your web site.
In addition, the page types differentiate by the type and amount of data that are saved in the details of the
respective pages.
When creating a page, the corresponding type is selected and determines the following process during
creating of the page.
You can access the page types in the page browser and in the datasheet view of a page. See Page browser,
on page 91 and Pages, on page 94.
The usage, function, and specialities of the various page types are described in the following chapters.
Home page
Page: Content / Categories >> Pages - Datasheet view
The home page is the main page. It is the root of your site tree structure. All other pages are subpages of
the home page.
It is the start page of your web site.
The home page cannot be deleted. You cannot change the ID for this page. The home page only exists
once.
Page 96
User Guide for Web site Administrators
Page types
Content / Categories
Most setting for the home page match those of all pages. See Datasheet view, on page 93. The following
details should be noted for the home page.
General
In the Summary for search engines field, enter the text that is shown in the results list for search engines.
Keep the text short but powerful in order to interest your customers for your page.
Intro
Page: Content / Categories >> Datasheet view >> Intro
If you wish you can create an introduction for your website, which will be displayed before the home page
is accessed. A link appears below the Intro that the user can click on to reach the home page.
To set up an intro, proceed as follows:
1. Enter the desired text or programme code in the Intro Code field. The intro code can contain elements
such as HTML code, flash or videos, for example a YouTube video.
2. Check the preview.
3. Activate display of the intro.
4. Save all your entries with Save.
Page / Category
Page/category is the page type for the construction of a hierarchical catalogue structure. You can assign
subcategories and products to it. You can enter a separate layout for each category.
In the page preview you can edit the category texts and texts of the associated products.
Most setting for the categories match those of all pages. See Datasheet view, on page 93.
Content page
Content page is the page type that you use to create general content as articles to display on your web site.
Most setting for content pages match those of all pages. See Datasheet view, on page 93. The following details should be noted for content pages:
You can put the date in the Date field. This will be shown together with the title.
In the Texts section, you can add an attachment to the article. Either enter the name of the file with its
path directly in the Attachment field, or click Browse to search for the file. At the end of the article, a link to
the attachment is displayed on the website. In the Attachment label field, enter the text for the link.
Link
Link is the page type that you use to create links to external or internal pages of your web site.
The link is displayed in page elements such as the category tree or in category lists.
Most setting for the link match those of all pages. See Datasheet view, on page 93. The following details
should be noted for the link:
With the New window option, you set whether the link opens in a new window or in the same browser window.
In the Web site field, enter the target address for the link.
User Guide for Web site Administrators
Page 97
Content / Categories
Page types
Promotional products
Promotional products is a page type that you can use to offer specials on selected products. Use it to present special offers, promotions, or new products to your customers. The Promotional products type is a
special category that can only be used once.
Most setting for the promotional products match those of all pages. See Datasheet view, on page 93.
There are two special page elements for displaying promotional products in the shop: Promotional products as box and Link to the promotional products. Place these on the web site in the Layout area. For more
information, see Page elements and navigation, on page 119.
Contact information
Contact information is the page type that you use to display your company information.
The contact information is an important part of your Web site and may be a legal requirement. It is also
called the vendor information. Contact information is obligatory.
The content of the contact information is determined by the respective countries. In Germany, the requirements for the contact information are contained in the tele-media laws. The following is required:
-
Name and address of the vendor
Communication data
Legal registration number and registry location
VAT ID or business tax ID
Depending upon the type of corporation, other information can be required. Get information about the current legal requirements.
It must be possible to open the contact information page from every page in the Web site. A corresponding
page element exists to do this. For more information, see Page elements and navigation, on page 119.
Terms and Conditions
Terms and conditions is a page type that you use to display your business and contractual conditions on
your web site.
The terms and conditions are a component of a shop, and strict regulations also apply here. The content
and access is dictated by laws of specific countries.
In Germany, for example, the Terms and Conditions have been legally regulated since 2002 (BGB paragraph 305 ff.).
Caution: You should review the default set of Terms and Conditions and adapt it, if necessary, to the
current requirements of your Web site or replace it with your own set of Terms and Conditions.
The Terms and Conditions must be readily available to the customer. A corresponding page element exists
to do this. For more information, see Page elements and navigation, on page 119.
Note: You can set up the order process so that the customer must confirm the privacy policy before the
purchase can be completed; see Shopping basket settings, on page 57.
The customer can either print out the terms and conditions or save them to a file, as required.
Page 98
User Guide for Web site Administrators
Page types
Content / Categories
Right of withdrawal
Right of withdrawal is the page type with which you display additional information about the cancellation
options on your website.
Information on the right of withdrawal supplements the Terms and Conditions and informs your customers
of the general conditions for cancelling an order and how to do so.
We recommend that you incorporate the page element Link to right of withdrawal page. To do so, in the
data sheet view, click on the link Page design at the bottom of the page. For more information, see Page
elements and navigation, on page 119.
Caution: Information on the right of withdrawal must be modified to match the current conditions of
your shop and/or be replaced by your own conditions.
Privacy policy
Privacy policy is the page type that you use to explain how you use personal information on your web site.
Since you receive and record personal information from your customers, you must inform your customers
of the ways this information is being used and saved. This is a legal requirement in many countries. You
can use the Privacy policy to display the relevant notification to your customer.
The privacy policy must be readily available to the customer. A corresponding page element exists to do
this. For more information, see Page elements and navigation, on page 119.
You can read about how to set up the agreement for your customer under Signing in, on page 40.
Caution: You should review the default privacy policy and adapt it, if necessary, to the current requirements of your Web site or replace it with your own privacy policy.
Business hours
Business hours is the page type that shows your visitors the times during which you offer your services.
You set the times themselves in the general settings for your web site. See Business hours, on page 39.
For the Layout of the business hours on the web site you can select between a table-based or graphical
view.
Site map
Sitemap is the page type that provides your visitors with a general overview of the structure of your Web
site. At a glance, visitors can see what pages your Web site contains, and can find their place. Depending
on the layout format, up to four levels of the Web site structure can be displayed.
Part of the general settings for the site map match the general settings for all pages. See General , on page
93.
For the Layout of the site map on the web site you can select between a block view and a tree view.
Forum
Forum is the page type to provide your visitors with an opportunity to discuss various topics on your Web
site. Users can start discussions on a given topic, as well as write responses to the various topics. Your visitors can also subscribe to the posts as an RSS feed.
User Guide for Web site Administrators
Page 99
Content / Categories
Page types
You can restrict who can read the forum and who is permitted to submit topics or posts. Visitors with permission to do so can report suspicious content using a special function. Such entries are marked as spam
in the Administration area. You can then block these posts from being displayed.
You can create new topics in the page preview.
Part of the general settings for the site map match the general settings for all pages. See General , on page
93.
For the Layout of the forums on the web site you can select between a list view and a tree view.
You can receive a notification via e-mail when a new post is made on the web site. To do so, activate the
corresponding e-mail event. See E-mail settings - Events, on page 55.
Topics
The table lists all the topics in this forum. You can also put in new topics here. Proceed as described in
Adding records, on page 21.
If you would like to read more about the topic, click the ID. See Topics – Details, below.
Topics – Details
In the details of a topic, you can rename it and set whether more posts can be made about this topic.
The table lists all the posts for the topic. If visitors report that a post is suspected of being spam, the post
is marked with a warning icon. In case the SPAM report is invalid, you can remove it. To do so, use the
batch command Delete Suspected spam marker.
You can also create your own posts about the topic here. Proceed in this as described in Adding records,
on page 21.
Blog
Blog is the page type that shows your visitors new information in a journal format.
The visitors can leave comments on the blog entries and subscribe to the entries as an RSS feed.
You can restrict who can read the blog and who is permitted to submit comments for the entries. Visitors
with permission to do so can report suspicious content using a special function. Such entries are marked
as spam in the Administration area. You can then block these posts from being displayed.
You can receive a notification via e-mail when a new post is made on the web site. To do so, activate the
corresponding e-mail event. See E-mail settings - Events, on page 55.
You can create new topics in the page preview.
Posts
The table lists all posts of the blog. Here you can also create new posts. For more information, see Adding
records, on page 21.
Posts – Details
The post details allow you to edit the general settings for the blog post and the list of associated comments.
Here is where you set the post to visible and allow comments. Blocking comments here is independent of
the permission settings for the blog.
Page 100
User Guide for Web site Administrators
Page types
Content / Categories
Comments
The table lists all the comments for the blog entry. If visitors report that a post is suspected of being spam,
the post is marked with a warning icon. In case the SPAM report is invalid, you can remove it. To do so, use
the batch command Delete Suspected spam marker.
You can also enter your own comments about the current post here.
Guestbook
Guestbook is the page type to provide your visitors with an opportunity to provide text comments on your
web site publicly.
In general, visitors to the Web site will use this option to leave their opinions, notes or criticism of the Web
site. Your visitors can also subscribe to the posts as an RSS feed.
You can restrict who can write or read guestbook entries. Visitors with permission to do so can report suspicious content using a special function. Such entries are marked as spam in the Administration area. You
can then block these entries from being displayed.
You can receive a notification via e-mail when a new post is made on the web site. To do so, activate the
corresponding e-mail event. See E-mail settings - Events, on page 55.
Entries
The table lists all the entries in the guestbook. If visitors report that a post is suspected of being spam, the
post is marked with a warning icon. In case the SPAM report is invalid, you can remove it. To do so, use the
batch command Delete Suspected spam marker.
You can also create your own entries here, for more information, see Adding records, on page 21.
Image gallery
Image gallery is the page type that you use to display photos on your web site.
You can show all images as a list with the slideshow. The viewer can control the slideshow In addition, you
can show the images with the cover-flow effect. The cover flow is a display in which all images are shown
as a running horizontal list with the current image in the foreground.
The page preview allows you to upload images and edit text elements. Edit the other settings in the datasheet view.
The directory under Directory is the directory under which the images are saved in the file manager. See File
management, on page 30
Images
In the table, you can see all the photos that you have uploaded for this image gallery.
To see a magnified view, click an image. You can enter additional data for each image. This data is displayed along with the image on the Web site. To enter this information for other languages, select the corresponding language from the drop-down menu above the table.
You can change the name of the file. To do so, click on the symbol in the name of the corresponding file.
You can set the sequence using the sorting key in the last column of the table. For more details, see Sorting
using sorting keys, on page 22.
User Guide for Web site Administrators
Page 101
Content / Categories
Import and export
To upload new images follow the instructions found in Uploading images, on page 29.
Caution: The images for the photo gallery can only be added using the Upload files function on the Images tab. You cannot use the file manager for this. The same thing applies to editing the file names.
Image search
You can search for images both on the Web site and in the Administration area. To enable proper searching, you should define search terms and other content for the images. Searches can be conducted using
this content.
You can add the following content for each image:
-
-
Keywords
Individual keywords under which the images can be found. Multiple terms must be separated by commas.
Image location
Description
The search form in the administration contains the fields Keywords and Text. When searching, the terms in
the Keywords field are compared with the content of the Keywords attribute. The terms entered in the Text
search field are compared with the content of the fields Image location and Description.
Terms in more than one field are linked using the AND operator. This means that if you enter a keyword and
a text in the search form, an image must be assigned to the keyword and the text in order to be located.
The web site only has one search field. The search term entered here is searched for in all three previously
mentioned fields.
Import and export
Page: Content / category >> Import and export
You can read a general description about importing and exporting in the chapter Import and export, on
page 31. In relation to contents and categories, the following import and export types exist:
-
Import/export of Pages and categories, see Import/Export of Content/Categories/Pages, below
Import/export of category-product assignments; see Import/export of category/product assignments,
on page 103
Note: Some functions in the application will open in new browser windows. For this reason, your
browser must allow pop-up windows to open. Otherwise, certain functions cannot be used.
Import/Export of Content/Categories/Pages
The Categories Import/Export function allows you to import or export the catalogue structure of your Web
site. This refers to all of the categories and pages and their properties, and how they are arranged in the
catalogue structure.
When creating new categories via the import file the following columns are mandatory:
-
"Type [Class]"
"Parent Object [Parent]"
"ID [Alias]"
Page 102
User Guide for Web site Administrators
Import and export
Content / Categories
If no further data is specified, the categories are created using the corresponding alias and specified type
and are sorted accordingly into the structure. The default settings are used for all other required data.
If there is no entry in the Parent Object [Parent] column, the corresponding elements are placed directly
under the Home page.
Import/export of category/product assignments
When category-product assignments are imported or exported, the assignment of products to categories is
also swapped in or swapped out. The assignment of products to categories is defined here.
In the import file, all the columns from the export file are mandatory.
Caution: In order to perform a category/product assignment import, the products used and a corresponding catalogue structure must be available. If you make this available per import, you need to first
perform the product import and the category import, and then after this, the category-product assignment import.
User Guide for Web site Administrators
Page 103
Services
Booking system
9. Booking system
The booking system allows you to offer services that your customers can reserve through the Web site. This
could include tool rentals, table reservations in a restaurant, or booking a hairdresser appointment. The
services are referred to as “Services”.
To offer these services, you must perform the basic settings and create the services. There are two assistants to help you do this. The booking system setup assistant helps you with the basic settings. The services setup assistant helps you to create services.
You work with the booking system as follows:
1. Setting up the booking system
Start the booking system setup assistant and perform all required steps.
2. Creating services
Create services. Start the services setup assistant and perform all required steps.
3. Creating bookings
Bookings can be made by your customers using the Web site, or created by you in the Administration
area. This is done by selecting the corresponding service and entering the required data. Finally, the
booking is sent or saved. The bookings are entered in the booking overview for the specific service.
4. Control and confirmation
In the Administration area, you can display the booking either using the calendar function of a service
or using the search tool. If the manual confirmation option is active, you must check and confirm each
booking individually in order for the confirmation e-mail to be sent to the customer. If required you can
change the booking time in the booking details at any time, or also cancel the booking. For more information, see Booking details, on page 109.
Once that is done, the bookings are entered into the calendar and confirmed with the customer.
The booking system setup assistant can be executed again after the first usage to change settings.
The services setup assistant is used to set up services. To change the details for the service, open the details of the corresponding service from the table. See also Service details, on page 106.
Services are managed in a similar way to products. After editing the general properties with prices and descriptions, you can assign images and define category assignments.
The bookings for each service are listed in a special tab; see Bookings, on page 109.
You can specify whether the booking function is available only for registered customers. To do so set the
option Shopping basket only for registered customers under Basket settings.
Services
Page: Booking system >> Services
Services are offerings such as trainings, reservations, or rentals which your customers can book.
The table lists all the services which you have created. To open the details of a service, click the name.
Click the icon to the left of the name to open a new browser window with the service details. See also
Service details, on page 106.
The following methods of creating services exist:
User Guide for Web site Administrators
Page 105
Booking system
-
Services
Run the assistant to create a service
Duplicate an existing service
Enter the new service in the last row of the table which lists all services
Open the Create new service function from the Booking system menu
Service details
Page: Booking system >> Services >> [Service] >> General
The general properties in Name/Price, Description and User-defined attributes are mostly the same as
those of products. For the relevant settings, see Product details – General, on page 69.
In the Duration/Time Limits section, you can set the general conditions for this service. You can define,
for example, how long the service runs, whether customers can set the duration of the service, in which intervals the service can be booked and so on.
The assignment and management of images, categories, and cross-selling matches the process with products. Read about this in Product details – Images, on page 71, Product details – Categories, on page 72
and Product details – Cross-selling, on page 78.
Service details - Customer options
Page: Booking system >> Services >> [Service] >> Customer options
You can create options for a service. Using these options you can allow your customers to make certain selections for the service. For example, in the case of a table reservation you could offer the type of table
decoration as a selection.
To create such options you must create a corresponding attribute for the product type to which the service
is assigned. Proceed as follows:
1. Click Edit product type. This takes you to the page containing the attributes for the displayed product
types.
2. Enter the ID and name of the attribute (such as Table decorations) and select the attribute type Customer options. Save your entries by clicking Save.
3. Click the name of the new attribute to edit the details. Enter the general details.
4. Click the Value selection tab to enter the selection values. (For example, Birthday decorations, Candlelight dinner, …). Save your entries by clicking Save.
5. Switch to the page with the options for the corresponding service. Here you will see the attribute values with check boxes. Highlight the options that you want to make available to the customers on the
Web site.
6. Save your entries by clicking Save.
7. The options are displayed for the customer in the form of a drop-down menu when reserving the service.
To add or remove options click Add or remove values. This takes you back to the page with the attributes,
which you can edit accordingly.
For more on product types and attributes, see Product type details, on page 80!
Bookings
Page: Booking system >> Services >> [Service] >> Bookings
Here you will see all the bookings that have been reserved for a service in a calendar overview format.
Page 106
User Guide for Web site Administrators
Services
Booking system
Overview
You can use the calendar to access all the bookings for the service. Use the bar containing the day numbers to choose the corresponding day in the month that is displayed. Select the month using the left and
right arrows next to the month indicator.
The individual icons in the days bar have the following meanings:
Table 8: Key to calendar icons
Icon
Description
Day number Currently selected day;
with high- The bookings list is displayed for this day.
lighted
background
Day number Current date
with border
Day number Day has at least one booking
displayed in
bold
Day number No bookings can be created for this day.
grey
If you move the mouse over the days bar, an overview of the bookings for the corresponding day is displayed in a small window.
If you click a specific date, the table containing the bookings for this day is displayed and you can edit the
bookings for this day. The number of columns that are displayed is governed by what was entered for this
service in the stock level.
The individual icons in the bookings list have the following meanings:
Table 9: Key to bookings list
Icon
Description
Released reservation period can be blocked for reservations
Blocked reservation period can be released for reservations
Delete
Delete selected bookings;
This function appears when you move the mouse over the booking.
To configure a new booking, the following options are available:
-
Click a time period in the day list and enter the details; see Booking details, on page 109.
Click the New Booking link and enter the details; see Booking details, on page 109
Create a booking on the web site.
To call up the details for an booking, click the corresponding entry in the bookings list.
Set allowed booking times
Here you can enter the periods during which the current service may be reserved. The business hours are
entered as the default setting; see Business hours, on page 39! You can overwrite these times here. These
times then only apply for this service.
Save your entries by clicking Save.
User Guide for Web site Administrators
Page 107
Booking system
Services
Batch clearance
You can use the batch release function to configure simple releases/blocks for specific periods of time.
Such exceptions could be special opening hours, closure for vacation, etc. During these periods, the service is not available as usual. However, in order not to have to change the general hours of business for
this service for this limited period, you can enter the exception period here.
The various fields have the following meanings:
Table 10: Fields for batch release
Field name
Description
Field type
Example
Start date
Date of the first day from which the
exception should apply
Date field
02/12/2010
End date
Date of the last day to which the excep- Option button +
tion should apply
date field
Multiple occurrence
5
Number of occasions that the modified Option button +
entry field, numeric
times may be used;
This is evaluated in conjunction with
the field Repetition.
Repetition
The time interval between repetitions Option button
of the exception periods;
Repeat as many times during the repetition period as specified in the Repeated occurrence field
Mornings from/to
Differing business hours in the morning Entry field, alphanumeric
09:00
12:00
Afternoons from/to
Differing business hours in the afternoon
13:00
18:00
Entry field, alphanumeric
04/12/2010
Closing during lunch is not necessarily required.
Save your entries by clicking Save.
Note: The exception periods for the service are entered in the calendar for the number of weeks specified in Repetition. The maximum number is limited by the system to 30 repetitions.
Examples for batch approval:
a) Temporary closure due to holiday;
•
•
•
•
For the start date, enter the first day of vacation.
Enter the end date for the holiday
Repetition: daily
Leave fields for opening hours empty (not open)
b) Shut Fridays in the coming month:
•
•
•
•
Page 108
For the start date, enter the date of the Friday on which the rule commences.
Number: 4
Repetition: weekly
Enter morning opening hours; leave afternoon hours empty
User Guide for Web site Administrators
Bookings
Booking system
Bookings
Page: Booking system >> Bookings
In the table, you can see all bookings that have been performed. To call up the details for a booking, click
the link in the Booking column.
Use the batch commands to confirm or cancel multiple bookings at once. An e-mail about this is sent to
the corresponding contact person.
Booking details
Page: Booking system >> Bookings >> [booking]
This shows an overview of all the data for the corresponding booking. You can change the data if you need
to, or move, or cancel the booking.
To confirm the booking manually, highlight the Booking confirmed check box. After saving, a corresponding e-mail is sent to the customer.
To cancel the booking, highlight the Booking cancelled check box. Upon saving, a corresponding e-mail is
sent to the customer.
Before the e-mail message can be sent, the corresponding e-mail event must be activated. See E-mail settings - Events, on page 55.
Save your entries by clicking Save.
User Guide for Web site Administrators
Page 109
Design basics
Design
10. Design
In the Design menu, you can find all tools to edit the design and layout of your web site. The possibilities
range from the selection of entire templates up to the colour definition of texts and backgrounds of different areas.
You can find templates under Templates and you can manage multiple templates at the same time under
Own styles. For more information, see Templates, on page 122 and Own styles, on page 121.
In the Quick design section, you have several functions that you can use to make fundamental design
changes. See Quick design, on page 123.
In Advanced design, functions are available to help you adapt the layout and design of your entire Web site
as well as individual areas to your needs.
Before you begin to edit your design, we recommend you read the chapter Design basics and Edit design.
See also Design basics, below and Editing the design, on page 114.
Design basics
In order to design your web site in all possible ways, open Advanced design. You edit the design and layout in a WYSIWYG mode, Changes are shown immediately.
The working area of the browser is split in two. In the upper section you can see the multifunction bar. This
displays the available functions. For more information, see Multifunction bar and content, on page 115.
In the lower section you can see the page preview. You can edit the design and layout directly there. The
page preview shows you the current Web page in the design and layout specified by the selected style; see
Own styles, on page 121.
The web site is split into the following functional areas; see Figure 8.
User Guide for Web site Administrators
Page 111
Design
Design basics
Figure 8: Web site structure
Area 1:
Area 2:
Area 3:
Area 4:
Area 5:
Area 6:
Area 7:
Header
Top
Left
Content area
Right
Bottom
Footer
In addition there is the surrounding working area of the browser on which the Web site is displayed. See
Page view in browser, on page 115.
If you want to edit an area, click the mouse in the corresponding location. This activates that area. It is
highlighted by a border and the multifunction bar displays the functions that can be carried out in this area.
In terms of editing and configuration options, the areas of the site can be categorised into vertical and horizontal areas as well as the content area:
Page 112
User Guide for Web site Administrators
Design basics
Horizontal areas:
Design
Header, Top, Bottom, Footer
The horizontal areas mostly extend over the entire width of the Web site. They
are wider than they are high. They mostly contain links and narrow display elements. Typical page elements for horizontal areas include:
- Logo
- Name of the Web site
- Link to the Home page, Contact information, Terms and Conditions, Categories, Shopping basket
- Flags for the country selection
Vertical areas:
left, right
The vertical areas are mostly located between horizontal areas and lie parallel to
the content area. They are higher than they are wide. They mostly contain boxes
with texts, lists, links or entry fields. Typical page elements for vertical areas are,
among others:
- List of main categories
- Signing in
- Compact shopping basket view, Shopping basket status
- Product search
- Promotional products
Content area:
Whereas the other areas contain mainly functional elements such as menus and
links, the content area contains the content of the pages that you have created
under Content / Categories.
The size of the content area is determined by the height and width information of
the other areas, as well as the padding. The "rest" of the browser window is left
for the contents.
The parameters for the individual areas create the complete design when they are combined. Some parameters influence each other or are interdependent. These side-effects must be considered. The following
information should be helpful:
-
-
In areas, background images have more priority than background colours. This means that if you load a
background image and also set a background colour, the background image will cover the colour.
All sizes and dimensions for the examples are shown in pixels (px). You can also use any other sizes
which can be used in style sheets, for example percent (%). For more information on the possible settings and how to use them, please consult the corresponding specialist literature or Web sites, such as
http://www.selfhtml.org (only partially in English).
Test out the various settings. Remember that you can use the Undo function at any time to restore the
initial state. Alternatively, make a copy of the current style and test out the various options on the copy.
You can do this in the table of your own styles by using the Create backup copy function. See Own
styles, on page 121 for more information about this. Once you have created the desired design there,
activate the style for your customers.
Notes on background images
Matching templates are loaded for the background images in each design template. You can replace these
with your own images. If you delete your own images, the template is reloaded automatically. If you do not
want a background image at all, you must delete the template image too. To do this, click the Delete template link. When the template has been deleted, the name of this link changes to Restore template. Click
this link to restore the default template for the background image without having to search for file names.
Note: If you set both a background colour and a background image, the background image will always
be on top of the background colour. Therefore, if you want to display the colour, delete the background
image. If the background is to be filled completely, the image must be resized to fit the area or you can
activate Tile image.
User Guide for Web site Administrators
Page 113
Design
Editing the design
Tile image
Background images can either be displayed as a single image or repeatedly displayed so that the background of the entire page is filled. This arranges copies of the image next to and below each other until
they fit the whole page.
Editing the design
In this chapter you will learn the basics of editing the design of your Web site. The information is provided
only as a recommendation, since the procedures for designing Web pages can differ greatly.
First you should read the chapter Design basics, on page 111. This will provide you with the required basic
knowledge.
To edit the design of your Web site, click the menu item Design. Depending on the scope and type of design changes, you can either start the Quick design function or the Advanced design function. For more
on working with the Quick design function, see Quick design, on page 123.
Note: Before you make any changes to the current design, we recommend that you save a copy of the
design. You can do this in the table of your own styles by using the Create backup copy function. This
ensures that you can always revert to the initial state. See also Own styles, on on page 121.
After selecting the advanced design, your Web site will be displayed in the browser using the design that is
specified by the current template.
Initially the background area of the browser is active. You can see that from the red border surrounding the
display area in the browser window. This area is where you configure the general way in which your Web
site is displayed in the browser. See Page view in browser, on page 115.
The multifunction bar at the top of the browser displays the corresponding functions that are available. For
more information, see Multifunction bar and content, on page 115.
Therefore, you should first configure the general display settings for your Web site in the browser. Make
any changes as necessary to the page layout by hiding and displaying different page areas.
To select the different Web site areas, move the mouse over the Web site. Areas available for selection are
highlighted. To select an area for editing, click on it. A red border is then displayed around that area.
You must now check whether all required functions are displayed on the Web site. These functions include: Shopping basket, sign-in box, catalogue tree or links to specific pages. These functions are provided
by page elements. You can modify the arrangement of the page elements within the individual areas, and if
necessary create new elements. For more information, see Page elements and navigation, on page 119.
Start editing the design now. Proceed through each area at a time, using the functions provided by the multifunction bar for the currently active area.
Upload images, play around with colours and fonts, and try out as many of the options as you want. Use
the Undo function to restore the condition to before the last command.
Once you are happy with the design, save all the changes.
Page 114
User Guide for Web site Administrators
Multifunction bar and content
Design
Multifunction bar and content
In the Design and Advanced design area, you will see the multifunction bar in the upper section of the
browser window. This makes available the functions that can be used to design the Web site. Only the
functions that can be used in the selected area (active area) are shown.
Functions are grouped together in function groups. Various subfunctions can be selected for some function
groups. In this case, the row with the group name is shown with an arrow. Click the arrow to view the selection options. Select the desired subfunction for editing. The associated setting options are displayed in the
group area.
Depending upon the selected area, various functions are available. See
-
Page view in browser, below
Horizontal areas, on page 116,
Vertical areas, on page 117,
Content area, on page 118,
The File function group is always available.
File function group
In this group, you can find the functions to save, undo, and repeat changes.
In addition, you can activate or deactivate the editing helps. The editing helps are frames around the areas
that you have currently selected. This enables you to localize the areas on the page.
Page view in browser
Alongside the design and layout of your Web site, you can also define how the Web site is shown within
the browser.
The corresponding function groups are shown when then browser background is selected as an active area. In this case, the complete browser window is enclosed in red beneath the multifunction bar.
Area function group
Here you can set the background colour and can upload a background image. Read about the basics of this
in Uploading images, on page 29 and Colour selector, on page 29.
The image or colour is shown under the web page. If the web site is set smaller than the browser window,
the colour or the background image will be a frame around the web site. Note that background images
have a higher priority than background colours. If the background image is not visible, check whether you
have uploaded a background image.
Width and padding function group
Here you can define the width of the Web site in the browser. You can specify absolute values in pixels (px)
or relative values in percent (%). Relative values are relative to the width of the current browser window. If
the user changes the width of the browser, the width of the web site will change correspondingly in the
browser.
With Top margin, you define the space from the top of the browser window to the top of the Web site.
Page areas function group
Here you can define which individual sub areas of your Web site are displayed. See Web site structure, on
page 112.
User Guide for Web site Administrators
Page 115
Design
Multifunction bar and content
Note: Remember that the page elements assigned to the areas are hidden if their corresponding areas
are hidden. The page elements may then have to be arranged in other areas before hiding; see Page
elements and navigation, on page 119.
Icon set function group
Some functions and statuses are triggered or displayed with icons. There are pre-defined sets for these
icons. Click this icon to view the list of the various icon sets. Click on the set that fits your design the best
and save your changes with Apply.
Horizontal areas
Horizontal areas are the Header, Footer, Top and Bottom, see Web site structure, on page 112. In addition
to the File function group, the following additional function groups are also available:
Area function group
This group contains all the functions that can be used to configure the background and dimensions of the
current area.
Here you can set the background colour and can upload a background image. Read about the basics of this
in Uploading images, on page 29 and Colour selector, on page 29. Note that for entire areas, background
images have a higher priority than background colours.
Use Margin to set the space between the active area and other areas.
Use Padding to set the space between page elements within an area to the edge of the area.
Alignment determines the placement of the page elements in an area.
Font function group
You can format the individual text elements of the current area such as, for example, headings and links as
well as set various fonts for these.
Page elements function group
Page elements are functional elements that can be placed in all areas apart from the content area. The visitor navigates through the web site with these and opens the functions. See also Page elements and navigation, on page 119.
In addition to making the page elements available on the web site, you can also edit their design to a certain extent by uploading images and changing colours.
(Active) button / (Active) button - Right Image
Buttons are areas that contain links. Depending upon the template, these buttons are designed differently.
See Figures 9 and 10.
Figure 9: Rectangular buttons
Page 116
User Guide for Web site Administrators
Multifunction bar and content
Design
Figure 10: Buttons as tabs
You can assign a background image to these buttons. For simple rectangular buttons such as in Figure 9, it
is good enough to upload an image for Button. The image must be at least as long as the longest button.
If the buttons are tabs with rounded corners such as in Figure 10, you have to upload left and right-hand
image sections, each containing the right and left pare of the tab. Proceed as follows:
1. Activate Buttons in Page elements.
2. Upload a background image for the left part of the tab.
3. Activate the Button- Right image in Page elements.
4. Upload a background image for the right part of the tab.
The image for the right side must be at least as long as the longest button, because it fills the tab from
right to left.
In such a tabbed layout, the active tab is often highlighted. You can upload appropriate images for this
purpose. Do this using the Active button and Active button - Right image options.
Box
A box consists of a header row and a list of entries or entry fields. Examples for this in horizontal areas:
-
Signing in
Product search with link “Advanced search”
Shopping basket summary as a box
You can upload a background image and configure a background colour for the box and the header. See
also Uploading images, on page 29. and Colour selector, on page 29. When doing this, please note the following:
-
The background image for the box covers the background of the complete box including the header.
The background image of the header is limited to the header and covers the background image of the
box within it.
The background colour of the box covers the box area without the header and covers the background
image.
The background colour of the header covers the header, covers the background image of the box and is
covered by the background image of the title row.
In addition, you can define the width of the box within the navigation bar. Enter the values in pixels (px).
Vertical areas
Vertical areas are Left and right, see Web site structure, on page 112. In addition to the File function group,
the following additional function groups are also available:
Area function group
This group contains all the functions that can be used to configure the background and dimensions of the
current area.
User Guide for Web site Administrators
Page 117
Design
Multifunction bar and content
Here you can set the background colour and can upload a background image. Read about the basics of this
in Uploading images, on page 29 and Colour selector, on page 29. Note that for entire areas, background
images have a higher priority than background colours.
Use Padding to set the space between page elements within an area to the edge of the area. By changing
the size values in the padding Left and Right, the page elements can possibly be reduced.
Font function group
You can format the individual text elements of the current area such as, for example, headings and links as
well as set various fonts for these.
Page elements function group
Page elements are functional elements that can be placed in all areas apart from the content area. The visitor navigates through the web site with these and opens the functions. See also Page elements and navigation, on page 119. In the vertical areas, mainly page elements are placed in boxes, such as:
-
Currency selection via list,
Shopping basket overview with all items in box format.
Business hours as a box
A box consists of a header row and a list of entries or entry fields.
You can upload a background image and configure a background colour for both the box and the header.
See also Uploading images, on page 29. and Colour selector, on page 29. When doing this, please note the
following:
-
The background image for the box covers the background of the complete box including the header.
The background image of the header is limited to the header and covers the background image of the
box within it.
The background colour of the box covers the box area without the header and covers the background
image.
The background colour of the header covers the header, covers the background image of the box and is
covered by the background image of the header.
Content area
Area function group
This group contains all the functions that can be used to configure the background and dimensions of the
current area.
Here you can set the background colour and can upload a background image. Read about the basics of this
in Uploading images, on page 29 and Colour selector, on page 29. Note that for entire areas, background
images have a higher priority than background colours.
Use Padding to set the space between the content (images and text) to the edge of the area.
Font function group
You can format the individual text elements of the current area such as, for example, headings and links as
well as set various fonts for these.
View function group
Here you can see a preview of the content of various pages of the web site (for example, Home page, shopping basket) as they will look with the current design settings. The drop-down menu contains a list of various content types that are displayed in the content area. This means that you can check very easily wheth-
Page 118
User Guide for Web site Administrators
Page elements and navigation
Design
er all content is readable using the current design. Sample text is displayed in the content area for each
type that you select.
Depending upon the selection, another function group may be shown. In this, you can upload background
images and set colours for the respective contents.
Work with the various settings in order to find the optimal view. Use the Undo function to restore the condition to before the last command at any time.
Page elements and navigation
The term navigation describes how the customer moves around the Web site and how he opens individual
pages or calls functions. You can configure navigation for your Web site individually. This is done by defining the distribution and arrangement of the individual functions on the pages of your Web site. These functions include:
-
link to home page,
Link to the categories
Logo display
display of a compact shopping basket,
display of the sign-in box,
product search display.
Display of promotional products
A corresponding page element exists for every available function. This element is used to display and call
the function on the page. Place the page elements respectively on the page.
In addition to this, you can create user-defined page elements; see User-defined page elements, on page
120.
All page elements are available for every area shown in Figure 8, on page 114 except for the content area.
Due to the way they work and their design, certain functions are best used in specific areas. They function
in other areas, but are out of place and disturb the design or do not fit in the defined area. With your design
you decide which page elements are assigned to which areas so that they are completely visible and can
be used.
If you move the mouse over a page element in the quick design or advanced design, the functions are
shown with which you can edit the design. The following functions are available:
Table 11: Functions for page elements
Function
Comment
You can move the page elements to different areas or within an area by using drag & drop.
Click the icon for the corresponding page element, keep the mouse button pressed down
and drag the mouse pointer over the target area. A red dashed border indicates the position
at which you can deposit the page element. Now release the left mouse button. The page
element is displayed at the corresponding location.
This deletes a page element from the area.
Details can be edited for some page elements. These include all user-defined page elements. Click the icon to call up and edit the details.
This is how to add a page element:
1. In the area in which you wish to place the page element, click Insert page element.
2. Select the desired page element from the list.
3. Click Insert to apply the page element for this area.
User Guide for Web site Administrators
Page 119
Design
Page elements and navigation
Page elements that are marked in the list with an asterisk (*) are already on the web site.
Page elements that are shown in grey are not available at the moment. Either the corresponding feature
has not yet been activated or the maximum amount has already been reached.
Browser title of the page page element
This page element shows the title of the current web site as it is shown in the title row of your browser. If
you put this page element as the last thing on your web site, in the footer, you increase the ranking of your
page for search engines.
Page elements for search on the web site
A search function on the Web site is provided to allow visitors to find information directly. You can offer
your customers a product search or a general search function.
There is a separate page element for each of these searches. You must place this element on your Web
page in order for the function to be made available to your visitors.
When searching for products, the system looks for the search term in all product data. The search function
can be offered as a simple search box, or with more advanced options. Customers can only search for visible products; see Visibility, on page 23. This search is faster than the general search. For the product
search, use the page elements Product search with link “Advanced search” or Product search with entry
field.
The general search function includes all types of page and product. If the search term appears in both
product descriptions and in pages such as categories, blogs and forums, then all these objects are displayed in the hit list. For the general search, use the page element General search as an entry field.
The search field allows the visitor to enter several search terms. These terms are linked by the AND operator during the search. In other words the search function shows objects that contain all terms.
User-defined page elements
As well as the specified page elements, you can also define your own. To add such an element, proceed as
follows:
1. Activate the area in which you wish to place the page element.
2. Click Insert page element.
3. Click on User-defined page elements.
4. Select an element type and click Insert.
5. Edit the corresponding details and then click Apply.
The following types can be used for user-defined page elements:
-
Text (HTML)
This element allows you to show short, HTML-formatted texts in the relevant area. This can be used to
display notes or information for your customers. An example of this is an informational text about delivery and payment. For more on formatting the associated text field, see Working with text fields, on
page 27.
-
Text with heading (Box with HTML)
This element allows you to show short, HTML-formatted texts in the relevant area, in a box with a title.
This can be used to display information or a group of functions for your customers. For more on formatting the associated text field, see Working with text fields, on page 27.
-
Link
Page 120
User Guide for Web site Administrators
Own styles
Design
This element allows you to display links in the relevant area. This can be used to provide links to additional internal or external Web pages for your customers. Examples of this are Link to contact information or Link to business hours. Always enter external pages in the following form: http://www....
User-defined page elements adjust their size and design to fit the relevant area. If no user-defined page elements are permitted or if the maximum permitted number of elements has been reached, the selection is
deactivated.
Caution: If you remove a user-defined page element from the page area, you delete the entire element
including its content. If you want to use it again, you must create it again.
You can access the user-defined page elements in the list of your own styles. See Edit page elements, on
page 122. This can be necessary if the elements contain errors and thus can no longer be accessed over
the page preview (JavaScript, for example).
Own styles
Page: Design >> Own styles
A style contains all the information about the presentation of your Web site. This includes the definition of
colours, images and fonts as well as the layout configuration and the distribution of functional elements on
your Web page. You can create several styles for your Web site. The basis for a style is a template that you
have used from the template selection. See Templates, on page 122.
In the table, you can see all styles you have created for your Web site. A preview image is displayed for
each style. The image shows the original layout of the template for this style. If you make changes to the
style, these changes are not visible in the preview image in the table. As soon as a style is edited and the
changes have been saved, the change is indicated by an icon (paintbrush) on the preview image. In addition, the date of the last change to the respective style is entered in the table.
Use the photo symbol to upload your own image for the style. This is relevant if you export your own style.
See Export and import of styles, on page 122.
The style that determines the look of the web site is the style used. It is shown indented on the first position of the table.
You can edit all the other styles without this having any effect on how the Web site is presented to your
customer. This allows you to prepare and test additional styles. You can activate one of the other styles at
any time. To do this, click Activate now.
You can edit a style using one of the following methods:
-
Click on Start quick design. This takes you to the page preview, where you can edit the basic style settings. For more information, see Quick design, on page 123.
Click the link Start advanced design. This takes you to the page preview, where you can edit the style
directly. All style editing functions and options are available. See also Design basics, on page 111.
The View on the web site link allows you to see how your Web site would appear in this style.
Before making comprehensive changes to the style, you should first make a backup copy. Click Create
backup.
You can create new styles by importing them from the templates or copying existing styles.
User Guide for Web site Administrators
Page 121
Design
Templates
Export and import of styles
You can export a complete style and import the design, for example into another shop.
During export, the files are compressed and saved in a file of the type .style. A log is displayed. This lists
which page elements, pages, and functions must exist on the target system in order to import the style
successfully. Print the log. This enables you to check before the import whether all requirements are filled
for successful import.
You can upload your own preview image for the style which is to be exported. To do so, click the photo
symbol of the export style. In the following dialogue, upload an image file with a screenshot of the style.
This will also be exported. After the import, your preview image is shown for the style.
After the import, a log is shown. Here information about problems are shown which occurred during import.
If this information is present, check the design and correct the errors manually.
The imported style will be shown as a new entry in the table.
Edit page elements
User-defined page elements contain text fields in which you can also enter HTML code. If the code is not
correct, this can lead to your page no longer functioning in design mode. This prevents you from gaining
access to the offending page element.
Use the safe mode in the style table to always have access to your user-defined page elements. You can
edit or delete page elements here at any time.
For more information, see User-defined page elements, on page 120.
Templates
Page: Design >> Templates
All available style templates can be found under Templates. Each template defines a specific layout and
design. You can either use these templates unchanged for your Web design or use them as a basis for individual customisations.
The templates are divided into groups in which different branches and designs are proposed. There are various basic templates per type, for which additional colour variants may exist.
To select a template, proceed as follows:
1. Select a topic. To do this, browse through the structure displayed of the listed topics. The available designs for each topic are displayed.
2. Select the template you prefer from those that are shown. The design is displayed in a magnified view
in the right column. If there are variants, they are shown in the form of colour boxes below the preview
image.
3. Select your colour variant. The available degree of customisation of the selected template is displayed
below the image using paintbrush symbols. If more paintbrushes are displayed, you have more freedom to customise the template. When you click the preview image, a larger illustration of the design is
displayed in a new window.
4. Click Apply to import the selected template into the table in the My styles tab.
In case you do not want to use a preconfigured design and you wish to create your own design from the
bottom up, at the end of every main group the Free templates area is available. These contain various layout variants without designs. This gives experienced designers the maximum level of freedom to customise.
Page 122
User Guide for Web site Administrators
Quick design
Design
There is also a Display all templates function. This generates an overview of all templates regardless of the
sectors and styles.
Note: If you do not change the name of your own template and load a style with the same name, any
changes you have made will be overwritten and the style will be reset to its original settings. You will be
asked to confirm this command.
Quick design
Page: Design >> Quick design
You can use the Quick design function to change entire design of your current Web site style with just a few
mouse clicks.
Caution: Any changes that you make here are saved automatically and can be seen on the Web site
immediately. Create a backup copy before working with quick design.
Because the quick design is a special case of advanced design, we recommend learning the basics about
design. To do so, read Design basics, on page 111 and Multifunction bar and content, on page 115.
In the quick design, you cannot select any areas. The multifunction bar offers the following special functions.
Logo/Header image
You load the images directly from the file management. You must have previously uploaded these images
into the file management. For more about this, see File management, on page 30. You can also provide a
link with the logo.
Colour
You can set a basic colour for the entire design using the Colour option. Your selected template is displayed using the specified basic colour, with the areas using matching colours. This colour is shown in the
box of the Colour function. If you select a colour, this is used as the new basic colour for the design and the
matching colours are recalculated. The areas of the site are then displayed using the newly calculated colours. If the design template consists of several basic colours, there is a selection option for each colour.
Read about the colour selection in Colour selector, on page 29.
Font
Here you can select a shared font for all areas of the web site.
Template
You can select a template for your Web site here. All other design settings will be overwritten.
Caution: All settings made in Quick Design overwrite any other settings that have been configured previously in the Design area.
If you are happy with the basic settings, but wish to customise individual areas further, open the Advanced
design.
User Guide for Web site Administrators
Page 123
Orders
11. Orders
Page: Orders >> Orders
Opening the page by clicking Inbox displays the new orders to you. New orders are orders for which the
Viewed status has not been set.
All orders for which the status Viewed has not yet been set will be shown in bold.
The last status set is always shown for the order in the table.
If an order contains a customer comment, this is indicated by a special symbol behind the order number. if
you place the mouse there, the comment is shown.
To see the details of an order, click the order number. To open the details in a new window, click the icon in
front of the order number.
You can only delete orders with the status Rejected or Archived.
As soon as you have opened the details of an order, it will be set to Viewed. This also sends a corresponding e-mail to the customer. The corresponding e-mail event must be activated for this to occur, however.
For more information, see E-mail settings, on page 54.
Note: If you need an overview of all orders for a customer, click the customer name. All of the customer's orders are listed in the Orders tab.
Exporting orders
Orders can be exported in XML and text formats.
Export in XML is necessary to use the data in ERP systems, for example. The XML export can be started as a
batch command for the list of orders and in the details of an order.
The export as a text file is used to utilise the data in a word processor, for example. This export will be
started as a batch command for the list of orders.
Orders – Details
Page: Orders >> Orders >> [order] >> General
The general properties of an order provide you with an overview of all necessary order information such as
the current processing status, products ordered, delivery and billing address, and so on.
The market status is updated with the current date and time after saving. Multiple statuses can be set. Registered customers can view the status in the shop.
The order number is assigned by the system. You can change these.
The order confirmation is sent to the e-mail address specified in the billing address for this order.
You can send the invoice in PDF format as an e-mail. The invoice must be generated previously. If multiple
invoices exist, the last created will be sent.
For downloadable products, you can manually send the link to download.
User Guide for Web site Administrators
Page 125
Orders
Orders – Details
In the internal note, you can save processing notes or additional information about the order. This data is
not shown to the customer.
You can only delete orders with the status Rejected or Archived.
It is possible that a Conflict warning is displayed for an order. This applies to orders that were paid using
external payment systems. A conflict occurs when the order value and the transaction value differ. This difference can happen if the order or shopping basket is changed subsequently. Such a change may include,
for example, adding a new item to the order. Since the customer has already paid via the external system,
the difference occurs and a conflict warning is displayed.
When doing this, please note the following:
-
-
If you set an order to Rejected, the stock level for the relevant product is corrected automatically.
Due to security reasons, credit card data in the database for orders paid to you by credit card (payment
method Credit card, manual) is deleted after the order is set to the status of Paid. The only information
that remains is a note that the order was paid by credit card.
Before the order confirmation e-mail message can be sent, the Inbox confirmation e-mail event must be
active. For more information, see E-mail settings, on page 54.
Order details for customizable products
If the customer has customized one of the ordered products, you will find customization details in the
overview of ordered products.
The following options are available to you here:
-
-
Click to see only the most important customization information.
Click to download a PDF document with all details as your template for production of the customized
product.
to send the customization details as PDF file to one of the recipients determined by you. The
Click
recipient receives an e-mail with the PDF document as attachment. If the customer has uploaded images, these will be attached to the e-mail.
Below you will find links to the files attached by the customer.
Note: Do not rely on the size information of texts and images specified by the customer. If, for example,
the customer selected 12 point as font size, this does not mean that you have to select 12 point as font
size when printing onto the product. If possible, use the preview customized by the customer as a template.
Editing mode
To change the order, click the Edit button. This displays all relevant information in entry fields where it can
be edited. Delete functions are activated for the entries in the order list. It is also possible to add new entries.
When you click Update, the order will be recalculated with the current values and displayed again. This
processing status remains until you accept the changes with Apply or cancel all changes with Cancel.
Note: It is also a good idea to notify the customers about changes made to their orders. To do this, use
the Send order receipt confirmation link in the detail view.
Orders with the status Rejected, Closed or Archived cannot be edited.
You can change the limits for downloadable products for this order. See also Creating a downloadable
product, on page 68.
Page 126
User Guide for Web site Administrators
Orders – Details
Orders
In addition to products, you can also add services to the order from the tray. To do so, click Add products
from the tray.
Documents
Page: Orders >> Orders >> [order] >> Documents
For each order, it is possible to generate various documents, such as invoices, packing slips, and credit
notes. You can create documents with the following methods:
-
Running the batch command Create and print documents... for the table of orders.
Use batch commands to create and print packing slips and invoices. In addition, the displayed status
can be changed in the dialogue as well. The documents created in this manner are added to the document list of the corresponding order.
-
Create the documents in the details of an order on the Documents tab
The Documents tab becomes active when you are not in Edit mode for an order. The number shown in
brackets after Documents shows the number of documents which have been created for the current
order.
For more information about document details, see Document details, below.
Depending on the type of document, you may also be able to display it in PDF format and send it by e-mail.
Take note of the following information when working with order documents:
-
You can only delete documents which have not been finalised. Finalised documents cannot be selected
and therefore cannot be deleted.
Changes in amount or deleting line items affects the document but not the order itself.
Changes in the order only affect documents that are created after the changes have been made. Documents that were created before the changes were made remain unchanged.
Changes made to quantities in the documents do not affect inventory levels.
Note: When printing via the browser, depending on the browser settings, disruptive headers and footers (such as page number, Internet address, date) may also be printed. You can change these settings.
For Firefox, click File >> Page Setup in the menu bar. This has a Margins & Header/Footer tab. The values
entered here are printed on every page printed via the browser. If you do not wish to print any of this information, simply delete the entries in the two fields.
Document details
Various numbers and date entries must be entered for each document type. Always click Save after entering the document number and date. Otherwise, the current data will not be applied in the print view
The sender information is taken from the Web site address data; See Address, on page 38.
For the individual order items, depending on the document type you can modify different values or delete
the item. The line item will be deleted from the document without deletion confirmation. Document sums
are updated after saving.
If a line item number is marked with an asterisk (*), this means that this product is contained in at least
one other document of the same type.
In the print preview, additional customer information is displayed below the customer address. This is information that the customer has entered in My Account. The documents are printed in the language that
the customer used for the order.
User Guide for Web site Administrators
Page 127
Orders
Orders – Details
If you would like to save your documents so that they cannot be changed, you can use the Finalise function. After clicking Finalise, documents can still be displayed and printed but they can no longer be edited
or deleted. In this way after finalising the corresponding process, you can save all of your documents in the
system in a tamper-proof state. You will have to create new documents for possible amendments and corrections.
The comments on the payment method are only printed on the invoice if the order status Paid is not set.
UPS packing slip
A UPS packing slip offers you the possibility of configuring order tracking for the corresponding orders. This
allows you and your customer to track the delivery status of the package.
To do so, enter the UPS tracking number into the details of the UPS packing slip. This number is generated
by the UPS WorldShip software. This is a requirement for package tracking.
Preparation
In order to offer your customers package tracking, you must register with UPS and install the WorldShip
software.
Use the Register with UPS link to register with UPS. After registration, you should log in and request a customer number in the My UPS menu.
In the next step, request the WorldShip software from UPS. To do this, click the Order UPS WorldShip
software link. Complete and submit the form that is shown. Or you can also download the software from
the UPS website.
Please install this after it has been received. Follow the instructions provided by UPS. Read the chapter
about XML import and reading the tracking number in the UPS software handbook.
Caution: A shipping weight must be provided for products that you wish to send using UPS.
Creating the UPS control number
To create the UPS tracking number, the packing slip must be exported and opened in WorldShip. A shop
address is necessary for this. The packing slip cannot be exported without this address. If your shop address does not satisfy the UPS requirements, you will receive a relevant notification with a link to the shop
address.
Proceed as follows:
Create a document of type UPS packing slip in the shop administration for this order.
If all entries are correct, click Export.
Choose a place to save the file and a name for the export file.
Start UPS WorldShip.
Select the menu to import XML files, for example Import/Export data.
Select a matching import method, for example Automatic XML Import.
Select where to save the XML file and start the import process.
Select the shipping archive after completing the import process and look there for the matching package. The tracking number is shown.
The UPS WorldShip software is being developed continually by UPS. If you are not able to perform the import and creation of the tracking method using the method described previously, read the current UPS
WorldShip handbook or contact someone at UPS.
1.
2.
3.
4.
5.
6.
7.
8.
Activate order tracking
Enter the UPS tracking number in the UPS tracking number field of the relevant document UPS packing slip.
Page 128
User Guide for Web site Administrators
WorldPay transactions
Orders
Save your entries by clicking Save.
After saving, the Track shipment link is displayed next to the UPS tracking number. Use this link to open
the UPS page where you can see the status of your delivery.
Order tracking in the shop
As soon as the tracking number has been entered and saved, the order tracking link also becomes available for the corresponding customer.
The customer opens order tracking in My Account under the Query order status option. The UPS tracking
number is also displayed as a link in the order. The customer can use this link to open the UPS page where
he can see the status of his delivery.
A link to the order tracking is also inserted into every status e-mail sent to the customer.
WorldPay transactions
The Amount column shows the value from the basket. The Authorised amount column shows the value in
the currency that the customer paid to WorldPay.
In the Status column, you can see for which orders you must perform a manual debit. Use the Open
link to view and edit the transactions at WorldPay.
WorldPay administration
The AVS column shows the AVS Code for the transaction. The AVS code (address verification system) displays the results of the customer data check. Not all WorldPay access methods support this AVS code. It
depends on the customer's bank and the type of contract you signed with WorldPay.
User Guide for Web site Administrators
Page 129
Newsletter campaigns
Marketing
12. Marketing
Here you can find the functions for all sales-promoting activities. Use this to manage your customer relationships and increase the market availability of your products.
Newsletter campaigns
Page: Marketing >> Newsletter >> General
Use newsletters to send out the latest information to your customers, such as promotional offers or discounts.
Before creating a newsletter, you must first create a newsletter campaign. A newsletter campaign can be
regarded as a container for newsletters and related data. Campaigns can be used to group newsletters.
Newsletter campaigns - Settings
Page: Marketing >> Newsletter >> Settings
In the Subscribe to newsletter section, you can configure and edit the texts that describe your newsletters. The language-dependent text is displayed on the Web site above the list of newsletter campaigns. It
allows you to display information and notes on your newsletter campaigns for your customers.
You can also offer your customers the possibility to subscribe to your newsletters during the order or registration process. To do this, set the option in the Allow product comparison section to Yes. The text that
you write there is shown with the selection of the newsletter campaigns in the specific address form.
Creating a newsletter campaign
What should you do when you create the newsletter? The next section will describe the individual steps involved, without going into too many details. These details are discussed in the relevant chapters. To create
a newsletter and send it to your customers, proceed as follows:
1. Create a newsletter campaign and provide a meaningful name.
2. Enter the details of the campaign. Add a description to further explain the name and edit the sender
data. You must set the e-mail address for test distribution. For the basics about the campaign details,
see Newsletter campaigns – Details – General, on page 132. Do not make the campaign visible until
all data has been entered and tested.
3. Create a newsletter in the details of the newsletter campaign on the Newsletter tab.
4. Open the details of the new newsletter and enter the relevant data and lay out the text. For more information, see Newsletter details – General, on page 133 and Creating the newsletter content, on page
134.
5. Conduct a test distribution, and check the results. Note that in this test e-mail, the placeholders will
not be replaced by current data.
6. Normally, subscribers register for your newsletter using the Web site. However, if you already have addressees for the newsletter from another source, you must enter them. Do this on the Addressees tab
in the campaign details. Enter the known addressees or import the data. See Newsletter campaigns –
Details – Addressees, on page 132.
7. In order to inform visitors to your Web site of your newsletters and to interest them in subscribing, you
need to enter and display a corresponding text. For more information, see Newsletter campaigns - ,
above.
8. Once all the preparatory work is complete, set the campaign as visible. You can do this either in the
campaign details, or by running a batch processing command in the table of newsletter campaigns.
9. In order to allow your Web visitors to sign up for the newsletters, you also have to display the corresponding function on the Web site. This is for one thing the subscription during the registration or order process, see Newsletter campaigns - Settings, above. This is done using the navigation elements
User Guide for Web site Administrators
Page 131
Marketing
Newsletter campaigns
Newsletter subscription and Link to newsletter subscription. See Page elements and navigation, on
page 119.
This completes the creation of the newsletter campaign and publishes it on your Web site.
Newsletter campaigns – Details – General
Page: Marketing >> Newsletter >> General >> [campaign] >> General
Here you can manage the data that contain additional information about the campaign and in addition that
are useful for the delivery of the newsletter.
Name and Description are shown on the web site on which the customer subscribes to the newsletter.
Use the Language drop-down menu to select the language for which the campaign will be created. One feature is the language selection International. Campaigns created with this option are valid for all languages.
Sender Name, Sender e-mail and Subject are all standard settings for all newsletters from this campaign.
You can overwrite the default settings in the details of the specific newsletter if desired. The name and email address of the sender are formed together to an expanded e-mail address such as: Shop Team <[email protected]>
The E-mail for test address is used by all newsletters in the campaign for text mailings. At the time of campaign creation, the Web site e-mail address is entered automatically; See Address, on page 38.
Newsletter campaigns – Details – Addressees
Page: Marketing >> Newsletter >> General >> [campaign] >> Addressees
Addressees are planned recipients of all newsletters of a specific campaign. There is no direct assignment
of addressees to individual newsletters. Addressees who receive a newsletter are referred to as recipients;
see Newsletter details – Recipients, on page 135.
The table lists all the addressees who are entered in the current campaign. The following methods exists to
add addressees to the list:
-
Direct entry of customer name and an e-mail address. This possibility is best for addressees that are
not registered customers.
Direct entry using customer number
Add all customers of a specific customer group
Add from tray
Importing addressees
Visitors that register themselves on the website for newsletter campaigns. For more information, see
Subscription from the Web site, below.
When addressees are deleted for registered customers, only the assignments to the campaign are deleted.
The other customer data remain. Unregistered visitors are deleted from the system for this campaign.
Caution: Deleting this also deletes the "Subscription status" (subscribed or unsubscribed) for the corresponding customer. If one of the customers is added to the campaign later, the status is automatically
set to subscribed. This can lead to legal problems if a customer receives a newsletter from which he had
actually unsubscribed. Think about this before adding a customer manually.
Subscription from the Web site
The web page visitors can subscribe to the newsletter in the following ways:
-
Directly subscribing to newsletters on the web site
Open the pages to subscribe to newsletters using Subscribe to newsletter
Page 132
User Guide for Web site Administrators
Newsletter
-
Marketing
For registered users, subscribing under My account >> Newsletter
Subscribe during the order process
The user is shown a page with the newsletter offering. He selects the desired newsletters and clicks Subscribe.
Due to security reasons, the customer receives an e-mail message that asks him to confirm that he has
subscribed to the newsletter. After confirmation, he is added to the addressee list with the status Subscribed. This is to prevent unauthorised people from subscribing to the newsletter on behalf of others. This
process is the double opt-in process.
For subscribing in the order process, the double opt-in process does not occur because it is assumed that
it is not an unauthorized use of the e-mail address.
Unsubscribing from newsletter is done the same way. The user must confirm unsubscribing by e-mail for
his status for the corresponding newsletter to be set to Unsubscribed.
Note: The subscription and unsubscription of newsletters and the corresponding confirmations are
events for which the system sends e-mail confirmations. To enable this, the corresponding e-mail
events must be activated; see E-mail settings - Events, on page 55. If you, as the administrator, assign
customers to newsletters manually, then no event is triggered.
For unregistered customers, you must provide one of the following page elements on your web site:
-
Link to newsletter subscription
Newsletter subscription
For more on working with page elements, see Page elements and navigation, on page 119.
Newsletter
Page: Marketing >> Newsletter >> General >> [campaign] >> Newsletter
Newsletters are e-mails that you send as part of a newsletter campaign to subscribers.
Newsletters can only be created using the table. For more information, see Adding records, on page 21.
Newsletters can only also only be deleted using the table. For more information, see Deleting records, on
page 21.
Newsletter details – General
Page: Marketing >> Newsletter >> General >> [campaign] >> Newsletter >> [newsletter] >> General
In the general newsletter details, you create the content and edit the sending data such as the mailing date
or sender address.
Mailing data
Mailing data for newsletters are data that are imported for sending.
The name and e-mail address of the sender are pre-filled with the date from the general properties of the
corresponding newsletter campaign. Both fields are put together to an expanded e-mail address such as:
Shop Team <[email protected]>
Use Send date to set when the newsletter will automatically be sent to subscribers, in case you do not
want to send immediately.
User Guide for Web site Administrators
Page 133
Marketing
Newsletter
The recipient address for the test e-mail is defined in the general properties of the corresponding newsletter campaign. As long as no address is entered for the test, you cannot send a test e-mail. When sending a
test e-mail, the placeholders will not be replaced by current data. No coupons are created for test e-mails.
Design
You can send the newsletter as a pure text or with formatting, images, and links. You can control these over
the Use HTML option. If you have selected No, all HTML code and formatting will be sent as text. You cannot
use a template. If you set this option to Yes, all HTML instructions will be applied to the e-mail.
The basic structure and design is selected using a template. The template is loaded into the Text field. Text
previously contained there will be deleted after confirmation.
The text and the design can be edited further in the WYSIWYG editor. See WYSIWYG Editor, on page 27.
Note: Newsletter templates are pre-set. You cannot modify them. To be able to create your own newsletter template, you can create a newsletter with your own design, duplicate it and use the duplicate to
send a new newsletter.
Contents
The content of a newsletter can contain manually-created text and contents from the database, such as
product and customer data.
Insert customer data using placeholders. The available placeholders can be found in the Placeholder box
on the right side of the text field. To insert a placeholder in the Text field, click its name. It will be inserted
in the field at the current cursor position. When sending the newsletter, the relevant information will be
substituted for the placeholders. For customers who subscribed to the newsletter as non-registered users,
you can only use the Display name placeholder for the display name. No data is stored for the other placeholders.
Product and category data are entered into the newsletter from the tray at the current cursor position. To do
so, click Add products and categories from tray.
You must provide your customers with the opportunity to unsubscribe. Use the Infotext about unsubplaceholder for this. This placeholder inserts a link next to the text in the newsletter that the customer can use to unsubscribe from the newsletter, if desired.
scribing
You can also send coupons with newsletters. After selecting a coupon campaign, two new functions are activated that you can use to put coupon data into the text. See Coupons, on page 135 and especially the
section Using coupons in newsletters, on page 137.
Creating the newsletter content
Before you can edit the newsletter content with product and coupon data, place the corresponding products in the tray and create a coupon campaign.
Create the content as follows:
1.
2.
3.
4.
5.
6.
7.
8.
9.
Set the Use HTML option to Yes.
Enter a fitting subject for the e-mail to make your customers curious.
Select a template.
Write and design your text.
Add placeholders at the correct places.
Make sure unsubscribe text is present. If not, insert the relevant placeholder.
Add products from tray.
Select the coupon campaign.
Enter the desired coupon data.
Page 134
User Guide for Web site Administrators
Coupons
10.
11.
12.
13.
14.
Marketing
Check the content and design in the WYSIWYG editor.
Send a test e-mail. Note sure that the placeholders show example data in the e-mail.
Check the name and the sender address.
Set a mailing data if you want the newsletter to be sent automatically.
Save your entries by clicking Save.
Sending the newsletter
A newsletter can be sent in the following ways:
-
Enter a mailing data.
Click Send now.
After the newsletter has been sent, the corresponding data can no longer be changed and the newsletter
cannot be sent again. You can use the Duplicate function to create a copy of the newsletter which you can
use to edit or send out.
Note: No newsletters can be sent in test shops; the Send now button is disabled.
Newsletter details – Recipients
Page: Marketing >> Newsletter >> General >> [campaign] >> Newsletter >> [newsletter] >> Recipients
Recipients are customers who have received the corresponding newsletter. The table lists all the recipients
of the current newsletter.
Coupons
Page: Marketing >> Coupons
Coupons are an important marketing instrument to motivate existing customers to buy and to reach new
customers. Using coupons, you can provide absolute or percentage-based price reductions that you can attach to specific conditions. These are conditions such as using specific delivery and payment methods as
well as purchasing specific products. A coupon can only be redeemed if the order fulfils these criteria.
Coupons are organized into campaigns. The campaign includes a code as well as all other parameters and
settings. For editing the details of a campaign, the following tabs are available.
Coupons - General
You can change the following settings here:
-
-
Type and size of the discount
Minimum value above which the coupon can be redeemed
Length of the validity period for the coupons in the campaign
Number of coupons that can be used
(The setting for this action is meant as follows: ‘The first 100 customers that buy this product receive...”)
Single or multiple usage of coupons
For example, if you place a coupon in the newspaper, multiple customers can use it.
Coupons - Validity
The table lists all the conditions that limit redemption of a coupon for the current campaign. If no entries
are in the table, customers can redeem the coupons without any restrictions.
User Guide for Web site Administrators
Page 135
Marketing
Coupons
The various entries are inserted into the table from the tray. For more on working with the tray, see Tray, on
page 18.
The conditions of the same type are connected with an OR. Conditions of different types are related by
AND.
You have included a specific product, the payment method Cash and the delivery method Pick up in the
table. To be able to redeem a coupon from this campaign, a customer has to order the product entered and
select the delivery method Pick up and the payment method Cash.
Example 2: You have three products (Product 1, Product 2, Product 3), which you would like to send using
the Special delivery delivery method and would like to offer your customers a coupon for this. Apply the
three products and the delivery method in the table. To be able to redeem a coupon from this campaign, a
customer has to order Product 1 or Product 2 or Product 3 and select the delivery method Special delivery.
Coupons - Coupon codes
You can generate coupon codes with the following methods:
-
Manual creation
Proceed as described in Adding records, on page 21.
-
Automatic generation using the code generator
Enter the number of codes in the Number field and click Generate codes automatically.
-
Creating new coupon codes using newsletter dispatch
See Using coupons in newsletters, on page 137.
If you do not want to distribute the coupons to your customers through a newsletter, you can export the
generated coupon codes into a text file using batch commands and then distribute them to your customers
via other channels.
Notes
Note the following: when working with coupons:
-
Coupon campaigns can always only be created for one currency. To offer coupons for the same event
using another currency, you need to create a separate campaign.
All coupons remaining in the possession of customers after the deletion of a campaign which are not
redeemed lose their validity and are no longer recognised by the system.
Deleted coupon codes lose their validity and can no longer be redeemed by customers.
An entry field for entering the coupon code is made available to the customer in the shopping basket.
However, this field is only displayed if there is at least one coupon campaign valid at the current time.
If you specify the validity period of coupons, remember to respect any statutory provisions regarding
the validity of coupons (for example, in Germany for 3 years).
The Redeemed column is a good indicator of the success of your marketing promotion, since you can
see here how well the coupon campaign was accepted.
You can see whether a coupon was used in the order details.
Creating coupons
To create coupons and make them available to your customers, proceed as follows:
1. Create a coupon campaign.
Page 136
User Guide for Web site Administrators
Product recommendations
Marketing
Enter all required values into the table. Save your entries by clicking Save. Allocate a meaningful
name. Note that you cannot then change the selected currency any more. You can edit all other properties in the general details.
2. Enter the general details for the campaign.
Add a description to further explain the name. Describe clearly why and for what reason you are issuing coupons, so that there are no misunderstandings when they are redeemed. This especially applies
to coupons to which specific conditions are attached.
3. Define the conditions of validity.
If you want to stipulate further conditions for the redemption of the coupon, set them on the Validity
tab. Use the corresponding products, payment, and delivery methods from the tray.
4. Create the coupon codes.
Enter your coupon codes manually or have them be generated automatically. For more information
about this, see Coupons - Coupon codes, on page 136. If you want to distribute the coupons to your
customers through a newsletter, you do not need to assign coupon codes. See Using coupons in newsletters, below.
Using coupons in newsletters
First, create a coupon campaign, see Creating coupons, on page 136.
Note: You do not need to generate any coupon codes. The system generates a new code for each newsletter that is sent.
All available coupon campaigns are listed in the newsletter details in the Coupon campaign selection field.
Select the desired campaign.
After selecting the coupon campaign and clicking Save, the following special functions are shown:
-
A new placeholder for the Coupon code
Place the Coupon code placeholder in the newsletter text. When sending the newsletter, a separate
coupon code is generated and entered for each customer.
-
The Insert coupon template button
This allows you to add not only the code but also additional information about the coupon campaign.
The customer receives with the newsletter the name and description of the coupon campaign, the price
reduction the coupon provides, and the coupon code itself.
Save your entries by clicking Save.
Product recommendations
Page: Marketing >> Product recommendations
A product recommendation comprises sending an e-mail with a link to a certain product. The product recommendation is sent by customers to other customers, in the product detail view (Tell-a-Friend). The Recommend product link is displayed in the shop for this purpose on the product detail page.
User Guide for Web site Administrators
Page 137
Marketing
Product inquiries
Caution: For the system to be able to send product recommendation e-mail messages when this function is enabled, the event must be activated in the e-mail settings. For more information, see E-mail settings, on page 54.
Product inquiries
Page: Marketing >> Question about product
This allows you to provide your customers with the ability to send you questions or notes about the products in your shop.
Caution: For the system to be able to send questions about products by e-mail, the event must be enabled in the e-mail settings and you must have entered a recipient address. For more information, see Email settings, on page 54.
etracker statistics
etracker Web controlling (www.etracker.de) is an Internet application for evaluating user data. This data is
recorded and analysed in real time. Use these numbers to evaluate and influence the success and effectiveness of your Web page.
After setup, you can use this function for a limited amount of time. Etracker normally offers recording and
reporting of visitors, click behaviour, pages opened, click behaviour, click paths, viewing times, and so on.
After the test phase is completed, you will be requested to select a service package. If you do not select a
service package, you can only use a limited amount of the statistics features.
You can also use etracker to evaluate how your customers click on your Web pages. Etracker provides the
Clickmap and Heatmap functions for this purpose. The Web site is ready for this analysis and sends the required data to etracker. In order to use the functions, you need to enable the Transfer as URL parameter option in the etracker administration. Contact your etracker support contact for more information.
Note: If you use etracker, you must notify your customers about it. Add this to the content of your privacy policy.
General
Page: Marketing >> etracker statistics >> General
You can register automatically with etracker on the page.
If you are registered with etracker, this is where you enter your etracker registration data, and where you
can manage the basic settings for search engine campaigns. The tab is divided into the following sections:
-
Set up etracker account; see Create etracker account, below
Registration data; see Registration data, on page 139.
Search engine reporting; see Search engine reporting, on page 139
Create etracker account
If you have not yet registered with etracker, you can sign up here automatically. Once you have entered the
registration data, this section will no longer be displayed.
Enter a password, complete the password confirmation and click Set up account. Use this password to
sign in to the etracker administration.
Page 138
User Guide for Web site Administrators
etracker statistics
Marketing
Customer number, Security code, and Direct Login Bookmark will be entered automatically in the registration information.
You can also register automatically in the Set-up assistant.
Registration data
If you have already registered with etracker, enter your registration information in the corresponding fields
here. This includes the Customer number, Security code, and Direct Login Bookmark.
You can find the Security code in your etracker administration at Settings >> Setup/Tracking code.
You can create the Direct Login Bookmark in your etracker administration under Settings >> Personal settings.
Save your entries by clicking Save.
After you save the registration data, the Show etracker statistics link and direct login bookmark are displayed. Click this to go to your etracker administration.
The statistics displayed depend on your contract with etracker.
Search engine reporting
Using etracker, you can evaluate how easy it is to find your Web site using search engines such as Google
or Yahoo. You must create a campaign to do this in etracker of the type search engine (generated index).
Use the campaign assistant for this.
After creation, you can read the code parameter out of the campaign details. It takes the following form:
var et_se=3;
Enter the number, in this case 3, in the field of the same name on the Search engine reporting in the general etracker details in the website administration.
Save your entries by clicking Save.
Pages
Page: Marketing >> etracker statistics >> Pages
The table lists all the pages that can send information to etracker. Select the check box in the Enabled column for the pages for which information should be sent.
You can also specify an importance value for the individual pages. This defines how important it is for you
that your customers view these pages. Using the etracker statistics, you can then evaluate which of the
pages that you consider important are actually visited by your customers.
Select the corresponding importance for the page using the drop-down menu. The most important pages
are allocated the setting 10.
Save your entries by clicking Save.
Note: Depending on your page cache settings, you will need to update your pages after saving them.
For information about this, see Page cache, on page 37.
To view the records and statistics for your Web site, open your etracker administration page.
User Guide for Web site Administrators
Page 139
Marketing
Google Analytics
Google Analytics
You can analyse the usage of your web site using Google Analytics. After this you must register with Google
Analytics. After registration, you select the pages whose data is sent to Google. In your Google Analytics
account, you can see the statistical data for individual pages statistically prepared for you.
Note: If you use Google Analytics, you must notify your customers of this. Add this to the content of
your privacy policy.
Product portals
Page: Marketing >> Product portals
Product portals are Internet platforms that collect and offer products of various merchants in a single catalogue. They are also product search engines that help customers find and compare products and which
contain a direct link from the product to the merchant's shop. For you as the merchant, this can be used to
offer your products to a larger group of possible customers. To do so, you must export your products to the
respective platform.
The table lists all the available product portals.
A list of country platforms exists for each portal. You can export your products to these platforms. The installed languages and currencies determine the available countries; see Country settings, on page 50.
Every country platform must be configured separately. To do this you must enable the platform. This can be
done by selecting the relevant check box in the Active column and saving the entries by clicking Save.
The settings for each country platform are edited in the following tabs:
-
General:
By and large these are common setting options; see General settings, below. Specialised parameters are possible; see the chapters on the individual portals.
Products: The product list is edited for all platforms in the same way; see Product list and export,
below.
etracker reporting: All platforms are edited in the same way; see etracker reporting, on page 141. Differing contents are possible.
Note: The portals do not support HTML coding in the product descriptions. The HTML codes are automatically removed during export to allow you to use your product descriptions in the portals.
General settings
Page: Marketing >> Product portals >> [portal] >> General
To use a portal, you must register there. A link to the registration page is available for every portal. In addition, there is a link to the home page of the portal.
During registration on the portals, you receive your sign-in data such as merchant login or merchant ID. For
some portals, you must enter this sign-in information into the shop administration in the general details for
the corresponding country platform.
Note: Due to security reasons, passwords are displayed as asterisks in the entry field irrespective of
their original length.
If you would like to transfer all products to a country platform, set the option, Export all products to Yes. In
this case, the corresponding product list will be ignored. The Products tab is inactive. Although the prodPage 140
User Guide for Web site Administrators
Product portals
Marketing
uct list cannot then be edited, any assignments remain. New products are automatically considered during
the next export.
You can decide with variation products whether only the master product or all product variations will be
exported. The option becomes active when Export all products is set to active.
You must enter a delivery method for your products. Customer must be information about a possible delivery method on the portal.
You can edit the display of your products on the portal by choosing which images and description texts will
be transferred.
You can set up the automatic export for many portals. The export and uploading (if required) are repeated
automatically at set intervals. This updates modified product information on the platform. This is also an
advantage primarily for the portals which remove products from the catalogue after a certain time, for example, Google Base after 30 days. This allows you to keep your products up-to-date in the portal catalogue.
The Export button becomes active when the Export all products option is set to Yes or products are added
to the product list.
If the platform requires the export file to be uploaded to it, the Upload button is displayed. This becomes
active when all parameters are set correctly and the export file is generated.
Note: Once you have configured all the parameters and an interval, test the settings manually using
Upload. This way you can make sure that the parameters are set correctly for the automated upload
process.
Product list and export
Page: Marketing >> Product portals >> [portal] >> Products
On the Products tab, you can manage products that are exported to the corresponding platform.
The table lists all the products which are to be exported.
Caution: The products can only be exported to a portal if the prices are specified for the tax model that
is used by the portal. For example, if the portal expects prices that include tax, you must have specified
only the gross (tax included) prices for the products, and no others.
To export products, go to the General tab of the relevant platform and click Export.
When products are included in the export file, the system checks whether all the requirements on format
and content have been met. If a product does not fulfil one of the criteria, an error is displayed after the
process is complete. There are two classes of errors – simple errors where the data can be automatically
corrected in such a way that the product can be exported and serious errors where the product cannot be
exported.
etracker reporting
Page: Marketing >> Product portals >> [portal] >> etracker reporting
Etracker allows you to monitor the efficiency of a portal connection. Using statistics, you can generate a
cost-benefit analysis for each platform. This provides you with full control over your costs, and a tool that
will allow you to manage your work with individual portals.
User Guide for Web site Administrators
Page 141
Marketing
Product portals
To do this, the etracker functionality must be available in the Web site administration. The etracker functionality, which is activated for your Web site by default, is based on the Basic services from etracker. To
configure an etracker campaign, you must book the tracking 5000 with etracker.
The basis for the reporting are URL parameters you enter on the etracker reporting tab for each country
platform. Each platform has its own parameters. These parameters are linked to the products which are exported to the platform. If a customer is forwarded to your shop through the portal, the platform is recognised by the parameters and the transactions are evaluated by etracker.
The parameters can only be generated through your etracker account in the channel of an etracker campaign. You must create a channel in a campaign for each country platform in etracker.
The parameters are displayed in the details of the corresponding channel in the following form:
URL: http://server/epages/Testetracker02.sf/?et_cid=5&et_lid=5
Transfer these parameters in the URL parameters field on the etracker reporting tab of the corresponding
country platform of the portal.
In addition to this, Pangora also has sub-channels. When you export products to Pangora, these are distributed by Pangora to the attached portals. To allow etracker to evaluate the portal via which the customer
was forwarded to your shop, relevant sub-channels are displayed in the statistics. You can create, for example, a Pangora Germany channel. Pangora then distributes your products to portals such as Fireball.de
and freenet.de. In the etracker statistics, the Pangora Germany channel contains sub-channels for Fireball
and freenet. Pangora uses abbreviations for the sub-channels. Contact Pangora for an explanation of these.
Amazon
In contrast to other product portals, the products are not sent to Amazon in an export file. Each product
must be matched to an existing product in the Amazon catalogue. After successful assignment, the product
can then be activated online at Amazon.
To publish a product with Amazon, do the following
1. Activate the corresponding Amazon country platform on the Product portals page.
2. Open the detail page and enter the access data.
3. Open the Products tab.
4. Paste the product using the tray or by directly entering the product number.
5. Click the product name.
6. Select an Amazon product from the list and click Assign.
7. Enter the required information in the offer details fields and save all entries by clicking Save.
8. Click Set offer online.
Note the following: when exporting products to Amazon:
-
-
-
If a product code is saved for a product, it is automatically assigned to an Amazon product. If no product exists at Amazon with this code, no assignment is possible. A product must be created at Amazon
with this code.
You can enter a product code directly. All Amazon products with this code are then shown. Assign your
product to one of the displayed Amazon products. The code is also saved as the product code in the
product details.
You cannot create any new Amazon products from the shop administration.
The product name will be used as the standard for the search for offers. If no offers are shown for your
product, change the search term in the search box and restart the search.
You must assign each variation individually for variation products.
If you would like to delete an offer from the Amazon catalogue, in the MBO in the details of the corresponding Amazon portal under Products, execute the End offer batch command.
Page 142
User Guide for Web site Administrators
Product portals
Marketing
Offer details
After the assignment, the details of the offer are shown. These data are listed in the Amazon catalogue.
Enter the price that you would like to charge in Amazon. The list price is entered by default.
Enter the delivery duration and article condition. If you would like to provide information or notes about the
product for your customers, enter these into the Condition field.
If you place the offer online, it is sent to Amazon immediately. It is not shown in the Amazon catalogue immediately because Amazon edits the data.
If you set an offer to offline, is is invisible in the Amazon catalogue but is still exists within the Amazon system.
PriceMinister
Unlike other product portals, the products are not sent to PriceMinister in an export file. Every product must
be assigned to an existing offer in the PriceMinister catalogue. Only following assignment can the product
then be activated on PriceMinister.
To publish a product on PriceMinister, proceed as follows:
1. Activate the relevant PriceMinister country platform on the Product Portals page.
2. Access the detail page and follow the steps specified there as far as entry of your PriceMinister access
data.
3. Access the Products tab.
4. Add the product from the clipboard or by entering the product number directly.
5. Click on the product name.
6. From the list select a PriceMinister product and click Assign.
7. Enter the necessary data into the offer details and save all entries with Save.
8. Click Activate offer.
Note the following when exporting products to PriceMinister:
-
-
-
New products can only be listed by merchants who are Pro members of PriceMinister. A fee is payable
for Pro membership.
If a product code is stored for a product, it is automatically assigned to a PriceMinister product. If there
is no product with this code on PriceMinister, no assignment is possible. First, a product for this code
must be created on PriceMinister.
You can enter a product code directly. All PriceMinister products with this code will then be displayed.
Assign your product to one of the displayed PriceMinister products. The code will simultaneously be
stored as product code in the product details.
You cannot create any new PriceMinister products from shop administration.
In the case of variation products, you must assign every variation individually.
To delete an offer from the PriceMinister catalogue, run the batch command End offer in the MBO in the
details of the relevant PriceMinister portal under Products.
Offer details
Following assignment you will see the details of the offer. This data is listed in the PriceMinister catalogue.
Enter the price that you wish to obtain for your product on PriceMinister. The list price of the product is already entered.
Specify the article condition. If you wish to enter information or pointers about the product for your customers, enter them in the field Condition note.
User Guide for Web site Administrators
Page 143
Marketing
Social Web
When you activate the offer, it is immediately transferred to PriceMinister. However, it is not immediately
displayed in the PriceMinister catalogue because PriceMinister is still processing the data.
Own portals
Page: Marketing >> Product Portals >> Own Portals
To connect to other product portals here you can export your product data in the format determined by you.
To do so, follow the steps listed in the MBO.
If you do not want to export all products, specify the products to be exported on the Products tab.
Comments concerning CSV files
The export takes place in file format CSV. For CSV files the following are some of the special features which
apply:
-
Individual data records are separated by a line break.
Values within a data record are split by a defined separator such as a comma.
To use special characters such as spaces or commas within a value, this value is placed in quotation
marks.
Problems can result when processing CSV files with Microsoft Excel. For more information, see Editing
CSV files with Microsoft Excel, on page 32.
Social Web
The social web is defined by creating and managing relationships through the Internet. Contents, opinions,
and various other information is exchanged between users. Platforms for this include Facebook, Twitter,
and Mister Wong.
This network offers opportunities to publicise the contents of your website or your shop. This provides you
with additional channels through which you can present your products or your services. You improve your
market profile and profit from rating functions.
In the shop administration, you have various functions which allow you to connect your web site with Facebook, Twitter, and various other portals. These other portals are listed under the Social bookmarks term.
In the following chapters, we describe how you can use these connections.
How to connect your website to Facebook
Visitors can use the Like button to rate your website. In addition, they can also see how many other users
liked this page. You can use this to show how well-known and liked your website is. In order to use this
function, you don't have to be registered with Facebook.
You can place the Facebook button on the product detail pages or on other pages. In addition to the Like
button, you can show visitors images of their Facebook friends who like the displayed page as well. For
this, the customer must be signed in to Facebook in the background.
The corresponding settings for the product detail pages can be found here: Marketing >> Social Web >> Fa-
cebook >> Facebook button.
On other pages, add the corresponding gadget from the Social web group in a text field.
In addition, you can display the data of your Facebook page on the website. To do this, you can use the
Like box gadget. In the box, the image and name of the Facebook page, your current messages on this
Page 144
User Guide for Web site Administrators
Google AdWords
Marketing
page and a list of friends that like this page is shown. The prerequisite for this is that you have created a
page for this at Facebook. Enter the URL of this page in the settings for the gadget (Facebook page field).
Another possibility is the display of products from your shop on your Facebook page. Here you can either
display the products on the home page or promotional products. If visitors click on one of these products,
they are brought to your shop. The corresponding settings can be found here: Marketing >> Social Web >>
Facebook >> Shop in Facebook.
How to connect your website with Twitter
Enable your visitors to talk to friends about your website. To do this, put a Tweet this button on product detail pages and other pages. This enables your visitors to share the URL of the current page immediately
within a tweet with their followers.
The corresponding settings for the product detail pages can be found here: Marketing >> Social Web >> Twit-
ter >> Button "Tweet this".
On other pages, add the corresponding gadget from the Social web group in a text field.
You do not have to be registered with Twitter to use this function.
If you actively twitter, provide your visitors with the ability to follow you. Use the Follow me button gadget
for this. Use this function to keep your customers up-to-date with information about your website.
Show your customers tweets about a search term that has a meaningful connection to your website. This
allows you to offer your customers external short information that extend the contents of your website. To
do so, use the Twitter search gadget.
If you would like to show your visitors the tweets of a specific twitter user, place the Show tweets gadget on
your pages. You can set the user name in the gadget settings.
How you use other social bookmarks for your website
Use this link to allow your visitors to publish the URL of a specific page on the corresponding service and
supplement this with comments. This allows you to make sure that your website is shown in the relevant
communities.
The corresponding settings for the product detail pages can be found here: Marketing >> Social Web >> So-
cial Bookmarks >> General.
On other pages, add the corresponding gadget from the Social web group in a text field.
Google AdWords
Google AdWords allows companies to place their ads quickly and easily into Google's search results (both
in the right-hand column and in the top, shaded, horizontal area) as well as in partner advertising networks
(in other search engines using Google technology and on websites with advertising by Google AdWords
advertisers). Via Google AdWords, companies can place their advertisements so that they will be displayed
to potential customers for search requests that relate to the services of that company.
Advertisers who create a campaign in Google AdWords can:
-
have their advertisements displayed to a strongly segmented target group according to location and
language.
administer their desired budget.
also select the keywords for their advertisements just like the advertisement texts.
change these settings at any time.
User Guide for Web site Administrators
Page 145
Marketing
-
Trusted Shops Certification
expand the campaigns to different formats and devices (image advertisements, video advertisements
and interactive advertisements as well as campaigns in Google Maps or on mobile devices).
Advertisers only pay if a user clicks on the advertisement and thus accesses the soliciting website.
You can find additional information about Google AdWords and the registration of the campaign under the
following link: http://adwords.google.de/
You can also find free AdWords Online courses at:
http://support.google.com/adwords/bin/static.py?hl=de-419&page=webinars.cs
Trusted Shops Certification
Page: Marketing >> Trusted Shops Certification
Your customers require a high level of security for online purchases. Certification from Trusted Shops
(www.TrustedShops.de) ensures this security for your customers and helps build trust in your shop. Along
with checks for security and data protection, Trusted Shops also offers a money-back guarantee and comprehensive customer service.
Your shop is optimally prepared for certification with Trusted Shops.
When the check is successfully completed, you will receive a Trusted Shop ID from Trusted Shops.
Enter the Trusted Shop ID in the entry field. Save your entries by clicking Save. You must enter your own ID
for each language.
You then have the right to display the Trusted Shops quality seal in your shop. There are two navigation elements which you can place on your Web site for this purpose. For more information, see Page elements
and navigation, on page 119.
If you have not saved a Trusted Shops ID, the Trusted Shops page element will not be displayed on the
Web site.
Trusted shops offers various templates, for the contact information or customer information that match legal requirements. In Related topics, click on Sample formulations from Trusted Shops to view the texts
with Trusted Shops.
eBay
eBay offers are products that you upload to eBay and sell during an auction there.
To do so, you have to assign additional parameters to the product data that are necessary for the auction
there. If you are unsure about the meaning of these parameters or how to use them, they are explained in
depth on eBay.
In the shop administration, the eBay assistant helps you to enter all required data and parameters and to
send the offer to eBay. For more details, see Item settings/eBay assistant, on page 148.
To be able to enter offers into eBay, you must be registered as a seller with eBay and have the corresponding eBay accounts. For information about the settings required, see eBay settings, on page 60.
In order to sell your products over eBay, do the following:
1. Register with eBay as a seller.
Page 146
User Guide for Web site Administrators
eBay
Marketing
2. Set up your eBay account and perform additional settings. See eBay accounts, on page 61 and General
settings, on page 61.
3. Create a template that you would like to use to present your products on eBay. See Templates on page
62.
4. Prepare the corresponding products and place these in the tray.
5. Create the default values for your offers that are automatically set for each offer. See also Default values, on page 150.
6. Add products from tray into the table of eBay offers.
7. Look at the values in the offer details and change them if necessary.
8. Have your offer confirmed by eBay.
9. Send the offer to eBay.
10. Update all offers in the table.
11. If the customer has paid at eBay, an order is created from the offer that can be seen in the Offers
point.
Items
Page: Marketing >> eBay >> Items
The table lists all the eBay offers with their current status.
To view the item offered on eBay, click the item item number.
In the Current bid column of the items table, you can see the current bid for the item, as well as how many
bidders have bid on the item. If you offer more than one product for sale, the number of products that have
been bid on is displayed in brackets.
The coloured bar in the Current bid column shows the relationship between the current price and the sales
price in the shop. An arrow marks the current value. The colour fields have the following meanings:
Table 12: colour fields for item price
Colour
Description
red
Item price is lower than the shop price
yellow
Item price is similar to the shop price
green
Item price is higher than the shop price
The following specialised batch commands can be performed:
Table 13: specialised batch processing commands for eBay items
Command
Comment
Duplicate
When you duplicate items for sale and finished items, the new item is created in the start status.
Repeat an item
Copies of an item can be placed automatically in set intervals.
The start item must be defined as a planned item with set start time.
In the first step, select the start item and run the command. Next, you must
set the repeat intervals. Enter the interval between items and specify how
often the items should be created. Execute the command by clicking Create.
If the product is not available and the option Cannot be added to shopping
basket or Set to "Not Visible" is enabled in the product settings, the item
cannot be uploaded automatically to eBay.
Verify
You can only test items that are not yet for sale on eBay or that are already
finished.
Offers that have not yet been verified cannot be placed on eBay.
User Guide for Web site Administrators
Page 147
Marketing
eBay
Command
Comment
Upload to eBay
The selected items are placed on eBay immediately, irrespective of a
planned start time.
The item must have been successfully verified.
Delete
Items that are for sale on eBay or are finished are only removed from the
table and not deleted in the eBay system.
Update all items
Queries the state of all items on eBay
You can also upload the item to eBay when it is generated. Select the Upload as an eBay item immediately
check box before saving the entry or importing the item from the tray. The item will be checked and sent to
eBay. The default values will be used for new items; see Default values, on page 150.
It is also possible to create a new item from a product directly. For more information, see eBay, on page
79.
To open the details of an offer, click the name. As long as the item has not been sent to eBay, you can edit
the details. See Item settings/eBay assistant, below. Details of items which are for sale on eBay and of
closed eBay sales are displayed in an overview. They cannot be changed. There is also an Orders tab in the
offer details. All orders pertaining to this offer item are displayed here. The table is comparable in composition and function to the table for all eBay items. For more information, see Orders, on page 151.
Item settings/eBay assistant
Page: Marketing >> eBay >> Items >> [item]
The eBay assistant helps you create, edit, verify, and upload eBay items.
Apart from the product information, which is imported from the shop, all other parameters are eBayspecific.
The assistant contains multiple steps that can be performed sequentially as well as in any order.
Caution: To save the information you have entered or modified on individual pages, you must change
page by clicking the Next >> or << Previous buttons. The information is only saved if you do this. If
you change pages using the links in the tab headings, the changes are not saved. The same applies if
you leave the assistant without confirming your changes via Next >> or << Previous.
To start the assistant, click the name of an item in the eBay items table.
Title
Through the selection of the eBay account, you can select on which eBay platform the offer will be placed.
For more information, see eBay accounts, on page 61.
Caution: Payment and delivery settings are lost if you change eBay accounts. This is because they depend upon the country platform and are imported again when you change.
The subtitle includes a short description of the item, and which is displayed on the eBay page and also in
the gallery directly under the name of the item.
The description contains the item description that is shown to eBay bidders.
Note: Due to security reasons, eBay restricts the use of active page contents such as JavaScript, Flash,
and so on. If you use such elements in your description, your pages might not be displayed properly on
eBay.
Page 148
User Guide for Web site Administrators
eBay
Marketing
The template determines the presentation of your product on the eBay page. Define selection list of templates in the eBay settings. See Templates, on page 62. To use a template for the current offer, select this
in the Template drop-down menu and click Load template.
Save your entries by clicking Next>>.
Category
Each item must be assigned to at least one specific eBay category. The following methods exist for category assignment:
-
Enter the category number directly in the Category 1 field.
Select the category from the Recently selected categories drop-down menu. After selection, the number
is entered into the Category 1 field.
Select a category from the catalogue structure. You can only select a category if an option button for
this category is displayed in the Selection column. Click the respective category. The option button is
marked and the number is entered into the Category 1 field.
You can also assign the item to additional categories. There is one entry field for each category. The assignment procedure is the same as for the first category. The currently active entry field is indicated by an
arrow.
If you own an eBay shop, you can also import the item into two categories used by your eBay shop. Select
the target categories in the Categories in your eBay shop selection fields.
Save your entries by clicking Next >> or << Previous.
Details
This is where you define settings that affect the sequence of events for the item. These are the same settings you edit when you place an item on eBay directly.
Consult eBay for more information about the usage, function, and any costs of the individual parameters.
Note: If you set the Accept returns option to Yes, you should specify the conditions under which you
will accept returns in the item description.
Depending upon the selected category, various product traits are displayed that you can fill out. Use these
in order to make your item more visible at eBay.
Save your entries by clicking Next >> or << Previous.
Layout
This is where you define settings that affect the presentation of the item on eBay. Consult eBay for more information about the usage, function, and any costs of the individual parameters.
In the drop-down menus for image types, all images are listed that you have available for the product. See
also Product details – Images, on page 71. The address of the image is automatically entered in the respective entry field. If you would like to link to an image which is not listed in the drop-down menu, enter
the address of the image in the entry field.
You can test whether the image is available at any time by clicking Preview.
Save your entries by clicking Next >> or << Previous.
User Guide for Web site Administrators
Page 149
Marketing
eBay
Delivery
This is where you define the delivery methods you wish to offer to your eBay customers. Each eBay country
platform offers certain delivery methods, which are listed in a drop-down menu.
There is a list for domestic delivery and a separate table for international delivery. A maximum of three delivery methods can be selected for domestic delivery.
Select each method you wish to offer individually and allocate a price to it. Save your entries by clicking
Save.
A universal method is available, which refers to the description of the item. Use this if none of the methods
offered applies to you. Note that you must also enter a price here.
If you do not select a delivery method, eBay will automatically refer to the description or recommend contacting you as the seller.
Go from page to page by clicking Next >> or << Previous, or click the tab headings.
Payment
This is where you define the payment methods that you wish to offer to your eBay customers. Each eBay
country platform offers certain payment methods, which are listed in a drop-down menu.
Select a method for each and save your entries by clicking Save. You have to select at least one method. A
universal method is available. This refers to the description of the item. Use this if none of the methods offered applies to you.
For certain items, the selection of the payment method PayPal is required. In this case, you will be notified
about this during the item verification.
Go from page to page by clicking Next >> or << Previous, or click the tab headings.
Verification
The last step of the eBay assistant consists of verifying all settings. If all entries are correct, the item can be
placed on eBay.
Click the Verify button or Activate scheduling to test your settings. If all the information is correct, the fees
for the offer are displayed. You can place the item on eBay by clicking Upload to eBay or Upload to eBay
Now. Scheduled items are placed on eBay at the entered start time.
Once an item is for sale on eBay, the parameters can no longer be changed.
Default values
Page: Marketing >> eBay >> Default values
There are many settings for an item, and many properties are the same for most items. For this reason, you
can assign standard values to these parameters to avoid having to enter them again for each item.
An overview of all default values is displayed on this page. The areas shown correspond to the steps of the
eBay assistant.
You can change these default values at any time. To do this, click the link Customise default item values.
You are transferred directly to the corresponding page of the eBay assistant. For more details, see Item settings/eBay assistant, on page 148.
Page 150
User Guide for Web site Administrators
eBay
Marketing
Changes to the default values are only valid for the products that are included in the list of eBay items after
the changes.
Orders
Page: Marketing >> eBay >> Orders
As soon as a bidder buys your product or wins your auction, this item is marked as closed and entered into
the table of eBay orders.
The individual columns have the following meaning:
Table 14: table columns for eBay orders
Column name
Comment
Item
Initial offer for the order. The icon indicates the eBay platform.
User account
eBay user who won the item
Click the icon to send an e-mail message to the address in the user's eBay
profile.
Price
Price for which the item was won
Customer
Name of the bidder in the customer administration of the shop;
When the details of a customer are transferred from eBay for the first time,
the system creates him as an unregistered customer. The eBay e-mail address is saved as well. During further data transfers, the customer is identified using this e-mail address and all eBay orders for this customer are bundled.
Order
Order number, when sale has been finalised;
Otherwise, a notification is issued that the customer has not yet finalised
the order.
Feedback
Displays the feedback for this item. For more information, see General settings, on page 61.
Orders that the customer has not finalised within 3 days are marked in the Orders column with the icon. In
a case like this, you can remind your customers to complete their purchase via e-mail. Use the corresponding batch action for this.
The following batch commands can be performed:
Table 15: Batch processing commands for eBay orders
Command
Comment
Send feedback
The Feedback and the Feedback text fields contain the default settings from
the eBay settings; see General settings, on page 61. These entries can be
changed if necessary.
The command sends the feedback information entered for all selected
items.
Resend reminder mail
After the item ends, the buyer receives an automatically generated e-mail,
requesting him to make payment and thus to complete the transaction. See
also Configuration of notification e-mail, on page 61.
This command sends a reminder e-mail to customers that have not finalised
the transaction.
Note: You can only provide feedback for each offer once. You cannot make a correction by submitting a
second rating. As a seller, you can only provide positive ratings for buyers.
User Guide for Web site Administrators
Page 151
Marketing
eBay
After payment by the customers with eBay, a corresponding order is created. You can display and edit these in the Orders item. eBay orders are indicated in the list of all orders by the eBay icon.
Page 152
User Guide for Web site Administrators
Glossary
13. Glossary
Administration area
The Web pages that the technical administrator can use after signing in, to
fulfil his responsibilities.
Administration page
The Web page displayed after signing in, where all functions are listed. You
can access all the functions you need from this page. The menu bar and
sidebar, and the working area, are embedded here.
Administrator
The operator of a Web site. This Web site allows the Administrator to provide
content and also offer products and services. The available functions are
provided according to the type of Web site selected. Moreover, there are
comprehensive options for customising the design and layout of the site.
Attribute
A freely-definable descriptor for a product or customer. Attributes are used
to define properties, for example, prices, dimensions, colours, and so on.
Attribute types
You can define various types of variables. The type of variable controls how
it is processed by the system. For more information, see Attribute types, 23.
Batch processing
A command that affects multiple elements at one time;
This option is offered in tables where multiple instances of the same action
can be combined into a multiple or batch process, for example, deleting
multiple lines in a table at once.
Button
A function area on Web pages used to trigger actions;
They are usually graphically designed to look like buttons.
Caps-lock key
A key that switches on capitalisation permanently. Deactivate this feature by
pressing the key again. When this key is activated, this is usually indicated
by a small light on the keyboard.
Catalogue
This term describes the entire inventory of all the products. The catalogue is
the equivalent of a mail-order catalogue. Categories are used to set up
structured hierarchies.
Category
A subgroup of a catalogue;
Categories act as containers for product groups, such as computers, office
supplies and shoes.
Check box
A field in a form which is selected or cleared by clicking it with the cursor. It
is used to make specific selections.
Cookie
A small file containing text information that is sent from a Web server to a
Web browser. This information is saved on the hard drive and can be retrieved later. Cookies are often necessary for Internet applications. See also
Session cookies.
Currency format
A currency-dependent format for price information. The system formats the
prices according to the set currency.
Default setting
The status of the attributes;
If this status has been set, the attribute or the value will be used as the
default value until the user makes a different selection.
User Guide for Web site Administrators
Page 153
Glossary
Duplicate
This creates an exact copy (apart from the ID). This is helpful, for example,
when creating products from a template product (if one exists), from which a
majority of the attributes can be transferred.
Entry field
This is a field in a form where the user can enter information.
Favourite
Web pages that are opened and used repeatedly. A favourite page is saved
as a link in a special folder and can be opened with a single click.
FTP
File Transfer Protocol;
FTP is a method of transmitting data over networks. This is used to transfer
files between different computers, regardless of the operating system and
location.
HTML
(Hyper Text Markup Language) source code for Web pages that determines
how the content is displayed.
Individual HTML formatting instructions are called HTML tags.
ID
This is a unique identifier that is used to locate a data element (product,
customer, attribute, etc.). The ID is used in the database and is not the same
as the name displayed on the Web site.
Furthermore, IDs serve to uniquely classify data when exporting and importing and to manage objects in multiple languages.
Link
A link to another Internet page or to a document.
Localisation
Preparation of the data and content of a Web page so it can be displayed in
another language. Some attributes can be localised. This means that you
can enter different values for these attributes in different languages. They
are then displayed in the respective language, for example, descriptions or
names.
Merchants
The merchant is an administrator who sells products online. The Web site
and Administration provide the additional functions required for this task.
Multifunction bar
Area of the Web page that contains various functions for editing content.
Similar functions are classified into function groups. For more information,
see Multifunction bar and content, on page 92 and Multifunction bar and
content, on page 115.
Name
Name of a language-dependent object or method in the administration area
and on the Web site. In this way, a descriptive name can be displayed in any
language on the Web pages.
Navigation bar
Active area with a structure of links for selecting specific functions.
Navigation history
Navigation bar that shows how you arrived at your current location in the
program. The individual hierarchy levels are shown as links so that you can
go backwards one step at a time.
Option button
A field in a form which requires you to make a decision;
Option buttons allow you to select just one option from several possible
options.
Page 154
User Guide for Web site Administrators
Glossary
Page elements
PangV
Page elements are functions or functional areas that you can place on your
web site and move using drag & drop. You can place the page elements in
quick design or in advanced design.
Examples of page elements:
- Tree view of pages as box
- Signing in
- Link to home page
- Country selection using flags
German Price Indication Ordinance;
This sets forth which regulations a merchant must observe when setting
prices in Germany.
For a version of these regulations in German, see
http://bundesrecht.juris.de/bundesrecht/PangV/
Path / File path
Information about the location of a file on a storage medium, for example,
C:\windows\system32\notepad.exe.
Pixel
A pixel is the smallest graphical unit that a computer can display.
Provider
Providers provide hardware and software solutions. Usually, consulting
services are also offered.
Reference unit
The base unit of quantity used for comparing products by reverse calculating
the price of the products. For more information, see Reference unit, on page
70.
Session cookies
A session cookie is a piece of text that is written to the browser's memory
when specific Web pages are opened (at the beginning of a session). This
session cookie provides the authorisation details needed for you to use all
the functions on the Web site. After signing out or closing your browser (to
end a session), the session cookie is deleted.
Shop
A Web site that provides functions that allow products to be sold online.
Merchants can use this to build up an Internet sales channel.
Shop types
Product of the provider that he sells or leases to merchants or shop operators. Each shop type is provided with specific functions and in varying price
classes. Merchants create their own shops by selecting from among these
shop types.
Sign in/signing in
A procedure for obtaining access to an application by entering a user name/
e-mail address and password. Frequently, the combination of both a user
name/e-mail address and password is called sign-in information.
Sub menu
A menu, the functionality of which changes according to the chosen working
area.
Text field
The field in a form where you can type a large amount of text. This can be
used to compose descriptions or other information. Text fields can be edited
using a WYSIWYG editor. For more information, see Working with text fields,
on page 27.
Tool tip
A short informational text that is displayed automatically when you move
the cursor over a specific area. The presence of a tool tip is often indicated
by an icon next to an entry field.
User Guide for Web site Administrators
Page 155
Glossary
Upload
If you want to publish files or pages on the Internet, you must copy them to
a server. This copying procedure (from a local computer to a foreign computer) is called uploading.
URL
An abbreviation for Uniform Resource Locator, the unique Internet address
of a Web page. The URL is used to open the page in a browser.
Variable
Variables are placeholders for concrete values which are first entered by the
user or program when the Web site is online.
Visibility
The status of data; this determines whether these data can be seen by the
customer in the Web site or not.
Web site
An Internet application that contains all the functions required to offer
products or services or content. This application generates the Web site on
the basis of a predefined type configured by the provider. The Administration area allows the layout and design of the site to be customised and the
content to be managed.
The portion of the administration page in which data and tables are displayed and managed. The content depends on the function selected in the
menu.
Working area
Page 156
User Guide for Web site Administrators
Index
14. Index
Currencies
A
Accessories
Address
Administration navigation
Administrator data
Alternative items
Amazon
Attribute types
78
38
17
35
78
142
24
Customer options
24
Date
25
Date and time
25
Decimal number
24
File
25
Integer
24
Language-dependent file
25
Language-dependent options
24
Language-dependent text
24
Language-dependent text with value selection
24
Money
24
Options
24
Text
24
Text with value selection
24
Time
25
yes/no
24
Swiss Franks
53
Customer details
Customers
85
85
Address data
Billing address
Customer groups
Customers accounts
Customers attributes
Data synchronisation
Delivery address
New order
Orders
Sign in
Special attributes
User data
85
86
87
85
88
87
86
87
87
86
86
86
D
Datasheet view
General
Images
Pages
Products
93
95
94
94
Default settings
Deferred payment
Deletion
23
49
Deletion confirmation
B
35
Delivery method
Booking system
Bookings
Business hours
105
109
39
Weight of the products in the shopping basket
45
Delivery method
Shopping basket total
C
44
Delivery methods
Categories
Category
Contact information
Content page
Privacy policy
Right of withdrawal
Terms and conditions
91
97
98
97
99
99
98
Content area
Country settings
113
52
Countries
Currencies
Languages
Regions
53
53
52
53
Coupons
Creating the UPS control number
Cross-selling
Accessories
Alternative items
References
Related products
Currencies
User Guide for Web site Administrators
135
128
78, 79
78
78
78
78
53
43
Dependencies
Exemption limit
Number of products in the shopping basket
Shipping method DHL
48
44
45
45
Delivery options
General details
Selection
Delivery options
Dependencies
Design
Design basics
Downloadable products
Downloads
49
49
49
48
111
111
68
E
eBay
Account
Authentication
Default values
Items
Orders
79, 146
61
61
150
147
151
Page 157
Index
Settings
Templates
60
62
Editing the design
E-mail events
114
Special cases
56
E-mail settings
System e-mail structure
E-mail settings
E-mail settings - Events
etracker statistics
Create account
Pages
Registration
Registration data
Search engine reporting
Export
Categories
Customer export
Product export
55
54
55
138
138
139
138
139
139
31, 32
Subscription
131
Adressees
Create new
Create newsletter
General details
Texts
Newsletters
General details
132
131
131
132
131
133
133
O
Options
Usage
26
Order tracking
Orders
128
125
Details
Documents
Edit details
Editing mode
UPS packing slip
102
88
83
F
132
Newsletter campaigns
125
127
126
126
128
ORders
Favourites
Shopping basket settings
19
Own styles
G
Google Adwords
145
H
Help
History
Horizontal areas
20
19
113
I
P
Page cache
Page elements
Page view in browser
Pages
Home page
Link
Promotional products
Payment methods
Icon set
Images
Import
Categories
Customer import
Product import
116
29
31, 32
57
121
Credit card, manual
Customer groups
Deferred payment
37
119
115
96
97
98
46
48
47
49
102
88
83
Portals
Preislisten
32
Price lists
81
23
Price lists
Price lists
Details
82
Navigation
119
Price lists
Loading times
Logistics
38
50
Import file
79
Customers
82
Advanced settings
L
Language-dependency
Layout
M
Marketing
Multifunction bar and design
131
115
N
Newsletter
Creating content for
Recipients
Page 158
134
135
Shopping basket discount
PriceMinister
Prices
Product bundles
Bundle products
Product inquiries
Product portals
Product portals
Product recommendations
Product references
Product reviews
Product settings
81
82
143
75, 76, 77
66
67
138
79
140
137
78
83
58
User Guide for Web site Administrators
Index
Auto Cross-selling
Availability
Product comparison
Texts
Product types
Attributes
Layout
Source product type
Value selection for attributes
Products
Bulk discount
Category
Comparison price
Create individual product
Create new
Creating a downloadable product
Creating a new product with variations
Creating a product bundle
Customizable products
Customization
Delivery entries
Description
Discount calculation
Images
Inventory
Prices
Quantity discoun
Search
Special attributes
Value discount
Variations
59
59
60
59
79
80
81
80
80
65
76
72
69
65
65
68
66
66
69
74
70
70
78
71
70
75
76
84
71
77
72
R
Related products
Registration
18
144
22
37
121
Templates
122
T
Tables
Adding records
Batch processing in tables
Deleting records
Editing records
Selecting in tables
Sorting using sorting keys
Tax areas
Tax calculation
Tax classes
Tax matrix
Tax models
Text fields
WYSIWYG-Editor
Usage
Tray
Trusted Shops Certification
Free delivery
20
22, 84
120
60
60, 82
37
62
Uploading images
User administration
User management
Registration
Sign in
Commands
Settings
Texts
Shopping basket discount
Shopping basket settings
User Guide for Web site Administrators
Variations
Cross-selling
Extending with variation assisstant
Variation assistant
Vertical areas
Visibility
W
57
57
57
Web site updating
Web site views
Working area
WYSIWYG editor
82
42
41
42
41
43
27
27
25
18
146
29
39
40
40
38
V
44
Shopping basket
21
22
21
21
22
22
U
Utilisation
Save
Search
Search on the web site
Search options
Search statistics
Settings
Settings for order documents
Shipping methods
21
Text with value selection
78
S
58
Sidebar
Social Web
Sorting keys
Status
Styles
72
79
74
73
113
23
38
20
18
27
Page 159
The information contained in this document is subject to change without notice at any time.
This document and all of its parts are protected by copyright. All rights, including copying, reproduction, translation,
storage on microfilm and all forms of archiving and processing in electronic form are expressly reserved.
All corporations, products, and trade names are trademarks or registered trademarks of the respective owners.
Copyright © 2012 ePages Software GmbH. All rights reserved.
User Guide for Web site Administrators
Page 160