1
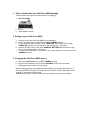
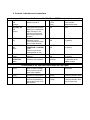
Vital Force MKIII user guide.
Introduction
Thank you for purchasing the Vital Force MKIII Potentiser. You have chosen a product that has
been ergonomically designed whilst keeping functionality to a maximum. The Vital Force MKIII
has been researched and tested over many years in Australia and by international affiliates. It
represents the latest in innovations of Homeopathy, combining modern technology and proven
methods to bring you an effective reliable and powerful Potentiser.
Please read through this manual to familiarize yourself with the controls and functions to get the
most out of your new equipment. With proper care you will get many years of un-compromised
operation from the Vital Force MKIII Potentiser.
Index
1.
2.
3.
4.
5.
6.
7.
Parts included with your Vital Force MKIII package
Setting up your Vital Force MKIII
Charging the Vital Force MKIII
Controls, Indicators and connections
Instructions for ‘Copying’ substances
Instructions for ‘Potentising’ substances
Using the ‘Invert’ function
1. Parts included with your Vital Force MKIII package
(Please check that all parts are included within the packaging)
a. Vital Force MKIII
b. Lid x 2
c. Power Adapter charger
2. Setting up your Vital Force MKIII
a. Carefully remove the Vital Force MKIII from its packaging
b. Ensure the power switch is selected to the 'OFF / CHARGE' position
c. Turn on the power switch and the orange ‘POWER ON’ LED will light (if the orange
'POWER ON' LED does not light then go to the charging step – see below)
d. Press the 'START' button (if the green 'RUNNING / BATTERY OK' LED does not light
then go to the charging step – see below)
e. Your new Vital Force MKIII is now ready for use – simply switch the unit off to cancel the
‘RUNNING’ process
3. Charging the Vital Force MKIII (note 1)
a. Select the ‘Power Switch’ to the ‘OFF / CHARGE’ position
b. Plug the Power Adapter (note 2) into the ‘CHARGER’ socket on the rear panel
c. Allow approximately 24 hours to fully charge
*note 1: Charging is only recommended when the battery will no longer power the unit, i.e.
when the ‘BATTERY OK’ light does not light when the ‘START’ button is depressed. Avoid
“topping up” the battery for best results
*note 2: Using any other adapter other than the unit supplied may void your warranty
4. Controls, Indicators and connections
Controls and Indicators of the Vital Force MKIII front panel
a.
b.
‘POWER ON’
LED
(Orange)
‘RUNNING /
BATTERY OK’
LED
(Green)
c.
‘TIME LOG (mins)’
dial
d.
‘OFF / CHARGE –
ON’
switch
e.
‘START’
button
‘INVERT –
POTENTISE’
switch
f.
Indicates when the power
switch is turned on
g.
‘MULTIPLIER’
LED’s
(Red)
‘MULTIPLIER’
dial
Provide a visual indication
of the selected
‘Multiplication factor’
Selects the ‘Multiplication
factor’
Indicates when the unit is
running and also that the
battery is in a satisfactory
state of charge. If this
LED does not light then
the unit may need to be
charged
Sets the time the
Potentiser runs for
(This does not shut down
the unit when finished)
Sets the Potentiser to
POWER ON or CHARGE
mode
(Note: the unit cannot
recharge when in use)
Starts the process
selected
Select to either ‘Invert’ or
‘Potentise’ the substance
h.
I.
‘POTENCY x100’
dial
Selects the 100’s value of
the potency
j.
‘POTENCY x10’
dial
Selects the 10’s value of
the potency
k.
‘POTENCY x1’
dial
‘COPY’
selection
Selects the units value of
the potency
Shows the position to set
the Potentiser to the
‘COPY’ function
l.
Connections of the Vital Force MKIII Rear and Top Panel
m.
‘CHARGER’
Socket
n.
‘INPUT’ BNC
socket
‘OUTPUT’ Socket
o.
Plug the supplied plug
pack into here to charge
the unit (do not use any
other power adapter)
Plug any external source
into here for convenience
Plug an external probe
into here for potentising
objects that cannot fit into
the canisters
p.
Input Plate
The source should be
placed here
q.
Output Chamber
(Small)
Output Chamber
(Large)
The source will be copied
to the item placed in here
The source will be copied
to the item placed in here
(use for large vials)
r.
5. Instructions for ‘Copying’ substances
a. Turn the power switch to the ‘ON’ position
b. Select the ‘TIME LOG’ to the appropriate length of time
c. Ensure the ‘POTENTISE / INVERT’ switch is set to the ‘POTENTISE’ setting*
* See section 7 for invert function
d. Set the ‘MULTIPLIER’ dial to the ‘COPY’ position
e. Set the ‘POTENCY x100’ dial to the ‘COPY’ position (Note 1)
f. Press the ‘START’ button and leave all items in place until the ‘RUNNING LED’ has
turned off
* Note 1: With the ‘MULTIPLIER’ and ‘POTENCY x100’ dials set to ‘COPY’ the other dials
will have no effect
6. Instructions for ‘Potentising’ substances
a. Turn the power switch to the ‘ON’ position
b. Select the ‘TIME LOG’ to the appropriate length of time
c. Ensure the ‘POTENTISE / INVERT’ switch is set to the ‘POTENTISE’ setting*
* See section 7 for invert function
d. Set the ‘MULTIPLIER’ dial to the appropriate position
e. Set the ‘POTENCY’ dials to indicate the appropriate position for the potency required in
Units (x1), 10’s(x10) and 100’s(x100).
f. Press the ‘START’ button and leave all items in place until the ‘RUNNING LED’ has
turned off
7. Using the ‘INVERT’ function
The ‘INVERT’ function is simply to invert the substance. To do this set the ‘INVERT /
POTENTISE’ switch to the ‘INVERT’ position. Follow the other instructions as normal.