1
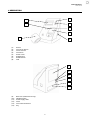
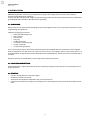
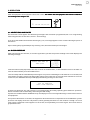
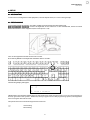
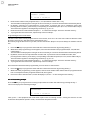
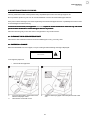
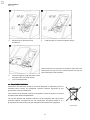
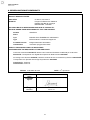
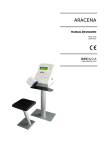
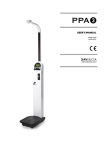
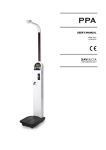
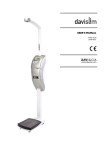
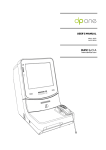
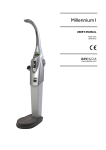
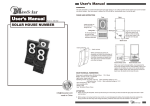
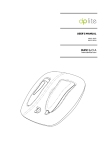
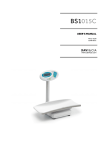
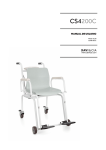
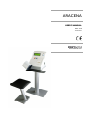
ARACENA
USER’S MANUAL
MA01-02/B
15/09/2011
www.davicia.com
USER’S MANUAL
MA01-02/B
INDEX
Page
2
1. DESCRIPTION
2. INSTALLATION
2.1. Unpacking
2.2. Location and setting
2.3. Startup
3
3
3
3
3. OPERATION
3.1. Advertising and prices
3.2. Blood pressure
3.3. Printed results
4
4
4
5
4. SETUP
4.1. Accounting
4.2. Programming
4.2.1. Time setting
4.2.2. Date setting
4.2.3. Price programming
4.2.4. Programming advertising
4.2.5. Programming the ticket
4.2.6. Accounting receipt
6
6
6
7
7
7
8
8
9
5. MAINTENANCE AND CLEANING
5.1. Cleaning the blood pressure cuff
5.2. Paper roll change
5.3. Equipment disposal
10
10
10
11
6. TECHNICAL SPECIFICATIONS
12
7. WARRANTY CERTIFICATE
14
8. CE DECLARATION OF CONFORMITY
15
1
USER’S MANUAL
MA01-02/B
1. DESCRIPTION
2
1
3
6
7
5
8
(1)
(2)
(3)
(4)
(5)
(6)
(7)
(8)
4
Screen
Coin return button
Coin insert slot
Coin hatch
Printer cover
STOP button
START button
Cuff
9
12
10
11
13
14
(9)
(10)
(11)
(12)
(13)
(14)
Back door (maintenance only)
ON/OFF switch
Power supply cable
Fuses
Coin collection drawer
Key
2
USER’S MANUAL
MA01-02/B
2. INSTALLATION
ARACENA equipment comes factory configured according to the voltage of each country and is ready for
operation immediately after unpacking.
Connect the device to the power supply via the power supply cable. It is necessary that the outlet is provided with
grounding. Adapters should not be used without grounding.
2.1. UNPACKING
Remove the security tape and the packaging protecting the appliance. Do not use any sharp instruments, as they
might damage the equipment.
Inside the packaging you will fi nd:
o The Aracena blood pressure
o User’s manual
o Coin box key
o 1 key ring
o 4 table lock screws
o 2 roll of heat-sensitive paper
o 1 paper roll spindle
o 1 programming keyboard
For its security and comfort, the Aracena must be placed on the supplied table. Attach the four screws supplied
with the equipment. On the base of the Aracena there are four protrudings used as stops where there is a
screwed drillhole. Facing the Aracena base drillholes with the table drillholes, attach the screws at the back side of
the table.
Read the instructions carefully before connecting the Aracena blood pressure.
2.2
2.2. LOCATION AND SETTING
Set the equipment in a place flat and level, where it is perfectly supported. This last point is of vital importance to
proper operation.
2.3
2.3. STARTUP
o
o
o
o
Connect the equipment to the power supply.
Actuate the switch on the back.
At this point the equipment will perform the process of self-test.
If the process of self-test completes successfully, the screen displays the price of the service and the current
time.
3
USER’S MANUAL
MA01-02/B
3. OPERATION
After the equipment startup appears the home screen. This means that the equipment has done the calibration
successfully and is ready for
for use.
14:08 24/01/06
Pantalla de Inicio
3.1. ADVERTISING AND PRICES
On the home screen appear the advertising messages that have been programmed (see 4.2.3. Programming
advertising) and the current time ( see 4.2.1. Time setting)
If you press the START button before inserting any coin, a message appears on the screen indicating the price of
the service.
Upon reaching the programmed price by inserting coins, the measurement process begins.
3.2
3.2. BLOOD PRESSURE
After inserting the price amount, an acoustic signal alerts you that the process will begin. The screen displays the
following message:
PLACE THE ARM IN
THE CUFF
Insert the left arm (fully exposed) in the cuff, as shown in the illustration, so that the elbow rests on the table. To
start the measurement press the START button.
You hear a beep and the cuff inflated process begins. The process of inflating the cuff takes 10 to 15 seconds, and
stops when it reaches a pressure of 180 mm Hg. If the process takes over 45 seconds, then a failure has occurred.
In that case, the ARACENA will stop and display the following message on the screen:
OUT OF SERVICE
CALL YOUR SERVICE
If pulses are detected, the cuff pressure is increased another 60 mmHg repeating pulse detection operation.
Pulses reached in cuff are: 80 mmHg , 240 mmHg and 300 mmHg.
If pulses are still detected the ARACENA stops and displays an error message indicating to remove the arm from
the equipment.
If no pulse is detected for 5 seconds, the equipment will assume that the cuff pressure has exceeded the systolic
pressure. The display shows the cuff pressure, which gradually descends at a rate of about 3 mmHg / sec. Each
time a pulse is detected, a heart appears on the screen, accompanied by an acoustic signal. The screen shows a
graph of heart rate.
4
USER’S MANUAL
MA01-02/B
If the cuff pressure falls below 40mmHg, an error will occur and ARACENA will stop before completing the
measurement. The screen will display an error message indicating to remove the arm from the equipment.
The pressure falls to 0 mmHg. Then, the display shows the values obtained:
MAXIMUM: 132 mmHg
SYSTOLIC
MINIMUM: 64 mmHg
DIASTOLIC
69
bpm
WARNING: Do not self-medicate based on measurements made with the equipment.
3.3
3.3. PRINTED RESULTS
Upon completion of the selected measurements, the equipment automatically prints a receipt with the obtained
results including the recommended values for each measurement performed.
5
USER’S MANUAL
MA01-02/B
4. SETUP
4.1. ACCOUNTING
To issue an accounting ticket of the equipment, see the chapter below, 4.2.6. Accounting receipt.
4.2. PROGRAMMING
To proceed to the programming, we need a standard computer keyboard with USB or PS2.
With the equipment turned off,
off connect the keyboard to the connector on the motherboard, which is located
behind the rear door of the equipment (see 1. Description - # 9).
Turn on the equipment and wait for the home screen.
Press the key HOME on the keyboard and hold it down 5 seconds.
The following display will appear:
>>
12:39 o 15/09/11
IMPORTANT: Use the BACK SPACE key from the keyboard to make sure the screen cursor is at the beginning of
the line, right next to the symbol>. Otherwise, when you type to access the programming options, the equipment
will not recognize the entered code.
The options that are accessed through the user menu are:
PH
PF
Time setting
Date setting
6
USER’S MANUAL
MA01-02/B
PT
PP
PA
PC
Programming the ticket
Price programming
Programming advertising
Receipt
Keyboard operation
We will use the keyboard to enter all data. When using the programming menu, it’s important to consider the
following functions:
Key
HOME
ESC
↵
Function
Enter the programming mode
Exit the programming mode
Confirm selection
4.2.1. Time setting
Press the PH keys to set the time and then confirm the selection by pressing the key
The screen displays the following message:
↵
TIME (HH:MM)
12:39 o 15/09/11
Use the keyboard to enter the hours and the minutes, separated by a colon. Press the ↵ key to save the
information. For example, in order to enter 15 hours 35 minutes, type:
1 5 : 3 5
NOTA: Recuerde que la hora se introduce en formato de 24 horas, de 0 a 24
4.2.2
4.2.2. Date setting
Press the PF keys to set the date and then confirm the selection by pressing the key
The screen displays the following message:
↵
DATE (MM.DD.YY)
12:39 o 15/09/11
Use the keyboard to enter the month, day and year in this order, each separated by a period. Press the ↵ key to
save the information. For example, to enter the date of 23rd March 2006, type:
2 3.0 3.0 6
4.2.3. Price programming
Press the PP keys to set the price of the service and then confirm the selection by pressing the key
The screen displays the following message:
PRICE
12:39 o 15/09/11
7
↵
USER’S MANUAL
MA01-02/B
Use the keyboard to enter the desired amount and then confirm the selection by pressing the key
Si If you want the blood pressure to work without coins, enter a price of 0.
↵
NOTE: If switch 7 of the motherboard of the equipment is ON, the tensiometer will always work without coins,
regardless of whether there is a programmed price.
4.2.4
4.2.4. Programming advertising
This option can be used to set the text that will appear on the screen as a static message, distributed in 5
successive screens. To program the message, there is a total of 99 characters available (blanks are also
considered characters).
Press the PP keys to set the advertising text and then confirm the selection by pressing the key
The screen displays the following message:
↵
ADVERTISING
12:39 o 15/09/11
Enter text using the keyboard, the text appears on the screen.
Once you have entered all the text, press the ↵ key to save it in the memory.
NOTE: The text is entered all at once; however the ARACENA arranges it on the 5 available screens by cutting it
into strings of 20 characters.
4.2.5. Programming the ticket
We have four lines at the top of the ticket and 19 lines at the bottom of the ticket, with 23 characters (normal
mode) and 11 characters (expanded mode) for each line.
Key
Sample
Character Type
Characters per line
Normal
23 characters
F1
Horizontally expanded
11 characters
F2
Vertically expanded
23 characters
F3
Doubly expanded
11 characters
NOTE: By default, the equipment performs text programming in Normal mode.
Keyboard operation
Key
F8
F9
Function
Delete a line
Indicate end of ticket
Programming of the ticket header
Lines 1 through 4 contain the header of the ticket and are used to program the pharmacy data (name, address,
phone, etc.).
1.
Press the PT keys to program the ticket and then confirm the selection by pressing the key ↵
The screen displays the following message:
8
USER’S MANUAL
MA01-02/B
TICKET: (LINE)
12:39 o 15/09/11
2.
3.
4.
5.
Enter the line number to be programmed (1, 2, 3 or 4) and then confirm with ↵ key.
The selected line is displayed on the right of the screen and you can enter the desired text with the keyboard.
By default, characters are represented in normal mode. To present the text in a different mode, after
pressing the line number, press the key corresponding to the desired option (F1 to F3, see the table of keys).
This information appears at the beginning of the line, p. eg. F2 = 2>.
Enter the text for the selected line and press ↵ to confirm the changes. The text is saved in memory.
To program the other ticket lines, repeat the process from Step 1.
Programming the foot of the ticket
The foot of the ticket can be programmed to have 16 lines, from 24 to 40. This area is ideal to advertise other
pharmacy services (eg., Special formulas, homeopathy, etc.).
No need to program the 16 lines if you wish, but the "end of line" (Steps 6 to 8) must always be stated in the last
line.
1.
2.
3.
4.
5.
Press the PT keys to program the ticket and then confirm the selection by pressing the key ↵
When the ticket programming screen appears, enter the line number to be programmed (24 - 40) and then
confirm with ↵
The selected line is displayed on the right of the screen and you can enter the desired text with the keyboard.
By default, characters are represented in normal mode. To present the text in a different mode, after
pressing the line number, press the key corresponding to the desired option (F1 to F3, see the table of keys).
This information appears at the beginning of the line, p. eg. F2 = 2>.
Enter the text for the selected line and press ↵ to confirm the changes. The text is saved in memory.
To program the other ticket lines, repeat the process from Step 1.
Once all the text lines have been programmed, you must set the “end of ticket”:
6.
7.
8.
Press the PT keys to program the ticket and then confirm the selection by pressing the key ↵
When the ticket programming screen appears, enter the line number which follows the last programmed text
line. For example: If the last programmed line is 28, then type 29.
Press F9 to select “End of ticket” (screen will display 9>). Press ↵ to save changes in the memory.
4.2.6
4.2.6. Accounting receipt
receipt
Press the PC keys to program the accounting receipt and then confirm the selection by pressing the key
The screen displays the following message:
↵
ACCOUNTING
12:39 o 15/09/11
Then, press ↵. The equipment will issue three copies of the accounting receipt – stating the amount of coins
inserted to date (whether partial or total) – and will reset the partial counter.
9
USER’S MANUAL
MA01-02/B
5. MAINTENANCE AND CLEANING
The only maintenance that can be performed by unqualified personnel is the change of paper roll.
Do not perform repairs on your own. In case of breakdown contact the Technical Support Service.
If the power cable is damaged, it must be replaced by the Technical Support Service or qualified personnel in order
to avoid dangerous malfunctioning.
To ensure accurate results, the equipment ARACENA requires an annual maintenance check that only authorized
personnel from the Davi & Cia Technical Support Service can perform.
Clean the unit using only a soft cloth. Do not use gasoline or any similar solvent.
5.1. CLEANING THE BLOOD PRESSURE CUFF
Clean with a cloth soaked in a mixture of water and detergent. To dry, use a dry cloth.
5.2. PAPER ROLL CHANGE
When the ARACENA runs out of paper, it stops working and the following message is displayed:
ERROR
PRINTER
To change the paper roll:
o
1.
2.
Switch off the equipment
To access the printer, remove the cover
where is the paper cutter
Unscrew the screw with a coin
3.
Take out the empty paper roll and replace it with a new
one
10
USER’S MANUAL
MA01-02/B
4.
Pull the lever to open the printer
mechanism
5.
Feed the paper 2 ½ inches though the slot (C)
NOTE: If results are not printed on the paper check that it has
been placed correctly, since it is a thermal printer and only one
side of the paper is heat sensitive.
6.
7.
Insert the paper through the paper-cutter
located on the cover of the printer
Turn on the equipment
5.3.
5.3. EQUIPMENT DISPOSAL
All electrical and electronic products should be disposed of separately from the
municipal waste stream via designated collection facilities appointed by the
government or the local authorities.
This crossed-out wheeled bin symbol on the product means the product is covered
by the European Directive 2002/96/EC.
The correct disposal and separate collection of the equipment will help prevent
potential negative consequences for the environment and human health. It is a
precondition for reuse and recycling of used electrical and electronic equipment.
11
USER’S MANUAL
MA01-02/B
6. TECHNICAL SPECIFICATIONS
Model:
Manufacturer:
Display:
Weight:
Maximum external
dimensions:
Cuff:
Type:
Capacity:
Measurement range:
Blood pressure:
Heart rate:
Measurement methods:
Measurement accuracy:
Static pressure:
Power supply:
Consumption:
In operation:
Temperature:
Humidity:
Printer:
Paper width:
Fuses primary circuit:
Power supply 230V:
Power supply 115V:
Fuses secondary circuit:
(On board):
Classification according to
Measuring Instrument
standards and applicable EC
Directive
Applicable Standards:
ARACENA
DAVI & CIA
C/Murcia 35 nave G
E08830 Sant Boi de Llobregat
Barcelona – SPAIN
LCD Graphic
240 x 64 pixels
12 kg (aprox.)
46 x 37 x 37.5 cm
Cylindrical 13 x 13
Min. 20 cm / Max. 35 cm
40 to 300 mmHg in div. 1 mmHg
40 to 200 bpm
Oscillometric method
+/- 3 mmHg
230V~, 50/60 Hz
115V~, 50/60 Hz
In operation, max. 50 VA
0 ºC to +40 ºC
30 % to 75 %
Thermal printhead
8 dots/mm.
384 dots/line, 32 characters per line.
Speed = 40 mm/s.
58 mm
2 x 0.5 A 5 x 20 mm, type M
2 x 1.0 A 5 x 20 mm, type M
1 x 2.0 A 5 x 20 mm, type M
Directive 93/42/CE Class IIa
SEGURIDAD ELÉCTRICA / Electrical Security
UNE EN 60601-1 (1990) + A1 (1993) + A11 (1993) + A12 (1993) + A2 (1995) + A13
(1996)
EN 60601-1-2 & EN 50081-1:
EMISIÓN ELECTROMAGNÉTICA / EM Emission.
-EN 55011 / A1
-EN 55014-1 (1993) / A1 (1997)
-EN 55022 (1994) / A1 / A2
-EN 61000-3-2 (1995)
-EN 61000-3-3 (1995)
EN 60601-1-2 & EN 50082-1:
INMUNIDAD ELECTROMAGNÉTICA / EM Immunity.
-EN 61000-4-2 (1995): Descarga electrostática / ESD;
-EN 61000-4-3 (1996): Campo radiado EM de RF / EM radiated field of RF;
12
USER’S MANUAL
MA01-02/B
-EN 61000-4-4 (1995); Ráfagas de transitorios rápidos / EFT burst;
-EN 61000-4-5 (1995); Ondas de choque / Surges;
-EN 61000-4-6 (1996): RF en modo común / RF common mode;
-EN 61000-4-8 (1993): Campo magnético a 50 Hz / 50 Hz H field;
-EN 61000-4-11 (1994); Interrupciones de alimentación / Dips, interruptions.
13
USER’S MANUAL
MA01-02/B
7. WARRANTY CERTIFICATE
We provide a 1-year guarantee from the date of purchase. The guarantee covers manufacturing defects or
defects occurring as a result of normal use and operation.
It excludes all removable parts such as batteries, wires, power supply devices, etc. Faults falling within the
guarantee period shall be rectified free of charge upon presentation of the purchase receipt for the appliance. No
other rights can be taken into consideration.
Return shipment is at the customer's expense if the appliance is anywhere other than at the customer's
headquarters.
In the event of damage during shipment, guarantee rights will be granted only if the appliance is shipped in the
original packaging. You are therefore recommended to keep the original packaging.
Following expiry of the guarantee period, all services requested will be dealt with by our specialist technicians at
the user's expense.
14
USER’S MANUAL
MA01-02/B
8. CE DECLARATION OF CONFORMITY
FABRICANTE PRODUCTO:
PRODUCT MANUFACTURER:
DAVI & CIA S.L.
DIRECCIÓN:
ADDRESS
C/ Murcia, 35, Nave G
Polígono Industrial Can Calderón
E08830 Sant Boi de Llobregat
BARCELONA - ESPAÑA
DECLARAN BAJO SU RESPONSABILIDAD QUE EL PRODUCTO:
DECLARE UNDER THEIR RESPONSIBILITY THAT THE PRODUCT
Nombre
Name
ARACENA
Tipo
Type
EQUIPO ELECTROMÉDICO / MECÁNICO
Electromedical / mechanical equipment
Finalidad Prevista
Intended Use
Esfigmomanómetro automático.
Automatic sphygmomanometer.
CUMPLE LOS REQUISITOS DE LAS DIRECTIVAS:
CONFORMS WITH THE REQUISITES OF THE DIRECTIVES
Conforme a la directiva 93/42/CE, relativa a los Productos Sanitarios modificada por la directiva
2007/47/CE. Transposición a la legislación española en Real Decreto 1591/2009.
According to the Directive 93/42/CE, related to medical devices as amended by Directive 2007/47/CE.
Transposition into Spanish law through Royal Decree 1591/2009.
Clasificación: Clase IIa.
Classification: Class IIa.
th
DATE: 15 April 2010
FECHA: 15 de Abril de 2010
J.Masana
Nombre:
Name
Firmado:
Signed
Cargo:
Director
Function
DAVI & CIA
15
USER’S MANUAL
MA01-02/B
This manual and other support documents are available on the web
www.davicia.com
C/ Murcia, 35 Nave G Pol.industrial Can Calderón.
E 08830 Sant Boi de Llobregat. Barcelona. Spain
Tel. +34 93 654 32 32
Fax. +34 93 654 16 62
16
[email protected]
www.davicia.com