1
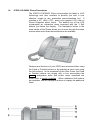
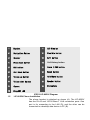
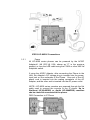
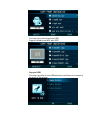
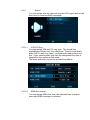
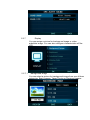
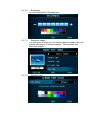
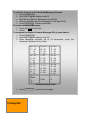
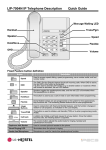
LIP-8050V User Guide LIP-8050V User Guide Issue 1.0.2 Revision History Issue 1.0 1.0.1 1.0.2 Date May 09 May 09 Jun 09 Remark Initial Release Update UI Update UI Disposal of your old appliance 1. When the crossed-out wheeled bin symbol is attached to a product, it means the product is covered by the European Directive 2002/96/EC. 2. All electrical and electronic products should be disposed of separately from the municipal waste stream via designated collection facilities appointed by government or the local authorities. The correct disposal of your old appliance will help prevent potential negative consequences for the environment and human health. 4. For more detailed information about disposal of your old appliance, please contact your city office, waste disposal service or the shop where you purchased the product. Copyright© 2009 LG-Ericsson Co. Ltd. All Rights Reserved This material is copyrighted by LG-Ericsson Co. Ltd. Any unauthorized reproductions, use or disclosure of this material, or any part thereof, is strictly prohibited and is a violation of Copyright Laws. LGEricsson reserves the right to make changes in specifications at any time without notice. The information furnished by LG-Ericsson in this material is believed to be accurate and reliable, but is not warranted to be true in all cases. LG-Ericsson and iPECS are trademarks of LG-Ericsson Co. Ltd. All other brand and product names are trademarks or registered trademarks of their respective companies. LIP-8050V User Guide Issue 1.0 Important Safety Information To prevent unexpected danger or damage please read this information before installing or attempting to repair you phone. Warning and Caution information is provided to alert the consumer of known dangers: Warning: To reduce the possibility of electric shock, do not expose your phone to high humidity areas, such as a bathroom, swimming area, etc. Caution: Use only LG-Ericsson approved batteries and desktop chargers to avoid the damage to the phone. Using other batteries or chargers voids your warranty and may cause an explosion. 1. Only trained and qualified service personnel shall install, replace or service the phone. 2. Do not spill liquid life water on the phone. If so, call the service center as this may result in fire or electric shock. 3. If you see smoke or smell something during use, unplug the power cord and the phone line. Call the service center immediately. 4. If the power adapter is used, do not touch the plug with wet hands. This may result in a fire or an electric shock or equipment damage. 6. Do not use the phone during a thunderstorm. Lightning strike may result in fire, severe electrical or acoustic shock. 7. Do not use the power adapter if the power cord or wall outlet is damaged. This may result in fire or an electric shock. 1. Ensure that children do not pull on phone cords. This may injure children or result in equipment damage. 2. The ear-piece houses a magnetic device which may attract pins or small metal objects. Keep headset clear of such objects and check before use. 3. Avoid placing the phone in an area that is excessively dusty, damp or subject to vibration. 4. Choose a site for the phone that is wellventilated and dry. 5. Do not plug multiple plug-packs into one power outlet. This may result in the plug overheating and may result in a fire or plug pack failure. 6. Do not put heavy things on the phone. 7. Do not drop or throw the phone. 8. Static electricity discharge will damage electronic components. 9. Keep out of direct sunlight and away from heat. 10. No user-serviceable parts inside. Do not insert a screwdriver or any metal objects into the phone. This may cause electric shock or damage the equipment and will render the warranty void. 11. Clean the phone with a soft, dry cloth only. Do not use volatile liquids such as petrol, alcohol, or acetone as this may cause a fire or result in discoloration or damage to plastics. Do not clean with wax or silicon products as these may enter the equipment and cause operation to become unstable. LIP-8050V User Guide Issue 1.0 TABLE OF CONTENTS 1. INTRODUCTION .................................................................................................... 1 1.1 1.2 1.3 1.4 1.5 2. General .................................................................................................................. 1 Feature Information ............................................................................................... 1 Feature Groupings ................................................................................................. 1 iPECS LIP-8050V Phone Description .................................................................... 2 LIP-8050V Phone Installation ................................................................................ 3 1.5.1 Power ......................................................................................................... 4 1.5.2 Wall Mount ................................................................................................. 5 LCD, SPEAKERPHONE & RELATED FEATURES .................................................... 5 2.1 Using the LCD ....................................................................................................... 5 2.2 Display Menu ......................................................................................................... 6 2.2.1 Preference .................................................................................................. 7 2.2.2 Contacts ..................................................................................................... 8 2.2.3 SMS Short Message Service ................................................................... 12 2.2.4 Organizer ................................................................................................. 15 2.2.5 Tools ........................................................................................................ 17 2.2.6 Sound ....................................................................................................... 25 2.2.7 Display ..................................................................................................... 26 2.2.8 Settings .................................................................................................... 28 3. LCD, SPEAKERPHONE & RELATED FEATURES .................................................. 34 3.1 Using the Speakerphone ......................................................................................34 3.2 Using a Serial DSS ...............................................................................................35 4. RECEIVING CALLS ............................................................................................. 37 4.1 4.2 4.3 4.4 4.5 4.6 4.7 4.8 Answering a Call While Idle ..................................................................................37 Responding to a Call While Busy .........................................................................37 Using Answering Machine Emulation (AME) ........................................................38 Differential Ring Signals .......................................................................................39 Answering Calls at Night.......................................................................................40 Answering Calls to Other Stations ........................................................................40 Using Do-Not-Disturb (DND) to Block Incoming Calls ..........................................41 Forwarding Calls...................................................................................................41 4.8.1 Forwarding calls to another Station or Voice Mail .................................... 41 4.8.2 Forwarding callers to a Text Message...................................................... 44 5. PLACING A CALL ............................................................................................... 46 5.1 Internal Calls.........................................................................................................46 i LIP-8050V User Guide Issue 1.0 5.1.1 Using Camp-On when calling a busy station ............................................ 46 5.1.2 Leaving a Message Wait .......................................................................... 47 5.2 External Calls .......................................................................................................47 5.2.1 Placing external CO/VoIP calls................................................................. 47 5.2.2 Waiting for the next available CO/IP line .................................................. 48 5.2.3 Account Codes: Tracking External calls for billing .................................... 49 5.2.4 Disable dialing from your phone ............................................................... 49 5.2.5 Temporarily override dialing restrictions at a phone ................................. 50 5.3 Using Automated Dialing ......................................................................................50 5.3.1 Using Last Number Redial (LNR) ............................................................. 50 5.3.2 Using and Entering Saved Number Dial ................................................... 51 5.3.3 Using System Speed Dial Numbers ......................................................... 51 5.3.4 Using and Entering Station Speed Dial Numbers ..................................... 52 5.3.5 Using Dial by Name and Entering Your Name ......................................... 53 5.3.6 Using Automatic Called Number Redial (ACNR) ...................................... 55 6. PLACING A CALL ............................................................................................... 56 6.1 6.2 6.3 6.4 Call Transfer: Sending a call to a different destination .........................................56 Call Hold: Placing a call in a waiting state ............................................................56 Broker Call: Switching between two calls .............................................................57 Joining Multiple People in a Conference ..............................................................57 6.4.1 Setting up a Conference Room ................................................................ 57 6.5 Call Park: Placing a call on Hold to Page .............................................................58 6.6 Two-Way Record: Recording a call ......................................................................59 7. SEND & RETRIEVE MESSAGES ........................................................................... 60 7.1 Responding to a Station Message Waiting Indication ...........................................60 7.2 Getting Voice Mail Messages ...............................................................................60 8. REMOTE SYSTEM ACCESS ................................................................................. 62 8.1 Direct Inward System Access (DISA) ...................................................................62 8.2 Mobile Phone Extension .......................................................................................62 9. MISC. FEATURES............................................................................................... 65 9.1 9.2 9.3 9.4 9.5 9.6 9.7 Call Log ................................................................................................................65 Background Music and Music on Hold .................................................................66 Using Internal, External and Meet-Me Paging ......................................................66 Push-To-Talk (PTT) Page.....................................................................................67 Alarm/Door Bell ....................................................................................................67 Power Fail Transfer (PFT) ....................................................................................68 System Voice Memo .............................................................................................68 10. PBX, CENTREX & ISDN FEATURES ................................................................... 70 ii LIP-8050V User Guide Issue 1.0 10.1 Access PBX or Centrex features ..........................................................................70 10.2 Access the ISDN Network ....................................................................................70 10.2.1 Using the Keypad facility to access ISDN features................................... 70 10.2.2 Using ISDN Supplementary Services ....................................................... 71 10.2.3 Activating ISDN Caller ID Restriction ....................................................... 71 11. FEATURES & FLEX BUTTONS ............................................................................. 72 11.1 Entering Station Program Data .............................................................................72 11.2 Assigning Features to Flex Buttons ......................................................................72 APPENDIX A FLEXIBLE NUMBERING PLAN ............................................................... 73 APPENDIX B USER PROGRAM CODES...................................................................... 74 iii 1. Introduction 1. INTRODUCTION 1.1 General Your telephone is connected to an advanced-technology, highlyversatile, fully-featured telecom system designed to make office communications easy and productive. Employing state-of-theart Voice over Internet Protocol (VoIP) technology, voice and data converge on a single IP packet network. Because each iPECS Phone is an IP appliance, it can be moved easily throughout the office LAN and maintain normal operation. 1.2 Feature Information We have taken every effort to make this user guide simple and straightforward. The guide starts with a discussion of the Display and the Display Menu then moves to the simpler operations of the iPECS Phone Speakerphone, on to receiving and placing calls, and then to more advanced features. Each section includes a brief and basic description of each feature and step-by-step operation instructions. The operations shown in this guide use the System‘s base default Numbering Plan. Your specific Numbering Plan may be different. Some features may not be available for you to access or may be subject to certain limitations based on the set-up of the System (refer to your System Administrator, or the iPECS Technical Manuals for further information). NOTE - Under certain operating conditions, this equipment may not be able to make emergency calls. Alternative arrangements should be made for access to emergency services. 1.3 Feature Groupings Every effort has been taken to divide the features into a logical and consistent sequence so that features can be quickly located. Features have been divided into groups, Receiving Calls, Placing Calls, etc. Within each group, features are arranged according to the difficulty of operation and frequency of use. 1.4 iPECS LIP-8050V Phone Description The iPECS LIP-8050DV Phone incorporates the latest in VoIP technology and user interface to provide you with a cost effective, simple to use, productive communications tool. It includes a 4.3‖ (480 x 272 - pixel) color graphic LCD, refer to Phone Diagrams which follow. The bottom line of the LCD incorporates an interactive menu accessed with the 3 Soft buttons just below the display. The Navigation button in the lower center of the Phone allows you to move through the menu choices when more than three selections are available. Features and functions of your iPECS are accessed either using the Fixed or Flexible buttons or by selecting a menu item using the Soft buttons. In the remainder of this User Guide, the Fixed or Flexible buttons are shown with a box surrounding the BUTTON designation while Soft button menu selections are shown with a double underline. When additional Soft buttons are available, use the navigation buttons to display the additional items. 1 Handset 11 LCD Display 2 Navigation Button 12 Flexible button 3 Speaker 13 Soft button 4 Phone book button 14 Call History button 5 DND button 15 Trans / PGM button 6 Call Back button 16 Speed button 7 Volume up button 17 Hold/Save button 8 Volume down button 18 Speaker button 9 Camera 19 Microphone 10 Ring/MWI LED 1.5 iPECS LIP-8050V Diagram LIP-8050V Phone Installation The phone handset is attached as shown (A). The LIP-8050V has two RJ-45 and 10/100 Base-T LAN connection ports. One port is for connecting to the LAN (D), and the other can be connected to a desktop data device or PC (B). iPECS LIP-8050V Connections 1.5.1 Power All LIP-8000 series phones can be powered by the AC/DC Adapter-K- (48 VDC @ 0.3A; shown as ―C‖ in the previous graphic) or over the LAN cable using the POE8 or other 802.3af compliant switch. If using the AC/DC Adapter, after connecting the Phone to the LAN, the Adapter‘s DC voltage plug is inserted into the powerinput jack on the underside of the Phone. One end of the AC power cord is inserted into the mating receptacle of the AC Adapter, and the other end is inserted into the AC power outlet. NOTE—LIP-8000 series consoles are powered through the flat cable used to connect the console to the IP phone. Up to 2(without LIP-8048DSS) or 4(with LIP-8048DSS) consoles can be chain-link connected to the phone. DSS Connection to IP Phone 1.5.2 Wall Mount The LIP-8000 series phones can be wall mounted as needed. The following instructions describe how to perform a wall mount installation. For more detailed instruction, refer to the iPECS Hardware Description and Installation Manual. 2. LCD & the Display Menu Mark and drill two (2) 7mm holes for plastic wall anchors. Insert the two (2) anchors into the holes and insert and tighten the each screw leaving about 2.5 mm (1/8-inch) of the screw exposed. Slide the LIP-8000 phone over the screws and assure the phone is secure. It may be necessary to remove the phone and tighten or loosen the screws for a secure mounting. Remove the Handset hook from the phone as shown in the figure below. Reverse the hook and re-install in the LIP-8000 phone so that the hook catches the groove in the handset receiver. 2. LCD, SPEAKERPHONE & RELATED FEATURES 2.1 Using the LCD The iPECS LIP-8050V has a 4.3‖ (480 x 272 pixel) color graphic LCD which is divided into 3 sections. The upper section consists of a line to display various icons, date, time and station number display. The middle section includes designations for the five Flexible buttons and information on the active call (called/calling party Id, feature status, etc. The lower section, which consists of a single line, is an interactive menu to guide you through feature access, User Program selections, and the Display Menu discussed below. 2.2 Display Menu The MENU button accesses the Display Menu. Use the Navigation button to highlight an item. Use the center Navigation button to select the item. When inputting a character string use the DND button to delete a character. 2.2.1 Preference You can configure the Call Preference menu and flexible button label. 2.2.1.1 2.2.1.2 Call preference You can configure the call preference items. Flexible button label You can set the label (name) for each flexible button. If the label is not set then the feature name displays. 2.2.2 Contacts You can configure call history and phone book in the contacts menu. 2.2.2.1 Phonebook You can access the Phonebook menu from the Display Menu or, while idle, with the left navigation button. In the Phone Book, you can search and call contacts by the name. Press the CALL button, to call the Main number (in yellow) or MENU to select a different number available for the contact (Mobile/Home/Office/Station). To add or edit a contact record in the Phonebook, select Add from the Phonebook menu or Edit from the Search menu. You can enter various telephone numbers, identify the Main number and select the CO line for calling the contact. use LIST for available CO codes. Scroll down; you can assign a ring tone and photo image that displays if the incoming Call ID matches an assigned contact. You can assign the CO line to use when calling a contact number. 2.2.2.2 Call History You can go to the Call History from the Display Menu or, while idle, with the right navigation button. The Call History includes several call categories, incoming calls, outgoing calls, missed calls and all calls. The display indicates time and date for the call as well as any photo assigned and the duration of the call. You can scroll and call a record from selected in the Call History. Records are sorted by category and time, most recent first. From the MENU button pop-up you can add a record from the Call History to the Phonebook, and delete a call or all Call History records. 2.2.3 SMS Short Message Service You can send SMS messages to internal stations or, with SMS service, over the public network. 2.2.3.1 New SMS You can enter and send an SMS message using edit box. To edit new message: Enter your message in the test box and check the box for recipients you desire and select SEND. 2.2.3.2 Received SMS You can check and view your received messages. The navigation button is used to move message. If you press OK button then you can view the message in detail. Select the highlighted message for the message time and number stamp. 2.2.3.3 Send SMS You can check and view sent messages. Select the highlighted message to view the recipient list and time stamp. 2.2.3.4 Delete SMS You can delete the Received, Sent or all messages. 2.2.4 Organizer You can set the alarm clock and organize your schedule. 2.2.4.1 Alarm You can configure the local phone Alarm Clock with up to ten (10) different alarm times. For each alarm, set the condition as once or repeated daily, the time, the alarm notification interval, the Ring tone group and ring tone for notification. If you lift the handset the alarm notification will cease. 2.2.4.2 Schedule You can configure your schedule from the Organizer menu to notify you of a scheduled event. You can assign up to 30 event schedules. If you press the ADD button the new schedule screen appears. The event date and time is set along with a name and ring tone group and tone for notification. To show saved schedules use the MENU pop-up to see the list of all or today‘s schedules. Today‘s scheduled events are displayed in yellow. 2.2.5 Tools You can record and play video and audio files and also copy from/to USB memory. 2.2.5.1 Camera You can take pictures and configure it in the photo album. You can record video and configure it in the video album. Take photo You can adjust resolution using the navigation button before you Capture a picture. Supported Resolution are: 120 x 90 320 x 240 352 x 288 480 x 272 640 x 480 Record video You can adjust resolution using the navigation button before you Record a video. Supported resolutions are: 176 x 144 352 x 288 Image gallery You can manage photo files. There are three categories Basic Images (photos stored in the phone at the factory), Taken Images (photos captured by you) and Received Images. Select a category to display the list of images and a thumb nail of the highlighted image. The highlighted can be stored as the background screen for the phone. Video album You can manage video files. There are two categories, Recorded Videos and Received Videos. Select a category to display the list of videos and a thumb nail of the highlighted video. 2.2.5.2 Audio You can record and play audio files. To record sound, select 1. Record Audio then select record to record your audio. In the Audio Gallery, you can view and manage your recorded audio files. 2.2.5.3 Internal memory You can review the internal memory status. 2.2.5.4 External memory You can review the external memory status and copy some files from/to USB memory. External memory You can review the external memory status. Copy from USB You can copy files from USB memory card that you connect to the back of the phone. You can copy image (photo) files from USB. The supported formats are jpg and png. 1. 2. Please do not remove USB while in use. If image size is over 200 Kbyte then it could not copy. You can copy audio files from USB. Support formats are MP3, AMR and WAV (CCITT u-law 8,000 kHz, 8bit, mono). You can copy video files from USB. Support formats are MP4 and 3GP. Copy to USB You can copy files to the USB memory card that you connect to the back of the phone. 2.2.6 Sound You can assign tone for intercom ring and CO ring as well as the alert tone for received SMS messages. 2.2.6.1 ICM-CO Ring You can assign ICM and CO ring type. The sound files available are divided into four categories. These include basic audio (MP3), main ring (wav), received audio and system ring files. If you select system ring then the designated ring that is assigned in the system will be used. The basic and main ring will be provided by default. 2.2.6.2 SMS Alert sound You can assign SMS alert tone, the selected tone is played when new SMS message is received. 2.2.7 Display You can assign a picture for background image or video substitute image. You can also configure characteristics off the LCD. 2.2.7.1 Background image You can select a picture for background image from one of three categories, Basic Images, Taken Photos or Received Images. 2.2.7.2 Brightness You can adjust the LCD brightness. 2.2.7.3 Substitute image You can select a picture for the video substitute image from one of three categories, Substitute images, Taken photos and Received images. 2.2.7.4 Window color 2.2.7.5 Font 2.2.7.6 Language 2.2.8 Settings From the Settings menu you can manage the Phone settings, configure network and initialize the LIP-8050. 2.2.8.1 Phone Management Under Phone management you can assign a station name, password, station number and maximum video frame rate. To register name: To change password: You can request a station number: You can assign the maximum video frame rate. 2.2.8.2 Network Configuration You can review and set some items related to your LAN and VLAN. LAN information You can review the network mode (static or DHCP), IP address, Subnet mask, Default gateway, DNS address, MAC address. LAN Configuration You can set the network mode (static or DHCP), IP address, Subnet mask, Default gateway and primary and secondary DNS address. VLAN Configuration You can set the VLAN ID and priority for both LAN port and PC port of the phone. DIFFSERV Configuration You can set the DiffServ value for voice, signals and video. Check network You can ping and trace the route to an IP address. Ping Trace route 2.2.8.3 System Configuration You can set the system IP address and connection mode (Local / Local-Remote / Remote). 2.2.8.4 Initialization You can initialize some configuration and restart phone itself. Set to default You can initialize the Call History, PhoneBook, Multimedia data, Alarm clock and schedule and configuration Settings. Reboot You can restart phone from the Reboot menu. 3. LCD, Speakerphone & Related Features 3. LCD, SPEAKERPHONE & RELATED FEATURES 3.1 Using the Speakerphone Activate the iPECS Speakerphone at any time (except for Paging) in place of lifting the handset to receive or place calls. Additionally, you may switch between the handset and Speakerphone during a call. By keeping the handset Off-hook, the Group Listen feature is activated, which provides incoming audio over the speaker with outgoing audio from the handset. This permits a local ‗group‘ to listen to both sides of the conversation without interfering with the conversation. While in a conversation using the Speakerphone, Mute the microphone using the MUTE button. When Mute is active, the display selection changes to SPEAK. To turn the microphone on, press the SPEAK soft button. With Auto Speaker Select, activating or accessing a feature by pressing its button will activate the Speakerphone automatically. When using a Headset, the SPEAKER button controls the ON/OFF-hook state for the phone. To use the Speakerphone to answer or place a call: Press SPEAKER , the phone goes off-hook and sends audio to the speaker and the microphone. To control the volume of the Speakerphone or handset: Press the VOL▲ VOL▼ button. 3.2 Using a Serial DSS The LIP-8012DSS, LIP-8012LSS, and LIP-8048DSS can be connected with the LIP-8050V using the RS-232 cable. Be sure to verify the serial DSS and LSS capacities with the iPECS System to ensure usability (refer to iPECS Manual). The following graphics show the front and rear view of each. NOTE—A Linked Pair slave station cannot use a serial DSS. LIP-8012LDSS LIP-8012DSS LIP-8048DSS 4. Receiving Calls 4. RECEIVING CALLS 4.1 Answering a Call While Idle There are 3 basic types of incoming calls; internal/external ringing calls, Intercom Voice Announce calls, and Hold recalls. Your phone may be assigned Ringing Line Preference; in this case, calls that ring are answered by lifting the handset. Otherwise, you must press the flashing Flex button. External calls to an iPECS Phone will appear under the CO/IP line or a LOOP button. External calls are from CO lines or VoIP channels that are programmed to ring at your phone. For external calls, Delay Ring may be assigned allowing others to answer the call before the call rings at your phone. Calls can be forwarded in some manner from another user; if providing call coverage for other users, you may also receive Station Call Coverage calls. Calls placed on Hold, including Transfers, parked calls, etc. will recall if left on hold for too long. ICM Voice Announce calls are answered based on the ICM Signaling mode at the receiving phone; in Hands-free (HF) mode, after the splash tone and announcement, speak normally into the microphone. In the Privacy (PV) mode, lift the handset to respond. The ICM Signaling mode can be assigned in Station Programming. The LCD will display the calling number or, if available, the name of the station or CO/VoIP line, CO Line Name Display. To answer a call ringing at your phone: Lift the handset or press the flashing Flex button (as needed), the call will be connected. To respond to an Intercom Voice Announce call: In HF mode, simply speak as normal into the microphone, OR In PV mode, lift the handset to respond. 4.2 Responding to a Call While Busy While you are busy on another call, you may receive a Muted Ring, Camp-On tone, or Voice-Over announcement. Muted Ring is provided over the speaker of your Phone indicating a Call Waiting. You also may receive Camp On tones, a burst of tone on top of the existing call, as an indication of another call waiting. While busy, certain stations can activate Voice-Over to your phone. In this case, audio is received from both the active call and the Voice-Over announcement at the same time. Respond to any of these Off-hook Signals in one of several ways; place the existing call on Hold and respond to the new incoming call, activate One-time DND, send a Silent Text Message, or ignore the new call. Silent Text Message requires a TEXT MESSAGE button (not available on a SLT or other non-display terminal). The Attendant or Secretary may use Intrusion to announce a call while you are busy. To answer a Call Waiting: Press HOLD/SAVE, and/or Press the flashing CO/IP LINE button. To activate One-time DND: Press the DND button. To send a Silent Text Message: Press the programmed TEXT MESSAGE button, Select the desired message to send. 4.3 Using Answering Machine Emulation (AME) When a call is connected to your voice mail, you can screen the call as if using a normal Answering Machine. The caller‘s voice is played over your speaker while the message is being recorded. There are two methods of notification and call screening provided, Ring or Speaker mode. Ring mode—the Answering Machine Emulation (AME) Flex button will flash to notify you of a call. You may press the Flex button to hear the caller as the voice message is stored. Speaker mode—when the call is sent to the voice mailbox, the caller‘s voice is automatically broadcast over the speaker of your iPECS Phone. You may terminate screening, leaving the caller in voice mail to record a message, talk with the caller and record the conversation in the mailbox, or answer the call and disconnect the Voicemail. The AME feature is only available when using the iPECS VMIM/VSF Voice Mail; a MUTE and AME button should be programmed (refer to Appendix A User Program Codes). To screen a call in Ring mode: Press the flashing AME button, the caller‘s voice is broadcast over the station speaker and stored in the voice mailbox (in the Speaker mode, broadcast is automatic). To stop the voice broadcast and leave the caller in Voice Mail: Press the illuminated SPEAKER button. To talk with the caller and record the conversation in Voice Mail: Press the MUTE button. To answer the call and cancel the voice message recording: Press the illuminated AME button, the caller is connected and the Voice Mail disconnected. 4.4 Differential Ring Signals When multiple phones in a small area ring, it can be difficult to tell which are ringing. With the LIP-8050V, 12 ring tones are available for differentiating one phone‘s ringing from another. These tones are stored on the phone‘s permanent memory. To select a Ring Tone from phone memory: Press the TRANS/PGM button, Dial 1 for Ring Tones, Dial 1 or 2 for Internal or External ring, Dial 01-12 for the desired tone number; a confirmation tone is heard, Press HOLD/SAVE to make the selection. To select a Ring Tone from the Main Menu: Select Sounds, Select ICM/CO Ring For each ring select a Ring Tone. 4.5 Answering Calls at Night In the Night mode, Loud Bell Control may be used to send ring signals to external bells. You may answer these calls with Universal Night Answer (UNA). To answer a call ringing during night mode: Lift the handset, Dial 567 (UNA code). 4.6 Answering Calls to Other Stations When nearby stations are ringing, you may pick-up (answer) the call. Select to answer a call ringing at a specific station (Directed Call Pick-Up) or you may choose to answer the oldest call ringing to your station group (Group Call Pick-Up). Assign a Flex button with the Group Call Pick-Up code (566) for one-touch access. NOTE—Pick-Up will not answer calls on the ringing station Private Line unless the line appears on your phone. To answer a call ringing at another station: Lift the handset, Dial 7 (Directed Call Pick-Up code), Dial the Intercom Number of the ringing station; the call will be connected. To answer a call ringing at a station in your group: Lift the handset, Dial 566 (Group Call Pick-Up code), the call is connected. 4.7 Using Do-Not-Disturb (DND) to Block Incoming Calls Activate Do-Not-Disturb when you wish not to be interrupted by pressing the DND button; the phone will block incoming calls. Internal callers will receive a fast busy tone and the display will show the DND status. Activate Do-Not-Disturb while busy (OneTime DND); DND will be active for the duration of the present call. One-Time DND requires using a DND button. When an Executive activates DND, calls are forwarded to the paired Secretary automatically. The Attendants and Secretary may be able to activate DND Override and Intrude on an active call. The Attendants may also cancel DND at other stations. To toggle DND ON and OFF: Press the DND button. 4.8 Forwarding Calls 4.8.1 Forwarding calls to another Station or Voice Mail Incoming calls may be diverted to other resources of the system. Resources include other stations, VMIM/VSF Voice Mail, External Voice Mail and external number (speed). Call Forward can be activated or deactivated from your phone or from a different station (Call Forward, Remote). You may define the conditions or ‗type of forward‘ as below: 1: Unconditional—all calls to the station, except recalls, are forwarded. 2: Busy—Immediately forwards all calls, except recalls, when the station is busy. 3: No Answer—forwards all calls to the station, except recalls, when the station does not answer within the No Answer timer. 4: Busy/No Answer—forwards calls if the station is busy or does not answer within the No Answer timer. When you forward calls from a different station, you may need to enter your Authorization Code. Calls on a Private Line will not forward except to a station with an appearance of the Private Line or to Voice Mail. Press the Forward button. Highlight the Forward type desired and select OK. Select forward destination. (Station, VM(VSF) group, Hunt group or Speed Dial number. The forward status will be updated on your LCD. When you forward calls from a different station or a remote location, you may need to enter your Authorization Code. In addition, from a remote location, you must access the system through a DISA enabled CO line. To activate Call Forward, Off Premise (forward to an external number) from a different phone: Lift the handset, Press FWD or dial 554, Dial the Remote Call Forward code 0, Dial your Authorization code (Station number & Password), Dial the ‗type of forward‘ code 1-4, Press SPEED , Dial Speed Dial bin number, Replace the handset, return to idle. To activate Call Forward, Off Premise (forward to an external number) from a remote location: Lift the handset, Dial the telephone number of a DISA assigned CO line, While receiving dial-tone, dial the Call Forward feature code 554, Dial your Authorization Code (Station number & Password), Dial the ‗type of forward‘ code 6-9, Dial Speed Dial bin number, Replace the handset, return to idle. To activate Call Forward, Off Premise (forward to an external number) from a different phone: Lift the handset, 4.8.2 Forwarding callers to a Text Message Using an iPECS Phone, the system can be setup to return a ‗Text Message‘ to internal callers. When calling your Station, internal callers will automatically receive the selected message or you can send a text message you select in response to an internal call, Silent Text Message. There are 11 Custom Display Messages each up to 24 characters. Ten can be assigned by the Attendant and one assigned by you, see Station Speed Dial Character entry chart. In addition, there are ten fixed Pre-Defined Text Messages; some allow auxiliary input for time, date, etc. (as shown in message list). Message 01: LUNCH RETURN AT hh:mm Message 02: ON VACATION RETURN AT DATE mm:dd Message 03: OUT OF OFFICE RETURN AT TIME hh:mm Message 04: OUT OF OFFICE RETURN AT DATE mm:dd Message 05: OUT OF OFFICE RETURN UNKNOWN Message 06: CALL (enter up to 17 digits) Message 07: IN OFFICE STA xxxx Message 08: IN MEETING RETURN AT TIME hh:mm Message 09: AT HOME Message 10: AT BRANCH OFFICE To activate Custom or Pre-Defined Message Forward: Press TRANS/PGM , Dial User Program feature code 51, Dial the two-digit text Message code (00-20), Dial any auxiliary input for messages 01-04 and 06-08, Press HOLD/SAVE , forward confirmed. To cancel activated Message: Press the Fwd Soft button, Dial #. To program the Station Custom Message (00) at your station: Press TRANS/PGM , Dial User Program feature code 52, Enter Message contents, up to 24 characters, using the following Character Entry Chart: Q – 11 A - 21 D - 31 Z – 12 B - 22 E - 32 . – 13 C - 23 F - 33 1 – 10 2 - 20 3 - 30 G – 41 J - 51 M - 61 H - 42 K - 52 N - 62 I - 43 L - 53 O - 63 4 - 40 5 - 50 6 - 60 P - 71 W - 91 T - 81 R - 72 X - 92 U - 82 S - 73 Y - 93 V - 83 Q - 7* Z - 9# 8 - 80 7 - 70 9 - 90 *1 Blank 0-00 # *2 - : *3 - , Character Entry Chart Press 5. Placing Calls HOLD/SAVE , to save the message. 5. PLACING A CALL 5.1 Internal Calls You can place calls to other stations in the system over the Intercom. The call will ring, or for an ICM Voice Announce call, a splash tone will be heard. Ring or Voice Announce is normally determined by settings at the called station but you may change this by dialing ‗#‘ after placing the call. By changing the mode, a Voice Announce call will ring or a ringing ICM call will allow Voice Announce (toggle). You can assign a Flex button for Direct Station Selection/Busy Lamp Field (DSS/BLF). The DSS/BLF button allows you to call another station with the single touch of a button. The button LED will display the other station‘s status (ON=busy, OFF=idle). When you go off-hook, you may connect to another station or system resource automatically. This Prime Line Preference may be immediate or delayed allowing you to take other actions during the delay. Otherwise, you may press another Flex button before going off-hook to override Prime Line Preference. If you go off-hook and take no action, Intercom dial-tone will time-out, and after the Howler tone is received, your phone will be placed out-of-service in Intercom Lock-Out; you then must hang-up to return the phone to an idle state. To place an Intercom call: Lift the handset, Dial the Intercom number of the desired station, When the call is answered or the Splash tone is heard, begin speaking with the called party. 5.1.1 Using Camp-On when calling a busy station If the called party is busy, you may activate Camp-On, Callback or Voice Over at the station. Camp-On allows you to wait offhook for the called station to answer. Callback allows you to hang-up, and when the busy station returns to an idle state, the system will call your Station; after you answer the callback, the system will call the previously busy station. If you are the Attendant or Secretary, you may activate Intrusion. You may also use Step Call; dial the next station by dialing the last digit of the Intercom number. To Camp-On (wait off-hook) for a busy station: Press * and await an answer. To request a Callback (wait on-hook) for a busy station: Press the CALL BACK button and hang-up. To make a Voice Over announcement to a busy station: Dial #, After the Splash tone is heard, begin speaking. 5.1.2 Leaving a Message Wait If the called user does not answer or is in DND mode, you may leave a Message Wait. The called user will receive a Message Wait indication; the message icon will be displayed. If the Ring/Message LED is set to Message Wait, the LED will flash. To activate Message Waiting: When calling a number that is busy or in DND mode, press the CALL BACK button and hang-up. 5.2 External Calls 5.2.1 Placing external CO/VoIP calls External calls are placed on CO/IP lines. These ‗lines‘ are accessed either using a button on the iPECS Phone assigned as a CO/IP line or using dial codes. The CO/IP lines are grouped for different types of calls, local, long distance, etc. Using the CO/IP line group code, you will be able to access any line from the group. A Flex button on the iPECS Phone assigned as a LOOP button lets you access a line from a group. Dial codes for access to CO/IP lines are: Individual CO/IP line access 88 + Line number (01-42 for iPECS-50 & 100, 001-200 for iPECS-300, 001-400 for iPECS-600, or 001-600 for iPECS1200). CO/IP Group access— 801-820 for iPECS-50 & 100, 801-872 for iPECS-300 & 600, or 8001-8200 for iPECS-1200. Any CO/IP Line access— 9 When dialing on a CO line which uses pulse style signals, you may activate Dial Pulse to Tone Switchover changing to DTMF style dialing (for banking services, etc.). When placing an IP call, you must dial an IP address using the ‗*‘ key in place of the dot. If Least Cost Routing is set-up, the number you dial will be analyzed and the system will place the call on the least expensive route. You may be assigned Dialing and/or CO/IP Line Access Restrictions, in which case you will receive error tone if you attempt to dial or access a restricted number/CO/IP line. CO/IP line and Station Class Of Service (COS), which establish dialing restrictions, may vary during Day and Night operation (Day/Night COS). You may need to enter an Authorization code before placing calls, in which case you will receive a second dial tone. Your external calls may be subject to Call Time Restrictions, you will receive a Call Warning Tone prior to disconnect. NOTE—In the event of an emergency, assigned Emergency numbers (ex., a 911 call) may be dialed from any station in the System, regardless of a Station’s dialing restrictions (COS). To place an external call: Lift the handset, Dial the CO/IP line/group, Dial the desired number. 5.2.2 Waiting for the next available CO/IP line If all the lines connected to your system are busy, you will receive an All Trunks Busy signal. You may request to be notified when a line is available for use. To activate a queue if the selected/dialed line is busy: Select/dial CO/IP line; when the busy tone is returned, press the CALL BACK button, Return to an idle state by going on-hook; when the line is available, the Station will be notified with ringing. 5.2.3 Account Codes: Tracking External calls for billing In some cases, you or your company may desire to track calls for billing or other purposes. You may enter an Account Code, which is output from the system to a printer in the SMDR report. You may have an Account Code Flex button (refer to Assigning features to Flex buttons). To enter an Account Code before the call: Lift the handset, Press the assigned ACCOUNT CODE button, Dial the Account Code (1-12 digits), Press *, Intercom dial tone is heard, Place the CO/IP call as normal. To enter an Account Code during a call: Press the assigned ACCOUNT CODE button, Dial the Account Code (1-12 digits), Press *. 5.2.4 Disable dialing from your phone You can temporarily ‗Lock‘ your phone by activating Temporary COS, which will disable all dialing outside calls from the phone. To deactivate Temporary COS you must enter the station‘s Authorization code. To activate Temporary COS: Press TRANS/PGM , Dial 21 (User Program code), Press HOLD/SAVE . To deactivate Temporary COS: Press TRANS/PGM , Dial 22 (User Program code), Dial your Authorization code, Press HOLD/SAVE . 5.2.5 Temporarily override dialing restrictions at a phone Override the dialing restrictions at any phone by activating Walking COS. The Walking COS dialing restriction levels are applied for a single call only. For multiple calls, you will need to reactivate Walking COS or use the Flash Soft button to regain CO/IP dial-tone. To activate Walking COS: Press TRANS/PGM , Dial 23 (User Program code), Dial your Authorization Code (station number and password), Place call as normal. 5.3 Using Automated Dialing 5.3.1 Using Last Number Redial (LNR) The last number dialed on an external call is automatically saved in the Last Number Redial (LNR) buffer. The LIP-8050 phone will display the last 15 numbers. Press the SPEED . Use the Navigation button to highlight the desired number Press SEND. User can make call using CALL HISTORY button. 5.3.2 Using and Entering Saved Number Dial You may store the last number dialed on an external call to the Saved Number Dial buffer for convenient dialing at a later time. The Saved number is stored until a new number is saved. To place a call using Save Number Dial: Press SPEED button, Dial #. To store a number in the Save Number Dial: While on an outgoing external call, press the SAVE button. 5.3.3 Using System Speed Dial Numbers The iPECS-100 system has memory allocated for 800 System Speed Dial numbers (bins 200-999). The iPECS-300 system has memory allocated for 3000 System Speed Dial numbers (bins 2000-4999). The iPECS-600 system has memory allocated for 6000 System Speed Dial numbers (bins 2000-7999). The iPECS-1200 system has memory allocated for 12000 System Speed Dial numbers (bins 20000-31999). You may, if allowed, use System Speed Dial to call frequently dialed numbers. In some cases, these numbers are divided into groups called System Speed Zone Groups. In this case, you may access some numbers and not others and your dialing restrictions may be invoked. Only an Attendant can assign System Speed Dial numbers. To place a call using System Speed Dial: Lift the handset, Press the SPEED button, Dial the desired System Speed Dial bin number 5.3.4 Using and Entering Station Speed Dial Numbers Each station in the iPECS-100 System is allocated memory for 20 Station Speed Dial numbers (bins 00-19) each up to 48 digits. The iPECS-300 & 600 &1200 support 100 Station Speed Dial numbers (bins 000-099). These numbers are entered at the user‘s station and may include several ‗special‘ instructions. Special instructions and the corresponding button are: PAUSE will momentarily stop dialing. st FLASH as 1 digit—Activate dial tone detect. st FLASH not as 1 digit—The system will generate a flash on the CO line. CALL BACK as 1st digit—Send digits as ISDN Keypad Facility message. st ‘*’ as 1 digit—Display Security, the stored number will not be displayed when used. st ‗*‘ not as 1 digit—Dial Pulse to Tone Switchover, the system will switch from pulse to tone dialing. When entering a Speed Dial, a 16-character name may be associated with the number for Dial by Name. Characters are entered with two keystrokes as shown in the following chart. Q – 11 A - 21 D - 31 Z – 12 B - 22 E - 32 . – 13 C - 23 F - 33 1 – 10 2 - 20 3 - 30 G – 41 J - 51 M - 61 H - 42 K - 52 N - 62 I - 43 L - 53 O - 63 4 - 40 5 - 50 6 - 60 P - 71 W - 91 T - 81 R - 72 X - 92 U - 82 S - 73 Y - 93 V - 83 Q - 7* Z - 9# 8 - 80 7 - 70 9 - 90 *1 Blank 0-00 # *2 - : *3 - , Character Entry Chart To place a call using Station Speed Dial: Lift the handset, Press the SPEED button, Dial the desired Station Speed Dial bin number (00-19 or 000099). To enter a Station Speed Dial number with CO Line and Name: Press TRANS/PGM , Press the SPEED , button, Dial the desired Station Speed Dial bin number, Select/dial the CO/IP line/group, Dial the desired number to be stored, Press HOLD/SAVE , If desired, enter the associated name, see Character Entry Chart, Press HOLD/SAVE . To assign a Station Speed Dial number directly to a Flex button: Press TRANS/PGM , Press the desired Flex button, Select the Tel Num, Select/dial the CO/IP line/group, Dial the desired number, Press HOLD/SAVE , If desired, enter the associated name, see Character Entry chart, Press HOLD/SAVE . 5.3.5 Using Dial by Name and Entering Your Name Dial by Name employs three different Directories: Private directory (Station Speed dial), Public Directory (System Speed dial), or Intercom directory. NOTE—To allow others to contact you via the Intercom directory, you must enter a name for your station (up to 12 characters). To make call by name, Press SPEED button twice. Select a type (ICM, Station speed or system speed). Select a person and press SEND button to place the call. 5.3.6 Using Automatic Called Number Redial (ACNR) When making an external call and a busy signal is received, the system can be set to retry the number until the call is connected, the feature is cancelled, or the maximum number of retries is attempted—this is Automatic Called Number Redial (ACNR). For each retry, the system will activate your speaker then place the call with the microphone muted. When the remote end answers, you must select the MUTE button, or lift the handset. Either of these actions will cancel the ACNR request as well as connect you to the remote party. To set up ACNR, while on an outgoing call: Use the Navigation button to display the next menu and select the ACNR button, Hang-up handset. To cancel the ACNR request: Press the Stop button. 6. Call Handling 6. PLACING A CALL 6.1 Call Transfer: Sending a call to a different destination You can send an active call to another station or other resource of the system, Call Transfer. You can screen the transfer with the receiving party (Screened Call Transfer) or complete the transfer without screening (Unscreened Call Transfer). Transferred calls, internal or external, are place in Transfer Hold. These calls will receive Music on Hold (MOH) and will recall if not answered in a timely manner. If an Unscreened Transfer call encounters an error or DND, it may immediately recall at your Station. DSS/BLF buttons may be employed to transfer calls. To Transfer an active call: Press TRANS/PGM , Call the transfer party, Unscreened Call Transfer- Hang-up, Screened Call Transfer– When call is answered or Splash tone is heard, announce the call then hang-up. 6.2 Call Hold: Placing a call in a waiting state You may place an active Internal or External call in one of several holding states. In System Hold, other non-restricted stations may pick-up the call. In Exclusive Hold, only the holding station may pick-up the call. The system is assigned a preferred hold type (System or Exclusive). You may override this Hold Preference by pressing the HOLD/SAVE button twice. The LEDs for CO/IP line buttons flash at distinctive rates for the holding station and other iPECS Phone users. There are also user operations such as pressing a DSS/BLF button that will place a call in Automatic Hold. Calls will remain in the held state for a period and then recall the user. This Hold Recall is provided with a different ring signal. If not answered in a timely manner, the Attendant will receive Attendant Hold Recall. To place a call on Hold: Press HOLD/SAVE . 6.3 Broker Call: Switching between two calls You may switch between the active call and a call on Hold, placing the active call on Hold acting as a broker between two or more parties (Broker Call). iPECS Phone users may ‗broker‘ for multiple calls up to the number of CO/IP line buttons. To switch between two calls (Broker Call): Press the desired CO/IP line button. 6.4 Joining Multiple People in a Conference You can establish a Conference with up to 3 parties, or 24 parties when using a Multi-Party Conference Interface Module (MCIM). The other parties in the Conference may be internal or external. A Conference can be placed on Hold and is subject to Hold Recall. You may also use the Conference operation to join 2 external parties in a private conversation. This is an Unsupervised Conference, which is not subject to the normal Hold Recall operation. To establish a Conference: Establish call with one of the desired conference parties, Select the Conf button, Establish call with the other conference party, Select the Conf button, Repeat above for additional parties Select the Conf button again to establish the conference. To establish a Conference: Establish call with one of the desired conference parties, Select the Conf button, Establish call with the other conference party, Select the Conf button, Repeat above for additional parties Select the Conf button again to establish the conference. 6.4.1 Setting up a Conference Room In addition to establishing a Conference, up to 9 Conference Rooms can be set up, letting up to 24 parties converse when using a MCIM. When setting up a Conference Room, a password can be designated for invited parties (internal and external parties) to use for accessing the established Conference Room. To set-up a Conference Room: Press the TRANS/PGM button, Dial 53 to create a Conference Room, Dial the desired Conference Room number (1-9), If desired enter a password for the Conference Room (up to 12 digits), Press HOLD/SAVE to establish the Room. To join a Conference Room: Lift the handset, Dial 59 (Conference Room entry code), Dial the Conference Room Number, Dial the Conference Room password. To delete a Conference Room: Press the TRANS/PGM button, Dial 54 (Conference Room delete code), Dial the Conference Room number (1-9), Dial the Conference Room password, Press HOLD/SAVE to delete the Conference Room. 6.5 Call Park: Placing a call on Hold to Page A user may transfer an active CO/IP call to a special holding location (Park Orbit), which can be accessed easily from any station in the system. Typically, this feature is used with Paging to notify the desired user of a parked call. Parked calls are subject to Hold Recall after the Call Park timer. To place a Conference on Hold: Press the HOLD/SAVE button. To retrieve the Conference from Hold: Select the Conf button. To establish an Unsupervised Conference: Establish conference with external parties, Select the Conf button, Hang-up the handset. To retrieve an Unsupervised Conference: Lift the handset, Select the Conf button. To park an active external call: Press TRANS/PGM , Dial the Park Orbit (601-610 for iPECS-50 & 100, 601-619 for iPECS-300, 601-699 for iPECS-600, 6001-6200 for iPECS1200), Return to idle. To retrieve a parked call: Lift the handset, Dial the Park Orbit. 6.6 Two-Way Record: Recording a call You may record an active external conversation in your Voice Mail Box. To activate Two-Way Record while on a CO/IP call: Use the Navigation button to display the next Menu and select the Record button, record warning tone is heard and recording starts. To stop Two-Way Record while on a CO/IP call: Use the Navigation button to display the next menu, and select the Record button or, Hang-up, return to idle. 7. Send & Retrieve Messages 7. SEND & RETRIEVE MESSAGES 7.1 Responding to a Station Message Waiting Indication Another station can leave an ICM Message Waiting indication (MWI) when you do not answer or your phone is in DND mode. The message icon will be displayed on the LCD screen. If programmed, a flashing MSG LED on the iPECS Phone also will indicate when there is a Message Waiting. As a further notification, a Message Wait Reminder Tone can be provided. You may review and delete messages as well as respond with a call back. Press the CALL BACK button. Select 1. ICM MWI. Press OK button to return the call. 7.2 Getting Voice Mail Messages When callers are forwarded or recall to your Voice Mail Box, they can leave a voice message, as part of the integrated VMIM/VSF module, the iPECS Feature Server or an external Voice Mail system. These Voice Mail systems allow access to and management of received voice messages. While in your Mail Box, you have control of your password and Mail Box greeting. In addition, you can remotely control Call Forward for your station to Voice Mail. You will need to register an Authorization Code for your station to access the VMIM/VSF Voice messages. Press the CALL BACK button. Select the desired Voice Mail (3, 4, 5) Follow the Voice Mail voice prompts. Hang-up to complete the session To access your Voice Mail Box from a Remote Location: Lift the handset, Dial the telephone number of a DISA CO line answered by the VMIM/VSF Auto Attendant, At answer, dial # to receive the ‗Mail Box & Password‘ prompt, Dial the Mail Box and password to receive the ‗Number of Messages‘ prompt, Dial desired option codes, At completion of session, hang-up. 8. Remote System Access 8. REMOTE SYSTEM ACCESS 8.1 Direct Inward System Access (DISA) DISA (Direct Inward System Access) allows remote users to gain access to the system‘s resources (remote users may be required to enter an Authorization Code). The system will recognize remote user dialed inputs to call other stations, place calls over CO/IP lines, review voice mails, etc. To access system resources remotely: Call the system‘s DISA facility, Await answer and dial your authorization code (station number and password), Dial as needed for the desired system resource. 8.2 Mobile Phone Extension When away from your desk or office you can place and receive iPECS calls on a registered mobile phone. Calls to your iPECS Phone will ring your Mobile Phone and you can place calls using the resources of the iPECS. You may need to activate the Mobile Phone Extension feature and assign the Mobile Phone number. To register a mobile phone number: Press the TRANS/PGM button, Dial 37, Dial the mobile phone number, Press the HOLD/SAVE button. To activate a registered mobile phone: Press the TRANS/PGM button, Dial 38, 1 to activate, 0 to deactivate, Press the HOLD/SAVE button. To place a call from the mobile extension using the iPECS System: Dial the ISDN DID number of the station; the system will check the Caller ID and answer the call. The user then will receive intercom dial tone, Place internal or external iPECS calls as normal. To Transfer a call from the mobile extension using the iPECS: Dial ―*‖ while on an iPECS call, Dial the desired extension, the call is transferred and the mobile phone returns to idle. Reconnect to the transfer by pressing the # key. NOTE—The mobile extension may reconnect to the transfer by pressing the # key. This feature is only effective with an ISDN CO line. 9. Misc. Features 9. MISC. FEATURES 9.1 Call Log Users can view a log of incoming, outgoing and missed calls on the display (up to 100 records). A CALL HISTORY button provides simple access to all calls (incoming (called), outgoing (dialed) and missed (lost) calls) at any time. The right navigation button will access the Call Logs while idle. Press the CALL HISTORY button or the right navigation button. Select the call type (Incoming, Outgoing, or Missed) with the Navigation button. Scroll through the Call Log with the Navigation button. To call the number: Press CALL button to call the highlighted number. Select MENU button to add the number to the Phone Book, delete the record or delete all records in the Call Log. 9.2 Background Music and Music on Hold Two audio sources can be connected to the system. These sources or an internal source provide input for Background Music (BGM) and Music on Hold (MOH). In addition, a recorded message from the VMIM can be used. BGM is played over the speakers of the iPECS Phone when the station is idle. MOH is played to callers placed on Hold. There are eleven possible selections for BGM and MOH: 00: Off 01: Source BGM1 (INT 1 or EXT 1) 02: Source BGM2 (EXT 2) st 03: 1 VSF/VMIM message nd 2 VSF/VMIM message rd 3 VSF/VMIM message st 04 1 SLTM message nd 2 SLTM message rd 3 SLTM message th 4 SLTM message th 5 SLTM message To turn on Background Music: Press HOLD/SAVE to cycle through the BGM selections. 9.3 Using Internal, External and Meet-Me Paging The User can broadcast announcements to other stations and/or external speakers. Stations are assigned to one or more of the Internal Page Zones. The system has two External Page Zones that can be connected to external speakers. Page Zone codes are: Internal Page Zones : 501-510 (iPECS 100) 501-535 (iPECS 300 & 600) 5001-5100 (iPECS 1200) Internal All Call Page 543 External Page Zones 545-546 External All Call Page 548 All Call Page 549 If the desired Page Zone is busy, the User can elect to be recalled when their turn comes in the queue. Users can also request a paged party answer the Page using Meet-Me Paging. In this case, the paged party may answer the page from any phone in the system by dialing the Meet-Me code. To make a page: Lift the handset, Dial the desired Page zone, If assigned, after Page warning tone, make announcement. To queue for a page when busy is received: Press the CALL BACK button, Replace the handset returning to idle. To answer a Meet-me-Page: Lift the handset. Dial 544 (Meet-Me-Page code). 9.4 Push-To-Talk (PTT) Page iPECS Phones can be assigned as a member of one or more of the system‘s nine Push-To-Talk (PTT) page groups. Users separately log-in or log-out of any one or all PTT groups to which the phone is assigned. Once logged in, place or receive one-way page announcements to/from other users who are logged in to the same PTT group. To log-in to a PTT group: Dial #0, the PTT Log-in/out code, Dial the desired PTT group number (1-9 or 0 for all groups), To log-out of the PTT group(s): Dial #0, the PTT Log-in/out code, Press the * key. To place a page announcement to the active PTT group: Press and hold the PTT button, After confirmation tone, make page announcement. 9.5 Alarm/Door Bell The system can monitor external Alarm or Door Bell contacts: Alarm Monitor—should the external contact activate, a unique Alarm Ring signal and LCD display may be received. To restart the monitor circuit, the external contacts must be deactivated and the Alarm Ring signal terminated. Door Bell—a unique Door Bell Ring (single tone burst) may be received each time the external contact is activated. A system contact also can be assigned to act as a Door Open contact. To terminate the Alarm signal: Dial 565 (Alarm Stop code). To activate the Door Open contacts: Lift the handset, Dial Door Open code, #* and contact number 1-4. NOTE—Contacts 3 & 4 are only available in the iPECS-300, 600 and 1200. 9.6 Power Fail Transfer (PFT) When AC power to the system fails, back-up operation may be provided with back-up batteries or Power Fail Transfer (PFT). When battery back-up is provided the station will operate normally. When PFT is implemented, an SLT is connected to a CO line by the system. This SLT can be used as any normal SLT, providing service while power is out. 9.7 System Voice Memo The integrated Voice Mail modules incorporate several Voice Memos to provide Station Users with general information such as station number, date, time, and feature status. Voice Memos are heard over the iPECS Phone speaker and over the handset for SLTs. For the Station Status Memo, the following items are reported: ICM Signaling Mode (Handsfree/Tone/Privacy) Station IP Address Station Mac Address Number of messages x (x: number of all message waiting) Wake-Up Time (hh:mm) Do Not Disturb Forwarded to station xxx Forwarded to speed bin xxx Queued CO/IP line xxx Locked (Temporary COS) COS x To hear Date & Time memo: Dial the Voice Memo code (661 for iPECS-100, or *661 for iPECS-300 & 600 & 1200), Date and Time memo is heard, ―Date is May 2nd.Time is xx:xx pm‖. To hear Station Number Prompt: Dial Voice Memo code (662 for iPECS-100, or *662 for iPECS300 & 600 & 1200), The Station Number memo is heard, ―This is station 150‖. To hear Station Settings: Dial Voice Memo code (663 for iPECS-100, or *663 for iPECS300 & 600 & 1200)), Station Status Memo is heard. NOTE—only activated features are announced. 10. PBX, Centrex, & ISDN Features 10. 10.1 PBX, CENTREX & ISDN FEATURES Access PBX or Centrex features The iPECS has been designed to operate with a host PBX system or Centrex services from your service provider. The iPECS connects to a host with analog CO lines. When accessing a CO line, the phone will act as an extension of the host, allowing access to the host system features using the host dial codes. While on a call, use the iPECS Flash feature to transfer calls to other host extensions or access features of the host. The Flash feature may be used on other CO lines to regain dial tone from the CO line without relinquishing control of the CO line to place another call. To access PBX or Centrex features while idle: Lift the handset, Select/dial access a PBX/Centrex CO line, Dial PBX/Centrex feature code. To access PBX/Centrex features while on a PBX/Centrex CO line: Use the Navigation button to display the next menu, and select the Flash button, After receiving new dial tone, dial the PBX/Centrex feature code. 10.2 Access the ISDN Network 10.2.1 Using the Keypad facility to access ISDN features Access to certain features of your ISDN services requires that dialed digits be sent to the ISDN as data and not tones. In this case, dialed digits are sent as ‗Keypad messages‘. A Keypad Facility button must be assigned using the Flex Button program procedures. Once active, dial into the ISDN for services; however, actions other than dialing will deactivate the Keypad Facility operation. To activate Keypad Facility operation: Press the programmed KEYPAD FACILITY button to switch to keypad mode, Dial as desired. To deactivate Keypad Facility operation: Press KEYPAD FACILITY , OR Press a Feature or Flex button. 10.2.2 Using ISDN Supplementary Services ISDN service providers may incorporate features similar to those of Centrex. These ISDN Supplementary services are provided on a subscription basis, and as with Centrex, are accessed using the Flash button on an iPECS phone. Using supplementary services, an ISDN line can be placed on Hold and a second call placed on the line. You may then alternate between the two held calls (Broker Call) using the HOLD button. An ISDN line conference can be established using the Flash and Conf buttons. A conference can also be placed on hold. While on an ISDN CO line, to access ISDN Supplementary services: Press Flash, Press HOLD/SAVE , Conf, or CO line button to activate the desired feature. 10.2.3 Activating ISDN Caller ID Restriction iPECS Phone users can restrict the transmission of Caller ID to the far-end. This may be a subscription service of your carrier. Separate Flex buttons are required to activate outgoing, Connected Line (COL), and incoming, Calling Line ID (CLID) restriction. To restrict Caller ID: Lift the handset, Press programmed CLIR / COLR button to place call. 11. Features & Flex Buttons 11. 11.1 FEATURES & FLEX BUTTONS Entering Station Program Data A special code set is available for iPECS Phone users to assign certain attributes such as Authorization Codes (Passwords). After entering the User Program mode, dial the codes to select the attribute and setting. Once selected, the setting is saved. A list of the User Program codes, the feature/function and any input required are given in Appendix B. In some cases, you enter these codes as part of Flex button assignments. To assign user programmable attributes to your station: Press TRANS/PGM , Dial desired User Program codes shown in Appendix B, Press HOLD/SAVE . 11.2 Assigning Features to Flex Buttons You may assign features and functions to the Flex buttons on your iPECS Phone (possibly CO/IP lines as well). Flex buttons may be assigned for most features providing OneTouch feature activation (ex., a Flex button may be assigned to access the Account Code feature and may include the Account code digits). Features that may be assigned to a Flex button include: DSS/BLF—Enter station number. Speed Dial—Enter Station/System Speed dial bin. Flex Numbering Plan—Enter Flex Numbering Plan code (refer to Appendix A). User Program Code—Press TRANS/PGM and enter a User Program code (refer to Appendix B). CO/IP Line—Enter the CO/IP line or group number. To assign a feature to a Flex button: Press TRANS/PGM , Press the desired Flex button, Dial desired code and required inputs; for User Program codes (Appendix B), first press the TRANS/PGM , Press HOLD/SAVE . Appendix A Flexible Numbering Plan FEATURE Intercom Call Internal Page Zone Internal All Call Page Meet Me Page External Page Zone 1~2 External All Call Page All Call Page (Internal/External) SMDR Account Code Enter Flash Command to CO Line Last Number Redial DND (Toggle On/Off) Call Forward Speed Dial Programming Message Wait/Callback Enable Message Wait/Callback Return Speed Dial Access Cancel DND/FWD/Pre MSG CO System Hold Program Mode Access Attendant Unavailable Answering Machine Emulation Alarm Reset Group Call Pickup Universal Night Answer Account Code with bin Walking COS Code ACD Supervisor On/Off Duty ACD Supervisor Login ACD Supervisor Logout ACD Help Code ACD Calls In Queue Display ACD Supervisor Status Display ACD Supervisor Monitor iPECS50 100-149 iPECS100 100-169 iPECS300 100-399 501-535 543 544 545-546 548 549 iPECS600 10001599 501-535 543 544 545-546 548 549 iPECS1200 10002199 301-400 543 544 545-546 548 549 501-510 543 544 545 548 549 501-510 543 544 545-546 548 549 550 551 552 553 554 555 556 550 551 552 553 554 555 556 550 551 552 553 554 555 556 550 551 552 553 554 555 556 550 551 552 553 554 555 556 557 557 557 557 557 558 559 560 561 562 564 558 559 560 561 562 564 558 559 560 561 562 564 558 559 560 561 562 564 558 559 560 561 562 564 565 566 567 568 569 571 572 573 574 575 576 565 566 567 568 569 571 572 573 574 575 576 565 566 567 568 569 571 572 573 574 575 576 565 566 567 568 569 571 572 573 574 575 576 565 566 567 568 569 571 572 573 574 575 576 577 577 577 577 577 FEATURE ACD Reroute Queued Call w/answer ACD Reroute Queued Call w/o answer Enter Conference Room Camp-On Answer Call Parking Locations Group Pilot Number Station User VMIM/VSF Features Call Coverage button Direct Call Pickup CO/IP Group Access Individual CO/IP Line Access Retrieve Last Held CO/IP Retrieve Individual Held CO/IP Access CO Line in the 1st available CO Group Attendant Call VM Message Wait Enabled VM Message Wait Disable Door Open (1st Door ) Door Open (2nd Door ) rd Door Open (3 Door ) th Door Open (4 Door ) MCID Request AME Feature Unsupervised Conference Timer Extension code PTT Group Login/Logout iPECS50 578 iPECS100 578 iPECS300 578 iPECS600 578 iPECS1200 578 579 579 579 579 579 59 600 601-610 59 600 601-610 59 600 601-619 59 600 601-619 620-659 66 620-659 66 620-667 *66 620-667 *66 59 600 #601#800 401-500 *66 67 7 8xx 01-20 88xx 01-42 8* 8#xx 67 7 8xx 01-20 88xx 01-42 8* 8#xx 67 7 8xx 01-72 88xxx 001-200 8* 8#xxx 67 7 8xx 01-72 88xxx 001-400 8* 8#xxx 76 *77 89xxx 001-200 88xxx 001-600 8* 8#xxx 9 9 9 9 9 0 *8 *9 #*1 #*2 *0 564 ## 0 *8 *9 #*1 #*2 #*3 #*4 *0 564 ## 0 *8 *9 #*1 #*2 #*3 #*4 *0 564 ## 0 *8 *9 #*1 #*2 #*3 #*4 *0 564 ## 0 *8 *9 #*1 #*2 #*3 #*4 *0 564 ## #0 #0 #0 #0 #0 Appendix B User Program Codes CODE 10 11 x FUNCTION Enblock Mode Dialing Differential Ring, Intercom REMARK iPECS LIP-7000 only Select Ring Tone 1-8 CODE 12 x FUNCTION Differential Ring, CO/IP line 13 x Intercom Answer Mode 14 x 15 x 19 21 22 23 24 30 31 32 52 xx 53 x Call Coverage Attribute Setting Station Ring Download Ear & Mic Headset Usage Knock Down Station COS Restore Station COS Walking COS ICR SCENARIO VM Mobile Notify Station Message Wait Retrieve CLI/IP Message Wait Retrieve Authorization Code (Password) Entry Assign DID CALL W AIT Button Message Wait in Executive/Secretary pair Send SMS Message Register Mobile Extension Activate Mobile Extension Register Mobile Ext. CLI Set Wake-Up Time Erase Wake-Up Time Custom/Pre-defined Message Display Register Custom Message Create Conference Room 54 x Delete Conference Room 55 61 x 62 x 71 72 73 74 x 75 76 77 78 79 Monitor Conf. Room Headset/Speakerphone Mode Headset Ring Mode LCD Display Mode Version Display Background Music Station User Name Registration Display Phone IP Address Change Phone IP Address Display Phone MAC IP Address Change Mode Display Phone Version 33 x 34 35 36 37 38 39 41 xx 42 51 xx REMARK Select Ring Tone 1-8 Select ICM Signal mode, 1: HF, 2: TONE, 3: Privacy 1+: ON/OFF, 2+: ring delay (0-9) Select download Ring Tone 0-9 iPECS LIP-7000 only May require Authorization code May require Authorization code Station number +up to 12 digits, no Flex button Input time, 24 hour clock Select Message 00-20 Input up to 24 characters Input Conf Room (1-9) & password Input Conf Room (1-9) & optional password 1: Speakerphone, 2: Headset, 3: both Input up to 12 characters CODE 7* 80 81 82 84 85 86 87 88 89 8# 91 92 93 94 95 96 97 98 99 *0 ** *7 *8 *9 FUNCTION Display Serial number/Package for SMEMU Assign RECORD Button Assign ISDN CLIR Button ISDN COLR Button Assign ACCOUNT CODE Button Assign LOOP Button Assign ATD INTRUSION Button ICM Button Assign CAMP-ON Button Assign KEYPAD FACILITY Button Assign OHVO Button CONF Button Assignment CALL BACK Button Assignment DND Button Assignment FLASH Button Assignment MUTE Button Assignment MONITOR Button Assignment REDIAL Button Assignment FWD Button Assignment Assign PTT Button Hot Desk Login Code Hot Desk Log out Code Force Fwd to Dest. Register Bluetooth Bluetooth Usage REMARK Requires VSF/External SMDI VM