1
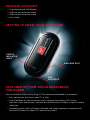
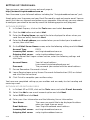
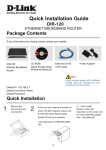
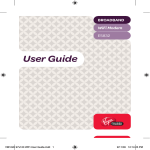
USER
GUIDE
USB MODEM
virginbroadband.com.au
A
Package Contents
• Virgin Broadband USB Modem
• USB one port extension cable
• USB two port extension cable
• User Guide
Getting to know your USB modem
STATUS
INDICATOR
LIGHT
SIM CARD SLOT
USB
INTERFACE
Features of your Virgin Broadband
USB Modem
Easy Installation, thanks to the Plug ‘N’ Play software embedded in the modem.
• Easy connection, directly to your PC or Mac.
• Visual feedback on the connection status through the modem LED (Status
Indicator Light) and the easy connection software which includes a signal strength
indication.
• Compatible with nearly all modern desktop and laptop computers equipped with
Microsoft Windows or Apple OS X operating systems.
B
Disclaimer
Virgin Mobile (Australia) has tried its best to make sure all information, graphics and
other items appearing in this document (“Content”) are correct and up to date at the
time of publication. We do not represent or warrant the accuracy or completeness of
the Content and are not liable for any errors, omissions or defects.
To the extent allowed by law, Virgin Mobile and its officers, employees, agents and
contractors exclude all liability for any consequential, indirect or incidental loss or
for any loss of profits, income, business or goodwill, that happens from you using or
relying on the Content, whether or not it’s caused by any negligent act or oversight on
our part.
Certain laws, including the Trade Practices Act 1974, can imply warranties or
conditions, or impose obligations on Virgin Mobile that we exclude, restrict or modify
at all, or that we can only exclude, restrict or modify to a limited extent. If these laws
apply, to the extent to which Virgin Mobile is able to do so, our liability will be limited
to the resupplying of the Content.
TRADEMARKS
Virgin Mobile (Australia) and Virgin Broadband are trademarks of Virgin Mobile
(Australia) Pty Limited. All other trademarks mentioned in this manual are the
property of their respective holders.
and HUAWEI are trademarks of Huawei Technologies Co., Ltd. All other
trademarks mentioned in this manual are the property of their respective holders.
Notice
The information in this manual is subject to change without notice. Every effort has
been made in the preparation of this manual to ensure accuracy of the contents, but
all statements, information, and recommendations in this manual do not constitute a
warranty of any kind, expressed or implied.
Copyright © 2008 Virgin Mobile (Australia) Pty Limited
Copyright © 2008 Huawei Technologies Co., Ltd.
All Rights Reserved
No part of this manual may be reproduced or transmitted in any form or by any
means without the prior written consent of Virgin Mobile (Australia) and Huawei
Technologies Co., Ltd.
virginbroadband.com.au
V2.5
1
TABLE OF CONTENTS
WELCOME TO VIRGIN
BROADBAND
SYSTEM REQUIREMENTS
3
3
MAC OS X 10.4 AND ABOVE
13
WINDOWS XP SERVICE PACK 2
13
WINDOWS VISTA HOME BASIC
HOME PREMIUM/ULTIMATE
BUSINESS ENTERPRIS
14
CONNECTING YOUR VIRGIN
BROADBAND USB MODEM
4
INSTALLING THE VIRGIN
BROADBAND SOFTWARE
5
SOFTWARE INSTALLATION FOR WINDOWS
5
TROUBLESHOOTING
SOFTWARE INSTALLATION FOR APPLE OS X 5
YOUR FIRST CONNECTION
LED STATUS INFORMATION
STARTING YOUR VIRGIN BROADBAND
CONNECTION
6
6
6
WINDOWS
6
MAC OS X
6
CLOSING THE VIRGIN BROADBAND
SOFTWARE
6
WINDOWS
6
MAC OS X
6
CONFIGURING YOUR COMPUTER
SOFTWARE
7
CONFIGURING YOUR INTERNET BROWSER 7
7
MICROSOFT INTERNET EXPLORER
7
SAFARI: OS X 10.4 (TIGER)
7
SAFARI: OS X 10.5 (LEOPARD)
MOZILLA FIREFOX 2.X
7
8
SETTING UP YOUR E-MAIL
8
OUTLOOK EXPRESS
8
OUTLOOK XP OR OUTLOOK 2003
9
Outlook 2007
Windows Mail (Vista)
9
10
Apple Mail OS X 10.4 (Tiger)
Apple Mail OS X 10.5 (Leopard)
10
V2.5
USING THE VIRGIN BROADBAND
SERVICES
11
CHECKING YOUR DATA USAGE
11
11
USING WEBMAIL
11
CHECKING YOUR ACCOUNT DETAILS
12
VIRGIN BROADBAND USB MODEM
INFORMATION
13
SIM CARD INFORMATION
13
13
DETAILED TECHNICAL SPECIFICATIONS
13
SAFETY INFORMATION
13
INTERFERENCE
13
MEDICAL DEVICES
14
INFLAMMABLES AND EXPLOSIVES
MOTOR VEHICLES AND AIRCRAFT
14
14
CHILD SAFETY
ENVIRONMENT
14
14
WEEE APPROVAL
14
ROHS APPROVAL
15
LAWS AND REGULATIONS
15
CARE AND MAINTENANCE
15
EMERGENCIES
15
SPECIFIC ABSORPTION RATE (SAR)
15
BODY WORN OPERATION
16
REGULATORY INFORMATION
16
CE APPROVAL (EUROPEAN UNION)
16
FCC STATEMENT
IMPORTANT NOTES
17
2
Welcome to Virgin Broadband
Virgin Broadband offers an easy to use connection: simply plug it into a compatible
Desktop or Laptop computer (meeting the system requirements below) via its USB
connector. Shortly thereafter, you are ready to go online using the latest HSDPA
wireless network technology (where available).
Your Virgin Broadband USB Modem combines the convenience of high-speed
wireless connectivity with extreme ease of use. There is no need to configure
advanced settings or parameters, just plug the USB Modem in and let the installer
work its magic!
Then you are only one click away from access to the Internet, E-mail, Instant
Messaging, Downloading and more…
Your Virgin Broadband USB Modem is a truly versatile device for easy Internet access.
System Requirements
• Free USB Port (Type A). Some computers with low powered USB ports may require
the supplied two port extension cable.
• 50 MB of free hard disk space
Mac OS X 10.4 and above.
• Macintosh™ computer with an Intel, PowerPC G3, G4 or G5 processor
• 512MB of RAM
Windows XP Service Pack 2
• Pentium 4 - 1Ghz processor or equivalent
• 128MB of RAM
Windows Vista Home Basic / Home Premium / Ultimate / Business /
Enterprise
• 1 GHz 32-bit (x86) or 64-bit (x64) processor
• 512MB of RAM for Vista Basic and 1GB for Vista Premium editions.
V2.5
3
Connecting your Virgin Broadband
USB Modem
1. Connect the USB extension cable to your Modem.
2. Insert the USB cable into a spare USB port on your computer.
This double USB cable gives you more power if you have older USB ports.
Otherwise, use the single cable.
3. Follow the relevant steps below to install the Virgin Broadband Software
V2.5
4
Installing the Virgin Broadband software
Software installation for Windows
• After connecting the modem’s USB cable to your computer, the setup software will
run automatically.
• If the software does not run automatically, go to “My Computer”, which should
be located on your Windows desktop, and browse to the disk drive labelled
“VIRGINBROADBAND”. Double-click on “Autorun.exe”, to start the installation
program
1. Choose Install and then click Continue.
2. Please read the Software Licence Agreement and leave the installation
directory unchanged. The software will start to install, and a progress screen
will be displayed.
3. Once the software and drivers have installed, click Finish.
4. Your computer will now use the new software to properly configure your
modem. Please wait until the software tells you it is finished. An information
balloon will pop up from your System Tray area to advise you of this. This
process may take several minutes.
5. When the install is finished the Virgin Broadband connection software will start.
6. Click Connect. Open your Internet browser (e.g. Internet Explorer). You are
now connected to the Internet and ready to start surfing!
Software installation for Apple OS X
1. After connecting the USB Modem, the disk on the modem will automatically open.
2. Under Install or Run Program, double-click on Virgin Broadband to begin
installation.
3. Please read the Software Licence Agreement and leave the installation
directory unchanged. The software will start to install and a progress screen
will be displayed.
4. Select the disk drive where you wish to install the Virgin Broadband
connection software and click Continue to proceed.
5. Choose Easy Install to proceed with the current install.
6. You will be prompted for an administrator password to allow the software
package to be installed. In most cases this will simply be the password you use
to log onto the computer. Click OK to continue.
7. When you see the message “The software was successfully installed”, click
Close to finish.
8. Your computer will now start the Virgin Broadband Connection software which
is already configured for the Virgin Broadband network.
9. Click the Connect button. Open your Internet browser (e.g. Safari). You are
now connected to the Internet and ready to start surfing!
V2.5
5
Your First Connection
The first time you connect, you will be taken to a special page to activate your
broadband service.
Enter your first name, last name and specify your preferred email address with
‘@virginbroadband.com.au’ and new password. This will become the primary email
address that Virgin will send notifications to from time to time. Please make a note
of the details.
You will also have 4 additional e-mail addresses available. Simply give us a call on
1300 555 100 to create these additional e-mail addresses.
LED Status Information
Indicator - This indicator indicates the status of the Virgin Broadband USB Modem.
• Off: The Virgin Broadband USB Modem is powered off.
• Green: Blinking twice - The modem is searching for a network or no network is available.
• Green: Blinking once - The GSM network is normal.
• Dark Blue: Blinking twice - The modem is powered on but the Connection software
is not running.
• Green: Steady - GPRS data service is established.
• Dark Blue: Steady - UMTS data service is established.
• Light Blue: Steady - HSDPA data service is established.
Starting your Virgin Broadband connection
When you plug in your modem the Virgin Broadband USB Modem software will now
start automatically. To start the software manually, follow the directions below:
Windows
1. Double click on the Virgin Broadband icon on your desktop.
2. When you’re finished, click Disconnect and close the software, or simply
remove the USB Modem
Mac OS X
1. Start the Virgin Wireless Broadband Connection software located in your
Applications folder.
2. Click Connect, and you’re online! If you close the software whilst connected,
you will disconnect from the network.
Closing the Virgin Broadband software
Windows
To close the Virgin Broadband Connection software, click “Close” or the “X” found
in the top right of the application. Alternatively, you can right-click on the Virgin
Broadband Icon displayed in the Task Bar and select Exit.
Max OS X
To close the Virgin Broadband Connection software, click the red circle in the top left
of the application.
V2.5
6
Configuring your computer software
Configuring your Internet Browser
Your Internet (Web) Browser may need some small settings changed. Virgin
Broadband does not require anything specific to be set but, some computers may
already be setup to use old information from an earlier Internet Provider.
Microsoft Internet Explorer:
1. Open Internet Explorer. Ignore any errors that may pop up due to your
Internet Browser being configured for another Internet provider
2. Click on the Tools menu item and then choose Internet Options
3. In Internet Options, click on the Connections tab
4. Ensure the option to Never dial a connection is selected
5. Click on the LAN Settings button
6. Un-tick all the available options and click OK
7. Click OK again to close Internet Options
Safari: OS X 10.4 (Tiger)
1. Click on the Safari menu item and select Preferences
2. Click on Advanced
3. Beside Proxies click on Change Settings
4. Select the Network: Virgin Mobile Broadband modem and click on Configure
5. Click on Proxies and select Web Proxies from the list
6. Ensure the box Web Proxy Server is empty
7. Click on OK and then close the Networks window.
Safari: OS X 10.5 (Leopard)
1. Click on the Safari menu item and select Preferences
2. Click on Advanced
3. Beside Proxies click on Change Settings
4. Select Web Proxies from the list
5. Ensure the box Web Proxy Server is empty
6. Click on OK and then close the Networks window
Mozilla Firefox 2.x
1. From the Tools menu, select Options
2. Click the Advanced icon
3. In the Network tab, click on the Settings button
4. Select the Direct Connection to the Internet button
5. Click OK, and OK again to finish
V2.5
7
Setting up your E-mail
You can access your email via our web mail page at:
http://webmail.virginbroadband.com.au
Your Username is your full email address including the “@virginbroadband.com.au” part.
Simply enter your Username and your Email Password to send and receive email. You can
access this from any Internet connection on any computer. Alternatively, you may choose
to configure your email to be used by one of the following popular mail programs:
Outlook Express
1. In Outlook Express, click on the Tools menu and select Accounts.
2. Click the Add button and select Mail.
3. Enter the Display Name you would like to be displayed to others when you
send them an email, then click Next.
4. Enter the E-mail address you created when you activated your broadband
service, then click Next.
5. On the E-Mail Server Names screen, enter the following settings and click Next:
Account Type:
POP3
Incoming Mail server: mail.virginbroadband.com.au
Outgoing Mail server: smtp.virginbroadband.com.au
6. In the Internet Mail Logon screen section, enter the following settings and
click Next.
Account Name:
Your full email address
([email protected])
Password:
The password you created with the email address.
7. Ensure Remember Password is ticked
8. Leave Require logon using Secure Password Authentication (SPA) un-ticked
and click Next to continue.
9. Click Finish to complete your mailbox setup.
You have now completed setting up your mailbox and are ready to start sending and
receiving e-mail.
Outlook XP or Outlook 2003
1. In Outlook XP or 2003, click on the Tools menu and select E-mail Accounts.
2. Select the Add a new e-mail account option and click Next.
3. Select POP3 and click Next.
4. Enter your User Information and the following Server Information:
Your Name:
Email Address:
Incoming Mail server:
Outgoing Mail server
V2.5
The name you would like to be displayed to others when you send them an email.
Your Virgin Broadband email address.
mail.virginbroadband.com.au
smtp.virginbroadband.com.au
8
User Name:
Your full email address
([email protected])
Password:
The password you created with the email address.
5. Ensure Remember Password is ticked
6. Leave Require logon using Secure Password Authentication (SPA) un-ticked
7. Click Next to continue.
8. Click Finish to save the settings and then Close to exit the Internet Accounts Screen
You have now completed setting up your mailbox and are ready to start sending and
receiving e-mail!
Outlook 2007
1. In Outlook 2007, click on the Tools menu and select Accounts Settings.
2. Select the E-mail tab option and click New.
3. Ensure Microsoft Exchange, POP3, IMAP or HTTP is selected and then click Next
4. In the Add New E-mail Account window, select the option to Manually
configure server settings then click Next
5. Ensure Internet Email is selected and then click Next
6. Enter your User Information and the following Server Information:
Your Name:
The name you would like to be displayed to others when you send them an email.
Email Address:
Your Virgin Broadband email address.
Account Type:
POP3
Incoming Mail server: mail.virginbroadband.com.au
Outgoing Mail server smtp.virginbroadband.com.au
User Name:
Your full email address
([email protected])
Password:
The password you created with the email address.
7. Ensure Remember Password is ticked
8. Leave Require logon using Secure Password Authentication (SPA) un-ticked
9. Click Next to continue.
10. Click Finish to save the settings.
11. Ensure your new email account is selected, click on Set as Default then click Close
You have now completed setting up your mailbox and are ready to start sending and
receiving e-mail!
Windows Mail (Vista)
1. In Windows Mail, click on the Tools menu and select Accounts.
2. Click the Add button.
3. Select E-mail Account and click Next.
4. Enter a Display Name and click Next.
V2.5
9
5. Enter your Virgin Broadband E-mail address and click Next.
6. Ensure that POP3 is selected in the Incoming e-mail server type field and
enter the following server details:
Incoming Mail server: mail.virginbroadband.com.au
Outgoing Mail server smtp.virginbroadband.com.au
7. Click Next to continue
8. Enter your full email address in the E-mail username field. Enter your
password and click Next.
9. Click Finish.
10. Click Close to save the settings and access your email
You have now completed setting up your mailbox and are ready to start sending and
receiving e-mail!
Apple Mail OS X 10.4 (Tiger)
1. In Apple Mail client, select Add Account from the File menu and then click
Continue on the next screen.
2. On the New Account page, enter the following information:
Account Type:
Account Description:
Full Name:
Email Address:
3. Then click Continue.
POP
Virgin Broadband
The name you would like to be displayed to others when you send them an email.
Your Virgin Broadband email address.
4. Enter the following in the Incoming Mail Server screen:
Incoming Mail server:
User Name:
Password:
5. Then click Continue.
mail.virginbroadband.com.au
Your full email address
([email protected])
The password you created with the email address.
6. Leave the default settings and click Continue.
7. Enter the following Outgoing Mail Server:
Outgoing Mail server: smtp.virginbroadband.com.au
8. Then click Continue
9. Leave the default settings and click Continue.
10. Confirm that the settings are correct and click Continue.
11. Click Done.
You have now completed setting up your mailbox and are ready to start sending and
receiving e-mail!
Apple Mail OS X 10.5 (Leopard)
1. Open Apple Mail and select Add Account from the File menu.
V2.5
10
2. Enter the following Account information:
Full Name:
The name you would like to be displayed to others when you send them an email.
Email Address:
Your Virgin Broadband email address.
Password:
The password you created with the email address.
3. Click the Continue button.
4. Enter the following Incoming Mail Server information:
Account Type:
POP
Description:
Virgin Broadband
Incoming Mail server: mail.virginbroadband.com.au
User Name:
Your full email address
([email protected])
Password:
The password you created with the email address.
5. Click the Continue button.
6. Ensure the Use Secure Sockets Layer (SSL) option is un-ticked and click
the Continue button.
7. Enter the following Outgoing Mail Server information:
Description:
Virgin Broadband
Outgoing Mail server: smtp.virginbroadband.com.au
8. Ensure the Use Authentication option is un-ticked and click the Continue
button.
9. Ensure the Use Secure Sockets Layer (SSL) option is un-ticked and click
the Continue button.
10. Confirm that the settings are correct and click the Create button
You have now completed setting up your mailbox and are ready to start sending and
receiving e-mail!
Using the Virgin Broadband Services
Checking Your Data Usage
To check your usage, go to http://mybroadbandusage.virginbroadband.com.au and
log in using your full Virgin Broadband email address and email password.
Using Webmail
To use the Virgin Broadband Webmail service, go to
http://webmail.virginbroadband.com.au and log in using your full Virgin Broadband
email address and email password.
Checking Your Account Details
To check your account details, go to http://www.virginbroadband.com.au/ and log in
using your Virgin Broadband Service Number and your 6 digit Account Security PIN
which you set when you opened your account.
V2.5
11
Troubleshooting
SYMPTOM
POSSIBLE CAUSE
POSSIBLE SOLUTION
No Active LED on
USB Modem
USB Modem is not
connected to a
working USB port.
Check if the USB Modem is firmly
plugged into the USB Port or check the
connection of the USB extension cable
if you are using one. Perhaps try the
double ended USB cable or another USB
port.
LED does not
Start blinking
(USB Modem
does not attach
to GPRS or
UMTS)
No SIM inserted
Disconnect the USB Modem. Insert the
SIM and reconnect the USB Modem to a
USB port.
Insufficient signal
Try moving the USB Modem to a
different location (e.g. Near a window).
The extension cable may be helpful
in this situation. Refer to the signal
strength meter in the software.
Drivers are not
properly installed
(USB Modem will show
a yellow exclamation
mark in Device
Manager - Microsoft
Windows only)
Try removing ALL USB devices
connected to your computer, close all
software applications and restart your
computer.
The APN (Access Point
Name) is incorrect
Ensure that the APN is set to
‘VirginBroadband’.
You are attempting
to use the service
outside of Australia.
This is not currently supported.
No reception or weak
reception where you
are situated.
In the Virgin Broadband Wireless
Software, confirm that ‘UMTS Preferred’
is selected under Profile Management.
Additionally, check the signal strength
meter to ensure sufficient network
coverage.
The Virgin
Broadband
software doesn’t
detect the USB
Modem
Faulty Driver
Installation
Remove all previously installed instances
of the software. Then connect the USB
modem to re-install the software.
Conflicting with other
programs
Disable or Remove any other
communication based program that may
conflict with the USB Modem (at your
own discretion)
Slow Speeds
No or Weak UMTS/
HSPDA network where
you are situated
In the Virgin Broadband Connection
Software, confirm that ‘UMTS Preferred’
is selected under Profile Management.
Additionally, check the signal strength
meter to ensure sufficient network
coverage.
LED does Blink,
but does not
connect
If you are unsure, just ask us how on 1300 555 100.
V2.5
12
Virgin Broadband USB Modem information
SIM Card Information
• To help protect against damage from electronic discharge (e.g. static electricity)
please do not touch the SIM card connectors. As a precaution, always make sure
that your USB Modem is already in your hand before inserting or removing the
SIM card.
• Removing the SIM card may cause damage and should be avoided.
• Only the SIM card provided by Virgin Broadband will work in your USB Modem.
• If you remove the SIM and try to use your USB Modem it will not be able to find
the network. If you do this, unplug the USB Modem, replace the SIM and plug your
Modem in again.
• If the SIM is not properly inserted, you will see the following error message.
“Remove and re-insert the SIM and try again.”
Detailed Technical Specifications
Technical standard
USB interface standard
Radio system
Radio power output
Dimensions (D % W % H)
Weight
Power supply method
Operating temperature
Storage temperature
3GPP R5
USB2.0 full speed standard
GSM/GPRS/EDGE: 900 MHz/1800 MHz/1900 MHz
HSDPA /WCDMA: 2100 MHz
HSDPA/WCDMA 2100 MHz: Power Class 3,
+24 dBm+1/-3
89.37 mm % 42.61 mm % 14.50 mm
Approximately 50 g
One or two USB interfaces (depending on the
specifications of the connected computer)
-10 to +55
-40 to +70
Safety Information
Read the safety information carefully to ensure the correct and safe use of your
wireless device.
Interference
Do not use your wireless device under circumstances where use of such devices are
explicitly or where its use may cause danger or interference with electric devices.
Medical Devices
• Use your wireless device taking care to follow the rules and regulations set forth
by hospitals and health care facilities where applicable.
• Some wireless devices may affect the performance of hearing aids. For any such
problems, consult your hearing aid service provider.
• If you are using an electronic medical device, consult your doctor or device
manufacturer to confirm whether the radio waves emitted by the modem may
affect the operation of this medical device.
V2.5
13
Inflammables and Explosives
To prevent explosions and fires, do not use your wireless device in areas where
inflammable and explosive devices may be stored. These areas include but are not
limited to the following:
• Petrol stations
• Fuel depots (such as the bunk below the deck of a ship)
• Containers/Vehicles for storing or transporting fuels or chemical products
• Areas where the air contains chemical substances and particles (such as granule,
dust, or metal powder)
• Areas indicated with the “Explosives” sign
• Areas indicated with the “Power off bi-direction wireless equipment” sign
• Areas where you are generally advised to stop the engine of a vehicle.
Motor Vehicles and Aircraft
• Observe local laws and regulations while using the wireless device. To prevent
accidents, do not use your wireless device whilst driving.
• Radio signals may affect electronic systems used in motor vehicles. For more
information, consult the vehicle manufacturer.
• In a motor vehicle, do not place the wireless device over the air bag or in the
air bag deployment area. In the event of deployment of the air bag, the wireless
device may cause injury due to the extreme forces at play.
• Observe the rules and regulations of airline companies. When boarding and
aircraft, switch off your wireless device. Radio signals emitted by the wireless
device may interfere with the aircraft’s electrical systems.
Child Safety
Do not allow children to use the wireless device without guidance. Small and sharp
components of the wireless device may cause danger to children or cause suffocation
if swallowed.
Environment
Observe the local regulations regarding the disposal of packaging materials, used
wireless devices and accessories. Promote recycling where possible.
WEEE Approval
This wireless device is in compliance with the essential requirements and other
relevant provisions of the Waste Electrical and Electronic Equipment Directive
2002/96/EC (WEEE Directive).
RoHS Approval
This wireless device is in compliance with the restrictions on the use of certain
hazardous substances in electrical and electronic equipment Directive 2002/95/EC
(RoHS Directive).
V2.5
14
Laws and Regulations
Observe laws and regulations when using your wireless device. Respect the privacy
and legal rights of others.
Care and Maintenance
It is normal for your wireless device to get hot during operation. Before you clean or
maintain the wireless device, stop all applications and disconnect the wireless device
from your computer.
• Use your wireless device and accessories with care and in a clean environment.
Keep the wireless device away from fires, lit cigarettes and other direct flame
sources.
• Protect your wireless device and accessories from water and vapour and keep them dry.
• Do not drop, throw or bend your wireless device.
• Clean your wireless device with a piece of damp, soft, anti-static cloth. Do not
use any chemical agents (such as alcohol and benzene), chemical detergent, or
powder when cleaning.
• Do not leave your wireless device and accessories in a place with a considerably
low or high temperature.
• Only use accessories approved by the manufacturer. Contact an authorised
service centre to address any abnormalities with the wireless device or
accessories.
• Do not dismantle the wireless device or accessories. This will void the warranty.
Emergencies
This wireless device functions through receiving and transmitting radio signals.
Therefore, the connection cannot be guaranteed in all conditions. In an emergency,
you should not rely solely on the wireless device for essential communications.
Specific Absorption Rate (SAR)
Your wireless device is a radio transmitter and receiver. It is designed not to exceed
the limits for exposure to radio waves recommended by international guidelines.
These guidelines were developed by the independent scientific organisation
ICNIRP and include safety margins designed to assure the protection of all persons,
regardless of age and health.
The guidelines use a unit of measurement known as the Specific Absorption Rate, or
SAR. The SAR limit for wireless devices is 2.0 W/kg and the highest SAR value for this
device when tested complied with this limit.
Body Worn Operation
Important safety information regarding radiofrequency radiation (RF) exposure:
To ensure compliance with RF exposure guidelines, this device must be used with a
minimum of 1.5 cm separation from the body.
Failure to observe these instructions could result in your RF exposure exceeding the
relevant guideline limits.
V2.5
15
Regulatory Information
The following approvals and notices apply in specific regions as noted.
CE Approval (European Union)
The wireless device is approved to be used in the member states of the EU. The
wireless device is in compliance with the essential requirements and other relevant
provisions of the Radio and Telecommunications Terminal Equipment Directive
1999/5/EC (R&TTE Directive).
Federal Communications Commission Notice (United States): Before a wireless device
model is available for sale to the public, it must be tested and certified to the FCC that
it does not exceed the limit established by the government-adopted requirement for
safe exposure.
The SAR limit adopted by the USA and Canada is 1.6 watts/kilogram (W/kg) averaged
over one gram of tissue. The highest SAR value reported to the FCC for this device
type was compliant with this limit.
FCC Statement
This device complies with Part 15 of the FCC Rules. Operation is subject to the
following two conditions: (1) this device may not cause harmful interference, and (2)
this device must accept any interference received, including interference that may
cause undesired operation.
* This device should be installed and operated with a minimum distance of 20 cm
between the radiator (USB modem) and your body when using it via USB cable.
V2.5
16
IMPORTANT NOTES
Email Address: @virginbroadband.com.au
Email Password:
Service Number:
PIN Number:
17
Please recycle me
virginbroadband.com.au
18
DY9771 APR 08