1
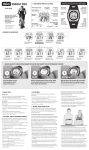
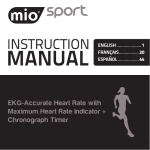
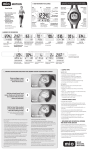
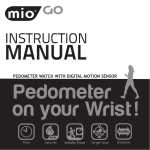
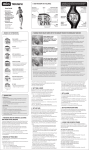
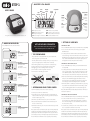
A. MIO STEP 1 AT-A-GLANCE Alarm Split Function Weight Mode Alarm Mode Stopwatch Stride Length PM AM This guide is also available at www.miowatch.com B. Modes of operation Press MODE to move to the next mode. LB weight in pounds INCH stride length in inches KG weight in kilograms CM stride length in centimeters STEP number of steps walked KCAL number of calories burned KM distance walked in kilometers MILE distance walked in miles ACTIVATING YOUR PEDOMETER If the screen is blank remove the insulation tape from the battery door to activate the unit. STEP •Shows number of steps taken C. Tips for wearing •The pedometer is designed with a clip on the back that can be clipped on your waist band. DISTANCE •Shows distance travelled in kilometers or miles •For the pedometer to accurately count your steps it must stay in an upright position and be worn on the hip. The following situations may result in miscounted steps: 1.If the pedometer isn’t perpendicular to the ground. 2.Dragging your feet or taking uneven footsteps 3.The vibrations from being inside a vehicle 4.The motion of standing up or down CALORIES •Dipslays calories burned D. Determining Your Stride Length You will need a tape measure to ensure accuracy. 1.Pick a spot on the floor and mark it. TIME •Choose either 12 or 24 hour clock ALARM •Set daily alarm. STOP/DOWN button starts or stops timer, decreases value MODE/UP button switches modes, increases value E. Setting up User Data Setting up Time 1.Press the MODE button until you reach the Time screen (TMR). 2.You can select 12 or 24 hour format by pressing the DOWN button. 3.To change the hour hold the SET button until the hour starts flashing, release the SET button then use the UP or DOWN buttons to adjust the time and press SET to confirm. Press and hold the DOWN or UP button to quickly move through the numbers. Repeat for the minutes. Setting up the Alarm Clock 1.Press the MODE button until you reach the Alarm Clock Screen (ALM). 2.To change the hours hold the SET button down until the hours start flashing, release the SET button then use the UP or DOWN buttons to adjust the hours. When desired hour found press the SET button. Repeat for the minutes. 3.After hours and minutes are entered they will start flashing then press UP or DOWN to toggle the activation of the alarm. An image of a bell with appear in the top left corner of the display screen indicating the alarm is activated. STOPWATCH •Time your activities SET SET button resets timer AR CLE CLEAR button resets values /ST Time Mode User’s Guide DOWN STEP 1 UP DE/ MO 2.Start with your toe on that line and proceed to take ten natural strides of the type of activity you wish to measure strides for (walk, jog or run). 4.When the alarm is sounding it can be turned off by pressing any button. To deactivate the alarm for future days, repeat steps 1–3 and toggle the alarm off so the bell disappears. Note: The alarm will automatically turn off after 1 minute if no button is pushed. Setting up the Step Counter 1.Press the MODE button until you reach the Step screen (STEP). 4.Measure the distance between the two marked spots in inches or centimetres. 2.To choose either km or miles for your distance to be measured in, press and hold the SET button, you will see km or miles flashing. Press UP or DOWN to select miles or km. Press SET to select. 5.Divide the number by 10. This is the number that you enter for stride length. To reset the step counter press the clear button. This will also reset distance and calories burned. Note: If you choose to measure your steps in miles (imperial) all other measurements will be done with the imperial system (weight in lbs and stride length in inches). If you choose to measure your steps in km (metric) all your other measurements will be done with the metric system (cms and kms). Note: If you choose to measure your steps in miles (imperial) all other measurements will be done with the imperial system (weight in lbs and stride length in inches). If you choose to measure your steps in km (metric) all your other measurements will be done with the metric system (cms and kms). 3.Mark the spot where the toe of your front foot lands F. Entering your Stride Length 1. Press the MODE button until you reach the Distance Screen (Either KM or MILE will be displayed based on your previous selection). 2.To enter your stride length in inches (IN) or centimetres (CM) press and hold the SET button until the word Stride is displayed and the numbers flash, release the SET button then use the UP or DOWN button to enter your stride length (see section Determining Your Stride Length for more details). Press SET to confirm. 6. To resume press the SET button again. You can repeat as many times as necessary. 2.Remove the old battery and replace with the new one. Make sure that the polarity of each is lined up correctly. 7. To clear, press the SET button then the ST button and the SET button again. 3.Replace the cover, it should click when in place properly. I. Changing the Batteries Note: You must re-enter your personal information once the battery has been changed. MIO Step 1 takes a LR1130 battery (available at most drugstores). 1.Hold the clip on the back of the pedometer up and slip the battery cover that is located underneath the clip. For more info visit www.miowatch.com Note: If you previously selected miles, then your stride length will be entered in inches (in) and if kms was selected then your stride length will be entered in centimetres (cm). You can toggle the view between KM and MILE by pressing the ST button. G. Setting up your Weight Entry 1.Press the MODE button until you reach the Calories Screen (KCAL). 2.To enter your weight in kilograms (kg) or pounds (lbs) press and hold the SET button and then use the UP or DOWN buttons to enter your weight. Press SET to confirm. Note: If you previously selected miles then your weight will be entered in pounds (lbs) and if kms was selected then your weight would be kilograms (kg). H. Using the StopWatch 3500 Calorie Countdown 1.Press the MODE button until you reach the Stopwatch screen (STW). Your MIO Step 1 can help you to achieve MIO’s 3500 Calorie Countdown and lose 1 pound per week. Simply track your calories burned throughout the day as you are walking with a goal of burning 500 per day for a total of 3500 per week. Use the MIO Watch online diary to help you keep track of your daily calorie burn at www.miowatch.com. 2.Press the ST button to start the stopwatch 3. Press the ST button to stop the stopwatch 4. To restart back to zero press the SET button. 5. If you wish to use the split (SPL) function press the SET button while the stop watch is running. Pressing the SET button will stop the time on the screen but keep the time running in the background. The split function is useful for timing an ongoing activity such as laps where you need to mark the interval times but still the need the stopwatch to be running in the background to capture the total time. Physi-Cal Enterprises Inc., 7501 N Harker Drive, Peoria, IL 61615 Toll-free: 1-877-770-1116 • www.miowatch.com Disclaimer Limited (One Year) Warranty The material in the Instruction Guide & MIOSense booklet is for information purposes only. The MIO pedometer described is subject to change without prior notice, due to the manufacturer’s continuous development program. The MIO pedometer, Instruction Guide & MIOSense booklet are intended to support a sensible approach to health & Fitness. They are not intended to replace professional medical advice related to diet, exercise or weight loss. Physi-Cal Enterprises shall not be liable for any damages, direct or incidental, consequential or special, arising out of, or related to, the use of MIO & accompanying documents. IF YOU EXPERIENCE SEVERE OR PROLONGED DISCOMFORT OR PAIN AT ANY TIME, SEE YOUR DOCTOR IMMEDIATELY. The information in the Instruction Guide & MIOSense booklet is intended to be used as a general guide only & may not be appropriate to specific users. In particular: Maximum Heart Rate. Consult a doctor to determine your personal maximum heart rate. MIO uses complex formulae that generally predict the HR based upon studies of subjects with healthy hearts. The percentage of maximum calculations are not to be relied upon especially if you have a history of heart disease, stroke, high or low blood pressure, diabetes, asthma or other circulatory or respiratory conditions. Calorie Target & Expenditure. Reliance on inappropriate intake & expenditure targets may result in excessive weight gain or loss, fainting, dietary deficiencies or other adverse medical consequences. Consult a doctor to determine what caloric intake & expenditure targets are appropriate for you. MIO, while designed to provide an ECG-accurate heart rate, is neither designed nor warranted for medical use & should not be relied upon for medical purposes. ALWAYS CONSULT A DOCTOR BEFORE BEGINNING A NEW EXERCISE REGIME OR DIET PROGRAM OF ANY KIND. The MIO lifestyle pedometer, except the battery, is warranted to the original purchaser to be free from defects in material & workmanship under normal use for a period of one (1) year from the date of purchase. During the warranty period, & upon PROOF OF PURCHASE, the MIO Fitness pedometer will be repaired or replaced (with the same or similar model) at the option of the manufacturer, without charge for either parts or labor. The warranty does not apply to damage resulting from abuse, misuse or alteration of the MIO lifestyle pedometer. This includes any damage to the MIO that appears to be caused by the use of tools. Without limiting the foregoing, damage resulting from bending or dropping the MIO lifestyle pedometer will be deemed to result from abuse or misuse. This warranty is void if the pedometer case of the MIO Fitness pedometer has been opened or otherwise tampered with. There is a U.S. $12.00 charge for handling, postage & insurance on warranty repairs. Contact Physi-Cal customer service to arrange for warranty repair or replacement by phoning 1.877.770.1116. It can take up to six weeks to receive your replacement/ repaired pedometer after your defective pedometer has been received at our warehouse. Please note that only your original retailer can offer refund according to their own terms & conditions. You can also contact us by mail to arrange to receive return/replacement shipping authorization: MIO Pedometer Service Center, 7501N. Harker Drive, Peoria, IL 61615, toll free 1.877.770.1116 fax 1.309.689.6543 Neither the warranty nor any other warranty, express or implied, including implied warranties of merchantability, shall extend beyond the warranty period (one year from date of original purchase). No responsibility is assumed for any incidental or consequential damage, including but not limited to damage resulting from inaccuracy of the product or any of its functions. The laws of some jurisdictions do not allow the exclusion or limitation of incidental or consequential damages so that the above limitations or exclusions may not apply to you. The warranty gives you specific legal rights & you may have other rights that vary from state to state. This warranty is void unless the MIO pedometer is purchased from an authorized MIO reseller. MIO STEP 1 SPECIFICATIONS 12/24 hour clock + Daily alarm Maximum Steps: 99,999 Maximum Distance: 99.999 km or miles Maximum Calories: 9999.9 Maximum Stopwatch: 99'59"99 (99 minutes and 59.99 seconds) Material: plastic with rubber paint Operating Temperature: 0°C to 45°C Battery: standard lithium type LR1130 Expected Battery Life: 1 year SPECifications Subject to change without notice • Made in China EU RESIDENTS: Do not dispose of this product as unsorted municipal waste. It is your responsibility to return this product to local recycling service. EU-DECLARATION OF CONFORMITY Physi-Cal Enterprises Inc. declares this pedometer (MIO Step 1) in compliance with EMC directive 2004/108/EC. A copy of the Declaration of Conformity is available on request from our Customer Service.