1
Manual Release 1
Diagnostics and Troubleshooting Exam
Study Guide
Version 7.20
Schneider Electric (Australia) Pty Ltd
3 Fitzsimons Lane
GORDON NSW 2072
PO Box 174
PYMBLE NSW 2073
AUSTRALIA
Telephone:
61 2 9496 7300
Fax:
61 2 9496 7399
DISCLAIMER
Schneider Electric (Australia) Pty Ltd makes no representations or warranties with respect to this manual and, to the maximum extent permitted by law, expressly
limits its liability for breach of any warranty that may be implied to the replacement of this manual with another. Furthermore, Schneider Electric (Australia) Pty
Ltd reserves the right to revise this publication at any time without incurring an obligation to notify any person of the revision.
Schneider Electric (Australia) Pty Ltd
ABN 4200 4969 304
V7.20 Upgrade Exam Study Guide Training Manual
INTRODUCTION AND LEGAL NOTICE
Your purchase of this official V7.20 Upgrade Exam Study Guide Training Manual entitles you to undertake the V7.20 Upgrade Exam Study Guide training
course. The number allocated to you on purchase of this manual is your key to complete the course evaluation.
Satisfactory completion of this evaluation is mandatory for you to obtain a certificate of completion of the training course.
The contents of this manual are proprietary to Schneider Electric (Australia) Pty Ltd and all rights, including copyright, are reserved by Schneider Electric
(Australia) Pty Ltd. You must not copy any part of the manual in hard or electronic form or make any adaptation or other commercial use of it without Schneider
Electric's prior written consent.
Schneider Electric (Australia) Pty Ltd will not accept any liability for action taken in reliance on this training manual.
COPYRIGHT
(c) Schneider Electric (Australia) Pty Ltd 2006-2010. All rights reserved. This material is copyright under Australian and international laws. Except as permitted
under the relevant law, no part of this work may be reproduced by any process without the prior written consent of Schneider Electric (Australia) Pty Ltd. Any
authorised reproduction must acknowledge Schneider Electric (Australia) Pty Ltd as owner of copyright in work.
TRADEMARKS
Schneider Electric (Australia) Pty Ltd has made every effort to supply trademark information about company names, products and services mentioned in this
manual. Trademarks shown below were derived from various sources.
CitectSCADA, CitectHMI, Vijeo Citect, CitectFacilities, CitectHistorian, Vijeo Historian and Ampla are registered trademarks of Schneider Electric (Australia)
Pty Ltd
Windows, Windows NT, Windows 2000, Windows XP, Windows Vista, MSSQL Server and Excel are trademarks of Microsoft Corporation.
Oracle is a registered trademark of Oracle Corporation and/or its affiliates.
Novell and NetWare are registered trademarks of Novell Inc.
dBASE is a trademark of dataBased Intelligence, Inc.
GENERAL NOTICE
Some product names used in this manual are used for identification purposes only and may be trademarks of their respective companies.
PLEASE NOTE
Electrical equipment should be installed, operated, serviced, and maintained only by qualified personnel. No responsibility is assumed by Schneider Electric
(Australia) Pty. Ltd. for any consequences arising out of the use of this material.
Validity Note
The present documentation is intended for qualified technical personnel responsible for the implementation, operation and maintenance of the products described.
It contains information necessary for the proper use of the products. However, those who wish to make a more "advanced" use of our products may find it
necessary to consult our nearest distributor in order to obtain additional information.
The contents of this documentation are not contractual and in no way constitute an extension to, or restriction of, the contractual warranty clauses.
For further information contact Schneider Electric (Australia) Pty Ltd. at www.citect.com/scada or www.schneider-electric.com/vijeocitect
About Us
Members of Educational Services' team of Instructional Designers have tertiary qualifications in Education, Educational Course Development and are also
experienced instructors in their own right; some are also published authors. Currently, the team is supporting a range of over 70 courses in multiple languages
and multiple software environments.
Authors
Alynda Brown, David Heath
January 2011 Edition for Version 7.20
Manual Release 1
Written, Printed and bound in Australia
ii
Version 7.20
January 2011
Contents
CHAPTER 1:
INTRODUCTION TO THE EXAMINATION SYSTEM .................................. 1-1
Overview .................................................................................................................... 1-1
Examination and Certification.................................................................................... 1-2
Registration................................................................................................................. 1-3
The Examination System............................................................................................ 1-4
Examination Instructions Course ............................................................................... 1-7
Exam Questions.......................................................................................................... 1-8
The Examination ........................................................................................................ 1-9
Exam Sections .......................................................................................................... 1-13
Working through the Exam ...................................................................................... 1-16
Submitting an Exam ................................................................................................. 1-17
Completing the Exam ............................................................................................... 1-19
Successful Completion ............................................................................................. 1-20
CHAPTER 2:
V7.20 DIAGNOSTICS AND TROUBLESHOOTING EXAM TOPICS ............ 2-1
Overview .................................................................................................................... 2-1
Tag Extensions ........................................................................................................... 2-2
The Cicode Kernel...................................................................................................... 2-7
Communication and the Kernel................................................................................ 2-12
Logging Tools .......................................................................................................... 2-20
Communications Analysis........................................................................................ 2-22
Performance Management........................................................................................ 2-23
CHAPTER 3:
NAVIGATING THE KNOWLEDGE BASE .................................................. 3-1
Overview .................................................................................................................... 3-1
Searching .................................................................................................................... 3-2
Diagnostics and
Troubleshooting Exam
Manual Release 1
iii
Chapter 1:
Introduction to the Examination System
Overview
Introduction
There are not many people who enjoy taking exams. In fact most people view
impending exams with some degree of trepidation. There are, however, three
things that help alleviate anxiety – preparation, preparation and preparation.
This Study Guide is designed to help prepare you for the exams in the
CitectSCADA Certified Engineer stream. In this study guide you will see a list of
suggested exercises, and a list of references for suggested reading.
The CSCE exams cover a very broad range of topics, so to enhance your chances of
passing the exams it is advisable to take enough time to study the topics with which
you are not yet familiar.
The best resource is the Educational Services Training courseware. Each of the
exams is designed around the content in the Educational Services curriculum.
Of course you also need to be familiar with searching the CitectSCADA Help files
and searching the CitectSCADA Knowledge base.
This Chapter Covers These Topics:
Examination and Certification ...............................................1-2
Registration............................................................................1-3
The Examination System .......................................................1-4
Examination Instructions Course...........................................1-7
Exam Questions .....................................................................1-8
The Examination....................................................................1-9
Exam Sections......................................................................1-13
Working through the Exam..................................................1-16
Submitting an Exam.............................................................1-17
Completing the Exam ..........................................................1-19
Successful Completion ........................................................1-20
Examination and Certification
Authorised
Examination
Centres
There are a number of Authorised Examination Centres throughout the world.
These centres are most likely to be your local Citect Office or Partner. A list of
Examination Centres is located on the Educational Services website. Any
Authorised Examination Centre must have been approved by Educational Services.
We are currently in the process of authorising our Citect offices so many of the
Citect offices are in provisional status. If you do not find your local office listed on
this page contact them directly as they may be a Provisional Examination Centre.
All examinations must be held under the supervision of an approved Examination
Supervisor.
1-2
Version 7.20
January 2011
Registration
Registering for
an Exam
Before anyone may sit for any of the Exams in the Certified Engineer program they
must register via the Citect website.
To register for an exam through the website, this page needs to be filled out with
the candidate's details. When the request is submitted an email will be sent to the
Exam Coordinator in the Examination Centre that has been specified. The Exam
Coordinator will contact the candidate regarding the details of the examination.
Go to the page http://www.citect.com/education and select the Exam Registration
option from the left-side menu.
Complete the Exam Registration page with the appropriate information.
Why Register?
The registration process not only allows your local office to coordinate exams but is
the first step in the exam process. When you register for the first time the Exam
Coordinator in your region will arrange for your unique Student Login and
Student Password. This Student Login and Password will be used in all of your
Exams. We will also need an email address so that your exam results may be sent to
you.
The Student Login follows this format
es_firstname_lastname
The Student Password is a computer generated random selection of characters.
The password will generally not be revealed to you, instead the Examination
Supervisor will log in on your behalf at the examination centre
Exam Enrolment
The exam enrolment is created prior to the day of the exam. When the Exam
coordinator registers the candidate to sit for a particular exam their Username is
entered into the Enrolled User Group for that exam. The enrolment is disabled until
the day of the exam.
The Day of the
Exam
The Exams are supervised by Examination Supervisors. The exam may be held at
the end of a training course or independently of any courses. When the candidate
arrives at the Examination Centre they will need to identify themselves to the Exam
Supervisor. If this is the candidate's first exam the Exam Supervisor will need to
supply them with their Exam Username and Password. They will then be escorted
to the Examination Room. The location of the testing room is most likely to be a
Citect Training Room.
Diagnostics and
Troubleshooting Exam
Manual Release 1
1-3
The Examination System
Open Book
Exams
All exams are open book. The computers in the Examination room are loaded with
an appropriate version of CitectSCADA for the exam being undertaken, the
Knowledge Base and all PDF documents available on the distribution CD-ROM or
DVD-ROM. However, no other material will be permitted in the Examination
Room, for example, the Educational Services Training Manuals or the Study
Guides.
The exams are supervised by the Exam Supervisor. Whilst candidates are allowed
to refer to the online documentation and to create test projects on the installed
CitectSCADA system, no speaking is allowed and no looking at another computer.
The examination procedure does not allow:
Notes to be taken in or out of the examination room
Screen shots or copies of examination questions to be taken from the
examination room
USB keys or any other removable media to be taken in or out of the
examination room
Photographs of any type
Talking
Collaboration with anyone
1-4
Version 7.20
January 2011
The Examination System (cont.)
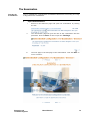
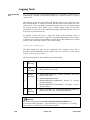
Logging In to the
Exam System
The Examination system is hosted on the Citect UniverCITe website and can be
accessed from a web browser. The Examination Supervisor will have the page
loaded prior to your arrival.
1
Login to the Examination System.
i.
Enter the student name and password at the login page.
The name and password follows this format.
es_firstname_lastname
password
ii.
Diagnostics and
Troubleshooting Exam
Click GO.
Manual Release 1
1-5
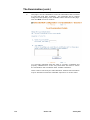
Logging In to the Exam System (cont.)
iii.
The Citect UniverCite will open at the Welcome page. All
examinations and courses in which the candidate is currently enrolled
will be listed.
1-6
Version 7.20
January 2011
Examination Instructions Course
Course for New
Candidates
A course has been provided to introduce new candidates to the examination system.
If this is a new candidate they should complete this course before proceeding.
1
Complete the Examination Instructions course.
i.
Once the candidate has logged into the examination system all
courses and examinations in which they are enrolled are listed. If this
is a first time candidate they should complete the Examination
Instructions course. Click the Examination Instructions title to
enter the course.
ii.
Click the Start --> link to open the course.
iii.
The title page of the Course will open. Click the Next --> link to begin
the course.
iv.
Follow the links through the pages to view examples of all the
question types that are used throughout the examination system.
Diagnostics and
Troubleshooting Exam
Manual Release 1
1-7
Exam Questions
Single Answer
Read the question and select your response from the list of options. Select the radio
button beside your choice.
Multiple Answers
These questions are expecting at least one response, possibly as many as four. Tick
boxes are provided for you to select as many or as few responses as you think
appropriate.
In order to score the marks for these questions, you much select exactly the correct
set of responses; there are no partial marks for partially correct responses.
1-8
Version 7.20
January 2011
The Examination
Starting the
Examination
Once a candidate has completed the Examination Instructions course they are ready
to begin their first examination.
1
Open the Examination.
i.
Return to the Welcome page and open the examination by clicking
the link.
ii.
The introduction page will give the title of the examination and the
passmark. Click the Start --> link to open the Title Page.
iii.
The next page is the title page of the examination. Click the Next -->
link to continue.
Diagnostics and
Troubleshooting Exam
Manual Release 1
1-9
The Examination (cont.)
iv.
This page is for the candidate to enter the information that is needed
to print and send their certificate. The certificate will be created
using the exact spelling of the candidate name entered on this page.
Click the Next --> link to continue.
It is critically important that this page is correctly completed and
properly submitted as it is the only cross-check we have to ensure
the examination was conducted under suitable conditions.
Those exams received by the Chief Examiner without this information
may be declared null and the candidate required to re-sit the exam.
1-10
Version 7.20
January 2011
The Examination (cont.)
v.
The Examination Instructions provide the candidate with important
information regarding the type of questions that they will see.
vi.
The Examination Sections provides information on the content of
each section and the controls that are contained within each section.
It is important that the candidate is familiar with these controls.
Diagnostics and
Troubleshooting Exam
Manual Release 1
1-11
Starting the Examination (cont.)
vii.
The instructions page provides information regarding the time limits
and how to submit each section. Once the section has been
submitted they may not re-enter that section. The time allocated
increases with the difficulty of the questions. Regardless of the
difficulty or the number of the questions each section is given a
minimum of 5 minutes. Extra time has been provided in this system
due to the needs of candidates who do not not speak English as their
primary language.
viii.
The instructions page also provides information regarding how to
finalise the examination and upload their marks. When the candidate
has finished reading this page click the Next --> link to continue.
1-12
Version 7.20
January 2011
Exam Sections
Topics
Each Exam Section covers a specific Topic. These topics are listed when the
exam is entered but before the exam starts.
Value
Each section contains a pool of questions. The candidate is given a random
selection from this pool. Not all questions are of the same difficulty. Therefore
different sections have different values assigned to the questions. However, all
questions in each section have the same value. The Section information at the
beginning of each section indicates the value of the questions.
Diagnostics and
Troubleshooting Exam
Manual Release 1
1-13
Exam Sections (cont.)
Entering the
Section
The Section Information page has a Start button that must be clicked to enter the
section. The candidate should NOT press the Next --> link as this will not enter the
section. Instead it will take them to the beginning of the following section.
Section Time
All Sections allow a certain maximum amount of time in which to complete your
work. Each section of the examination corresponds to chapters in the courses and is
timed independently.
The available time is fixed for each exam and is also subdivided into allotments for
each section of the exam. The system will not "bank" time - at the end of a section,
any spare time is lost.
The Introduction page of each section provides the candidate with the time
available for that section.
The candidate is able to control when they start each section. The section timer
starts when the candidate clicks the Start button
This time is indicated by an onscreen counter/clock in the top right hand corner of
the screen.
1-14
Version 7.20
January 2011
Exam Sections (cont.)
Completing a
Section
When the candidate clicks Submit, the section is graded and the section results are
displayed. This is the reason why it is not possible to return to a section.
Diagnostics and
Troubleshooting Exam
Manual Release 1
1-15
Working through the Exam
Exam Sections
Having confirmed your details, you are then presented with the exam sections you
will encounter. Each of these sections is separately timed and questions in each
section, although having equal value, may have different value to questions in other
sections.
Typically, there are easy questions worth few marks and hard questions worth more
marks. This is your last opportunity to decide you're attempting the wrong exam!
Once you click the Start button (not shown in the graphic) timing commences for
the first section.
Inside a section
You will be given the name of the section and advised the value of each section and
the total number of marks available in the section. The timer in the top-right corner
of the screen commences a count-down.
Click submit at the bottom of the screen to complete the section. You will be
warned if there are un-completed questions and the section will not close.
1-16
Version 7.20
January 2011
Submitting an Exam
Last Exam
Section
Once the examination has been completed the candidate needs to submit their
examination. This is done by clicking the Click to Complete Course & upload
Marks link.
Confirmation
and Results
The examination completion is confirmed and the candidate may view their results
by clicking the Grades link on the left side menu.
The page will display their overall result. The full section detail may be viewed by
clicking the module name.
Diagnostics and
Troubleshooting Exam
Manual Release 1
1-17
Submitting an Exam (cont.)
Detailed Results
The full section detail allows the candidate to view the results for each section so
that they can see which sections they may need to review.
Passing Grade
The pass mark for all exams is 75%.
Once all of the exams have been passed (or the upgrade exam for an existing
CSCE), the Examination Administrator will be advised automatically. The
certificate will be mailed within a few days.
1-18
Version 7.20
January 2011
Completing the Exam
Uploading Your
Marks
After submitting the final exam section, a screen will be presented inviting you to
upload your marks.
Once done, you are advised that your final grade may be seen via the Grades link
on the left-side menu. The exam is completed.
Diagnostics and
Troubleshooting Exam
Manual Release 1
1-19
Successful Completion
Certificates
1-20
If the candidate has been successful in all the required examinations they will be
given CitectSCADA Certified Professional (CSCP) or CitectSCADA Certified
Engineer (CSCE) status. Unlike the course certificates, a CSCP or CSCE
qualification is one that implies attainment of a level of expertise. In order to
separate the two types of certificate given by Citect, any accreditation that implies
the attainment of expertise is represented by the word PASSED on the certificate.
The certificates may be sent either directly to the candidate or to the Examination
Centre.
Version 7.20
January 2011
Chapter 2:
V7.20 Diagnostics and Troubleshooting
Exam Topics
Overview
Introduction
At any time, a fully configured and properly operating system may experience
problems. These may be related to issues on the network, on the computers or
simply a side-effect of growth in the system.
In order to be able to isolate and deal with such issues, the ability to intelligently
troubleshoot is an important skill.
This Chapter Covers These Topics:
Tag Extensions.......................................................................2-2
The Cicode Kernel .................................................................2-7
Communication and the Kernel ...........................................2-12
Logging Tools......................................................................2-20
Communications Analysis ...................................................2-22
Performance Management ...................................................2-23
Tag Extensions
Access to Plant
Meta-data
A tag name by itself (for instance TIC_P1_PV) carries the current value as its only
attribute. In order to access additional information, a series of sub-fields, referred
to as Tag Extensions has been defined.
In addition to the actual plant data, Tag Extensions provide access to:
Tag value Quality and Timestamp information
Extended data associated with a variable tag
In addition, it is now possible to perform the following actions:
Override the tag variable value
Prohibit writing to the tag variable value
Display and trend the tag values even if quality is not “Good”
Access to this extra information allows operators to gain a deeper understanding of
the actual state of their plant.
Quality information was available in CitectSCADA v7.0 and v7.10 via a suite of
Cicode functions, however the information has now been made more visible with
this new structure.
See Also:
For further information about Tag Extensions in previous versions, see
CitectSCADA KnowledgeBase - "Q5741 - PSI Quality values."
Project developers should also be aware that Tag Extensions can be used inside
SuperGenies and Popup pages, but not in their associations.
If a tag with an extension is passed to an association then Runtime doesn't parse it
and split to Tag, Element and Item, but interprets entire string with dots as a tag
name. This will almost certainly lead to a ‘tag not found’ compile error.
Note:
The use of tag Extensions will have an effect on network traffic as the distribution
of Quality and Value timestamps will increase the amount of data being sent
between servers and clients.
2-2
Version 7.20
January 2011
Tag Extensions (cont.)
Quality
Attributes
The primary extension fields are as follows;
tagname.v
The current tag value (this is the same as referencing the
tagname without any extension).
tagname.vt
The value timestamp. This is the timestamp of when the value
last changed.
tagname.q
The quality of the tag value. This will represent the quality of
the value and is expressed as either GOOD, UNCERTAIN or
BAD
tagname.qt
The quality timestamp. This is the timestamp of when the
quality last changed
tagname.t
The timestamp of when the tag or element was last updated.
Tags may now be referenced according to this syntax:
[Cluster.]Tag[.Element][.Item]
The tag data may be accessed via a Cicode function, or a Text element on a
graphics page by using either a qualified or an unqualified tag reference.
A qualified tag reference includes the tag element name and provides access to the
specified tag element or the element item, for example. “Tag1.Field”,
“Tag1.Field.Q” where "Field" is the element name and "Q" is the item name. An
unqualified tag reference is one that does not include a tag element name or item
name, and is resolved at runtime, for example “Tag1”, “Tag1.Q”.
Diagnostics and
Troubleshooting Exam
Manual Release 1
2-3
Tag Extensions (cont.)
Ensure
Operators are
Aware
To provide a visual indication to the operator that a tag is in the Control inhibit
mode the following can be done:
Set any of the following Citect.ini parameters in such a way that Control inhibit
mode will be indicated by changing the background colour or overlaying the
numeric or text graphics objects and symbol set objects with a dithered pattern:
[Page]ControlInhibitDitheringColor
[Page]ControlInhibitDitheringDensity
[Page]ControlInhibitTextBackgroundColor
In addition, set [Page]IgnoreValueQuality parameter to a value of 0 or 2.
or
Use the Control Mode element value (0 if the tag is not in the control inhibit
mode or 1 otherwise)
or
Use the Field element quality Tag Status ControlInhibit bit (1 if the tag is in the
control inhibit mode or 0 otherwise)
Caution!
Dithering values are not implemented when values are delivered to a graphic page
using the tagname.V format. If the .V format is used, project designers must find
some other way to identify that Override of Control Inhibit modes are set. This
may be confirmed with a close inspection of the popup page in Exercise - Control
Inhibit and Override Modes .
2-4
Version 7.20
January 2011
Tag Extensions (cont.)
Quality and
Timestamp
Cicode Functions
There are a number of Cicode functions provided to deal with the Quality and
Timestamp attributes of the Tag Extension fields.
Quality Functions
QualityCreate
Creates a quality value based on the quality fields provided.
QualityIsBad
Returns a value indicating whether the quality is bad.
QualityIsGood
Returns a value indicating whether the quality is good.
QualityIsUncertain
Returns a value indicating whether the quality is uncertain.
QualityIsOverride
Returns a value indicating whether the tag is in Override Mode.
QualityIsControlInhibit
Returns a value indicating whether the tag is in Control inhibit
mode.
QualityGetPart
Extracts a requested part of the Quality value from the QUALITY
variable.
QualitySetPart
Sets a Quality part’s value to the QUALITY variable.
QualityToStr
Returns a textual representation of the CitectSCADA quality.
VariableQuality
Extracts the quality from a given variable.
Timestamp Functions
TimestampAdd
Adds time (in part of) to a TIMESTAMP variable.
TimestampCreate
Returns a timestamp variable created from the parts.
TimestampToStr
Converts a TIMESTAMP variable into a string.
TimestampDifference
Returns a difference between two TIMESTAMP variables as a
number of milliseconds.
TimestampCurrent
Returns the current system date and time as a TIMESTAMP
variable.
TimestampFormat
Format a TIMESTAMP variable into a string.
TimestampGetPart
Returns one part (year, month, day, etc) of the timestamp variable.
TimeIntToTimestamp
Converts a time INTEGER which is represented as a number of
seconds since 01/01/1970 to a TIMESTAMP
TimestampSub
Subtracts time (in part of) from a TIMESTAMP variable.
TimestampToTimeInt
Converts a TIMESTAMP variable into a time INTEGER which is
represented as a number of seconds since 01/01/1970.
VariableTimestamp
Extracts the timestamp from a given variable.
Diagnostics and
Troubleshooting Exam
Manual Release 1
2-5
Tag Extensions (cont.)
Suggested
Exercises
Use these suggested exercises to increase your understanding of the topic.
Access the Tag Extensions popup page in the Example project and manipulate
the various properties available.
Work with the available citect.ini parameters and cicode functions to control
the display of quality and other Tag Extension attributes.
Further Reading
Use the following references to assist your understanding of the topic.
CitectSCADA Help Topic - Tag Extensions.
CitectSCADA Help Topic - Tag data Types.
CitectSCADA Help Topic - Controlling and OverridingTag Values.
CitectSCADA Help Topic - Page Parameters.
2-6
Version 7.20
January 2011
The Cicode Kernel
How to Open the
Kernel
There are several ways to gain access to the Kernel.
To open the Citect Kernel using the Computer Setup Editor:
Open the Computer Setup Editor and add this parameter:
[DEBUG]
Menu=1
This will place an entry for the Kernel on the Control Menu that is displayed when
the icon to the left of the title bar is single clicked or by pressing Alt-Space on the
keyboard.
or
Add this parameter:
[Debug]
Kernel=1
This will show the Kernel as the project is compiling and also when CitectSCADA
starts runtime. As most problems with CitectSCADA are to do with something not
communicating or not connecting properly, the only way to see exactly what
happens and when is to be viewing the Kernel as CitectSCADA starts up.
Diagnostics and
Troubleshooting Exam
Manual Release 1
2-7
The Citect Kernel (cont.)
How to Open the Kernel
(cont.)
To open the Kernel using the Runtime Manager:
Another way to gain access to the kernel is to single click the Runtime Manager
icon in the system tray then right click one of the processes and select Kernel from
the menu.
Note:
The availability of the Kernel option in the Runtime Manager is controlled by the
Menu = 1 parameter described earlier.
Access to the Runtime Manager may also be gained via the Cicode function
DisplayRuntimeManager() which will display the Runtime Manager on the
local computer. If the Runtime Manager is already running, it will be brought to
the foreground.
Kernel Access
It is important to restrict access to the Kernel, because once a user has acces to the
Kernel, any Cicode function can be executed with no privilege restrictions.
Anyone using the Kernel will have total control of CitectSCADA (and
subsequently the plant and equipment). Therefore in a normal runtime environment
it is not good practice to enable the Kernel menu command or configure the Kernel
to start up automatically.
The function DspKernel(1) will open the Kernel from a button or system
command.
2-8
Version 7.20
January 2011
The Cicode Kernel (cont.)
Password
Protection
Cicode and Cache commands are password protected in the Kernel, preventing
unauthorized access. A user named kernel must be defined in the User database
of the CitectSCADA project in order to gain access to these windows.
The user must be called kernel and have a non-blank password. There is no
requirement for the user to have any specific privileges or areas assigned.
See Also:
For further information about The kernel user, see CitectSCADA Help - Using the
Kernel.
Diagnostics and
Troubleshooting Exam
Manual Release 1
2-9
The Cicode Kernel (cont.)
Debug Cicode
Functions
This command is particularly useful for debugging Cicode functions and running
functions directly from within the running system.
The Cicode command opens a child window that can be used to call Cicode
functions. Any in-built or user-written function can be called from this window.
When the Cicode command is entered a local Cicode window is created. The syntax
is:
Cicode
Each Cicode command is executed with its own Cicode task, so tasks that take a
long time to complete can be executed.
The Cicode prompt returns immediately after the Cicode task has started and the
task continues to run in the background. If the function is completed immediately,
the return result of the function is displayed. If the function continues to run, the
result is not displayed and cannot be returned.
Note:
As mentioned previously, Cicode and Cache commands are now passwordprotected in the Kernel, preventing unauthorised access.
The Cicode prompt 0:> shows the current window number with which any object is
associated. To change the current window, use the WinGoto() function (or any
other Cicode function that affects the current window).
The Cicode window does not recognise any variable names, so when a Cicode
function is called, it is possible to pass constants only (e.g. numbers or strings).
When a function that expects a string is called, ya string constant should be passed,
e.g. Prompt("Hello from the Kernel"). If the string is only a single word, delimiters
need not be used, e.g. Prompt(Hello).
The Cicode window tries to convert whatever is entered (as arguments) into the
correct data type. If it cannot convert the arguments, it passes either 0 (zero) or an
empty string to the function.
Note:
Some Cicode functions are implemented as label macros by the compiler. These
macros allow backward compatibility when the number of arguments to a function
has been changed.
These functions cannot be called directly because the Cicode window does not
expand macros. In this case the macro expansion must be used. If the function
cannot be found, try again by adding an underscore (_) to the front of the function
name, e.g. _DevClose(1)
2-10
Version 7.20
January 2011
The Cicode Kernel (cont.)
Tasks and Preemption
Cicode tasks (or threads) can be executed in either foreground or background
mode. A foreground task is one that displays and controls animations on the
graphics pages. Any expression (not a command) entered in a property field (i.e.
Text, Rectangle, Button, etc.) is executed as a foreground task. All other
commands and expressions are executed in background mode.
The difference between a background and foreground task is that a background task
can be pre-empted, that is, if system resources are limited, the task (e.g. the
printing of a report) can pause to allow a more critical task to be executed. When
the critical task is completed (or when system resources become available) the
original task resumes. Foreground tasks are considered critical and can never be
pre-empted.
Suggested
Exercises
Use these suggested exercises to increase your understanding of the topic.
Access the kernel using all available methods.
Open a variety of Kernel windows and note their behaviour.
Write a function that will increment the value of a variable indefinitely.
Call the function from a command button.
Call the function from a command button using TaskNew().
Compare the two running threads using the Page Cicode in the kernel and the
Thread Window in the Cicode Editor.
Further Reading
Use the following references to assist your understanding of the topic.
CitectSCADA Help Topic - Foreground and background tasks.
CitectSCADA Help Topic - Using the Kernel.
CitectSCADA Help Topic - taskNew.
Diagnostics and
Troubleshooting Exam
Manual Release 1
2-11
Communication and the Kernel
Multi-process
Kernel Startup
Every instance of CitectSCADA on a given computer has a separate kernel view for
each process when the Multi-Process option is selected in the Computer Role
setup. Examples of processes include a Trend Server, an Alarm Server, a Report
Server, and an I/O Server. In pre V7 versions of CitectSCADA, each of these
Servers existed, but they were all contained within a single process. Even the
Control Client is now a process.
In this mode, when the project is run, the Runtime manager window will display
separate tasks for each process.
2-12
Version 7.20
January 2011
Communication and the Kernel (cont.)
Kernel Startup
Information
Once the Kernel is open a Line by Line description of the startup process is visible
(this is identical whether the computer is a standalone or a networked Server).
These are some typical startup notifications and their meanings.
Version
The first line displays version of CitectSCADA.
Initializing
Systems
Sub
These internal sub systems provide services to the major
components and must be started first so that the bigger
components can be started. Once all these sub systems are
loaded then the RDB system is initialised and CitectSCADA
can start loading the RDB files.
Initializing
System
Font
This is now creating all fonts that have been defined within
CitectSCADA. These are fonts for displaying items such as
Alarms, and any pre V5.0 dynamic text.
Initializing
System
Client
This is determining what Servers the Client needs to talk to, as
set in the INI file.
TCPIP
only
configuration
This is a relic. Prior to V7, CitectSCADA supported both
TCP/IP and NetBIOS.
Initializing Cicode
System
All the Cicode has been loaded into memory and is getting
ready to run.
Diagnostics and
Troubleshooting Exam
Manual Release 1
2-13
Status Messages when the Kernel Starts Up
(cont.)
Kernel Startup Information
(cont.)
Loaded
RDB
_Library
_Library.RDB contains all of the compiled custom Cicode
functions developed as part of the project. these must be
loaded separately.
Debugger
listening
is
The breakpoint debugger is always active, whether or not
breakpoints have been placed in any Cicode functions.
Breakpoints are discussed in Exercise - Thread Window .
Initializing
System
Alarm
Alarm:
loaded
RDB
2-14
Client
_Categor
Starting the Alarm Server.
Alarm Category information is separately stored in
_Categor.RDB; this file is loaded into the Alarm Client
separately.
Alarm:
Client
initialization
complete
The Alarm Client is loaded and functional.
Initializing Trend
Client System
The Trend Client is slightly different than the normal Client so
it has its own method of doing things.
Initializing Report
System
Starting the Report Server.
Initializing
System
Event
Starting the Event Server.
Initializing
System
Page
The system is ready to display the Startup Page. It is at this
time that CitectSCADA will cover up the Kernel. Use the
TaskBar or switch to the kernel with Alt-Tab or Alt-Esc to
return to the Kernel screen.
Citect (PID 4760)
Startup
This identifies the Windows Process ID Number of the client
task and confirms that the Server has completed the startup
teps successfully.
Version 7.20
January 2011
Status Messages when the Kernel Starts Up
(cont.)
Kernel Startup Information
(cont.)
Things to Watch
Areas to watch are that all the PLCs come online. First the
ports must be initialised and be online, then the PLCs should
all come online. Some PLCs may take 2 attempts from
CitectSCADA to come online or may not be connected
initially. In that case messages that are specific to every PLC
type will be displayed.
All these messages are basically similar and will identify
something like PLC not responding, or, Unit Offline, or
something similar. If the PLC is difficult to connect to, then
wait 30 seconds (the standard period that CitectSCADA waits
until it will try to connect again) and see what happens this
time. If still nothing good happens then it is time to check
EVERYTHING.
Hints & Tips
Use the Pulp or Paper project for the exercises to do with networking. It may be
useful in the exercises that examine performance and code to use different projects
such as the Example project and compare the differences.
Diagnostics and
Troubleshooting Exam
Manual Release 1
2-15
Communication and the Kernel (cont.)
Server Startup
This screen displays the Kernel startup for the I/O process of a computer that is the
I/O, Alarm, Trend and Report Servers. The screen displays all messages as the
Servers are first initialised and then started.
The previous exercises were based on a persisted Memory I/O Server which is
relatively invisible to the kernel startup logs. The next few steps will be based on a
Disk PLC I/O Device.
2-16
Version 7.20
January 2011
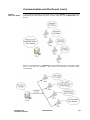
Communication and the Kernel (cont.)
Publish
Subscribe Model
A more effective method of communication is for the Clients to join a list of users
and identify the information they need. In other words the Clients Subscribe to the
Server.
The Server will announce, or Publish, the new information to the subscribers when
there is data that has changed. This reduces the amount of network traffic
considerably.
Diagnostics and
Troubleshooting Exam
Manual Release 1
2-17
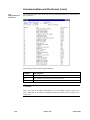
Communication and the Kernel (cont.)
Tag
Subscriptions to
I/O Device
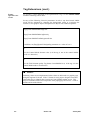
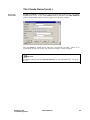
The IODevices.Subs table shows all the tag subscriptions that have been made to
this I/O Device.
The fields provide the following information:
Column
Description
Handle
An internal subscription handle (unique identifier)
Tag
The variable tag the subscription has been made for
Scan Rate
The scan rate of the subscription in milliseconds
Note:
There may well be multiple subscriptions to an individual tag and varying scan
rates, depending on the project configuration and the number of I/O Clients active
at any time.
2-18
Version 7.20
January 2011
Communication and the Kernel (cont.)
Variable Tag
Deadband
A deadband is expressed as a percentage of the engineering range of the tag to
which it is applied.
For example, if a variable tag has an engineering range of zero to 5,000 a deadband
of 1 would mean a change of at least 50 would be required before the change was
sent through the system. Thus if the current value was 3,230, a value lower than
3,180 or greater than 3,280 would be required in order for the new value to appear
at the clients.
Clearly some tags are more amenable than others to being deadbanded.
Suggested
Exercises
Use these suggested exercises to increase your understanding of the topic.
Configure a multi-server CitectSCADA system and observe the start-up screens
of all computers.
Use a variety of kernel pages to track the creation and termination of tag
subscriptions between the I/O Server and a variety of clients.
Further Reading
Use the following references to assist your understanding of the topic.
CitectSCADA Help Topic - Foreground and background tasks.
CitectSCADA Help Topic - Using the Kernel.
CitectSCADA Help Topic - TaskNew.
Diagnostics and
Troubleshooting Exam
Manual Release 1
2-19
Logging Tools
The Minidump
File
As part of the standard CitectSCADA installation, the Windows crash handler is
automatically extended to enable Mini Dumps to be captured whenever a system
crash occurs.
Mini Dumps, which were introduced with Windows XP, are an alternative to the
full crash dump that is usually associated with Dr Watson (Microsoft's full crash
analysis tool). The crash dump (sometimes also referred to as a user dump) dumps
all running threads. Mini dumps give a smaller dump which just provides
information on errors due to the faulted thread rather than other threads. They can
be an asset to problem discovery.
By default, a crash will create a "light mini dump" which generally seems to
contain less information than is required to properly understand the issues at play.
Customers are generally recommended to ensure Heavy Mini Dumps are acquired
instead. This is achieved with the Citect.ini file setting:
[Debug]MiniDumpType=3
The Mini Dump type may also be configured with a Registry entry; this is
described in KnowledgeBase article Q4495 "How do I Enable the Mini Dump
Feature in the Event of a Crash."
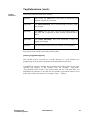
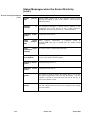
The following table lists the available types of Mini Dump:
0
No
Minidump.
1
Light
Minidump.
MiniDumpWithIndirectlyReferencedMemory
(Heap referenced by stack)
Medium
Minidump.
MiniDumpWithDataSegs (Global Variables, and heap
referenced by stack)
MiniDumpWithHandleData
MiniDumpWithUnloadedModules (Details of recently
unloaded modules)
2
MiniDumpWithProcessThreadData
and thread data)
3
Heavy
Minidump.
(Complete
process
Same as Medium but with MiniDumpWithFullMemory
(All memory, same as a User.dmp but smarter)
See Also:
For further information about Crash Logs and related information, see
CitectSCADA KnowledgeBase - Q4366 Crash Logs, Crash Dumps, User Dumps,
Mini Dumps, Dr Watson Logs and Exception Reports.
2-20
Version 7.20
January 2011
Logging Tools (cont.)
Debug
Diagnostics Tool
On occasions, a Citect crash may not generate a usable Exception report. In this
situation, it is advisable to use an active exception monitoring tool such as
Microsoft's Debug Diagnostic Tool.
According to the Help contained within the Debug Diagnostics Tool, "The Debug
Diagnostics Tool is designed to assist in troubleshooting issues such as hangs, slow
performance, memory leaks or fragmentation, and crashes in any Win32 user-mode
process."
See Also:
For further information about The Debug Diagnostics Tool, see CitectSCADA
Knowledgebase - Q5387 "Monitor Process using Debug Diagnostics Tool".
Suggested
Exercises
Use these suggested exercises to increase your understanding of the topic.
Cause a system to crash (using the command debug("GPF") and experiment
with the various tools , including the debug diagnostics tool, to investigate the
crash and the various information it provides.
Investigate the use of various citect.ini parameters for logging Alarm and other
transactions.
Further Reading
Use the following references to assist your understanding of the topic.
CitectSCADA KnowledgeBase - Q4366 Crash Logs, Crash Dumps, User
Dumps, Mini Dumps, Dr Watson Logs and Exception Reports.
CitectSCADA Knowledgebase - Q5387 "Monitor
Diagnostics Tool"
Diagnostics and
Troubleshooting Exam
Manual Release 1
Process using Debug
2-21
Communications Analysis
Understand the
Network
A variety of publicly-available tools may be used to determine the computers on the
network and what processes or tasks they are running.
This information may be used to confirm that only the expected computers are
present and that they are only running tasks intended for them.
The course investigates, as examples only, the following tools:
NetStat
Process Monitor
Nmap
Wireshark
Suggested
Exercises
Use these suggested exercises to increase your understanding of the topic.
Install and / or make use of the featured analysis tools (NetStat, Process
Monitor, Nmap and Wireshark) on a running system to become familiar with
their installation and use.
Further Reading
Use the following references to assist your understanding of the topic.
CitectSCADA Help Topic - Configure Servers.
CitectSCADA Knowledgebase Article - Q3943 Implications for Citect and
Microsoft Windows XP Service Pack 2
CitectSCADA Knowledgebase Article - Q4813 Default TCP/IP Ports used by
Citect
CitectSCADA Knowledgebase Article - Q4946 WebClient across LAN / WAN v7.0
2-22
Version 7.20
January 2011
Performance Management
Monitor and
Manage
Performance
CitectSCADA has the ability to distribute its various server tasks across the
multiple CPUs in a multi-core system. This permits some semblance of loadbalancing to occur.
In addition, it is useful for system managers to undertake regular base-line
performance measurements to get an accurate view of the long-term trends in the
system's activity. This may give early warning of the need for upgrade or other
remediation work.
Suggested
Exercises
Use these suggested exercises to increase your understanding of the topic.
Use the Computer Setup Wizard to allocate server tasks to CPUs on a multicore computer.
Use Performance Monitor to access the variety of dotNet counters provided by
CitectSCADA.
Diagnostics and
Troubleshooting Exam
Manual Release 1
2-23
Chapter 3:
Navigating the Knowledge Base
Overview
Introduction
The Knowledge Base contains three navigational tools to help you quickly find
relevant information:
Contents - so you can always find the start and also lists the Latest Articles.
Index - Lists all articles in numeric order
Search - the quickest way to find relevant articles. It allows you to query all of
the text in the entire Citect Knowledge Base.
This Chapter Covers These Topics:
Searching................................................................................3-2
Searching
Search Queries
Learning about effective queries will help you to locate relevant articles. The
simplest query consists of just one word. For example, to find articles about alarm
pages, you could enter the word alarm. This query would return a list of all articles
that contain the word 'alarm'. If the query word is common, a large number of
articles will be displayed, and you may need to further narrow your search.
Enter Multiple
Words
To narrow your search, enter more than one word. For example, to find articles
about alarm pages, you could enter the words alarm page. This query would return
all articles that contain both the words 'alarm' and 'page'. Some search engines
require the keyword AND to be used for this kind of search - it is not necessary
here.
Operators
Customise your queries with the NEAR, NOT and OR keyword operators. For
example, the query alarms page not hardware, would exclude an article about the
"hardware alarms page".
Literal Phrases
Put quotation marks around keywords if you want to search for a literal expression.
For example, searching for "alarm page" would find articles that contain that exact
phrase. This can be quite useful if you need to use a keyword in your search. For
example, "exclusive or" contains the keyword OR, and would cause an error
without the quotes.
Wild Cards
Use wild cards (* and ?) where you are uncertain about the form of a word. For
example, if you are uncertain about whether to search for "alarms", "alarm", or
"alarming", search instead for alarm*. The ? is similar, but works only for one
character.
3-2
Version 7.20
January 2011