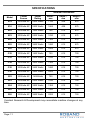
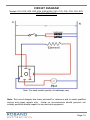
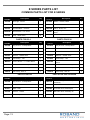
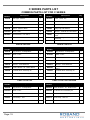
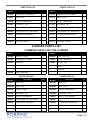
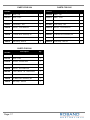
1
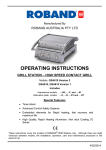
Manufactured By ROBAND AUSTRALIA PTY LTD OPERATING INSTRUCTIONS HOT FOOD BAR Models: E14, E16, E22, E23, E24, E25, E26, Version 6 Units C22, C23, C24, C25 & C26 S22, S23, S24, S25 & S26 Version 5 Units ® These instructions cover the models of Roband Hot Food Bars listed above only. Although there are slight variances between models, the installation, operation, care and maintenance procedure is the same for all. 29/10/2014 Roband® Australia is a wholly Australian owned company and has been manufacturing quality commercial catering equipment for the food service industry for more than 50 years. Roband products are engineered and manufactured to the highest standards to provide functionality, reliability and durability, and our quality products are exported world-wide. Included in the comprehensive Roband® range are Toasters, Fryers, Milkshake Mixers, Rotisseries, Food Display Cabinets and much more. Roband® Australia also acts as the Australian agents for Vitamix® Blenders, Noaw® Meat Slicers, Förje® Cookware, RobalecTM Soup/Rice Warmers, Robatherm Urns, Austheat® Fryers, Dipo Induction & Autofry Machines. Roband also has its own line of commercial cookware and cutlery under the Robinox® brand name. For a complete set of brochures please contact your nearest authorised dealer or contact Roband directly at our head office. Roband Head Office Sydney, Australia Roband Australia Pty Ltd 1 Inman Road Dee Why NSW 2099 AUSTRALIA Tel: +61 2 9971 1788 Fax: +61 2 9971 1336 Email: [email protected] Web: www.roband.com.au International Agents For additional agents please email Head Office Cyprus: Fiji: Hong Kong: Malaysia: Maldives: New Zealand: Noumea: Papua New Guinea: Singapore: United Catering Equipment Supplies Ph: +357 777 777 24 Hotel Equipment Ltd Ph: +679 672 0666 Chung Wah Kitchen Machine Ltd Ph: +852 2334 5411 Allied Food Equipment Ph: +603 9133 5833 Radiant Heat Maldives Pty Ltd Ph: +960 333 4845 Roband New Zealand Ph: +649 274 1354 Comptoir Materiel Professionnel Ph: +687 28 50 43 Brian Bell & Company Pty Ltd Ph: +675 325 5411 Allied Foodservice Equipment Ph: +65 62525880 Switzerland: Thailand: United Arab Emirates: United Arab Emirates: United Kingdom: USA: USA: NETHERLANDS GREECE Burgi Infra Grill Ph: +41 418 554 552 Seven Five Distributors Co Ltd Ph: +662 866 5858 Boncafe Middle East LLC +9714 282 8742 Nisa Trading LLC +9714 396 6132 Metcalfe Catering Equipment Ph +44 1766 830 456 Condon & Fisher International Ph: +1 508 361 9226 Condon & Fisher International Ph: +1 508 361 9226 AKB Bert Muller Ph: +31 306 017 442 K&N Engineers Ltd Ph: +30 210 520 0440 © Copyright 2014 – Roband® Australia Pty Ltd All rights reserved. No part of this work may be reproduced or copied in any form or by any means, electronic or mechanical, including photocopying or posting to a website, without the written permission of the publisher. The material contained within this document is intended entirely for instructional purposes. Page: 2 CONTENTS INTRODUCTION ..................................................................................................... 1 GENERAL PRECAUTIONS ..................................................................................... 1 PACKAGING ........................................................................................................... 2 COMPLIANCE ......................................................................................................... 2 INSTALLATION ....................................................................................................... 3 OPERATION............................................................................................................ 4 LAMP REPLACEMENT & INSTALLATION .............................................................. 5 TROUBLESHOOTING ............................................................................................. 7 USE OUTSIDE DESIGN PARAMETERS................................................................. 7 GENERAL SAFETY ................................................................................................. 8 SAFETY GLASS ...................................................................................................... 9 CLEANING, CARE & MAINTENANCE .................................................................... 9 TROUBLESHOOTING ........................................................................................... 10 SPECIFICATIONS ................................................................................................. 11 CIRCUIT DIAGRAM............................................................................................... 12 E SERIES PARTS LIST ......................................................................................... 13 C SERIES PARTS LIST......................................................................................... 15 S SERIES PARTS LIST ......................................................................................... 16 APPENDIX A ......................................................................................................... 18 WARRANTY .......................................................................................................... 20 INTRODUCTION Congratulations on your purchase of this quality Roband® product. With proper care and management your new purchase will give you years of trouble free service. By reading these instructions carefully you can ensure that this machine is used and maintained properly, helping your new investment to perform well for you now, and to continue performing in the many years to come. GENERAL PRECAUTIONS This appliance must only be operated by qualified person(s) who are fully versed in the operating and safety instructions described in this manual. Serviceperson should be instructed to familiarise themselves with any and all safety instructions described in this manual prior to commencement of any maintenance or service. In the case of new personnel, training is to be provided in advance. These appliances should not be operated by persons (including children) with reduced physical, sensory or mental capabilities, or lack of experience or knowledge, unless they have been given supervision or instruction concerning the safe use of the appliance by a person responsible for their safety. These appliances are heating units, and as with any commercial heating unit the surfaces on these units will get hot. Always be careful when near an operating food bar, and ensure that any risk to unwary customers or staff is minimised with additional signage if necessary. Due to the obvious heat hazard Roband recommends that these units be kept out of reach of children. The performance of this unit cannot be guaranteed for operational use outside its design parameters. The appliance should be disconnected from all power and allowed to cool before cleaning. ROBAND WILL ACCEPT NO LIABILITY IF; Non-authorised personnel have tampered with the appliance. The instructions in this manual have not been followed correctly. Non-original spare parts are used. The machine is not cleaned correctly, with the right product. There is any damage to the unit. Page: 1 PACKAGING All care is taken when packing and Roband ensures that every unit is functional and undamaged at the time of packaging. The Package of these grills should include: 1) One Hot Food Bar (appropriate model) – includes Heat lamps 2) Steam Pans (If ordered with E series) 3) This Manual 4) Glass Doors (RD Models Only) Any damage to the machine as a result of freight must be reported to the Freight Company and to the agent responsible for the dispatch of said unit within 24 hours of receipt. No claims will be accepted or entertained after this period. COMPLIANCE RCM: Roband® products have been designed and manufactured to comply with any and all specifications set out by the Australian Communications and Media Authority (ACMA) in regards to Electromagnetic Compatibility. As testament to such compliance these units bear the RCM symbol. For further information contact the Australian Communications Authority, PO Box 13112, Law Courts, Melbourne VIC 8010. Page: 2 INSTALLATION Remove all the packaging materials and tape, as well as any protective plastic from the appliance. Clean off any glue residue left over from the protective plastic or tape using methylated spirit. Place the food bar on a firm, level surface in the required position. As a precaution, it is recommended that all non-metal bench top surfaces be protected from heat with some form of insulation. A piece of Masonite, sheet metal, laminate or similar material would be sufficient for this task. You will notice that gaps exist between some glass edges and the surfaces of other glass pieces or other metal surfaces. These gaps exist to allow for assembly in construction, but they also serve as steam vents in the case of a steam build up, and as such these gaps are deliberately left unsealed. If it is preferred that these gaps be sealed Roband recommends the use of a silicon sealant such as Silastic. Before connecting the Food Bar to the power supply, ensure that the energy regulator is in the "OFF" position. For models E14, E16, E22, E23, C22, C23, S22 & S23, Plug the food bar into a standard, single phase 10 Amp power point. For models E24, E25, E26, C24, C25, C26, S24, S25 & S26, plug the food bar into a standard, single phase 15 Amp power point. National Standards exist outlining the positioning, spacing and ventilation requirements when installing new appliances. These Standards should be consulted and new equipment should be installed accordingly. In any situation where specifications allow a distance of less than 100mm we would still recommend that a well-ventilated air gap of not less than 100mm be maintained. If the appliance is near particularly heat-sensitive materials common sense should be employed in determining sufficient spacing. Page: 3 OPERATION The food bar tank element and heat lamps are controlled individually. The tank element is controlled by an energy regulator, located on the control panel. The heat lamps are switched on with a toggle switch, also located on the control panel. The thermometer on the control panel has been designed to function as a guide for operation only. It reflects the temperature beneath the pans. The thermometer does not directly reflect the temperature of the food in the pans. DRY OPERATION Place all the pans in the food bar and switch on the heat lamps. Set the energy regulator to the desired position and allow the food bar to pre-heat for approximately 15 minutes before placing any food in the pans. An operating position of around 2 to 2½ should suffice, but experience will dictate the best position for the particular food being displayed. Please note: Care should be taken while operating dry not to leave the energy regulator on HIGH for extended periods. The build up of excessive heat may damage the thermometer and cause excessive and hazardous external surface temperatures. A hazard assessment and appropriate risk management practices should be conducted and implemented prior to operating these units dry. WET OPERATION For wet operation, the most important factor is the volume of water placed in the tank. The tank should be filled with fresh clean water to a level where it just touches the bottom of the element. If the water level is too high, performance will be compromised. Once the water has been placed in the tank, place all the pans in the food bar and switch on the heat lamps. Turn the energy regulator to high and pre-heat the food bar, bringing the water up to a temperature of approximately 65-70°C. As a guide this will take approximately 20 to 30 minutes. When the water has reached this temperature, the food may be placed in the pans and the energy regulator can be returned to a lower, operating value. As with dry operation, around 2 to 2½ should suffice, but experience will dictate the best position for the particular food being displayed. The food bar should not be operated wet without the heat lamps operating. The heat generated from the lamps prevents steam from condensing inside the food bar. If the food bar is fitted with rear sliding glass doors, it is recommended that they are not fully closed during operation. This ensures that the steam can escape from inside the food bar. When the food bar is shut down these doors should be left open to allow the moisture to evaporate. Note: These units are not “humidity cabinets” and are not suited to holding Chickens at serving temperature and maintaining humidity for extended periods. For Further information refer to the “Use Outside Design Parameters” section. Page: 4 HEAT LAMPS The heat lamp globes in these appliances are specifically designed and manufactured for Roband food bars. Each lamp globe is rated at 250W, 230V. The lamps are controlled by a simple rocker switch. IMPORTANT: The heat lamp assembly should be powered on DURING and AFTER operation of the food bar. Otherwise, steam from below the lamp assembly may condense on the lamp components, creating the potential to cause an “arc” or “short”. This arcing may damage the heat lamp components. When the food bar is switched off, the lamps should be left running for 10 – 15 mins to allow all the steam to evaporate, removing the potential for condensate to form on the lamp components. LAMP REPLACEMENT & INSTALLATION 1) Turn the unit off, unplug the machine and allow to cool to room temp before replacing lamps. (If the unit is a fixed appliance, ensure power is disconnected). 2) Grip wire lamp cover/guard between thumb and forefinger on left and right element guard bars. Squeeze towards the center to release the guard and let the guard rotate down. 3) Remove new lamp from packaging and grip around large diameter of ceramic end. Insert alternate end of lamp into ceramic terminal block, taking care to line up Center Boss of lamp, with terminal Pin in terminal block. Page: 5 4) Using gentle force, push the lamp so that the sprung terminal pin and lamp retracts 5mm into the terminal block, then rotate lamp upwards so that alternate end is inserted into the other terminal block. Taking care to line up Centre Boss of Lamp with terminal pin in terminal, release spring and allow lamp to seat between the two terminal blocks. Jiggle lamp slightly to make sure it is secure in place. 5) Snap the lamp cover back in place. 6) Repeat process for remaining lamps. Page: 6 TROUBLESHOOTING If the heat lamp Assembly does not function check the following points before calling for service. The device is plugged in correctly and the power switched on. The power point is not faulty. The halogen heat lamp or lamps have not failed. The halogen lamp is installed USE OUTSIDE DESIGN PARAMETERS These units are not “humidity cabinets” and are not suited to holding Chickens at serving temperature and maintaining humidity for extended periods. Use of the unit in this manner exceeds the design parameters and is likely to result in premature failure of components. Such issues would not be covered by warranty. Chickens kept in these appliances should be kept on a Roband Chicken Tray (ECT22 and ECT23) and should be displayed for short periods only. Chickens kept in these appliances for periods of more than a couple of hours will dry out and become less palatable. Running these appliances on “HI” with water covering the elements will generate excess steam. Whilst this steam may extend the longevity of any chickens (or similar products) displayed the excess steam will cause premature lamp failure and may damage the lamp terminal blocks. These appliances are therefore not suited for prolonged storage and display of cooked chickens. Page: 7 SAFETY GENERAL SAFETY This appliance contains no user-serviceable parts. Roband Australia, one of our agents, or a similarly qualified person(s) should carry out any and all repairs. Any repair person(s) should be instructed to read the Safety warnings within this manual before commencing work on these units. Steel cutting processes such as those used in the construction of this machine result in sharp edges. Whilst any such edges are removed to the best of our ability it is always wise to take care when contacting any edge. Particular care should be taken when panels are removed (eg during servicing) as this may expose sharp edges. Do not remove any cover panels that may be on the appliance. This unit can get very hot, ensure everyone is aware that the machine is operating and take care to avoid contact with hot surfaces. The top of these units can reach temperatures that will burn skin – these units should not be “served over” without providing additional insulation or guarding to protect staff and customers. National Standards exist outlining the positioning, spacing and ventilation requirements when installing new appliances. These Standards should be consulted and new equipment should be installed accordingly. In any situation where specifications allow a distance of less than 100mm we would still recommend that a well-ventilated air gap of not less than 100mm be maintained on all sides. If the appliance is near particularly heat-sensitive materials common sense should be employed in determining sufficient distancing. Always ensure the power cable is not in contact with hot parts of the appliance when in use. Ensure that any damaged power cord is replaced before further use. Keep this unit out of reach of children. Page: 8 SAFETY GLASS The Toughened Safety Glass used in the Roband® Food Bars is about five times stronger than normal glass. In addition to this strength the toughened glass is able to handle high temperatures and it is designed to shatter into small, relatively harmless pieces in the event of breakage. These glass pieces can be collected carefully by hand without resulting in lacerations. This type of glass has a rather unusual property as a direct result of its toughened nature. When the glass takes an impact that does not immediately shatter the piece, it “stores” that stress in the glass layers. This stress “storage” is invisible and unmeasurable, but it is there nonetheless. The storing of a stress is only temporary. If the glass suffers a sufficient impact and the stress is stored, it will one day be released. There is no way to measure when this release will occur, it could be after a few minutes, or it could be years later. When the stored stress is released the glass will spontaneously shatter. This could occur at any time, even when the appliance is off and nobody is near it. In extremely rare occasions a glass door will “explode”. This is a rare but entirely normal property of the glass, and although pieces of shattered glass may travel several metres, if they do contact bare skin they should not cause injury (even if you are directly in front of the explosion). It is important that any contaminated product be thrown away. The alternative is to have glass that can be very dangerous when broken, or worse, could chip off and fall onto the food within (without being noticed). It is the opinion of Roband Australia that this glass is superior to both “Clear Float” and “Ceramic” glass with regards to function and safety. CLEANING, CARE & MAINTENANCE When the food bar is being operated wet, it must be stressed that clean, fresh water should be used at all times. The addition of a slice of lemon or lemon drops to the water daily will help to prolong the life of the element. It is recommended that the water be allowed to cool before draining the tank. The tank and element can then be wiped clean. To clean the food bar, wipe the unit down with warm soapy water using a damp sponge or cloth. Do not immerse the unit in water or allow the ingress of water into ventilation holes or controls. Do not clean this unit with the use of a water jet or spray applicator. Remove doors for cleaning. Use only soapy water to clean the unit (or glass cleaners on the glass panels) – many industrial chemical cleaners will damage plastics, polycarbonates or stainless steel, all of which are used in the construction of these appliances. Such damage could severely affect the operation of the unit and may result in appliance failures. Never Page: 9 apply soapy water with a spray applicator as direct spraying of the appliance can result in moisture ingress in the electrical controls. Cleaning should be carried out daily for health and safety purposes and to prolong the life of the element and tank. Do not use a metal scourer. In some areas hard water may cause a residue to build up on the surface of the tank and element. This should be removed to prevent any corrosion to the tank and/or element failure. Caution: Although every care id taken during manufacture to remove all sharp edges, care should be taken when cleaning to avoid injury. Particular care should be taken when cleaning near the inside rim of the tank. Caution: Handle glass with care when cleaning. Note: Do not remove the silicone used in the corners and base of the tank. This silicone covers and protects welds used in manufacture, and if left uncovered may lead to rust spots. Reminder: Some cleaning agents can damage stainless steel, usually through prolonged use. For this reason we recommend cleaning with soapy water. Any damage to the unit through the use of harsh or improper cleaning agents is entirely the fault of the user. TROUBLESHOOTING If the Food Bar does not function check the following points before calling for service. The appliance is plugged in correctly and the power switched on. The power point is not faulty. The energy regulator is not in the “OFF” position. The energy regulator knob is not loose or broken, rendering the switch inoperable. Check Appendix A on page 14 of this manual on RCD’S Page: 10 SPECIFICATIONS Nominal Dimensions Model Power Source Power Rating Width mm Depth – mm Height mm E14 230Volts AC 2300 Watts 1135 408 675 E16 230Volts AC 2300 Watts 1665 408 675 E22 230Volts AC 1450 Watts 705 615 675 E23 230Volts AC 2300 Watts 1030 615 675 E24 230Volts AC 3200 Watts 1355 615 675 E25 230Volts AC 3450 Watts 1680 615 675 E26 230Volts AC 3450 Watts 2005 615 675 C22 230Volts AC 1450 Watts 700 615 750 C23 230Volts AC 2300 Watts 1030 615 750 C24 230Volts AC 3200 Watts 1355 615 750 C25 230Volts AC 3450 Watts 1680 615 750 C26 230Volts AC 3450 Watts 2005 615 750 S22 230Volts AC 1450Watts 700 615 750 S23 230Volts AC 2300 Watts 1030 615 750 S24 230Volts AC 3200 Watts 1355 615 750 S25 230Volts AC 3450 Watts 1680 615 750 S26 230Volts AC 3450 Watts 2005 615 750 Constant Research & Development may necessitate machine changes at any time. Page: 11 CIRCUIT DIAGRAM Models: E14, E16, E22, E23, E24, E25 & E26, C22, C23, C24, C25, C26, S22, S23, S24, S25 & S26, Note: For each model quantity of heatlamps vary. Note: This circuit diagram has been provided for reference and to assist qualified service and repair agents only. Under no circumstances should person’s not suitably qualified attempt repairs to any electrical equipment. Page: 12 E SERIES PARTS LIST COMMON PARTS LIST FOR E SERIES Part Number Description Qty Part Number Description Qty EC0008 Pilot Light - Amber 1 EC0158 Switch - Rocker, Black 1 EC0030 Terminal Block - Plastic 1 MC0096 Control Bezel 1 EC0031 Terminal Block - Ceramic 1 MC0435 Valve - Drain, 3/4" 1 MC0086 Thermometer - 0 to 120°C 1 TS0007 Energy Regulator & Graduated Knob 1 EC0422 Lamp - 250W 230V 2 PARTS FOR E14 Part Number Description PARTS FOR E16 Qty Part Number Description Qty EC0239 Plug & Cord - 10 Amp Black 1 EC0239 Plug & Cord - 10 Amp Black 1 GC0008 Glass - Front 1 GC0010 Glass - Front 1 GC0016 Glass - Side 2 GC0016 Glass - Side 2 HC0027 Element - 1650W 230V 1 HC0029 Element - 1550W 230V 1 PC0060 Cord Clamp - 10A 1 PC0060 Cord Clamp - 10A 1 MS0336 Track & Rivets - 14 - Roller Doors 1 MS0338 Track & Rivets - 16 - Roller Doors 1 VS0100 LH Roller Door Assembly 14 1 VS0102 LH Roller Door Assembly 16 1 VS0103 RH Roller Door Assembly 14 1 VS0105 RH Roller Door Assembly 16 1 VS0276 Heat Lamp - Size 14 1 VS0278 Heat Lamp - Size 16 1 PARTS FOR E22 Part Number .Description PARTS FOR E22 continued Qty Part Number Description Qty EC0239 Plug & Cord - 10 Amp Black 1 MC0775 Roller Bearing and End Cap Assembly 4 GC0011 Glass - Front 1 MS0321 Track & Rivets - 22 - Roller Doors 1 GC0017 Glass - Side 2 VS0084 LH Roller Door Assembly 22 1 HC0030 Element - 1200W 1 VS0090 RH Roller Door Assembly 22 1 PC0060 Cord Clamp - 10A 1 VS0271 Heat Lamp - Size 22 1 Page: 13 PARTS FOR E23 Part Number Description PARTS FOR E24 Qty Part Number Description Qty EC0239 Plug & Cord - 10 Amp Black 1 EC0306 Plug & Cord - 15 Amp Black 1 GC0012 Glass - Front 1 GC0013 Glass - Front 1 GC0017 Glass - Side 2 GC0017 Glass - Side 2 HC0031 Element - 1800W 230V 1 HC0032 Element - 2700W 230V 1 PC0060 Cord Clamp - 10A 1 PC0061 Cord Clamp - 15A 1 MC0775 Roller Bearing and End Cap Assembly 4 MC0775 MS0322 Track & Rivets - 23 - Roller Doors 1 MS0323 Roller Bearing and End Cap Assembly Track & Rivets - 24 - Roller Doors VS0085 LH Roller Door Assembly 23 1 VS0086 LH Roller Door Assembly 24 1 VS0091 RH Roller Door Assembly 23 1 VS0092 RH Roller Door Assembly 24 1 VS0272 Heat Lamp - Size 23 1 VS0273 Heat Lamp - Size 24 1 PARTS FOR E25 Part Number Description 4 1 PARTS FOR E26 Qty Part Number Description Qty EC0306 Plug & Cord - 15 Amp Black 1 EC0306 Plug & Cord - 15 Amp Black 1 GC0014 Glass - Front 1 GC0015 Glass - Front 1 GC0017 Glass - Side 2 GC0017 Glass - Side 2 HC0033 Element - 2700W 230V 1 HC0034 Element - 2700W 230V 1 PC0061 Cord Clamp - 15A 1 PC0061 Cord Clamp - 15A 1 MC0775 Roller Bearing and End Cap Assembly 4 MC0775 MS0324 Track & Rivets - 25 - Roller Doors 1 MS0325 VS0087 LH Roller Door Assembly 25 1 VS0088 LH Roller Door Assembly 26 1 VS0093 RH Roller Door Assembly 25 1 VS0094 RH Roller Door Assembly 26 1 VS0274 Heat Lamp - Size 25 1 VS0275 Heat Lamp - Size 26 1 Roller Bearing and End Cap Assembly Track & Rivets - 26 - Roller Doors 4 1 Page: 14 C SERIES PARTS LIST COMMON PARTS LIST FOR C SERIES Part Number Description: Qty Part Number Description: Qty EC0008 Pilot Light - Amber 1 MC0435 Valve - Drain, 3/4" 1 EC0030 Terminal Block - Plastic 2 PS0075 Silicone - Side Glass 2 EC0031 Terminal Block - Ceramic 2 PS0081 Silicone - Top 1 EC0158 Switch - Rocker, Black 1 PS0090 Snap Cap and Washer 4 GC0049 Glass - Side 2 PS0109 Silicone - Vertical on Front Glass 2 MC0086 Thermometer - 0 to 120°C 1 TS0007 MC0096 Control Bezel 1 MC0075 Energy Regulator & Graduated Knob Roller Bearing and End Cap Assembly EC0422 Lamp - 250W 230V 2 PARTS FOR C22 Part Number Description 1 4 PARTS FOR C23 Qty Part Number Description Qty EC0239 Plug & Cord - 10 Amp Black 1 EC0239 Plug & Cord - 10 Amp Black 1 GC0043 Glass - Front 1 GC0029 Glass - Front 1 HC0030 Element - 1200W 1 HC0031 Element - 1800W 230V 1 PC0060 Cord Clamp - 10A 1 PC0060 Cord Clamp - 10A 1 PS0076 Silicone - Front Glass 22 1 PS0077 Silicone - Front Glass 23 1 MS0321 Track & Rivets - 22 - Roller Doors 1 MS0322 Track & Rivets - 23 - Roller Doors 1 VS0084 LH Roller Door Assembly 22 1 VS0085 LH Roller Door Assembly 23 1 VS0090 RH Roller Door Assembly 22 1 VS0091 RH Roller Door Assembly 23 1 VS0271 Heat Lamp - Size 22 1 VS0272 Heat Lamp - Size 23 1 PARTS FOR C24 Part Number Description PARTS FOR C24 continued Qty Part Number Description Qty EC0306 Plug & Cord - 15 Amp Black 1 MS0323 Track & Rivets - 24 - Roller Doors 1 GC0030 Glass - Front 1 VS0086 LH Roller Door Assembly 24 1 HC0032 Element - 2700W 230V 1 VS0092 RH Roller Door Assembly 24 1 PC0061 Cord Clamp - 15A 1 VS0273 Heat Lamp - Size 24 1 PS0078 Silicone - Front Glass 24 1 Page: 15 PARTS FOR C25 Part Number Description PARTS FOR C26 Qty Part Number Description Qty EC0306 Plug & Cord - 15 Amp Black 1 EC0306 Plug & Cord - 15 Amp Black 1 GC0031 Glass - Front 1 GC0032 Glass - Front 1 HC0033 Element - 2700W 230V 1 HC0034 Element - 2700W 230V 1 PC0061 Cord Clamp - 15A 1 PC0061 Cord Clamp - 15A 1 PS0079 Silicone - Front Glass 25 1 PS0080 Silicone - Front Glass 26 1 MS0324 Track & Rivets - 25 - Roller Doors 1 MS0325 Track & Rivets - 26 - Roller Doors 1 VS0087 LH Roller Door Assembly 25 1 VS0088 LH Roller Door Assembly 26 1 VS0093 RH Roller Door Assembly 25 1 VS0094 RH Roller Door Assembly 26 1 VS0274 Heat Lamp - Size 25 1 VS0275 Heat Lamp - Size 26 1 S SERIES PARTS LIST COMMON PARTS LIST FOR S SERIES Part Number Description: Qty Part Number Description: Qty EC0008 Pilot Light - Amber 1 MC0435 Valve - Drain, 3/4" 1 EC0031 Terminal Block - Ceramic 2 PS0075 Silicone - Side Glass 2 GC0102 Side Glass 2 PS0081 Silicone - Top 1 MC0086 Thermometer - 0 to 120°C 1 TS0007 1 MC0096 Control Bezel 1 MC0775 Energy Regulator & Graduated Knob Roller Bearing and End Cap Assembly EC0422 Lamp - 250W 230V 2 PARTS FOR S22 Part Number Description 4 PARTS FOR S23 Qty Part Number Description Qty GC0103 Glass - Top 1 GC0104 Glass - Top 1 GC0108 Glass - Front 1 GC0109 Glass - Front 1 HC0030 Element - 1200W 1 HC0031 Element - 1800W 230V 1 PC0060 Cord Clamp - 10A 1 PC0060 Cord Clamp - 10A 1 PS0076 Silicone - Front Glass 22 1 PS0077 Silicone - Front Glass 23 1 MS0321 Track & Rivets - 22 - Roller Doors 1 MS0322 Track & Rivets - 23 - Roller Doors 1 VS0084 LH Roller Door Assembly 22 1 VS0085 LH Roller Door Assembly 23 1 VS0090 RH Roller Door Assembly 22 1 VS0091 RH Roller Door Assembly 23 1 VS0271 Heat Lamp - Size 22 1 VS0272 Heat Lamp - Size 23 1 Page: 16 PARTS FOR S24 Part Number Description PARTS FOR S25 Qty Part Number Description Qty GC0105 Glass - Top 1 GC0106 Glass - Top 1 GC0110 Glass - Front 1 GC0111 Glass - Front 1 HC0032 Element - 2700W 230V 1 HC0033 Element - 2700W 230V 1 PC0061 Cord Clamp - 15A 1 PC0061 Cord Clamp - 15A 1 PS0078 Silicone - Front Glass 24 1 PS0079 Silicone - Front Glass 25 1 MS0323 Track & Rivets - 24 - Roller Doors 1 MS0324 Track & Rivets - 25 - Roller Doors 1 VS0086 LH Roller Door Assembly 24 1 VS0087 LH Roller Door Assembly 25 1 VS0092 RH Roller Door Assembly 24 1 VS0093 RH Roller Door Assembly 25 1 VS0273 Heat Lamp - Size 24 1 VS0274 Heat Lamp - Size 25 1 PARTS FOR S26 Part Number Description Qty GC0107 Glass - Top 1 GC0112 Glass - Front 1 HC0034 Element - 2700W 230V 1 PC0061 Cord Clamp - 15A 1 PS0080 Silicone - Front Glass 26 1 MS0325 Track & Rivets - 26 - Roller Doors 1 VS0088 LH Roller Door Assembly 26 1 VS0094 RH Roller Door Assembly 26 1 VS0275 Heat Lamp - Size 26 1 Page: 17 APPENDIX A Residual Current Devices (RCD’s) Also known as Earth Leakage Protection systems an RCD is a protective device that automatically disconnects the active conductors of a circuit when an earth leakage current reaches a predetermined value. Although RCD’s are mandatory in domestic installations, and in the final subcircuits of residential-type areas, the Australian Standards quote that the requirement of an RCD does “not apply to a socket-outlet…..for the connection of fixed electric cooking appliances, such as ranges, ovens or hotplates” In installations that are neither Domestic nor Residential-type, AS/NZS 3000 2.5.3.3 states that RCD’s are needed only in situations where equipment may represent an increased risk of electric shock to the user. AS/NZS3000 2.5.2 gives the following warnings that should have been taken into consideration when an RCD circuit was installed. To avoid unwanted tripping due to leakage currents and transient disturbances, care should be taken to ensure that the sum of the leakage currents of electrical equipment on the load side of an RCD is less than 1/3 of its rated residual current. To avoid excessive leakage current causing unwanted tripping where socket-outlets are protected by one RCD having a rated residual current not greater than 30mA, consideration should be given to the number of socket-outlets protected and the nature of electrical equipment likely to be connected to the socket-outlets. Tubular elements (such as those used in this unit) reaching temperatures greater than 110°C are subject to moisture absorption and therefore earth leakage current generation. Should the installation and use of this unit trip an RCD, the unit will need to be run on a circuit without an RCD (as mentioned above) for approximately 30-60 minutes, after which time the elements should have dried out and the appliance should function normally. If you are unable to locate a circuit without an RCD please contact your supplier, or if you prefer you can contact Roband and send the unit to one of our offices where we can run the appliance on a suitable circuit free of charge (a return freight charge may apply). Page: 18 NOTES This page is intentionally left blank. Please note your favourite settings here. Page: 19 WARRANTY Every care is taken to ensure that no defective equipment leaves our factory and all goods manufactured by us are guaranteed against defective workmanship and materials for a period of 12 months from the date of purchase. Roband Australia’s obligations pursuant to this express warranty being limited to the repair or replacement of the defective goods or materials, at is option and subject to the terms contained within this Warranty statement. Where relevant, glass, Teflon® and lamps are not included in this warranty and RCD tripping due to moisture absorption by Tubular Heating Elements is not considered a warranty fault. Generally, all goods claimed under this warranty must be returned to the factory or an authorized service agent, freight prepaid, for inspection. All parts deemed to be defective will be replaced, however, no claims will be entertained for second hand products, or parts damaged in transport, misused or modified in any way without our approval. For machines that are not considered to be portable (e.g. food bars, rotisseries, large hotplates and some bain maries), on site warranty service will be provided in capital city metropolitan areas only. In all other locations, the customer is responsible for all travelling time/service call costs and payment for this will be required prior to the commencement of the repair. The labour costs to actually repair the fault will be met by the company. Any repairs or replacement of defective goods or materials pursuant to this warranty, must be authorized by Roband Australia prior to any action being taken. The company reserves the right to reject a claim for warranty if it is not completely satisfied with the circumstances under which it occurred and any other costs incurred for false claims or faults due to incorrect usage etc. are the responsibility of the claimant. Roband Australia Pty Ltd nor any subsidiary company or Agent shall be liable for loss of profit or damage to other equipment and property except where it is in breach of the guarantees provided in accordance with Schedule 2 of the Competition and Consumer Act 2010 (Cth) or the applicable legislation from time to time. The goods come with guarantees that cannot be excluded under the Australian Consumer Law (ACL). You are entitled to a replacement or refund for a major failure and for compensation for any other reasonably forseeable loss or damage. You are also entitled to have the goods repaired or replaced if they fail to be of acceptable quality and the failure does not constitute a major failure. Generally, authorized service agents are located in all areas which have authorized distribution dealers. For the name of your nearest Australian authorised service agent, please contact: Roband Australia Pty Ltd 1 Inman Road, Cromer, NSW 2099 Warranty Number: 1800 268 848 Phone: (02) 9971 1788 Fax: (02) 9971 1336 All other countries please contact your selling Agent. Please complete the following details and keep this card in a safe place. NAME ADDRESS MODEL No: SERIAL No: DATE PURCHASE NAME OF DEALER: PLEASE RETAIN THIS SECTION FOR YOUR RECORDS DO NOT POST ROBAND® AUSTRALIA PTY LTD Page: 20 OTHER LEADING PRODUCTS AVAILABLE: -PLUS PIE & FOOD WARMERS DRINK MIXERS HIGH PERFORMANCE DEEP FRYERS VITAMIX BLENDERS GRILLMAX TOASTERS NOAW Slicers Manufactured/Imported in Australia by: Authorised Distributor/Agent Page: 21