1
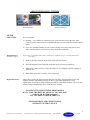
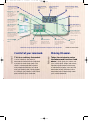
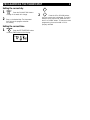
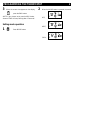
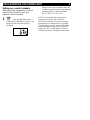
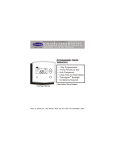
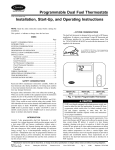
HOMEDEAL AIR CONDITIONING (QLD) Heating & Cooling Specialists Ducted System Operating Instructions For Sales, Service and Maintenance p: (07) 3397 8900 f: (07) 3397 8922 e: [email protected] w: www.homedealqld.com a: 88 Cavendish Road, COORPAROO 1 Contractors Licence No.28700 World leader in air conditioning and heating technology. Authorised dealer 07/11/2007 GENERAL INSTRUCTIONS Personal Instructions These instructions have been prepared as a guide to enable you to obtain the utmost benefit from your Air Conditioning System, and to ensure that you enjoy many years of Carrier comfort. Before your Air Conditioning System is finally placed under your care, the location of the controls and their correct operation will be explained to you. Also the air filter location, its removal and care. Any further special items, which have been individually designed for your particular Air Conditioning System, will be demonstrated and their location explained Zone System Your Air Conditioning System has been designed to enable One Zone/Multiple Zones of your home to be conditioned at any one time. Points to Consider The interconnecting areas between zones of your total home Air Conditioning System, usually the corridor or passages, acts as a “buffer” zone through which air circulated from the conditioned rooms is “returned” via the return air grille to the system for reconditioning. The thermostat records the temperature of this “return” air and automatically calls for it to be cooled or heated according to the setting of the controls. Efficient air conditioning depends on free circulation of the conditioned air throughout the particular zone and corridor area. Close all windows and doors leading to outside. CLOSE doors to ALL rooms and areas that are not be conditioned. Check your home for any external draughts as these can affect the economy of your system. During the summer time, when your Air Conditioning System is operating on COOLING, the corridor area could be at 2.0C warmer than the conditioned rooms. Thus, to achieve a temperature of 24C in the conditioned rooms it would be necessary to set the thermostat, which is located in the corridor, to a temperature of 26C. On the other hand, during the winter, when HEATING is in operation, the corridor could be 2.0C colder than the conditioned rooms. In this instance the rooms would be heated to 21C if the thermostat is set at 19C. The temperature difference between the corridor area and the conditioned rooms may vary, in many instances, from those given above. It depends on individual SYSTEM design, the are of the corridors and many other factors. Assist your total home Air Conditioning System to control comfort within your residence. Do not wait for excessive heat or cold to build up before bringing the System into operation. The SYSTEM is automatic which enables you to leave it on whilst you are out for part of the day. 2 Contractors Licence No.28700 World leader in air conditioning and heating technology. Authorised dealer 07/11/2007 If the system fails to operate satisfactorily, then check the following: 1. Thermostat and switches set correctly – refer to paragraph – “TO OPERATE YOUR HOME AIRCONDITIONING SYSTEM” 2. Return Air Filter Clean 3. Zone control switch/s set to correct zone 4. Outside doors and windows closed and doors to unconditioned zones also closed. GENERAL INSTRUCTIONS (Continued) Humidity Should it be necessary to register a Service Call, please quote the information requested by our service personnel. You will find this information contained in your 5 year Gold Warranty Certificate. It is most important that this documentation is kept in a safe place. The higher the HUMIDITY, the more effort the SYSTEM will divert towards removing the excess moisture from the air within your residence. Under high HUMIDITY conditions, the temperature inside your residence may not drop as quickly as when the outdoor HUMIDITY is comparatively low. When such extreme conditions of temperature and humidity do occur, DO NOT RESET the temperature control (1). Lowering the temperature setting will NOT make the SYSTEM discharge colder air. As the SYSTEM removes the excess moisture from the residence it will maintain comfortable conditions by lowering the HUMIDITY to an acceptable level. TO OPERATE YOUR HOME AIR CONDITIONING SYSTEM – SUMMERTIME Set the thermostat temperature control to the “DESIRED TEMPERATURE” (suggested temperature between 24C and 26C). NOTE: - SHOULD YOU SET THE TEMPERATURE LOWER THAN 24C IN HIGH HUMIDITY CONDITIONS WATER CAN CONDENSATE AT THE CEILING OUTLETS POSSIBLY CAUSING WATER STAINS ON THE CEILING. THIS IS NOT COVERED UNDER WARRANTY. (a) Select “COOL” mode of operation on the thermostat. (b) Select “ON” or “CONTINUOUS” for the fan operation. (c) Set Zone switches to the Zone or Zones to be conditioned. The home Air Conditioning System will now operate on COOLING, and will continue to do so until the air-cools down to the temperature set by the thermostat. 3 Contractors Licence No.28700 World leader in air conditioning and heating technology. Authorised dealer 07/11/2007 When the control temperature has been reached, COOLING will stop, but the fan will continue to circulate conditioned air, if set to the continuous position. Note: Should the temperature rise above the thermostat setting, COOLING will automatically commence and continue until the control temperature has been reached The fan button allows you to switch between “Auto” and “Continuous” operation. With the switch in the auto position, both the indoor fan and outdoor compressor will stop as determined by the thermostat setting. When switch is set to “Continuous” the outdoor compressor will stop when the control temperature has been reached, but the indoor fan will continue to circulate conditioned air. TO OPERATE YOUR HOME AIR CONDITIONING SYSTEM – WINTER TIME It is possible to operate fan only, when the switch is in continuous position, and the unit is switched off. This enables you to circulate and filter the air in your home. (a) Set the thermostat temperature control to the “DESIRED TEMPERATURE” (suggested temp between 19°C - 21°C). (b) Select “HEAT” mode of operation on the thermostat. (c) Select “AUTO” for the fan operation. (d) Set Zone one or zones to be conditioned. The Air Conditioning System will now operate on HEATING, and will continue to HEAT until the air passing the thermostat rises to the temperature set by the thermostat control. When the control temperature has been reached, BOTH HEATING and FAN will stop operating, and will remain out of operation until the temperature at the thermostat commences to fall. The HEAT and FAN will automatically re-commence the HEATING process. The FAN remains out of operation to avoid circulating the air that is not being heated, otherwise such air may be sensed as cool air and cause discomfort. WINTER DEFROST CYCLE In winter months when the outside temperature drops below 7°C, the unit may go onto a defrost cycle. 4 Contractors Licence No.28700 World leader in air conditioning and heating technology. Authorised dealer 07/11/2007 During defrost, the system will stop heating for up to seven (7) minutes (in fact it will blow cold air during that period). The need for defrost is reduced when the system is allowed to cycle off as it should. To minimise the need for defrost follow the following operating procedures: - Do’s Do Nots Set your thermostat correctly. For economical and comfortable conditions, we suggest 19°C 21°C o Don’t set your thermostat too high. This won’t heat your space any quicker. It’s not like turning up a flame. By setting your thermostat too high you don’t allow your system to cycle off and increasing the likelihood of frost forming. Close doors from un-heated rooms o Don’t leave doors open from un-heated rooms. This will result in the thermostat being influenced by cold air from un-heated rooms, causing the system not to cycle off enough – same problem as thermostat set too high. Turn your system on before your home becomes too cold or hot. Use set-back instead of turning off when it’s very cold or hot. o Don’t wait until your home gets too hot before turning the cooling on. If your home becomes too hot and the outdoor temperature is very high, the system will struggle to reduce the temperature to reach set point. When you know you’re expecting a cold night or morning, set your thermostat back to 16°C instead of switching it off. This will minimise the running time (operating cost) without allowing your home to get too cold. This is how your system has been designed to work. Let system cycle. defrosts o Don’t turn the system off if it’s defrosting (If you feel a cold draft). This will only make the problem worse, reduce efficiency and increase running costs. Only turn on as many rooms as the system was designed to handle. o Don’t turn on all or too many rooms. The system won’t heat any spaces properly system won’t cycle off and more defrosting will be necessary. complete . 5 Contractors Licence No.28700 World leader in air conditioning and heating technology. Authorised dealer 07/11/2007 START/STOP & SET BACK OPERATION. When the air conditioning is turned on, there is a period of time when the system operates to bring the active zones to the desired temperature. In moderate conditions this time span will be shorter than in extremes of summer and winter. You may only want to operate the air conditioning at certain times of the day or night. This is quite satisfactory but remember that, during summer and winter peak conditions some comfort will be sacrificed during warm-up or cool-down period. To achieve greater comfort in peak conditions it is recommended that, when the house is not occupied the system be programmed to maintain a set-back (moderate temperature) so that the air conditioning system can quickly bring the home to a comfort level when required. We suggest Summer set-back temperature is to be set between 28°C to 30°C. Winter set-back temperature to be set between 14°C to 16°C The Carrier programmable thermostat and Comfort Zone Control System can be programmed to provide set-back temperatures. A non-programmable thermostat will need to be manually adjusted from normal temperature to set-back. 7 Contractors Licence No.28700 World leader in air conditioning and heating technology. Authorised dealer 07/11/2007 AIRCONDITIONING FILTERS Washable Filters FILTER CLEANING Replaceable Filters We recommend: a) Monthly – run a rubber or soft nozzle type vacuum cleaner across the face of the return air grille (when the unit is switched off) this removes loose dust and lint off the grille. b) Every two months (monthly if your system is being used a lot of the time or in an office situation where it is used every day) check the actual filter. Washable Filters (Standard Type) Replaceable Filters If you have a washable filter and it needs to be cleaned every 6-8 weeks follow this procedure: Remove the filter from the back of the grille and take outside. Hose through the back of the filter with fine spray jet from a garden hose. When clean, shake off excess water and allow to dry completely before refitting to grille for use. When filter wears thin or patchy, have it replaced. These filters need to be replaced when they become dirty (typically between six and eighteen months, depending on usage) however your filters useable life can be significantly increased by gently cleaning the surface of the filter medium with a vacuum cleaner using a brush fitting. Don’t wash this type of filter. FAILURE TO FOLLOW THESE PROCEDURES MAY CAUSE THE RETURN AIR DUCT TO COLLAPSE AND INCUR WATER DAMAGE NOT COVERED UNDER WARRANTY NEVER OPERATE AIR CONDITIONING WITHOUT FILTER IN PLACE 8 Contractors Licence No.28700 World leader in air conditioning and heating technology. Authorised dealer 07/11/2007 IMPORTANT NOTICE Most air conditioning manufactures build into their systems “Safety Switches”. This is to eliminate the possibility of expensive repair costs to your air conditioning systems due to external reasons such as power supply distribution. Safety switch shut down also extends to the clients general maintenance to their air conditioning systems, even within the five-year part and labour period. Unit shut down can be caused by a number of reasons here are some examples: Power surges in your street, power spike, power drop outs. Internal filters not being cleaned regularly thus reducing airflow across the fan coil unit. Dense planting of shrubs too close to the outdoor unit thus not allowing sufficient air flow to the condenser. Household material/items too close to the outdoor unit thus not allowing sufficient airflow to the condenser. (Eg. Wheelie bins,) Excessive dust, dirt or paint particles in the air drawn into the fan thus causing airflow obstruction across the condenser coil. If our service technician deems repairs the system where caused by any of the above finding that your unit has shut down, these were not be covered under our warranty “Terms and Conditions”. Payment to the services mechanic on the day in full will be required. DRAINS The fan coil unit located in the roof will discharge water through a main condensate drain from the unit, this drain is run into your gutter. In keeping with good design principles, we have installed a safety drip tray underneath the fan coil unit. The outlet of this safety tray is to run through your eaves, in a noticeable place, SO IF YOU DO SEE WATER COMING OUT FROM THIS DRAIN, TURN OFF THE AIR CONDITIONING AND NOTIFY US IMMEDIATELY to have the problem rectified. Please note that regular maintenance avoids this problem and we accept no responsibility for the blocked drains. Please also be advised that external elements such as wasps, mice etc. can cause drains to block, again keeping a regular eye on the overflow pipe can help reduce any expensive repairs. 9 Contractors Licence No.28700 World leader in air conditioning and heating technology. Authorised dealer 07/11/2007 AVOID UNNECESSARY SERVICE CALLS Should the SYSTEM fail to operate (or not work as well as you would expect), check the following before placing a service call: 1) Thermostat and switches set correctly – refer to “TO OPERATE YOUR HOME AIR CONDITIONING SYSTEM” 2) Fuses intact (or circuit breaker on) on electrical switchboard. 3) Power failure – check house lights or power point 4) If the system has had a power failure and the power has been turned back on, you will need to wait for five (5) minutes before the unit’s internal safety mechanism will allow the unit to turn on. 5) Return air filter is clean. 6) The outdoor unit is running and air is circulating (check zone switches are turned on). 7) The outdoor condenser coil is not blocked. 8) Windows and doors to the outside are closed and doors from unconditioned spaces are closed. 9) Comfort zone sensors or controls are clean and getting good air circulation. 10) Check number of zones operating (eg. Day and night zones are not to be on all at once) WARNING Whenever the SYSTEM is switched “OFF” do not switch “ON” again for two minutes. Only allow qualified, Carrier Authorised service technicians to service or maintain the equipment. HOMEDEAL AIR CONDITIONING (QLD) OFFICE ADDRESS: 88 CAVENDISH ROAD, COORPAROO POSTAL ADDRESS: PO BOX 139, STONES CORNER QLD 4120 TELEPHONE: (07) 3397 8900 FAX: (07) 3397 8922 10 Contractors Licence No.28700 World leader in air conditioning and heating technology. Authorised dealer 07/11/2007 Page 1 Replaces: OMTSTAT-3 11:33 AM Form: OMTSTAT-7 8/24/01 © 1998 Carrier Corporation Printed in the U.S.A. 9-98 Prog. Tstat HO Guide -3 Catalog No. 03TS-TA3 Carrier Corporation Indianapolis, IN 46231 PROGRAMMABLE THERMOSTAT Homeowner’s Guide comfort Intelligent, easy to use. Congratulations on your purchase of a new Carrier thermostat. Your new thermostat combines computer-like intelligence with extremely simple operation in an elegant package. Designed to maximize the performance of your Carrier total indoor weather system, our thermostats provide reliable, accurate temperature control while blending into any home’s decor. As you read on, you’ll quickly see how easy it is to set up and operate your new thermostat and enjoy the comfort of your home. Page 1 Replaces: OMTSTAT-3 11:33 AM Form: OMTSTAT-7 8/24/01 © 1998 Carrier Corporation Printed in the U.S.A. 9-98 Prog. Tstat HO Guide -3 Catalog No. 03TS-TA3 Carrier Corporation Indianapolis, IN 46231 PROGRAMMABLE THERMOSTAT Homeowner’s Guide comfort Intelligent, easy to use. Congratulations on your purchase of a new Carrier thermostat. Your new thermostat combines computer-like intelligence with extremely simple operation in an elegant package. Designed to maximize the performance of your Carrier total indoor weather system, our thermostats provide reliable, accurate temperature control while blending into any home’s decor. As you read on, you’ll quickly see how easy it is to set up and operate your new thermostat and enjoy the comfort of your home. 8/24/01 11:33 AM Room Temperature Display shows current room temperature. ▲ ▲ ▲ ▲ ▲ ▲ END Button “locks in” the most recently entered temperatures and schedule. ▲ ▲ RESET FILTER Button restarts the timer that determines the next air filter change or cleaning. HOLD Button maintains the current temperature and overrides programmed temperature changes until reset. NOTE: Not all messages displayed in the above illustration will appear at once in any situation. UP AND DOWN Buttons change the temperature settings. They are used for programming and to access outdoor temperature. FAN Button chooses ON or AUTO fan operation. This is no ordinary thermostat. Carrier listened to the needs of homeowners nationwide and delivered a product to meet those needs. The result is a thermostat that interacts with people as effectively as it does with your heating and cooling system. It’s a simple, yet powerful control that puts comfort at your command. * Available on selected models. Making life easier. features Comfort at your command. control Clean Filter Indicator lets you know it is time to clean or replace your system’s air filter. ▲ ▲ CHANGE DAY Button advances you to the next day to be programmed and advances the day of the week display. ▲ Time of Day Display ▲ COPY PREVIOUS DAY Button “memorizes” the current day’s comfort schedule and copies it into the next day’s schedule. SET TIME/TEMP Button Temperature Settings Display shows the temperature settings for current time period. ▲ PROGRAM Button starts the programming process and moves you from one step to the next. Outdoor Temperature Display shows the outdoor temperature. ▲ ▲ * Auxiliary Heat Indicator is displayed when a heat pump system’s auxiliary heat is on. MODE Button selects OFF, HEAT, COOL, or AUTO operation. Heat pump thermostats include EMERGENCY HEAT mode. Page 2 ▲ Prog. Tstat HO Guide -3 Take a few minutes to review the features and functions listed above. Carrier gives you control over your comfort with simple instructions, responsive push buttons and an easyto-read backlit display. Once set, this thermostat reliably monitors indoor temperatures and responsively meets your comfort demands. TABLE OF CONTENTS PROGRAMMING THE THERMOSTAT Setting the current day........................................1 Setting the current time ......................................1 Setting the mode operation ................................2 Setting the fan operation ....................................3 Personalize your comfort....................................4 Setting your comfort schedule. ...........................5 Copying a daily schedule. ..................................8 OPERATING THE THERMOSTAT Changing your comfort schedule......................10 Overriding your comfort schedule....................10 Checking the outdoor temperature ..................11 Checking current programmed time and temperature settings ...............................12 Clean filter feature............................................13 i AUTO CHANGEOVER.........................................14 SMART RECOVERY .............................................15 What if… The auxiliary heat indicator is displayed...........16 The clean filter indicator is displayed ...............16 The hold indicator is displayed.........................16 You have a power outage .................................17 You have a system error message .....................17 Warranty .............................................................18 Common Terms and Where to Find Them ...........19 PROGRAMMING THE THERMOSTAT 1 Setting the current day 1 2 Press the CHANGE DAY button. The day of the week will change. Stop on the desired day. The thermostat then follows the program schedule for that day. Setting the current time 1 Press the SET TIME/TEMP button. The word TIME flashes on the display. 2 Press the UP or DOWN buttons until the correct time is displayed. To quickly advance to the proper time, press and hold the UP or DOWN button. To ensure accurate programming, be sure that AM or PM is properly selected. PROGRAMMING THE THERMOSTAT 3 When the correct time appears on the display, 2 When the MODE button is pressed, the words press the END button. NOTE: If you choose not to press the END button, the word TIME will stop flashing after 15 seconds. OFF, Setting mode operation 1 2 HEAT, Press MODE button. COOL, PROGRAMMING THE THERMOSTAT 3 Setting the fan operation and AUTO will rotate on the display. If you have a heat pump, the display will show OFF, HEAT, COOL, AUTO, and EHEAT. NOTE: In AUTO mode, your system will heat OR cool as needed to reach your temperature settings. AUTO mode may be turned off. Contact your indoor weather expert for details. 3 Continue to press the MODE button until you reach the desired setting. 1 Press the FAN button to switch between ON and AUTO fan settings. When the ON mode is selected, the fan runs continuously for improved air circulation. When the AUTO mode is selected, the fan runs only as needed to maintain your indoor temperature settings. PROGRAMMING THE THERMOSTAT Personalize Your Comfort Before you program your thermostat, take a moment to plan your temperature schedule. Each day of the week is divided into 4 time periods: WAKE, DAY, EVENING, and SLEEP. For each time period, enter a start time, heating temperature, and cooling temperature in the appropriate blank. Once completed, this chart will be your guide during programming. NOTE: Your thermostat requires your cooling temperature to be at least 2° higher than your heating temperature. 4 PROGRAMMING THE THERMOSTAT Setting your comfort schedule Before you begin programming, refer to page 4 of this manual to plan your personal comfort schedule. 1 Press the PROGRAM button. The word PROGRAMMING appears on the display and the word TIME flashes on the display. 5 Above the clock, the word WAKE, DAY, EVE, or SLEEP will appear. The day to be programmed is displayed with a 2-letter abbreviation: MO, TU, WE, TH, FR, SA, or SU. NOTE: Your thermostat will always start the programming process in the current time period and current day. You may wish to begin programming on a different day or time period. To change the time period, press the PROGRAM button as needed until the correct time period, WAKE, DAY, EVE, or SLEEP appears. Press the CHANGE DAY button to display the desired day. PROGRAMMING THE THERMOSTAT 6 NOTE: Pressing the SET TIME/TEMP button allows you to select between HEAT, COOL and TIME settings. 2 3 Using your personalized comfort schedule as a guide, press the UP and DOWN buttons to set the time for the indicated time period. Press the SET TIME/TEMP button. The word HEAT flashes on the display. 4 5 Press the UP and DOWN buttons to adjust the heating temperature setting to match your personalized comfort schedule. Press the SET TIME/TEMP button to select the cooling temperature setting for this time period. PROGRAMMING THE THERMOSTAT The word COOL flashes on the display. 6 Press the UP and DOWN buttons to adjust the cooling temperature setting listed in your personalized comfort schedule. NOTE: Don’t forget, your COOL setting must be at least 2° higher than your HEAT setting. Your thermostat will automatically change your previously set temperature to maintain that 2° difference. 7 7 Press the PROGRAM button to advance to the next time period. Following your personalized comfort schedule, enter times and temperatures for DAY, EVE, and SLEEP time periods. You have now programmed 1 day into your thermostat. At this time, you can either repeat steps 1-7 until all days of the week have been programmed, OR you can copy the schedule onto the remaining days of the week. See the section on ”Copying a daily schedule“ for details. PROGRAMMING THE THERMOSTAT NOTE: During programming, if you have not touched a button or made an entry within 3 minutes, the programming mode will automatically shut off. Anything you have programmed will be saved. 8 Press the END button when you finish entering your comfort schedule. NOTE: Once you’ve programmed your comfort schedule, the thermostat will continue operating on that program until you enter an alternative schedule. It may be appropriate to adjust temperatures as seasons change. 8 Copying a daily schedule Typically, your Monday through Friday comfort schedule will be the same. That’s why the thermostat includes a COPY PREVIOUS DAY button. When programming, this eliminates the need to re-enter identical information for each day. 1 2 Program a daily schedule. Suggestion: Start with Monday so the following 4 days can be copied. Press the CHANGE DAY button to move to the next day. PROGRAMMING THE THERMOSTAT 3 Press the COPY PREVIOUS DAY button. The previous day’s schedule will be entered into the new day. 4 Continue this process by repeating steps 2 and 3. 9 10 OPERATING THE THERMOSTAT Changing your comfort schedule Overriding your comfort schedule 1 There are 2 ways to override the existing program. 2 3 Press the PROGRAM button to begin the programming process. Make necessary changes by following previous sections. Press the END button to end the programming process. NOTE: Entering new information always deletes the old selections. Refer to the table of contents at the front of this guide to locate the type of programming you desire. 1 Pressing the HOLD button. By pressing the HOLD button, the thermostat will maintain the current temperature settings and ignore the comfort schedule for an indefinite period of time. The word HOLD will appear in the display. Press the HOLD button a second time and the thermostat will resume normal operation, returning the temperature settings to the programmed comfort schedule. The thermostat will change the temperature setting as needed upon the next program 11 OPERATING THE THERMOSTAT change the other temperature setting as needed. The thermostat will automatically restore the comfort schedule settings at the next programmed time. cycle. Pressing HOLD will not permanently alter your set program. Checking the outdoor temperature 4 Pressing the UP or DOWN buttons. By pressing the UP or DOWN button, the current temperature settings appear on the display. Pressing the UP or DOWN button again will temporarily change the temperature setting above the flashing indicator as needed. To change the other setting for this time period, press the SET TIME/TEMP button until the other setting indicator flashes. Pressing the UP or DOWN button again will temporarily 1 Press the UP and DOWN buttons simultaneously. 12 OPERATING THE THERMOSTAT 2 The outdoor temperature will appear on the display. NOTE: If 2 dashes (--) appear, your thermostat does not include the outdoor temperature sensor or the sensor is not working properly. Check with your dealer if you are unsure. Checking current programmed time and temperature settings 1 Press the PROGRAM button. 2 3 4 The current time and temperature settings for the current day and time period are displayed for you to check. Press the PROGRAM button again to advance to the next time period for same day. Continue this process to review all settings for the day. Press the CHANGE DAY button to view the next day’s settings. 13 OPERATING THE THERMOSTAT 5 Repeat steps 3 and 4 to review entire 7 day schedule. CAUTION: Pressing any other buttons while reviewing current selections could alter the set program. 6 Clean filter feature Your thermostat reminds you when it’s time to change or clean your filter by displaying the CLEAN FILTER indicator. Press the END button to exit the program mode. Checking current temperature The thermostat will display current temperature. To view your current temperature settings, press the UP or DOWN button once. The heat and cool temperature settings will be displayed. 1 Press the RESET FILTER button after you have changed or cleaned your filter to restart the timer. AUTO CHANGEOVER Your thermostat provides complete, automatic control over heating and cooling with auto changeover. Auto changeover means your system will automatically heat or cool as needed to maintain your temperature set points. 14 Auto changeover makes life easier because you no longer have to manually switch the thermostat between heating or cooling operation. Just set your heating and cooling set points and let the system do the rest! NOTE: If auto changeover is not necessary in your area of the country, your installer may disable the AUTO mode. 15 SMART RECOVERY Smart recovery is a feature of your new thermostat designed to save energy by gradually adjusting temperatures. When it’s time for a programmed temperature change, smart recovery begins working in advance, turning the system on and off as needed to slowly adjust the indoor temperature. During these transition periods, you may notice that the actual temperature and your temperature setting don’t match. That’s smart recovery in action, adjusting temperatures in small increments for greater energy efficiency. This is more energy efficient than simply allowing the system to operate at full capacity until the desired temperature has been met. NOTE: The thermostat will start adjusting the temperature 1.5 hours before the scheduled temperature change. Smart recovery does not apply to cooling operation. WHAT IF… AUXILIARY HEAT indicator is displayed… The AUX HT indicator appears on the heat pump version of the thermostat only. It is displayed when your system is operating on auxiliary heat. NOTE: This indicator does not reflect a problem with your system. CLEAN FILTER indicator is displayed… The CLEAN FILTER indicator tells you when to clean or replace your system’s air filter. Press the RESET FILTER button after cleaning or replacing the filter to turn off the indicator and restart the timer. 16 NOTE: This indicator does not reflect a problem with your system. HOLD indicator is displayed… The HOLD indicator reminds you that your thermostat’s comfort schedule has been overridden. This function will hold the current temperature settings indefinitely, so it can be used to hold an energy-saving temperature setting for several days if needed. Press the HOLD button to resume normal system operation. NOTE: This indicator does not reflect a problem with your system. WHAT IF… You have a power outage… An internal power source eliminates the need to reprogram the thermostat after power outages. The comfort schedule you have entered will be maintained indefinitely. The clock will run for 72 hours. 17 You have a system error message… The display may appear as follows: --, E2, or E3 -- indicates a problem with the indoor air sensor E2 indicates low line voltage E3 indicates a problem with the outdoor air sensor WARRANTY This thermostat includes a 1-year limited warranty. For detailed warranty information, please refer to the All Product Limited Warranty Card included in your information packet. This thermostat is also eligible for manufacturer’s extended system warranties. Ask your dealer for details on extended warranties for longer-term protection. 18 COMMON TERMS AND WHERE TO FIND THEM Auxiliary Heat .................................Pg. 16 Most heat pump systems require a supplemental heating source, called auxiliary heat, to maintain your comfort when outdoor temperatures fall significantly. Your thermostat lets you know when your home is being warmed with supplemental heat. NOTE: For additional energy savings opportunities, ask your dealer about locking out auxiliary heat at a selected outdoor temperature. Change Day .......................................Pg. 1 Change day is a function of your thermostat’s programming. Once you’ve programmed a day’s heating or cooling 19 schedule, you move to the next day by pressing the CHANGE DAY button. This button also advances the day of the week on the display. Clean Filter ......................................Pg. 13 Your system’s air filter will require regular cleaning to reduce the dirt and dust in the system and your indoor air. The CLEAN FILTER indicator lets you know when it’s time to clean the filter. Comfort Schedule..............................Pg. 4 The comfort schedule is a personalized list of the heating and cooling temperature settings along with a corresponding time COMMON TERMS AND WHERE TO FIND THEM 20 of day. This schedule includes 4 time periods per day, and can feature a different comfort schedule each day of the week. Emergency Heat ................................Pg. 3 This indicates that auxiliary heat is being used without the compressor. Copy Previous Day ............................Pg. 8 This programming function allows you to copy the previously programmed day for use in setting the current day’s schedule. It is activated by pressing the COPY PREVIOUS DAY button. End ....................................................Pg. 2 The END button returns the thermostat to normal operation. Current Day and Time .......................Pg. 1 The day of the week and current time are displayed continuously on the display. Fan.....................................................Pg. 3 Your system’s fan can run continuously or only as called for during heating or cooling. Continuous operation helps with air circulation and cleaning. Automatic operation provides better efficiency. Press the FAN button to make your choice. COMMON TERMS AND WHERE TO FIND THEM Hold ..................................................Pg. 2 This function allows you to override the programmed temperature settings. Mode. ................................................Pg. 2 Mode refers to the type of operation your system is set up to perform. Mode settings include: OFF, HEAT, COOL, and AUTO. Heat pump systems also include EMERGENCY HEAT (EHEAT). Outdoor Temperature ......................Pg. 11 Your thermostat not only registers the indoor temperature, but it may also be equipped to register and display the outdoor temperature as well. Press the UP 21 and DOWN buttons simultaneously to read the outdoor temperature display. Override ..........................................Pg. 10 Temporarily disregards the thermostat’s programmed temperature settings and schedules. You can override the system by pressing the HOLD button to maintain the current temperature indefinitely or by pressing the UP and DOWN buttons to change the temperature settings for the remainder of the current period. Power Outage..................................Pg. 17 Complete loss of electricity. Your thermostat has an internal power source COMMON TERMS AND WHERE TO FIND THEM that allows it to continue to run for 72 hours or more without electricity. Programmed settings are stored indefinitely without the aid of batteries. Program .............................................Pg. 5 The program function of your thermostat allows you to enter time and temperature information into the thermostat. To activate the program function, press the PROGRAM button. Reset Filter.......................................Pg. 13 The reset filter function turns off the CLEAN FILTER indicator and restarts the timer. Press the RESET FILTER button after 22 you’ve cleaned and replaced the system’s air filter. Set Time .............................................Pg. 1 This function allows you to set the proper time, ensuring accurate heating and cooling schedules. Press the SET TIME/TEMP button to activate. Temperature Sensors........................Pg. 12 Temperature sensors measure the current indoor or outdoor temperatures which are displayed on the thermostat. COMMON TERMS AND WHERE TO FIND THEM Temperature Settings .........................Pg. 7 These settings are the temperatures programmed into the thermostat as part of your comfort schedule. The actual room temperature will automatically be displayed, but you can check the desired temperature for the current mode by pressing either the UP or DOWN button. 23 Time of Day .......................................Pg. 4 When programming the thermostat, time of day refers to the 4 time periods available, including WAKE, DAY, EVE, and SLEEP. Time of day also refers to the time shown on the thermostat’s display. Up and Down Buttons.......................Pg. 1 These buttons are used to set the clock and enter other time and temperature information. 11:33 AM Page 1 Replaces: OMTSTAT-3 8/24/01 Form: OMTSTAT-7 Printed in the U.S.A. 9-98 Prog. Tstat HO Guide -3 © 1998 Carrier Corporation Catalog No. 03TS-TA3 Carrier Corporation Indianapolis, IN 46231 PROGRAMMABLE THERMOSTAT Homeowner’s Guide Intelligent, easy to use. comfort Congratulations on your purchase of a new Carrier thermostat. Your new thermostat combines computer-like intelligence with extremely simple operation in an elegant package. Designed to maximize the performance of your Carrier total indoor weather system, our thermostats provide reliable, accurate temperature control while blending into any home’s decor. As you read on, you’ll quickly see how easy it is to set up and operate your new thermostat and enjoy the comfort of your home. a) Equipment Carrier equipment is warranted for 5 years parts and labour as per the terms of the Carrier warranty certificate. b) Electric Zones Electric Zones are warranted for 1 year parts and labour against any mechanical or internal electrical breakdown (excluding fusion). c) Duct work & Air Diffusion Duct work and air diffusion is warranted for 5 years against material defects and 1 year on labour defects. d) Refrigeration 6 Months Refrigerant is a consumable item, which will require topping up over your air conditioning systems life. Warranty for refrigerant topping up will only extend to 6 months from commission. However, any equipment failure requiring replacement of refrigerant will be warranted for the full five years. e) Air Balancing 3 Months Air balancing is carried out at commissioning and air is balanced by measuring room temperature to ensure even temperature (within tolerances of + or - 3 degrees Celsius). Often this means more air from outlet to outlet. Clients often confuse this and request service to rectify what is in fact actually required. Our warranty on air balance will extend to 3 months from commissioning which allows ample time for room conditions to be assessed. f) Filtration Standard washable filters are a consumable item, which if washed regularly as required, will need replacing after 12 months and is chargeable. Homedeal Air Conditioning QLD Pty Ltd under the terms and conditions of the manufacturers warranty conditions shall carry out all warranty repairs. You may however employ a local contractor to carry out general maintenance not covered under warranty, as listed below. No back charges will be accepted, unless ordered in writing by a representative of this company. Please note: The following items are not covered under warranty, and any service calls are chargeable at the current rates. 1) 2) 3) 4) 5) 6) 7) 8) 9) Blown fuses. Power failure and any power surges from local electricity supplier. Nuisance calls where no mechanical fault exist. Dirty filters. Systems subject to misuse, abuse, negligence. Air balance after commissioning and three months use. Incorrect operation of thermostat or tuition after commissioning. Ground subsiding around condensing unit. Excessive defrost operation due to air conditioning unit location.