1
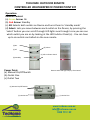
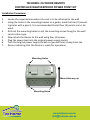
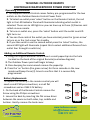
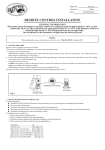
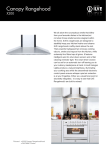
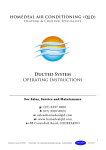
TecHome
Model: TH591
Remote Controlled
Weatherproof Power Point
Instruction and Installation
Manual
TECHOME: OUTDOOR REMOTE
CONTROLLED WEATHERPROOF POWER POINT KIT
Thank you for purchasing the TH591 Outdoor Remote Control Power Point Kit
from Techome. All Techome products are Australian designed and manufactured.
The TH591 is backed by a one (1) year warranty.
Note: Any internal modifications, manipulations or attempts to open the
Device is deemed unsafe and will void the warranty.
Please read the safety instructions highlighted in this manual carefully and
follow all instructions.
Kit contents:
1x TH701—Remote Control
1x TH591—Power Point Device
1x Instruction Manual
Features:
Individual Control: The Device can operate two (2) outlets, both Independently.
Group Control: Up to three (3) Devices can be controlled via one remote.
Manual Control: The Device has the ability to be manually operated
No Interference: Each Remote Control has its own code, will not interfere with
other devices.
Magnetic Back: The Remote Control has a magnetic back meaning it can attach
itself to any steel based structure (no need to use the Remote holder)
Loss of Power: If the Device loses power when the power returns the Device will
automatically be in the ‘off’ position.
Low Energy Consumption: < 2.5W
Weatherproof: I/P53
Easy operation: Factory Pre-programmed
www.techome.com.au
[email protected]
1800 773 139
TECHOME: OUTDOOR REMOTE
CONTROLLED WEATHERPROOF POWER POINT KIT
Operation:
Remote Control:
(a) Green Arrow: On
(b) Red Arrow: Standby
(c) All: Selects both outlets on Device and turns them to ‘standby mode’
(d) Select: Lets you move between each outlet on the Device, by pressing the
‘select’ button you can scroll through LED lights one through to six you can see
which outlet you are on by looking at the LED Indictor Panel (e) . You can have
up to six outlets controlled via the one remote.
(a) On
(d) Select
(c) All
(e) LED Indicator Panel
(b) Standby
Power Point:
(a) Manual On/Off Switch
(b) Outlet One
(c) Outlet Two
Remote with LED Light Display illuminated
(a) Manual On/Off Switch
(b) Outlet One
(c) Outlet Two
www.techome.com.au
[email protected]
1800 773 139
TECHOME: OUTDOOR REMOTE
CONTROLLED WEATHERPROOF POWER POINT KIT
Installation Procedure:
1.
2.
3.
4.
5.
6.
7.
Locate the required area where the unit is to be attached to the wall
Using the holes in the mounting bracket as a guide, mark the four (4) mounting holes with a pencil. It is recommended that all four (4) points are to be
used.
Drill out the mounting holes to suit the mounting screws fixing for the wall
construction type.
Now attach the Device to the wall using four (4) screws
Plug the power lead into the original power supply socket
Turn the original power supply socket on (you will hear a beep from the
Device indicating that the Device is ready for operation)
Mounting Holes
Mount this way up
Mounting Holes
www.techome.com.au
[email protected]
TECHOME: OUTDOOR REMOTE
CONTROLLED WEATHERPROOF POWER POINT KIT
Operating Instructions:
1. The supplied Remote Control comes factory pre-programmed for the two
outlets on the Outdoor Remote Control Power Point
2. To Select an outlet press ’select’ button on the Remote Control, the red
light in the LED Indicator Panel will illuminate indicating which outlet is
selected. There are six LED lights as you can have up to three (3) Devices cont
rolled via one remote
3. To turn on outlet one, press the ‘select’ button until the outlet one LED
light turns on
4. You can then control the outlet you have selected, press the ‘green arrow’
to turn on or the ‘red arrow’ for standby
5. If you then wish to use the second outlet press the ‘select’ button, the
second LED light will illuminate (repeat this to select additional Devices from
outlet four through to outlet six)
Adding an Additional Remote Control:
1. Using the original Remote Control insert a small paperclip into the hole
located on the back of the original Remote (see below diagram)
2. The Outdoor Power point will begin to beep
3. Once beeping has commenced remove the paperclip
4. Press the ‘on’ button (the green arrow) for three seconds on the new
remote will beep three (3) times to confirm that it is successfully
programmed.
Battery Replacement:
To replace the battery in the remote control you will
need a small Phillips screwdriver, a small flat
screwdriver and an 23AE 12V battery
1. On the back of the Remote Control remove the
Screw using the Philips screwdriver
2. Loosen the back by inserting the flat screw driver
between the seams on both sides, top, middle and
bottom. Gently remove the back cover.
www.techome.com.au
[email protected]
1800 773 139
TECHOME: OUTDOOR REMOTE
CONTROLLED WEATHERPROOF POWER POINT KIT
Bypassing the Remote Control:
1.
On the Outdoor Power Point there will be a sticker on the side with
‘Emergency Operation Swipe Back of Remote Control Here’
(see example below)
2.
Using the back of the Remote Control place and hold over this sticker
3.
The device will beep once to activate and twice to deactivate the Remote
4.
This will now manually turn both the outlets on the Remote Controlled Power
Point on or off
Fault Finding:
Not working: 1. Check that the unit is plugged into an existing power socket that has
power on
2. Check that the Device you wish to use is turned on
3. Check the Outlet Switch on the controller is in the ‘on’ position
4. Check the Remote Control Battery (the LED will be illuminated
brightly is the battery is operational, if the LED is dull the battery
will need to be replaced)
If still not working, return to supplier.
Warning:
Do not exceed maximum power rating 2400W or 10A total (resistive)
Do not exceed maximum power rating 8A @ 0.8Pf (Inductive)
Do not let unsupervised children operate the Device
Do not submerge the Device into any liquid of any kind
Do not locate Device where it may cause a hazard to any person
Do not attempt to open the Outdoor Power Point Device
www.techome.com.au
[email protected]
1800 773 139
s
TECHOME: OUTDOOR REMOTE
CONTROLLED WEATHERPROOF POWER POINT KIT
Warning:
1.
The Device must be securely attached to the wall and located less than 1.5
meters from a supply socket
2.
If the Device is attached to a wall near a pool or spa, it must be located
more then 3.5 meters from the wet zone
3.
Do not attempt to open the Outdoor Power Point Device
4.
This Device is designed and tested to be mounted vertically against a wall
5.
The total current for the Device must not exceed 10A
What you could use this Outdoor Remote Control Power Point on:
Garden Lights
Security Lights
Pool /Spa Pumps
Pool / Spa Lights
Rainwater Tank Pumps
Opening Roof System
www.techome.com.au
[email protected]
1800 773 139
Technical Information:
Remote Control:
Frequency 433 Mhz
Distance up to 100 meters
Battery GP23AE
Approval SAA121177EA
Power Point:
Max Load 10A 2400W Resistive
Max Load 8A @ 0.8Pf Inductive
Working Voltage 240VA/C 50Hz
Warranty:
Proof of Purchase:This warranty is only valid to the original purchaser and is not
transferable. Please keep your receipt for warranty purposes, please present your
receipt when claiming warranty as proof of purchase date.
Warranty: This product is warranted to be free from any defects for a period of 12
months (one year) from the date of purchase, any defects that may occur will be
repaired or replaced.
Warranty Procedure: Please return the faulty product with the valid proof of purchase to the original place of purchase. The customer is responsible for freight,
postage and packing costs when claiming warranty.
Exclusions: This warranty does not cover: batteries, misuse, packaging, general
wear and tear, power surges, lightening strikes, floods, incorrect installation, damage due to lack of care, modifications or repair by an unauthorised person.
Maintenance: If the power supply cord is damaged, it must be replaced by the
manufacturer and/or its service agent or similar qualified person.
TecHome
T: + 61 (7) 3117 9888 F: + 61 (7) 3847 1337
[email protected] www.techome.com.au
26 Harries Rd Coorparoo Brisbane QLD, PO Box 1432 Coorparoo DC Qld 4151