1
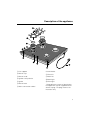
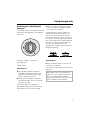
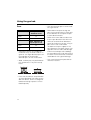
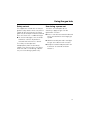
Operating instructions
Gas hob
KM 417
To avoid the risk of accidents or
damage to the appliance it is
essential to read these
instructions before it is installed
or used for the first time.
WO
M.-Nr. 05 725 340
C o ntents
D escrip tio n o f th e ap p liance . . . . . . . . . . . . . . . . . . . . . . . . . . . . . . . . . . . . . . . . . 3
W arning and S afety instru ctio ns . . . . . . . . . . . . . . . . . . . . . . . . . . . . . . . . . . . . . 4
C aring fo r th e enviro nm ent . . . . . . . . . . . . . . . . . . . . . . . . . . . . . . . . . . . . . . . . . 1 0
B efo re u sing fo r th e first tim e . . . . . . . . . . . . . . . . . . . . . . . . . . . . . . . . . . . . . . . 1 1
G eneral notes . . . . . . . . . . . . . . . . . . . . . . . . . . . . . . . . . . . . . . . . . . . . . . . . . . . . 1 1
C leaning and heating up for the first time . . . . . . . . . . . . . . . . . . . . . . . . . . . . . . . 1 2
U sing th e g as h o b . . . . . . . . . . . . . . . . . . . . . . . . . . . . . . . . . . . . . . . . . . . . . . . . 1 3
S w itching on, S w itching off, C ontrols . . . . . . . . . . . . . . . . . . . . . . . . . . . . . . . . . . 1 3
P ans . . . . . . . . . . . . . . . . . . . . . . . . . . . . . . . . . . . . . . . . . . . . . . . . . . . . . . . . . . . . 1 4
S afety cut-out . . . . . . . . . . . . . . . . . . . . . . . . . . . . . . . . . . . . . . . . . . . . . . . . . . . . . 1 5
U se during a pow er cut . . . . . . . . . . . . . . . . . . . . . . . . . . . . . . . . . . . . . . . . . . . . . 1 5
C leaning and care . . . . . . . . . . . . . . . . . . . . . . . . . . . . . . . . . . . . . . . . . . . . . . . . 1 6
G eneral notes . . . . . . . . . . . . . . . . . . . . . . . . . . . . . . . . . . . . . . . . . . . . . . . . . . . . 1 6
P an supports, controls . . . . . . . . . . . . . . . . . . . . . . . . . . . . . . . . . . . . . . . . . . . . . . 1 7
C eramic surface . . . . . . . . . . . . . . . . . . . . . . . . . . . . . . . . . . . . . . . . . . . . . . . . . . 1 7
B urners . . . . . . . . . . . . . . . . . . . . . . . . . . . . . . . . . . . . . . . . . . . . . . . . . . . . . . . . . 1 8
P ro blem so lving g u id e . . . . . . . . . . . . . . . . . . . . . . . . . . . . . . . . . . . . . . . . . . . . 20
G as co nnectio n . . . . . . . . . . . . . . . . . . . . . . . . . . . . . . . . . . . . . . . . . . . . . . . . . . 21
E lectrical co nnectio n . . . . . . . . . . . . . . . . . . . . . . . . . . . . . . . . . . . . . . . . . . . . . 22
A fter sales service . . . . . . . . . . . . . . . . . . . . . . . . . . . . . . . . . . . . . . . . . . . . . . . 23
D ata plate . . . . . . . . . . . . . . . . . . . . . . . . . . . . . . . . . . . . . . . . . . . . . . . . . . . . . . . 23
2
D escrip tio n o f th e ap p liance
a P an support
C ontrol knobs:
b B urner cap
h F ront left
c B urner head
i B ack left
d Ignition safety device
j B ack right
e Ignitor
k F ront right
f B urner base
* D epending on country of destination,
the appliance may be supplied w ith or
w ithout a plug. The plug show n is for
illustration only .
g Mains connection cable *
3
W arning and S afety instru ctio ns
This appliance complies w ith all
relevant legal safety req uirements.
Improper use of the appliance can,
how ever, present a risk of both
personal injury and material
damage.
B efore installing and using the
appliance for the first time, read the
operating and installation
instructions carefully . They give
information on safety , on the
operation and care of the appliance.
This w ay y ou w ill avoid the risk of
accident and damage to the
appliance.
D o not let children access the
appliance or its controls. S upervise
its use by the elderly or infirm.
K eep these instructions in a safe
place for reference and pass them
on to any future user.
B u ild ing in and co nnectio n
The connection to the gas supply
must be carried out by a suitably
q ualified and competent person in
accordance w ith local and national
safety regulations, e.g. a registered
gas fitter. If the appliance is supplied
w ithout a plug, or if the plug is removed
the appliance must additionally be
installed and connected by a suitably
q ualified and competent electrician in
strict accordance w ith national and
local regulations. The manufacturer
cannot be held liable for damage
caused by incorrect installation or
connection.
4
The electrical safety of this
appliance can only be guaranteed
w hen continuity is complete betw een
the appliance and an effective earthing
sy stem.
It is imperative that this basic safety
req uirement be tested and w here there
is any doubt, the electrical sy stem of
the house should be checked out by a
q ualified electrician. The manufacturer
cannot be held liable for damage such
as electric shock caused by the lack or
inadeq uacy of an effective earthing
sy stem.
E nsure that the gas pipe and
electrical cable are installed in
such a w ay that they do not touch any
parts of the appliance w hich become
hot. This could cause damage.
D o not connect the appliance to
the mains electricity supply by an
ex tension lead. E x tension leads do not
guarantee the req uired safety of the
appliance.
This eq uipment is not designed for
maritime use or for use in mobile
installations such as caravans, aircraft
etc. H ow ever it may be suitable for
such usage subject to a risk
assessment of the installation being
carried out by a suitably q ualified
engineer.
W arning and S afety instru ctio ns
C o rrect u sag e
F or safety reasons the appliance
must only be operated after it has
been built in. This is necessary to
ensure that all electric components are
shielded.
This appliance is for domestic use
only , and is not intended for
commercial use.
U se this appliance for the
preparation of meals only . A ny
other usage is at the ow ner’s risk and
could be dangerous. The manufacturer
can not be held liable for damage
caused by improper use or misuse of
the appliance.
D o not use the appliance to heat
up the room. D ue to the high
temperatures radiated, objects near the
appliance could catch fire. The life of
the appliance could also be reduced.
U sing the gas hob w ill cause a
build-up of heat and moisture in
the room in w hich it is installed. E nsure
that the room has sufficient natural or
mechanical means of ventilation, e.g.
an ex tractor.
If the hob is used for very long
periods of time, additional
ventilation of the room may be
necessary , e.g. by opening w indow s or
doors, or running the ex tractor on the
highest setting.
This appliance must not be set up
or operated in the open air.
Make sure all the components of
the gas burners have been
correctly assembled before sw itching
on.
W hen using a cooker hood over
the gas hob, ensure that any
burners in use are alw ay s covered w ith
a pan. O therw ise flames could be
draw n up by the suction of the cooker
hood, parts of w hich could then be
damaged or even set on fire.
P ans must be the correct siz e for
the burner they are used on (see
"P ans"). A pan w hich is too small w ill be
unstable on the pan support. If the pan
diameter is too large, flames can
spread out to the sides and damage or
burn the w orktop, w all claddings or
surrounding units and also parts of the
hob. The manufacturer cannot be held
liable for this ty pe of damage.
D o not store any inflammable
objects near the gas hob.
5
W arning and S afety instru ctio ns
S afety w ith ch ild ren
The appliance is only intended for
use by adults w ho have read these
operating instructions. K eep children
w ell aw ay . They w ill not understand the
potential danger of touching the
appliance. It is therefore important to
supervise children at all times.
O lder children may use the
appliance only w hen its operation
has been clearly ex plained to them,
and they are able to use it safely ,
recognising the dangers of misuse.
This appliance is not a toy . To avoid
the risk of injury , do not allow
children to play w ith the appliance or its
controls. S upervise its use by the
elderly or infirm.
The appliance gets hot w hen in
use and remains hot for q uite a
w hile after being sw itched off. To
safeguard against burning, keep
children w ell aw ay from the appliance
until it has cooled dow n.
D o not store any thing w hich might
arouse a child's interest in storage
areas above or nex t to the appliance.
O therw ise they could be tempted into
climbing onto the appliance w ith the
risk of burning themselves.
6
K eep all pans out of reach of
children. Turn pan handles inw ards
aw ay from the edge of the hob. D anger
of burning or scalding. S pecial hob
guards are available from good retail
outlets.
P ackaging (e.g. cling film,
poly sty rene) and plastic w rappings
must be kept out of the reach of babies
and y oung children. D anger of
suffocation. D ispose of all packaging
safely as soon as possible.
W arning and S afety instru ctio ns
P ro tecting th e ap p liance fro m
d am ag e
D o not drop any thing on the
ceramic surface of the hob. E ven a
light object could cause damage in
certain circumstances.
U nless the pan manufacturer
states that y ou can do so, y ou
should never use pans w ith thin bases
on this hob and y ou should never heat
up an empty pan. O therw ise the hob
could get damaged.
D o not use a steam cleaner to
clean this appliance. The steam
could reach electrical components and
cause a short circuit. P ressurised
steam could also cause permanent
damage to the surface and to other
components, for w hich the
manufacturer cannot accept liability .
In countries w hich may be subject
to infestation by cockroaches or
other vermin, pay particular attention to
keeping the appliance and its
surroundings in a clean condition at all
times. A ny damage w hich might be
caused by cockroaches or other vermin
w ill not be covered by the appliance
guarantee.
P ro tectio n fro m bu rning
The appliance gets hot w hen in
use, and remains hot for q uite a
w hile after being sw itched off. D o not
touch it w hilst it is still hot.
U se heat-resistant pot holders or
gloves w hen handling hot pots and
pans. E nsure that the pot holders do
not come into contact w ith the flames.
D o not use large cloths, tea tow els or
similar as the ends could touch the
flames and catch fire. Take care not to
let pot holders or gloves get damp or
w et, as this causes heat to transfer
through the material q uicker w ith the
risk of burning y ourself.
D o not heat up unopened tins of
food on the hob as pressure w ill
build up in the tin and it can ex plode.
This could result in injury or damage.
D o not use the hob as a resting
place for any thing else. The article
could melt or catch fire if residual heat
is still present or if the appliance is
sw itched on by mistake.
D o not cover the appliance, e.g.
w ith a cloth, kitchen foil, etc. This
could be a fire haz ard if the appliance
is sw itched on by mistake.
7
W arning and S afety instru ctio ns
R emove splashes of fat and other
food debris from the surface as
soon as possible. These are a fire
haz ard.
Never leave the appliance
unattended w hen cooking w ith oil
or fat as these are fire haz ards if
overheated. V ery hot oil can catch fire
and could even set a cooker hood
above on fire. A lw ay s heat fat slow ly ,
w atching as it heats.
If, despite this, oil or fat does catch
fire, do not attempt to put out the
flames w ith w ater. U se a suitable fire
ex tinguisher or fire blanket, saucepan
lid, damp tow el or similar to smother the
flames.
8
D o not flambé under a cooker
hood. The flames could set the
cooker hood on fire.
E nsure that the flames from the
burner do not spread out bey ond
the base and up the sides of the pan.
D o not spray aerosols in the vicinity
of this appliance w hile it is in
operation.
W arning and S afety instru ctio ns
A p p liance fau lts
F u rth er safety no tes
In the event of damage or a defect,
sw itch off the appliance immediately . Turn off the gas supply tap, and
disconnect completely from the
electricity supply . If the appliance has
not y et been fully installed, the
electricity cable must be disconnected
from the supply point. If connected via
a plug and socket, sw itch off at the
socket and w ithdraw the plug. C ontact
the S ervice D epartment.
D o not reconnect the appliance to the
mains electricity supply until after it has
been repaired.
W hen using an electric socket near
the appliance, care should be
taken that the cable of the electrical
appliance does not come into contact
w ith the hot appliance. The insulation
on the cable could become damaged,
giving rise to an electric shock haz ard.
If there is any damage to the
ceramic surface the appliance
must be disconnected from the mains
electricity and gas supplies immediately and not used until it has been
repaired. D anger of electric shock.
R epairs to the gas and electrical
components of this appliance must
only be carried out by a suitably
q ualified person. R epairs and other
w ork by unq ualified persons could be
very dangerous and could damage the
appliance. The manufacturer cannot be
held liable for unauthorised w ork. Never
open the housing of the appliance.
W hile the appliance is under
guarantee, repairs should only be
undertaken by a service technician
authorised by the manufacturer.
O therw ise the guarantee is invalidated.
A lw ay s ensure that food is
sufficiently cooked or reheated.
Many factors w ill affect the overall
cooking time, including the siz e and
amount of food and its temperature.
S ome foods, e.g. poultry , may contain
micro-organisms w hich are only
destroy ed by thorough cooking at a
sufficiently high temperature for long
enough. If in doubt, select a longer
cooking or reheating time.
D o not use plastic or aluminium foil
containers. These melt at high
temperatures and could catch fire.
S pray canisters, aerosols and other
inflammable substances must not
be stored in a draw er under the hob.
C utlery inserts must be heat-resistant.
If the appliance has not been used
for a longer period of time it should
be thoroughly cleaned before it is used
again. It is also advisable to have the
appliance tested for safety . This should
be done at regular intervals.
The manufacturer cannot be held
liable for damage caused by
non-compliance w ith these W arning
and S afety instructions.
9
C aring fo r th e enviro nm ent
D isp o sal o f th e p acking
m aterial
The transport and protective packing
has been selected from materials w hich
are environmentally friendly for disposal
and can normally be recy cled.
E nsure that any plastic w rappings,
bags etc. are disposed of safely and
kept out of the reach of babies and
y oung children. D anger of suffocation.
R ather than just throw ing these
materials aw ay , please ensure that they
are recy cled.
10
D isp o sal o f yo u r o ld ap p liance
O ld appliances contain materials w hich
can be reclaimed or recy cled. P lease
contact y our dealer, y our local w aste
collection centre or scrap merchant
about available recy cling schemes.
E nsure that the appliance presents no
danger to children w hile being stored
for disposal.
B efore discarding an old appliance,
sw itch off and disconnect it from the
pow er supply . C ut off and render
any plug useless. C ut off the cable
directly behind the appliance to
prevent misuse. This should be done
by a competent person.
B efo re u sing fo r th e first tim e
G eneral no tes
A data plate for y our appliance is
supplied w ith this documentation. It
should be stuck into the space
provided at the end of the instruction
book. The address of the nearest S ervice D epartment is given on the back
page.
11
B efo re u sing fo r th e first tim e
C leaning and h eating u p fo r
th e first tim e
B efore using for the first time clean the
hob and all removable parts as follow s:
^ The removable parts of the gas
burner assembly can be w ashed in a
mild solution of w ater and
w ashing-up liq uid. W ipe dry and
reassemble in the correct order (see
"C leaning and care").
^ C lean the ceramic surface w ith a
damp cloth only , and then w ipe dry .
D o not use w ashing up liq uid to
clean the ceramic surface as it can
leave a blue sheen w hich may be
difficult to remove.
12
Metal components have a protective
coating w hich may give off a slight
smell w hen the hob is heated up for the
first time. The smell and any vapours
w ill dissipate after a short time and do
not indicate a faulty connection or
appliance.
U sing th e g as h o b
S w itch ing o n,S w itch ing o ff,
C o ntro ls
The control knobs are used to sw itch on
the burner and regulate the strength of
the flame.
^ W ith the knob no longer pressed in
y ou can continue turning it tow ards
the small flame sy mbol.
C ontrol the flame so that it does not
spread out bey ond the sides of the
pan. A s the outer part of the flame is
much hotter than the centre, the tips of
the flames should stay beneath the pan
base. F lame tips w hich ex tend bey ond
the sides of the pan merely w arm up
the air in the room and can also
damage pan handles and increase the
danger of burning.
ß the gas supply is turned off
S w itch ing o ff:
& strong flame
/ w eak flame
^ Turn the knob clockw ise until the ß
position is reached.
S w itch ing o n:
This stops the flow of gas and the flame
goes out.
^ The control knob for the burner
req uired must be pressed in and
turned anti-clockw ise to the large
flame sy mbol to sw itch on.
^ W hen the flame ignites, keep the
control pressed in for 8-1 0 seconds,
and then let it go.
R emember: Turn anti-clockw ise to
sw itch on, turn clockw ise to sw itch
off. The control knob cannot be
turned anti-clockw ise from the small
flame sy mbol to the ß position.
If the flame goes out, repeat the
procedure, keeping the control knob
pressed in for a few ex tra seconds.
13
U sing th e g as h o b
P ans
B u rners
– A ny heat-resistant pans can be used
on a gas burner.
M in.p an b ase
d iam eter in cm
small
12
large
14
M ax.d iam eter at
to p o f p an in cm
small
22
large
24
– S elect pans w hich are suitable for
the burner they are to be used on. In
general: use larger diameter pans on
the large burner and smaller
diameter pans on the small burner.
– W ide, shallow pans are preferable to
tall, narrow ones. They w ill heat up
faster.
– P ans w ith thick bases are preferable
as these distribute heat more evenly .
W ith thin bases, there is a danger of
food overheating in places. S tir the
food freq uently .
14
– R emember w hen purchasing new
pans that manufacturers usually refer
to the diameter at the top of the pan
in their documentation.
– R efer to the chart above and ensure
that the pan diameter falls w ithin the
minimum and max imum diameters
given for the burner y ou are using. A
pan w hich is too small w ill be
unstable on the pan support. If the
pan diameter is too large, flames can
spread out to the sides and damage
or burn the w orktop, w all claddings
or surrounding units and also parts of
the hob. The manufacturer cannot be
held liable for this ty pe of damage.
– U se a pan lid w henever possible to
minimise heat loss.
U sing th e g as h o b
S afety cu t-o u t
U se d u ring a p ow er cu t
This appliance is fitted w ith an electric
ignition safety device w hich cuts off the
supply of gas to a burner if the flame
goes out, for ex ample if food has boiled
over, or if there w as a sudden draught.
If there is an interruption to the
electricity supply the gas can be
ignited w ith a match:
^ To use the hob again, turn the knob
clockw ise until the "ß" position is
reached and sw itch on as normal.
The safety cut-out operates
independently from the electricity
supply . This means that it is still active
w hen the hob is used during a pow er
cut (see "U se during a pow er cut").
^ P ress in the relevant control knob and
turn it anti-clockw ise to the large gas
sy mbol.
^ H old the control pressed in and light
the gas at the burner w ith a match.
^ K eep the control knob pressed in for
a further 8-1 0 seconds and then
release it.
15
C leaning and care
G eneral no tes
C lean the appliance regularly ,
preferably after each use. A llow the
appliance to cool dow n to a safe
temperature before cleaning.
D o not use a steam cleaner to clean
this appliance. The steam could
reach electrical components and
cause a short circuit. P ressurised
steam could also cause permanent
damage to the surface and to other
components for w hich the
manufacturer cannot accept liability .
D o not use any sharp objects w hich
could damage the seal betw een the
ceramic surface and the
surrounding frame and betw een the
frame and the w orktop.
D o not use any of the follow ing on
y our hob as they can damage the
surface:
cleaning agents containing sand,
soda, alkalines, acids or chlorides,
grill and ovenspray s, dishw asher
detergent, stain or rust removers,
scouring agents or cream cleaners,
abrasive sponges and brushes.
D o not use w ashing up liq uid to
clean the ceramic surface as it can
leave a blue sheen w hich may be
difficult to remove.
16
The ceramic surface can be cleaned
using a proprietary cleaning agent
for ceramic surfaces. F ollow the
manufacturer's instructions on the
packaging.
D o not let the ignitor in the burner
get w et. If it gets w et it w ill not spark.
A fter cleaning, dry thoroughly w ith a
soft cloth to prevent a build up of
limescale deposits.
C leaning and care
P an su p p o rts,co ntro ls
C eram ic su rface
R emove the pan supports.
W ipe all coarse soiling off using a
damp cloth. S tubborn soiling may need
to be removed w ith a shielded scraper
blade.
C lean the pan supports and the
controls w ith a solution of hot w ater and
a little w ashing up liq uid applied w ith a
soft sponge. S oak stubborn soiling first
to loosen it.
F inally , w ipe dry using a soft cloth.
Then apply a few drops of a proprietary
cleaning agent for ceramic surfaces
using a soft cloth or kitchen paper
tow el. This w ay any limescale deposits,
caused for ex ample by w ater boiling
over, are removed.
F inally w ipe the hob surface w ith a
damp cloth and then dry it w ith a clean
soft cloth.
Note that some cleaning agents contain
a protective additive designed to
prevent w ater marks and smears
adhering to the surface.
17
C leaning and care
The surface of the burner cover w ill
gradually become more matt w ith time.
This is q uite normal and w ill not affect
the operation of the hob.
^ W ipe the fix ed parts of the burner
base w ith a damp cloth and dry
afterw ards.
^ G ently w ipe the ignitor and the
ignition safety device w ith a w ell
w rung-out cloth and w ipe dry w ith a
clean cloth.
B u rners
The burners can be dismantled for
cleaning once they have cooled dow n.
P ro ceed as fo llow s:
^ Take off all the removable parts of the
burner and w ash in a solution of hot
w ater and w ashing-up liq uid. Then
dry them all thoroughly . Make sure
that the flame holes are clean and
completely dry .
18
C leaning and care
R e-assem ble th e bu rner as fo llow s
(see illu stratio n):
^ Make sure that all the locating tabs
and notches line up ex actly . P lace
the burner head c on to the burner
base f so that the ignitor and the
ignition safety control ex tend through
their respective holes in the burner
head. The burner head must click
into place correctly .
^ R eplace the burner cap b ensuring
that the locating tabs fit into the
notches in the burner head.
Important: replace parts in the correct
order after cleaning.
1 . D o not mix up the top and bottom.
2. The locating lugs must fit ex actly
into the notches.
19
P ro b lem so lving g u id e
R epairs to the gas and electrical
components of this appliance must
only be carried out by a suitably
q ualified and competent person to
ensure safety . U nauthorised repairs
could be dangerous.
H ow ever, some minor problems can be
resolved as follow s:
W h at to d o if ...
...th e bu rner d o es no t ig nite after
several attem p ts
C heck w hether
– the burner is correctly assembled.
– the gas supply tap is turned on.
– the burner is dry and clean.
– the flame slits are clean and
unblocked.
– The mains fuse has blow n. If this is
the case, call an electrician or the
S ervice D epartment. (The gas can
be lit w ith a match). (S ee "U se during
a pow er cut").
20
...th e g as flam e g o es o u t after b eing
lit
C heck w hether the burner cover is
correctly assembled.
...th e ig nito r o n th e bu rner d o es no t
sp ark?
C heck w hether food deposits have
lodged themselves betw een the ignitor
and the burner cover.
C arefully remove any soiling. D o not let
the ignitor get w et.
...th e flam e su dd enly lo o ks d ifferent
C heck w hether the burner is correctly
assembled.
G as co nnectio n
C onnection to the gas supply , or
conversion from use of one ty pe of
gas to another should only be
undertaken by an approved fitter,
w ho is responsible for the correct
functioning of the appliance w hen
installed. E very appliance should
have its ow n isolating valve.
The hob is supplied ready for
connection to natural gas.
D epending on country , a set of jets for
conversion to liq uid gas is included
w ith the hob.
C onversion to another ty pe of gas is
described in the separate Installation
Instructions.
C heck w ith y our local gas supplier
about the ty pe of gas and its
calorific value and compare this
information w ith the ty pe of gas
q uoted on the data plate.
The gas installation must be made in
such a w ay that the isolating valve is
visible and easily accessible.
The gas hob is normally suitable for
connection to either natural or liq uid
gas. C heck suitability in y our country
w ith y our dealer or agent.
21
E lectrical co nnectio n
A ll electrical w ork should be carried out
by a competent person, in strict
accordance w ith national and local
safety regulations.
F or ex tra safety it is advisable to install
a residual current device (R C D ), w ith a
trip current of 30 mA .
C onnection for each appliance should
be made via a suitable isolator.
The data plate gives the necessary
data for connection.
V oltage:
230 - 240 V , 50 H z
R ated load:
see data plate
P lug rating:
10A
Test marks
G as safety
E lectrical safety ,
C -Tick Mark.
E lectrically suppressed
according to A S /NZ S 1 044
W A R N IN G
T H IS A P P L IA N C E M U S T B E
E A R TH E D
22
Im p o rtant:
The w ires in the mains lead are
coloured in accordance w ith the
follow ing code:
G reen/y ellow = earth
B lue
= neutral
B row n
= live
A s the colours of the w ires in the mains
lead of this appliance may not
correspond w ith the coloured markings
identify ing the terminals in y our plug
proceed as follow s:
The w ire w hich is coloured green and
y ellow must be connected to the
terminal in the plug w hich is marked
w ith the letter E or by the earth sy mbol
z or coloured green or green and
y ellow .
The w ire w hich is coloured blue must
be connected to the terminal w hich is
marked w ith the letter N or coloured
black.
The w ire w hich is coloured brow n must
be connected to the terminal w hich is
marked w ith the letter A or coloured
red.
A fter sales service
The address of the nearest S ervice D epartment is given on the back page.
The voltage and rated load are given on the data plate. P lease q uote these data,
together w ith the model description and serial number w hen contacting the S ervice D epartment.
D ata p late
S pace in w hich to stick the ex tra data plate supplied w ith the appliance. E nsure
that the model number is the same as the one on the front of these operating
instructions.
23
A lteration rights reserved / 2904
M.-Nr. 05 725 340 / 01
en - A U S
This paper consists of cellulose w hich has been bleached w ithout the use of chorine