1
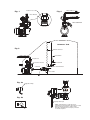
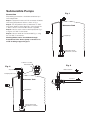
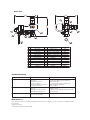
nu
Ma a l
e r r i de
Ov
Installation and
Operating Instructions
Surface Pumps
Introduction
The AcquaSaver valve is a fully
automatic mechanical rainwater/mains
water changeover device designed
for pressure pump supply systems
for harvesting rainwater for the toilet,
laundry and household applications
with automatic mains backup.
The AcquaSaver valve is designed
to operate with a pump with an
electronic pressure controller with auto
restart not requiring a float switch.
The AcquaSaver valve can also
operate with any pump with a
pressure controller with or without a
float switch.
Operation
The AcquaSaver valve will always
prioritize the use of rainwater over
mains water when rainwater is
available and will automatically
switch over to mains water in the
event of the rainwater tank running
low or electrical failure. When water
has been replenished or power has
been restored to the pump, the
AcquaSaver valve will automatically
prioritize back to rainwater.
The pump is only active when
rainwater is being drawn from the
water tank, it does not operate when
the AcquaSaver valve has switched
to mains position.
The pump controller starts and stops
the pump when it detects a demand,
for example flushing a toilet or using
a washing machine.
The operating mechanism of the
AcquaSaver valve is a unique patent
design, it works by hydraulic water
pressure created by the pump to
close one inlet fully before opening
the other inlet without restriction
of flow. This ensures an extremely
reliable mechanism using few moving
parts, no electronic components and
no energy consumption.
Features
Easy to install
Patented design
Does not require maintenance
No electrical consumption - No
electronic components
Solid brass construction - Fully
weatherproof - Built to last
Suitable for any pressure pump with
sufficient head pressure
Can be mounted in any position
Dual check valve for back flow
prevention (WaterMark Approved)
Manual override
2 Year warranty
Connection
All plumbing connections should be
carried out by a licensed plumber.
Step 1. The AcquaSaver Valve is
fitted onto the pump controller as
shown in Fig 1.
Lock up the 1” BSP F loose nut with
the fibre washer supplied.
Step 2. Connect mains water to the
AcquaSaver Fig 2. using the 3/4”
BSP F connection.
NOTE: Mains water should flow
through AcquaSaver Valve before
rainwater, to avoid air being trapped
in pipes.
Step 3. Connect outlet to the
household Fig 2. using the 3/4” BSP
F connection.
Step 4. Installation of float switch
refer to Fig 3.
NOTE: When using a float switch with
a piggy back plug Fig 4a, plug into
electrical outlet and pump lead into
the back of piggy back plug Fig 4b.
Connection of the pump should
be carried out to manufacturers
instructions, It is recommended a
Y-Strainer be fitted between the tank
and pump.
Specications
Max mains pressure 500 KPa
Max pump pressure 700 KPa
Max flow rate 100 LPM
Cold water applications only
Rainwater Inlet 25mm 1” BSP F
Mains Water in 20mm 3/4” BSP F
Outlet 20mm 3/4” BSP F
Weight 2.2 kg
Certified to: WaterMark ATS
5200.477 WMK 60075
Complies with AS/NZS 3500.1 when
installed by a licensed plumber
NOTE: According to AS/NZS 3500.1
maximum allowable pressure in
buildings is 500 KPa
1" BSP F Loose Nut
Fig. 1
Mains Water In
Fig. 2
Fiber Washer
To House
u
Man a l
M
rr i
Ove de
RW
PRESSCONTROL
Power On
Pump On
Failure
Restart
Rainwater Tank
Fig. 3
200 mm minimum
Mains Water In
Float Switch
AcquaSaver
u
Man a l
rr i
Ov e de
Pressure Controller
Y-Strainer
150 mm minimum
100 mm above outlet minimum
Isolation Valve
Suction Hose
Fig. 4a
Piggy Back Plug
nual
Ov
Ma
e rr ide
Fig. 4b
Dumping Valve Pipe
NOTE: A dumping of a small amount of
rainwater from the dumping valve pipe is normal
during changeover back to mains water.
E.g. When rainwater tank is empty or there is
no electrical power.
Submersible Pumps
Fig. 1
Connection
All plumbing connections should be carried out by a
licensed plumber.
Step 1. Fill pipe with water until full to remove air before
connecting AcquaSaver Valve as shown in Fig 1.
Step 2. The AcquaSaver Valve is fitted onto a 1” BSP
male union fitted on top of pipe Fig 2. lock up tight the
1” BSP F loose nut with the fibre washer supplied.
Step 3. Connect mains water to the AcquaSaver Fig 3.
using the 3/4” BSP F connection.
Step 4. Connect outlet to the household Fig 3. using
the 3/4” BSP F connection.
Warning! Mains water should flow through
AcquaSaver Valve before pump is turned on to
avoid air being trapped in pipes.
Rainwater Tank
1" Rigid Pipe
Submersible Pump
with built in controller
1" BSP F loose Nut
Fig. 3
Fiber Washer
Fig. 2
AcquaSaver Valve
Mains Water In
Manual
rr
Ove i de
Dumping Valve Pipe
M
Rainwater Tank
RW
1" Rigid Pipe
Submersible Pump
with built in controller
To House
Parts List
170
170
11
5
160
M
nu
Ma a l
RW
e r r i de
Ov
7
1
2
9
3
8
4
10
12
N/A
N/A
12
Fiber Washer
1
11
M6 Screws
4
Stainless Steel
N/A
10
Dumping Valve Pipe
1
Anti UV Elastollan Tube
PU 1198
9
Copper Pipe
1
Copper - Nickel Plated
N/A
8
Push Fit Union
1
DR Brass - Nickel Plated
MA 12 08 14
7
Push Fit Elbow
3
DR Brass - Nickel Plated
MA 16 08 14
6
Check Valve
1
DZR Brass
5
Dual Check Valve
1
DZR Brass
7179
4
Nut & Tail Assembly
1
DZR Brass
WDV-NT2520
3
Dumping Valve
1
2
Actuator Body
1
DZR Brass
WDV-CBA
1
3 Way Ball Valve
1
DZR Brass
F32TBT020
No.
Component
Qty
Material
Part No.
Brass - Nickel Plated
20 CVF
MV 27 00 14
Trouble Shooting
Symptom
Cause
Remedy
No water is delivered from pump.
Rainwater tank is empty.
No Power.
Isolation Valve is shut.
Pump is not primed.
Incorrect Instalation of float switch.
Y-Strainer is blocked.
Wait for tank to fill.
Check power supply & plug. Restart pump.
Open isolation Valve.
See pump owners manual on priming pump.
Refer to instalation instructions.
Clean Y-Strainer.
No water is delivered from mains.
No water from mains.
Air Lock.
Mains pressure above 500 KPa.
Dumping valve pipe blocked.
Check isolation valve on water meter.
Manually override.
Install a pressure limiting valve (manually override).
Remove blockage.
Pump continually runs.
Leak in the plumbing system.
E.g. Toilet or tap leaking.
Repair Leak.
Maintenance
The AcquaSaver Valve does not require any maintenance, however there are things you can do to ensure its most reliable operation.
Fit a Y-Strainer
Cleaning your gutters
Cleaning the inlet strainer on rainwater tank
6