1
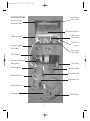
116269 Cigweld1.out
10/7/06
5:56 PM
OXY-VIVA 3
RESUSCITATOR
OPERATING
INSTRUCTIONS
COMWELD
MEDICAL
Page 1
116269 Cigweld1.out
10/7/06
5:56 PM
Page 2
TABLE OF CONTENTS
1.0
INTRODUCTION
3
2.0
GENERAL DESCRIPTION
3
3.0
SAFETY PRECAUTIONS
3
4.0
PARTS IDENTIFICATION
4
5.0
OPERATIONAL CHECK-OUT
5
6.0
EQUIPMENT USE
5
7.0
CLEANING
8
8.0
EQUIPMENT TESTING
9
9.0
SPARES AND ACCESSORIES
10
10.0
SPECIFICATIONS
11
11.0
SERVICE RECOMMENDATIONS
12
12.0
NOTES
13
2
116269 Cigweld1.out
10/7/06
5:56 PM
Page 3
therapy masks, airways, therapy tubing, suction tubing and a
suction catheter.
1.0 INTRODUCTION
This manual is intended to provide the users with information on
the features, testing, use and care of an OXY-VIVA 3 resuscitator.
3.0 SAFETY PRECAUTIONS
Any potential users of an OXY-VIVA 3 should carefully read the
contents of this manual to ensure that they are fully conversant
with all the information on its testing, use and care before
attempting to use the resuscitator.
Resuscitation should only be undertaken by persons who have
received adequate training.
The resuscitator should only be used if the assembly and all its
components are in correct operating condition as described in
the manual.
Resuscitation using an OXY-VIVA 3, or any other type of
resuscitator, should only be attempted after the operator has
completed a recognised course of study and practised regularly
on a resuscitation manikin. The information contained in this
manual should not be considered an adequate training program
in resuscitation. Information concerning resuscitation in Australia
is available from:
An OXY-VIVA 3 resusctitator operates using oxygen. When using
the resuscitator the following precautions should be observed:
-
Australian Red Cross
National Heart Foundation
The Royal Lifesaving Society of Australia
St John Ambulance
Surf Life Saving Associations
Water Safety Councils
Ambulance Services
No smoking, naked flames or sources of ignition nearby.
Use no oil or greases as a fire or explosion may result
Open cylinder valves slowly and fully.
Turn off cylinder valve when not in use.
Keep gas cylinders cool.
Do not dump or drop cylinders.
The suction unit uses oxygen. Prolonged use may deplete the
oxygen supply.
All repairs should be undertaken only by personnel trained in the
servicing procedures for medical equipment.
2.0 GENERAL DESCRIPTION
The information in this manual covers the OXY-VIVA 3
rescuscitator P/N 552090, and P/N’s 517859 and 517621 when
modified with upgrade kit P/N 552081.
Use only manufacturer approved spare parts when servicing.
An OXY-VIVA resuscitator is not suitable for use in hazardous or
explosive atmospheres.Toxic gases may be entrained into the
patient’s lungs causing patient harm.
The main features of the OXY-VIVA 3 are a gas powered demand
resuscitator, a suction attachment with collection jar, a fixed flow
oxygen therapy attachment and an auxiliary inlet/outlet. It also
contains adult and child resuscitation masks, adult and child
3
116269 Cigweld1.out
10/7/06
5:56 PM
Page 4
4.0 PARTS IDENTIFICATION
Storage sheath for
suction catheter.
Store suction tubing by
winding around knobs.
Brief operating instructions.
Collection jar for
suction system.
Cylinder contents gauge.
On-off control
for suction.
Inlet-outlet for oxygen at
400kPa (hidden).
On-off control for
oxygen therapy.
Cylinder keywheel.
Yoke connection,Bodok seal
yoke wing screw.
Suction tubing.
Demand Resuscitator.
Oxygen therapy tubing.
Oxygen therapy mask.
Adult resuscitation mask.
Oxygen therapy mask.
Child resuscitation mask.
Guedel airways.
Suction handpiece.
4
116269 Cigweld1.out
10/7/06
5:56 PM
Page 5
8. Check the condition of the resuscitation masks. Ensure that
they fit the Demand Resuscitator, that they are free from
damage, and the cuffs are soft and pliable.
5.0 OPERATIONAL CHECK-OUT
It is recommended that the OXY-VIVA 3 undergo the following
simple functional tests to ensure that the unit is in readiness for
use in an emergency. In addition to these tests the OXY-VIVA 3
should be placed on a preventative maintenance schedule which
should include the tests detailed in section 8 of this manual.
9. Turn off the cylinder valve (clockwise) and place the
keywheel in the case. Depressurise the unit by turning on the
therapy flow control until the flow stops. Turn off the therapy
flow control.
1 Tighten the oxygen cylinder in the yoke, making sure that the
Bodok seal is in good condition and is in position (see 6.1,
Cylinder Supply). Turn on the oxygen cylinder valve
(anticlockwise) to ensure that no leaks exist (see 8.1) and that
adequate contents are registered on the gauge.
The lid can now be closed and the OXY-VIVA is ready for
immediate application should an emergency arise.
6.0 EQUIPMENT USE
2. The suction trap jar must be located in the housing provided,
and connected to the venturi outlet.
6.1 Oxygen Supply
3. Check that the suction, attachment operates by turning the
‘SUCTION’ control ‘ON’, and confirm that suction is
generated at the suction outlet of the trap jar.
The OXY-VIVA 3 has two oxygen supply inlets, a pin indexed
yoke inlet for connection to oxygen cylinders and an auxiliary
inlet/outlet sleeve indexed system (SIS) inlet for connection to a
regulated 400 kPa external supply source.
4. Ensure that the Demand Resuscitator functions when the
cylinder valve is open and the actuating button is pressed.
When released, the plunger must return fully to the”OFF”
position and completely shut off the gas flow. Block off the
mask connection on the Demand Resuscitator and press the
manual ventilation button.The pressure relief valve should
open and gas should be heard venting to the atmosphere.
Cylinder Supply
To fit a “C” size cylinder to an OXY-VIVA 3 first check that the
Bodok seal is fitted to the pin indexed yoke connection and that
the yoke wing screw is backed off. Remove any protective cover
on the cylinder valve outlet. Crack the cylinder by briefly
opening then closing the cylinder valve.
5. Check that the oxygen therapy attachment functions by
turning the “THERAPY” control “ON” and confirm that gas
flows.
Slide the cylinder into the frame at the base of the case. Locate
the pin index holes on the cylinder valve with the corresponding
pins on the yoke. Secure the cylinder valve in position by
tightening the yoke wing screw.
6. Check that both airways are present and held securely in their
clips.
Fit the keywheel to the cylinder valve and slowly open
(anticlockwise). Ensure that the cylinder valve has made a leaktight seal and the cylinder pressure registers on the contents
gauge. Close the cylinder valve and release pressure from the
unit by turning ON therapy flow control until the pressure gauge
7. Check that the cylinder keywheel and yoke plug are securely
attached to the case by their chains.
5
116269 Cigweld1.out
10/7/06
5:56 PM
Page 6
USE ON A NON BREATHING PATIENT
reads zero. Turn OFF therapy flow control. Leave cylinder fitted
and turned off until it is required for use.
1. Turn on the oxygen cylinder valve
The keywheel is located inside the case. Turn anticlockwise.
Open the valve slowly and fully. Check the contents gauge for
adequate supply.
Auxiliary Inlet/Outlet Supply
This inlet allows the OXY-VIVA 3 to be used in a fixed location
when a regulated external supply of oxygen is available, thus
leaving the cylinder supply for use when portability is required.
To connect to a regulated supply,the pin indexed yoke must be
blocked off. This can be done by closing the cylinder valve, or
by using a blanking plug secured in the pin indexed yoke. A
length of oxygen hose with sleeve indexed hand wheels can be
used to connect the OXY-VIVA 3 to the regulated supply source
(connect the OXY-VIVA 3 end first, then the regulated supply end
to prevent whipping of hose).
2. Clear the patient’s mouth and throat, use suction if required.
Insert airway if necessary.
3. Tilt the head back, lift jaw. Place support under shoulders if
necessary.
4. Attach the mask to the Demand Resuscitator. Select the child
or adult size mask as necessary.
5. Apply the mask firmly to the patient’s face. Maintain an
airtight seal over the nose and mouth.
6.2 Demand Resuscitator - General Description
With the oxygen supply turned on, there will be no flow from
the Demand Resuscitator until either the manual ventilation
button is depressed or the patient inhales. A very slight inhalation
effort produces an oxygen flow. The oxygen flow varies
according to the inhalation effort and stops flowing during
exhalation. An integral part of the Demand Resuscitator is an
exhalation or non-rebreathing diaphragm and patient valve
which allows gases from the lungs to be expelled during
exhalation.
6. Press the manual ventilation button on the Demand
Resuscitator until the chest rises - then release. Wait until the
lungs deflate, then repeat the operation continuously.
7. When the patient begins to breathe, stop pressing the manual
ventilation button. Keep the mask on the face. The patient will
automatically receive 100% oxygen with each breath on
demand.
To resuscitate a non-breathing patient the Demand Resuscitator
has been designed to supply oxygen to the patient’s lungs by
means of a mask or endotracheal tube. When the manual
ventilation button is depressed, oxygen will flow and inflate the
lungs.
CAUTION: Hazards of Overinflation.
Overinflation of the lungs can occur if an excessive tidal
volume is delivered, particularly in the case of children and
when an endotracheal tube is in place. Inflation of the
stomach can occur if an excessive tidal volume is delivered or
if inflation is performed in the presence of a partially
obstructed airway. If the stomach becomes distended, check
the airway again but do not try to empty the stomach.
When the manual ventilation button is released the gases are
passively expelled from the lungs via the exhalation diaphragm
and patient valve.
6
116269 Cigweld1.out
10/7/06
5:56 PM
Page 7
5. If necessary, empty the reservoir jar during use to prevent
overfilling.
USE ON A BREATHING PATIENT
Turn on the oxygen cylinder valve.
Important
Turn suction ‘OFF’ after use to prevent oxygen cylinder
depletion.
The keywheel is located inside the case. Turn anti clockwise.
Open the valve slowly and fully. Check the contents gauge for
adequate supply.
Attach the child or adult mask to the Demand Resuscitator
Trouble Shooting
When suction is turned on, there is no aspiration of fluids.
Apply the mask firmly over the nose and mouth ensuring an airtight seal.When the patient breathes, the resuscitator will
automatically supply 100% oxygen.
1. Check that the jar is tight.
2. Check that there is no blockage in the suction tubing.
NOTE
Operation of the suction attachment uses oxygen. When suction
is in use the suction attachment would empty a full “C” size
cylinder (approximate contents 400 litres) in approximately 8
minutes.
If breathing stops,immediately proceed from Step under
“Patient not breathing”.
NOTE
The demand Resuscitator, when delivering a tidal volume of 600 ml,
12 times a minute to a patient, would deplete a “C” size cylinder
(contents approximately 400 litres) in approximately 45 minutes.
6.4 THERAPY ATTACHMENT
6.3 SUCTION ATTACHMENT
When necessary oxygen therapy can be used. To use the oxygen
therapy attachment:
To ensure clear airways before or during resuscitation, suction
may be applied via the flexible suction tubing and catheter or
handpiece when necessary.
1. Connect one end of the therapy tubing to the therapy outlet
under the ON/OFF lever.
2. Connect the other end of the therapy tubing to the therapy
mask.
1. Ensure that the suction collection jar is connected to the
suction venturi under the ON/OFF lever.
3. Turn the ’Therapy’ control to ‘ON’.
2. Connect the suction tubing to the collection jar.
4. Fit the therapy mask to the patient’s face and form an effective
seal. The elastic bands should pass just above and below the
ears and the soft metal strip should be bent over the nose to
form a seal.
3. Fit the suction handpiece or catheter to the suction tubing.
4. Turn the “Suction” control to “ON. This produces a
continuous vacuum in the plastic reservoir jar and enables
blood and other fluids to be sucked from airways.
5. The oxygen concentration delivered to the patient depends on
the particular mask used, see specification section of manual.
7
116269 Cigweld1.out
10/7/06
5:57 PM
Page 8
Re-assemble the exhalation disc to the mask connector. The
exhalation disc must be centralised and it should freely rotate
when lightly moved with a finger.
6 Turn therapy OFF when finished.
If a variable flow is required,a flowmeter may be attached to the
auxiliary inlet/outlet connection on the outside of the case.
Insert the diaphragm into the body of the resuscitator and smooth
it into position with a finger.
7.0 CLEANING
The OXY-VIVA 3 and its accessories must be thoroughly cleaned
after each use. When cleaning use only legally marketed
commercially available disinfectants or sterilising agents.
Disinfectants and sterilising agents must only be used in
accordance with their manufacturers instructions.
Place the mask connector diaphragm and screw it hand tight in a
clockwise direction onto the body.
Check the operation of the Demand Resuscitator as per section 5
of this manual.
The recommend cleaning method for various OXY-VIVA 3
accessories is listed below:
7.1 Case
The OXY-VIVA 3 case may be cleaned using a mild soap
solution, methylated spirits or a disinfectant.
Resuscitator Body
7.2 Demand Resuscitator
Manual Ventilation
Button
Operate the Manual Ventilation Button to blow out any loose
contaminant.
Ensure that the oxygen supply is turned off. Bleed the remaining
pressure out of the system by depressing the Manual Ventilation
Button. Remove any mask fitted to the Demand Resuscitator and
disconnect it from the supply hose.
Diaphragm
Unscrew the mask connector from the Demand Resuscitator
body. Remove the exhalation disc from the mask connector.
Mask Connector
All components, except the body, can be cleaned using a mild
soap solution, disinfectant, autoclaving or ethylene oxide gas.
The resuscitator body should only be wiped over with a soft
cloth and a mild soap solution. After cleaning dry all
components thoroughly.
Exhalation Disc
8
116269 Cigweld1.out
10/7/06
5:57 PM
Page 9
7.3 Suction Jar, Suction Handpiece and Tubing
8.0 EQUIPMENT TESTING
The suction trap jar and tubing can be cleaned by drawing soap
water,or a disinfectant through them or by autoclaving. If a mild
soap solution is used, flush with clear water after cleaning to
remove any solution.
8.1 Leak Test
1. Fit a full (10,000 kPa minimum) oxygen cylinder to the unit.
2. Open the cylinder valve to pressurise the piping system and
note the regulator gauge reading.
3. Firmly close the cylinder valve, wait three minutes then note
the regulator gauge reading again.
4. The maximum permissible leak is 2 widths of the gauge
pointer.
7.4 Resuscitation Masks
The adult and child resuscitation masks supplied with an OXYVIVA 3 may be cleaned with a mild soap solution or disinfectant.
They are NOT suitable for autoclaving or ethylene oxide gas.
8.2 Therapy Flow Test
7.5 Therapy Masks
7.6 Orophharyngeal Airways
1. Turn the cylinder valve fully ‘ON’.
2. Connect a suitable oxygen rotameter to the therapy outlet and
turn the therapy valve ‘ON’.
3. The reading on the rotameter should be 7 to 9 litres per
minute.
The airways supplied with an OXY-VIVA 3 are for single use
only. They must not be cleaned and re-used.
8.3 Suction Test
The therapy masks supplied with an OXY-VIVA 3 are for single
use only. They must not be cleaned and re-used.
1. Ensure that the cylinder valve is turned fully ‘ON’.
2. Connect a suitable vacuum gauge to the suction hose so that
the hose is occluded.
3. Turn the suction valve fully ‘ON’ then take the reading on the
gauge. This reading should indicate a suction level of -60 kPa
minimum, (450 mmHg).
4. Check that the suction unit displaces 300 ml of water in about
2 seconds. Check that the edge of the plastic jar is not
chipped and that the sealing gasket is sound. Check that the
suction tubing is not blocked and the filter, adjacent to the
control block, is clean.
9
116269 Cigweld1.out
10/7/06
5:57 PM
Page 10
8.4 Demand Resuscitation Test
9.0 SPARES AND ACCESSORIES
1. Ensure that the cylinder valve is turned fully ‘ON’.
2. Connect a suitable oxygen rotameter to the Demand
Resuscitator mask connection.
3. Depress the Demand Resuscitator operation button.
4. The flow reading should be 40 to 60 litres per minute.
5. Connect a suitable pressure measuring device to the mask
connection.
6. Depress the manual ventilation button.
7. The pressure generated should be 54 to 60cm H20.
9.1 OXY-VIVA 3 Accessories
Listed below are some of the accessories suitable for use with an
OXY-VIVA 3. It is recommended that if any other accessories are
intended to be used with an OXY-VIVA 3 your nearest authorised
distributor should be contacted to check the compatibility of the
accessory.
Description
EZI-FLOW 0-15L/min flowmeter
EZI-FLOW 0-2.5L/min flowmeter
Gauge type 0-14L/min flowmeter
O-TWO Demand Resuscitator upgrade kit for
OXY-VIVA 3 (Part Number 517859)
The Demand Resuscitator is not designed for field disassembly or
service outside that indicated in this manual. Any malfunctioning
units should be returned to an authorised repairer. Unauthorised
repairs will nullify the product warranty.
Part No
515800
515824
TM17
552081
9.2 User Replacement Parts
Listed below are the items that are considered to be user
replaceable parts. It is recommended that the owner keep stock
of items like Bodok seals, airways, therapy masks,...etc to ensure
that the OXY-VIVA 3 is quickly replenished after any items are
used.
Description
Bodok Seal, 10 pack
Inlet filter RB38, 10 pack
Inlet filter/retainer, 10 pack
Adult resuscitation mask - size 5
Child resuscitation mask - size 3
Demand Resuscitator diaphragm
Demand Resuscitator mask connector
(with exhalation disc)
10
Part No
551022
551024
551028
515743
515744
552082
552083
116269 Cigweld1.out
10/7/06
5:57 PM
Page 11
Demand Resuscitation
Supply Pressure:
Resuscitation Flowrate:
Demand Flowrate:
Demand Triggering Pressure:
Negative Pressure:
10.0 SPECIFICATIONS
Part Numbers
552090 OXY-VIVA 3 Demand Resuscitator
517859 OXY-VIVA 3 Demand Valve Model with upgrade
kit 552081 fitted
517621 OXY-VIVA 3 RM Resuscitator with upgrade kit 552081
fitted
Pressure Relief Valve:
Delivered Oxygen
Concentration:
Weight
Each model weighs 6.5kg without a cylinder fitted,
(approximately 10 kg with a cylinder fitted).
Dimensions
Each model 570 x 180 x 295 mm
Cylinder Compatibility
The OXY-VIVA 3 is compatible with all “C” size cylinders fitted
with pin indexed cylinder valves.
Gas Inlets
1. Cylinder Connection:
Pin indexed high pressure oxygen yoke inlet to AS 2473.3
2. auxiliary Inlet/Outlet:
Sleeve indexed low pressure oxygen connection
to AS2896, nominal 400kPa).
400k kPa nominal
40 - 60 L/min
0 - 160 L/min
0.2 kPa (2cm H20) max
0.8 kPa (8cm H20) max
(for a flow of 100 L/min)
54 - 60cm H20, available
Patient Connection:
Inlet Connection:
100% during both Manual and
Demand modes
22mm Male/15mm Female Taper
9/16” DISS
Suction Attachment
Control Operation:
Static Vacuum:
Suction Flow:
Suction Jar Capacity:
Suction Connection:
Suction Tubing:
Suction Handpiece:
ON/OFF lever
-60 kPa (-450 mmHg)
40 L/min free air minimum
350 ml separate trap jar
to suit standard 8mm tubing
1.5 metres of 8mm suction tubing
Yankuer suction tip
Therapy Flow Attachment
Control Operation:
Flowrate:
Connection:
Therapy Tubing:
Maximum Inlet Pressure
Pin indexed yoke connection 20,000 kPa @ 15oC.
ON/OFF Lever
8 L/min fixed
to suit standard 5mm tubing
2 metres of 5mm therapy tubing
NOTE
When the therapy mask supplied with the OXY-VIVA 3 is used, a
fixed flow of 8 L/min will give a delivered oxygen concentration
of approximately 60%.
11
116269 Cigweld1.out
10/7/06
5:57 PM
Page 12
11.0 SERVICE RECOMMENDATIONS
An OXY-VIVA 3 is a piece of life saving emergency equipment.
To ensure that the unit is always in a reliable, useable condition
it is recommended that the unit be placed on a preventative
maintenance program every 3 to 6 months depending on usage.
The preventative maintenance program should include the test
detailed in section 8. In addition to these tests the inlet filter and
Bodok seal should be replaced annually, and the regulator seat
be replaced every three years.
Maintenance servicing of the OXY-VIVA 3 should only be carried
out by trained service personnel. Contact your nearest authorised
service agent for further information.
12
116269 Cigweld1.out
10/7/06
5:57 PM
Page 13
12.0 NOTES
13
116269 Cigweld1.out
10/7/06
5:57 PM
Page 14
14
116269 Cigweld1.out
10/7/06
5:57 PM
Page 15
15
116269 Cigweld1.out
10/7/06
5:57 PM
Page 16
COMWELD
MEDICAL
CIGWELD Pty. Ltd. A.B.N. 56 007 226 815
71 Gower Street, Preston, Victoria, Australia 3072
Customer Service & Technical Support Line
Ph: +61 3 9474 7314 Fax: +61 3 9474 7391
Website: www.cigweld.com.au
In the interest of continuous improvement, CIGWELD Pty. Ltd. reserves the right to change
the specifications or design of any of its products without prior notice.
PART NO.
ISSUE
DATE
522392
02
706