1
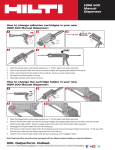
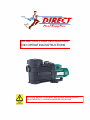
SOLAR POOL PUMP INSTALLATION
AND OPERATING INSTRUCTIONS
The solar panels, controller and pump wiring should
be installed by a suitably qualified electrician.
Introduction
The Blue Pool Solar Pool Pump consists of a brushless DC (Direct Current) motor that is
nearly twice as efficient as an AC (Alternating Current) motor, which means the job of
filtering with DC power can be achieved with a much smaller motor. A brushless DC motor
will generally outlast its AC equivalents life by up to 2 to 3 times.
During the summer swimming season, your pool requires more pumping, and naturally,
with more hours of sunlight, your solar pool pump will put in the work needed to keep your
pool sparkling. The system is so efficient that it will continue to run even on partially cloudy
days.
Dimensions
Installation
We recommend that our DC pump is installed alongside your current AC pump so that if
you decide to backwash or vacuum your pool in the late evening when the sun is low/down
you can simply change the valves from the DC pump back to your existing AC pump.
1) Locate the pump on solid level ground and make sure it is protected from the
weather and pool splash. Water should not come in contact with the motor. Ensure
there is sufficient space from other objects to allow cooling airflow from the fan.
2) If the pump is located below the water level then isolation valves will need to be
installed.
3) For gluing pipes ensure correct pressure pipe priming fluid and solvent cement is
used as per the manufacturers’ instructions.
Basic Installation Diagram
Wiring Instructions
Please ensure the wiring is installed by a suitably qualified electrician.
1) Solar panels should be installed as per the solar panel mounting instructions.
2) Important - Connection of the panels to the DC Isolator should be the final step.
3) The Controller Box should be attached securely and within 100mm from the
pump. It should be housed in a weatherproof enclosure with a transparent front
as per Australian electrical requirements.
4) Connect the 3 wires from the solar pool pump labeled 1, 2 and 3 into the
corresponding ports within the Controller. Ensure they are attached well.
5) The pump comes with water sensors that can be used to prevent the pump from
operating when there is insufficient water in the pool. It is optional to install these
and they are not required for the normal setup of the solar pool pump. Special
plumbing is required from your pool to house the sensors. Please contact us for
further information if you wish to install these.
6) Connect the wire labeled “Isolator Cable” from P+ and P- to the corresponding
terminals within the DC Isolator.
7) Connect the solar panels in serial and then in parallel as per the following
diagrams.
8) Ensure the switch located at the top right hand corner within the controller box is
in the “Solar” position and the DC Isolator is OFF.
9) Connect all wiring from the solar panels to the DC isolator making sure the final
connection is the two branch connectors into the wire running to the DC Isolator.
10) Fill the hair and lint pot with water to prime the pump before operating for the
first time.
11) Switch the DC Isolator ON, and if there is sufficient sunlight, the pump should
start operating.
Controller Display
There are 7 LED display lights across the top of the controller as follows:
1. Power Light. Green light indicates the controller is receiving sufficient power from
the solar panels
2. Pump Light. Green light that turns on 20 seconds after the controller receives power
and indicates that the pump is running.
3. MPPT Light. Green light indicating that the MPPT (Maximum Power Point Tracking) is
functioning to achieve maximum possible power from the solar panels.
4. Current Error. Red light that displays if over current is detected. If this light is
displayed then turn off the DC Isolator and call us.
5. Low Power. Yellow light displays when insufficient voltage is present.
6. Tank Full. This light can be ignored as it is not part of the standard pool installation.
7. Pool Low. If you have set up the water sensors, then this light is Red when the pool
level is too low. The pump will not operate until the water level has reached the
reactivation sensor.
Controller Input Voltage
nominal voltage 48VDC
open circuit voltage max 100VDC
Warranty
Your Blue Pool Solar Pump and Controller is covered against defects in materials and
workmanship from the date of purchase for a period of 3 years. Please see our terms and
conditions for returning goods under warranty.
Available from:
Direct Pool Supplies
www.DirectPoolSupplies.com.au
Ph: 1800 648 363