1
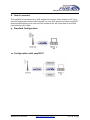
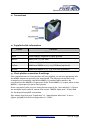
Operation/ Installation Manual Product: A025 - easyAIS² Ver. 1.0_2013 Operation/ Installation Manual 1. Safety Information 3 2. Limited Warranty 3 3. Warnings and Precautions 4 4. easyAIS² 5 5. How to use the easyAIS² 5 6. Packaging contents 5 7. Mounting the easyAIS² 5 8. How to connect 6 9. Standard Configuration 6 10. Configuration with easySPLIT³ 6 11. Connections 7 12. Supplied cable information 7 13. Chart plotter connection & settings 7 14. PC serial connection & settings 8 15. Technical data 9 16. External NMEA input 10 17. Baud rate 38.4kb to 4.8kb modification 10 18. Baud rate 4.8kb to 38.4kb modification 10 19. Troubleshooting 11 20. Contact 11 Weatherdock Australia www.weatherdock.com.au +61 2 46 28 7550 Operation/ Installation Manual 1. Safety Information Software License Agreement BY USING THE easyAIS² YOU AGREE TO BE BOUND BY THE TERMS & CONDITIONS OF THE FOLLOWING SOFTWARE LICENSE AGREEMENT. PLEASE READ THIS AGREEMENT CAREFULLY. Weatherdock grants you a limited license to use the software embedded in this device (the “software”) in binary executable form in the normal operation of the product. Title, ownership rights & intellectual property rights in & to the software remain in Weatherdock AG. You acknowledge that the software is the property of Weatherdock & is protected under the German copyright laws & international copyright treaties. You further acknowledge that the structure, organisation & code of the software are valuable trade secrets of Weatherdock & that the software in source code remains a valuable trade secret of Weatherdock AG. You agree not decompile, modify, revers assemble. reverse engineer or reduce to human readable form the software or any part thereof or create any derivate works based on the software. You agree not to export or re-export the software to any country. 2. Limited Warranty This Weatherdock product is warranted to be free from defects in materials or workmanship for Twenty-four (24) months from the date of purchase. Within this period, Weatherdock will at its sole discretion repair or replace any components that fail in normal use, such repairs or replacement will be made at no charge to the customer for parts or labour - provided that the customer shall be responsible for any transportation costs. This warranty does not cover failures due to abuse, misuse, accident or un-authorised alteration or repairs. THE WARRANTIES & REMEDIES CONTAINED HEREIN ARE EXCLUSIVE & IN LIEU OF ALL OTHER WARRANTIES EXPRESS OR IMPLIED OR STATUTORY, INCLUDING ANY LIABILITY ARISING UNDER ANY WARRANTY OF MERCHANTABILITY OR FITNESS FOR A PARTICULAR PURPOSE, STATUTORY OR OTHERWISE. IN NO EVENT SHALL WEATHERDOCK BE LIABLE FOR ANY INCIDENT, SPECIAL, INDIRECT OR CONSEQUENTIAL DAMAGES, WETHER RESULTING FROM THE USE, MISUSE OR INABILITY TO USE THIS PRODUCT OR FROM DEFECTS IN THE PRODUCT. Weatherdock retains the exclusive right to repair or replace the product or software or offer a full refund of the purchase price at its sole discretion. SUCH REMEDY SHALL BE REMEDY SHALL BE YOUR SOLE & EXCLUSIVE REMEDY FOR ANY BREACH OF WARRANTY. Weatherdock Australia www.weatherdock.com.au +61 2 46 28 7550 Operation/ Installation Manual 3. Warnings and Precautions As the owner of this equipment, it is your sole responsibility as the operator of the easyAIS² to secure the easyAIS² so that it will not cause damage or personal injury in the event of an accident. it is also the sole responsibility of the operator of the boat to operate the boat in a safe manner, maintain full surveillance of all boating conditions at all times, and never become distracted by the EasyAIS² to the exclusion of safe operating practices. NOT ALL VESSELS CARRY AIS. IT IS IMPORTANT AT ALL TIMES TO KEEP A PROPER LOOKOUT. THE “easyAIS²” IS NOT A SUBSTITUTE FOR GOOD SEAMANSHIP. Weatherdock Australia www.weatherdock.com.au +61 2 46 28 7550 Operation/ Installation Manual 4. easyAIS² Thank you for purchasing the easyDVB-T from Weatherdock. The only AIS receiver available with the following features: • 2 channel AIS receiver with the latest µP technology available • The highest sensitivity receiver (-112dBm) in its class • Integrated multiplexer up-converting from 4.8kB to 38.4kB • DC power range from 9-28 VDC 5. How to use the easyAIS² The easyAIS² is simple to use, just connect the unit to your VHF antenna, connect the serial output to your chart plotter or PC & that’s it. The green LED confirms power & the unit is working. The channel A LED flashes when it receives AIS data on channel 1. The channel B LED flashes when it receives AIS data on channel 2. 6. Packaging contents With the unit itself you will find: • Power cable (connector pre-terminated one end, with bare wires at other for connection to vessel power & chart plotter or PC data input) • 2x stainless steel screws (for mounting purposes) • Manual • 1x “SUB-D 9” connector for terminating bare wires in correct configuration for your chart plotter or PC 7. Mounting the easyAIS² The easyAIS² data output is equipped with an enhanced driver circuit, which means that it is perfectly capable of maintaining a stable data feed to your chart plotter or PC through 10 meters of cable. It is also best practice to keep the easyAIS² as far away as practical from other transmitting radio devices. If you are also operating a dedicated VHF antenna for AIS, please also keep this at least 1 meter away from any VHF transmitting antenna(s). The easyAIS² can be mounting in any orientation “under deck” as the unit is not waterproof. You will need to keep around 125mm free space in-front of the connection panel for ease of connecting the unit to power, antenna & other optional products. Weatherdock Australia www.weatherdock.com.au +61 2 46 28 7550 Operation/ Installation Manual 8. How to connect The easyAIS² is connected to a VHF antenna & to your chart plotter or PC. You can also optionally connect the easyAIS² to your VHF antenna via the easySPLIT³ which would allow you to use one VHF antenna for AIS reception & also with your existing VHF radio. 9. Standard Configuration 10. Configuration with easySPLIT³ Weatherdock Australia www.weatherdock.com.au +61 2 46 28 7550 Operation/ Installation Manual 11. Connections 12. Supplied cable information Colour Function Red Power supply, +9-28VDC Black Power supply, negative & signal ground White NMEA out, (+), AIS data Green NMEA out, (-), AIS data Yellow Additional NMEA in, (+), e.g. GPS data (optional) Brown Additional NMEA in, (-), e.g. GPS data (optional) 13. Chart plotter connection & settings Each manufacturer of chart plotters will vary slightly, so we have purposely left the NMEA output connections un-terminated. The physical connection may change but is essentially; the White NMEA (+) output cable needs to be connected to the NMEA (+) input port & the Green NMEA (-) output cable to the NMEA (-) input port for your chart plotter. Once connected, refer to your chart plotter manual for “port settings”. If there are multiple input options, ensure the correct “NMEA input port” is specified for the physical easyAIS² connection. Also ensure that the port “baud rate” or “transmission data rate” is set to 38,400 (38.4kB) & the bit configuration is: “8/N/1”. Weatherdock Australia www.weatherdock.com.au +61 2 46 28 7550 Operation/ Installation Manual 14. PC serial connection & settings If your PC/ laptop has a serial input connection, take the supplied SUB-D 9 connector & terminate the White (NMEA out +) cable to pin 2 & the Green (NMEA out -) to pin 5. If your PC/ laptop does not have a serial input port (which is the normal case in newer computers), you can use a serial-to-USB adaptor. Please make sure that the adaptor is already installed & working BEFORE plugging in the easyAIS² serial connection. If you have the easyAIS² connected to the serial-to-USB adaptor during driver/ software installation for the adaptor, this can lead to errors & the adaptor will not function properly. Once connected to your PC/ laptop, ensure the correct “NMEA input port” is specified for the physical easyAIS² connection. Also ensure that the port “baud rate” or “transmission data rate” is set to 38,400 (38.4kB) & the bit configuration is: “8/N/1”. Weatherdock Australia www.weatherdock.com.au +61 2 46 28 7550 Operation/ Installation Manual 15. Technical data easyAIS² 2 channel AIS receiver for AIS signals on: • Ch 1. 161.975 MHz • Ch 2. 162.025 MHz • Channel spacing: 25kHz • Sensitivity: -112dBm • Data rate: 9600Bps • Antenna Impedance: 50Ohm Electrical performance • Power supply: 9-28VDC @<100mA • Antenna connector: BNC • Power & data cable: 6 pole plug (included) Output • Default Baud rate: 38.4kB (4.8kB optional) • Format: NMEA 0183 • NMEA type: VDM Dimensions (overall): • Size 150mm(W) 150mm(H) 30mm(D) • Weight 500 grams Weatherdock Australia www.weatherdock.com.au +61 2 46 28 7550 Operation/ Installation Manual 16. External NMEA input NMEA data can also be sent to the easyAIS², such as GPS from another source. The yellow (NMEA in +) & brown (NMEA in -) are optically de-coupled to provide high protection from electronic failures. The data needs to be set to”4k8”, which is then multiplexed into the AIS received data & collectively sent to the NMEA output connections for use with your chart plotter or PC. 17. Baud rate 38.4kb to 4.8kb modification If your chart plotter or PC software will only receive NMEA data at the 4.8kb setting, it is possible to configure the easyAIS² to this data transfer rate. Please follow these steps: • Switch off the easyAIS² by disconnecting the power connection • Connect the NMEA output cables white to yellow & green to brown. • Re-connect the power connection Once powered, the unit’s “on” LED will appear & the “channel B” LED will appear. This indicates that the unit is now set to 4.8kb baud rate. • After the “channel B” LED has appeared, break the connection between the white to yellow & green to brown. Once the NMEA output cables have been disconnected from each other, the “channel B” LED will disappear & then re-appear for approximately 1 sec. This completes the 38.4kb to 4.8kb modification. 18. Baud rate 4.8kb to 38.4kb modification To re-set the easyAIS² back to 38.4kb please follow the following steps: • Switch off the easyAIS² by disconnecting the power connection • Connect the NMEA output cables white to yellow & green to brown. • Re-connect the power connection Once powered, the unit’s “on” LED will appear & the “channel A” LED will appear. This indicates that the unit is now set to 38.4kb baud rate. • After the “channel A” LED has appeared, break the connection between the white to yellow & green to brown. Once the NMEA output cables have been disconnected from each other, the “channel A” LED will disappear & then re-appear for approximately 1 sec. This completes the 4.8kb to 38.4kb modification. Weatherdock Australia www.weatherdock.com.au +61 2 46 28 7550 Operation/ Installation Manual 19. Troubleshooting Fault Cause Recommendation “ON” LED not showing No power Check power connections No AIS data being received Check if there is any AIS transmitters in your local area Antenna faulty connection Check antenna functionality & cabling In-correct connection to chart plotter/ PC Review chart plotter/ PC software manual for correct setup Channel A & B LED’s not flashing No AIS information on Chart plotter/ PC The signals being processed by the easyAIS² are very small & sensitive to poor quality of cables & connections. For best results use high grade antenna, cable & connector combinations. 20. Contact Service & technical advice: The store where your unit was purchased should be able to assist in any technical matters, however for further support & contact information please see our website at: www.weatherdock.com.au. Weatherdock Australia www.weatherdock.com.au +61 2 46 28 7550