1
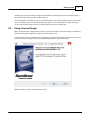
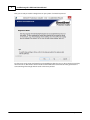
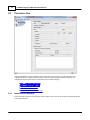
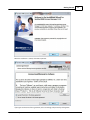
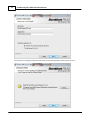
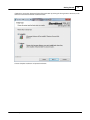
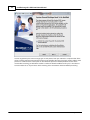
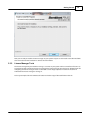
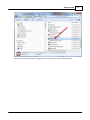
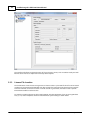
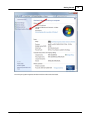
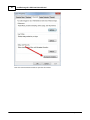
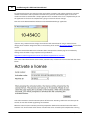
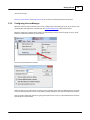
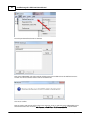
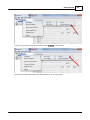
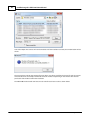
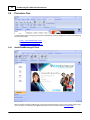
CardExchange® 9 SBS Installation
Manual
© 2013 CardExchange® Solutions
2
CardExchange® 9 SBS Installation Manual
Table of Contents
Foreword
0
Part I Introduction
3
Part II Getting Started
4
1 Requirements
................................................................................................................................... 4
2 Using License
...................................................................................................................................
Dongle
5
3 Procedure
...................................................................................................................................
One
10
Install License
..........................................................................................................................................................
Manager
10
License Manager
..........................................................................................................................................................
Tools
15
License File Location
.......................................................................................................................................................... 18
Activating SBS..........................................................................................................................................................
License
21
Configuring License
..........................................................................................................................................................
Manager
23
4 Procedure
...................................................................................................................................
Two
28
Install CardExchange®
..........................................................................................................................................................
Client
28
Configure Client
..........................................................................................................................................................
License
29
Configure Shared
..........................................................................................................................................................
Data Folder
29
Part III Support
Index
32
0
© 2013 CardExchange® Solutions
Introduction
1
3
Introduction
Welcome and thank you purchasing our CardExchange® Small Business Server product.
You have received a CD that contains all the applications and installers that are needed to make this a successful
installation. Therefore we created a Auto Play menu that will lead you to all the different installation and
configuration processes, step by step. After inserting the CD, the main menu will start as shown below:
If this menu does not start automatically, please browse to the CD content and execute the autorun.exe
application.
In this menu you can open this manual, start with the procedures, visit our website, our forum, and contact us.
© 2013 CardExchange® Solutions
4
2
CardExchange® 9 SBS Installation Manual
Getting Started
As with any installation, everything starts with a good preparation so please everything carefully to ensure you
are successful installing CardExchange® Small Business Server.
This manual is created to explain in detail the installation and configuration and it is very important that, before
starting, you are a true administrator that has all the rights to do the installation and configurations. Be aware, if
you are a local Administrator and you are installing this product on a computer or server that is inside you
network domain does not guarantee that you have all the privileges and rights to make installations on domain
servers.
Although this manual is very detailed, installing a CardExchange® Small Business Server requires more advanced
skills then a standard CardExchange® desktop installation.
Installing and configuring CardExchange® Small Business Server products requires the installation of the license
manager, activating and installing of the license(s), configuring the data folder location, installing the
CardExchange® client application on the desktop, and the client license retrieval location. Therefore we have
split the whole process into two (2) procedures; installation and configuration of the license manager and the
installation and configuration of the CardExchange® client application.
Make sure that you are aware of all the technical specifications that are required for making a successful
installation of our CardExchange® Small Business Server product. If you have any doubt or are unsure of you are
meeting the technical requirements, technical knowledge level, etc. please contact your CardExchange®
Reseller as they can offer you services for installation and configuration. You can also contact our support
department at [email protected]. Be aware that installation and configuration support is not
offered as a free service and fees may apply!
Please check the Requirements section to make sure everything is set to start...
2.1
Requirements
For installing CardExchange® Small Business Server on your server, the following operating systems are
supported:
Windows XP, Vista, Windows 7, Windows 8
Windows Server 2003, 2005, 2008 R2, 2012
Citrix and Terminal Systems
Virtual Machines
All operating systems are supported as 32 and 64 bit systems and need to run the latest available service packs
of Microsoft.
For running CardExchange® Small Business Server on servers or workstations we advice the following minimum
specifications:
100 MB free disk space for Workstations, 300 MB running on servers
Intel Core i3 or comparable
2048 MB internal memory
Internet Explorer 6 or higher
Microsoft .NET Framework 3.5
Specific Firewall information:
© 2013 CardExchange® Solutions
Getting Started
5
Firewall issues are usually solved by adding the Sentinel RMS License Manager to your the firewall exceptions.
The provider of the licensing system SafeNet states that:
"The Sentinel RMS License Manager only uses the UDP port 5093 at Server end by default. And at client end the
ports are used dynamically and controlled by Operating System i.e. for communication only UDP port 5093 is
used at server end and at client end it is used dynamically on the basis of available port."
2.2
Using License Dongle
When you have received a dongle with your license, it is important that the driver of this dongle is installed first
before connecting this dongle to your system and activating the license.
In the main page of the Auto Play Menu you can find the menu option Drivers. When you select this menu item
you will enter the driver page. Now click on the USB Dongle button to execute the installer:
When the installer is started, click on Next to proceed:
© 2013 CardExchange® Solutions
6
CardExchange® 9 SBS Installation Manual
If you agree to the terms of the license agreement, please do select the corresponding option and proceed with
Next. If you decline these terms, when selecting the installation will stop and the wizard will be closed after
clicking on Finish:
© 2013 CardExchange® Solutions
Getting Started
Select Complete as Setup Type and click on Next to Proceed:
© 2013 CardExchange® Solutions
7
8
CardExchange® 9 SBS Installation Manual
Now you are ready to install the dongle driver on your system. Click Install to proceed:
To allow access to the server, the firewall has to be modified to allow this. You can always do this manual later,
select No to do so. We advice to let the installer do the modifications to the firewall as that guarantees the
correct working of the dongle with the server. Click Yes to proceed:
© 2013 CardExchange® Solutions
Getting Started
9
When the installation is successful you can click on Finish to close the installation wizard.
Now you can insert the dongle into a free USB port of your system and it will automatically install the driver.
© 2013 CardExchange® Solutions
10
2.3
CardExchange® 9 SBS Installation Manual
Procedure One
In Procedure One we are going to explain how to install the license manager, activate your license, and
configure the license manager. Follow the steps one by one to guarentee a successful installation and
configuration. Each step will explain in detail what to do, install or configure:
Step 1 - Install License Manager
Step 2 - License Manager Tools
Step 3 - License File Location
Step 4 - Activating SBS License
Step 5 - Configuring License Manager
2.3.1
Install License Manager
First we need to install the license manager on the system to do so, click on the Install License Manager button
to start the installation:
© 2013 CardExchange® Solutions
Getting Started
When the installation is started, click Next to proceed:
If you agree to the terms of this agreement, select accordingly and proceed by clicking Next:
© 2013 CardExchange® Solutions
11
12
CardExchange® 9 SBS Installation Manual
Enter the user and company information. We advice to install this application so that anyone can use it:
© 2013 CardExchange® Solutions
Getting Started
13
If applicable, change the destination folder of the application by clicking the Change button. However, we do
advice to install it into the default installation folder:
Choose Complete installation and proceed with Next:
© 2013 CardExchange® Solutions
14
CardExchange® 9 SBS Installation Manual
License assignment by the license manager goes via TCP protocol over your network. It is important that all the
clients can freely communicate with the license manager therefore the license manager needs to address some
ports for it's communications. These ports are described and explained in the Requirements section of this
manual. When installing, per default the installer can make the firewall modifications for your, as we advice to
have the installer do so. If you want to do this manually, please uncheck the check box before proceeding:
© 2013 CardExchange® Solutions
Getting Started
15
Now you are ready to install the license manager on your system and you can click Install to start the installation.
Click on Finish when the installation is done to close the installer.
2.3.2
License Manager Tools
The license manager we just installed is running as a service on your system and has no interface of it's own. As
we need to be able to install the licenses and manager the license manager, we need to use additional tools for
configuring the license manager. These so called tools can be simply copied to a location on the server or
workstation the license manager is running on.
To do so just simple click on the Browse CD button and make a copy of the tools folder on the CD:
© 2013 CardExchange® Solutions
16
CardExchange® 9 SBS Installation Manual
and copy this folder to a location on your server or workstation, for example to the folder C:\Program Files (x86)
\Common Files\SafeNet Sentinel\Tools
Now browse the Tools folder and create a shortcut for the WlmAdmin.exe application as shown below, to any
location that is convenient for you:
© 2013 CardExchange® Solutions
Getting Started
When you execute the WlmAdmin.exe application, an interface for the license manager will start:
© 2013 CardExchange® Solutions
17
18
CardExchange® 9 SBS Installation Manual
This interface will inform you about the status of all your licenses, servers, and is needed to install your Small
Business Server licenses as explained in later steps of this help file.
2.3.3
License File Location
The Small Business Server license manager stores it's license codes in a plain text file. This file can be located
anywhere on the system but the Windows user that manages the license manager service process needs to
have read and write access to this location. To make sure this is guaranteed, we need to create a specific
Environment Variable to set the location.
To create this variable right mouse click on My Computer and select Properties. If you are running Windows
Vista, 7, or 8, click on Properties and then select Advanced System Settings as shown below:
© 2013 CardExchange® Solutions
Getting Started
This will open System Properties window with the Advanced tab selected.
© 2013 CardExchange® Solutions
19
20
CardExchange® 9 SBS Installation Manual
Now click on Environment Variables to open the this window:
© 2013 CardExchange® Solutions
Getting Started
21
And click on New to create a new variable:
Enter LSERVRC as the variable name and enter the complete path of where the license file will be located into
the value field. Please note that the directory of the path should exist, while the file itself should not exist. The
name of the file is arbitrary, for example, CardExchange.Licenses
Click on OK to store the new created Environment Variable.
2.3.4
Activating SBS License
Just like with the standard CardExchange® license, the license manager needs to activated to the Machine ID of
the server or computer too. The only difference is that the Small Business Server License cannot be activated
with a CardExchange® client, but has to be done online via our website.
© 2013 CardExchange® Solutions
22
CardExchange® 9 SBS Installation Manual
For activating the license we need to have the serial number, activation code, and the machine ID. The serial
number and activation code are printed on the DVD box or you have received them digital via email. The
machine ID needs to retrieved with a simple application that is available on this CD. It is important that you run
this application on the server or computer that is going to contain the license manager.
Now click on the Retrieve Machine ID button to start the MachineExchange® application:
If you are using a external license dongle, the machine ID will start with 80. For using an external license
dongle, please install the dongle driver first. For instructions, please see the Using License Dongle section of this
manual.
If you have retrieved the Machine ID and write it down. Now open the activation page on our website by
clicking on the url below or copy and paste it into your browser:
http://www.cardexchangesolutions.com/id-card-software-support/license-activation
Now enter all the information like serial number, activation code, and the machine ID into the fields like shown
below:
And click on Activate to start the activation process of the license. Activating a SBS license can take up to 60
seconds. do not close the web page during the activation!
When the license has been activated you will be prompted to download the activated license file with the
extension *.LIC. This file needs to be saved to a location that can be accessed by the computer that is running
© 2013 CardExchange® Solutions
Getting Started
23
the license manager
Version: 9 Serial number: 38384 Activation code: 01156-A7581-74234-0FC86-A3616-F51FD-47F9
2.3.5
Configuring License Manager
When the license has been activated, you can now configure the License Manager. To do so you have to start
the WlmAdmin.exe application as explained in the License Manager Tools section of this manual.
When the application is started we first need to set the Preferences of the license manager. To do so, select
Preferences from the Edit menu as shown below:
This will open the Preferences window:
Make sure that you set all the options as shown in the screenshot; Check "Discover defined servers on startup"
and "Save these preferences to a file". Click on OK to set the preferences and close the Preferences window.
Now we need to define the server that is going to hold the licenses. To do so, select Defined Server List from
the Edit menu as shown below:
© 2013 CardExchange® Solutions
24
CardExchange® 9 SBS Installation Manual
This will open the Defined Server List window:
Now enter "LOCALHOST" and click on Add to add the server name and OK to close the Defined Server List
window. You will be asked to add the server to the defined list:
Click Yes to confirm.
Now we need to add the license file to the license manager. To do so, right click on the LOCALHOST node in
the Defined Servers tree and select Add Feature -> From File -> To Server and its File as shown below:
© 2013 CardExchange® Solutions
Getting Started
If you are using a license dongle you will need to select To Server as shown below:
Browse to the location of the license file with the extension LIC, as shown below:
© 2013 CardExchange® Solutions
25
26
CardExchange® 9 SBS Installation Manual
And click on Open. The licenses will now be installed and if the installation succeeds, the window below will be
shown:
This message box indicates the amount of licenses that it was able to read from the license file and the amount
of licenses that was successfully installed. Of course this number is depending on the amount client licenses
purchased. Click on OK to confirm the installation.
The LOCALHOST node should now have one sub node for each license code as shown below:
© 2013 CardExchange® Solutions
Getting Started
27
By selecting the license, you can see in the license manager GUI how many licenses are available and how
many licenses are in use.
Don't forget, the License Manager is a Windows service and this GUI does not to be started to have the system
working. After you are done with the configuration, you can close this window.
This concludes the installation and configuration of the License Manager and Procedure One. Now we start
installing the CardExchange® clients on the Desktop computers or on the server. This process is explained in
Procedure Two!
© 2013 CardExchange® Solutions
28
2.4
CardExchange® 9 SBS Installation Manual
Procedure Two
In this Procedure Two we are going to install the CardExchange® client(s), configure the license, and configuring
the shared Data folder:
Step 1 - Install CardExchange® Client
Step 2 - Configure Client License
Step 3 - Configure Shared Data Folder
2.4.1
Install CardExchange® Client
We first need to install the CardExchange® Client on the computers which are going to be used for producing ID
cards. This process is explained in the Quick Install Manual and is available online by CLICKING HERE!
© 2013 CardExchange® Solutions
Getting Started
2.4.2
29
Configure Client License
After you have installed the client on your system(s), each client needs to be configured to get access to the
license server. The location of the license manager is set in the CardExchange® Configuration file. This
CardExchange.ini file is located in the Program Files folder on your system. You can open and edit this file using
Notepad.
The location of the license server is set in the section [BasicSettings] as named entry LicenseServer. by default
this entry is set to "no-net" and CardExchange® will use the LicenseDirectory during the start up. Now replace
the "no-net" by the name or the IP address of the server or computer that is running the license server, see the
example in the above screenshot.
Now save the configuration file and start CardExchange®. When CardExchange® is starting, it will request a
license from the license manager. If they are available, it will start directly if all licenses are in use it will inform
the user that all licenses are in use. As soon as another client is closed, the license will become available again.
2.4.3
Configure Shared Data Folder
Unlike the regular CardExchange® editions, the Small Business Server allows multiple CardExchange®
installations to share the same data folder, which in that case will be located on a network drive. Therefore all
clients needs to point to the same Data folder location. This location of the Data folder needs to be adapted in
the configuration file of CardExchange®. Just like we did when configuring the Client License, browse to the
© 2013 CardExchange® Solutions
30
CardExchange® 9 SBS Installation Manual
Program Files folder and open the CardExchange.ini file with Notepad:
The location of the Data folder is also available under the [BasicSettings]. Change the location to the location of
the central Data folder, as shown in the above screenshot, and save and close the configuration file.
When the data folder is shared between multiple sessions, CardExchange® makes sure that only one session
gets write access to the data folder. All other sessions will run in read-only mode, which means that any
changes to the configuration are not stored and that the Configuration tab in the main window will be hidden
altogether.
By default, CardExchange® grants write access to the first session that starts up and denies it to any subsequent
session. This behavior can changed by clicking Share data folders in the Configuration tab.
Click on the Data folder Sharing button to open the Locking window:
© 2013 CardExchange® Solutions
Getting Started
31
When the Locking window is shown, you can select Enable locking of the data directory. When selected, you
are offered a choice of three criteria's;
Lock to the current CardExchange® user - If you have setup user authorizations, you can use the actual
logged in user to lock the data folder to. This is a good choice as it gives you the option to access and
configure the data folder from any client location by simply logging in as that user. How to configure
and setup user authorizations is explained in the online CardExchange® Help File and can be accessed
by CLICKING HERE!
Lock to the current computer - This choice will allow only the selected computer to make changes
independent to which user is logged in.
Lock to the current Windows user - This option is basically the same as the first option. It can be more
hassle as you will have to log off in Windows and log in with your account again.
You can also make a combination of the available locking criteria for example, the data folder can only be edit
by the logged user and only on one specific computer.
© 2013 CardExchange® Solutions
32
3
CardExchange® 9 SBS Installation Manual
Support
CardExchange® Solution partners and distributors are your first point of contact if it comes to support for the
Small Business Server edition. Please be aware that Small Business Server editions installations and
configurations can be complex and therefore additional fees may apply. Please contact your CardExchange®
Small Business Server reseller for more information or contact CardExchange® Solutions at
[email protected]. For more support tools can be found on our website bly CLICKING HERE!
Thank you for using our CardExchange® Small Business Server! We appreciate your business and trust.
© 2013 CardExchange® Solutions