1
cooking collection
Instructions for use and warranty details
%XLOW,Q6WHDP2YHQ
0RGHO1R62
Dear Customer,
Thank you and congratulations for choosing
Kleenmaid.
Your new appliance has been designed
and meticulously tested to ensure that it
meets all your culinary requirements, and
has been carefully manufactured using top
quality materials to give you years of reliable
performance.
For best results, carefully read the instructions
on how your new appliance is to be installed.
Correct installation will avoid delays and
unnecessary service call costs.
Once installation is complete, please read this
instruction manual carefully and get to know
the controls and the features of your new
Kleenmaid appliance. These simple instructions
will enable you to achieve excellent results from
the very first time you use it.
Again, congratulations and thank you for
choosing The Best You Can Own.
KLEENMAID
2
BUILT-IN ELECTRIC STEAM OVEN
USE, INSTALLATION AND MAINTENANCE INSTRUCTIONS
TABLE OF CONTENTS
page
USER GUIDE
!
Overview of the Product
!
General warnings
5
5
GUIDE TO USING THE OVEN
!
Control panel
!
Selectable traditional cooking functions
!
Specific steam cooking functions
!
Description of the oven and accessories
8
10
11
12
TURNING THE OVEN ON
!
First start-up
!
Setting the time
!
ON/OFF Function
!
Oven on : awaiting commands
13
14
14
15
COOKING FUNCTIONS MENU
!
Traditional cooking functions
!
Steam cooking functions
!
Static steam cooking 100°-130°C
!
Ventilated steam cooking 100°-130°C
!
Steam supply function
16
17
18
19
20
STEAM FUNCTION MANAGEMENT
!
No water in the tank
!
Drain water from the boiler
21
21
DISPLAY TEMPERATURE
!
Displays
!
HOT residual heat
!
Setting/changing temperature
!
Preheating
23
23
24
24
SPECIAL FUNCTIONS
!
Start / Pause
!
Oven light
!
Key Function – child safety
!
Food Warmer Function
!
Defrost Function
!
Food probe function (in applicable models)
!
Correct food probe use
25
26
26
27
27
27
28
2
PROPER USE OF THE FOOD PROBE
28
TIME PROGRAMMING FUNCTIONS
!
Setting the timer
!
Setting the alarm
!
Setting the timer and alarm
!
Programming the cooking time
!
Cooking duration
!
End cooking time
!
Automatic Cooking
!
Delete / Edit programming time
30
30
31
32
33
34
35
35
37
COOKING INSTRUCTIONS
!
Position of internal grills
!
Use of the grill
!
Tangential fan
38
38
39
39
AUTOMATIC COOKING RECIPES
39
REFERENCE TABLES PROGRAMS
42
MAINTENANCE AND CLEANING
!
Periodic maintenance
!
Cleaning the surfaces
!
Sanitising
!
Descaling
!
Removing the oven door
!
Re-insertion of the oven door
!
Removing inner glass
!
Removing / remounting lateral guides
!
Removing/mounting the sliding guides (if any)
!
Replacing the light bulb in the oven
44
44
45
45
46
47
47
48
49
50
51
INSTALLATION INSTRUCTIONS
!
Technical data
!
Dimensions of the single oven
!
Dimensions of the oven with food warmer
!
Single built-in cabinet measurements
!
Built-in cabinet with food warmer measurements
!
Inserting the oven into the cabinet
!
Features of the cabinet
52
52
52
53
53
54
54
55
OVEN ELECTRICAL CONNECTION
!
Assembly/replacement of the power supply cable
!
Earth connection
55
56
56
3
TECHNICAL AFTER-SALES ASSISTANCE AND SPARE PARTS
!
Touch errors
!
Software parameters that can be changed by the user
!
Spare parts
!
Technical assistance
57
57
57
58
58
TABLES OF REFERENCE
59
4
"
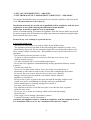
OVERVIEW OF THE PRODUCT
Combination electric-steam oven ideal for cooking food in common households, for
non-professional use. This unit is capable of perfectly combining traditional cooking
with the advantages of steam cooking, maintaining all of the flavour, aroma, freshness
and sensory properties for meats, fish, vegetables and desserts. It is not suitable for other
purposes.
"
GENERAL WARNINGS
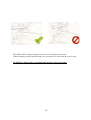
This product is in compliance with the EU 2002/96/EEC Directive.
The crossed out "wheeled bin" symbol on the appliance indicates that at the end of its
life-span, the product, as it has to be separately treated from domestic waste, must be
conferred to a differential collection centre for electric and electronic appliances or
redelivered to the dealer at the time of purchasing a new equivalent appliance.
The user is responsible, at the time of disposal, for taking the device to the appropriate
collection point. Failure to do so shall result in punishment in accordance with the
current legislation on waste disposal.
Proper differentiated collection is necessary so that the obsolete device can be sent on
for environmentally friendly recycling, treatment and dismantling, in order to avoid any
possible negative environmental impact or health risk and to permit re-use of the
constituent materials.
More detailed information about available systems for collection may be obtained from
the local waste disposal services, or from the shop where the device was purchased.
The manufacturer declines all civil or criminal liability in the event of poor or
improper installation of the device.
The manufacturer also reserves the right to many any necessary and useful amendments
to its products without prior notice.
Dispose of the various packaging materials in compliance with the applicable local
Standards.
Carefully read this instruction manual prior to installing or using this device, in order to
have all the necessary information for correct installation, maintenance and use of the
same.
It is essential for this instruction manual to be kept together with the device for its entire
life-span, also in case of transfer to other persons.
This appliance has been designed for domestic use and only for the cooking and heating
of food. Any other use, different to that indicated in this manual must be considered
improper and consequently dangerous.
The product is in compliance with the 89/109/EEC European Directive as it is destined
to come into contact with food products.
This household appliance is compliant with the provisions of the European
Community Directives
5
- LOW VOLTAGE DIRECTIVE – 2006/95/EC
- ELECTROMAGNETIC COMPATIBILITY DIRECTIVE – 2004/108/EC
The product identification data is stated on the relevant plate applied on the front of the
oven. The plate must never be removed.
Installation must only be carried out by qualified staff in compliance with the local
regulations in force and following the indications in this manual.
Important: do not lift or pull the oven by the handle.
In case of malfunctioning, disconnect the appliance from the electric mains (do not pull
the power supply cable to disconnect the plug) and contact the authorised original spare
parts technical after-sales centre.
Do not, in any case, attempt to repair the device.
Correct use of the oven
- The device is only meant to be used by adults. Keep children away.
- The appliance produces heat both in the functioning phase and due to inertia, even
when recently turned off. Do not touch parts inside the oven during these phases and
limit contact with the external parts. Keep children away from the unit when it is in
operation.
The accessible parts may become very hot.
- To insert or extract containers or accessories from the oven, always wear
suitable protective gloves.
- Use only containers able to resist to high temperatures
- Do not leave the appliance unattended during cooking operations that may release
greases or
oils that may catch fire.
- Never cover or lean on the walls or lower part of the oven with sheets of
aluminium or other objects such as pans or trays that could damage the product.
- Do not use the oven to store objects when it is not in use, otherwise
damage could be caused to both the oven and the objects when the
appliance is switched on.
- Do not sit on or place weight on the open door and do not hang weights on the
handle as to do so could damage the product and cause malfunctions.
- Before maintenance or cleaning, unplug the oven and, if
just used, wait for it to cool.
- Pay attention to the flow of air that leaves the oven when the door is opened
when the same is hot.
- Do not use jets of steam for cleaning, which could reach and damage
electrical parts.
- If the supply cord is damage, immediately contact
Technical Assistance which will replace it.
Attention, this appliance must be earthed in compliance with the standards in force.
For installation of the oven see the “installation instructions” chapter.
6
Correct use of the oven
- Pre-heat the oven for the strictly necessary time only;
- Open the door only when necessary to avoid unnecessary heat losses;
- Keep the gaskets clean and efficient to avoid heat dispersion which can cause damage;
- Always turn off the oven when no longer in use;
- To reduce the formation of condensate owing to the humidity in food, it is always
necessary to pre-heat the oven before introducing the foodstuffs. In any case
formation of condensate on the door glass or on the walls of the oven does not
compromise its operation and with continued cooking it tends to
disappear.
Instructions for first time use of the oven:
Unplug the device.
Remove all internal packaging and accessories from the oven. Clean the internal
surfaces with hot water or neutral detergent (see “maintenance and cleaning”
paragraph). Rinse thoroughly with a damp cloth. Wash all oven accessories in the same
way and dry everything thoroughly.
Operate the oven, empty and for a maximum of about 1 hour, with a ventilated cooking
function. Ventilate the premises well, possibly by opening the windows. This will allow
the evacuation of the combustion fumes of production residue such as grease, oil and
resin from processing.
Attention:
- Never use this device to warm the premises
- Do not obstruct the passage of cooling air by blocking the ventilation holes
of the room or on the appliance.
- Before installation, check that the local power supply
is compatible with the data indicated on the product label.
- During use, do not touch the heating elements inside the
oven.
- The accessible parts can become very hot during use, it is recommended to keep
children out of reach.
7
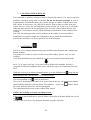
! GUIDE TO USING THE OVEN !
"
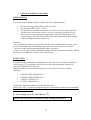
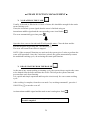
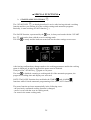
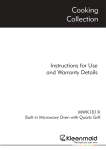
STANDARD CONTROL PANEL
TWO KNOB ASSISTED TOUCH CONTROL
1
4
Graphic display
2
Left knob
3
5
6
Right knob
KEY 1: on/off/wake
KEY 2: oven light
KEY 3 : start/pause
KEY 4: food warmer
KEY 5: puff of steam
KEY 6 : setting time/reset
LEFT KNOB : “Scrolling”
selection/menu settings
functions and timer
RIGHT KNOB : “Scrolling”
selection/setting
temperature
PUSH LEFT KNOB: activation/confirmation
activation/confirmation
PUSH RIGHT KNOB:
Please Note: - "scrolling" is done by turning the knob;
- “push knob” = push the knob;
Whenever a button or knob is pushed you will hear a Beep.!
!!!!!!!!!!!!!!!!!!!!!!!!!!!!!!
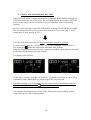
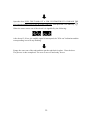
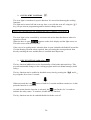
DISPLAY AREA DETAIL
Display area/setting the system clock.
(position on the display: upper centre)
8
Area for programming time and display the progressive
cooking time.
(position on the display: upper left)
timer
alarm
progressive manual cooking time
cooking duration
end cooking time
automatic cooking
Cooking method display area
(position on the display: centre)
- AUTO = AUTOMATIC programming
- MAN = MANUAL programming
Display area/central chamber temperature setting and temperature graph.
(position on the display: upper right)
BLOCK KEYS (special safety function)
temperature selection indicator
increase/decrease temperature
interior temperature graph
(position on the display: right of centre)
cooking delay mode indicator / cooking not active
active cooking mode indicator
SPECIAL FUNCTIONS INDICATORS
9
"LIGHT" mode indicator (position on the display: centre)
“PAUSE” mode indicator (position on the display: lower left)
"DEFROST" function indicator (position on the display: lower left)
“FOOD WARMER” mode indicator (position on the display: lower right)
"FOOD PROBE" mode indicated, in applicable models
(position on the display: left of centre)
"NO WATER IN TANK" mode indicator, if
only the internal part flashes or "DRAIN WATER FROM BOILER" if
the whole icon flashes (position on the display: lower left).
"
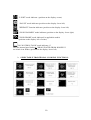
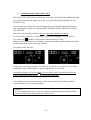
SELECTABLE TRADITIONAL COOKING FUNCTIONS:
10
POSSIBLE TEMPERATURE RANGE: FROM 50 TO 250 °C.
Except for:
-
From 50 to 160° C (Base heating element);
-
From 50 to 150° C (Base heating element + Radial Fan);
" SPECIFIC STEAM COOKING FUNCTIONS
STEAM "PUFF" (SUPPLY) FUNCTION IN TRADITIONAL COOKING
"STEAM PUFF " mode indicator (position on the display: centre right)
"STEAM PUFF OPERATING" mode indicator
OVEN CLEANING FUNCTIONS
“SANITISING” mode indicator (position on the display: lower right)
"DESCALING" mode indicator (position on display: lower right)
IMPORTANT NOTE: All of the functions are accompanied by the activation
of the internal light . The light remains on for 3 min and then goes off
automatically.
11
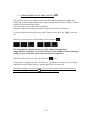
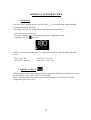
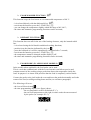
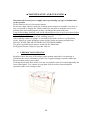
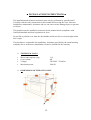
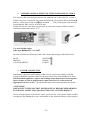
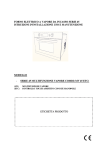
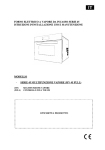
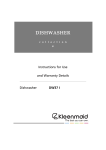
" DESCRIPTION OF THE OVEN AND ACCESSORIES
1
8
9
9
6
5
3
1)
2)
3)
4)
5)
6)
7)
8)
9)
4
7
Control panel;
Water tank for steam cooking;
Completely extracting guides (where applicable);
Support rack;
Tray for steam cooking;
Drip tray;
Ventilated cooking fan cover;
Grill cooking heating element;
Steam distribution nozzles;
12
2
! TURNING THE OVEN ON !
"
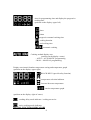
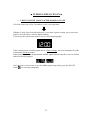
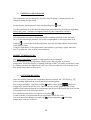
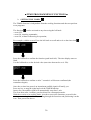
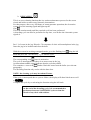
FIRST STARTUP / RESET AFTER POWER OUTAGE
All of the icons stay on for 2 seconds to verify oven operation.
Whether it is the first electrical hookup or a reset after a power outage, the system time
appears as in the figure, with the digits flashing.
To proceed, the system time must be set (see relevant paragraph).
If the cooking mode was interrupted due to a power outage, the oven maintains all of the
information (blackout mode).
When power is restored an intermittent audible signal indicates that the oven was locked
and the following appears:
Once the time is reset on the oven, the audible signal stops and it goes into PAUSE
mode
(see relevant paragraph).
13
"
ADJUSTING THE SYSTEM TIME
The system time (clock) is based on the type of power supply (50 Hz or 60 Hz). The
time is adjusted with the oven OFF:
1)
2)
3)
Hold down the 6 key for at least 3 sec. The hour digits on the display will
flash. Use the right knob to set the value.
To acquire the set time, confirm using the "!#$% !or press the right knob.
Perform the same procedure to set the minutes.
If the oven is on OFF: the control displays only the system time, dimming the brightness
after 1 min.
If the oven is in blackout mode due to a power outage, the hour digits flash. Use the left
knob!to set the hour as indicated above.
"
ON/OFF Function
The oven is activated by holding down the 1 ON/OFF key! !for at least 2 seconds and
is turned off with a single touch of the same key.
If no key is pressed after the oven is turned on, it is disabled automatically after 1 min
(accidental startup control).
!
Oven ON: single audible signal.
Oven OFF: double audible signal.
NOTE: when the oven is turned off, it cancels all of the set cooking programs and times.
If the oven is turned off in low consumption mode (display dimmed), the first time a key
is touched it has a WAKE function (the display light becomes brighter). Low
consumption mode is automatically re-enabled after 1 min.
!
ACCIDENTAL STARTUP CONTROL
This function automatically turns off the oven.
It occurs after the oven is turned on with the 1 ON/OFF key
and after 1 minute if no
function is selected and activated.
After 1 min, a double audible signal notifies the user that the oven will shut off.
14
"
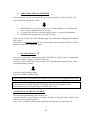
OVEN ON awaiting commands
Pressing the 1 ON/OFF key
turns the oven on, awaiting settings on the desired
cooking function.
The default function is ventilated cooking (Circular heating element + Radial fan) with
pre-set temperature of 180° C.
The display is as shown in the figure:
Turning the left knob scrolls through the functions in the following order:
12345-
cooking functions menu;
oven temperature;
programming cooking time;
timer;
alarm;
6-
DESCALING function
;
7-
SANITISING function
;
(see paragraph for oven cleaning functions.)
ATTENTION:
- when scrolling through the functions, the icons flash. If the function is not confirmed
or changed within 7 seconds, the selection is de-activated.
- from oven "on, awaiting commands", if there is command inactivity for more than 5
min, the oven will automatically shut off.
NOTE: the oven can switch from "in cooking mode" to "on, awaiting commands" by
pressing the 1 ON/OFF key! &!When the key is pressed again, the oven shuts off.
15
! COOKING FUNCTIONS MENU !
"
TRADITIONAL COOKING FUNCTIONS
After the oven is turned on using the 1 ON/OFF key , it is possible to directly access
the cooking function selection by immediately pressing the left knob.
The central icon and the interior cooking functions start to flash.
Using the left knob you can also scroll through the available cooking functions (see
"SELECTABLE TRADITIONAL COOKING FUNCTIONS"): the related segments are
activated.
When the desired function is highlighted, confirm by pressing the left knob (push left
knob). In any case, after 7 seconds of command inactivity, the function chosen is
automatically confirmed (auto-confirm).
The functions menu can also be accessed in the following mode.
After turning on the oven, scroll through the functions using the left knob, position it
over the flashing central icon (oven chamber) and confirm by pressing the left knob. The
central icon and the interior cooking functions now start to flash together. Then proceed
as above.
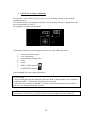
At this point, to start cooking, confirm everything with the 3 START key
(see the reference paragraph).
The oven starts the pre-heating phase. The internal oven light comes on . The cooking
pan icon
comes on and starts to flash. Based on the cooking function selected the
default temperature appears and the temperature increase icon
starts to flash. The
progressive manual cooking time is displayed. The icon! !starts to flash (see figure).
At the end of cooking, press the 1 ON/OFF key
and the oven stays in "on, awaiting
commands" mode. When the key is pressed again, the oven shuts off.
Please Note: when using the oven with the traditional functions, the jug can remain in its
location without affecting cooking.
16
"
STEAM COOKING FUNCTIONS
PREPARATION
Use of the steam cooking functions requires the following operations:
•
•
•
•
Fill the tank (jug) with potable and/or tap water.
The maximum fill level is 1.1 litres.
The jug must be inserted so that there is a perfect seal between the jug hose
and the water circuit in the oven. So be sure to push the jug all the way in.
Always place a non-perforated drip pan below the perforated drip pan for
steam cooking. This will collect all the drips and condensation from cooking
without soiling the bottom of the oven.
Attention:
- never completely fill the jug, especially near the end of cooking since, because once
the cycle has ended, the water draining from the boiler could cause it to overflow.
- do not use other liquids other than potable and/or tap water.
- if the oven was just used for traditional cooking, in order to use steam cooking, with all
its features, wait until the oven has cooled sufficiently.
EXECUTION
As with choosing traditional cooking functions, after the oven is turned on using the 1
ON/OFF key , it is possible to directly access the cooking function selection by
immediately pressing the left knob.
When the left knob is turned anticlockwise you can select the 4 steam cooking
functions:
•
•
•
•
VENTILATED STEAM 130° C
VENTILATED STEAM 100° C
STATIC STEAM 130° C
STATIC STEAM 100° C
Confirm the function desired by pressing the left knob.
In any case, after 7 seconds of command inactivity, the function chosen is automatically
confirmed (auto-confirm).
To start cooking, press the 3 START key
.
Please note: If the door is not closed, steam cooking will not start.
17
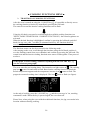
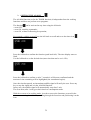
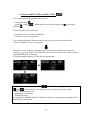
" STATIC STEAM COOKING 100°-130°C
During STATIC steam cooking, the steam flows naturally in the chamber through two
orifices located in the rear of the oven. The water transformed into steam by the boiler
preserves the colour, flavour, freshness and sensory qualities of the foods during
cooking.
STATIC steam cooking is especially indicated for cooking VEGETABLES and FISH.
The two temperature levels let you cook more delicately if you select 100° C as the
temperature or more quickly at 130° C.
Once the steam function is chosen, the set temperature cannot be changed.
To start cooking, press the 3 START key
(see the paragraph "EXECUTION").
The steam icon
under the temperature indication starts to flash.
When the temperature has been reached, a continuous audible signal indicates the end of
pre-heating and the steam icon stops flashing.
The display looks like this:
At the end of cooking, press the 1 ON/OFF key
and the oven stays in "on awaiting
commands" mode. When the key is pressed again, the oven shuts off.
If another cooking cycle is not started, the oven turns itself off and indicates that the
water is draining from the boiler
(see relevant paragraph).
All cooking time programming and use of the food probe is also available with the
steam functions (see relevant paragraphs).
18
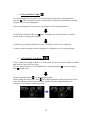
"
Ventilated steam cooking 100°-130°C
During VENTILATED steam cooking, the steam flows naturally in the chamber through
two orifices located in the upper rear of the oven and is distributed uniformly by the
RADIAL FAN.
This function gives all of the steam cooking properties with uniform heat distribution
and is particularly suitable for cooking PRE-COOKED FOODS, FROZEN FOODS or
LEFTOVERS.
Once the steam function is chosen, the set temperature cannot be changed.
To start cooking, press the 3 START key
(see the paragraph "EXECUTION").
The steam icon
under the temperature indication starts to flash.
When the temperature has been reached, a continuous audible signal indicates the end of
pre-heating and the steam icon stops flashing.
The display looks like this:
At the end of cooking, press the 1 ON/OFF key
and the oven stays in "on awaiting
commands" mode. When the key is pressed again, the oven shuts off.
If another cooking cycle is not started, the oven turns itself off and indicates that the
water is draining from the boiler
(see relevant paragraph).
All cooking time programming and use of the food probe is also available with the
steam functions (see relevant paragraphs).
Attention:
to avoid condensation on the oven walls, during ventilated steam cooking the radial
fan does not start until the temperature reaches 100° C.
19
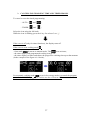
"
STEAM SUPPLY FUNCTION ("PUFF")
This function lets the user supply steam at any time during traditional cooking, thus
combining cooking methods that require higher temperatures with the benefits of steam
cooking for softer and tastier foods.
It is especially useful for ROASTS and MEAT.
Activate a traditional cooking function (except Defrost and Food Warmer).
To activate and de-activate the steam "puff" function, press the 5 key
sec.
When the cycle starts the corresponding icon is animated
…
for at least 3
:
…
The steam puff is a manual steam cycle with a limited time duration
(approximately 5 minutes). Use of this function for the number of times needed per
cooking cycle is at the user's discretion and based on experience.
When the steam puff cycle stops, the animation
stops.
At the end of cooking, press the 1 ON/OFF key
and the oven stays in "on awaiting
commands" mode. When the key is pressed again, the oven shuts off.
If another cooking cycle is not started, the oven turns itself off and indicates that the
water is draining from the boiler
(see relevant paragraph).
20
! STEAM FUNCTION MANAGEMENT !
" NO WATER IN THE TANK
Usually, if the tank is filled with 1.1 litres of water, this should be enough for the entire
steam cooking cycle.
If not, the electronic system signals that the water is finished using an
intermittent audible signal and the corresponding water icon flashes
The oven automatically goes into pause .
.
Open the door, remove the tank and fill with potable water. Close the door and deactivate the pause by pressing the 3 START key
The oven will restart from where it stopped.
.
NOTE: if the steam puff function was activated, the system gives 5 mins to perform the
water refill procedure. Once the 5 mins have passed, the system automatically restarts
the traditional cooking cycle, de-activating the steam puff function.
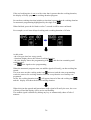
" DRAIN WATER FROM THE BOILER
At the end of any steam cooking or cleaning cycle, the system always requires the water
to be drained from the boiler and thus the circuit. This keeps the system clean and
prevents lime scale from forming.
It is a quick and simple operation and keeps the circuit ready for a new steam cooking
cycle.
After cooking is complete, from the oven mode "on, awaiting commands", press the 1
ON/OFF key to turn the oven off.
An intermittent audible signal and the tank+water icon begin to flash
The oven does not turn completely off until the boiler
circuit is emptied.
21
.
Open the door, PULL THE TANK OUT A FEW CENTIMETRES TO UNHOOK THE
JUG HOSE FROM THE OVEN WATER CIRCUIT, then press the 3 START key
.
When the water comes out of the circuit it is signalled by the following:
After about 15-20 sec, the audible signal is interrupted, the "H2o out" indication and the
corresponding icon will stop flashing.
Empty the water out of the tank and then put the tank back in place. Close the door.
The process is thus completed. The oven is now off and ready for use.
.
22
! DISPLAY TEMPERATURE !
"
!
DISPLAYS
After the oven is turned on, the 1 ON/OFF key ! is activated along with the default
"ventilated cooking" function.!
If cooking is started, the display shows the following information:
- pre-set temperature (default);
- icon: thermometer, arrow rising and progressive temperature graph;
- "cooking pan" icon
lights up;
NOTE: the control has time limits for continuous operation, with the following safety
limits:
- 250°C: max 3h;
- 200-245°C: max 5h;
"
- 120-195°C: max 8h;
- up to 120°C: max 11h;
RESIDUAL HEAT
If HOT appears in the upper right part of the temperature display, be careful not to touch
the inside parts of the even, even if it is turned off.
HOT is displayed after the oven is turned off and remains active until the chamber
temperature goes below 50° C.
23
" SETTINGS AND CHANGES
!
The temperature can be changed at any time after choosing a cooking function by
simply pressing the right knob.
On the display, the temperature and corresponding icon
flash&
Use the right knob to set the desired temperature and confirm by pressing the right knob.
In any case, after 7 seconds of command inactivity, the temperature chosen is
automatically confirmed (auto-confirm).
The temperature can also be changed using the scrolling functions on the left knob.
Set it on the temperature function: the switch is highlighted by the temperature icon
flashing . To select the desired temperature, press the left knob and the temperature
value starts to flash.
Using the right knob, set the temperature and confirm by pressing it again, otherwise
after 7 seconds the value will be auto-confirmed.
PRESET TEMPERATURE
The preset temperature assigned to each function can be changed.
Use to left knob to go to temperature change mode and select the new preset
temperature. While the display is flashing (and thus within 7 seconds), confirm the value
by holding down the left knob for at least 3 sec. The next time the oven is turned on the
new preset temperature will be active.
"
OVEN PRE-HEATING
Once the cooking function and temperature has been chosen, the 3 START key !
enters cooking mode and the oven starts the pre-heating phase.
!
and the status graph
!shows the
The rising temperature icon starts to flash
temperature reached inside the oven. Once all the bars on the graph are full, a long
audible signal indicates that the set temperature has been reached inside the oven and the
rising temperature icon no longer flashes.
The stabilised temperature icon appears in its place .
At this point the oven maintains the set temperature inside the cavity.
If oven temperature changes are made, the
rising temperature
and falling
temperature icons are activated.
24
! SPECIAL FUNCTIONS !
"
START/PAUSE FUNCTIONS
, as already described, is active after having selected a cooking
The 3 START KEY
function and lets you confirm all of the cooking settings and automatic programs.
Basically, it starts cooking (START function ).
The PAUSE function, represented by the
icon, is always activated with the 3 START
! and can be done with the oven in cooking mode.
key
The icon
is steady and the loads are turned off but the other settings are not reset.
!!!!!!!!!!!!!!!!!!!!!!!!!!!!
!
After having confirmed any changes made to the cooking parameters and/or the cooking
status is displayed, in order to proceed the pause must be disabled.
Then press the 3 START key!
again to exit pause.
The icon
is disabled, returning to cooking and all of the automatic programs, the
progressive cooking time and displays are activated.
NOTE: The PAUSE function does not hinder the TIMER
and ALARM
functions while it blocks automatic programming of the time (AUTO functions).
!
The pause function activates automatically in the following cases:
- the previously confirmed cooking function is changed;
- power is reset with the oven in cooking mode;
- no water in the steam cooking tank;
25
"
OVEN LIGHT CONTROL
!
The oven light is considered a special function. It is not selected among the cooking
functions.
The light can be turned off and on at any time, even with the oven off, using the
key (except when in programming and/or function change mode).
2
In any case, the light goes off automatically after 3 minutes of operation.
The oven light is also controlled by a microswitch on the door that detects when it is
opened or closed.
When the door is open,
appears on the clock display and the light comes on.
This also occurs with the oven OFF.
If the oven is in cooking mode, when the door is open it disables the Radial Fan and the
Circular Heating Element where required, thus preventing the steam produced form
directly touching the user and that there is a notable heat dispersion.
"
KEY FUNCTION (child safety)
The key function inhibits/freezes the functionality of the knobs and touch keys. This
prevents unintended changes to the cooking program and/or accidental startups (child
safety).
The key function can be enabled or disabled at any time by pressing the 5
keys together for at least 3 seconds.
and 6
When activated, the icon
starts to flash for 3 seconds and then remains on. At this
point the function is confirmed.
At each action after the function is activated, the
icon flashes for 3 seconds to
indicate the safety status. To continue, disable the key function.
The key function can also be enabled/disabled with the oven off.
26
"
FOOD WARMER FUNCTION
!
This function keeps the food warm at a recommended temperature of 80° C.
- it is selected directly with the dedicated 4 key
;
;
- to activate the function, press the 3 START key!
- you can change the temperature slightly within the range of 60°-90°C;
- the timer and automatic programming functions can be activated;
"
DEFROST FUNCTION
!
!
This function does not call for the use of the heating elements, only the internal radial
fan:
- it is selected using the left knob!in traditional cooking functions;
- position it on the function indicated by the icon ;
- press the left knob or it will be automatically confirmed after 7 seconds;
;
- to activate the function, press the 3 START key!
- the temperature cannot be changed and the display is off;
- the timer and automatic programming functions can be activated;
"
FOOD PROBE (IN APPLICABLE MODELS)
In the models where applicable, the food probe can be used.
This is a tool that communicates with the oven electronics and allows precise and
constant control of the cooking using a probe that detects the temperature inside the
food. Its purpose is to insure with precision that the food is completely cooked inside.
Connect the probe to the jack inside the oven and insert the probe horizontally and in the
centre of the food, avoiding touching bones and fat (see reference paragraph).
The following will occur:
- the icon will be activated
!;
- the time programming display (see figure) shows:
- the set temperature to the left (default 65° C);
- the real food temperature to the right, in other words the one measured
by the probe (for example 20° C);
27
The set temperature can be changed using the left knob within the range 65° C - 85° C.
Position it on the set value and confirm with the left knob. Change and confirm the value
with the left knob or the confirmation will be automatic after 7 seconds.
Once the real food temperature reaches the set temperature, the oven shuts off
automatically. An intermittent audible signal advises that cooking has completed.
With this function timed cooking programs
are not possible. But it is still
possible to set the timers
! "!
NOTE: always use the probe provided with the oven.
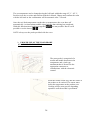
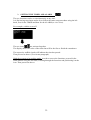
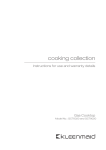
" PROPER USE OF THE FOOD PROBE
(IN APPLICABLE MODELS)
The meat probe is comprised of a
needle and handle that detects the
temperature and a jack type
attachment that is inserted in the
appropriate connector to
communicate with the electronic
control.
Insert the needle all the way into the centre of
the product to be cooked. The sensor must
detect the temperature at the product core.
Cooking will be more precise depending
upon how well the needle is positioned.
28
PLEASE NOTE: during cooking or at the end of cooking the cap is hot.
When inserting or removing the probe, use oven gloves or wait until the oven is cool.
WARNING: Meat probe is not applicable during recipes programs.
29
! TIME PROGRAMMING FUNCTIONS !
!
"
SETTING THE TIMER
The TIMER function is independent from the cooking functions and does not perform
oven programs.
The function
can be activated at any time using the left knob:
- oven OFF;
- oven ON, awaiting commands;
- oven ON, without influencing its operation;
For example, with the oven off, use the left knob to scroll and set it on the timer icon
.
Press the left knob to confirm the function (push knob left). The time display starts to
flash.
Use the left knob to set the desired value (max time that can be set is 12h).
Press the left knob to confirm or after 7 seconds it will be auto-confirmed (the
countdown begins).
Once the set time has passed, an intermittent audible signal will notify you.
Press any key to stop the signal and exit the TIMER function.
In any case, the audible signal will automatically stop after 3 min.
The oven then (after 1 minute) goes back into low consumption mode.
With the oven on or in cooking mode, in order to access the functions, proceed in the
same manner using the left knob, scrolling through the functions and positioning it at the
icon. Then proceed as above.
30
"
SETTING THE ALARM
The ALARM function (as for the TIMER function) is independent from the cooking
functions and does not perform oven programs.
The function
can be activated at any time using the left knob:
- oven OFF;
- oven ON, awaiting commands;
- oven ON, without influencing its operation;
For example, with the oven off, use the left knob to scroll and set to the timer icon
.
Press the left knob to confirm the function (push knob left). The time display starts to
flash.
Use the left knob to set the desired time (max time that can be set is 12h).
Press the left knob to confirm or after 7 seconds it will be auto-confirmed and the
amount of time remaining will be highlighted (the countdown begins).
Once the time has passed, an intermittent audible signal will notify the user. Press any
key to stop the signal and exit the ALARM function.
In any case, the audible signal will automatically stop after 3 min.
The oven then (after 1 min) goes back into low consumption mode.
With the oven on or in cooking mode, in order to access the functions, proceed in the
same manner using the left knob, scrolling through the functions and positioning it at the
icon.
31
"
SETTING THE TIMER AND ALARM
The two functions can be set simultaneously at any time.
It is like having two timers and to do so follow the same setup procedure using the left
knob' first for the TIMER and then for the ALARM (or vice versa).
For example, with the oven off:
The two icons
! !are activated together.
The display shows the value of the timer that will be the first to finish the countdown.
The respective audible signals will indicate the time has passed.
Then proceed as above (see relevant paragraph).
With the oven on or in cooking mode, in order to access the functions, proceed in the
same manner using the left knob, scrolling through the functions and positioning it at the
icon. Then proceed as above.
32
"
PROGRAMMING THE COOKING TIME
!
The cooking time programming functions are:
- cooking duration ;
- automatic cooking
duration !;
: combination between end cooking time
!and cooking
These functions can be activated:
- with the oven ON, awaiting commands;
- with the oven in cooking mode;
The timed programming functions require the oven to be turned on and they are
effective when the oven is in operation.
With the oven on, awaiting commands, enter timed programming mode using the 2
menu key
that allows you to position yourself on the relevant icon. The position is
highlighted by the icon flashing.
For programming methods, see the relevant paragraphs.
NOTE: if you wish to set the TIMER
! ! and AUTO time programming functions !
and
at the same time, the display priority on the time display will be:
- AUTO programming time;
- progressive cooking time;
- TIMER functions;
To display the TIMERS and/or the "hidden" progressive cooking time, position the left
knob on the relevant icon.
33
"
COOKING DURATION
!
It is a function that lets you block the cooking automatically after a certain amount of
time.
With the oven on awaiting commands, position the left knob on the icon that is !
flashing&!Confirm by pressing the left knob.!!
Set the desired cooking duration by turning the left knob (max time 12h).
Confirm by pressing the left knob or after 7 seconds it will be auto-confirmed.
The display highlights the switch from
to
.
Once the cooking function has been defined, in order to start the countdown, press the 3
START key!
.
This commences cooking for a defined and limited time.
When this time has passed and intermittent audio signal!will notify the user, the oven
will turn off and the display will be active and flashing.
The audible signal is disabled by hitting any key or automatically shuts off after 3 min.
The cooking duration can also be programmed with the oven in cooking mode. In this
case, it is not necessary to press the 3 START key!
34
to start the programming.
"
END COOKING TIME
The end cooking time can only be set after having activated the cooking duration
function . The combination of the two functions will perform an automatic cooking
program (see relevant paragraph).
The end cooking time is restricted to a maximum of 12h of postponement.
Position the left knob on the icon !()*(!+,!flashing& Press the left knob to confirm.
Set the hour by turning the left knob.
Confirm by pressing the left knob or after 7 seconds it will be auto-confirmed.
At this point the automatic cooking program is confirmed (see relevant paragraph).
"
AUTOMATIC COOKING
!
This is a delayed cooking method. It is used whenever you need to have dishes available
and ready at a specific time of day.
The two methods must be set simultaneously: cooking duration ! and end cooking
time !in that order&!!
!
!
!
Set the cooking duration
(see relevant paragraph).
When setting the end cooking time , the control determines and proposes the time to
enter calculated based on the current time and the desired cooking duration. For
example, set 45 minutes cooking duration. !
!
!!!!!!!!!!!!!!!!
!
35
If the end cooking time is not set with a time that is greater than the cooking duration,
the display will only propose the cooking duration program.
Set one hour cooking time that includes a time that is greater than the cooking duration
for automatic programming highlighted by the single icon
.
When finished, press the left knob or after 7 seconds it will be auto-confirmed.
For example, set a 6 hour delayed cooking and a cooking duration of 45 min.
At this point:
- the oven goes into low energy mode;
- functions display shows the selected cooking function;
- the time display shows the programming icon
! and the time remaining until
cooking starts;
- the
icon signals active programming;
When the automatic program starts, an audible signal will notify you that cooking has
started.
The oven turns on (the cooking mode icon
activates) and the time programming
works the same as the cooking duration function except that the oven startup was
postponed.
In fact, the cooking duration icon ! will appear instead of the end cooking one
!
and the ! display will show the desired cooking duration.
When this time has passed and intermittent audio signal!will notify the user, the oven
will turn off and the display will be active and flashing.
The audible signal is disabled by hitting any key or automatically shuts off after 3
minutes.
!
!
36
" CANCELLING/CHANGING TIME AND TIMER PROGR.
!
To cancel or reset the timed programming:
- AUTO :!
and
;
!!and!!!! !!;
- TIMER :
!
Select the icon using the left knob.
While the icon is flashing, press the 6 key for at least 3 sec
.
If the oven is off (only for timer functions), the display turns off.
If the oven is on in cooking mode
:
- from mode
it returns to manual mode. The
icon activates;
- the timer display and programmed cooking icon go off;
- the timer display switches and shows the progressive cooking time up to that moment
(in the example in the figure it is 10 min);!!!
For automatic cooking mode
(oven in low energy mode), to cancel the program
press the 1 ON/OFF key
twice. In this case the oven turns off.
37
! COOKING INSTRUCTIONS !
!
"
POSITION OF THE INTERNAL GRILLS FOR SPECIFIC COOKING
- Position n. 1 and 2 from bottom
Frozen cakes, Long roasts, Turkey, Cakes, Meat well done;
- Position n. 2 from bottom.
Cakes, Sandwich Load, Toast, Casserole, Wholemeal bread, Meat;
- Position n. 2 and 3 from bottom.
Biscuits, Fine cut meat;
- Position n. 3 from bottom.
For Browning with Grill.
This data regarding the cooking positions are indicative and can be interpreted on the
basis of your own experience.
It is recommended to insert foods into the oven when it has been pre-heated
38
"
USE OF THE GRILL
To optimise Grill cooking, switch on the grill oven and pre-heat for at least 10 minutes.
Introduce the dish inside the oven in the nearest position to the Grill, depending on the
type of food to cook. Always use the Grill with door closed and for a maximum time of
15 minutes.
With the grill it is possible to cook fish, vegetables, small spits and various types of
meat, with the exception of lean game meat. Finely cut meat and fish must always be
grilled very quickly greasing them slightly with oil using a suitable brush and always
placed on the grill. In turn, the grill must be placed nearest to the upper heating element,
proportionally to the thickness of the dish, to avoid burning it on the surface and not
cooking it enough inside. Only salt the meat after cooking or it will be less juicy. Never
prick food during cooking, not even to turn them. Their juice would run making the
grilled food dry.
Meat can be arranged in suitable containers or cooked directly on the grill. In the latter
case, always pour some water in the drip pan then insert it in the guides under the grill.
This prevents the grease in the dripping pan from burning and creating bad odours.
Attention:: during use of the Grill, the accessible parts can overheat. It is therefore
advisable to keep children at a safe distance.
Never use the oven to heat the premises or the room you are in.
TANGENTIAL FAN
This appliance is provided with a tangential fan for cooling the control panel and the
oven door handle. This fan starts working a few minutes after the start of cooking, when
the oven reaches a certain temperature (the time varies according to model) and also
avoids the overheating of the cabinet housing. The hot air expelled from below the
control panel will continue to escape also after the oven has been switched-off, until the
temperature falls to a normal level.
! AUTOMATIC COOKING RECIPES !
The oven has 32 preset recipes with timing sequences and temperature already set,
created by specialist chefs. The programmer allows you to customise the preset
recipes for your convenience. It is always possible to revert to the original factory
settings.
The programmer allows you to create 20 additional personalised recipes, based on
your own method of cooking.
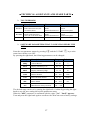
Some programs allow the partially or totally use of steam option, as follows:
- programs P04 and P32 use steam puff during traditional cooking
- from program P23 to P31 allow only steam cooking
39
To utilise personalised programs follow the instructions below.
WARNING: Meat probe is not applicable during recipes programs
"
AUTOMATIC RECIPES
A) Enter the recipes menu as follows:
1. Turn on the oven by key 1;
2. Turn the left knob slowly clockwise until the "P AUTO MAN" icon appears
flashing;
3. Press the left knob to confirm access;
4. Turn the left knob from MAN to AUTO P;
5. Press the left knob within 5 seconds and the P AUTO icon remains fixed.
In the central part of the display is alternatively the first recipe programmed in P01 and
the set time, at the top left of the display is the total time duration of the recipe, in the
upper right is the preheating temperature.
B)
1.
2.
3.
4.
5.
6.
How to select the programmed recipe you want.
Firstly repeat the 5 steps of “A” above;
push the left knob;
P01 starts flashing, it is the first recipe of the menu;
Turn the left knob until you reach the desired recipe (P01…; P32);
push the left knob to confirm;
start the cooking program by pressing the START button (button 3).
If you want to delay the cooking program, follow the instructions in the section below.
C)
1.
2.
3.
4.
5.
6.
How to select a recipe for delayed cooking.
Follow the first 5 steps of section "B" above;
turn the left knob until the icon "END TIME" flashes;
access to new program by pressing the left grip;
turn the knob to the left and set the end time of your choice;
Within 5 seconds press the left knob to confirm;
push the START button;
The oven will be in pause mode until the activation of the program shown in the viewing
area at the left top of the display.
In case of removal of power to the oven, the job is automatically cancelled.
D)
1.
2.
3.
Editing an additional personal recipe.
Repeat the 5 steps of section “A” above;
Push the left knob;
P01 starts flashing, it is the first recipe of the menu;
40
4.
5.
6.
7.
8.
9.
10.
11.
12.
13.
14.
15.
16.
17.
18.
19.
20.
E)
1.
2.
3.
Turn the left knob until you reach the desired recipe (P01…; P32);
Push the left knob to confirm;
Push the ENTER button (button 6) for 3 seconds;
The “Func PRE” writing appears blinking;
To turn slowly the right knob;
Select the function you want to use for preheating;
Push the right button to confirm;
Turn the right knob to select the preheating temperature;
Push the right button to confirm;
Turn the right knob to select the duration of the preheating;
Press the right knob to confirm;
“Func F” appears, identifying the cooking sequence following to the
preheating;
Follow the instructions from step 9 to step 14 to confirm the characteristics of
the cooking program;
the oven prompts you to set / change up to 5 cooking sequences (F1-F2-F3F4-F5);
To repeat the instructions from step 9 to step 14 for all cooking sequences
from change;
At the end of No. 5 sequences, the oven will display "DEF NO";
Press the right knob to confirm the changes made;
Restoring factory settings according to recipe.
If you want to return the factory settings, go over the instructions from step 6
through 17 of section “D” above. At the display of "DEF NO", rotate slightly
the right knob;
Shows "SURE DEF YES" flashing;
Press right knob to confirm the reset factory settings of the individual recipe;
F)
1.
2.
3.
Create a custom recipe without changing the factory settled recipes.
Follow the instructions in paragraph a) from step 1 to step 5;
Push the left button;
Turn the left knob until the end of all the factory recipes (the oven has a
maximum of 32 programmed recipes P1. P02 ... P32);
4. In the recipe following the programmed P32, appears U01;
5. Identifies the first recipe totally set by the user;
6. Creating a recipe as described in paragraph D) from 6 through 19;
7. The oven allows you to create and store No. 20 recipes (from U01 to U20);
To cancel the recipe, follow the instructions in section E)
41
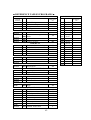
! REFERENCE TABLES PROGRAMS !
AUTOMATIC PROGRAMS RECIPES
NAME
SYSTEM
COOKING
STEAM PUFF
P01
P02
P03
P04
ELECTRIC
P05
ELECTRIC
ELECTRIC
ELECTRIC
ELECTRIC
ELECTRIC
ELECTRIC
ELECTRIC
ELECTRIC
ELECTRIC
ELECTRIC
STEAM PUFF
P06
P07
P08
P09
P10
P11
P12
P13
ELECTRIC
ELECTRIC
P17 Pepper dish
ELECTRIC
ELECTRIC
ELECTRIC
P18
P19
ELECTRIC
STEAM
P23 Eggs
ELECTRIC
STEAM
P24
P25
P26
P27
P28
P29
P30
P31
ELECTRIC
P32
STEAM
STEAM
STEAM
STEAM
STEAM
STEAM
STEAM
66
41
26
29
80
76
86
86
96
30
30
86
60
41
56
56
41
BREAD/PIZZAS
Frozen pizza
Liguria style focaccia bread
CAKES
Jam tart
Short-pastry biscuits
Plum cake
P20
P21
P22
ELECTRIC
NAME
DURATION
min
Baked Lasagne
Baked Frozen potatoes
Au gratin stuffed tomatoes
Aubergines sauteed
WHITE MEAT
Roasted chicken
Rabbit into the bag with
herbs
Roasted duck
Turkey in sauce
RED MEAT
Pork ossobuco in the bag
Roast beef
Underdone beef
Roast meat
Chicken
FISH
Whole baked sea bass
Salted sea bass
Salted sea bream
P14
P15
P16
ELECTRIC
USER PROGRAM
21
41
57
22
51
23
CONTOURS
Fresh carrots cut into rounds
Zucchini cut into rounds
Baked potato slices
Cauliflower
Brussels sprouts
Spinach cubes
Fresh spinach
Sea bass fillet
Chilled food restore
42
32
26
32
30
34
28
20
22
7
U01
U02
U03
U04
U05
U06
User 01
User 02
User 03
User 04
User 05
User 06
U07
U08
U09
U10
U11
U12
U13
U14
U15
U16
U17
U18
U19
U20
User 07
User 08
User 09
User 10
User 11
User 12
User 13
User 14
User 15
User 16
User 17
User 18
User 19
User 20
DURATION
min
43
! MAINTENANCE AND CLEANING !
Disconnect the electric power supply before performing any type of maintenance
on the product
Do not clean the device with steam cleaners.
Do not use rough, abrasive materials or sharp metal scrapers to clean the oven door, as
they can scratch or damage the surfaces and cause the glass to breakDo not use acid
products (like anti-scaling agents) as they can damage the enamelled parts.
Turn off the heating elements, wait for the internal parts of the oven to cool down before
touching or cleaning them. Pay greater attention to the cooking grills. Clean the oven
with care. Take all due care to avoid scalding yourself
when cleaning with a wet sponge or soft cloth if the surface is hot as it will produce
steam . Moreover, some detergents create noxious fumes on contact with the heat.
DO NOT WASH THE MEAT PROBE IN THE DISHWASHER.
The grills, jug and drip pan may be washed in the dishwasher.
For hygiene reasons, empty the jug after each use.
"
PERIODIC MAINTENANCE
Regularly check the state of the rubber gasket located around the oven opening. It
guarantees the correct functioning of the oven. If gasket damage is noted, contact the
nearest technical after-sales centre.
Cleaning the aeration slots on the oven: the air expulsion slots are located right under the
front control panel. Use a duster to keep them clean in order to insured optimal
operation of the oven cooling system.
44
"
CLEANING THE SURFACES
The enamelled or stainless steel parts must be treated with caution. Use water or specific
products, accurately drying with a soft cloth. Do not use abrasive products. In case of
tough deposits on enamelled parts, use a plastic sponge or similar, soaked in hot water
and vinegar. It can become very difficult to remove food residues or stains from oils,
sugars, fats, etc. if they are not immediately removed after use of the oven. It will make
removing them easier if the internal parts of the oven are cleaned while they are still
warm. Use a soft cloth to dry any liquid remaining on the bottom of the chamber after
cooking.
Due to an increasing presence of new products on the market it is not possible to
establish a list of items suitable for cleaning this device. Read the manufacturer
instructions carefully to verify the possible use of the detergent.
"
SANITISING
This is an oven cleaning function using a pre-defined steam function and a slightly preheated chamber.
The purpose is to make it easier to remove any food residues, grease, soil, etc. after
cooking.
It can be performed at any time when the oven is on in awaiting commands mode.
Put 0.5 L of water in the jug. If you also wish to disinfect the chamber, dissolve a
teaspoon of sodium bicarbonate in the water. Insert the jug in its location and close the
door.
With the oven on in awaiting commands mode, go to the flashing icon
knob and press the 3 START key
using the left
to start the cycle.
The corresponding icon
starts its animation.
The cycle is interrupted when there is no more water in the jug. An intermittent audible
signal indicates that the cycle has ended. The container + water icon
the water from the boiler (see relevant paragraph).
The sanitising function only works with the door closed.
flashes. Drain
NOTE: the cleaning cycle may last about 1 hour.
If the cycle is interrupted due to a power failure, the display will show Black-out as well
.
as
Complete the cycle by re-activating the function using the left knob.
45
"
DESCALING
This is an oven cleaning function that is a routine maintenance process for the steam
circuit and boiler to remove any limescale incrustations.
For that purpose, after every 200 hours of steam generator operation, the electronics
system gives the warning signal and lights up the
icon
.
This icon remains steady until the required cycle has been performed.
A descaling cycle can also be performed at any time, even before the electronic system
signals it.
Put 1 L of water in the jug. Dissolve 7-8 teaspoons of citric acid monohydrate in the jug.
Insert the jug in its location and close the door.
With the oven on in awaiting commands mode, go to the flashing icon
knob and press the 3 START key
using the left
to start the cycle.
starts its animation.
The corresponding icon
The cycle is interrupted when there is no more water in the jug.
An intermittent audible signal indicates that the cycle has ended.
flashes. Drain the water from the boiler (see relevant
The container + water icon
paragraph).
The descaling function only works with the door shut.
NOTE: the cleaning cycle may last about 2 hours.
If the cycle is interrupted due to a power failure, the display will show black-out as well
.
as
Complete the cycle by re-activating the function using the left knob.
At the end of the descaling cycle, it is recommended to
perform at least one SANITISING cycle to clean the
circuit of any citric acid residues.
46
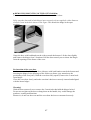
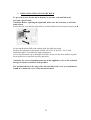
! REMOVING/MOUNTING OF THE OVEN DOOR !
To remove and insert the oven door, follow the instructions below.
Fully open the door and in both hinges insert a metal rod (not supplied) with a diameter
of about 3 mm in the hole shown in the figure. This blocks the hinge in the open
position.
Grasp the door with both hands on the sides towards the bottom. Lift the door slightly
and remove the hinges from 2 locations. Pull the door toward you to release the hinges
from the openings of the frame of the oven.
Re-insertion of the oven door
Act in reverse order, holding the door sideways with both hands towards the bottom and
inserting the hinges in the openings of the front oven frame, (pay attention to the
positioning of the foot joint). With the oven door fully opened, remove the 2 metal rods
from hinges.
Close the oven door slowly and make sure that it has been correctly inserted and aligned
with the lateral edges.
Warning!
With the door removed, never remove the 2 metal rods that hold the hinges locked.
Do not rest weights on the door or hang them on the handle, they could damage the
products, creating malfunctions
Moreover, do not use the oven until the oven door has been re-mounted correctly.
47
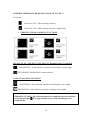
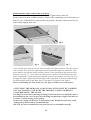
Removing inner glass (remove the oven door)
For more complete cleaning, the two inner panes of glass can be removed.
Remove the oven door as indicated above, unscrew the 4 mounting screws from the steel
plates C (fig. 5) that block the glass surfaces in position. The glass surfaces can now be
removed by slipping them out.
fig. 5
fig. 6
fig. 7
Carry out the same steps in reverse order to replace the glass surfaces. Take the utmost
care to ensure they are in the right order and are placed the right way round (the clear
glass must be towards the inside and the position of the lettering on the glass surfaces
must be as in (fig. 6). Also make sure the protective gaskets are positioned correctly.
Some models have a glass anchoring clip that must be repositioned correctly (fig.7) by
keeping the clip D against the painted strip on the upper part of the door and inserting
the intermediate glass E and inner glass F into place (as shown in the figure).
Before remounting the door, make sure the glass is firmly secured into place
ATTENTION! THE REMOVAL AND INSTALLATION MUST BE CARRIED
OUT ACCURATELY AND WITH THE HIGHEST CARE IN ORDER TO
AVOID BREAKING THE GLASS.
Warning! Do not remove the hinge locking hooks from their seat when the door is
not mounted in the oven. Do not close the hinges without the weight of the door as
it causes a violent closing of the springs.
Do not rest weights on the door or hang them on the handle, because they could
damage the product and create malfunctions
DO NOT use the oven until the oven door has been re-mounted correctly.
48
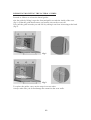
REMOVING/MOUNTING THE LATERAL GUIDES
Proceed as follows to release the lateral guides:
take the guide by lifting it up at the front and pull it towards the inside of the oven
(fig.1) so that the guide hook comes out from the slot on the oven wall.
Now pull the guide towards you and lift it by taking it out from its housing at the back
(fig.2).
fig. 1
fig. 2
To replace the guides, carry out the steps in reverse order.
Always make sure you do not damage the enamel on the oven walls.
49
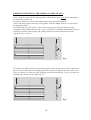
REMOVING/MOUNTING THE SLIDING GUIDES (IF ANY)
If any, there are right and left sliding guides, which means they are not interchangeable
on both sides of the oven.
Proceed as follows to remove the sliding element from the lateral guide:
release the lateral guide from the oven together with the sliding element, as reported in
the paragraph above.
Place the guide on a flat surface. Now exert some pressure from top down near the
couplings in the sliding element (fig. 1 step 1). When the couplings underneath come out
from the rod of the lateral guide, the sliding element has been released and can be
removed. (fig. 1 step 2).
fig. 1
To replace the sliding element, position the upper hooks on the special rods of the lateral
guide. Always make sure the sliding element is moving towards the outside of the oven
when it is taken out. Now press the sliding element downwards (fig. 2 step 1) so that it is
coupled onto the lower rods (fig2 step 2).
fig. 2
50
"
REPLACING THE OVEN LIGHT BULB
To prevent electric shocks and/or damage to persons, read and follow the
procedure given below:
Attention: Before replacing the light bulb, make sure the electricity is off at the
main switch.
Ensure that the oven and the light bulb are cold and then remove the protection cover A
Do not touch the hot bulb with a damp cloth, the bulb may break.
Replace the light bulb with another suitable one of 25 W for 220 - 230 V with
attachment type E14 suitable for high temperatures.
In case the protection cap is damaged or broken, do not use the oven until the cap has
been replaced or re-inserted correctly and safely.
Attention: for correct installation and use of this appliance, refer to the technical
data given on the serial label of the product.
The product label is on the edge of the internal side of the oven. A second label is
found on or inside the cover of the instruction book.
51
! INSTALLATION INSTRUCTIONS !
The installation and technical assistance must only be performed by qualified staff.
Carefully read the safety instructions in this manual before using the oven. Incorrect
installation, maintenance, assistance and use can cause serious damage/injury to persons
or objects
This product must be installed as instructed in this manual and in compliance with
National Standards and local regulations in force.
Do not lift or pull the oven from the door handle and do not force or load weights when
this is open.
The purchaser is responsible for installation. Assistance provided by the manufacturing
company due to an incorrect installation will not be included in the warranty.
"
TECHNICAL DATA
•
•
•
•
Water tank capacity (jug)
Oven volume
Voltage
Maximum power
"
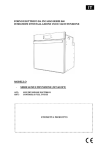
DIMENSIONS OF THE OVEN ONLY
1.1L
46L
220-240V 50/60 Hz
3000 W
52
"
DIMENSIONS OF THE OVEN WITH FOOD WARMER
"
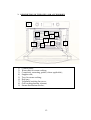
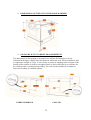
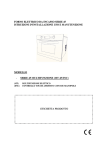
SINGLE BUILT-IN CABINET MEASUREMENTS
The dimensions of the opening to be made in the cabinet for fitting the oven are
indicated in the figures. Make sure the cabinet in which the oven will be installed is able
to support the weight of 30 kg. It is necessary to create an opening in the rear part of the
bottom of the cabinet or in the oven support shelf, to allow sufficient air to circulate for
the cooling of the oven during functioning. The oven can be installed in a column or
below the worktop of a kitchen cabinet.
UNDER WORKTOP
COLUMN
53
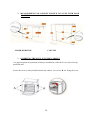
"
MEASUREMENTS OF CABINET FOR BUILT-IN OVEN WITH FOOD
WARMER
UNDER WORKTOP
"
COLUMN
INSERTING THE OVEN INTO THE CABINET
It is important that all operations relating to installation of the device are carried out by
qualified staff.
Ensure the oven is safely installed inside the cabinet. Use screws A, for fixing the oven.
54
"
FEATURES OF THE CABINET
The technical requirements of the enclosing cabinet are the following:
- The cabinet and its components must be able to withstand temperatures
of up to 90°C without presenting deformities and/or surface defects.
- the cabinet must enable the free passage of the oven connections;
- All household kitchen units must be protected with
fire-resistant material in accordance with the standards in force;
! ELECTRIC CONNECTION OF THE OVEN !
Ensure the electric current has been disconnected before connecting the oven to the
electric mains.
The oven requires single-phase alternate current 220-240 V~ 50/60 Hz, using flexible
cable. Ensure the household power supply can support the electric load of the device.
The electric safety of this appliance is only assured if the same is correctly connected to
a system having efficient earth connection, according to the legal Standards in force.
In case of permanent connection to the electric mains, apply a bipolar switch
dimensioned to the corresponding load, with opening for each contact of at least 3 mm
in accordance with the current local regulations.
In models where present, the flexible cable is supplied without plug. The plug to be used
must be suitable for the electric load of the product and must comply with the current
regulations.
The installer must ensure that the socket is suitable for the power absorbed by the oven
as indicated on the serial plate.
The connection socket must be easily accessible.
55
"
ASSEMBLY/REPLACEMENT OF THE POWER SUPPLY CABLE
The electric cable must be kept locked to the terminal box by the cable fix, so that it
cannot come out. Connect the line cable to terminal L , the neutral cable to terminal N
and the yellow/green cable to the earth terminal
. The yellow/green cable must be
longer than the other two by at least 20 mm.
Ensure the electric cable does not pass near or come into contact with the surfaces
reaching a temperature above 75°C.
Use only flexible cables:
cable type H05RR-FH 3 x 1.5mm2
Be sure to follow the following colour code when connecting the individual wires:
BLUE
BROWN
YELLOW-GREEN
"
-
NEUTRAL
PHASE
EARTH
EARTH CONNECTION
Installation, connection and earthing of the electric system must comply with the
European standard requisites and meet the provisions of the local Standards in force.
This household appliance requires an earthing connection for protection against
short-circuits or electric dispersions. It must, therefore, be connected to an
appropriate electric socket. The earth cable must not be interrupted by the switch.
ATTENTION:
DISCONNECT THE ELECTRIC POWER SUPPLY BEFORE PERFORMING
TECHNICAL ASSISTANCE OR MAINTENANCE ON THE PRODUCT.
In case of replacement of the electric cable, ensure the use of an electric cable certified
according to the Standards in force and suitable to the technical features of the product.
56
! TECHNICAL ASSISTANCE AND SPARE PARTS !
"
TOUCH ERRORS
Error
Description
Cause
What to do
Err Sc1
Probe detection error, the
oven shuts down
Probe
failure/disconnected
Check
connection/replace
Err Sb1
Boiler probe detection
error, the oven shuts down
Probe
failure/disconnected
Check
connection/replace
"
SOFTWARE PARAMETERS THAT CAN BE CHANGED BY THE
USER
and the 3 START
Enter the user parameter menus by pressing 2
same time with the oven OFF.
By pressing the right knob, the following parameters can be changed:
Message
Description
Range
keys at the
Default
bEEp
Volume Buzzer
01…03
3
dLou
Display luminosity Low
01…15
3
dHiG
Display luminosity High
15…30
30
tbEE
Buzzer duration
05…180
180s
Vent
Fan icon blade number
02…03
3 blades
dEF
Reset default
No - Yes
No
fact
Manufacturer menu password
-50… +50
The desired range can be set by turning the right knob. Confirm by pressing the right
knob to save the new setting and exit the parameters menu.
When the "dEF" parameter is confirmed with the value "Yes" "SurE" appears.
Turn and press the right knob again to confirm with "Yes" to reset to factory settings.
57
PARTS
Only authorised components can be used for the household appliance repairs. Do not
repair or replace any oven component not recommended by this manual for user
installation. All inspections, technical adjustments or repairs must be carried out by
authorised technical staff.
To request a spare part, provide the following data:
1) Model of oven (MOD.) and production number (N.L.), found on the product label
positioned on the lower front part of the oven and on the first page of the booklet.
2) Description and number of the spare part, technical information available only to the
authorised assistance service.
3) Last, indicate the details of the distributor that sold the oven and the details of your
nearest after-sales assistance centre.
"
TECHNICAL ASSISTANCE
In case your oven requires technical assistance and/or spare parts, contact the dealer or
the authorised technical assistance centre nearest to you.
In this case also it is necessary to state all the appliance data on the aluminium product
label, such as: model (MOD) lot number (N.L.), etc, label placed on the lower part of
the oven façade or on the first page of the instructions booklet.
58
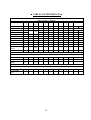
! TABLES OF REFERENCE !
ELECTRIC DATA FOR TYPE AND MODEL
Voltage 220-240 V ~ 50/60 Hz
MV
45
Total power
Top element
W
W
Grill element
Bottom element
Circular element
W
W
W
Oven light
Oven fan
Tangential fan
W
W
W
25
20
20
W
1200
W
22x2
Generator
steam
Micro-pump
3000
1500
900
1500
EXTERNAL DIMENSIONS
Width
cm
59,5
Height
cm
45,5
Depth
cm
54,3
INTERNAL DIMENSIONS
Internal volume
Grill cooking
area
litres
46
cm"
726
59
Notes:
60
Warranty and Service
Domestic Warranty – Full three year warranty
In addition to all statutory rights which you, the Purchaser, have under relevant laws in respect of
this appliance, during the first three years of ownership as the original purchaser of this Kleenmaid
appliance, Compass Capital Services trading as Kleenmaid guarantee that any fault caused by
defective material or workmanship becoming apparent will be rectified free of charge with reference
to parts and labour, provided that all service is performed during normal working hours by Kleenmaid
or their designated Agents. Where the appliance is installed outside the normal servicing area of the
above, the Purchaser must pay for the cost of transporting the appliance to and from the Agent or the
Agent’s travel cost to and from the purchaser’s home.
Commercial Warranty – One year warranty
When this appliance is installed in a commercial application, in addition to all statutory rights which
you, the Purchaser, have under relevant laws in respect of this appliance, during the first one year of
ownership as the original purchaser of this Kleenmaid appliance, Compass Capital Services trading as
Kleenmaid guarantee that any fault caused by defective material or workmanship becoming apparent
will be rectified free of charge with reference to parts and labour, provided that all service is performed
during normal working hours by Kleenmaid or their designated Agents. Where the appliance is installed
outside the normal servicing area of the above, the Purchaser must pay for the cost of transporting the
appliance to and from the Agent or the Agent’s travel cost to and from the purchaser’s home.
What these warranties do not cover
Compass Capital Services trading as Kleenmaid is not responsible for any damage or malfunction
unless caused by a defect in material or workmanship. This includes but is not limited to abuse,
misuse, improper installation and transportation damage. Compass Capital Services trading as
Kleenmaid is not responsible for consequential damages from any malfunction.
This warranty does not cover wear or breakage of consumable items such as door seals , replacement
of light globes or glass breakage due to impact. In case of fractured glass do not use your appliance.
Purchaser’s responsibility
The Purchaser must make the appliance available for servicing and shall bear any costs incurred
for any de-installation and/or re-installation required to make the appliance available for servicing.
Compass Capital Services trading as Kleenmaid is not liable for any consequential damage incurred
during de-installation or re-installation.
Warranty registration and Proof of Purchase.
Please complete warranty details below and retain together with your proof of purchase document.
When requesting service under this warranty the Purchaser agrees that Proof of Purchase of their
Kleenmaid appliance will be necessary in order to make the warranty valid. Inability to provide Proof
of Purchase even though this warranty is in place will not bind Compass Capital Services trading as
Kleenmaid to repair the appliance at no charge under this warranty and will require the Purchaser to
pay for the service costs in full.
Model Number
For service assistance visit
www.kleenmaidhelp.com.au
Date of purchase
Other products available in the
Kleenmaid range of appliances
|
Washing machines
|
Clothes dryers
|
Dishwashers
|
Ovens
|
Cooktops
|
Steam ovens
|
Microwave ovens
|
Built in espresso
coffee machines
|
Rangehoods
|
Freestanding ovens
Compass Capital Services Pty Limited
trading as Kleenmaid
ABN 96138214525
Level 2, 204 Botany Road
Alexandria NSW 2015
E: [email protected]
www.kleenmaid-appliances.com.au