1
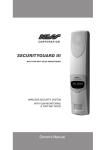
NESS SECURITY PRODUCTS
MEDI - ALARM
INSTALLATION MANUAL
D.Barker
18/5/01
Doc ID. 100-106 PROGRAM MANUAL.DOC
1
TABLE OF CONTENTS
Introduction
Packaging
Installation
Wiring. Inputs \ Outputs.
Program Summary
Program Mode
Program Options.
Peripheral Devices
Radio PIR
Radio Reed Switch
Dialler
Alarm reporting
Specifications.
Doc ID. 100-106 PROGRAM MANUAL.DOC
2
1. Introduction
Ness Security Products have developed the Ness Medi-Alarm which provides the sick or
elderly, Mum, Dad, friend or patient a simple and instant means of summoning assistance
when needed.
And nothing could be easier to use than the feature packed Medi Alarm. It’s like having a full
time carer that never sleeps.
Simply by pressing a radio pendant that can be worn around the neck, as a wrist watch or on a
key ring, assistance can be summoned within seconds. These seconds could make all the
difference.
If the transmitter is activated a radio signal is sent to the main unit. The Medi Alarm will then
dial one or two pre-programmed telephone numbers and send an alarm message to central
monitoring station indicating that ‘HELP’ is required.
The Ness Medi Alarm is easy to install and very simple to use. It is designed to comply with
the Australian Standard AS2999 for such devices.
2. Packaging
The Ness Medi Alarm comes complete with the following items.
1 x Medi Alarm Main unit
1 x Plug Pack for Mains connection
1 x 9 volt Lithium long life battery
1 x Showerproof transmitter pendant with battery
1 x Connection lead for T200 Series telephone
1 x Owners Manual
Optional Mode 5 Adaptor lead
Doc ID. 100-106 PROGRAM MANUAL.DOC
3
3. Installation
The Ness Medi is extremely easy to install and requires no tools. The normal location for the
Medi Alarm is at the first telephone installed in the premises. This ensures that the Medi Alarm
has priority if it needs to send a message to the central monitoring station. The local telephone
sits on top of the Medi Alarm unit to make it as unobtrusive as possible.
Another important aspect of the installation is the location of the Medi Alarm unit to give
optimum radio coverage. To give the best all round coverage it is best to have the Medi Alarm
installed centrally in the premises. This may not always be possible due to the location of the
telephone and mains power but it must still be a consideration. Once a suitable location is
found the install can take place.
INSTALLATION EXAMPLE
This example is based on the common Telstra T200 series telephone.
1) Select the best location, taking into consideration the customers requirements and the above
criteria.
2) Connect the plug pack and 9 volt Lithium battery and enter program mode if necessary by
pressing the ‘CANCEL’ within five seconds of powering up the system. (See programming
guide)
3) Program in any additional pendants and \ or detection devices and other program
parameters as required.
4) After which conduct a signal strength check on all devices to ensure correct radio
operation.
5) Unplug the modular telephone plug on the T200 phone (marked as ‘LINE’) and plug it into
the modular telephone socket marked ‘Line In’ on the Medi Alarm.
6) Using the supplied jumper lead with a modular telephone plug on each end. Plug one end
into the socket on the Medi Alarm marked ‘Line Out’ and the other end into the T200 phone
marked ‘LINE’.
7) Lift the handset on the telephone to check that dial tone is present. This completes the
telephone wiring process.
8) If the Medi Alarm is in program mode and no further programming is required press the
‘CANCEL’ button until ‘E’ is on the display then press the ‘HELP’ button to leave program
mode.
NOTE: It may be worth while to pre-program the system prior to arriving at the customers
premises to ensure a smooth install takes place.
Doc ID. 100-106 PROGRAM MANUAL.DOC
4
4. FRONT PANEL INDICATORS
MAINS
CANCEL
HELP
Colour code (AS2999)
RED
help
YELLOW
fault
GREEN
cancel
WHITE
reassurance
BATTERY
FAULT
RED HELP LIGHT & BUTTON.
GREEN CANCEL LIGHT & BUTTON.
Yellow 7 segment display used for PROGRAM mode and FAULT indication.
Green MAINS FAIL steady = normal, flashing = mains fail
Yellow LOW BATTERY off = normal, flashing = low battery
FAULT off = normal, flashing = fault
5. PERSONAL RADIO TRANSMITTERS
5.1 WRIST WATCH
The wrist watch is water proof. The wrist watch model is
attached to the wearer’s wrist by a strap. It may be worn
either left or right handed. It has 1 HELP button on the face.
Doc ID. 100-106 PROGRAM MANUAL.DOC
5
6. PROGRAM SUMMARY
Display
Option
Default
1
Transmitter 1 Program
P
2
Transmitter 2 Program
-
3
Transmitter 3 Program
-
4
Transmitter 4 Program
-
5
Transmitter 5 Program
-
6
Transmitter 6 Program
-
7
Transmitter 7 Program
-
8
Transmitter 8 Program
-
C
System Check
-
d
Dial Type (Aus / NZ)
0
N
Primary Phone Number
-
n
Secondary Phone Number
-
A
Client Account Number
-
o
Over Due Timer Enable
0
i
Inactivity Timer
0
t
Test Call Timing
24
F
Time to First Test Call
12
r
Restores Enabled
r
b
Button Operation
A
q
Quiet Operation
0
p
Programming Via modem
1
E
Exit Program Mode
Doc ID. 100-106 PROGRAM MANUAL.DOC
6
6.1 PROGRAM MODE
To enter PROGRAM mode, turn the Medi Alarm off by unplugging the mains plug and removing the 9 volt
battery.
Turn the Medi Alarm on by replacing the 9 volt battery. The Medi Alarm will display the version number for
0.5 seconds, followed by ‘1’, indicating that PENDANT 1 may be programmed.
Within 5 seconds of connecting the battery press the ‘CANCEL’ button on the Medi-Alarm to enter program
mode. The speaker will beep and the display will show ‘2’ on the display.
or
If a pendant is to be programmed as pendant 1, press any button 3 times on an unprogrammed pendant to
program. (The pendant must not have been previously programmed). The speaker will beep with each button
press and beep twice on the third button press and the status display will show ‘P’. Press the ‘CANCEL’ button
and the display will show ‘2’.
or
If the ‘HELP’ button on the Medi Alarm is pressed the speaker will beep once and the display will show the
status of Transmitter 1 (generally a pendant) where ‘-’ = unprogrammed and P = Programmed.
or
If no buttons are pressed within 5 seconds and Medi Alarm is programmed, the Medi Alarm will return to
operation mode.
6.2 PROGRAMMING RULES
Program options are displayed steady, the values for each option flash.
Press the ‘CANCEL’ button on the Medi-Alarm to step through the options.(1,2,3,4,5 etc.)
Press the ‘HELP’ button to view the programmed value for that option. The values will be displayed
flashing.
To step through values press the ‘HELP’ button.
To store a program change press the ‘HELP’ and ‘CANCEL’ buttons simultaneously on the Medi Alarm
unit.
Press the ‘CANCEL’ button to step to the next option.
CANCEL
MAINS
HELP
Colour code (AS2999)
RED
help
YELLOW
fault
GREEN
cancel
BATTERY
FAULT
Doc ID. 100-106 PROGRAM MANUAL.DOC
7
6.3 PROGRAMMING OPTIONS
Option Description
1
TRANSMITTER 1 PROGRAM
1) 1 is on the display
2) Press the ‘HELP’ button to view programmed option.
P
E
unprogrammed
programmed pendant
erase
no device has been programmed for transmitter 1
a device is programmed for transmitter 1
remove previously programmed device
To program a new pendant.
• Display must show ‘-’ (unprogrammed)
• Press any button on a new unprogrammed pendant 3 times
Medi Alarm will Beep with each press and twice on the third press to acknowledge when the
key is programmed. The display will show ‘P’ to indicate that the pendant is
programmed.
To program a new detector.
• Display must display ‘-’ (unprogrammed)
• Trigger detector (3 transmissions must be detected)
Medi Alarm will Beep with each transmission of the detector and twice on the third
transmission to acknowledge when the detector is programmed. The display will show
‘P’ to indicate that the detector is programmed.
Erasing Pendants or Detectors
Go to the Transmitter option you wish to erase (1 to 8)
To erase a user pendant or detector, press ‘HELP’ to select E (ERASE). (not available if
unprogrammed)
• Press the ‘SIDE LEVER’ button or press the ‘HELP’ and ‘CANCEL’ buttons simultaneously to
erase. Display will show ‘-’indicating erased.
•
Press the ‘Cancel’ button to move to the next program option.
2
3
4
5
6
7
8
TRANSMITTER 2 PROGRAM
TRANSMITTER 3 PROGRAM
TRANSMITTER 4 PROGRAM
TRANSMITTER 5 PROGRAM
TRANSMITTER 6 PROGRAM
TRANSMITTER 7 PROGRAM
TRANSMITTER 8 PROGRAM
All pendants and detectors are programmed in
the same manner as Transmitter 1.
Press the ‘Cancel’ button to move to the next program option.
C
SYSTEM CHECK: Check radio signal strength of pendants and detectors.
Displays the first pendant or detector’s signal strength, 1 being minimum and 9 being maximum.
Only one pendant or detector can be tested at a time. The signal level is displayed and also beeped to
indicate the level.
Doc ID. 100-106 PROGRAM MANUAL.DOC
8
To test the signal strength of a Pendant.
1) C is on the display
2) Press the ‘Help’ button for the Medi-Alarm to accept a signal (‘-’ is displayed)
3) Press the ‘SIDE LEVER’ to check signal strength of transmitter.
‘-’
1-9
No pendant received
Signal strength of pendant
Press the ‘Help’ button for the Medi-Alarm to accept another signal (‘-’ is displayed)
To test the signal strength of a Radio PIR or Reed Switch.
1) C is on the display
2) Press the ‘Help’ button for the Medi-Alarm to accept a signal (‘-’ is displayed)
3) Activate the detector in normal operation location.
Display will show the signal strength of the detector triggered.
‘-’
1-9
No pendant received
Signal strength of pendant
Press the ‘Help’ button for the Medi-Alarm to accept another signal (‘-’ is displayed)
Press the ‘Cancel’ button to move to the next program option.
d
DIAL TYPE: Determines the dialling type, Australian or NZ. Default 0 (Australia)
‘d’ is on the display
Press the ‘HELP’ button to view the programmed value
Programmed dial type will be flashed on status display. (0 or 1)
Press the ‘HELP’ button to step through the values. (0 or 1)
Press the ‘SIDE LEVER’ button or press the ‘HELP’ and ‘CANCEL’ buttons simultaneously to
program the value.
0 Australia
1 New Zealand
Press the ‘Cancel’ button to move to the next program option.
Doc ID. 100-106 PROGRAM MANUAL.DOC
9
N
PRIMARY PHONE NUMBER default The primary telephone number is the first number that the dialler calls when an event message needs
to be sent.
1) ‘N’ is on the display
2) Press the ‘HELP’ button to view programmed phone number.
The programmed phone number will be flashed on status display. ‘N’ will flash after the phone
number is flashed out on the display.
If you wish to view the phone number again press the ‘HELP’ button then the ‘CANCEL’ button to
display the phone number.
3) To program a phone number, press the ‘HELP’ button to step through the
digits.(1,2,3,4,5,6,7,8,9,0,t,H and -)
4) Press the ‘SIDE LEVER’ button to store each digit.
The display will show the next digit to be programmed.
5) Press the ‘HELP’ button until the next digit is on the display.
6) Press the ‘SIDE LEVEL’ button or press the ‘HELP’ and ‘CANCEL’ buttons simultaneously to
store each digit.
Continue this method until all the numbers are programmed.
7) Press the ‘CANCEL’ button to display the programmed number. ‘N’ will flash on the display after
the number is displayed.
Up to 14 digits may be programmed.
Pause
0-9
Digits 0-9
t
Star
H
Hash
8) Press the ‘CANCEL’ button. (‘N’ will be displayed steady)
eg. To program the number 762308 follow these steps.
1) Press the ‘HELP’ button then the ‘CANCEL’ button to view the current phone number after which
‘N’ will flash.
2) Press the ‘HELP’ button until 7 is displayed, press the ‘SIDE LEVER’ button or press the ‘HELP’
and ‘CANCEL’ buttons simultaneously to store the number. The next digit will flash.
3) Press the ‘HELP’ button until 6 is displayed, press the ‘SIDE LEVER’ button or press the ‘HELP’
and ‘CANCEL’ buttons simultaneously to store the number. The next digit will flash.
4) Press the ‘HELP’ button until 2 is displayed, press the ‘SIDE LEVER’ button or press the ‘HELP’
and ‘CANCEL’ buttons simultaneously to store the number. The next digit will flash.
5) Press the ‘HELP’ button until 3 is displayed, press the ‘SIDE LEVER’ button or press the ‘HELP’
and ‘CANCEL’ buttons simultaneously to store the number. The next digit will flash.
6) Press the ‘HELP’ button until 0 is displayed, press the ‘SIDE LEVER’ button or press the ‘HELP’
and ‘CANCEL’ buttons simultaneously to store the number. The next digit will flash.
7) Press the ‘HELP’ button until 8 is displayed, press the ‘SIDE LEVER’ button or press the ‘HELP’
and ‘CANCEL’ buttons simultaneously to store the number. The next digit will flash.
8) Press the ‘CANCEL’ button to view the programmed number after which ‘N’ will flash.
9) Press the ‘CANCEL’ button. (‘N’ will be displayed steady)
Press the ‘Cancel’ button to move to the next program option.
n
SECONDARY PHONE NUMBER default The secondary telephone number is the second number that is called when an event message needs to
be sent. The secondary number is used if the primary number is unsuccessful.
1) ‘n’ is on the display
Doc ID. 100-106 PROGRAM MANUAL.DOC
10
2) Press the ‘HELP’ button to view programmed phone number.
Programmed phone number will be flashed on the display. ‘n’ will flash after the phone number is
flashed out on the display.
If you wish to view the phone number again press the ‘HELP’ button then the ‘CANCEL’ button to
display the phone number.
3) To program a phone number, press the ‘HELP’ button to step through the
digits.(1,2,3,4,5,6,7,8,9,0,t,H and -)
4) Press the ‘SIDE LEVER’ button or press the ‘HELP’ and ‘CANCEL’ buttons simultaneously to
store each digit.
The display will show the next digit to be programmed.
5) Press the ‘HELP’ button until the next digit is on the display.
6) Press the ‘SIDE LEVEL’ button or press the ‘HELP’ and ‘CANCEL’ buttons simultaneously to
store each digit.
Continue this method until all the numbers are programmed.
7) Press the ‘CANCEL’ button to display the programmed number. ‘n’ will be flash after the number
is displayed.
Up to 14 digits may be programmed.
Pause
0-9
Digits 0-9
t
Star
H
Hash
8) Press the ‘CANCEL’ button. (‘n’ will be displayed steady)
Note: See example of telephone number 1 for more details.
Press the ‘Cancel’ button to move to the next program option.
A
CLIENT ACCOUNT NUMBER
The client account number identifies to the central station which Medi-Alarm is sending the alarm
message. (Default 0000)
1) ‘A’ is steady on the display.
2) Press the ‘HELP’ button to view the programmed client account number. The programmed client
account number will be flashed on display. 0...9 after which the display will flash ‘A’.
3) Press the ‘HELP’ button until the first digit of the client account number is displayed.
4) Press the ‘SIDE LEVER’ button or press the ‘HELP’ and ‘CANCEL’ buttons simultaneously to
store each digit. The display will show the next digit to be programmed.
5) Press the ‘HELP’ button until the second digit of the client account number is displayed.
6) Press the ‘SIDE LEVER’ button or press the ‘HELP’ and ‘CANCEL’ buttons simultaneously to
store each digit. The display will show the next digit to be programmed
7) Continue this method until all 4 digits are programmed.
8) After the forth digit is stored the display will show the programmed client account number after
which the display will flash ‘A’. If you wish to view the programmed number again press the
‘HELP’ button then the ‘CANCEL’ button to display the number.
9) Press the ‘CANCEL’ button to display ‘A’ steady.
Note: All four digits must be programmed.
Press the ‘Cancel’ button to move to the next program option.
Doc ID. 100-106 PROGRAM MANUAL.DOC
11
o
ENABLE OVER DUE TIMER:
The Over Due Timer is the time period between ‘CANCEL’ button presses to restart the over due
timer. The over due timer is for local indication purposes only. (no alarm report is sent) 0-255
hours. default = 0, disabled. 1,2 or 3 digits may be programmed with a maximum of 255 hours. If
a number greater than 255 is programmed, Medi Alarm will sound a long beep and re display the
original value.
1) ‘o’ is steady on the display.
2) Press the ‘HELP’ button and the programmed time will be flashed out in hours. The display will
flash ‘o’.
3) Press the ‘HELP’ button until the first digit is on the display. (0 to 9)
4) Press the ‘SIDE LEVER’ button or press the ‘HELP’ and ‘CANCEL’ buttons simultaneously to
store each digit. (_ will flash)
5) Press the ‘HELP’ button until the second digit is on the display. (0 to 9)
6) Press the ‘SIDE LEVER’ button or press the ‘HELP’ and ‘CANCEL’ buttons simultaneously to
store each digit. (_ will flash)
7) Press the ‘HELP’ button until the third digit is on the display. (0 to 9)
8) Press the ‘SIDE LEVER’ button or press the ‘HELP’ and ‘CANCEL’ buttons simultaneously to
store each digit. (_ will flash)
9) Press the ‘CANCEL’ to view the programmed time. (‘o’ will then flash on the display)
To view the programmed time again press the ‘HELP’ button then the ‘CANCEL’ button and the
stored value will flash on the display after which ‘o’ will flash.
10) Press the ‘CANCEL’ button to display ‘o’ steady.
Press the ‘Cancel’ button to move to the next program option.
i
INACTIVITY TIME.
The inactivity timer alarm is triggered if the ‘CANCEL’ button or detector is not triggered in this
time. 1-255 hours, default 0. 1,2 or 3 digits may be programmed with a maximum of 255 hours.
If a number greater than 255 is programmed, Medi Alarm will sound a long beep and re display
the original value.
1) ‘I’ is on the display.
2) Press the ‘HELP’ button and the programmed time will be flashed out in hours. The display will
flash ‘i’.
3) Press the ‘HELP’ button until the first digit is on the display. (0 to 9)
4) Press the ‘SIDE LEVER’ button or press the ‘HELP’ and ‘CANCEL’ buttons simultaneously to
store each digit. (_ will flash)
5) Press the ‘HELP’ button until the second digit is on the display. (0 to 9)
6) Press the ‘SIDE LEVER’ button or press the ‘HELP’ and ‘CANCEL’ buttons simultaneously to
store each digit. (_ will flash)
7) Press the ‘HELP’ button until the third digit is on the display. (0 to 9)
8) Press the ‘SIDE LEVER’ button or press the ‘HELP’ and ‘CANCEL’ buttons simultaneously to
store each digit. (_ will flash)
9) Press the ‘CANCEL’ to view the programmed time. (‘i’ will then flash on the display)
To view the programmed time again press the ‘HELP’ button then the ‘CANCEL’ button and the
stored value will flash on the display after which ‘i’ will flash.
10) Press the ‘CANCEL’ button to display ‘i’ steady.
Press the ‘Cancel’ button to move to the next program option.
Doc ID. 100-106 PROGRAM MANUAL.DOC
12
t
TEST CALL TIME.
This option controls to time between the automatic test calls the Medi-Alarm will make. 1,2 or 3
digits may be programmed with a maximum of 255 hours. If a number greater than 255 is
programmed, Medi Alarm will sound a long beep and re display the original value. 0 - 255 hours,
default = 24 hours. 0 = Disabled.
1) ‘t’ is on the display.
2) Press the ‘HELP’ button and the programmed time will be flashed out in hours. The display will
flash ‘t’.
3) Press the ‘HELP’ button until the first digit is on the display. (0 to 9)
4) Press the ‘SIDE LEVER’ button or press the ‘HELP’ and ‘CANCEL’ buttons simultaneously to
store each digit. (_ will flash)
5) Press the ‘HELP’ button until the second digit is on the display. (0 to 9)
6) Press the ‘SIDE LEVER’ button or press the ‘HELP’ and ‘CANCEL’ buttons simultaneously to
store each digit. (_ will flash)
7) Press the ‘HELP’ button until the third digit is on the display. (0 to 9)
8) Press the ‘SIDE LEVER’ button or press the ‘HELP’ and ‘CANCEL’ buttons simultaneously to
store each digit. (_ will flash)
9) Press the ‘CANCEL’ to view the programmed time. (‘t’ will flash on the display)
To view the programmed time again press the ‘HELP’ button then the ‘CANCEL’ button and the
stored value will flash on the display after which ‘t’ will flash.
10) Press the ‘CANCEL’ button to display ‘t’ steady.
Press the ‘Cancel’ button to move to the next program option.
F
TIME TO FIRST TEST CALL.
The time till first call should be programmed so that the first test call will be made during a low
activity period of the monitoring station. eg. midnight. 1,2 or 3 digits may be programmed with a
maximum of 255 hours. If a number greater than 255 is programmed, Medi Alarm will sound a
long beep and re display the original value.
1) ‘F’ is on the display.
2) Press the ‘HELP’ button and the programmed time will be flashed out in hours. The display will
flash ‘F’.
3) Press the ‘HELP’ button until the first digit is on the display. (0 to 9)
4) Press the ‘SIDE LEVER’ button or press the ‘HELP’ and ‘CANCEL’ buttons simultaneously to
store each digit. (_ will flash)
5) Press the ‘HELP’ button until the second digit is on the display. (0 to 9)
6) Press the ‘SIDE LEVER’ button or press the ‘HELP’ and ‘CANCEL’ buttons simultaneously to
store each digit. (_ will flash)
7) Press the ‘HELP’ button until the third digit is on the display. (0 to 9)
8) Press the ‘SIDE LEVER’ button or press the ‘HELP’ and ‘CANCEL’ buttons simultaneously to
store each digit. (_ will flash)
9) Press the ‘CANCEL’ to view the programmed time. (‘F’ will flash on the display)
To view the programmed time again press the ‘HELP’ button then the ‘CANCEL’ button and the
stored value will flash on the display after which ‘F’ will flash.
10) Press the ‘CANCEL’ button to display ‘F’ steady.
Press the ‘Cancel’ button to move to the next program option.
Doc ID. 100-106 PROGRAM MANUAL.DOC
13
r
RESTORES ENABLED.
This option selects whether restore reports are sent to the central station if the alarm restores or the
‘CANCEL’ button is pressed. default = r
1) ‘r’ is on the display steady.
2) Press the ‘HELP’ button to view the programmed value (r = restore reports, - = no restores)
3) Press the ‘HELP’ button to select a value.
4) Press the ‘SIDE LEVER’ button or press the ‘HELP’ and ‘CANCEL’ buttons simultaneously to
store the selected value.
- No restores sent by dialler.
r Restores enabled
Press the ‘Cancel’ button to move to the next program option.
b
BUTTON OPERATION.
This option determines the manner in which the radio pendant buttons operate the system. (default H)
1) ‘b’ is on the display steady.
2) Press the ‘HELP’ button to view the programmed value (H = Help, C = Cancel, c = call)
3) Press the ‘HELP’ button to select a value.
4) Press the ‘SIDE LEVER’ button or press the ‘HELP’ and ‘CANCEL’ buttons simultaneously to
store the selected value.
H
C
c
All buttons generate a ‘HELP’ alarm.
Additional buttons generate a ‘CANCEL’ to restore ‘HELP’ alarms. (bottom button)
Buttons generate ‘CALL’, ‘HELP’ and ‘CANCEL’. Diagram below describes the button
operation for this option.
CALL
HELP
SIDE LEVER
CANCEL
Press the ‘Cancel’ button to move to the next program option.
q
QUIET OPERATION: Determines if the internal beeper operates during alarm operation.
Default = 0
‘q’ is on the display
Press the ‘HELP’ button to view the programmed value
Programmed dial type will be flashed on status display. (0 or 1)
Press the ‘HELP’ button to step through the values. (0 or 1)
Press the ‘SIDE LEVER’ button or press the ‘HELP’ and ‘CANCEL’ buttons simultaneously to
program the value.
0 Beeps activated
1 Quiet operation
Doc ID. 100-106 PROGRAM MANUAL.DOC
14
Press the ‘Cancel’ button to move to the next program option.
p
PROGRAMMING VIA MODEM.
The Medi-Alarm may be remotely programmed via a telephone modem link. Remote programming is
enabled in program mode or may be enabled in normal operation mode by setting the program
option. (default = 0 enabled in program mode only) NOTE: Answer type is ‘Fax Defeat’
regardless of option.
1) ‘P’ is on the display steady.
2) Press the ‘HELP’ button to view the programmed value (0 = Program mode, 1 = always enabled)
3) Press the ‘HELP’ button to select a value.
4) Press the ‘SIDE LEVER’ button or press the ‘HELP’ and ‘CANCEL’ buttons simultaneously to
store the selected value.
0
1
Enabled only in program mode.
Enabled all the time.
Press the ‘Cancel’ button to move to the next program option.
E
Exit Program Mode
Press ‘HELP’ to exit program mode or press the ‘CANCEL’ button to go to option 1.
Peripheral Devices.
Radio PIR
The radio PIR is based on the Ness Quantum \ Ten+ design. It uses a 9 volt lithium battery as its power source,
with it’s 4 minute sleep time, the battery life should be slightly longer. The PIR uses the Heimann Pyro Electric
sensor for reliable stability. The PIR has very strong terminals mounted directly to the circuit board.
Link settings:
Radio Enable link.
Having the link ‘ON’ will allow the radio transmitter to operate. Taking the link ‘OFF’ will disable the
transmitter ( could be handy when programming multiple detectors into the main unit). The LED will indicate
detection with the link ‘ON’ or ‘OFF’. Always remember to have the link on so it can communicate with the
Medi Alarm.
Test link.
In Test mode the three minute sleep time is disabled. Test mode is used to check PIR detection coverage. The
LED will come on every time the PIR is triggered.
Normal link.
This link setting is the standard setting for normal operation. This setting gives the PIR maximum battery life
as it activates the four minute sleep time.
Program link.
Program mode should only be needed if a new 16 bit code (random or fixed) needs to be entered.
1\0\R Pins.
Doc ID. 100-106 PROGRAM MANUAL.DOC
15
These pins are used to either program a fixed code (multiple devices with the same code) or to generate a
random code.
Range link.
The range link is a means of setting the level of Infra-red energy required to generate a pulse from the detector,
this in turn directly affects the range of the detector. The correct setting will depend on the size of the area to
cover.
- With the range link ‘ON’ the detector will detect to the full 12m x 12m.
- With the range link removed the detector will detect to approximately 8m x 8m.
The range link should always be set to the lowest setting which will still provide good coverage.
Pulse Count link.
At times it may be unavoidable to install the detector in a difficult environment. Pulse count is a means of
adjusting the number of pulses received (therefore the number of steps) before an alarm is generated.
- In a normal stable environment the link should be ‘ON’. 1 to 2 pulses will cause an alarm.
- In doubtful environments remove the link. 3 to 4 pulses will cause an alarm.
6.3.1 Radio Reed Switch
The Ness radio reed switch is a multipurpose radio device. It has an internal reed switch and has the provision
for an external reed switch. It can also function as a radio vibration analyser if a Nessensor (VIB100) is
connected to the external device input.
A 9 volt lithium battery powers the reed switch and should last approximately 3 years (@25 activation’s per
day).
Terminals and Link Settings:
Two way terminal block (TB1)
The terminal block is used to connect a normally closed reed switch or a Nessensor (VIB100). The cable
length to the external switch should be kept to a minimum and no longer than 40 cm.
I\B\E Pins:
Link in ‘I-B’ position.
Only the internal reed switch controls the transmitter. External devices are disabled.
I\B\E Link REMOVED.
Both the internal reed switch and the external device are connected in series with the transmitter.
Link in ‘E-B’ position
Only the External device controls the transmitter. The internal reed switch is disabled.
Program link.
Program mode should only be needed if a new 16 bit code (random or fixed) needs to be entered. See the setup
\ testing section on page ?? to program a fixed code into a reed switch.
1\0\R Pins.
These pins are used to either program a fixed code (multiple devices with the same code) or to generate a
random code.
Radio Enable link.
Having the link ‘ON’ will allow the radio transmitter to operate. Taking the link ‘OFF’ will disable the
transmitter ( could be handy when programming multiple detectors into the main unit). The LED will indicate
Doc ID. 100-106 PROGRAM MANUAL.DOC
16
detection with the link ‘ON’ or ‘OFF’. Always remember to have the link on so it can communicate with the
Securityguard.
Tamper Button.
When the plastic housing is lifted a tamper alarm message is sent. A low level warning will sound in disarm or
home mode. A full alarm will sound if in armed state.
Sensitivity Control (VR1)
The sensitivity control is used to adjust the sensitivity of the vibration sensor (Nessensor). This control (Low =
full anti-clock wise, High = full clock wise) can be used in conjunction with the sensitivity settings on the
Nessensor itself. (High, Medium, Low) If a vibration sensor is not used have the sensitivity set to low. (full
anti-clock wise)
Important: Care should be taken when handling the circuit board as the reed switch is quite fragile.
Incorrect handling may damage the vacuum seal of the reed and cause short and long term intermittent
operation.
7. DIALLER
The dialler will report alarms to a monitoring center and is also capable of remotely programming the Medi
Alarm via a modem link.
7.1 REMOTE PROGRAMMING
The Medi Alarm may be remotely programmed via a telephone modem link. Remote programming is enabled
when in Medi Alarm is in program mode and may be enabled in ‘NORMAL’ mode by setting the program
option.
Medi Alarm may be installed in parallel with answering machines, faxes etc. which will all answer the phone.
Medi Alarm uses an answering technique called fax defeat. Fax defeat is done by calling the panel, hanging up
and calling back. The panel will answer the phone as soon as the call back ring is detected .
All program options may be remotely programmed.
Medi Alarm will remain on line for 4 minutes while communicating with modem. This ensures
communication failures will not leave Medi Alarm in program mode.
7.2 ALARM REPORTING
This reporting is used to transmit alarms from a subscriber’s site to a monitoring center via the telephone.
There are 2 phone numbers, a primary number ‘N’ and a secondary number ‘n’. Reports are usually sent on
the primary number but if the dialler is unsuccessful in connecting, it will dial the secondary number.
Telephone numbers ‘N’ and ‘n’ must be programmed into the Medi Alarm’s memory.
A client account number is allocated by the monitoring company to identify the customer. The client account
number must be programmed into the Medi Alarm’s memory.
Time till first test call option allows test calls to be sent to monitoring during non peak periods (usually at
night.) This time is only used when exiting program mode. The first test call is made in the time specified by
program option ‘TIME TO FIRST TEST CALL’. All test calls are then made at intervals specified by program
option ‘TEST CALL TIME’. ‘TIME TO FIRST TEST CALL’ option should be programmed.
The dialler reports alarms to a central monitoring station in Ademco High Speed format.
New alarms initiate a dial out report. Alarms are deemed to be restored when the ‘CANCEL’ button on the
Medi Alarm is pressed.
Doc ID. 100-106 PROGRAM MANUAL.DOC
17
7.2.1 Alarm Reporting States
Each alarm may be reported as one of the following states:•
•
•
•
New alarm
Normal
Outstanding
Restore
7.2.2 Alarms Reported
The following alarms may be sent on the dialler:•
•
•
•
•
•
•
•
Help (pendant or main unit)
Call Alarm
Inactivity Alarm
A.C. fail
Low battery Medi Alarm
Low battery pendant
Test calls
7.3 ADEMCO HIGH SPEED EXTENDED REPORTING
This reporting is used to transmit alarms from a subscriber’s site to a central monitoring station via the
telephone.
The transmission is done using DTMF tones. 14 digits are sent to report an alarm. The format is as follows:
SSSS QQQQQQQQ T E
SSSS
4 digit subscriber ID
Q
Event qualifier (8 Channels)
Channels 1-8 indicate the status of the 8 reporting channels.
Each channel may have the following values:
1 - New alarm
3 - Restore
5 - Normal
6 - Previously reported event
T
Channel 9 indicates the type of event.
Channel 9 may have the following values:
1 - Extra Alarms
5 - Zone Trouble
6 - System Alarms
7 - Zone Alarm
9 - Test
Therefore, channel 9 determine what channels 1-8 mean.
E
Error check
Doc ID. 100-106 PROGRAM MANUAL.DOC
18
Alarms sent without ‘CALL’ button option.
CH 9
1
5
none
LOW
BATT
P1
CH 1
none
LOW BATT P2
CH 2
none
LOW BATT P3
CH 3
none
LOW BATT P4
CH 4
none
LOW BATT P5
CH 5
HELP MAIN
LOW BATT P6
CH 6
INACTIVITY
LOW BATT P7
CH 7
none
LOW BATT P8
CH 8
6
AC POWER
LOW BATT
none
none
none
none
none
none
7
HELP P 1
HELP P 2
HELP P 3
HELP P 4
HELP P 5
HELP P 6
HELP P 7
HELP P 8
none
none
none
none
none
none
none
none
Alarms sent with button option ‘b’ is selected for ‘CALL’ (c) option.
CH 9
1
5
6
HELP P1
LOW BATT P1 AC POWER
CH 1
HELP P2
LOW BATT P2 LOW BATT
CH 2
HELP P3
LOW BATT P3 none
CH 3
HELP P4
LOW BATT P4 none
CH 4
HELP P5
LOW BATT P5 none
CH 5
HELP
MAIN
LOW
BATT P6 none
CH 6
INACTIVITY
LOW BATT P7 none
CH 7
HELP P8
LOW BATT P8 none
CH 8
7
CALL P 1
CALL P 2
CALL P 3
CALL P 4
CALL P 5
none
none
CALL P 8
none
none
none
none
none
none
none
none
Doc ID. 100-106 PROGRAM MANUAL.DOC
9
9
19
Medi Alarm Specifications
Plug Pack:
17 - 20 volts AC. 300 mA
Medi Alarm Main Unit:
Back up Battery
Average Quiescent Current
Low Voltage Warning
Radio RX Frequency
9 volt. Lithium
Approx. 1 mA
7.5 volts (Dynamic)
303.875 MHz
Radio Pendant
Operating Voltage
Low Voltage (P display)
Quiescent Current
Carrier Frequency
RF Power Output
Battery Type
8 to 12 Volts
10.5 volts
0uA
303.875 MHz
10 uW PEP
12 Volt Alkaline.
Vinnic L1028, Duracell MN21
Energiser A23
Radio PIR Detector
Battery
Low Voltage (AL display)
Quiescent Current
Type
No. of Zones (inc. creep)
Sensitivity Control
Range Control
RF
9 Volt Lithium (Ultralife)
7.5 volts
Less than 30uA
Passive Infra-red (Dual element)
21
1/2 or 3/4 Pulses
High (14M), Low (8M)
(as per Radio Pendant specs)
Radio Reed Switch
Battery
Low Voltage
Quiescent Current
Transmit Current
R.F.
9 Volt Lithium (Ultralife)
7.5 Volts
4 uA
10 to 14 mA
(as per Radio Pendant specs)
This document is accurate at the time of print however this is subject to specification being revised at any time.
Doc ID. 100-106 PROGRAM MANUAL.DOC
20


![[ TVS M ASCOT USER M ANUAL ] - TVS-E](http://vs1.manualzilla.com/store/data/005862685_1-4bbb7317613bf954ee62497b52c82516-150x150.png)