1
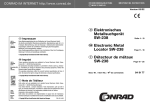
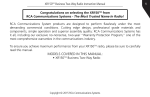
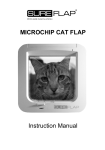
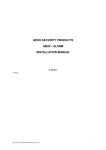
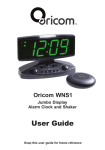
User Manual
Doorbell and Phone Ring Alerting system
AM20
PLEASE READ THIS USER GUIDE BEFORE INITIAL USE.
Keep this user guide for future reference. Always retain your proof of purchase in case of warranty
service and register your product on line at AUSTRALIA: www.oricom.com.au
Please visit www.oricom.com.au for the latest copy of the user manual.
Oricom Customer Support: 1300 889 785 or (02) 4574 8888
Description
Description
AM20 Main unit
Low battery indicator
(Green LED)
Strobe flasher
Red LED
OrangeLED
Volume control
Alarm mode
switch
Tone control
Doorbell tone
control
Desk stand
Speaker
FRONT
battery
compartment
(4 X AA AlkalineBatteries not supplied)
Wall mounting
screw holes
LINE
PHONE
REAR
Shaker jack
AC adaptor jack
Pairing/Test button
Socket for Telephone
line connection
2
Socket for Telephone
connection or to connect to a
second AM20 (not Supplied)
Installation
This Pack Contains
One AM20 Main Unit
One Wireless doorbell
One Desk Stand
One Energy efficient MEPS AC Adaptor
One Telephone Line cord
Four screws and raw plugs for wall mounting
Warning
The product is designed for indoor use only.
Do not install the product in areas where there is the risk
of an explosion, or exposure to smoke, dust, vibrations,
chemicals, moisture and heat.
It is very important that you read the User Guide
carefully as it contains detailed information on setup and
operational issues which you will need to be aware of to
ensure this product operates properly. Following is a list
of some of the important issues and important warnings
which you need to be aware of.
• Do not use this product during a thunderstorm as it is
possible to get a shock.
3
Installation
• T his product has been designed for individuals who
are hard of hearing and has volume which is louder
than a standard product.
• Do not connect this product to an extension of a
Digital Telephone system (PBX). Damage to this
product or the phone system may occur.
Notes for operation in New Zealand
The grant of a Telepermit for any item of terminal
equipment indicates only that Telecom has accepted
that the item complies with minimum conditions for
connection to its network. It indicates no endorsement
of the product by Telecom, nor does it provide any sort
of warranty. Above all, it provides no assurance that any
item will work correctly in all respects with another item
of Telepermitted equipment of a different make or model,
nor does it imply that any product is compatible with all
of Telecom’s network services.Telepermitted equipment
only may be connected to the auxiliary telephone port.
The auxiliary telephone port is not specifically designed
for 3-wire-connected equipment, 3-wire-connected
equipment might not respond to incoming ringing when
attached to this port.
4
Installation
REN (RN for New Zealand)
The REN (Ringer Equivalence Number) or (RN) is of
significance only if you wish to connect more than 1
telephone to your telephone line. A standard telephone
line has a maximum REN capacity of 5 (RN of 5). It is
possible to connect 5 devices with a REN of 1 (RN of
1) with no degradation to the product’s performance.
Exceeding this limit may cause the volume of the ringer
in any phone to decrease or not ring at all.
5
Installation
How To connect:
Power socket AC adaptor
LINE
PHONE
Option: VIB100 Shaker
(not supplied)
Telephone
Socket
Wireless doorbell
1)Insert 4 AA Alkaline batteries (not supplied) into the
battery compartment
2)Connect one end of the telephone line cord to the
AM20 and the other end to the wall socket.
3)Connect the telephone cable between the AM20 and
your telephone.
4)Plug the power cable into the power AC adaptor jack
of the AM20. Plug the AC adaptor into the mains
power point.
6
Installation
Setting up doorbell
1.The doorbell can be fixed on a wall or a door frame.
Drill two holes horizontally, 15mm apart and place the
supplied anchors into the two holes.
2.Hang the doorbell onto the two anchors and then
insert and tighten the screws. Stick the white name
plate over the two holes.
3.The doorbell can be stuck onto a door or window
using the supplied strong adhesive tape. Remove the
protective paper from the adhesive tape on the back of
the doorbell and stick to the required door or window.
Wall Mounting the ringer
1.Drill two holes horizontally, 96mm apart, and leave
the screws protruding 5mm from the wall.
2.Hang the base onto the two screws (supplied) and
pull the base down to lock it on.
Table Mounting
If you want to mount the AM20 on a table, simply clip it
into the base stand and place on a table.
7
Installation
Setting the Alarm Mode
Choose which alarm mode you want by moving the
alarm mode switch to one of the following positions:
0
:no alarm
:both strobe flasher and sound alarm activated
:both strobe flasher and shaker (if connected)
activated
:both sound alarm and shaker (if connected)
activated
Volume Control Slide Switch
Use the slider control to adjust the volume of the doorbell
ring, phone ring or to turn power off.
Tone Control Switch (3 Positions)
Set the tone of the alarm sound.
DoorBell Tone Control
The three position switch allows you to set a different
tone when the doorbell rings.
Fitting Batteries in the AM20
For battery back up in case of power failure or for
portable use when no mains power is available the main
unit requires 4×AA Alkaline batteries (not supplied).
8
Installation
1. Open the battery compartment door.
2.Insert 4 x AA Alkaline batteries into the battery compartment.
3. Snap the battery compartment door back into place.
IMPORTANT:
When the red LED indicator flashes, it is time to replace
the batteries.
Before fitting or replacing the batteries, disconnect the
main unit from power and remove the telephone line
cord from the main unit .
Adding a second AM20
If required a second AM20 can be added to the system
contact Oricom 1300 889 785 for details.
Change the Battery in the Doorbell
The doorbell is supplied with a type 23A 12V battery
installed and is ready to use, it is not necessary to open
the doorBell when you first set up the AM20.
If the red light on the doorbell is not flashing when it is
pressed it is time to replace the battery in the doorbell.
To replace the battery, unscrew the it from the wall,
unscrew the five screws located on the base and open
the box to get access to the battery compartment.
Replace the battery, replace back and remount.
9
Installation
Note:
Do not use a rechargeable battery. Dispose of batteries
according to local regulations, never in your household
rubbish.
The Pairing Procedure
1.Press and hold the Pairing/Test button until the AM20 makes
a beep sound, then release the Pairing/Test button. The
1st LED lights to indicate that the pairing mode has been
entered.
2.Press and hold the Pairing/Test button again until the
1st LED flashes, then press and hold the remote button
at the same time until the strobe flasher flashes. The
AM20 makes a beep sound to confirm pairing has been
successful.
3.If the user wants to pair a 2nd and 3rd remote, when the
1st LED lights, press the Pairing/Test button once, the
1st LED goes off and then the 2nd LED lights. The user
is then able to pair the 2nd remote. Repeat the same
procedure for the 3rd remote.
10
Installation
4.Repeat the above, all 3 LEDS flashing together for the
4th remote pairing.
Un- Register The Pairing:
1.Press and hold the Pairing/Test button for 5 seconds to
enter un-register mode, 3 LEDs flash together.
2.If user wants to un-register the 1st doorbell, press the
Pairing/Test button once, the 1st LED will be flashing (the
other 2 LED light), then press and hold the Pairing/Test
button until the 1st LED goes off, beeps to confirm. The
1st is now un-registered.
3.If user wants to keep the 1st but un-register the 2nd or 3rd,
when the 1st LED flashes, press the Pairing/Test button again,
the 2nd LED flashes (other 2 LED light) to select which to be
un-registered.
4.Repeat the above, all 3 LEDS flashing together for the 4th
doorbell unregister.
To check whether the unit works normally, you can press the
Door bell button, the unit would sound alarm and flash.
Operation
Once the main unit and the doorbell have been placed in
the required locations and all required batteries have been
inserted, you are ready to use the device.
To use the device as a doorbell, the person who needs assistance
must press the doorbell button. The indoor unit will sound an
alarm and flash (depending on the Alarm mode setting).
11
Installation
To use the device as a telephone ringer amplifier whilst
receiving a new call, the indoor unit will sound an alarm and
flash (depending on the Alarm mode setting)
Trouble shooting
Symptom
Solution
1)Check the batteries are inserted
No incoming call
yet the AM20 rings
correctly.
automatically or rings 2)Check the power adaptor is
continuously.
connected correctly.
3)Turn off the power for 10 minutes
The shaker vibrates
and then turn it back on.
automatically or
continuously.
The strobe LED flashes
continuously.
The red low battery
LED flashes
continuously.
1)Replace the batteries.
2)Turn off the power for 10 minutes
and then turn it back on.
12
Installation
When there is an
incoming call but no
ringing can be heard.
1)Check it is connected to the
power adaptor correctly.
2)Check the batteries are inserted
correctly.
3)Check the volume switch is on.
4)Check it is connected to the line
cord correctly.
5)Check the alarm mode selection
switch position is correct
When there is an
1)Check it is connected to the
shaker correctly.
incoming call but the
shaker doesn’t vibrate. 2)Check the shaker socket to see if
it has been damaged.
3)Check the alarm mode selection
switch position is correct.
The AM20 does not
1)Check that the red light on
ring when the doorbell
the doorbell flashes when it is
is pressed
pressed. If it does not, change
the battery.
2)Register the doorbell to the
AM20 again
3)Check the alarm mode selection
switch position is correct i.e. not
on ‘0’
13
Customer Support
Customer Support
If you have any problems setting up or using this product
you will find useful tips and information in the Troubleshooting
section of this user guide as well as “Frequently Asked
Questions” on our website www.oricom.com.au.
If you have further questions about using the product after
reviewing the resources above or would like to purchase
replacement parts or accessories please call our Customer
Support Team. Our dedicated local support team are more
likely to be able to help you than the retailer where you
made your purchase.
Important
Please retain your purchase receipt and attach to the back
page of this user guide as you will need to produce this if
warranty service is required. Take a few moments to register
your product online: www.oricom.com.au
14
Warranty
How to make a claim under Warranty in Australia
Oricom has a simple warranty process for you to follow:
• P lease call or email our Customer Support Team,
contact details follow.
• A Customer Support Team member will verify after
troubleshooting with you if your product qualifies under
warranty. If so, they will give you a Product Return
Authorisation number.
• W
e will then email or fax a Return Authorisation form
and a Repair Notice (if necessary), together with
instructions on how to return the goods for warranty
service.
Please note that if a Customer Support Team member advises that
your product does not qualify for return, this warranty does not apply
to your product.
Products that are authorised to be returned to Oricom in Australia
must include all of the following:
• A completed Return Authorisation form
• A copy of your Proof of Purchase (please keep your
original copy)
• The faulty prod uct, including all accessories.
Send the approved returns to:
Oricom International Pty Ltd
Locked Bag 658
South Windsor NSW 2756 Australia
15
Warranty
Please note that this warranty excludes expenses incurred by you
in returning any faulty product to us. You must arrange and pay any
expenses incurred (including postage, delivery, freight, transportation
or insurance of the product) to return the faulty product to us,
however, we will arrange delivery of the repaired or replaced faulty
product to you.
Important Information
Repair Notice
Please be aware that the repair of your goods may result in the loss
of any user-generated data (such as stored telephone numbers, text
messages and contact information). Please ensure that you have
made a copy of any data saved on your goods before sending for
repair.
Please also be aware that goods presented for repair may be
replaced by refurbished goods or parts of the same type rather than
being repaired.
16
Warranty
Warranty information (Australia)
This Warranty is provided by Oricom International Pty Ltd ABN 46
086 116 369, Unit 1, 4 Sovereign Place, South Windsor NSW 2756,
herein after referred to as “Oricom”.
Oricom makes no other warranties or conditions, express or implied,
including as to acceptable quality and fitness for a particular
purpose, except as stated in this Warranty.
Any implied warranties that may be imposed by law are limited in
duration to the Warranty Period.
Oricom warrants that the product is free from defects in materials
or workmanship during the Warranty Period. This Warranty does
not extend to any product from which the serial number has been
removed or was purchased outside of Australia.
This warranty in no way affects your statutory warranty rights
under the Competition and Consumer Act 2010 or any other similar
legislation.
The Warranty Period will be 1 year from the date of purchase of the
product evidenced by your dated sales receipt. You are required to
provide proof of purchase as a condition of receiving warranty services.
You are entitled to a replacement product or repair of the product
according to the terms and conditions of this document if your product
is found to be faulty within the Warranty Period. This Warranty extends
to the original purchaser only and is not transferable.
Products distributed by Oricom are manufactured using new
materials or new and used materials equivalent to new in
performance and reliability. Spare parts may be new or equivalent to
new. Spare parts are warranted to be free from defects in material
17
Warranty
or workmanship for thirty (30) days or for the remainder of the
Warranty Period of the Oricom branded product in which they are
installed, whichever is longer. During the Warranty Period, Oricom
will where possible repair and if not replace the faulty product or
part thereof. All component parts removed under this Warranty
become the property of Oricom. In the unlikely event that your
Oricom product has a recurring failure, Oricom may, subject to
the Competition and Consumer Act 2010, at its discretion, elect to
provide you with a replacement product of its choosing that is at
least equivalent to your product in performance.
Oricom does not warrant that the operation of the product will be
uninterrupted or error free.
Oricom is not responsible for damage that occurs as a result of
your failure to follow the instructions that came with the product.
These terms and conditions together with any specific terms and
conditions contained in the user guide to the product purchased
constitute the complete and exclusive agreement between you and
Oricom regarding the product.
No change to the conditions of this Warranty is valid unless it is
made in writing and signed by an authorised representative of
Oricom.
Oricom will not be in breach of a warranty expressly set out in this User
Guide or under the Competition and Consumer Act 2010 and excludes
any liability for damages or any other remedy arising under any other
legislation or the common law if the damage occurs as a result of:
1.failure by you to adhere to the warnings and follow the
instructions set out in this user guide for the proper
installation and use of the product;
18
Warranty
2.negligence on your part or misuse by you of the product;
3.an uncontrollable external cause which results in the
product not functioning including but not limited to power
failure, lightning or over voltage; and
4.modification to the product or services carried out on the
product by anyone other than Oricom or Oricom’s authorised
service provider.
Oricom will not be liable for any damages caused by the product
or the failure of the product to perform, including any lost profits or
savings or special, incidental or consequential damages. Oricom
is not liable for any claim made by a third party or made by you
on behalf of a third party. This limitation of liability applies whether
damages are sought, or a claim made, under this Warranty or as
a tort claim (including negligence and strict product liability), a
contract claim or any other claim. However, this limitation of liability
will not apply to claims for personal injury. Nothing in this Warranty
excludes, restricts or modifies any condition, warranty, right or
remedy which pursuant to the Competition and Consumer Act
2010 applies to this Warranty and which may not be so excluded,
restricted or modified. For warranties that cannot be excluded,
restricted or modified, Oricom limits the remedies available to those
specified in the relevant legislation.
Oricom products come with guarantees that cannot be excluded
under the Australian Consumer Law. You are entitled to a
replacement or refund for a major failure and compensation for
any other reasonably foreseeable loss or damage. You are also
entitled to have the goods repaired or replaced if the goods fail to
be of acceptable quality and the failure does not amount to a major
failure.
19
Contact details for Oricom support and warranty claims in
Australia
Oricom International Pty Ltd
Locked Bag 658
South Windsor, NSW 2756
Australia
Email: [email protected]
Phone: 1300 889 785 or (02) 4574 8888
(Monday to Friday 8am to 6pm AEST)
Web: www.oricom.com.au
Fax: (02) 4574 8898
Contact details for Oricom support and warranty claims in
New Zealand
Email: [email protected]
Phone: 0800 674 266
(Monday to Friday 10am to 8pm NZST)
Web: www.oricom.co.nz
Ref: 30082012