1
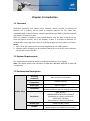
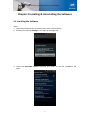
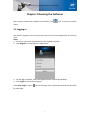
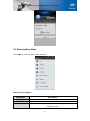
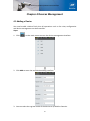
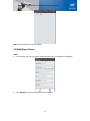
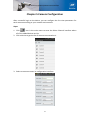
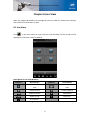
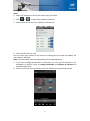
ADTVision (Android) Mobile Client
Software User Manual
ADTVision (Android) Mobile Client Software
Thank you for purchasing our product. This manual applies to ADTVision (Android)
mobile client software, please read it carefully for the better use of this software.
The contents in this manual are subject to change without notice.
1
ADTVision (Android) Mobile Client Software
Contents
Chapter 1 Introduction...................................................................................................................... 3
1.1 Overview ............................................................................................................................. 3
1.2 System Requirements.......................................................................................................... 3
1.3 Performance Description .................................................................................................... 3
1.4 Conventions......................................................................................................................... 4
Chapter 2 Installing & Uninstalling the Software .............................................................................. 5
2.1 Installing the Software ........................................................................................................ 5
2.2 Uninstalling the Software .................................................................................................... 6
Chapter 3 Running the Software ....................................................................................................... 7
3.1 Logging in ............................................................................................................................ 7
3.2 Entering Main Menu ........................................................................................................... 8
Chapter 4 Devices Management ..................................................................................................... 10
4.1 Adding a Device ................................................................................................................. 10
4.2 Modifying a Device............................................................................................................ 12
4.3 Deleting a Device............................................................................................................... 13
Chapter 5 Camera Configuration .................................................................................................... 14
Chapter 6 Live View ........................................................................................................................ 16
6.1 Live View ........................................................................................................................... 16
6.2 PTZ Control ........................................................................................................................ 18
Chapter 7 Playback.......................................................................................................................... 21
Chapter 8 Favorites ......................................................................................................................... 23
Chapter 9 Files Saving Configuration .............................................................................................. 26
Chapter 10 Local Configuration....................................................................................................... 28
Chapter 11 Others ........................................................................................................................... 29
11.1 Account ........................................................................................................................... 29
11.2 About............................................................................................................................... 29
Chapter 12 Troubleshooting............................................................................................................ 31
2
ADTVision (Android) Mobile Client Software
Chapter 1 Introduction
1.1 Overview
ADTVision (Android) V1.6 mobile client software, which is based on Android OS
(Version 1.6 or higher), can be used to remotely monitor the live video from
embedded DVR, network camera, network speed dome and DVS via wireless network,
and realize PTZ control as well.
With this software installed in your mobile device, user are able to log on to the
front-end device via WIFI, 2G or 3G; besides, if there is no public IP available, it’s
accessible by using a dynamic name, or by forwarding ports to the public IP of router.
Notes:
1. WIFI, 2G or 3G access service must be supported by the mobile phone.
2. Network traffic charges may be produced during the use of this client software.
Please refer to the local ISP.
1.2 System Requirements
The mobile phone should be based on Android OS (version 1.6 or higher).
Note: The mobile phone with resolution of 480*320, 480*800, 480*854 or 960*540
is supported.
1.3 Performance Description
Encoding
Parameter
Video
Compression
Frame Type
Frame Rate
Mobile Client
Resolution
Stream Type
Bit Rate
Main stream or sub-stream
H.264 or MPEG4
BBP or single P
Depending on the performance of mobile
phone and the frame rate settings of camera
Main stream:
1080P/720P/4CIF/DCIF/2CIF/CIF/QCIF
(depending on camera connected)
Sub-stream: CIF/QCIF
(depending on camera connected)
Video & Audio, Video
32~2048Kbps
(depending on the network environment)
3
ADTVision (Android) Mobile Client Software
1.4 Conventions
In order to simplify the description, we define the “ADTVision (V1.6) mobile client
software” as “mobile client”, “DVR, DVS, IP camera, IP speed dome” as “device”
and some figures shown in the following chapters are just for reference only.
4
ADTVision (Android) Mobile Client Software
Chapter 2 Installing & Uninstalling the Software
2.1 Installing the Software
Steps:
1. Copy the installation file of mobile client to the mobile phone.
2. Run the file and click Settings in the pop-up message box.
3. Check the Unknown sources checkbox and return to run the installation file
again.
5
ADTVision (Android) Mobile Client Software
2.2 Uninstalling the Software
Enter the Application Management interface of your mobile phone (Settings >
Applications > Manage Applications) and select ADTVision, and click Uninstall to
uninstall the mobile client software.
6
ADTVision (Android) Mobile Client Software
Chapter 3 Running the Software
After having installed the software successfully, click
icon to start the mobile
client.
3.1 Logging in
You need to register a user account when you use this client application for the first
time.
Steps:
1. Enter the user name and password in the register interface.
2. Click Register to complete user registration.
3. On the login interface, enter the registered user name and password.
4. Click Login to access to the system.
If the Auto Login is set to
, the
current login user name and password can be saved
for next login.
7
ADTVision (Android) Mobile Client Software
3.2 Entering Main Menu
Click Login to enter the main menu interface.
Main menu description:
Main Menu
Live Preview
Playback
Devices
Descriptions
Live view and PTZ control
Search and play back record files
Display device list, add/delete/modify new device, view device
information, etc.
8
ADTVision (Android) Mobile Client Software
Favorites
Channel Config
Image
Local Config
Account Settings
About
Define specific channels to your favorites
Configure camera’s stream type, resolution, frame rate, bit rate,
etc.
Management of the local captured pictures and local record
files
Configure the auto login, range of PTZ control
Modify password
View software’s version information
9
ADTVision (Android) Mobile Client Software
Chapter 4 Devices Management
4.1 Adding a Device
You need to add a device firstly that all operations such as live view, configuration
and device management can be accessible.
Steps:
1. Click
on the main menu to enter the device management interface.
2. Click Add to enter the new device adding interface.
3. You can select the register mode of the device to IP, DDNS or Domain.
10
ADTVision (Android) Mobile Client Software
Notes:
1. The IP mode is used when you give a fixed IP to the device.
2. The Domain mode is used when there is no fixed IP address available, and you
apply a domain name for the device.
3. The Device Alias for the DDNS register mode must be the same with that
configured in the DDNS settings interface of the device to be added. EasyDDNS
and IPServer are supported. By default, EasyDDNS is adopted. If the device
connected adopts IPServer, you need to modify the Device Alias (the name of the
DVR), DNS (IP of the PC that runs IPServer) and port (default: 7071) manually.
4. Configure the following settings.
Device name: You can define it by yourself which is used for the IP/Domain
register mode.
Device Alias: The domain name of the device which is used for the DDNS register
mode.
Address: For the IP register mode, it is IP of the device. For the Domain register
mode, it is the domain name of the device.
DNS: For the DDNS register mode, it is IP of the server.
Port: By default, the port 8000 is used for the IP/Domain register mode, and the
port 80 is used for the DDNS register mode.
User name: The user name of the device.
Password: The password of the device.
Channel number: The channel number of the device.
5. Press the Menu button on the phone and then click Save to finish adding device.
The successfully added new device will be displayed in the devices list.
11
ADTVision (Android) Mobile Client Software
Note: Up to 100 devices can be added.
4.2 Modifying a Device
Steps:
1. In the device list, you can select a device and view its parameters configured.
2. Click Modify to enter the Modify Device interface.
12
ADTVision (Android) Mobile Client Software
3. Modify the parameters of the device if required.
4. Press the Menu button on the phone and then click Save to finish the
modification.
4.3 Deleting a Device
In the device list, select a device and click Delete to delete the selected device.
13
ADTVision (Android) Mobile Client Software
Chapter 5 Camera Configuration
After successful login to the device, you can configure the live view parameters for
each camera according to your network environment.
Steps:
1. Click
icon in the main menu to enter the Select Channel interface where
all of the added devices are list.
2. Click a device to get the list of cameras connected to it.
3. Select a camera to enter its configuration interface.
14
ADTVision (Android) Mobile Client Software
4. You can configure stream type, resolution, bit rate, frame rate, etc.
The Param type can be set to Customize or General. If the Customize option is
selected, all parameters can be configured manually, and while the General
option is selected, the default parameters are used for the channel configuration.
Camera parameters description:
Parameters
Description
Chan name
Define a name for the camera
Param type
Select ‘Customize’ or ‘General’
Stream type
Select main stream or sub-stream for live view
Resolution
QCIF/CIF/2CIF/DCIF/4CIF (depending on the camera connected)
Image quality
6 levels of image quality are selectable
Bitrate type
Select variable or constant bit rate
Max. bitrate
The maximum bit rate of each camera, configurable according to
actual network environment
Frame rate
Frame rate of the camera
When the parameter type is selected to ‘General’, all parameters are not configurable,
and the following default settings are used:
Parameters
Descriptions
Stream type
Sub-stream
Video type
Video
Resolution
QCIF
Image quality
Medium
Bitrate type
Constant
Max. bitrate
32Kbps
Frame rate
4fps
5. Press the Menu button on the phone and then click Save to save the settings.
Press the return button on the phone to back to the Select Channel interface.
15
ADTVision (Android) Mobile Client Software
Chapter 6 Live View
After the proper parameters are configured, you can view live video from cameras,
and control PTZ movement as well.
6.1 Live View
Click
in the main menu to enter the live view interface and the screen will be
displayed in 4-division mode by default.
Description of Live View Buttons:
Buttons
Descriptions
/
Buttons
Descriptions
Add camera for live
view
Switch camera for live
view
Stop live view
Picture capture
Manual record
Bookmarks
Audio on/off
Voice talk
PTZ control
Notes: slide the toolbar right to get PTZ control
16
ADTVision (Android) Mobile Client Software
Starting Live View
Steps:
1. Select the window on which you want to play live video.
2. Click
or
to enter Select Camera interface.
3. Select a device and click it to unfold the cameras list.
4. Click a camera for live view.
You can select main stream or sub-stream for viewing the live video. By default, the
sub-stream is adopted.
Note: The sub-stream must be supported by the connected device.
5. If you have configured bookmark or favorites, you can view the channel in the
bookmark or favorite. Refer to Adding Bookmark and Chapter 8 Favorites for
detailed information.
6. Return to the live view interface to view live video from the selected camera.
17
ADTVision (Android) Mobile Client Software
Adding a Bookmark
In live view mode, click
button to save the current live view information in
bookmarks.
Edit the bookmark name in the pop-up dialog box and then click Save to add the
bookmark for the current live view information.
Capturing a Picture
In live view mode, select the playing window and click the
button to capture
picture.
Note: The captured pictures are saved in the picture folder of your phone by default.
You can access the directory to view or delete the pictures.
6.2 PTZ Control
In live view mode, click
to enter PTZ control interface.
18
ADTVision (Android) Mobile Client Software
Slide the direction arrows on the live view to realize the pan left/right and tilt
up/down movements.
You can use the
icon to set and call the preset, or click
to adjust the
brightness.
Setting a Preset
Steps:
1. In PTZ control mode, use the direction arrows to move the camera to the desired
scene.
2. Click
to edit the preset number.
19
ADTVision (Android) Mobile Client Software
3. Click Set to finish the preset settings.
Calling a Preset
For the programmed preset, you can enter the preset number in the text box and
click Call to call it.
Adjusting Brightness
Click
to enter the brightness adjustment interface.
Move the sliding bar to adjust the adjustment according to different environmental
requirements.
After completion of PTZ control, click
to exit the PTZ control interface and
return to the live view window.
20
ADTVision (Android) Mobile Client Software
Chapter 7 Playback
You can search the recorded video files from the remote storage device for playback.
Steps:
1. Click
2. Click
in the main menu to enter the playback interface.
to select the channel for playback.
3. Select the start time and end time.
4. Click
to search the video files.
5. The search results will be dispalyed in the list. Select a file and click
start playing.
21
to
ADTVision (Android) Mobile Client Software
During the playback, you can click
to capture pictures. Click
to open/close
the audio.
Note: The captured pictures are saved in the photo folder of your phone by default.
You can access the directory to view or delete the pictures.
22
ADTVision (Android) Mobile Client Software
Chapter 8 Favorites
The Favorites function can be used for realizing self-defined management of cameras
and enabling the live view much easier and convenient.
Adding a Camera to Favorites
Steps:
1. Click
in the main menu interface to enter the Favorites interface.
2. Press the Menu button of the phone and click Add to add cameras as the
Favorites.
3. In the Select Channel interface, select the camera from the list under each device.
Press Return button of your phone to return to the Favorites interface. The added
cameras are displayed in the list.
23
ADTVision (Android) Mobile Client Software
Deleting a Camera from Favorites
Click
to delete the corresponding channel from the favorite list.
Bookmarks
Click
Click
to view and manage the list of the added bookmarks.
to delete the bookmark.
24
ADTVision (Android) Mobile Client Software
25
ADTVision (Android) Mobile Client Software
Chapter 9 Files Saving Configuration
You can set the picture and record files saving path in the software.
In the main menu, click
to enter the picture management interface and the list
of pictures captured is shown.
Note: If there is no SD card installed, there is no picture can be stored.
Choose the picture or record file you want to see. The picture can be zoomed in and
out; and you can also delete the picture or record file.
To delete the picture, click the picture and long press the picture to delete the
picture.
Click the record management tab menu; you can see the record files stored in the
phone.
26
ADTVision (Android) Mobile Client Software
You can click the record file to play it.
After the configuration, click Return button to back to the main menu.
27
ADTVision (Android) Mobile Client Software
Chapter 10 Local Configuration
Through the Local Configuration, you can configure the auto login on/off, and the
step of speed when controlling the PTZ camera.
Local Configuration
Steps:
1. Click
in the main menu to enter the local configuration interface:
2. Drag the sliding bar of PTZ step to adjust the pan/tilt movement speed. Seven
steps are selectable, and the higher level indicates higher speed of pan/tilt
movement.
3. You can set the Auto Login mode to Yes to enable auto login when running the
client software next time.
4. Click Confirm to save the current settings.
28
ADTVision (Android) Mobile Client Software
Chapter 11 Others
11.1 Account
Click
on the Main Menu to enter the Password Modification interface. Input your old
password and new password twice in the appropriate fields. Click Menu then Save.
11.2 About
Click
in the main menu to view the information of our company.
29
ADTVision (Android) Mobile Client Software
30
ADTVision (Android) Mobile Client Software
Chapter 12 Troubleshooting
1. What kinds of devices are compatible with ADTVision (Android) mobile client
software?
The devices which adopt H.264 and Mpeg4 are compatible with this software.
2. Why does the mobile client software prompt ‘login failed’ when access to the
device via WIFI?
Please check whether the WIFI parameters are configured properly in your phone.
3. After starting viewing the live video, why does the responding of the mobile
device becomes very slow and the video is easy to get stuck?
This problem may due that the lower performance of your mobile device, please try
to view less cameras at the same time, or decrease the frame rate and resolution,
you may refer to the following parameter settings.
31