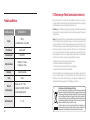
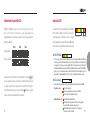
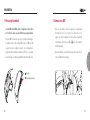
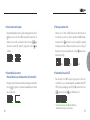
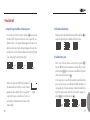
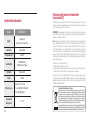
1
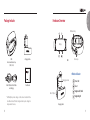
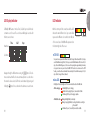
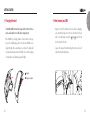
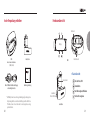
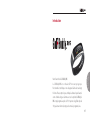
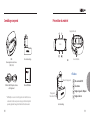
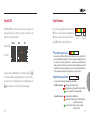
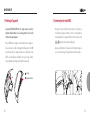
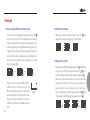
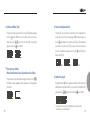
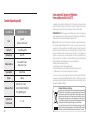
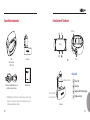
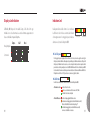
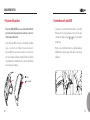
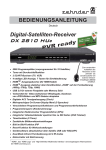
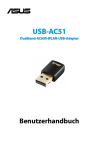
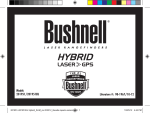
EN/DE/ES/FR/IT
User Manual
EN/DE/ES/FR/IT
Printed in Korea : MAR/2015
User Manual
EN/DE/ES/FR/IT
User Manual
CONTENTS
GETTING STARTED 12
BASIC OPERATIONS 14
User Manual (EN)
User Manual
Introduction
Thank you for choosing the GolfBuddyBB5.
The GolfBuddy BB5 is an innovative GPS band that brings fashion and
function to one device. The slim band design tells time, counts steps, and
shows you the distance to the front/center/back of the green. As with all
other GolfBuddy products, the BB5 comes preloaded with over 37,000
courses, in more than 130 countries around the world & free lifetime
course & software updates.
7
User Manual
Package Includes
Hardware Overview
Wristband strap
Display
BB5
Charging Cradle
BB5
Two black wristband straps
(1 S/M, 1 L/XL)
Buckle-pin
■Button Indicator
Charging terminals
Micro USB cable for both data
and charging
User Manual
Select
Navigate Left / Mark
Micro USB port
*GolfBuddy may make changes to the contents included in the
box without notice. Product's design and size may also change for
improvement of service.
8
Power / Esc
Navigate Right
Charging Cradle
9
LED Indicator
GolfBuddy's BB5 features 3 modes: Time, Golf, and Step mode. All modes
contain two sets of screens. The second screen will display 2 seconds after
the first screen is shown.
On the bottom part of the screen, there will be a LED
indicator shown in different colors. Step counts will be
represented in different colors at the bottom left side
of the screen. Status of the BB5 will be represented on
the bottom right side of the screen.
Main Menu
Time
Golf
Step
Sub-Menu
Navigate through the different menus using the
buttons.The submenu underneath will be shown automatically after 2 seconds when
the menu has been selected. Golf mode can be initiated by pressing and
holding the button for 2 seconds when the sub-menu screen is shown.
10
User Manual
LED Display Indicator
STEP LED’s
Status LED’s
■STEP LED’s
Step counts are represented in different colors (Red/ Orange/ Yellow/ Green).After 1,000 steps,
one LED will illuminate. Eg. After 1,000 steps, one red LED will illuminate. After the next 1,000
steps, the next LED will appear, etc. You can see from a quick glance approximately how many
steps you’ve taken since you last reset the BB5 STEP counter. As a sub-menu on the STEP
feature , you will see the exact number of measured steps. The unit will measure up to 10,000
steps. (Red 2, Orange 2, Yellow 2, Green 2)
■Status LED’s
LED lights on the bottom right side of the screen indicates the status of the BB5 unit.
<While charging>
Solid Redlight(Stay-on) : Charging
Solid Red and Orange light (Stay-on) : Connected to PC/Mac
Solid Green light(Stay-on) : Charging is complete
<While BB5 is active>
Blinking Red light (Blinks) : Low battery
Blinking Orange light (Blinks) :Searching for satellite / searching for
golf course GPS
Solid Green (Stay-on) : Successfully connected to satellite.
11
⊙Charging the unit
User Manual
GETTING STARTED
⊙How to wear your BB5
T he GolfBuddy BB5 unit must be charged before its first use. Please
use the cradle and the micro USB cable to charge the unit.
Place the BB5 in the charging cradle as shown in the above images.
Connect the USB/Charging cable to the cradle and the BB5 can be
charged through either a wall charger or a computer. The display will
show a battery indicator and the red LED will come on. When charging
is complete,the screen will display a green LED light.
•Align both ends of the wristband so they are directly overlapping
each other with the clasp pins over the two holes that best fit your
wrist. To view the display correctly, the
and
buttons should
be at the bottom of the unit.
•Squeeze the clasp and the wristband together until you feel a soft
click and the band is firmly in place.
Charging
Charging is complete
12
13
⊙Turning the BB5 On/Off
Press the Power but to turn the unit on. The BB5 display will display
“GolfBuddy” and then display the TIME. (*We recommend you charge
the unit prior to use.)
Power off: To manually power off the device, press and hold the
button. When you see the “OFF” message, use the
buttons to
navigate. Select “YES” to power off, “NO” not to power off and press the
button to confirm selection.
⊙TIME mode
•To set the UTC (Time zone) : While in the Time mode, press and hold the
button. UTC will display and the time zone can be adjusted by pressing the
buttons, then press .
(The BB5 will then display DST and you can use
then press
.)
buttons to choose yes (Y) or no (N),
•To change between 12 hour and 24 hour time, press and hold the
button
while in the time mode. You can switch between the 12 hour and 24 hour
display selection by pressing the
buttons, then press . Time will set automatically to your time zone after the GolfBuddy
BB5 successfully connects to a satellite.
You can also manually adjust the time zone you are in (UTC) and
change between 12-Hour to 24-Hour time.
14
15
User Manual
BASIC OPERATIONS
User Manual
⊙GOLF mode
■Acquiring satellite signal and commencing play
When the GOLF menu option is displayed, press and hold the
button
to enter golf GPS mode. The unit will then begin to search for GPS satellite
reception, which is shown in (Fig. A). The orange LED will flash while your
BB5 searches for a signal. Once the signal is found, the green LED will begin
to flash at 10-second intervals, and the display will begin to locate the golf
course (Fig. B). Once your golf course is found, the display will direct you to
move to the tee box (Fig. C)
(Fig. A)
(Fig. B)
Once you move to your tee box, your BB5 will begin to
display the distance information for that hole. First, the
display will indicate the hole number (Fig. D). This screen also
shows if the unit is reading left or right green if applicable,
and the par of the hole is indicated by the number of LEDs
lit on the right hand side of the display.
16
(Fig. C)
(Fig. D), (Hole #2 /
Right green / P4)
■Distance Information to the Green
The display will then move to the distance screen. Press the
move distance reading from Center, front, and back.
button to
■Changing holes/greens
While displaying the distance, press and hold the
button. The BB5 will
display the hole currently in play (Fig G.) By pressing the
buttons, you
can select a different hole, then press to move to the selected hole.
Some courses have an option to play either the left or right green on a certain
hole. If the hole you’re playing has this option, it will appear after the Hole
Change function is used (Fig. H). Press the
button to select Left (L) or
Right (R) green, then press the button.
(Fig. G)
(Fig. H)
17
■Selecting Meter / Yard
To change measurements from meters to yards, press and hold the
button while in GOLF mode. The screen will display the Distance mode
screen shown below. Use the
buttons to select between meters (M) or
Yards (Y) then press the button to confirm.
User Manual
■Mark Shot Function
While in GOLF mode, you can measure your shot distance by marking your
position with the BB5 Mark function. Press and hold the
button to “Mark”
your current position (Fig. I). The screen will show that the distance counter
is re-set to zero (Fig. J). When you arrive at the position you want to measure,
press the button to display your shot distance (Fig. K).
(Fig. I)
(Fig. J)
(Fig. K)
■Change to previous Hole
(Note: This function will not operate in “Demo” mode)
To change back to previously displayed hole, press and hold both
buttons. The following will display on the screen indicating the change being
made.
To exit GOLF mode after play, press the
button twice in quick succession.
The screen will display “END” and you can then choose between YES or NO by
pressing the
buttons and press button to confirm the selection.
18
■End GOLF mode
* If you exit the golf course, your BB5 will exit GOLF mode
automatically to conserve battery.
19
⊙System Information
fter turning on the BB5 unit, the STEP mode will be activated automatically.
A
You could check the number of steps taken by entering the sub menu on the
STEP mode. On the bottom left side of the screen, LED light(s) will indicate the
number of steps you've taken. Each LED light will indicate 1,000 steps. You could
adjust the daily target steps through GB World Manager program by connecting
your BB5 to a computer (This feature will be later announced shortly after the
release of the BB5).
•Steps will reset automatically at 12:00 AM of the set time on the BB5.
•You could reset the steps manually by pressing and holding the
button.
You could navigate between "Yes or No" and press
button to confirm the
option.
•When not in GOLF mode, you can view the battery indicator and firmware
version information (shown below) by pressing the button.
•When in GOLF mode, press the button and the BB5 screen will scroll through
the time → steps → battery information in 2 second intervals as shown below.
How to use the Demo Mode
To view the functions of GOLF mode while away from the golf course, you can put the
BB5 into “Demo mode”. To do this, enter GOLF mode as explained previously. Once the
unit is searching for satellites (Fig. L), press and hold both the
buttons until the
screen displays the “searching for course” symbol (Fig. M). Once the screen changes to the
distance function (Fig. N), you can now access and view the function of GOLF mode as if
you were actually at the course.
While in demo mode, one blue status LED will display on the right side of the BB5.
(Fig. L)
20
(Fig. M)
(Fig. N)
21
User Manual
⊙STEP mode
Federal Communications Commission (FCC) Statement
Product Specification
22
This device complies with part 15 of the FCC Rules. Operation is subject to the following two conditions;(1)This
device may not cause harmful interference, and (2)this device must accept any interference received including
interference that may cause undesired operation.
Model name
BB5(DSC-BB5-100)
FCC WARNING : Any changes or modifications in construction of this device which are not expressly approved
by the party responsible for compliance could void the user’s authority to operate this equipment under FCC
regulations.
Display
LED Type
(8 Step LED + 4 Status LED)
PC Interface
Charging cradle(USB)
Note : This equipment has been tested and found to comply with the limit for a Class B digital device, pursuant to
part 15 of the FCC Rules. These limits are designed to provide reasonable protection against harmful interference
in a residential installation. This equipment generates, uses and can radiate radio frequency energy and, if not
installed and used in accordance with the instructions, may cause harmful interference to radio communications,
However, there is no guarantee that interference will not occur in a particular installation. If this equipment does
cause harmful interference to radio or television reception, which can be determined by turning the equipment off
and on, the user is encouraged to try to correct the interference by one or more of the following measures;
- Reorient or relocate the receiving antenna.
- Increase the separation between the equipment and receiver.
- Connect the equipment into an outlet on a circuit different from that to which the receiver is connected.
- Consult the dealer or an experienced radio/TV technician for help.
Water Resistant
IP65 Level
Battery life
Golf mode : 10hrs
Normal mode : 20days
Battery type
Lithium Polymer
Button
4 Buttons
Dimension and
Weight
Body : 58 × 23 × 15mm
Band : 103mm(S/M), 128mm(L/XL)
weight : 34g(S/M), 35g(L/XL)
Operating
Temperature
0℃ ~ +40℃
This product does not contain any user-serviceable parts. Repairs should only be made by an authorized GolfBuddy
service center. Unauthorized repairs or modifications could result in permanent damage to the equipment, and
void your warranty and your authority to operate this device under Part 15 regulations
Disposal and Recycling Information
This symbol on the product or on its packaging indicates that this product shall not be treated as household
waste. Instead it shall be handed over to the applicable collection point for the recycling of electrical and
electronic equipment. By ensuring this product is disposed of correctly, you will help prevent potential
negative consequences for the environment and human health, which could otherwise be caused by
inappropriate waste handling of this product. The recycling of materials will help to conserve natural
resources. For more detailed information about recycling of this product, please contact your local city
office, your household waste disposal service or the shop where you purchased the product.
Each country in the European Union should have its collection centers for electrical and electronic
equipment recycling. For information about your recycling drop off point, please contact your local related
electrical and electronic equipment waste management authority or the retailer where you bought the product.
INHALT
ERSTE SCHRITTE 32
GRUNDBEDIENUNG 34
Benutzerhandbuch (DE)
Benutzerhandbuch
Einleitung
Vielen Dank, dass Sie sich für den GolfBuddy BB5 entschieden haben.
Der GolfBuddy BB5 ist ein innovatives GPS-Armband, das Mode und
Funktionalität vereint. Das sportliche Armband verfügt über eine
Uhrzeitanzeige, zählt Schritte und zeigt die Entfernung zum Anfangspunkt/
Mitte/Ende des Grüns an. Wie alle anderen GolfBuddy Produkte auch,
verfügt der BB5 über 37.000 vorinstallierte Golfkursinformationen &
lebenslange kostenlose Kurs- und Softwareupdates für mehr als 130
Länder weltweit.
27
In der Verpackung enthalten
Hardwareübersicht
Benutzerhandbuch
Armband
Display
BB5
Ladestation
BB5
Zwei schwarze Armbänder
(1 S/M, 1 L/XL)
Gürtelschnalle
■Tastenübersicht
Ladeterminal
Micro-USB-Kabel zur Datenübertragung
und Ladung des Gerätes
28
Bedienungsanleitung
*GolfBuddy kann ohne vorherige Ankündigung, Änderungen des
Verpackungsinhaltes vornehmen. DasDesign unddie Größe des
Produktes kann sich aus Gründen der Leistungsverbesserung
jederzeit ändern.
Ein-/Aus-Taste / ESC
Auswahltaste
Nach links navigieren / Markieren
Ladekabel/
Micro-USB-Kabel
Nach rechts navigieren
Ladestation
29
LED-Anzeige
Der GolfBuddy BB5 verfügt über 3 Modi: Uhrzeit-, Golf- und
Schrittzählermodus. Jeder Modus umfasst zwei Anzeigen.Die zweite
Anzeige erscheint 2 Sekunden nachdem die erste Anzeige abgebildet
wurde.
Im unteren Bereich derDisplayanzeige befinden sich
LED-Lichter in unterschiedlichen Farben. Die Anzahl
der zurückgelegten Schritte wird am unteren linken
Rand der Displayanzeige verschiedenfarbig dargestellt.
Der Status des BB5 wird im rechten unteren Bereich
der Anzeige indiziert.
Hauptmenü
Uhrzeit
Golf
Schritte
Untermenü
Benutzen Sie die
Tasten, um durch das Menü zu navigieren.Das
Untermenü wird automatisch nach 2 Sekunden abgebildet, sobald das
gewünschte Menü ausgewählt wurde. Der Golfmodus kann gestartet
werden, indem Sie die Taste während der Anzeige des Untermenüs für
2 Sekunden gedrückt halten.
30
LED-ANZEIGE
SCHRITTZÄHLER
LED-ANZEIGE
Status
■LED-ANZEIGE SCHRITTZÄHLER
Die Schrittanzahl wird in unterschiedlichen Farben dargestellt (Rot/Orange/Gelb/Grün). Nach
1.000 Schritten leuchtet eines der LED-Lichter auf. Beispiel: Nach 1.000 Schritten leuchtet
das rote LED-Licht auf. Nach 1.000 weiteren Schritten leuchtet das nächste LED-Licht auf,
usw. So können Sie auf den ersten Blick erkennen, wieviele Schritte Sie ungefähr seit dem
letzten Zurücksetzen des BB5 Schrittzählers zurückgelegt haben. Als Untermenü in der
SCHRITTZÄHLER-Funktion wird die genaue Anzahl der Schritte nummerisch angezeigt. Das
Gerät zählt bis zu 10.000 Schritte. (Rot 2, Orange 2, Gelb 2, Grün 2)
■LED-ANZEIGE Status
Die LED-Lichteram rechten unteren Rand derDisplayanzeigeindizieren den Status des BB5.
<Während des Ladevorgangs>
Konstant leuchtendes rotes Licht : Das Gerät wird geladen
Konstant leuchtendes rotes und oranges Licht : Verbindung mit einem PC/Mac
Konstant leuchtendes grünes Licht : Ladevorgang abgeschlossen
<Während der BB5 in Betrieb ist>
Blinkendes rotes Licht : Schwache Batterie
Blinkendes oranges Licht (10-Sekunden Intervall) :
Suche nach einer Satellitenverbindung/Suche nach einem Golfplatz
Blinkendes grünes Licht (10-Sekunden Intervall) :
Erfolgreiche Satellitenverbindung
31
Benutzerhandbuch
LED Displayanzeige
ERSTE SCHRITTE
⊙Anlegen des BB5
er GolfBuddy BB5 muss vor dem ersten Gebrauch geladen
D
werden. Verwenden Sie zum Laden bitte die Ladestation und das
Micro-USB-Kabel.
Setzen Sieden BB5, wie im Bild oben dargestellt, in die Ladestation
ein. Verbinden Sie das USB/Ladekabel mit der Ladestation. Der BB5
kannüber eine Steckdose oder einen Computer geladen werden. Auf
dem Display wird die Batterieanzeige abgebildet und das rote LEDLicht leuchtet auf. Wenn der Ladevorgang abgeschlossen ist, erscheint
ein grünes LED-Licht.
•Überlappen Sie die beiden Enden des Armbandes, sodass es
bequem am Handgelenk anliegt und positionieren Sie den
Verschluß direkt über den beiden Löchern. Um die Displayanzeige
richtig zu positionieren, stellen Sie sicher, dass die Ein-/Aus- und
Tasten nach unten gerichtet sind.
Benutzerhandbuch
⊙Gerät laden
•Drücken Sie den Verschluss und das Armband zusammen, bis Sie
einen leichten„Klick“ spüren und das Band einen festen Sitz hat.
Das Gerät wird geladen
Ladevorgang abgeschlossen
32
33
GRUNDBEDIENUNG
Drücken Sie die Ein-/Aus-Taste, um das Gerät einzuschalten. Auf der
BB5 Anzeige erscheint „GolfBuddy“ und anschließend dieUHRZEIT
(TIME). (*Wir empfehlen das Gerät vor dem ersten Gebrauch vollständig
aufzuladen.) Ausschalten: Um das Gerät manuell auszuschalten, halten
Sie die Ein-/Aus-Taste gedrückt. Sobald „AUS“ (OFF) angezeigt wird,
können Sie mit den
Tasten navigieren.Wählen Sie „Ja“ (YES), um
das Gerät auszuschalten, wählen Sie „Nein“ (NO), um das Gerät nicht
auszuschalten. Drücken Sie , um die Auswahl zu bestätigen.
⊙Uhrzeitanzeige
D ie Uhrzeit wird automatisch eingestellt, nachdem eine
Satellitenverbindung zum GolfBuddy BB5 aufgebaut wurde.
•Einstellungder koordinierten Weltzeit (UTC) (Zeitzone): Halten Sie die
Taste gedrückt, während Sie sich in der Uhrzeitanzeige befinden. Sobald „UTC“
auf der Anzeige erscheint, kann die Zeitzone mit den
Tasten gewählt
und mit bestätigt werden.
(Auf dem Display erscheint DST (Sommerzeit). Mit den
oder Nein (N) wählen und mit
bestätigen.)
Tasten können Sie Ja (Y)
•U
m zwischen der 12-Stunden- oder 24-Stunden-Anzeige zu wechseln,
halten Sie die
Taste gedrückt während die Uhrzeit angezeigt wird. Mit
den
Tasten können Sie zwischen dem 12-Stunden- und 24-StundenAnzeigeformat wählen und Ihre Auswahl mit bestätigen.
Sie können die Zeitzone (Universal Time Coordinated - UTC) auch
manuell anpassen und zwischen einer 12-Stunden und 24-Stunden
Anzeige wählen.
34
35
Benutzerhandbuch
⊙Ein-/Ausschalten des BB5
⊙Golfmodus
■Satellitensignal finden und Spiel starten
Halten Sie die
Taste gedrückt während die GOLF-Menüoption angezeigt
wird, um in den Golf-GPS-Modus zu gelangen. Das Gerät sucht nun, wie in
Abbildung A dargestellt, nach einer GPS Satellitenverbindung. Während des
Suchvorgangs blinkt das orange LED-Licht des BB5 auf. Sobald eine Verbindung
aufgebaut wurde, blinkt das grüne LED-Licht im 10 Sekundentakt auf und die
Anzeige lokalisiert den Golfplatz (Abbildung B). Sobald der Golfplatz lokalisiert
werden konnte, wird Sie die Anzeige zur Abschlagzone (Abbildung C) leiten.
(Abbildung A)
(Abbildung B)
Sobald Sie sich in der Abschlagzone befinden, zeigt Ihr BB5
die Entfernung zum Loch an. Die Lochnummer steht an erster
Stelle (Abbildung D). Falls vorhanden, wird zusätzlich das rechte
oder linke Grün angezeigt. Das Par des Loches wird durch die
Anzahl der aufleuchtenden LED-Lichter auf der rechten Seite
des Displays dargestellt.
36
(Abbildung C)
(Abbildung D)
■Distanzinformationen
Anschließend wechselt das Display zur Distanzanzeige. Um die
Distanzermittlung zwischen Mitte, Anfangspunkt und Endpunkt zu ändern,
drücken Sie die Taste.
■Änderung Loch/Grün
Halten Sie die Taste gedrückt, während Sie sich in der Distanzanzeige befinden.
Der BB5 zeigt das aktuell gespielte Loch an (Abbildung G). Mit den
Tasten
können Sie ein anderes Loch auswählen und anschließend mit bestätigen.
Einige Golfplätze bieten die Optionan bestimmten Löchern zwischen dem
linken oder rechten Grün zu wählen. Sollte diese Option für das von Ihnen
gespielte Loch zur Verfügung stehen, so wird dies angezeigt, nachdem Sie
„Loch ändern“ wählen (Abbildung H). Wählen Sie linkes (L) oder rechtes (R)
Grün mit den
Tasten und bestätigen Sie mit der Taste.
(Abbildung G)
(Abbildung H)
37
Benutzerhandbuch
■Einstellung Meter/Yard
Um die Entfernungsmessung von Metern zu Yards zu ändern, halten Sie die
Taste im GOLF-Modus gedrückt. Die Displayanzeige wird den Distanzmodus
wie unten abgebildet anzeigen. Nutzen Sie die
Tasten, um zwischen
Metern (M) oder Yards (Y) zu wählen und bestätigen Sie mit der Taste.
■Zum vorherigen Loch wechseln
(Hinweis: Diese Funktion steht im „Demo-Modus“ nicht zur Verfügung)
Um zu einem vorher angezeigten Loch zu wechseln, halten Sie beide
Tasten gedrückt. Wenn die Änderung vorgenommen wurde, wird dies,wie
unten dargestellt, angezeigt.
■Markierung Schlagfunktion
Während Sie sich im GOLF-Modus befinden, können Sie die Schlagdistanz
messen, indem Sie Ihre Position mit der BB5 Markierungsfunktion
bestimmen. Halten Sie die
Taste gedrückt, um Ihre aktuelle Position
zu „markieren“(Mark) (Abbildung I). Die Displayanzeige indiziert, dass der
Entfernungsmesser auf Null zurückgesetzt wurde (Abbildung J). Wenn Sie
an dem Punkt ankommen, den Sie vermessen möchten, drücken Sie die
Taste, um die Schlagdistanz anzuzeigen (Abbildung K).
(Abbildung I)
(Abbildung K)
Nach dem Spiel können Sie den GOLF-Modus durch kurzes zweimaliges
Drücken der Ein-/Aus-Taste verlassen. Auf dem Display erscheint „BEENDEN“
(END) und Sie können durch Drücken der
Tasten zwischen JA (YES)
oderNEIN (NO)wählen. Drücken Sie anschließend zur Bestätigung die Taste.
38
(Abbildung J)
■GOLF-Modus verlassen
* Um Batteriestrom zu sparen, wird Ihr BB5 den Golf-Modus automatisch beenden,
sobald Sie den Golfplatz verlassen.
39
Benutzerhandbuch
⊙Systeminformationen
ach dem Einschalten des BB5 wird der Schrittzähler-Modus automatisch
N
aktiviert. Sie können die Anzahl der zurückgelegten Schritte überprüfen, indem
Sie das Untermenü des Schrittzähler-Modus wählen. Am rechten unteren Rand
der Displayanzeige wird durch LED-Lichter die Anzahl der zurückgelegten
Schritte indiziert. Jedes LED-Licht indiziert 1.000 Schritte. Sie können die Anzahl
der täglich angestrebten Schritte im GB World Manager Programm ändern,
indem Sie Ihren BB5 mit einem Computer verbinden (Diese Funktion wird kurz
nach Veröffentlichung des BB5 bekanntgegeben werden).
•D er BB5 setzt die Anzahl der Schritte automatisch um 00:00 Uhr der
eingestellten Uhrzeit zurück.
•Halten Sie die
Taste gedrückt, um die Anzahl der Schritte manuell
zurückzusetzen. Sie können zwischen „Ja“ (Yes) oder„Nein“(No) wählen und
mit bestätigen.
•Wenn sich der BB5 nicht im GOLF-Modus befindet, können Sie die
Batterieanzeige und Informationen zur Firmware-Version (unten dargestellt)
ersehen, indem Sie die Ein-/Aus-Taste drücken.
•Drücken Sie die Ein-/Aus-Taste, während sich der BB5 im GOLF-Modus befindet,
um wie unten dargestellt, die Uhrzeit → Schritte → Batterieanzeige in Intervallen
von 2 Sekunden abwechselnd anzuzeigen.
Nutzung des Demo-Modus
Um die Funktionen des GOLF-Modus anzuzeigen, ohne auf einem Golfplatz präsent zu sein,
bringen Sie den BB5 in den „Demo-Modus“ (Demo Mode). Wählen Sie, wie bereits erwähnt,
denGOLF-Modus. Halten Sie, sobald das Gerät nach einer Satellitenverbindung sucht (Abbildung
L), beide
Tasten gedrückt, bis das Display „Golfplatzsuche“ (searching for course) anzeigt
(Abbildung M). Sobald das Display zur Distanzanzeige wechselt (Abbildung N), können Sie die
Funktionen des Golf-Modus so nutzen, alsbefändenSie sich gerade auf einem Golfplatz.
(Abbildung L)
40
(Abbildung M)
(Abbildung N)
41
Benutzerhandbuch
⊙Schrittzähler-Modus
FCC-Bestimmungen (Federal Communications Commission)
Produktspezifikation
Dieses Gerät entspricht Teil 15 der FCC-Bestimmungen. Der Betrieb dieses Gerätes muss die folgenden
Voraussetzungen erfüllen: (1) dieses Gerät darf keine störenden Interferenzen erzeugen und (2) muss empfangene
Interferenzen aufnehmen, auch wenn diese zu Betriebsstörungen führen können.
Modellbezeichnung
BB5 (DSC-BB5-100)
Display
LED Typ
(8 Schrittzähler LEDs + 4 Status LEDs)
PC-Schnittstelle
Ladestation(USB)
Wasserabweisend
Schutzart IP65
Batterielebensdauer
Golfmodus : 10 Stunden
Normalmodus : 20 Tage
Batterietyp
Lithium-Polymer-Akku
Tasten
4 Tasten
Maß- und
Gewichtsangaben
Gehäuse: 58 × 23 × 15mm
Armband: 103mm(S/M), 128mm(L/XL)
Gewicht: 34g(S/M), 35g(L/XL)
Betriebstemperatur
0℃ ~ +40℃
42
FCC Warnung : In den FCC-Bestimmungen ist festgelegt, dass Änderungen oder Modifikationen an diesem Gerät,
die nicht ausdrücklich vom Hersteller genehmigt sind, ein Erlöschen der Betriebsgenehmigung für dieses Gerät zur
Folge haben können.
Hinweis : Bei Tests wurde festgestellt, dass dieses Gerät den Grenzwerten eines digitalen Geräts der Klasse B gemäß
Teil 15 der FCC-Bestimmungen entspricht. Diese Grenzwerte sind so definiert, dass sie ausreichenden Schutz
gegen störende Interferenzen in einer Wohnumgebung gewährleisten. Von diesem Gerät wird Energie in Form
von Funkfrequenzen erzeugt, verwendet und womöglich ausgestrahlt, die, falls das Gerät nicht ordnungsgemäß
installiert und verwendet wird, zu Störungen des Funkverkehrs führen kann. Es kann nicht garantiert werden,
dass in einer bestimmten Installation keine Interferenzen auftreten. Falls dieses Gerät den Rundfunk- oder
Fernsehempfang stört, was durch Aus- und Einschalten des Geräts festgestellt werden kann, wird dem Benutzer
empfohlen, die Störungen durch eine oder mehrere der folgenden Maßnahmen zu korrigieren:
- Empfangsantenne anders ausrichten oder an einem anderen Ort anbringen.
- Abstand zwischen dem Gerät und dem Empfangsgerät erhöhen.
- Anschluss des Gerätes an einen anderen Stromkreis als den des Empfangsgerätes.
- Vertragshändler oder Rundfunk-/Fernsehtechniker um Hilfe bitten.
Dieses Produkt enthält keine Teile, die vom Benutzer gewartet werden sollten. Reperaturen sollten ausschliesslich
von einem befugten GolfBuddy Service Center durchgeführt werden. Unberechtigte Reperaturen oder
Modifikationen können das Gerät dauerhaft beschädigen, wodurch die Garantie Ihre Gültigkeit verliert und
enthebt Sie der Berechtigung, dieses Gerät unter Teil 15 der Bestimmungen zu betreiben.
Informationen zur korrekten Entsorgung und Recycling
Dieses Symbol auf dem Produkt oder dessen Verpackung gibt an, dass das Produkt nicht zusammen mit dem Restmüll
entsorgt werden darf. Es obliegt daher Ihrer Verantwortung, das Gerät an einer entsprechenden Stelle für die Entsorgung
oder Wiederverwertung von Elektrogeräten aller Art abzugeben (z.B. ein Wertstoffhof). Die separate Sammlung und das
Recyceln Ihrer alten Elektrogeräte zum Zeitpunkt ihrer Entsorgung trägt zum Schutz der Umwelt bei und gewährleistet,
dass die Geräte auf eine Art und Weise recycelt werden, die keine Gefährdung für die Gesundheit des Menschen und der
Umwelt darstellt. Weitere Auskünfte darüber, wo alte Elektrogeräte zum Recyceln abgeben können, erhalten Sie bei den
örtlichen Behörden, Wertstoffhöfen oder dort, wo Sie das Gerät erworben haben.
Jedes Land der Europäischen Union hat eine Recycling-Sammelstelle für Elektro- und Elektronikgeräte. Um
Informationen über Ihre Recycling-Sammelstelle zu erhalten, kontaktieren Sie bitte Ihre zuständige Behörde zur
Entsorgung von Elektro- und Elektronikgeräten oder den Händler, bei dem Sie dieses Produkt erworben haben.
CONTENIDO
PARA EMPEZAR 52
OPERACIONES BÁSICAS 54
Guía del usuario del (ES)
Guía del usuario del
Introducción
Gracias por elegir el GolfBuddy BB5.
El GolfBuddy BB5 es una banda innovadora de GPS que ofrece moda y
funcionalidad en un dispositivo. El diseño de banda delgada da la hora,
cuenta los pasos y le muestra la distancia a la parte del frente/centro/
atrás del green. Al igual que con todos los demás productos GolfBuddy, el
BB5 viene precargado con más de 37,000 campos de golf, en más de 130
países de todo el mundo, y actualizaciones de software y campos de golf
de por vida gratis.
47
El paquete incluye
Descripción general del equipo
Correa de muñeca
BB5
Base de carga
BB5
Dos correas de muñeca negras
(1 S/M, 1 L/XL)
Guía del usuario del
Pantalla
Hebilla
■Indicador del botón
Terminales de carga
Cable USB micro para
transferir datos y cargar
Manual del usuario
*Puede ser que GolfBuddy haga cambios a los contenidos incluidos
en la caja sin previo aviso. El diseño y tamaño del producto también
pueden cambiar para mejoras del servicio.
48
Encender / Salir
Seleccionar
Navegar a la izquierda / Marcar
Puerto para USB
micro/carga
Navegar a la derecha
Base de carga
49
Indicador LED
El BB5 de GolfBuddy cuenta con 3 modos: hora, golf y el modo de
paso. Todos los modos contienen dos juegos devisualización. La
segundavisualización se mostrará 2 segundos después de que aparezca la
primera visualización.
En la parte inferior de la pantalla, habrá un indicador
LED mostrado en diferentes colores. El conteo de pasos
estará representado por diferentes colores en la parte
inferior izquierda de la pantalla. El estado del BB5 estará
representado en la parte inferior derecha de la pantalla.
Menú principal
Hora
Golf
Paso
LEDs DE PASOS
LEDs de estado
■LEDs DE PASOS
Menú secundario
Navegue a través de los diferentes menús utilizando los botones
. El
menú secundario de abajo será mostrado automáticamente después de
2 segundos cuando el menú haya sido seleccionado. El modo de golf se
puede iniciar manteniendo presionado el botón
durante 2 segundos
cuando se muestre la pantalla del menú secundario.
50
El conteo de pasos está representado en diferentes colores (rojo/anaranjado/amarillo/verde). Después
de 1,000 pasos, un LED se iluminará. Ej. Después de 1,000 pasos, un LED rojo se iluminará. Después
de los siguientes 1,000 pasos, aparecerá el siguiente LED, etc. Usted puede ver de un vistazo rápido
la cantidad aproximada de pasos que ha tomado desde la última vez que el contador de PASOS BB5
regresó a cero. Como un menú secundario en la función de PASO, usted verá el número exacto de
pasos medidos. La unidad medirá hasta 10,000 pasos. (2 rojos, 2 anaranjados, 2 amarillos, 2 verdes)
■LEDs de estado
Las luces LED en la parte inferior derecha de la pantalla indican el estado de la unidad BB5.
<Durante la carga>
Luz roja fija : Cargando
Luz roja y anaranjada fijas: Conectado a una PC/Mac
Luz verde fija: Se ha completado la carga
<Mientras BB5 está en uso> Luz intermitente roja: Batería baja
Luz intermitente anaranjada (en intervalos de 10 segundos): Buscando satélite / buscando campo de golf
Luzintermitente verde (en intervalos de 10 segundos):
Conectado con éxito al satélite.
51
Guía del usuario del
Indicador de la pantalla LED
PARA EMPEZAR
⊙Cómo usar su BB5
L a unidad BB5 de GolfBuddy debe ser cargada antes de su primer
uso. Por favor use la base y el cable USB micro para cargar la unidad.
Coloque el BB5 en la base de carga como se muestra en las imágenes
de arriba. Conecte el cable de carga/USB a la base y el BB5 se podrá
cargar a través de un cargador de pared o una computadora. La
pantalla mostrará un indicador de batería y el LED rojo se encenderá.
Cuando la carga esté completa, la pantalla mostrará una luz LED verde.
•Alinee los dos extremos de la correa para que se superpongan
directamente entre sí con los pines de hebilla sobre los dos
agujeros que mejor se adapten a su muñeca. Para ver la pantalla
correctamente, el botón de encendido y
deben estar en la parte
inferior de la unidad.
•Apriete la hebilla y la correa juntas hasta que sienta un suave clic y la
correa esté firmemente en su lugar.
Guía del usuario del
⊙Para cargar la unidad
Cargando
Se ha completado la carga
52
53
OPERACIONES BÁSICAS
⊙Para encender y apagar el BB5
⊙Modo de hora
•Para ajustar el UTC (zona horaria): mientras esté en el modo de hora,
mantenga presionado el botón . Se mostrará el UTC y la zona horaria se
podrá ajustar presionando los botones
, luego presione .
(El BB5 mostrará entonces el horario de verano y usted puede utilizar los botones
para seleccionar sí (Y) o no (N), luego presione
.)
•Para cambiar entre 12 y 24 horas, mantenga presionado el botón
mientras
esté en el modo de hora. Usted puede cambiarla opción para mostrar 12 o 24
horas presionando los botones
, luego presione . La hora se ajustará automáticamente a su zona horaria después de
que el BB5 de GolfBuddy se conecte con éxito a un satélite.
Usted también puede ajustar manualmente la zona horaria en la que
se encuentra (UTC) y cambiar entre 12 a 24 horas
54
55
Guía del usuario del
Presione el botón de encendido para prender la unidad. La pantalla
BB5 mostrará "GolfBuddy" y luego mostrará la HORA. (*Recomendamos
cargar la unidad antes de su uso.) Apagado: para apagar manualmente
el dispositivo, mantenga presionado el botón de encendido. Cuando
vea el mensaje "OFF" (apagado), utilice los botones
para
navegar. Seleccione "YES" (sí) para apagar, "NO" para no apagar y
presione el botón para confirmar la selección.
⊙Modo de golf
■Para obtener la señal de satélite y empezar a jugar
Cuando se muestra la opción de menú de GOLF, mantenga presionado el
botón
para entrar al modo de GPS de golf. La unidad empezará entonces
a buscar la recepción de satélite del GPS, el cual se muestra en la (Fig. A). El LED
anaranjado oscilará mientras el BB5 busca señal. Una vez que se encuentra
la señal, el LED verde comenzará a oscilar a intervalos de 10 segundos, y la
pantalla comenzará a ubicar el campo de golf (Fig. B). Una vez que su campo
de golf es encontrado, la pantalla le dirigirá para pasar alteede salida (Fig. C)
(Fig. A)
(Fig. B)
Una vez que usted va a su tee de salida, su BB5 comenzará
a mostrar la información de la distancia para ese hoyo.
Primero, la pantalla indicará el número del hoyo (Fig. D).
La pantalla también muestra si la unidad está leyendo el
green a la izquierda (L) o a la derecha (R), si es aplicable,
y el par del hoyo está indicado por el número de LEDs
encendidos en el lado derecho de la pantalla.
56
(Fig. C)
(Fig. D)
■Información de la distancia
Luego la pantalla mostrará la distancia. Presione el botón
lectura de la distancia del centro (C), frente (F) y atrás (B)
para mover la
■Para cambiar de hoyos/greens
Mientras se muestra la distancia, mantenga presionado el botón
. El BB5
mostrará el hoyo que se está jugando actualmente (Fig. G). Presionando los
botones
, usted puede seleccionar un hoyo diferente, luego presione
para pasar al hoyo seleccionado.
Algunos campos tienen una opción para jugar ya sea el green izquierdo o
derecho en un determinado hoyo. Si el hoyo que está jugando tiene esta
opción, aparecerá después de que la función Cambiar de Hoyo es utilizada
(Fig. H). Presione el botón
para seleccionar el green izquierdo (L) o
derecho (R), luego presione el botón .
(Fig. G)
(Fig. H)
57
Guía del usuario del
■Para seleccionar metros/yardas
Para cambiar las medidas de metros a yardas, mantenga presionado el botón
mientras esté en el modo de GOLF. La pantalla mostrará el modo de
distancia como se muestra a continuación. Utilice los botones
para
seleccionar entre metros (M) o yardas (Y) y luego presione el botón
para
confirmar.
■Función para marcar el tiro
Mientras esté en el modo de GOLF, usted puede medir la distancia del
tiro marcando su posición con la función para Marcar de BB5. Mantenga
presionado el botón
para "Marcar" su posición actual (Fig. I). La pantalla
mostrará que el contador de distancia se ha vuelto a poner en cero (Fig. J). Al
llegar a la posición que desea medir, presione el botón
para mostrar su
distancia de tiro (Fig. K).
(Fig. I)
■Para cambiar al hoyo anterior
(Nota: esta función no se podrá realizar en modo de "demostración")
Para regresar al hoyo mostrado anteriormente, mantenga presionado ambos
botones
. Lo siguiente se mostrará en la pantalla indicando el cambio
que se está haciendo.
58
(Fig. J)
(Fig. K)
■Para terminar el modo de Golf
Para salir del modo de GOLF después de jugar, presione el botón de
encendido dos veces consecutivas rápidamente. La pantalla mostrará "END"
(“FIN”) y usted puede elegir luego entre YES(SÍ) o NOpresionando los botones
y presionando el botón para confirmar la selección.
* Si usted sale del campo de golf, su BB5 saldrá del Modo de
Golf automáticamente para conservar la batería.
59
Guía del usuario del
⊙Modo de paso
⊙Información del sistema
•Los pasos regresarán a cero automáticamente a las 12:00 AM de la hora
configurada en el BB5.
•U sted puede regresar los pasos a cero manualmente manteniendo
presionado el botón
. Usted puede navegar entre "YES(SÍ) o NO" y presionar
el botón para confirmar la opción.
•Cuando no está en modo de GOLF, usted puede ver el indicador de la batería
y la información de la versión del microprograma (mostrado a continuación)
presionando el botón de encendido.
•En el modo de GOLF, presione el botón de encendido y la pantalla del BB5 se
desplazará a través de la hora → pasos → información de la batería en intervalos
de 2 segundos como se muestra a continuación.
Cómo utilizar el Modo de Demostración
Para ver la las funciones de modo de GOLF mientras está fuera del campo de golf, usted puede
poner el BB5 en "Modo de demostración". Para hacer esto, ingrese al modo de GOLF como
se explicó anteriormente. Una vez que la unidad está buscando satélites (Fig. L), mantenga
presionado ambos botones
hasta que la pantalla muestre el símbolo de "buscando campo
de golf” (Fig. M). Una vez que la pantalla cambia a la función de distancia (Fig. N), ahora usted
puede acceder y ver la función de Modo de Golf como si estuviera realmente en el campo de golf.
(Fig. L)
60
(Fig. M)
(Fig. N)
61
Guía del usuario del
espués de encender la unidad BB5, el modo de paso se activará
D
automáticamente. Usted puede comprobar el número de pasos dados
ingresando al menú secundario en el modo de paso. En la parte inferior izquierda
de la pantalla, la luz (luces) LED indicará el número de pasos que ha dado. Cada luz
LED indicará 1,000 pasos. Usted puede ajustar el número objetivo diario de pasos a
través del programa GB World Manager conectando su BB5 a un computador (esta
función será anunciada poco después del lanzamiento del BB5).
Declaración de la Comisión Federal de Comunicaciones (FCC)
Especificación del producto
Nombre del modelo
BB5(DSC-BB5-100)
Pantalla
Tipo LED
(8 LEDs de pasos + 4 LEDs de estado)
Interfaz de PC
Base de carga(USB)
Resistente al agua
Nivel IP65
Duración de la batería
Modo de golf : 10hrs
Modo normal : 20 días
Tipo de batería
Polímero de litio
Botón
4 botones
Dimensión y peso
Temperatura de
funcionamiento
62
Cuerpo: 58 × 23 × 15 mm
Correa: 103mm(S/M), 128mm(L/XL)
Peso: 34g(S/M), 35g(L/XL)
0℃ ~ +40℃
Este dispositivo cumple con la parte 15 de las normas de la FCC. La operación está sujeta a las dos condiciones
siguientes: (1) este dispositivo no puede causar interferencias perjudiciales,y (2) este dispositivo debe aceptar
cualquier interferencia recibida incluyendo interferencias que puedan causar un funcionamiento no deseado.
ADVERTENCIA DE LA FCC : cualquier cambio o modificación en la construcción de este dispositivo que no sea
aprobado expresamente por la parte responsable del cumplimiento podría anular la autoridad del usuario para
operar este equipo bajo las regulaciones de la FCC.
Nota : este equipo ha sido probado y cumple con los límites para un dispositivo digital de Clase B, según la parte
15 de las normas de la FCC. Estos límites están diseñados para proporcionar una protección razonable contra las
interferencias perjudiciales en una instalación residencial. Este equipo genera,utiliza y puede irradiar energía de
radiofrecuencia y, si no se instala y utiliza de acuerdo con las instrucciones, puede causar interferencias perjudiciales
en las comunicaciones por radio, sin embargo, no hay garantía de que la interferencia no ocurrirá en una
instalación en particular. Si este equipo causa interferencias perjudiciales en la recepción de radio o televisión,que
puede ser determinada al apagar y prender el equipo,se recomienda al usuario que intente corregir la interferencia
mediante una o más de las siguientes medidas;
- Reorientar o reubicar la antena receptora.
- Aumentar la separación entre el equipo y el receptor.
- Conectar el equipo a una toma de un circuito distinto de aquel al que está conectado el receptor.
- Consultar al distribuidor o a un técnico con experiencia de radio/televisión para obtener ayuda.
Este producto no contiene piezas que pueden ser reparables por el usuario. Las reparaciones deben ser realizadas
sólo por un centro de servicio GolfBuddy autorizado. Las reparaciones o modificaciones no autorizadas pueden
provocar daños permanentes en el equipo e invalidar su garantía y su autoridad para utilizar el equipo bajo la Parte
15 de los reglamentos
Información de eliminación y reciclaje
Este símbolo en el producto o en su embalaje indica que este producto no puede ser tratado como residuo
doméstico. Este producto se debe entregar al punto de recojo para el reciclaje de aparatos eléctricos y electrónicos.
Al asegurarse de que este producto se deseche correctamente, usted ayudará a evitar posibles consecuencias
negativas para el medio ambiente y la salud humana, que podrían ser causadas por la incorrecta manipulación de
este producto. El reciclaje de materiales ayudará a conservar los recursos naturales. Para obtener información más
detallada sobre el reciclaje de este producto, por favor póngase en contacto con su oficina municipal, el servicio
de recojo de residuos o el establecimiento donde adquirió el producto.
Cada país de la Unión Europea debería tener sus centros de recojo para el reciclaje de aparatos eléctricos y electrónicos.
Para obtener información acerca del lugar para dejar su reciclaje, por favor comuníquese con la autoridad local de
manejo de residuos de aparatos eléctricos y electrónicos o el establecimiento donde adquirió el producto.
SOMMAIRE
MISE EN ROUTE 72
FONCTIONNEMENT DE BASE 74
Guide de l'utilisateur (FR)
Guide de l'utilisateur
Introduction
Merci d'avoir choisi le GolfBuddy BB5.
Le GolfBuddy BB5 est un bracelet GPS innovant qui regroupe
fonctionnalité et esthétique en un seul appareil. Ce bracelet au design
fin donne l'heure, compte les pas, et indique la distance depuis l’avant, le
centre et l'arrière du green. Comme avec tous les produits GolfBuddy, le
BB5 est pré-programé avec plus de 37 000 parcours de golf, dans plus de
130 pays à travers le monde, et propose des mises à jour gratuites, à vie.
67
L'emballage comprend
Présentation du matériel
Sangle de bracelet
Ecran
BB5
Un socle de recharge
BB5
Deux sangles de bracelets noires
(1 S/M, 1 L/XL)
boucle d'attache
Un Micro câble USB pour les données
et le chargement
Manuel d’Utilisation
*GolfBuddy se réserve le droit d'apporter des modifications au
contenu de la boîte sans préavis. Le design et la taille du produit
peuvent également changer afin d'améliorer le fonctionnement.
68
Guide de l'utilisateur
■Touches
Bornes de chargement
Mise en marche/ ESC
Sélectionner
Naviguer à gauche / Marquer
Chargement /
Micro-câble USB
Naviguer à droite
Socle de recharge
69
Voyants LED
Voyant lumineux
Golfbuddy's BB5 propose 3 modes: Le mode heure, le mode golf, et le
mode pas. Chaque mode comporte deux écrans. Le deuxième écran
s'affiche 2 secondes après le premier.
En bas de l'écran, apparaît un voyant lumineux de
différentes couleurs. Le nombre de pas apparaît dans
différentes couleurs en bas à gauche de l'écran. Le
Statut du BB5 s'affiche en bas à droite de l'écran.
Heure
Golf
Pas
Sous-menu
Naviguez à travers les différents menus en utilisant les touches
.
Le sous-menu s'affichera automatiquement après 2 secondes une fois le
menu sélectionné. Le mode golf peut être lancé en maintenant la touche
appuyée pendant 2 secondes lorsque le sous-menu apparaît.
Voyant lumineux
pour le statut
■Voyant lumineux pour les pas
Le nombre de pas est affiché en différentes couleurs (Rouge, Orange, Jaune, Vert). Après 1.000
pas, un voyant s'allume. Par exemple, après 1.000 pas le voyant rouge va s'allumer. Après les 1.000
pas suivants, un autre voyant va apparaître, etc. On peut ainsi voir approximativement d'un
simple coup d'œil, le nombre de pas réalisés depuis la dernière réinitialisation du compteur
de pas BB5. Dans le sous-menu de l'appareil, vous pourrez voir exactement le nombre de pas
réalisés. L'appareil compte jusqu'à 10.000 pas (Rouge 2, Orange 2, Jaune 2, Vert 2).
■Voyant lumineux pour le statut
Les voyants en bas à droite de l'appareil indiquent le statut du BB5.
<Pendant le chargement>
Lumière rouge continue (fixe) : En charge
Lumières continues rouge et orange (fixe) : Connecté au PC / Mac
Lumière verte continue (fixe) : Chargement terminé
<Lorsque le BB5 est en marche >
70
Voyant clignotant rouge : Batterie faible
Voyant clignotant orange :Recherche de satellite / Recherche
de GPS de parcours de golf
Voyant vert continu (fixe) :Relié avec succès au satellite.
Mode GOLF (10sec)
71
Guide de l'utilisateur
Menu principal
Voyant lumineux
pour les pas
MISE EN ROUTE
⊙Recharger l'appareil
⊙Comment porter votre BB5
L 'appareil GolfBuddy BB5 doit être chargé avant sa première
utilisation. Veuillez utiliser le socle de chargement et le micro câble
USB pour recharger l'appareil.
Placez le BB5 dans le chargeur comme illustré dans les images cidessus. Connectez le câble de chargement USB au support et le BB5
peut être branché à un chargeur mural ou à un ordinateur. L'écran
affiche alors un indicateur de batterie et le voyant rouge s'allume.
Lorsque la batterie est chargée l'écran affiche un voyant vert.
•Rejoignez les deux extrémités du bracelet de sorte qu'elles se
chevauchent et alignez le fermoir sur les trous correspondant au
mieux à la taille de votre poignet. Pour bien voir l'écran, les boutons
et devraient se trouver en bas de l'appareil.
•Appuyez sur le fermoir et sur le bracelet en même temps jusqu'à ce
que vous sentiez un léger clic et que le bracelet soit bien en place.
Guide de l'utilisateur
En charge
Chargement terminé
72
73
OPÉRATIONS DE BASE
⊙Allumer / Eteindre le BB5
⊙Mode heure
•Pour régler le UTC (fuseau horaire): Une fois dans le mode Heure,
maintenez appuyé le bouton
. UTC s'affiche et le fuseau horaire peut être
réglé en appuyant sur les touches
, puis sur .
(Le BB5 affiche ensuite DST. Utilisez les boutons
puis appuyez sur
.)
pour choisir oui (Y) ou non (N),
•Pour passer du mode 12 heures au mode 24 heures, maintenez enfoncé
le bouton
une fois sur le mode heure. Vous pouvez passer du mode 12
heures au mode 24 heures en appuyant sur les boutons
puis sur . L'heure s'ajuste automatiquement à votre fuseau horaire une fois
que le GolfBuddy BB5 est relié à un satellite.
Vous pouvez également choisir votre fuseau horaire manuellement
(UTC) et choisir entre le mode 12 heures et 24 heures.
74
75
Guide de l'utilisateur
Appuyez sur le bouton Power pour allumer l'appareil. L'écran
d'affichage indique « GolfBuddy », puis affiche l'heure.
(*Nous recommandons que vous chargiez l’appareil avant de l’utiliser)
Pour éteindre l’appareil manuellement, appuyez sur le bouton Power
continuellement. Lorsque vous verrez le message “OFF” appuyez sur
pour naviguer. Choisissez “YES” pour éteindre et appuyez sur
pour confirmer votre choix.
⊙Mode golf
■Recevoir un signal satellite et commencer à jouer
Lorsque l'option de menu Golf apparaît, maintenez appuyée la touche
pour entrer dans le mode GPS Golf. Votre appareil va ensuite commencer
à chercher un signal satellite, comme présenté dans l'image A (Fig. A). Le
voyant orange clignote pendant que le BB5 recherche un signal. Une fois que
le signal est trouvé, le voyant vert commence à clignoter à intervalles de 10
secondes, et l'écran commence à localiser le parcours de golf. (Fig. B). Une fois
que le parcours de golf est localisé, l'écran vous guide pour vous conduire
vers le tertre de départ. (Fig. C)
(Fig. A)
(Fig. B)
Une fois sur votre tertre de départ, le BB5 commence
à afficher les données de distance pour ce trou. Tout
d'abord, l'écran indique le numéro de trou (Fig D). Cet
écran montre également s'il s'agit d'un green droit ou d'un
green gauche, si l'option est disponible, et le par du trou
est indiqué par le nombre de voyants allumés à droite de
l'écran.
76
(Fig. C)
(Fig. D)
■Information sur la distance
L'affichage passe ensuite aux distances. Appuyez sur la touche
changer la lecture des distances depuis le centre, l'avant et l'arrière.
pour
■Changer de trous / greens
Lorsque la distance est affichée, maintenez appuyée la touche . Le BB5 indique
le trou joué en ce moment (Fig G.) En appuyant sur les boutons
, vous
pouvez choisir un autre trou, puis passer au trou sélectionné en cliquant sur .
Certains parcours proposent une option pour sélectionner le green droit
ou gauche pour un certain trou. Si le trou que vous êtes en train de jouer
présente cette option, elle vous sera proposée une fois sélectionnée la
fonction de changement de trou (Fig H). Appuyez sur le bouton
pour
choisir gauche (L) ou droite (R) du green, puis appuyez sur la touche .
(Fig. G)
(Fig. H)
77
Guide de l'utilisateur
■Sélectionner Mètres / Yards
Pour passer des mètres aux yards, une fois en mode Golf, maintenez appuyée
la touche
L'écran affichera le mode de distance présenté ci-dessous.
Utilisez les boutons
pour choisir entre mètres (M) et yards (y) puis
appuyez sur la touche pour confirmer.
(Fig. I)
■Passer au trou précédent
(Notez: Cette fonction n'est pas disponible en mode «Démo»)
Pour repasser au trou précédent, maintenez appuyés les deux boutons
.
L'information suivante apparaitra à l'écran, indiquant que le changement a
été effectué.
78
■Fonction d'emplacement de tir
En mode golf, vous pouvez mesurer votre distance de tir en marquant votre
position grâce à la fonction de marquage du BB5. Maintenez appuyé le
bouton
pour «Marquer» votre position actuelle. (Fig. I). L'écran indiquera
que la distance est remise à zéro (Fig. J). Lorsque vous arrivez sur la position
que vous souhaitez mesurer, appuyez sur le bouton
pour afficher votre
distance de tir (Fig. K).
(Fig. J)
(Fig. K)
■Quitter le mode golf
Pour quitter le mode GOLF après le jeu, appuyez deux fois de suite sur le bouton
d'alimentation. L'écran affichera «FIN» et vous pourrez choisir entre Oui et Non
grâce aux boutons
. Cliquez ensuite sur la touche pour confirmer.
*Si vous quittez le parcours de golf, votre BB5 quittera automatiquement le
mode Golf pour économiser la batterie.
79
Guide de l'utilisateur
⊙Mode pas
⊙Information sur le système
•Les pas se remettront à jour automatiquement à 00h00 de l'heure réglée sur
le BB5.
•Vous pouvez réinitialiser les pas manuellement en maintenant enfoncée la
touche
. Vous pouvez naviguer entre «Oui» et «Non» et appuyer sur la
touche pour confirmer votre choix.
•Lorsque l'appareil n'est pas en mode Golf, vous pouvez voir l'indicateur de
batterie et les informations sur le logiciel (voir ci-dessous) en appuyant sur
POWER.
•En mode GOLF, appuyez sur le bouton d'alimentation et l'écran du BB5 fera défiler
l'heure → les pas → les informations sur la batterie à intervalles de 2 secondes,
comme indiqué ci-dessous.
Comment utiliser le Mode Démo
Pour voir les fonctions du mode GOLF en dehors du parcours de golf, vous pouvez
mettre le BB5 en mode "Démo". Pour ce faire, passez en mode GOLF comme expliqué
précédemment. Une fois que l'appareil recherche les satellites (Fig. l), maintenez appuyées
les touches
jusqu'à ce que l'écran affiche le symbole « recherche de parcours » (Fig.
M). Une fois que l'écran passe à la fonction de distance (Fig. N), vous pouvez accéder et
afficher la fonction du mode golf comme si vous étiez vraiment sur le terrain.
(Fig. L)
80
Guide de l'utilisateur
près avoir allumé le BB5, le mode pas sera activé automatiquement. Vous
A
pouvez vérifier le nombre de pas réalisés en entrant dans le sous-menu du mode
pas. En bas à gauche de l'écran, des voyants lumineux indiquent le nombre de
pas effectués. Chaque voyant représente 1,000 pas. Vous pouvez ajuster l'objectif
de pas quotidien sur le programme GB World Manager en connectant votre BB5
à un ordinateur (Cette fonction sera annoncée plus tard, peu de temps après la
sortie du BB5).
(Fig. M)
(Fig. N)
81
Caractéristiques du produit
Nom du Modèle
BB5 (DSC - BB5 - 100)
Écran
Type LED
(8 LED pas + 4 LED de statut)
Interface PC
Socle de Chargeur(USB)
Résistant à l'eau
Niveau IP65
Durée de la batterie
Mode de Golf : 10 heures
Mode normal : 20 jours
Type de batterie
Lithium Polymer
Bouton
4 Boutons
Dimension et Poids
Température de
fonctionnement
82
Boîtier: 58 × 23 × 15mm
Band: 103mm(S/M), 128mm(L/XL)
Poids: 34g(S/M), 35g(L/XL)
0℃ ~ +40℃
Communiqué de la Commission Fédérale des
Communications des États-Unis (FCC)
Cet appareil est conforme à la partie 15 du Règlement de la FCC. Le fonctionnement est sujet aux deux conditions
suivantes; (1) Cet appareil ne doit pas causer d’interférence nuisible, et (2) cet appareil doit accepter toute
interférence reçue, y compris les interférences qui peuvent engendrer un fonctionnement indésirable.
AVERTISSEMENT DE LA FCC: Tout changement ou toute modification dans la construction de cet appareil, qui
n’est pas expressément approuvée par l’organisme responsable de la conformité, peut annuler l’autorisation de
l’utilisateur de faire fonctionner cet appareil conformément au règlement de la FCC.
Note : Cet appareil a été testé et a été déclaré dans les normes de la limite d’un appareil numérique de classe
B, conformément à la partie 15 du Règlement de la FCC. Ces limites sont conçues pour fournir une protection
acceptable contre les interférences nuisibles dans d’une installation résidentielle. Ce matériel génère, utilise et
peut émettre un rayonnement de fréquence radio et s’il n’est pas installé et utilisé en accord avec les instructions,
peut causer une interférence nuisible aux communications radio. Cependant, il n’y a aucune garantie qu’une
interférence ne se produira pas dans une installation particulière. Si ce matériel cause une interférence radio
nuisible à une réception radio ou de télévision, ce qui peut être déterminé en éteignant et allumant l’appareil,
l’utilisateur peut tenter de corriger l’interférence avec une ou plusieurs méthodes suivantes ;
- Réorienter ou installer l’antenne de réception ailleurs.
- Augmenter la distance de séparation entre l’appareil et le récepteur.
- Connectez le matériel à une prise sur un circuit différent de celui auquel le récepteur est connecté.
- Consultez le revendeur ou un technicien radio/TV expérimenté pour toute assistance.
Ce produit ne contient aucune pièce réparable par l’utilisateur. Les réparations devraient être effectuées
uniquement par un centre de réparation GolfBuddy qualifié. Les réparations ou modifications non-autorisées
peuvent engendrer des dégâts du matériel et annuler votre garantie, ainsi que votre autorité de faire fonctionner
cet appareil selon le Règlement de la Partie 15.
Information sur l’Élimination et le Recyclage
Ce symbole sur le produit ou son emballage indique que le produit ne doit pas être traité comme déchet ménager.
Il doit plutôt être remis à un point de ramassage pour le recyclage d’appareils électriques et électroniques. En
vous assurant que vous vous débarrassez de ce produit correctement, vous aiderez à éviter des conséquences
négatives éventuelles pour l’environnement et la santé humaine, qui pourraient autrement être causées par un
traitement inapproprié de déchets provenant de ce produit. Le recyclage de matériaux aidera à préserver les
ressources naturelles. Pour plus de détails sur le recyclage de ce produit, veuillez vous renseigner auprès du bureau
local de votre ville, votre service de déchets ménagers ou le magasin où vous avez acheté l’appareil.
Chaque pays de l’Union Européenne devrait avoir des centres de ramassage et recyclage pour le matériel
électrique et électronique. Pour obtenir des renseignements sur votre point de dépôt, veuillez contacter votre
autorité locale pour la gestion des déchets électriques et électroniques ou le revendeur qui a procuré le produit.
INDICE
GUIDA INTRODUTTIVA 92
OPERAZIONI DI BASE 94
Manuale d’uso (IT)
Introduzione
Manuale d’uso
Grazie per aver scelto GolfBuddy BB5.
GolfBuddy BB5 è un’innovativa fascia GPS che combina stile e funzionalità
in un unico dispositivo. Caratterizzato da un design sottile, BB5 tiene il
tempo, conta i passi e mostra la distanza dal centro, dall’inizio e dal fondo
del green. Come tutti gli altri prodotti GolfBuddy, BB5 contiene già in
dotazione oltre 37’000 mappe di campi di golf di più di 130 paesi in tutto il
mondo e l’aggiornamento del software e delle mappe è gratuito per tutta
la durata del dispositivo.
87
Il pacchetto comprende
Introduzione all’hardware
Cinturino
Display
BB5
Caricatore
BB5
Due cinturini neri
(1 S/M, 1 L/XL)
Fibbia
■Comandi
Contatti per la ricarica
Manuale d’uso
*GolfBuddy può modificare il contenuto del pacchetto senza
preavviso. Il design e le dimensioni del dispositivo possono
cambiare per migliorarne il servizio.
88
Power / Esc
Seleziona
Navigare a sinistra / Contrassegnare
Porta micro USB /
porta per la ricarica
Navigare a destra
Manuale d’uso
Cavo micro USB utilizzabile sia per lo
scambio dati, sia per la ricarica
Caricatore
89
Display a Led indicatore
Indicatore Led
GolfBuddy BB5 dispone di 3 modalità: Tempo, Golf e Passi. Per ogni
modalità ci sono due schermate. La seconda schermata appare trascorsi
due secondi dalla comparsa della prima.
Nella parte inferiore dello schermo c’è un indicatore
Led di diversi colori. In basso a sinistra, Led di diversi
colori rappresentano il conteggio dei passi; in basso a
destra, invece, lo stato del dispositivo BB5.
Menù principale
Sotto-menù
Tempo
Golf
Passi
I Led dei passi
I Led di stato
■I Led dei passi
Il conteggio dei passi è rappresentato nei diversi colori: rosso, arancione, giallo e verde. Ogni
mille passi, un Led si illumina. Ad esempio, dopo mille passi, si illumina un Led rosso. Dopo altri
mille passi, si illumina il Led successivo; e così via. In questo modo, basta una rapida occhiata
per rendersi conto di quanti passi sono stati fatti dall’ultima volta che il contatore di passi BB5
è stato azzerato. Il numero esatto dei passi viene indicato nel sotto-menù della modalità Passi.
Il dispositivo conta fino a 10'000 passi: rosso 2, arancione 2, giallo 2, verde 2.
■I Led di stato
90
<Durante la carica>
Led rosso fisso: In carica
Led rosso e Led arancione fissi: Connesso al Pc/Mac
Led verde fisso: Carica completa
<Mentre BB5 è acceso>
Led rosso lampeggiante: Batteria scarica
Led arancione lampeggiante (a intervalli di dieci secondi):
Ricerca del satellite / ricerca del campo di golf
Led verde lampeggiante (a intervalli di dieci secondi):
Connesso al satellite con successo.
Manuale d’uso
I Led in basso a destra dello schermo indicano lo stato del dispositivo BB5.
91
GUIDA INTRODUTTIVA
⊙Ricaricare il dispositivo
⊙Come indossare il vostro BB5
Il dispositivo GolfBuddy BB5 deve essere caricato prima di utilizzarlo
per la prima volta. Siete pregati di usare il caricatore e il cavo micro
USB per ricaricare il dispositivo.
Inserite il dispositivo BB5 nel caricatore, come illustrato nella figura
sopra, e connettete il cavo USB/cavo di ricarica al caricatore. Il
dispositivo BB5 può essere ricaricato sia attraverso un caricatore da
muro sia da computer. Sul display comparirà l’indicatore del livello di
carica della batteria e si illuminerà il Led rosso. Un Led verde indicherà
quando la carica sarà completa.
•Sovrapponete una estremità del cinturino all’altra, con i perni della
fibbia sopra i fori che meglio si adattano al vostro polso. Per vedere
correttamente il display, i pulsanti
e
devono stare alla base
del dispositivo.
•Premete le due estremità del cinturino una sopra l’altra ad altezza
della fibbia, fino a sentire un leggero click. La fascia è ora posizionata
saldamente.
In carica
Manuale d’uso
Carica completa
92
93
OPERAZIONI DI BASE
⊙Accendere/spegnere il dispositivo BB5
Premete il pulsante Power per accendere il dispositivo. Sul display
apparirà la scritta “GolfBuddy” e poi l’ora. (*Prima dell’utilizzo, è
consigliato caricare il dispositivo.) Spegnimento: Per spegnere
manualmente il dispositivo, tenete premuto il pulsante Power. Quando
appare la scritta “OFF”, con i pulsanti
scegliete ‘YES’ se volete
spegnere il dispositivo oppure ‘NO’ se non volete spegnerlo; quindi,
premete il pulsante per confermare la scelta.
⊙Modalità Tempo
•Per selezionare il fuso orario (UTC): in modalità Tempo, tenete premuto il
pulsante
fino a che compare la scritta “UTC”. Quindi scegliete il fuso orario
navigando con i pulsanti
e poi premete .
(Sul display comparirà la scritta “DST”. Scegliete se impostare l’ora legale oppure no
selezionando con i pulsanti
sì (Y) o no (N); poi premete
.)
•Per cambiare il formato dell’ora da 12-ore a 24-ore, tenete premuto il pulsante
mentre siete in modalità Tempo. Per scegliere tra il formato 12-ore e il
formato 24-ore navigate con i pulsanti
; poi premete . L’ora esatta comparirà non appena GolfBuddy BB5 si sarà connesso
con successo al satellite.
94
Manuale d’uso
È possibile impostare il fuso orario (UTC) anche manualmente e
cambiare il formato dell’ora da 12-ore a 24-ore.
95
⊙Modalità Golf
■Acquisire il segnale satellitare e iniziare a giocare
Una volta sul menù Golf, tenete premuto il pulsante
per accedere alla
modalità Golf GPS. Il dispositivo inizierà la ricerca del segnale GPS, come
illustrato in (Fig. A) e come segnalato dal lampeggiare del Led arancione sul
display. Una volta trovato il segnale, inizierà a lampeggiare il Led verde, ad un
intervallo di dieci secondi, e inizierà la localizzazione del campo di golf (Fig. B).
Trovato il campo di golf, verrete diretti al tee (Fig. C)
(Fig. A)
(Fig. B)
Arrivati al tee, il dispositivo BB5 fornirà le informazioni
sulla distanza della buca. Per prima cosa, sulla schermata
appariranno il numero della buca (Fig. D), se si è alla destra
o alla sinistra del green, eventualmente, e il numero di
par di quella buca, indicato dal numero di Led accesi sulla
destra del display.
96
(Fig. C)
(Fig. D)
■Informazioni sulla distanza
Il display passerà poi alla schermata delle distanze. Premete il pulsante
navigare tra le distanze dal centro, dall’inizio e dal fondo del green.
per
■Cambiare buca / green
M entre viene mostrata la distanza, tenete premuto il pulsante . Il
dispositivo BB5 indicherà la buca attualmente selezionata (Fig. G). Tenendo
premuti i pulsanti
potrete selezionare una buca differente. Per passare
alla nuova buca selezionata, premete .
A volte, una buca può essere affrontata sia dalla destra sia dalla sinistra del
green. Se la buca scelta può essere affrontata da entrambi i lati del green, vi
verrà segnalato dopo che l’avrete selezionata con la funzione di Cambio buca
(Fig. H). Per scegliere tra il lato destro (R) o il lato sinistro (L), navigate con i
pulsanti
e poi confermate premendo .
(Fig. G)
(Fig. H)
97
Manuale d’uso
■Selezionare Metri / Yard
Per cambiare l’unità di misura da metri a yard, tenete premuto il pulsante
mentre siete in modalità Golf. Apparirà la schermata della modalità di
distanza, come illustrato sotto. Navigando con i pulsanti
selezionate
metri (M) o Yard (Y). Tenete premuto per confermare.
■Funzione contrassegno colpo
In modalità Golf, è possibile calcolare la distanza del colpo indicando la
posizione in cui ci si trova con la funzione di contrassegno del dispositivo BB5.
Tenete premuto il pulsante
per “contrassegnare” la posizione di partenza
(Fig. I). Sul display verrà indicato che il calcolatore di distanza è stato azzerato
(Fig. J). Una volta arrivati alla posizione di destinazione, premete di nuovo il
pulsante per calcolare la distanza del colpo (Fig. K).
(Fig. I)
■Tornare alla buca precedente
(Nota: Questa funzione non è disponibile in modalità Demo)
Per tornare alla buca precedente, tenente premuti contemporaneamente i
pulsanti
. Una schermata come la seguente indicherà che il passaggio
è stato effettuato con successo.
98
(Fig. J)
(Fig. K)
■Terminare la modalità Golf
Per uscire dalla modalità Golf dopo aver giocato, premete due volte in una
rapida successione il pulsante Power. Sul display apparirà la scritta “END”.
Potrete scegliere se uscire (YES) oppure no (NO) navigando con i pulsanti
e premendo per confermare.
* Se si esce dal campo da gioco, il dispositivo BB5 uscirà automaticamente
dalla modalità Green per conservare la batteria.
Manuale d’uso
99
⊙Modalità Passi
⊙Informazioni di sistema
•Il numero dei passi si azzera in automatico alle ore 12.00 AM (ora indicata dal
dispositivo BB5).
•Èpossibile azzerare manualmente il numero dei passi tenendo premuto il
pulsante . Una volta selezionata l’opzione desiderata tra si “Yes” o no “No” ,
premete per confermare.
•Se non siete in modalità Golf, potete consultare il livello di carica della batteria
e la versione del firmware (come illustrato nell’immagine sotto) premendo il
pulsante Power.
•Se siete in modalità Golf, premete il pulsante Power. Sul display verranno
visualizzati a distanza di due secondi l’ora, i passi fatti e il livello della batteria, come
illustrato nell’immagine sotto.
Come usare la modalità Demo
È possibile visualizzare la modalità Golf quando si è lontano da un campo di golf utilizzando il
dispositivo BB5 in modalità Demo. Per utilizzare la modalità Demo, entrate in modalità Golf come
precedentemente illustrato. Quando il dispositivo inizia la ricerca del satellite (Fig. L), premete
contemporaneamente i pulsanti
fino a quando sullo schermo appare il simbolo di “ricerca
del campo” (Fig. M). Il dispositivo passerà alla funzione della distanza (Fig. N) e sarà così possibile
utilizzare la modalità Golf come se ci si trovasse veramente su un campo di golf.
(Fig. L)
100
(Fig. M)
(Fig. N)
101
Manuale d’uso
ll’accensione del dispositivo BB5, la modalità Passi si avvia automaticamente.
A
È possibile vedere quanti passi sono stati fatti andando nel sotto-menù della
modalità Passi. Il numero di passi fatti è indicato dai Led che si trovano in basso a
sinistra dello schermo. Ogni luce Led indica mille passi. È possibile personalizzare
l’obiettivo quotidiano di passi grazie al programmaGB Worldf Manager
connettendo il dispositivo BB5 al computer (Questa funzioneverrà annunciata
successivamente, poco dopo l’uscita di BB5).
Caratteristiche del prodotto
Modello
BB5(DSC-BB5-100)
Display
Display a Led
(8 Led per i passi + 4 Led di stato)
Interfaccia Pc
Caricatore(USB)
Resistenzaall’acqua
Livello IP65
Capacitàbatteria
Modalità Golf:10ore
Modalitànormale: 20giorni
Tipobatteria
Polimeri di Litio
Pulsanti
4 Pulsanti
Dimensioni e peso
Temperatura di
funzionamento
102
Corpo: 58 × 23 × 15mm
Fascia: 103mm(S/M), 128mm(L/XL)
Peso: 34g(S/M), 35g(L/XL)
0℃ ~ +40℃
Dichiarazione della Commissione Federale delle
Comunicazioni (FCC)
Questo dispositivo è conforme alla Parte 15 delle norme FCC. L’utilizzo è soggetto alle seguenti due condizioni. (1)
Il dispositivo non deve causare interferenze dannose e (2) deve accettare qualsiasi interferenza ricevuta, comprese
quelle che potrebbero comprometterne il funzionamento.
AVVERTENZA FCC : Eventuali alterazioni o modifiche nella costruzione di questo dispositivo, non espressamente
approvate dall’ente responsabile della conformità, potrebbero invalidare il diritto dell’utente ad utilizzare questo
apparecchio in conformità con le direttive FCC.
Nota : Questo apparecchio è stato testato ed è risultato conforme ai limiti previsti per i dispositivi digitali di Classe
B, ai sensi della Parte 15 delle norme FCC. Questi limiti sono stati stabiliti per garantire una protezione contro
le possibili interferenze dannose in caso di utilizzo in zone residenziali. Questo apparecchio genera, utilizza e
può diffondere radiofrequenze e, se non installato ed utilizzato secondo le istruzioni, potrebbe interferire con le
comunicazioni radio. Tuttavia, non vi è alcuna garanzia che non si verifichino interferenze in particolari installazioni.
Se l’apparecchio dovesse provocare interferenze alla ricezione radio o televisiva, che possono essere determinate
dall’accensione e dallo spegnimento dell’apparecchio, l’utente è invitato a cercare di correggere le interferenze con
una o più delle seguenti misure:
- Ri-orientare o riposizionare l’antenna di ricezione.
- Aumentare la distanza tra l’apparecchio e il ricevitore.
- Collegare l’apparecchio ad una presa appartenente ad un circuito diverso da quello a cui è collegato il ricevitore.
- Consultare il rivenditore o chiedere assistenza ad un tecnico radio/televisivo specializzato.
Questo prodotto non contiene parti riparabili dall’utente. La manutenzione deve essere eseguita solo ad opera
di centri di assistenza autorizzati da GolfBuddy. Riparazioni o modifiche non autorizzate potrebbero danneggiare
irreparabilmente l’apparecchio, invalidando la garanzia e il diritto dell’utente ad utilizzare questo dispositivo in
conformità con le direttive della Parte 15.
Informazioni sullo smaltimento e il riciclaggio
Questo simbolo sul prodotto o sulla confezione indica che questo prodotto non deve essere trattato come rifiuto
domestico. Al contrario, deve essere consegnato ad un centro adibito al riciclaggio delle apparecchiature elettriche
ed elettroniche. Assicurandosi che questo prodotto venga smaltito correttamente, si contribuisce ad evitare
potenziali conseguenze negative per l’ambiente e per la salute umana, che potrebbero altrimenti essere causate
da un inadeguato smaltimento del prodotto. Il riciclaggio dei materiali aiuta a preservare le risorse naturali. Per
informazioni più dettagliate riguardo il riciclaggio di questo prodotto, contattare l’ufficio competente della propria
città, il servizio locale di smaltimento rifiuti oppure il negozio dove è stato acquistato il prodotto.
Ogni paese dell’Unione Europea dovrebbe avere i suoi centri di raccolta per il riciclaggio delle apparecchiature elettriche ed
elettroniche. Per informazioni sui punti di raccolta e riciclaggio del proprio paese, contattare l’autorità locale competente dello
smaltimento delle apparecchiature elettriche ed elettroniche oppure il rivenditore dal quale è stato acquistato il prodotto.