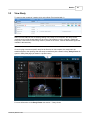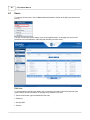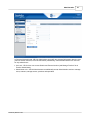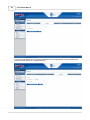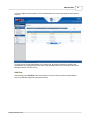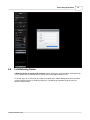
1
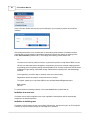
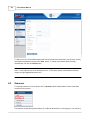
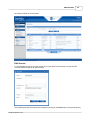
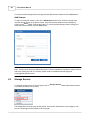
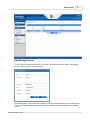
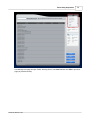
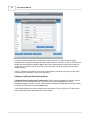
CB Link User Manual CB Link Portal Canada Bay Medical Centre Canada Bay Link is a web portal, designed for easy communication, sharing and backup of patient scans and reports. CB Link User Manual Canada Bay Medical Centre All rights reserved. No parts of this work may be reproduced in any form or by any means - graphic, electronic, or mechanical, including photocopying, recording, taping, or information storage and retrieval systems - without the written permission of the publisher. Products that are referred to in this document may be either trademarks and/or registered trademarks of the respective owners. The publisher and the author make no claim to these trademarks. While every precaution has been taken in the preparation of this document, the publisher and the author assume no responsibility for errors or omissions, or for damages resulting from the use of information contained in this document or from the use of programs and source code that may accompany it. In no event shall the publisher and the author be liable for any loss of profit or any other commercial damage caused or alleged to have been caused directly or indirectly by this document. Printed: February 2011 in Sydney Publisher Canada Bay Medical Centre Managing Editor Vivien Munoz - Ferrada Technical Editors Ana Bajec Marieta Miljkovic Cover Designer Vladimir Stajcic Team Coordinator Igor Jecmenic Production Raking Ltd Canada Bay Medical Centre 4 CTLink User Manual Table of Contents Part I Overview 7 1 Introduction ................................................................................................................................... 7 2 Table of Symbols ................................................................................................................................... 7 3 System Requirements ................................................................................................................................... 8 Part II Quick Guide 10 1 Log In ................................................................................................................................... 10 2 Register ................................................................................................................................... 11 3 Forgot Your................................................................................................................................... Password? 12 4 Log Out ................................................................................................................................... 13 5 Current Parameters ................................................................................................................................... 13 6 Menu ................................................................................................................................... 14 7 Preform a Search ................................................................................................................................... 15 8 Navigate a List ................................................................................................................................... 16 9 Tab Navigation ................................................................................................................................... 16 10 Info Bar ................................................................................................................................... 17 Part III Studies 19 1 Study Details ................................................................................................................................... 19 2 View Study ................................................................................................................................... 21 3 Download Study ................................................................................................................................... 22 4 Request Review ................................................................................................................................... 22 5 Request Cancellation ................................................................................................................................... 23 Part IV Manage Practice 25 1 Invite to Practice ................................................................................................................................... 25 2 Practice Info................................................................................................................................... 27 3 Practice Users ................................................................................................................................... 28 4 Search for Doctor ................................................................................................................................... 30 Part V Personal 33 1 Send Invitation ................................................................................................................................... 33 2 Personal Information ................................................................................................................................... 34 3 Change Password ................................................................................................................................... 35 4 Change Security ................................................................................................................................... Q&A 36 Contents Part VI Administration 5 39 1 Users ................................................................................................................................... 40 2 Scanners ................................................................................................................................... 44 3 Storage Servers ................................................................................................................................... 46 4 Practices ................................................................................................................................... 48 5 Specialties ................................................................................................................................... 52 Part VII Study Viewer 56 1 The MPR View ................................................................................................................................... 56 2 The Axial, Coronal ................................................................................................................................... and Sagittal Views 58 3 Selected View ................................................................................................................................... 58 4 3D View ................................................................................................................................... 58 5 Tools Panel ................................................................................................................................... 59 6 Panoramic Tool ................................................................................................................................... and Panoramic View 63 7 Oblique Tool................................................................................................................................... and Oblique View 65 8 TMJ Tool and ................................................................................................................................... TMJ View 66 9 Regions Panel ................................................................................................................................... 68 Part VIII Refer Study Acquisition 70 1 Refer Study ................................................................................................................................... Acquisition in CT Premium 70 2 Acquire Doctor's ................................................................................................................................... Username or ID from CB Link 72 3 Link Ordering ................................................................................................................................... Doctor 72 4 Link Referring ................................................................................................................................... Doctor 75 5 Study in CB ................................................................................................................................... Link 77 Canada Bay Medical Centre 5 Part I Overview 1 7 Overview Welcome to the Canada Bay Link pages! CB Link portal are web-based pages, designed for easy communication and backup of patient images and reports. Primary pages include online multiplanar image viewing, offsite data storage, administrative reporting tools and teleradiolgy workflow. 1.1 Introduction After a CB scan has been performed, the case data are automatically backed-up on a secure central server. With password-protected access, users can access studies from any web-enabled computer. CB Link portal also allows another colleague to view the case at your discretion. 1.2 Table of Symbols New Online Offline Transfer in Progress Error Initiate Cancellation for Send of Review Cancel Review for User Download Study File Send for Review Canada Bay Medical Centre 8 1.3 CTLink User Manual System Requirements System Compatibility: Microsoft Windows XP Pro SP2 or higher Microsoft Windows Vista or Windows 7 Microsoft Internet Explorer v6, v7 or v8 Minimum Required Configuration: 1.0 GHz processor, 512 MB RAM, 64 MB video card (XP) 1.0 GHz processor, 1 GB RAM, 64 MB video card (Vista) Recommended Configuration: 1.5 GHz processor, 1 GB RAM, 128 MB video card (XP) 1.5 GHz processor, 2 GB RAM, 128 MB video card (Vista) 1280 x 1024 is the recommended screen resolution. Lower resolutions may work in full screen mode (F11). Part II 10 2 CTLink User Manual Quick Guide In this section you can find useful information about CB Link basics and navigation principles used across the portal. You will find information on the following topics: Log In Log Out Current Parameters Menu Perform a Search Navigate a List Tab Navigation Info Bar 2.1 Log In A successful login requires a valid email address and a password of already created account. There is also an option of remembering the user for next log in. From this page you can: Register and set-up an account, following the Join CB Link Today prompts on www.cblink.com.au main page. Quick Guide 11 Recover a forgotten password by clicking on Forgot your password? and following the on-screen prompts. Acquire help on CB Link pages by clicking on Need help? Learn more about Gammasonics Technologies compliance statement by going to HIPAA compliance statement. 2.2 Register To register and set-up an account, follow the Join CB Link Today prompts from the Log In page. The Registration page will open. Canada Bay Medical Centre 12 CTLink User Manual After inserting relevant information create CB Link account clicking on the Create User button, or cancel registration by going to the Cancel button. 2.3 Forgot Your Password? To recover a forgotten password click on Forgot your password? in the Log In page and follow the on-screen prompt. Quick Guide 13 After entering and submitting your Username (email address), a temporary password will be sent to your email account. 2.4 Log Out To log out from CB Link portal, click on the Log Out button at top right corner of the page (as shown in picture below). It will take user to the Log In page of CB Link portal. 2.5 Current Parameters As long as logged in, user can at any time get information on an account and username he is signed in with (marked with 1) and his current practice (marked with 2). Canada Bay Medical Centre 14 CTLink User Manual In a case of having more than one practice, user can to select among his practices from the list (as shown in picture below). 2.6 Menu Navigation in CB Link portal is done through navigation menu. The Menu (marked red) is available from any screen on CB Link portal after user logs in. Quick Guide 15 CB Link users can access different sections of the Menu based on their privileges assigned: Every CB Link User can access Studies and Personal section of the menu. If a Practice Administrator, user can access Manage Practice menu for his practices. If a CB Link Administrator, user can access Administration menu, to manage users, scanners, storage servers, practices and specialties. 2.7 Preform a Search The CB Link pages - My Scans, Practice Users, Users, Scanners and Practices contain a search area to locate specific items. Note: A search will only be performed within the context of the list you are searching in (i.e. study). In the Search area you can: Canada Bay Medical Centre 16 CTLink User Manual Search through the list of items (e.g. studies, practices) based on item property (study title, time range, practice name) Clear all specified search filters on that page 2.8 Navigate a List CB Link pages present various lists of items (e.g. patients, users, scanners). All these lists use the same navigation principles: To navigate through item pages use navigation bar at the bottom of the list (marked with 1) To access item from the list (if functionality allowed) click on relevant item. Page size (number of items on the page - marked with 2) is presented next to the page navigation bar. To set the size of the items page, select one of the options 10, 20 or 50. Total number of items in the list and number of pages is presented in right bottom corner of the page (marked with 3) To order items in the list by specific parameter, click on that parameter in the list header (marked with 4) (e.g. in a case above it is 3. from 12 pages of list of 118 patients presented in descending alphabet order by Patient Name. The page size is set to 10 items per page) 2.9 Tab Navigation Several CB Link pages (e.g. Edit User, Edit Practice in Administration section) contain information in several tabs. Quick Guide 17 To open a tab (marked red in the picture above) click on specific tab name (e.g. Practices). 2.10 Info Bar Relevant information (e.g. upon trying to send a study for review) User can also find in the Info Bar at the top of the page (as shown in picture below). Canada Bay Medical Centre Part III Studies 3 19 Studies To access CB Link Studies pages, click on My Scans within Studies menu (marked with 1). It will take you to My Scans page (as shown in picture below) presenting the list of patients with your studies. Studies are listed under patients' names as shown in the picture below. To find a patient's study, you can search by patient or by a study information. 3.1 Study Details To access studies of one patient, click on symbol '+' left of the patient name. The list of studies (see picture below) will open. Canada Bay Medical Centre 20 CTLink User Manual Note: Your studies are scans that were made by you or that were sent to you for a review. As a CB Link User you can find following details about every study: Study Title Study Date Protocol Study Type Transfer Status A Transfer Status of the study can be: New - for a new study Transfer Started - study with transfer in progress Online - study available for review Error - study transferred with error, not available Only Online studies are available for immediate review. From this page you can: Review study (scan) for a patient by clicking on a Study Title you want to open (see View a Study section) Download a study Send study to a colleague for review Cancel request for study review Studies 3.2 21 View Study To open (review) a study of a patient, click on the Study Title (marked with 1). Note: First time CB Link User is initiating viewing of any study on his computer, the Study Viewer (activeX control) will be downloaded from the server and installed on user's computer. Additionally, every time a new version of the Study Viewer is posted on the server, it will be downloaded again and installed in the same way. If user is trying to access a specific study for the first time on his computer, the study has to be transferred prior to the opening. After the study is transferred (with a status Online), Study Viewer will open it in Study View page (as shown in a picture below) For more information on the Study Viewer see section 7. Study Viewer. Canada Bay Medical Centre 22 3.3 CTLink User Manual Download Study To download a study, click on the Download button (marked red in a picture below) for that study. Window will pop up to specify location where file will be downloaded and saved. 3.4 Request Review To send a request to a colleague to review a study, click on the Review button (marked red in a picture below) for that study. Window will pop up to specify email address of colleague to send review request message: Dear <Name>, A study has been sent to you by <Requester Name>. Please log in to CBLink.com.au to view the study. Best regards, CTLink After sending the request for a scan review, colleague - request recipient will be able to see relevant study in his study list in the My Scans page. In the Review section (marked red) it will be noted on mouse-over who was the request initiator. Studies 3.5 Request Cancellation To cancel request for a study review click on the Cancel button (marked red in a picture below). The window will pop up with the list of current request recipients for that study. To cancel request to a specific user, click on the Cancel button next to him (marked with 1 in the picture). To close the window click on the Close button (marked with 2). Canada Bay Medical Centre 23 Part IV Manage Practice 4 25 Manage Practice To access Practice pages in CB Link portal, go to Manage Practice section of the menu (marked with red). Note: A simple CB Link user, that is not a Practice Administrator will not have access to this section of the Menu. Additionally, note that Manage Practice menu will appear only when user logged in is administrator for currently selected practice (e.g. in the picture above, logged user is a Practice Administrator for current Dr. Smith Practice 4) From Manage Practice menu you can: Invite colleague to the practice by clicking Invite to Practice Manage practice information by clicking on Practice Info Manage Practice Users 4.1 Invite to Practice To send email invitation to a colleague to join your practice on CB Link, click on Invite to Practice within Manage Practice section of the Menu (as shown in the picture) Canada Bay Medical Centre 26 CTLink User Manual Invite to Practice window will pop up (in picture below) for you to specify a practice and email the invitation. After setting the practice name (marked with 1) and entering email address of invitation recipient (marked with 2), send invitation to the address specified in the text box (above) by clicking on the button Send Invitation (marked with 3). A message with following content will be sent: Hi, You have been invited by <Name of Inviter> to join his/her practice on http://www.CBLink.com.au. CB Link is a web-based service designed to complement point-of-care medical imaging systems by providing point-of-expertise viewing and interpretation tools. Primary components include online multiplanar image viewing, offsite data storage, administrative reporting tools, and teleradiology workflow. Once registered, you will be able to remotely review your clinical cases. Registration will take less than 5 minutes and is free of charge. To register, please go to: http://www.CBLink.com.au/Administration/Registration.aspx. Best regards, CB Link To cancel initiation of sending invitation, click on the Cancel button (marked with 4) Invitation to a new user If invitation sent to still not registered user, upon registration invited person will be automatically assigned to the specified practice. Invitation to existing user If invitation to join a practice is sent to an existing CB Link user, next time he logs in to CB Link portal, a window (in a picture below) will pop up informing him of invitation. Manage Practice 27 CB Link user can: Accept invitation by clicking on the Accept button Refuse invitation by going to the Refuse button Postpone decision for later, by clicking on the Cancel button Practice Manager will be able to track invitation responses for specific practice in the Practice Users page (as shown marked red in the picture below) 4.2 Practice Info To update relevant practice information, click on Practice Info within Manage Practice section of the Menu (as shown in the picture). The Practice Info page will open. Canada Bay Medical Centre 28 CTLink User Manual Update the practice information as appropriate, save changes clicking on the Save button or cancel modifications clicking on the Cancel button. Note: Status of relevant practice can be Active or Not Active. If practice not active, ii will not be taken into consideration, as if deleted from the portal. 4.3 Practice Users To access/manage list of users for current practice, click on Practice Users within Manage Practice section of the Menu (as shown in the picture). Practice User List will open. On this page you can, as a practice administrator, see all users of the specified practice and search through them. Manage Practice 29 Note: Practice User Status can be: Active - for user active in that practice Not Active - for user not active in that practice Invited - for user invited to join specified practice Rejected - if user decided to reject specified practice invitation Practice User Privilege can be: Practice Member - a regular user with no Practice Administration privilege for specific practice. While logged on for that specific practice he will not have a Manage Practice option in his menu. Practice Administrator - advanced user with Practice Administration privilege to manage specific practice. While logged on for that specific practice he will have a Manage Practice option in his menu. Edit User To access a specific Practice User details, click on the name of that user from the list. Edit User window will pop up (in picture below). Canada Bay Medical Centre 30 CTLink User Manual Change Privilege or Status of selected user, update information and save changes by clicking on the Save button (in the picture above). To cancel potential changes (before saving) and close Edit User window click Close button. 4.4 Search for Doctor To search for a doctor from specific practice, log in as a Practice Administrator and click on Search for Doctor within Manage Practice section of the Menu (as shown in the picture). Search for Doctor page will open. On this page you can, as a Practice Administrator, see all doctors of the specified practice and search through them. Manage Practice Canada Bay Medical Centre 31 Part V Personal 5 33 Personal To access Personal pages in CB Link portal, go to Personal section of the menu (marked with red). Note: All CB Link account roles can access this menu section. From here you can: Send invitation to join CB Link to a specific email Manage personal information by clicking on Personal Information Change password Change security Q&A 5.1 Send Invitation To send email invitation to a colleague to join CB Link, click on Send Invitation within Personal section of the Menu (as shown in the picture) Canada Bay Medical Centre 34 CTLink User Manual Send Invitation window will pop up (in picture below) for you to enter email address to which you would like to send invitation. After entering email of an invitation recipient (marked with 1): To send email invitation to the address specified in the text box above, click on the button Send Invitation (marked with 2). A message with following content will be sent: Hi, You have been invited by <Name of Inviter> to register on http://www.CBLink.com.au. CB Link is a web-based service designed to complement point-of-care medical imaging systems by providing point-of-expertise viewing and interpretation tools. Primary components include online multiplanar image viewing, offsite data storage, administrative reporting tools, and teleradiology workflow. Once registered, you will be able to remotely review your clinical cases. Registration will take less than 5 minutes and is free of charge. Please, go to: http://www.CBLink.com.au/Administration/Registration.aspx. Best regards, CB Link To cancel initiation of sending invitation, click on the Cancel button (marked with 3). 5.2 Personal Information To update your personal information, click on Personal Information within Personal section of the Menu (as shown in the picture). Personal 35 The Personal Info page will open. Update your information as appropriate and save changes clicking on the Save button or cancel modifications clicking on the Cancel button. 5.3 Change Password To change your CB Link account password click on Change Password within Personal section of the Menu (as shown in the picture). Canada Bay Medical Centre 36 CTLink User Manual After entering an old and new password (with confirmation) as shown in the picture below, to change password, click on the Change Password button or cancel the changes clicking on the Cancel button. Note: According to CB Link password policy, password should have: - length 5-15 characters - at least one numeric character 5.4 Change Security Q&A To change security question and answer for your CB Link account, click on Change Security Q&A within Personal section of the Menu (as shown in the picture). Personal 37 After entering your password (as shown in the picture below), to change security question and answer, insert the new values and click on the Change Security Answer button or cancel the changes clicking on the Cancel button. Canada Bay Medical Centre Part VI Administration 6 39 Administration To access Administration pages in CB Link portal, go to Administration section of the menu (marked with red). Note: A simple user, which is not a CB Link Administrator will not have access to Administration section of the Menu. From Administration menu you can: Manage CB Link Users Manage CB Link Scanners Manage Storage Servers Manage Practices Manage Specialties list Canada Bay Medical Centre 40 6.1 CTLink User Manual Users To manage CB Link users, click on Users within Administration section of the Menu (as shown in the picture). The User List will open (picture below). As a CB Link Administrator, on this page you can see and search list of all users defined in CB Link portal (including not active users) . Edit User To access/update a specific user details, click on username from the list. Edit User page will open (picture below). All user information in this page are presented in four tabs: Personal Information (open as default Edit User tab) Password Security Q&A Practice Administration 41 In Personal Information tab, CB Link Administrator can modify any personal information about the user (also see section Personal, Personal Information). Additionally, in this tab administrator can set roles for any selected user: User role - CB Link user can access Studies and Personal section (and Manage Practice if he is Practice Administrator) Administrator role - CB Link Administrator can additionally access Administration section to manage users, scanners, storage servers, practices and specialties Canada Bay Medical Centre 42 CTLink User Manual In Password tab (picture above) CB Link Administrator can change password of any selected user (also see section Personal, Change Password). Administration 43 In Security Q&A tab (picture above), CB Link Administrator can set security question and answer for any user. In Practices tab, CB Link Administrator can access list of all practices relevant for selected user. Administrator can manage relevant user role for any selected practice from the list (also see section Manage Practices, Practice Users). Add User After clicking on the Add User button at the bottom of User List (Users section in Administration menu), the Add User page will open (picture below) Canada Bay Medical Centre 44 CTLink User Manual To add a new user, CB Link Administrator will enter all relevant user information, set his roles, security information and password and go to the Save button. To cancel user insertion (before saving) Administrator can click the Cancel button. Note: To map CB Link User to the existing doctor in CT Premium, please contact Medica technical support at [email protected] 6.2 Scanners To manage scanners in CB Link portal, click on Scanners within Administration section of the Menu (as shown in the picture). The Scanner List will open (picture below). As a CB Link Administrator, on this page you can see list of Administration 45 all scanners defined in CB Link portal. Edit Scanner To access/update a specific scanner details, click on the name of that scanner from the list. Edit Scanner window will pop up (in picture below). After updating scanner information save changes by clicking on the Save button (in the picture above). Canada Bay Medical Centre 46 CTLink User Manual To cancel potential changes (before saving) and close Edit Scanner window click the Close button. Add Scanner To add a new scanner to the list, click on the Add Scanner button in the Scanner List page. Add Scanner window will pop up (in picture below). Insert new scanner details and save changes by clicking on the Save button (in the picture below). To cancel potential changes (before saving) and close Add Scanner window, click the Close button. Note: A new scanner should be added only with CT Premium installation. If needed, to map a scanner with to the existing one with CT Premium, please contact our Medica technical support at [email protected]. 6.3 Storage Servers To manage storage servers in CB Link portal, click on Storage Servers within Administration section of the Menu (as shown in the picture). The Storage Server List will open (picture below). As a CB Link Administrator, on this page you can see list of all storage servers defined in CB Link portal. Administration 47 Edit Storage Server To edit a specific storage server details, click on the name of that server from the list. Edit Storage Server window will pop up (in picture below). After updating server information save changes by clicking on the Save button (in the picture above). To cancel potential changes (before saving) and close Edit Storage Server window click the Close button. Canada Bay Medical Centre 48 CTLink User Manual Add Storage Server To add a new storage server to the list, click on the Add Server button in the Storage Server List page . Add Storage Server window will pop up (in picture below). Insert new server details and save changes by clicking on the Save button (in the picture below). To cancel potential changes (before saving) and close Add Storage Server window, click the Close button. 6.4 Practices To manage practices in CB Link portal, click on Practices within Administration section of the Menu (as shown in the picture). The Practice List will open (picture below). As a CB Link Administrator, on this page you can see and search list of all practices defined in portal (including not active practices) . Administration 49 Edit Practice To access/update a specific practice details, click on the name from the list. Edit Practice page will open (picture below). All practice information in this page are presented in three tabs: Practice Information (open as default Edit Practice tab) Users Scanners Canada Bay Medical Centre 50 CTLink User Manual In Practice Information tab, CB Link Administrator can modify any information about the practice (also see section Manage Practice, Practice Info), including practice status. Administration 51 In Users tab (picture above) CB Link Administrator can manage users and their roles for relevant practice (also see section Manage Practice, Practice Users). In Scanners tab (picture above), CB Link Administrator can see list of scanners for selected practice. Add Practice After clicking on the Add Practice button at the bottom of Practice List (Practices section in Administration menu), the Add Practice page will open (picture below) Canada Bay Medical Centre 52 CTLink User Manual To add a new user, CB Link Administrator will enter all relevant practice information, set practice status and go to the Save button. To cancel practice insertion (before saving) Administrator can click the Cancel button. 6.5 Specialties To manage list of specialties in CB Link portal, click on Specialties within Administration section of the Menu (as shown in the picture). The Specialty List will open (picture below). As a CB Link Administrator, on this page you can see list of all specialties defined in CB Link portal. Administration 53 Note: Specialty Status can be: Active - for specialties currently active in the portal Not Active - for specialties that should not be displayed in the Specialty List presented to CB Link user. This is alternative of removing existing specialty from the list, equivalent to deletion of that specialty. Edit Specialty To access/update a specific specialty details, click on the name of that specialty from the list. Edit Specialty window will pop up (in picture below). Canada Bay Medical Centre 54 CTLink User Manual Change specialty details (Name, Description) or specialty Status, update information and save changes by clicking on the Save button (in the picture above). Cancel potential changes (before saving) and close Edit Specialty window by clicking Close button. Add Specialty To add a new specialty to the list, click on the Add Specialty button (at the bottom of Specialty List page). Add Specialty window will pop up (in picture below). Insert specialty details (Name, Description) and save changes by clicking on the Save button (in the picture above). To cancel potential changes (before saving) and close Add Specialty window click Close button. Part VII 56 7 CTLink User Manual Study Viewer Main components of CB Link Study Viewer are: Panels group (Views panel, Tools panel, Regions panel) The Viewing panel The changes made in the Study Viewer (window/level, zoom, position, filter, rotation, drawn regions, selected view, etc.) will be saved and applied to the study when it’s opened again. The only exception is the Show 3D option from the Tools context menu. This option needs to be activated manually. 7.1 The MPR View The MPR view is a default view and when study is opened for the first time, this view will be selected and displayed. Selecting the MPR view is done by clicking the MPR button in the Views panel. It contains four different panels: Axial Coronal Sagittal 3D Panel Study Viewer 57 The Axial panel shows axial frames. This is the only panel where Panoramic, Oblique and TMJ regions can be drawn. Except from that these panels behaves the same as Coronal or Sagittal panel. The Axial, Coronal and Sagittal show all frames of the corresponding frame type. The scroll bar on the right side of each view enables scrolling through frames. The 3D panel is initially empty. 3D viewing is enabled from the tools context menu. When the Display 3D item is clicked a progress bar will appear in the 3D view, showing progress of 3D opening. When slices downsampling is done a 3D image will be shown and the 3D View button will be added to the View panel. The 3D Panel allows 3D model rotation, zoom in and out, changing Window/Level settings, changing the applied palette, and quick navigation. The rotation is performed by clicking and dragging the model to the desired angle and position. The zoom in and zoom out operations are enabled via left/right clicking. The viewing palette can be changed by selecting the desired palette from the palette combo box. When moving the mouse pointer above the currently selected palette value the Palette combo box will show available palettes (Bone, Skin, Skin Red, Default, Default 2m and ISI). Quick navigation buttons enable quick positioning of the 3D model. The button letters stand for: L = Left Lateral R = Right Lateral A = Anterior P = Posterior S = Superior I = Inferior Canada Bay Medical Centre 58 7.2 CTLink User Manual The Axial, Coronal and Sagittal Views The Axial view is opened when the Axial view button from the Views panel is pressed. All Axial frames will be shown in this view in a matrix form. Window level changing is supported in this view, but changes made in one of these views will affect other two views. Pitch, slice thickness, position, scroll position and column number can be set, individually for each view. These values will be saved when current study is closed. 7.3 Selected View Selected view type shows all selected images. It shows the Columns button where number of columns can be set. The Pan tool is available in this tool. 7.4 3D View This view shows 3D model, same as one available in the MPR view as an independent view. Study Viewer 7.5 59 Tools Panel The main components of Tools Panel are: Pan W/L Distance Rectangle Ellipse Text Label Panoramic Oblique TMJ The Tools context menu. The Pan tool is a default tool. When the tool is selected, the application allows the user to drag/drop study images within their parent view, thus changing the position of the images. Also, the application allows the user to zoom in / zoom out the images, and to drag / drop the horizontal and vertical hairlines of the displayed images. To move image to new position make sure that pan tool is selected, and position the mouse pointer above the desired image. Left click and drag / drop the image to the desired position. To zoom in / zoom out left click / right click above the image. The W/L or Window/Level tool is used to set window and level of the displayed images in one of the available views. The Window/Level changes made in one of the views will affect all views. If W/L is changed in the Axial view, this action will affect Coronal and Sagittal views as well, and vice versa. Changes in one of the view panels in the MPR view will affect Axial, Coronal, and Sagittal panels, and the Axial, Coronal and Sagittal views. The Window/Level context menu allows selection of predefined values, creating new and deleting old values, and saving current values. The W/L context menu can be opened by clicking the arrow shaped button next to the W/L tool. The Context menu will show all predefined values, and it will show Edit current window level and Save current window level items. To apply one of predefined values just select it from the list. Tools context menu is displayed when clicking the tools button at top of the Tools panel. It contains the following options: Show ruler – when enabled, all viewing panels will display horizontal and vertical rulers, and vice versa. Canada Bay Medical Centre 60 CTLink User Manual Show overlay – when enabled, the application will display overlay (rulers, patient info, and hairlines) on all viewing panels. Show pixel info – when enabled, the application will show HU values of the pixels according to the position of the mouse pointer. MIP – when enabled, the application will display all study frames with Maximum Intensity Projection (MIP). Filter – gives a list of filters that can be applied to displayed frames. Selecting a filter from the list will automatically change the frame display. Restore position and size – clicking this option restores the position and zoom of the displayed frames to the original setting (100% zoom and the frame is positioned in the top left corner). Restore original tilt – clicking this option restored the original study tilt. Load region of interest – enables importing predefined ROI file and applying study viewing settings as defined in the imported file. Save region of interest – enables saving current study viewing settings into a ROI file. Open 3D / Close 3D – enables / disables 3D viewing. Viewing settings – clicking this option displays a dialog box used for defining various study viewing settings (default regions’ colors, names, captions, etc.). The first two options are enabled by default. The Distance tool enables drawing measuring region on study slices. To draw the region, mark the position of start and end points between which the line should be drawn. The region can be drawn on all viewing panels, with exception of 3D and Selected slices views. The region will display its length, measured in millimeters. The region will be visible only on the slice on which it was drawn. The region has the following edit options, accessible through the region’s context menu: Go to region Visible Study Viewer Change name Change color Delete Delete all regions 61 The Ellipse and Rectangle tools enable drawing ellipse/rectangle shaped region on study slices. To draw the region, mark the position of two points defining a rectangle that will border the resulting region. The region can be drawn on all viewing panels, except from 3D and Selected slices views. The region shows the medium (average) value and the standard deviation of HU values of the pixels contained by the region. The area of the region is also displayed, measured in square millimeters. The region will be visible only on the slice on which it was drawn. The region has the following edit options, accessible via region’s context menu: Go to region Visible Change name Change color Set water attenuation coefficient Delete all regions Delete Canada Bay Medical Centre 62 CTLink User Manual The Text tool enables drawing of text display region. To draw the region, mark the position of the two points that will define a rectangular border of the region. The region can be drawn on all viewing panels, with exception of 3D and Selected slices views. The region will initially show default text. The region’s text can be changed using the Edit caption option. The region will be visible only on the slice on which it was drawn. The region has the following edit options, accessible through the region’s context menu: Go to region Visible Change name Change color Edit caption Delete all regions Delete The Label tool enables drawing of label region on study slices. To draw the region, mark the position of start and end points between which line should be drawn. The start point will be pointed to, and at the end point label’s text will be shown. This region will be visible only on the slice on which it was drawn. The region has the following edit options, accessible through the region’s context menu: Go to region Visible Change name Change color Edit caption Delete all regions Delete Study Viewer 7.6 63 Panoramic Tool and Panoramic View The Panoramic Tool enables drawing of panoramic region. To draw the region, mark the position of the control points that will define the shape of the region and the application will automatically draw a curve through the control points. The last control point is indicated by mouse double click. The region can be defined by at least two control points. The region can be drawn only on Axial slices. Once it is drawn the region will be visible on all slices of the Axial view type. The region can be edited through the following options, accessed via region’s context menu: Go to region Visible Change name Change color Show hashmarks – enables display of region’s hasmarks Insert point Delete point Delete all regions Delete Canada Bay Medical Centre 64 CTLink User Manual The region is used for defining Orthopan images. This means that the curve drawn in the Axial view will generate an image as a vertical intersection of the panoramic curve and all Axial slices of the study, forming a 2D Orthopan image. The generated image is displayed in the Panoramic view. The Panoramic view is consisted of three viewing panels: Axial, Panoramic and Cross section. The Panoramic viewing panel displays the resulting Orthopan image. The functionalities of the panel are similar to the functionalities of the basic MPR viewing panels. Additionally, the panel displays a Vertical hairline that can be dragged / dropped by the user, and this hairline represents the position on the panoramic curve. The Cross section viewing panel displays images generated as vertical intersections of the normals on the panoramic curve along its length and Axial slices. The user can set the width and height of the cross sectional images. The center of the image positioned in line with the currently displayed Axial slice (vertical position) and current position of the vertical panoramic hairline (horizontal position). The user can define slice thickness and pitch (distance between two subsequently displayed images, measured in mm) of cross sectional images, as well as a number of images displayed in the viewing panel. The user can draw 2D regions (distance, label, text, ellipse and rectangle) on both panoramic and cross sectional images. These regions are called child regions, and the panoramic region is named parent region. Deleting the parent panoramic region will cause a deletion of all of his child regions. Changing MIP, Filter and WL settings will affect both panoramic and cross sectional images, but it will leave the Axial images intact. Study Viewer 7.7 65 Oblique Tool and Oblique View The Oblique tool enables drawing of oblique region. To draw the region, mark the position of two control points and the application will automatically draw a line connecting the control points. Unlike the Panoramic region the oblique region can be defined by two and only two control points. The region inherits almost all functionalities of the Panoramic region, hence this chapter will describe only the features that differ from the Panoramic region’s behavior. The region can be edited through the following options, accessed via region’s context menu: Go to region Visible Change name Change color Delete all regions Delete Canada Bay Medical Centre 66 7.8 CTLink User Manual TMJ Tool and TMJ View The TMJ tool enables drawing of The Temporomandibular Joint (TMJ) region. To draw the region, mark the position of two control points and the application will automatically draw a line connecting the control points. It will also generate a line mirror axial symmetric to the previous one. The region can be drawn only on Axial slices of the study. Once it is drawn the region will be visible on all slices of the Axial view type. The TMJ lines can be moved on the Axial slices – the user can drag and drop one of the lines, and the remaining line will be translated along with the first one. Additionally, the user can change the position of just one TMJ line by dragging/dropping it while pressing the CTRL key on the keyboard. Also, the user can change direction and length of both TMJ lines separately, without affecting the position, location or length of the other line by dragging / dropping control point of the desired TMJ line. Study Viewer 67 The region can be edited trough the following options, accessed via region’s context menu: Go to region Visible Change name Change color Delete all regions Delete The region is usually used for generating panoramic images of condyles. This means that the lines drawn in the Axial view will generate two images as a vertical intersection of the TMJ lines and all Axial slices of the study, forming a set of 2D panoramic image. The generated images are displayed in the TMJ view. Canada Bay Medical Centre 68 CTLink User Manual The TMJ view is consisted of five viewing panels: Axial, TMJ left, TMJ right, Cross section left and Cross section right. The TMJ left and right viewing panels display the resulting panoramic images. The functionalities of the panels are the same as the functionalities of the Panoramic and Oblique panels. The Cross section viewing panels display images generated as vertical intersections of the normals on the TMJ lines along its length and Axial slices. The Cross section panels work in the same way as the Cross section panels of the Oblique and Panoramic views. 7.9 Regions Panel The Regions Panel represents a list of all existing regions. When a region is drawn it is automatically added to the Regions Panel. Each region has its context menu that can be accessed by right clicking on region item in the list. The context menu items differ depending on region type. However there is a list of items that is common for all regions: Go to region – selecting this item will navigate to the frame containing selected region, making it currently visible. Visible – determines region’s visibility. If one of the regions needs to be hidden, simply uncheck this option for wanted region. The option is checked by default. Change name – enables existing region’s name change. To change region name click on the Change name item, this will prompt the input box dialog, allowing you to enter new name of the region. Click the OK button to save your changes. Change color – allows changing region’s color. With the targeted region selected select the Change region color menu item. The color dialog box will open. Select the desired color and click the OK button, to change the color of the selected region. Delete – deletes the selected region. Delete all regions – deletes all existing regions from the study. Part VIII 70 8 CTLink User Manual Refer Study Acquisition In this section you can find more information about study referrals and interconnection of CT Premium systems with CB Link portal. CT Premium system is a system comprising of CT Premium client desktop application and CT Premium scanner device, that is used for acquiring and viewing of patient's scans. Referral of study acquisition is a process of acquiring patient's scan from one of CT Premium Ordering Practices through CB Link portal. Referring Doctor can refer a patient to one of CT Premium Ordering Practices for a scan and then access the relevant study through CB Link portal. Crucial roles in this process are: Patient which needs a scan. Ordering Practice and Doctor - Doctor and a practice with CT Premium system that can perform scan acquisition of the patient. Referring Doctor - Doctor requesting a patient scan. He refers the patient to an Ordering Practice, where Ordering Doctor will, with his Performing Doctor/Technician, make patient scan in CT Premium and refer it to CB Link portal for the Referring Doctor to see it. Performing Doctor/Technician - User logged in CT Premium application, making a patient scan to refer it to the Referring Doctor in CB Link portal. Note: In a case of a patient visiting directly practice with CT Premium system (Ordering Practice), Referring and Ordering Doctor will be the same and only the Ordering Doctor will be listed for the study acquired. Very often, Ordering Doctor is the same person as Performing Doctor/Technician. Prior to referring study acquisition, Referring Doctor has to be a registered CB Link user. If Referring Doctor is not a CB Link user, before any referrals he has to register in CB Link portal (as describe in section Register in Quick Guide chapter). Ordering Doctor is always a CT Premium user. 8.1 Refer Study Acquisition in CT Premium To do a scan acquisition for a patient referred to his Ordering Practice, Performing Doctor/Technician should log in into CT Premium application and go to the Study Acquisition Form for patient (as shown in picture below) Refer Study Acquisition 71 After setting all other relevant parameters for a new study (see CT Premium Manual), in order to set Referring and Ordering Doctor in CT Premium, the Performing Doctor/Technician should insure that Referring and Ordering Doctor were previously linked with their CB Link accounts through Username or ID. Note: Insuring link between CT Premium and CB Link accounts for doctors will provide that Ordering and Referring Doctor can access the study in CB Link portal when acquisition is completed. To set Ordering Doctor for the study, Performing Doctor/Technician should select doctor from Ordering Physician drop down list for an existing and linked Ordering Doctor (marked 1 in picture above), or add a new Ordering Doctor clicking on '+' button (marked 2) and link him as described in section Linking Ordering Doctor of this chapter. To set Referring Doctor for the study (if any), Performing Doctor/Technician should select doctor from Referring Physician drop down list for an existing and linked Referring Doctor (marked 3 in picture above), or add a new Referring Doctor clicking on '+' button (marked 4) and link him as described in section Linking Referring Doctor in CT Premium to CB Link Doctor of this chapter. After setting all relevant parameters, to create a scan start acquisition (marked 5). Upon successful scan acquisition, study will be automatically sent to CB Link and both Ordering and Referring Doctor will be able see it in their My Scans section of portal. Canada Bay Medical Centre 72 CTLink User Manual Note: In a case of a patient visiting directly practice with CT Premium system (Ordering Practice), given that Referring and Ordering Doctor will be the same, only the Ordering Doctor will be listed for the scan acquired. 8.2 Acquire Doctor's Username or ID from CB Link To acquire doctor's username or ID (Guid) in CB Link portal, log in to CB Link as a Practice Administrator and go to Search for Doctor page (as describe in Search for Doctor paragraph in Manage Practice section). You will find username or ID for the relevant Doctor in columns Username and Guid of the table. 8.3 Link Ordering Doctor If Ordering Doctor already is a CT Premium user, before any scan acquisition, Ordering Doctor in CT Premium has to be linked with the his CB Link account through his ID (Guid). To do that, log in to CT Premium, go to Options (marked red) in Patient Management Form (as shown in picture below) and click on User Management Refer Study Acquisition 73 User Management page will open. Select Ordering Doctor from User List and click Edit to open User page (as presented below) Canada Bay Medical Centre 74 CTLink User Manual In CB Link ID field (marked with 1) insert doctor's CB Link Guid (e.g. 8c7ae51d-c4d9-4cf3-b1fb26cd606217ef), acquired as described in section Acquire Doctor's Username or ID from CB Link of this chapter and save changes clicking the Save button. After Ordering Doctor is linked with his CB Link account, he will be able to see all his studies in CB Link portal in My Scans section (as described in chapter Studies) Linking CT Premium and CB Link accounts for Ordering Doctor should be done only once per doctor and should not be repeated for every scan acquisition. Adding and Linking a New Ordering Doctor If Ordering Doctor is still not a CT Premium user, before any scan acquisition or linking, he has to be added to CT Premium application as CT Premium User, by clicking New button in User Management page. User form will open. Insert relevant information including acquired CB Link ID and create new CT Premium User pressing Save button. A new Ordering Doctor can also be added from the Acquisition Form, by clicking on '+' button next to Ordering Physician field (marked with red in picture below). Refer Study Acquisition 8.4 75 Link Referring Doctor If Referring Doctor is already a CB Link user, before starting any scan acquisition, Referring Doctor in CT Premium has to be linked with his CB Link account through Username or ID. To do that, log in to CT Premium, go to Options (marked red) in Patient Management form (as shown in picture below) and click on Referring Physicians. The Referring Physicians page will open (as shown in picture below). Canada Bay Medical Centre 76 CTLink User Manual To add/link to a new Referring Doctor from CB Link, click on button New (marked with 1). The Referring Physician will open. To link Referring Doctor, insert in Username or ID field in the form his username or ID (Guid) acquired as described in section Acquire Doctor's Username or ID from CB Link in this chapter and click on Verify User button. If verification is successful, other fields (First Name, Last Name) in the form will populate with data from CB Link. After successful verification, by clicking on Save button you will create and link new Referring Doctor in CT Premium. In a case of unsuccessful verification check acquired Username or ID from CB Link and contact CB Link Administrator. A new Referring Doctor can also be added from the Acquisition Form, by clicking on '+' button next to Referring Physician field (marked with red in picture below). Refer Study Acquisition 77 To edit existing Referring Doctor in CT Premium, select him from the list in the Referring Physicians page (as shown in picture above) and click on Edit button (marked with 2). After Referring Doctor is linked with his CB Link account, he will be able to see all his referred studies in CB Link portal in My Scans section after the acquisition (as described in chapter Studies) 8.5 Study in CB Link To see a referring scan, Referring Doctor (or Ordering Doctor) should log in to CB Link portal and access the study in his My Scans section, as described in chapter Studies. Canada Bay Medical Centre