1
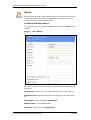
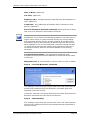
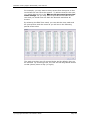
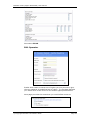
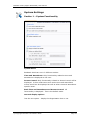
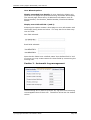
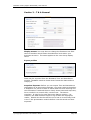
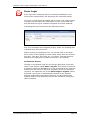
User Manual
BioMatch 2006 (Sagem Embedded)
BioMatch 2006 (Sagem Embedded) User Manual
Table of Contents
Table of Contents ...................................................................... 2
Introduction.............................................................................. 3
Terms used in this manual.......................................................... 4
Getting Started ......................................................................... 5
Computer hardware requirements....................................................... 5
Windows requirements ...................................................................... 5
Installation of BioMatch 2006 software ................................................ 5
Installation Notes......................................................................................5
Version after installation ............................................................................6
Software licenses.............................................................................. 6
Procedure for activation of licences .............................................................7
Running BioMatch 2006.............................................................. 8
Login............................................................................................... 8
Overview ......................................................................................... 9
Administration..........................................................................10
Organization Unit............................................................................ 10
Creating an organization unit ................................................................... 10
Biometric Terminals ........................................................................ 11
Create a Biometric Terminal ..................................................................... 11
Modify a Biometric Terminal ..................................................................... 12
Biometric Terminal Actions....................................................................... 12
Deleting a Biometric Terminal................................................................... 14
Business Units................................................................................ 15
Create a new Business Unit ...................................................................... 15
User Groups................................................................................... 16
Create a new User Group ......................................................................... 16
Users ............................................................................................ 23
Creation and Enrolment ........................................................................... 23
User Actions........................................................................................... 28
Operators ...................................................................................... 30
Creating a new operator .......................................................................... 30
Edit Operator ......................................................................................... 32
Report Templates ........................................................................... 33
Access Logs ................................................................................... 35
System Settings ............................................................................. 37
Section 1 – System Functionality .............................................................. 37
Section 2 - Automatic Log management .................................................... 38
Section 3 - T & A General ........................................................................ 39
Error Logs...................................................................................... 42
Event Logs..................................................................................... 43
Reports Centre .........................................................................44
User Activity Report ........................................................................ 44
Biometric Terminal Activity Report .................................................... 45
User Group Activity Report....................................................................... 45
All Activity (included all users and biometric terminals). .............................. 45
Time and Attendance ................................................................46
Search for Shifts............................................................................. 46
Shift Actions........................................................................................... 48
Shift Reports .......................................................................................... 48
Search for Saved Shifts (Snapshots) ................................................. 48
Snapshot Reports ................................................................................... 49
Backing up the database ...........................................................50
Method 1 - SQL backup ................................................................... 50
Method 2 – Copying the two files to a secure place ............................. 54
Warranty .................................................................................55
Support ...................................................................................55
© Copyright Biometric Innovations 2006
Page 2
BioMatch 2006 (Sagem Embedded) User Manual
Introduction
BioMatch 2006 is a software application that works with biometric
hardware to capture users’ finger prints, video images (stills) and
personal details which are stored in a database. The fingerprint
information is sent to specified biometric terminals which are
placed at locations where users will either gain access with the use
of their finger (access control) or clock on and off during the day
(time and attendance).
BioMatch supports the SAGEM range of biometric terminals.
This manual covers all aspects of BioMatch 2006 with emphasis on
detail for the areas that are most commonly used.
The common actions performed include the Administration of:
•
•
•
•
Users and Operators (Add, Edit & Delete)
Access point management (Biometric terminals)
Personnel Groups and Personnel
Logins
Also covered in this document are the procedures for:
•
•
•
Running reports
Interpreting the Event Log
System Settings
The last section covers the procedures for:
•
•
Rebuilding access points
Sending individual user data to the terminal(s).
BioMatch 2006 (Sagem Embedded) is the latest generation of the
Access Control and Time and Attendance software suite and was
designed with ease of use in mind, so you will find that most steps
to add personnel or access points are as simple as clicking “New”
and then following the onscreen instructions.
© Copyright Biometric Innovations 2006
Page 3
BioMatch 2006 (Sagem Embedded) User Manual
Terms used in this manual
The term “Users” in the previous release, BioMatch 6.0, referred to
those who administered the system. Those Users are now known as
“Operators”.
“Personnel” in BioMatch 6 are now known as “Users” in BioMatch
2006.
Users
Persons who will have their biometric data
(or minutia) sent to the selected Access
Points for identification purposes for either
access Control or time and Attendance.
Operators
An operator is a person who uses the
BioMatch 2006 Client software. Operators
are the only people who can logon to the
BioMatch 2006 software. The
Administrator operator has full access.
Other operators with limited rights can be
created.
User groups
User groups are means by which groups of
users can be managed. Access points are
allocated and Time masks can be applied
to a group of users via User Groups.
Event Logs
The event log details the inner workings of
the BioMatch system and will provide
detailed information regarding the
communications status of the BioMatch
2006 software and the MorphoAccess
hardware units.
Biometric Terminals
The biometric devices at which the users
present their finger for identification.
© Copyright Biometric Innovations 2006
Page 4
BioMatch 2006 (Sagem Embedded) User Manual
Getting Started
This section describes the requirements for a BioMatch 2006 Sagem
Embedded system.
Computer hardware requirements
Processor:
RAM:
Ports:
CD ROM:
Internet Access:
P4 or AMD 1.8GHz minimum speed
recommendations
512MBytes
Two spare USB ports for enrolment device and
USB stick and Ethernet NIC port, 10 or
100mbps
required if no Internet Access available
Required for updates or updates to loaded via
USB stick or CD ROM
Windows requirements
Windows version: Microsoft Windows XP Professional SP2,
Windows 2000 SP4 or Windows Server 2003 R2.
Installation of BioMatch 2006 software
You will receive the latest CD ROM based version upon placement
of order along with a serial number on an accompanying form. The
content of the CD ROM is identical to that found on the web site.
The latest software and patches can be obtained by visiting:
http://kb.biometricinnovations.com
The version of installed BioMatch 2006 can be identified by opening
the Control Panel and running Add / Remove Programs, selecting in
turn BioMatch Server and BioMatch 2006 Client and clicking on
‘Click here for Support Information’.
Installation Notes
The CD contains both the client and server software. Following are
pertinent points of interest:
•
•
A pc can be both the server and the client.
Should the administrator prefer to have the server software
installed on a dedicated server then firstly the BioMatch
server software would be installed on that server followed
by the client software on the appropriate client pc(s).
© Copyright Biometric Innovations 2006
Page 5
BioMatch 2006 (Sagem Embedded) User Manual
Version after installation
Software licenses
There are three licences required for BioMatch 2006 to function
complete:
1. Server licence
2. Client licence
3. Access Point licence.
BioMatch 2006 consists of server and client software and uses an
SQL database that may reside on the same pc as the client or on a
remote pc.
The BioMatch 2006 server software can be installed on a LAN
connected remote pc such as a corporate server.
The Client software may be installed on any pc that has direct
access to the server or pc that holds the BioMatch 2006 Server
software.
After installation, without licensing, BioMatch 2006 will run for 30
days allowing operation of all functions.
There are three licences that need activation – Server, Client and
Access Point (one per biometric terminal).
© Copyright Biometric Innovations 2006
Page 6
BioMatch 2006 (Sagem Embedded) User Manual
Procedure for activation of licences
The BioMatch 2006 licence manager can be found by clicking on the
start menu then selecting “BioMatch 2006”, followed by “Server
Tools” and then “Licence Manager”.
Click the Add button and select the type of licence required. Enter
the serial code that was provided and an install code will be
generated. Both the serial code and install code need to be given
to the support staff at Biometric Innovations. An activation code
will then be provided by the support staff. Click Save Changes to
complete the activation. This procedure will need to be repeated
for every serial code.
© Copyright Biometric Innovations 2006
Page 7
BioMatch 2006 (Sagem Embedded) User Manual
Running BioMatch 2006
Login
Each time BioMatch 2006 client software is run, you are greeted
with a Login screen.
This login screen prompts you to enter a Username & Password.
BioMatch 2006 ships with the default Username “administrator”
and Password “password”. BioMatch cannot be started without
entering a valid user name. There should be a password associated
with each user name.
(NOTE: Remove the quotes when entering this information into the
login screen). Once you have entered the required username &
password, click “OK” to login.
© Copyright Biometric Innovations 2006
Page 8
BioMatch 2006 (Sagem Embedded) User Manual
Overview
The main BioMatch 2006 screen has, at top, a horizontal listing of
icons (Home, User Management, Time & Attendance, Reports,
Administration, Help, Change password, Log Out, Close
BioMatch) and a vertical listing of icons on the left hand side of
the screen. You may select from either the top or left hand side
listings.
© Copyright Biometric Innovations 2006
Page 9
BioMatch 2006 (Sagem Embedded) User Manual
Administration
The administration section is where all the configuration and setup
of BioMatch occurs. BioMatch logs are also available in this section
allowing the operator to view errors, events and access. When
setting up BioMatch for the first time the following items need to be
created in this order: Organization Unit (if available), Biometric
Terminals, Business Units, User Groups and Users.
When creating or editing an item, if a text entry box is coloured it
means that the information is required to complete the creation of
that item.
When managing items in the administration section, all actions
available in the toolbar are also available from a right click menu.
If no items are selected the right click menu will only show the
available actions that can be performed, which is generally just
“Create a new Item”
Organization Unit
Organization units can be used to manage situations where a site
consists of multiple organizations administered by a central
authority. This allows individual organizations to manage their own
information and keep it separate and hidden from other
organization units.
Organisational units will only be visible if the system is configured
for this.
Creating an organization unit
Organization units can be created by selecting the organization unit
section in administrator and selecting “New” from the toolbar.
Enter the Name and Description of the Organization Unit and then
click “Finish”. If you do not want to save this Organisation Unit
click cancel.
© Copyright Biometric Innovations 2006
Page 10
BioMatch 2006 (Sagem Embedded) User Manual
Biometric Terminals
A Biometric Terminal is a physical unit that stores fingerprint
information for access control and access logs for time and
attendance.
Create a Biometric Terminal
Select the Biometric terminals section then Click New in the toolbar
All Biometric terminals should be created before Groups and Users
are created, in order for the assignment of access rights to
continue.
Type data into the fields as follows:
Name: The name of the Biometric terminal.
Description: A description of the Biometric Terminal.
Location: Where this terminal will / has been placed.
Time Zone: It is important that this field is entered correctly as it
will affect the time displayed on the terminal and time access logs
are recorded to have occurred.
Site Code: Normally all terminals on a site will have the same
number.
Hardware serial number: Used to record the serial number on
the hardware device. This is optional.
Role: This is an important choice as it will determine the way in
which time and attendance functions will operate. There are four
choices: “None”, “Start/Stop”, “Start” and “Stop”.
You would select “Start/Stop” if this terminal was to be used to
record the times that staff enter and leave the area. In this mode
(Time & Attendance), the users press the far left blue key (IN)
before applying their finger (start of shift) and must press the right
hand blue button (OUT) before applying their finger at end of shift.
Select “Start” for all access at this terminal to be recorded as a
start log and similarly select “Stop” for a stop log to be recorded.
Select “None” if the terminal is to be used to grant access to a
door, gate etc.
Export field value: This would be used when the BioMatch data
has to be exported to another application. This value would be
dependant on the particular requirements of that package.
NB. The Export Field Value field description and reason is
the same for all occurrences of this field box.
© Copyright Biometric Innovations 2006
Page 11
BioMatch 2006 (Sagem Embedded) User Manual
The IP address: This value is critical and has the default value of
134.1.32.214. If this is the only terminal in the initial system then
you may leave this value there.
The pc communicating with the terminals must have its network
interface card IP address manually assigned and it must be in the
same range; e.g. 134.1.32.x where x is a number not used by any
terminal.
Ethernet
(Cat5) Cable
Biometric
Terminal
Ethernet
(Cat5) Cable
Server
Hub
(Hub is used if 2 or more
terminals are used)
Port number: This is the default that the BioMatch software is
expecting.
MA type corresponds to the model of the terminal, usually an MA
200.
Initial Wait and Partial Data Wait numbers are thousandths of a
second and the default numbers may be left there.
After all information has been entered click Finish to save the
changes or Cancel to discard the changed. You now will see the
new terminal in the window and its status will be Idle, provided the
pc and terminals are correctly connected and configured.
Modify a Biometric Terminal
To modify a biometric terminal, right click on a biometric terminal
and select “Open Selected Biometric Terminal” or left click on a
biometric terminal and click “open” on the toolbar. A wizard will
open showing the information entered when the terminal was
created. Change any or the values required and click Finish to
save changes or Cancel to discard changes.
Biometric Terminal Actions
When right clicking on a terminal, you will see the following
options.
© Copyright Biometric Innovations 2006
Page 12
BioMatch 2006 (Sagem Embedded) User Manual
Open: selected Biometric Terminal choice does the same as double
clicking on the name of the terminal.
Advanced Properties: This option displays additional information
about the selected Biometric Terminal. The Organisation Unit that
the Biometric Terminal belongs to can also be changed here.
Get Logs from Biometric Terminal will download the currently
stored transactions from the terminal into BioMatch. Inbuilt into
BioMatch is an automatic retrieval that, by default, occurs every 5
minutes.
Set Biometric terminal Date/Time – usually only needed when
commissioning the system.
Rebuild Biometric Terminal – This command sends all the
information for the users who need to use that terminal and is NOT
generally used as the terminals are accessed every 5 minutes by
BioMatch and transactions are communicated back to the server pc.
All modifications to data that the terminal needs to know about is
automatically transmitted to the appropriate terminals as soon as
the editing or inputting of a new user is complete.
© Copyright Biometric Innovations 2006
Page 13
BioMatch 2006 (Sagem Embedded) User Manual
Preview Tasks: Clicking on this item will list current tasks and
any error information. All Failed Tasks need to be tried again and if
it does not clear then there is likely a communications problem.
Preview Tasks Dialog
In the example screen above, the Set date and time and the Get
logs failed as the terminal was not connected to the hub. The Set
date and time has been highlighted and the message below
explains the reason for the failed task. Now just click on retry
provided the communications fault has been fixed. After a few
seconds in this case, this error will disappear.
The next item on the left of the screen is the Business Unit(s).
•
•
Select New to add a unit OR
Double click on any existing unit to examine its content.
There are three fields:
•
•
•
Name
Description
Export Value
The Name and Description is self explanatory and again the Export
Value is for interfacing into an accounts program.
Deleting a Biometric Terminal
To delete a terminal, you must remove ALL group and user access.
This situation can be regarded as a safety measure.
© Copyright Biometric Innovations 2006
Page 14
BioMatch 2006 (Sagem Embedded) User Manual
Business Units
A business unit allows for different cost allocation areas within an
organization. Multiple business units can be created.
BioMatch needs at least one unit defined to allow users (staff who
use the terminals) to be created.
Create a new Business Unit
Select Business units from the left panel. Then click on New. Fill
in the following fields on the form.
Name: Enter the business unit name. (Required)
Description: Additional information to assist the BioMatch
operator.
Export Value: Data placed here for interface to accounting
packages.
Click Finish to save the Business Unit or click Cancel if you do not
want to create this business unit.
© Copyright Biometric Innovations 2006
Page 15
BioMatch 2006 (Sagem Embedded) User Manual
User Groups
User groups are means by which groups of users can be managed.
Access points are allocated and time masks can be applied to a
group of users via User Groups.
Users cannot exist in the database without being assigned to a User
Group. However, a User Group can exist without having access to
any terminals. This can be useful for segregating users who, for
security or other reasons, are not yet ready to be stored on a
biometric terminal (eg. Employees that have been terminated or
recently hired).
Create a new User Group
Click on User Groups then click New.
Page 1 - Details
Complete the following fields on this form, and then click Next.
Name:
Name of the user group.
Description:
Description of the user group.
Disable Job areas:
Select this option to override the export
value specified in the Biometric Terminal.
Export Value:
This value will be inserted in an export
operation.
Page 2 - Selected Biometric Terminals
Select the terminal(s) that this group will have access to.
© Copyright Biometric Innovations 2006
Page 16
BioMatch 2006 (Sagem Embedded) User Manual
Page 3 - Time Mask
In several sections in BioMatch 2006 you will see this window. It
allows you to create access times by selecting from the table with
15 minute steps across 24 hours of all days of the week.
Select “Edit Time Mask” to show this screen.
Page 4 - Shift lengths and breaks
When starts and stops are recorded, three values are used to
determine what constitutes a break and a shift.
Maximum shift length: If the time between a start and a stop
exceeds this value, then the shift will appear as an error in the time
and attendance screen. When the mouse is moved over the shift it
will show “Exceeds Maximum Shift Length”.
Maximum break time: If the time between the first stop and
second start is greater than the maximum break time then two
shifts are recorded for this user. If the time is greater than the
minimum break time but less than the maximum break time then a
single shift is recorded with a break.
Minimum break time: If the time between the first stop and
second start is less than the minimum break time then no breaks
are recorded and the time between the first start and the last stop
is recorded as a single shift.
© Copyright Biometric Innovations 2006
Page 17
BioMatch 2006 (Sagem Embedded) User Manual
Shift length and break examples
Example: Minimum break time is set at 5 minutes and maximum
break time is set at 30 minutes. A user enters the workplace and
records a start, then leaves recording a stop and returns after 35
minutes recording another start and then leaves for the day
recording a final stop. This would be recorded as two separate
shifts.
Example: Minimum break time is set at 5 minutes and maximum
break time is set at 30 minutes. A user enters the workplace and
records a start, then leaves recording a stop and returns after 25
minutes recording another start and then leaves for the day
recording a final stop. This would be recorded as a single shift with
a 25 minute break
Example: Minimum break time is set at 5 minutes and maximum
break time is set at 30 minutes. A user enters the workplace and
records a start, then leaves recording a stop and returns after 3
minutes recording another start and then leaves for the day
recording a final stop. This would be recorded as a single shift with
no breaks.
© Copyright Biometric Innovations 2006
Page 18
BioMatch 2006 (Sagem Embedded) User Manual
Page 5 – Start and Stop Rounding
These values are set by default to 5 minutes, so if a start occurs at
8:59 AM the value that will be displayed and exported from the
time and attendance section will be rounded to the nearest 5
minutes which is 9:00 AM. This is the same for stops, so 5:43 PM
would be rounded to 5:45 PM. This value can also be set to round
to the nearest 1, 10 15 and 30 minutes. This can
Used when accounting packages are expecting values rounded to
the nearest x minutes.
In situations that require more flexibility a custom option is
available. When this option is selected a list of rounding values is
displayed. This allows any minute value to be rounded to a specific
value. Select the minute value and enter the round to value in the
box underneath and click set value.
Page 6 - Automatic Adjustments
If users do not record breaks then a rule can be configured to
automatically adjust the length of the shift. Time can either be
added or subtracted from a shift that is greater than a specified
length. This is a highly flexible facility that allows for such cases as
compulsory meal breaks after a certain length of time has been
worked.
Clicking Add Rule will display the following dialog.
Enter the values required and click OK.
Once a rule has been created it can be opened for editing by
clicking Open Selected Rule or deleted if no longer required by
clicking Delete Selected Rule.
© Copyright Biometric Innovations 2006
Page 19
BioMatch 2006 (Sagem Embedded) User Manual
Page 7 – Pay Rate Groups
Pay Rate Groups
There are two ways of setting up Pay Rate Groups:
Period Mode: This type of pay rate group is applied when a set
number of hours have been worked in a given period. The pay rate
group calculation period determines that period.
The types of calculation periods are as follows.
Daily (same each day): The pay rate groups are applied in the
same way for each day.
Daily (specify each day): The pay rate groups can be set up in a
different way for each day of the week.
Weekly: The pay rate groups are applied for all hours worked in
one week
Fortnightly: The pay rate groups are applied for all hours worked
in one fortnight.
When adding a pay rate group enter the name of the pay rate
group, an export value (which will appear when a snapshot is
exported) and the value at which the pay rate group will apply.
There is a standard pay rate for all periods that starts at zero
hours, and is always applied.
An example scenario is if two pay rate groups are created using a
“Daily (same each day)” calculation period. These groups would be
called “Time and a half” and “Double time”. If Time and a half pay
rate group starts after 8 hours and Double time starts after 10
hours and a person worked 12 hours in one day the report would
show
Standard Pay Rate - 8 hours
Time and a half - 2 hours
Double time – 2 hours
© Copyright Biometric Innovations 2006
Page 20
BioMatch 2006 (Sagem Embedded) User Manual
Date\Day of Week and Time mode: This mode is used for
determine pay rates dependant of the date or day of the week and
the time that the work occurred instead of “duration over a period
of time”.
Adding a pay rate group in “Day of week and time” means that if
any hours that are worked within that range they will be reported at
that pay rate. Day of week and time is applied every week. “Date
and Time Range” pay rate groups are applied only on the day of the
year that is specified eg. December 25.
© Copyright Biometric Innovations 2006
Page 21
BioMatch 2006 (Sagem Embedded) User Manual
© Copyright Biometric Innovations 2006
Page 22
BioMatch 2006 (Sagem Embedded) User Manual
Users
Persons who will have their biometric data (or minutia) sent to the
selected biometric terminal for identification purposes for either
access control or time and attendance.
Creation and Enrolment
To create a new user, select the User section and click New on the
Toolbar.
Page 1 – User Details
You firstly need to select the next two fields that the individual will
belong to.
User Group: Select the user group that this user will belong to.
Business Unit: Select the Business Unit that this user will belong
to.
First Name: Users first Name (Required)
Middle name: Users Middle Name
Surname: Users Surname (Required)
© Copyright Biometric Innovations 2006
Page 23
BioMatch 2006 (Sagem Embedded) User Manual
Date of Birth: (Optional)
Job Title: (Optional)
Employee ID: A company specific code that may be assigned to a
user. (Optional)
Comments: Any additional information that is relevant to that
person. (Optional)
Enrol for Biometric terminal download: Check this box to allow
this user to be stored on the biometric terminal.
Enrol for Biometric terminal is enabled by default but can be
disabled for one or both of the following reasons: You may want to
import users whom you have enrolled off site (by using a laptop
and enrolment device) but for security reasons do not want their
information sent to the terminals yet OR this terminal has not yet
been installed or not yet commissioned. Therefore having this box
un-ticked would prevent the system from generating errors as it
would have tried to send the enrolment details to the missing
terminals.
Terminal Display Name: The information displayed upon
acceptance by the terminal and defaults to the First and last name
of the user
Wiegand Code: Is incremented by one as each new user is added
Page 2 – Override Biometric Terminals
The settings in this form will only be used if the user needs special
access that is different from the Biometric Terminals that were
specified in the User Group.
Check the “Override user group biometric terminals” and select the
Biometric terminals this user will be enrolled on.
Page 3 - Time Masking:
The settings in this form will only be used if the user needs special
access that is different from the time masks that were specified in
the User Group.
© Copyright Biometric Innovations 2006
Page 24
BioMatch 2006 (Sagem Embedded) User Manual
For example, you may want to deny access form this point on but
not delete the user form the system. To achieve that for this user,
you would place a tick in the Override personnel group time
mask settings. Or you may want to provide total access to this
user and you would then tick both the Override and Allow all
Access.
By selecting the Edit Time mask, you can edit the time mask and
be quite precise with the times as you will see in the following
partial screen shot.
The week is broken into 15 minute blocks and by default, they are
all selected. By removing ticks, the user will not be granted access
to that (those) times of day (or night).
© Copyright Biometric Innovations 2006
Page 25
BioMatch 2006 (Sagem Embedded) User Manual
Page 4 – Photo Capture
Position the person in front of a plain background so that all of their
face is visible in the picture, similar to the sample image. Once the
user is positioned correctly click Capture Photo. If no camera is
connected, you STILL click on Capture Photo capturing the blue
screen and then click on Next.
Page 5 – Fingerprint Capture
This is the screen you will see if one of the following situations is
present:
1. There is no fingerprint reader connected
2. The fingerprint connected is the wrong model for the
software.
© Copyright Biometric Innovations 2006
Page 26
BioMatch 2006 (Sagem Embedded) User Manual
So here is the screen you should see:
If you are editing an existing user you will see this screen:
The default fingers that the system suggests you enrol are both
fore fingers.
You do not need to use these fingers and can click on others.
The system expects two fingers to be enrolled so that the user will
still have access should one fingerprint become damaged due to
minor events such as knife cuts etc.
© Copyright Biometric Innovations 2006
Page 27
BioMatch 2006 (Sagem Embedded) User Manual
Click on a finger and have the user place their finger in the centre
of the scanner glass whereupon you will see the print on the
screen. There are three scans performed on each finger and the
system analyses the all scans and decides when the quality is
sufficient.
The swirl of the print is located in the middle
of the finger. The system is specifically
looking for this in the image. So advise the
user to place the ball of their finger in the
middle of the scanner glass and not to exert
much downward pressure! Too black an
image is not acceptable (too much pressure)
as is too light an image.
Next will take you to the Congratulations! window.
User Actions
Along the top toolbar of the Users window, there are 9 function
tools. We have covered New. The others are as follows:
Open – opens the already saved user details for viewing or editing.
Delete – use with caution as the user’s details will be permanently
deleted.
Advanced Properties – You can change the Organisation Unit that
the user belongs to.
Rebuild User – activation of this icon will re-send the user’s
details to the terminal(s). It can be used if modifications have just
been performed but this is not necessary as BioMatch will complete
this task immediately upon the completion of the editing. The main
purpose of this icon is to send the user’s information to the
terminal(s) EVEN if no modifications have been carried out. The
scenario in which this may be used is when the user is having
problems being accepted by the terminal as sending the data again
would rule out whether or not there was a problem with the stored
data.
Import user – Users can be enrolled on another system such as a
laptop with an enrolment device (MSO 300) and BioMatch 2006
installed. Then you can export the users to a device such as a USB
drive or a network share and import them into the main system
with this facility. During the importing, they will be automatically
placed into a group that will be created by BioMatch called
Imported Users. From there, they need to be assigned to the
appropriate Business Group and User Group by selecting each user
one at a time and editing their details.
© Copyright Biometric Innovations 2006
Page 28
BioMatch 2006 (Sagem Embedded) User Manual
Export User – Selecting a user and clicking on this icon will
produce a window asking where you want the file to be stored.
Typically used as described above where a laptop is used to enrol
users.
Review Tasks – You can view the progress of a selected task that
was instigated by the delete, export, import etc icons and can
choose between Pending and failed. Should a task have failed, you
may highlight it and click on Retry. Pending tasks cannot be
altered or deleted.
Show Search – For locating a user. When selected a window
opens above the column heading.
© Copyright Biometric Innovations 2006
Page 29
BioMatch 2006 (Sagem Embedded) User Manual
Operators
An operator is a person who uses the BioMatch 2006 Client
software. Operators are the only people who can logon to the
BioMatch 2006 software. The Administrator operator has full
access. Other operators with limited rights can be created.
Creating a new operator
Select the operator section on the left and click New
In the panel to the right, you will see that a default Operator has
been created the System Administrator. This operator cannot be
deleted or modified. This operator has access to every part of
BioMatch 2006 and so keeping the password for this user secure is
essential.
Page 1 – Operator Details
As the administrator, you fill in the name and password of the new
Operator. You may:
•
•
•
•
elect to allow the password NOT to expire
not have a password for this Operator
disable the account or
provide full administrator rights to this user (not
recommended).
© Copyright Biometric Innovations 2006
Page 30
BioMatch 2006 (Sagem Embedded) User Manual
Page 2 – Operator Access
You may choose which areas of the system that this new Operator
access to.
The following example assumes there may be a need for a
particular Operator to have very limited rights across BioMatch
including NO rights to Edit, Delete or Create users but DOES have
rights to create reports and view tasks, access logs etc.
Select “Build a custom access right” profile and Click Next.
Tick the Read and Display boxes of your choice as above and Click
next.
© Copyright Biometric Innovations 2006
Page 31
BioMatch 2006 (Sagem Embedded) User Manual
Now select Finish.
Edit Operator
Rather that create a custom set of rights you may choose to give
the new operator a predefined set of rights. To use these defaults
you would click in the circle for Use access rights profiles below.
Next page provides the areas that you would allow access to.
© Copyright Biometric Innovations 2006
Page 32
BioMatch 2006 (Sagem Embedded) User Manual
Report Templates
Report Templates are used in the Reports centre and allows
preselected information to appear when generating a report
depending on the type of report template selected. This allows
frequently created reports to be generated faster as the common
information is already selected. The Reports are found via the icon
in the main icon list:
Click on the Reports Template from the left panel and click on
New. A drop down menu will be displayed allowing creation of the
following types of report templates.
Inactivity Reports: Will show all users who have not presented at a
biometric terminal for the specified date range.
On-site / Off-site Reports: Using presentation information this
report will show a list of all users who should be on-site and offsite.
User Detail Reports: Displays a summary of the selected user’s
profile and all biometric terminal activity.
Activity Reports: After selecting this report template the process for
creating an activity report template is as follows.
There are two tabs named Template details and Item Selection.
Template details:
Name: All activity (includes all users and biometric terminals).
This is the default name for this template.
Report type: There are four to choose from – User Activity,
Biometric Terminal Activity, User Group Activity and All Activity
(users and terminals).
User Activity: Set the start date and time and the end date and
time. Also, place the first two characters of the First name in the
appropriate field and the first two characters of the Surname in the
next field and click on “”Search”. Once you see the user, highlight
© Copyright Biometric Innovations 2006
Page 33
BioMatch 2006 (Sagem Embedded) User Manual
the name and then click on Generate Report. This procedure is
similar for the next two reports.
Biometric Terminal Activity: as above but no search is required.
These four choices cover most operators’ needs.
Range Type: There are two choices you can select – Timespan
with offset from today OR Date Range, both user configurable.
Range: If Range type selected is Timespan then enter the Span
Offset in days and minutes. In this case, you are telling the system
to present data covering the range from a date and time in the past
to the current date and time. The default offset is zero for all fields.
If Date Range is selected, then the screen changes to show Start
Date and Time and End Date and Time.
Page 2 - Item Selection (select second tab, Page 2)
This message is shown because we have selected All Activity.
The procedure is similar for editing or creating the other report
templates.
© Copyright Biometric Innovations 2006
Page 34
BioMatch 2006 (Sagem Embedded) User Manual
Access Logs
An access log is a text record of transactions recorded by the
system.
To view access logs, firstly go to Display – Custom and a drop down
menu will appear.
Select Custom if the predefined lengths are not applicable. Then
set the From and To date. Then click on Search.
This information can be exported but you will see the following
message if export profiles have not been created.
Before the access log can be exported, you need to create an
Export profile. This is an initial setup procedure and is performed
only once unless you need to export to another type of time and
attendance application. The following error will be displayed if the
profile(s) have not been created.
Refer to the system settings section to see how to do this.
Once an access log exporter has been set up click on Export Access
logs and you are presented with a window showing the destination
of the file - type a name.
© Copyright Biometric Innovations 2006
Page 35
BioMatch 2006 (Sagem Embedded) User Manual
Enter a file name and click on Save.
Should Timeminder be the export profile, then the file created will
be as follows (comma delimitated):
© Copyright Biometric Innovations 2006
Page 36
BioMatch 2006 (Sagem Embedded) User Manual
System Settings
Section 1 – System Functionality
System Mode
BioMatch 2006 can run in 3 different modes:
Time and Attendance: Only functionality related to time and
attendance is displayed to the user.
Access Control: Only functionality related to Access Control will be
displayed. In this mode items such as the time and attendance
screen would not be displayed as well as other time and attendance
specific items.
Both Time and Attendance and Access Control: All
functionality is displayed. This is the default mode.
General display options
Just the one option – display the Organisation Unit or not.
© Copyright Biometric Innovations 2006
Page 37
BioMatch 2006 (Sagem Embedded) User Manual
User Wizard options
Display extended User details: In user details by default only
the first of two pages are presented during enrolment and display.
The second page allows entry of additional information such as
Phone Number, Fax Number, Mobile Number, Email and Address
details.
Display user defined field 1 (and 2)
Selecting this option creates a third page on user information with
the filed(s) being shown as below. You may also force data entry
into this field.
One field selected.
Both fields selected.
Note that the fields have a default name ‘User defined field x’ and
of course you may create names for these fields by overwriting the
existing text.
Section 2 - Automatic Log management
These settings are in place to prevent any log files from becoming
unmanageable due to their size. The above values are the default
values.
© Copyright Biometric Innovations 2006
Page 38
BioMatch 2006 (Sagem Embedded) User Manual
Section 3 - T & A General
Display names: You may elect to change the Business Unit field
name to another which better describes this level within your
business structure. The same applies to the user Group display
name.
Export profiles
Data may be exported from the BioMatch Time and Attendance
module. BioMatch needs to know what format the data needs to
comply to.
Snapshot Exporter: Before you can export Time and Attendance
information to an accounting package, you must create a Snapshot.
A Snapshot is a period of time in which staff has been working and
the information contained therein clearly shows start and stop time,
hours worked in a normal shift, overtime etc. The data is
complete. It may be the case that some data is missing – for
instance, the staff member forgot to log off with the fingerprint
reader. Should this be the case the error has to be manually fixed
in the T & A presentation module before it can be saved and then
exported.
© Copyright Biometric Innovations 2006
Page 39
BioMatch 2006 (Sagem Embedded) User Manual
Choosing MYOB as an example and selecting Configure will display
the following screen.
MYOB requires a Slip ID containing 2 characters (alpha numeric)
and a starting Index number. The Slip ID may refer to a location or
city, for example: MB, SY, BE AU, NZ etc. The Index number is
incremented by 1 for each instance of work carried out including
Normal Time, Time and a Half and Double Time as every shift
component has an Index number.
Access Log Exporter
You need to select the format you want the exported data to
comply with. You may choose from Commac, Neller, MYOB and
Timeminder.
© Copyright Biometric Innovations 2006
Page 40
BioMatch 2006 (Sagem Embedded) User Manual
There is no need to configure any of these options in this release of
BioMatch. Attempting to do so will result in a message being
displayed:
Automatic Access Log Exporter
Click on the tick box for Automatic export access log information
and select a destination for the exported file.
You will see the default file name and destination for the file. You
may change this to your preference. Click Apply Changes and
Click Yes when asked if you are sure you want to make these
changes.
When activated, a file will be created regularly according to the
number in the hours box. It will be saved to the folder in “Export to
directory”.
This function is only used if the T and A / Payroll package being
used requires this type of integration with BioMatch 2006.
© Copyright Biometric Innovations 2006
Page 41
BioMatch 2006 (Sagem Embedded) User Manual
Error Logs
Error logs store messages that are created by BioMatch in the
event of an internal action not producing the expected results.
This icon is used should a support call be made. The support team
member may ask about the information on the screen and may
also ask that the log be emailed to support for further analysis.
Activating this icon will produce the following screen:
Any error messages would appear directly under the heading that
indicates when they occurred.
Before clicking on the Export icon, you should click on the drop
down menu of the Display box then either select from the choices:
One day, Two days, Five days etc. or Custom. The last selection
allows for the start and end date and times to be selected.
No Internet Access
Clicking on the Export Logs icon at the top right hand corner will
open a new window called Save a log file. This action is useful for
a situation where the BioMatch pc is not connected to the Internet,
allowing for the file to be saved in a location for future reference.
However, an important icon is the Email Logs to support. When
activated, the log file is automatically emailed to the support
address of Biometric Innovations where it can be examined by
support staff to help determine the process needed to rectify any
fault conditions.
© Copyright Biometric Innovations 2006
Page 42
BioMatch 2006 (Sagem Embedded) User Manual
Event Logs
Here you will find the history of internal actions performed by
BioMatch. When there is a Red circle with a white X at the far left of
the command, an error has occurred. A common error is a failed
attempt by BioMatch to communicate with the biometric
terminal(s). This situation will occur if, for example, there is more
than one terminal and all are in error – this may well point to the
network hub being switched off or if power to all terminals has
been interrupted.
The Export Logs and Email Logs to Support icons provide the same
facility as previously outlined in Access logs.
© Copyright Biometric Innovations 2006
Page 43
BioMatch 2006 (Sagem Embedded) User Manual
Reports Centre
The reports centre has a variety of reporting options for displaying
information about user activity. The reports visible in this section
are dependant on the report templates that have been set up in the
administration section. There are four types of reports that can be
generated:
Inactivity Reports: Will show all users who have not presented at a
biometric terminal for the specified date range.
On-site / Off-site Reports: Using presentation information this
report will show a list of all users who should be on-site and offsite.
User Detail Reports: Displays a summary of the selected user’s
profile and all biometric terminal activity.
Activity Reports: These reports will show all activity for the
selected item type. Four Activity Reports are included by default:
•
•
•
•
User Activity Report
Biometric Terminal Report
User Group Activity Report
All Activity Report
User Activity Report
The default Date Range date and time is one week back from
today.
Select the user – Enter the first few characters of both the first and
last name. The Add criteria provides more options. Select Search.
Once the user is on the screen, select the user and click on
Generate Report.
© Copyright Biometric Innovations 2006
Page 44
BioMatch 2006 (Sagem Embedded) User Manual
Biometric Terminal Activity Report
This is the same search window to that of the User Activity. You
enter the name of the terminal. If you are not sure of the name or
spelling, just click on Search and all the terminals will appear. Just
select the terminal.
User Group Activity Report
Again the screen is similar to the Biometric Terminal Activity
Report.
All Activity (included all users and biometric
terminals).
Again, the same operations apply to this report.
© Copyright Biometric Innovations 2006
Page 45
BioMatch 2006 (Sagem Embedded) User Manual
Time and Attendance
The Time and Attendance function in BioMatch has two sections
1. Search for Shifts
2. Search for Saved Shifts (Snapshots)
Search for Shifts
Shifts are derived from starts and stops and are determined by the
rules defined in the person group.
To search for shifts select the user groups that are required (or all
groups can be selected) then select the Business Units and finally
the date range that is to be displayed.
Selecting Custom will allow a custom date range to be entered.
After clicking on Display Shifts:
© Copyright Biometric Innovations 2006
Page 46
BioMatch 2006 (Sagem Embedded) User Manual
At the top right corner of the screen you will see “Save Snapshot”.
The displayed Shift details can be saved once any errors have been
fixed. Saved shift details are called a Snapshot.
The most common error displayed is either the lack of a shift Stop
or Start.
When one or more such errors are present, the operator has to
manually edit the shift before the displayed information can be
saved.
The colour codes for the items displayed in this view are as below:
If one end of a shift is red and the other is white it means that
there is missing information. Move the mouse over the error to see
what the problem is. The shift can be edited by dragging the end
that has the error to the correct position. Right clicking on a shift
will pop up a menu. Clicking “edit this shift” will display a dialog
that can be used to specify the missing data.
When a shift is solid green it indicates that both the start and stop
information were recorded by a biometric terminal and have not
been modified. If a shift transitions from one colour to another eg
orange to green it means that the start has been modified and the
stop was recorded on a biometric terminal.
© Copyright Biometric Innovations 2006
Page 47
BioMatch 2006 (Sagem Embedded) User Manual
If any shift end is blue it indicates that an operator has manually
added this information.
Alterations performed to the displayed shifts do not affect the
actual raw data that was displayed. After any alterations are
performed, re-importing the data will revert the system to the
original data.
Shift Actions
There are several other actions that can be performed in the shift
view.
Add a shift component: Selecting this will display a dialog that
allows a new shift to be created. Fill in the required information
and click OK. This feature is used when both a start and stop has
not been recorded for a user.
Reimport: This function will revert all of the shift data back to its
original state. All modifications and added shifts will be lost.
Save Snapshot: Once all errors are fixed a snapshot can be
saved.
Shift Reports
All users: This report displays start and stops for all users for the
date range specified in the shift view.
Selected Users: Selecting this report will display a dialog that
shows all of the users in the shift view. Select the users that are to
be displayed and click ok. The report will display starts and stops
for all selected users for the date range specified in the shift view.
Search for Saved Shifts (Snapshots)
Selecting this tab will display a screen that shows all available
snapshots. This view can be filtered by selecting a date range and
clicking “Show Snapshots for Date Range”.
Select the snapshot to view and click “View Selected Snapshot”.
After performing this action a screen will be displayed that is very
similar to the shifts screen. However, different actions can be
performed on a snapshot than to shifts so the options available will
be different.
In the snapshot view shifts cannot be edited. The snapshot can be
exported at this point or a report can be run on the snapshot data.
© Copyright Biometric Innovations 2006
Page 48
BioMatch 2006 (Sagem Embedded) User Manual
Snapshot Reports
There are five reports available in the snapshot view.
All users: Shows the details (start time, end time, shift length) for
all shifts for every user in the snapshot.
Selected users: Selecting this report will display a dialog that
shows all of the users in the snapshot. Select the users that are to
be displayed and click ok. The report will then show the details
(start time, end time, shift length) for all shifts for the selected
users.
Pay rate group: This report displays all the pay rate groups for
each person for the hours worked.
Cost centre: This report displays the total number of hours worked
in each cost centre. Depending on the user group settings the cost
centre can be based on the biometric terminals or user groups.
Total hours: Selecting this report will display a dialog to select
user, user group or business unit. The report will then display the
total hours worked for each item of the selected type.
© Copyright Biometric Innovations 2006
Page 49
BioMatch 2006 (Sagem Embedded) User Manual
Backing up the database
We strongly recommend the routine backing up of the database
through either one of these methods:
1. Backing up the files using SQL Server Management Studio
Express
2. Copying the two files to a secure place.
Method 1 - SQL backup
This method requires SQL Server Management Studio Express.
Please make sure this is installed before continuing.
1. Stop the BioMatch Server.
Run Server Manager from the following location.
Click Stop Service.
Open SQL Server Management Studio Express from the
following location.
Click Connect.
© Copyright Biometric Innovations 2006
Page 50
BioMatch 2006 (Sagem Embedded) User Manual
Highlight the BM2006SGM database. Right mouse click and click on
Backup.
© Copyright Biometric Innovations 2006
Page 51
BioMatch 2006 (Sagem Embedded) User Manual
Click Add.
SQL will suggest the location “c:\Program Files\Microsoft SQL
Server\MSSQL.1\MSSQL\Backup\“, and expect a name for the file
to be supplied. Clicking on the right hand side of the file path
name on the icon brings up the following:
© Copyright Biometric Innovations 2006
Page 52
BioMatch 2006 (Sagem Embedded) User Manual
Type in the name you want to use OR select an existing backup file.
If using an existing file, the new data will be appended to that file
as another session.
It contains the path and file name (obscured in this screen shot).
© Copyright Biometric Innovations 2006
Page 53
BioMatch 2006 (Sagem Embedded) User Manual
The backup is complete at this point.
Method 2 – Copying the two files to a
secure place
The database files are stored in the SQL database folder:
C:\Program Files\Microsoft SQL
Server\MSSQL.1\MSSQL\Data
The two files that need to be copied are:
Firstly, run Server Manager from the following location.
Click Stop Service. These files can now be copied to a USB
Memory stick or removable hard drive, or written to a dvd / cd for
off-site backup. When this is completed either reboot the computer
or Click Start Service to continue using BioMatch 2006.
© Copyright Biometric Innovations 2006
Page 54
BioMatch 2006 (Sagem Embedded) User Manual
Warranty
Biometric Innovations warrants the software applications to
perform the functions as described in this manual.
Biometric Innovations reserves the right to make modifications to
the software to either rectify faults and / or provide enhancements
as required.
Support
For the first 90 days after purchase of BioMatch 2006, free support
is provided. Access to patches is always available at no charge.
Support packages are available after the first 90 days. Please
contact your account manager to obtain more information on the
support package to best suit your needs.
Telephone support can be provided in addition to free email support
at rates that are available by contacting Biometric Innovations.
Biometric Innovations
Level 3
11 Lang Parade,
Milton 4064
Queensland
Australia
Ph: +617 3243 6000
Email:
Web page:
[email protected]
http://www.biometricinnovations.com
© Copyright Biometric Innovations 2006
Page 55