1
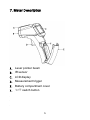
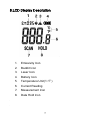
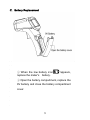
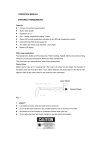
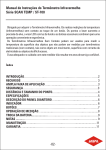
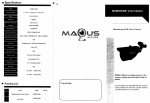
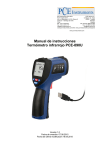
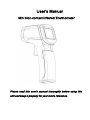
User’s Manual
Mini Non-contact Infrared Thermometer
Please read this user's manual thoroughly before using this
unit and keep it properly for your future reference.
Contents
1.Introduction .................................................. 2
2.Features ...................................................... 2
3.Application ................................................... 3
4.Safety.......................................................... 3
5.Field of View................................................. 4
6.Specifications ............................................... 4
7.Meter Description .......................................... 6
8.LCD Display Description................................. 7
9.Operating Instruction ..................................... 8
10.Notes........................................................10
11.Accessories ...............................................11
1
1. Introduction
Congratulations on your purchase of our professional
non-contact infrared thermometers.
These units can provide fast, easy and accurate temperature
readings. With the non-contact (infrared) technology, they
can be used to measure the surface temperature of
hard-to-reach objects like electrified equipment or moving
objects, without any damage or pollution to them.
2. Features
◆ Compact size
◆ Fast and easy measurement
◆ Precise non-contact measurement
◆ The built-in laser pointer increases the target accuracy
◆ Backlight LCD display
◆ Automatic measurement range selection with resolution
0.1℃/ 0.1℉
◆ Data hold
◆ Auto power off
◆ User selectable units
◆ D:S=12:1
2
3. Application
These units are widely used in Food preparation, Safety and
Fire inspection, Plastic molding, Asphalt, Marine, Printing ink
and dryer temperature, Diesel and Fleet maintenance.
4. Safety
●Use extreme caution when the laser beam is turned on.
●Do not point the beam toward anyone or any animals.
●Do not allow the beam to strike the eye from a reflective
surface.
●Do not use the laser near explosive gases.
3
5. Field of View
The meter's field of view is 12:1, for example, if the meter
is 12 inches from the target spot, the diameter of the
target must be at least 1 inch. Other distance ratios are
show below in the field of view diagram.
6. Specifications
Range
Accuracy
Field of View
Response
Time
Emissivity
-50℃~330℃ (-58℉~626℉)
-50℃~0℃/-58℉~32℉:±4℃/7℉
0℃~330℃/32℉~626℉:±2% ±2℃/4℉
D:S= Approx. 12:1 (D=distance, S=spot)
﹤1s
0.95 fixed at value
4
Resolution
Spectral
Response
0.1℃ / 0.1℉
8~14um
Polarity
Auto display, "-" indicates negative,
Display
while positive with no sign.
Diode Laser
Output<1mW, 630~670nm,class (Ⅱ)
Automatic
Meter shuts off automatically after 20
Power Off
seconds of inactivity
Operating
Temperature
Storage
Temp
0℃ to 50℃ / 32℉ to 122℉
-20℃ to 60℃ / -4℉ to 140℉
Relative
Operating Humidity:10 to 95%RH
Humidity
Storage Humidity:<80%RH
Power Supply
9V battery
Weight
145g
Dimensions
(L*W*H)
134X88.5X36
5
7. Meter Description
A. Laser pointer beam
B. IR sensor
C. LCD display
D. Measurement trigger
E. Battery compartment cover
F. ℃/℉ switch button
6
8.LCD Display Description
1.
Emissivity Icon
2.
Backlit Icon
3.
Laser Icon
4.
Battery Icon
5.
Temperature Unit(℃/℉)
6.
Current Reading
7.
Measurement Icon
8.
Data Hold Icon
7
9. Operating Instruction
A. Operating steps:
①Hold the meter by its handle grip and point it toward the
surface to be measured.
②Pull and hold the Trigger to turn the meter on, the "SCAN"
icon will appear and begin testing.
③The surface temperature being tested will be displayed on
the LCD screen.
④Release the trigger, the "HOLD" icon will appear, and the
reading will be hold for several seconds.
⑤Release the trigger, the meter will automatically shut off
after 7 seconds.
Measurement Note:
If the meter used in an ambient temperature with wide
temperature change, allow it at least 30 minutes to adjust to
it.
B. Button Function
① ℃/℉button: In Measurement Mode, press ℃/℉ switch
button at the upper battery compartment to switch
the temperature unit ℃ or ℉.
8
C.Battery Replacement
① When the low battery icon“
replace the meter's
”appears,
battery.
② Open the battery compartment, replace the
9V battery and close the battery compartment
cover.
9
10. Notes
⑴ Work Principle
●
The infrared thermometer is designed for measuring
surface temperature of and object.
●
The optical sensor can emit, reflect and transmit
energy, which is collected and focused on a detector,
then translate it into the temperature reading by
electronics and displayed on the LCD screen.
●
The laser is used for aiming the target object only.
⑵ Field of View
●
The object under test should be larger than the spot
size calculated by the field of view diagram.
●
The smaller the target object is, the closer the meter
should be to it for accurate measuring.
●
When accuracy is critical, make sure the target is at
least twice as large as the spot size.
⑶ Distance & Spot Size
●
As distance (D) from the object increases, the spot
size (S) of the area measured by the unit becomes
larger.
⑷ Locating a hot spot
●
To find a hot spot, first aim the thermometer to the
10
outside of target area, then scan across in an up and
motion until the hot spot is located.
⑸ Notice
Not recommend for measuring shiny or polished
●
metal surfaces like stainless steel, aluminum, etc.
Do not make measurement through transparent
●
surface such as glass.
If the surface of the object under test is covered with
●
frost,
oil,
grime,
etc.,
clean
before
taking
measurement.
⑹ Maintenance
Do not use volatile liquids to clean the unit, swipe it
●
with dry soft cloth.
Do not disassemble the unit, repair it by qualified
●
personnel
●
Do not immerse it in water.
●
Do not store it in high temperature or humidity.
11. Accessories
①
User's Manual
②
9V Battery
11