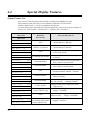
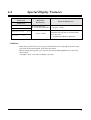
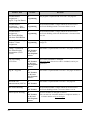
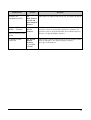
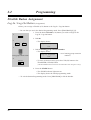
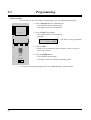
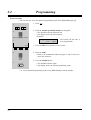
1
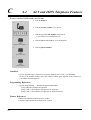
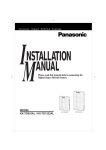
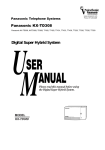
Digital Super Hybrid System
KX-TD816AL / KX-TD1232AL
Added and Changed Features for
the User Manual
In this manual, the last letter of each model number is omitted.
Table of Contents
Additional Features
Section 1.1, Configuration .................................................................................................................6
Location of Controls.............................................................................................................................7
Connection..........................................................................................................................................11
Feature Buttons...................................................................................................................................12
Fixed Buttons.................................................................................................................................12
Flexible Buttons.............................................................................................................................14
Initial Settings for KX-T7400 Series .................................................................................................15
Section 2.2, Programming
Flexible Button Assignment
ISDN Service Button .....................................................................................................................18
Section 4.2, DPT Features
Handset Microphone Mute.................................................................................................................19
ISDN Network Service Access ..........................................................................................................20
Whisper OHCA ..................................................................................................................................22
Section 4.3, Operator Service Features
Outgoing Message (OGM).................................................................................................................24
Section 4.4, Special Display Features
How to Use the Display .....................................................................................................................26
CO Outgoing Call Log .......................................................................................................................28
Extension Dialling ..............................................................................................................................29
Station Speed Dialling........................................................................................................................31
System Speed Dialling .......................................................................................................................33
System Feature Access Menu.............................................................................................................35
Section 5.1, Configuration
Location of Controls...........................................................................................................................40
Connection..........................................................................................................................................40
Feature Buttons...................................................................................................................................41
Section 5.2, DSS Console Features
ANSWER / RELEASE Button Operation (KX-T7541 only)............................................................42
2
Table of Contents
Changed Features
Section 2.2, Programming
Flexible Button Assignment
Log-In / Log-Out Button .........................................................................................................44, 46
One-Touch Dialling Button ...........................................................................................................44
One-Touch Dialling with Auto Hold Button .................................................................................44
Station Speed Dialling Number / Name Assignment...................................................................44, 47
Section 4.2, DPT Features & 6.2 SLT and ISDN Telephone Features
Calling / Connected Line Identification Presentation (CLIP / COLP) ..................................44, 54, 61
Call Forwarding — to CO Line .........................................................................................................44
Log-In / Log-Out....................................................................................................................44, 56, 63
Station Speed Dialling........................................................................................................................44
Uniform Call Distribution (UCD)..........................................................................................45, 60, 64
Section 4.2, DPT Features
Off-Hook Call Announcement (OHCA) ......................................................................................44, 58
One-Touch Dialling ............................................................................................................................44
Section 4.3, Operator Service Features
Background Music (BGM) — External.............................................................................................45
Class of Service (COS) Switch ..........................................................................................................45
Section 4.4, Special Display Features (— for KX-T7235)
All features in the Section 4.4......................................................................................................45, 26
3
Additional Features
1.1
Configuration
KX-T7400 series Panasonic Digital Proprietary Telephones (DPT) are available to utilise
various features of the KX-TD816 and KX-TD1232 Systems, in addition to supporting basic
telephone services (making and receiving calls).
KX-T7425
KX-T7433
KX-T7436
KX-T7450
None
Tilt-up,
16 char./line,
3-line LCD
Tilt-up,
24 char./line,
6-line LCD
None
None
3 Soft Buttons
3 Soft Buttons/
10 Function
Buttons
None
Jog Dial
Yes
Yes
Yes
Yes
CO Buttons
24
24
24
12
Display
Soft Buttons
and
Function Buttons
Fixed Feature
Buttons
6
Refer to the “Fixed Buttons” in this section.
1.1
Configuration
Location of Controls
■ KX-T7425
Flexible CO Buttons
(CO lines 01 through 24)
PROGRAM Button
FWD/DND Button
CONF Button
INTERCOM Button
PAUSE Button
TRANSFER Button
MESSAGE Button
AUTO DIAL/STORE Button
RINGER Volume Selector
Used to adjust the ringer volume.
REDIAL Button
AUTO ANSWER/MUTE Button
HOLD Button
RECALL Button
SP-PHONE Button
Jog Dial
Microphone
7
1.1
Configuration
■ KX-T7433
Display (Liquid Crystal Display)
With 16-character/3-line readout:
Shows the date, time, dialed number or name,
call duration time, etc. In Programming mode,
it shows the programming messages.
Flexible CO Buttons
(CO lines 01 through 24)
PROGRAM Button
Soft Buttons
(S1 through S3)
FWD/DND Button
SHIFT Button
CONF Button
INTERCOM Button
PAUSE Button
TRANSFER Button
MESSAGE Button
AUTO DIAL/STORE Button
AUTO ANSWER/MUTE Button
REDIAL Button
RECALL Button
HOLD Button
Jog Dial
SP-PHONE Button
Microphone
To lift or set down the display:
LCD
– To lift the display
1 Press the LCD ADJ button.
2 Lift up the display.
– To set down the display
1 Press the LCD ADJ button.
2 Press down the display.
8
LCD ADJ button
1.1
Configuration
■ KX-T7436
Display (Liquid Crystal Display)
Function Buttons
(F1 through F5)
With 24-character/6-line readout:
Shows the date, time, dialed number or name,
call duration time, etc. In Programming mode,
it shows the programming messages.
Flexible CO Buttons
(CO lines 01 through 24)
Soft Buttons
(S1 through S3)
PROGRAM Button
FWD/DND Button
Function Buttons
(F6 through F10)
CONF Button
INTERCOM Button
SHIFT Button
PAUSE Button
TRANSFER Button
MESSAGE Button
AUTO DIAL/STORE Button
AUTO ANSWER/MUTE Button
REDIAL Button
RECALL Button
HOLD Button
Jog Dial
SP-PHONE Button
Microphone
To lift or set down the display:
LCD
– To lift the display
1 Press the LCD ADJ button.
2 Lift up the display.
– To set down the display
1 Press the LCD ADJ button.
2 Press down the display.
LCD ADJ button
9
1.1
Configuration
■ KX-T7450
PROGRAM Button
Flexible CO Buttons
(CO lines 01 through 12)
FWD/DND Button
CONF Button
INTERCOM Button
PAUSE Button
TRANSFER Button
MESSAGE Button
AUTO DIAL/STORE Button
RINGER Volume Selector
Used to adjust the ringer volume.
REDIAL Button
VOICE CALL/MUTE Button
HOLD Button
RECALL Button
MONITOR Button
Jog Dial
10
1.1
Configuration
Connection
Connect as shown.
■ KX-T7400 Series DPTs
The included
telephone
line cord
→ Connect to a Digital Super Hybrid System
(TO MAIN UNIT).
→ Connect to a single line telephone jack,
Telephone Answering Machine, or FAX for
XDP* or parallel connections (TO TEL).
<Back View>
* XDP (eXtra Device Port) expands the number of telephones available in the system by allowing an
extension port to contain two telephones. For more details, please consult with your dealer.
11
1.1
Configuration
Feature Buttons
KX-T7400 Series Digital proprietary telephones (DPTs) have the following types of Feature
Buttons:
• Fixed Buttons
• Flexible Buttons
Fixed Buttons
Fixed buttons have specific functions permanently assigned to them. These default function
assignments cannot be changed. The following table lists the fixed buttons located on each
DPT model.
Feature Button
T7425 T7433 T7436 T7450
AUTO ANSWER/MUTE
✔
✔
✔
AUTO DIAL/STORE
✔
✔
✔
✔
CONF
✔
✔
✔
✔
✔
Function buttons
FWD/DND
✔
✔
✔
✔
HOLD
✔
✔
✔
✔
INTERCOM
✔
✔
✔
✔
Jog Dial
✔
✔
✔
✔
MESSAGE
✔
✔
✔
✔
✔
MONITOR
PAUSE
✔
✔
✔
✔
PROGRAM
✔
✔
✔
✔
RECALL
✔
✔
✔
✔
REDIAL
✔
✔
✔
✔
SHIFT
✔
✔
Soft buttons
✔
✔
SP-PHONE
✔
✔
✔
TRANSFER
✔
✔
✔
VOICE CALL/MUTE
“✔” indicates the button is available.
12
✔
✔
1.1
Configuration
Usage
Jog Dial
Used to adjust the volume of the handset receiver, headset, ringer and speaker. It also adjusts
the display contrast. Refer to “Initial Settings for KX-T7400 Series” in this section.
For KX-T7433 and KX-T7436 users, it is also used to select data from the stored phone
numbers or the System Feature Access Menu.
SHIFT Button
Used to access the second and third level of Soft Button functions.
VOICE CALL/MUTE Button
Used for extension auto answer, but it cannot be used for handsfree conversations. It also
turns the handset microphone off during a conversation.
Refer to the main User Manual for other button usages.
13
1.1
Configuration
Flexible Buttons
Flexible Buttons do not have specific features permanently assigned to them. Features are
assigned to Flexible Buttons through System or Station Programming. “Flexible Button
Assignment” is addressed in Station Programming (Section 2). The three types of Flexible
Buttons are as follows:
• Flexible CO buttons (located on a DPT only)
• Flexible DSS buttons (located on a DSS Console only)
• Programmable Feature (PF) (located on a DSS Console only)
The following table outlines the features that can be assigned to Flexible Buttons:
Feature (Buttons)
CO
DSS
PF
Single-CO (S-CO)
✔
—
—
Group-CO (G-CO)
✔
—
—
Loop-CO (L-CO)
✔
—
—
Alert
✔
—
—
✔
—
—
Live Call Screening (LCS)
✔
—
—
LCS Cancel
✔
—
—
Log-In / Log-Out
✔
—
—
Direct Station Selection (DSS)
✔
✔
—
Message Waiting (MESSAGE)
✔
✔
—
Night
✔
✔
—
✔
✔
—
Two-Way Record
✔
✔
—
Two-Way Transfer†
✔
✔
—
Account
✔
✔
✔
Conference (CONF)
✔
✔
✔
FWD/DND
✔
✔
✔
ISDN Service
✔
✔
✔
One-Touch Dialling
✔
✔
✔
One-Touch Dialling with Auto Hold
✔
✔
✔
SAVE
✔
✔
✔
Terminate
✔
✔
✔
Voice Mail (VM) Transfer
✔
✔
✔
Hurry-Up
†
†
Phantom
†
In the list, “✔” indicates that the feature can be assigned to the button.
†: Available when the Digital Super Hybrid System is connected to a Digital Proprietary
Telephone capable Panasonic Voice Processing System (one that supports digital
proprietary telephone integration; e.g. KX-TVP100).
14
1.1
Configuration
Initial Settings for KX-T7400 Series
The Jog Dial can be used for the display contrast and the volume control. Rotate the Jog Dial
in either direction as desired. The contrast or the volume level will change as follows.
Left
(counter-clockwise)
Right
(clockwise)
Level decreases
Level increases
Display Contrast Adjustment
A Soft button and the Jog Dial for KX-T7433 and KX-T7436 users are used to adjust the
display contrast. The contrast level is indicated on the display by the number of asterisks.
While on-hook or during a conversation
1. Press the CONT (S1) button.
1
CONT
S1
S2
S3
2. Rotate the Jog Dial in the desired direction.
• The display shows:
<Example>
2
Contrast: ***
(— contrast volume level 3)
When using the headset
The Panasonic Digital Super Hybrid System supports the use of a headset with a proprietary
telephone (PT). When you use the headset (optional), you should switch the selection mode
first. Selection is explained in the “Handset/Headset Selection” in Station Programming
(Section 2).
To change to the headset mode
Press: [PROGRAM] [9] [9] [9] [2] [STORE] [PROGRAM].
15
1.1
Configuration
Changing the ringing tone of CO buttons / Intercom calls
There are eight ringer frequencies available for each CO (Group-CO, Loop-CO, Single-CO)
button and INTERCOM button. If you wish to change them, refer to the “Ringing Tone
Selection for CO Buttons” or “Ringing Tone Selection for Intercom Button” in Station
Programming (Section 2).
Volume Control — Handset Receiver/Headset/Ringer/Speaker
Allows you to adjust the following volumes as required.
— Handset Receiver volume (levels 1 through 4)
— Headset volume (levels 1 through 4)
— Ringer volume (levels 0 through 3)
— Speaker volume (levels 1 through 12)
If your digital proprietary telephone is provided with a display (display DPT), the volume level
is indicated on the display by the number of asterisks. For ringer volume adjustment, three
levels (OFF/LOW/HIGH) are available with the KX-T7425 and KX-T7450.
To adjust the handset receiver volume
1. Lift the handset.
1
2. Rotate the Jog Dial in the desired direction.
• The display shows:
<Example>
2
Handset: ***
(— volume level 3)
• You may also adjust the handset receiver volume during a
conversation using the handset receiver.
To adjust the headset volume
1
SP-PHONE
Be sure the headset is connected.
1. Press the SP-PHONE button.
2
2. Rotate the Jog Dial in the desired direction.
• The display shows:
<Example>
Headset: ***
16
(— volume level 3)
1.1
Configuration
To adjust the ringer volume
– KX-T7433 and KX-T7436
While the telephone is ringing
1. Rotate the Jog Dial in the desired direction.
• The display shows:
<Example>
1
Ringer: ***
(— volume level 3)
While the telephone is idle and on-hook
1. Press the RING (S2) button.
• The telephone will ring.
1
RING
S1
S2
S3
2
2. Rotate the Jog Dial in the desired direction.
• The telephone will stop ringing in about 4 seconds.
• When the volume level is 0, the display shows “RNGOFF.”
– KX-T7425 and KX-T7450
1. Adjust the RINGER Volume Selector lever to the desired setting
(OFF/LOW/HIGH).
1
OFF • • • HIGH
LOW
To adjust the speaker volume
1. Press the SP-PHONE button.
1
SP-PHONE
2
2. Rotate the Jog Dial in the desired direction.
• The display shows:
<Example>
SP: ************
(— volume level 12)
• You may also adjust the speaker volume while listening to
background music (BGM On mode), receiving a voice call, or
receiving a page.
17
2.2
Programming
Flexible Button Assignment
ISDN Service Button (Assignment)
Allows you to assign a Flexible (CO, DSS, PF) button as the ISDN Service button.
— Be sure that you are in the Station Programming mode: Press [PROGRAM] [9] [9].
1
1. Press the desired Flexible (CO, DSS, PF) button which you wish to
assign as the ISDN Service button.
2
2. Dial 89.
• The display shows:
8
9
CLR
3
ISDN service number
3. Dial the specified ISDN service number.
• Up to 24 digits can be stored.
• To erase an incorrect entry, press the CLR (S2) button or the
TRANSFER (CLEAR) button.
(The TRANSFER button becomes the CLEAR button when using the overlay.)
4
AUTO DIAL
STORE
4. Press the STORE button.
• The STORE indicator light turns on.
• The display shows the initial programming mode.
— To exit the Station Programming mode: Press [PROGRAM] or lift the handset.
Conditions
• The entry number in step 3 depend on the services which you want to perform. For more
information about the ISDN network services or the specific numbers, please consult with
your ISDN network supplier.
• You can use 0 through 9, and # for storing.
18
4.2
DPT Features
H
Handset Microphone Mute
Allows you to turn off the handset microphone so you can consult privately with others in
the room. You will still be able to hear the other party.
This feature is only available for KX-T7400 series telephone users.
Setting
1
AUTO ANSWER
MUTE
or
During a conversation using the handset
1. Press the AUTO ANSWER/MUTE or
VOICE CALL/MUTE button.
• The AUTO ANSWER/MUTE or VOICE CALL/MUTE
indicator light flashes red slowly.
VOICE CALL
MUTE
Cancelling
1
AUTO ANSWER
MUTE
or
When handset microphone mute is established
1. Press the AUTO ANSWER/MUTE or
VOICE CALL/MUTE button.
• The AUTO ANSWER/MUTE or VOICE CALL/MUTE
indicator light turns off.
VOICE CALL
MUTE
Conditions
• This feature is only available during a conversation with the handset.
19
I
4.2
DPT Features
ISDN Network Service Access
Allows you to access a service which is provided from the ISDN network.
Using the flexible button
1. Lift the handset or press the SP-PHONE/MONITOR button.
1
2. Press a CO button or dial the line access code (9 or 81 through 88).
2
CO
3
3. Press the flexible button which is assigned as the ISDN Service
button.
4
4. Hang up or press the SP-PHONE/MONITOR button.
Using the FWD/DND button
1. Lift the handset or press the SP-PHONE/MONITOR button.
1
2. Press a CO button or dial the line access code (9 or 81 through 88).
2
CO
3. Press the FWD/DND button.
3
FWD/DND
4. Dial the specified service number for the ISDN service.
4
5. Press the FWD/DND button.
Specified service number
5
FWD/DND
6
20
6. Hang up or press the SP-PHONE/MONITOR button.
4.2
DPT Features
I
Condition
• For more information about the ISDN network services or the specific numbers, please
consult with your ISDN network suppliers.
Programming References
• Station Programming (Section 2)
Flexible Button Assignment — ISDN Service Button
(System Programming–[005] (Installation Manual) can be used for this assignment.)
21
W
4.2
DPT Features
Whisper OHCA
Allows busy party notification through the handset. Only the handset will hear the
notification. Only KX-T7400 series telephone users can send or receive Whisper OHCA.
Setting / Cancelling to receive Whisper OHCA
1. Lift the handset or press the SP-PHONE button.
1
2. Enter the feature number (731).
2
1
3
7
3. Enter 3 or 0.
- 3 : to set Whisper OHCA
- 0 : to cancel
• You hear a confirmation tone and then a dial tone.
3
3
or
0
4
4. Hang up or press the SP-PHONE button.
Soft Button Operation
Executing
If you make an intercom call and hear a busy tone;
1. Press the BSS (S1) button.
• You can talk after you hear a confirmation tone.
1
BSS
S1
S2
S3
Standard Operation
Executing
If you make an intercom call and hear a busy tone;
1
2
1. Enter 2.
• You can talk after you hear a confirmation tone.
To talk to the third party by terminating the current call
1
If you hear two beeps and a voice announcement;
1. Hang up.
• The current call is disconnected.
• The INTERCOM indicator light turns green.
22
4.2
DPT Features
W
To talk to the third party by holding the current call
If you hear two beeps and voice announcement;
1
HOLD
1. Press the HOLD button.
• The current call is placed on hold.
• The INTERCOM indicator light flashes green slowly.
Conditions
• Class of Service programming determines which extensions can perform Whisper OHCA.
• The Whisper OHCA receiving extension display shows the calling extension’s number or
name for 5 seconds in 10 second intervals.
• You can select to receive a Call Waiting tone, OHCA, Whisper OHCA or none of these at
your extension.
• If the Whisper OHCA sender does not use a KX-T7400 series telephone, it will work as
OHCA. If the receiver does not use a KX-T7400 series telephone, it may not work properly.
(E.g. The announcement may be heard by the other party.)
• The receiving mode may shift depending on the settings on each telephone or the telephone
type.
<Example> If the user selects 3 (Whisper OHCA mode);
– If using a KX-T7436 handset ............................Whisper OHCA
– If using a KX-T7436 SP-PHONE......................Call Waiting
– Other...................................................................Call Waiting
• It is possible to enable the Whisper OHCA by any type of telephones by system
programming. However, it may not work properly. (E.g. the announcement may be heard
by the other party.)
• The Whisper OHCA sender will receive a ringback tone in the following cases.
– If the receiver presses the TRANSFER, CONF, SP-PHONE, DSS or CO button.
– If the party who is talking with the receiver disconnects the line or presses the
TRANSFER, CONF or HOLD button.
Programming References
• System Programming — Installation Manual Addendum
[519] Off-Hook Call Announcement (OHCA)
[990] System Additional Information, Field (61)
Feature References
Busy Station Signaling (BSS)
Call Waiting
Off-Hook Call Announcement (OHCA)
23
4.3
Operator Service Features
Outgoing Message (OGM)
The operator can record or play back outgoing voice messages. There are two types of
outgoing messages that can be recorded.
UCD message:
If assigned in the UCD table, this message is played when all extensions in an UCD
group are busy or not available. There are four different UCD messages.
Timed Reminder message:
This is played when answering the Timed Reminder alarm (often used as a wake-up call).
There is only one Timed Reminder message.
Recording a message
1. Lift the handset or press the SP-PHONE/MONITOR button.
1
2. Dial the feature number (712) and 1.
2
7
1
1
3. Dial the OGM number (1 through 4).
• The display shows:
OGM 2
Rec.:00
Time counter (seconds)
3
OGM number
4
OGM number selected
(1 through 4)
• The STORE indicator light flashes red slowly; recording starts
after the confirmation tone.
4. Record the message.
5
AUTO DIAL
STORE
6
AUTO DIAL
STORE
7
2
5. Press the STORE button to stop recording or record for the preset
recording duration.
• The STORE indicator light turns steady red.
• You hear a confirmation tone; the recorded message will be
played back automatically.
• The display shows:
<Example>
OGM 2
Play:10
6. Press the STORE button or wait until playback is finished.
• The STORE indicator light turns off.
• You hear a confirmation tone and then a dial tone.
7. Hang up or press the SP-PHONE button.
24
4.3
Operator Service Features
Playing back a message
1. Lift the handset or press the SP-PHONE/MONITOR button.
1
2. Dial the feature number (712) and 2.
2
1
7
2
2
3
OGM number
4
AUTO DIAL
STORE
5
3. Dial the OGM number (1 through 4).
• You hear a confirmation tone.
• The STORE indicator lights.
• The message is played back; the counter starts.
• The display shows:
<Example>
OGM 1
Play:10
Time counter (seconds)
OGM number selected
(1 through 4)
4. Press the STORE button or wait until playback is finished.
• The STORE indicator light turns off.
• You hear a confirmation tone and then a dial tone.
5. Hang up or press the SP-PHONE/MONITOR button.
Conditions
• You can select a maximum recording time of 0/16/32/64 seconds for each message
(Outgoing Message Time). The total length must be under sixty four seconds.
• To use the Timed Reminder message, you must select the recorded OGM number by System
Programming.
Programming References
• System Programming — Installation Manual Addendum
[216] Outgoing Message Time
[818] Timed Reminder Message Assignment
Feature References
Timed Reminder
Uniform Call Distribution (UCD)
25
4.4
Special Display Features
How to Use the Display
With display telephones, KX-T7230, KX-T7235, KX-T7433 and KX-T7436, you can easily
access several features.
Display telephones have the ability to perform the following features.
Feature
KX-T7230 KX-T7235 KX-T7433 KX-T7436
✔
Call Forwarding / Do Not Disturb*1
CO Incoming Call Information Log*1
✔
✔
✔
✔
✔
CO Outgoing Call Log
✔
✔
Extension Dialling
✔
Hotel Application (operator only)*2
✔
Station Speed Dialling
✔
✔
✔
System Speed Dialling
✔
✔
✔
System Feature Access Menu
✔
✔
✔
✔
✔
✔
“✔” indicates the features is available.
*1: Please refer to the corresponding feature in Section 4.2, “DPT Features.”
*2: Please refer to the corresponding feature in Section 4.3, “Operator Service Features.”
*1 *2: KX-T7433 user should follow the procedures for the KX-T7230, while KX-T7436 user
should follow the procedures for the KX-T7235.
Soft Buttons and SHIFT Button
Three soft buttons are provided right below the display on display DPTs, KX-T7230, KXT7235, KX-T7433 and KX-T7436. The functions which are assigned to the buttons are shown
on the lower line of the display. Each soft button has several functions assigned. To change
the functions, press the SHIFT button on the right side of the display.
Helpful Information about Soft Button Operation
Press CONT (S1) to adjust the display contrast.
Press RING (S2) to adjust the ringer volume.
Press BGM (S3) to turn on/off the BGM.
Press MENU (S1) to return to the initial display.
Press PREV (S2) to return to the previous display.
Press NEXT (S3) to advance to the next display.
Press ACCNT (S3) to enter an account code.
26
4.4
Special Display Features
Jog Dial Operation
KX-T7433 or KX-T7436 users can search for desired items by using the Jog Dial
corresponding with the display menu. Rotate the Jog Dial in either direction as desired. The
items will be displayed as follows.
Left
(counter-clockwise)
Right
(clockwise)
To the previous
item
To the next
item
Jog Dial Operation Display
– KX-T7433
While idle, the bottom line of the display changes by pressing the SHIFT button as follows.
The Jog Dial operation is available for the third display.
Initial Display
Second Display
Third Display
CONT
RING
OLD6
NEW9
STA
EXT
BGM
SHIFT
SHIFT
FEAT
SHIFT
– KX-T7436
The Jog Dial operation is available after pressing a Function button on the third and fourth
line and the Soft buttons in the third display. The third display appears by pressing the
SHIFT button as follows.
1 Jan
Initial Display
Second Display
Third Display
3:00PM
Extension STA Speed
Features
SYS Speed
Call Log
RING
BGM
CONT
OLD6
NEW9
STA
EXT
SHIFT
SHIFT
FEAT
SHIFT
27
4.4
Special Display Features
CO Outgoing Call Log (KX-T7235 / KX-T7436 only)
The last five outside calls you made are logged automatically. You can make a call using the
call log.
Initial Display
1 Jan
3:00PM
Extension STA Speed
Features
SYS Speed
Call Log
RING
BGM
CONT
<Example>
To select 111
1234567890
111
0987654
000111222333
100200300400500
CLR
MENU
28
NEXT
Making a call using the call log
Note
1. Press the Call Log (F5) button.
2. Press the Function button which is next
to the desired number.
• To delete all numbers, press the CLR (S2)
button.
• To return to the initial display, press the MENU
(S1) button.
4.4
Special Display Features
Extension Dialling (KX-T7235 / KX-T7433 / KX-T7436 only)
You can make an intercom call using the directory. Only items which have a name assigned
are displayed in alphabetical order.
■ KX-T7235
■ KX-T7433
Initial Display
1 Jan
3:00PM
Extension STA Speed
Features
SYS Speed
Call Log
RING
BGM
CONT
Initial Display
1 Jan
CONT
RING
BGM
Third Display
<Example>
To select Beth
STA
AB
C
DE
FG
HIJ
MENU
3:00PM
EXT
FEAT
KL
MN
OPQR
S
T-Z
Adam
Bob
Alice
Carol
Ann Parker
Casey
Ben Johns
Ched Ely
Beth
Chris
MENU
PREV
NEXT
NEXT
MENU
<Example>
To select Bob Jones
→B o b J o n e s
Carol
MENU
CALL
or
1. Press the Extension (F3) button.
2. Press the Function button which is
next to the desired letter.
3. Press the Function button which is
next to the desired name.
1. Press the SHIFT button repeatedly until
the Jog Dial operation display appears.
2. Press the EXT (S2) button.
3. Rotate the Jog Dial until the desired
name is at the arrow.
4. Press the CALL (S3) button or go off-hook.
29
4.4
Special Display Features
■ KX-T7436
Conditions
• Before rotating the Jog Dial, you can press
the corresponding alphabet key to select the
desired letter.
<Example> Press 2 two times to display “B”
items.
• The KX-T7436 user can press the Function
button (F1 through F10) on the same line of
the desired item instead of the CALL (S3)
button.
Initial Display
1 Jan
3:00PM
Extension STA Speed
Features
SYS Speed
Call Log
RING
BGM
CONT
Programming References
Third Display
STA
EXT
• User Programming (Section 3) /
System Programming (Installation Manual)
[003] Extension Number Set
[004] Extension Name Set
FEAT
<Example>
To select Bob Jones
Ann Parker
Beth
→Bob Jones
Carol
Chris
MENU
MENU
CALL
NEXT
or
1. Press the Extension (F3) button or the
EXT (S2) button.
(The S2 button can be changed to “EXT”
by pressing the SHIFT button repeatedly.)
2. Rotate the Jog Dial until the desired name is
at the arrow.
3. Press the CALL (S3) button or go off-hook.
30
4.4
Special Display Features
Station Speed Dialling (KX-T7235 / KX-T7433 / KX-T7436 only)
You can make a call to a party stored in your telephone.
For the KX-T7235, you can switch the name and number display by pressing the NEXT
button.
For the KX-T7433 and KX-T7436, items which have a name assigned are displayed by priority
in stored order. If a name is not assigned, the number is displayed. The displaying mode, name
or number, can be assigned in System Programming.
■ KX-T7235
■ KX-T7433
Initial Display
Initial Display
1 Jan
1 Jan
3:00PM
CONT
Extension STA Speed
Features
SYS Speed
Call Log
RING
BGM
CONT
RING
BGM
Third Display
<Example>
To select Panasonic
STA
Bob
Jim Kopp
Ronald
Zangril
Nancy
MENU
3:00PM
EXT
FEAT
KME-soft
Panasonic
Police
Louisa
Home
NEXT
NEXT
9-123-4567
9111111
93333333
97777777
10
MENU
MENU
9-987-6543
9-5555555
9-999
9-4444444
9-1000001
NEXT
<Example>
To select Bob Jones
→B o b J o n e s
Carol
MENU
CALL
or
1. Press the STA Speed (F8) button.
2. Press the Function button which is
next to the desired name or number.
To alternate the display between
name and number, press the NEXT
(S3) button.
1. Press the SHIFT button repeatedly until
the Jog Dial operation display appears.
2. Press the STA (S1) button.
3. Rotate the Jog Dial until the desired name
or number is at the arrow.
4. Press the CALL (S3) button or go off-hook.
31
4.4
Special Display Features
■ KX-T7436
Programming References
• Station Programming (Section 2)
Station Speed Dialling Number / Name
Assignment (KX-T7235 / KX-T7433 / KX-
Initial Display
1 Jan
3:00PM
T7436 only)
Extension STA Speed
Features
SYS Speed
Call Log
RING
BGM
CONT
• System Programming — Installation Manual
[990] System Additional Information,
Field (19)
Third Display
STA
EXT
FEAT
<Example>
To select Bob Jones
Ann Parker
Beth
→Bob Jones
Carol
Chris
MENU
MENU
CALL
NEXT
or
1. Press the STA Speed (F8) button or the
STA (S1) button.
(The S1 button can be changed to “STA” by
pressing the SHIFT button repeatedly.)
2. Rotate the Jog Dial until the desired name or
number is at the arrow.
3. Press the CALL (S3) button or go off-hook.
32
4.4
Special Display Features
System Speed Dialling (KX-T7235 / KX-T7433 / KX-T7436 only)
You can make a call to a party stored in the system using the directory. Only items which
have a name assigned are displayed in alphabetical order.
■ KX-T7235
■ KX-T7433
Initial Display
1 Jan
Initial Display
1 Jan
3:00PM
Extension STA Speed
Features
SYS Speed
Call Log
RING
BGM
CONT
CONT
<Example>
To select Jack
AB
C
DE
FG
HIJ
MENU
3:00PM
RING
BGM
Third Display
KL
MN
OPQR
S
T-Z
STA
EXT
FEAT
<Example>
To select Bob Jones
Harry
Jack
Henry
Janny
Hiroshi
Jimmy
Isaac
John
Ivy‘s shop
Johes
NEXT
MENU
PREV
MENU
1. Press the SYS Speed (F9) button.
2. Press the Function button which is
next to the desired letter.
3. Press the Function button which is
next to the desired name.
→B o b J o n e s
Carol
MENU
CALL
or
1. Press the SHIFT button repeatedly until
the Jog Dial operation display appears.
2. Rotate the Jog Dial until the desired name
is at the arrow.
3. Press the CALL (S3) button or go off-hook.
33
4.4
Special Display Features
■ KX-T7436
Conditions
• Before rotating the Jog Dial, you can press the
corresponding alphabet key to select the desired
letter. <Example> Press 2 two times to display
“B” items.
• The KX-T7436 user can press the Function
button (F1 through F10) on the same line of the
desired item instead of the CALL (S3) button.
Initial Display
1 Jan
3:00PM
Extension STA Speed
Features
SYS Speed
Call Log
RING
BGM
CONT
Programming References
• User Programming (Section 3) /
System Programming (Installation Manual)
[001] System Speed Dialling Number Set
[002] System Speed Dialling Name Set
Third Display
STA
EXT
FEAT
<Example>
To select Bob Jones
Ann Parker
Beth
→Bob Jones
Carol
Chris
MENU
MENU
CALL
NEXT
or
1. Press the SYS Speed (F9) button, or press
the SHIFT button repeatedly until the Jog
Dial operation display appears.
2. Rotate the Jog Dial until the desired name is
at the arrow.
3. Press the CALL (S3) button or go off-hook.
34
4.4
Special Display Features
System Feature Access Menu (KX-T7235 / KX-T7433 / KX-T7436 only)
The System Feature Access Menu provides a display of the system features which appear in
alphabetical order. The available features are as follows:
Absent Message Capability
Background Music — External (operator only)
Call Park
Call Pickup, Group
Class of Service (COS) Switch (operator only)
Message Waiting
Night Service On / Off (operator only)
Paging — External
Paging — Group
Paging — ANSWER
Paralleled Telephone Connection
The following shows the operating procedures with an example. Please refer to the System
Feature List for feature descriptions and required parameters.
<Example>
Message Waiting: To leave a notification so that the called party may call you back
35
4.4
Special Display Features
■ KX-T7235
■ KX-T7433
Initial Display
1 Jan
3:00PM
Extension STA Speed
Features
SYS Speed
Call Log
RING
BGM
CONT
Initial Display
1 Jan
CONT
3:00PM
RING
BGM
Third Display
Absent MSG Off
Absent MSG On
C.Pickup Group
Call Park
COS Primary
MENU
PREV
(0-9)
(ext)
NEXT
Extrn BGM On/Off
Message Off
Message On
Night On/Off
Page-Ext Answer
MENU
PREV
MENU
(ext)
(ext)
(1/0)
(1-4)
NEXT
NEXT
(1-9)
STA
EXT
→M S G O n
Night Mode
MENU
FEAT
ext
1/0
SEL
If a parameter is required,
the parameter will flash.
Enter the extension number.
If a parameter is required,
the feature name and
parameter will flash.
Enter the
extension
number.
1. Press the Features (F4) button.
2. Press the NEXT (S3) button until
“Message On” is displayed.
3. Press the Function button which is next
to “Message On.”
4. Enter the extension number.
5. On-hook.
36
1. Press the SHIFT button repeatedly until
the Jog Dial operation display appears.
2. Press the FEAT (S3) button.
3. Rotate the Jog Dial until “MSG On”
is at the arrow.
4. Press the SEL (S3) button.
5. Enter the extension number.
6. On-hook.
4.4
Special Display Features
■ KX-T7436
Initial Display
1 Jan
3:00PM
Extension STA Speed
Features
SYS Speed
Call Log
RING
BGM
CONT
Third Display
EXT
STA
FEAT
Extrn BGM On/Off
Message Off
(ext)
(ext)
→Message On
Night On/Off
(1/0)
Page-Ext Answer
(1-4)
MENU
SEL
NEXT
MENU
If a parameter is required,
the parameter will flash.
Enter the
extension
number.
1. Press the Features (F4) button
or the FEAT (S3) button.
(The S3 button can be changed
to “FEAT” by pressing the
SHIFT button repeatedly.)
2. Rotate the Jog Dial until
“Message On” is at the arrow.
3. Press the SEL (S3) button.
4. Enter the extension number.
5. On-hook.
37
4.4
Special Display Features
System Feature List
You can access the following features which are displayed in alphabetical order.
The parameters used in the list are for a telephone connected to a KX-TD1232.
Features marked with “*” are only available for the operator.
For more details about the features and required parameters, refer to the respective features in
Section 4.2, “DPT Features,” and Section 4.3, “Operator Service Features.”
DISPLAY
REQUIRED
PARAMETERS
(KX-T7436)
(KX-T7433)
Absent MSG Off
ABST MSG Off
Absent MSG On
(1-9)
ABST MSG On 1-9
C.Pickup Group
Call Park (0-9)
Call Park
0-9
COS Primary
(ext)
COS Primary ext
COS Secondary
COS Second
(ext)
Message Off
(ext)
(ext)
ext
Night On/Off
(1/0)
1-4
Page-GRP Answer
Page-GRP ANS
Paging External
Page Extrn
38
0-4
Picks up a call within your extension group.
— “Call Pickup, Group”
0-9: Parking zone number
Places a call on hold in a system parking area.
— “Call Park”
Extension number
Selects Class of Service (COS) primary mode.*
— “Class of Service (COS) Switch”
Extension number
Selects Class of Service (COS) secondary mode.*
— “Class of Service (COS) Switch”
Turns on/off the background music.*
— “Background Music (BGM) – External”
Extension number
Cancels a notification.
— “Message Waiting”
Extension number
Leaves a notification so that the called party
may call you back. — “Message Waiting”
1 (On) / 0 (Off)
Changes the Day (Off) / Night (On) mode.*
— “Night Service”
1/0
Page-Ext Answer
Page-E ANS
Sets an absent message.
— “Absent Message Capability”
ext
Message On
Night Mode
Message number (1-9) +
parameter (if required)
None
Ext-BGM On/Off
MSG On
Cancels the absent message.
— “Absent Message Capability”
ext
Extrn BGM On/Off
MSG Off
None
None
C.Pickup GRP
FEATURE DESCRIPTION
(1-4) 1-4: External pager number Answers a page through a speaker.
— “Paging – ANSWER”
(3 and 4: TD1232 only)
None
Answers a page through a telephone in the same
extension group. — “Paging – ANSWER”
Pages through the speaker.
(0-4) 0: All external pagers
1-4: External pager number — “Paging – External”
(3 and 4: TD1232 only)
4.4
Special Display Features
DISPLAY
REQUIRED
PARAMETERS
(KX-T7436)
(KX-T7433)
FEATURE DESCRIPTION
(00-16) 00: All extension groups
Pages to all or a particular extension group.
— “Paging – Group”
01-16:
Extension
group
number
00-16
Paging Group
Page GRP
Parallel On/Off
(1/0)
1 (On) / 0 (Off)
Parallel
1/0
Sets whether a single line telephone connected
in parallel will ring (On) or not (Off) when
receiving a call.
— “Paralleled Telephone Connection”
Conditions
• When using a KX-T7436, you can press a Function button (F1 through F10) on the same
line of the desired item instead of the SEL (S3) button.
• Before rotating the Jog Dial, you can press the corresponding alphabet key to select the
desired letter.
<Example> Press 2 two times to display “B” items.
39
5.1
Configuration
Location of Controls
■ KX-T7440
DSS Buttons with
Busy Lamp Field (BLF) (01 through 66)
■ KX-T7441
DSS Buttons with
Busy Lamp Field (BLF) (01 through 48)
ANSWER Button
RELEASE Button
Connection
Included telephone
line cord
40
→ Connect to a Digital Super
Hybrid System.
5.1
Configuration
Feature Buttons
DSS Consoles have the following types of Feature Buttons:
DSS Buttons with Busy Lamp Field (BLF)
Used to access extensions. The BLF indicates the busy or idle status of each extension in the
system. These buttons can also be changed to other function buttons.
PF (Programmable Feature) Buttons
These buttons are provided with no default settings. With a paired telephone, you can program
the buttons as other function buttons.
ANSWER Button
Used to answer an incoming call.
RELEASE Button
Used to disconnect the line.
41
5.2
DSS Console Features
ANSWER / RELEASE Button Operation (KX-T7441 only)
The KX-T7441 DSS Console is provided with an ANSWER and RELEASE button which are
useful for operators who use headsets.
With the ANSWER button, you can answer all incoming calls to the paired telephone. With
the RELEASE button, you can disconnect the line during or after a conversation or complete a
Call Transfer.
Answering a call
1
ANSWER
1. Press the ANSWER button on the console.
• You can talk to the caller with the headset or using the handsfree
mode.
Call Transfer
1
TRANSFER
During a conversation with the headset or handsfree mode
1. Press the TRANSFER button on the paired telephone.
2
or
2. Press the desired DSS button on the console or dial the desired
number at the paired telephone.
desired number
3. Press the RELEASE button after the party answers.
3
RELEASE
One-Touch Transfer
A CO call can be transferred to an extension with the one-touch operation. The One-Touch
Transfer function must be set by System Programming.
1
2
RELEASE
During a conversation with the headset or handset mode
1. Press the desired DSS button on the console.
• The other party is placed on hold and the destination extension is
called immediately.
2. Press the RELEASE button after the party answers.
Programming References
• System Programming — Installation Manual
[108] Automatic Hold by CO/DSS Button
42
Changed Features
Feature Title
Section
2.2
Flexible Button
Programming
Assignment —
Log-In / Log-Out Button
Revision
This program is replaced with a new one. See page 46.
Flexible Button
Assignment — OneTouch Dialling Button
2.2
Programming
The maximum number of digits which can be stored on a
One-Touch Dialling button is increased from 16 to 24.
Flexible Button
Assignment —
One-Touch Dialling
with Auto Hold Button
2.2
Programming
The maximum number of digits which can be stored on a
One-Touch Dialling with Auto Hold button is increased from
16 to 24.
Station Speed Dialling
Number / Name
Assignment
2.2
Programming
This program is replaced with a new one. See pages 47
through 53.
Calling / Connected
Line Identification
Presentation (CLIP /
COLP)
This feature is replaced with a new one. See pages 54 and 61.
4.2
DPT Features
6.2 SLT and
ISDN Telephone
Features
Call Forwarding —
to CO Line
4.2
The second condition is changed.
DPT Features • Up to 24 digits (line access code is included) can be pro6.2 SLT and
grammed.
ISDN Telephone
Features
Log-In / Log-Out
This feature is replaced with a new one. See pages 56 and 63.
4.2
DPT Features
6.2 SLT and
ISDN Telephone
Features
4.2
Off-Hook Call
Announcement (OHCA) DPT Features
This feature is replaced with a new one. See page 58.
The maximum number of digits which can be stored on a
One-Touch Dialling button is increased from 16 to 24.
One-Touch Dialling
4.2
DPT Features
Station Speed Dialling
The first condition is changed as follows:
4.2
DPT Features • You can store an extension number, a telephone number, or
6.2 SLT and
a feature number of up to 24 digits.
ISDN Telephone
Features
44
Feature Title
Section
Revision
Uniform Call
Distribution (UCD)
4.2
This features is replaced with a new one. See pages 60 and 64.
DPT Features
6.2 SLT and
ISDN Telephone
Features
Background Music
(BGM) — External
4.3 Operator
Service
Features
KX-T7433 and KX-T7436 users can also execute the display
operation. However the Display Operation is changed. For
operation, refer to the System Feature Access Menu feature in
Section 4.4 “Special Display Features.”
4.4 Special
Display
Features
(— for KXT7235)
This section is wholly replaced with a new one and the section
name is changed to “4.4 Special Display Features.”
See pages 26 through 41.
Class of Service (COS)
Switch
All features in the
Section 4.4
45
2.2
Programming
Flexible Button Assignment
Log-In / Log-Out Button (Assignment)
Allows you to assign a Flexible (CO) button as the Log-In / Log-Out button.
— Be sure that you are in the Station Programming mode: Press [PROGRAM] [9] [9].
1
1. Press the desired Flexible (CO) button you wish to assign as the
Log-In / Log-Out button.
2
2. Dial 80.
• The display shows:
0
8
Log-in Grp
CLR
3
3. Dial the hunting group extension number.
• The display shows:
hunting group extension number
Log-in Grpxxxx
CLR
(— xxxx: hunting group extension
number)
4
AUTO DIAL
STORE
• To erase an incorrect entry, press the CLR (S2) button or the
TRANSFER (CLEAR) button.
(The TRANSFER button becomes the CLEAR button when using the overlay.)
4. Press the STORE button.
• The STORE indicator light turns on.
• The display shows the initial programming mode.
— To exit the Station Programming mode: Press [PROGRAM] or lift the handset.
46
2.2
Programming
Station Speed Dialling Number / Name Assignment
(KX-T7235 / KX-T7433 / KX-T7436 only)
Allows you to assign frequently dialled numbers and names to each Function button on your
telephone.
For KX-T7235 and KX-T7436 users
To store a number
— Be sure that you are in the Station Programming mode: Press [PROGRAM] [9] [9].
1
F1
F6
F2
F7
F3
F8
F4
F5
1. Press a Function button (F1 through F10).
• The STORE indicator light turns off.
• The display shows the current status.
<Example>
F9
PT-PGM Mode
F10
9-431-2111
CLR
(— The outside call, 431-2111, is
now programmed.)
NEXT
2
desired number
3
AUTO DIAL
2. Enter the desired number (up to sixteen digits).
• 0 through 9, , #, RECALL, PAUSE, INTERCOM, ( “[” or “]”:
secret) and CONF (–: hyphen) can be used.
• To store the telephone number of an outside party, the line
access code (9 or 81 through 88) must be the leading digit.
• To erase the entry, press the CLR (S2) button.
STORE
3. Press the STORE button.
• The STORE indicator lights.
• The display shows the initial programming mode.
— To exit the Station Programming mode: Press [PROGRAM] or lift the handset.
47
2.2
Programming
To store a name
— Be sure that you are in the Station Programming mode: Press [PROGRAM] [9] [9].
1
F1
F6
F2
F7
F3
F8
F4
1. Press a Function button (F1 through F10).
• The STORE indicator light turns off.
• The display shows the current status.
F9
PT-PGM Mode
F5
F10
2
2. Press the NEXT (S3) button.
• The display shows the current status.
<Example>
(— The name is now programmed.)
Mike
NEXT
S1
S2
CLR
NEXT
S3
3. Enter the name.
• Refer to the Combination Table on pages 51 and 52 on how to
enter each character.
3
name
4
AUTO DIAL
4. Press the STORE button.
• The STORE indicator lights.
• The display shows the initial programming mode.
STORE
— To exit the Station Programming mode: Press [PROGRAM] or lift the handset.
48
2.2
Programming
For KX-T7433 users
To store a number
— Be sure that you are in the Station Programming mode: Press [PROGRAM] [9] [9].
1. Press
1
.
2. Enter the Station Speed Dial number (0 through 9).
• The STORE indicator light turns off.
• The display shows the current status.
<Example>
2
Station Speed Dial number
9-431-2111
CLR
3
desired number
4
AUTO DIAL
STORE
(— The outside call, 431-2111, is
now programmed.)
NEXT
3. Enter the desired number (up to sixteen digits).
• 0 through 9, , #, RECALL, PAUSE, INTERCOM, ( “[” or “]”:
secret) and CONF (–: hyphen) can be used.
• To store the telephone number of an outside party, the line
access code (9 or 81 through 88) must be the leading digit.
• To erase the entry, press the CLR (S2) button.
4. Press the STORE button.
• The STORE indicator lights.
• The display shows the initial programming mode.
— To exit the Station Programming mode: Press [PROGRAM] or lift the handset.
49
2.2
Programming
To store a name
— Be sure that you are in the Station Programming mode: Press [PROGRAM] [9] [9].
1. Press
1
2
Station Speed Dial number
.
2. Enter the Station Speed Dial number (0 through 9).
• The STORE indicator light turns off.
• The display shows the current status.
<Example>
9-431-2111
CLR
3
NEXT
S1
S2
4
(— The outside call, 431-2111, is
now programmed.)
NEXT
3. Press the NEXT (S3) button to store a name.
S3
4. Enter the name.
• Refer to the Combination Table on pages 51 and 52 on how to
enter each character.
name
5
AUTO DIAL
5. Press the STORE button.
• The STORE indicator lights.
• The display shows the initial programming mode.
STORE
— To exit the Station Programming mode: Press [PROGRAM] or lift the handset.
50
2.2
Programming
Combination Table
Characters can be entered using the dial key pad, various buttons or the Jog Dial for storing
names.
Combination Table 1 shows the combination of keys and the number of times to press the
SELECT (AUTO ANSWER/MUTE) button, or the combination of keys and the SHIFT and
Soft buttons to enter characters. (The AUTO ANSWER/MUTE button becomes the SELECT button when
using the overlay.)
To enter a character, find the key and number of times to press the SELECT button or the corresponding SHIFT and Soft button combination on the table. Press the corresponding key first,
then press the SELECT button the required number of times. Or, you can use the SHIFT button
and a Soft button (S1 through S3) instead of the SELECT button.
Combination Table 2 shows the combination of keys and the number of pulses to move the
Jog Dial (click tones) to the right.
To enter a character, find the key and number pulses to rotate the Jog Dial. Press the corresponding key first, then rotate the Jog Dial the required number of times. Or, if you keep rotating the Jog Dial after pressing any dialling key, all of the characters in the table will be displayed.
Combination Table 1
SHIFT & Soft
Combination
S1
SHIFT+ S1
S2
SHIFT+ S2
S3
SHIFT+ S3
1
Q
A
D
G
J
M
P
T
W
2
q
a
d
g
j
m
p
t
w
.
+
%
3
Z
B
E
H
K
N
Q
U
X
,
&
4
z
b
e
h
k
n
q
u
x
’
=
@
5
!
C
F
I
L
O
R
V
Y
:
<
(
6
?
c
f
i
l
o
r
v
y
SHIFT+
SHIFT+
SHIFT+ S1 SHIFT+ S2
Pressing
SELECT
(Times)
Keys
1
2
3
4
5
6
7
8
9
0
#
0
1
2
3
4
5
6
7
8
9
0
*
#
/
$
7
8
S
s
Z
z
;
>
)
51
2.2
Programming
Combination Table 2
Rotating
Jog Dial
(Pulses)
Keys
1
2
3
4
5
6
7
8
9
0
#
0
1
2
3
4
5
6
7
8
9
0
*
#
1
Q
A
D
G
J
M
P
T
W
/
$
2
q
a
d
g
j
m
p
t
w
!
+
%
3
R
B
E
H
K
N
Q
U
X
?
&
4
r
b
e
h
k
n
q
u
x
.
=
@
5
S
C
F
I
L
O
R
V
Y
,
<
(
6
s
c
f
i
l
o
r
v
y
7
T
D
G
J
M
P
S
W
Z
8
t
d
g
j
m
p
s
w
z
’
>
)
:
#
A
;
$
a
<Example> To enter “Mike”
— Using the SELECT button (With a KX-T7433 / KX-T7436 / KX-T7235)
See Combination Table 1.
1. Press 6 and then press the SELECT button once to enter “M.”
2. Press 4 and then press the SELECT button six times to enter “i.”
3. Press 5 and then press the SELECT button four times to enter “k.”
4. Press 3 and then press the SELECT button four times to enter “e.”
— Using the SHIFT button and a Soft button (With a KX-T7433 / KX-T7436 / KX-T7235)
See Combination Table 1.
1. Press 6 and then press the S1 button to enter “M.”
2. Press 4 and then press the SHIFT and S3 button to enter “i.”
3. Press 5 and then press the S2 button to enter “k.”
4. Press 3 and then press the S2 button to enter “e.”
52
2.2
Programming
— Using the Jog Dial (With a KX-T7433 / KX-T7436)
See Combination Table 2.
1. Press 6 and then rotate the Jog Dial one pulse to enter “M.”
2. Press 4 and then rotate the Jog Dial six pulses to enter “i.”
3. Press 5 and then rotate the Jog Dial four pulses to enter “k.”
4. Press 3 and then rotate the Jog Dial four pulses to enter “e.”
OR
1. Press 2 and then rotate the Jog Dial until “M” appears.
2. Press 2 and then rotate the Jog Dial until “i” appears.
3. Press 2 and then rotate the Jog Dial until “k” appears.
4. Press 2 and then rotate the Jog Dial until “e” appears.
Notes
• Pressing the SHIFT button alternates between capital and lower case letters. Once this button is pressed, that letter SHIFT mode remains until SHIFT is pressed again.
• To erase the last word (to backspace), press the CONF button.
(The CONF button becomes the “←” (backspace) key when using the overlay.)
• To erase all of the data, press the CLR (S2) button.
• If you keep rotating the Jog Dial, all of the characters will be displayed in order.
<Example> If you rotate the Jog Dial after pressing 2, all of the characters will appear in the
following order:
A a B b ···· Z z (space) ! ? . , ’ : ; * / + – = < > # $ % & @ ( ) A a B b
····
Conditions
• The default is “Not Stored.”
• Up to ten dialling numbers and names can be assigned. Each dialling number has a maximum of sixteen digits and each name has a maximum of ten characters.
53
C
4.2
DPT Features
Calling / Connected Line Identification Presentation
(CLIP / COLP)
Allows you to display your number on the LCD of the called party’s telephone when making a call (CLIP), or allows you to display your number on the LCD of the calling party’s
telephone when answering a call (COLP) through an ISDN line.
To select a CLIP / COLP number for a CO line
1. Lift the handset or press the SP-PHONE/MONITOR button.
1
2
7
1
1
2. Dial the feature number (711) and 1.
• You will hear a confirmation tone.
• The display shows:
CLIP/COLP:CO
1
3
3. Hang up or press the SP-PHONE/MONITOR button.
To select a CLIP / COLP number for an extension
1. Lift the handset or press the SP-PHONE/MONITOR button.
1
2
7
2
3
54
1
1
2. Dial the feature number (711) and 2.
• You will hear a confirmation tone.
• The display shows:
CLIP/COLP:EXT
3. Hang up or press the SP-PHONE/MONITOR button.
4.2
DPT Features
C
To select a desired CLIP number for one time
1. Lift the handset or press the SP-PHONE/MONITOR button.
1
2. Dial the feature number (711) and 3.
2
1
7
1
3. Dial the desired CLIP number and press #.
• You will hear a confirmation tone.
3
3
4. Press a CO button or dial the line access code (0 or 81 through 88).
desired CLIP number + #
5. Dial the phone number.
4
CO
5
phone number
Condition
• System programming is required to assign the numbers for a CLIP / COLP number.
However, the number actually sent to the called or calling party depends on the contract of
your ISDN network suppliers.
Programming References
• System Programming — Installation Manual Addendum
[419] Subscriber Number Assignment
[623] CLIP / COLP Number Assignment for Extension
[624] CLIP / COLP Number Assignment for ISDN Extension
Feature References
Calling Line Identification Restriction (CLIR)
Connected Line Identification Restriction (COLR)
55
L
4.2
DPT Features
Log-In / Log-Out
Allows you to assign the Log-In mode or Log-Out mode within the hunting or UCD (Uniform
Call Distribution) group. When in the Log-Out mode, you can leave the group temporarily,
preventing hunting calls from being sent to your extension. The lighting patterns of the LogIn / Log-Out button and status are as follows.
Off : Log-In mode
Red : Log-Out mode
Flashing red moderately : Calls in an UCD queue
Log-In / Log-Out (Using the Log-In / Log-Out button)
1. Lift the handset or press the SP-PHONE/MONITOR button.
1
2. Press the flexible button which is assigned as
the Log-In / Log-Out button.
• You hear a confirmation tone and then a dial tone.
• The indicator light turns off in Log-In mode or turns steady red in
Log-Out mode.
2
3
3. Hang up or press the SP-PHONE/MONITOR button.
Log-In / Log-Out (Using the feature number)
1. Lift the handset or press the SP-PHONE/MONITOR button.
1
2. Dial the feature number (45).
2
5
4
3
1
or
0
4
hunting group extension number
5
3. Dial 1 or 0.
- 1 : for Log-In mode
- 0 : for Log-Out mode
4. Dial the hunting group extension number.
• You can press to select all the hunting groups.
• You hear a confirmation tone and then a dial tone.
• The display shows:
Log-in Grpxxxx
or
Log-out Grpxxxx
5. Hang up or press the SP-PHONE/MONITOR button.
56
4.2
DPT Features
L
Conditions
• The Log-In / Log-Out button can be assigned to a flexible CO button.
Programming References
• Station Programming (Section 2)
Flexible Button Assignment — Log-In / Log-Out Button
(System Programming — [005] (Installation Manual) can be used for this assignment.)
Feature References
Station Hunting (→ see Installation Manual)
Uniform Call Distribution (UCD)
57
O
4.2
DPT Features
Off-Hook Call Announcement (OHCA)
Allows you to signal a busy extension that your call is waiting. Your voice is received
through the built-in speaker of the called party’s telephone (KX-T7235 and KX-T7436
only). The called party can connect to the two parties and carry two independent conversations.
Setting / Cancelling to receive OHCA
1. Lift the handset or press the SP-PHONE button.
1
2. Enter the feature number (731).
2
1
3
7
3. Dial 2 or 0.
- 2 : to set
- 0 : to cancel
• You hear a confirmation tone and then a dial tone.
3
2
or
0
4
4. Hang up or press the SP-PHONE button.
Soft Button Operation
Executing
If you make an intercom call and hear a busy tone;
1. Press the BSS (S1) button.
• You can talk after you hear a confirmation tone.
1
BSS
S1
S2
S3
Standard Operation
Executing
If you make an intercom call and hear a busy tone;
1
2
58
1. Dial 2.
• You can talk after you hear a confirmation tone.
4.2
DPT Features
O
To talk to the third party
If you hear two beeps and a voice announcement;
1
1. Consult with the third party by microphone.
• The called extension display shows the calling extension’s number or name for 5 seconds in 10 second intervals.
• You can talk to two parties independently.
To talk to the third party by terminating the current call
If you hear two beeps and a voice announcement;
1
1. Hang up.
• The current call is disconnected.
• The INTERCOM indicator light turns green.
• You can talk in handsfree mode.
To talk to the third party by holding the current call
If you hear two beeps and voice announcement;
1
HOLD
1. Press the HOLD button.
• The current call is placed on hold.
• The INTERCOM indicator light flashes green slowly.
Conditions
• Class of Service programming determines which extensions can perform this.
• This feature works when the called party is off-hook and the telephone INTERCOM button is idle.
• You can select to receive a Call Waiting tone, OHCA, Whisper OHCA or none of these at
your extension.
• If the “Do Not Disturb (DND)” feature is set at the called extension, you must activate the
“Do Not Disturb (DND) Override” feature before OHCA is available.
Programming References
• System Programming — Installation Manual Addendum
[519] Off-Hook Call Announcement (OHCA)
Feature References
Busy Station Signaling (BSS)
Call Waiting
Whisper OHCA
59
U
4.2
DPT Features
Uniform Call Distribution (UCD)
Allows incoming calls to be distributed uniformly to a specific group of extensions called an
UCD group. Calls to an UCD group search for an idle extension in a circular way.
If all extensions in an UCD group are busy or not available, the incoming outside call will be
handled by the UCD Time Table.
Conditions
• UCD can be used in the following cases.
a) The floating number* of UCD is assigned as the Direct In Lines (DIL) 1:1 destination.
b) The floating number* of UCD is assigned as the Intercept Routing destination.
c) The floating number* of UCD is dialled from an extension.
d) The floating number* of UCD is assigned as the Direct Dialling In (DDI) destination.
e) The floating number* of UCD is assigned as the UCD Overflow destination.
• It is possible to set the log-in or log-out status on an extension basis.
Programming References
• System Programming — Installation Manual Addendum
[106] Station Hunting Type
[139] UCD Time Table
[813] Floating Number Assignment
Feature References
Log-In / Log-Out
* A Floating Number (FN) is a virtual extension number which appears to be an extension.
For more details, refer to the Installation Manual.
60
6.2
SLT and ISDN Telephone Features
C
Calling / Connected Line Identification Presentation
(CLIP / COLP)
Allows you to display your number on the LCD of the called party’s telephone when making a call (CLIP), or allows you to display your number on the LCD of the calling party’s
telephone when answering a call (COLP) through an ISDN line.
To select a CLIP / COLP number for a CO line
1
1. Lift the handset.
2
2. Dial the feature number (711) and 1.
• You will hear a confirmation tone.
3. Hang up.
5
To select a CLIP / COLP number for an extension
1
1. Lift the handset.
2
2. Dial the feature number (711) and 2.
• You will hear a confirmation tone.
3. Hang up.
5
61
C
6.2
SLT and ISDN Telephone Features
To select a desired CLIP number for one time
1. Lift the handset.
1
2. Dial the feature number (711) and 3.
2
3. Dial the desired CLIP number and press #.
• You will hear a confirmation tone.
3
4. Dial the line access code (0 or 81 through 88).
desired CLIP number + #
5. Dial the phone number.
4
line access code
5
phone number
Condition
• System programming is required to assign the numbers for a CLIP / COLP number.
However, the number actually sent to the called or calling party depends on the contract of
your ISDN network suppliers.
Programming References
• System Programming — Installation Manual Addendum
[419] Subscriber Number Assignment
[623] CLIP / COLP Number Assignment for Extension
[624] CLIP / COLP Number Assignment for ISDN Extension
Feature References
Calling Line Identification Restriction (CLIR)
Connected Line Identification Restriction (COLR)
62
6.2
SLT and ISDN Telephone Features
L
Log-In / Log-Out
Allows you to assign the Log-In mode or Log-Out mode within a hunting, ring or UCD
(Uniform Call Distribution) group. When in the Log-Out mode, you can leave the group temporarily, preventing hunting calls from being sent to your extension.
Log-In / Log-Out
1. Lift the handset.
1
2. Dial the feature number (45).
2
3
or
3. Dial 1 or 0.
- 1 : for Log-In mode
- 0 : for Log-Out mode
4. Dial the hunting group extension number.
• You can press to select all the hunting groups.
• You hear a confirmation tone and then a dial tone.
4
hunting group extension number
5. Hang up.
5
Feature References
Station Hunting (→ see Installation Manual)
Uniform Call Distribution (UCD)
63
U
6.2
SLT and ISDN Telephone Features
Uniform Call Distribution (UCD)
Allows incoming calls to be distributed uniformly to a specific group of extensions called an
UCD group. Calls to an UCD group search for an idle extension in a circular way.
If all extensions in an UCD group are busy or not available, the incoming outside call will be
handled by the UCD Time Table.
Conditions
• UCD can be used in the following cases.
a) The floating number* of UCD is assigned as the Direct In Lines (DIL) 1:1 destination.
b) The floating number* of UCD is assigned as the Intercept Routing destination.
c) The floating number* of UCD is dialled from an extension.
d) The floating number* of UCD is assigned as the Direct Dialling In (DDI) destination.
e) The floating number* of UCD is assigned as the UCD Overflow destination.
• It is possible to set the log-in or log-out status on an extension basis.
Programming References
• System Programming — Installation Manual Addendum
[106] Station Hunting Type
[139] UCD Time Table
[813] Floating Number Assignment
Feature References
Log-In / Log-Out
* A Floating Number (FN) is a virtual extension number which appears to be an extension.
For more details, refer to the Installation Manual.
64
Printed in Japan
PSQX1776ZA KW0399MT0