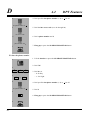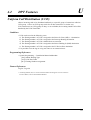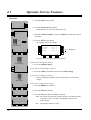
1
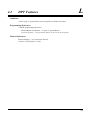
Digital Super Hybrid System
KX-TD816/1232AL
User Manual Addendum
In this manual, the last letters “AL” of each model number are omitted.
User Manual Contents
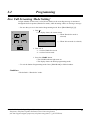
Simple Guide on How to Use this Manual
User
Example 1 (Refer to both U/M and U/M Addendum)
Manual
C CO Incoming Call Information Log......................................................................3-49
U/M
Addendum
A219
See User Manual Page 3-49.
See User Manual Addendum Page 219.
Example 2 (Refer to only the U/M Addendum)
D Doorphone Call .....................................................................................................3-63
A87
User Manual Page 3-63 is now obsolete.
See User Manual Addendum Page 87.
User
Manual
Section 1
U/M
Addendum
DPT Overview ...................................................1-1
1.1 Configuration ............................................................................1-2
A11
Location of Controls................................................................................................1-3
Feature Buttons........................................................................................................1-9
Fixed Buttons .....................................................................................................1-9
Flexible Buttons ...............................................................................................1-12
Line Access Buttons .........................................................................................1-13
Initial Setting .........................................................................................................1-15
Display Contrast Adjustment ...........................................................................1-15
A12
A17
A17
A19
When using the headset....................................................................................1-15
Changing the ringing tone of a CO buttons/Instercom calls ...........................1-15
Volume Control — Handset Receiver/Headset/Ringer/Speaker......................1-16
A21
A21
A217
A21
A22
A22
LED Indication ......................................................................................................1-18
Section 2
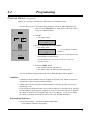
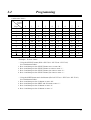
Station Programming .......................................2-1
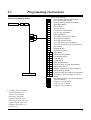
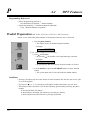
2.1 Programming Instructions.......................................................2-2
A24
2.2 Station Programming ...............................................................2-6
Call Waiting Tone Type Assignment .......................................................................2-6
Charge Fee Reference..............................................................................................2-7
Extension Charge Fee Reference .......................................................................2-8
CO Line Charge Fee Reference .........................................................................2-9
Total Extension Charge Fee Reference ............................................................2-10
Account Code Charge Fee Reference ..............................................................2-11
New Rate Set....................................................................................................2-12
All Clear ...........................................................................................................2-13
Print the Charge Fee.........................................................................................2-15
Account Code Set.............................................................................................2-16
2
A27
A217
User Manual Contents
User
Manual
Flexible Button Assignment ..................................................................................2-17
Account Button.................................................................................................2-17
Alert Button .............................................................................................................
Call Forwarding from Hunting Group Button.........................................................
Call Pickup Deny Button.........................................................................................
Call Waiting Button .................................................................................................
CLIR (Calling Line Identification Restriction) Button ...........................................
COLR (Connected Line Identification Restriction) Button ....................................
Conference (CONF) Button .............................................................................2-17
Direct Station Selection (DSS) Button.............................................................2-18
Doorphone Call Forwarding to CO Line Button.....................................................
DND for DDI Button...............................................................................................
Executive Busy Override Deny Button ...................................................................
FWD/DND Button ...........................................................................................2-19
Group-CO (G-CO) Button ...............................................................................2-19
Hurry-Up Button......................................................................................................
ISDN Service Button ...............................................................................................
Live Call Screening (LCS) Button ..........................................................................
Live Call Screening (LCS) Cancel Button..............................................................
Log-In / Log-Out Button .........................................................................................
Loop-CO (L-CO) Button..................................................................................2-20
Message Waiting (MESSAGE) Button ............................................................2-20
Night Button ............................................................................................................
One-Touch Dialling Button ..............................................................................2-21
One-Touch Dialling with Auto Hold Button ...........................................................
Paging Deny Button.................................................................................................
Paralleled Telephone Connection Button ................................................................
Pickup Dialling Button ............................................................................................
Phantom Button .......................................................................................................
SAVE Button ....................................................................................................2-22
Single-CO (S-CO) Button ................................................................................2-22
Terminate Button .....................................................................................................
Two-Way Record Button .........................................................................................
Two-Way Transfer Button .......................................................................................
Voice Mail (VM) Transfer Button....................................................................2-23
Full One-Touch Dialling Assignment....................................................................2-24
Handset / Headset Selection ..................................................................................2-24
Intercom Alerting Assignment...............................................................................2-25
Live Call Screening Mode Setting ...............................................................................
Phantom Extension Bell On/Off Setting ......................................................................
Preferred Line Assignment — Incoming ..............................................................2-26
No Line Preference — Incoming .....................................................................2-26
Ringing Line Preference — Incoming .............................................................2-26
Prime Line (CO Line) Preference — Incoming...............................................2-27
Preferred Line Assignment — Outgoing...............................................................2-28
No Line Preference — Outgoing .....................................................................2-28
Idle Line Preference — Outgoing....................................................................2-28
Prime Line (CO Line) Preference — Outgoing...............................................2-29
Prime Line (INTERCOM) Preference — Outgoing........................................2-29
Ringing Tone Selection for CO Buttons ...............................................................2-30
Ringing Tone Selection for the Intercom Button .........................................................
Self-Extension Number Confirmation...................................................................2-31
Station Programming Data Default Set.................................................................2-31
U/M
Addendum
A28
A28
A29
A29
A30
A30
A31
A31
A32
A32
A33
A34
A34
A35
A35
A36
A37
A37
A38
A39
A40
A40
A41
A43
A44
A45
3
User Manual Contents
User
Manual
Station Speed Dialling Number/Name Assignment (KX-T7235 only) ................2-32
Station Speed Dialling Number/Name Assignment ....................................................
Section 3
U/M
Addendum
A46
User Programming (Manager Programming).....
A53
3.1 Programming Instructions ............................................................
A54
General Programming Instructions...............................................................................
Programming Ways.......................................................................................................
A54
A57
3.2 User Programming (Manager Programming) ............................
A59
A59
A61
A63
A64
A66
[000] Data and Time Set...............................................................................................
[001] System Speed Dialling Number Set ...................................................................
[002] System Speed Dialling Name Set .......................................................................
[003] Extension Number Set ........................................................................................
[004] Extension Name Set ............................................................................................
Section 4
DPT Features.....................................................3-1
4.1 Basic Operation.........................................................................3-2
Making Calls ...........................................................................................................3-2
Receiving Calls........................................................................................................3-3
4.2 DPT Features ............................................................................3-4
A
Absent Message Capability .....................................................................................3-4
Account Code Entry ................................................................................................3-8
Alternate Calling — Ring / Voice .........................................................................3-12
Answering, Direct CO Line ..................................................................................3-13
Automatic Callback Busy (Camp-On) ..................................................................3-14
B
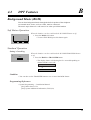
Background Music (BGM)....................................................................................3-16
Busy Station Signalling (BSS) ..............................................................................3-17
C
Call Forwarding — SUMMARY ..........................................................................3-18
Call Forwarding — All Calls ...........................................................................3-19
Call Forwarding — Busy .................................................................................3-21
Call Forwarding — No Answer .......................................................................3-22
Call Forwarding — Busy / No Answer............................................................3-23
Call Forwarding — to CO Line .......................................................................3-25
Call Forwarding — Follow Me........................................................................3-27
Call Forwarding — CANCEL...............................................................................3-29
Call Forwarding — from Hunting Group.....................................................................
Call Hold ...............................................................................................................3-31
Call Hold, Exclusive..............................................................................................3-32
Call Hold Retrieve.................................................................................................3-33
4
A218
A68
A218
A69
A70
User Manual Contents
User
Manual
Calling/Connected Line Identification Presentation (CLIP/COLP).............................
Calling Line Identification Restriction (CLIR) ............................................................
Call Park ................................................................................................................3-35
Call Pickup, CO Line ............................................................................................3-36
Call Pickup, Directed ............................................................................................3-37
Call Pickup, Group ................................................................................................3-38
Call Pickup Deny...................................................................................................3-39
Call Splitting..........................................................................................................3-40
Call Transfer — to CO Line..................................................................................3-41
Call Transfer — to Extension................................................................................3-42
Call Waiting ...........................................................................................................3-45
CO Incoming Call Information Display................................................................3-47
CO Incoming Call Information Log......................................................................3-49
CO Incoming Call Information Log Lock ............................................................3-51
CO Incoming Call Information Log Mode ...........................................................3-53
Conference.............................................................................................................3-54
Completion of Calls to Busy Subscriber (CCBS) ........................................................
Conference, Unattended ........................................................................................3-56
Connected Line Identification Restriction (COLR) .....................................................
D
Data Line Security.................................................................................................3-57
Display Call Information.......................................................................................3-58
Do Not Disturb (DND)..........................................................................................3-59
Do Not Disturb for Direct Dialling In Calls.................................................................
Do Not Disturb (DND) Override ..........................................................................3-62
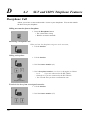
Doorphone Call .....................................................................................................3-63
Doorphone Call Forwarding to CO Line......................................................................
E
Electronic Station Lockout....................................................................................3-65
Emergency Call.............................................................................................................
External Feature Access ........................................................................................3-67
U/M
Addendum
A72
A74
A218
A76
A218
A79
A81
A219
A82
A85
A87
A89
A92
F
Full One-Touch Dialling........................................................................................3-68
H
Handsfree Answerback..........................................................................................3-69
Handsfree Operation..............................................................................................3-70
Handset Microphone Mute ...........................................................................................
Hotel Application..........................................................................................................
I
Intercom Calling....................................................................................................3-71
ISDN Network Service Access.....................................................................................
A219
A93
A94
A219
A96
L
Live Call Screening (LCS) ...........................................................................................
Lockout..................................................................................................................3-72
Log-In / Log-Out ..........................................................................................................
A104
M
Message Waiting....................................................................................................3-73
A219
A98
5
User Manual Contents
User
Manual
U/M
Addendum
Microphone Mute ..................................................................................................3-75
N
Night Service .........................................................................................................3-76
Notebook Function .......................................................................................................
O
Off-Hook Call Announcement (OHCA) ...............................................................3-77
One-Touch Dialling ...............................................................................................3-78
Operator Call .........................................................................................................3-79
A106
A108
A109
A111
Outward Dialling, Line Access — SUMMARY...................................................3-80
Line Access, Automatic....................................................................................3-81
Line Access, CO Line Group ...........................................................................3-82
Line Access, Individual ....................................................................................3-83
P
Paging — SUMMARY .........................................................................................3-84
Paging — All....................................................................................................3-85
Paging — External ...........................................................................................3-86
Paging — Group...............................................................................................3-87
Paging — ANSWER .............................................................................................3-88
Paging — DENY ..........................................................................................................
Paging and Transfer...............................................................................................3-89
Paralleled Telephone Connection ..........................................................................3-92
Phantom Extension .......................................................................................................
Pickup Dialling (Hot Line)....................................................................................3-94
Predial Preparation........................................................................................................
Pulse to Tone Conversion......................................................................................3-96
Q
Quick Dialling...............................................................................................................
R
Recall .....................................................................................................................3-97
Redial, Automatic ..................................................................................................3-98
Redial, Last Number..............................................................................................3-99
Redial, Saved Number.........................................................................................3-100
S
Secret Dialling .....................................................................................................3-101
Station Feature Clear ...........................................................................................3-102
Station Speed Dialling.........................................................................................3-103
System Speed Dialling ........................................................................................3-105
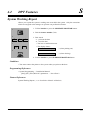
System Working Report................................................................................................
T
Terminate ......................................................................................................................
Timed Reminder ..................................................................................................3-106
Toll Restriction Override.....................................................................................3-108
Toll Restriction Override by Account Code Entry.........................................3-108
6
A219
A112
A113
A114
A115
A220
A220
A116
A220
A117
A118
A220
A221
User Manual Contents
User
Manual
U/M
Addendum
Toll Restriction Override for System Speed Dialling ....................................3-109
Trunk (CO Line) Answer From Any Station (TAFAS).......................................3-110
Two-Way Recording into Voice Mail ...........................................................................
A119
A221
A120
U
Uniform Call Distribution (UCD) ................................................................................
A121
V
Voice Mail Integration .........................................................................................3-111
Voice Mail Transfer .............................................................................................3-113
W
Whisper OHCA.............................................................................................................
4.3 Operator Service Features ...................................................3-114
Alert Indication .............................................................................................................
Automatic Overflow and Hurry-Up Transfer ...............................................................
Background Music (BGM) — External ..............................................................3-114
Class of Service (COS) Switch.....................................................................................
CO Incoming Call Information Log Lock Clear.................................................3-116
Night Service On/Off...........................................................................................3-117
Remote Station Lock Control..............................................................................3-120
Hotel Application.................................................................................................3-121
Check-In / Check-Out ....................................................................................3-121
Timed Reminder, Notification for Unanswered Extension .....................................
Timed Reminder, Remote (Wake-Up Call)....................................................3-123
Live Call Screening Password Control.........................................................................
Outgoing Message (OGM) ...........................................................................................
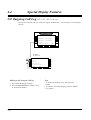
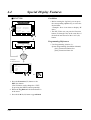
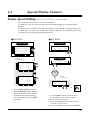
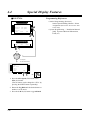
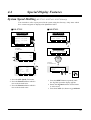
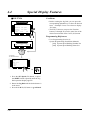
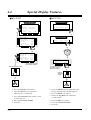
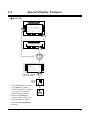
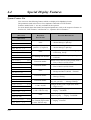
4.4 Special Display Features (— for KX-T7235) .....................3-126
CO Outgoing Call Log ........................................................................................3-128
Extension Dialling ...............................................................................................3-128
Station Speed Dialling.........................................................................................3-129
System Speed Dialling ........................................................................................3-129
System Feature Access Menu..............................................................................3-130
Absent Message Capability............................................................................3-130
Answering, Paging — External......................................................................3-131
Answering, Paging — Group.........................................................................3-131
Call Park (Operator only)...............................................................................3-132
Call Pickup, Group.........................................................................................3-132
Message Waiting ............................................................................................3-133
Night Service (Operator only) .................................................................................
Paging — External .........................................................................................3-133
Paging — Group.............................................................................................3-134
Paralleled Telephone Connection...................................................................3-134
Section 5
A122
A124
A124
A125
A126
A127
A128
A129
A129
A132
A133
A137
A138
A140
A142
A143
A145
A147
A149
A149
A149
A149
A149
A149
A149
A149
A149
A149
A149
DSS Console Features ......................................4-1
5.1 Configuration ............................................................................4-2
Location of Controls................................................................................................4-3
Feature Buttons .............................................................................................................
A154
A154
A155
7
User Manual Contents
User
Manual
U/M
Addendum
5.2 DSS Console Features ..............................................................4-4
ANSWER / RELEASE Button Operation....................................................................
Station Programming...............................................................................................4-4
Extension Number Assignment..........................................................................4-4
One-Touch Dialling Assignment ........................................................................4-4
One-Touch Access Assignment for System Features.........................................4-5
Direct Station Dialling.............................................................................................4-7
One-Touch Dialling .................................................................................................4-7
One-Touch Access for System Features..................................................................4-8
Call Transfer ............................................................................................................4-8
Section 6
A156
A157
SLT and ISDN Telephone Features.................5-1
6.1 Basic Operation.........................................................................5-2
Making Calls ...........................................................................................................5-2
Receiving Calls........................................................................................................5-3
6.2 SLT and ISDN Telephone Features.........................................5-4
A
Absent Message Capability .....................................................................................5-4
Account Code Entry ................................................................................................5-8
Alternate Calling — Ring / Voice .........................................................................5-10
Automatic Callback Busy (Camp-On) ..................................................................5-11
A160
A162
B
Busy Station Signalling (BSS) ..............................................................................5-12
C
Call Forwarding — SUMMARY ..........................................................................5-13
Call Forwarding — All Calls ...........................................................................5-14
Call Forwarding — Busy .................................................................................5-15
Call Forwarding — No Answer .......................................................................5-15
Call Forwarding — Busy / No Answer............................................................5-16
Call Forwarding — to CO Line .......................................................................5-17
Call Forwarding — Follow Me........................................................................5-18
Call Forwarding — CANCEL...............................................................................5-19
Call Forwarding — from Hunting Group.....................................................................
Call Hold ...............................................................................................................5-20
Call Hold Retrieve.................................................................................................5-21
Calling / Connected Line Identification Presentation (CLIP / COLP).........................
Calling Line Identification Restriction (CLIR) ............................................................
Call Park ................................................................................................................5-22
Call Pickup, CO Line ............................................................................................5-23
Call Pickup, Directed ............................................................................................5-24
Call Pickup, Group ................................................................................................5-25
Call Pickup Deny...................................................................................................5-26
Call Splitting..........................................................................................................5-27
Call Transfer — to CO Line .........................................................................................
Call Transfer — to Extension................................................................................5-28
8
A164
A166
A168
A170
User Manual Contents
User
Manual
Call Waiting ...........................................................................................................5-30
Completion of Calls to Busy Subscriber (CCBS) ........................................................
Conference.............................................................................................................5-32
Connected Line Identification Restriction (COLR) .....................................................
D
Data Line Security.................................................................................................5-34
Do Not Disturb (DND)..........................................................................................5-35
Do Not Disturb for Direct Dialling In Calls.................................................................
Do Not Disturb (DND) Override ..........................................................................5-36
Doorphone Call .....................................................................................................5-37
Doorphone Call Forwarding to CO Line......................................................................
E
Electronic Station Lockout....................................................................................5-39
Emergency Call.............................................................................................................
External Feature Access ........................................................................................5-41
U/M
Addendum
A221
A171
A173
A219
A174
A176
A178
A180
A183
H
Hotel Application..........................................................................................................
A184
I
Intercom Calling....................................................................................................5-42
A222
L
Lockout..................................................................................................................5-42
Log-In / Log-Out ..........................................................................................................
A186
M
Message Waiting....................................................................................................5-43
A187
N
Night Service .........................................................................................................5-45
A190
O
Off-Hook Call Announcement (OHCA) ...............................................................5-45
Operator Call .........................................................................................................5-46
Outward Dialling, Line Access — SUMMARY...................................................5-47
Line Access, Automatic....................................................................................5-48
Line Access, CO Line Group ...........................................................................5-48
A222
A192
P
Paging — SUMMARY .........................................................................................5-50
Paging — All....................................................................................................5-51
Paging — External ...........................................................................................5-51
Paging — Group...............................................................................................5-53
Paging — ANSWER .............................................................................................5-55
Paging and Transfer...............................................................................................5-56
Paralleled Telephone Connection ..........................................................................5-59
Pickup Dialling (Hot Line)....................................................................................5-60
Pulse to Tone Conversion......................................................................................5-62
9
User Manual Contents
User
Manual
Q
Quick Dialling...............................................................................................................
U/M
Addendum
A193
R
Redial, Last Number..............................................................................................5-62
S
Station Feature Clear .............................................................................................5-63
Station Speed Dialling...........................................................................................5-64
System Speed Dialling ..........................................................................................5-65
T
Timed Reminder ....................................................................................................5-66
Toll Restriction Override.......................................................................................5-68
Toll Restriction Override by Account Code Entry...........................................5-68
Toll Restriction Override for System Speed Dialling ......................................5-68
Trunk (CO Line) Answer From Any Station (TAFAS).........................................5-70
U
Uniform Call Distribution (UCD) ................................................................................
A194
A222
A223
A223
A195
A223
A196
V
Voice Mail Integration...........................................................................................5-71
6.3 ISDN Telephone Features..............................................................
Section 7
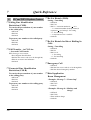
Quick Reference................................................6-1
Basic Operation .......................................................................................................6-2
Station Programming...............................................................................................6-2
User Programming (Manager Programming)...............................................................
DPT Features ...........................................................................................................6-6
Operator Service Features .....................................................................................6-17
Special Display Features .......................................................................................6-19
DSS Console Features ...........................................................................................6-21
SLT and ISDN Telephone Features .......................................................................6-22
Section 8
A197
A223
A198
A200
A201
A205
A207
A208
Appendix............................................................7-1
Display Examples....................................................................................................7-2
Feature Number List..............................................................................................7-12
Tone List ................................................................................................................7-15
Troubleshooting.....................................................................................................7-17
A210
A224
A213
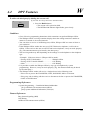
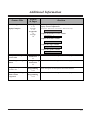
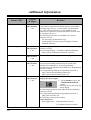
Additional Information .................................................................. A217
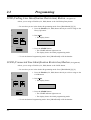
As section 3 User Programming (Manager Programming) has been added, the other sections have been shifted.
For example “Section 3 DPT Features” has become “Section 4 DPT Features”.
10
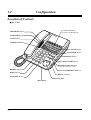
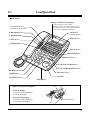
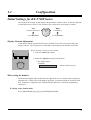
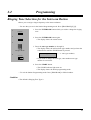
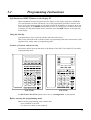
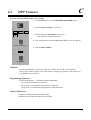
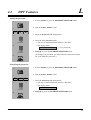
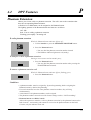
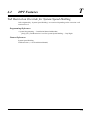
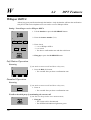
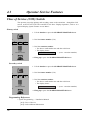
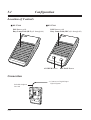
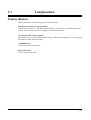
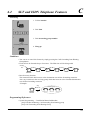
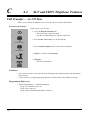
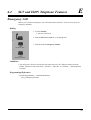
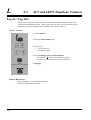
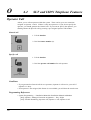
1.1
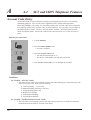
Configuration
KX-T7400 series Panasonic Digital Proprietary Telephones (DPT) are available to utilise
various features of the KX-TD816 and KX-TD1232 Systems, in addition to supporting basic
telephone services (making and receiving calls).
KX-T7425
KX-T7433
KX-T7436
KX-T7450
None
Tilt-up,
16 char./line,
3-line LCD
Tilt-up,
24 char./line,
6-line LCD
None
None
3 Soft Buttons
3 Soft Buttons/
10 Function
Buttons
None
Jog Dial
Yes
Yes
Yes
Yes
CO Buttons
24
24
24
12
Display
Soft Buttons
and
Function Buttons
Fixed Feature
Buttons
Refer to the “Fixed Buttons” in this section.
11
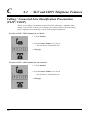
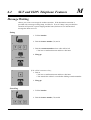
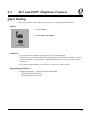
1.1
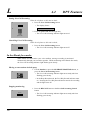
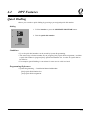
Configuration
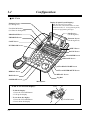
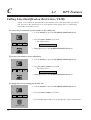
Location of Controls
■ KX-T7425
Flexible CO Buttons
(CO lines 01 through 24)
PROGRAM Button
FWD/DND Button
CONF Button
INTERCOM Button
PAUSE Button
TRANSFER Button
MESSAGE Button
AUTO DIAL/STORE Button
RINGER Volume Selector
Used to adjust the ringer volume.
REDIAL Button
AUTO ANSWER/MUTE Button
HOLD Button
RECALL Button
SP-PHONE Button
Jog Dial
Microphone
12
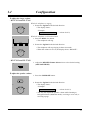
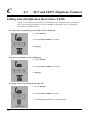
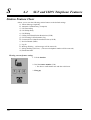
1.1
Configuration
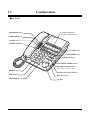
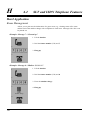
■ KX-T7433
Display (Liquid Crystal Display)
With 16-character/3-line readout:
Shows the date, time, dialed number or name,
call duration time, etc. In Programming mode,
it shows the programming messages.
Flexible CO Buttons
(CO lines 01 through 24)
PROGRAM Button
Soft Buttons
(S1 through S3)
FWD/DND Button
SHIFT Button
CONF Button
INTERCOM Button
PAUSE Button
TRANSFER Button
MESSAGE Button
AUTO DIAL/STORE Button
AUTO ANSWER/MUTE Button
REDIAL Button
RECALL Button
HOLD Button
Jog Dial
SP-PHONE Button
Microphone
To lift or set down the display:
LCD
– To lift the display
1 Press the LCD ADJ button.
2 Lift up the display.
– To set down the display
1 Press the LCD ADJ button.
2 Press down the display.
LCD ADJ button
13
1.1
Configuration
■ KX-T7436
Display (Liquid Crystal Display)
Function Buttons
(F1 through F5)
With 24-character/6-line readout:
Shows the date, time, dialed number or name,
call duration time, etc. In Programming mode,
it shows the programming messages.
Flexible CO Buttons
(CO lines 01 through 24)
Soft Buttons
(S1 through S3)
PROGRAM Button
FWD/DND Button
Function Buttons
(F6 through F10)
CONF Button
INTERCOM Button
SHIFT Button
PAUSE Button
TRANSFER Button
MESSAGE Button
AUTO DIAL/STORE Button
AUTO ANSWER/MUTE Button
REDIAL Button
RECALL Button
HOLD Button
Jog Dial
SP-PHONE Button
Microphone
To lift or set down the display:
LCD
– To lift the display
1 Press the LCD ADJ button.
2 Lift up the display.
– To set down the display
1 Press the LCD ADJ button.
2 Press down the display.
14
LCD ADJ button
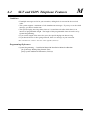
1.1
Configuration
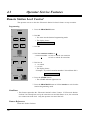
■ KX-T7450
PROGRAM Button
Flexible CO Buttons
(CO lines 01 through 12)
FWD/DND Button
CONF Button
INTERCOM Button
PAUSE Button
TRANSFER Button
MESSAGE Button
AUTO DIAL/STORE Button
RINGER Volume Selector
Used to adjust the ringer volume.
REDIAL Button
VOICE CALL/MUTE Button
HOLD Button
RECALL Button
MONITOR Button
Jog Dial
15
1.1
Configuration
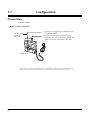
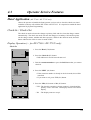
Connection
Connect as shown.
■ KX-T7400 Series DPTs
The included
telephone
line cord
→ Connect to a Digital Super Hybrid System
(TO MAIN UNIT).
→ Connect to a single line telephone jack,
Telephone Answering Machine, or FAX for
XDP* or parallel connections (TO TEL).
<Back View>
* XDP (eXtra Device Port) expands the number of telephones available in the system by allowing an
extension port to contain two telephones. For more details, please consult with your dealer.
16
1.1
Configuration
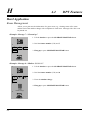
Feature Buttons
KX-T7400 Series Digital proprietary telephones (DPTs) have the following types of Feature
Buttons:
• Fixed Buttons
• Flexible Buttons
Fixed Buttons
Fixed buttons have specific functions permanently assigned to them. These default function
assignments cannot be changed. The following table lists the fixed buttons located on each
DPT model.
Feature Button
T7425 T7433 T7436 T7450
AUTO ANSWER/MUTE
✔
✔
✔
AUTO DIAL/STORE
✔
✔
✔
✔
CONF
✔
✔
✔
✔
✔
Function buttons
FWD/DND
✔
✔
✔
✔
HOLD
✔
✔
✔
✔
INTERCOM
✔
✔
✔
✔
Jog Dial
✔
✔
✔
✔
MESSAGE
✔
✔
✔
✔
✔
MONITOR
PAUSE
✔
✔
✔
✔
PROGRAM
✔
✔
✔
✔
RECALL
✔
✔
✔
✔
REDIAL
✔
✔
✔
✔
SHIFT
✔
✔
Soft buttons
✔
✔
SP-PHONE
✔
✔
✔
TRANSFER
✔
✔
✔
VOICE CALL/MUTE
✔
✔
“✔” indicates the button is available.
17
1.1
Configuration
Usage
Jog Dial
Used to adjust the volume of the handset receiver, headset, ringer and speaker. It also adjusts
the display contrast. Refer to “Initial Settings for KX-T7400 Series” in this section.
For KX-T7433 and KX-T7436 users, it is also used to select data from the stored phone
numbers or the System Feature Access Menu.
SHIFT Button
Used to access the second and third level of Soft Button functions.
VOICE CALL/MUTE Button
Used for extension auto answer, but it cannot be used for handsfree conversations. It also
turns the handset microphone off during a conversation.
Refer to the main User Manual for other button usages.
18
1.1
Configuration
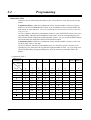
Flexible Buttons
Flexible Buttons do not have specific features permanently assigned to them. Features are
assigned to Flexible Buttons through System or Station Programming. “Flexible Button
Assignment” is addressed in Station Programming (Section 2). The three types of Flexible
Buttons are as follows:
• Flexible CO buttons (located on a DPT only)
• Flexible DSS buttons (located on a DSS Console only)
• Programmable Feature (PF) (located on a DSS Console only)
The below-mentioned table shows all of the featres which can assigned to flexible buttons.
In the table, “✔” indicates that hte feature can be assigned to the button.
CO
DSS
PF
Single-CO
✔
—
—
Group-CO
✔
—
—
Loop-CO
✔
—
—
Alert
✔
—
—
✔
—
—
✔
—
—
Call Forwarding from Hunting Group*
✔
✔
—
Call Pickup Deny*1
✔
✔
—
✔
✔
—
✔
✔
—
Connected Line Identification Restriction (COLR)*
✔
✔
—
Direct Station Selection (DSS)
✔
✔
—
Do Not Disturb for Direct Dialling In Call (DND for DDI)*1
✔
✔
—
Doorphone Call Forwarding to CO Line*
✔
✔
—
Executive Busy Override Deny*
✔
✔
—
Live Call Screening†
✔
✔
—
Live Call Screening Cancel†
✔
✔
—
Message Waiting
✔
✔
—
Night*
1
✔
✔
—
Paging Deny*1
✔
✔
—
Paralleled Telephone Connection*1
✔
✔
—
Phantom Extension
✔
✔
—
Pickup Dialing (Hot Line)*
Two-Way Record†
✔
✔
—
✔
✔
—
Two-Way Transfer†
✔
✔
—
Feature (Buttons)
Hurry-Up
Log-In / Log-Out*
1
1
Call Waiting*2
Calling Line Identification Restriction (CLIR)*
1
1
1
1
1
19
1.1
Configuration
CO
DSS
PF
Account Code Entry
✔
✔
✔
Conference
✔
✔
✔
FWD/DND
✔
✔
✔
ISDN Service
✔
✔
✔
One-Touch Dialing
✔
✔
✔
One-Touch Dialing with Auto Hold
✔
✔
✔
Saved Number Redial
✔
✔
✔
Terminate
✔
✔
✔
Voice Mail Transfer
✔
✔
✔
Feature (Buttons)
† : Available for the KX-TD816/1232 when the Digital Super Hybrid System is connected to a
Digital Proprietary Telephone capable Panasonic Voice Processing System (one that supports
digital proprietary telephone integration; e.g. KX-TVP100).
*1 : Pressing this button while on-hook or hearing a dial tone changes the setting (on or off) of
the corresponding feature.
*2 : Pressing this button changes the settings as follows:
Receiving Call Waiting tone → OHCA → Whisper OHCA → none of these
20
1.1
Configuration
Initial Settings for KX-T7400 Series
The Jog Dial can be used for the display contrast and the volume control. Rotate the Jog Dial
in either direction as desired. The contrast or the volume level will change as follows.
Left
(counter-clockwise)
Right
(clockwise)
Level decreases
Level increases
Display Contrast Adjustment
A Soft button and the Jog Dial for KX-T7433 and KX-T7436 users are used to adjust the
display contrast. The contrast level is indicated on the display by the number of asterisks.
While on-hook or during a conversation
1. Press the CONT (S1) button.
1
CONT
S1
S2
S3
2. Rotate the Jog Dial in the desired direction.
• The display shows:
<Example>
2
Contrast: 3
(— contrast volume level 3)
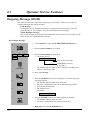
When using the headset
The Panasonic Digital Super Hybrid System supports the use of a headset with a proprietary
telephone (PT). When you use the headset (optional), you should switch the selection mode
first. Selection is explained in the “Handset/Headset Selection” in Station Programming
(Section 2).
To change to the headset mode
Press: [PROGRAM] [9] [9] [9] [2] [STORE] [PROGRAM].
21
1.1
Configuration
Changing the ringing tone of CO buttons / Intercom calls
There are eight ringer frequencies available for each CO (Group-CO, Loop-CO, Single-CO)
button and INTERCOM button. If you wish to change them, refer to the “Ringing Tone
Selection for CO Buttons” or “Ringing Tone Selection for Intercom Button” in Station
Programming (Section 2).
Volume Control — Handset Receiver/Headset/Ringer/Speaker
Allows you to adjust the following volumes as required.
— Handset Receiver volume (levels 1 through 4)
— Headset volume (levels 1 through 4)
— Ringer volume (levels 0 through 3)
— Speaker volume (levels 1 through 12)
If your digital proprietary telephone is provided with a display (display DPT), the volume level
is indicated on the display by the number of asterisks. For ringer volume adjustment, three
levels (OFF/LOW/HIGH) are available with the KX-T7425 and KX-T7450.
To adjust the handset receiver volume
1. Lift the handset.
1
2. Rotate the Jog Dial in the desired direction.
• The display shows:
<Example>
2
Handset: 3
(— volume level 3)
• You may also adjust the handset receiver volume during a
conversation using the handset receiver.
To adjust the headset volume
1
SP-PHONE
Be sure the headset is connected.
1. Press the SP-PHONE button.
2
SELECT / VOLUME
2. Rotate the Jog Dial in the desired direction.
• The display shows:
<Example>
Headset: 3
22
(— volume level 3)
1.1
Configuration
To adjust the ringer volume
– KX-T7433 and KX-T7436
1
While the telephone is ringing
1. Rotate the Jog Dial in the desired direction.
• The display shows:
<Example>
SELECT / VOLUME
Ringer: 3
(— volume level 3)
While the telephone is idle and on-hook
1. Press the RING (S2) button.
• The telephone will ring.
1
RING
S1
S2
S3
2
SELECT / VOLUME
2. Rotate the Jog Dial in the desired direction.
• The telephone will stop ringing in about 4 seconds.
• When the volume level is 0, the display shows “RNGOFF.”
– KX-T7425 and KX-T7450
1. Adjust the RINGER Volume Selector lever to the desired setting
(OFF/LOW/HIGH).
1
OFF • • • HIGH
LOW
To adjust the speaker volume
1. Press the SP-PHONE button.
1
SP-PHONE
2
2. Rotate the Jog Dial in the desired direction.
• The display shows:
<Example>
SP: 12
(— volume level 12)
• You may also adjust the speaker volume while listening to
background music (BGM On mode), receiving a voice call, or
receiving a page.
23
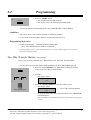
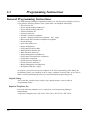
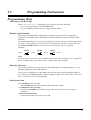
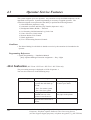
2.1
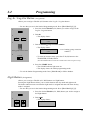
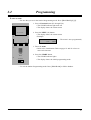
Programming Instructions
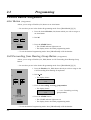
To confirm the assigned function data
— Be sure that you are in the Station Programming mode: Press [PROGRAM] [9] [9].
1
access number
2
HOLD
1. Enter the programming access number* (0 through 9, 01 through
03, 1 and #).
• Each number corresponds to the data as follows:
- 1 : Preferred Line Assignment — Outgoing
- 2 : Preferred Line Assignment — Incoming
- 3 : Full One-Touch Dialling Assignment
- 4 : Intercom Alerting Assignment
- 5 : Call Waiting Tone Type Assignment
- 6 : Self-Extension Number Confirmation
- 8 : Charge Fee Reference
- 9 : Handset/Headset Selection
- 01 : Remote Station lock Control (— Operator only)
- 02 : CO Incoming Call Information Log Lock Clear
(— Operator only)
- 03 : Live Call Screening Password Control† (— Operator only)
- # : Station Programming Data Default Set
- 1: Live Call Screening Mode Setting†
• The display shows the programmed data.
<Example>
When you press [5], the display shows:
C.W. Tone 1
(— Call Waiting tone is now programmed to Tone 1)
2. Press the HOLD (END) button.
• The display shows the initial programming mode.
— To exit the Station Programming mode: Press [PROGRAM] or lift the handset.
— If you wish to change the data, follow the programming procedure explained in this section.
* A programming access number is required to program/confirm the function data by Station Programming.
To confirm the assigned data on the Flexible button
— Be sure that you are in the Station Programming mode: Press [PROGRAM] [9] [9].
1. Press the desired Flexible (CO, DSS, PF) button.
• The display shows the current status.
1
2
HOLD
2. Press the HOLD (END) button.
• The display shows the initial programming mode.
— To exit the Station Programming mode: Press [PROGRAM] or lift the handset.
— If you wish to change the data, follow the programming procedure explained in this section.
24
†: Available when the Digital Super Hybrid System is connected to a
Proprietary Telephone capable Panasonic Voice Processing System
(one that supports proprietary telephone integration; e.g. KX-TVP100)
2.1
Programming Instructions
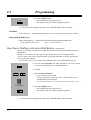
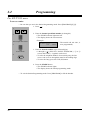
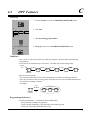
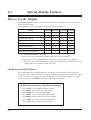
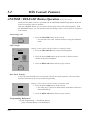
Station Programming Outline
PROGRAM
9
9
CO
DSS
PF
To the next page
1
2
3
4
5
6
7
80
81
82
83
84
85
86
87
88
89
8
8
8
8
8
8
8
8
8
8
8
8
8#
9
0
#
(Station Programming)
Direct Station Selection (DSS) Button
One-Touch Dialling Button
Message Waiting (MESSAGE) Button
FWD/DND Button
SAVE Button
Account Button
Conference (CONF) Button
Log-In / Log-Out Button
Hurry-Up Button
Voice Mail (VM) Transfer Button
Two-Way Record Button†
Two-Way Transfer Button†
Live Call Screening (LCS) Button†
Live Call Screening (LCS) Cancel Button†
Alert Button
Phantom Button
ISDN Service Button
00 Night Button
01 Call Pickup Deny Button
02 Call Waiting Button
03 CLIR Button
04 COLR Button
05 DND for DDI Button
06 Executive Busy Override Deny Button
07 Paging Deny Button
08 Paralleled Telephone Connection Button
09 Pickup Dialling Button
10 Call Forwarding from Hunting Group Button
11 Doorphone Call Forwarding to CO Line
Button
One-Touch Dialling with Auto Hold Button
Terminate Button
Single-CO (S-CO) Button
Loop-CO (L-CO) Button
Group-CO (G-CO) Button
†: Available when the Digital
Super Hybrid System is
connected to a Digital
Proprietary Telephone
capable Panasonic Voice
Processing System (one that
supports digital proprietary
telephone integration; e.g.
KX-TVP100).
25
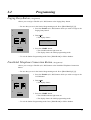
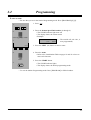
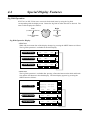
2.1
Programming Instructions
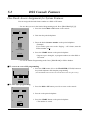
Station Programming Outline (Contd.)
PROGRAM
9
9
CO
DSS
To the previous page
PF
CO
(Ringing Tone Selection for CO Button)
CO
INTERCOM INTERCOM
Function
1
2
3
4
5
6
8
9
0
1
0
2
0
3
#
1
(F1 - F10)
(Ringing Tone Selection for Intercom Button)
(Station Speed Dialling Number / Name Assignment)
(Preferred Line Assignment — Outgoing)
(Preferred Line Assignment — Incoming)
(Full One-Touch Dialling Assignment)
(Intercom Alerting Assignment)
(Call Waiting Tone Type Assignment)
(Self-Extension Number Confirmation)
(Charge Fee Reference)
(Handset / Headset Selection)
(Remote Station Lock Control)
— see “Operator Service Features” (Section 4.3)
(CO Incoming Call Information Log Lock Clear)
— see “Operator Service Features” (Section 4.3)
(Live Call Screening Password Control)†
— see “Operator Service Features” (Section 4.3)
(Station Programming Data Default Set)
(Live Call Screening Mode Setting)†
PROGRAM (Exit)
26
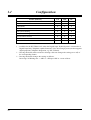
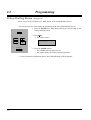
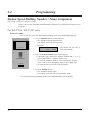
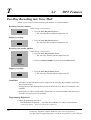
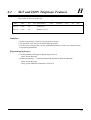
2.2
Programming
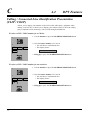
Charge Fee Reference
Allows you to see, print out and clear charges. Charges are displayed per extension, CO line,
account code, department code, or the total of each can be referred to. There are seven
corresponding features as follows:
[PROGRAM] [99] [8] [ID Code] [1] Extension Charge Fee Reference
[2] CO Line Charge Fee Reference
[3] Total Extension Charge Fee Reference
[4] Account Code Charge Fee Reference
[6] All Clear
[7] Print the Charge Fee
[8] Account Code Set
Conditions
• System Programming determines the extension that can see charges.
• An identification code (ID code), set by System Programming, is required to see charges.
• The first display format – METER or CHARGE (AS$) – is selected by System
Programming. This can be switched manually at each extension.
• You may use the overlay while programming. In this case, the HOLD button becomes the
END button and the REDIAL button becomes the PREV button.
• The currency denomination is programmable by System Programming.
• If a different rate is assigned to each CO line, the extension charge fee, account code charge
fee and total extension charge fee meters will not be displayed correctly. In this case, the
meter is calculated by the rate assigned to CO1 and is displayed.
Programming References
• System Programming —Installation Manual & Installation Manual Addendum
[015] Charge Rate Fractional Point Assignment
[016] Charge Rate Assignment
[117] Charge Display Selection
[118] Charge Verification Assignment
[119] Charge Verification ID Code Set
[125] Assignment of Denomination
27
2.2
Programming
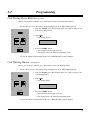
Flexible Button Assignment
Alert Button (Assignment)
Allows you to assign a Flexible (CO) button as an Alert button.
— Be sure that you are in the Station Programming mode: Press [PROGRAM] [9] [9].
1. Press the desired Flexible (CO) button which you wish to assign as
an Alert button.
1
2
2. Dial 87.
7
8
3
3. Press the STORE button.
• The STORE indicator light turns on.
• The display shows the initial programming mode.
AUTO DIAL
STORE
— To exit the Station Programming mode: Press [PROGRAM] or lift the handset.
Call Forwarding from Hunting Group Button (Assignment)
Allows you to assign a Flexible (CO, DSS) button as Call Forwarding from Hunting Group
button.
— Be sure that you are in the Station Programming mode: Press [PROGRAM] [9] [9].
1
1. Press the Flexible (CO, DSS) button which you wish to assign as the
Call Forwarding from Hunting Group button.
2
2. Dial 8 10.
• The display shows:
8
FWD-H:
CLR
0
1
3. Enter the forwarding receiving group number.
• The display shows:
3
FWD-H:xxxx
CLR
forwarding receiving
group number
4
AUTO DIAL
(— xxxx: forwarding receiving
group number)
4. Press the STORE button.
• The STORE indicator light turns on.
• The display shows the initial programming mode.
STORE
— To exit the Station Programming mode: Press [PROGRAM] or lift the handset.
28
2.2
Programming
Call Pickup Deny Button(Assignment)
Allows you to assign a Flexible (CO, DSS) button as the Call Pickup Deny button.
— Be sure that you are in the Station Programming mode: Press [PROGRAM] [9] [9].
1
1. Press the Flexible (CO, DSS) button which you wish to assign as the
Call Pickup Deny button.
2
2. Dial 8 01.
• The display shows:
8
C.Pickup
0
1
3
AUTO DIAL
3. Press the STORE button.
• The STORE indicator light turns on.
• The display shows the initial programming mode.
STORE
— To exit the Station Programming mode: Press [PROGRAM] or lift the handset.
Call Waiting Button (Assignment)
Allows you to assign a Flexible (CO, DSS) button as the Call Waiting button.
— Be sure that you are in the Station Programming mode: Press [PROGRAM] [9] [9].
1
1. Press the Flexible (CO, DSS) button which you wish to assign as the
Call Waiting button.
2
2. Dial 8 02.
• The display shows:
8
0
2
Call Waiting
3
AUTO DIAL
STORE
3. Press the STORE button.
• The STORE indicator light turns on.
• The display shows the initial programming mode.
— To exit the Station Programming mode: Press [PROGRAM] or lift the handset.
29
2.2
Programming
CLIR (Calling Line Identification Restriction) Button (Assignment)
Allows you to assign a Flexible (CO, DSS) button as the Call Pickup Deny button.
— Be sure that you are in the Station Programming mode: Press [PROGRAM] [9] [9].
1
1. Press the Flexible (CO, DSS) button which you wish to assign as the
Hurry-Up button.
2
2. Dial 8 03.
• The display shows:
8
0
3
CLIR
3
AUTO DIAL
3. Press the STORE button.
• The STORE indicator light turns on.
• The display shows the initial programming mode.
STORE
— To exit the Station Programming mode: Press [PROGRAM] or lift the handset.
COLR (Connected Line Identification Restriction) Button (Assignment)
Allows you to assign a Flexible (CO, DSS) button as the COLR button.
— Be sure that you are in the Station Programming mode: Press [PROGRAM] [9] [9].
1
1. Press the Flexible (CO, DSS) button which you wish to assign as the
COLR button.
2
2. Dial 8 04.
• The display shows:
8
0
4
COLR
3
AUTO DIAL
STORE
3. Press the STORE button.
• The STORE indicator light turns on.
• The display shows the initial programming mode.
— To exit the Station Programming mode: Press [PROGRAM] or lift the handset.
30
2.2
Programming
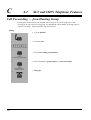
Doorphone Call Forwarding to CO Line Button (Assignment)
Allows you to assign a Flexible (CO, DSS) button as the Doorphone Call Forwarding to CO
button.
— Be sure that you are in the Station Programming mode: Press [PROGRAM] [9] [9].
1
1. Press the Flexible (CO, DSS) button which you wish to assign as the
Doorphone Call Forwarding to CO Line button.
2
2. Dial 8 11.
• The display shows:
8
1
1
3
DPH FWD
3. Enter doorphone number.
DPHxFWD
(— x: doophone number)
doorphone number
4. Press the STORE button.
• The STORE indicator light turns on.
• The display shows the initial programming mode.
4
AUTO DIAL
STORE
— To exit the Station Programming mode: Press [PROGRAM] or lift the handset.
DND for DDI Button (Assignment)
Allows you to assign a Flexible (CO, DSS) button as the DND for DDI button.
— Be sure that you are in the Station Programming mode: Press [PROGRAM] [9] [9].
1
1. Press the Flexible (CO, DSS) button which you wish to assign as the
DND for DDI button.
2
2. Dial 8 05.
• The display shows:
8
5
0
DND-DDI
3
AUTO DIAL
STORE
3. Press the STORE button.
• The STORE indicator light turns on.
• The display shows the initial programming mode.
— To exit the Station Programming mode: Press [PROGRAM] or lift the handset.
31
2.2
Programming
Executive Busy Override Deny Button (Assignment)
Allows you to assign a Flexible (CO, DSS) button as the Executive Busy Override Deny
button.
— Be sure that you are in the Station Programming mode: Press [PROGRAM] [9] [9].
1
1. Press the Flexible (CO, DSS) button which you wish to assign
as the Executive Busy Override Deny button.
2
2. Dial 8 06.
• The display shows:
8
Busy Ovrde
6
0
3
AUTO DIAL
3. Press the STORE button.
• The STORE indicator light turns on.
• The display shows the initial programming mode.
STORE
— To exit the Station Programming mode: Press [PROGRAM] or lift the handset.
Hurry-Up Button (Assignment)
Allows you to assign a Flexible (CO) button as the Hurry-Up to CO button.
— Be sure that you are in the Station Programming mode: Press [PROGRAM] [9] [9].
1
1. Press the Flexible (CO) button which you wish to assign as the
Hurry-Up button.
2
2. Dial 81.
• The display shows:
1
8
Hurry up toCLR
3
3. Enter doorphone number.
extension number
4
AUTO DIAL
STORE
Hurry up to-xxxx
CLR
(— xxxx: extension number)
4. Press the STORE button.
• The STORE indicator light turns on.
• The display shows the initial programming mode.
— To exit the Station Programming mode: Press [PROGRAM] or lift the handset.
32
2.2
Programming
ISDN Service Button (Assignment)
Allows you to assign a Flexible (CO, DSS, PF) button as the ISDN Service button.
— Be sure that you are in the Station Programming mode: Press [PROGRAM] [9] [9].
1
1. Press the desired Flexible (CO, DSS, PF) button which you wish to
assign as the ISDN Service button.
2
2. Dial 89.
• The display shows:
8
9
3
CLR
ISDN service number
3. Dial the specified ISDN service number.
• Up to 24 digits can be stored.
• To erase an incorrect entry, press the CLR (S2) button or the
TRANSFER (CLEAR) button.
(The TRANSFER button becomes the CLEAR button when using the overlay.)
4
AUTO DIAL
STORE
4. Press the STORE button.
• The STORE indicator light turns on.
• The display shows the initial programming mode.
— To exit the Station Programming mode: Press [PROGRAM] or lift the handset.
Conditions
• The entry number in step 3 depend on the services which you want to perform. For more
information about the ISDN network services or the specific numbers, please consult with
your ISDN network supplier.
• You can use 0 through 9, and # for storing.
33
2.2
Programming
Live Call Screening (LCS) Button (Assignment)†
Allows you to assign a Flexible (CO, DSS) button as the Live Call Screening button.
— Be sure that you are in the Station Programming mode: Press [PROGRAM] [9] [9].
1. Press the desired Flexible (CO, DSS) button which you wish to
assign as the Live Call Screening button.
1
2
5
8
2. Dial 85.
• The display shows:
LCS
3
AUTO DIAL
3. Press the STORE button.
• The STORE indicator light turns on.
• The display shows the initial programming mode.
STORE
— To exit the Station Programming mode: Press [PROGRAM] or lift the handset.
Live Call Screening (LCS) Cancel Button (Assignment)†
Allows you to assign a Flexible (CO, DSS) button as the Live Call Screening Cancel button.
— Be sure that you are in the Station Programming mode: Press [PROGRAM] [9] [9].
1. Press the desired Flexible (CO) button which you wish to assign as
the Live Call Screening Cancel button.
1
2
6
8
2. Dial 86.
• The display shows:
LCS Cancel
3
AUTO DIAL
STORE
3. Press the STORE button.
• The STORE indicator light turns on.
• The display shows the initial programming mode.
— To exit the Station Programming mode: Press [PROGRAM] or lift the handset.
34
†: Available when the Digital Super Hybrid System is connected to a Digital
Proprietary Telephone capable Panasonic Voice Processing System
(one that supports digital proprietary telephone integration; e.g. KX-TVP100).
2.2
Programming
Log-In / Log-Out Button (Assignment)
Allows you to assign a Flexible (CO) button as the Log-In / Log-Out button.
— Be sure that you are in the Station Programming mode: Press [PROGRAM] [9] [9].
1
1. Press the desired Flexible (CO) button you wish to assign as the
Log-In / Log-Out button.
2
2. Dial 80.
• The display shows:
0
8
Log-in GRP
CLR
3
hunting group extension number
3. Dial the hunting group extension number.
• The display shows:
Log-in GRPxxxx
(— xxxx: hunting group extension
number)
CLR
4
• To erase an incorrect entry, press the CLR (S2) button or the
TRANSFER (CLEAR) button.
AUTO DIAL
STORE
(The TRANSFER button becomes the CLEAR button when using the overlay.)
4. Press the STORE button.
• The STORE indicator light turns on.
• The display shows the initial programming mode.
— To exit the Station Programming mode: Press [PROGRAM] or lift the handset.
Night Button (Assignment)
Allows you to assign a Flexible (CO, DSS) button as a Night button.
Pressing the Night button allows you to switch between the day mode and night mode.
The button indicator turns on when the night mode is assigned and turns off when the day
mode is assigned.
— Be sure that you are in the Station Programming mode: Press [PROGRAM] [9] [9].
1
1. Press the desired Flexible (CO, DSS) button you wish to assign as
the Night button.
2
2. Dial 8 00.
• The display shows:
8
0
Night
0
35
2.2
Programming
3
AUTO DIAL
3. Press the STORE button.
• The STORE indicator light turns on.
• The display shows the initial programming mode.
STORE
— To exit the Station Programming mode: Press [PROGRAM] or lift the handset.
Condition
• “Class of Service ” programming determines the extensions that can perform this feature.
Programming References
• System Programming —Installation Manual & Installation Manual Addendum
[513] Night Service Access
[601] Class of Service
One-Touch Dialling with Auto Hold Button (Assignment)
Allows you to assign a Flexible (CO, DSS, PF) button as an One-Touch Dialling with Auto
Hold button.
During a conversation, the call is put on hold and transferred to the assigned number.
You can make a call to the assigned number by pressing this button as well as pressing the
One-Touch dialling button.
— Be sure that you are in the Station Programming mode: Press [PROGRAM] [9] [9].
1. Press the desired Flexible (CO, DSS, PF) button you wish to assign
as an One-Touch Dialling with Auto Hold button.
1
2. Dial 8#.
2
3. Enter the desired number.
• Up to 24 digits can be stored.
• To erase an incorrect entry, press the CLR (S2) button or the
TRANSFER (CLEAR) button.
8
3
(The TRANSFER button becomes the CLEAR button when using the overlay.)
desired number
4
AUTO DIAL
4. Press the STORE button.
• The STORE indicator light turns on.
• The display shows the initial programming mode.
STORE
— To exit the Station Programming mode: Press [PROGRAM] or lift the handset.
36
2.2
Programming
Paging Deny Button (Assignment)
Allows you to assign a Flexible (CO, DSS) button as the Paging Deny button.
— Be sure that you are in the Station Programming mode: Press [PROGRAM] [9] [9].
1
1. Press the Flexible (CO, DSS) button which you wish to assign as the
Paging Deny button.
2
2. Dial 8 07.
• The display shows:
8
0
7
Paging Deny
3
AUTO DIAL
3. Press the STORE button.
• The STORE indicator light turns on.
• The display shows the initial programming mode.
STORE
— To exit the Station Programming mode: Press [PROGRAM] or lift the handset.
Paralleled Telephone Connection Button (Assignment)
Allows you to assign a Flexible (CO, DSS) button as the Paralleled Telephone Connection
button.
— Be sure that you are in the Station Programming mode: Press [PROGRAM] [9] [9].
1
1. Press the Flexible (CO, DSS) button which you wish to assign as the
COLR button.
2
2. Dial 8 08.
• The display shows:
8
0
8
Parallel
3
AUTO DIAL
STORE
3. Press the STORE button.
• The STORE indicator light turns on.
• The display shows the initial programming mode.
— To exit the Station Programming mode: Press [PROGRAM] or lift the handset.
37
2.2
Programming
Pickup Dialling Button (Assignment)
Allows you to assign a Flexible (CO, DSS) button as the Pickup Dialling button.
— Be sure that you are in the Station Programming mode: Press [PROGRAM] [9] [9].
1
1. Press the Flexible (CO, DSS) button which you wish to assign as the
Pickup Dialling button.
2
2. Dial 8 09.
• The display shows:
8
0
9
Hot Line
3
AUTO DIAL
STORE
3. Press the STORE button.
• The STORE indicator light turns on.
• The display shows the initial programming mode.
— To exit the Station Programming mode: Press [PROGRAM] or lift the handset.
38
2.2
Programming
Phantom Button (Assignment)
Allows you to assign a Flexible (CO, DSS) button as a Phantom button.
— Be sure that you are in the Station Programming mode: Press [PROGRAM] [9] [9].
1
1. Press the desired Flexible (CO, DSS) button which you wish to
assign as a Phantom button.
2
2. Dial 88.
• The display shows:
8
8
EXTCLR
3
3. Enter the phantom extension number.
• The display shows:
Phantom extension number
EXT-xxxx
CLR
4
AUTO DIAL
STORE
(— xxxx: phantom extension
number)
• To erase an incorrect entry, press the CLR (S2) button or the
TRANSFER (CLEAR) button.
(The TRANSFER button becomes the CLEAR button while in the
programming mode.)
4. Press the STORE button.
• The STORE indicator light turns on.
• The display shows the initial programming mode.
— To exit the Station Programming mode: Press [PROGRAM] or lift the handset.
Conditions
• A phantom extension number must be assigned in program [130] “Phantom Extension
Assignment” before assigning a Phantom button.
• A DSS button can be assigned as a Phantom button so that the operator can use it for
transferring a call.
• If you assigned a Phantom button to one of the CO buttons (13 through 24) on your KXT7230 telephone and change the telephone to a KX-T7235 model, you must re-program
the setting as the KX-T7235 telephone has only 12 CO buttons. If you do not change
the setting, a phantom extension call will be sent to the INTERCOM button.
Programming References
• System Programming — Installation Manual Addendum
[130] Phantom Extension Assignment
39
2.2
Programming
Terminate Button (Assignment)
Allows you to assign a Flexible (CO, DSS, PF) button as the Terminate button.
— Be sure that you are in the Station Programming mode: Press [PROGRAM] [9] [9].
1
1. Press the desired Flexible (CO, DSS, PF) button which you wish to
assign as the Terminate button.
2
2. Dial 9.
• The display shows:
9
Terminate
3
AUTO DIAL
3. Press the STORE button.
• The STORE indicator light turns on.
• The display shows the initial programming mode.
STORE
— To exit the Station Programming mode: Press [PROGRAM] or lift the handset.
Two-Way Record Button (Assignment)†
Allows you to assign a Flexible (CO, DSS) button as the Two-Way Record button.
— Be sure that you are in the Station Programming mode: Press [PROGRAM] [9] [9].
1
1. Press the desired Flexible (CO, DSS) button which you wish to
assign as the Two-Way Record button.
2
2. Dial 83.
• The display shows:
8
3
3
VM extension number
2 WAY-REC:
CLR
3. Enter the extension number of the Voice Mail system.
• The display shows:
2 WAY-REC:xxxx
(— xxxx: VM extension number)
CLR
• To erase the entry, press the CLR (S2) button or the TRANSFER
(CLEAR) button.
(The TRANSFER (CLEAR) button becomes the CLEAR button when using the
overlay.)
40
†: Available when the Digital Super Hybrid System is connected to a Digital
Proprietary Telephone capable Panasonic Voice Processing System
(one that supports digital proprietary telephone integration; e.g. KX-TVP100).
2.2
Programming
4. Press the STORE button.
• The STORE indicator light turns on.
• The display shows the initial programming mode.
4
AUTO DIAL
STORE
— To exit the Station Programming mode: Press [PROGRAM] or lift the handset.
Conditions
• You cannot enter a non-existent extension or a floating number.*
• A voice mail extension number must be assigned in program [127].
Programming References
• System Programming — Installation Manual Addendum
[127] Voice Mail Extension Number Assignment
* A floating Number (FN) is a virtual extension number for a resource to make it appear to be an extension.
Refer to the Installation Manual.
Two-Way Transfer Button (Assignment)†
Allows you to assign a Flexible (CO, DSS) button as the Two-Way Transfer button.
— Be sure that you are in the Station Programming mode: Press [PROGRAM] [9] [9].
1
1. Press the desired Flexible (CO, DSS) button which you wish to
assign as the Two-Way Transfer button.
2
2. Dial 84.
• The display shows:
8
4
3
2 WAY-TRANS:
CLR
3. Enter the extension number of the Voice Mail system.
• The display shows:
VM extension number
2 WAY-TRANS:xxxx
CLR
(— xxxx: VM extension number)
• To erase the entry, press the CLR (S2) button or the TRANSFER
(CLEAR) button.
(The TRANSFER (CLEAR) button becomes the CLEAR button when using the
overlay.)
†: Available when the Digital Super Hybrid System is connected to a Digital
Proprietary Telephone capable Panasonic Voice Processing System
(one that supports digital proprietary telephone integration; e.g. KX-TVP100).
41
2.2
Programming
4
AUTO DIAL
STORE
4. Press the STORE button.
• The STORE indicator light turns on.
• The display shows the initial programming mode.
— To exit the Station Programming mode: Press [PROGRAM] or lift the handset.
Conditions
• You cannot enter a non-existent extension or a floating number.*
• A voice mail extension number must be assigned in program [127].
Programming References
• System Programming — Installation Manual Addendum
[127] Voice Mail Extension Number Assignment
* A floating Number (FN) is a virtual extension number for a resource to make it appear to be an extension.
Refer to the Installation Manual.
42
2.2
Programming
Live Call Screening Mode Setting†
Assigns whether an alert tone is sent (Private mode) or the recording message is monitored
through the built-in speaker (Hands-free mode), while incoming callers are leaving a message.
— Be sure that you are in the Station Programming mode: Press [PROGRAM] [9] [9].
1. Dial 1.
• The display shows the current status.
1
1
Hands-free
(— When Hands-free mode is
selected)
Private
(— When Private mode is selected)
2
or
1
2
3
AUTO DIAL
STORE
2. Dial 1 or 2.
- 1 : to select Hands-free mode
- 2 : to select Private mode
3. Press the STORE button.
• The STORE indicator light turns on.
• The display shows the initial programming mode.
— To exit the Station Programming mode: Press [PROGRAM] or lift the handset.
Conditions
• The default is “Hands-free” mode.
†: Available when the Digital Super Hybrid System is connected to a Digital
Proprietary Telephone capable Panasonic Voice Processing System
(one that supports digital proprietary telephone integration; e.g. KX-TVP100).
43
2.2
Programming
Phantom Extension Bell On/Off Setting
You can select whether or not the bell will ring when a call is received at a phantom
extension.
Bell On/Off Setting
— Be sure that you are in the Station Programming mode: Press [PROGRAM] [9] [9].
1. Press the Phantom button.
1
2. Press the same Phantom button again.
2
3
1
or
4
AUTO DIAL
STORE
2
3. Dial 1 or 2.
— 1 : Ring off
— 2 : Ring on
4. Press the STORE button.
• The STORE indicator light turns on.
— To exit the Station Programming mode: Press [PROGRAM] or lift the handset.
44
2.2
Programming
Ringing Tone Selection for the Intercom Button
Allows you to assign a ringer frequency to the intercom button.
— Be sure that you are in the Station Programming mode: Press [PROGRAM] [9] [9].
1
INTERCOM
1. Press the INTERCOM button which you wish to change the ringing
tone.
2
INTERCOM
2. Press the INTERCOM button again.
• The display shows the current status.
3
tone type number
3. Enter the tone type number (1 through 8).
• The display shows the selected tone type number and you hear the
selected tone until the STORE button is pressed.
Tone Type–x
4
(— x: tone type number)
AUTO DIAL
STORE
• If you want to change the tone type, enter another tone type
number in succession.
4. Press the STORE button.
• The STORE indicator light turns on.
• The display shows the initial programming mode.
— To exit the Station Programming mode: Press [PROGRAM] or lift the handset.
Condition
• The default is Ringing Tone Type 2.
45
2.2
Programming
Station Speed Dialling Number / Name Assignment
(KX-T7436 / KX-T7433 / KX-T7235 only)
Allows you to assign frequently dialled numbers and names to each Function button on your
telephone.
For KX-T7436 / KX-T7235 users
To store a number
— Be sure that you are in the Station Programming mode: Press [PROGRAM] [9] [9].
1
F1
F6
F2
F7
F3
F8
F4
F5
F9
PT-PGM Mode
F10
1. Press a Function button (F1 through F10).
• The STORE indicator light turns off.
• The display shows the current status.
<Example>
9-431-2111
CLR
NEXT
(— The outside call, 431-2111, is
now programmed.)
2
desired number
3
AUTO DIAL
2. Enter the desired number (up to sixteen digits).
• 0 through 9, , #, RECALL, PAUSE, INTERCOM, ( “[” or “]”:
secret) and CONF (–: hyphen) can be used.
• To store the telephone number of an outside party, the line
access code (9 or 81 through 88) must be the leading digit.
• To erase the entry, press the CLR (S2) button.
STORE
3. Press the STORE button.
• The STORE indicator lights.
• The display shows the initial programming mode.
— To exit the Station Programming mode: Press [PROGRAM] or lift the handset.
46
2.2
Programming
To store a name
— Be sure that you are in the Station Programming mode: Press [PROGRAM] [9] [9].
1
F1
F6
F2
F7
F3
F8
F4
1. Press a Function button (F1 through F10).
• The STORE indicator light turns off.
• The display shows the current status.
F9
PT-PGM Mode
F5
F10
2
2. Press the NEXT (S3) button.
• The display shows the current status.
<Example>
(— The name is now programmed.)
Mike
NEXT
S1
S2
CLR
NEXT
S3
3. Enter the name.
• Refer to the Combination Table on pages 51 and 52 on how to
enter each character.
3
name
4
AUTO DIAL
4. Press the STORE button.
• The STORE indicator lights.
• The display shows the initial programming mode.
STORE
— To exit the Station Programming mode: Press [PROGRAM] or lift the handset.
47
2.2
Programming
For KX-T7433 users
To store a number
— Be sure that you are in the Station Programming mode: Press [PROGRAM] [9] [9].
1. Press
1
.
2. Enter the Station Speed Dial number (0 through 9).
• The STORE indicator light turns off.
• The display shows the current status.
<Example>
2
Station Speed Dial number
9-431-2111
CLR
3
desired number
4
AUTO DIAL
STORE
(— The outside call, 431-2111, is
now programmed.)
NEXT
3. Enter the desired number (up to sixteen digits).
• 0 through 9, , #, RECALL, PAUSE, INTERCOM, ( “[” or “]”:
secret) and CONF (–: hyphen) can be used.
• To store the telephone number of an outside party, the line
access code (9 or 81 through 88) must be the leading digit.
• To erase the entry, press the CLR (S2) button.
4. Press the STORE button.
• The STORE indicator lights.
• The display shows the initial programming mode.
— To exit the Station Programming mode: Press [PROGRAM] or lift the handset.
48
2.2
Programming
To store a name
— Be sure that you are in the Station Programming mode: Press [PROGRAM] [9] [9].
1. Press
1
2
Station Speed Dial number
.
2. Enter the Station Speed Dial number (0 through 9).
• The STORE indicator light turns off.
• The display shows the current status.
<Example>
9-431-2111
CLR
3
NEXT
S1
S2
4
(— The outside call, 431-2111, is
now programmed.)
NEXT
3. Press the NEXT (S3) button to store a name.
S3
4. Enter the name.
• Refer to the Combination Table on pages 51 and 52 on how to
enter each character.
name
5
AUTO DIAL
5. Press the STORE button.
• The STORE indicator lights.
• The display shows the initial programming mode.
STORE
— To exit the Station Programming mode: Press [PROGRAM] or lift the handset.
49
2.2
Programming
Combination Table
Characters can be entered using the dial key pad, various buttons or the Jog Dial for storing
names.
Combination Table 1 shows the combination of keys and the number of times to press the
SELECT (AUTO ANSWER/MUTE) button, or the combination of keys and the SHIFT and
Soft buttons to enter characters. (The AUTO ANSWER/MUTE button becomes the SELECT button when
using the overlay.)
To enter a character, find the key and number of times to press the SELECT button or the corresponding SHIFT and Soft button combination on the table. Press the corresponding key first,
then press the SELECT button the required number of times. Or, you can use the SHIFT button
and a Soft button (S1 through S3) instead of the SELECT button.
Combination Table 2 shows the combination of keys and the number of pulses to move the
Jog Dial (click tones) to the right.
To enter a character, find the key and number pulses to rotate the Jog Dial. Press the corresponding key first, then rotate the Jog Dial the required number of times. Or, if you keep rotating the Jog Dial after pressing any dialling key, all of the characters in the table will be displayed.
Combination Table 1
SHIFT & Soft
Combination
S1
SHIFT+ S1
S2
SHIFT+ S2
S3
SHIFT+ S3
1
Q
A
D
G
J
M
P
T
W
2
q
a
d
g
j
m
p
t
w
.
+
%
3
Z
B
E
H
K
N
Q
U
X
,
&
4
z
b
e
h
k
n
q
u
x
’
=
@
5
!
C
F
I
L
O
R
V
Y
:
<
(
6
?
c
f
i
l
o
r
v
y
SHIFT+
SHIFT+
SHIFT+ S1 SHIFT+ S2
Pressing
SELECT
(Times)
Keys
1
2
3
4
5
6
7
8
9
0
#
50
0
1
2
3
4
5
6
7
8
9
0
*
#
/
$
;
>
)
7
8
S
s
Z
z
2.2
Programming
Combination Table 2
Rotating
Jog Dial
(Pulses)
Keys
1
2
3
4
5
6
7
8
9
0
#
0
1
2
3
4
5
6
7
8
9
0
*
#
1
Q
A
D
G
J
M
P
T
W
/
$
2
q
a
d
g
j
m
p
t
w
!
+
%
3
R
B
E
H
K
N
Q
U
X
?
&
4
r
b
e
h
k
n
q
u
x
.
=
@
5
S
C
F
I
L
O
R
V
Y
,
<
(
6
s
c
f
i
l
o
r
v
y
7
T
D
G
J
M
P
S
W
Z
8
t
d
g
j
m
p
s
w
z
’
>
)
:
#
A
;
$
a
<Example> To enter “Mike”
— Using the SELECT button (With a KX-T7433 / KX-T7436 / KX-T7235)
See Combination Table 1.
1. Press 6 and then press the SELECT button once to enter “M.”
2. Press 4 and then press the SELECT button six times to enter “i.”
3. Press 5 and then press the SELECT button four times to enter “k.”
4. Press 3 and then press the SELECT button four times to enter “e.”
— Using the SHIFT button and a Soft button (With a KX-T7433 / KX-T7436 / KX-T7235)
See Combination Table 1.
1. Press 6 and then press the S1 button to enter “M.”
2. Press 4 and then press the SHIFT and S3 button to enter “i.”
3. Press 5 and then press the S2 button to enter “k.”
4. Press 3 and then press the S2 button to enter “e.”
51
2.2
Programming
— Using the Jog Dial (With a KX-T7433 / KX-T7436)
See Combination Table 2.
1. Press 6 and then rotate the Jog Dial one pulse to enter “M.”
2. Press 4 and then rotate the Jog Dial six pulses to enter “i.”
3. Press 5 and then rotate the Jog Dial four pulses to enter “k.”
4. Press 3 and then rotate the Jog Dial four pulses to enter “e.”
OR
1. Press 2 and then rotate the Jog Dial until “M” appears.
2. Press 2 and then rotate the Jog Dial until “i” appears.
3. Press 2 and then rotate the Jog Dial until “k” appears.
4. Press 2 and then rotate the Jog Dial until “e” appears.
Notes
• Pressing the SHIFT button alternates between capital and lower case letters. Once this button is pressed, that letter SHIFT mode remains until SHIFT is pressed again.
• To erase the last word (to backspace), press the CONF button.
(The CONF button becomes the “←” (backspace) key when using the overlay.)
• To erase all of the data, press the CLR (S2) button.
• If you keep rotating the Jog Dial, all of the characters will be displayed in order.
<Example> If you rotate the Jog Dial after pressing 2, all of the characters will appear in the
following order:
A a B b ···· Z z (space) ! ? . , ’ : ; * / + – = < > # $ % & @ ( ) A a B b
····
Conditions
• The default is “Not Stored.”
• Up to ten dialling numbers and names can be assigned. Each dialling number has a maximum of sixteen digits and each name has a maximum of ten characters.
52
Section 3
User Programming
(Manager Programming)
Contents
3.1
3.2
Programming Instructions ...................................................54
General Programming Instructions.........................54
Programming Ways...................................................57
User Programming (Manager Programming).....................59
53
3.1
Programming Instructions
General Programming Instructions
User Programming (Manager Programming) allows you, the proprietary telephone (PT) user,
to program the following features of the system from your telephone individually.
• Date and Time Set
• System Speed Dialling Number Set
• System Speed Dialling Name Set
• Extension Number Set
• Extension Name Set
• Flexible CO Button Assignment
• Operator / Manager Extension Assignment – Day / Night
• DSS Console Port and Paired Telephone Assignment
• Absent Messages
• Quick Dial Number Set
• Budget Management
• Charge Margin and Tax Rate
• ISDN Extension Number Set
• ISDN Extension Name Set
• Budget Management on ISDN Port
• Charge Rate Fractional Point Assignment
• Charge Rate Assignment
• TD286 Extension Number Set
• TD286 Extension Name Set
• Budget Management on TD286 Port
• Doorphone FWD Day / Night
To program, you need to switch your telephone to the User Programming mode. During the
programming mode, your telephone is put in a busy condition to outside caller. If you want to
make a normal call handling operation, you should finish the programming mode.
Default Setting
This system has a default factory setting. Any required changes can be written on
“Programming Tables.”
Required Telephone Set
One of the following telephone sets is required for User Programming (Manager
Programming):
• Proprietary Telephone (PT): KX-T7436 / KX-T7433 / KX-T7235 / KX-T7230
54
3.1
Programming Instructions
Soft Buttons and SHIFT Button on the Display PT
Three soft buttons are provided just below the display on the display Proprietary Telephones
(PT). The functions of these soft buttons vary as the programming procedures advance from
step to step. Those functions that are currently assigned to the buttons are shown on the lower
line of the display. If the SHIFT button indicator is on, two functions are available with each
soft button. To alternate between the two functions, press the SHIFT button on the right side
of the display.
Using the Overlay
A programming overlay is packed with the main unit at the factory.
This overlay should be used at all times while in programming mode since the functions of the
telephone keys change while in programming mode.
Location of Controls with the Overlay
The pictures below show the functions of the buttons of the KX-T7235 and KX-T7230 while
in programming mode.
PROGRAM
Soft-1
Soft-2
Soft-3
SHIFT
PROGRAM
SHIFT
Soft 1
SECRET
1
PAUSE CLEAR
2
3
Soft 2
Soft 3
SECRET
PAUSE CLEAR
1
2
3
4
5
6
7
8
9
VOLUME
VOLUME
4
5
6
7
8
9
STORE
STORE
SELECT
SELECT
0
0
PREV
RECALL
END
NEXT
KX-T7230
PREV
RECALL
END
NEXT
KX-T7235
For KX-T7436 / KX-T7433, please refer to the “1.1 Configuration” in this manual.
Before entering the programming mode
Before entering programming mode, confirm that:
• Your telephone is on-hook.
• No calls are on hold at your telephone.
55
3.1
Programming Instructions
Entering the programming mode
To enter the User Programming (Manager Programming) mode:
Press PROGRAM +
+
+ User Password (default:1234)
• The display shows the Initial Message: USR-PGM NO?->
Notes:
• If nothing is entered in five seconds after the PROGRAM button is pressed, it is cancelled.
• During the programming mode, your extension is treated as a busy extension.
• Only one proprietary telephone can be in programming mode at any one time.
• The User Password is not shown on the display. The password can be changed by System
Programming.
Programming References
• System Programming — Installation Manual
[120] User Password
In this section, programs [000] through [004] are described. Please refer to the Installation
Manual or consult your dealer when you need to change the following programs:
•
•
•
•
•
•
•
•
•
•
•
•
•
•
•
•
•
56
[005] Flexible CO Button Assignment
[006] Operator / Manager Extension Assignment – Day / Night
[007] DSS Console Port and Paired Telephone Assignment
[008] Absent Messages
[009] Quick Dial Number Set
[010] Budget Management
[011] Charge Margin and Tax Rate
[012] ISDN Extension Number Set
[013] ISDN Extension Name Set
[014] Budget Management on ISDN Port
[015] Charge Rate Fractional Point Assignment
[016] Charge Rate Assignment
[017] TD286 Extension Number Set
[018] TD286 Extension Name Set
[019] Budget Management on TD286 Port
[021] Doorphone Call Forwarding — Day
[022] Doorphone Call Forwarding — Night
3.1
Programming Instructions
Programming Ways
Advancing to the next stage
When “USR-PGM NO?->” is displayed, you can select one of the following:
• To go to program [000], press the NEXT button.
• To go to another program, enter the 3-digit program address.
Rotation of jack number
Each jack of our Digital Super Hybrid System supports the connection of a proprietary
telephone and an analog device with different extension numbers (eXtra Device Port: XDP
function).
To program this function it is necessary to assign two parts for each jack. The first part of jack
one is 01-1. The second part of jack one is 01-2. The first part of jack two is 02-1 and so on.
The NEXT and PREV buttons can be used to move from jack to jack as required.
Example;
NEXT
#01-1
NEXT
#01-2
PREV
NEXT
#02-1
PREV
#02-2......
PREV
Note:
The first part of a jack is for a PT of a XDP-assigned jack. The second part is for a single line
device. Program [600] “EXtra Device Port” assigns which jacks are XDP.
Entering Characters
You can enter characters to store names for speed dial numbers, extension numbers, etc., by
using the dialling key pad and the buttons.
Each of twelve dialling keys on the dialling key pad has seven characters assigned. Refer to
the “Station Speed Dialling Number / Name Assignment (KX-T7436 / KX-T7433 / KX-T7235
only)” section in Section 2.2 Programming.
Storing your data
Press STORE to store your data.
• The STORE indicator lights red and confirmation tone sounds.
* Confirmation tone (one beep)
After pressing STORE, you will hear a beep. This informs you that your storage is
completed.
*Alarm tone (three beeps)
If you hear the alarm, your entry is not valid.
57
3.1
Programming Instructions
Making another selection within the same program address
• To make the next higher selection, press NEXT.
• To make the previous selection, press PREV.
• To make a specific selection, press SELECT and then enter the number.
Going to another program address
After pressing STORE, you can go to another program with either of the following two
methods:
(1) • To go to the next larger program address:
Press Soft 1 (SKP+) or VOLUME
(DOWN) or rotate Jog Dial
(counter-clockwise).
• To go to the next smaller program address:
Press SHIFT + Soft 1 (SKP-) or VOLUME
(UP) or rotate Jog Dial (clockwise).
(2) To go to a specific program address:
Press END, then enter the program address.
Going back to the operation mode
There are two ways to go back to the operation mode:
(1) Lift the handset while in programming mode.
(2) When the Initial Message: USR-PRG NO?-> is displayed, press the PROGRAM
button.
(To display the Initial Message, press END.)
58
3.2
User Programming (Manager Programming)
Date and Time Set
000
NOTICE
It is assumed that you have read Section 3.1 “General Programming Instructions.” The use of the soft buttons
is discussed in the section, therefore we will not make any reference to them in the following instructions.
At any time the soft buttons can be used in place of the overlay keys.
Description
Sets the current data and time.
Selection
•
•
•
•
•
•
•
Default
1 Jan ’94 SAT 12:00 AM
Programming
1.
Day: 1 through 31
Month: Jan. through Dec.
Year: 00 through 99
Day of the week: SUN / MON / TUE / WED / THU / FRI / SAT
Hour: 00 through 12
Minute: 00 through 59
AM / PM
Enter 000.
Display: Day/Time Set
2.
Press NEXT.
Display example: 1 Jan
3.
'94 SAT
Enter the day.
To change the current entry, press CLEAR and the new day.
4.
Press
.
5.
Keep pressing SELECT until the desired month is displayed.
6.
Press
7.
Enter the year.
.
To change the current entry, press CLEAR and the new year.
8.
Press
.
9.
Keep pressing SELECT until the desired day of the week is displayed.
10.
Press STORE.
11.
Press NEXT.
Display example: 12:00 AM
59
000
3.2
User Programming (Manager Programming)
Date and Time Set (contd.)
12.
Enter the hour.
To change the current entry, press CLEAR and the new hour.
13.
Press
.
14.
Enter the minute.
To change the current entry, press CLEAR and the new minutes.
15.
Press
.
16.
Press SELECT for AM or PM.
17.
Press STORE.
18.
Press END.
Conditions
• After changing an entry, you can press STORE. You do not have to
perform all of the rest of the steps.
• To go back to the previous field, press
at steps 4 through 9 and steps 13
through 16.
• If you hear the alarm after pressing STORE, check that the date is valid.
• The clock starts immediately after the STORE button is pressed.
• You cannot leave the entry empty.
• The time is adjusted automatically, if the first outgoing call is made after
three o’clock each morning.
Feature References
Installation Manual, Section 3, Features,
Display, Time and Date
60
3.2
User Programming (Manager Programming)
System Speed Dialling Number Set
001
Description
Used to program the System Speed Dial numbers. These numbers are
available to all extension users. The stored numbers are also applied to
CO Incoming Call Information Display / Log features.
Selection
• Speed dial number: 000 through 499
• Telephone number: 24 digits (max.)
Default
All speed dial numbers – Not stored
Programming
1.
Enter 001.
Display: SPD Number Set
2.
Press NEXT.
Display: SPD-Code?->
3.
Enter a speed dial number.
To enter speed dial number 000, you can also press NEXT.
Display example: 000: Not Stored
4.
Enter a telephone number.
To delete the current entry, press CLEAR.
To change the current entry, press CLEAR and the new number.
Conditions
5.
Press STORE.
6.
To program another speed dial number, press NEXT or PREV, or
SELECT and the desired speed dial number.
7.
Repeat steps 4 through 6.
8.
Press END.
• There is a maximum of 500 speed dial numbers. Each speed dial number
has a maximum of 24 digits. The valid characters are 0 through 9, , and
# keys, RECALL, PAUSE, SECRET and – (hyphen) buttons.
– To store the register recall signal, press RECALL.
Note : The stored recall will be in effect only during an established
call.
(Refer to the Installation Manual, Section 3 “External
Feature Access.”)
61
001
3.2
User Programming (Manager Programming)
System Speed Dialling Number Set (contd.)
•
•
•
•
•
•
•
Feature References
62
– To store a hyphen, press the “–” button.
– To store a pause, press PAUSE.
(Refer to the Installation Manual, Section 3 “Pause Insertion,
Automatic.”)
– To store the feature number to convert pulse signals to DTMF
signals, press the # keys.
(Refer to the Installation Manual, Section 3 “Pulse to Tone
Conversion.”)
– To prevent the display of all or part of the number, press SECRET
before and after confidential parts of the number. The SECRET
button must always be entered in a pair. Or your entry is not stored.
(Refer to the Installation Manual, Section 3 “Secret Dialling.”)
If you are storing an external number, include the line access code
(default=9, 81 through 88) before the number. When dialling, a pause is
automatically inserted after the code. If the programmed pause time (in
program [412] “Pause Time”) is 1.5 or 2.5 seconds, it is required to store a
pause manually after the line access code.
If you are storing an account code, enter the account code before the line
access code. (Refer to the Installation Manual, Section 3 “Account Code
Entry.”)
If you are storing a number for CO Incoming Call Information Display with
name, enter “–” (hyphen) after the line access code. The system starts to
compare the calling party’s number with the System Speed Dialling Number
stored after “–.” Example : 9–12345678
(Refer to the Installation Manual, Section 3 “CO Incoming Call Information
Display.”)
It is possible to store a number consisting of 25 digits or more by storing it
in two speed dial numbers. A line access code should not be stored in the
second speed dial number.
To go to another speed dial number at steps 3 through 6, press SELECT
and start with step 3.
To display parts of the number which have scrolled off the display, press
or
.
Program [002] “System Speed Dialling Name Set” is used to give names to
speed dial numbers.
Installation Manual, Section 3, Features,
CO Incoming Call Information Display
CO Incoming Call Information Log
Special Features for KX-T7436 / KX-T7433 / KX-T7235
— System Speed Dialling
System Speed Dialling
Toll Restriction for System Speed Dialling
3.2
User Programming (Manager Programming)
System Speed Dialling Name Set
002
Description
Assigns names to the system speed dial numbers assigned in program [001]
“System Speed Dialling Number Set.” The KX-T7436 / KX-T7433 /
KX-T7235 shows the stored name when performing System Speed Dialling.
The stored names are applied to the CO Incoming Call Information Display /
Log features.
Selection
• Speed dial number: 000 through 499
• Name: 10 characters (max.)
Default
All speed dial numbers – Not stored
Programming
1.
Enter 002.
Display: SPD Name Set
2.
Press NEXT.
Display: SPD Code?->
3.
Enter a speed dial number.
To enter speed dial number 000, you can also press NEXT.
Display example: 000: Not Stored
4.
Enter a name.
For entering characters, see Section 2.2 “Programming.”
To delete the current entry, press CLEAR.
To change the current entry, press CLEAR and the new name.
5.
Press STORE.
6.
To program another speed dial number, press NEXT or PREV, or
SELECT and the desired speed dial number.
7.
Repeat steps 4 through 6.
8.
Press END.
Conditions
• Speed dial numbers are programmed in program [001] “System Speed
Dialling Number Set.”
• There is a maximum of 500 names. Each name has a maximum of 10
characters.
Feature References
Installation Manual, Section 3, Features,
CO Incoming Call Information Display
CO Incoming Call Information Log
Special Features for KX-T7436 / KX-T7433 / KX-T7235
— System Speed Dialling
System Speed Dialling
63
003
3.2
User Programming (Manager Programming)
Extension Number Set
Description
Assigns an extension number to each extension.
Selection
• Jack number: KX-TD816 – 01 through 16 (-1 / -2)
KX-TD1232 – 01 through 64 (-1 / -2)
(-1 = first part, -2 = second part)
• Extension Number: 2 through 4 digits
Default
KX-TD816 – Jack 01-1 through 16-1 = 201 through 216;
Jack 01-2 through 16-2 = 301 through 316
KX-TD1232 – Jack 01-1 through 64-1 = 201 through 264;
Jack 01-2 through 64-2 = 301 through 364
Programming
1.
Enter 003.
Display: EXT Number Set
2.
Press NEXT.
Display: Jack NO?->
3.
Enter a jack number.
To enter jack number 01, you can also press NEXT.
To select the second part (-2), press NEXT after entering a jack number.
Display: #01-1:EXT201
4.
Enter an extension number.
To change the current entry, press CLEAR and the new number.
Conditions
64
5.
Press STORE.
6.
To program another jack, press NEXT or PREV, or SELECT and the
desired jack number.
7.
Repeat steps 4 through 6.
8.
Press END.
• There is a maximum of 32 extension numbers for the KX-TD816 and 128
extensions for the KX-TD1232. Each extension number can be two, three,
or four digits, consisting of 0 through 9. The and # keys cannot be used.
• For the KX-TD1232, jack numbers 01 through 32 are for the Master System
and 33 through 64 are for the Slave System.
3.2
User Programming (Manager Programming)
Extension Number Set (contd.)
003
• An extension number is invalid if the leading first or second digits disagree
with the setting of the program [100] “Flexible Numbering, 1st through 16th
hundred extension blocks.” If one digit is assigned as the leading digit,
some extensions have two digits and some have three digits. If two digits
are assigned, some have three digits and some have four digits.
• Two extension numbers can be assigned per jack. If XDP is disabled for the
jack in program [600] “EXtra Device Port,” the extension number of the
second part (XX-2) is not available. (XX=jack number)
• For an explanation of jack numbering, see “Rotation of jack number” on
page 57.
• Double entries or incompatible entries are invalid for programs [012]
“ISDN Extension Number,” [127] “Voice Mail Extension Number
Assignment,” and [813] “Floating Number Assignment.”
Valid entry examples: 10 and 11; 10 and 110. Invalid entry examples: 10
and 106; 210 and 21.
• Program [004] “Extension Name Set” is used to give names to extension
numbers.
Feature References
Installation Manual, Section 3, Features,
Display, Call Information
EXtra Device Port (XDP)
Intercom Calling
Special Features for KX-T7436 / KX-T7433 / KX-T7235
— Extension Dialling
65
004
3.2
User Programming (Manager Programming)
Extension Name Set
Description
Assigns names to the extension numbers programmed in program [003]
“Extension Number Set.”
Selection
• Jack number: KX-TD816 – 01 through 16 (-1 / -2)
KX-TD1232 – 01 through 64 (-1 / -2)
(-1 = first part, -2 = second part)
• Name: 10 characters (max.)
Default
All jacks – Not stored
Programming
1.
Enter 004.
Display: EXT Name Set
2.
Press NEXT.
Display: Jack NO?->
3.
Enter a jack number.
To enter jack number 01, you can also press NEXT.
To select the second part (-2), press NEXT after entering a jack number.
Display: #01-1:Not Stored
4.
Enter a name.
For entering characters, see “Station Speed Dialling Number/Name
Assignment” in Section 2.2 “Programming.”
To delete the current entry, press CLEAR.
To change the current entry, press CLEAR and the new name.
Conditions
66
5.
Press STORE.
6.
To program another jack, press NEXT or PREV, or SELECT and the
desired jack number.
7.
Repeat steps 4 through 6.
8.
Press END.
• There is a maximum of 32 extension numbers for the KX-TD816 and 128
extensions for the KX-TD1232
• For the KX-TD1232, jack numbers 01 through 32 are for the Master System
and 33 through 64 are for the Slave System.
• Program [003] “Extension Number Set” is used to assign extension
numbers.
• For an explanation of jack numbering, see “Rotation of jack number” on
page 29.
3.2
User Programming (Manager Programming)
Extension Name Set (contd.)
Feature References
004
Installation Manual, Section 3, Features,
Display, Call Information
Intercom Calling
Special Features for KX-T7436 / KX-T7433 / KX-T7235
— Extension Dialling
67
A
4.2
DPT Features
Automatic Callback Busy (Camp-On)
Cancelling
1. Lift the handset or press the SP-PHONE/MONITOR button.
1
2. Dial the feature number (46).
2
4
6
3. Hang up or press the SP-PHONE/MONITOR button.
3
Programming References
• System Programming — Installation Manual Addendum
[100] Flexible Numbering, Automatic callback busy cancel
68
4.2
B
DPT Features
Background Music (BGM)
You can hear background music through the built-in speaker of the telephone.
An external music source, such as a radio, must be connected.
The music stops whenever a call comes in or when you lift the handset.
Soft Button Operation
When the handset is on the cradle and the SP-PHONE button is off;
1. Press the BGM (S3) button.
• To turn off the BGM, press this button again.
1
BGM
S1
S2
S3
Standard Operation
Setting / Cancelling
1
HOLD
When the handset is on the cradle and the SP-PHONE/MONITOR button
is off;
1. Press the HOLD or TRANSFER button.
• The display shows as following for five seconds depending on
whether BGM is on or off:
BGM On
or
BGM Off
Condition
• You can also use the TRANSFER button to set or cancel the BGM feature.
Programming References
• System Programming — Installation Manual
[803] Music Source Use
[990] System Additional Information, Field (20)
69
C
4.2
DPT Features
Call Forwarding — from Hunting Group
Pre-assigned extension users can forward calls arriving at any receiving group or calls
arriving just at your own receiving group. The destination can be another receiving group or
a specific extension. Some extensions may be restricted.
Setting
1. Lift the handset or press the SP-PHONE/MONITOR button.
1
2
2. Dial the 7141.
7
1
4
1
3
3. Dial a forwarding group number.
forwarding group number
4
destination group number
or extension number
5
70
4. Dial a destination group number or extension number.
5. Hang up and press the SP-PHONE/MONITOR button.
4.2
C
DPT Features
Cancelling
1. Lift the handset or press the SP-PHONE/MONITOR button.
1
2
2. Dial 7140.
7
1
4
0
3. Dial forwarding group number.
3
forwarding group number
4. Hang up and press the SP-PHONE/MONITOR button.
4
Conditions
• You can set or cancel this feature by simply pressing the Call forwarding from Hunting
Group button.
• Each call can be forwarded up to four times. The fifth time will be disregarded.
Incoming
call
A
B
once
twice
C
three times
D
four times
E
five times
F
Original
destination
• Boss-Secretary function
The extension which has been set as the destination can call the forwarding extension.
Also, any extension in the receiving group which has been set as the forwarded destination
can call the forwarding extension.
<Example>
Call
Receiving group 1
Fowarding
extension
Forward
set
Programming References
• System Programming — Installation Manual Addendum
[005] Flexible CO Button Assignment
[100] Flexible Numbering, Call forwarding from hunting group
[520] Call Forwarding from Hunting Group
71
C
4.2
DPT Features
Calling / Connected Line Identification Presentation
(CLIP / COLP)
Allows you to display your number on the LCD of the called party’s telephone when
making a call (CLIP), or allows you to display your number on the LCD of the calling
party’s telephone when answering a call (COLP) through an ISDN line.
To select a CLIP / COLP number for a CO line
1. Lift the handset or press the SP-PHONE/MONITOR button.
1
2
7
1
1
2. Dial the feature number (711) and 1.
• You will hear a confirmation tone.
• The display shows:
CLIP/COLP:CO
1
3
3. Hang up or press the SP-PHONE/MONITOR button.
To select a CLIP / COLP number for an extension
1. Lift the handset or press the SP-PHONE/MONITOR button.
1
2
7
2
3
72
1
1
2. Dial the feature number (711) and 2.
• You will hear a confirmation tone.
• The display shows:
CLIP/COLP:EXT
3. Hang up or press the SP-PHONE/MONITOR button.
4.2
DPT Features
C
To select a desired CLIP number for one time
1. Lift the handset or press the SP-PHONE/MONITOR button.
1
2. Dial the feature number (711) and 3.
2
1
7
1
3. Dial the desired CLIP number and press #.
• You will hear a confirmation tone.
3
3
4. Press a CO button or dial the line access code (0 or 81 through 88).
desired CLIP number + #
5. Dial the phone number.
4
CO
5
phone number
Condition
• System programming is required to assign the numbers for a CLIP / COLP number.
However, the number actually sent to the called or calling party depends on the contract of
your ISDN network suppliers.
Programming References
• System Programming — Installation Manual Addendum
[419] Subscriber Number Assignment
[623] CLIP / COLP Number Assignment for Extension
[624] CLIP / COLP Number Assignment for ISDN Extension
Feature References
Calling Line Identification Restriction (CLIR)
Connected Line Identification Restriction (COLR)
73
C
4.2
DPT Features
Calling Line Identification Restriction (CLIR)
Allows you to restrict the presentation of your number to the called party when you make a
call. You can set the called party to see your number on the display once or continuously.
This feature is an ISDN service.
To restrict the presentation of your number to the called party
1
1. Lift the handset or press the SP-PHONE/MONITOR button.
2
2. Dial the feature number (59) and 2.
• The display shows:
5
9
2
3
CLIR
On
3. Hang up and press the SP-PHONE/MONITOR button.
To present your number to the called party
1
1. Lift the handset or press the SP-PHONE/MONITOR button.
2
2. Dial the feature number (59) and 0.
• The display shows:
5
9
0
3
CLIR
Off
3. Hang up and press the SP-PHONE/MONITOR button.
To change the current setting just for this call
1
1. Lift the handset or press the SP-PHONE/MONITOR button.
2
2. Dial the feature number (59) and 1.
5
9
1
3. Dial the line access code (9 or 81 through 88), or press a CO button.
3
line access code
74
4.2
DPT Features
C
4. Dial the phone number.
4
phone number
Programming References
• System Programming — Installation Manual Addendum
[100] Flexible Numbering, CLIR continue/once/cancel
[419] Subscriber Number Assignment
[516] Calling Line Identification Restriction
75
C
4.2
DPT Features
CO Incoming Call Information Display
(KX-T7436 / KX-T7433 / KX-T7235 / KX-T7230 only)
Provides you with incoming outside call information on an ISDN line provided with the
CLIP feature*. You can also record the information.
Operation (— for KX-T7436 / KX-T7235)
F1
F2
F3
F4
F5
0111111111
JOHN WHITE
Extension STA Speed
Features
SYS Speed
Call Log
S1
CO 09
F1
F2
F3
F4
F5
F3
F4
F5
F1
F2
F3
F4
F5
00: 01'30
S2
S2
S2
F8
F9
F10
1. Lift the handset or press the SP-PHONE button.
• The display changes as shown to the left.
• If you want the normal display, press the SHIFT button. The
button line of the display shows:
CONT
EFA
ACCNT
S3
F6
F7
F8
F9
2. Press the INFO (S1) button if you want to see the caller’s
information.
• The display changes as shown to the left.
F10
S3
0111111111
JOHN WHITE
Extension STA Speed
Features
SYS Speed
Call Log
INFO
LOG
S1
F10
F6
F7
0111111111
JOHN WHITE
Extension STA Speed
Features
SYS Speed
Call Log
INFO
LOG
S1
F8
F9
When you receive a CO incoming call, the display shows one of the
following.
• The caller’s telephone number and name
• The CO line number and CO line name
• The called party’s DDI number and name
S3
Extension STA Speed
Features
SYS Speed
Call Log
INFO
LOG
S1
F1
F2
S2
F6
F7
F6
F7
3. Press the LOG (S2) button if you want to record the information.
F8
F9
F10
S3
* The ISDN line with CLIP feature provides you with the caller’s information, such as his/her name and telephone number, on the CO
line assigned to receive ISDN service calls. Refer to the Added and Changed features for the Installation Manual.
76
4.2
C
DPT Features
Display Operation (— for KX-T7433 / KX-T7230)
Provides you with incoming outside call information on an ISDN line
provided with the CLIP feature*. You can also record the information.
• The caller’s telephone number and name
• The CO line number and CO line name
• The called party’s DDI number and name
0111111111
JOHN WHITE
S2
S1
S3
CO 09 00: 01'30
INFO
LOG
S2
S1
1. Lift the handset or press the SP-PHONE button.
• The display changes as shown to the left.
• If you want the normal display, press the SHIFT button. The
button line of the display shows:
S3
CONT
CO 09 00: 00'30
INFO
LOG
S2
S1
S3
EFA
2. Press the INFO (S1) button if you want to see the caller’s
information.
• The upper line of the display changes as follows (example):
(caller’s telephone number)
0111111111
JOHN WHITE
S2
(caller’s name)
3. Press the LOG(S2) button if you want to record the information.
JOHN WHITE
LOG
S1
ACCNT
S3
Conditions
• The SHIFT indicator light may turn on when receiving a call. Pressing this button provides
you with more information about the caller.
• The displayed information is assigned by system programming.
• If a call is carried from the ISDN line, only the telephone number is sent to the system. The
system provides the caller’s name by comparing the number with the Speed Dialing
Numbers and Names. If the Speed Dialing Number is not given a name, the name cannot
be displayed.
Programming References
•User Programming (Manager Programming) (Section 3)
[001] System Speed Dialing Number Set
[002] System Speed Dialing Name Set
• System Programming — Installation Manual & Installation Manual Addendum
[001] System Speed Dialing Number Set
[002] System Speed Dialing Name Set
[622] Incoming Call Display
77
C
4.2
DPT Features
Feature References
CO Call Information Log
CO Incoming Call Information Log Lock
CO Incoming Call Information Log Mode
* The ISDN line with CLIP feature provides you with the caller’s information, such as his/her name and telephone number, on the CO
line assigned to receive ISDN service calls. Refer to the Added and Changed features for the Installation Manual.
78
4.2
DPT Features
C
Completion of Calls to Busy Subscriber (CCBS)
You can set the telephone to receive call-back ringing when a busy called party on an ISDN
line becomes free. When you answer the call-back ringing, the called party’s telephone
number is automatically dialled.
Soft Button Operation
Setting
While hearing an indication tone*;
1. Press the CCBS (S3) button.
1
CCBS
S1
S2
S3
2
2. Hang up or press the SP-PHONE/MONITOR button.
Standard Operation
Setting
While hearing an indication tone*;
1. Dial 6.
1
6
2
2. Hang up or press the SP-PHONE/MONITOR button.
Answering and calling
1
1. Hang up or press the SP-PHONE/MONITOR button.
79
C
4.2
DPT Features
Cancelling
1. Lift the handset or press the SP-PHONE/MONITOR button.
1
2. Dial 713.
2
1
7
3
3. Hang up and press the SP-PHONE/MONITOR button.
3
Condition
•
•
•
•
The availability of this feaure depends on the ISDN service of your telephone company.
If you do not answer after four call-back rings, this feature will be cancelled.
This feature is not available for an ISDN telephone user.
* Indication tone
1s
Programming References
• System Programming — Installation Manual Addendum
[100] Flexible Numbering, CCBS
[153] Completion of Calls to Busy Subscriber
80
4.2
C
DPT Features
Connected Line Identification Restriction (COLR)
Allows you to restrict the presentation of your number to the calling party when you receive
the incoming call. You can set the calling party not to see your number on the display. This
feature is an ISDN service.
To restrict the presentation of your number to the calling party
1. Lift the handset or press the SP-PHONE/MONITOR button.
1
2. Dial the feature number (58) and 1.
• The display shows:
2
5
8
COLR
1
3
On
3. Hang up or press the SP-PHONE/MONITOR button.
To present your number to the calling party
1. Lift the handset or press the SP-PHONE/MONITOR button.
1
2. Dial the feature number (58) and 0.
• The display shows:
2
5
8
0
3
COLR
Off
3. Hang up or press the SP-PHONE/MONITOR button.
Programming References
• System Programming — Installation Manual Addendum
[100] Flexible Numbering, COLR set/cancel
[419] Subscriber Number Assignment
[517] Connected Line Identification Restriction
81
D
4.2
DPT Features
Do Not Disturb (DND)
Allows you to prevent other parties from disturbing you. Your extension does not receive
intercom or outside calls.
Display Operation (— for KX-T7436 / KX-T7235)
Setting
1. Lift the handset or press the SP-PHONE button.
1
2. Press the FWD/DND button.
2
FWD/DND
3
F2
DND
(→0/ /ext)
3. Press the Do Not Disturb (F2) button.
F3
F4
4. Dial the extension number, 0 (to operator) for the backup station or
(no backup).
• You hear a confirmation tone and then a dial tone.
• The display shows:
F5
4
DND
extension number, 0 or
5
Extxxx
Extension number
5. Hang up or press the SP-PHONE button.
• The FWD/DND indicator light turns on.
Cancelling
1. Lift the handset or press the SP-PHONE button.
1
2
2. Press the FWD/DND button.
FWD/DND
3
F1
F2
FWD/DND Cancel
3. Press the FWD/DND Cancel (F1) button.
• You hear a confirmation tone and then a dial tone.
• The display shows:
F3
F4
FWD/DND
Cancel
F5
4
82
4. Hang up or press the SP-PHONE button.
• The FWD/DND indicator light turns off.
4.2
D
DPT Features
Standard Operation
Setting
1
1. Lift the handset or press the SP-PHONE/MONITOR button.
2
2. Press the FWD/DND button.
• You may dial the feature number (710) instead.
FWD/DND
3. Dial 1.
3
1
4. Dial the extension number, 0 (to operator) for the backup station or
(no backup).
• You hear a confirmation tone and then a dial tone.
• The display shows:
4
extension number, 0 or
DND
Extxxx
Extension number
5. Hang up or press the SP-PHONE/MONITOR button.
• The FWD/DND indicator light turns on.
5
Cancelling
1. Lift the handset or press the SP-PHONE/MONITOR button.
1
2. Press the FWD/DND button.
• You may dial the feature number (710) instead.
2
FWD/DND
3
0
4
3. Dial 0.
• You hear a confirmation tone and then a dial tone.
• This display shows:
FWD/DND
Cancel
4. Hang up or press the SP-PHONE/MONITOR button.
• The FWD/DND indicator light turns off.
83
D
4.2
DPT Features
Conditions
• If the extension is already set as the destination of the “Call Forwarding,” “Do Not Disturb
(DND)” and “Do Not Disturb for Direct Dial In Calls” features, you cannot set this feature
and when you set this feature, you hear a reorder tone.
• When this feature is set, an incoming outside call (directed by Intercept Routing or DIL 1:1
extension) will be automatically transferred to the backup station (pre-assigned extension).
An incoming intercom call will send the DND tone to your extension.
• This feature does not work for the following calls: doorphone calls; recalls for hold; Timed
Reminder alarm.
• While the operator is set as the destination of the “Do Not Disturb (DND)” feature, even if
the operator is different from Day mode and Night mode, an incoming call will be
transferred to an operator. If the operator is not assigned, an incoming call will be
transferred to the IRNA.
• When this feature is set, “Call Forwarding” and “Do Not Disturb for Direct Dial In Calls”
features are cancelled.
• A calling extension that has “Do Not Disturb (DND) Override” enabled can override your
extension when it is set to “Do Not Disturb (DND)” mode.
• If the destination extension has DND activated, then DSS button corresponding to it will
light up red. This indicates to the proprietary telephone or DSS console user that the
destination extension is unavailable.
• A flexible button on the KX-T7250 (no FWD/DND button provided) can be assigned as the
FWD/DND button.
Programming References
• Station Programming (Section 2)
Flexible Button Assignment — FWD/DND Button
(System Programming — [005] (Installation Manual) can be used for this assignment.)
Feature References
Call Forwarding
Do Not Disturb (DND) Override
Do Not Disturb for Direct Dialling In Calls
Intercept Routing (→ see Installation Manual)
84
4.2
DPT Features
D
Do Not Disturb for Direct Dialling In Calls
You can set “Do Not Disturb (DND)” feature for Direct Dialling In (DDI) calls. Direct
Dialling In calls will be transferred to the operator. The operator cannot set this feature.
Setting
1. Lift the handset or press the SP-PHONE/MONITOR button.
1
2
5
4
1
2. Dial the feature number (54) and 1.
• You hear a confirmation tone and then a dial tone.
• The display shows:
DND-DDI Set
• The FWD/DND indicator light turns on.
3
3. Hang up or press the SP-PHONE/MONITOR button.
Cancelling
1. Lift the handset or press the SP-PHONE/MONITOR button.
1
2
4
5
0
2. Dial the feature number (54) and 0.
• You hear a confirmation tone and then a dial tone.
• The display shows:
DND-DDI Cancel
• The FWD/DND indicator light turns off.
3
3. Hang up or press the SP-PHONE/MONITOR button.
Conditions
• When this feature is set, an incoming call (directed by Intercept Routing or DIL 1:1, DIL
1:N) can be answered.
• Even if this feature is set, your extension does not deny Direct Dialling In calls in the
following cases:
1) The destination of DDI calls is UCD.
2) The destination of DDI calls is the Hunting group member that is set this feature.
• If the destination extension has DND activated, then the DSS button corresponding to it will
light up red. This indicates to the proprietary telephone or DSS console user that the
destination extension is unavailable.
85
D
4.2
DPT Features
• If the operator is assigned different from Day mode and Night mode, Direct Dialling In calls
will be transferred to an operator. If the operator is not assigned, Direct Dialling In calls
will be transferred to the IRNA.
• When you set this feature, “Call Forwarding” and “Do Not Disturb (DND)” features will be
cancelled.
• When this feature is set, if you go off-hook, you will hear a special dial tone.
Feature References
Call Forwarding
Do Not Disturb (DND)
Do Not Disturb (DND) Override
Direct Dialling In (DDI) (→ see Installation Manual)
86
4.2
D
DPT Features
Doorphone Call
Allows you to have a conversation with a visitor at your doorphone. You can also unlock
the door from your telephone.
Calling an extension from a doorphone
1. Press the Doorphone button.
• The visitor hears a beep.
• Wait for an answer and talk.
1
Answering a doorphone call
When you hear the doorphone ring tone at the extension;
1. Lift the handset or press the SP-PHONE button.
1
Calling a doorphone
1. Lift the handset or press the SP-PHONE/MONITOR button.
1
2. Dial the feature number (61).
2
1
6
3
doorphone number
3. Dial a doorphone number (1 or 2) or (1 through 4) as follows.
– 1 or 2:
if you are connected to the KX-TD816
– 1 through 4: if you are connected to the KX-TD1232
• You can talk after you hear a confirmation tone.
• The display shows:
Doorphone X
Doorphone number
To unlock the door from an assigned extension
1. Lift the handset or press the SP-PHONE/MONITOR button.
1
2. Dial the feature number (55).
2
5
5
87
D
4.2
3
door opener number
4
DPT Features
3. Dial a door opener number (1 or 2) or (1 through 4) as follows.
– 1 or 2:
if you are connected to the KX-TD816
– 1 through 4: if you are connected to the KX-TD1232
• You hear a confirmation tone.
• The door is left unlocked for 5 seconds.
• The display shows:
Door 1 Open
4. Hang up or press the SP-PHONE/MONITOR button.
To unlock the door while talking to the doorphone from any extension
1
5
2
1. Dial 5.
• You hear a confirmation tone.
• The door is left unlocked for 5 seconds.
• The display shows:
Door 1 Open
2. Hang up or press the SP-PHONE button.
Conditions
• If you dial 5 again while the door is open, the door will stay open for another five seconds.
• If you do not answer an incoming doorphone call within thirty seconds, the call is cancelled.
• You must program the extensions that can receive calls from each doorphone for day and
night mode.
• “Class of Service” programming determines the extension that can unlock the door.
• It is possible for any extension user to originate a call to a doorphone.
• The door opener 1 through 4 can be unlocked using the feature number, while the doors
which are paired with the doorphone 1 through 4 can be unlocked while talking to the
doorphone.
• For the KX-TD1232, door openers 1 and 2 and doorphones 1 and 2 are related to the master
cabinet, and door openers 3 and 4 and doorphones 3 and 4 are related to the slave cabinet.
Programming References
• System Programming — Installation Manual & Installation Manual Addendum
[122] Automatic Door Open Assignment
[511] Door Opener Access
[607]–[608] Doorphone Ringing Assignment — Day/Night
[625]–[626] Doorphone Call Forwarding — Day/Night
88
4.2
D
DPT Features
Doorphone Call Forwarding to CO Line
You can have incoming doorphone calls forwarded to outside parties using ISDN lines.
You can choose a different destination for Day mode and Night mode.
Some extensions may be restricted.
Setting / Cancelling (at the extension receiving doorphone calls)
1. Lift the handset or press the SP-PHONE button.
1
2. Dial 716.
2
1
7
6
3. Dial a specific doorphone number (1-4) or
- 1-4 : doorphone number
- : for all
3
4. Dial 1 or 0.
- 1 : to set
- 0 : to cancel
doorphone number or
4
1
or
for all.
0
5
5. Hang up or press the SP-PHONE/MONITOR button.
To store the phone number
1. Lift the handset or press the SP-PHONE button.
1
2. Dial 715.
2
1
7
5
3
0
or
3. Dial 0 or 1.
- 0 : for Day
- 1 : for Night
1
89
D
4.2
4
DPT Features
4. Dial specific doorphone number (1-4) or
for all.
doorphone number or
5. Dial the line access code (9 or 81 through 88).
5
line access code
6. Dial a phone number and #.
6
phone number and #
7
7. Hang up or press the SP-PHONE/MONITOR button.
To clear the phone number
1. Lift the handset or press the SP-PHONE/MONITOR button.
1
2. Dial 715.
2
1
7
5
3
0
or
3. Dial 0 or 1.
– 0: for Day
– 1 : for Night
1
4
4. Dial specific doorphone number (1-4) or
doorphone number or
for all.
5. Dial #.
5
6. Hang up or press the SP-PHONE/MONITOR button.
6
90
4.2
DPT Features
D
Conditions
• You can set or cancel this features by simply pressing the Doorphne Call Forwarding to
Outside Line button.
If set, the button light turns red.
• Time limit
A call between a party at a doorphone and an outside party is restricted by the system timer
(Default: 0 sec.). The call is disconnected when the time runs out.
Programming References
• System Programming — Installation Manual & Installation Manual Addendum
[005] Flexible CO Button Assignment
[021]-[022] Doorphone Call Forwarding — Day/Night
[100] Flexible Numbering, Doorphone call forwarding to CO line / Doorphone call
forwarding mode switch
[218] Doorphone-to-CO Line Call Duration Time
[521] Doorphone Call Forwarding to CO Line
[607]–[608] Doorphone Ringing Assignment — Day/Night
[990] System Additional Information, Area 06 – Bit 14
91
E
4.2
DPT Features
Emergency Call
Allows you to make an emergency call without dial restriction. You can store up to ten
emergency numbers.
Dialling
1. Lift the handset or press the SP-PHONE/MONITOR button.
• You hear a dial tone.
1
2. Press a CO button or dial the line access code (9 or 81 through 88).
2
CO
3. Dial the desired emergency number.
3
emergency number
Conditions
• An emergency call will override any toll restriction level, including the “Electronic Station
Lockout” feature, and the account code mode, “Verified — All Calls” or “Verified — Toll
Restriction Override.”
Programming References
• System Programming — Installation Manual
[311] Emergency Dial Set
92
4.2
DPT Features
H
Handset Microphone Mute
Allows you to turn off the handset microphone so you can consult privately with others in
the room. You will still be able to hear the other party.
This feature is only available for KX-T7400 series telephone users.
Setting
1
AUTO ANSWER
MUTE
or
During a conversation using the handset
1. Press the AUTO ANSWER/MUTE or
VOICE CALL/MUTE button.
• The AUTO ANSWER/MUTE or VOICE CALL/MUTE indicator
light flashes red slowly.
VOICE CALL
MUTE
Cancelling
1
AUTO ANSWER
MUTE
or
When handset microphone mute is established
1. Press the AUTO ANSWER/MUTE or
VOICE CALL/MUTE button.
• The AUTO ANSWER/MUTE or VOICE CALL/MUTE indicator
light turns off.
VOICE CALL
MUTE
Conditions
• This feature is only available during a conversation with the handset.
93
H
4.2
DPT Features
Hotel Application
Room Management
Allows you to print out the information of a guest room (e.g., cleaning status of the room
and the total of the minibar charge) with a telephone in each room. Messages No.6-No.9 can
be printed out.
<Example> Message 7: “Cleaned-up”
1. Lift the handset or press the SP-PHONE/MONITOR button.
1
2. Dial the feature number (750) and 7.
2
7
5
0
3. Hang up or press SP-PHONE/MONITOR button.
7
3
<Example> Message 8: “Minibar $ %%%.%”
1. Lift the handset or press the SP-PHONE/MONITOR button.
1
2. Dial the feature number (750) and 8.
2
7
5
0
3. Enter the minibar charge.
8
3
4. Hang up or press SP-PHONE/MONITOR button.
minibar charge
4
94
4.2
H
DPT Features
Data similar to below is printed out.
Date
Time
Ext
CO Dial Number
24.03.95
14:09
221
Cleaned-up
24.03.95
10:23
230
Minibar $535.5
ANS
Duration
Cost
Acc
CD
Conditions
• System Programming is required to program the messages.
• This operation is the same as the Absent Message feature.
• It is necessary to assign [990] “System Additional Information, Field (34)” through System
Programming beforehand.
Programming References
• System Programming — Installation Manual & Installation Manual Addendum
[008] Absent Messages
[990] System Additional Information, Field (34)
95
I
4.2
DPT Features
ISDN Network Service Access
Allows you to access a service which is provided from the ISDN network.
Using the flexible button
1. Lift the handset or press the SP-PHONE/MONITOR button.
1
2. Press a CO button or dial the line access code (9 or 81 through 88).
2
CO
3
3. Press the flexible button which is assigned as the ISDN Service
button.
4
4. Hang up or press the SP-PHONE/MONITOR button.
Using the FWD/DND button
1. Lift the handset or press the SP-PHONE/MONITOR button.
1
2. Press a CO button or dial the line access code (9 or 81 through 88).
2
CO
3. Press the FWD/DND button.
3
FWD/DND
4. Dial the specified service number for the ISDN service.
4
5. Press the FWD/DND button.
Specified service number
5
FWD/DND
6
96
6. Hang up or press the SP-PHONE/MONITOR button.
4.2
DPT Features
I
Condition
• For more information about the ISDN network services or the specific numbers, please
consult with your ISDN network suppliers.
Programming References
• Station Programming (Section 2)
Flexible Button Assignment — ISDN Service Button
(System Programming–[005] (Installation Manual) can be used for this assignment.)
97
L
4.2
DPT Features
Live Call Screening (LCS)†
Allows a digital proprietary telephone user to monitor his voice mailbox while incoming
callers are leaving a message and, if desired, intercept the call.
Preparation
• Setting the Password
• Assigning the Live Call Screening (LCS) button (Station Programming)
• Selecting the mode, either Hands-free or Private (Station Programming)
The flowchart of the Live Call Screening (LCS) feature
To set LCS on
• Press the LCS button.
• Enter the password.
To cancel LCS
Press the LCS button.
Private Mode
Hands-free Mode
During a conversation
(Alert Tone)
(Call Waiting Tone)
To monitor
To stop the alert tone
To monitor
Hang up*.
(No operation)
To stop monitoring
Press RECALL or the
LCS Cancel button.
Press the SP-PHONE
/MONITOR or LCS
button.
Lift the handset.
To answer the call
Lift the handset.
Press LCS or the
SP-PHONE button.
Press the LCS
Cancel button.
To stop monitoring
Press RECALL or the Hang up.
LCS Cancel button.
*: To hold the current call temporarily, press the HOLD button.
To return to the held call, press the CO button whose indicator light flashes green slowly.
• The shaped areas are for the Hands-free operation.
98
†: Available when the Digital Super Hybrid System is connected to a Digital
Proprietary Telephone capable Panasonic Voice Processing System
(one that supports digital proprietary telephone integration; e.g. KX-TVP100).
4.2
L
DPT Features
Setting the password
1. Lift the handset or press the SP-PHONE/MONITOR button.
1
2. Dial the feature number (799).
2
7
9
9
3. Enter the password (000 through 999).
3
4. Enter the same password again.
• You hear a confirmation tone and then a dial tone.
• The display shows:
password
4
Password: xxx
— (xxx: password)
5. Hang up or press the SP-PHONE/MONITOR button.
(To change your password, you must follow the instructions below
for “Cancelling the password”)
password
5
Cancelling the password
1. Lift the handset or press the SP-PHONE/MONITOR button.
1
2. Dial the feature number (799).
2
7
9
9
3. Enter the password (000 through 999).
• You hear a confirmation tone and then a dial tone.
• The display shows:
3
Password Cancel
password
4
4. Hang up or press the SP-PHONE/MONITOR button.
99
L
4.2
DPT Features
Setting Live Call Screening
1
LCS
When the telephone is idle and on-hook;
1. Press the Live Call Screening button.
• The display shows:
LCS
2
2. Enter the password (000 through 999).
• The Live Call Screening indicator light turns red.
password
Cancelling Live Call Screening
While the telephone is idle and on-hook;
1. Press the Live Call Screening button.
• The Live Call Screening indicator light turns off.
1
LCS
In the Hands-free mode:
When callers are connected to your voice mailbox, message recording is monitored
automatically through your extension speaker. While monitoring in the Hands-free mode,
the Live Call Screening indicator light flashes green slowly.
Having a conversation with the party
1. Lift the handset or press the SP-PHONE/MONITOR button, or
press the Live Call Screening button.
• The Live Call Screening indicator light turns steady red from
flashing green slowly.
• In the Keep Record mode, the Two-Way Record indicator turns
on. Pressing the Two-Way Record button cancels the recording
and the light turns off.
1
Stopping monitoring
1
RECALL
100
1. Press the RECALL button or the Live Call Screening Cancel
button.
• The Live Call Screening indicator light turns steady red from
flashing green slowly.
4.2
DPT Features
L
In the Private mode:
When a caller is connected to your voice mailbox, an alert tone is sent. The Live Call
Screening indicator light flashes green rapidly when a caller is connected to your voice
mailbox. (When using a single line telephone, which is connected to a proprietary telephone
in parallel, the single line telephone will ring.)
Stopping the alert tone
1
RECALL
1. Press the RECALL button or the Live Call Screening Cancel
button.
• The Live Call Screening indicator light turns steady red from
flashing green rapidly.
• The alert tone stops.
Monitoring the message recording
1. Lift the handset or press the SP-PHONE/MONITOR button, the
flashing Live Call Screening button or INTERCOM button.
(When using a single line telephone, which is connected to a
proprietary telephone in parallel, only the handset is available).
• The Live Call Screening indicator light flashes green slowly.
• To stop monitoring, lift the handset. The RECALL button or the
Live Call Screening Cancel button can be also used to stop
monitoring. The Live Call Screening indicator light turns steady
red from flashing green slowly.
1
Having a conversation with the party
1. Lift the handset or press the SP-PHONE/MONITOR button.
1
2
LCS
2. Press the flashing Live Call Screening button. (When using a single
line telephone, which is connected to a proprietary telephone in
parallel, flash the hookswitch instead.)
• The Live Call Screening indicator light turns steady red from
green flashing slowly.
• In the Keep Record mode, the Two-Way Record indicator light
turns on.
101
L
4.2
DPT Features
While having a conversation with another party:
When the extension user is having a conversation, a call waiting tone is sent. The Live Call
Screening indicator light flashes green rapidly.
- If you want to terminate the current call
Monitoring
1
1. Hang up or press the SP-PHONE/MONITOR button.
• An alert tone is sent.
2
2. Lift the handset or press the SP-PHONE/MONITOR button.
• Monitoring begins.
Having a conversation with the party
1. Press the flashing Live Call Screening button.
1
LCS
- If you want to hold the current call
Monitoring
1. Press the HOLD button.
1
HOLD
2. Hang up or press the SP-PHONE/MONITOR button.
• An alert tone is sent.
2
3
3. Lift the handset or press the SP-PHONE/MONITOR button.
• Monitoring begins.
Having a conversation with the party
1. Press the flashing Live Call Screening button.
1
LCS
102
4.2
DPT Features
L
Conditions
• A flexible CO and DSS button can be assigned as a Live Call Screening button.
• The Live Call Screening indicator shows the feature status as below;
Red steadily......................Live Call Screening mode is on.
Off ...................................Live Call Screening mode is off.
Flashing green slowly ......Live Call Screening is active.**
Flashing green rapidly......An alert tone is ringing in the Private mode.**
** The DSS button indicator lights steady red while the Live Call Screening is active.
• The Two-Way Record indicator shows the feature status as below;
On.....................................Recording the conversation.
Off ....................................Not recording.
• The operator can clear the password at any extension in Station Programming.
• In the Keep Record mode, if you want to stop recording the conversation, press the TwoWay Recording button.
Programming References
• Station Programming (Section 2)
Flexible Button Assignment — Live Call Screening Button, Live Call Screening Cancel
Button, Two-Way Record Button
(System Programming — [005] can be used for this assignment.)
Live Call Screening Mode Setting
• System Programming — Installation Manual Addendum
[617] Live Call Screening Recording Mode Assignment
Feature References
Live Call Screening Password Control (4.3/Operator Service Features)
103
L
4.2
DPT Features
Log-In / Log-Out
Allows you to assign the Log-In mode or Log-Out mode within the hunting or UCD (Uniform
Call Distribution) group. When in the Log-Out mode, you can leave the group temporarily,
preventing hunting calls from being sent to your extension. The lighting patterns of the LogIn / Log-Out button and status are as follows.
Off : Log-In mode
Red : Log-Out mode
Flashing red moderately : Calls in an UCD queue
Log-In / Log-Out (Using the Log-In / Log-Out button)
1. Lift the handset or press the SP-PHONE/MONITOR button.
1
2. Press the flexible button which is assigned as
the Log-In / Log-Out button.
• You hear a confirmation tone and then a dial tone.
• The indicator light turns off in Log-In mode or turns steady red in
Log-Out mode.
2
3
3. Hang up or press the SP-PHONE/MONITOR button.
Log-In / Log-Out (Using the feature number)
1. Lift the handset or press the SP-PHONE/MONITOR button.
1
2. Dial the feature number (45).
2
5
4
3
1
or
0
4
hunting group extension number
5
3. Dial 1 or 0.
- 1 : for Log-In mode
- 0 : for Log-Out mode
4. Dial the hunting group extension number.
• You can press to select all the hunting groups.
• You hear a confirmation tone and then a dial tone.
• The display shows:
Log-in Grpxxxx
or
Log-out Grpxxxx
5. Hang up or press the SP-PHONE/MONITOR button.
104
4.2
DPT Features
L
Conditions
• The Log-In / Log-Out button can be assigned to a flexible CO button.
Programming References
• Station Programming (Section 2)
Flexible Button Assignment — Log-In / Log-Out Button
(System Programming — [005] (Installation Manual) can be used for this assignment.)
Feature References
Station Hunting (→ see Installation Manual)
Uniform Call Distribution (UCD)
105
N
4.2
DPT Features
Night Service
This system supports both the Night and Day modes of operation. The system operation for
originating and receiving calls can be different in night and day modes. Toll restriction calls
can be programmed to prevent unauthorized toll calls at night. Day/Night mode can be
switched manually at anytime desired. If your extension is assigned as an operator, you can
perform the operation using the display.
Manual Night Service
1. Lift the handset or press the SP-PHONE/MONITOR button.
1
2. Dial the feature number (78).
2
8
7
3
0
or
1
4
3. Dial 0 or 1.
- 0 : from Night mode to Day mode
- 1 : from Day mode to Night mode
• You hear a confirmation tone.
• The display shows:
Night Mode
or
Day Mode
4. Hang up or press the SP-PHONE/MONITOR button.
Confirming the current mode (with a display PT only)
1
When the telephone is idle;
1. Press #.
• The display shows the current mode for 3 seconds.
Night Button Operation
1
2
106
To set/cancel the night mode;
1. Lift the handset or press the SP-PHONE/MONITOR button.
2. Press the Night button.
- To set : The Night button indicator light turns on.
- To cancel : The Night button indicator light turns off.
4.2
DPT Features
N
To check the current mode (with a display PT only);
1. Press the Night button.
• The display shows the current mode for 3 seconds.
1
Conditions
• The following items have separate day and night programming:
1) Outgoing Permitted CO Line Assignment
2) Direct In Lines (DIL)
3) Doorphone Ringing Assignment
4) Intercept Routing
5) Ringing, Delayed
6) Toll Restriction Level
7) Toll Restriction for System Speed Dialling
8) Operator Assignment
• “Class of Service” programming determines the extensions that can perform this feature.
• The Day/Night mode is automatically switched at a predetermined time (default: 9:00 a.m.
for all days of the week; 5:00 p.m. for all nights of the week) if automatic switching mode
is selected in System Programming.
Programming References
• System Programming — Installation Manual & Installation Manual Addendum
[100] Flexible Numbering, Night service mode
[102] Day/Night Service Starting Time
[513] Night Service Access
[601] Class of Service
Feature References
CO Line Connection Assignment — Outgoing (→ see Installation Manual)
Direct In Lines (DIL) (→ see Installation Manual)
Doorphone Call
Intercept Routing (→ see Installation Manual Addendum)
Ringing, Delayed (→ see Installation Manual)
System Feature Access Menu — Night Service (4.4/Special Display Features)
Toll Restriction (→ see Installation Manual)
107
N
4.2
DPT Features
Notebook Function
Allows you to store an outside phone number in memory during a conversation with an
outside party or on-hook status.
The stored number is dialled automatically with a simple operation.
Storing
1
AUTO DIAL
STORE
2
AUTO DIAL
While having a conversation or in on-hook status;
1. Press the AUTO DIAL/STORE button.
• The AUTO DIAL/STORE indicator light turns red.
2. Press the AUTO DIAL/STORE button again.
• The AUTO DIAL/STORE indicator light flashes red.
STORE
3. Dial the desired phone number.
3
phone number
4. Press the flexible button which is assigned as the SAVE button.
4
Dialling
— When you want to dial the stored number;
1. Lift the handset or press the SP-PHONE/MONITOR button.
1
2
2. Press the flexible button which is assigned as the SAVE button.
• The CO indicator light turns green.
Conditions
• When you dial the stored telephone number of an outside party, you do not need to dial (9
or 81 through 88) as the leading digit.
• The same CO line is selected when redialling the number. If the line is busy, the busy tone
is sent.
• The pause, if programmed, can be inserted between the CO line access number and the
following phone number (Automatic Pause Insertion).
• Up to 24 digits long can be stored in the notebook function.
• “ ” and “#” are counted as one digit.
108
4.2
DPT Features
O
Off-Hook Call Announcement (OHCA)
Allows you to signal a busy extension that your call is waiting. Your voice is received
through the built-in speaker of the called party’s telephone (KX-T7235 and KX-T7436
only). The called party can connect to the two parties and carry two independent
conversations.
Setting / Cancelling to receive OHCA
1. Lift the handset or press the SP-PHONE button.
1
2. Enter the feature number (731).
2
1
3
7
3. Dial 2 or 0.
- 2 : to set
- 0 : to cancel
• You hear a confirmation tone and then a dial tone.
3
2
or
0
4
4. Hang up or press the SP-PHONE button.
Soft Button Operation
Executing
If you make an intercom call and hear a busy tone;
1. Press the BSS (S1) button.
• You can talk after you hear a confirmation tone.
1
BSS
S1
S2
S3
Standard Operation
Executing
If you make an intercom call and hear a busy tone;
1
2
1. Dial 2.
• You can talk after you hear a confirmation tone.
109
O
4.2
DPT Features
To talk to the third party
If you hear two beeps and a voice announcement;
1
1. Consult with the third party by microphone.
• The called extension display shows the calling extension’s
number or name for 5 seconds in 10 second intervals.
• You can talk to two parties independently.
To talk to the third party by terminating the current call
If you hear two beeps and a voice announcement;
1
1. Hang up.
• The current call is disconnected.
• The INTERCOM indicator light turns green.
• You can talk in handsfree mode.
To talk to the third party by holding the current call
If you hear two beeps and voice announcement;
1
HOLD
1. Press the HOLD button.
• The current call is placed on hold.
• The INTERCOM indicator light flashes green slowly.
Conditions
• Class of Service programming determines which extensions can perform this.
• This feature works when the called party is off-hook and the telephone INTERCOM button
is idle.
• You can select to receive a Call Waiting tone, OHCA, Whisper OHCA or none of these at
your extension.
• If the “Do Not Disturb (DND)” feature is set at the called extension, you must activate the
“Do Not Disturb (DND) Override” feature before OHCA is available.
Programming References
• System Programming — Installation Manual Addendum
[519] Off-Hook Call Announcement (OHCA)
Feature References
Busy Station Signaling (BSS)
Call Waiting
Whisper OHCA
110
4.2
DPT Features
O
Operator Call
Allows you to call an operator within the system. There can be up to two extensions
assigned as Operator 1 and 2.
If there is only one operator or if you do not specify the operator, you should generate the
General call. If you want to specify the operator, you should generate the Specific call by
pressing a pre-assigned operator call number.
General call
1. Lift the handset or press the SP-PHONE/MONITOR button.
1
2. Dial the feature number (0).
2
0
Specific call
1. Lift the handset or press the SP-PHONE/MONITOR button.
1
2. Dial the operator call number for each operator.
2
operator call number
Conditions
• If you generate the General call for two operators, Operator 2 will receive your call if
Operator 1 is busy.
• If an operator is not assigned, this feature is not available; you will hear the reorder tone.
Programming References
• System Programming — Installation Manual & Installation Manual Addendum
[006] Operator / Manager Extension Assignment — Day / Night
[100] Flexible Numbering, Operator call, Operator 1 call, Operator 2 call
111
P
4.2
DPT Features
Paging — DENY
A page sent to the built-in speaker can be denied by any extension in the system.
Setting
1
1. Lift the handset or press the SP-PHONE/MONITOR button.
2
2. Dial the feature number (721) and 1.
• The display shows:
7
2
1
1
Paging Deny On
3. Hang up or press the SP-PHONE/MONITOR button.
3
Cancelling
1
1. Lift the handset or press the SP-PHONE/MONITOR button.
2
2. Dial the feature number (721) and 0.
• The display shows:
7
0
3
112
2
1
Paging Deny Off
3. Hang up or press the SP-PHONE/MONITOR button.
4.2
DPT Features
P
Phantom Extension
Allows you to route calls to a phantom extension. The call is sent to the extensions that
have the corresponding Phantom button.
A flexible CO or DSS button can be assigned as the Phantom button.
The lighting patterns of the Phantom button and status are as follows:
Off : Idle
Red : You are calling a phantom extension.
Flashing green rapidly : Incoming call
To call a phantom extension
While the Phantom button indicator light is off ;
1. Lift the handset or press the SP-PHONE/MONITOR button.
1
2. Press the Phantom button.
• You may dial the phantom extension number instead.
• The Phantom indicator light turns red (steady).
To transfer a call to a phantom extension
During a conversation with an outside party;
1. Press the Phantom button.
• You may dial the phantom extension number after pressing the
TRANSFER button instead.
1
To answer a phantom extension call
While the Phantom button indicator light is flashing green;
1. Press the Phantom button.
Conditions
• A phantom number must be assigned by System Programming before assigning the
Phantom button by Station Programming.
• If several extensions have the same phantom extension number, they will ring
simultaneously.
• A maximum of 128 phantom numbers can be assigned.
• The phantom number cannot be used for feature settings such as “Call Forwarding”.
• Phantom button on a DSS Console:
Allows the operator to transfer a call to a phantom extension by the phantom button on the
DSS Console. An incoming call cannot be received at the phantom button on the DSS
Console, only the indicator turns red.
113
P
4.2
DPT Features
Programming References
• Station Programming (Section 2)
Flexible Button Assignment — Phantom Button
• System Programming — Installation Manual Addendum
[130] Phantom Number Assignment
Predial Preparation (KX-T7436 / KX-T7433 / KX-T7235 / KX-T7230 only)
Allows you to confirm the phone number on the display before the line is connected.
1. Dial the phone number.
• The display shows the dialled telephone number.
<Example>
1
phone number
2
and re-enter
912345678
If you want to change the current entry;
2. Dial and re-enter.
• By pressing , the number at the right-hand edge is deleted.
<Example>
91234567
3
• By pressing the RECALL button, the entire number is cleared.
3. Lift the handset or press the SP-PHONE button, or press the CO
button.
• The system hunts the CO line and sends the dialled number.
Conditions
• Pressing CO button will cancel this feature if entered number does not have line access code
(9 or 81 through 88).
• If you press “ ” or “#” as a first digit of the phone number, this feature does not work.
• This feature will be cancelled, if you do the following operation during entering the phone
number.
a) Pressing the RECALL button.
b) Answering the incoming call (off-hook or pressing any button)
c) Retrieving the held call (off-hook or pressing any button)
114
4.2
DPT Features
Q
Quick Dialling
Allows you to make a quick dialling by pressing a pre-assigned quick dial number.
Dialling
1. Lift the handset or press the SP-PHONE/MONITOR button.
1
2. Dial the quick dial number.
2
quick dial number
Conditions
• Up to 80 quick dial numbers can be stored by System Programming.
• You must assign a feature number first in program [104] “Quick Dial Assignment,” and then
a quick dial number in program [009] “Quick Dial Number Set” in order for Quick Dial to
be effective.
• For example, Quick Dialling is convenient for room service calls in a hotel.
Programming References
• System Programming — Installation Manual Addendum
[009] Quick Dial Number Set
[104] Quick Dial Assignment
115
S
4.2
DPT Features
Station Feature Clear
Allows you to reset the following station features to the default settings.
a) Absent Message Capability
b) Automatic Callback Busy (Camp-On)
c) Background Music (BGM)
d) Call Forwarding
e) Call Pickup Deny
f) Call Waiting
g) Calling Line Identification Restriction (CLIR)
h) CO Incoming Call Information Log
i) Connected Line Identification Restriction (COLR)
j) Do Not Disturb (DND)
k) Log-In
l) Message Waiting – (All messages will be removed.)
m) Paging — DENY
n) Paralleled Telephone Connection
o) Pickup Dialling (Hot Line) – (The stored telephone number will be removed.)
p) Timed Reminder
Clearing current feature setting
1. Lift the handset or press the SP-PHONE/MONITOR button.
1
2
7
9
0
2. Dial the feature number (790).
• You hear a confirmation tone and then a dial tone.
• The display shows:
Ext Data Clear
3
3. Hang up or press the SP-PHONE/MONITOR button.
116
4.2
S
DPT Features
System Working Report
Allows you to print the system’s working state recorded in the system. Only the extensions
which are assigned as the manager or operator can perform this feature.
1. Lift the handset or press the SP-PHONE/MONITOR button.
1
2. Dial the feature number (794).
2
7
9
4
3
1
or
0
3. Dial 1 or 0.
- 1 : print out the data
- 0 : clear the data
• You hear a confirmation tone.
• The display shows:
SWR Data Dump
— (when printing out)
4
SWR Data Clear
— (when clearing)
4. Lift the handset or press SP-PHONE/MONITOR button.
Conditions
• You must connect the printer to the system when you print out the data.
Programming References
• System Programming — Installation Manual
[806]–[807] EIA (RS-232C) parameters — Port 1/Port 2
Feature References
System Working Report (→ see Installation Manual Addendum)
117
T
4.2
DPT Features
Terminate
Allows you to terminate the current outside call and make another call without hanging up.
Standard Operation
While hearing any tone, dialling, or talking;
1. Press the flexible button which is assigned as the Terminate button.
• You hear an internal dial tone.
1
2
or
CO
2. Dial the line access code (9 or 81 through 88), or press a CO button.
line access code
3. Dial the phone number.
3
phone number
Conditions
• When you dial the telephone number of an outside party, you must dial the line access code
(9 or 81 through 88) as the leading digit.
• Pressing the Terminate button disconnects the conversation, and outputs an SMDR record.
• The Terminate button can be assigned to a flexible CO button.
Programming References
• Station Programming (Section 2)
Flexible Button Assignment — Terminate Button
(System Programming — [005] (Installation Manual) can be used for this assignment.)
• System Programming — Installation Manual
[414] Disconnect Time
118
4.2
DPT Features
T
Toll Restriction Override for System Speed Dialling
Calls originated by “System Speed Dialling” are restricted depending on the extension’s toll
restriction level.
Programming References
• System Programming — Installation Manual Addendum
[509]–[510] Toll Restriction Level for System Speed Dialling — Day/Night
Feature References
System Speed Dialling
Toll Restriction (→ see Installation Manual)
119
T
4.2
DPT Features
Two-Way Recording into Voice Mail†
Allows you to record a conversation into your mailbox or a desired mailbox.
Recording into your mailbox
While having a conversation;
1. Press the Two-Way Record button.
• The Two-Way Record indicator light turns red.
1
Two-Way Rec
Stopping recording
1. Press the Two-Way Record button.
• The Two-Way Record indicator light turns off.
1
Two-Way Rec
Recording into another mailbox
While having a conversation;
1. Press the Two-Way Transfer button.
• The Two-Way Transfer indicator light turns red.
1
Two-Way TRS
2
2. Enter an extension number or press the desired DSS button.
extension number
Stopping recording
1. Press the Two-Way Transfer button.
• The Two-Way Transfer indicator light turns off.
1
Two-Way TRS
Conditions
• A flexible CO and DSS button can be assigned as the Two-Way Record button or the TwoWay Transfer button.
• Pressing the Two-Way Record button sends an alarm tone, if an idle voice mail port is not
available.
• Pressing the Two-Way Transfer button followed by an extension number sends alarm tone,
if an idle voice mail port is not available.
Programming References
• Station Programming (Section 2)
Flexible Button Assignment — Two-Way Record Button, Two-Way Transfer Button
(System Programming — [005] can be used for this assignment.)
120
†: Available when the Digital Super Hybrid System is connected to a Digital
Proprietary Telephone capable Panasonic Voice Processing System
(one that supports digital proprietary telephone integration; e.g. KX-TVP100).
4.2
DPT Features
U
Uniform Call Distribution (UCD)
Allows incoming calls to be distributed uniformly to a specific group of extensions called an
UCD group. Calls to an UCD group search for an idle extension in a circular way.
If all extensions in an UCD group are busy or not available, the incoming outside call will be
handled by the UCD Time Table.
Conditions
• UCD can be used in the following cases.
a) The floating number* of UCD is assigned as the Direct In Lines (DIL) 1:1 destination.
b) The floating number* of UCD is assigned as the Intercept Routing destination.
c) The floating number* of UCD is dialled from an extension.
d) The floating number* of UCD is assigned as the Direct Dialling In (DDI) destination.
e) The floating number* of UCD is assigned as the UCD Overflow destination.
• It is possible to set the log-in or log-out status on an extension basis.
Programming References
• System Programming — Installation Manual Addendum
[106] Station Hunting Type
[139] UCD Time Table
[813] Floating Number Assignment
Feature References
Log-In / Log-Out
* A Floating Number (FN) is a virtual extension number which appears to be an extension.
For more details, refer to the Installation Manual.
121
W
4.2
DPT Features
Whisper OHCA
Allows busy party notification through the handset. Only the handset will hear the notification.
Only KX-T7400 series telephone users can send or receive Whisper OHCA.
Setting / Cancelling to receive Whisper OHCA
1. Lift the handset or press the SP-PHONE button.
1
2. Enter the feature number (731).
2
1
3
7
3. Enter 3 or 0.
- 3 : to set Whisper OHCA
- 0 : to cancel
• You hear a confirmation tone and then a dial tone.
3
3
or
0
4
4. Hang up or press the SP-PHONE button.
Soft Button Operation
Executing
If you make an intercom call and hear a busy tone;
1. Press the BSS (S1) button.
• You can talk after you hear a confirmation tone.
1
BSS
S1
S2
S3
Standard Operation
Executing
If you make an intercom call and hear a busy tone;
1
2
1. Enter 2.
• You can talk after you hear a confirmation tone.
To talk to the third party by terminating the current call
1
If you hear two beeps and a voice announcement;
1. Hang up.
• The current call is disconnected.
• The INTERCOM indicator light turns green.
122
4.2
DPT Features
W
To talk to the third party by holding the current call
If you hear two beeps and voice announcement;
1
HOLD
1. Press the HOLD button.
• The current call is placed on hold.
• The INTERCOM indicator light flashes green slowly.
Conditions
• Class of Service programming determines which extensions can perform Whisper OHCA.
• The Whisper OHCA receiving extension display shows the calling extension’s number or
name for 5 seconds in 10 second intervals.
• You can select to receive a Call Waiting tone, OHCA, Whisper OHCA or none of these at
your extension.
• If the Whisper OHCA sender does not use a KX-T7400 series telephone, it will work as
OHCA. If the receiver does not use a KX-T7400 series telephone, it may not work properly.
(E.g. The announcement may be heard by the other party.)
• The receiving mode may shift depending on the settings on each telephone or the telephone
type.
<Example> If the user selects 3 (Whisper OHCA mode);
– If using a KX-T7436 handset ............................Whisper OHCA
– If using a KX-T7436 SP-PHONE......................Call Waiting
– Other...................................................................Call Waiting
• It is possible to enable the Whisper OHCA by any type of telephones by system
programming. However, it may not work properly. (E.g. the announcement may be heard
by the other party.)
• The Whisper OHCA sender will receive a ringback tone in the following cases.
– If the receiver presses the TRANSFER, CONF, SP-PHONE, DSS or CO button.
– If the party who is talking with the receiver disconnects the line or presses the TRANSFER,
CONF or HOLD button.
Programming References
• System Programming — Installation Manual Addendum
[519] Off-Hook Call Announcement (OHCA)
[990] System Additional Information, Field (61)
Feature References
Busy Station Signaling (BSS)
Call Waiting
Off-Hook Call Announcement (OHCA)
123
4.3
Operator Service Features
The system supports up to two operators. Any extension except for ISDN telephones can be
appointed as an operator. System Programming is necessary to appoint operators. The
extension assigned as an operator has the ability to perform the following features:
1) Alert Indication (Operator 1 only)
2) Automatic Overflow and Hurry-Up Transfer (Operator 1 only)
3) Background Music (BGM) — External
4) CO Incoming Call Information Log Lock Clear
5) Class of Service (COS) Switch
6) Remote Station Lock Control
7) Hotel Application
8) Live Call Screening Password Control†
Conditions
• The Direct Dialing In call which is denied to receive by the extension is forwarded to the
operator.
Programming References
• System Programming — Installation Manual
[006] Operator/Manager Extension Assignment — Day / Night
Alert Indication (KX-T7436 / KX-T7433 / KX-T7235 / KX-T7230 only)
The pre-warning message is displayed on LCD of Operator 1.
You can solve and access in the following ways.
Message
System Data Err 1
Meaning
Countermeasure
The system finds the wrong
system data with back up
RAM.
Re-assign the programming.
Contact your dealer.
-Err 1: for master system
-Err 2: for slave system
124
Check Printer
The paper of the Printer
SMDR runs out or the
printer is out-of-service.
Confirm the connection and
the paper in the printer.
System Link Down
System inter-connection is
down.
Contact your dealer.
†: Available when the Digital Super Hybrid System is connected to a Digital
Proprietary Telephone capable Panasonic Voice Processing System
(one that supports digital proprietary telephone integration; e.g. KX-TVP100).
4.3
Operator Service Features
Automatic Overflow and Hurry-Up Transfer
When Operator 1 is busy and the outside call reaches Operator 1 directly, the incoming call
can be held until the waiting queue is over the assigned number.* When the incoming call
overflows the assigned number,* the last call will be automatically transferred to Operator 2.
(Automatic Overflow)
Operator 1 can refer the waiting queue with LED indication, and transfer the first waiting
call to the pre-assigned extension. (Hurry-Up Transfer)
The Hurry-Up button indicator shows as follows:
— No call in the queue : The indicator light is off.
— More than one call in the queue : The indicator light is steady red.
— More than assigned number in the queue : The indicator light is flashing red rapidly.
Executing the Hurry-Up Transfer
While having a conversation;
1. Press the flexible button which is assigned as the Hurry-Up button.
• The first call in the queue will be transferred to the pre-assigned
extension.
1
Conditions
• A flexible button can be assigned as the Hurry-Up button.
• *: the number should be assigned through System Programming.
Feature References
• Station Programming (Section 2)
Flexible Button Assignment — Hurry-Up Button
(System Programming — [005] (Installation Manual) can be used for this assignment.)
• System Programming — Installation Manual Addendum
[129] Operator Queue
125
4.3
Operator Service Features
Class of Service (COS) Switch
The operator can assign primary and secondary status to the extensions through the COS
switch. As KX-T7436, KX-T7433 and KX-T7235 have “Display Operation”, refer to “4.4
Special Display, System Feature Access Menu”.
Primary switch
1. Lift the handset or press the SP-PHONE/MONITOR button.
1
2. Dial the feature number (791).
2
7
9
1
3
extension number
3. Dial the extension number.
• You hear a confirmation tone and then a dial tone.
• The display shows:
xxxx : Primary
— (xxxx : extension number)
4
4. Hang up or press the SP-PHONE/MONITOR button.
Secondary switch
1. Lift the handset or press the SP-PHONE/MONITOR button.
1
2. Dial the feature number (793).
2
7
9
3
3
extension number
3. Dial the extension number.
• You hear a confirmation tone and then a dial tone.
• The display shows:
xxxx : Secondary — (xxxx : extension number)
4
4. Hang up or press the SP-PHONE/MONITOR button.
Programming References
• System Programming — Installation Manual
[601] Class of Service
[991] COS Additional Information
126
4.3
Operator Service Features
CO Incoming Call Information Log Lock Clear
(KX-T7436 / KX-T7433 / KX-T7235 / KX-T7230 only)
The operator can clear the “CO Incoming Call Information Log Lock” feature on any
extension.
Programming
1. Press the PROGRAM button.
1
PROGRAM
2
9
9
2. Dial 99.
• You enter into the Station Programming mode.
• The display shows:
PT-PGM Mode
3
0
2
3. Dial 02.
4
extension number or
4. Dial the extension number or .
– extension number : to clear one extension
–
: to clear all extensions
5
AUTO DIAL
STORE
6
PROGRAM
or
5. Press the STORE button.
• The STORE indicator light turns on.
6. Press the PROGRAM button or lift the handset to exit from the
Station Programming mode.
Feature References
CO Incoming Call Information Log Lock
127
4.3
Operator Service Features
Remote Station Lock Control
The operator can set or clear the “Electronic Station Lockout” feature on any extension.
Programming
1. Press the PROGRAM button.
1
PROGRAM
2
9
9
2. Dial 99.
• You enter into the Station Programming mode.
• The display shows:
3
PT-PGM Mode
1
0
3. Dial 01.
4
extension number or
4. Dial the extension number or .
–extension number : to lock or unlock one extension
–
: to lock or unlock all extensions
5
1
or
2
6
AUTO DIAL
STORE
5. Dial 1 or 2.
- 1 : to unlock
- 2 : to lock
• The display shows:
<Example> If you dial extension number 1234 and then dial 2.
7
EXT1234: Lock
PROGRAM
or
6. Press the STORE button.
• The STORE indicator light turns on.
7. Press the PROGRAM button or lift the handset to exit from the
Station Programming mode.
Conditions
• This feature supersedes the “Electronic Station Lockout” feature. If “Electronic Station
Lockout” has already been set by the extension user and this feature is set, the extension
user cannot cancel the lock. Only the operator can cancel the lock.
Feature References
Electronic Station Lockout
128
4.3
Operator Service Features
Hotel Application (KX-T7436 / KX-T7235 only)
Allows the operator to handle the front/operator services such as check-in/check-out, timed
reminder (wake-up call) with the KX-T7436 or KX-T7235. It is required to enable the hotel
application by System Programming.
Check-In / Check-Out
The check-in mode activates the change to primary COS and also clears the charge counter
automatically. The check-out mode activates the change to secondary COS and also prints
out the charge counter, minibar and other expenses. While in the check-in mode, the DSS
button indicates the check-in room in stead of BLF.
Display Operation (— for KX-T7436 / KX-T7235 only)
Check-In
1. Press the Hotel (F10) button.
1
F9
Hotel
F10
2
F1
Check in
Check out
2. Press the Check-In (F1) button.
• DSS indicator in check-in mode turns red.
3. Dial the extension number or press the DSS button that you want to
check-in.
3
or
4. Press the NEXT (S3) button.
• If the extension number is already in check-in mode, this will be
cancelled.
• If you want to exit, press END (S1) button.
extension number
4
Check in Room: @2345
NEXT
END
S1
S2
S3
5
Check in Room: 2345
Really check-in?
NO
YES
S1
S2
5. Press the YES (S1) button or NO (S3) button.
– YES : The check-in extension’s charge counter is cleared and the
primary COS is activated. The display returns to the initial
display.
– NO : The display returns to step 2.
S3
129
4.3
Operator Service Features
Check-Out
1. Press the Hotel (F10) button.
1
F9
Hotel
F10
2. Press the Check-Out (F2) button.
• DSS indicator in check-out mode turns red.
2
F1
F2
Check out
3. Dial the extension number or press the DSS button that you want to
check-out.
3
4. Press the NEXT (S3) button.
• The display shows the charge.
or
extension number
F1
F2
4
NEXT
END
S1
S2
S3
5
F3
F4
F5
Check out Room: 2345
Telephone
00100.40
Minibar
00000.00
Others
00000.00
F6
F7
F8
F9
(0 : is blinking)
F10
END
PREV
PRINT
S1
S2
S3
• If you want to exit, press END (S1) button.
If you want to charge the minibar;
5. Enter the minibar charge.
minibar charge
6
F4
Others
If you want to charge Other expenses;
6. Press the Others (F4) button and enter the others charge.
F5
and
If you want to change the charge;
• Press the appropriate button {(F2) through (F4)} and enter the
charge.
others charge
7
PRINT
S1
S2
If you want to print out the charge;
7. Press the PRINT (S3) button.
S3
8. Press the END (S1) button.
8
END
S1
S2
S3
9
Check out Room: 2345
Really check-out?
NO
YES
S1
130
S2
S3
9. Press the YES (S1) button or NO (S3) button.
– YES : The check-in extension’s charge counter is left alone and the
secondary COS is activated. The display returns to the
initial display.
– NO : The display returns to step 2.
4.3
Operator Service Features
Data similar to below is printed out.
Check in : 30.Jan.99 17:30
Check out : 31.Jan.99 00:15
Room
: 201
Telephone
Minibar
Others
Total
11.22 (Tax
44000.33 (Tax
55.00 (Tax
0.0%=
0.0%=
0.0%=
0.0)
0.0)
0.0)
$44066.55 (Tax
Total=
0.0)
Conditions
• You must assign the Hotel Application feature through System Programming.
• While an extension is in check-in mode, you cannot enter check-in mode again on the same
extension.
• The LCD displays the telephone including the margin. You can enter the margin through
System Programming.
• The entered Minibar charge and Others charge do not remain in the system after completing
check-out.
• A new page will be ready after each printout.
Programming References
• System Programming — Installation Manual & Installation Manual Addendum
[010] Budget Management
[011] Charge Margin and Tax Rate
[123] Hotel Application
[990] System Additional Information, Field (33)
131
4.3
Operator Service Features
Timed Reminder, Notification for Unanswered Extension
(— KX-T7436 / KX-T7235 only)
If the guest does not answer the wake-up call, the Alert indicator will flash. Pressing the
Alert button informs you which extension did not answer his/her wake-up call.
1. Press the flexible button assigned as the Alert button.
1
2
Room: 2345
Wake up no answer
MENU
NEXT
CLR
S1
S2
S3
3
Room: 2345
Wake up no answer
MENU
NEXT
CLR
S1
If you want to clear the notification;
2. Press the CLR (S2) button.
S2
If you want to go to the next unanswered extension;
3. Press the NEXT (S3) button.
S3
4
Room: 2345
Wake up no answer
MENU
NEXT
CLR
S1
S2
If you want to exit;
4. Press the MENU (S1) button.
S3
Programming References
• Station Programming (Section 2)
Flexible Button Assignment — Alert Button
(System Programming — [005] (Installation Manual) can be used for this assignment.)
Feature References
Hotel Application — Timed Reminder, Remote (Wake-Up Call)
132
4.3
Operator Service Features
Timed Reminder, Remote (Wake-Up Call)
The operator can remotely set or cancel the Timed Reminder of the desired extension.
Display Operation (— KX-T7436 / KX-T7235 only)
Setting
1. Press the Hotel (F10) button.
1
Hotel
F10
2. Press the Wake up (F3) button.
2
Check in
Check out
Wake up
F3
3
3. Dial the extension number or press the desired DSS button to set
the wake-up reminder.
• If you want to exit, press the END (S1) button.
or
extension number
4
Wake up Room:
2345
4. Press the NEXT (S3) button.
• If the wake-up reminder is already set, the current time is
displayed. If not, the time is blank.
NEXT
S1
S2
S3
5. Enter the hour (01 through 12) and minute (00 through 59).
5
6. Dial 0 to enter AM, or 1 to enter PM.
hour and minute
6
0
or
1
0
or
1
7
8
7. Dial 0 for one time alarm setting,*1 or dial 1 for a daily alarm
setting.*2
• You hear a confirmation tone.
*1 You hear an alarm ringing at the preset time and then the setting is cleared.
*2 You hear an alarm ringing at the preset time every day until the setting is
changed or cancelled.
Wake up Room:
2345
Time(hh:mm): 07:00
AM/PM(0/1):
Daily Y/N(1/0): 0
END
CLR
PROG
S1
S2
S3
8. Press the PROG (S3) button.
133
4.3
Operator Service Features
Cancelling
1. Press the Hotel (F10) button.
1
F9
Hotel
F10
2. Press the Wake up (F3) button.
2
F3
Check in
Check out
Wake up
3. Dial the extension number or press the DSS button.
3
or
4. Press the NEXT (S3) button.
extension number
4
Wake up Room:
5. Press the CLR (S2) button.
2345
NEXT
S1
S2
S3
5
CLR
S1
S2
S3
Checking the setting time
1. Press the Hotel (F10) button.
1
F9
Hotel
F10
2. Press the Wake up (F3) button.
2
F3
Check in
Check out
Wake up
3. Dial the extension number or press the DSS button.
3
or
4. Press the NEXT (S3) button.
• The setting time is displayed.
extension number
4
Wake up Room:
2345
NEXT
S1
S2
S3
S2
S3
5
END
S1
134
5. Press the END (S1) button.
4.3
Operator Service Features
Standard Operation
Setting
1. Lift the handset or press the SP-PHONE/MONITOR button.
1
2. Dial the feature number (7 ) and 1.
2
7
1
3. Dial the desired extension number or DSS button.
3
or
4. Enter the hour (01 through 12) and the minute (00 through 59).
extension number
4
5. Dial 0 to enter AM, or 1 to enter PM.
6. Dial 0 for one time alarm setting,*1 or dial 1 for daily alarm setting.*2
• You hear a confirmation tone.
*1 You hear an alarm ringing at the preset time and then the setting is cleared.
*2 You hear an alarm ringing at the preset time every day until the setting is
hour and minute
5
0
or
1
0
or
1
6
changed or cancelled.
7. Hang up or press the SP-PHONE/MONITOR button.
7
Cancelling
1. Lift the handset or press the SP-PHONE/MONITOR button.
1
2. Dial the feature number (7 ) and 0.
2
7
0
3
or
extension number
3. Dial the desired extension number or DSS button on which you
have set the Timed Reminder.
• You hear a confirmation tone and then a dial tone.
• The display shows:
Alarm Cancelled
4
4. Hang up or press the SP-PHONE/MONITOR button.
135
4.3
Operator Service Features
Checking the setting time (with a display PT only)
1. Lift the handset or press the SP-PHONE button.
1
2. Dial the feature number (7 ) and 2.
2
7
2
3
or
3. Dial the desired extension number or DSS button on which you
have set the Timed Reminder.
<Example>
If “10:10” has been set, the display shows:
extension number
Alarm
10:10AM
— only one time
4
or
Alarm
10:10AM
— everyday
4. Hang up or press the SP-PHONE button.
Conditions
• The system clock must be set beforehand.
Programming References
• System Programming — Installation Manual
[100] Flexible Numbering, Timed Reminder, Remote
Feature References
Timed Reminder
136
4.3
Operator Service Features
Live Call Screening Password Control†
The operator can clear the password of Live Call Screening on any extension. If you forget
the pre-set password, you may ask the operator to clear
the password for you.
1. Press the PROGRAM button.
1
PROGRAM
2
9
9
2. Dial 99.
• You enter into the Station Programming mode.
• The display shows:
3
PT-PGM Mode
0
3
3. Dial 03.
4
extension number or
5
AUTO DIAL
4. Dial the extension number or .
–extension number : to clear the password of the extension
–
: to clear the password of all extensions
• The display shows:
<Example>
STORE
6
PROGRAM
or
EXT1234:Cancel?
5. Press the STORE button.
• The STORE indicator light turns on.
6. Press the PROGRAM button or lift the handset to exit the Station
Programming mode.
Feature References
Live Call Screening (LCS)
†: Available when the Digital Super Hybrid System is connected to a Digital
Proprietary Telephone capable Panasonic Voice Processing System
(one that supports digital proprietary telephone integration; e.g. KX-TVP100).
137
4.3
Operator Service Features
Outgoing Message (OGM)
The operator can record or play back outgoing voice messages. There are two types of
outgoing messages that can be recorded.
UCD message:
If assigned in the UCD table, this message is played when all extensions in an UCD
group are busy or not available. There are four different UCD messages.
Timed Reminder message:
This is played when answering the Timed Reminder alarm (often used as a wake-up call).
There is only one Timed Reminder message.
Recording a message
1. Lift the handset or press the SP-PHONE/MONITOR button.
1
2. Dial the feature number (712) and 1.
2
7
1
1
3. Dial the OGM number (1 through 4).
• The display shows:
OGM 2
Rec.:00
Time counter (seconds)
3
OGM number
4
OGM number selected
(1 through 4)
• The STORE indicator light flashes red slowly; recording starts
after the confirmation tone.
4. Record the message.
5
AUTO DIAL
STORE
6
AUTO DIAL
STORE
7
2
5. Press the STORE button to stop recording or record for the preset
recording duration.
• The STORE indicator light turns steady red.
• You hear a confirmation tone; the recorded message will be
played back automatically.
• The display shows:
<Example>
OGM 2
Play:10
6. Press the STORE button or wait until playback is finished.
• The STORE indicator light turns off.
• You hear a confirmation tone and then a dial tone.
7. Hang up or press the SP-PHONE button.
138
4.3
Operator Service Features
Playing back a message
1. Lift the handset or press the SP-PHONE/MONITOR button.
1
2. Dial the feature number (712) and 2.
2
1
7
2
2
3
OGM number
4
AUTO DIAL
STORE
5
3. Dial the OGM number (1 through 4).
• You hear a confirmation tone.
• The STORE indicator lights.
• The message is played back; the counter starts.
• The display shows:
<Example>
OGM 1
Play:10
Time counter (seconds)
OGM number selected
(1 through 4)
4. Press the STORE button or wait until playback is finished.
• The STORE indicator light turns off.
• You hear a confirmation tone and then a dial tone.
5. Hang up or press the SP-PHONE/MONITOR button.
Conditions
• You can select a maximum recording time of 0/16/32/64 seconds for each message (Outgoing
Message Time). The total length must be under sixty four seconds.
• To use the Timed Reminder message, you must select the recorded OGM number by System
Programming.
Programming References
• System Programming — Installation Manual Addendum
[216] Outgoing Message Time
[818] Timed Reminder Message Assignment
Feature References
Timed Reminder
Uniform Call Distribution (UCD)
139
4.4
Special Display Features
How to Use the Display
With display telephones, KX-T7230, KX-T7235, KX-T7433 and KX-T7436, you can easily
access several features.
Display telephones have the ability to perform the following features.
Feature
KX-T7230 KX-T7235 KX-T7433 KX-T7436
✔
Call Forwarding / Do Not Disturb*1
CO Incoming Call Information Log*1
✔
✔
✔
✔
✔
CO Outgoing Call Log
✔
✔
Extension Dialling
✔
Hotel Application (operator only)*2
✔
Station Speed Dialling
✔
✔
✔
System Speed Dialling
✔
✔
✔
System Feature Access Menu
✔
✔
✔
✔
✔
✔
“✔” indicates the features is available.
*1: Please refer to the corresponding feature in Section 4.2, “DPT Features.”
*2: Please refer to the corresponding feature in Section 4.3, “Operator Service Features.”
*1 *2: KX-T7433 user should follow the procedures for the KX-T7230, while KX-T7436 user
should follow the procedures for the KX-T7235.
Soft Buttons and SHIFT Button
Three soft buttons are provided right below the display on display DPTs, KX-T7230, KXT7235, KX-T7433 and KX-T7436. The functions which are assigned to the buttons are shown
on the lower line of the display. Each soft button has several functions assigned. To change
the functions, press the SHIFT button on the right side of the display.
Helpful Information about Soft Button Operation
Press CONT (S1) to adjust the display contrast.
Press RING (S2) to adjust the ringer volume.
Press BGM (S3) to turn on/off the BGM.
Press MENU (S1) to return to the initial display.
Press PREV (S2) to return to the previous display.
Press NEXT (S3) to advance to the next display.
Press ACCNT (S3) to enter an account code.
140
4.4
Special Display Features
Jog Dial Operation
KX-T7433 or KX-T7436 users can search for desired items by using the Jog Dial
corresponding with the display menu. Rotate the Jog Dial in either direction as desired. The
items will be displayed as follows.
Left
(counter-clockwise)
Right
(clockwise)
To the previous
item
To the next
item
Jog Dial Operation Display
– KX-T7433
While idle, the bottom line of the display changes by pressing the SHIFT button as follows.
The Jog Dial operation is available for the third display.
Initial Display
Second Display
Third Display
CONT
RING
OLD6
NEW9
STA
EXT
BGM
SHIFT
SHIFT
FEAT
SHIFT
– KX-T7436
The Jog Dial operation is available after pressing a Function button on the third and fourth
line and the Soft buttons in the third display. The third display appears by pressing the
SHIFT button as follows.
1 Jan
Initial Display
Second Display
Third Display
3:00PM
Extension STA Speed
Features
SYS Speed
Call Log
RING
BGM
CONT
OLD6
NEW9
STA
EXT
SHIFT
SHIFT
FEAT
SHIFT
141
4.4
Special Display Features
CO Outgoing Call Log (KX-T7235 / KX-T7436 only)
The last five outside calls you made are logged automatically. You can make a call using the
call log.
Initial Display
1 Jan
3:00PM
Extension STA Speed
Features
SYS Speed
Call Log
RING
BGM
CONT
<Example>
To select 111
1234567890
111
0987654
000111222333
100200300400500
CLR
MENU
NEXT
Making a call using the call log
Note
1. Press the Call Log (F5) button.
2. Press the Function button which is next
to the desired number.
• To delete all numbers, press the CLR (S2)
button.
• To return to the initial display, press the MENU
(S1) button.
142
4.4
Special Display Features
Extension Dialling (KX-T7235 / KX-T7433 / KX-T7436 only)
You can make an intercom call using the directory. Only items which have a name assigned
are displayed in alphabetical order.
■ KX-T7235
■ KX-T7433
Initial Display
1 Jan
3:00PM
Extension STA Speed
Features
SYS Speed
Call Log
RING
BGM
CONT
Initial Display
1 Jan
CONT
RING
BGM
Third Display
<Example>
To select Beth
STA
AB
C
DE
FG
HIJ
MENU
3:00PM
EXT
FEAT
KL
MN
OPQR
S
T-Z
Adam
Bob
Alice
Carol
Ann Parker
Casey
Ben Johns
Ched Ely
Beth
Chris
MENU
PREV
NEXT
NEXT
MENU
<Example>
To select Bob Jones
→B o b J o n e s
Carol
MENU
CALL
or
1. Press the Extension (F3) button.
2. Press the Function button which is
next to the desired letter.
3. Press the Function button which is
next to the desired name.
1. Press the SHIFT button repeatedly until
the Jog Dial operation display appears.
2. Press the EXT (S2) button.
3. Rotate the Jog Dial until the desired
name is at the arrow.
4. Press the CALL (S3) button or go off-hook.
143
4.4
Special Display Features
■ KX-T7436
Conditions
• Before rotating the Jog Dial, you can press
the corresponding alphabet key to select the
desired letter.
<Example> Press 2 two times to display “B”
items.
• The KX-T7436 user can press the Function
button (F1 through F10) on the same line of
the desired item instead of the CALL (S3)
button.
Initial Display
1 Jan
3:00PM
Extension STA Speed
Features
SYS Speed
Call Log
RING
BGM
CONT
Programming References
Third Display
STA
EXT
• User Programming (Section 3) /
System Programming (Installation Manual)
[003] Extension Number Set
[004] Extension Name Set
FEAT
<Example>
To select Bob Jones
Ann Parker
Beth
→Bob Jones
Carol
Chris
MENU
MENU
CALL
NEXT
or
1. Press the Extension (F3) button or the
EXT (S2) button.
(The S2 button can be changed to “EXT”
by pressing the SHIFT button repeatedly.)
2. Rotate the Jog Dial until the desired name is
at the arrow.
3. Press the CALL (S3) button or go off-hook.
144
4.4
Special Display Features
Station Speed Dialling (KX-T7235 / KX-T7433 / KX-T7436 only)
You can make a call to a party stored in your telephone.
For the KX-T7235, you can switch the name and number display by pressing the NEXT
button.
For the KX-T7433 and KX-T7436, items which have a name assigned are displayed by priority
in stored order. If a name is not assigned, the number is displayed. The displaying mode, name
or number, can be assigned in System Programming.
■ KX-T7235
■ KX-T7433
Initial Display
Initial Display
1 Jan
1 Jan
3:00PM
CONT
Extension STA Speed
Features
SYS Speed
Call Log
RING
BGM
CONT
RING
BGM
Third Display
<Example>
To select Panasonic
STA
Bob
Jim Kopp
Ronald
Zangril
Nancy
MENU
3:00PM
EXT
FEAT
KME-soft
Panasonic
Police
Louisa
Home
NEXT
NEXT
9-123-4567
9111111
93333333
97777777
10
MENU
MENU
9-987-6543
9-5555555
9-999
9-4444444
9-1000001
NEXT
<Example>
To select Bob Jones
→B o b J o n e s
Carol
MENU
CALL
or
1. Press the STA Speed (F8) button.
2. Press the Function button which is
next to the desired name or number.
To alternate the display between
name and number, press the NEXT
(S3) button.
1. Press the SHIFT button repeatedly until
the Jog Dial operation display appears.
2. Press the STA (S1) button.
3. Rotate the Jog Dial until the desired name
or number is at the arrow.
4. Press the CALL (S3) button or go off-hook.
145
4.4
Special Display Features
■ KX-T7436
Programming References
• Station Programming (Section 2)
Station Speed Dialling Number / Name
Assignment (KX-T7235 / KX-T7433 / KX-
Initial Display
1 Jan
3:00PM
T7436 only)
Extension STA Speed
Features
SYS Speed
Call Log
RING
BGM
CONT
• System Programming — Installation Manual
[990] System Additional Information,
Field (19)
Third Display
STA
EXT
FEAT
<Example>
To select Bob Jones
Ann Parker
Beth
→Bob Jones
Carol
Chris
MENU
MENU
CALL
NEXT
or
1. Press the STA Speed (F8) button or the
STA (S1) button.
(The S1 button can be changed to “STA” by
pressing the SHIFT button repeatedly.)
2. Rotate the Jog Dial until the desired name or
number is at the arrow.
3. Press the CALL (S3) button or go off-hook.
146
4.4
Special Display Features
System Speed Dialling (KX-T7235 / KX-T7433 / KX-T7436 only)
You can make a call to a party stored in the system using the directory. Only items which
have a name assigned are displayed in alphabetical order.
■ KX-T7235
■ KX-T7433
Initial Display
1 Jan
Initial Display
1 Jan
3:00PM
Extension STA Speed
Features
SYS Speed
Call Log
RING
BGM
CONT
CONT
<Example>
To select Jack
AB
C
DE
FG
HIJ
MENU
3:00PM
RING
BGM
Third Display
KL
MN
OPQR
S
T-Z
STA
EXT
FEAT
<Example>
To select Bob Jones
Harry
Jack
Henry
Janny
Hiroshi
Jimmy
Isaac
John
Ivy‘s shop
Johes
NEXT
MENU
PREV
MENU
1. Press the SYS Speed (F9) button.
2. Press the Function button which is
next to the desired letter.
3. Press the Function button which is
next to the desired name.
→B o b J o n e s
Carol
MENU
CALL
or
1. Press the SHIFT button repeatedly until
the Jog Dial operation display appears.
2. Rotate the Jog Dial until the desired name
is at the arrow.
3. Press the CALL (S3) button or go off-hook.
147
4.4
Special Display Features
■ KX-T7436
Conditions
• Before rotating the Jog Dial, you can press the
corresponding alphabet key to select the desired
letter. <Example> Press 2 two times to display
“B” items.
• The KX-T7436 user can press the Function
button (F1 through F10) on the same line of the
desired item instead of the CALL (S3) button.
Initial Display
1 Jan
3:00PM
Extension STA Speed
Features
SYS Speed
Call Log
RING
BGM
CONT
Programming References
• User Programming (Section 3) /
System Programming (Installation Manual)
[001] System Speed Dialling Number Set
[002] System Speed Dialling Name Set
Third Display
STA
EXT
FEAT
<Example>
To select Bob Jones
Ann Parker
Beth
→Bob Jones
Carol
Chris
MENU
MENU
CALL
NEXT
or
1. Press the SYS Speed (F9) button, or press
the SHIFT button repeatedly until the Jog
Dial operation display appears.
2. Rotate the Jog Dial until the desired name is
at the arrow.
3. Press the CALL (S3) button or go off-hook.
148
4.4
Special Display Features
System Feature Access Menu (KX-T7235 / KX-T7433 / KX-T7436 only)
The System Feature Access Menu provides a display of the system features which appear in
alphabetical order. The available features are as follows:
Absent Message Capability
Background Music — External (operator only)
Call Park
Call Pickup, Group
Class of Service (COS) Switch (operator only)
Message Waiting
Night Service On / Off (operator only)
Paging — External
Paging — Group
Paging — ANSWER
Paralleled Telephone Connection
The following shows the operating procedures with an example. Please refer to the System
Feature List for feature descriptions and required parameters.
<Example>
Message Waiting: To leave a notification so that the called party may call you back
149
4.4
Special Display Features
■ KX-T7235
■ KX-T7433
Initial Display
1 Jan
3:00PM
Extension STA Speed
Features
SYS Speed
Call Log
RING
BGM
CONT
Initial Display
1 Jan
CONT
3:00PM
RING
BGM
Third Display
Absent MSG Off
Absent MSG On
C.Pickup Group
Call Park
COS Primary
MENU
PREV
(0-9)
(ext)
NEXT
Extrn BGM On/Off
Message Off
Message On
Night On/Off
Page-Ext Answer
MENU
PREV
MENU
(ext)
(ext)
(1/0)
(1-4)
NEXT
NEXT
(1-9)
STA
EXT
→M S G O n
Night Mode
MENU
FEAT
ext
1/0
SEL
If a parameter is required,
the parameter will flash.
Enter the extension number.
If a parameter is required,
the feature name and
parameter will flash.
Enter the
extension
number.
1. Press the Features (F4) button.
2. Press the NEXT (S3) button until
“Message On” is displayed.
3. Press the Function button which is next
to “Message On.”
4. Enter the extension number.
5. On-hook.
150
1. Press the SHIFT button repeatedly until
the Jog Dial operation display appears.
2. Press the FEAT (S3) button.
3. Rotate the Jog Dial until “MSG On”
is at the arrow.
4. Press the SEL (S3) button.
5. Enter the extension number.
6. On-hook.
4.4
Special Display Features
■ KX-T7436
Initial Display
1 Jan
3:00PM
Extension STA Speed
Features
SYS Speed
Call Log
RING
BGM
CONT
Third Display
EXT
STA
FEAT
Extrn BGM On/Off
Message Off
(ext)
(ext)
→Message On
Night On/Off
(1/0)
Page-Ext Answer
(1-4)
MENU
SEL
NEXT
MENU
If a parameter is required,
the parameter will flash.
Enter the
extension
number.
1. Press the Features (F4) button
or the FEAT (S3) button.
(The S3 button can be changed
to “FEAT” by pressing the
SHIFT button repeatedly.)
2. Rotate the Jog Dial until
“Message On” is at the arrow.
3. Press the SEL (S3) button.
4. Enter the extension number.
5. On-hook.
151
4.4
Special Display Features
System Feature List
You can access the following features which are displayed in alphabetical order.
The parameters used in the list are for a telephone connected to a KX-TD1232.
Features marked with “*” are only available for the operator.
For more details about the features and required parameters, refer to the respective features in
Section 4.2, “DPT Features,” and Section 4.3, “Operator Service Features.”
DISPLAY
REQUIRED
PARAMETERS
(KX-T7436)
(KX-T7433)
Absent MSG Off
ABST MSG Off
Absent MSG On
(1-9)
ABST MSG On 1-9
C.Pickup Group
Call Park (0-9)
Call Park
0-9
COS Primary
(ext)
COS Primary ext
COS Secondary
COS Second
(ext)
Message Off
(ext)
(ext)
ext
Night On/Off
(1/0)
1-4
Page-GRP Answer
Page-GRP ANS
Paging External
Page Extrn
152
0-4
Picks up a call within your extension group.
— “Call Pickup, Group”
0-9: Parking zone number
Places a call on hold in a system parking area.
— “Call Park”
Extension number
Selects Class of Service (COS) primary mode.*
— “Class of Service (COS) Switch”
Extension number
Selects Class of Service (COS) secondary mode.*
— “Class of Service (COS) Switch”
Turns on/off the background music.*
— “Background Music (BGM) – External”
Extension number
Cancels a notification.
— “Message Waiting”
Extension number
Leaves a notification so that the called party
may call you back. — “Message Waiting”
1 (On) / 0 (Off)
Changes the Day (Off) / Night (On) mode.*
— “Night Service”
1/0
Page-Ext Answer
Page-E ANS
Sets an absent message.
— “Absent Message Capability”
ext
Message On
Night Mode
Message number (1-9) +
parameter (if required)
None
Ext-BGM On/Off
MSG On
Cancels the absent message.
— “Absent Message Capability”
ext
Extrn BGM On/Off
MSG Off
None
None
C.Pickup GRP
FEATURE DESCRIPTION
(1-4) 1-4: External pager number Answers a page through a speaker.
— “Paging – ANSWER”
(3 and 4: TD1232 only)
None
Answers a page through a telephone in the same
extension group. — “Paging – ANSWER”
Pages through the speaker.
(0-4) 0: All external pagers
1-4: External pager number — “Paging – External”
(3 and 4: TD1232 only)
4.4
Special Display Features
DISPLAY
REQUIRED
PARAMETERS
(KX-T7436)
(KX-T7433)
FEATURE DESCRIPTION
(00-16) 00: All extension groups
Pages to all or a particular extension group.
— “Paging – Group”
01-16:
Extension
group
number
00-16
Paging Group
Page GRP
Parallel On/Off
(1/0)
1 (On) / 0 (Off)
Parallel
1/0
Sets whether a single line telephone connected
in parallel will ring (On) or not (Off) when
receiving a call.
— “Paralleled Telephone Connection”
Conditions
• When using a KX-T7436, you can press a Function button (F1 through F10) on the same
line of the desired item instead of the SEL (S3) button.
• Before rotating the Jog Dial, you can press the corresponding alphabet key to select the
desired letter.
<Example> Press 2 two times to display “B” items.
153
5.1
Configuration
Location of Controls
■ KX-T7440
DSS Buttons with
Busy Lamp Field (BLF) (01 through 66)
■ KX-T7441
DSS Buttons with
Busy Lamp Field (BLF) (01 through 48)
ANSWER Button
RELEASE Button
Connection
Included telephone
line cord
154
→ Connect to a Digital Super
Hybrid System.
5.1
Configuration
Feature Buttons
DSS Consoles have the following types of Feature Buttons:
DSS Buttons with Busy Lamp Field (BLF)
Used to access extensions. The BLF indicates the busy or idle status of each extension in the
system. These buttons can also be changed to other function buttons.
PF (Programmable Feature) Buttons
These buttons are provided with no default settings. With a paired telephone, you can program
the buttons as other function buttons.
ANSWER Button
Used to answer an incoming call.
RELEASE Button
Used to disconnect the line.
155
5.2
DSS Console Features
ANSWER / RELEASE Button Operation (KX-T7441 only)
The KX-T7441 DSS Console is provided with an ANSWER and RELEASE button which are
useful for operators who use headsets.
With the ANSWER button, you can answer all incoming calls to the paired telephone. With
the RELEASE button, you can disconnect the line during or after a conversation or complete a
Call Transfer.
Answering a call
1
ANSWER
1. Press the ANSWER button on the console.
• You can talk to the caller with the headset or using the handsfree
mode.
Call Transfer
1
TRANSFER
During a conversation with the headset or handsfree mode
1. Press the TRANSFER button on the paired telephone.
2
or
2. Press the desired DSS button on the console or dial the desired
number at the paired telephone.
desired number
3. Press the RELEASE button after the party answers.
3
RELEASE
One-Touch Transfer
A CO call can be transferred to an extension with the one-touch operation. The One-Touch
Transfer function must be set by System Programming.
1
2
RELEASE
During a conversation with the headset or handset mode
1. Press the desired DSS button on the console.
• The other party is placed on hold and the destination extension is
called immediately.
2. Press the RELEASE button after the party answers.
Programming References
• System Programming — Installation Manual
[108] Automatic Hold by CO/DSS Button
156
5.2
DSS Console Features
One-Touch Access Assignment for System Features
You can assign the desired feature number to a DSS or PF button.
— Be sure that you are in the Station Programming mode: Press [PROGRAM] [9] [9].
1
1. Press the desired DSS or PF button on the console.
or
2
2. Dial 2 on the paired telephone.
2
3. Enter the desired feature number on the paired telephone.
<Example>
If you wish to gain access to the “Paging — All” feature, enter the
feature number, 62 .
3
feature number
4
4. Press the STORE button on the paired telephone.
• Repeat steps 1 through 4, to program numbers on other DSS or
PF button.
AUTO DIAL
STORE
— To exit the Station Programming mode: Press [PROGRAM] or lift the handset.
■ To correct an error while programming
1. Press the CLR button (S2) or the TRANSFER (CLEAR) button on
the paired telephone and complete programming.
1
(The TRANSFER button becomes the CLEAR button when using the overlay.)
CLR
S1
S2
S3
or
TRANSFER
■ To erase after programming
1. Press the DSS or PF button you wish to erase on the console.
1
or
2. Press 2 on the paired telephone.
2
2
3
AUTO DIAL
3. Press the STORE button on the paired telephone.
• The number is erased.
STORE
157
5.2
DSS Console Features
Conditions
• DSS buttons can be changed to any of the following function buttons through Station
Programming:
a) Account Button
b) Another DSS Button (Every DSS button can be assigned to another extension number.)
c) Call Forwarding from Hunting Group Button
d) Call Pickup Deny Button
e) Call Waiting Button
f) CLIR Button
g) COLR Button
h) Conference (CONF) Button
i) Doorphone Call Forwarding to Outside Line Button
j) DND for DDI Button
k) Executive Busy Override Deny Button
l) FWD/DND Button
m) ISDN Service Button
n) Message Waiting (MESSAGE) Button
o) Night Button
p) One-Touch Dialling Button
q) One-Touch Dialling with Auto Hold Button
r) Paging Deny Button
s) Paralleled Telephone Connection Button
t) Pickup Dialling Button
u) Phantom Button
v) SAVE Button
w) Terminate Button
x) Two-Way Record Button†
y) Two-Way Transfer Button†
z) Voice Mail (VM) Transfer Button
• PF buttons can be changed to any of the following function buttons through Station
Programming:
a) Account Button
b) Conference (CONF) Button
c) FWD/DND Button
d) ISDN Service Button
e) One-Touch Dialling Button
f) One-Touch Dialling with Auto Hold Button
g) SAVE Button
h) Terminate Button
i) Voice Mail (VM) Transfer Button
• When the STORE button is pressed after programming, you will hear beep tones as follows:
— One beep : The entry is changed from the one that was previously stored.
— Two beeps : The entry is the same as what was previously stored.
158
5.2
DSS Console Features
Programming References
• Station Programming (Section 2)
Flexible Button Assignment — Account Button, Conference (CONF) Button,
DSS Button, FWD/DND Button, Message Waiting
(MESSAGE) Button, Night Button, One-Touch Dialling
Button, One-Touch Dialling with Auto Hold button,
Phantom Button, SAVE Button, Terminate Button,TwoWay Record Button†, Two-Way Transfer Button†, Voice
Mail (VM) Transfer Button
• System Programming — Installation Manual
[007] DSS Console Port and Paired Telephone Assignment
[108] One-Touch Transfer by DSS Button
†: Available when the Digital Super Hybrid System is connected to a
Proprietary Telephone capable Panasonic Voice Processing System
(one that supports proprietary telephone integration; e.g. KX-TVP100).
159
A
6.2
SLT and ISDN Telephone Features
Account Code Entry
An Account Code is used to identify incoming and outgoing outside calls, for accounting
and billing purposes. The account code is appended to the “Station Message Detail
Recording (SMDR)” call record. For incoming outside calls, account codes are not required.
For outgoing outside calls, account codes are often required. You can enter account codes in
the following three modes: Verified - All Calls mode; Verified - Toll Restriction Override
mode; and Option mode. One mode is selected for each extension on a “Class of Service*”
basis.
Entering account codes
1. Lift the handset.
1
2. Dial the feature number (49).
• No tone is returned.
2
3. Dial the account code and #.
• You may dial 99 instead of “#.”
• You hear a confirmation tone and then a dial tone.
3
account code and #
4. Dial the line access code (9 or 81 through 88) and dial.
4
line access code
Conditions
In “Verified - All Calls” mode
• You must always enter a pre-assigned account code when making any of the following calls
unless it has previously been stored in memory:
a) Call Forwarding — to CO Line
b) Manual Dialling (Selecting a CO line)
c) Pickup Dialling (Hot Line)
d) Redial, Last Number
e) Station Speed Dialling
f) System Speed Dialling
In “Verified - Toll Restriction Override” mode
• You can enter a pre-assigned account code only when you need to override toll restriction
(Toll Restriction Override by Account Code Entry).
160
6.2
SLT and ISDN Telephone Features
A
In “Option” mode
• You can enter any account code when needed. It is possible to record a calling or called
party’s account code in the SMDR within fifteen seconds after the other party hangs up.
General
• It is not possible to enter an account code while having a conversation or hearing reorder
tone.
• There is no need for an account code entry when receiving incoming calls.
• Dialling “ ” while entering an account code allows you to clear the number and re-enter.
• Pressing the Register Recall button while entering an account code cancels the entry.
• An account code can be up to ten numeric digits (0 through 9). After entering an account
code, the delimiter “#” or “99” must be entered (the entered account code should not be
“99” nor end with “9”).
• An account code can be stored into Memory Dialling (“Pickup Dialling (Hot Line),”
“System/Station Speed Dialling,” “Call Forwarding — to CO Line”). The sequence to enter
an account code into Memory Dialling is as follows:
— [Feature Number] [Account Code] [#] [Line Access Code] [Phone Number]
or
— [Feature Number] [Account Code] [99] [Line Access Code] [Phone Number]
• If an entered account code does not match a stored account code when making a CO call, a
reorder tone is returned.
• If an entered account code matches a pre-assigned account code when making a CO call, the
charge fee of the account code is totalized.
• If you use an account code which is for a private call, the phone number of the destination
is not recorded on SMDR.
Programming References
• Station Programming (Section 2)
Charge Fee Reference — Account Code Charge Fee Reference, Account Code Set
• System Programming — Installation Manual & Installation Manual Addendum
[105] Account Codes
[508] Account Code Entry Mode
[601] Class of Service
Feature References
Station Message Detail Recording (SMDR) (→ see Installation Manual)
Toll Restriction Override by Account Code Entry
*
Class of Service (COS) is used to define the features which are allowed for a group of extension.
Refer to the Installation Manual for programming and more details.
161
A
6.2
SLT and ISDN Telephone Features
Automatic Callback Busy (Camp-On)
When the selected CO line or extension you have dialled is busy, dial the camp-on code and
hang up. Your telephone will ring when the called party is idle.
Setting
If you make a call and hear a busy tone;
1. Dial 6.
• You hear a confirmation tone and then a reorder tone.
1
2
2. Hang up.
• Wait until the telephone rings back.
Answering an intercom recall
If you hear the telephone ringing;
1. Lift the handset.
• You hear a ringback tone and the called extension rings
automatically.
1
Answering a CO line recall
If you hear the telephone ringing;
1. Lift the handset.
• You hear a dial tone.
1
2. Dial the phone number of the outside party.
2
phone number
Cancelling
1
1. Lift the handset.
2. Dial the feature number (46).
2
162
6.2
SLT and ISDN Telephone Features
A
3. Hang up.
3
Conditions
• If you do not answer before four callback ring signals (within 10 seconds), this feature will
be automatically cancelled.
• If the called party becomes busy again after the callback ringing starts, ringing stops but this
feature will be executed again when the extension becomes free.
163
C
6.2
SLT and ISDN Telephone Features
Call Forwarding — from Hunting Group
Pre-assigned extension users can forward calls arriving at any receiving group or calls
arriving just at your own receiving group. the destination can be another receiving group or
a specific extension. Some extensions may be restricted.
Setting
1
1. Lift the handset.
2
2. Dial the 7141.
3
3. Dial a forwarding group number.
forwarding group number
4
4. Dial a destination group number or extension number.
group number or
extension numer
5
164
5. Hang up.
6.2
C
SLT and ISDN Telephone Features
Cancelling
1
1. Lift the handset.
2
2. Dial 7140.
3
3. Dial forwarding group number.
forwarding group number
4. Hang up.
4
Conditions
• You can set or cancel this feature by simply pressing the CAll forwarding from Hunting
Group button.
• Each call can be forwarded up to four times. The fifth time will be disregarded.
Incoming
call
A
once
B
twice
C
three times
D
four times
E
five times
F
Original
destination
• Boss-Secretary function
The extension which has been set as the destination can call the forwarding extension.
Also, any extension in the receiving group which has been set as the forwarded destination
can call the forwarding extension.
<Example>
Call
Receiving group 1
Fowarding
extension
Forward
set
Programming References
• System Programming — Installation Manual Addendum
[100] Flexible Numbering, Call forwarding from hunting group
[520] Call Forwarding from Hunting Group
165
C
6.2
SLT and ISDN Telephone Features
Calling / Connected Line Identification Presentation
(CLIP / COLP)
Allows you to display your number on the LCD of the called party’s telephone when
making a call (CLIP), or allows you to display your number on the LCD of the calling
party’s telephone when answering a call (COLP) through an ISDN line.
To select a CLIP / COLP number for a CO line
1
1. Lift the handset.
2
2. Dial the feature number (711) and 1.
• You will hear a confirmation tone.
3. Hang up.
5
To select a CLIP / COLP number for an extension
1
1. Lift the handset.
2
2. Dial the feature number (711) and 2.
• You will hear a confirmation tone.
3. Hang up.
5
166
6.2
SLT and ISDN Telephone Features
C
To select a desired CLIP number for one time
1. Lift the handset.
1
2. Dial the feature number (711) and 3.
2
3. Dial the desired CLIP number and press #.
• You will hear a confirmation tone.
3
4. Dial the line access code (9 or 81 through 88).
desired CLIP number + #
5. Dial the phone number.
4
line access code
5
phone number
Condition
• System programming is required to assign the numbers for a CLIP / COLP number.
However, the number actually sent to the called or calling party depends on the contract of
your ISDN network suppliers.
Programming References
• System Programming — Installation Manual Addendum
[419] Subscriber Number Assignment
[623] CLIP / COLP Number Assignment for Extension
[624] CLIP / COLP Number Assignment for ISDN Extension
Feature References
Calling Line Identification Restriction (CLIR)
Connected Line Identification Restriction (COLR)
167
C
6.2
SLT and ISDN Telephone Features
Calling Line Identification Restriction (CLIR)
Allows you to restrict the presentation of your number to the called party when you make a
call. You can set the called party to see your number on the display once or continuously.
This feature is an ISDN service.
To restrict the presentation of your number to the called party
1. Lift the handset.
1
2. Dial the feature number (59) and 2.
2
3. Hang up.
3
To present your number to the called party
1. Lift the handset.
1
2. Dial the feature number (59) and 0.
2
3. Hang up.
3
To change the current setting just for this call
1
1. Lift the handset.
2
2. Dial the feature number (59) and 1.
3
3. Dial the line access code (9 or 81 through 88).
line access code
168
6.2
SLT and ISDN Telephone Features
C
4. Dial the phone number.
4
phone number
Programming References
• System Programming — Installation Manual Addendum
[419] Subscriber Number Assignment
[516] Calling Line Identification Restriction
169
C
6.2
SLT and ISDN Telephone Features
Call Transfer — to CO Line
Allows you to transfer an intercom call to a CO line by a Screened Call Transfer.
Screened Call Transfer
1
R
2
While having a conversation;
1. Press the Register Recall button.
• The other party is placed on hold.
• You hear a confirmation tone and then a dial tone.
2. Dial the line access code (9 or 81 through 88).
line access code
3
3. Dial the phone number where calls will be transferred.
phone number
4
4. Wait for an answer and announce.
5
5. Hang up.
• The call is transferred.
Conditions
• If you want to return to the held call, press the Register Recall button before the destination
party answers.
• “Class of Service” programming determines the extensions that can perform this feature.
Programming References
• System Programming — Installation Manual
[503] Call Transfer to CO Line
[601] Class of Service
[990] System Additional Information, Field (1)
170
6.2
SLT and ISDN Telephone Features
C
Completion of Calls to Busy Subscriber (CCBS)
You can set the telephone to receive call-back ringing when a busy called party on an ISDN
line becomes free. When you answer the call-back ringing, the called party’s telephone
number is automatically dialled.
Setting
1
2
While hearing an indication tone*;
1. Dial 6.
2. Hang up.
Answering and calling
1
1. Lift the handset.
1
Cancelling
1. Lift the handset.
1
2. Dial 713.
2
3. Hang up.
3
171
C
6.2
SLT and ISDN Telephone Features
Condition
•
•
•
•
The availability of this feaure depends on the ISDN service of your telephone company.
If you do not answer after four call-back rings, this feature will be cancelled.
This feature is not available for an ISDN telephone user.
* Indication tone
1s
Programming References
• System Programming — Installation Manual Addendum
[100] Flexible Numbering, CCBS
[153] Completion of Calls to Busy Subscriber
172
6.2
SLT and ISDN Telephone Features
C
Connected Line Identification Restriction (COLR)
Allows you to restrict the presentation of your number to the calling party when you receive
the incoming call. You can set the calling party not to see your number on the display. This
feature is an ISDN service.
To restrict the presentation of your number to the calling party
1. Lift the handset.
1
2. Dial the feature number (58) and 1.
2
3. Hang up.
3
To present your number to the calling party
1. Lift the handset.
1
2. Dial the feature number (58) and 0.
2
3. Hang up.
3
Programming References
• System Programming — Installation Manual Addendum
[419] Subscriber Number Assignment
[517] Connected Line Identification Restriction
173
D
6.2
SLT and ISDN Telephone Features
Do Not Disturb (DND)
Allows you to deny an incoming intercom call or transfer an incoming CO call to the backup
station.
Setting
1
1. Lift the handset.
2. Dial the feature number (710) and 1.
2
3
3. Dial the extension number, 0 (to operator) for the backup station or
(no backup).
• You hear a confirmation tone and then a dial tone.
4. Hang up.
extension number, 0 or
4
Cancelling
1. Lift the handset.
1
2
2. Dial the feature number (710) and 0.
• You hear a confirmation tone and then a dial tone.
3. Hang up.
3
174
6.2
SLT and ISDN Telephone Features
D
Conditions
• When this feature is set, an incoming outside call (directed by Intercept Routing or DIL 1:1
extension) will be automatically transferred to the backup station (pre-assigned extension).
An incoming intercom call will send the DND tone to your extension.
• If the extension is already set as the destination of the “Call Forwarding,” “Do Not Disturb
(DND)” and “Do Not Disturb for Direct Dial In Calls” features, you cannot set this feature
and when you set this feature, you hear a reorder tone.
• While the operator is set as the destination of the “Do Not Disturb (DND)” feature, even if
the operator is different from Day mode and Night mode, an incoming call will be
transferred to an operator. If the operator is not assigned, an incoming call will be
transferred to the IRNA.
• A calling extension that has “Do Not Disturb (DND) Override” enabled can override your
extension when it is set to “Do Not Disturb (DND)” mode.
Feature References
Call Forwarding
Do Not Disturb (DND) Override
Do Not Disturb for Direct Dialling In Calls
Intercept Routing (→ see Installation Manual)
175
D
6.2
SLT and ISDN Telephone Features
Do Not Disturb for Direct Dialling In Calls
Allows you to set “Do Not Disturb (DND)” feature for Direct Dialling In (DDI) calls.
Direct Dialling In calls will be transferred to the operator. The operator cannot set this
feature.
Setting
1. Lift the handset.
1
2. Dial the feature number (54) and 1.
• You hear a confirmation tone and then a dial tone.
2
3. Hang up.
3
Cancelling
1. Lift the handset.
1
2. Dial the feature number (54) and 0.
• You hear a confirmation tone and then a dial tone.
2
3. Hang up.
3
Conditions
• When this feature is set, an incoming call (directed by Intercept Routing or DIL 1:1, DIL
1:N) can be answered.
• Even if this feature is set, your extension does not deny Direct Dialling In calls the
following cases:
1) The destination of DDI calls is UCD group.
2) The destination of DDI calls is the Hunting group number that has set this feature.
176
6.2
SLT and ISDN Telephone Features
D
• When you set this feature, “Call Forwarding” and “Do Not Disturb (DND)” features will be
cancelled.
• While you set this feature, if you go off-hook, you hear a special dial tone.
Feature References
Call Forwarding
Do Not Disturb (DND)
Do Not Disturb (DND) Override
Direct Dialling In (→ See Installation Manual)
177
D
6.2
SLT and ISDN Telephone Features
Doorphone Call
Allows you to have a conversation with a visitor at your doorphone. You can also unlock
the door from your telephone.
Calling an extension from a doorphone
1. Press the Doorphone button.
• The visitor hears a beep.
• Wait for an answer and talk.
1
Answering a doorphone call
When you hear the doorphone ring tone at the extension;
1. Lift the handset.
1
Calling a doorphone
1. Lift the handset.
1
2. Dial the feature number (61).
2
3. Dial a doorphone number (1 or 2) or (1 through 4) as follows.
– 1 or 2:
if you are connected to the KX-TD816
– 1 through 4: if you are connected to the KX-TD1232
• You can talk after you hear a confirmation tone.
3
doorphone number
To unlock the door from an assigned extension
1
1. Lift the handset.
2. Dial the feature number (55).
2
178
6.2
SLT and ISDN Telephone Features
3
door opener number
4
D
3. Dial a door opener number (1 or 2) or (1 through 4) as follows.
– 1 or 2:
if you are connected to the KX-TD816
– 1 through 4: if you are connected to the KX-TD1232
• You hear a confirmation tone.
• The door is left unlocked for 5 seconds.
4. Hang up.
To unlock the door while talking to the doorphone from any extension
1. Press the Register Recall button.
• You hear a confirmation tone and then a dial tone.
1
R
2. Dial 5.
• You hear a confirmation tone.
• The door is left unlocked for 5 seconds.
2
3. Hang up.
3
Conditions
• You must dial 5 within ten seconds after pressing the Register Recall button.
• If you do not answer an incoming doorphone call within thirty seconds, the call is cancelled.
• You must program the extensions that can receive calls from each doorphone for day and
night mode.
• “Class of Service” programming determines the extension that can unlock the door.
• It is possible for any extension users to originate a call to a doorphone.
• The door opener 1 through 4 can be unlocked using the feature number, while the doors
which are paired with the doorphone 1 through 4 can be unlocked while talking to the
doorphone.
• For the KX-TD1232, door openers 1 and 2 and doorphones 1 and 2 are related to the master
cabinet, and door openers 3 and 4 and doorphones 3 and 4 are related to the slave cabinet.
Programming References
• System Programming — Installation Manual & Installation Manual Addendum
[021]–[022] Doorphone Call Forwarding — Day/Night
[122] Automatic Door Open Assignment
[511] Door Opener Access
[607]–[608] Doorphone Ringing Assignment — Day/Night
179
D
6.2
SLT and ISDN Telephone Features
Doorphone Call Forwarding to CO Line
You can have incoming doorphone calls forwarded to outside parties using ISDN lines.
You can choose a different destination for Day mode and Night mode.
Some extensions may be restricted.
Setting / Cancelling (at the extension receiving doorphone calls)
1. Lift the handset.
1
2. Dial 716.
2
3. Dial a specific doorphone number (1-4) or
- 1-4 : doorphone number
- : for all
3
doorphone number or
4
4. Dial 1 or 0.
- 1 : to set
- 0 : to cancel
or
5
5. Hang up.
To store the phone number
1. Lift the handset.
1
2. Dial 715.
2
3
or
180
3. Dial 0 or 1.
- 0 : for Day
- 1 : for Night
for all.
6.2
SLT and ISDN Telephone Features
4. Dial specific doorphone number (1-4) or
4
D
for all.
doorphone number or
5. Dial the line access code (9 or 81 through 88).
5
line access code
6
phone number and #
6. Dial a phone number and #.
7. Hang up.
7
To clear the phone number
1. Lift the handset.
1
2. Dial 715.
2
3. Dial 0 or 1.
– 0: for Day
– 1 : for Night
3
or
4
4. Dial specific doorphone number (1-4) or
doorphone number or
for all.
5. Dial #.
5
6. Hang up.
6
181
D
6.2
SLT and ISDN Telephone Features
Conditions
• Time limit
A call between a party at a doorphone and an outside party is restricted by the system timer
(Default: 0 sec.). The call is disconnected when the time runs out.
Programming References
• System Programming — Installation Manual & Installation Manual Addendum
[021]-[022] Doorphone Call Forwarding — Day/Night
[100] Flexible Numbering, Doorphone call forwarding to CO line / Doorphone call
forwarding mode switch
[218] Doorphone-to-CO Line Call Duration Time
[521] Doorphone Call Forwarding to CO Line
[607]–[608] Doorphone Ringing Assignment — Day/Night
[990] System Additional Information, Area 06 – Bit 14
182
6.2
SLT and ISDN Telephone Features
E
Emergency Call
Allows you to make an emergency CO call without dial restriction. You can store up to ten
emergency numbers.
Dialling
1. Lift the handset.
• You hear a dial tone.
1
2. Dial the line access code (9 or 81 through 88).
2
3. Dial the desired emergency number.
line access code
3
emergency number
Conditions
• The emergency call will override the toll restriction level, the “Electric Station Lockout”
feature, and the account code mode, “Verified — All Calls” or “Verified — Toll Restriction
Override.”
Programming References
• System Programming — Installation Manual
[311] Emergency Dial Set
183
H
6.2
SLT and ISDN Telephone Features
Hotel Application
Room Management
Allows you to print out the information of a guest room (e.g., cleaning status of the room
and the total of the minibar charge) with a telephone in each room. Messages No.6-No.9 can
be printed out.
<Example> Message 7: “Cleaned-up”
1. Lift the handset.
1
2. Dial the feature number (750) and 7.
2
3. Hang up.
3
<Example> Message 8: “Minibar $ %%%.%”
1. Lift the handset.
1
2. Dial the feature number (750) and 8.
2
3. Enter the minibar charge.
3
4. Hang up.
minibar charge
4
184
6.2
H
SLT and ISDN Telephone Features
Data similar to below is printed out.
Date
Time
Ext
CO Dial Number
24.03.95
14:09
221
Cleaned-up
24.03.95
10:23
230
Minibar $ 535.5
ANS
Duration
Cost
Acc
CD
Conditions
• System Programming is required to program the messages.
• This operation is the same as the Absent Message feature.
• It is necessary to assign [990] “System Additional Information, Field (34)” through System
Programming beforehand.
Programming References
• User Programming (Manager Programming) (Section 3)
[008] Absent Messages
• System Programming — Installation Manual & Installation Manual Addendum
[008] Absent Messages
[990] System Additional Information, Field (34)
185
L
6.2
SLT and ISDN Telephone Features
Log-In / Log-Out
Allows you to assign the Log-In mode or Log-Out mode within a hunting, ring or UCD
(Uniform Call Distribution) group. When in the Log-Out mode, you can leave the group
temporarily, preventing hunting calls from being sent to your extension.
Log-In / Log-Out
1. Lift the handset.
1
2. Dial the feature number (45).
2
3
or
3. Dial 1 or 0.
- 1 : for Log-In mode
- 0 : for Log-Out mode
4. Dial the hunting group extension number.
• You can press to select all the hunting groups.
• You hear a confirmation tone and then a dial tone.
4
hunting group extension number
5. Hang up.
5
Feature References
Station Hunting (→ see Installation Manual)
Uniform Call Distribution (UCD)
186
6.2
SLT and ISDN Telephone Features
M
Message Waiting
Allows you to leave a message for another extension. If the destination extension is
provided with a message waiting lamp, it will be lit. Even if a lamp is not provided, the
extension will provide a special ringing and dial tone (dial tone 4*) to indicate that a
message has been received.
Setting
1. Lift the handset.
1
2. Dial the feature number (70) and 1.
2
3. Dial the extension number where calls will be left.
• You hear a confirmation tone and then a dial tone.
3
4. Hang up.
extension number
4
1
2
If the called extension is busy;
1. Dial 4.
• You hear a confirmation tone and then a dial tone.
• You must dial 4 within 5 seconds after dialling extension number.
2. Hang up.
Cancelling
1
1. Lift the handset.
2. Dial the feature number (70) and 0.
2
187
M
6.2
SLT and ISDN Telephone Features
3. Dial the extension number where you left a message.
• You hear a confirmation tone and then a dial tone.
3
extension number
4 Hang up.
4
Calling back the message sender
1
1. Lift the handset.
• You hear dial tone 4.*
2
2. Dial the feature number (70) and 2.
• If you have more than one message at your extension, the line is
connected to the message sender which you select.
3
3. Start talking.
• The message is cleared after the conversation.
Clearing all messages by the message receiver
1. Lift the handset.
• You hear a dial tone 4.*
1
2. Dial the feature number (70) and 0.
2
3 Dial your (message receiver’s) extension number.
• All messages are cleared.
3
your extension number
188
6.2
SLT and ISDN Telephone Features
M
Conditions
• If multiple messages are left at your extension, calling back is executed in the received
order.
• The system supports a maximum of 128 simultaneous messages. If you try to set the 129th
message, you hear a reorder tone.
• The special ringing tone rings three times at 5 second intervals after which there is an
interval of programmable length. The length of this programmable interval can be set by
System Programming.
• If you set the length of the interval to zero, the special ringing tone doesn’t ring.
• If you hear dial tone 4* after going off-hook, there is a message at your extension.
*One of the dial tones. Refer to “Tone List” in the Appendix (Section 8).
Programming References
• System Programming — Installation Manual & Installation Manual Addendum
[214] Message Waiting Ring Internal Time
[990] System Additional Information, Field (9)
189
N
6.2
SLT and ISDN Telephone Features
Night Service
This system supports both the Night and Day modes of operation. The system operation for
originating and receiving calls can be different in night and day modes. Toll restriction calls
can be programmed to prevent unauthorized toll calls at night. Day/Night mode can be
switched manually at anytime desired.
Manual Night Service
1. Lift the handset.
1
2. Dial the feature number (78).
2
3
or
4
3. Dial 0 or 1.
- 0 : from Night mode to Day mode
- 1 : from Day mode to Night mode
• You hear a confirmation tone.
4. Hang up.
Conditions
• The following items have separate day and night programming:
1) Outgoing Permitted CO Line Assignment
2) Direct In Lines (DIL)
3) Doorphone Ringing Assignment
4) Intercept Routing
5) Ringing, Delayed
6) Toll Restriction Level
7) Toll Restriction for System Speed Dialling
8) Operator Assignment
• “Class of Service” programming determines the extensions that can perform this feature.
• The Day/Night mode is automatically switched at a predetermined time (default: 9:00 a.m.
for all days of the week; 5:00 p.m. for all nights of the week) if automatic switching mode
is selected in System Programming.
190
6.2
SLT and ISDN Telephone Features
N
Programming References
• System Programming — Installation Manual & Installation Manual Addendum
[101] Day/Night Service Switching Mode
[102] Day/Night Service Starting Time
[513] Night Service Access
[601] Class of Service
Feature References
CO Line Connection Assignment — Outgoing (→ see Installation Manual)
Direct In Lines (DIL) (→ see Installation Manual)
Doorphone Call
Intercept Routing (→ see Installation Manual Addendum)
Ringing, Delayed (→ see Installation Manual)
System Feature Access Menu — Night Service (4.4/Special Display Features)
Toll Restriction (→ see Installation Manual)
191
O
6.2
SLT and ISDN Telephone Features
Operator Call
Allows you to call an operator within the system. There can be up to two extensions
assigned as Operator 1 and 2. If there is only one operator or if you do not specify the
operator, you should generate the General call. If you want to specify the operator, you
should generate the Specific call by pressing a pre-assigned operator call number.
General call
1. Lift the handset.
1
2. Dial the feature number (0).
2
Specific call
1. Lift the handset.
1
2. Dial the operator call number for each operator.
2
operator call number
Conditions
• If you generate the General call for two operators, Operator 2 will receive your call if
Operator 1 is busy.
• If an operator is not assigned, this feature is not available; you will hear the reorder tone.
Programming References
• System Programming — Installation Manual & Installation Manual Addendum
[006] Operator / Manager Extension Assignment — Day / Night
[100] Flexible Numbering, Operator call, Operator 1 call, Operator 2 call
192
6.2
SLT and ISDN Telephone Features
Q
Quick Dialling
Allows you to make a quick dial call by pressing a pre-assigned quick dial number.
Dialling
1. Lift the handset.
1
2. Dial the quick dial number.
2
quick dial number
Conditions
• Up to 80 quick dial numbers can be stored by System Programming.
• You must assign a feature number first in program [104] “Quick Dial Assignment,” and then
a quick dial number in program [009] “Quick Dial Number Set” in order for Quick Dial to
be effective.
• For example, Quick Dialling is convenient for room service calls in a hotel.
Programming References
• System Programming — Installation Manual Addendum
[009] Quick Dial Number Set
[104] Quick Dial Assignment
193
S
6.2
SLT and ISDN Telephone Features
Station Feature Clear
Allows you to reset the following station features to the default settings.
a) Absent Message Capability
b) Automatic Callback Busy (Camp-On)
c) Call Forwarding
d) Call Pickup Deny
e) Call Waiting
f) Calling Line Identification Restriction (CLIR)
g) CO Incoming Call Information Log
h) Connected Line Identification Restriction (COLR)
i) Do Not Disturb (DND)
j) Log-In
k) Message Waiting – (All messages will be removed)
l) Pickup Dialling (Hot Line) – (The stored telephone number will be removed)
m) Timed Reminder
Clearing current feature setting
1
2
1. Lift the handset.
2. Dial the feature number (790).
• You hear a confirmation tone and then a dial tone.
3. Hang up.
3
194
6.2
SLT and ISDN Telephone Features
T
Toll Restriction Override for System Speed Dialling
Calls originated by “System Speed Dialling” are restricted depending on the extension’s toll
restriction level.
Programming References
• System Programming — Installation Manual Addendum
[509]–[510] Toll Restriction Level for System Speed Dialling — Day/Night
Feature References
System Speed Dialling
Toll Restriction (→ see Installation Manual)
195
U
6.2
SLT and ISDN Telephone Features
Uniform Call Distribution (UCD)
Allows incoming calls to be distributed uniformly to a specific group of extensions called an
UCD group. Calls to an UCD group search for an idle extension in a circular way.
If all extensions in an UCD group are busy or not available, the incoming outside call will be
handled by the UCD Time Table.
Conditions
• UCD can be used in the following cases.
a) The floating number* of UCD is assigned as the Direct In Lines (DIL) 1:1 destination.
b) The floating number* of UCD is assigned as the Intercept Routing destination.
c) The floating number* of UCD is dialled from an extension.
d) The floating number* of UCD is assigned as the Direct Dialling In (DDI) destination.
e) The floating number* of UCD is assigned as the UCD Overflow destination.
• It is possible to set the log-in or log-out status on an extension basis.
Programming References
• System Programming — Installation Manual Addendum
[106] Station Hunting Type
[139] UCD Time Table
[813] Floating Number Assignment
Feature References
Log-In / Log-Out
* A Floating Number (FN) is a virtual extension number which appears to be an extension.
For more details, refer to the Installation Manual.
196
6.3
ISDN Telephone Features
The KX-TD1232 users can use ISDN telephones in addition to proprietary telephones and
single line telephones. The features are almost the same as ones of the single line telephone.
There are, however, some features that are unavailable for ISDN telephones as shown below.
As for available features, see Chapter 6.2 SLT and ISDN telephone Features.
Features unavailable for ISDN telephones
• Account Code Entry
Dialling “99” instead of “#” as the delimiter makes this feature available.
• Alternate Calling — Ring/Voice
• Automatic Callback Busy (Camp-On)
• Call Forwarding
• Call Hold
• Call Pickup, Group
• Call Waiting
• Conference
• Do Not Disturb (DND)
• Do Not Disturb (DND) Override
• Doorphone Call
- To unlock the door while talking to the doorphone
• Log-In / Log-Out
• Message Waiting
• Paging — ANSWER
- Answering a page sent to the built-in speaker
• Paralleled Telephone Connection
• Pickup Dialling (Hot Line)
• Station Speed Dialling
• Timed Reminder
197
7
Quick Reference
2
Station Programming
❐ Flexible Button Assignment
— Alert Button
• Enter into programming mode.
• Press the desired CO button.
• Dial 87.
• Press STORE button.
• Exit from programming mode.
— Call Forwarding from Hunting Group
Button
• Enter into programming mode.
• Press the desired CO or DSS button.
• Dial 8 10 + forwarding receiving group
number.
• Press STORE button.
• Exit from programming mode.
— Call Pickup Deny Button
• Enter into programming mode.
• Press the desired CO or DSS button.
• Dial 8 01.
• Press STORE button.
• Exit from programming mode.
— Call Waiting Button
• Enter into programming mode.
• Press the desired CO or DSS button.
• Dial 8 02.
• Press STORE button.
• Exit from programming mode.
— CLIR Button
• Enter into programming mode.
• Press the desired CO or DSS button.
• Dial 8 03.
• Press STORE button.
• Exit from programming mode.
— COLR Button
• Enter into programming mode.
• Press the desired CO or DSS button.
• Dial 8 04.
• Press STORE button.
• Exit from programming mode.
198
— Doorphone Call Forwarding to CO Line
Button
• Enter into programming mode.
• Press the desired CO or DSS button.
• Dial 8 11 + doorphone number.
• Press STORE button.
• Exit from programming mode.
— DND for DDI Button
• Enter into programming mode.
• Press the desired CO or DSS button.
• Dial 8 05.
• Press STORE button.
• Exit from programming mode.
— Executive Busy Override Deny Button
• Enter into programming mode.
• Press the desired CO or DSS button.
• Dial 8 06.
• Press STORE button.
• Exit from programming mode.
— Hurry Up Button
• Enter into programming mode.
• Press the desired CO button.
• Dial 81 + extension number.
• Press STORE button.
• Exit from programming mode.
— ISDN Service Button
• Enter into programming mode.
• Press the desired Flexiblebutton.
• Dial 89.
• Press STORE button.
• Exit from programming mode.
— Live Call Screening (LCS) Button†
• Enter into programming mode.
• Press the desired CO or DSS button.
• Dial 85.
• Press STORE button.
• Exit from programming mode.
— Live Call Screening (LSC) Cancel Button†
• Enter into programming mode.
• Press the desired CO or DSS button.
• Dial 86.
• Press STORE button.
• Exit from programming mode.
†: Available when the Digital Super Hybrid System is connected to a Digital
Proprietary Telephone capable Panasonic Voice Processing System
(one that supports digital proprietary telephone integration; e.g. KX-TVP100).
7
Quick Reference
— Log-In/Log-Out Button
• Enter into programming mode.
• Press the desired CO button.
• Dial 80 + hunting group extension number.
• Press STORE button.
• Exit from programming mode.
— Night Button
• Enter into programming mode.
• Press the desired Flexible button.
• Dial 8 00.
• Press the STORE button.
• Exit from programming mode.
— One-Touch Dialling with Auto Hold
Button
• Enter into programming mode.
• Press the desired Flexible button.
• Dial 8#.
• Dial the desired number.
• Exit from programming mode.
— Terminate Button
• Enter into programming mode.
• Press the desired Flexible button.
• Dial 9.
• Press STORE button.
• Exit from programming mode.
— Two-Way Record Button†
• Enter into programming mode.
• Press the desired CO or DSS button.
• Dial 83 + extension number of the Voice Mail.
• Press STORE button.
• Exit from programming mode.
— Two-Way Transfer Button†
• Enter into programming mode.
• Press the desired CO or DSS button.
• Dial 84 + extension number of the Voice Mail.
• Press STORE button.
• Exit from programming mode.
— Paging Deny Button
• Enter into programming mode.
• Press the desired CO or DSS button.
• Dial 8 07.
• Press the STORE button.
• Exit from programming mode.
— Paralleled Telephone Connection Button
• Enter into programming mode.
• Press the desired CO or DSS button.
• Dial 8 08.
• Press the STORE button.
• Exit from programming mode.
— Pickup Dialling Button
• Enter into programming mode.
• Press the desired CO or DSS button.
• Dial 8 09.
• Press the STORE button.
• Exit from programming mode.
— Phantom Button
• Enter into programming mode.
• Press the desired Flexible button.
• Dial 88.
• Dial the phantom extension number.
• Press the STORE button.
• Exit from programming mode.
199
7
Quick Reference
❐ Live Call Screening Mode Set†
• Enter into programming mode.
• Dial 1.
• Dial 1 or 2.
- 1 : Hands-free mode
- 2 : Private mode
• Press STORE button.
• Exit from programming mode.
❐ Phantom Extension Bell On/Off
Setting
• Enter into programming mode.
• Press the phantom button twice.
• Dial 1 or 2
– 1 : Ring off – 2 : Ring on
• Press the STORE button.
• Exit from programming mode.
❐ Ringing Tone Selection for Intercom
Button
• Enter into programming mode.
• Press the Intercom button.
• Press the Intercom button again.
• Dial the tone type number (1 through 8).
• Press the STORE button.
• Exit from programming mode.
3
User Programming (Manager Programming)
●
To enter programming mode
(Be sure the telephone is idle and on-hook.)
Press: PROGRAM
●
User Password
(default: 1234)
To exit programming mode
Press: PROGRAM or lift the handset
❑ 000 Date and Time Set
1.
2.
3.
4.
5.
6.
7.
8.
9.
10.
11.
12.
13.
14.
15.
16.
17.
18.
Enter 000.
Press NEXT.
Enter the day.
Press →.
Press SELECT until the desired selection
is displayed.
Press →.
Enter the year.
Press →.
Press SELECT until the desired selection
is displayed.
Press STORE.
Press NEXT.
Enter the hour.
Press →.
Enter the minute.
Press →.
Press SELECT for AM or PM.
Press STORE.
Press END.
❑ 001 System Speed Dialling Number Set
1.
2.
3.
4.
5.
6.
Enter 001.
Press NEXT.
Enter a speed dial number.
Enter a telephone number.
Press STORE.
Press NEXT, PREV, or SELECT and
desired speed dial number.
7. Repeat steps 4 through 6.
8. Press END.
200
†: Available when the Digital Super Hybrid System is connected to a Digital
Proprietary Telephone capable Panasonic Voice Processing System
(one that supports digital proprietary telephone integration; e.g. KX-TVP100).
7
Quick Reference
❐ 002 System Speed Dialling Name Set
1.
2.
3.
4.
5.
6.
Enter 002.
Press NEXT.
Enter a speed dial number.
Enter a name.
Press STORE.
Press NEXT, PREV, or SELECT and
desired speed dial number.
7. Repeat steps 4 through 6.
8. Press END.
4
DPT Features
❐ Back ground Music (BGM)
Setting / Cancelling
- Be sure the telephone is on-hook.
• Press HOLD button.
OR
- When using the KX-T7436 / KX-T7433 /
KX-T7235 / KX-T7230;
• Press BGM (S3) button.
❑ 003 Extension Number Set
1.
2.
3.
4.
5.
6.
Enter 003.
Press NEXT.
Enter a jack number.
Enter an extension number.
Press STORE.
Press NEXT, PREV, or SELECT and
desired jack number.
7. Repeat steps 4 through 6.
8. Press END.
❑ 004 Extension Name Set
1.
2.
3.
4.
5.
6.
Enter 004.
Press NEXT.
Enter a jack number.
Enter a name.
Press STORE.
Press NEXT, PREV, or SELECT and
desired jack number.
7. Repeat steps 4 through 6.
8. Press END.
❐ Calling Line Identification
Restriction (CLIR)
To restrict the presentation of your number
to the called party
• Off-hook.
• Dial 592.
• On-hook.
To present your number to the called party
• Off-hook.
• Dial 590.
• On-hook.
To change the current setting just for this
call
• Off-hook.
• Dial 591.
• Press CO button.
• Dial the phone number.
❐ Connected Line Identification
Restriction (COLR)
To restrict the presentation of your number
to the calling party
• Off-hook.
• Dial 581.
• On-hook.
To present your number to the calling party
• Off-hook.
• Dial 580.
• On-hook.
201
7
Quick Reference
❐ Display Call Information
Alternating the display (the meter, the
phone number, the phone charge)
• Press CO button.
❐ Do Not Disturb (DND)
Setting / Cancelling
• Off-hook.
• Press the FWD/DND button.
• Dial 1 + extension number /0 / , or 0.
- 1 + extension number (backup station)/0
(operator)/ (no backup) : for setting
- 0 : for cancelling
— A confirmation tone is audible.
• On-hook.
OR
❐ Hotel Application
Room Management
<Example> Message 7: “Cleaned-up”
• Off-hook.
• Dial 7507.
• On-hook.
<Example> Message 8: “Minibar and
charge”
• Off-hook.
• Dial 7508.
• Enter minibar charge.
• On-hook.
❐ Live Call Screening†
Setting the password
- When using the KX-T7436 / KX-T7235;
Setting
• Off-hook.
• Press the FWD/DND button.
• Press the Do not disturb (F2) button.
• Dial the extension number/0 / .
- extension number (backup station)/0
(operator)/ (no backup)
— A confirmation tone is audible.
• On-hook.
❐ Do Not Disturb for Direct Dialling In
Calls
Setting / Cancelling
• Off-hook.
• Dial 54.
• Dial 1 or 0.
- 1 : for setting
- 0 : for cancelling
• On-hook.
• Off-hook.
• Dial 799.
• Enter the password.
• Enter the same password again.
• On-hook.
Cancelling the password
• Off-hook.
• Dial 799.
• Enter the password.
• On-hook.
Setting Live Call Screening
• Press LCS button.
• Enter the password.
Cancelling Live Call Screening
• Press LCS button.
In the Hands-free mode;
Having a conversation with the party
• Off-hook or press LCS button.
Stopping monitoring
❐ Emergency Call
• Press RECALL button or LCS Cancel button.
• Off-hook.
• Press a CO button.
• Dial the desired emergency number.
202
In the Private mode;
Stopping the alert tone
• Press RECALL button or LCS Cancel button.
†: Available when the Digital Super Hybrid System is connected to a Digital
Proprietary Telephone capable Panasonic Voice Processing System
(one that supports digital proprietary telephone integration; e.g. KX-TVP100).
7
Quick Reference
Monitoring the recording message
• Off-hook, or press LCS button or INTERCOM
button.
Having a conversation with the party
• Off-hook.
• Press flashing LCS button.
While having a conversation with another
party;
If you want to terminate the current call
Monitoring
• Off-hook.
• On-hook.
Having a conversation with the party
• Press flashing LCS button.
If you want to hold the current call
Monitoring
• Press HOLD button.
• On-hook.
• Off-hook.
Having a conversation with the party
• Press flashing LCS button.
❐ Log-In / Log-Out
Setting
Using Log-In/Log-Out button
• Off-hook.
• Press Log-In/Log-Out button.
- Log-In : the indicator light is off.
- Log-Out : the indicator light is red.
- Calls in the UCD queue
: the indicator is flashing red.
• On-hook.
Using the feature number
• Off-hook.
• Dial 45.
• Dial 1 or 0.
- 1 : for Log-In
- 0 : for Log-Out
• Dial the hunting grouop extension number.
• On-hook.
❐ Night Service
Switching mode
• Off-hook.
• Dial 78.
• Dial 0 or 1.
- 0 : from Night mode to Day mode
- 1 : from Day mode to Night mode
• On-hook.
OR
- When using the KX-T7436 (Operator only);
• Press Features (F4) button.
• Rotate the Jog Dial until “Night On/Off” is at
the arrow.
• Dial 0 or 1.
- 0 : from Night mode to Day mode
- 1 : from Day mode to Night mode
• Press the SEL (S3) button.
• On-hook.
OR
- When using the KX-T7433 (Operator only);
• Press the SHIFT button until the Jog Dial
operation display.
• Press the FEAT (S3) button.
• Rotate the Jog Dial until “Night Mode” is at
the arrow.
• Dial 0 or 1.
- 0 : from Night mode to Day mode
- 1 : from Day mode to Night mode
• Press the SEL (S3) button.
• On-hook.
OR
- When using the KX-T7235 (Operator only);
• Press Features (F4) button.
• Press NEXT (S3) button twice to go to the
exclusive list.
• Press Night On/Off (F2) button.
• Dial 0 or 1.
- 0 : from Night mode to Day mode
- 1 : from Day mode to Night mode
• On-hook.
203
7
Quick Reference
Confirming the current mode
- Be sure the telephone is idle and on-hook.
• Press #.
Night Button Operation –Setting/Cancelling
• Off-hook.
• Press the Night button.
- To set : the button indicator turns on.
- To cancel : the button indicator turns off.
Confirming the current mode
- Be sure the telephone is idle and on-hook.
• Press the Night button.
❐ Notebook Function
Storing
While having a conversation or in on-hook status;
• Press AUTO DIAL/STORE button.
• Press AUTO DIAL/STORE button again.
• Dial the desired phone number.
• Press SAVE button.
Dialling
• Off-hook.
• Press SAVE button.
- When using the KX-T7436 / KX-T7433 /
KX-T7230 / KX-T7235;
• Dial the phone number.
— To change the current entry;
• Dial and re-dial.
• Off-hook.
❐ Quick Dialling
• Off-hook.
• Dial the quick dial number.
❐ System Working Report
(Manager and operator only)
• Off-hook.
• Dial 794.
• Dial 1 or 0.
- 1 : print out the data
- 0 : clear the data
— A confirmation tone is audible.
• On-hook.
❐ Terminate
❐ Paging – DENY
Setting / Cancelling
• Off-hook.
• Dial 721.
• Dial 1 or 0.
- 1 : for setting
- 0 : for cancelling
— A confirmation tone is audible.
• On-hook.
❑ Phantom Extension
While hearing any tone, dialling, or talking;
• Press Terminate button.
— An internal dial tone is audible.
• Press a CO button.
• Dial the phone number.
❐ Two-Way Recording into Voice Mail†
Recording into your mailbox
• Press Two-Way Record button.
Stopping recording
To call a phantom extension
• Off-hook.
• Press the Phantom button
To transfer a call to a phantom extension
• Press the Phantom button
To answer a phantom extension call
• Press the Phantom button (flashing green).
204
❐ Predial Preparation
• Press Two-Way Record button.
Recording into another mailbox
• Press Two-Way Transfer button.
• Enter extension number or press the desired
DSS button.
Stopping recording
• Press Two-Way Transfer button.
†: Available when the Digital Super Hybrid System is connected to a Digital
Proprietary Telephone capable Panasonic Voice Processing System
(one that supports digital proprietary telephone integration; e.g. KX-TVP100).
7
Quick Reference
5
Operator Service Features
❐ Automatic Overflow and Hurry-Up
Transfer
While having a conversation;
• Press Hurry-Up button.
❐ Class of Service (COS) Switch
Primary switch
• Off-hook.
• Dial 791 + extension number.
• On-hook.
OR
- When using the KX-T7436;
• Press Features (F4) button.
• Rotate the Jog Dial until “COS Primary” is at
the arrow.
• Press the SEL (S3) button.
• Dial extension number.
• On-hook.
OR
- When using the KX-T7433;
• Press the SHIFT button repeatedly until the
Jog Dial operation display appears.
• Press the FEAT (S3) button.
• Rotate the Jog Dial until “COS Primary” is at
the arrow.
• Press the SEL (S3) button.
• Dial extension number.
• On-hook.
OR
- When using the KX-T7235;
• Press Features (F4) button.
• Press NEXT (S3) button twice to go to the
exclusive list.
• Press COS Primary (F4) button.
• Dial extension number.
• On-hook.
OR
- When using the KX-T7436;
• Press Features (F4) button.
• Rotate the Jog Dial until “COS Secondary” is
at the arrow.
• Press the SEL (S3) button.
• Dial extension number.
• On-hook.
OR
- When using the KX-T7433;
• Press the SHIFT button repeatedly until the
Jog Dial operation display appears.
• Press the FEAT (S3) button.
• Rotate the Jog Dial until “COS Second” is at
the arrow.
• Press the SEL (S3) button.
• Dial extension number.
• On-hook.
OR
- When using the KX-T7235;
• Press Features (F4) button.
• Press NEXT (S3) button twice to go to the
exclusive list.
• Press COS Secondary (F5) button.
• Dial extension number.
• On-hook.
❐ CO Incoming Call Information Log
Lock Clear
• Press PROGRAM button + 99.
• Dial 02.
• Dial extension number or .
- extension number : to clear one extension
: to clear all extensions
• Press STORE button.
• Press PROGRAM button.
Secondary switch
• Off-hook.
• Dial 793 + extension number.
• On-hook.
205
7
Quick Reference
❐
Hotel Application
- When using the KX-T7436 / KX-T7235;
Check-In
• Press Hotel (F10) button.
• Press Check-In (F1) button.
• Dial extension number or DSS button.
• Press NEXT (S3) button.
• Press YES (S1) or NO (S3) button.
Check-Out
• Press Hotel (F10) button.
• Press Check-Out (F2) button.
• Dial extension number or DSS button.
• Press NEXT (S3) button.
• Enter minibar charge.
• Press Others (F4) and enter charge.
• Press PRINT (S3) button.
• Press END (S1) button.
• Press YES (S1) or NO (S3) button.
Timed Reminder, Notification for
Unanswered Extension
(KX-T7436 / KX-T7235 only)
• Press Alert button.
If you want to clear the notification;
• Press CLR (S2) button.
If you want to go to the next unanswered
extension;
• Press NEXT (S3) button.
If you want to exit;
• Press MENU (S1) button.
Timed Reminder, Remote (Wake-Up Call)
Setting
• Off-hook.
• Dial 7 1.
• Dial desired extension number or DSS button.
• Enter hour (01 through 12).
• Enter minute (00 through 59).
• Dial 0 or 1.
- 0 : for AM
- 1 : for PM
• Dial 0 or 1.
- 0 : for a one time setting
- 1 : for a daily setting
— A confirmation tone is audible.
• On-hook.
Cancelling
• Off-hook.
• Dial 7 0.
• Dial desired extension number or DSS button.
— A confirmation tone is audible.
• On-hook.
OR
- When using the KX-T7436 / KX-T7235;
Setting
• Press Hotel (F10) button.
• Press Wake up (F3) button.
• Dial the desired extension number or DSS
button.
• Press NEXT (S3) button.
• Enter hour and minute.
• Dial 0 or 1.
- 0 : for AM
- 1 : for PM
• Dial 0 or 1.
- 0 : for a one time setting
- 1 : for a daily setting
• Press PROG (S3) button.
Cancelling
• Press Hotel (F10) button.
• Press Wake up (F3) button.
• Dial the extension number or DSS button.
• Press NEXT (S3) button.
• Press CLR (S2) button.
Checking the setting time (KX-T7436 / KXT7433 / KX-T7230 and KX-T7235 only)
• Off-hook.
• Dial 7 2.
• Dial desired extension number or DSS button.
• On-hook.
OR
206
7
Quick Reference
- When using the KX-T7436 / KX-T7235;
• Press Hotel (F10) button.
• Press Wake up (F3) button.
• Dial the extension number or DSS button.
• Press NEXT (S3) button.
• Press END (S1) button.
❐ Live Call Screening Password
Control†
• Press PROGRAM button + 99.
• Dial 03.
• Dial extension number or .
- extension number : to assign one extension
: to assign all extensions
• Press STORE.
• Press PROGRAM button.
❐ Remote Station Lock Control
• Press PROGRAM button + 99.
• Dial 01.
• Dial extension number or .
- extension number : to lock or unlock one
extension
: to lock or unlock all
extensions
• Dial 1 or 2.
- 1 : to unlock
- 2 : to lock
• Press STORE button.
• Press PROGRAM button.
Special Display Features
6
Special Features —
KX-T7436 / KX-T7433 / KX-T7235
— CO Outgoing Call Log / Extension Dialling
/ Station Speed Dialling / System Speed
Dialling / System Feature Access Menu /
Hotel Application (Operator only)
Press the desired button according to the
messages on the display.
● The operation is performed by following the
messages on the display.
●
• System Feature Access Menu provides a
display of the system features available and
allows access to the following features:
1) Absent Message Capability
2) Paging — External (Access/Answer)
3) Paging — Group (Access/Answer)
4) Background Music (BGM) — External
(Operator only)
5) Call Park (Operator only)
6) Call Pickup, Group
7) Class of Service (COS) Switch (Operator
only)
8) Message Waiting
9) Night Service (Operator only)
10) Paralleled Telephone Connection
By pressing the FWD/DND button after going
off-hook, a new display appears. From this
display, the following additional System
Feature can be operated.
1) Call Forwarding
2) Do Not Disturb (DND)
— Refer to Section 4.4, “Special Display
Features.”
— For “BGM — External” and “Class of
Service (COS) Switch” features, refer to
Section 4.3, “Operator Service Features.”
— For “Call Forwarding” and “Do Not Disturb
(DND)” features, refer to Section 4.2, “DPT
Features.”
†: Available when the Digital Super Hybrid System is connected to a Digital
Proprietary Telephone capable Panasonic Voice Processing System
(one that supports digital proprietary telephone integration; e.g. KX-TVP100).
207
7
Quick Reference
8
SLT and ISDN Telephone Features
❐ Calling Line Identification
Restriction (CLIR)
To restrict the presentation of your number
to the called party
• Off-hook.
• Dial 592.
• On-hook.
To present your number to the called party
• Off-hook.
• Dial 590.
• On-hook.
❐ Do Not Disturb (DND)
Setting / Cancelling
• Off-hook.
• Dial 710.
• Dial 1 + extension number/0 / , or 0.
- 1 + extension number (backup station)/0
(operator)/ (no backup) : for setting
- 0 : for cancelling
— A confirmation tone is audible.
• On-hook.
❐ Do Not Disturb for Direct Dialling In
Calls
Setting / Cancelling
❐ Call Transfer – to CO Line
— Screened Call Transfer
While having a conversation;
• Press Register Recall button.
• Dial the line access code (9 or 81 through 88).
• Wait for an answer and announce.
• On-hook.
❐ Connected Line Identification
Restriction (COLR)
To restrict the presentation of your number
to the calling party
• Off-hook.
• Dial 581.
• On-hook.
To present your number to the calling party
• Off-hook.
• Dial 580.
• On-hook.
• Off-hook.
• Dial 54.
• Dial 1 or 0.
- 1 : for setting
- 0 : for cancelling
• On-hook.
❐ Emergency Call
• Off-hook.
• Dial the line access code (9 or 81 through 88).
• Dial the desired emergency number.
❐ Hotel Application
Room Management
<Example> Message 7: “Cleaned-up”
• Off-hook.
• Dial 7507.
• On-hook.
<Example> Message 8: “Minibar and
charge”
• Off-hook.
• Dial 7508.
• Enter minibar charge.
• On-hook.
208
7
Quick Reference
❐ Log-In / Log-Out
Setting
• Off-hook.
• Dial 45.
• Dial 1 or 0.
- 1 : for Log-In
- 0 : for Log-Out
• Dial the hunting grouop extension number.
• On-hook.
❐ Night Service
Switching mode
• Off-hook.
• Dial 78.
• Dial 0 or 1.
- 0 : from Night mode to Day mode
- 1 : from Day mode to Night mode
• On-hook.
❐ Operator Call
General
• Off-hook.
• Dial 0.
Specific call
• Off-hook.
• Dial the operator call number.
❐ Quick Dialling
• Off-hook.
• Dial the quick dial number.
209
8
Appendix
Display Examples
Examples (in alphabetical order)
3434: Primary
• “Class of Service (COS) Switch” is set to primary status.
4545: Secondary
• “Class of Service (COS) Switch” is set to secondary status.
1234567890
• Called by the ISDN line with the CLIP feature* (phone number).
* The ISDN line with the CLIP feature
Provides you with a caller’s information, such as his/her name and
telephone number, on the CO line assigned to receive ISDN service call.
Refer to the Installation Manual.
JOHN WHITE
• Called by the ISDN line with the CLIP feature* (name).
01:01111111
• Sequence number and the caller’s phone number
(KX-T7433 / KX-T7230).
01:BOB HANKS
• Sequence number and the caller’s name
(KX-T7433 / KX-T7230).
01:30 09:00AM 2
• Sequence number, date, time and the number of times called
(KX-T7433 / KX-T7230).
CLIR On
• Complete to set “Calling Line Identification Restriction (CLIR).”
CLIR Off
• Cancel “Calling Line Identification Restriction (CLIR).”
CO01:$00001.15
• CO line charge in Dollars.
CO01:00005
• CO line meter.
— Pressing the corresponding CO button allows you to
alternate between this display and the about Example.
COLR On
210
• Complete to set “Connected Line Identification Restriction
(COLR).”
8
Appendix
COLR Off
DND
Ext201
• Cancel “Connected Line Identification Restriction (COLR).”
• Complete to set “Do Not Disturb (DND).”
DND-DDI Set
• Complete to set “Do Not Disturb for Direct Dialling In Call.”
DND-DDI Cancel
• Cancel “Do Not Disturb for Direct Dialling In Call.”
LCS
• Complete to set “Live Call Screening (LCS).”
LCS Cancel
• Cancel “Live Call Screening (LCS).”
Log-in
• Log-In mode status.
— “Log-In / Log-Out”
Log-out
• Log-Out mode status.
— “Log-In / Log-Out”
Paging Deny On
• Complete to set “Paging — Deny.”
Paging Deny Off
• Cancel “Paging — Deny.”
Password: 123
• Complete to set the LCS password.
— “Live Call Screening (LCS)”
Password Cancel
SWR Data Dump
SWR Data Clear
• Cancel the LCS password.
— “Live Call Screening (LCS)”
• “System Working Report” is printed out.
• “System Working Report” is cleared.
211
8
Appendix
Examples — in Station Programming mode
212
ACSM:00450
• Total account code meter is assigned.
ACSM:$00099.99
• Total account code in Dollars is assigned.
Alert
• Alert button is assigned.
C.W. Tone 1
• Select Call Waiting tone.
Hurry up to-223
• Hurry-Up button is assigned.
LCS
• Live Call Screening (LCS) button is assigned.
LCS Cancel
• Live Call Screening (LCS) Cancel button is assigned.
Log-in GRP1234
• Log-In / Log-Out button is assigned.
Terminate
• Terminate button is assigned.
2 WAY-REC:1234
• Two-Way Record button is assigned.
2 WAY-TRANS:1234
• Two-Way Transfer button is assigned.
8
Appendix
Feature Number List
Numbers listed below are the initial factory setting (default value). There are the flexible
feature numbers and the fixed feature numbers. To change the flexible feature numbers, follow
the procedure described in the “System Programming” section in the Installation Manual.
Flexible Feature Numbers
Feature
1st hundred extension block
2nd hundred extension block
3rd through 16th hundred extension block
Absent Message Capability set/cancel
Account Code Entry
Automatic Callback Busy (Camp-On) cancel
Background Music (BGM) — External on/off
Call Forwarding set/cancel
Call Forwarding to CO Line
Call Forwarding — Follow Me set/cancel
Call Forwarding — from Hunting Group set
/cancel
Call Hold
Call Hold, Retrieve outside call/intercom call
Call Park/Call Park Retrieve
Call Pickup, CO Line
Call Pickup, Directed
Call Pickup, Group
Call Pickup Deny set/cancel
Call Waiting set/cancel
Class of Service (COS) Switch — Primary
Class of Service (COS) Switch — Secondary
CLIR once/continue/cancel
CLIP / COLP
— for a CO line
— for an extension
— to select a desired CLIP number for once
CO Incoming Call Information Log Lock lock
unlock
CO Incoming Call Information Log Lock Mode
set/cancel
COLR set/cancel
Default
Required Additional Digits
2
3
—
750
49
46
65
710
710
710
714
714
50
53 / 51
52
4
41
40
720
731
791
793
59
0 through 9, 00 through 99
0 through 9, 00 through 99
0 through 9, 00 through 99
1-9/0
Account code + #(99)
2-5 + EXTN. (extension number) / 0
6 + phone number + #
7 + EXTN. / 8 + EXTN.
1 + forwarding EXTN. + EXTN.
0 + forwarding EXTN.
0-9
EXTN.
1/0
1/0
EXTN.
EXTN.
1/2/0
711
711
711
57
57
56
1
2
3 + CLIP number + #
lock code (000 - 999) twice
lock code (000 - 999)
1/0
58
1/0
213
8
Appendix
Feature
Do Not Disturb (DND) set/cancel
Do Not Disturb for Direct Dialling In set/cancel
Doorphone Call calling/door open (for KX-TD816)
Doorphone Call calling/door open (for KX-TD1232)
Doorphone Call Forwarding to CO Line — to set
/ cancel
— to store / clear the phone number
Electronic Station Lockout set/
cancel
Emergency Call
External Feature Access
Live Call Screening Password set/
cancel
Log-In/Log-Out
Message Waiting set/cancel/callback
Night Service night mode/day mode
Operator Call — General call
Operator Call — Specific call
Outgoing Message (OGM) — recording / playback
Outward Dialling,
— Line Access, Automatic / LCR
— Line Access, CO Line Group
Paging — All
Paging — External (for KX-TD816)
Paging — External (for KX-TD1232)
Paging — External Answer/TAFAS Answer
(for KX-TD816)
Paging — External Answer/TAFAS Answer
(for KX-TD1232)
Paging — Group
Paging — Group Answer
Paging — Deny set/cancel
Paralleled Telephone Connection set/cancel
Pickup Dialling (Hot Line) assign/set/cancel
Redial, Last Number (— for SLT)
Station Feature Clear
Station Speed Dialling
Station Speed Dialling store
214
Default
Required Additional Digits
710
54
61 / 55
61 / 55
716
716
715
1 + (EXTN./ /0) / 0
1/0
1-2
1-4
doorphone number / + 0
doorphone number / + 1
0 / 1 + doorphone number /
+ phone number +#
lock code (000 - 999) twice
lock code (000 - 999)
77
77
114, 000
64
799
799
45
70
78
0
—
712
password (000 - 999) twice
password (000 - 999)
1 / 0 + hunting group EXTN. number
1 + EXTN. / 0 + EXTN. / 2
1/0
1 / 2 + OGM number
9
8
62 or 63
62
62
0/1-2
0/1-4
42
1-2
42
63
43
721
69
74
#
790
6
60
1-4
00 / 01 - 16
1-8
1/0
1/0
2 + phone number + # / 1 / 0
0-9
(0 - 9) + phone number + #
8
Appendix
Feature
System Speed Dialling (— for SLT)
System Working Report print out the data/
clear the data
Timed Reminder set/
cancel/confirm
Timed Reminder, Remote set/
cancel/confirm
Default
Required Additional Digits
794
000 - 499
1/0
76
76
7
7
1 + hhmm* + (0 / 1) + (0 / 1)
0/2
1 + EXTN. + hhmm* + (0 / 1) + (0 / 1)
0 + EXTN. / 2 + EXTN.
* hhmm
hh: hour (01-12)
mm: minute (00-59)
215
8
Appendix
Fixed Feature Numbers
Feature
While busy tone is heard
Automatic Callback Busy (Camp-On)
Busy Station Signalling (BSS)
Off-Hook Call Announcement (OHCA)
While Do Not Disturb tone is heard
Do Not Disturb (DND) Override
While calling or talking
Account Code Delimiter
Alternate Calling — Ring/Voice
Conference
Door open
Pulse to Tone Conversion
When the telephone is on-hook
Background Music (BGM) on/off
Day/Night mode display
Time display/date display switching
Default
6
2
2
2
#/99
3
5
#
HOLD
(TRANSFER)
#
Conditions
• Extension numbers can be two to four digits in length. Any number can be set as the leading
first or second digit.
• Flexible feature numbers can only be dialled during dial tone.
• When “ ” or “#” are included in a feature number, it will not be possible for users of loop
disconnect (LD) telephones to access the feature.
Programming References
• User Programming (Manager Programming) (Section 3)
[003] Extension Number Set
• System Programming — Installation Manual
[003] Extension Number Set
[100] Flexible Numbering
216
Additional Information
Feature Title
Initial Setting
Display Examples
Section
& Pages
1.1 Configuration
1-15
through
1-17
8 Appendix
7-5
through
7-8
Revision
The changed display examples are shown below.
Display Contrast Adjustment
(KX-T7436 / KX-T7433 / KX-T7235 / KX-T7230 only)
Contrast: 3
To adjust the handset receiver volume
Handset: 3
To adjust the headset volume
Headset: 3
To adjust the ringer volume
Ringer: 3
To adjust the speaker volume
SP: 12
To confirm the assigned
function data
Station Programming
Outline
Charge Fee Reference
New Rate Set
Station Speed Dialling
Number/Name
Assignment
2.1 Programming This section has been changed as shown on page 24 .
Instructions
2-3
2.1 Programming The outline has been changed as shown on page 25 .
Instructions
2-5
2.2
Programming
2-12
2.2
Programming
2-34
This feature has become unavailable.
Please disregard all descriptions about this feature.
This feature has been changed as shown on page 46 .
217
Additional Information
Feature Title
Account Code Entry
Section
& Pages
4.2
DPT Features
3-10
through
3-11
Revision
The “In “Verified - All Calls” mode” section has been changed
as follows.
In “Verified - All Calls” mode
• You must always enter a pre-assigned account code when
making any of the following calls unless it has previously
been stored in memory:
a) Call Forwarding — to CO Line
b) Manual Dialling (Selecting a CO line)
c) Notebook Function
d) One-Touch Dialling
e) Pickup Dialling (Hot Line)
f) Redial, Last Number
g) Redial, Saved Number
h) Station Speed Dialling
i) System Speed Dialling
In the “General” section, the following conditions have been
added.
• If an entered account code matches a pre-assigned account
code when making an outside call, the charge fee of the
account code is totalized.
• If you use an account code which is for a private call, the
phone number of the destination is not recorded on SMDR.
The following program has been added to the Programming
References section.
• System Programming — Installation Manual
[105] Account Codes
Please disregard the following condition.
• If the telephone is off-hook before call back ringing starts,
this feature is cancelled.
Automatic Callback Busy
(Camp-On)
4.2
DPT Features
3-15
Call Waiting
4.2
DPT Features
3-46
The following sentence has been added to the first condition.
3) When a doorphone call comes in.
CO Incoming Call
Information Display
4.2
DPT Features
3-48
This feature has been chaged as shown on page 76 .
CO Incoming Call
Information Log
4.2
DPT Features
3-50
The following program has been added to the Programming
References section.
• System Programming — Installation Manual Addendum
[622] Incoming Call Display
218
Additional Information
Feature Title
Data Line Security
Do Not Disturb (DND)
Section
& Pages
Revision
4.2
This feature has become unavailable.
DPT Features Please disregard all descriptions about this feature.
3-57
6.2 SLT and
ISDN Telephone
Features
5-34
4.2
This feature has been changed as shown on page 82.
DPT Features
3-59
Doorphone Call
4.2
DPT Features
3-63
This feature has been changed as shown on page 87.
Handsfree Answerback
4.2
DPT Features
3-69
The following conditions has been added.
• When an outside call is transferred to an extension, this
feature is overridden and a ringing tone is heard.
Intercom Calling
4.2
DPT Features
3-72
Message Waiting
4.2
DPT Features
3-75
The following programs have been added to the Programming
References section.
• User Programming (Manager Programming) (Section 3)
[003] Extension Number Set
[004] Extension Name Set
The following programs have been added to the Programming
References section.
• System Programming — Installation Manual
[214] Message Waiting Ring Interval Time
[990] System Additional Information, Field (9)
Night Service
4.2
DPT Features
3-76
This feature has been chaged as shown on page 106.
Off-Hook Call
Announcement (OHCA)
4.2
DPT Features
3-77
This feature has been chaged as shown on page 109.
Operation Call
4.2
DPT Features
3-79
This feature has been chaged as shown on page 111.
Paging — SUMMARY
4.2
DPT Features
3-84
The following condition has been added to the Conditions
section.
• If you want to deny the page, refer to “Paging —DENY.”
The following feature has been added to the Feature
References section.
Paging — DENY
219
Additional Information
Feature Title
Section
& Pages
Revision
Redial, Automatic
4.2
DPT Features
3-98
The description has been changed as follows.
It is possible to redial the last dialled number, saved number,
“CO Outgoing Call Log,” “CO Incoming Call Information
Log,” and “Notebook Function” in the handsfree mode.
Redial will be repeated a programmed number of times until
the called party answers.
The following features have been added to the Feature
References section.
CO Incoming Call Information Log
CO Outgoing Call Log (4.4/Special Display Features)
Notebook Function
Secret Dialling
4.2
DPT Features
3-101
The following program has been added to the Programming
References section.
• System Programming — Installation Manual Addendum
[990] System Additional Information, Field (53)
Station Feature Clear
4.2
DPT Features
3-102
This feature has been changed as shown on page 116.
System Speed Dialling
4.2
DPT Features
3-105
The first condition has been changed as follows:
• System Speed Dialling numbers must be stored either
through User (Manager) or System Programming.
The following programs have been added to the Programming
References section.
• User Programming (Manager Programming) (Section 3)
[001] System Speed Dialling Number Set
[002] System Speed Dialling Name Set
Timed Reminder
4.2
DPT Features
3-107
The operation has been changed as follows.
Stopping the alarm ringing
1. Lift the handset or press the
1
SP-PHONE/MONITOR
button.
• Pressing any key also stops the
alarm ringing.
The following program has been added to the Programming
References section.
• User Programming (Manager Programming) (Section 3)
[000] Date and Time Set
The following section has been added.
Feature References
Hotel Application — Timed Reminder, Remote
(4.3/Operator Service Features)
220
Additional Information
Feature Title
Section
& Pages
Toll Restriction Override
Toll Restriction Override
by Account Code Entry
4.2
DPT Features
3-108
Toll Restriction Override
Toll Restriction Override
by System Speed Dialing
4.2
DPT Features
3-109
Trunk (CO Line ) Answer
From Any Station
(TAFAS)
4.2
DPT Features
3-110
Revision
The following program has been added to the Programming
References section.
• System Programming — Installation Manual
[105] Account Codes
This feature has been chaged as shown on page 119.
The following sentence has been added to the first condition.
c) The floating number* of an external pager is dialled as the
Direct Dialling In (DDI) destination.
4.3 Operator Service
Features
4.3 Operator This despcription has been changed as shown on page 122.
Service Features
3-114
CO Incoming Call
Information Log Lock
Clear
4.3 Operator This feature has been changed as shown on page 127.
Service Features
3-116
Remote Station Lock
Control
4.3 Operator This feature has been changed as shown on page 128.
Service Features
3-120
Hotel Application
4.3 Operator This feature has been changed as shown on page 129.
Service Features
3-121
4.4 Special Display
Featues
(— for KX-T7235)
This section has been changed as shown on page 140.
4.4 Special
Display Features
(— for KX-T7235)
One-Touch Access
Assignment for System
Features
5.2 DSS Console This feature has been changed as shown on page 157.
Features
4-5
Account Code Entry
3-126
6 SLT and ISDN
Telephone
Features
5-8
Automatic Callback Busy 6 SLT and ISDN
Telephone
(Camp-On)
Features
5-11
Call Waiting
6 SLT and ISDN
Telephone
Features
5-31
This feature has been changed as shown on page 160.
This feature has been changed as shown on page 162.
The following sentence is added to the first condition.
3) When a doorphone call comes in.
221
Additional Information
Feature Title
Do Not Disturb (DND)
Doorphone Call
Intercom Calling
Message Waiting
Night Service
Off-Hook Call
Announcement (OHCA)
Section
& Pages
6 SLT and ISDN
Telephone
Features
5-35
6 SLT and ISDN
Telephone
Features
5-37
6 SLT and ISDN
Telephone
Features
5-42
6 SLT and ISDN
Telephone
Features
5-42
6 SLT and ISDN
Telephone
Features
5-45
6 SLT and ISDN
Telephone
Features
5-45
Revision
This feature has been changed as shown on page 174.
This feature has been changed as shown on page 178.
The following programs have been added to the Programming
References section.
• User Programming (Manager Programming) (Section 3)
[003] Extension Number Set
[004] Extension Name Set
This feature has been changed as shown on page 187.
This feature has been changed as shown on page 190.
The first condition has been changed as follows:
• OHCA is performed the same way as the “Busy Station
Signaling (BSS)” feature. The KX-T7436 / KX-T7235 user
can select to use the BSS feature instead of the OHCA
feature by System Programming.
The following section has been added.
Programming References
• System Programming — Installation Manual
[990] System Additional Information, Field (47)
Operator Call
6 SLT and ISDN This feature has been changed as shown on page 192.
Telephone
Features
5-46
Station Feature Clear
6 SLT and ISDN
Telephone
Features
5-63
6 SLT and ISDN
Telephone
Features
5-65
System Speed Dialling
222
This feature has been changed as shown on page 194.
The first condition has been changed as follows:
• System Speed Dialling numbers must be stored either
through User (Manager) or System Programming.
The following programs have been added to the Programming
References section.
• User Programming (Manager Programming) (Section 3)
[001] System Speed Dialling Number Set
[002] System Speed Dialling Name Set
Additional Information
Feature Title
Section
& Pages
Revision
Timed Reminder
6 SLT and ISDN The following program has been added to the Programming
Telephone
References section.
Features
• User Programming (Manager Programming) (Section 3)
5-67
[000] Day and Time Set
The following section has been added.
Feature References
Hotel Application — Timed Reminder, Remote
(4.3/Operator Service Features)
Toll Restriction Override
Toll Restriction Override
by Account Code Entry
6 SLT and ISDN The following program has been added to the Programming
Telephone
References section.
Features
• System Programming — Installation Manual
5-68
[105] Account Codes
Toll Restriction Override
Toll Restriction Override
for System Speed Dialing
6 SLT and ISDN This feature has been chaged as shown on page 195.
Telephone
Features
5-68
Trunk (CO Line) Answer
From Any Station
(TAFAS)
6 SLT and ISDN The following sentence has been added to the first condition.
Telephone
c) The floating number* of an external pager is dialled as the
Features
Direct Dialling In (DDI) destination.
5-70
Quick Reference
7
The description has been changed as follows.
Quick Reference This list is divided into the following eight sections. Refer to
6-2
each section as needed.
1.) Basic Operation
2.) Station Programming
3.) User Programming (Manager Programming)
4.) DPT Features
5.) Operator Service Features
6.) Special Display Features
(— KX-T7436 / KX-T7433 / KX-T7235)
7.) DSS Console Features
8.) SLT and ISDN Telephone Features
When setting “Idle Line Preference — Outgoing,” “No Line
Preference — Outgoing,” or “Prime (CO Line) Preference,”
press the INTERCOM button after going off-hook to activate
the following operations. (Pressing the INTERCOM button
directly without going off-hook is also available.)
223
Additional Information
Feature Title
Section
& Pages
Revision
Automatic Callback Busy
7
The following operation has been added.
Quick Reference
(Camp-On)
Cancelling
6-8
• Off-hook.
• Dial 46.
• On-hook.
Background Music
7
The operation has been changed as shown on page 201.
Quick Reference
(BGM)
6-8
Do Not Disturb (DND)
7
The operation has been changed as shown on page 202.
Quick Reference
6-8
Night Service
7
The operation has been changed as shown on page 203.
Quick Reference
6-13
6 Special Display
7
The description has been changed as shown on page 207.
Quick Reference
Features
6-19
Display Example
Feature Number List
Printed in Japan
8
Appendix
7-5
8
Appeneix
7-12
Please disregard the following display examples.
(46)
Data Mode Off
(47)
Data Mode On
The list has been changed as shown on page 213.
PSQX1291XA
KW0797KM2079M