1
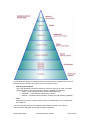
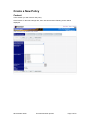
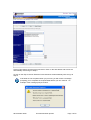
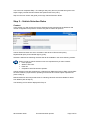
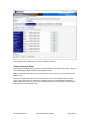
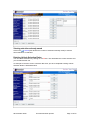
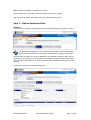
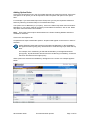
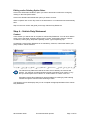
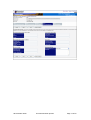
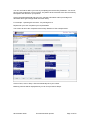
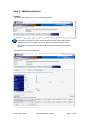
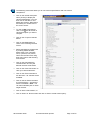
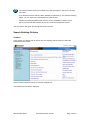
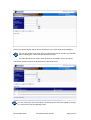
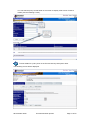
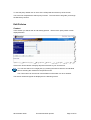
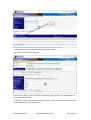
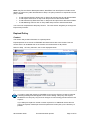
Fleetscape Online User Manual Policy 26 November 2009 Uncontrolled when printed Page 1 of 25 Table of Contents Policy ................................................................................................................... 3 Create a New Policy ..............................................................................................................5 Step 1 - Service Delivery Descriptions .....................................................................6 Step 2 - Vehicle Selection Rules ..............................................................................8 Step 3 - Option Selection Rules ...............................................................................11 Step 4 - Vehicle Duty Statements.............................................................................13 Step 5 - Matching Vehicles – page...........................................................................17 Search Existing Policies ........................................................................................................19 Edit Policies ...........................................................................................................................22 Expired Policy ........................................................................................................................24 26 November 2009 Uncontrolled when printed Page 2 of 25 Policy Overview Whole-of-Government, Departmental and individual agency policy is embedded into the Fleetscape system to enable informed decision making. This ensures that the vehicles selected meet your service delivery requirements and provides outputs of compliant vehicles to select. Policy has a ‘parent to child’ relationship in Fleetscape with whole-of-Government policy flows down to agency policy which in turn flows down the agency structure. Whole-of-Government policies are automatically embedded in Fleetscape and are inherited by all agencies. Example, for SES policy, agencies will inherit these rules and do not need to create their own SES policy. Policies are set up in Fleetscape by the Agencies Policy Managers and are converted into business rules which reflect the services delivered by the agency and the agency’s organisational structure. Online Ordering Officers will only see those vehicles available for lease from QFleet that comply with their agency’s policy (as defined in the business rules). Content This section of the User manual will guide the Policy Manager through: • Creating a New Policy through the following steps: Step 1 - Service Delivery Descriptions Step 2 - Vehicle Selection Rules Step 3 - Option Selection Rules Step 4 - Vehicle Duty Statements Step 5 - Matching Vehicles Search function Edit function Expired policy Policy rules contain the appropriate compliant vehicle selection rules and option (accessory) selection rules. Each policy will consist of: • Service Delivery Description A name selected by your agency that should reflect the service delivery that vehicles will perform. • Business Group The structure of Business Groups is designed to reflect your agency’s operational structure. For example, G/C5/HLTH/NQ identifies that NQ is a region in Queensland Health and is part of Portfolio 5 within Queensland Government. The diagram below illustrates the hierarchy of a Business Group Structure. 26 November 2009 Uncontrolled when printed Page 3 of 25 Current Business Groups are already listed in the system and you will be able to select a Business Group relevant to your agency from a Drop Down menu. • Operating Environment This is the operating environment where the vehicle is going to be used. You will be required to select one or more from the following operating environments: • Metro – city and major business centre metropolitan area. • Regional – country districts outside major centres. • Remote – isolated locations generally requiring off road operating capability. • Duty Describes the purpose a vehicle will be used e.g. Administration - Pool, Operational – Pool, SES etc. You are now ready to set up policy based vehicle selection rules for your agency. The next section will guide you through creating a new Policy. 26 November 2009 Uncontrolled when printed Page 4 of 25 Create a New Policy Content In this section you will create a new policy. Click Policies on the task manager bar, then click New and the following screen will be displayed: 26 November 2009 Uncontrolled when printed Page 5 of 25 Step 1 – Service Delivery Description The first step is to determine a Service Delivery Description. A Service Delivery Description is a name that you allocate to reflect the service delivery that vehicles will perform in a specific area. For example, you may set up a policy specific to North Region and the Service Delivery Description name could be ‘North Region’ – or whatever you feel is appropriate for your agency. You can set up as many Service Delivery Descriptions as required. However this should be done with QFleet assistance. Fleetscape Tab Headings at the top of the screens will also guide you through the policy process. They are ordered from Step 1 to Step 5. The step number and name will be displayed in dark blue to indicate which section you are working on. See screen below. You are now ready to complete the new policy fields, which consist of: • • • • • • • Service Delivery Description (free text field to be defined by individual agencies). Business Group (QFleet requirement to reflect an agency’s hierarchical structure). Operating Environment (Metro, Regional or Remote). Duty (the duty that the vehicle will perform). Policy “Effective from” date. Policy “Expires on” date. Status (of policy e.g. active/ inactive). Enter policy description fields by: • • • • • • • Click in Service Delivery Description field and type in Service Delivery Description name. Click on the Applied to Business Group drop down menu and select the appropriate Business Group from the list. Click on the Applied to Operating Environment(s) drop down menu and select appropriate environment from the list (e.g Metro, Regional and/or Remote). You can select one, two or all three of the environments. Click on the Applied to Duty(ies) drop down menu and select appropriate duty from the list (e.g. Admin – Pool, Ops and/or SES). You can select more than one duty by holding the Control key down. The With Effect From date is the date the policy is to be effective from and must be set from at least the next working day. Use the drop down menu to select a date from the calendar. The Expires On date is the date on which the policy is to be reviewed. Use the drop down menu to select a date from the calendar. The status field will appear as Inactive until the actual With Effect From date arrives then the status will change to Active. The last two fields will automatically populate with the date the policy was Created On and who the policy was Created By. This creates an audit trail for Policy Managers. When you have entered all the above fields the screen displays: 26 November 2009 Uncontrolled when printed Page 6 of 25 Click on Save button and the screen will save or Click on the Next button and screen will automatically save and go to Step 2. Or click on the Step 2 Vehicle Selection Rules tab which will automatically save and go to Step 2. If all fields are not completed when you proceed, you will receive a message prompting you to complete the required fields before you can continue. An example of the message prompt is below: 26 November 2009 Uncontrolled when printed Page 7 of 25 You have now completed Step 1 of creating a new policy and can proceed through the next steps to apply Vehicle Selection Rules and Option Rules to the policy. Step 2 in the next section will guide you through Vehicle Selection Rules. Step 2 – Vehicle Selection Rules Content In this section you will choose the Vehicle Selection Rules to determine the attributes and vehicle configuration/s required to meet the duty that a vehicle will perform. Vehicle Selection Rules are set in accordance with whole-of-Government policy, Departmental policy and individual agency policy. Selections will limit the matching vehicles that will be available in the online ordering module. When you set up vehicle selection rules it is important that you also consider: • Fit for purpose. • Whole of life costs. • Fleet mix. • Compliance with Government policies. Vehicle selection rules are supported by a Vehicle Duty Statement (refer to Step 4) and reflect the service delivery requirements, operating environment and vehicle option requirements (refer to Step 3). Defined selection rules will provide a list of ‘matching vehicle/s’ that are available for lease from QFleet (refer to Step 5). The following screen will be displayed for Step 2: 26 November 2009 Uncontrolled when printed Page 8 of 25 The following steps will guide you through completion of Step 2. Vehicle Selection Rules Select vehicle selection rules by clicking on the Add button to the right of each field. A pop up menu will display available selections (see below screen). Note: This pop up menu will remain at the top of the screen even as you move further down adding rules. Click on the required selection (you can select more than one by holding down the Control button). Click Save and your selection/s will appear under each field heading. Repeat this step to add further rules. You don’t have to select rules from every category; only select what is appropriate for the relevant policy. 26 November 2009 Uncontrolled when printed Page 9 of 25 Viewing selections already saved Click on the 2 saved (this denotes the number of selections already made) to view all saved selections in that field. Deleting Vehicle Selection Rules You can delete selections by clicking on the box. This will delete the current selection and you can add another one. An example of what the screen could look like when you have completed entering Vehicle Selection Rules is illustrated below: 26 November 2009 Uncontrolled when printed Page 10 of 25 Note: Greenhouse Rating is a mandatory inclusion. When finished click on the Step 3 tab or Next button to proceed to Step 3. Step 3 in the next section will guide you through Option Selection Rules. Step 3 – Option Selection Rules Content In this section you will be selecting options (accessories) that you want to apply to a policy. The Option Rules identify the vehicle options that complete a vehicle configuration. Option selection is limited to those options supporting the matching vehicle type/s. Selection tabs will require you to select Mandatory (automatically included in each vehicle quote when online ordering) or Not Available (the addition of these accessories will require policy exception authorisation). All other accessories will be available for selection in online ordering. In Step 3 the following screen will be displayed: 26 November 2009 Uncontrolled when printed Page 11 of 25 Adding Option Rules Click on the drop down menu in the Group field and select an option from the list. If there are sub-options for an option you will be required to select a specific sub-option in the Option field. For example, if you select Mud Flaps at the Group level you may be required to define this further by selecting Front Mud Flaps or Front/Rear Mud Flaps. If an option is to be Mandatory in your policy, click on the Status drop down menu and select Mandatory. If you want to make an accessory Not Available for selection, click on the Status drop down menu and select Not Available. Note: Every other vehicle option will be listed on the Online Ordering Module and will be available for selection. Click on the Add Options tab. Complete these steps to add further options. All options will appear on the screen in order of selection. Option Selection Rules that have been nominated as Mandatory or Not Available in the highest business group policy will flow down to all business groups under that top level. For example, if air conditioning is selected as Mandatory in the highest business group policy, all policies below will show that air conditioning is mandatory, and that it has been inherited from the higher policy. When options are selected and added they will appear on the screen. An example appears below: 26 November 2009 Uncontrolled when printed Page 12 of 25 Editing and/or Deleting Option Rules Click on the Edit button beside an option you wish to amend and confirm the change by clicking on the Edit Option button. Click on the Delete button beside the option you wish to remove. When complete click on the Step 4 tab or the Next button. Your selections will automatically save. Step 4 in the next section will guide you through Vehicle Duty Statement. Step 4 – Vehicle Duty Statement Content In this section you will be able to complete a Vehicle Duty Statement. You can enter data in some or all of the fields: Operating Environment; Terrain; Predominant Adverse Climatic Conditions; Primary Duty; Required Capability; and/or Typical Operating Trip. Completing a Vehicle Duty Statement is not mandatory; however, it will further define your policy rules for vehicle selection. The Vehicle Duty Statement reflects the main service delivery the vehicles will perform. For example, an Administrative Vehicle would likely to be used in a “city” and you would expect it to be driven on “sealed roads” for “100%” of its use. Completed Vehicle Duty Statements will be available for viewing by staff ordering vehicles through the Vehicle Online Ordering module. The following screen will display and you can complete the appropriate fields of the Vehicle Duty Statement: 26 November 2009 Uncontrolled when printed Page 13 of 25 26 November 2009 Uncontrolled when printed Page 14 of 25 Important: Please read the following information Hover the curser over the black bolded headings (e.g. Operating Environment) to view the following information, which will provide you with definitions. Operating Environment - Estimate, using percentages, how much time the vehicle is expected to operate in each of the stated environments (e.g. if a vehicle is expected to operate in a city environment for 80% of its time, then enter 80 against City). Must add up to 100%. Definitions of Operating Environment: • City – major business centre metropolitan area. • Regional – country districts outside major centres. • Remote – isolated locations generally requiring off road operating capability. Terrain – Estimate, using percentages, how much time the vehicle is expected to operate in each of the stated terrains (e.g. if a vehicle is expected to operate on sealed roads for 80% of its time, then enter 80 against sealed roads). Must add up to 100%. Definitions of each Terrain: • Sealed Roads –For example any bitumen or concrete surface free of loose materials. • Unsealed Formed Roads – Graded and compacted gravel or dirt surfaces. • Off Road – Meaning that there has been no surface preparation for vehicle use. Predominant Adverse Climatic Conditions – Estimate, using percentages, how much time the vehicle is expected to operate in each of the climatic conditions (e.g. if a vehicle is expected to operate in Dry/Dusty/Arid conditions for 80% of its time, then enter 80 against Dry/Dusty/Arid). This need not add up to 100%. Definitions of each Climatic Condition: • Dry/Dusty/Arid – Climates that may result in particle dust in contact with vehicle body and entering working parts of the vehicle. • Seasonal Wet / River Crossing – Climates that may result in water entering working parts of the vehicle. • Coastal/Sand/Salt Exposure – Climates that may result in substances with eroding effects (such as salt) attacking exterior body and entering working parts of the vehicle. Primary Duty – Estimate, using percentages, how much time the vehicle is expected to be performing each of the primary duties (e.g. if a vehicle is expected to carry passengers for 80% of its time, then enter 80 against Passenger Carriage. This need not add up to 100%. Definitions of each Primary Duty: • Passenger Carriage – The transport of humans with no excessive cargo. • Load/ Goods Carriage – The transport of goods using the main body of the vehicle (e.g. roof rack or boot space), not the use of exterior bodies such as trailer. • Towing Loads – The transport of goods using an external body of the vehicle (e.g. a trailer). Required Capability – Provide indications of the required capability of the vehicle. Definitions of each Capability: • Passenger Number – Enter maximum number of passengers the vehicle will be required to carry. • Load Carriage – Enter maximum load carriage in kilograms. • Towing Capability – Enter maximum towing capability in kilograms. Typical Operating Trip – Provide indications of the distance of a typical operating trip expected of the vehicle. Choose from: • Less than 100km. • Less than 250km. • Less than 500km. • More than 500km. 26 November 2009 Uncontrolled when printed Page 15 of 25 You can now further define your rules by completing the Vehicle Duty Statement. You do not have to make a selection in every section; only define what is relevant to the Service Delivery Description and relevant to your policies. Click in the appropriate field and type in the relevant information and/or percentages as described above (percentage fields must total 100%). For example - Operating Environment - City 95 Regional 5. Repeat until you have completed your required fields. The screen will show the completed Vehicle Duty Statement. See example below: Click on Save, Next or Step 5 Tab to automatically save your entries. Matching vehicles will be displayed and you can now proceed to Step 5. 26 November 2009 Uncontrolled when printed Page 16 of 25 Step 5 – Matching Vehicles Content This section will enable you to view the matching vehicles. The Matching Vehicle list shows all vehicles that meet the rules and the options (accessories) you have defined in Vehicle Selection Rules and Option Rules. The Matching Vehicles also reflects the vehicles that are available for lease from QFleet. The following screen will be displayed: 26 November 2009 Uncontrolled when printed Page 17 of 25 The Matching Vehicle list allows you to view vehicle specifications and view vehicle comparisons. • • • Click on the vehicle description name (in blue) to display the vehicle specifications. You can then click on the tabs to view details like Comfort, Dimensions and Safety etc. Please refer to the screen across: To view vehicle comparisons, click on the box at the left of vehicle description you wish to compare. • Click on the Compare Vehicles button. • Click on the Close button to return to the matching Vehicles screen. • Refine the Matching Vehicles list by entering details in Make, Model, Body Type, Segment, Drive, cylinders, CO2, Seats, Status and Included from using drop down menus and selecting from the lists. • Click on the Filter Matching Vehicles button and only the defined vehicles will be listed. • Click on the Clear Filter button to clear your criteria selections. • Click on the Select All button to tick all boxes – All vehicles will be available. • Click on the De-Select All button to untick all boxes – All vehicles will be unavailable. Note: You can also individually tick or untick single vehicles. • Click on Next or Back button, or • Click on Return to Search button and click on New to create another policy. 26 November 2009 Uncontrolled when printed Page 18 of 25 The vehicles will be shown as Available and a tick will appear in the box on the right hand side. If you determine that a vehicle is NOT available for selection by your Vehicle Ordering Officer, you can click on the Select button to clear the box. A blank box means that QFleet will have the vehicle available for lease but your agency’s policy has determined that you cannot lease that particular vehicle. The next section will guide you through the Search function. Search Existing Policies Content In this section you will be able to search and view existing policies. Return to the initial Fleetscape screen below: Click on Policies and the Search on the task manager bar. The following screen will be displayed: 26 November 2009 Uncontrolled when printed Page 19 of 25 Click on the Search button and all policies relevant to your access level will be displayed. You can also search for a single policy by entering the search criteria in an individual field or selecting the criteria from the drop down menus. The Clear button can be used to clear all fields so information can be re-entered. The search results will appear as displayed in the following screen: You can change the order (ascending or descending) the results will appear by clicking on a column title. See the following screen. 26 November 2009 Uncontrolled when printed Page 20 of 25 You can hide the policy criteria fields on the screen to display a full screen of search results (see the following screen): To view details for a policy click on the Service Delivery Description name. The following screen will be displayed: 26 November 2009 Uncontrolled when printed Page 21 of 25 To view full policy details click on each of the 5 Step tabs across the top of the screen. You have now completed the search policy function. The next section will guide you through the Edit Policy function. Edit Policies Content In this section you will be able to edit existing policies. Return to the policy search screen displayed below: Click on the Search button to display all policies relevant to your access level. You can also search for a single policy by entering the search criteria in an individual field or selecting the criteria from drop down menus. The Clear button can be used to clear all fields so information can be re-entered. The search results will appear as displayed in the following screen: 26 November 2009 Uncontrolled when printed Page 22 of 25 To edit a policy click on the Service Delivery Description name. The following screen will be displayed: You are now in Step 1 of the 5 step tabs across the top of the screen. You can edit details in any or all of these sections. To edit Service Delivery Description selections in Step 1 click on the relevant field and choose another selection from the drop down box. 26 November 2009 Uncontrolled when printed Page 23 of 25 Note: Only Service Deliver Description Name, With Effect from and Expires on fields can be edited. To perform any other amendments in Step 1 the policy needs to be expired and a new policy created. • • • • To edit Vehicle Selection Rules click on Step 2 tab and proceed to edit relevant fields. To edit Option Rules click on Step 3 tab and proceed to edit relevant fields. To edit Vehicle Duty Statement click on Step 4 tab and proceed to edit relevant fields. To edit Matching Vehicles click on Step 5 tab and proceed to edit relevant fields. You have now completed the edit policy function. The next section will guide you through the Expire Policy function. Expired Policy Content This section will provide information on expired policies. Expired policies are to remain as EXPIRED and New Policies are to be created. This will ensure there is an auditable trail on the creation and amendments to all policies. Return to Step 1 in Policy selection, see screen displayed below: Your policy status will change to EXPIRED as soon as the Expires On date is reached. A warning message will also appear on the screen stating “This policy has expired. Modifications to this policy may result in changes to other existing policies that have not expired”. If you attempt to replace a vehicle or obtain a quote for an additional vehicle where a policy has Expired, Fleetscape will revert upward to a Parent policy in the hierarchy of policies. 26 November 2009 Uncontrolled when printed Page 24 of 25 For example, if the DIR Corporate Passenger policy (attached to Business Group G/C2/DIR/CORP/*) has expired, quotes for vehicles attached to that policy will revert to the Parent policy which is DIR Fleet Policy (attached to Business Group G/C2/DIR/*). You have now completed the expired policy section. Conclusion You have completed the policy based section discussing: • • • • • Service Delivery Descriptions. Operating Environments. Vehicle Selection Rules. Option Selection Rules. Vehicle Duty Statements. Your agency policy rules are now embedded in the system. The policy based vehicle selection rules have set the parameters for the online ordering process supporting replacement and additional vehicle ordering. Vehicles ordered for lease outside of these parameters will be exceptions and will require authorisation from delegated officers. The next section of the manual is Online Ordering. 26 November 2009 Uncontrolled when printed Page 25 of 25