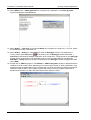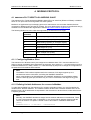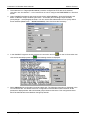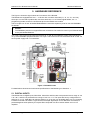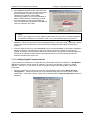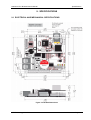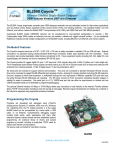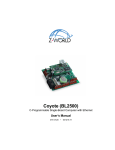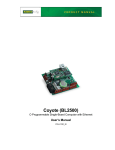
1
Z-WORLD SINGLE BOARD COMPUTER BL2500 EMBEDDED PLC USER’S MANUAL COPYRIGHT EMBEDDED PLC BL2500 User’s Manual y Part Number: TD-0002-5 © 2006 OEM Technology Solutions Pty Ltd. All rights reserved worldwide. This document is the property of OEM Technology Solutions Pty Ltd and may not be copied, used or disclosed in whole or in part except with the prior written permission of OEM Technology Solutions Pty Ltd or if it has been furnished under contract with another party, as specified in that contract. The copyright and the foregoing restriction on copying, use and disclosure extend to all media in which this information may be embodied. No liability is accepted for errors or omissions in this document. The information contained within this document is subject to change without notice. TRADEMARKS EMBEDDED PLC is a registered trademark of OEM Technology Solutions Pty Ltd. Microsoft, Windows, Windows XP, Windows 2000 and Windows NT are registered trademarks of Microsoft Corporation in the United States and/or other countries. ISaGRAF is a registered trademark of ICS Triplex ISaGRAF Inc. Rabbit and Rabbit 3000 are registered trademarks of Rabbit Semiconductor. RabbitNet is a trademark of Z-World Inc. Dynamic C is a registered trademark of Z-World Inc. Indusoft is a registered trademark of Indusoft Ltd. All other brand or product names are trademarks or registered trademarks of their respective holders. NOTICE TO USERS When a system failure may cause serious consequences, protecting life and property against such consequences with a back-up system or safety device is essential. The buyer agrees that protection against consequences resulting in system failure is the buyer’s responsibility. This device is not approved for life support or medical systems. OEM Technology Solutions Unit 13, 82 Reserve Road Artarmon NSW 2064 AUSTRALIA Telephone: +61 (2) 9966-9424 Fax: +61 (2) 9966-9429 www.oem.net.au EMBEDDED PLC BL2500 User’s Manual TABLE OF CONTENTS 1. 2. 3. 4. 5. INTRODUCTION.................................................................................................................................1 1.1 WHAT IS EMBEDDED PLC?....................................................................................................1 1.2 BL2500 OVERVIEW .................................................................................................................1 1.3 ABOUT THIS MANUAL ............................................................................................................2 1.4 EMBEDDED PLC APPLICATION KIT ......................................................................................3 1.5 TEXT CONVENTIONS .............................................................................................................3 1.6 WINDOWS CONVENTIONS ....................................................................................................3 1.7 REFERENCE DOCUMENTS....................................................................................................4 1.8 ABBREVIATIONS AND TERMINOLOGY.................................................................................4 GETTING STARTED ..........................................................................................................................7 2.1 INTRODUCTION ......................................................................................................................7 2.2 SOFTWARE INSTALLATION ...................................................................................................7 2.2.1 Installing ISaGRAF Workbench V3.5 ........................................................................8 2.2.2 Installing EMBEDDED PLC Board Support Package (BSP) for BL2500 ..................8 2.3 LICENSING THE ISAGRAF WORKBENCH.............................................................................8 2.3.1 Adding the software license.......................................................................................9 2.3.2 Adding a hardware license (optional) ........................................................................9 2.4 BL2500 CONNECTIONS ........................................................................................................10 2.4.1 Connect a Power Supply .........................................................................................10 2.4.2 Connect an Ethernet Cable .....................................................................................10 2.4.3 Connect an RS232 Cable (optional)........................................................................12 2.5 RUNNING A SAMPLE APPLICATION ...................................................................................12 2.6 WHERE DO I GO FROM HERE? ...........................................................................................14 RUNNING SAMPLE APPLICATIONS..............................................................................................15 3.1 RUNNING APPLICATIONS IN SIMULATION MODE ............................................................15 3.2 RUNNING APPLICATIONS THAT USE INTERNAL VARIABLES ONLY ..............................17 3.3 RUNNING APPLICATIONS THAT USE BL2500 INPUTS AND OUTPUTS ..........................18 3.3.1 Creating I/O connectors...........................................................................................18 3.3.2 Downloading and running the ISaGRAF application...............................................19 3.4 CREATING A NEW PLC APPLICATION................................................................................20 3.4.1 Using Function Blocks Diagrams ............................................................................20 3.4.2 Using Quick Ladder Diagrams ................................................................................25 3.4.3 Using Structured Text..............................................................................................27 3.4.4 Using Instruction List ...............................................................................................29 3.4.5 Using Sequential Function Chart.............................................................................30 3.4.6 Using Flow Chart .....................................................................................................33 MODBUS PROTOCOL.....................................................................................................................35 4.1 EMBEDDED PLC TARGET AS A MODBUS SLAVE .............................................................35 4.1.1 Configuring Modbus Slave ......................................................................................35 4.1.2 Defining Variable Addresses for access via Modbus ..............................................35 4.2 EMBEDDED PLC TARGET AS A MODBUS MASTER..........................................................38 4.2.1 Configuration of Modbus Master over TCP .............................................................38 4.2.2 Examples .................................................................................................................39 HARDWARE REFERENCE..............................................................................................................47 5.1 DIGITAL INPUTS....................................................................................................................47 5.2 DIGITAL OUTPUTS................................................................................................................48 5.3 ANALOG INPUT .....................................................................................................................48 OEM Technology Solutions Page i EMBEDDED PLC BL2500 User’s Manual 5.4 5.5 6. 7. 8. 9. 10. ANALOG OUTPUT ................................................................................................................ 49 COMMUNICATION INTERFACES ........................................................................................ 50 5.5.1 Serial Ports ............................................................................................................. 50 5.5.2 Ethernet Port........................................................................................................... 51 5.6 LED INDICATORS ................................................................................................................. 52 SOFTWARE REFERENCE.............................................................................................................. 53 6.1 MORE ABOUT ISAGRAF ...................................................................................................... 53 6.1.1 Project Manager ..................................................................................................... 53 6.1.2 Program Manager................................................................................................... 53 6.1.3 Variable Definition................................................................................................... 53 6.1.4 Functional Module Programming............................................................................ 53 6.1.5 IEC 61131-3 Language Editors .............................................................................. 54 6.1.6 Flow Chart Editor .................................................................................................... 54 6.1.7 Document Generator .............................................................................................. 54 6.1.8 Simulation ............................................................................................................... 54 6.2 ISAGRAF SOFTWARE REFERENCE................................................................................... 55 6.2.1 I/O Boards............................................................................................................... 55 6.2.2 Remote I/O Boards and Equipments (Modbus TCP Master) ................................. 57 6.2.3 ISaGRAF C Functions ............................................................................................ 61 6.2.4 ISaGRAF C Function Blocks .................................................................................. 62 LOADING OR UPGRADING THE FIRMWARE KERNEL .............................................................. 63 7.1 INTRODUCTION.................................................................................................................... 63 7.1.1 Installing EMBEDDED PLC Utility .......................................................................... 63 7.1.2 Connecting to the BL2500 ...................................................................................... 63 7.1.3 Loading and licensing the Firmware Kernel ........................................................... 64 7.1.4 Configuring the Firmware Kernel ............................................................................ 65 7.2 EMBEDDED PLC UTILITY SOFTWARE REFERENCE ....................................................... 66 7.2.1 Menu Commands ................................................................................................... 66 7.2.2 Loading Shortcuts................................................................................................... 68 FAQ AND TROUBLESHOOTING ................................................................................................... 69 8.1 KNOWN ISSUES ................................................................................................................... 69 8.1.1 BL2500 with Rabbit 3000 Microprocessor Revision 0 (IL1T) ................................. 69 8.1.2 BL2500 with Large Sector Flash ............................................................................ 69 8.1.3 ISaGRAF Floating Point Arithmetic ........................................................................ 69 8.1.4 Reading/writing 32-bit integer/real analog variables via Modbus ........................... 69 8.2 FAQ ........................................................................................................................................ 70 8.3 TROUBLESHOOTING ........................................................................................................... 71 8.3.1 Common Errors ...................................................................................................... 71 8.3.2 Before Contacting Technical Support..................................................................... 72 SPECIFICATIONS ........................................................................................................................... 75 9.1 ELECTRICAL AND MECHANICAL SPECIFICATIONS ........................................................ 75 ABOUT INDUSOFT ......................................................................................................................... 77 10.1 USING INDUSOFT WEB STUDIO WITH EMBEDDED PLC................................................. 77 OEM Technology Solutions Page ii EMBEDDED PLC BL2500 User’s Manual LIST OF TABLES Table 1: Main Features of the EMBEDDED PLC Firmware Kernel V1.05 on the BL2500 ...........................2 Table 2: Modbus slave addresses mapping................................................................................................36 Table 3: EMBEDDED PLC BL2500 Serial Port Configuration ....................................................................50 Table 4: BL2500 Electrical, Mechanical and Environmental Specifications................................................76 LIST OF FIGURES Figure 1: Power Supply Connection............................................................................................................10 Figure 2: Ethernet connections ...................................................................................................................11 Figure 3: PC <-> BL2500 RS232 connection..............................................................................................12 Figure 4: Modbus TCP communication architecture ...................................................................................38 Figure 5: Example 1: Modbus Master to one Modbus Slave over TCP ......................................................39 Figure 6: Example 2: Modbus Master TCP to two Modbus Slaves over Serial ..........................................44 Figure 7: BL2500 Pinouts............................................................................................................................47 Figure 8: BL2500 Digital Inputs (Pull-up factory default).............................................................................48 Figure 9: BL2500 Digital Outputs ................................................................................................................48 Figure 10: Schematic Diagram of the A/D Converter..................................................................................49 Figure 11: Schematic Diagram of D/A Converters ......................................................................................49 Figure 12: BL2500 Multidrop Network.........................................................................................................51 Figure 13: RS485 Termination and Bias Resistors .....................................................................................51 Figure 14: RJ-45 Ethernet Port Pinout ........................................................................................................51 Figure 15: Programming Cable Connection ................................................................................................64 Figure 16: BL2500 Dimensions ...................................................................................................................75 OEM Technology Solutions Page iii EMBEDDED PLC BL2500 User’s Manual This page is intentionally left blank OEM Technology Solutions Page iv EMBEDDED PLC BL2500 User’s Manual Introduction 1. INTRODUCTION 1.1 WHAT IS EMBEDDED PLC? The EMBEDDED PLC system turns a Rabbit-based controller, such as the Coyote BL2500 Single-BoardComputer (SBC), into a high performance and yet inexpensive Programmable Logic Controller (PLC). The Target PLC can be programmed using the EMBEDDED PLC – ISaGRAF® Workbench in any of the standardized automation control programming languages IEC 61131-3: • Sequential Function Chart (SFC) • Function Block Diagram (FBD) • Ladder Diagram (LD) • Structured Text (ST) • Instruction List (IL) PLC – ISaGRAF Workbench becomes an alternative to Dynamic C to program Rabbit-based controllers. EMBEDDED The EMBEDDED PLC system consists of two parts: • The Target PLC: A SBC BL2500 powered with the RabbitCore® module RCM3200 (Rabbit 3000 microprocessor, 44.2 MHz clock speed, 512K Flash, 256K Battery-backed SRAM, 512K Fast SRAM and 10/100BaseT) and loaded with the EMBEDDED PLC Firmware Kernel (or refer to as the Kernel). The Firmware Kernel is distributed as a .bin file which is loaded to the Target through the EMBEDDED PLC Utility. The Kernel runs the PLC application in a loop (reading inputs → evaluate the logic → updating outputs) and also provides the communication interface between the Target and the Workbench. • The ISaGRAF Workbench: The Workbench provides a complete PLC programming environment, including an editor for each of the PLC programming languages, downloading PLC application to the target, simulation, program-debugging tools and on-line monitoring of the PLC application. 1.2 BL2500 OVERVIEW The BL2500 is an advanced Single Board Computer that incorporates flash memory, SRAM, digital I/O ports, A/D converter input, D/A converter outputs, RS232/RS485 ports and Ethernet interface (10/100 Mbps). The BL2500 SBC gives PLC designers extremely low-cost embedded control for high-volume applications such as product control, factory equipment control, access control, HVAC and vending machines. The BL2500’s compact board size of 100 x 100 mm is easily mountable in standard 100 mm DIN rail trays. External connections via polarized locking industry standard Molex® type connectors enable rapid assembly with wire harnesses. These connectors also provide dependable cable harness connectivity to I/O. Main features of the EMBEDDED PLC Firmware Kernel running on the BL2500 Target PLC, are shown in Table 1. OEM Technology Solutions Page 1 EMBEDDED PLC BL2500 User’s Manual Introduction Table 1: Main Features of the EMBEDDED PLC Firmware Kernel V1.05 on the BL2500 Kernel filename BL2500C_V1.05_3-0231I1.bin SBC model supported BL2500 with Rabbit core module RCM3200 (10/100BaseT, 512K Flash, 256K + 512K SRAM, 44.2 MHz clock speed). Z-World P/N: 101-0602 I/Os supported - 16 Digital Inputs - 8 Digital Outputs - 1 Analogue Input (connected through AD0): 10 bits resolution, 0 – 3.3 V - 1 Analogue Output (connected through DA1): 10 bits resolution, 0 – 3.3 V Communications Modbus RTU over TCP/IP using static IP address (slave or master) Modbus RTU over RS232 (using serial port E) or RS485 (using serial port D): - Baud rate: 19200, 9600, 4800, 2400, 1200 or 600 (configurable through EMBEDDED PLC Utility) - Parity: None - Data bits: 8 - Stop bits: 1 - Flow Control: None Minimum polling period time is 1 cycle duration for Modbus TCP and 2 x cycle duration for Modbus RTU over RS232/RS485. Cycle duration corresponds to the time that kernel executes one cycle (read inputs → execute logic → update outputs) Performance - Digital Input scan time is approx. 200 µs. - Analogue Input scan time is approx. 83 ms. - Digital Output update time is approx. 30 µs per output. - Analogue Output update time is approx. 120 µs. - Boolean instruction execution time is approx. 30 µs. - Program execution overhead is approx. 100 µs per program. Memory Space Maximum size of ISaGRAF application database is 50000 bytes. Size of ISaGRAF real-time database (holds variables, SFC engine data, C function and function blocks data) is 10000 bytes. Free root memory on the BL2500 is approx. 9000 bytes. EMBEDDED PLC firmware kernel total code size is approx. 260000 bytes. ISaGRAF V3.50 features not supported by EMBEDDED PLC - On-line modifications. This feature enables the user to modify the application while the process is running. - Uploading application stored in the target. 1.3 ABOUT THIS MANUAL This manual provides instructions for installing, testing, configuring and interconnecting the Z-World SBC BL2500 running the EMBEDDED PLC Firmware Kernel. Instructions are also provided for using the ISaGRAF Workbench. This User’s Manual is divided into the following chapters: • This chapter provides and overview of the EMBEDDED PLC and information about this publication such as conventions used and reference documents. • Chapter 2, Getting Started: Explains how to install the different EMBEDDED PLC products and run a sample application. • Chapter 3, Running Sample Applications: Provides instructions how to run the different types of sample applications and also how to create a PLC application using the ISaGRAF Workbench. • Chapter 4, Modbus Protocol: Describes in detail how to configure the Modbus slave and master protocols supported by the EMBEDDED PLC target. OEM Technology Solutions Page 2 EMBEDDED PLC BL2500 User’s Manual Introduction • Chapter 5, Hardware Reference: Provides a detailed description of the I/Os and communication ports present in the SBC BL2500 and how to configure them in order to work with EMBEDDED PLC. • Chapter 6, Software Reference: Provides an overview of the ISaGRAF Workbench functionalities and detailed description of the ISaGRAF library elements (I/O boards software configuration, C functions and C function blocks) available from the ISaGRAF Workbench. • Chapter 7, Using EMBEDDED PLC Utility: Detailed description of the EMBEDDED PLC Utility. • Chapter 8, FAQ and Troubleshooting: Describes the known issues with this release, frequently asked questions and troubleshooting. • Chapter 9, Specifications: Describes the electrical, mechanical and environmental specifications of the BL2500. • Chapter 10, About Indusoft: A brief description of Indusoft Web Studio and how can be used in conjunction with EMBEDDED PLC. 1.4 EMBEDDED PLC APPLICATION KIT The EMBEDDED PLC BL2500 Application Kit contains the hardware and software needed to use the SBC BL2500 with EMBEDDED PLC system. It contains: • BL2500 Single Board Computer with Ethernet capability and pre-loaded with the EMBEDDED PLC Firmware Kernel. • 1.27mm programming cable. • Ethernet crossover cable. • EMBEDDED PLC BL2500 CD-ROM, with complete product documentation on disk. • EMBEDDED PLC – ISaGRAF V3.50 Workbench License Registration form. • Getting Started instructions. 1.5 TEXT CONVENTIONS This manual uses special formatting to help you quickly identify certain items, as follows: • Titles, labels, and new terms are indicated using italic text. • File names, messages and screen text are indicated using bold, courier text (for example, C:\OEMTech\Install.exe). • Variables and information you must provide are indicated using bold, italicized text enclosed in < and > brackets (for example, run the <driver name>.exe file indicates you must provide a driver name). • Buttons, menu options and keyboard key are indicated in bold. • Text requiring special emphasis is in bold italic. • Some information is segregated into Note and Caution boxes as follows: ¾ " Notes provide supplemental information related to the surrounding text, usually the text just preceding the note. ¾ , Caution provides information necessary to prevent damage or problems. 1.6 WINDOWS CONVENTIONS This manual uses the following Windows conventions: • Dialog boxes (or dialogs) are windows that allow you to enter information. • Text boxes (or fields) are areas in dialogs where you can type in text. OEM Technology Solutions Page 3 EMBEDDED PLC BL2500 User’s Manual Introduction • Radio buttons are white circles in which a black dot appears or disappears when you click on the button. Typically, the black dot indicates that the option or function is enabled (active). The absence of a black dot indicates the option or function is disabled (inactive). • Check-boxes are white squares in which a check appears or disappears when you click on it with the cursor. Typically, the check indicates that the option or function is enabled (active). The absence of a check indicates the option or function is disabled (inactive). • Buttons are icons in boxes that appear “pressed” when you click on them. • Lists are panes (white boxes) in windows or dialog boxes containing two or more selectable options. • Combo-boxes have arrows that, when clicked, show part or all of an otherwise concealed list. " Note: The dialogs and procedures described in this manual are valid for Windows 2000 and XP. Some terms may vary according to the operating system (type, language and version) you are using. 1.7 REFERENCE DOCUMENTS [1] 019-0120 · 041215-H – Coyote (BL2500) C-Programmable Single-Board Computer with Ethernet User's Manual, 2002-2004 Z-World Inc. [2] ISaGRAF Version 3.5 User’s Guide, 1994 – 2004 ICS Triplex ISaGRAF Inc. [3] 019-0108 · 050610-P - Rabbit® 3000 Microprocessor User's Manual, 2002-2005 Rabbit Semiconductor. [4] Modbus Application Protocol Specification V1.1a. 1.8 ABBREVIATIONS AND TERMINOLOGY The following abbreviations are terms used throughout the document. Term Description A/D Analogue to Digital BSP Board Support Package D/A Digital to Analogue DDE Dynamic Data Exchange FAQ Frequently Asked Questions FBD Function Block Diagram FC Flow Chart HMI Human Machine Interface HVAC Heating, Ventilation and Air-Conditioning. This is sometimes referred to as climate control. I/O Input/Output IL Instruction List IWS Indusoft Web Studio LAN Local Area Network LD LED ODBC OPC Ladder Diagram Light Emitting Diode Open Database Connectivity OLE (Object Linking and Embedding) for Process Control PC Personal Computer PLC Programmable Logic Controller OEM Technology Solutions Page 4 EMBEDDED PLC BL2500 User’s Manual RAM Random Access Memory SBC Single Board Computer SCADA SFC SRAM ST TCP/IP USB Introduction Supervisory Control And Data Acquisition Sequential Function Chart Static Random Access Memory Structured Text Transport Control Protocol/Internet Protocol Universal Serial Bus OEM Technology Solutions Page 5 EMBEDDED PLC BL2500 User’s Manual Introduction This page is intentionally left blank OEM Technology Solutions Page 6 EMBEDDED PLC BL2500 User’s Manual Getting Started 2. GETTING STARTED 2.1 INTRODUCTION The EMBEDDED PLC Application Kit provides all the necessary tools to program the Z-World SBC BL2500 (Coyote) via the ISaGRAF Soft Logic package. This chapter will help you to quickly install the necessary software to run a PLC sample application on the BL2500 target using the ISaGRAF Workbench. This chapter contains also important information about licensing your product. To run the EMBEDDED PLC software products it is required to have a Personal Computer (PC) with at least a 133-MHz processor (550-MHz or faster processor is recommended). This PC will be referred as the Host. The PC must have the following hardware and software configuration: • Windows 2000 or XP operating system • 128 MB of RAM required; 256 MB or more recommended • 1.25 to 2 GB of available hard-disk space • CD-ROM or DVD-ROM drive • VGA or hardware that supports console redirection required; Super VGA supporting 800 x 600 or higher-resolution monitor recommended • 1 serial port (COM1 – COM4) • Ethernet card " Note: The EMBEDDED PLC Application Kit EMBEDDED PLC Firmware Kernel. If comes with one Z-World SBC BL2500 pre-loaded with the you require to load the Firmware Kernel to another BL2500 or to upgrade the current one, go to Chapter 7, which describes in detail the installation of the additional software and how to load or upgrade the EMBEDDED PLC Firmware Kernel to the Target. 2.2 SOFTWARE INSTALLATION The EMBEDDED PLC CD-ROM contains the following software: • ISaGRAF_V3.50: EMBEDDED PLC – ISaGRAF V3.50 Workbench installer. This particular installation is intended to work in stand-alone mode or only with EMBEDDED PLC Rabbit-based targets. After installation of the Workbench, the software runs in a trial mode for 30 days. After period expires, license is required. • BL2500C_BSP_V1.05_9-0003-007: EMBEDDED PLC Board Support Package (BSP) for the SBC BL2500. It contains the EMBEDDED PLC BL2500 Firmware Kernel and the ISaGRAF I/O boards and sample files to be installed in the ISaGRAF directory. • EmbeddedPLCUtility_V1.03_3-0237G: Microsoft Windows Installer of the EMBEDDED PLC Utility. The EMBEDDED PLC Utility allows you to load or upgrade the EMBEDDED PLC Firmware Kernel to a Rabbit-based Target. The installation of this software is optional and is described in Chapter 7. These software products can also be downloaded (in ZIP format) from the OEM Technology Solutions website www.oem.net.au. OEM Technology Solutions Page 7 EMBEDDED PLC BL2500 User’s Manual Getting Started 2.2.1 Installing ISaGRAF Workbench V3.5 Use the following procedure to install the EMBEDDED PLC - ISaGRAF Workbench V3.5 from the CD-ROM: 1. Insert the CD-ROM and open the ISaGRAF_V3.5 folder. 2. Double-click on ISAGRAF.EXE to launch the ISaGRAF installation wizard. Follow the instructions provided by the wizard to proceed with the installation. " Note: It is recommended that the ISaGRAF Workbench be installed on a new directory to avoid confusing files with files from other ISaGRAF versions. 3. Once all the ISaGRAF files have been copied, the following group is added to your Programs group: 2.2.2 Installing EMBEDDED PLC Board Support Package (BSP) for BL2500 Use the following procedure to install EMBEDDED PLC BSP for BL2500 from the CD-ROM: 1. Go to BL2500C_BSP_V1.05_9-0003-007 folder located in the root directory of the CD-ROM. 2. Open the ISaGRAF folder and double-click on INSTALL.EXE to launch the ISaGRAF installation wizard. Enter the location where the ISaGRAF Workbench was installed (default C:\ISAWIN) and press Install. The installation wizard will update the ISaGRAF main directory with the I/O boards, C functions, C function blocks and sample applications for the EMBEDDED PLC BL2500 target. 2.3 LICENSING THE ISAGRAF WORKBENCH The ISaGRAF V3.5 Workbench you just installed runs for a trial period of 30-days before requiring licensing. When not licensed, you can not create, modify or export IEC programs to a library, or export variables to ASCII text file. You can license ISaGRAF using either hardware or software license. When using a hardware license, a dongle which you place on the parallel or USB port of your PC is delivered pre-programmed with the selected feature set. When using software license, you need to obtain a set of registration keys. The software license is specific to a PC (hardware configuration and Operating System). Therefore if you re-install the Operating System and then re-install ISaGRAF Workbench a new software license will be required. However, it is possible to transfer a software license from one PC to another. Section A.1.2.2 of the ISaGRAF User’s Manual (See [2]) and the License Manager on-line help describe in detail how to transfer a software license. The EMBEDDED PLC Application Kit entitles you to a 32 I/O points software license. To obtain the software license follow these instructions: 1. Open the ISaGRAF License Manager (Start menu → Programs → ISaGRAF 3.5 → Licensing). On the Available Components select ISaGRAF 3 Software License and press Add button. Click Option 32 on Number of IO Variables box and press OK button. The Setup Code SET: WDX32WDE15 will be displayed in the Setup Code box. 2. If you have access to the Internet and have an e-mail account: OEM Technology Solutions Page 8 EMBEDDED PLC BL2500 User’s Manual Getting Started a) Press Proceed… button. A new mail message of your default e-mail client (such as Microsoft Outlook) will be displayed. Fill out the information on the message body: Contact details and Workbench Serial Number (located on the License Registration Form). Once you have filled out all the information, send the e-mail to [email protected]. The e-mail client application must be running before pressing Proceed… button. b) Alternatively, if instead of e-mail client (such as Microsoft Outlook) you use web-based email or a command line e-mail (such as pine), compose manually a new message indicating the Workbench Serial Number that appears in the License Registration Form, User Code 1 and 2, and Contact details, and send it to [email protected]. 3. Alternatively, if you do not have an e-mail address or access to the Internet, copy the User Code 1 and User Code 2 into the ISaGRAF License Registration Form that comes in the Application Kit and send the completed form to OEM Technology Solutions by fax (Fax Number: +61 2 9966 9429). 4. OEM Technology Solutions will send you the ISaGRAF software license within two business days of receiving the completed Form. Press Close button to close the License Manager. 2.3.1 Adding the software license The ISaGRAF software license consists of two sets of 4 Registration Keys. Upon reception of the Registration Keys, open License Manager and follow these instructions: 1. On the Available Components select ISaGRAF 3 Software License and press Add button. Select the purchased number of I/O points to license (32 if you purchased the EMBEDDED PLC Application Kit) and press OK button. 2. Enter the first set of Registration Keys and press Register button. Setup Code will change to SET: WDE15. Enter the second set of Registration Keys and press Register button again. In the Selected Components ISaGRAF 3 Software License will be displayed as Active. Press Close button to close the License Manager. Congratulations! Your ISaGRAF Workbench is now licensed. " Note: If you want to purchase a hardware license or upgrade your current software license, please contact OEM Technology Solutions ([email protected]) for pricing information and payment options. When you purchase a software license it is very important to include the following information in your Purchase Order: • Setup Code, User Code 1 and User Code 2. To obtain these codes open the ISaGRAF License Manager (Start menu → Programs → ISaGRAF 3.5 → Licensing). On the Available Components select ISaGRAF 3 Software License and press Add button. Select the desired number of I/O points to license (128, 256 or Unlimited) and press OK button. The Setup and User codes appear on the License Manager window. If you press Proceed… button, a new e-mail message window is displayed (if you have an e-mail client running such as Microsoft Outlook). You can fill out the required information and send that e-mail to obtain license pricing and payment information. • Contact details (Company, Name, Address, Telephone, Fax and e-mail). 2.3.2 Adding a hardware license (optional) When using a hardware license (dongle) on Windows 2000/XP systems, you must install the Sentinel driver in order for the dongle to be seen. Open the ISaGRAF_V3.5\Sentinel folder (located in the root directory of the CD-ROM) and doubleclick on Setup.exe. Follow the on-screen instructions to install the driver. After the installation is completed, connect the dongle to a parallel or USB port and open the License Manager (Start menu → OEM Technology Solutions Page 9 EMBEDDED PLC BL2500 User’s Manual Getting Started Programs → ISaGRAF 3.5 → Licensing). On the Selected Components list, the ISaGRAF 3 Hardware license will be shown active. 2.4 BL2500 CONNECTIONS 2.4.1 Connect a Power Supply 1. Connect the AC adapter to header J2 on the BL2500 as shown in Figure 1. Match the friction lock tab on the friction-lock connector to the back of header J2 on the BL2500 as shown. The friction-lock connector will only fit one way. Plug in the AC adapter. Application Kits sold outside North America or Australia include a friction-lock connector that can be connected to header J2 on the BL2500. Connect the leads from your power supply to the friction-lock connector to preserve the polarity indicated in the figure. The power supply should deliver 8 – 40 VDC at 500 mA. Figure 1: Power Supply Connection 2. Plug the AC Adapter. DS1 (yellow) and DS2 (red) LEDs indicate the Firmware Kernel status after the board has been powered up. If after 10 seconds DS2 (red) is turned off and DS1 (yellow) starts blinking, the Firmware Kernel is licensed and active. If DS2 (red) remains turned on during more than 10 seconds, it indicates that Kernel requires licensing. If DS1 and DS2 are off after powered-up, it indicates that the board has no EMBEDDED PLC Firmware Kernel loaded. In both cases, contact your local distributor. 2.4.2 Connect an Ethernet Cable The BL2500 that comes in the EMBEDDED PLC Application Kit has the Firmware Kernel loaded, licensed and configured. The default factory configuration is: Modbus Slave Number = 1 Use Modbus TCP IP Address = 192.168.1.100 Netmask = 255.0.0.0 Default gateway = 192.168.1.1 OEM Technology Solutions Page 10 EMBEDDED PLC BL2500 User’s Manual Getting Started If you want to change the default values, go to section 7.1.4 for instructions how to change the configuration of the Target PLC. The following instructions will guide you on how to connect the Target PLC to the Workbench using TCP/IP. There are two ways of connecting the Target PLC to your PC via Ethernet (see Figure 2): • Using a crossover Ethernet cable (provided in the EMBEDDED PLC Application Kit) to connect directly the Target PLC to your PC; or, • If your PC is currently connected to an Ethernet hub, use a straight-through Ethernet cable (not provided in the EMBEDDED PLC Application Kit) to establish an Ethernet connection to the BL2500 from the hub. Figure 2: Ethernet connections When your PC is connected directly to the BL2500 via an Ethernet connection, you need to set (or change) the TCP/IP parameters of your computer in order to establish a proper connection with the BL2500. If you require changing the TCP/IP configuration of the BL2500, go to section 7.1.4 for instructions how to change the configuration of the Target PLC. To configure your PC with an IP address and netmask suitable for establishing a TCP/IP connection with a pre-configured BL2500 Target PLC, follow these instructions (you might need Administrator privileges to perform these steps): 1. Go to Control Panel (Start button → Settings → Control Panel) and start Network Connections. 2. Select Local Area Connection and choose Properties (File menu → Properties). 3. Select Internet Protocol (TCP/IP) and press Properties button. 4. Click on Use the following IP Address and fill in the following fields: 5. Press OK button to close the Internet Protocol (TCP/IP) Properties window. Press OK button to close the Local Area Connection Properties and to update the new TCP/IP values. 6. To verify the communication between your PC and the BL2500 use the ping command. Open a Command Prompt window (Start button → Programs → Accessories → Command Prompt) and type C:\ping 192.168.1.100 The command output should display the replies from the Target PLC. OEM Technology Solutions Page 11 EMBEDDED PLC BL2500 User’s Manual Getting Started 2.4.3 Connect an RS232 Cable (optional) If your Target PLC is configured to Use Modbus TCP you can go straight to Section 2.5. If your Target PLC is configured to Use RS232, connect a serial cable to a COM port of the PC and to the RS232 port E of the BL2500. The RS232 cable must follow the diagram shown in Figure 3. A serial cable is not provided in the EMBEDDED PLC Application Kit. Figure 3: PC <-> BL2500 RS232 connection 2.5 RUNNING A SAMPLE APPLICATION Once you have established connection between your PC and the Target PLC, follow these instructions to run the sorting sample application. This sample application displays a SpotLight which shows different tokens being sorted depending on size and colour (see the Project Description at the bottom of the Projects Management window). This PLC application was written in Flow Chart. 1. Start ISaGRAF Workbench by double-clicking on the ISaGRAF 3.5 shortcut on your desktop or Start button → Programs → ISaGRAF 3.5 → Projects. On the Projects Management window, doubleclick on the sorting project. 2. On the SORTING - Programs window select Debug menu → Link setup. On the PC-PLC link parameters window check the Target Slave Number is set to 1 and ETHERNET communication port is selected. Press Setup button and check the IP address of the BL2500 target is set to 192.168.1.100. Press OK button to close this window. Press OK button to close the PC-PLC link parameters window. OEM Technology Solutions Page 12 EMBEDDED PLC BL2500 User’s Manual Getting Started If you are using RS232, on the PC-PLC link parameters window select COM port and press Setup button. Select the baud-rate (19200 to 600) depending on the current value of the Target PLC. 3. Select Debug menu → Debug to open the Debugger window. The Debugger window is displayed with a No application message. " Note: If the Debugger window shows that an application is currently running (‘<application name>’ active) on the Target PLC, press Stop button on the toolbar to stop the application before downloading a new one. You can also stop the application from the Debugger window menu (File menu → Stop application). 4. On Debugger window, select File menu → Download. Select “RABBIT: TIC code for Rabbit-based controllers” on the Download window and press Download button. 5. A progress bar on the Debugger window will show the progress of the downloading process. Once the downloading is completed, the application runs immediately and the SpotLight window shown below is displayed. Troubled? If you experienced problems running this application, such as an error message “Cannot install communication” or “Cannot start download – target not ready”, follow this checklist: 1. Make sure that the TCP/IP connection between the Target PLC and your PC is alive (use ping command). See Section 2.4.2 on how to configure TCP/IP parameters. 2. If connection is alive, repeat accurately the step-by-step instructions in this Section. Remember to put correctly the Target Slave Number and the IP address of the Target PLC in the PC-PLC link parameters window (Step 2). 3. If the Target PLC has already an application running, stop it before downloading a new one. If you still can not run this sample application, go to Chapter 8 (FAQ and Troubleshooting) which contains more information about how to troubleshoot your particular problem. OEM Technology Solutions Page 13 EMBEDDED PLC BL2500 User’s Manual Getting Started 2.6 WHERE DO I GO FROM HERE? The next chapter describes how to run the other sample applications and step-by-step instruction on how to create a simple PLC application. The ISaGRAF User’s Manual and the ISaGRAF Workbench on-line help contain a complete description of the Workbench features and capability, as well as a complete PLC programming languages reference. The User’s Manual can be found in the Documentation folder of the CD-ROM (ISaGRAF.pdf). OEM Technology Solutions Page 14 EMBEDDED PLC BL2500 User’s Manual Running Sample Applications 3. RUNNING SAMPLE APPLICATIONS The ISaGRAF Workbench provides two modes of running PLC applications: • Simulation mode. The PLC application runs entirely on the PC without the need to have a Target PLC connected. This mode is very useful to perform complete structural and functional tests prior to deploying the application to the target hardware. • Real mode. The PLC application is first downloaded to a Target PLC and then the Target PLC executes the application. The Workbench monitors the program execution as well as the status of internal and I/O variables. The EMBEDDED PLC – ISaGRAF V3.5 Workbench plus the EMBEDDED PLC BL2500 BSP, includes several sample applications. There are three types of sample applications: • Sample applications that use Virtual Boards (xai8, xao8, xbi8, xbo8, xmi8, xmo8). These applications can run ONLY in simulation mode: ¾ ¾ ¾ ¾ • Sample applications that use internal variables only. These applications can be simulated or downloaded to the Target PLC. The Target PLC does not need to be connected to physical I/Os: ¾ ¾ ¾ • blinkseq: Same implementation with various languages. rfdemo: Complete SFC demo. rfsample: Sample described in ISaGRAF User’s Guide (see [2]). rfsfc: Demonstrates SFC actions in SFC. bottlef: Flow Chart: Simulation of bottle production. rfstack: Demonstrates STACKINT function block. sorting: Flow Chart: Sorting of tokens depending on their size and colour. Sample applications pre-configured to use BL2500 I/O boards. These applications can be simulated or downloaded to the BL2500 Target PLC and requires that the Target is connected to physical I/Os: ¾ ¾ ¾ b25qld: Demo with Quick LD programming. b25rota: Rotation of 2 BL2500 on-board LEDs (DS3 and DS4) and 2 digital outputs. b25scope: Signal generation (BL2500 Analogue Out) and SpotLight. A description of each of the sample applications appears at the bottom of the ISaGRAF Project Manager. 3.1 RUNNING APPLICATIONS IN SIMULATION MODE Use the following procedure to run any sample application in simulation mode: 1. Open the ISaGRAF Project Management by double-clicking on the ISaGRAF Projects icon on your Desktop or selecting Start menu → Programs → ISaGRAF 3.5 → Projects. OEM Technology Solutions Page 15 EMBEDDED PLC BL2500 User’s Manual Running Sample Applications 2. Double-click on the sample application (for example, rfdemo) to open the Programs Manager window. 3. On the Programs Manager window, select Debug → Simulate (or press Simulate button the toolbar). The Debugger, I/O simulation and Debug program windows are displayed. on 4. The I/O simulation window shows the I/O boards used by the application (Boards 0 to 4). Board 0 (column 0) has 8 digital inputs; Board 1 (column 1) has 8 analog inputs; Board 2 (column 2) has 8 message (strings) outputs; Board 3 (column 3) has 8 digital outputs and Board 4 (column 4) has 8 analog outputs. On Board 0 (column 0) click on Input 1 and Input 4, a message start and Lead are displayed in message outputs 4 and 5 respectively; and Board 3 will show the LED outputs being turned ON in sequence. On the Debug programs window the Drive and Lead programs change to active state. Unset the digital input 4 and set any of the digital inputs 5 (Flash) or 6 (Random). 5. To close the simulation of the application, close the Debugger window. Close the Programs window. 6. Try with other sample applications such as the one listed in the introduction of this chapter. All the sample applications can run in simulation mode. OEM Technology Solutions Page 16 EMBEDDED PLC BL2500 User’s Manual Running Sample Applications 3.2 RUNNING APPLICATIONS THAT USE INTERNAL VARIABLES ONLY The Target PLC and your PC must be connected through Ethernet, RS232 or RS485. Use the following procedure to run any sample application that uses only internal variables: 1. Open the ISaGRAF Project Management by double-clicking on the ISaGRAF Projects icon on your Desktop or selecting Start menu → Programs → ISaGRAF 3.5 → Projects. On the Projects Management window, double-click on the bottlef project. 2. On the BOTTLEF - Programs window select Debug menu → Link setup. On the PC-PLC link parameters window enter the Target Slave Number (corresponds to the Modbus Slave number of the Target PLC) and the Communication port (ETHERNET for Modbus TCP or COM for Modbus RTU over RS232/RS485): a) If ETHERNET is selected press Setup button and enter the IP address of the target (default is 192.168.1.100). Press OK button. Press OK button to close the PC-PLC link parameters window , Caution: Do not change the port number from 1100 otherwise the Ethernet communication with the ISaGRAF Workbench will not work. This port is used exclusively by the communication between ISaGRAF Workbench and the EMBEDDED PLC target. b) If serial COM port is selected (COM1 – COM4) press Setup button and select either 19200, 9600, 4800, 2400, 1200 or 600 baud rate depending on the current configuration of your EMBEDDED PLC target. " Note: The EMBEDDED PLC Kernel supports baud rates from 19200 to 600. The other parameters are fixed: no parity, 8 data bits, 1 stop bit and no flow control. Note also that ISaGRAF supports serial ports COM1 to COM4. If you are using a USB-to-serial converter cable check that the com port assigned is between COM1 and COM4. If not, change the serial port settings on your Windows Operating System (see Section 8.2). Many USB-to-serial converters are assigned to COM5 port or higher after its installation. 3. Select Debug menu → Debug to open the Debugger window. If Debugger window displays “<application name> active” message, stop the current application that is running by pressing the Stop button is displayed. on the toolbar or select File menu → Stop application. A “No application” message 4. Download the bottlef application by selecting File menu → Download. Select “RABBIT: TIC code for Rabbit-based controllers” on the Download window and press Download button. A progress bar on the Debugger window will show the progress of the downloading process. Once the downloading is completed the application runs immediately and the SpotLight window is displayed. In the SpotLight, double-click on the START button and press TRUE button. The bottle production will start. OEM Technology Solutions Page 17 EMBEDDED PLC BL2500 User’s Manual Running Sample Applications 5. On the Debugger window, select Options menu → Parameters. Change the Cyclic refresh duration value to 200. This value corresponds to the refresh rate of the SpotLight. Press OK button. 6. On the SpotLight window, double-click on the t#1s box. Change the variable SPEED value to t#200ms and press Write button. The bottle production will speed up by a factor of two. 7. Repeat this procedure for the rfstack application. 3.3 RUNNING APPLICATIONS THAT USE BL2500 INPUTS AND OUTPUTS 3.3.1 Creating I/O connectors The EMBEDDED PLC Application Kit comes with a bag of cables, connectors and crimp terminals in order to connect to the I/Os of the BL2500. To create an I/O connector you will need to assemble a wiring harness using the friction-lock connectors and crimp terminals supplied with the EMBEDDED PLC Application Kit. In addition, you will need: • Wire—22 to 30 AWG (0.33 mm2 to 0.049 mm2) for the 0.1" crimp terminals, 22 to 26 AWG (0.33 mm2 to 0.13 mm2) for the 0.156" crimp terminals • Wire cutters and wire insulation stripper • Crimp tool (pliers may be used, but a crimp tool provides a better crimp with a stronger force) Follow these steps to build your wire harness: 1. Prepare a few lengths of wire about 30 cm (12") long. The wires should have different colours of insulation to facilitate identifying the connections. 2. Trim about 2 – 3 mm (0.1") of insulation from your wire. 3. Position the wire in the crimp terminal as shown in the figure. 4. Use a crimp tool or pliers to first crimp the bare wire, then the insulation as shown in figure. 5. Insert the crimp terminals with wires into the frictionlock connector with the tab on the crimp terminal facing the opening on the side of the friction-lock connector. Insert the crimp terminal until the tab snaps into place in the side opening. 6. Repeat these steps until all the wires and crimp terminals have been assembled. " Note: On 10-pin friction-lock connectors, insert a plug into the hole indicated in last figure to polarize your connector to help prevent offsetting the connector by one pin when you attach it to your BL2500. Polarizing plugs are not included in EMBEDDED PLC Application Kit. OEM Technology Solutions Page 18 EMBEDDED PLC BL2500 User’s Manual Running Sample Applications 3.3.2 Downloading and running the ISaGRAF application Use the following procedure to download a sample application (b25qld) to the BL2500 Target that uses physical I/Os. The Target PLC must be running a licensed EMBEDDED PLC Firmware Kernel and be connected to 4 digital inputs (use the procedure above to create an I/O connector). It also assumes that the Target is connected to the PC either via Ethernet or serial port. 1. Open the ISaGRAF Project Management by double-clicking on the ISaGRAF Projects icon on your Desktop or selecting Start menu → Programs → ISaGRAF 3.5 → Projects. On the Projects Management window, double-click on the b25qld project. 2. Select Debug → Link setup (or press Link Setup) and configure the Target PLC ↔ PC link. Follow the guidelines on Step 2 of the previous section. 3. Select Debug → Debug (or press Debug) to open the Debugger window. If an application is on the toolbar). On the Debugger window select File → running, stop it (press Stop button Download to download the b25qld application to the target. A progress bar on the Debugger window shows the progress of the download process. Once the downloading is completed the application starts running and the following SpotLight window is displayed. 4. The Digital inputs IN00 and IN01 of the BL2500 are wired as the Left and Right switches on the b25qld application. The BL2500 on-board LED DS3 is the output of the light. The BL2500 digital inputs IN02 and IN03 move the window’s screen to the left and right respectively. 5. To check the I/O connections, close the Debugger window and on the B25QLD – Programs window select Project → I/O connection. Check the wiring of the channels. OEM Technology Solutions Page 19 EMBEDDED PLC BL2500 User’s Manual Running Sample Applications Follow the same procedure to run the b25rota application. This application will turn ON the BL2500 onboard LEDs (DS3 and DS4) in sequence. 3.4 CREATING A NEW PLC APPLICATION The following Section describes how to use the ISaGRAF Workbench to create simple PLC applications using the 5 IEC 611131-3 PLC programming languages (FBD, LD, ST, IL and SFC) and Flow Chart that later you will download to the BL2500 Target PLC. The Target PLC must be connected to physical I/Os. It also assumes that the Target is connected to the PC either via Ethernet or serial port. To create (or modify) PLC applications the ISaGRAF Workbench must be licensed. The PLC application that is written using 6 different languages, implements a simple Boolean operation (XOR) between digital input IN00 and IN01 (SW1 and SW2 Boolean variables respectively). The DS3 LED (LED1 Boolean output variable) is used as the output. 3.4.1 Using Function Blocks Diagrams 1. Open the ISaGRAF Project Management by double-clicking on the ISaGRAF Projects icon on your Desktop or selecting Start menu → Programs → ISaGRAF 3.5 → Projects. On the Projects Management window, select File menu → New. 2. On the Create new project window, enter the name of the project (for example b25test1) and press OK button. The name of project should no exceed 8 characters. The b25test1 project is then listed in the Projects Management window. 3. Select Edit menu → Set comment text. Enter a brief description of this project and press OK button. This description will be displayed next to the project name in the Projects Management window. 4. Double-click on b25test1 project. An empty B25TEST1 – Programs window is displayed. 5. Select File menu → New. On the New program window enter the name of the program (for example, FBtest1); a brief comment; select the Language to FBD; select Begin Style and press OK button. The FBtest1 program is displayed in the B25TEST1 – Programs window. 6. On the B25TEST1 – Programs window select File menu → Dictionary to open the Dictionary window. OEM Technology Solutions Page 20 EMBEDDED PLC BL2500 User’s Manual Running Sample Applications 7. Select Tools menu → Quick declaration. Enter Numbering from 1 to 2, Symbol name SW and Attributes = Input as shown in figure below. Press OK button. 8. On the Dictionary window, the SW1 to SW2 variables are listed. 9. On the B25TEST1 Dictionary double-click on the empty row. Enter the name LED1 and select it as output. 10. On the Dictionary window, select Integers/Reals tab. Press Insert objects button or select Edit menu → New. Enter the following information on the Integer/Real Variable window: Name = AD0, Comment = Analog Input AD0, Unit = V, Attributes = Input and Format = Real. Press Store button. Repeat this step to create the analog output variable (Name = DA1, Comment = Analog Output DA1, Unit = V, Attributes = Output and Format = Real). Press Cancel to close the Integer/Real Variable window. OEM Technology Solutions Page 21 EMBEDDED PLC BL2500 User’s Manual Running Sample Applications 11. Save the current dictionary by selecting File menu → Save. Close the Dictionary window. 12. On the B25TEST1 – Programs window double-click on FBtest1 program. Press Insert variable on the toolbar and click on the working area. On the Select variable window select SW1 button and press OK button. SW1 variable box is drawn on the working area. Place SW2 and LED1 variables following the same procedure. 13. Select on the Function blocks combo box the exclusive OR (=1) function block and click on the working area. The exclusive OR (=1) function block is displayed. 14. Select button on the toolbar and move SW1 and SW2 variables to the left of the function block; also move the LED1 variable to the right of the function block. 15. Click on Draw connection line button on the toolbar and press left mouse button on the SW1 variable and drag the line towards the function block. A connection line will be drawn between SW1 and IN1 of the function block. Repeat the same procedure to connect SW2 with IN2 of the function block and LED1 with Q of the function block (connection lines are dragged always from left to right). 16. Save the program by selecting File menu → Save. Press OK button on the Update diary window. Close the FBtest1 – FBD/LD Program window. 17. On the B25TEST1 – Programs window click on I/O connection button OEM Technology Solutions on the toolbar. Page 22 EMBEDDED PLC BL2500 User’s Manual Running Sample Applications 18. Double-click on Slot 0 or press Set board/equipment button on the toolbar. Select bl25di board (BL2500 Digital Inputs) and press OK button. The bl25di I/O board is placed in Slot 0. Double-click on Channel 1. On the Connect I/O channel window press Connect button several times until all the free variables are connected. Press Close button. 19. Double-click on Slot 1 and select bl25led (BL2500 on-board LEDs) board. Double-click on Channel 1 and connect the free variable LED1. Press Close button. 20. Double-click on Slot 2 and select bl25ai (BL2500 Analog Input) board. Double-click on Channel 1 and connect the AD0 variable. Press Close button. 21. Double-click on Slot 3 and select bl25ao (BL2500 Analog Output) board. Double-click on Channel 1 and connect the DA1 variable. Press Close button. Select File menu → Save (or press Save button on the toolbar) to save the I/O connection. Close the I/O connection window. 22. Before downloading the PLC application to the Target PLC, the application needs to be compiled. On the B25TEST1 – Programs window, select Make menu → Compiler Options to check that RABBIT: TIC code for Rabbit-based controllers is selected. Press OK button. If RABBIT target is not selected, click on RABBIT target and press Select button. Alternatively you can double-click on RABBIT target. OEM Technology Solutions Page 23 EMBEDDED PLC BL2500 User’s Manual Running Sample Applications 23. Select Make menu → Make application to compile the PLC application. The Code generator window is displayed. Press Exit button. 24. Select Debug → Link setup (or press Link Setup) and configure the Target PLC ↔ PC link. Follow the guidelines on Step 2 of Section 3.2. 25. Select Debug → Debug (or press Debug) to open the Debugger window. If an application is running, stop it (press Stop button on the toolbar). On the Debugger window select File → Download to download the b25test1 application to the Target PLC. A progress bar on the Debugger window shows the progress of the download process. Once the downloading is completed the B25TEST1 – Debug programs window is displayed (On the Debugger window the application state will be RUN). 26. Double-click on FBtest1 program. The FBTEST1 – FBD/LD Programs window is displayed with the variables in BLUE or RED colour depending on its current state, FALSE or TRUE respectively. If the digital input IN00 of the BL2500 is short circuited, SW1 is FALSE and LED DS3 will be turned ON as well as the state of LED1 in the Programs window will change. The PLC program implements a Boolean XOR operation on SW1 and SW2 with the result set on the LED1. OEM Technology Solutions Page 24 EMBEDDED PLC BL2500 User’s Manual Running Sample Applications 27. On the FBTEST1 – FBD/LD Programs window select File menu → Dictionary. On the dictionary window click on Integers/Reals tab. Double-click on DA1 variable and set its value to 1.5 V (any value in the 0 – 3.3 V range). Connect a multimeter between DA1 and AGND of the BL2500 and check that the voltage is 1.5 V. 28. To stop the monitoring of the PLC application, close the Debugger window. The programs and dictionary windows in debug mode will be closed. 3.4.2 Using Quick Ladder Diagrams 1. Open the ISaGRAF Project Management by double-clicking on the ISaGRAF Projects icon on your Desktop or selecting Start menu → Programs → ISaGRAF 3.5 → Projects. On the Projects Management window, select File menu → New. 2. On the Create new project window, enter the name of the project (for example b25test2) and press OK button. The name of project should not exceed 8 characters. The b25test2 project is then listed in the Projects Management window. 3. Select Edit menu → Set comment text. Enter a brief description of this project and press OK button. This description will be displayed next to the project name in the Projects Management window. 4. Double-click on b25test2 project. An empty B25TEST2 – Programs window is displayed. 5. Select File menu → New. On the New program window enter the name of the program (for example, LDtest1); a brief comment; select the Language to Quick LD; select Begin Style and press OK button. The LDtest1 program is displayed in the B25TEST2 – Programs window. OEM Technology Solutions Page 25 EMBEDDED PLC BL2500 User’s Manual Running Sample Applications 6. Follow Steps 6 to 11 in Section 3.4.1 to create and populate the application’s Dictionary with SW1 and SW2 Boolean input variables (connected to Channel 1 and 2 of the bl25di I/O board respectively); and LED1 Boolean output variable connected to Channel 1 of the bl25led I/O board. 7. On the B25TEST2 – Programs window double-click on LDtest1 program. The Quick Ladder Diagram Editor contains an editing grid, a logical matrix where each cell of the matrix may contain up to one LD symbol. Press F2: Contact on the left button rung. A new rung with one contact and one coil is created. on the toolbar to insert a new 8. Double click the rung comment (* *) cell to insert a comment such as (*Exclusive OR logic for switching on LED*). 9. Double click the contact on the rung and select SW1 for an input. 10. With the SW1 contact selected, press F3: Contact on the right button on the toolbar. 11. Double click the new contact and select SW2 variable. Click once on the Coil/contact type button to negate this contact. 12. Select the Select button on the toolbar. Select both contacts on the rung by clicking on one contact and dragging the mouse over to the next contact before releasing the mouse button. Press F4: Parallel contact button to create two new contacts in parallel with the selected contacts. 13. Repeat steps 9 and 11 except negate the SW1 contact with the Coil/contact type button this time instead of the SW2 contact. 14. Double click on the coil on the rung and select LED1 for an output. 15. The LDtest1 program should now appear as follows: 16. Save the program by selecting File menu → Save. Press OK button on the Update diary window. Close the LDtest1 – QuickLD Program window. 17. Follow Steps 17 to 25 in Section 3.4.1 to compile the application and download it to the Target PLC. 18. Double-click on LDtest1 program. The LDTEST1 – Quick LD Programs window is displayed with the variables in BLUE or RED colour depending on its current state, FALSE or TRUE respectively. Press the SW1 (short-circuit digital input IN00) and the LED1 will be turned ON as well as the state of LED1 in the Programs window will change. The PLC program implements a Boolean XOR operation on SW1 and SW2 with the result set on the LED1. OEM Technology Solutions Page 26 EMBEDDED PLC BL2500 User’s Manual Running Sample Applications 19. To stop the monitoring of the PLC application, close the Debugger window. The programs and dictionary windows in debug mode will be closed. 3.4.3 Using Structured Text 1. Open the ISaGRAF Project Management by double-clicking on the ISaGRAF Projects icon on your Desktop or selecting Start menu → Programs → ISaGRAF 3.5 → Projects. On the Projects Management window, select File menu → New. 2. On the Create new project window, enter the name of the project (for example b25test3) and press OK button. The name of project should not exceed 8 characters. The b25test3 project is then listed in the Projects Management window. 3. Select Edit menu → Set comment text. Enter a brief description of this project and press OK button. This description will be displayed next to the project name in the Projects Management window. 4. Double-click on b25test3 project. An empty B25TEST3 – Programs window is displayed. 5. Select File menu → New. On the New program window enter the name of the program (for example, STtest1); a brief comment; select the Language to ST; select Begin Style and press OK button. The STtest1 program is displayed in the B25TEST3 – Programs window. OEM Technology Solutions Page 27 EMBEDDED PLC BL2500 User’s Manual Running Sample Applications 6. Follow Steps 6 to 11 in 3.4.1 to create and populate the application’s Dictionary with SW1 and SW2 Boolean input variables, and LED1 Boolean output variable. 7. On the B25TEST3 – Programs window double-click on STtest1 program. 8. Type in a comment in comment parentheses (* *) such as (* Exclusive OR logic for switching on LED *). When entered correctly comments are highlighted green. 9. Press Enter to move to the next command line in the ST program editor. 10. To enter Keyword commands, either click the desired button in the Keywords tool box or type it, such as for an ‘if’ statement, either click IF in the Keyword tool box or type IF on the command line. When correctly entered Keyword commands are highlighted pink. 11. To enter inputs, outputs, or variables, for example input switch SW1, either select Edit → Insert variable → SW1 or type SW1 on the command line. 12. Type the following command lines under the entered comment: IF SW1 = SW2 THEN LED1 := FALSE; ELSE LED1 := TRUE; END_IF; 13. The LDtest1 program should now appear as follows: 14. Save the program by selecting File menu → Save. Press OK button on the Update diary window. Close the STtest1 – ST Program window. 15. Follow Steps 17 to 25 in 3.4.1 to compile the application and download it to the Target PLC. 16. Double-click on STtest1 program. The STTEST1 – ST Programs window is displayed. Press the SW1 (short-circuit digital input IN00) and the LED1 will be turned ON as well as the state of LED1 in the Programs window will change. The PLC program implements a Boolean XOR operation on SW1 and SW2 with the result set on the LED1. 17. To stop the monitoring of the PLC application, close the Debugger window. The programs and dictionary windows in debug mode will be closed. OEM Technology Solutions Page 28 EMBEDDED PLC BL2500 User’s Manual Running Sample Applications 3.4.4 Using Instruction List 1. Open the ISaGRAF Project Management by double-clicking on the ISaGRAF Projects icon on your Desktop or selecting Start menu → Programs → ISaGRAF 3.5 → Projects. On the Projects Management window, select File menu → New. 2. On the Create new project window, enter the name of the project (for example b25test4) and press OK button. The name of project should not exceed 8 characters. The b25test4 project is then listed in the Projects Management window. 3. Select Edit menu → Set comment text. Enter a brief description of this project and press OK button. This description will be displayed next to the project name in the Projects Management window. 4. Double-click on b25test4 project. An empty B25TEST4 – Programs window is displayed. 5. Select File menu → New. On the New program window enter the name of the program (for example, ILtest1); a brief comment; select the Language to Quick IL; select Begin Style and press OK button. The ILtest1 program is displayed in the B25TEST4 – Programs window. 6. Follow Steps 6 to 11 in 3.4.1 to create and populate the application’s Dictionary with SW1 and SW2 Boolean input variables, and LED1 Boolean output variable. 7. On the B25TEST4 – Programs window double-click on ILtest1 program. 8. Type in a comment in comment parentheses (* *) such as (* Exclusive OR logic for switching on LED *). When entered correctly comments are highlighted green. 9. Press Enter to move to the next command line in the IL program editor. 10. To enter Keyword commands, either click the desired button in the Keywords tool box or type it, such as for an ‘AND’ statement, either click AND in the Keyword tool box or type AND on the command line. When correctly entered Keyword commands are highlighted pink. 11. To enter inputs, outputs, or variables, for example input switch SW1, either select Edit → Insert variable → SW1 or type SW1 on the command line. 12. Type the following command lines under the entered comment: LD SW1 XOR SW2 ST LED1 13. The ILtest1 program should now appear as follows: OEM Technology Solutions Page 29 EMBEDDED PLC BL2500 User’s Manual Running Sample Applications 14. Save the program by selecting File menu → Save. Press OK button on the Update diary window. Close the ILtest1 – ST Program window. 15. Follow Steps 17 to 25 in 3.4.1 to compile the application and download it to the Target PLC. 16. Double-click on ILtest1 program. The ILTEST1 – ST Programs window is displayed, with the line numbers visible and the TRUE or FALSE current state for each variable displayed in the Value column. Short circuit digital input IN00 to set SW1 to FALSE, the LED1 will be turned ON as well as the state of LED1 in the Programs window will change. The PLC program implements a Boolean XOR operation on SW1 and SW2 with the result set on the LED1. 17. To stop the monitoring of the PLC application, close the Debugger window. The programs and dictionary windows in debug mode will be closed. 3.4.5 Using Sequential Function Chart 1. Open the ISaGRAF Project Management by double-clicking on the ISaGRAF Projects icon on your Desktop or selecting Start menu → Programs → ISaGRAF 3.5 → Projects. On the Projects Management window, select File menu → New. 2. On the Create new project window, enter the name of the project (for example b25test5) and press OK button. The name of project should not exceed 8 characters. The b25test5 project is then listed in the Projects Management window. 3. Select Edit menu → Set comment text. Enter a brief description of this project and press OK button. This description will be displayed next to the project name in the Projects Management window. 4. Double-click on b25test5 project. An empty B25TEST5 – Programs window is displayed. OEM Technology Solutions Page 30 EMBEDDED PLC BL2500 User’s Manual Running Sample Applications 5. Select File menu → New. On the New program window enter the name of the program (for example, SFCtest1); a brief comment; select the Language to SFC; select Begin Style and press OK button. The SFCtest1 program is displayed in the B25TEST5 – Programs window. 6. Follow Steps 6 to 11 in Section 3.4.1 to create and populate application’s Dictionary with three Boolean variables (SW1, SW2 and LED1). 7. On the B25TEST5 – Programs window double-click on SFCtest1 program. 8. Click on below Step 1. Click on OR divergence single divergence and then on Transition to add a single divergence. Click on below to add a transition after the single divergence. Click on below the transition and add Step 2 by pressing Step button. Repeat the same procedure to add Transitions 3, 4 and 5, Step 3, a single divergence and a Jump to Step 1. The final program screen should be as shown below. 9. Double-click on Transition 1 and write the expression SW1 XOR SW2; on the Transition GT1 ST/LD editor that is displayed. OEM Technology Solutions Page 31 EMBEDDED PLC BL2500 User’s Manual Running Sample Applications 10. Double-click on Transition 2 and write the expression not(SW1 XOR SW2); on the Transition GT2 ST/LD editor that is displayed. 11. Double-click on Step 2 and write the action LED1(S); on the Step GS2 that is displayed. Add the action LED2(R); on Step 3. 12. Save the program by selecting File menu → Save. Press OK button on the Update diary window. Close the SFCtest1 – Program window. 13. Follow Steps 17 to 25 in 3.4.1 to compile the application and download it to the Target PLC. 14. Double-click on SFCtest1 program. The SFCTEST1 – SFC Program window is displayed. The step currently active is shown with a black box. Short circuit digital input IN00 to change the activity to Step 2 which set the LED1 (DS3 LED) output to TRUE. 15. To stop the monitoring of the PLC application, close the Debugger window. The programs and dictionary windows in debug mode will be closed. OEM Technology Solutions Page 32 EMBEDDED PLC BL2500 User’s Manual Running Sample Applications 3.4.6 Using Flow Chart 1. Open the ISaGRAF Project Management by double-clicking on the ISaGRAF Projects icon on your Desktop or selecting Start menu → Programs → ISaGRAF 3.5 → Projects. On the Projects Management window, select File menu → New. 2. On the Create new project window, enter the name of the project (for example b25test6) and press OK button. The name of project should not exceed 8 characters. The b25test6 project is then listed in the Projects Management window. 3. Select Edit menu → Set comment text. Enter a brief description of this project and press OK button. This description will be displayed next to the project name in the Projects Management window. 4. Double-click on b25test6 project. An empty B25TEST6 – Programs window is displayed. 5. Select File menu → New. On the New program window enter the name of the program (for example, FCtest1); a brief comment; select the Language to FC; select Begin Style and press OK button. The FCtest1 program is displayed in the B25TEST6 – Programs window. 6. Follow Steps 6 to 11 in 3.4.1 to create and populate the application’s Dictionary with SW1 and SW2 Boolean input variables, and LED1 Boolean output variable. 7. On the B25TEST6 – Programs window double-click on FCtest1 program. and place the comment box in the FCtest1 Flow Chart 8. Select the Insert a comment button editor. Double click on the box to type in a comment such as “Exclusive OR logic for switching on LED”. 9. Select the Insert a test button and place it between the “Begin” symbol and the “End” symbol. Double click on it to display the editing box for that symbol. Rename it SW1 = SW2, and type in the code SW1 = SW2. 10. Select the Insert an action button and place one on each of the two flow links from the test. Double click on the action symbol placed on the “Yes” flow link to display the editing box. Rename it LED1_OFF and type in the code: LED1 := FALSE; Double click on the action symbol placed on the “No” flow link to display the editing box. Rename it LED1_ON and type in the code: LED1 := TRUE; OEM Technology Solutions Page 33 EMBEDDED PLC BL2500 User’s Manual 11. Select the Insert a Repeat-Until button Running Sample Applications and place it in between the “Begin” symbol and the “SW1 = SW2” test symbol. Press Delete to just leave the flow line connector behind . 12. Select the flow link between the “Begin” symbol and the “End” symbol and delete it to allow for the program to run continuously without ending. 13. Click on the flow line connector that both the “LED_OFF” and the “LED_ON” action symbols connect to. Select the Insert a flow button and connect both the “LED_OFF” and the “LED_ON” action symbols to the flow line connector remaining from Step 11. This allows the “SW1 = SW2” test to repeat continuously, so if either of SW1 or SW2 change it can test again and change the LED1 output. 14. The FCtest1 Flow Chart should now appear as follows: 15. Save the program by selecting File menu → Save. Press OK button on the Update diary window. Close the FCtest1 – Flow Chart window. 16. Follow Steps 17 to 25 in 3.4.1 to compile and download it to the Target PLC. 17. Double-click on FCtest1 program. The FCTEST1 – Flow Chart window is displayed. Short circuit the digital input IN00 (SW1 will be FALSE), the LED1 will be turned ON as well as the state of LED1 in the Programs window will change. The PLC program implements a Boolean XOR operation on SW1 and SW2 with the result set on the LED1. 18. To stop the monitoring of the PLC application, close the Debugger window. The programs and dictionary windows in debug mode will be closed. The ISaGRAF User’s Manual (See [2]) and the on-line help of the ISaGRAF Workbench describes in detail all the Workbench functionalities (editor, simulation, debugger, etc.) including also a reference manual of the PLC programming languages (IEC 61131-3). OEM Technology Solutions Page 34 EMBEDDED PLC BL2500 User’s Manual Modbus Protocol 4. MODBUS PROTOCOL 4.1 EMBEDDED PLC TARGET AS A MODBUS SLAVE The EMBEDDED PLC Target implements Modbus slave RTU over serial line (RS232 or RS485) or Modbus slave on TCP protocols to exchange data with other systems. Modbus is an application layer messaging protocol for client/server communication between devices connected on different types of buses or network. For more details about the protocol specification see [4] available from the Modbus-IDA Organization website http://www.modbus.org/specs.php. The following Modbus function codes are supported by the EMBEDDED PLC target: Function Code (Decimal) Action 1 Read coils (or digital outputs) 2 Read discrete inputs (or digital inputs) 3 Read holding registers (or analogue outputs) 4 Read input registers (or analogue inputs) 5 Write single coil (1 bit) 6 Write single register (1 word) 15 Write multiple coils (N bits) 16 Write multiple registers (N words) 4.1.1 Configuring Modbus Slave The EMBEDDED PLC BL2500 comes pre-configured as a Modbus slave TCP. Use the EMBEDDED PLC Utility to change the Modbus slave parameters of the target. Go to section 7.1.1 for instructions on how to install the EMBEDDED PLC Utility. Section 7.1.4 describes step-by-step how to change the configuration of the EMBEDDED PLC Modbus slave interface. " Note: The Modbus TCP interface implemented in the EMBEDDED PLC target supports up to 5 simultaneous socket connections, excluding the ISaGRAF Workbench. When using Modbus over RS232/RS485, the ISaGRAF Workbench and the Modbus master share the same physical port, therefore only one can be connected to the target at any given time. 4.1.2 Defining Variable Addresses for access via Modbus To make data available from the EMBEDDED PLC target to a Modbus master, you must first define the variable with a “Network Address”. The variable must be declared with a network address that is in the Modbus format. All the addresses are expressed in this document in decimal format, unless other format is explicitly specified. " Note: Normally, the ISaGRAF Workbench always formats network addresses in hexadecimal. There is a new undocumented option in ISaGRAF V3.5 to set all network address displays and edit controls to decimal. This option is stored in isa.ini file located in <ISaGRAF folder>\EXE: [EDIT] NwAddrDecimal=1 ; 1=Decimal / 0=Hexadecimal OEM Technology Solutions Page 35 EMBEDDED PLC BL2500 User’s Manual Modbus Protocol Table 2 describes the Modbus address mapping supported by the EMBEDDED PLC target. Table 2: Modbus slave addresses mapping Modbus Data Type Coils (Read/Write) Network Address range (Decimal) 1 – 9999 Discrete Inputs (Read Only) 10001 – 19999 Input Registers (16-bit Integer, Read Only) 30001 – 34999 Input Registers (32-bit Integer/Float, Read Only) Holding Registers (16-bit Integer, Read/Write) Holding Registers (32-bit Integer/Float, Read Only) 35001 – 39997 (odd address) 40001 – 44999 45001 – 49997 (odd address) In order to exchange 32-bit data types via Modbus, each value uses two words (32-bit) of data via read or write multiple registers function codes. The data value is grouped as less significant word first. Since it uses two words, two contiguous addresses are needed to access the 32-bit value, therefore the starting address of the register must be odd: 35001, 35003, etc for input registers; and 45001, 45003, etc. for holding registers. From the Modbus master point of view, the data address of each type starts from 1. For example, if the Modbus master needs to access the Coil 21, the network address defined in the target must be equal to 21. If the Modbus master needs to access the Discrete Input 21, the network address defined in the target must be equal to 10021. If the Modbus master needs to access the Input Register 21 reported as 16-bit integer (1 word), the network address defined in the target must be equal to 30021. If the Modbus master needs to access the Holding Register 21 reported as 16-bit integer (1 word), the network address defined in the target must be equal to 40021. If the Modbus master needs to access a register reported as 32-bit integer or float, the address defined in the master must be odd and start from 5001; and the network address defined in the target must start from 35001 (read only) or 45001 (read or write). There are two methods in ISaGRAF Workbench to declare a variable for Modbus access: 1. Open ISaGRAF Workbench and open the desired program. Click on Dictionary icon (or click on File menu → Dictionary). Double click on the variable to assign the Modbus address. The following dialog window is displayed. Enter the complete Modbus address in the Network Address field and press Store button. See the previous Note on how to change the format (Decimal or Hexadecimal) of the Network Address field of the above window. If the variable is of Boolean type and its attribute is internal or output, the Network Address must be defined within the range of Modbus Coils (1 – 9999). If the variable is of Boolean type and its attribute is internal or input, the Network Address must be defined within the range of Discrete Inputs (10001 – 19999). OEM Technology Solutions Page 36 EMBEDDED PLC BL2500 User’s Manual Modbus Protocol If the variable is of Integer type and its attribute is internal or input, the Network Address must be defined within the range of Input Registers (30001 – 39997). If the variable if of Integer type and its attribute is internal or output, the Network Address must be defined within the range of Holding Registers (40001 – 49997). If the variable is of Real type it must be exchanged as 32-bit value, therefore its address must be in the range of 35001 – 39997 (internal or input attribute) or 45001 – 49997 (internal or output attribute). 2. The second method of assigning network addresses to variables requires that you define the variables BEFORE assigning addresses. This method allows you to assign several addresses before you link them to an ISaGRAF program. On the Dictionary window, select Tools menu → Modbus SCADA Addressing Map. The following window is displayed. In the Options menu you can select the displayed address format (Hexadecimal or Decimal). To assign the unmapped variables, position the cursor in the desired address and then double click on the variable to assign. To assign continuous network addresses to several variables, click on the starting address in the Map segment section, select the variables in the not-mapped section using the SHIFT key and click on Edit menu → Map selected variable. OEM Technology Solutions Page 37 EMBEDDED PLC BL2500 User’s Manual Modbus Protocol 4.2 EMBEDDED PLC TARGET AS A MODBUS MASTER The EMBEDDED PLC Target can also be used as a Modbus master over TCP. A typical Modbus TCP/IP distributed communication architecture is shown in next figure. EMBEDDED PLC Target Modbus Slave/Master TCP SCADA Application Modbus Master TCP HMI Screen Modbus Master TCP Modbus TCP EMBEDDED PLC Target Modbus Slave TCP Other Modbus Slave TCP Serial-toEthernet Converter Modbus Slave Serial Line Modbus Slave Serial Line Figure 4: Modbus TCP communication architecture The EMBEDDED PLC Modbus Master implementation supports the following functions through IEC 611313 programming environment: • Write 8 or 16 consecutive coils (0x). • Read 8 or 16 consecutive discrete inputs (1x). • Read 8 or 16 consecutive input registers (3x) as 16-bit integer value or 32-bit integer/float value. • Write 8 or 16 consecutive holding registers (4x) as 16-bit integer value or 32-bit integer/float value. The EMBEDDED PLC target acting as a Modbus master can communicate with up to one Modbus slave over TCP or up to 16 Modbus slaves over serial via Serial-to-Ethernet converter. 4.2.1 Configuration of Modbus Master over TCP The configuration of the Modbus master interface is done using ISaGRAF I/O boards and I/O complex equipments. The first step is to use the Interface Configuration I/O board (mbtcpcfg). This board must be defined in the I/O connection list before the data groups are declared. The following parameters are setup through this I/O board: • slave_ipAddr (Data type: String): IP Address of the Modbus TCP slave or the IP address of the serial-to-Ethernet converter (default 192.168.1.100). • slave_port (Data type: Integer): This is a read-only parameter and corresponds to the TCP port used by Modbus which is equal to 502. • polling_period (Data type: Long): The Modbus master request every polling_period (in milliseconds) a reading of all the data. In case of an output data group (coils or holding registers) it uses this information for data quality. • timeout (Data type: Long): Connection timeout in milliseconds (default 1000). • retries (Data type: Integer) Number of retries to establish connection before setting the status of the interface as BAD (default 2). Once the Interface Configuration board is connected in one available slot, the Data Groups I/O complex equipments can be connected. These equipments are used to configure and exchange the data available OEM Technology Solutions Page 38 EMBEDDED PLC BL2500 User’s Manual Modbus Protocol in the Modbus slave. The following Data Groups are available (through ISaGRAF I/O complex equipments): • mtcpNai: Read N consecutive input registers (3x) where N can be 8 or 16. • mtcpNdi: Read N consecutive discrete inputs (1x) where N can be 8 or 16. • mtcpNao: Write N consecutive holding registers (4x) where N can be 8 or 16. • mtcpNdo: Write N consecutive coils (0x) where N can be 8 or 16. Each I/O complex equipment consists of a configuration board (cfgstat) and the data board. The following parameters are common to all the I/O complex equipments and are setup through the configuration board (cfgstat): • slave_ipAddr (Data type: String): IP address defined in the Modbus Master TCP Interface Configuration I/O Board (Default 192.168.1.100). This value is used to link this data group to the main TCP interface and must be the same as defined in the TCP Interface Configuration board (mbtcpcfg). Multiple data groups can be linked to one TCP Interface board. • slave_address (Data type: Integer): Modbus slave address used in multiple slaves configuration (Default 1). This parameter is meaningful only when a serial-to-Ethernet converter is used to connect multiple Modbus slaves over serial line. The configuration board contains an input channel (Channel 1) which returns the quality of the data (GOOD or BAD). The data board usually contains a parameter with the starting address of the data group. It also contains the channels on which the ISaGRAF variables are connected to exchange the data values with the Modbus slave. All writing operations (coils and holding registers) require variables with output attribute. All reading operations (discrete inputs and input registers) require variables with input attribute. The next section contains a couple of examples on how to configure the Modbus master interface. Section 6.2.2 describes in details each parameter of the Modbus master I/O boards and complex equipment. 4.2.2 Examples 4.2.2.1 Modbus Master communicating to one Modbus Slave EMBEDDED PLC Target Modbus Master TCP IP Addr = 192.168.1.100 Modbus TCP Modbus Slave TCP IP Address = 192.168.1.101 Slave Address = 1 16 Coils (0x) Start Address = 21 8 Input Registers (3x) 32-bit Reals Start Address = 5001 Figure 5: Example 1: Modbus Master to one Modbus Slave over TCP There is one EMBEDDED PLC Target configured as a Modbus Master over TCP and one Modbus Slave over TCP which has 16 Coils (or digital outputs) starting from address 21 and 8 Input Registers (analogue inputs, 32-bit Real) starting from address 5001. All addresses are expressed in Decimal format. OEM Technology Solutions Page 39 EMBEDDED PLC BL2500 User’s Manual Modbus Protocol 1. The EMBEDDED PLC Target (Modbus Master) must be configured as TCP with the IP Address 192.168.1.100. See Section 7.1.4 for instructions on how to configure the EMBEDDED PLC firmware kernel. 2. Open ISaGRAF Workbench and create a new project called mdbMast1. Open the Dictionary and define 16 Boolean output variables (remCoil01 – remCoil02) and 8 Analogue input variables (remInpReg01 – remInpReg08) as Reals. You can use the Quick Declaration tool to quickly define those variables (Tools menu → Quick Declaration). Save and close the Dictionary. 3. In the ISaGRAF Programs window click the I/O connection tool icon click the Set board/equipment icon . On the I/O Connection tool . The following window is displayed. 4. Select mbtcpcfg I/O configuration board and press OK. The following information is displayed in the I/O connection tool. This board is the main configuration of the Modbus master interface. All the parameters displayed here affect all the data groups linked to this board. This configuration board MUST be defined before the Modbus data groups boards. OEM Technology Solutions Page 40 EMBEDDED PLC BL2500 User’s Manual Modbus Protocol 5. Double click on slave_ipAddr configuration parameter and enter the IP address of the Modbus slave device 192.168.1.101. The polling_period and timeout are in millisecond. The status of the Modbus master interface is returned as an integer value in Channel 1 of this board. 6. On the left side of the I/O connection tool double click on Slot 1 and select Equipment option on the window displayed below. 7. Select the Modbus data group I/O equipment mtcp16do which corresponds to the 16 Coils the Modbus slave support. 8. Under mtcp16do equipment, double click on cfgstat board. Enter the slave_ipAddr defined previously in the mbtcpcfg board 192.168.1.101. It is important that the IP address defined in the TCP Interface Configuration board (mbtcpcfg) and the configuration board of the mtcp16do data group are the same. The slave_address parameter is used if you have a TCP/IP to RS232/485 converter where multiple slaves can be connected to one IP address. The status of the data quality of the group is returned in Channel 1 of the cfgstat board (integer input). OEM Technology Solutions Page 41 EMBEDDED PLC BL2500 User’s Manual Modbus Protocol 9. Under mtcp16do equipment double click on do_0x board. Double click on start_address parameter to modify the starting address of the Modbus data group. 10. On the right section of the I/O Connection tool double click on Channel 1. On the Connect I/O channel window select the desired free output variable and press Connect. Repeat the same for the other channels. Close the Connect I/O channel window after all the output variables have been connected. 11. Double-click on Slot 2 of the I/O Connection window and select the mtcp8ai Equipment. Set the slave_ipAddr to the same value defined in the TCP Interface Configuration board (192.168.1.101). OEM Technology Solutions Page 42 EMBEDDED PLC BL2500 User’s Manual Modbus Protocol 12. Click on ai_3x board and set the data_type value to ‘L’ (Long data type for 32-bit Reals or Integers) and start_address to 5001. Connect the analogue input real variables remInpReg01 to remInpReg02 to the corresponding channels. Save and close the I/O Connection tool. When using input or holding registers, there is an extra parameter which defines the format of the data value: ‘S‘ for 16-bit or ‘L’ for 32-bit. If the variable connected to the channel is integer, the value will be treated as integer. If the attribute of the variable connected to the channel is Real, the value will be treated as floating point. If this project is compiled and downloaded to the target, the Boolean output variables remCoil01 to remCoil16 are used to write Boolean values to the Coils in the slave. The Analogue input variables hold the values of the Input Registers in the slave. OEM Technology Solutions Page 43 EMBEDDED PLC BL2500 User’s Manual Modbus Protocol 4.2.2.2 Modbus Master communicating to two slaves via RS485-to-Ethernet converter EMBEDDED PLC Target Modbus Master TCP IP Addr = 192.168.1.100 Modbus TCP RS485-to-Ethernet Converter Modbus Slave RS485 Modbus Slave RS485 Slave Address = 1 Slave Address = 200 16 Discrete Inputs (1x) Start Address = 100 8 Holding Registers(4x) 16-bit Integers Start Address = 1 IP Address = 192.168.1.101 RS485 Figure 6: Example 2: Modbus Master TCP to two Modbus Slaves over Serial There is an EMBEDDED PLC target acting as the Modbus Master over TCP communicating to two Modbus slaves over RS485 via an RS485-to-Ethernet converter. One Modbus slave has 16 Discrete Inputs (or digital inputs) starting from address 100. The other Modbus slave has 8 Holding Registers (or analogue outputs) starting from address 1 and its values are reported as 16-bit Integer. The IP Address of the Modbus Master is 192.168.1.100 and the IP address of the RS485-to-Ethernet Converter is 192.168.1.101. The following step-by-step instructions describe how to configure the Modbus master within an ISaGRAF project: 1. The EMBEDDED PLC Target (Modbus Master) must be configured as TCP with the IP Address 192.168.1.100. See Section 7.1.4 for instructions on how to configure the EMBEDDED PLC firmware kernel. 2. Open ISaGRAF Workbench and create a new project called mdbMast2. Open the Dictionary and define 16 Boolean input and 8 Analogue output variables. 3. Open the I/O Connection tool and connect the Modbus TCP Interface Configuration board (mbtcpcfg) as described in Steps 3 to 5 of the previous example. OEM Technology Solutions Page 44 EMBEDDED PLC BL2500 User’s Manual Modbus Protocol 4. Double-click on Slot 1, select Equipments and connect mtcp16di I/O equipment. Select cfgstat board and set the slave_ipAddr to 192.168.1.101 and slave_address to 1. 5. Select di_1x board, set the start_address to 100 and connect all the Boolean input variables. 6. Double-click on Slot 2, select Equipments and connect mtcp8ao I/O equipment. Select cfgstat board and set the slave_ipAddr to 192.168.1.101 and slave_address to 200. OEM Technology Solutions Page 45 EMBEDDED PLC BL2500 User’s Manual Modbus Protocol 7. Select ao_4x board, set the data_type to ‘S’ (Short or 16-bit value) and start_address to 1. Connect all the Analogue output variables. Save and close the I/O Connection tool. OEM Technology Solutions Page 46 EMBEDDED PLC BL2500 User’s Manual Hardware Reference 5. HARDWARE REFERENCE The Figure 7 shows the signal names and connectors of the BL2500. The BL2500 are equipped with five 1 × 10 friction-lock connector terminals (J1, J3, J9, J11, and J12) where pin 9 is removed to polarize the connector terminals, a 2 × 5 RS-232 signal header, a 2 × 5 programming header, and an RJ-45 Ethernet jack on the Rabbit core module. The RJ-45 jacks at J4 and J5 labelled RabbitNet® are serial I/O expansion ports for use with RabbitNet I/O boards. , Caution: The RabbitNet jacks do not support Ethernet connections. Be careful to connect your Ethernet cable to the jack labelled Ethernet. Two 4-pin 0.156" friction-lock connector terminals at J7 and J8 are installed to supply power (DCIN and +5 V) to the RabbitNet peripheral boards. Two 2-pin 0.156" friction-lock connector terminals at J2 and J10 are for power supply and +K connections. Figure 7: BL2500 Pinouts For detail about electrical and mechanical specifications of the BL2500 go to Section 9.1. 5.1 DIGITAL INPUTS The BL2500 has 16 digital inputs, IN00-IN15. IN00-IN13 and IN15 are each protected over a range of -36 V to +36 V, and IN14 is protected over a range of -36 V to +5 V. The inputs are factory-configured to be pulled up to +3.3 V; IN00-IN07 can also be pulled up to +K or they can be pulled down to 0 V by changing a surface-mounted 0 W resistor. Figure 8 shows a sample digital input circuit. IN00-IN07 and IN15 are protected against noise spikes by a low-pass filter composed of a 22 kΩ series resistor and a 10 nF capacitor. OEM Technology Solutions Page 47 EMBEDDED PLC BL2500 User’s Manual Hardware Reference Figure 8: BL2500 Digital Inputs (Pull-up factory default) The actual switching threshold between a zero and a one is between 0.9 V and 2.3 V for all 16 inputs, i.e. VINLMax = 0.9 V and VINHMin = 2.3 V. IN00-IN13 and IN15 are each fully protected over a range of -36 V to +36 V, and can handle short spikes of ±40 V. IN14 is protected over a range of -36 V to +5 V. 5.2 DIGITAL OUTPUTS The BL2500 has eight digital outputs, OUT0-OUT7, each of which can sink up to 200 mA. Figure 9 shows a wiring diagram for using the digital outputs in a sinking configuration. Figure 9: BL2500 Digital Outputs +K is an externally supplied voltage of 3.3 - 40 V DC, and should be capable of delivering all the load currents. Although a connection to a +K supply is not absolutely required with sinking outputs, it is highly recommended to protect against current spikes when driving inductive loads such as relays and solenoids. Connect the positive +K supply to pin 1 of friction-lock connector terminal J10 and the negative side of the supply to pin 2 of friction-lock connector terminal J10. A friction-lock connector is recommended to connect this supply because the +K inputs are not protected against reverse polarity, and serious damage to the BL2500 may result if you connect this supply backwards. 5.3 ANALOG INPUT The A/D converter, shown in Figure 10, compares the DA0 voltage to AD0, the voltage presented to the A/D converter. DA0 therefore cannot be used for the D/A converter when the A/D converter is being used. " Note: Only DA1 is available for EMBEDDED PLC as DA0 is used by the A/D converter. OEM Technology Solutions Page 48 EMBEDDED PLC BL2500 User’s Manual Hardware Reference Figure 10: Schematic Diagram of the A/D Converter The A/D converter programs DA0 using a successive-approximation binary search until DA0 equals the A/D converter input voltage. That programmed DA0 voltage is then reported as the A/D converter value. The A/D converter transforms the voltage at DA0 into a 13.2 mV window around DA0. Because the A/D converter circuit uses a 13.2 mV window, the accuracy is ±6.6 mV. DA0 can range from 0.1 V to 3.1 V, which represents 227 steps of 13.2 mV. This represents a resolution of approximately 8 bits. Since the D/A converter is able to change the DA0 output in 3.22 mV steps, there are 930 steps over the range from 0.1 V to 3.1 V. This represents a resolution of approximately 10 bits. The A/D converter has no reference voltage. There is a relative accuracy between measurements, but no absolute accuracy without calibration. This is because the +3.3 V supply can vary ±5%, the pulse-width modulated outputs might not reach the full 0 V and 3.3 V rails out of the Rabbit 3000 microprocessor, and the gain resistors used in the circuit have a 1% tolerance. For these reasons, each BL2500 needs to be calibrated individually, with the constants held in software, to be able to rely on an absolute accuracy. The BL2500 has this calibration support. An A/D conversion takes approximately 83 ms. 5.4 ANALOG OUTPUT Two D/A converter outputs, DA0 and DA1, are supplied on the BL2500. These are shown in Figure 11. " Note: Only DA1 is available for EMBEDDED PLC BL2500 as DA0 is used by the A/D converter. Figure 11: Schematic Diagram of D/A Converters The D/A converters have no reference voltage. Although they may be fairly accurate from one programmed voltage to the next, they do not have absolute accuracy. This is because the +3.3 V supply can change ±5%, the PWM outputs might not achieve the full 0 V and 3.3 V rail out of the processor, and OEM Technology Solutions Page 49 EMBEDDED PLC BL2500 User’s Manual Hardware Reference the gain resistors in the circuit have a 1% tolerance. The D/A converters therefore need individual calibration, with the calibration constants held in software before absolute accuracy can be relied on. The BL2500 has such calibration. Pulse-width modulation (PWM) is used for the D/A conversion. The digital signal, which is either 0 V or 3.3 V, will be a train of pulses. This means that if the signal is taken to be usually at 0 V (or ground), the pulses will be some 3.3 V pulses of varying width. The voltage will be 0 V for a given time, then jump to 3.3 V for a given time, then back to ground for a given time, then back to 3.3 V, and so on. A hardware filter that consists of a resistor and capacitor averages the 3.3 V signal and the 0 V signal over time. Therefore, if the time that the signal is at 3.3 V is equal to the time the signal is 0 V, the duty cycle will be 50%, and the average signal will be 1.65 V. If the time at 3.3 V is only 25% of the time, then the average voltage will be 0.825 V. Thus, the software needs to only vary the time the signal is at 3.3 V with respect to the time the signal is at 0 V to achieve any desired voltage between 0 and 3.3 V. It is very easy to do pulse-width modulation with the Rabbit 3000 microprocessor because the chip's architecture includes an advanced PWM feature. 5.5 COMMUNICATION INTERFACES 5.5.1 Serial Ports The BL2500 can be configured (using EMBEDDED PLC Utility) to use either one RS-232 (serial port E) or the RS485 (serial port D). The serial port chosen will be used as the communication channel with either the ISaGRAF Workbench or a Modbus master. The serial port A is used by the programming cable. Table 3: EMBEDDED PLC BL2500 Serial Port Configuration Serial Port Use Header A Programming Port J3 (Rabbit core module) D RS-485 (3-wires) J9 E RS-232 (3-wires) J6 5.5.1.1 RS-232 The BL2500 RS-232 serial communication is supported by an RS-232 transceiver. This transceiver provides the voltage output, slew rate, and input voltage immunity required to meet the RS-232 serial communication protocol. Basically, the chip translates the Rabbit 3000's CMOS/TTL signals to RS-232 signal levels. Note that the polarity is reversed in an RS-232 circuit so that a +3.3 V output becomes approximately -6 V and 0 V is output as +6 V. The RS-232 transceiver also provides the proper line loading for reliable communication. RS-232 can be used effectively for distances of up to 15 m. 5.5.1.2 RS-485 The BL2500 has one RS-485 serial channel, which is connected to the Rabbit 3000 Serial Port D through an RS-485 transceiver. The half-duplex communication uses PA4 to control the transmit enable on the communication line. Using this scheme a strict master/slave relationship must exist between devices to insure that no two devices attempt to drive the bus simultaneously. The BL2500 can be used in an RS-485 multidrop network spanning up to 1200 m (4000 ft), and there can be as many as 32 attached devices. Connect the 485+ to 485+ and 485- to 485- using single twisted-pair wires as shown in Figure 12. Note that a common ground is recommended. OEM Technology Solutions Page 50 EMBEDDED PLC BL2500 User’s Manual Hardware Reference Figure 12: BL2500 Multidrop Network The BL2500 comes with a 220 W termination resistor and two 681 W bias resistors installed and enabled. The load these bias and termination resistors present to the RS-485 transceiver limits the number of BL2500s in a multidrop network to one master and nine slaves, unless the bias and termination resistors are removed. When using more than 10 BL2500s in a multidrop network, or when you need the full common-mode immunity per the RS-485 specification, leave the 681 W bias resistors in place on the master BL2500, and leave the 220 W termination resistors in place on the BL2500 at each end of the network. Figure 13: RS485 Termination and Bias Resistors 5.5.2 Ethernet Port Figure 14 shows the pinout for the RJ-45 Ethernet port (J4). Note that some Ethernet connectors are numbered in reverse to the order used here. Figure 14: RJ-45 Ethernet Port Pinout Three LEDs are placed next to the RJ-45 Ethernet jack, one to indicate an Ethernet link (LNK), one to indicate Ethernet activity (ACT), and one to indicate when the RCM3200 is connected to a functioning 100Base-T network (SPD). The RJ-45 connector is shielded to minimize EMI effects to/from the Ethernet signals. OEM Technology Solutions Page 51 EMBEDDED PLC BL2500 User’s Manual Hardware Reference 5.6 LED INDICATORS The EMBEDDED PLC Kernel running on the BL2500 uses three LEDs to indicate status: • DS1 (yellow). When this LED is flashing every second, it indicates that the Target PLC is licensed and active. • DS2 (red). This LED is turned ON after reset the Target PLC. If the Target PLC is not licensed the LED will remain ON indefinitely. If the Target PLC is licensed the LED will be turned OFF after 8 seconds. Also, this LED is turned ON during configuration of the Target PLC. DS3 and DS4 (yellow) LEDs are used via ISaGRAF Workbench I/O boards. OEM Technology Solutions Page 52 EMBEDDED PLC BL2500 User’s Manual Software Reference 6. SOFTWARE REFERENCE 6.1 MORE ABOUT ISAGRAF 6.1.1 Project Manager The ISaGRAF methodology begins with the preparation of a detailed project specification. This step is common to all PLC programming techniques and is usually the result of a thorough analysis of the project and consultation between the integrator and the user. Distributed applications can be represented as several ISaGRAF projects grouped together in the project list. Distributed applications can be edited, simulated or debugged on the same Windows screen. 6.1.2 Program Manager With the program manager the application specification is divided into smaller functional modules. The exact operation that is to be performed within each module is defined at that stage. ISaGRAF’s program management facilities allow the user to define each of these modules, their operations and their interaction to form the complete application. 6.1.3 Variable Definition All variables are declared or imported in the ISaGRAF dictionary. When this step is achieved, during programming, a mouse click will insert the variable in the program. Any external database can be imported to build the ISaGRAF dictionary. A quick declaration allows many variables to be declared with one command and an easy to use mapping tool is provided for Modbusbased SCADA systems such as Indusoft®. For a brief description about Indusoft and how to use it in conjunction with EMBEDDED PLC see Chapter 10. The EMBEDDED PLC Firmware Kernel implements three types of Modbus communication: Modbus over TCP/IP, Modbus RTU over RS232 and Modbus RTU over RS485. The EMBEDDED PLC Kernel can run only one protocol at one time. " Note: EMBEDDED PLC has the TCP/IP port 502 reserved (this port can not be modified) to support Modbus over TCP/IP communications. Since ISaGRAF Workbench uses a different TCP/IP port for communication with the Target PLC (port 1100), the Workbench and a Modbus master (HMI or SCADA) can communicate with the Target at the same time, i.e. when the Target is configured as Modbus over TCP/IP the ISaGRAF Workbench and a Modbus master can share the same physical line (Ethernet). However, when the Target is using either RS232 or RS485 only an ISaGRAF Workbench or a Modbus master can be connected to the target at any one time. 6.1.4 Functional Module Programming The next step in the ISaGRAF methodology is the actual programming of the various functional modules. This can be done using any one of the six supported languages: • Sequential Functional Chart (SFC) • Function Block Diagram (FBD) • Ladder Diagram (LD) • Structured Text (ST) • Instruction List (IL) • Flow Chart (FC) OEM Technology Solutions Page 53 EMBEDDED PLC BL2500 User’s Manual Software Reference 6.1.5 IEC 61131-3 Language Editors In February 1993, responding to the need for standards to reduce training costs and guaranteed portability, the IEC issued the IEC 61131-3 standard: a specification of five PLC programming languages that can be freely mixed to define automation and control procedures. In August 1996, ISaGRAF version 3.2 received the certificate of PLC open compliance class of IEC 61131-3 (base level IL). 6.1.5.1 Sequential Function Chart Editor SFC divides the process cycle into a number of well defined steps, separated by transitions. SFC is the core language of the IEC 61131-3 standard. The other languages are used to describe the actions performed within the steps and the logical conditions for the transitions. Parallel processing can easily be described using SFC. 6.1.5.2 Function Block Diagram Editor The FBD is a graphical language that allows the user to build complex procedures by taking existing function blocks from the ISaGRAF library and wiring them together on the screen. ISaGRAF includes a library with more than 60 blocks ready to use. Users can enlarge this library by writing functions and function blocks in LD/FBD/ST/IL or C. 6.1.5.3 Ladder Diagram Editor The ladder diagram is one of the most familiar methods of representing logical equations and simple actions. The ISaGRAF ladder diagram editor offers the best compromises between high level graphic capabilities and easy to use keyboard driven programming. 6.1.5.4 Structured Text Editor Structured text is a high level structured language with a syntax similar to Pascal, but more intuitive to the automation engineer. This language is mainly used to implement complex procedure that cannot be easily expressed with graphical languages (IF/THEN/ELSE, FOR, WHILE, etc.). 6.1.5.5 Instruction List Editor Instruction list is a low level language similar to the simple textual PLC languages. 6.1.6 Flow Chart Editor In addition to the five IEC 61131-3 languages ISaGRAF implements another graphical language, Flow Chart. Flow Chart is a decision diagram, which can also be used to describe sequential operations. 6.1.7 Document Generator ISaGRAF features a self-documentation capability that can automatically generate the project’s most current project description, project architecture, history of modifications, I/O wiring lists, dictionaries and cross references. 6.1.8 Simulation Without any target hardware platform, the programmer can validate the complete application in the office. With ISaGRAF’s powerful simulator on the workbench, the user can perform structural and functional tests of each module separately or on the global application. The simulator makes it easy to trace the program execution and to see the status of any internal variable. The I/O hardware can be fully simulated and internal status and variables manual forced by the user. OEM Technology Solutions Page 54 EMBEDDED PLC BL2500 User’s Manual Software Reference During simulation, editors can be opened in debug mode to see how programs are executed. " Note: Not all C functions and C function blocks are available for simulation. Section 6.2.3 and 6.2.4 describes C functions and C function blocks that are specific to the BL2500 and are not available for simulation. 6.2 ISAGRAF SOFTWARE REFERENCE This section presents information about the specific elements of the ISaGRAF Workbench Library for the EMBEDDED PLC BL2500 (I/O boards, C functions and C function blocks). 6.2.1 I/O Boards ISaGRAF I/O board library for the BL2500 is included as part of the BL2500 BSP to make it easy to communicate with the BL2500 supported inputs and outputs. These I/O boards are described in the following sub-sections. 6.2.1.1 BL2500 Digital Inputs Board Name: bl25di Description: Monitors IN00 - IN15 of the BL2500 Digital Inputs Parameters: None Number of Channels: 16 Connection Terminals: IN00 to IN15 – Connection for positive signal channel 1 to 16 GND – Connection for negative signal all channels Channel Value Correspondence: TRUE – When digital input pulled up to greater than 2.3 V (VINHMin) FALSE – When digital input pulled down to less than 0.9 V (VINLMax) OEM Technology Solutions Page 55 EMBEDDED PLC BL2500 User’s Manual Software Reference 6.2.1.2 BL2500 Digital Outputs Board Name: bl25do Description: Controls OUT0 - OUT7 of the BL2500 digital sinking outputs Number of Channels: 8 Connection Terminals: OUT0 to OUT7 – Connection of channels 1 to 8 Channel Value Correspondence: TRUE – Digital output is short-circuit to 0 V FALSE – Digital output is open circuit 6.2.1.3 BL2500 On-board LEDs Name: bl25led Description: Controls the BL2500 on-board LEDs DS3 and DS4 Number of Channels: 2 Connection Terminals: None Channel Value Correspondence: TRUE – LED is ON FALSE – LED is OFF 6.2.1.4 BL2500 Analog Input Board Name: bl25ai Description: Monitors AD0 Analog Input of the BL2500 (10-bit resolution over 0-3.3V range) Number of Channels: 1 Connection Terminals: AD0 – Connection for positive signal channel 1 AGND – Connection for negative signal channel 1 Channel Value Correspondence: Analog REAL type variable: Voltage input in the range 0 – 3.3 V. OEM Technology Solutions Page 56 EMBEDDED PLC BL2500 User’s Manual Software Reference 6.2.1.5 BL2500 Analog Output Board Name: bl25ao Description: Controls DA1 Analog Output of the BL2500 (10-bit resolution over 0-3.3V range) Number of Channels: 1 Connection Terminals: DA1 – Connection for positive signal channel 1 AGND – Connection for negative signal channel 1 Channel Value Correspondence: Analog REAL type variable: Voltage output in the range 0 – 3.3 V. 6.2.2 Remote I/O Boards and Equipments (Modbus TCP Master) 6.2.2.1 Modbus TCP Master Main Configuration Board Name: mbtcpcfg Description: Configuration of TCP port used by Modbus Master TCP. This board is used to configure the Modbus Master TCP interface and it has to be placed before any other remote devices in the I/O connection tool. Several Modbus TCP based devices can be connected to this interface. The analogue (integer) input channel is used to read the status of the connection. Possible values are: 0 - BAD QUALITY (timeout or no connection) 1 - GOOD QUALITY Number of Channels: 1 Parameters: • slave_ipAddr - (String) IP Address of the Modbus TCP slave (default 192.168.1.100). • slave_port - (Integer/Read-only) TCP port used by Modbus which is equal to 502 (default 502). • polling_period - (Long) Polling period of the master in msec (default 5000). • timeout - (Long) TCP connection timeout in msec (default 1000). • retries - (Integer) Number of retries to establish connection before putting the status of the interface as BAD (default 2). OEM Technology Solutions Page 57 EMBEDDED PLC BL2500 User’s Manual Software Reference 6.2.2.2 Modbus TCP Master Coils Data Group Equipment Name: mtcp8do (or mtcp16do) Description: Modbus Master TCP - 8 or 16 Coils (0x) Data Group. This complex equipment is used to write 8 or 16 consecutive coils (or digital outputs) via the specified Modbus Master TCP Interface. The Modbus Master TCP Interface Configuration I/O board (mbtcpcfg) has to be defined before connecting this complex equipment. The IP address defined in the cfgstat board of this complex equipment must be the same as the one defined in the Modbus Master TCP configuration board (mbtcpcfg), otherwise this complex equipment will not be open (Workbench ERROR). It also supports communication with a Modbus slave TCP/IP gateway on which multiple serial slaves are connected through one IP address. In that case the slave address parameter is used to address the different slaves in the chain. Configuration: • cfgstat: Configuration and Status of this Modbus data group. Nb Channels: 1 (Data quality). Possible values are: 0 - Data quality is BAD 1 - Data quality is GOOD Parameters: slave_ipAddr (string): IP address defined in the Modbus Master TCP Interface Configuration I/O Board (Default 192.168.1.100). ¾ slave_address (integer): Modbus slave address used in multiple slaves configuration (Default 1). ¾ • do_0x: Coils (Modbus data type 0x). Nb Channels: 8 or 16. Parameters: ¾ start_address (integer): Modbus data start address (Default 1). 6.2.2.3 Modbus TCP Master Discrete Inputs Data Group Equipment Name: mtcp8di (or mtcp16di) Description: Modbus Master TCP - 8 or 16 Discrete Inputs (1x) Data Group. This complex equipment is used to read 8 or 16 consecutive discrete inputs (or digital inputs) via the specified Modbus Master TCP Interface. The Modbus Master TCP Interface Configuration I/O board (mbtcpcfg) has to be defined before connecting this complex equipment. The IP address defined in the cfgstat board of this complex equipment must be the same as the one defined in the Modbus Master TCP configuration board (mbtcpcfg), otherwise this complex equipment will not be open (Workbench ERROR). It also supports communication with a Modbus slave TCP/IP gateway on which multiple serial slaves are connected through one IP address. In that case the slave address parameter is used to address the different slaves in the chain. OEM Technology Solutions Page 58 EMBEDDED PLC BL2500 User’s Manual Software Reference Configuration: • cfgstat: Configuration and Status of this Modbus data group. Nb Channels: 1 (Data quality). Possible values are: 0 - Data quality is BAD 1 - Data quality is GOOD Parameters: slave_ipAddr (string): IP address defined in the Modbus Master TCP Interface Configuration I/O Board (Default 192.168.1.100). ¾ slave_address (integer): Modbus slave address used in multiple slaves configuration (Default 1). ¾ • di_1x: Discrete Inputs (Modbus data type 1x). Nb Channels: 8 or 16. Parameters: start_address (integer): Modbus data start address (Default 1) 6.2.2.4 Modbus TCP Master Input Registers Data Group Equipment Name: mtcp8ai (or mtcp16ai) Description: Modbus Master TCP - 8 or 16 Input Registers (3x) Data Group. This complex equipment is used to read 8 or 16 consecutive input registers (or analogue inputs) via the specified Modbus Master TCP Interface. It supports 16 or 32 bits data type values. The Modbus Master TCP Interface Configuration I/O board (mbtcpcfg) has to be defined before connecting this complex equipment. The IP address defined in the cfgstat board of this complex equipment must be the same as the one defined in the Modbus Master TCP configuration board (mbtcpcfg), otherwise this complex equipment will not be open (Workbench ERROR). It also supports communication with a Modbus slave TCP/IP gateway on which multiple serial slaves are connected through one IP address. In that case the slave address parameter is used to address the different slaves in the chain. Configuration: • cfgstat: Configuration and Status of this Modbus data group. Nb Channels: 1 (Data quality). Possible values are: 0 - Data quality is BAD 1 - Data quality is GOOD Parameters: slave_ipAddr (string): IP address defined in the Modbus Master TCP Interface Configuration I/O Board (Default 192.168.1.100). ¾ slave_address (integer): Modbus slave address used in multiple slaves configuration (Default 1). ¾ • ai_4x: Input registers (Modbus data type 3x). Nb Channels: 8 or 16. Parameters: ¾ data_type (character): 16 or 32 bits data types. Possible values are: 'S' - 16 bit 'L' - 32 bit ¾ start_address (integer): Modbus data start address (Default 1). OEM Technology Solutions Page 59 EMBEDDED PLC BL2500 User’s Manual Software Reference 6.2.2.5 Modbus TCP Master Holding Registers Data Group Equipment Name: mtcp8ao (or mtcp16ao) Description: Modbus Master TCP - 8 or 16 Holding Registers (4x) Data Group. This complex equipment is used to write 8 consecutive holding registers (or analogue outputs) via the specified Modbus Master TCP Interface. It supports 16 or 32 bits data type values. The Modbus Master TCP Interface Configuration I/O board (mbtcpcfg) has to be defined before connecting this complex equipment. The IP address defined in the cfgstat board of this complex equipment must be the same as the one defined in the Modbus Master TCP configuration board (mbtcpcfg), otherwise this complex equipment will not be open (Workbench ERROR). It also supports communication with a Modbus slave TCP/IP gateway on which multiple serial slaves are connected through one IP address. In that case the slave address parameter is used to address the different slaves in the chain. Configuration: • cfgstat: Configuration and Status of this Modbus data group. Nb Channels: 1 (Data quality). Possible values are: 0 - Data quality is BAD 1 - Data quality is GOOD Parameters: slave_ipAddr (string): IP address defined in the Modbus Master TCP Interface Configuration I/O Board (Default 192.168.1.100). ¾ slave_address (integer): Modbus slave address used in multiple slaves configuration (Default 1). ¾ • ao_4x: Holding registers (Modbus data type 4x). Nb Channels: 8 or 16. Parameters: ¾ data_type (character): 16 or 32 bits data types. Possible values are: 'S' - 16 bit 'L' - 32 bit ¾ start_address (integer): Modbus data start address (Default 1). OEM Technology Solutions Page 60 EMBEDDED PLC BL2500 User’s Manual Software Reference 6.2.3 ISaGRAF C Functions 6.2.3.1 KERNVER kernver versi Arguments: MSG versi EMBEDDED PLC kernel version number (minimum message length 8) Description: Returns the kernel version number. (* ST Equivalence *) result := kernver(); Remarks: Not available for simulation. 6.2.3.2 RD_TIME rd_time Sel Q Arguments: Sel INT format of the time and date in the output message (Q) Q MSG time, date and day of the week (depending of Sel value) If Sel = 0, Q format is YYYY/MM/DD; If Sel = 1, Q output format is HH:MM:SS If Sel = 2, Q output format is the day of the week Description: Gives the time, date and the day of the week depending on the value of argument sel. (* ST Equivalence *) result := rd_time(sel); Remarks: Not available for simulation. OEM Technology Solutions Page 61 EMBEDDED PLC BL2500 User’s Manual Software Reference 6.2.4 ISaGRAF C Function Blocks 6.2.4.1 SET_TIME set_time Trigger yy mm dd hh minute ss dOfWeek result Arguments: Trigger BOO if Rising edge, sets the time and date of the BL2500 yy INT Year (1900 - 2050) mm INT Month (1 - 12) dd INT Day of month (1 -31) hh INT Hour (0 - 23) minute INT Minute (0 - 59) ss INT Second (0 - 59) DOFWEEK INT Day of the week (0 - 6, 0 means Sunday) result BOO 1 if operation was successful; 0 otherwise Description: Set the time and date of the BL2500 Real Time Clock. (* ST Equivalence *) result := set_time(trigg, yy, mm, dd, hh, minute, ss, dOfWeek); Remarks: Not available for simulation. OEM Technology Solutions Page 62 EMBEDDED PLC BL2500 User’s Manual Loading or Upgrading the Firmware Kernel 7. LOADING OR UPGRADING THE FIRMWARE KERNEL 7.1 INTRODUCTION The EMBEDDED PLC Utility is used to load the EMBEDDED PLC Firmware Kernel to the Rabbit-based Target such as the SBC BL2500. The Firmware Kernel, once loaded into the Target, requires a license key to run. The EMBEDDED PLC Utility does not check for an existing license key before loading the Kernel. Thus, a new license key is required after a Kernel is loaded to a Target. Upgrading the EMBEDDED PLC Firmware Kernel means also loading the newer version of the Firmware kernel file into the Target. Therefore after loading a newer version of the Firmware Kernel file into a licensed Target PLC, a new license key will also be required. , Caution: Loading of the Firmware Kernel file is NOT needed if you purchased the EMBEDDED PLC Application Kit as the BL2500 comes with a pre-loaded and licensed Firmware Kernel. If you reload the Firmware Kernel to a pre-loaded Target, the license information will be lost and a new license key will be required. To verify if your BL2500 have the EMBEDDED PLC Kernel running, power up the BL2500 and if after 10 seconds the DS2 red LED turns off and DS1 starts flashing then the Kernel is loaded and licensed. This chapter describes how to install the EMBEDDED PLC Utility, load and license the EMBEDDED PLC Firmware Kernel. Also includes a complete reference of the Utility software. 7.1.1 Installing EMBEDDED PLC Utility Use the following procedure to install EMBEDDED PLC Utility from the CD-ROM: 1. Insert the EMBEDDED PLC BL2500 CD-ROM and open the root folder. 2. Double-click on the EmbeddedPLCUtility_V1.03_3-0237G.msi file to launch the EMBEDDED PLC Utility Setup Wizard. Follow the on screen instructions to proceed with the installation. 3. Once all the EMBEDDED PLC Utility files have been copied, the EMBEDDED PLC Utility icon is added to your Desktop and the following group is added to your main Programs group: 7.1.2 Connecting to the BL2500 1. Connect the 10-pin PROG connector of the programming cable to header J3 on the BL2500’s RabbitCore module. Ensure that the coloured edge lines up with pin 1 as shown in Figure 15. There is a small dot on the circuit board next to pin 1 of header J3. (Do not use the DIAG connector, which is used for licensing and configuring only). Connect the other end of the programming cable to a COM port on your PC. Make a note of the port to which you connect the cable, as the EMBEDDED PLC Utility will need to have this parameter configured. Note that COM1 on the PC is the default COM port used by the EMBEDDED PLC Utility. OEM Technology Solutions Page 63 EMBEDDED PLC BL2500 User’s Manual Loading or Upgrading the Firmware Kernel Figure 15: Programming Cable Connection 2. Connect the power supply to the BL2500 following the instructions in Section 2.4.1. 7.1.3 Loading and licensing the Firmware Kernel The EMBEDDED PLC BL2500 Firmware Kernel file (BL2500C_V1.05_3-0231I1.bin) is located in the BL2500C_BSP_V1.05_9-0003-007\Kernels directory of the CD-ROM (or in the ZIP file, if downloaded from the website). It is recommended to copy this file from the CD-ROM to a local PC folder, referred in this procedure as <EMBEDDED PLC Kernel Dir>. Use the following procedure to load the EMBEDDED PLC Firmware Kernel to the Target: 1. Open the EMBEDDED PLC Utility and select Setup → Communications… from the main menu bar. Select the serial COM port where the programming cable is connected. Check the Use USB to Serial converter check-box if you have the RS232-to-USB converter cable. Press OK. 2. Select File → Load Flash Image… from the main menu bar. On Choose Flash Image window press ... button. On the Open window select the EMBEDDED PLC Firmware Kernel file <EMBEDDED PLC Kernel Dir>\BL2500C_V1.05_3-0231I1.bin and press Open. Press OK on the Choose Flash Image window. 3. A Progress window is displayed with the status of the loading process. The process consists of four stages: Sending Coldloader → Sending Pilot BIOS → Erasing Flash → Sending Program. 4. After loading is completed a message dialog box is displayed. Follow the instructions in the same order: Connect DIAG cable → Reset Target → Press OK. There are two ways to reset the BL2500: unplugging the power supply and then plugging it again (also known as a power cycle); and the other is shorting out the reset pads on the back of the BL2500 board. For more information about the location of the hardware reset see Section 2.2.1 in [1]. OEM Technology Solutions Page 64 EMBEDDED PLC BL2500 User’s Manual Loading or Upgrading the Firmware Kernel 5. On the Kernel License window, write down the User Reference Code (you can select the code in the User Reference Code and copy it to the clipboard using Ctrl-C). Contact OEM Technology Solutions or your local distributor to obtain a valid license key. Remember to quote the User Reference Code. Press Cancel. An error message dialog is displayed, press OK and close the EMBEDDED PLC Utility. " Note: Even if your Target is not active (without valid license key) you can run several samples in the ISaGRAF Workbench in simulation mode. To run those sample files go to Section 0. 6. Once you have a valid license key, open the EMBEDDED PLC Utility. Select Setup → Kernel License… Follow the instructions on the message dialog box in the same order: Press OK → Reset Target. After a few seconds the License Window will be displayed and the DS2 led (red) will be turned on. 7. Enter the valid license key in the License Key entry box and press Send. A confirmation message is displayed. Save the User Reference Code and License Key for future reference and technical support. Press OK. The DS2 led (red) will be turned off and DS1 led (yellow) will start flashing every second as an indication that the Kernel is licensed and active. For more information about the BL2500 LED status see Section 5.6. 7.1.4 Configuring the Firmware Kernel If you purchased an EMBEDDED PLC Application Kit, the BL2500 comes pre-configured for Use Modbus TCP and the following TCP/IP values: IP address = 192.168.1.100, Netmask = 255.0.0.0, Default gateway = 192.168.1.1. If you want to check or change the Target PLC configuration, follow these instructions: 1. Open the EMBEDDED PLC Utility and check the communications setup. Select Setup → Target Configuration… Follow the instructions on the message dialog box in the same order: Connect DIAG cable → Press OK → Reset Target. After a few seconds the Target Configuration Window is displayed. OEM Technology Solutions Page 65 EMBEDDED PLC BL2500 User’s Manual Loading or Upgrading the Firmware Kernel 2. Enter the desired Modbus Slave Number (Default is 1). Select Use Modbus TCP radio button and fill the Modbus TCP configuration parameters if you want to use Modbus TCP as communication protocol. Otherwise select Use RS232 or Use RS485 radio buttons. Once all the configuration parameters have been entered press OK. The communication protocol and slave number are used to communicate the Target PLC with the ISaGRAF Workbench and Modbus master. " Note: The Modbus Slave Number parameter corresponds to the Target Slave Number on ISaGRAF Workbench (Default is 1). In order to communicate the ISaGRAF Workbench with a specific Target PLC, both numbers must be the same. This is also valid for communication between the Target PLC and a Modbus master using Modbus protocol. 3. After pressing OK the following message dialog box is shown. Press OK and your EMBEDDED PLC Firmware Kernel will be active and ready to be used with the ISaGRAF Workbench (The DS2 red LED is turned OFF and the DS1-yellow LED starts flashing every second). 7.2 EMBEDDED PLC UTILITY SOFTWARE REFERENCE To use the EMBEDDED PLC Utility you must have an EMBEDDED PLC Firmware Kernel (.bin file) to load to your Rabbit-based controller. Click on File → Load Flash Image; enter the .bin file’s location in the dialog box and click OK. This Utility works only with serial connection and it requires the programming cable for the Rabbit-based controller (1.27mm programming cable for Rabbit 3000 microprocessor based controllers). This Utility downloads ONLY EMBEDDED PLC Firmware Kernels. If you want to download another binary file generated with Dynamic C use the Rabbit Field Utility (RFU) that comes in the Dynamic C installation. 7.2.1 Menu Commands 7.2.1.1 File → Load Flash Image Allows a EMBEDDED PLC Kernel (.bin file) to be chosen as the file to be loaded. Clicking the ellipses button (…) brings up an Open File dialog box to browse for a file’s location. 7.2.1.2 Setup → Communications This version of the EMBEDDED PLC Utility only supports Serial Connection. The default com port is COM1. The default baud rate is 115200 bps. If the host PC is using a different com port, change the default to match the port being used by the PC. If the BIOS is using a different baud rate, change the default to match the baud rate being used by the BIOS. 7.2.1.3 Setup → File Locations The first time EMBEDDED PLC Utility runs, it assumes that coldload.bin, pilot.bin and flash.ini are located in the EMBEDDED PLC Utility subdirectory. Those files are installed by the EMBEDDED PLC installation process. The Rabbit Field Utility can be run from a different location if the location of coldload.bin and pilot.bin are specified using Setup → File Locations. OEM Technology Solutions Page 66 EMBEDDED PLC BL2500 User’s Manual Loading or Upgrading the Firmware Kernel 7.2.1.4 Setup → Target Configuration The configuration parameters can be changed at any time once the EMBEDDED PLC kernel is running but requires the Target to be reset (or powered cycle). Select Setup → Target Configuration… Follow the instructions that appear in the message dialog box and press OK. The EMBEDDED PLC Utility will establish connection with the target to get the configuration parameters. If connection is established the following window will appear. Enter the desired configuration and press OK. Configuration parameters: • Modbus Slave Number: This is slave number used to communicate with the ISaGRAF Workbench and a Modbus Master. • IP Address: IP address of the target (must be static, DHCP is not supported). • Netmask: Netmasks are used to identify which part of the address is the Network ID and which part is the Host ID. For example: 255.255.255.0. • Default Gateway: IP address of the default gateway. • Use Modbus TCP: If this option is selected, the Modbus RTU over RS232/RS485 box is disabled. Select this option if Modbus TCP is required. • Use RS232: If this option is selected, the Modbus TCP configuration box is disabled. Select this option if Modbus RTU over RS232 is required. • Use RS485: If this option is selected, the Modbus TCP configuration box is disabled. Select this option if Modbus RTU over RS485 is required. • Baud Rate: Select between 600 to 19200 bits per second. This operation can be repeated at any time but does require resetting (or power cycle) the Target. OEM Technology Solutions Page 67 EMBEDDED PLC BL2500 User’s Manual Loading or Upgrading the Firmware Kernel 7.2.1.5 Setup → Kernel License This option can be used to establish connection with the target to check the current license status. If license is required the following window will appear. The User Reference Code can be copied into the Clipboard by double-clicking on the box (this will select the whole text) and pressing Ctrl-C. The text can be pasted in any document. Enter the valid license key in the entry box and press Send. If license is valid a message confirming the validation will appear and the EMBEDDED PLC will be active. If license is already valid, a message dialog box will show the current Reference Code and License Key. Keep this numbers for your records and for customer support. 7.2.1.6 Setup → Utility Settings The Target Communication Timeout corresponds to the maximum amount of time waiting for a message coming from the EMBEDDED PLC target during licensing or configuring the kernel. The value is expressed in seconds and has to be an integer. Minimum value is 1 seconds. 7.2.2 Loading Shortcuts 7.2.2.1 Right Mouse Click Clicking the right mouse button anywhere on the main window will bring up a list of the most recently loaded programs. Selecting any of the programs in the list will automatically load that program to the attached controller. 7.2.2.2 Drag and Drop Once the EMBEDDED PLC Utility is open, if a file is dragged from Windows Explorer, the Desktop, etc, and dropped into the main window, the file will be automatically loaded to the controller. OEM Technology Solutions Page 68 EMBEDDED PLC BL2500 User’s Manual FAQ and Troubleshooting 8. FAQ AND TROUBLESHOOTING 8.1 KNOWN ISSUES 8.1.1 BL2500 with Rabbit 3000 Microprocessor Revision 0 (IL1T) The Rabbit microprocessor R3000 Revision 0 (IL1T or IZ1T) has a bug on the parallel port F (see ZWorld’s TN228 http://www.zworld.com/documentation/docs/refs/TN228/TN228.pdf). The analog inputs and analog outputs use the PWM which uses parallel port F. Thus any operation on analog I/O affects the normal operation of outputs, serial RS485 transmitter enable signal, SPI enable signal and LEDs DS3 and DS4. If you have an SBC BL2500 with the Rabbit 3000 microprocessor revision 0 (IL1T or IZ1T) and want to use the analog features bear in mind that outputs 0 to 3, RS485 and RabbitNet can not be used. For more information about the Rabbit 3000 microprocessor revisions see Appendix B of [3]. 8.1.2 BL2500 with Large Sector Flash The EMBEDDED PLC kernel writes the ISaGRAF application on flash to preserve the application on power cycles. This operation is done only with BL2500 with small sector flash. EMBEDDED PLC kernel saves the ISaGRAF application on Battery-Backed RAM if the BL2500 has large sector flash. 8.1.3 ISaGRAF Floating Point Arithmetic The floating point arithmetic implemented by Dynamic C for the Rabbit 3000 microprocessor is not 100% compliant with the IEEE Standard. When doing arithmetic operations with numbers close to the upper limit (3.4E38) instead of causing an overflow the result goes beyond the limits set by the standard. External applications, such as ISaGRAF Debugger, monitoring those values will fail because those values are invalid floating point (NaN). When this condition happens, the ISaGRAF Debugger stops but leaves some processes running. If you experience this problem, close all ISaGRAF applications (including the Project Management). Re open the Project Management to resume ISaGRAF development. 8.1.4 Reading/writing 32-bit integer/real analog variables via Modbus EMBEDDED PLC supports reading and/or writing 32-bit integer/real analog variable through Modbus. Requests are handled by using two consecutive words (multiple registers) in little endian format, i.e. the less significant word goes first. The constraint is the Modbus address for analog variables must be odd number. OEM Technology Solutions Page 69 EMBEDDED PLC BL2500 User’s Manual FAQ and Troubleshooting 8.2 FAQ Q1. What happens if I try to load the EMBEDDED PLC Firmware Kernel to a Target already running a licensed EMBEDDED PLC Kernel? The EMBEDDED PLC Utility does not check for an existing license before performing a loading and a new license is required after a Kernel is loaded to a Target. This means that after loading a new Kernel to a Target, a new User Reference Code is generated and you will need to contact OEM Technology Solutions or your local distributor to obtain a new license key to activate the EMBEDDED PLC Kernel. Q2. How can I change the assigned serial port number to the RS-232-to-USB converter cable on Windows XP? Open Control Panel → System. Click on Device Manager. On the Device Manager window expand the Ports (COM & LPT) category and select the USB Serial Port (COMx). Select Action → Properties on the menu bar. On the USB Serial Port (COMx) Properties window click on Port Setting tab and click on Advanced… On the Advanced window change the COM port number to within COM1 to COM4 range. For more information about device settings contact your local system administrator. Q3. Can I use the other serial ports on the BL2500 from an ISaGRAF application? The EMBEDDED PLC Firmware Kernel Version 1.05 uses one RS232 (serial port E) or one RS485 (serial port D) to communicate with the ISaGRAF Workbench or Modbus master. Contact OEM Technology Solutions or your local EMBEDDED PLC distributor for information about custom solutions for the EMBEDDED PLC Kernel. Q4. Can I have 2 analog outputs instead of 1 analog input and 1 analog output? The EMBEDDED PLC Firmware Kernel Version 1.05 has the analog I/O configuration fixed. For more information about custom I/O configuration on the EMBEDDED PLC BL2500 contact OEM Technology Solutions of your local EMBEDDED PLC distributor. Q5. Can I use RabbitNet with EMBEDDED PLC BL2500? In Version 1.05 of the EMBEDDED PLC BL2500 BSP RabbitNet is not supported. Contact OEM Technology Solutions or your local EMBEDDED PLC distributor for information about features to be implemented in upcoming versions. Q6. Do I need to keep the programming cable connected to the Target all the time? No. The programming DIAG cable is used only for entering license key or Target configuration parameters values. After that it can be disconnected. Q7. I already have a version of ISaGRAF Workbench V3.5 installed and licensed. What should I do or install to make it EMBEDDED PLC compatible? If you already have an ISaGRAF Workbench V3.5 running on you Host PC, use the following instructions to make your ISaGRAF Workbench compatible with EMBEDDED PLC: (a) Download the ISaGRAF_V3.55_3-0239I.zip file from OEM Technology Solutions website (http://www.oem.net.au). (b) Extract all files to a local directory <ISaGRAF Install Dir>. (c) Copy <ISaGRAF Install Dir>\EXE\RABBIT.RSC and <ISaGRAF Install Dir>\EXE\ISATXT.ERR to where your ISaGRAF main directory resides <ISaGRAF Main Dir>\EXE (for example, C:\ISAWIN\EXE). Confirm yes at overwriting ISATXT.ERR file. OEM Technology Solutions Page 70 EMBEDDED PLC BL2500 User’s Manual FAQ and Troubleshooting Edit <ISaGRAF Main Dir>\EXE\RSCDEF.RSC and add the following line: (d) Resource=RABBIT.rsc This line will add the “RABBIT: TIC code for Rabbit-based controllers” in the Targets list in the Compiler Options window of the ISaGRAF Programs Manager. You will have to recompile all your programs against this TIC code type in order to work with the EMBEDDED PLC BL2500. Q8. I have a BL2500 with 256K Flash. Can I use EMBEDDED PLC BL2500? The EMBEDDED PLC Firmware Kernel for BL2500 Version 1.05 was built specifically for the BL2500 with Rabbit core module RCM3200 (10/100BaseT, 512K Flash, 256K + 512K SRAM, 44.2 MHz clock speed, Z-World P/N: 101-0602). If you have any special requirements regarding targets that EMBEDDED PLC supports, visit OEM Technology website or contact sales directly via phone +61 2 99669424 or email [email protected]. Q9. What does the letter C after the BL2500 in the BSP filename stand for? The ‘C’ letter in the filename BL2500C_BSP_V1.05_9-0003-007.zip corresponds to the type of the BL2500 board supported by EMBEDDED PLC. Thus, the letter C corresponds to the BL2500 with Rabbit core module RCM3200 (10/100BaseT, 512K Flash, 256K + 512K SRAM, 44.2 MHz clock speed). At this moment only the BL2500 mentioned above is supported by EMBEDDED PLC. Q10. Can I use the EMBEDDED PLC Utility to download binary files compiled with Dynamic C? No. The EMBEDDED PLC Utility works only with EMBEDDED PLC firmware kernels. Use Rabbit Field Utility instead. Q11. Can I use the Rabbit Field Utility to download the EMBEDDED PLC Firmware Kernel to the Target? No. If you do so, when you tried to enter the run-time license using the EMBEDDED PLC Utility the following message is displayed: 8.3 TROUBLESHOOTING 8.3.1 Common Errors Listed below are some solutions of common errors that you may encounter with EMBEDDED PLC products. 8.3.1.1 Communications If you experienced problems with the communication between the Target and either the ISaGRAF Workbench or a Modbus master check the items below: • Disconnect all the physical I/Os connected to the Target and try again. • Check that the Modbus Slave Number value in the Target is the same as the Target Slave Number in the ISaGRAF Workbench. OEM Technology Solutions Page 71 EMBEDDED PLC BL2500 User’s Manual FAQ and Troubleshooting • If you are using Ethernet link, check that IP address, Netmask and Default Gateway values are correct in the Target. Check also that the port in the ISaGRAF Workbench is set to 1100. • If you are using RS232 or RS485 link remember that either the ISaGRAF Workbench or the Modbus master can be connected to the Target at a certain time. Check that the serial port parameters on the ISaGRAF Workbench and/or Modbus master are the following: Baud rate (19200 to 600, depending on the Target configuration), no parity, 8 data bits, 1 stop bits and no flow control. If you are using a RS232-to-USB converter cable check that the COM port assigned to it is within COM1 to COM4 range. If not follow the instructions described in Q2 of the FAQ section. • The minimum value of the polling period from ISaGRAF Workbench or a Modbus master must be greater than the PLC cycle execution time. In any case the absolute minimum values for the polling period must be greater than the following: Modbus over TCP/IP: 50 ms Modbus over RS232 or RS485: 200 ms 8.3.1.2 ISaGRAF Workbench for EMBEDDED PLC If you experienced problems downloading an application to the Target check the items below: • Check that you have communication with the Target (check items above). • In order to work with EMBEDDED PLC make sure that the “RABBIT: TIC code for Rabbit-based controllers” is selected in the Compiler options list before making and downloading the application. 8.3.1.3 EMBEDDED PLC Utility Check the items below if you have problems downloading the EMBEDDED PLC Firmware Kernel: • Check that the programming cable is connected through DIAG connection to the Target. • Check that no other application is using the selected COM port. • Check the location of the cold loader, pilot BIOS and Flash initialization files. Select Setup → File Locations… from the main menu bar. Check that the Cold loader (COLDLOAD.bin), Pilot BIOS (pilot.bin) and Flash table (flash.ini) files locations are correct. It should point to where the EMBEDDED PLC Utility is installed (default C:\OEMTech\EMBEDDED PLC\Utility). Press OK. 8.3.2 Before Contacting Technical Support Some things you should try before you contact Technical Support are: • Check out the documentation. • Consider recent changes on your system. If something used to work, think about what may have changed. New software installation or general system changes can affect performance and general functionality of other software on your system. • Verify that the entire system has good, low-impedance, separate grounds for analog and digital signals. The BL2500 is often connected between the host PC and another device. Any differences in ground potential can cause serious problems that are hard to diagnose. • Do not connect analog ground to digital ground anywhere. • Verify that the power supply has enough capacity and filtering to support the BL2500. If you cannot find an answer to your technical question in the product documentation or help system, send your request to OEM Technology Solutions technical support via email [email protected]. OEM Technology Solutions Page 72 EMBEDDED PLC BL2500 User’s Manual FAQ and Troubleshooting Please try to define the problem before you contact Technical Support so that you can repeat the steps that led to the problem and specifically identify when and how the problem occurred. The Technical Support representative will need to know exactly what the problem is in order to provide help. These steps will help us pinpoint and solve your problem more quickly. Please have the following information available: • Hardware environment: Target details (BL2500 model), Host PC details and a brief description of the physical I/Os used. • Software environment: Windows Operating System. • EMBEDDED • EMBEDDED • EMBEDDED • Description of the problem or error, including specific text or error messages. • Steps to reproduce the problem, if it is reproducible. PLC filenames used. PLC Kernel version: You can obtain this information from the Target Configuration Window (Module Version, Kernel Version, Kernel Description). PLC license information. OEM Technology Solutions Page 73 EMBEDDED PLC BL2500 User’s Manual FAQ and Troubleshooting This page is intentionally left blank OEM Technology Solutions Page 74 EMBEDDED PLC BL2500 User’s Manual Specifications 9. SPECIFICATIONS 9.1 ELECTRICAL AND MECHANICAL SPECIFICATIONS Figure 16: BL2500 Dimensions OEM Technology Solutions Page 75 EMBEDDED PLC BL2500 User’s Manual Specifications Table 4: BL2500 Electrical, Mechanical and Environmental Specifications Microprocessor Rabbit 3000 @ 44.2 MHz Ethernet Port 10/100 Base-T Flash Memory 512K SRAM Backup Battery Digital I/O 512K (program) + 256K (data) 3 V lithium coin-type, 1000 mA-h, supports RTC & SRAM 16 inputs: 15 protected to ±36 V DC, 1 protected to +5 – 36 V; threshold is 1.5 V nominal 8 outputs: sink up to 200 mA each, 36 V DC max. standoff voltage Analog Inputs One 10-bit resolution, 8-bit accuracy, input range 0.1 – 3.1 V, 10 samples/s 1 Analog Outputs Two 9-bit PWM, 0.1 – 3.1 V DC, 17 ms settling time RabbitNet Serial Ports Yes 6 serial ports : - 1 RS-485 - 2 RS-232 or 1 RS-232 (with CTS/RTS) - 1 CMOS level asynchronous or clocked serial port - 1 expansion serial port for multiplexed to two RS-422 clocked SPI ports - 1 CMOS compatible serial port for programming/debug Real-Time Clock Timers Yes 10 8-bit timers (6 cascadable from the first) and one 10-bit timer with 2 match 2 registers Watchdog/Supervisor Power Yes 8 – 40 V DC, 1 W typical w/ no load Temperature Humidity Connectors 2 3 -40°C to +70°C 5% to 95%, noncondensing Friction-lock connectors: - five polarized 9-position terminals with 0.1" pitch - two 2-position power terminals with 0.156" pitch - two 4-position terminals with 0.156" pitch Board Size Part Number 1 Only 1 analog output is available for EMBEDDED PLC. 2 Not supported in EMBEDDED PLC at this present time. 100 x 100 x 29 mm 101-0602 3 Only 1 RS232 (serial port E) and 1 RS485 (serial port D) serial ports are supported in EMBEDDED PLC at this present time. OEM Technology Solutions Page 76 EMBEDDED PLC BL2500 User’s Manual About Indusoft 10. ABOUT INDUSOFT Indusoft® Web Studio (IWS) is a powerful, integrated collection of automation tools that include all the building blocks needed to develop modern HMI, SCADA, instrumentation and embedded applications running on native Microsoft Windows XP, 2000, NT, CE and CE.NET or in Internet and intranet environments. Indusoft Web Studio provides a simple drag and drop, point and click development environment which mimics the most complex behaviours of you live processes. Indusoft Web Studio is ideal e-automation solution for industry. IWS applications consist of animated operator-interface screens, communication drivers (for PLCs and I/O protocols such as Modbus, DFS, Profibus, etc.), tags database, and additional modules such as alarm monitors, logic, trend charts, recipes, schedulers and security system. IWS applications interface with industrial I/O systems and other Windows applications in the run-time environment using ODBC, DDE, NetDDE, OPC or TCP/IP protocols. For more information about IWS contact OEM Technology Solutions (http://www.oem.net.au). 10.1 USING INDUSOFT WEB STUDIO WITH EMBEDDED PLC The EMBEDDED PLC implements Modbus over TCP/IP or RTU over RS232/RS485 to communicate with Modbus masters such as Indusoft Web Studio. Indusoft Web Studio (IWS) applications can be quickly developed to be used in conjunction with PLC since it has built-in communication drivers for Modbus. EMBEDDED OEM Technology Solutions Page 77 EMBEDDED PLC BL2500 User’s Manual About Indusoft You can quickly add the Modbus driver on the Workspace, define its operational parameters and define the I/O variables (tags) that will be exchanged between the EMBEDDED PLC and the IWS application. OEM Technology Solutions Page 78 EMBEDDED PLC BL2500 User’s Manual Index INDEX link setup...................................................... 17 software license ............................................. 8 SpotLight .............................................. 13, 17 Workbench..................................................... 1 B BL2500 A/D converter ............................................... 48 D/A converter ............................................... 49 digital inputs ................................................. 47 digital outputs............................................... 48 Ethernet port ................................................ 51 Main features ................................................. 1 pinouts ......................................................... 47 E EMBEDDED PLC Application kit contents .................................. 3 Board Support Package (BSP) ...................... 7 Definition ........................................................ 1 Firmware Kernel............................................. 1 software installation ....................................... 7 Target PLC..................................................... 1 Utility .............................................................. 7 Workbench..................................................... 1 F Firmware Kernel configuring ................................................... 65 licensing ....................................................... 65 loading ......................................................... 64 I Indusoft............................................................ 77 ISaGRAF hardware license............................................ 8 installation ...................................................... 8 OEM Technology Solutions M Modbus configuration ................................................ 66 N network configuration ...................................... 11 R RabbitNet ........................................................ 47 RS232 cable specification ....................................... 12 S sample applications......................................... 12 b25qld .......................................................... 15 b25rota......................................................... 15 b25scope ..................................................... 15 blinkseq........................................................ 15 bottlef ........................................................... 15 rfdemo.......................................................... 15 rfsample ....................................................... 15 rfsfc .............................................................. 15 rfstack .......................................................... 15 sorting .......................................................... 15 SORTING .................................................... 12 Serial Ports RS-232......................................................... 50 RS-485......................................................... 50 Page 79