1
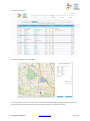
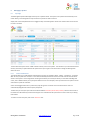
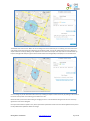
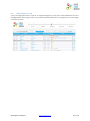
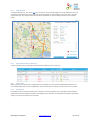
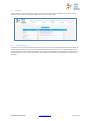
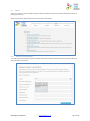
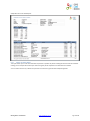
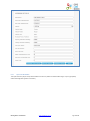
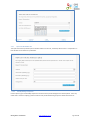
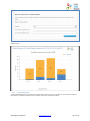
GPS LOG BOOK USER MANUAL V1.1 1 Introduction The GPS Log Book is a compact trip recording device that plugs into the power adaptor (cigarette lighter) of a motor vehicle. It completely replaces manual log books and records data automatically whenever the vehicle is driven, and doubles as a USB smartphone charger! It removes the ‘pain’ and hassle of keeping a manual logbook and can be used for: ATO tax logbooks Fringe Benefits Tax logbook Claiming tax back for business mileage (the ATO allows you to claim per km up to 5,000 km per year) Proof of activity for tradies, sales reps, technicians and others Managing employee vehicle usage claims by providing the evidence of distance and time driven Recording Pool car usage Helping Learner Drivers to keep their learner logbook The device contains a high sensitivity GPS receiver and records the following information: Date and time down to seconds resolution GPS position (latitude and longitude) Speed Heading Altitude (you never know!) This data is recorded into the flash memory of the device – which is big enough to store a minimum of 3 months of driving data, although we recommend syncing the data more regularly. The GPS Log Book syncs data via a USB port on your PC or Mac to the GPS Log Book web site, where the trips are processed and stored. On the web site you can easily view your trip list, mark trips as business or private, enter comments and even view the detailed trip and route in Google Maps. GPS Log Book – User Manual www.gpslogbook.com.au Page 1 of 21 An example of the trip list: A detailed trip integrated with Google Maps: You can also use the reports section to generate a variety of PDF reports including tax logbooks and analysis of business versus personal travel, and even export the trip data into Excel. Reports can be emailed or printed. GPS Log Book – User Manual www.gpslogbook.com.au Page 2 of 21 1.1 Who can benefit from keeping an accurate Log Book 1.2 Anyone who needs to update their logbook for the ATO (in fact you can use the GPS Log Book for longer than the minimum 12 weeks and then pick the period that gives you the best tax benefit!) Companies needing to track the Fringe Benefits Tax (FBT) payable on company vehicles or novated leases Employers that reimburse staff for using their personal vehicles for work travel – make sure that your staff are submitting the evidence to accurately support their claims Sales reps can use the GPS Log Book to produce their sales visits reports Technicians and support staff can use the GPS Log Book to produce evidence of support / maintenance calls Companies that have pool cars that they want to monitor usage Commission earners People that need to keep a log of activity – use the GPS Log Book to jog your memory of where and what you were doing at a particular date and time Learner drivers who need to keep a logbook of their driving Key Features of GPS Log Book Compact device – no wires or cables in the vehicle to get in the way Cutting edge GPS technology works in even tricky vehicle positions (it even works inside the centre console of the BMW X5) Ample storage capacity to store many months of driving if required The GPS Log Book is also a USB smartphone charger – charge your phone while you are recording your trips! The GPS Log Book is a user-friendly and well-designed online system that works with PC and Mac systems Reports comply with the ATO requirements for evidence of travel related tax claims Integrates with Google Maps to display trip detail – easy to remember where and what you were doing One-click categorization of trips as business or private and easily enter comments against a trip Create zones (for regularly visited locations) to easily label trips and reports One year warranty period from date of purchase GPS Log Book – User Manual www.gpslogbook.com.au Page 3 of 21 2 In the Box When receiving the GPS Log book, the following items will be found in the box: 3 GPS Log Book device Illustrated quick start guide (as part of the packaging insert) USB Cable Technical Specifications Component Rating Assisted GPS High sensitivity 50 Channel GPS with a maximum accuracy of 2.5m Power supply (input voltage range) 8V - 30V DC with transient protection. Internally fused at 8A. Power supply (average current draw) Approximately 45mA acquiring, 35-40mA tracking USB Charger 5V, max 1A continuous USB interface to PC HID (Human Interface Device) via a USB Mini-B cable. Super capacitor Sufficient charge to hold the GPS time and data for > 8 hours. Internal Flash Memory 4Mbytes total, 3.6Mbytes for trip data. Enough for 30,000 waypoints which equates to approximately 4 months of driving Metal components Nickel plated mild and spring steel Plastic ABS Plastic LED Tri colour Operating temperature -10 to + 60 degrees C with 0.5A charging load Dimensions 102mm x 41mm x 22mm 4 Requirements 4.1 Minimum PC Requirements The minimum requirements for running the software required to operate the GPS Log Book are listed below: 4.2 Microsoft Windows 7 / Vista / XP SP2 or better MAC OS X 10.4 or later Internet Connectivity 1 x USB port Supported web browsers include Microsoft IE8 or greater Mozilla Firefox Google Chrome GPS Log Book – User Manual www.gpslogbook.com.au Page 4 of 21 5 Getting Started 5.1 Quick Start Guide 1. Go to www.gpslogbook.com.au and register an account if you haven’t already. 2. Install the Sync app from the Downloads page. Select either the PC or Mac version depending on your computer type. The Sync application is a small program that is used to extract the data from the GPS Log Book and to send it up to the GPS Log Book web server. The sync app will also update your device with any software or parameter updates and keep the GPS aiding data file on the device up to date. Connect your device via the USB cable. The Sync app will take you to a web page where you will link your device to your account. Once this step is completed please unplug your device and then re-connect it to the USB cable to re-start the sync process. 3. 4. After the device has updated itself with the latest software and settings you can unplug it and plug into your vehicle and drive! 5. The next time you connect your device it will sync and then take you automatically to view the latest trip upload in your web browser. 5.2 In Your Vehicle Plug the device into the 12V outlet / cigarette lighter of the vehicle. Turn the ignition of the vehicle on. The LED will be solid red – this indicates that the device has not yet found its position and is searching for GPS satellites. The LED will turn green – this indicates that the device has found its location and tracking is in progress. Remove the device at any stage to stop the recording. NOTE: The device will end a trip when it loses power which in most modern vehicles is when the ignition is turned off. Some vehicles’ 12V outlet / cigarette lighter do not switch off when the ignition is turned off. In these cases the device will stop recording data and go into a low power mode when the vehicle does not move for 5 minutes. 5.3 LED Information Red Green Flashing Red The log book has power and is searching for satellites The log book has found satellites and is logging The log book is 80% full and will need to be connected to the server soon to upload the data (see below). DID YOU KNOW? The LED on the GPS Log Book is dimmable – in fact we use your last known GPS position to calculate what the sunrise and sunset times are in your area and automatically dim the LED at night time so that it does not blind you or distract you while driving at night. Neat! Other LED Facts: If the solid Red does not turn Green then the device is unable to find any satellites (e.g. if the vehicle is parked in a basement) and no data will be recorded. In order to allow the GPS Log Book to find GPS satellites as quickly as possible we have designed the unit to use GPS aiding data in a file that is downloaded to the GPS Log Book as part of the sync process. This aiding data file is valid for a 2 week period and therefore we suggest that you sync the device every 2 weeks. If the aiding data file is invalid (the device has not synced for more than 2 weeks) then the GPS Log Book will still work but you may find that the first position fix of the day takes longer than usual to acquire (the LED stays RED for longer at the start of the first trip of the day). GPS Log Book – User Manual www.gpslogbook.com.au Page 5 of 21 5.4 Using the Sync Application When the Sync App is running it will automatically detect when a GPS Log Book device is attached to the computer and begin syncing the data from the device: 1. 2. 3. 4. Connect the GPS Log Book device to the computer using the USB cable provided. The Sync Application will automatically download any trip data from the device and upload it to the GPS Log Book server. The LED on the device will turn Red while data transfer is in progress. Once all the data has been transferred from the device and new aiding data downloaded to the device, a message will be displayed stating that it is safe to disconnect the device and the LED on the GPS Log Book will turn Blue. GPS Log Book – User Manual www.gpslogbook.com.au Page 6 of 21 6 6.1 Managing Trip Data Trips Page The GPS Log Book system will display all the trips for a specific vehicle. The trip list is the quickest and easiest way to see recent activity, and to designate the trip as business or private and add a comment. Simply click on the home/briefcase icons to toggle the trips as business/private. Click in the comment box next to the icon to enter a comment. The line above the trip list shows “1.49% of device memory used on last upload”. This indicates to you how full the device’s memory was when you performed the last upload so that you can get an idea of how much driving the GPS Log Book device can store. 6.1.1 Create and Edit Zones The system allows you to add regularly visited locations as Zones, for example “Work”, “Home”, “Joes House”, “Customer ABC” etc. Any trip that starts or ends in a zone will automatically be linked to that zone and the name of the zone will be shown in the trip list as in the image above. Creating zones allows you to easily see where you have been travelling from and to, and in addition allows you to pull reports based on zones. For example, a sales rep could use zone reports to list all sales visits to a particular customer. Zones can be flagged as business or private. Any trips that go from a business zone to another business zone are automatically designated as business trips by the system. The first time you view your trips all the zones will be labelled “Unknown (Street Name, Suburb)” with the actual name of the street and suburb where you started and stopped. This indicates that the system does not have a zone at (or nearby) that location. To create a zone at that point, click on the “Unknown” link. GPS Log Book – User Manual www.gpslogbook.com.au Page 7 of 21 The default zone radius is set to 100m. This can be changed to suit the zone that you are creating. The zone radius is the area directly surrounding the point at which the trip started or ended. You can also change the zone to be a polygon or shape instead of a circle, by clicking on the “Replace the zone circle with a shape” link. If you click the “Location Look-up” link, the web page will attempt to get the closest street address from Google Maps and display it in the Comment box. You can change any of the information about the zone, including the shape and size of the zone, by clicking on the name of the zone in the trip table. This will bring up the edit zone screen. Click Save when you are done with creating or changing the zone. To cancel without saving click on the cross in the top right-hand corner of the dialog box. Once you have created or update a zone, all the trips will be reprocessed and the new zone will be applied to the trips and the trip table will be updated to reflect the change. GPS Log Book – User Manual www.gpslogbook.com.au Page 8 of 21 6.1.2 Change designation of a trip Trips can be designated as business or private. To change the designation of a trip, click on the Private/Business icon and it will toggle between personal (green house icon) and business (yellow briefcase icon). The designation can also be changed in the View Trip screen. GPS Log Book – User Manual www.gpslogbook.com.au Page 9 of 21 6.1.3 View Trip detail To view the detail of a trip, click on the View link in the trip list. The trip will be displayed on a map showing the trip in red. Trip details can be edited in this view and the trip can also be deleted. It is also possible to move to the next or previous trip from this page. Any changes made to the trip will be saved when you close the dialog or click the next or previous button. 6.1.4 Add a comment about a specific trip To add a comment to a trip, click on the comment field in the table or click on “View Trip”. 6.1.5 Snap To Zone When a trip starts or ends within the snapping distance of a specific zone, that zone will automatically be selected. The zone selected will be referred to as a Snapped Zone. These zones will have an asterisk (*) next to them on the Trip Table. 6.1.6 Selected Zone It is possible to select a nearby zone to the start or end point of the trip. Select the zone to be edited and then select the nearby zone from the drop down list provided. The assigned zone is referred to as a Selected Zone and will be marked with a tilde (~) next to the zone name on the Trip Table. GPS Log Book – User Manual www.gpslogbook.com.au Page 10 of 21 6.2 Zones Page The Zone Table contains all zones that have been created. The zones can be edited or deleted from this table. It is also possible to add a comment or change the designation of the zone from this page. 6.2.1 Create a New Zone To create a new zone, click on the Create New Zone button on the Zones page. A dialog will be displayed with a map of the world as well as an option to draw a circle or a specific shape. Once the specific location on the map where the zone is to be created has been found using the Google Maps controls, the pin can be dragged to the relevant area, or the outline of the area defined. The zone can be named, and the correct designation selected. The new zone will then be added to the Zone Table. GPS Log Book – User Manual www.gpslogbook.com.au Page 11 of 21 6.3 Reports There are a number of reports available through the system. (Additional reports may have been added after the time of writing this document.) Sample reports can be downloaded from the Product Page on the web site. 6.3.1 Business Travel Claim Report This report can be used to claim for business mileage. Only trips that have been marked as business under the ‘My Trips’ page, will appear on this report. GPS Log Book – User Manual www.gpslogbook.com.au Page 12 of 21 Sample Business Travel Claim Report: 6.3.2 Vehicle Tax Period Report This report allows you to enter the information required for a specific tax period including the dates and vehicle odometer readings, and to analyse the business trips driven during this period compared to the total distance travelled. You can create and save any number of tax periods and use these to generate ATO compliant logbooks. GPS Log Book – User Manual www.gpslogbook.com.au Page 13 of 21 6.3.3 Trip List for All Vehicles This report lists every trip for every vehicle linked to the account, within the selected date range. Trips are grouped by vehicle and designation (private or business). GPS Log Book – User Manual www.gpslogbook.com.au Page 14 of 21 7.3.4 Trip List for All Vehicles XLS This report lists all the trips made by all the vehicles linked to the account, ordered by date and time. It is exported to an Excel file that can be viewed as a spreadsheet. 6.3.5 Weekly Mileage Comparison Use this report to get a visual weekly comparison of business versus private mileage for the selected period. This is very useful when it comes to analysing a period of travel and to pick the weeks that give you the maximum business use. GPS Log Book – User Manual www.gpslogbook.com.au Page 15 of 21 Sample output: 6.3.5 Zone Detailed Report The Zone Detailed Report shows all the trips that have been made to and from a specific zone. This report is valuable if information is required for business trips to a specific customer or supplier for example. GPS Log Book – User Manual www.gpslogbook.com.au Page 16 of 21 GPS Log Book – User Manual www.gpslogbook.com.au Page 17 of 21 7 7.1 Managing Your Account Update Details 7.1.1 Edit Personal Details Once logged in, it is possible to change the name, surname, contact number or email address of the user in the Update Details menu under Account. Save changes by clicking on the Save button at the bottom of the page. 7.1.1.1 Change Email Address In order to change an email address, the user will be required to enter and confirm the new email address before this will be changed. An email will be sent to the new email address to verify that the change is correct. An email confirming the change will also be sent to the old email address. 7.1.2 Change Password To change your login password go to the Update Details page. Scroll down to the Reset Password section and enter the current password and the new password. Please remember to click Save after the new password has been entered. If you have forgotten your password and cannot log in, go to the Login page and click the “Reset Password” link. Enter your username (email address used with your account) and click the Reset button. A new password will be emailed to you. You should be able to log in now using this password. It is recommended that you change your password back to something that is easier to remember. 7.1.3 Settings It is possible to change the settings that are used to process trip data and display information about trips and zones that are created. 7.1.3.1 Snapping Distance When a trip starts or ends just outside a zone, that zone will be assigned to the trip if it is within the “snapping distance”. This is useful when, for example, you forget to plug your device in before you drive off or the device takes too long to find a satellite which causes the trip to start just outside a known zone. 7.1.3.2 Minimum Trip Time Any trips shorter than this time period will not appear in the trip list. This could be caused by switching the car’s ignition on and then immediately off again. 7.1.3.3 Minimum Trip Distance Any trips shorter than this distance will not appear in the trip list. 7.1.3.4 Nearby Zone Metres Any zone that falls within this distance of a trip start or end point is considered a nearby zone. Only nearby zones are shown as alternatives to snapped zones when editing a trip. 7.1.4 Personal Selection There are three additional preferences that can be updated. These include the following: 7.1.4.1 Receive Reminders When selected, a notification email will be sent when the recommended time limit for uploading data has expired. 7.1.4.2 Receive Newsletters When selected, the GPS Logbook newsletter will be emailed to the email address in the account. The newsletter contains information about Special Offers, Industry developments, and the latest GPS Logbook news. GPS Log Book – User Manual www.gpslogbook.com.au Page 18 of 21 7.1.4.3 7.2 Open Webpage on Device Upload When selected, the trip list will be opened in the browser after the GPS Log Book device is plugged into the computer and has successfully uploaded data via the Sync application. The Sync Application must be running on the PC / Mac in order for this to happen. Device Parameters Under the “Account” menu click on “Devices” to see information about your device(s). Here you can modify some device parameters including the Log Level detail. This can be set to “High” if you want to get more granular trip data at the cost of increased data. GPS Log Book – User Manual www.gpslogbook.com.au Page 19 of 21 8 Recommendations To get the most out of the GPS Log Book device and website, the following best practises are recommended. 8.1 Upload Data Every Two Weeks It is recommended that the GPS Log Book device is synchronised to the website at least every two weeks. This ensures that the GPS aiding data is updated and the trip data is saved onto the system. Apart from ensuring that your data is backed up to the server it is also a good idea to review your trips while they are relatively fresh in your memory. 9 Frequently Asked Questions The FAQ’s can be viewed on the GPS Log Book website www.gpslogbook.com.au under the Support menu GPS Log Book – User Manual www.gpslogbook.com.au Page 20 of 21