1
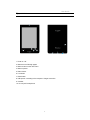
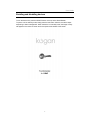
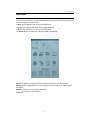
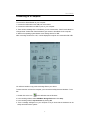
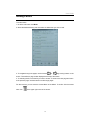
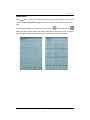
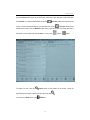
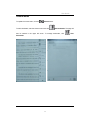
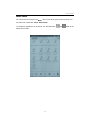
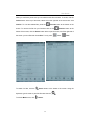
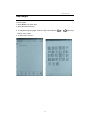
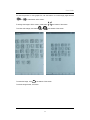
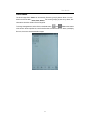
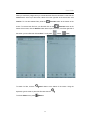
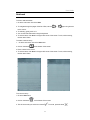
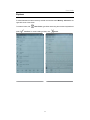
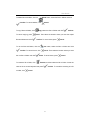
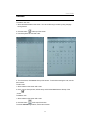
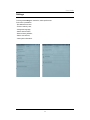
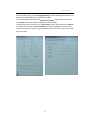
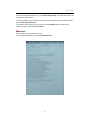
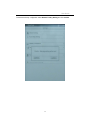
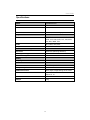
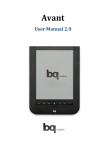
USER MANUAL
User Guide
Contents
General Precautions
2
Supplied
4
Appearance
5
Enabling and disabling devices
6
Main Menu
8
Connecting to a Computer
9
Reading e-books
10
Book menu
11
Context menu
13
Listening
18
Music Menu
19
View images
21
Photo Menu
23
Notebook
25
Explorer
26
Calendar
28
Settings
29
Transferring eBooks
33
Specifications
34
1
User Guide
General Precautions
Attention!
Before you start using the device, please read this manual and keep it handy for future use.
The impact of fluid
• Do not spill liquid on the surface or inside the eBook Reader - it can cause damage to the
device.
• Do not put it next to anything containing liquids.
Direct exposure to sunlight
• Avoid direct sunlight on the screen of the device. The information on the screen may be
displayed incorrectly or not at all, if exposed to direct sunlight.
2
User Guide
Additional devices
• Do not use any unsupported device - it can cause damage to the device.
Using earphones
• To protect your hearing, we recommend you do not listen to music on earphones at a high
volume for a long period of time.
• If you have a hearing problem, please turn down the volume or abstain from the use of
earphones.
Repair
• Please contact the Authorised Repair Centre.
Attention!
To avoid losing important data, periodically back up important data from the device. Kogan is
not responsible for all kinds of data loss and does not provide support for data recovery.
3
User Guide
Attention!
If your unit has been off for a long period of time, it may display artifacts of black and white on
the screen.
This is not a malfunction in your unit!
This is the operation of the screen. Please refresh the screen contents, and the artifacts will
disappear.
Supplied
• eBook Reader.
• USB Cable.
• Earphones.
• Cover.
4
User Guide
Appearance
1. Power on / off.
2. Buttons to scroll through pages.
3. Button to return to the main menu.
4. Button-up menu.
5. Return button.
6. Lock button.
7. Reset button.
8. USB port for connecting to the computer / charger connection.
9. Card slot.
10. 3.5 mm jack for earphones.
5
User Guide
Enabling and disabling devices
To turn the device ON, press the ON/OFF button on the top of the eBook Reader.
To put the unit into standby mode, briefly press the lock button. After this, the device stops
responding to button management. When the device is in standby mode, the image of a key
will appears in the center of screen and an inscription at the bottom of the screen:
6
User Guide
To unlock the eBook reader, click the lock button once again.
For emergency powering off of the device, press and hold on / off for a few seconds. The
device will be completely turned off.
If the eBook reader is frozen, or operates slower than usual, please press the hard reset button
in on the back of the unit. You may need to use a pin to do so.
7
User Guide
Main Menu
On the home screen there is a clock, calendar and icons that you can choose by touching the
corresponding button on the screen.
In Book, a list of eBooks in the memory will be displayed.
In Photo, a list of graphic files in the memory will be displayed.
In Music, a list of music files in memory will be displayed.
The Recent section provides quick links to the latest accessed files.
Explorer is designed to navigate the entire contents of the device and memory cards.
Settings section contains date, time, menu language, screen, power off, as well as system
information.
Manual is used to view the manual on the device.
Power off is used to turn off the device.
8
User Guide
Connecting to a Computer
To connect the eBook Reader to your computer:
1. Connect the USB-cable to the USB port on the device.
2. Connect the USB-cable to a USB 2.0 port on your computer.
3. There will be a message box on the eBook, you can choose either: “Data Transfer Mode” or
“Charge Mode”. Select Data Transfer Mode to gain access to the eBook via the computer.
4. Wait for the operating system detects a new storage device for USB.
After connecting the device to a PC, it will be displayed in explorer as a removable disk USB.
You will then be able to copy music and image files to your device.
To disconnect the unit from the computer you must use the Safely Remove Hardware. To do
this:
1. Double click on the icon
in the notification area of Windows.
2. In the resulting window, select USB Mass Storage Device and click Stop.
3. In the resulting window, stop the device by clicking OK.
4. Then a message will appear on your computer to let you know that the hardware can be
safely removed from the system.
9
User Guide
Reading e-books
To read e-books:
1. Go to the main menu click Book.
2. Select the desired directory and then select the eBook that you wish to read.
3. To navigate through the pages, use the buttons
or
page turning buttons on the
screen. There will be a page number displayed at the top of the screen.
4. To selecting the file, touch the file you wish to access. To move to the next page and return
to the previous page, use the buttons to scroll through pages.
For other actions, you can enter the Context Menu of the eBook. To do this: click the context
menu icon
in the upper right corner of the screen.
10
User Guide
Book menu
In the book menu, you can sort the list by file name, group by author or genre. You can select
one of three tabs - Name, Author, Type. The Author or Genre is determined by the book file
itself.
To change the appearance of the file list, you can use the
List button and the
Tiles button at the bottom of the screen. When clicking the List button the icon file or the book
cover will appear. When clicking the Tiles button only the book covers are displayed.
11
User Guide
When you sort files by the book’s name, you can add the book file to the favorites. To do this,
click the Collect button at the top of the screen, select tick on the right side of the screen then
click Confirm. To view the selected files, press the
Favorites button at the bottom of the
screen. To remove the book file from your favorites click on the
Favorites button at the
bottom of the screen, click the Remove button at the top of the screen, tick off the right side of
the screen you want files and click Confirm. To exit, press
To search for files, click the
Tiles.
Search button at the bottom of the screen. Using the
keyboard type the name or part of the file name and click
To exit from the Book menu, click
List or
Return.
12
.
User Guide
Context menu
To update the context menu, click the
Refresh button.
To add a bookmark, enter the shortcut menu and click
Add bookmarks. The page will
then be marked in the upper left corner. To manage bookmarks, click
bookmarks.
13
View
User Guide
To delete a bookmark, click
, select the bookmark and click
.
To listen to music while reading, click
Music, choose a file from the list and start playing it.
To return to the text books, use the return button.
To quickly jump to a specific chapter of the book log in the context menu, click
Selecting a chapter, click
on the right of the chapter.
14
View list.
User Guide
To go to a specific page, select the
Page jump button, enter a numeric keypad page
number and select OK.
To turn the horizontal position of the screen in shortcut menu, select the item
To quickly change the text size, click
Zoom and select the desired font size.
To change the settings displayed text log, click
15
Settings.
Rotation.
User Guide
Font - at this point choose the font, which will display the text of the book.
Encode –you can choose the encode of the text.
Margins - the item to adjust the distance between the text and the lateral limits of the
screen. You can select 9, 6 and 3 mm.
Line spacing- click to adjust the line spacing. You can select 1, 3 and 5 mm.
Hyphenation - click to activate and deactivate hyphens in the text.
Bold – can make the words in the text in bold.
16
User Guide
Italic - can make the words in the text in italic.
View bookmarks - information about the book.
17
User Guide
Listening
To play music:
1. Select Music from the Main Menu.
2. Select the desired directory.
3. To navigate through the pages of the files list, use buttons
and
scroll through
pages. At the top of the screen will display the page that you are on.
4. To select the file, click on it.
To start playing, press the button
, to stop playback, press
To go to the previous or next track, use the buttons
To control the volume level, use the buttons
.
and
and
To go to the list of files without stopping the music playback, press the return button.
To exit the music player, press the button
in the upper right corner of the screen.
18
User Guide
Music Menu
You can sort the list of songs in the Music menu, by file name, group by artist or album. You
can select one of three tabs - Name, Artist, Album.
To change the appearance of the file list, use the List button
bottom of the screen.
19
and
Tiles at the
User Guide
When you sort files by music name you can add the music file to favorites. To do this, click the
Collect button at the top of the screen, select tick on the right side of the screen then click
Confirm. To view the selected files, press the
Favorites button at the bottom of the
Favorites button at the
screen. To remove the file from your favorites click on the
bottom of the screen, click the Remove button at the top of the screen, tick off the right side of
the screen you want files and click Confirm. To exit, press
To search for files, click the
Tiles.
Search button at the bottom of the screen. Using the
keyboard, type the name or part of the file name then click
To exit the Music menu, click
List or
Return.
20
.
User Guide
View images
To view images:
1. Select Photo in the main menu.
2. Select the desired directory.
3. To navigate through the pages of the list of files, use the buttons
buttons on the screen.
4. To select a file, click on it.
21
or
page turning
User Guide
To view the previous or next graphic file, use the buttons or scroll through pages buttons
and
at the bottom of the screen.
To enlarge the image to fit the screen, press button
To reduce and enlarge, use buttons
To rotate the image, click
and
at the bottom of the screen.
at the bottom of the screen.
at the bottom of the screen.
To exit the image viewer, click return.
22
User Guide
Photo Menu
The list of image files in Photo can be sorted by file name, group by date or album. You can
select one of three tabs - Name, Date, Album. For correct grouping by date or by album, this
information should be written into the image file.
To change the appearance of the file list, used List button
and
Tiles at the bottom
of the screen. When map files list, next to the filename is the file format icon. When you display
file icons, there are visual thumbnails images.
23
User Guide
When you sort files by image name you can add the book file to the favorites. For this click the
Collect button at the top of the screen, select tick on the right side of the screen then click
Confirm. To view the selected files, press the
Favorites button at the bottom of the
screen. To remove book file from your favorites click on the
Favorites button at the
bottom of the screen, click the Remove button at the top of the screen, tick off the right side of
the screen you want files and click Confirm. To exit, press
To search for files, click the
Tiles.
Search button at the bottom of the screen. Using the
keyboard, type the name or part of the file name then click
To exit the Photo menu, press
List or
Return.
24
User Guide
Notebook
To view or edit text entries:
1. Go to the main menu item in the Note.
2. To navigate through the pages of the list of files, use the
or
page turning buttons
on the screen.
3. To selecting, gently touch on it.
4. You can then add information using the keyboard.
5. To exit and save, click Save in the upper left corner of the screen. To exit, without saving,
use the return button.
To create a new text entry:
1. Go to the main menu item in the Note menu.
2. Click on the button
at the bottom of the screen.
3. Enter a name for the record.
4. To exit and save, click Save in the upper left corner of the screen. To exit, without saving,
use the return button.
To remove an entry:
1. Go to the Note menu.
2. Click on the button
at the bottom of the screen.
3. Tick off the records you and click on button
. To cancel, press the button
25
.
User Guide
Explorer
To switch between the internal memory and SD card use the button Memory - SD Card in the
upper left corner of the screen.
To create a folder, click
press
New Folder, type folder name using the onscreen keyboard and
Confirm. To cancel creating a folder, click
26
Cancel.
User Guide
To delete files and folders, click the
Delete button, select the files or folders and click
Confirm. To cancel deletion, click
To copy files and folders, click
To cancel copying, press
Cancel.
Copy, select the files or folders and click
Cancel. Then select the location where you want the copied
files and folders and click
Confirm. To cancel insert, press
To cut the files and folders, click the
the cut files or folders and click
To rename a file or folder, click
Cancel.
Cut button, select the files or folders and click
Confirm. To cancel the cut, click
Cancel. Then select the location where you want
Paste. To cancel insert, press
Cancel.
Rename, and then select the file or folder. Correct the
name of the on-screen keyboard and press
or folder, click
Confirm.
Confirm. To cancel the renaming of a file
Cancel.
27
User Guide
Calendar
To create a new note:
1. Select the desired date on the screen. You can scroll through months by using the page
turning buttons.
2. Click the button
at the top of the screen.
3. Use the keyboard to enter text notes.
4. To exit and save, click Save at the top of the screen. To exit without saving the note, use the
return button.
To edit a note:
1. Select a date on the screen with a note.
2. Click
on the top screen, edit the entry and click the Save button at the top of the
screen.
To delete a note:
1. Select a date on the screen with a note.
2. Click the button
at the top of the screen.
To exit the Calendar application, use the return button.
28
User Guide
Settings
To change the settings on the device, select preferences.
From this it is possible to:
- Re-calibrate the screen;
- Format a memory card;
- Change the language;
- Set the date and time;
- Reset to factory defaults;
- Set the auto-off time;
- View system information.
29
User Guide
To change the language, go to the Language Setting and select the language from the list. To
exit the language selection screen, use the return button.
To change the date and time, go to the System Time Setting. Enter the date and time and
click Confirm. To exit date and time settings, use the return button.
To change the name of your device, go to Device Name, type a new name and click Confirm.
To calibrate the screen, go to Screen Calibration. To start the calibration touch the screen
anywhere, then touch the screen in places marked by a cross, first at the corners of the screen,
then in the center.
30
User Guide
To power off using the time setting, go to the Auto Sleep Setting, select the time to power off
and press the return button.
To view information on the amount of used memory on the internal memory and the SD card,
go to item Memory Information.
To format the internal memory or SD card, go to the Formatting option, select internal
memory or memory card and press Confirm.
Attention!
After formatting, all information will be lost.
To view system information, go to item Firmware Version.
31
User Guide
To restore the factory configuration select Restore Factory Setting and click Confirm.
32
User Guide
Transferring eBooks
Please follow the steps below to transfer eBooks using ADE software:1> Download Adobe Digital Editions from http://www.adobe.com/products/digitaleditions/
2> Install Adobe Digital Editions, open it and create an account and authorize your computer.
3> Connect your eBook reader to the computer, select data transfer mode, and authorise the eBook
reader as prompted.
To transfer books to the eBook Reader:
1> Inside ADE, click on the Library menu and select 'Add Item to Library'. You will need to find where
you saved the downloaded book to, and select it in this window.
2> Connect your eBook Reader to your computer and select Data Transfer Mode on the eBook
reader.
3> In ADE, in the Library view select the files you want to copy, and click and drag them onto the
'Mreader Flash' or 'Kogan eBook Flash' folder in the Bookshelf list on the left hand side of the
window. Wait for the files to transfer
4> Once you have finished transferring books, eject the ebook reader from your computer.
Once you have authorised your computer and the device, you will be able to skip steps 1-3, and will
not be prompted to authorise the ebook reader as in step 4.
Transferring Non-DRM protected eBooks
1> Connect the Reader to your computer and select Data Transfer mode.
2> Under ‘My Computer’ or ‘Computer’, a removable disc will appear as “Kogan eBook”
3> Open the location where your eBooks are stored. Click and drag your eBooks to the folder
named “ebooks” on the removable disc “Kogan eBook”.
4> Depending on the size of your eBooks, it may take some time.
5> Once you have finished transferring your eBooks, you can safely disconnect the Reader from
your computer.
33
User Guide
Specifications
Model
KAEBK06TCHAA
Screen Size
6’’
Resolution
800x600, 16 shades of gray
Supported Formats
PDF / EPUB with DRM, CHM, TXT, HTM,
Text
HTML, RTF, PDB, DJVU, DJV, IW4, IW44,
FB2, PRC, MOBI, TCR
Audio
MP3, WMA, WAV, M4A
Images
JPG, GIF, PNG, BMP, TIFF
Processor and memory
Processor
Arm9 Core (Samsung S3C2416)
Memory Card Support
SD 16 GB
Built-in Memory
4 GB
Battery
1600 mAh
Capacity
Interface
USB
miniUSB 2.0 port for PC connection
Headphone jack
3.5MM
Additional function
Music player, image viewing, touch Screen
Power
Input: 100 ~ 240 V 50/60 Hz, 0.15 A;
Output: 5V 1A
Dimensions
176
Weight
179 g
34
118
9.6