1
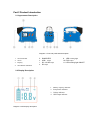
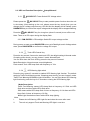
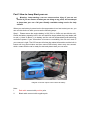
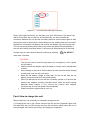
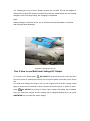
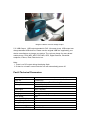
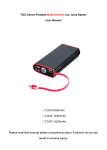
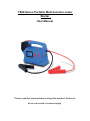
T80X Series Portable Multi-function Jump
Starter
User Manual
Please read this manual before using this product. Failure to
do so can result in serious injury.
CONTENT
Part 1 SAFETY & MAINTAINANCE
Part 2 PRODUCT INSTRUCTION
Part 3 HOW TO JUMP START YOUR CAR
Part 4 HOW TO CHARGE THE UNIT
Part 5 HOW TO USE Multi-Level VOLTAGE DC OUTPUT
Part 6 TECHNICAL PARAMETERS
Part 1 SAFETY & MAINTAINANCE
GENERAL SAFETY RULES
WARNING!
READ AND UNDERSTAND ALL INSTRUCTIONS
Failure to follow all instructions listed below may
Result in electric shock, fire, and/or serious injury.
SAVE THESE INSTRUCTIONS
Thanks to use our T80X series Portable Vehicle Multi-Function Jump Starter and before
using it, please read this manual carefully for reference.
WARNING
Before using this device, please read the manual carefully and observe the following
regulations
★ strictly prohibit disassembling this device without authorization.
★ strictly prohibit placing this device near high magnetic field, which will damage it and
make it can’t work well.
★ strictly prohibit making the device exposed to the rain or becoming damp, which will
cause interior short circuit and make the batter emit heat, smoke, be out of shape, damage
or even explode.
★ this device has large current discharge characteristic, please prevent children from
operating or playing it.
★ please fix this device well when placed in the back of a car to avoid affect drive safety.
★ this device is battery products so you’d better charge it once within 3 month or change
it once in half a year at least to extend the working life of lithium batteries.
★ strictly prohibit throwing this device in fire, which will cause blast.
★ please deal with the scrap device according to related rule. Don’t deal with the built in
battery as house refuse, which will cause blast and pollution.
Part 2 Product Introduction
2.1 Appearance Description
Diagram 1 Front and profile side description
1.
2.
3.
4.
Torch ON/OFF
Torch
Display
ON/OFF/DC SELECT
5.
6.
7.
8.
DIM/ENTER
USB output
DC 12/19Voutput
DC input
9. LED warning light
10. EC5 output
11. LED warning light ON/OFF
2.2 Display Description
1.
2.
3.
4.
Diagram 2 LCD display description
Battery capacity indicator
Jump starter indicator
Voltage indicator
USB output indicator
2.3 KEY and Function Description(Setup Winzard)
2.3.1
/DC SELECT: Power Switch /DC Voltage select
Please press the
/DC SELECT key to start portable power function when the unit
is shut down. After starting up the unit, please press the key shortly then you can
change the DC voltage output among 12V/19V,and the display will be flashed, press
DIM/ENTER key to confirm the output voltage and the display will be stopped flashing.
Press the
/DC SELECT key for a long time (about 3 second) to turn off the unit.
Note: There is no DC output during the display flash
2.3.2 DIM /ENTER: LCD backlight Switch/DC output voltage confirm
During power on state, press DIM /ENTER to turn on/off backlight ,and in Voltage select
state, press DIM /ENTER to confirm the voltage DC output.
2.3.3
: Torch LED Control Key
Press the key around 3 second to start torch LED, the default setting is Normal mode.
If keeping press shortly, you can choose 2 mode: Normal/Flash.
You can shut down the torch LED by press the key around 3 second.
Mode Description: Normal means normal brightness.
Flash means Torch LED keep flash with frequency of 1Hz.
2.3.4
: LED Warning light switch
Press the key around 3 seconds to startled LED Warning light function. The default
setting is Traffic Fault Warning mode. If keeping press shortly, you can choose 3 mode:
Traffic Fault Warning/SOS/White Light Illumination .You can shut down LED Warning
light function by press the key for 3 seconds or closing the LED Warning light.
Mode Description:
Traffic Fault Warning means LEDs keep flash at frequency of 0.5Hz: red LED
flash twice and then white LEDs flash twice.
SOS means white LEDs keep flash 3 times at frequency of 1Hz then red LEDs
Keep flash 3 times at frequency of 0.5Hz.
White Light Illumination means white LEDs keep lighting.
Note:
I.
Please shut off Warning LED Light first and close the cover after used.
II.
The unit only support Torch and Warning LED light in one time.
Part 3 How to Jump Start your car
Warning: Jump-starting a car can cause serious injury if you are not
careful. If you are unsure of what you are doing at any point, do not attempt
to jump-start your car. Call your friendly roadside towing service for help
instead.
When your car battery is power-lack or the temperature is too low to start your car, you
can use this device to start your car as the following steps:
Step 1:Please ensure the engine battery is 12V (if 6V or 24-Do not use with the unit).
Check the battery capacity level in the unit and then simply attach the jump leads (red
to red (+), black to black (-)) to battery and the unit will automatically start delivering
continuous power. If your connection is inverse or unreliability, the unit can’t work. If
your connect is right, The LCD screen will show the related information and the built in
buzzer will long sound twice and then sound DIDI shortly twice every two second,
which means that the car is ready for start and please start your car soon.
Diagram 3 Current output connect with car battery
Note:
I.
Red cable connect with positive pole.
II.
Black cable connect with negative pole.
Diagram 4
LCD Information after right connection
Step 2: After right connection, you can start your car in 60 second. If you haven’t do
that in 60 seconds, the unit will turn off automatically. You have to break the
connection between the unit and the car battery and then connect them again to start
the jump function for 60 seconds. After starting your car, please break the connection
between the unit and the car battery and remove the alligator clip from the rear port.
The unit can automatically identify start-jump status and power-off automatically. If
the unit can’t identify start-jump status, it will power-off automatically in 60 seconds.
Another way, you also can shut down the device by pressing “
/DC SELECT”
more than 3 seconds.
CAUTION:
1
2
3
4
5
6
The unit only can be used for jump-start car in emergency, it can’t replace
the car battery.
Please connect the alligator clip to car battery correctly: red to red and black
to black.
When Voltage of the built in lithium battery is lower than the lowest Voltage
to start-jump a car, the unit can’t work.
When the car battery voltage is lower than 3V, the unit will treat the car
battery as bad one and can’t start automatically.
When you disconnect the unit and the car battery, please try to prevent the
positive and negative touching otherwise there would be spark casuing
potential safety hazard. If you connect the positive and negative
unconsciously, the unit will power-off automatically.
Please choose the right mode for your car.
Part 4 How to charge the unit
Before initial use, it is necessary to completely charge the unit.
4.1.Charging the unit in Car: Please connect the unit and Car Cigarette Lighter with
DC cable then the unit LCD screen will show the scroll bar, which shows the unit is
being charged. If the scroll stop rolling, the charging is completed.
4.2. Charging the unit in home: Please connect the unit with 12V/1A AC adaptor to
charge the unit and LCD screen will show the scroll bar, which shows the unit is being
charged. If the scroll stop rolling, the charging is completed.
Note:
Always charge on concrete or tile, not on surfaces that are flammable or surfaces
that could get heat damaged.
Diagram 5 Charging in the car
Part 5 How to use Multi-level Voltage DC Output
5.1. Power on-off: Please press
/DC SELECT key shortly to power on the unit when
the unit is power off, please press the key for a long time (about 3 seconds) to turn off the
unit
5.2. Multi-level Voltage DC Output: The unit can support multi-level DC voltage output
apply for many kind of notebook or other consumer electronics device. In power on state ,
press
/DC SELECT key shortly to select output voltage ,the display will be flashed
when you adjust the voltage and the display will be stopped flashing when you press
DIM/ENTER key to confirm the output voltage
Diagram 6 Multi-Level DC Voltage Output
5.3. USB Output:USB output standard is 5V/2.1A current (max). USB output can
charge standard USB devices. Please use the original USB line supplied by your
device manufacturer to charge your device. The unit can charge for many brand
mobile phone, PDA, MP3, MP4, PSP, MID, GPS, Digital Camera , Bluetooth
earphone, iPhone, iPod, iPad and so on.
Note:
I. There is no DC output during the display flash
II. If there is no load in one minute the unit will automatically power off.
Part 6 Technical Parameters
Battery Capacity
Cycle life
EC5 output
DC output
USB output
DC input
Charging time
Torch power
Warning LED light power
Working temperature
Storage temperature
Product net weight
Product size(LXWXH)
3300mAh 11.1V ±5% (36.6Wh) Li-polymer
>300 times
8-12V /300A(max) Peak Cranking Power
12V /3.5A(max)
19V/3.5A (max)
5V/2.1A(max)
12V/1A
~4h(@1A charging current)
3W
1W
-20℃-60℃
-20℃-60℃
1.0Kg
190x90x150mm